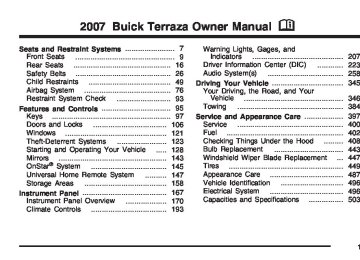
- Download PDF Manual
-
Passenger Compartment Air Filter Passenger compartment air, both outside and recirculated air, is routed through a passenger compartment filter. The filter removes most particles from the air, including dust particles. Reductions in airflow, which may occur more quickly in dusty areas, indicate that the filter needs to be replaced early. For how often to change the air filter, see Scheduled Maintenance on page 509.
The access panel for the passenger compartment air filter is located in the back of the glove box. To replace the filter, do the following:
1. Pull the tab located on the outer access
panel up and out.
205
4. Replace the filters by reversing Step 3. Make sure the filters are inserted so that the sealing foam is angled in the same direction on both filters. For the type of filter to use, see Normal Maintenance Replacement Parts on page 520.
5. Close the inner access door, while squeezing
the tab. Be sure it is tightly closed.
6. Snap the outer access panel into the back of
the glove box.
2. Then push the tab, located on the left of the
inner access panel, to the right.
3. The first air filter will pull straight out. To remove the second, reach in and slide it toward the opening. Pull the second filter out.
206
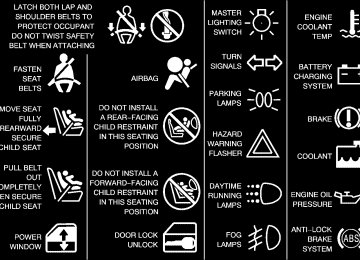
Warning Lights, Gages, and Indicators This part describes the warning lights and gages that may be on your vehicle. The pictures will help you locate them. Warning lights and gages can signal that something is wrong before it becomes serious enough to cause an expensive repair or replacement. Paying attention to your warning lights and gages could also save you or others from injury. Warning lights come on when there may be or is a problem with one of your vehicle’s functions. As you will see in the details on the next few pages, some warning lights come on briefly when you start the engine just to let you know they’re working. If you are familiar with this section, you should not be alarmed when this happens.
Gages can indicate when there may be or is a problem with one of your vehicle’s functions. Often gages and warning lights work together to let you know when there’s a problem with your vehicle. When one of the warning lights comes on and stays on when you are driving, or when one of the gages shows there may be a problem, check the section that tells you what to do about it. Please follow this manual’s advice. Waiting to do repairs can be costly — and even dangerous. So please get to know your warning lights and gages. They’re a big help.
207
Instrument Panel Cluster Your instrument panel cluster is designed to let you know at a glance how your vehicle is running. You will know how fast you are going, how much fuel you are using, and many other things you will need to drive safely and economically. The indicator warning lights and gages are explained on the following pages.
United States version shown, Canada similar
208
Speedometer and Odometer Your speedometer lets you see your speed in both miles per hour (mph) and kilometers per hour (km/h). Your odometer shows how far your vehicle has been driven, in either miles (used in the United States) or kilometers (used in Canada). Your vehicle has a tamper-resistant odometer. You may wonder what happens if your vehicle needs a new odometer installed. The new one can be set to the mileage total of the old odometer.
Trip Odometer The trip odometer can display how far you have driven since you last reset it. For more information see DIC Operation and Displays on page 224.
Tachometer The tachometer displays the engine speed in revolutions per minute (rpm).
Safety Belt Reminder Light When the key is turned to RUN or START, a chime will come on for several seconds to remind people to fasten their safety belts.
The safety belt light will also come on and stay on for several seconds, then it will flash for several more.
If the driver remains unbuckled when the ignition is on and the vehicle is in motion, the chime and safety belt light will be repeated. You should buckle your seat belt. If the driver’s belt is already buckled, neither the chime nor the light will come on.
209
Passenger Safety Belt Reminder Light Several seconds after the key is turned to RUN or START, a chime will come on for several seconds to remind the front passenger to buckle their safety belt. This would only occur if a passenger is detected by the passenger sensing system. See Passenger Sensing System on page 86 for more information. The passenger safety belt light will also come on and stay on for several seconds, then it will flash for several more.
You should have the passenger buckle their safety belt.
This light and chime reminder will be repeated if the ignition is on, the vehicle is in motion, the passenger is still unbuckled and the passenger airbag is enabled. If the passenger’s safety belt is buckled, neither the chime nor the light will come on.
210
Airbag Readiness Light There is an airbag readiness light on the instrument panel, which shows the airbag symbol. The system checks the airbag’s electrical system for malfunctions. The light comes on if there is an electrical problem. The system check includes the airbag sensor, the airbag modules, the wiring and the diagnostic module. For more information on the airbag system, see Airbag System on page 76.
This light will come on when you start your vehicle, and it will flash for a few seconds. Then the light should go out. This means the system is ready.
If the airbag readiness light stays on after you start the vehicle or comes on when you are driving, your airbag system may not work properly. Have your vehicle serviced right away.
{CAUTION:
If the airbag readiness light stays on after you start your vehicle, it means the airbag system may not be working properly. The airbags in your vehicle may not inflate in a crash, or they could even inflate without a crash. To help avoid injury to yourself or others, have your vehicle serviced right away if the airbag readiness light stays on after you start your vehicle.
The airbag readiness light should flash for a few seconds when you turn the ignition key to RUN. If the light doesn’t come on then, have it fixed so it will be ready to warn you if there is a problem.
Passenger Airbag Status Indicator Your vehicle has the passenger sensing system. Your instrument panel has a passenger airbag status indicator.
United States
Canada
When the ignition key is turned to RUN or START, the passenger airbag status indicator will light ON and OFF, or the symbol for on and off, for several seconds as a system check. Then, after several more seconds, the status indicator will light either ON or OFF, or either the on or off symbol to let you know the status of the right front passenger’s frontal airbag and side impact airbag (if equipped).
211
If the word ON or the on symbol is lit on the passenger airbag status indicator, it means that the right front passenger’s airbag or airbags are enabled (may inflate).
Your vehicle has a rear seat that will accommodate a rear-facing child restraint. A label on your sun visor says, “Never put a rear-facing child seat in the front.” This is because the risk to the rear-facing child is so great, if the airbag deploys.
{CAUTION:
If the on indicator comes on when you have a rear-facing child restraint installed in the right front passenger’s seat, it means that the passenger sensing system has not turned off the passenger’s frontal airbag and seat-mounted side impact airbag (if equipped). A child in a rear-facing child restraint can be seriously injured or killed if the right front passenger’s airbag inflates. This is because the back of the rear-facing child restraint would be very close to the inflating airbag. Do not use a rear-facing child restraint in the right front passenger’s seat if the airbag is turned on.
{CAUTION:
Even though the passenger sensing system is designed to turn off the passenger’s frontal airbag and side impact airbag (if equipped) if the system detects a rear-facing child restraint, no system is fail-safe, and no one can guarantee that an airbag will not deploy under some unusual circumstance, even though it is turned off. We recommend that rear-facing child restraints be secured in the rear seat, even if the airbag is off.
212
If the word OFF or the off symbol is lit on the airbag status indicator, it means that the passenger sensing system has turned off the right front passenger’s airbag or airbags. See Passenger Sensing System on page 86
for more on this, including important safety information. If, after several seconds, all status indicator lights remain on, or if there are no lights at all, there may be a problem with the lights or the passenger sensing system. See your dealer for service.{CAUTION:
If the off indicator and the airbag readiness light ever come on together, it means that something may be wrong with the airbag system. If this ever happens, have the vehicle serviced promptly, because an adult-size person sitting in the right front passenger seat may not have the protection of an airbag. See Airbag Readiness Light on page 210.
Charging System Light
The charging system light will come on briefly when you turn on the ignition, but the engine is not running, as a check to show you it is working.
It should go out once the engine is running. If it stays on, or comes on while you are driving, you may have a problem with the charging system. It could indicate that you have problems with a generator drive belt, or another electrical problem. Have it checked right away. Driving while this light is on could drain your battery. If you must drive a short distance with the light on, be certain to turn off all your accessories, such as the radio and air conditioner.
213
Brake System Warning Light When the ignition is on, the brake system warning light will come on when you set your parking brake. The light will stay on if your parking brake doesn’t release fully. If it stays on after your parking brake is fully released, it means you have a brake problem. Your vehicle’s hydraulic brake system is divided into two parts. If one part isn’t working, the other part can still work and stop you. For good braking, though, you need both parts working well. If the warning light comes on, there could be a brake problem. Have your brake system inspected right away.
United States
Canada
This light should come on briefly when you turn the ignition key to RUN. If it doesn’t come on then, have it fixed so it will be ready to warn you if there’s a problem.
214
If the light comes on while you are driving, pull off the road and stop carefully. You may notice that the pedal is harder to push. Or, the pedal may go closer to the floor. It may take longer to stop. If the light is still on, have the vehicle towed for service. See Anti-Lock Brake System Warning Light on page 215
and Towing Your Vehicle on page 384.{CAUTION:
Your brake system may not be working properly if the brake system warning light is on. Driving with the brake system warning light on can lead to an accident. If the light is still on after you have pulled off the road and stopped carefully, have the vehicle towed for service.
Anti-Lock Brake System Warning Light
Your vehicle has an Anti-lock Brake System (ABS) warning light.
This light should come on for a few seconds when you turn the ignition key to RUN. If the light does not come on then, have it fixed so it will be ready to warn you if there is a problem. If this light stays on longer than normal after you have started your engine, turn the ignition off. If the light comes on and stays on when you are driving, stop as soon as possible and turn the ignition off. Then start the engine again to reset the system. If the light still stays on, or comes on again while you are driving, the ABS needs service and you do not have anti-lock brakes.
215
Traction Control System (TCS) Warning Light
Your vehicle may have a traction control system warning light.
The traction control system warning light may come on for the following reasons: (cid:127)
If you turn the system off by pressing the traction control button. To turn the system back on, press the button again. The warning light should go off. See Traction Control System (TCS) on page 353 for more information.
(cid:127)
(cid:127)
If there is a brake system problem that is specifically related to traction control, the traction control system will turn off and the warning light will come on. If your brakes begin to overheat, the traction control system will turn off and the warning light will come on until your brakes cool down. If the traction control system is affected by an engine-related problem, the system will turn off and the warning light will come on.
If the traction control system warning light comes on and stays on for an extended period of time when the system is turned on, your vehicle needs service.
216
Engine Coolant Temperature Gage
Malfunction Indicator Lamp Check Engine Light
Your vehicle has a computer which monitors operation of the fuel, ignition, and emission control systems.
United States
Canada
This gage shows the engine coolant temperature. If the red gage lamp turns on, your engine is too hot! It means that your engine coolant has overheated. If you have been operating your vehicle under normal driving conditions, you should pull off the road, stop your vehicle and turn off the engine as soon as possible. See Engine Overheating on page 423.
This system is called OBD II (On-Board Diagnostics-Second Generation) and is intended to assure that emissions are at acceptable levels for the life of the vehicle, helping to produce a cleaner environment. The check engine light comes on to indicate that there is a problem and service is required. Malfunctions often will be indicated by the system before any problem is apparent.
217
If you keep driving your vehicle with
This may prevent more serious damage to your vehicle. This system is also designed to assist your service technician in correctly diagnosing any malfunction. Notice: this light on, after awhile, your emission controls may not work as well, your fuel economy may not be as good, and your engine may not run as smoothly. This could lead to costly repairs that may not be covered by your warranty. Notice: Modifications made to the engine, transaxle, exhaust, intake, or fuel system of your vehicle or the replacement of the original tires with other than those of the same Tire Performance Criteria (TPC) can affect your vehicle’s emission controls and may cause this light to come on. Modifications to these systems could lead to costly repairs not covered by your warranty. This may also result in a failure to pass a required Emission Inspection/Maintenance test. See Accessories and Modifications on page 400.
This light should come on, as a check to show you it is working, when the ignition is on and the engine is not running. If the light does not come on, have it repaired. This light will also come on during a malfunction in one of two ways: (cid:127) Light Flashing — A misfire condition has been detected. A misfire increases vehicle emissions and may damage the emission control system on your vehicle. Diagnosis and service may be required.
(cid:127) Light On Steady — An emission control
system malfunction has been detected on your vehicle. Diagnosis and service may be required.
If the Light is Flashing The following may prevent more serious damage to your vehicle: (cid:127) Reducing vehicle speed (cid:127) Avoiding hard accelerations (cid:127) Avoiding steep uphill grades (cid:127)
If you are towing a trailer, reduce the amount of cargo being hauled as soon as it is possible
218
If the light stops flashing and remains on steady, see “If the Light Is On Steady” following. If the light continues to flash, when it is safe to do so, stop the vehicle. Find a safe place to park your vehicle. Turn the key off, wait at least 10 seconds and restart the engine. If the light remains on steady, see “If the Light Is On Steady” following. If the light is still flashing, follow the previous steps, and see your dealer for service as soon as possible. If the Light Is On Steady You may be able to correct the emission system malfunction by considering the following: Did you recently put fuel into your vehicle? If so, reinstall the fuel cap, making sure to fully install the cap. See Filling the Tank on page 405. The diagnostic system can determine if the fuel cap has been left off or improperly installed. A loose or missing fuel cap will allow fuel to evaporate into the atmosphere. A few driving trips with the cap properly installed should turn the light off.
Did you just drive through a deep puddle of water? If so, your electrical system may be wet. The condition will usually be corrected when the electrical system dries out. A few driving trips should turn the light off. Have you recently changed brands of fuel? If so, be sure to fuel your vehicle with quality fuel. See Gasoline Octane on page 402. Poor fuel quality will cause your engine not to run as efficiently as designed. You may notice this as stalling after start-up, stalling when you put the vehicle into gear, misfiring, hesitation on acceleration, or stumbling on acceleration. (These conditions may go away once the engine is warmed up.) This will be detected by the system and cause the light to turn on. If you experience one or more of these conditions, change the fuel brand you use. It will require at least one full tank of the proper fuel to turn the light off. If none of the above steps have made the light turn off, your dealer can check the vehicle. Your dealer has the proper test equipment and diagnostic tools to fix any mechanical or electrical problems that may have developed.
219
Emissions Inspection and Maintenance Programs Some state/provincial and local governments have or may begin programs to inspect the emission control equipment on your vehicle. Failure to pass this inspection could prevent you from getting a vehicle registration. Here are some things you need to know to help your vehicle pass an inspection: Your vehicle will not pass this inspection if the check engine light is on or not working properly. Your vehicle will not pass this inspection if the OBD (on-board diagnostic) system determines that critical emission control systems have not been completely diagnosed by the system. The vehicle would be considered not ready for inspection. This can happen if you have recently replaced your battery or if your battery has run down. The diagnostic system is designed to evaluate critical emission control systems during normal driving. This may take several days of routine driving. If you have done this and your vehicle still does not pass the inspection for lack of OBD system readiness, your GM dealer can prepare the vehicle for inspection.
220
Oil Pressure Light
If your vehicle has low engine oil pressure, this light will stay on after you start your engine, or come on when you are driving.
This indicates that your engine is not receiving enough oil. The engine could be low on oil, or could have some other oil problem. Have it fixed immediately by your dealer. The oil light could also come on in three other situations: (cid:127) When the ignition is on but the engine is not
running, the light will come on as a test to show you it is working. The light will go out when you turn the ignition on. If it does not come on with the ignition on, you may have a problem with the fuse or bulb. Have it fixed right away. If you are idling at a stop sign, the light may blink on and then off. If you make a hard stop, the light may come on for a moment. This is normal.
(cid:127)
(cid:127)
{CAUTION:
Do not keep driving if the oil pressure is low. If you do, your engine can become so hot that it catches fire. You or others could be burned. Check your oil as soon as possible and have your vehicle serviced.
Notice: Lack of proper engine oil maintenance may damage the engine. The repairs would not be covered by your warranty. Always follow the maintenance schedule in this manual for changing engine oil.
Security Light
For information regarding this light, see Theft-Deterrent Systems on page 123.
Cruise Control Light
This light comes on whenever you set your cruise control.
The light will go out when the cruise control is turned off. See Cruise Control on page 177
for more information. Highbeam On LightThis light will come on when the high-beam headlamps or the Flash-to-Pass feature is in use.
See Headlamp High/Low-Beam Changer on page 174.
221
Fuel Gage
Here are four things some owners ask about. All these things are normal and do not indicate that anything is wrong with the fuel gage. (cid:127) At the gas station, the gas pump shuts off
(cid:127)
before the gage reads full. It takes a little more (or less) fuel to fill up than the gage reads. For example, the gage read half full, but it took more (or less) than half of the tank’s capacity to fill it.
United States
Canada
When the indicator nears empty, you still have a little fuel left, but you should get more soon. Your fuel gage tells you about how much fuel you have left when the ignition is on.
(cid:127) The gage pointer may move while cornering,
braking or speeding up.
(cid:127) The gage may not indicate empty when the
ignition is turned off.
Low Fuel Warning Light The light next to the fuel gage will come on briefly when you are starting the engine. This light comes on when the fuel tank is low on fuel. To turn it off, add fuel to the fuel tank.
222
If equipped, the outside air temperature automatically appears in the bottom right corner of the DIC display when viewing all of the information screens, except for the oil life screens. If the outside air temperature is at or below 37°F (3°C), the temperature reading will toggle between displaying the outside temperature and the word ICE for two minutes. If there is a problem with the system that controls the temperature display, the letters OC (open circuit) or SC (short circuit) will appear on the display. If this occurs, have the vehicle serviced by your dealer. The DIC also allows some features to be customized or personalized, if equipped. See DIC Vehicle Personalization (Uplevel Only) on page 249 for more information.
Driver Information Center (DIC) Your vehicle has a Driver Information Center (DIC). All messages will appear in the DIC display located in the instrument panel cluster, below the tachometer. The DIC buttons are located on the center of the instrument panel, below the center outlets. The DIC comes on when the ignition is on. After a short delay, the DIC will display WELCOME DRIVER (1 or 2) if a personalized key 1 or 2
is used, and then the information that was last displayed before the engine was turned off. The driver number also corresponds to the numbers, 1 or 2, on the back of the remote keyless entry transmitters. The DIC displays the odometer, trip odometers, fuel economy, trip computer, vehicle system information, and compass display, if equipped. It also displays warning messages if a system problem is detected. In addition, the DIC displays phone numbers that are called using the OnStar® system, if equipped. See OnStar® System on page 145.223
r (Set/Reset): Press this button to set or reset certain functions and to turn off or acknowledge messages on the DIC.
q (Menu): Press this button to display the units, language, personalization, if equipped, compass zone and compass calibration, if equipped. See DIC Vehicle Personalization (Uplevel Only) on page 249 and DIC Compass (Uplevel Only) on page 228 for more information. Information Button Items
Q4R (Information): Press this button to scroll through the following items: Odometer Press the information button until the odometer displays. This mode shows the distance the vehicle has been driven in either miles or kilometers.
DIC Operation and Displays The DIC has different modes which can be accessed by pressing the DIC buttons located on the center of the instrument panel. The buttons are the information, set/reset, and menu buttons. The button functions are detailed in the following pages.
DIC Buttons
Q4R (Information): Press this button to display the odometer, trip distance, time elapsed, average speed, fuel economy, battery voltage, oil life, and to turn off the DIC.
224
Trip A and Trip B Press the information button until A or B displays. This mode shows the current distance traveled in either miles or kilometers since the last reset for each trip odometer. Both trip odometers can be used at the same time. The display will show the odometer on the top line and the trip odometer information, either A or B, on the bottom line. Each trip odometer can be reset to zero separately by pressing the set/reset button while the desired trip odometer is displayed. There is also a retroactive trip odometer function that performs the following for each trip odometer: (cid:127)
If the vehicle’s speed has exceeded 3 mph (5 km/h) during the current ignition cycle, this function will set the trip odometer to the distance driven during the current ignition cycle. If the vehicle’s speed has not exceeded 3 mph (5 km/h), this function will set the trip odometer to the distance driven during the previous ignition cycle plus the distance driven during the current ignition cycle.
(cid:127)
Press and hold the set/reset button for three seconds, then release the button. The retroactive trip odometer value will be set into the currently displayed trip odometer. Time Elapsed Press the information button until TIME ELAPSED :00 displays. This mode is like a stopwatch, in that you can clock the time it takes to get from one point to another. Each of the fields for the hours, minutes, and seconds are two numeric digits. Once TIME ELAPSED :00 is displayed, press the set/reset button to start the timing feature. Press the set/reset button again to stop it. If you will be starting and stopping your vehicle, during a trip for instance, the TIME ELAPSED feature will automatically start timing where it left off when you last stopped. To reset it, press and hold the set/reset button for approximately 1.5 seconds. The display will return to zero.
225
Average Speed Press the information button until AVERAGE SPEED displays. This mode shows the average speed of the vehicle in miles per hour (mph) or kilometers per hour (km/h). This average is calculated based on the various vehicle speed recorded since the last reset of this value. To reset the value, press the information button to display AVERAGE SPEED, then press and hold the set/reset button. The display will return to zero. Fuel Range Press the information button until FUEL RANGE displays. This mode shows the approximate number of remaining miles or kilometers the vehicle can be driven without refueling. Fuel range is based on several factors, including distance travelled, fuel used, fuel capacity, etc. This estimate will change if driving conditions change. For example, if driving in traffic and making frequent stops, this mode may read one number, but if the vehicle is driven on a freeway, the number may change even though the same amount of fuel is in the fuel tank.
This is because different driving conditions produce different fuel economies. Generally, freeway driving produces better fuel economy than city driving. Fuel range cannot be reset. If your vehicle is low on fuel, FUEL RANGE LOW will display followed by the LOW FUEL message. See “LOW FUEL” under DIC Warnings and Messages on page 230 for more information. Average Fuel Economy Press the information button until AVG ECONOMY displays. This mode shows the approximate average miles per gallon (mpg) or liters per 100 kilometers (L/100 km). This number is calculated based on the number of mpg (L/100 km) recorded since the last time this menu item was reset. To reset AVG ECONOMY, press and hold the set/reset button. The display will return to zero. Battery Press the information button until BATTERY displays. This mode shows the current battery voltage.
226
Your vehicle’s charging system regulates voltage based on the state of the battery. The battery voltage may fluctuate when viewing this information on the DIC. This is normal. If there is a problem with the battery charging system, a DIC message will display. See DIC Warnings and Messages on page 230 for more information. Oil Life Press the information button until OIL LIFE displays. This mode shows an estimate of the oil’s remaining useful life. If you see OIL LIFE 99% on the display, that means 99% of the current oil life remains. The engine oil life system will alert you to change your oil on a schedule consistent with your driving conditions. When the remaining oil life is low, the CHANGE OIL SOON message will appear on the display. You should change your oil as soon as possible. See Engine Oil on page 411. In addition to the engine oil life system monitoring the oil life, additional maintenance is recommended in the Maintenance Schedule in this manual. See Scheduled Maintenance on page 509 for more information.
Remember, you must reset the OIL LIFE yourself after each oil change. It will not reset itself. Also, be careful not to reset the OIL LIFE accidentally at any time other than when the oil has just been changed. It cannot be reset accurately until the next oil change. To reset the engine oil life system, see Engine Oil Life System on page 414. The display will show 100% when the system is reset. Menu Button Items
q (Menu): Press this button to scroll through the following items: Units Press the menu button until UNITS displays. This mode allows you to select between English or Metric units of measurement. Once in this mode, press the set/reset button to select between ENGLISH or METRIC.
227
Language Press the menu button until the language screen displays. This mode allows you to select the language in which the DIC messages will appear. Once in this mode, press the set/reset button to select among the following choices: (cid:127) English (cid:127) Francais (French) (cid:127) Espanol (Spanish) Personalization (Uplevel Only) Press the menu button until PERSONAL PROGRAM displays. Your vehicle may have personalization capabilities that allow you to program certain features to a preferred setting for up to two drivers. Your vehicle may also have customization capabilities that allow you to program certain features to one preferred setting. Customization features can only be programmed to one setting on the vehicle and cannot be programmed to a preferred setting for up to two drivers. See DIC Vehicle Personalization (Uplevel Only) on page 249 for additional information on personal programming.
228
Compass Zone (Uplevel Only) Under certain circumstances, such as during a long distance cross-country trip, it will be necessary to compensate for compass variance and reset the zone. To change the compass zone through the DIC, see DIC Compass (Uplevel Only) on page 228. Compass Calibration (Uplevel Only) The compass can be manually calibrated. To calibrate the compass through the DIC, see DIC Compass (Uplevel Only) on page 228.
DIC Compass (Uplevel Only) Your vehicle may have a compass in the Driver Information Center (DIC). Compass Zone Press the menu button until COMPASS ZONE displays. Press the set/reset button to change the compass zone. Zones 1 through 15 are available. The direction the vehicle is moving will be displayed in the top right corner of the DIC display.
Compass Calibration Under certain circumstances, such as during a long distance cross-country trip, it will be necessary to compensate for compass variance and reset the zone through the DIC. Compass variance is the difference between the earth’s magnetic north and true geographic north. If not adjusted to account for compass variance, the compass in the vehicle could give false readings. In order to do this, the compass must be set or calibrated to the variance zone in which the vehicle is traveling. To adjust for compass variance, use the following procedure: 1. Press the menu button until COMPASS ZONE
displays.
2. Find the vehicle’s current location and
variance zone number on the map.
3. Press the set/reset button to scroll through and select the appropriate variance zone.
229
4. Press the menu button to advance to the
COMPASS CALIBRATION screen.
5. To start the compass calibration, press and
hold the set/reset button until CALIBRATION BEGUN DRIVE UNTIL DONE appears in the DIC display.
6. Drive the vehicle slowly in a circle two times
to activate the compass. When the calibration is complete, the DIC will display CALIBRATION FINISHED.
7. If the message CAL appears in the DIC, you
must manually put the compass into the calibration mode again. Repeat Steps 1 through 6.
230
DIC Warnings and Messages Messages are displayed on the DIC to notify the driver that the status of the vehicle has changed and that some action may be needed by the driver to correct the condition. Multiple messages may appear one after another. Some messages may not require immediate action, but you can press any of the DIC buttons to acknowledge that you received the message and clear it from the DIC display. Some messages cannot be cleared from the DIC display because they are more urgent. These messages require action before they can be cleared. If there are any active warning messages when the vehicle is turned off, two chimes sound and the DIC goes into a reminder mode. The reminder mode displays any active message. If there are multiple messages, the DIC displays each message for five seconds. After each active message is displayed once, the reminder mode turns off. You should take any messages that appear on the display seriously and remember that clearing the messages will only make the messages disappear, not correct the problem.
The following are the possible messages that can be displayed and some information about them. A/C OFF FOR ENGINE PROTECTION This message displays when the engine coolant becomes hotter than the normal operating temperature. See Engine Coolant Temperature Gage on page 217. To avoid added strain on a hot engine, the air conditioning compressor is automatically turned off. When the coolant temperature returns to normal, the air conditioning compressor turns back on. You can continue to drive your vehicle. This message comes on while the ignition is in RUN. Press any of the DIC buttons to acknowledge this warning message and to clear it from the screen. This message continues to display for two seconds if it has not been acknowledged when the engine is turned off. It also re-displays for two seconds if the message has been acknowledged, but the condition still exists when the engine is turned off.
If the condition still exists, the message re-appears when the engine is turned on. If this message continues to appear, have the system repaired by your dealer as soon as possible to avoid damage to the engine. BATTERY SAVER ACTIVE This message displays when the system detects that the battery voltage is dropping beyond a reasonable level. The battery saver system starts reducing certain features of the vehicle that you may be able to notice. At the point that the features are disabled, this message is displayed. It means that the vehicle is trying to save the charge in the battery. Turn off all unnecessary accessories to allow the battery to recharge. The normal battery voltage range is 11.5 to 15.5 volts. You can monitor the battery voltage by pressing the information button until BATTERY displays.
231
CHANGE OIL SOON This message displays when service is required for the vehicle. See your dealer. See Engine Oil on page 411 and Scheduled Maintenance on page 509 for more information. The CHANGE OIL SOON message is reset by acknowledging the message. The OIL LIFE screen under the gages menu on the DIC must also be reset. See “Oil Life” under DIC Operation and Displays on page 224 and Engine Oil Life System on page 414. This message displays while the ignition is in RUN. Press any of the DIC buttons to acknowledge this message and to clear it from the screen. This message continues to display for two seconds if it has not been acknowledged when the engine is turned off. It also re-displays for two seconds if the message has been acknowledged, but the condition still exists when the engine is turned off. If the condition still exists, the message re-appears when the engine is turned on.
CHARGING SYSTEM FAILURE This message displays when there is a problem with the generator and battery charging systems. Driving with this problem could drain the battery. Turn off all unnecessary accessories. Stop and turn off the vehicle as soon as it is safe to do so. Have the electrical system checked by your dealer immediately. This message displays and a chime sounds while the ignition is in RUN. Press any of the DIC buttons to acknowledge this message and to clear it from the screen. This message continues to display for two seconds if it has not been acknowledged when the engine is turned off. It also re-displays for two seconds if the message has been acknowledged, but the condition still exists when the engine is turned off. If the condition still exists, the message re-appears when the engine is turned on.
232
CHECK GAS CAP This message displays if the fuel cap is not on, or is not fully tightened. Check the fuel cap to ensure that it is on properly. See Filling the Tank on page 405 for more information. This message displays and a chime sounds while the ignition is in RUN. Press any of the DIC buttons to acknowledge this message and to clear it from the screen. This message continues to display for two seconds if it has not been acknowledged when the engine is turned off. It also re-displays for two seconds if the message has been acknowledged, but the condition still exists when the engine is turned off. If the condition still exists, the message re-appears when the engine is turned on. DELAYED LOCKING This message displays to inform the driver that even though a door lock switch or the lock button on the Remote Keyless Entry (RKE) transmitter has been pressed, that actual locking of the doors is being delayed because the delayed locking feature has been activated in the DIC.
See “DELAYED LOCKING” under DIC Vehicle Personalization (Uplevel Only) on page 249
for more information. This message appears and a chime sounds when the ignition is off. This message cannot be acknowledged. DRIVER’S DOOR AJAR This message displays when the driver’s door is not closed properly. When this message appears, make sure that the driver’s door is closed completely. This message displays while the ignition is in RUN. A chime sounds when the ignition is shifted out of PARK (P). Press any of the DIC buttons to acknowledge this message and to clear it from the screen. This message continues to display for two seconds if it has not been acknowledged when the engine is turned off. It also re-displays for two seconds if the message has been acknowledged, but the condition still exists when the engine is turned off. If the condition still exists, the message re-appears when the engine is turned on.233
DRIVER’S REAR DOOR AJAR This message displays when the driver’s side rear door is not closed properly. When this message appears, make sure that the driver’s side rear door is closed completely. This message displays while the ignition is in RUN. A chime sounds when the ignition is shifted out of PARK (P). Press any of the DIC buttons to acknowledge this message and to clear it from the screen. This message continues to display for two seconds if it has not been acknowledged when the engine is turned off. It also re-displays for two seconds if the message has been acknowledged, but the condition still exists when the engine is turned off. If the condition still exists, the message re-appears when the engine is turned on.
If you drive your vehicle while the
ENGINE COOLANT HOT Notice: engine is overheating, severe engine damage may occur. If an overheat warning appears on the instrument panel cluster and/or DIC, stop the vehicle as soon as possible. Do not increase the engine speed above normal idling speed. See Engine Overheating on page 423 for more information. This message displays when the engine coolant temperature is too hot. The engine coolant temperature warning light also appears on the instrument panel cluster. See Engine Coolant Temperature Gage on page 217 for more information. To avoid added strain on the engine, turn off the air conditioner if it is on. When the coolant temperature returns to normal, the air conditioner can be turned back on. This message displays only when the ignition is in RUN. A chime sounds continuously when this message is displayed. Press any of the DIC buttons to acknowledge this message and to clear it from the screen.
234
This message continues to display for two seconds if it has not been acknowledged when the engine is turned off. It also re-displays for two seconds if the message has been acknowledged, but the condition still exists when the engine is turned off. If the condition still exists, the message re-appears when the engine is turned on. HEADLAMPS SUGGESTED This message displays when the amount of available light outside of the vehicle is low, or the windshield wipers have been on for approximately 30 seconds, and the exterior lamps control is off or in the park lamps position. This message informs the driver that turning on the exterior lamps is recommended. See Exterior Lamps on page 181 for more information. This message displays while the ignition is in RUN. Press any of the DIC buttons to acknowledge this message and to clear it from the screen. This message continues to display for two seconds if it has not been acknowledged when the engine is turned off. It also re-displays for two seconds if the message has been acknowledged, but the condition still exists when the engine is turned off.
If the condition still exists, the message re-appears when the engine is turned on. HOOD AJAR If your vehicle has the remote start feature, this message displays when the hood is not closed properly. When this message appears, make sure that the hood is closed completely. See Hood Release on page 409. This message displays while the ignition is in RUN. Press any of the DIC buttons to acknowledge this message and to clear it from the screen. This message continues to display for two seconds if it has not been acknowledged when the engine is turned off. It also re-displays for two seconds if the message has been acknowledged, but the condition still exists when the engine is turned off. If the condition still exists, the message re-appears when the engine is turned on.
235
KEY FOB BATTERY LOW This message displays when the battery in the Remote Keyless Entry (RKE) transmitter needs to be replaced. To replace the battery, see “Battery Replacement” under Remote Keyless Entry System Operation on page 99. This message displays while the ignition is in RUN. Press any of the DIC buttons to acknowledge this message and to clear it from the screen. This message continues to display for two seconds if it has not been acknowledged when the engine is turned off. It also re-displays for two seconds if the message has been acknowledged, but the condition still exists when the engine is turned off. If the condition still exists, the message re-appears when the engine is turned on. KEY IN IGNITION This message displays and a chime sounds continuously when the driver’s door is open and the key is in ACCESSORY or LOCK. This message cannot be acknowledged. This message disappears and the chiming stops when the key is removed from the ignition.
236
LEFT FRONT TURN LAMP OUT This message displays when the left front turn signal bulb needs to be replaced. See Headlamps and Sidemarker Lamps on page 443. This message displays while the ignition is in RUN. Press any of the DIC buttons to acknowledge this message and to clear it from the screen. This message continues to display for two seconds if it has not been acknowledged when the engine is turned off. It also re-displays for two seconds if the message has been acknowledged, but the condition still exists when the engine is turned off. If the condition still exists, the message re-appears when the engine is turned on. LEFT REAR TURN LAMP OUT This message displays when the left rear turn signal bulb needs to be replaced. See Taillamps, Turn Signal, Stoplamps and Back-up Lamps on page 445. This message displays while the ignition is in RUN. Press any of the DIC buttons to acknowledge this message and to clear it from the screen.
This message continues to display for two seconds if it has not been acknowledged when the engine is turned off. It also re-displays for two seconds if the message has been acknowledged, but the condition still exists when the engine is turned off. If the condition still exists, the message re-appears when the engine is turned on. LIFT GATE AJAR This message displays when the liftgate is not closed completely. Make sure that the liftgate is closed completely. See Liftgate on page 119. This message displays while the ignition is in RUN. A chime sounds when the ignition is shifted out of PARK (P). Press any of the DIC buttons to acknowledge this message and to clear it from the screen. This message continues to display for two seconds if it has not been acknowledged when the engine is turned off. It also re-displays for two seconds if the message has been acknowledged, but the condition still exists when the engine is turned off. If the condition still exists, the message re-appears when the engine is turned on.
LOW BRAKE FLUID This message displays when the brake fluid level is low. Have the brake system serviced by your dealer as soon as possible. See Brakes on page 434 for proper fluid level. The brake system warning light also appears on the instrument panel cluster when this message appears on the DIC. See Brake System Warning Light on page 214. This message displays and a chime sounds only while the ignition is in RUN. Press any of the DIC buttons to acknowledge this message and to clear it from the screen. This message continues to display for two seconds if it has not been acknowledged when the engine is turned off. It also re-displays for two seconds if the message has been acknowledged, but the condition still exists when the engine is turned off. If the condition still exists, the message re-appears when the engine is turned on.
237
LOW FUEL This message displays when your vehicle is low on fuel. Refill the fuel tank as soon as possible. See Fuel Gage on page 222 and Filling the Tank on page 405 for more information. The message displays and a chime sounds while the ignition is in RUN. Press any of the DIC buttons to acknowledge this message and to clear it from the screen. If the condition still exists, the message re-appears when the engine is turned on. LOW OIL PRESSURE Notice: message appears on the DIC display, stop the vehicle immediately. Do not drive the vehicle until the cause of the low oil pressure is corrected. Severe engine damage can result from driving a vehicle with low oil pressure. See Engine Oil on page 411 for more information. This message displays when the vehicle’s engine oil pressure is low. The oil pressure light also appears on the instrument panel cluster. See Oil Pressure Light on page 220.
If the LOW OIL PRESSURE warning
238
Stop the vehicle immediately, as engine damage can result from driving a vehicle with low oil pressure. Have the vehicle serviced by your dealer as soon as possible when this message is displayed. This message displays only when the ignition is in RUN. A chime sounds continuously when this message is displayed. This message cannot be acknowledged and cleared from the screen. This message re-displays for a few seconds if the condition still exists when the engine is turned off. If the condition still exists, the message re-appears when the engine is turned on. PARKING BRAKE ON This message displays to alert the driver when the vehicle’s parking brake is on, the ignition is in RUN, and the vehicle speed is greater than 5 mph (8 km/h). Release the parking brake before driving. See Parking Brake on page 137
for more information.The brake system warning light also appears on the instrument panel cluster when this message appears on the DIC. See Brake System Warning Light on page 214. A chime sounds continuously while this message is displayed if driving above 5 mph (8 km/h). Press any of the DIC buttons to acknowledge this message and to clear it from the screen. This message continues to display for two seconds if it has not been acknowledged when the engine is turned off. It also re-displays for two seconds if the message has been acknowledged, but the condition still exists when the engine is turned off. If the condition still exists, the message re-appears when the engine is turned on. PARK LAMPS ON This message displays to alert the driver when the headlamps or parking lamps are on while the ignition is off and the driver’s door is opened. See Exterior Lamps on page 181 for more information. A chime sounds continuously while this message is displayed. This message cannot be acknowledged.
PASSENGER’S DOOR AJAR This message displays when the front passenger’s door is not closed properly. When this message appears, make sure that the front passenger’s door is closed completely. This message displays while the ignition is in RUN. A chime sounds when the ignition is shifted out of PARK (P). Press any of the DIC buttons to acknowledge this message and to clear it from the screen. This message continues to display for two seconds if it has not been acknowledged when the engine is turned off. It also re-displays for two seconds if the message has been acknowledged, but the condition still exists when the engine is turned off. If the condition still exists, the message re-appears when the engine is turned on.
239
PASSENGER’S REAR DOOR AJAR This message displays when the passenger’s side rear door is not closed properly. When this message appears, make sure that the passenger’s side rear door is closed completely. This message displays while the ignition is in RUN. A chime sounds when the ignition is shifted out of PARK (P). Press any of the DIC buttons to acknowledge this message and to clear it from the screen. This message continues to display for two seconds if it has not been acknowledged when the engine is turned off. It also re-displays for two seconds if the message has been acknowledged, but the condition still exists when the engine is turned off. If the condition still exists, the message re-appears when the engine is turned on.
PASSENGER SEATBELT IS NOT FASTENED This message reminds you to buckle the passenger’s safety belt. This message displays and a chime sounds when the ignition is on, the driver’s safety belt is buckled, the passenger’s safety belt is unbuckled with the passenger airbag enabled, and the vehicle is in motion. You should have the passenger buckle their safety belt. The reminder will be repeated if the ignition is on, the vehicle is in motion, the driver is unbuckled and the passenger is still unbuckled and the passenger airbag is enabled. If the passenger’s safety belt is already buckled, this message and chime will not come on.
240
REDUCED ENGINE POWER This message displays when the vehicle’s engine power is reduced. This happens when driving conditions, such as climbing a steep hill, make the transaxle overwork in a gear that may cause damage to the vehicle’s engine or transaxle. Reduced engine power can affect the vehicle’s ability to accelerate. This message displays and a chime sounds only when the ignition is in RUN. Press any of the DIC buttons to acknowledge this message and to clear it from the screen. This message continues to display for two seconds if it has not been acknowledged when the engine is turned off. It also re-displays for two seconds if the message has been acknowledged, but the condition still exists when the engine is turned off. If the condition still exists, the message re-appears when the engine is turned on.
REDUCED POWER STOP WHEN SAFE This message displays when your vehicle is in an overheated engine operating mode. This operating mode allows your vehicle to be driven to a safe place in an emergency. In this mode, you will notice a significant loss in power and engine performance. See Overheated Engine Protection Operating Mode on page 425 for more information. Anytime this message is on, the vehicle should be taken to your dealer for service as soon as possible. This message displays and a chime sounds only when the ignition is in RUN. Press any of the DIC buttons to acknowledge this message and to clear it from the screen. This message continues to display for two seconds if it has not been acknowledged when the engine is turned off. It also re-displays for two seconds if the message has been acknowledged, but the condition still exists when the engine is turned off. If the condition still exists, the message re-appears when the engine is turned on.
241
REMOTE START DISABLED If your vehicle has the remote start feature, this message displays if a remote start attempt is unsuccessful. This may be caused if any of the following conditions are true when a remote start attempt is made: (cid:127) The remote start system is disabled through
the DIC.
(cid:127) The key is in the ignition. (cid:127) The hood or the doors are not closed. (cid:127) There is an emission control system
malfunction.
(cid:127) The engine coolant temperature is too high. (cid:127) The oil pressure is low. (cid:127) The hazard warning flashers are turned on. (cid:127) The maximum number of remote starts
or remote start attempts between ignition cycles has been reached.
(cid:127) The content theft-deterrent alarm is on while
attempting to remote start the vehicle. See “REMOTE START” under DIC Vehicle Personalization (Uplevel Only) on page 249 and “Remote Vehicle Start” under Remote Keyless Entry System Operation on page 99 for more information.
242
REMOTE START ON If your vehicle has the remote start feature, this message displays when a remote start is initiated. See “Remote Vehicle Start” under Remote Keyless Entry System Operation on page 99 for more information. RIGHT FRONT TURN LAMP OUT This message displays when the right front turn signal bulb needs to be replaced. See Headlamps and Sidemarker Lamps on page 443. This message displays while the ignition is in RUN. Press any of the DIC buttons to acknowledge this message and to clear it from the screen. This message continues to display for two seconds if it has not been acknowledged when the engine is turned off. It also re-displays for two seconds if the message has been acknowledged, but the condition still exists when the engine is turned off. If the condition still exists, the message re-appears when the engine is turned on.
RIGHT REAR TURN LAMP OUT This message displays when the right rear turn signal bulb needs to be replaced. See Taillamps, Turn Signal, Stoplamps and Back-up Lamps on page 445. This message displays while the ignition is in RUN. Press any of the DIC buttons to acknowledge this message and to clear it from the screen. This message continues to display for two seconds if it has not been acknowledged when the engine is turned off. It also re-displays for two seconds if the message has been acknowledged, but the condition still exists when the engine is turned off. If the condition still exists, the message re-appears when the engine is turned on.
SERVICE ABS SYSTEM This message displays when the vehicle’s Anti-lock Brake System (ABS) is not functioning properly. Have the ABS serviced by your dealer as soon as possible. The ABS warning light also appears on the instrument panel cluster when this message appears on the DIC. See Anti-Lock Brake System Warning Light on page 215. This message only displays while the ignition is in RUN. Press any of the DIC buttons to acknowledge this message and to clear it from the screen. This message continues to display for two seconds if it has not been acknowledged when the engine is turned off. It also re-displays for two seconds if the message has been acknowledged, but the condition still exists when the engine is turned off. If the condition still exists, the message re-appears when the engine is turned on.
243
SERVICE AIR BAG This message displays along with the airbag readiness light if there is a problem with the airbag system. Have your dealer inspect the system for problems. See Airbag Readiness Light on page 210 and Airbag System on page 76 for more information. This message only displays while the ignition is in RUN. Press any of the DIC buttons to acknowledge this message and to clear it from the screen. This message continues to display for two seconds if it has not been acknowledged when the engine is turned off. It also re-displays for two seconds if the message has been acknowledged, but the condition still exists when the engine is turned off. If the condition still exists, the message re-appears when the engine is turned on.
SERVICE BRAKE SYSTEM This message displays when a problem with the brake system has been detected. Have your vehicle serviced by your dealer as soon as possible. The brake system warning light also appears on the instrument panel cluster when this message appears on the DIC. See Brake System Warning Light on page 214. This message only displays while the ignition is in RUN. Press any of the DIC buttons to acknowledge this message and to clear it from the screen. This message continues to display for two seconds if it has not been acknowledged when the engine is turned off. It also re-displays for two seconds if the message has been acknowledged, but the condition still exists when the engine is turned off. If the condition still exists, the message re-appears when the engine is turned on.
244
SERVICE PARK LAMPS This message displays when there is a problem with the park lamps. Check to see if the park lamp fuse is blown and replace the fuse if necessary. See Fuses and Circuit Breakers on page 497 and Instrument Panel Fuse Block on page 498 for more information. If changing the fuse does not correct the problem, see your dealer. This message only displays while the ignition is in RUN. Press any of the DIC buttons to acknowledge this message and to clear it from the screen. This message continues to display for two seconds if it has not been acknowledged when the engine is turned off. It also re-displays for two seconds if the message has been acknowledged, but the condition still exists when the engine is turned off. If the condition still exists, the message re-appears when the engine is turned on.
SERVICE STABILITY SYSTEM If your vehicle has StabiliTrak®, this message displays if there has been a problem detected with StabiliTrak®. See StabiliTrak® System on page 355. If this message turns on while you are driving, pull off the road as soon as possible and stop carefully. Try resetting the system by turning the ignition off and then back on. If this message still stays on or turns back on again while you are driving, your vehicle needs service. Have the StabiliTrak® System inspected by your dealer as soon as possible. This message displays only while the ignition is in RUN. Press any of the DIC buttons to acknowledge this message and to clear it from the screen. This message continues to display for two seconds if it has not been acknowledged when the engine is turned off. It also re-displays for two seconds if the message has been acknowledged, but the condition still exists when the engine is turned off. If the condition still exists, the message re-appears when the engine is turned on.
245
SERVICE TRACTION SYSTEM If your vehicle has the Traction Control System (TCS), this message displays when the system is not functioning properly. A warning light also appears on the instrument panel cluster. See Traction Control System (TCS) Warning Light on page 216. See Traction Control System (TCS) on page 353 for more information. Have the TCS serviced by your dealer as soon as possible. This message displays only while the ignition is in RUN. Press any of the DIC buttons to acknowledge this message and to clear it from the screen. This message continues to display for two seconds if it has not been acknowledged when the engine is turned off. It also re-displays for two seconds if the message has been acknowledged, but the condition still exists when the engine is turned off. If the condition still exists, the message re-appears when the engine is turned on.
SERVICE VEHICLE SOON This message displays when a non-emissions related malfunction occurs. Have the vehicle serviced by your dealer as soon as possible. This message displays only while the ignition is in RUN. Press any of the DIC buttons to acknowledge this message and to clear it from the screen. This message continues to display for two seconds if it has not been acknowledged when the engine is turned off. It also re-displays for two seconds if the message has been acknowledged, but the condition still exists when the engine is turned off. If the condition still exists, the message re-appears when the engine is turned on. STABILITY CONTROL ACTIVE If your vehicle has StabiliTrak®, this message displays when StabiliTrak® is actively assisting you with directional control of the vehicle. Slippery road conditions may exist when this message is displayed, so adjust your driving accordingly. See StabiliTrak® System on page 355.
246
This message displays only while the ignition is in RUN. This message stays on until road conditions change and StabiliTrak® is not active. This message cannot be acknowledged and cleared from the screen. STABILITY CONTROL OFF If your vehicle has StabiliTrak®, this message displays any time the system turns off. When this message has been displayed, StabiliTrak® is no longer available to assist you with directional control of the vehicle. Adjust your driving accordingly. See StabiliTrak® System on page 355. This message displays only while the ignition is in RUN. Any of the following conditions may cause the StabiliTrak® system to turn off: (cid:127) The battery is low. (cid:127) There is a StabiliTrak® system failure.
See your dealer for service.
STARTING DISABLED This message displays if the starting of the engine is disabled due to the electronic throttle control system or vehicle theft-deterrent system. Have your vehicle serviced by your dealer immediately. This message only appears while the ignition is in RUN and will not disappear until the problem is resolved. This message cannot be acknowledged. TRACTION CONTROL ACTIVE If your vehicle has the Traction Control System (TCS), this message displays when the system is on. Slippery road conditions may exist if this message is displayed, so adjust your driving accordingly. See Traction Control System (TCS) on page 353 for more information. This message only displays while the ignition is in RUN and will not disappear until driving conditions change and the TCS is no longer active. This message cannot be acknowledged or cleared from the screen.
247
TRACTION CONTROL OFF If your vehicle has the Traction Control System (TCS), this message displays when the TCS turns off. See Traction Control System (TCS) on page 353 for more information. This message only displays while the ignition is in RUN and disappears after two seconds. Any of the following conditions may cause the TCS to turn off: (cid:127) The TCS is turned off by pressing the traction
control button located on the center of the instrument panel. See Traction Control System (TCS) on page 353.
(cid:127) The battery is low. (cid:127) There is a TCS failure. See your dealer
for service.
TRANSMISSION FLUID HOT This message displays when the transaxle fluid in your vehicle is too hot. Stop the vehicle and allow it to idle until it cools down. If the warning message continues to display, have the vehicle serviced by your dealer as soon as possible.
248
This message displays and a chime sounds only while the ignition is in RUN. Press any of the DIC buttons to acknowledge this message and to clear it from the screen. This message continues to display for two seconds if it has not been acknowledged when the engine is turned off. It also re-displays for two seconds if the message has been acknowledged, but the condition still exists when the engine is turned off. If the condition still exists, the message re-appears when the engine is turned on. TURN SIGNAL ON This message displays as a reminder to turn off the turn signal if you drive your vehicle for more than about 0.75 mile (1.2 km) with a turn signal on. See Turn Signal/Multifunction Lever on page 173. This message displays and a chime sounds only when the ignition is in RUN. This message clears from the DIC if the turn signal is manually turned off, a turn is completed, or the message is acknowledged.
DIC Vehicle Personalization (Uplevel Only) Your vehicle may have customization capabilities that allow you to program certain features to one preferred setting. Customization features can only be programmed to one setting on the vehicle and cannot be programmed to a preferred setting for two different drivers. The customization features include the following: (cid:127) Exterior lighting delay (cid:127) Interior lighting delay (cid:127) Delayed locking (cid:127) Content theft (cid:127) Remote keyless entry feedback (cid:127) Remote start (cid:127) Rear park chime Your vehicle may also have personalization capabilities that allow you to program certain features to a preferred setting for up to two drivers. The first personalized key corresponds to driver 1
and the second personalized key corresponds to driver 2. The driver number also corresponds to the numbers, 1 or 2, on the back of the remote keyless entry transmitters.The personalization features include the following: (cid:127) Radio station presets (cid:127) Auto door unlock preferences (cid:127) Remote keyless entry unlock preferences All of the customization and personalization options may not be available on your vehicle. Only the options available will be displayed on your DIC. The default settings for the customization and personalization features were set when your vehicle left the factory, but may have been changed from their default setting since then. The customization preferences are automatically recalled. The driver’s personalization preferences are recalled by using the key programmed for driver 1 or 2. The driver number also corresponds to the numbers, 1 or 2, on the back of the remote keyless entry transmitters. To change customization and personalization preferences, use the following procedure.
249
Entering the Personal Program Menu 1. Turn the ignition on and place the vehicle
in PARK (P). To avoid excessive drain on the battery, it is recommended that the headlamps are turned off.
2. Press the menu button until PERSONAL
PROGRAM displays. If the vehicle is not in PARK (P), PERSONAL PROGRAM ONLY IN PARK will display. If the vehicle is not able to enter the personal program menu, PERSONAL PROGRAM NOT AVAILABLE will display.
3. Press the set/reset button to begin. 4. The DIC will then display an instruction screen.
Press the menu button to display the modes that are available to program. Press the set/reset button to change the setting of each mode.
Customization Menu Items The following are customization features that allow you to program settings to the vehicle: FACTORY DEFAULTS This feature allows you to set all of the customization and personalization features back to their factory default settings. Press the menu button until FACTORY DEFAULTS appears on the DIC display. Press the set/reset button to scroll through the following choices:
NO (default): The customization and personalization features will not be set to their factory default settings.
YES: The customization and personalization features will be set to their factory default settings. If YES is selected, the keys will need to be personalized again to be recognized as key 1 or 2. See “PERSONALIZE KEY” later in this section for more information. Choose one of the available settings and press the menu button while it is displayed on the DIC to select it and move on to the next feature.
250
ALL KEYS RESET This screen will only display if YES was selected on the FACTORY DEFAULTS screen. Press the set/reset button to scroll through the following choices:
CANCEL (default): The features will not be set to their factory default settings and the DIC will return to the FACTORY DEFAULTS screen.
OK: The features will be set to their factory default settings, the DIC will exit the personal program menu, and PERSONAL OPTIONS SAVED will display. EXT (Exterior) LIGHT DELAY This feature allows you to set the amount of time the exterior lamps remain on after the key is removed from the ignition or the vehicle is unlocked using the remote keyless entry transmitter.
Press the menu button until EXT LIGHT DELAY appears on the DIC display. Press the set/reset button to scroll through the following choices:
OFF: The exterior lamps will not turn on.
15 seconds: The exterior lamps will stay on for 15 seconds.
30 seconds (default): The exterior lamps will stay on for 30 seconds.
60 seconds: The exterior lamps will stay on for 60 seconds.
90 seconds: The exterior lamps will stay on for 90 seconds. Choose one of the available settings and press the menu button while it is displayed on the DIC to select it and move on to the next feature.
251
INT (Interior) LIGHTS KEYS REMOVED This feature enables the interior lamps in the vehicle to turn on for about 25 seconds after the key is removed from the ignition. Press the menu button until INT LIGHTS KEYS REMOVED appears on the DIC display. Press the set/reset button to scroll through the following choices:
OFF: Removing the key from the ignition will not cause the interior lamps to turn on.
ON (default): Removing the key from the ignition will cause the interior lamps to be turned on for about 25 seconds. Choose one of the available settings and press the menu button while it is displayed on the DIC to select it and move on to the next feature. DELAYED LOCKING This feature allows the locking of the vehicle to be delayed until all of the doors have been closed for approximately five seconds.
When the delayed locking feature is enabled, it may be activated when the key is out of the ignition by doing one of the following: (cid:127) Pressing the driver’s door power lock switch
one time while the driver’s door is open.
(cid:127) Pressing the passenger’s door power lock
switch one time while the passenger’s door is open.
(cid:127) Pressing the lock button on the remote
keyless entry transmitter one time while any door is open.
Two chimes will sound to signal that delayed locking is active. The doors may be locked immediately by repeating one of the above actions more than one time. If a door remains open, without any other door being opened or closed, the vehicle will lock after approximately 45 seconds. If a key is in the ignition, this feature will not lock the doors. See Delayed Locking on page 108
for more information.252
Press the menu button until DELAYED LOCKING appears on the DIC display. Press the set/reset button to scroll through the following choices:
Press the menu button until CONTENT THEFT appears on the DIC display. Press the set/reset button to scroll through the following choices:
OFF: There will be no delayed locking of the vehicle’s doors.
OFF: The content theft-deterrent system will be turned off.
ON (default): The locking of the vehicle’s doors will be delayed by five seconds while a door is open after a power door lock switch is pressed, or the lock button on the remote keyless entry transmitter is pressed while a door is open. Choose one of the available settings and press the menu button while it is displayed on the DIC to select it and move on to the next feature. CONTENT THEFT If your vehicle has the content theft-deterrent system, once this feature is turned on, the system will activate if someone tries to enter the vehicle without using the remote keyless entry transmitter or the correct key. It will also activate when an incorrect key is used in the ignition.
ON (default): The content theft-deterrent system will be turned on. When ON is selected, the content theft-deterrent system will be armed when the vehicle is locked by pressing the lock button on the remote keyless entry transmitter or by pressing the power door lock switch. See Content Theft-Deterrent on page 124 and Power Door Locks on page 107
for more information. Choose one of the available settings and press the menu button while it is displayed on the DIC to select it and move on to the next feature.253
FOB LOCK FEEDBACK This feature allows you to select the type of feedback you will receive when locking the vehicle with the remote keyless entry transmitter. Press the menu button until FOB LOCK FEEDBACK appears on the DIC display. Press the set/reset button to scroll through the following choices:
OFF: There will be no feedback when locking the vehicle.
LIGHTS: The exterior lamps will flash when you press the lock button on the remote keyless entry transmitter.
LIGHTS and HORN (default): The exterior lamps will flash when you press the lock button on the remote keyless entry transmitter, and the horn will sound when the lock button is pressed again within five seconds of the previous command. Choose one of the available settings and press the menu button while it is displayed on the DIC to select it and move on to the next feature.
REMOTE START If your vehicle has remote start, this feature allows the remote start to be turned OFF or ON. The remote start feature allows you to start the engine from outside of the vehicle using the remote keyless entry transmitter. See “Remote Vehicle Start” under Remote Keyless Entry System Operation on page 99 for more information. Press the menu button until REMOTE START appears on the DIC display. Press the set/reset button to scroll through the following choices:
OFF: The remote start feature will be disabled.
ON (default): The remote start feature will be enabled. Choose one of the available settings and press the menu button while it is displayed on the DIC to select it and move on to the next feature. REAR PARK CHIME If your vehicle has the Ultrasonic Rear Parking Assist (URPA) system, this feature allows the URPA system’s chime to be turned OFF or ON. See Ultrasonic Rear Parking Assist (URPA) on page 188 for more information.
254
Press the option button until REAR PARK CHIME appears on the DIC display. Press the set/reset button to scroll through the following choices:
Press the menu button until PERSONALIZE KEY appears on the DIC display. Press the set/reset button to scroll through the following choices:
OFF: The URPA system’s chime will be disabled.
NO (default): The key will not be personalized.
ON (default): The URPA system’s chime will be enabled. Choose one of the available settings and press the menu button while it is displayed on the DIC to select it and move on to the next feature. Personalization Menu Items The following are personalization features that allow you to program setting for up to two drivers: PERSONALIZE KEY If you are using a key that has already been personalized to be recognized as key 1 or 2, this screen will not display. This feature allows you to personalize a key to be recognized as key 1 or 2. A personalized key allows you to program personalization features to a preferred setting to correspond to key 1 or 2.
YES: The key will be personalized. Choose one of the available settings and press the menu button while it is displayed on the DIC to select it and move on to the next feature. REPLACE KEY This screen displays only if YES was selected for the PERSONALIZE KEY feature, keys 1 and 2
have already been personalized, and the current key being used is not key 1 or 2. This feature allows you to program a key to be recognized as key 1 or 2 in the event that the previously programmed key needs to be replaced. 1: The key will be programmed to be recognized as key 1. 2: The key will be programmed to be recognized as key 2.CANCEL (default): The key will not be programmed.
255
RADIO STATIONS PERSONALIZED This screen displays only if YES was selected for the PERSONALIZE KEY feature. This feature allows you to set the radio station presets to be recognized for the key, 1 or 2, that is being used. Once this message displays, set the radio station presets. If the presets are not set at this time, the presets will not be recognized for key 1 or 2, however, the vehicle radio station presets will be maintained. AUTO DOOR UNLOCK This feature allows automatic door unlocking to be turned off, used for the driver’s door only, or for all of the doors. Press the menu button until AUTO DOOR UNLOCK appears on the DIC display. Press the set/reset button to scroll through the following choices:
OFF: None of the doors will unlock when the vehicle is shifted into PARK (P) or the key is taken out of the ignition.
DRIVER: Only the driver’s door will unlock when the vehicle is shifted into PARK (P) or the key is taken out of the ignition.
256
ALL (default): All of the doors will unlock when the vehicle is shifted into PARK (P) or the key is taken out of the ignition. Choose one of the available settings and press the menu button while it is displayed on the DIC to select it and move on to the next feature. AUTO UNLOCK ON This feature displays only if DRIVER or ALL was selected for the AUTO DOOR UNLOCK feature. This feature allows the selection of when the vehicle’s doors will unlock. Press the menu button until AUTO UNLOCK ON appears on the DIC display. Press the set/reset button to scroll through the following choices:
KEY-OUT: The door(s) will unlock when the key is taken out of the ignition.
PARK (default): The door(s) will unlock when the vehicle is shifted into PARK (P). Choose one of the available settings and press the menu button while it is displayed on the DIC to select it and move on to the next feature.
FOB UNLOCK ON 1ST PRESS This feature allows the selection of which doors will unlock on the first press of the unlock button on the remote keyless entry transmitter. See Remote Keyless Entry System Operation on page 99 for more information. Press the menu button until FOB UNLOCK ON 1ST PRESS appears on the DIC display. Press the set/reset button to scroll through the following choices:
DRIVER (default): The driver’s door will unlock on the first press of the unlock button on the remote keyless entry transmitter.
ALL: All of the doors will unlock on the first press of the unlock button on the remote keyless entry transmitter. Choose one of the available settings and press the menu button while it is displayed on the DIC to select it. The DIC will then display PRESS UNLOCK SWITCH ON KEY FOB.
Press the unlock button on the remote keyless entry transmitter and your setting will be saved for that remote keyless entry transmitter. After programming the last option, the message KEY FOB NOW PERSONALIZED will appear on the DIC display for a few seconds if you personalized the key. Next, the message PERSONAL OPTIONS SAVED will appear briefly on the DIC display, then the display will return to the PERSONAL PROGRAM main screen. Exiting the Personal Program Menu The personal program menu will be exited when any of the following occurs: (cid:127) The vehicle is shifted out of PARK (P). (cid:127) The vehicle is no longer in RUN. (cid:127) The end of the personal program menu
is reached.
257
Audio System(s) Determine which radio your vehicle has and then read the pages following to familiarize yourself with its features. Driving without distraction is a necessity for a safer driving experience. See Defensive Driving on page 346. By taking a few moments to read this manual and get familiar with your vehicle’s audio system, you can use it with less effort, as well as take advantage of its features. While your vehicle is parked, set up your audio system by presetting your favorite radio stations, setting the tone, and adjusting the speakers. Then, when driving conditions permit, you can tune to your favorite stations using the presets and steering wheel controls if the vehicle has them.
258
{CAUTION:
This system provides you with a far greater access to audio stations and song listings. Giving extended attention to entertainment tasks while driving can cause a crash and you or others can be injured or killed. Always keep your eyes on the road and your mind on the drive — avoid engaging in extended searching while driving.
Keeping your mind on the drive is important for safe driving. Here are some ways in which you can help avoid distraction while driving. While your vehicle is parked: (cid:127) Familiarize yourself with all of its controls. (cid:127) Familiarize yourself with its operation. (cid:127) Set up your audio system by presetting your favorite radio stations, setting the tone, and adjusting the speakers. Then, when driving conditions permit, you can tune to your favorite radio stations using the presets and steering wheel controls if the vehicle has them.
Notice: Before adding any sound equipment to your vehicle, such as an audio system, CD player, CB radio, mobile telephone, or two-way radio, make sure that it can be added by checking with your dealer. Also, check federal rules covering mobile radio and telephone units. If sound equipment can be added, it is very important to do it properly. Added sound equipment may interfere with the operation of your vehicle’s engine, radio, or other systems, and even damage them. Your vehicle’s systems may interfere with the operation of sound equipment that has been added. Notice: The chime signals related to safety belts, parking brake, and other functions of your vehicle operate through the radio/entertainment system. If that equipment is replaced or additional equipment is added to your vehicle, the chimes may not work. Make sure that replacement or additional equipment is compatible with your vehicle before installing it. See Accessories and Modifications on page 400.
Your vehicle has a feature called Retained Accessory Power (RAP). With RAP, the audio system can be played even after the ignition is turned off. See Retained Accessory Power (RAP) on page 130 for more information.
Setting the Time Press the H or the M button to enter clock mode. Press and hold H until the correct hour appears on the display. Press and hold M until the correct minute appears on the display. To change the time default setting from 12 hour to 24 hour, press either the H or the M button to enter the clock mode, then press the tune knob to select between the 12 or 24 hour display format. The clock mode will automatically time out with the changed display format set as the current default setting.
259
Radio with CD
Radio with CD shown, Radio with Six-Disc CD
similar
260
Radio Data System (RDS) The audio system has a Radio Data System (RDS). RDS features are available for use only on FM stations that broadcast RDS information. With RDS, the radio can do the following: (cid:127) Seek to stations broadcasting the selected
type of programming
(cid:127) Receive announcements concerning local and
national emergencies
(cid:127) Display messages from radio stations (cid:127) Seek to stations with traffic announcements This system relies upon receiving specific information from these stations and only works when the information is available. In rare cases, a radio station may broadcast incorrect information that causes the radio features to work improperly. If this happens, contact the radio station. While the radio is tuned to an RDS station, the station name or call letters appear on the display. RDS stations may also provide the time of day, a program type (PTY) for current programming, and the name of the program being broadcast.
XM™ Satellite Radio Service XM™ is a satellite radio service that is based in the 48 contiguous United States and Canada. XM™ offers a large variety of coast-to-coast channels including music, news, sports, talk, traffic/weather (U.S. subscribers), and children’s programming. XM™ provides digital quality audio and text information that includes song title and artist name. A service fee is required in order to receive the XM™ service. For more information, contact XM™; In the U.S. at www.xmradio.com or call 1-800-852-XMXM (9696) or in Canada at www.xmradio.ca or call 1-877-GET-XMSR (438-9677). Playing the Radio
Top Knob (Power/Volume): Press this knob to turn the system on and off. Turn this knob clockwise or counterclockwise to increase or to decrease the volume. 4 (Information): For RDS, press this button to change what appears on the display while using RDS. The display options are station name, RDS station frequency, PTY (program type), and the name of the program (if available).
For XM™ (if equipped), press the information button while in XM™ mode to retrieve four different categories of information related to the current song or channel: Artist, Song Title, Category or PTY, Channel Number/Channel Name. To change the default on the display, press the information button until you see the desired display, then hold the button for two seconds. The radio produces one beep and the selected display becomes the default.
AUTO n (Automatic Volume): With automatic volume, the audio system adjusts automatically to make up for road and wind noise as you drive, by increasing the volume as the vehicle speed increases. Set the volume at the desired level. Press this button to select AUTO VOLUME MIN (minimum), AUTO VOLUME MED (medium), or AUTO VOLUME MAX (maximum). Each higher setting provides more volume compensation at faster vehicle speeds. To turn automatic volume