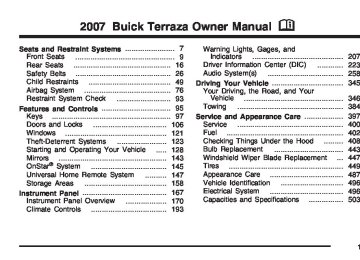
- Download PDF Manual
-
off, press this button until AUTO VOLUME OFF appears on the display.
261
MUTE: Press this button to silence the system. Press this button again to turn the sound on. This button is not available on the Radio with Six-Disc CD. Finding a Station
BAND: Press this button to switch between FM1, FM2, AM, or XM1 or XM2 (if equipped). The display shows the selection. O / e (Tune): Turn this knob to select radio stations. t SEEK u: Press the right or the left arrow to go to the next or to the previous station and stay there. The radio only seeks stations with a strong signal that are in the selected band. t SCAN u: Press and hold either arrow for two seconds until FREQUENCY SCAN appears on the display. The radio goes to a station, plays for a few seconds, then goes to the next station. Press either arrow again to stop scanning.
To scan preset stations, press and hold either arrow for four seconds until PRESET SCAN appears on the display. The radio goes to the next preset station, plays for a few seconds, then goes to the next preset station. Press either scan arrow again or one of the pushbuttons to stop scanning presets. The radio only scans stations with a strong signal that are in the selected band. Setting Preset Stations Up to 30 stations (six FM1, six FM2, and six AM, six XM1 and six XM2 (if equipped)), can be programmed on the six numbered pushbuttons, by performing the following steps: 1. Turn the radio on. 2. Press BAND to select FM1, FM2, AM, or XM1
or XM2.
3. Tune in the desired station. 4. Press AUTO EQ to select the equalization. 5. Press and hold one of the six numbered
pushbuttons until you hear a beep. Whenever that numbered pushbutton is pressed, the station that was set returns and the equalization that was selected is stored for that pushbutton.
6. Repeat the steps for each pushbutton.
262
Setting the Tone (Bass/Treble) e (Bass/Treble/Midrange): Press this knob to select BASS, MIDRANGE, or TREBLE. Turn the knob to increase or to decrease. If a station is weak or has static, decrease the treble. To adjust the bass, midrange, and treble to the middle position, press and hold this knob when the tone control is on the display. The level changes to the middle position. To adjust all tone and speaker controls to the middle position, press and hold this knob when no tone or speaker control is displayed. AUDIO SETTINGS CENTERED appears on the display.
AUTO EQ (Automatic Equalization): Press this button to select customized equalization settings designed for country/western, jazz, talk, pop, rock, and classical. Selecting CUSTOM or changing bass or treble, returns the EQ to the manual bass and treble settings. The radio saves separate AUTO EQ settings for each preset and source.
Adjusting the Speakers (Balance/Fade) e (Balance/Fade): To adjust the balance between the right and the left speakers, press this knob until BALANCE appears on the display. Turn the knob to move the sound toward the right or the left speakers. To adjust the fade between the front and the rear speakers, press this knob until FADE appears on the display. Turn the knob to move the sound toward the front or the rear speakers. To adjust the balance and fade to the middle position, press and hold this knob when the speaker control is on the display. The level changes to the middle position. To adjust all tone and speaker controls to the middle position, press and hold this knob when no tone or speaker control is displayed. AUDIO SETTINGS CENTERED appears on the display.
263
Finding a Category Station (RDS and XM™) To select and find a desired category perform the following: 1. Press the CAT (category) button. The last selected category appears on the display. 2. Turn the tune knob to select the category. 3. Once the desired category is displayed, press either SEEK arrow to take you to a category’s station. SEEKING CATEGORY appears on the display.
4. To go to another station within that category, press the CAT button to display the category, then press either SEEK arrow to go to another station.
If both category and traffic are on, the radio searches for stations with the selected category and traffic announcements. This function does not work with XM™. If the radio cannot find the desired category, NONE appears on the display and the radio returns to the last station you were listening to. This function does not work with XM™.
264
SCAN: Scan the stations within a category by performing the following: 1. Press the CAT button. The last selected
category appears on the display.
2. Turn the tune knob to select the category. 3. Once the desired category is displayed, press and hold either SCAN arrow until you hear a beep and SCAN CATEGORY appears on the display. The radio begins scanning the stations in the category.
4. Press either SCAN arrow to stop scanning. If both category and TRAF (traffic) are on, the radio scans for stations with the selected category and traffic announcements.
BAND (AF – Alternate Frequency): Alternate frequency allows the radio to switch to a stronger station with the same category. To turn alternate frequency on, press and hold BAND for four seconds. AF ON appears on the display. The radio may switch to stations with a stronger frequency.
To turn alternate frequency off, press and hold BAND again for four seconds. AF OFF appears on the display. The radio does not switch to other stations. This function does not apply for XM™ Satellite Radio Service. RDS Messages
ALERT!: Alert warns of local or national emergencies. When an alert announcement comes on the current radio station, ALERT! appears on the display. You will hear the announcement, even if the volume is low or a CD is playing. If a CD is playing, play stops during the announcement. Alert announcements cannot be turned off. ALERT! is not affected by tests of the emergency broadcast system. This feature is not supported by all RDS stations. 4 (INFO – Information): If the current station has a message, INFO appears on the display. Press this button to see the message. The message may display the artist, song title, call in phone numbers, etc.
If the entire message is not displayed, parts of the message appears every three seconds. To scroll through the message, press and release this button. A new group of words appears on the display after every press of the button. Once the complete message has displayed, INFO disappears from the display until another new message is received. The last message can be displayed by pressing this button. You can view the last message until a new message is received or a different station is tuned to. When a message is not available from a station, NO INFO appears on the display.
TRAF (TA – Traffic): If TA appears on the display, the tuned station broadcasts traffic announcements and when a traffic announcement comes on the tuned radio station you will hear it. If the station does not broadcast traffic announcements, press the TRAF button and the radio seeks to a station that does. When a station that broadcasts traffic announcements is found, the radio stops seeking and TA appears on the display. If no station is found that broadcasts traffic announcements, NO TRAFFIC appears on the display.
265
If TA is on the display, press the TRAF button to turn off the traffic announcements. The radio plays the traffic announcement even if the volume is low. The radio interrupts the play of a CD if the last tuned station broadcasts traffic announcements. This function does not apply to XM™ Satellite Radio Service. Radio Messages
CAL ERR (Calibration Error): The audio system has been calibrated for your vehicle from the factory. If CAL ERR appears on the display, it means that the radio has not been configured properly for your vehicle and must be returned to your dealer for service.
LOCKED: This message is displayed when the THEFTLOCK® system has locked up. Take the vehicle to your dealer for service. If any error occurs repeatedly or if an error cannot be corrected, contact your dealer. If the radio displays an error message, write it down and provide it to your dealer when reporting the problem.
266
Radio Messages for XM™ Only See XM Radio Messages on page 280 later in this section for further detail. Playing a CD (Single CD Player) Insert a CD partway into the slot, label side up. The player pulls it in and the CD should begin playing. If the ignition or radio is turned off with a CD in the player, it stays in the player. When the ignition or radio is turned on, the CD starts playing where it stopped, if it was the last selected audio source. When a CD is inserted, CD and the CD symbol appears on the display. As each new track starts to play the track number appears on the display. The CD player can play the smaller 3 inch (8 cm) single CDs with an adapter ring. Full-size CDs and the smaller CDs are loaded in the same manner. If playing a CD-R, the sound quality (and playback performance) may be reduced due to the CD-R quality, method of recording, the quality of the music that has been recorded, and the way the CD-R has been handled. For better playback performance when home burning audio discs, use brand named CD media showing the Compact Disc™, and a burn rate no faster than 12X.
There may be an increase in skipping, difficulty in finding tracks, and/or difficulty in loading and ejecting. If these problems occur, check the bottom surface of the CD. If the surface of the CD is damaged, such as cracked, broken, or scratched, the CD will not play properly. If the surface of the CD is soiled, see Care of Your CDs and DVDs on page 343 for more information. If there is no apparent damage, try a known good CD. Do not add any label to a CD, it could get caught in the CD player. If a CD is recorded on a personal computer and a description label is needed, try labeling the top of the recorded CD with a marking pen. Notice: more than one CD into the slot at a time, or attempt to play scratched or damaged CDs, you could damage the CD player. When using the CD player, use only CDs in good condition without any label, load one CD at a time, and keep the CD player and the loading slot free of foreign materials, liquids, and debris.
If you add any label to a CD, insert
If an error appears on the display, see “CD Messages” later in this section. O / e (Tune): Turn this knob to go to the next or previous track. { (Reverse): Press and hold this button to reverse the current track. | (Fast Forward): Press and hold this button to fast forward through the current track.
RDM (Random): Press this button to hear the tracks in random, rather than sequential, order. RANDOM DISC appears on the display. Press this button again to turn off random play.
RPT (Repeat): Press this button to hear a track over again. REPEAT appears on the display. Press this button again to turn off repeat play.
MUTE: Press this button to silence the system. Press this button again to turn the sound on.
267
t SEEK u: Press the left arrow to go to the start of the current track if more than eight seconds have played. Press the right arrow to go to the start of the next track. If either arrow is held or pressed more than once, the player continues moving backward or forward through the CD.
BAND: Press this button to listen to the radio when a CD is playing. The inactive CD remains safely inside the radio for future listening.
CD AUX (Auxiliary): Press this button to play a CD when listening to the radio. CD appears on the display when a CD is in the player. If the system has a remote playback device, pressing this button a second time allows the remote device to play.
AUTO EQ (Automatic Equalization): Press AUTO EQ to select the equalization setting while playing a CD. The equalization is stored whenever a CD is played. For more information on AUTO EQ, see “AUTO EQ” listed previously in this section. X (Eject): Press this button to eject the CD. EJECT may be activated with either the ignition or radio off.
268
Playing a CD(s) (Six-Disc CD Player) If the ignition or radio is turned off, with a CD in the player, it stays in the player. When the ignition or radio is turned on, the CD starts playing where it stopped, if it was the last selected audio source. When a CD is inserted, the CD symbol appears on the CD. As each new track starts to play, the track number appears on the display. The CD player can play the smaller 3 inch (8 cm) single CDs with an adapter ring. Full-size CDs and the smaller CDs are loaded in the same manner. If playing a CD-R, the sound quality (and playback performance) may be reduced due to the CD-R quality, method of recording, the quality of the music that has been recorded, and the way the CD-R has been handled. For better playback performance when home burning audio discs, use brand named CD media showing the Compact Disc™, and a burn rate no faster than 12X.
There may be an increase in skipping, difficulty in finding tracks, and/or difficulty in loading and ejecting. If these problems occur, check the bottom surface of the CD. If the surface of the CD is damaged, such as cracked, broken, or scratched, the CD will not play properly. If the surface of the CD is soiled, see Care of Your CDs and DVDs on page 343 for more information. If there is no apparent damage, try a known good CD. Do not add any label to a CD, it could get caught in the CD player. If a CD is recorded on a personal computer and a description label is needed, try labeling the top of the recorded CD with a marking pen. Notice: more than one CD into the slot at a time, or attempt to play scratched or damaged CDs, you could damage the CD player. When using the CD player, use only CDs in good condition without any label, load one CD at a time, and keep the CD player and the loading slot free of foreign materials, liquids, and debris.
If you add any label to a CD, insert
If an error appears on the display, see “CD Messages” later in this section.
M (Load): Press this button to load CDs into the CD player. This CD player holds up to six CDs. To insert one CD, do the following: 1. Turn the ignition on. 2. Press and release the load button. 3. When INSET CD # appears on the display,
load a CD. Insert the CD partway into the slot, label side up. The player pulls the CD in.
To insert multiple CDs, do the following: 1. Turn the ignition on. 2. Press and hold the load button for
two seconds. A beep will sound and LOAD ALL DISC appears on the display.
3. When INSERT CD # appears on the display,
load a CD. Insert the CD partway into the slot, label side up. The player pulls the CD in. Once the CD is loaded, wait for INSERT CD # to appear on the display, then load the next CD. The CD player takes up to six CDs. Do not try to load more than six.
269
To load more than one CD but less than six, complete Steps 1 through 3. When finished loading CDs, press the load button to cancel the loading function. The radio begins to play the last CD loaded. If more than one CD has been loaded, a number for each CD appears on the display. Playing a Specific Loaded CD For every CD loaded, a number appears on the display. To play a specific CD press the numbered pushbutton that corresponds to the CD. If an error appears on the display, see “CD Messages” later in this section. X (Eject): Press this button to eject CD(s). To eject the CD that is currently playing, press and release this button. To eject multiple CDs, do the following: 1. Press and hold the eject button for
two seconds. A beep will sound and EJECT ALL DISCS appears on the display.
2. When REMOVE DISC appears on the display,
the CD ejects and can be removed. To stop ejecting the CDs, press the load or the eject button.
If the CD is not removed, after 25 seconds, the CD automatically pulls back into the player. If CD is pushed back into the player, before the 25 second time period is complete, the player senses an error and tries to eject the CD several times before stopping. Do not repeatedly press the eject button to eject a CD after you have tried to push it in manually. The player’s 25-second eject timer resets at each press of eject, causing the player to not eject the CD until the 25-second time period has elapsed. O / e (Tune): Turn this knob to go to the next or previous track. { (Reverse): Press and hold this button to reverse within the current track. | (Fast Forward): Press and hold this button to fast forward through the current track.
270
RDM (Random): Press this button to hear the tracks in random, rather than sequential order, on one CD or all of the loaded CDs. To use random, do one of the following: (cid:127) To play the tracks on the CD you are listening
to in random order, press and release this button until RANDOM DISC PLAY appears on the display.
(cid:127) To play the tracks on all of the CDs that are loaded in random order, press and release this button until RANDOM ALL DISCS appears on the display.
To turn off random play, press and release the RDM button until RANDOM OFF appears on the display.
RPT (Repeat): Press this button to hear a track or an entire CD over again. To use repeat, do one of the following: (cid:127) To repeat a track, press and release this
button until REPEAT appears on the display.
(cid:127) To repeat an entire CD, press and release this
button until REPEAT ONE DISC appears on the display.
To turn off repeated play, press and release the RPT button until REPEAT OFF appears on the display. t SEEK u: Press the left arrow to go to the start of the current track, if more than ten seconds have played. Press the right arrow to go to the next track. If either arrow is held or pressed more than once, the player continues moving backward or forward through the CD. t SCAN u: To scan one CD, press and hold either SCAN arrow for more than two seconds until SCAN appears on the display and you hear a beep. The radio goes to the next track, plays for 10 seconds, then goes to the next track. Press either SCAN arrow again, to stop scanning. To scan all loaded CDs, press and hold either SCAN arrow for more than four seconds until CD SCAN appears on the display and you hear a beep. Use this feature to listen to 10 seconds of the first track of each loaded CD. Press either SCAN arrow again, to stop scanning.
BAND: Press this button to listen to the radio when a CD is playing. The inactive CD(s) will remain safely inside the radio for future listening.
271
CD AUX (Auxiliary): Press this button to play a CD when listening to the radio. CD appears on the display when a CD is in the player. If your system has a remote playback device, pressing this button a second time allows the remote device to play.
AUTO EQ (Automatic Equalization): Press AUTO EQ to select the equalization setting while playing a CD. The equalization is stored whenever a CD is played. For more information on AUTO EQ, see “AUTO EQ” listed previously in this section. Playing an MP3 CD-R Disc Your vehicle’s radio system may have the MP3
feature. If it has this feature, it is capable of playing an MP3 CD-R disc. For more information on how to play an MP3 CD-R disc, see Using an MP3
on page 274 later in this section.272
Using R (Song List) Mode (Single CD, MP3, and Six-Disc CD) This feature is capable of saving 20 track selections. To save tracks into the song list feature, perform the following steps: 1. Turn the CD player on and load it with at least
one CD.
2. Check to see that the CD player is not in song list mode. S-LIST (sound list) should not appear on the display. If S-LIST is present, press the song list button to turn it off. 3. Select the desired CD by pressing the
numbered pushbutton and then use the SEEK right arrow or turn the tune knob to locate the track to be saved. The track begins to play. 4. Press and hold the song list button to save
the track into memory. When song list is pressed, one beep will sound. ADDED SONG will appear on the display.
5. Repeat Steps 3 and 4 for saving other
selections.
SONGLIST FULL appears on the display if you try to save more than 20 selections.
To play the song list, press the song list button. The recorded tracks begins to play in the order they were saved. Seek through the song list by using the SEEK arrows. Seeking past the last saved track returns to the first saved track. To delete tracks from the song list, perform the following steps: 1. Turn the CD player on. 2. Press the song list button to turn song list on.
S-LIST appears on the display.
3. Press either SEEK arrow or turn the tune
knob to select the desired track to be deleted.
4. Press and hold the song list button for two seconds. Release the button when SONG REMOVED appears on the display.
After a track has been deleted, the remaining tracks are moved up the list. When another track is added to the song list, the track is added to the end of the list.
To delete the entire song list, perform the following steps: 1. Turn the CD player on. 2. Press the song list button to turn song list on.
S-LIST appears on the display.
3. Press and hold the song list button for more
than four seconds. One beep will sound. SONGLIST EMPTY appears on the display indicating the song list has been deleted. If a CD is ejected, and the song list contains saved tracks from that CD, those tracks are automatically deleted from the song list. Any tracks saved to the song list again are added to the bottom of the list. To end song list mode, press the song list button. One beep will sound and S-LIST will be removed from the display.
273
CD Messages
CHECK CD: If this message appears on the display and/or the CD comes out, it could be for one of the following reasons: (cid:127)
It is very hot. When the temperature returns to normal, the CD should play.
(cid:127) You are driving on a very rough road.
When the road becomes smoother, the CD should play.
(cid:127) The CD is dirty, scratched, wet, or
upside down.
(cid:127) The air is very humid. If so, wait about an
hour and try again.
(cid:127) There may have been a problem while
burning the CD.
(cid:127) The label may be caught in the CD player. If the CD is not playing correctly, for any other reason, try a known good CD. If any error occurs repeatedly or if an error cannot be corrected, contact your dealer. If the radio displays an error message, write it down and provide it to your dealer when reporting the problem.
274
Using an MP3
MP3 CD-R Disc MP3 Format If you burn your own MP3 disc on a personal computer: (cid:127) Make sure the MP3 files are recorded on aCD-R disc.
(cid:127) Do not mix standard audio and MP3 files on
one disc.
(cid:127) Make sure playlists have a .m3u or .wpl
extension, other file extensions may not work.
(cid:127) Files can be recorded with a variety of fixed or variable bit rates. Song title, artist name, and album will be available for display by the radio when recorded using ID3 tags version 1 and 2.
(cid:127) Create a folder structure that makes it easy to find songs while driving. Organize songs by albums using one folder for each album. Each folder or album should contain 18 songs or less.
(cid:127) Make sure to finalize the disc when burning
an MP3 disc, using multiple sessions. It is usually better to burn the disc all at once.
(cid:127) Do not use CD-RW discs. (cid:127) Do not use colored discs. The player will be able to read and play a maximum of 50 folders, 50 playlists, 10 sessions, and 255 files. Long file names, folder names, or playlist names may use more disc memory space than necessary. To conserve space on the disc, minimize the length of the file, folder, or playlist names. You can also play an MP3 CD that was recorded using no file folders. The system can support up to 11 folders in depth, though, keep the depth of the folders to a minimum in order to keep down the complexity and confusion in trying to locate a particular folder during playback. If a CD contains more than the maximum of 50 folders, 50 playlists, 10 sessions, and 255 files the player lets you access and navigate up to the maximum, but all items over the maximum cannot be accessed.
Root Directory The root directory will be treated as a folder. If the root directory has compressed audio files, the directory is displayed as F1 ROOT. All files contained directly under the root directory are accessed prior to any root directory folders. However, playlists (Px) are always accessed before root folders or files. Empty Directory or Folder If a root directory or a folder exists somewhere in the file structure that contains only folders/ subfolders and no compressed files directly beneath them, the player advances to the next folder in the file structure that contains compressed audio files. The empty folder will not display. No Folder When the CD contains only compressed files, the files will be located under the root folder. The next and previous folder functions will not function on a CD that was recorded without folders or playlists. When displaying the name of the folder the radio displays ROOT.
275
When the CD contains only playlists and compressed audio files, but no folders, all files are located under the root folder. The folder down and the folder up buttons search playlists (Px) first and then go to the root folder. When the radio displays the name of the folder the radio displays ROOT. Order of Play Tracks are played in the following order: (cid:127) Play begins from the first track in the first playlist and continues sequentially through all tracks in each playlist. When the last track of the last playlist has played, play continues from the first track of the first playlist. If the CD does not contain any playlists, then play begins from the first track under the root directory. When all tracks from the root directory have played, play continues from files according to their numerical listing. After playing the last track from the last folder, play begins again at the first track of the first folder or root directory.
(cid:127)
When play enters a new folder, the display does not automatically show the new folder name unless you have chosen the folder mode as the default display. See the information button later in this section for more information. The new track name appears on the display. File System and Naming The song name that displays is the song name that is contained in the ID3 tag. If the song name is not present in the ID3 tag, then the radio displays the file name without the extension (such as .mp3) as the track name. Track names longer than 32 characters or four pages are shortened. Parts of words on the last page of text and the extension of the filename will not display. Preprogrammed Playlists Preprogrammed playlists that were created using WinAmp™, MusicMatch™, or Real Jukebox™ software can be accessed, however, they cannot be edited using the radio. These playlists are treated as special folders containing compressed audio song files.
276
Playing an MP3
Insert a CD partway into the slot, label side up. The player pulls it in, and READING appears on the display. The CD should begin playing and the CD symbol appears on the display. If the ignition or radio is turned off with a CD in the player it stays in the player. When the ignition or radio is turned on, the CD starts to play where it stopped, if it was the last selected audio source. As each new track starts to play, the track number appears on the display. The CD player can play the smaller 3 inch (8 cm) single CDs with an adapter ring. Full-size CDs and the smaller CDs are loaded in the same manner. If playing a CD-R, the sound quality (and playback performance) may be reduced due to the CD-R quality, method of recording, the quality of the music that has been recorded, and the way the CD-R has been handled. For better playback performance when home burning audio discs, use brand named CD media showing the Compact Disc™, and a burn rate no faster than 12X.There may be an increase in skipping, difficulty in finding tracks, and/or difficulty in loading and ejecting. If these problems occur, check the bottom surface of the CD. If the surface of the CD is damaged, such as cracked, broken, or scratched, the CD will not play properly. If the surface of the CD is soiled, see Care of Your CDs and DVDs on page 343 for more information. If there is no apparent damage, try a known good CD. Do not add any label to a CD, it could get caught in the CD player. If a CD is recorded on a personal computer and a description label is needed, try labeling the top of the recorded CD with a marking pen. Notice: If you add any label to a CD, insert more than one CD into the slot at a time, or attempt to play scratched or damaged CDs, you could damage the CD player. When using the CD player, use only CDs in good condition without any label, load one CD at a time, and keep the CD player and the loading slot free of foreign materials, liquids, and debris. If an error appears on the display, see “CD Messages” later in this section.
277
(cid:127) To play the tracks on all of the CDs that
are loaded in random order, press and release this button until RANDOM ALL appears on the display.
To turn off random play, press and release the RDM button until RANDOM OFF appears on the display
RPT (Repeat): Press this button to hear a track, CD, or a folder over again. To use repeat, do one of the following: (cid:127) To repeat a track, press and release this button until REPEAT TRACK appears on the display.
(cid:127) To repeat a CD, press and release this button
until REPEAT DISC appears on the display.
(cid:127) To repeat a folder, press and release
this button until REPEAT FOLDER appears on the display.
O / e (Tune): Turn this knob to go to the next or previous track. { (Previous Folder): P ress this button to go to the first track in the previous folder. Press and hold this button to reverse through the current track. | (Next Folder): Press this pushbutton to go to the first track in the next folder. Press and hold this button to fast forward the current track.
RDM (Random): Press this button to hear the tracks in random, rather than sequential order, on one CD, one folder, or all of the loaded CDs. To use random, do one of the following: (cid:127) To play the tracks on the CD you are
listening to in random order, press and release this button until RANDOM DISC appears on the display.
(cid:127) To play the tracks in the folder you are listening to in random order, press and release this button until RANDOM FOLDER appears on the display.
278
To turn off repeated play, press and release the RPT button until REPEAT OFF appears on the display
MUTE: Press this button to silence the system. Press this button again to turn the sound on. This button is not available on the Radio with Six-Disc CD. t SEEK u: Press the left arrow to go to the start of the current track, if more than 10 seconds have played. Press the right arrow to go to the next track. If either arrow is held or pressed more than once, the player continues moving backward or forward through the CD.
4 (Information): Press this button to display the artist name and album contained in the ID3 tag.
BAND: Press this button to listen to the radio when a CD is playing. The inactive CD remains safely inside the radio for future listening.
CD AUX (Auxiliary): Press this button to play a CD when listening to the radio. The CD symbol appears on the display when a CD is loaded. Y (Eject): Press this button to eject a CD. Eject may be activated with either the ignition or radio off.
279
XM Radio Messages
Radio Display Message
Condition
Action Required
XL (Explicit Language Channels)
XL on the radio display, after the channel name, indicates content with explicit language.
These channels, or any others, can be blocked at a customer’s request, by calling 1-800-852-XMXM (9696).
Updating
Updating encryption code The encryption code in the receiver is being updated, and no action is required. This process should take no longer than 30 seconds.
No Signal
Loss of signal
The system is functioning correctly, but the vehicle is in a location that is blocking the XM™ signal. When you move into an open area, the signal should return.
Acquiring channel audio (after 4 second delay)
The audio system is acquiring and processing audio and text data. No action is needed. This message should disappear shortly.
Channel not in service
This channel is not currently in service. Tune to another channel.
Channel no longer available
This previously assigned channel is no longer assigned. Tune to another station. If this station was one of the presets, choose another station for that preset button.
Artist Name/Feature not available
No artist information is available at this time on this channel. The system is working properly.
Loading XM
CH Off Air
CH Unavail
No Info
280
Radio Display Message
Condition
Action Required
No Info
No Info
No Info
Not Found
Song/Program Title not available
No song title information is available at this time on this channel. The system is working properly.
Category Name not available
No category information is available at this time on this channel. The system is working properly.
No Text/Informational message available
No text or informational messages are available at this time on this channel. The system is working properly.
No channel available for the chosen category
There are no channels available for the selected category. The system is working properly.
XM Locked
Theft lock active
Radio ID
Unknown
Chk XMRcvr
Radio ID label (channel 0)
Radio ID not known (should only be if hardware failure)
Hardware failure
The XM™ receiver in the vehicle may have previously been in another vehicle. For security purposes, XM™ receivers cannot be swapped between vehicles. If this message is received after having your vehicle serviced, check with your GM dealer.
If tuned to channel 0, this message will alternate with the XM™ Radio eight digit radio ID label. This label is needed to activate the service.
If this message is received when tuned to channel 0, there may be a receiver fault. Consult with your GM dealer.
If this message does not clear within a short period of time, your receiver may have a fault. Consult with your GM dealer.
281
Navigation/Radio System Your vehicle may have a navigation radio system. The navigation system has built-in features intended to minimize driver distraction. Technology alone, no matter how advanced, can never replace your own judgment. See the Navigation System manual for some tips to help you reduce distractions while driving.
Rear Seat Entertainment System (Option A, Uplevel) Your vehicle may have this type of DVD Rear Seat Entertainment (RSE) system. If it has this feature, it will include a DVD player, a video display screen, auxiliary inputs, two sets of wireless headphones (if included), and a remote control.
Parental Control rj (Parental Control): This button is located behind the video screen, below the auxiliary jacks. Press this button while using RSA, or when a DVD or CD is playing to blank the video screen and to mute the audio. The power indicator lights on the DVD player will flash. Turning on the parental control will also disable all other button operations from the remote control and the DVD player, except for the eject button. Press this button again to restore operation of the RSA, DVD player, and remote control. This button may also be used to turn the DVD player power on and automatically resume play if the vehicle is on and a disc is in the player. If no disc is in the player, the system will power up in auxiliary mode.
282
Before You Drive The RSE is designed for rear seat passengers only. The driver cannot safely view the video screen while driving and should not try to do so. The RSE system will play DVD, CD, and MP3
discs. You can also connect an auxiliary device to the RSE system to play games, watch videos, look at pictures, etc. Normal operation may be limited under extremely low or high temperatures, in order to protect the system from damage. Operate the RSE system under normal or comfortable cabin temperature ranges. Headphones Wireless Headphones The RSE system may include two sets of wireless headphones (batteries are included). The wireless headphones have an ON/OFF switch, a channel select switch, and a volume control. To use the headphones, turn the switch to ON. An indicator light on the headphones will illuminate. If the light does not illuminate, the batteries may need to be replaced.See “Battery Replacement” later in this section for more information. Switch the headphones to OFF when not in use. The headphones will shut off automatically to save the battery power if the RSE system is shut off or if the headphones are out of range of the transmitters for more than three minutes. The transmitters are located next to the DVD faceplate. If you move too far forward or step out of the vehicle, the headphones will lose the audio signal. DVD and auxiliary audio will always be found on channel (CHA or CH1) of the wireless headphones. RSA audio is dedicated to CHB or CH2 of the wireless headphones. To adjust the volume on the wireless headphones, use the volume control. Notice: Do not store the headphones in heat or direct sunlight. This could damage the headphones and repairs will not be covered by your warranty. Keep the headphones stored in a cool, dry place. If there is a decreased audio signal during CD, MP3, or DVD play, there may be a low hissing noise through the speakers and/or headphones.
283
If the hissing sound in the wireless headphones seems excessive, make sure that the headphone batteries are fully charged. Some amount of hissing is normal. Both sets of rear seat headphones may include foam ear pads that can be replaced. Foam ear pads on these headphones may become worn or damaged. The headphone foam ear pads can become damaged if they are not handled or stored properly. If the foam ear pads do become damaged or worn out, the pads can be replaced separately from the headphone set. It is not necessary to replace the complete headphone set. The headphone replacement foam ear pads can be ordered in pairs. See your dealer for more information.
Battery Replacement To change the batteries, do the following: 1. Loosen the screw on the battery compartment door located on the left side of the headphone earpiece.
2. Replace the two AAA batteries in the compartment. Make sure that they are installed correctly using the diagram on the inside of the battery compartment.
3. Tighten the screw on the battery
compartment door.
If the headphones are to be stored for a long period of time, remove the batteries, and keep them in a cool, dry place.
284
Wired Headphones There is a right and left wired headphone jack. To adjust the volume, do the following: 1. Plug the headphone into the corresponding jack, located behind the video screen, next to the auxiliary jacks.
2. Press the corresponding headphone button
on the DVD faceplate.
3. Press the right and left arrow buttons, on the DVD faceplate, to increase or to decrease the volume.
The wired headphones work as follows: (cid:127) DVD on / RSA off: The wired headphones
will play RSE audio.
(cid:127) DVD off / RSA on: The wired headphones
will play RSA audio.
(cid:127) DVD on / RSA on: The wired headphones
will play RSA audio.
Stereo RCA Jacks
The RCA jacks are located behind the video screen on the DVD console. The RCA jacks allow audio and video signals to be connected from an auxiliary device such as a camcorder or a video game unit to the RSE. The yellow RCA jack is used for video inputs, the red RCA jack for right audio inputs, and the white RCA jack for left audio inputs. The system requires standard RCA cables, not included, to connect the auxiliary device to the RCA jacks. Refer to the manufacturer’s instructions for proper usage.
285
To use the auxiliary audio and video inputs, connect an external auxiliary device such as a camcorder to the RCA jacks and turn on both the auxiliary device power and the power on the front of the RSE player. If a disc is present when the RSE power is turned on, the player will automatically begin playing the disc and the user will need to press the AUX button on the remote control or on the DVD player faceplate to switch the system between the DVD player and the auxiliary device. See “DVD Player” and “Remote Control” later in this section for more information. Audio Output Audio from the DVD player or auxiliary devices can be heard through the following possible sources: (cid:127) Vehicle Speakers (cid:127) Wireless Headphones (cid:127) Wired Headphones (not included)
Vehicle Speakers Only one audio source can be heard through the vehicle’s speakers at a time. The RSE system or an auxiliary device can be heard through all of the vehicle’s speakers when the following occurs: (cid:127) A DVD or auxiliary device is playing (cid:127) The front audio system is on and the CD AUX
button is pressed to enable the RSE system
DVD will appear on the radio display when the RSE system is on. To turn the vehicles speakers on and off, press the CD AUX button on the radio. The audio from the RSE system can be heard through the wireless headphones and the vehicles speakers at the same time. The volume on the radio may vary when switching between the radio, CD, DVD, MP3, or an auxiliary device.
286
The RSE system DVD player is only compatible with DVDs of the appropriate region code for the country that the vehicle was sold. The DVD region code is printed on the jacket of most DVDs. Standard audio CDs, CD-R, CD-RW, enhanced CDs, video CDs, and CD-ROM with MP3
media are supported by this DVD player. DVD+R, DVD+RW, and copy protected CDs may or may not be supported by the DVD player. The DVD player does not support DVD-RAM, DVD-ROM, DVD-R, DVD-R/W, and DVD audio media. An error message will appear on the display if this type of media is inserted into the DVD player. If an error message appears on the video screen, see “DVD Messages” later in this section.Video Screen The video screen is located in the overhead console. To use the video screen, do the following: 1. Push forward on the release button and the
screen will fold down.
2. Adjust its position as desired. When the video screen is not in use, push it up into its stowed and latched position. Notice: Avoid directly touching the video screen, as damage may occur. See “Cleaning the Video Screen” later in this section for more information. DVD Player The DVD player is located in the overhead console. The DVD player can be controlled by the buttons on the DVD player and/or by the buttons on the remote control. See “Remote Control” later in this section for more information.
287
DVD Player Buttons
cY (Stop/Eject): Press and release this button to stop playing, rewinding, or fast forwarding. Press this button twice to eject a disc. If the player is already stopped, then only press this button once. O (Power): Press this button to turn the DVD player on and off.
288
AUX (Auxiliary): Press this button to switch the system between the DVD player and an auxiliary device. s (Play/Pause): Press this button to start play of a disc. Press this button while a disc is playing to pause it. Press it again to continue play of a disc. tr / [ u (Previous and Fast Reverse/Next and Fast Forward): These controls can be used to move forward or backward through a disc. These buttons can also be used to modify RSA, rear temperature, rear fan speed, and wired headphone volume adjustment. See “Headphones” earlier in this section, Rear Seat Audio (RSA) (Option A, Uplevel) on page 314 or Rear Seat Audio (RSA) (Option B, Uplevel) on page 316, and Rear Climate Control System (Option A, Uplevel) on page 200 or Rear Climate Control System (Option B, Uplevel) on page 203
for more information. When a DVD is playing in the DVD player and the RSA system is on, the stop/eject and play/pause buttons are the only buttons that will work.Playing a Disc To play a disc, gently insert the disc, with the label side up, into the loading slot. The DVD player will continue loading the disc and the player will automatically start if the vehicle is in ACCESSORY, RUN, or RAP. If a disc is already in the player, make sure that the DVD player is on, then press the play/pause button on the player faceplate or on the remote control. You can also, press the CD AUX button on the radio faceplate, until RSE appears on the display, to start playing a disc. Some DVDs will not allow fast forwarding or skipping of the copyright information or previews. Some DVDs will begin playing after the previews have finished. If the DVD does not begin playing at the main title, refer to the on-screen instructions.
Stopping and Resuming Playback To stop playing a disc, press and release the stop button on the DVD player faceplate or the remote control. To resume playback, press the play/pause button on the DVD player faceplate or the remote control. The movie should resume play from where it was last stopped if the disc has not been ejected. If the disc has been ejected, the disc will resume play at the beginning of the disc. Ejecting a Disc Press the eject button on the DVD player faceplate, when the disc is stopped, to eject the disc. There is not an eject button on the remote control. If a disc is ejected from the player, but not removed, the DVD player will reload the disc after a short period of time.
289
Remote Control The RSE system will include a remote control (batteries are included). To use the remote control, aim it at the transmitter window next to the RSE faceplate and press the desired button. Direct sunlight or very bright light may affect the ability of the transmitter to receive signals from the remote control. If the remote control does not seem to be working, the batteries may need to be replaced. See “Battery Replacement” later in this section. Objects blocking the line of sight will affect the function of the remote control. Notice: Storing the remote control in a hot area or in direct sunlight may damage it, and the repairs will not be covered by your warranty. Keep the remote control stored in a cool, dry place.
290
Remote Control Buttons
O (Power): Press this button to turn the DVD player on and off. P (Backlight): Press this button to turn the remote control backlighting on. The backlight will automatically turn off after eight seconds. v (Title): Press this button to display the current title number. Each press of this button will move the disc to the next available title.
n, q, p, o (Directional Arrows): Press these buttons to move through DVD menus. The up and down arrows will move through MP3
folders. r (Enter): Press this button to select the choice that is highlighted in any menu. z (Display Control Button): Press this button to open the RSE On-Screen Display (OSD) menus to adjust the color, tint, brightness, contrast, and display modes. y (Main Menu): Press this button to view the main DVD menu. The menu is different on every disc. Use the up, down, right, and left arrow buttons to move the cursor around the menu. After making a selection, press the enter button. q (Return): Press this button to go back one step in the RSE OSD menu and some DVD menus. Press this button to exit the current menu and to move to the previous menu. c (Stop): Press this button to stop playing, rewinding, or fast forwarding a disc.s (Play/Pause): Press this button to start play of a disc. Press this button while a disc is playing to pause it. Press it again to continue playing the disc. t (Prior Chapter/Track): Press this button to go to the beginning of the current chapter or track. Press this button again to return to the previous chapter or track. This button may not work when the DVD is playing the copyright information or previews. u (Next Chapter/Track): Press this button to go to the beginning of the next chapter or track. This button may not work when the DVD is playing the copyright information or the previews. r (Fast Reverse): Press this button to fast reverse the DVD and CD. To stop reversing, press the play or stop button. This button may not work when the DVD is playing the copyright information or the previews. [ (Fast Forward): Press this button to fast forward the DVD and CD. To stop fast forwarding, press the play or stop button. This button may not work when the DVD is playing the copyright information or the previews.
291
e (Sound): Press this button to display the current audio track. Each press will move the DVD to the next language or commentary. The format and content of this function will vary for each disc. { (Subtitles): Press this button to display the current subtitles. Each press of this button will move the DVD to the next available subtitle option (English, Spanish, French, etc., if available). The format and content of this function will vary for each disc.
AUX (Auxiliary): Press this button to switch the system between the DVD player and an auxiliary source.
d (Camera): Press this button to display the current camera angle on DVDs that have this feature. Each press will move the DVD to the next available camera angle. The format and content of this function will vary for each disc.
0 through 9 (Numeric Keypad): The numeric keypad provides the capability of direct chapter or track number selection.
292
\ (Clear): Press this button within two seconds after inputting a numeric selection, to clear all numeric inputs. } 10 (Multiple Digit Entries): Press this button to select chapter or track numbers greater than 9. Press this button before inputting the number. RSE On-Screen Display (OSD) Menu To use the RSE OSD menu when using a DVD or an auxiliary device, do the following: To access this menu, press the display button on the remote control. Once the menu is on the screen, use the directional arrows and the enter button to navigate the screen. This menu will let you select default preferences for video format, language preference, brightness, color, contrast, and tint. Not all DVDs support all the feature defaults in the setup menus. If a feature is not supported, the defaults will be provided by the DVD media. To exit this menu, press the display or the return button on the remote control or wait for the menu to time out. The default language selection will apply to all future DVDs.
To use the RSE OSD menu when using a CD or an MP3, do the following: Make sure that a CD or an MP3 is loaded in the RSE system and that the system is not in auxiliary, then press the display button on the remote control. Once the menu is on the screen, use the directional arrows and the enter button to navigate the screen. This menu will let you select default preferences for language and playback settings. To exit this menu, press the display or the return button on the remote control or wait for the menu to time out. Battery Replacement To change the remote control batteries, do the following: 1. Slide the battery door, located on the back
of the remote control, down.
2. Replace the two AA batteries in the
compartment. Make sure that they are installed correctly, using the diagram on the inside of the battery compartment.
3. Close the battery door. If the remote control is to be stored for a long period of time, remove the batteries and keep hem in a cool, dry place.
Tips and Troubleshooting Chart
Problem
Recommended Action
No power.
Disc will not play.
No sound — Wireless Headphones
The ignition may not be in ACCESSORY, RUN, or RAP.
The system might be off. The parental control button might have been pressed. The power indicator lights will flash. The system might be in auxiliary source mode. Press the AUX button to switch between the DVD player and the auxiliary source. The disc is upside down or is not compatible.
Turn the headphones on. Make sure the correct channel is selected on the wireless headphones. Check the batteries. The volume on the headphones could be too low, adjust the volume.
293
Problem
Recommended Action
Problem
Recommended Action
Make sure the wired headphones are plugged in. Adjust the volume. If RSA is on, DVD audio will not be heard.
If the DVD system is being heard through the vehicle speakers, adjust the volume on the radio. Press the CD AUX button on the radio to make sure that RSE is enabled. The rear speakers will mute when RSA is on.
This is normal for this operation.
Video mode may not be correctly set. See “RSE OSD” earlier in this section.
I ejected the disc and tried to take it out, but it was pulled back into the slot.
The language in the audio or on the screen is wrong.
The remote control does not work.
Press the eject button once.
Press the main menu button on the remote control and change the audio or language selection on the DVD menu. To change the language preference, press the display button to access the RSE OSD menu. See “RSE OSD” earlier in this section.
Point the remote control directly at the face of the DVD unit. The batteries could be weak or put in wrong. The parental control button might have been pressed, the power indicator lights will flash.
No sound — Wired Headphones
No sound — Vehicle Speakers
The picture is distorted during fast forward or reverse.
The picture does not fill the screen. There are black borders on the top and bottom or on both sides or it looks stretched out.
294
Problem
Recommended Action
Problem
Recommended Action
How do I get subtitles on or off?
The auxiliary source is running but there is no picture or sound.
The audio or video skips or jumps.
Press the subtitle button on the remote control to select subtitle option or go to the DVDs main menu and follow the screen prompts.
Press and release the AUX button on the remote control or the DVD player to get to auxiliary input. Check to make sure that the auxiliary source is connected to the inputs properly.
The DVD could be dirty or scratched. Try cleaning the disc.
The fast forward, fast reverse, previous, and next functions do not work.
My disc is stuck in the player. The eject button does not work.
Some commands that do one thing for DVDs will not always work or perform the same function for audio, audio discs, or games. These functions may also be disabled when the DVD is playing the copyright information or the previews. When RSA is on, these buttons control RSA functions.
Press the eject button on the DVD player. Turn the ignition off, then on again, then press the eject button on the DVD player. Do not attempt to force or remove the disc from the player. If the problem persists, return to your GM dealer for further assistance.
295
Problem
Recommended Action
Problem
Recommended Action
I lost the remote control and/or the headphones.
Contact your GM dealer for assistance.
The wireless headphones have audio distortion.
Sometimes the wireless headphone audio cuts out or buzzes for a moment, then it comes back.
DVD System inoperable.
This could be caused by interference from cell towers or by using the cellular telephone or other radio transmitter devices in the vehicle.
In severe or extreme temperatures the DVD system might not be operable. Temperatures below −4°F (−20°C) or above 140°F (60°C) could damage the DVD system. Operate the DVD system under normal or comfortable cabin temperature ranges. See your GM dealer if the problem persists.
In auxiliary mode, the picture moves or scrolls.
Verify that the headphones are facing to the front of the vehicle, left and right sides are indicated on the headphones to ensure that the signal is received properly. Verify that there is no obstruction between the headphone(s) and the transmitter. Verify that the batteries have a full charge.
Check the signal coming from the auxiliary device and make sure that the connection and the signal is good.
296
DVD Messages The following errors may be displayed on the video screen.
Disc Format Error: This message will be displayed if a disc is inserted upside down, if the disc is not readable, or if the disc format is not compatible.
Disc Play Error: This message will be displayed if the mechanism cannot play the disc. Scratched or damaged discs will cause this error.
Region Code Error: This message will be displayed if the region code of the DVD is not compatible with the region code of the DVD player.
Load/Eject Error: This message will be displayed if the disc is not properly loaded or ejected.
No Disc: This message will be displayed when you try to play or eject a disc that is not in the player.
X: A white X will be displayed, in the upper left corner of the video screen, if the operation that has been selected is not currently available.
DVD Distortion There may be an experience with video distortion when operating cellular phones, scanners, CB radios, Global Position Systems (GPS)*, two-way radios, mobile fax, or walkie talkies. It may be necessary to turn off the DVD player when operating one of these devices in or near the vehicle. *Excludes the OnStar® System. Cleaning the DVD Player When cleaning the outside DVD faceplate and buttons, use only a clean cloth dampened with clean water. Cleaning the Video Screen When cleaning the video screen, use only a clean cloth dampened with clean water. Use care when directly touching or cleaning the screen, as damage may result.
297
Rear Seat Entertainment System (Option B, Uplevel) Your vehicle may have this type of DVD Rear Seat Entertainment (RSE) system. If it has this feature, it will include a DVD player, a video display screen, auxiliary inputs, two sets of wireless headphones, and a remote control. Parental Control rj (Parental Control): This button is located behind the video screen, next to the auxiliary jacks. Press this button while using rear seat audio (RSA), or when a DVD or CD is playing to make the video screen go blank and to mute the audio. The power indicator lights on the DVD player will flash. Turning on the parental control will also disable all other button operations from the remote control and the DVD player, except for the eject button. Press this button again to restore operation of the RSA, DVD player, and remote control.
298
This button may also be used to turn the DVD player power on and to automatically resume play of a disc that is in the player while the vehicle is on. If no disc is in the player, the system will power up and display no display on the LCD screen. Before You Drive The RSE is designed for rear seat passengers only. The driver cannot safely view the video screen while driving and should not try to do so. The RSE system can play DVD, CD, and MP3
discs. You can also connect an auxiliary device to the RSE system to play games, watch videos, look at pictures, etc. Normal operation may be limited under extremely low or high temperatures, in order to protect the system from damage. Operate the RSE system under normal or comfortable cabin temperature ranges. Headphones Notice: Do not store the headphones in heat or direct sunlight. This could damage the headphones and repairs will not be covered by your warranty. Keep the headphones stored in a cool, dry place.Wireless Headphones The RSE system may include two sets of wireless headphones (batteries may be included with the headphone sets). The wireless headphones have an ON/OFF switch, a channel select switch, and a volume control. To use the headphones, turn the ON/OFF switch to ON. An indicator light on the headphones will come on. If the light does not come on, the batteries may need to be replaced. See “Battery Replacement” later in this section for more information. Switch the headphones to OFF when not in use. The headphones will shut off automatically to save the battery power if the RSE system is off or if the headphones are out of range of the transmitters for more than three minutes. The transmitters are located next to the DVD faceplate. If you move too far forward or step out of the vehicle, the headphones will lose the audio signal. DVD and auxiliary audio will always be found on channel (CHA or CH1) of the wireless headphones. RSA audio is dedicated to CHB or CH2 of the wireless headphones.
To adjust the volume on the wireless headphones, use the volume control located on the headphones. If there is a decreased audio signal during CD, MP3, or DVD play, there may be a low hissing noise through the speakers and/or headphones. If the hissing sound in the wireless headphones seems excessive, make sure that the headphone batteries are fully charged. Some amount of hissing is normal. Both sets of rear seat headphones may include foam ear pads that can be replaced. Foam ear pads on these headphones may become worn or damaged. The headphone foam ear pads can become damaged if they are not handled or stored properly. If the foam ear pads do become damaged or worn out, the pads can be replaced separately from the headphone set. It is not necessary to replace the complete headphone set. The headphone replacement foam ear pads can be ordered in pairs. See your dealer for more information.
299
Battery Replacement To change the batteries, do the following: 1. Loosen the screw on the battery compartment door located on the left side of the headphone earpiece.
2. Replace the two batteries in the compartment.
Make sure that they are installed correctly using the diagram on the inside of the battery compartment.
3. Tighten the screw on the battery
compartment door.
If the headphones are to be stored for a long period of time, remove the batteries, and keep them in a cool, dry place. Wired Headphones There is a right and left wired headphone jack. To adjust the volume, do the following: 1. Plug the headphone into the corresponding
jack, located behind the video screen, next to the auxiliary jacks.
2. Press the headphone volume control button until the Wired Headset Volume is displayed and the Left wired headphone is highlighted for selection. Press the volume control button again to select the Right volume control. Another way to select either the Left or Right Wired Headset Volume is to press the up or down arrows on the DVD faceplate.
3. Press the right and left arrow buttons on the
DVD faceplate to increase or to decrease the volume. Press the headphone volume control button again or wait for a few seconds until the screen disappears.
The wired headphones work as follows: (cid:127) DVD on / RSA off: The wired headphones
will play RSE audio.
(cid:127) DVD off / RSA on: The wired headphones
will play RSA audio.
(cid:127) DVD on / RSA on: The wired headphones
will play RSA audio.
300
Stereo RCA Jacks
The RCA jacks are located behind the video screen on the DVD console. The RCA jacks allow audio and video signals to be connected from an auxiliary device such as a camcorder or a video game unit to the RSE. The yellow RCA jack is used for video input, the red RCA jack for right audio inputs, and the white RCA jack for left audio inputs. The system requires standard RCA cables, not included, to connect the auxiliary device to the RCA jacks. Refer to the manufacturer’s instructions for proper usage.
To use the auxiliary audio and video inputs, connect an external auxiliary device such as a camcorder to the RCA jacks and turn on both the auxiliary device power and the power on the front of the RSE player. If a disc is present when the RSE power is turned on, the player may automatically begin playing the disc. Press the AUX button on the remote control or the DVD AUX button on the DVD player faceplate to switch the system between the DVD player and the auxiliary device. See “DVD Player” and “Remote Control” later in this section for more information. Audio Output Audio from the DVD player or auxiliary devices can be heard through the following sources: (cid:127) Vehicle Speakers (cid:127) Wireless Headphones (cid:127) Wired Headphones (not included)
301
Vehicle Speakers Only one audio source can be heard through the vehicle’s speakers at a time. The RSE system or an auxiliary device can be heard through all of the vehicle’s speakers when the following occurs: (cid:127) A DVD or auxiliary device is playing (cid:127) The front audio system is on and the CD AUX
button is pressed to enable the RSE system DVD appears on the radio display when the RSE system is on. To turn the vehicles speakers on and off, press the CD AUX button on the radio. The audio from the RSE system can be heard through the wireless headphones and the vehicles speakers at the same time. The volume on the radio may vary when switching between the radio, CD, DVD, MP3, or an auxiliary device.
Video Screen The video screen is located in the overhead console. To use the video screen, do the following: 1. Push the release button and the screen will
fold down.
2. Adjust its position as desired. When the video screen is not in use, push it up into its stowed and latched position. Notice: Avoid directly touching the video screen, as damage may occur. See “Cleaning the Video Screen” later in this section for more information.
302
DVD Player The DVD player is located in the overhead console. The DVD player can be controlled by the buttons on the DVD player and/or by the buttons on the remote control. See “Remote Control” later in this section for more information. The RSE system DVD player is only compatible with DVDs of the appropriate region code for the country that the vehicle was sold. The DVD region code is printed on the jacket of most DVDs. The player is capable of playing the following media formats: DVD (single and dual player), DVD+R/RW, DVD-R/RW, DVD-ROM with MP3, DVD-ROM with WMA, CD-DA, CD-R/RW, CD-ROM with MP3, CD-ROM with WMA, Enhanced CD, SACD (CD player only). An error message may appear on the display if any other type of media is inserted into the DVD player. If an error message appears on the video screen, see “DVD Messages” later in this section.
DVD Player Buttons
RSE Faceplate with Rear Seat Climate Controls shown, RSE Faceplate without
Rear Seat Climate Controls similar
cY (Stop/Eject): Press and release this button to stop playing, rewinding, or fast forwarding. Press this button twice to eject a disc. If the player is already stopped, then only press this button once.
DVD AUX (Disc Auxiliary): Press this button to switch the system between the DVD player and an auxiliary device. rj (Play/Pause): Press the play button to start play of a disc. Press the pause button while a disc is playing to pause it. Press it again to continue play of a disc.
303
43 (Wired Headphone Volume): Press this button to select the correct headphone. Then press the left or right arrow buttons to increase or decrease the headphone volume. When a DVD is playing in the DVD player and the RSA system is on, the stop/eject and play/pause buttons are the only buttons that will work.
RSA SRC (Rear Seat Audio Source): Press this button to switch between playing the AM, FM1, FM2, XM1™ or XM2™ Satellite Radio Service (if equipped), or the front CD player. If one of the sources are not loaded, the system will skip over the source when this button is pressed. q, Q, r, R (Directional Arrows): Press these buttons to move through DVD menus. The up and down arrows will move through MP3
folders. g (Fast Reverse): Press this button to fast reverse the DVD and CD. To stop reversing, press the play or stop button. This button may not work when the DVD is playing the copyright information or the previews.304
l (Fast Forward): Press this button to fast forward the DVD and CD. To stop forwarding, press the play or stop button. This button may not work when the DVD is playing the copyright information or the previews.
MENU (Disc): Press this button to view the main DVD menu. The menu is different on every disc. Use the up, down, right, and left arrow buttons to move the cursor around the menu. After making a selection, press the enter button. r (Enter/Select): Press this button to select the choice that is highlighted in any menu. z (Display Control Button): For vehicles without rear seat climate control, this button will take the place of the fan/temp button. For vehicles with rear seat climate control, this button is also found on the remote control. Press this button to open the RSE On-Screen Display (OSD) menus to adjust the color, tint, brightness, contrast, and display modes.
Playing a Disc To play a disc, gently insert the disc, with the label side up, into the loading slot. The DVD player will continue loading the disc and the player will automatically start if the vehicle is in ACCESSORY, RUN, or RAP. If a disc is already in the player, make sure that the DVD player is on, then press the play/pause button on the player faceplate or on the remote control. You can also press the DVD AUX button on the player faceplate, or the CD AUX button on the radio faceplate until RSE appears on the display, to start playing a disc. Some DVDs will not allow fast forwarding or skipping of the copyright information or previews. Some DVDs will begin playing after the previews have finished. If the DVD does not begin playing at the main title, refer to the on-screen instructions.
Stopping and Resuming Playback To stop playing a disc, press and release the stop button on the DVD player faceplate or the remote control. To resume playback, press the play/pause button on the DVD player faceplate or the remote control. The movie should resume play from where it was last stopped if the disc has not been ejected. If the disc has been ejected, the disc will resume play at the beginning of the disc. Ejecting a Disc Press the eject button on the DVD player faceplate, when the disc is stopped, to eject the disc. There is no eject button on the remote control. If a disc is ejected from the player, but not removed, the DVD player will reload the disc after a short period of time.
305
Remote Control The RSE system includes a remote control (batteries may be included with the remote control). To use the remote control, aim it at the transmitter window next to the RSE faceplate and press the desired button. Direct sunlight or very bright light may affect the ability of the transmitter to receive signals from the remote control. If the remote control does not seem to be working, the batteries may need to be replaced. See “Battery Replacement” later in this section. Objects blocking the line of sight will affect the function of the remote control. Notice: Storing the remote control in a hot area or in direct sunlight may damage it, and the repairs will not be covered by your warranty. Keep the remote control stored in a cool, dry place.
306
Remote Control Buttons
O (Power): Press this button to turn the DVD player on and off. P (Backlight): Press this button to turn the remote control backlighting on. The backlight will automatically turn off after eight seconds. v (Title): Press this button to display the current title number. Each press of this button will move the disc to the next available title.
q, Q, r, R (Directional Arrows): Press these buttons to move through DVD menus. The up and down arrows will move through MP3
folders. r (Enter): Press this button to select the choice that is highlighted in any menu. z (Display Control Button): Press this button to open the RSE On-Screen Display (OSD) menus to adjust the color, tint, brightness, contrast, and display modes. y (Main Menu): Press this button to view the main DVD menu. The menu is different on every disc. Use the up, down, right, and left arrow buttons to move the cursor around the menu. After making a selection, press the enter button. q (Return): Press this button to go back one step in the RSE OSD menu and some DVD menus. Press this button to exit the current menu and to move to the previous menu. c (Stop): Press this button to stop playing, rewinding, or fast forwarding a disc.s (Play/Pause): Press this button to start play of a disc. Press this button while a disc is playing to pause it. Press it again to continue playing the disc. t (Prior Chapter/Track): Press this button to go to the beginning of the current chapter or track. Press this button again to return to the previous chapter or track. This button may not work when the DVD is playing the copyright information or previews. u (Next Chapter/Track): Press this button to go to the beginning of the next chapter or track. This button may not work when the DVD is playing the copyright information or the previews. r (Fast Reverse): Press this button to fast reverse the DVD and CD. To stop reversing, press the play or stop button. This button may not work when the DVD is playing the copyright information or the previews. [ (Fast Forward): Press this button to fast forward the DVD and CD. To stop fast forwarding, press the play or stop button. This button may not work when the DVD is playing the copyright information or the previews.
307
e (Sound): Press this button to display the current audio track. Each press will move the DVD to the next language or commentary. The format and content of this function will vary for each disc. { (Subtitles): Press this button to display the current subtitles. Each press of this button will move the DVD to the next available subtitle option (English, Spanish, French, etc., if available). The format and content of this function will vary for each disc. AUX (Auxiliary): Press this button to switch the system between the DVD player and an auxiliary source. d (Camera): Press this button to display the current camera angle on DVDs that have this feature. Each press will move the DVD to the next available camera angle. The format and content of this function will vary for each disc. 0 through 9 (Numeric Keypad): The numeric keypad provides the capability of direct chapter or track number selection. \ (Clear): Press this button within two seconds after entering a numeric selection, to clear all numeric inputs.
308
} 10 (Multiple Digit Entries): Press this button to select chapter or track numbers greater than 9. Press this button before entering the number. RSE On-Screen Display (OSD) Menu To use the RSE OSD menu when using a DVD or an auxiliary device, do the following: To access this menu, press the display button on the remote control or on the DVD faceplate, if you do not have rear seat climate control. Once the menu is on the screen, use the directional arrows and the enter button to navigate the screen. This menu will let you select default preferences for video format, language preference, brightness, color, contrast, and tint. Not all DVDs support all the feature defaults in the setup menus. If a feature is not supported, the defaults will be provided by the DVD media. To exit this menu, press the display button, or the return button on the remote control, or faceplate if there is no rear seat climate control, or wait for the menu to time out. The default language selection will apply to all future DVDs.
To use the RSE OSD menu when using a CD or an MP3, do the following: Make sure that a CD or an MP3 is loaded in the RSE system and that the system is not in auxiliary, then press the display button on the remote control, or faceplate if there is no rear seat climate control. Once the menu is on the screen, use the directional arrows and the enter button to navigate the screen. This menu lets you select default preferences for language and playback settings. To exit this menu, press the display button, or the return button on the remote control, or faceplate if there is no rear seat climate control, or wait for the menu to time out. Battery Replacement To change the remote control batteries, do the following: 1. Slide the battery door, located on the back of
the remote control, down.
2. Replace the two batteries in the compartment.
Make sure that they are installed correctly, using the diagram on the inside of the battery compartment.
3. Close the battery door.
If the remote control is to be stored for a long period of time, remove the batteries and keep them in a cool, dry place. Tips and Troubleshooting Chart
Problem
Recommended Action
No power.
Disc will not play.
The ignition may not be in ACCESSORY, RUN, or RAP.
The system might be off. The parental control button might have been pressed. The power indicator lights will flash. The system might be in auxiliary source mode. Press the DVD AUX button on the player faceplate or the AUX button on the remote to switch between the DVD player and the auxiliary sources. The disc is upside down or is not compatible.
309
Problem
Recommended Action
Problem
Recommended Action
The picture does not fill the screen. There are black borders on the top and bottom or on both sides or it looks stretched out.
I ejected the disc and tried to take it out, but it was pulled back into the slot.
The language in the audio or on the screen is wrong.
Video mode may not be correctly set. See “RSE OSD” earlier in this section.
Press the eject button once.
Press the main menu button on the remote control and change the audio or language selection on the DVD menu. To change the language preference, press the display button to access the RSE OSD menu. See “RSE OSD”