- 2002 Buick Rendezvous Owners Manuals
- Buick Rendezvous Owners Manuals
- 2005 Buick Rendezvous Owners Manuals
- Buick Rendezvous Owners Manuals
- 2003 Buick Rendezvous Owners Manuals
- Buick Rendezvous Owners Manuals
- 2004 Buick Rendezvous Owners Manuals
- Buick Rendezvous Owners Manuals
- 2007 Buick Rendezvous Owners Manuals
- Buick Rendezvous Owners Manuals
- 2006 Buick Rendezvous Owners Manuals
- Buick Rendezvous Owners Manuals
- Download PDF Manual
-
use an impact wrench to remove the wheel nuts, you could damage the lock nut or wheel lock key. Do not use an impact wrench to remove the wheel nuts if your vehicle has wheel locks.
3. Locate the notch
(A is 3.0 inches (7.5 cm) from the front tire or B is 5.5 inches (14.0 cm) from the rear tire). The notch is located near each wheel in the vehicle’s body.
{CAUTION:
Getting under a vehicle when it is jacked up is dangerous. If the vehicle slips off the jack you could be badly injured or killed. Never get under a vehicle when it is supported only by a jack.
If you use a jack to raise the vehicle
Notice: without positioning it correctly, you could damage your vehicle. When raising your vehicle on a jack, avoid contact with the rear axle control arms.
Do not raise the vehicle yet. Put the compact spare tire near you.
437
5. Raise the vehicle by turning the folding wrench clockwise in the jack. Raise the vehicle far enough off the ground so that there is enough room for the spare tire to fit under the wheel well.
6. Remove all the wheel nuts and take off the
flat tire.
{CAUTION:
Raising your vehicle with the jack improperly positioned can damage the vehicle and even make the vehicle fall. To help avoid personal injury and vehicle damage, be sure to fit the jack lift head into the proper location before raising the vehicle.
4. Attach the folding
wrench to the jack, and turn the wrench clockwise to raise the jack head 3 inches (7.6 cm).
438
{CAUTION:
{CAUTION:
Rust or dirt on the wheel, or on the parts to which it is fastened, can make the wheel nuts become loose after time. The wheel could come off and cause an accident. When you change a wheel, remove any rust or dirt from the places where the wheel attaches to the vehicle. In an emergency, you can use a cloth or a paper towel to do this; but be sure to use a scraper or wire brush later, if needed, to get all the rust or dirt off.
Never use oil or grease on studs or nuts. If you do, the nuts might come loose. Your wheel could fall off, causing a serious accident.
7. Remove any rust or dirt from the wheel bolts, mounting surfaces and spare wheel.
439
{CAUTION:
Incorrect wheel nuts or improperly tightened wheel nuts can cause the wheel to come loose and even come off. This could lead to an accident. Be sure to use the correct wheel nuts. If you have to replace them, be sure to get new GM original equipment wheel nuts. Stop somewhere as soon as you can and have the nuts tightened with a torque wrench to the proper torque specification. See Capacities and Specifications on page 469
for wheel nut torque specification.Improperly tightened wheel nuts can
Notice: lead to brake pulsation and rotor damage. To avoid expensive brake repairs, evenly tighten the wheel nuts in the proper sequence and to the proper torque specification. See Capacities and Specifications on page 469 for the wheel nut torque specification.
8. Lower the vehicle by attaching the folding wrench to the jack and turning the wrench counterclockwise. Lower the jack completely.
440
9. Tighten the wheel
nuts firmly in a crisscross sequence, as shown.
Notice: Wheel covers will not fit on your compact spare. If you try to put a wheel cover on the compact spare, you could damage the cover or the spare.
10. Do not try to put a wheel cover on the compact spare tire. It will not fit. Store the wheel cover securely in the rear of the vehicle until you have the flat tire repaired or replaced.
Secondary Latch System Your vehicle has an underbody mounted tire hoist assembly equipped with a secondary latch system. It is designed to stop the compact spare tire from suddenly falling off your vehicle if the cable holding the spare tire is damaged. For the secondary latch to work, the tire must be stowed with the valve stem pointing down. See Storing a Flat or Spare Tire and Tools on page 444 for instructions on storing the spare tire correctly.
{CAUTION:
Before beginning this procedure read all the instructions. Failure to read and follow the instructions could damage the hoist assembly and you and others could get hurt. Read and follow the instructions listed next.
441
To release the spare tire from the secondary latch, do the following:
{CAUTION:
Someone standing too close during the procedure could be injured by the jack. If the spare tire does not slide off the jack completely, make sure no one is behind you or on either side of you as you pull the jack out from the spare.
1. If the cable is not visible, start this procedure
at Step 3.
2. Turn the folding wrench counterclockwise until
approximately 6 inches (15 cm) of cable is exposed.
442
3. Attach the folding wrench to the jack and
raise the jack at least 10 turns.
4. Place the jack under the vehicle, ahead of the
rear bumper. Position the center lift point of the jack under the center of the spare tire.
5. Turn the folding wrench clockwise to raise the
jack until it lifts the secondary latch spring.
6. Keep raising the jack until the spare tire stops
moving upward and is held firmly in place. This lets you know that the secondary latch has released and the spare tire is balancing on the jack.
8. Disconnect the folding wrench from the jack and carefully remove the jack. Use one hand to push against the spare tire while firmly pulling the jack out from under the spare tire with the other hand.
7. Lower the jack by turning the folding wrench
counterclockwise. Keep lowering the jack until the spare tire slides off the jack.
443
9. Tilt the retainer and slip it through the wheel
opening when the spare tire has been completely lowered.
10. Turn the folding wrench clockwise to raise the
cable back up if the cable is hanging.
Have the hoist assembly inspected as soon as you can. You will not be able to store a spare tire using the hoist assembly until it has been repaired or replaced.
Storing a Flat or Spare Tire and Tools Storing the Flat Tire (Vehicles without Stowable Seat and without Rear Convenience Center)
D. Valve Stem E. Full-Size Tire
A. D-Ring B. Wing Nut C. J-Hook 1. Flip up the D-ring located in the rear cargo area. 2. Lay the tire in the rear cargo area of the
vehicle with the valve stem up with the center hole of the tire over the D-ring.
444
For vehicles with aluminum wheels, remove the center cap by tapping the back of the cap with the folding wrench.
3. Remove the J-hook and the wing nut from the
back of the jack access door. Assemble the wing nut and the J-hook.
4. Install the wing nut and the J-hook to the D-ring through the center hole of the tire. 5. Tighten the wing nut to secure the tire to
the floor. Push and pull on the tire to make sure the tire is secure and does not move.
6. Put back all tools as they were stored in the
jack storage compartment and put the compartment cover back on. Slip the tabs on the side of the compartment cover into the cover opening. Push the cover in place and push down the tabs on the cover so that it rests in the groove. This secures the cover in place.
Storing the Flat Tire (Vehicles with a Rear Convenience Center)
A. D-Ring B. Rear Convenience
E. Full-Size Tire F. Cap on Bottom of
Center
Storage Compartment
C. Wing Nut D. J-Hook 1. Open the center storage compartment door of
the rear convenience center.
2. Remove the cap on the bottom of the storage
compartment and flip the D-ring up.
445
3. Lay the tire on top of the center storage compartment with the valve stem down. Make sure you can see the D-ring through the center hole of the tire.
4. Remove the J-hook and the wing nut from the
back of the jack access door. Assemble the wing nut and the J-hook.
5. Install the wing nut and the J-hook to the D-ring through the center hole of the tire. 6. Tighten the wing nut to secure the tire to
the floor. Push and pull on the tire to make sure the tire is secure and does not move.
7. Put back all tools as they were stored in the
jack storage compartment and put the compartment cover back on. Slip the tabs on the side of the compartment cover into the cover opening. Push the cover in place and push down the tabs on the cover so that it rests in the groove. This secures the cover in place.
446
Storing the Flat Tire (Vehicles with a Stowable Seat)
A. Rear Convenience
D. Stowable Seat
Center
B. Full-Size Tire C. D-Ring
Strap
E. Cargo Net Hook F. J-Hook G. Wing Nut
1. If the seatback is not in an upright position,
move it to an upright position.
2. There is a strap attached to each side of the stowable seat. Hook the straps to the cargo net hook in the rear of the vehicle.
3. Flip the D-ring so it is pointing outward. 4. Open the convenience center cover. 5. Stand the full-size tire up, in the tray against
the back of the seat with the valve stem pointing out.
6. Remove the J-hook and the wing nut from the
back of the jack access door. Assemble the wing nut and the J-hook.
7. Install the wing nut and the J-hook to the D-ring through the center hole of the tire.
8. Tighten the wing nut to secure the tire to the
seatback. Push and pull on the tire to make sure the tire is secure and does not move.
9. Put back all tools as they were stored in the
jack storage compartment and put the compartment cover back on. Slip the tabs on the side of the compartment cover into the cover opening. Push the cover in place and push down the tabs on the cover so that it rests in the groove. This secures the cover in place.
Storing the Flat Tire (Vehicles with a Stowable Seatback Folded Flat)
D. J-Hook E. D-Ring
A. Stowable Seat B. Full-Size Tire C. Wing Nut 1. Fold the seatback down and flip the D-ring up. 2. Lay the tire on the seatback with the valve stem pointing up with the center hole of the tire over the D-ring.
447
3. Remove the J-hook and the wing nut from the
back of the jack access door. Assemble the wing nut and the J-hook.
4. Install the wing nut and the J-hook to the D-ring through the center hole of the tire.
5. Tighten the wing nut to secure the tire to the
seatback.
6. Push and pull on the tire to make sure the tire
is secure and does not move.
7. Put back all tools as they were stored in the
jack storage compartment and put the compartment cover back on. Slip the tabs on the side of the compartment cover into the cover opening. Push the cover in place and push down the tabs on the cover so that it rests in the groove. This secures the cover in place.
Storing the Spare Tire and Tools
{CAUTION:
Storing a jack, a tire, or other equipment in the passenger compartment of the vehicle could cause injury. In a sudden stop or collision, loose equipment could strike someone. Store all these in the proper place.
448
{CAUTION:
The underbody-mounted spare tire needs to be stored with the valve stem pointing down. If the spare tire is stored with the valve stem pointing upwards, its secondary latch will not work properly and the spare tire could loosen and suddenly fall from your vehicle. If this happened when your vehicle was being driven, the tire might contact a person or another vehicle, causing injury and, of course, damage to itself as well. Be sure the underbody-mounted spare tire is stored with its valve stem pointing down.
1. Lay the compact spare tire on the ground at the rear of the vehicle. Position the compact spare tire so that the valve stem is pointed down facing the rear of the vehicle.
2. Lower the cable to the ground. See Removing
the Spare Tire and Tools on page 429.
3. Tilt the retainer downward and slip it through
the center hole of the spare tire. Make sure the retainer is fully seated across the underside of the wheel.
4. Attach the folding wrench to the hoist shaft. 5. Turn the folding wrench clockwise to lift
the spare tire.
6. When the tire reaches the stabilizer bar, move the tire over the bar, then continue to turn the folding wrench clockwise to lift the spare tire.
7. When the tire is almost in the stored position, turn the tire so that the valve stem is towards the rear of the vehicle. This will help when you check and maintain tire pressure in the spare.
8. Raise the tire fully against the underside of the
vehicle. Continue turning the folding wrench until you feel more than two clicks. This indicates that the compact spare tire is secure and the cable is tight. The spare tire hoist cannot be overtightened.
449
When you replace the compact spare with a full-size tire, reinstall the bolt-on wheel covers or the center cap, whichever your vehicle has. Tighten them hand tight over the wheel nuts, using the folding wrench.
Compact Spare Tire Although the compact spare tire was fully inflated when your vehicle was new, it can lose air after a time. Check the inflation pressure regularly. It should be 60 psi (420 kPa). After installing the compact spare on your vehicle, you should stop as soon as possible and make sure your spare tire is correctly inflated. The compact spare is made to perform well at speeds up to 65 mph (105 km/h) for distances up to 3,000 miles (5 000 km), so you can finish your trip and have your full-size tire repaired or replaced where you want. Of course, it’s best to replace your spare with a full-size tire as soon as you can. Your spare will last longer and be in good shape in case you need it again.
9. Make sure the tire is stored securely. Push, pull (A), and then try to turn (B) the tire. If the tire moves, use the folding wrench to tighten the cable.
10. Put back all tools as they were stored in
the jack storage compartment and put the compartment cover back on. To put the cover back on, slip the tabs on the side of the cover into the cover opening. Push the cover in place and push down the tabs on the cover so that it rests in the groove. This secures the cover in place.
450
Notice: When the compact spare is installed, do not take your vehicle through an automatic car wash with guide rails. The compact spare can get caught on the rails. That can damage the tire and wheel, and maybe other parts of your vehicle. Do not use your compact spare on other vehicles. And do not mix your compact spare tire or wheel with other wheels or tires. They will not fit. Keep your spare tire and its wheel together. Notice: Tire chains will not fit your compact spare. Using them can damage your vehicle and can damage the chains too. Do not use tire chains on your compact spare.
Appearance Care
Cleaning the Inside of Your Vehicle Your vehicle’s interior will continue to look its best if it is cleaned often. Although not always visible, dust and dirt can accumulate on your upholstery. Dirt can damage carpet, fabric, leather, and plastic surfaces. Regular vacuuming is recommended to remove particles from your upholstery. It is important to keep your upholstery from becoming and remaining heavily soiled. Soils should be removed as quickly as possible. Your vehicle’s interior may experience extremes of heat that could cause stains to set rapidly. Lighter colored interiors may require more frequent cleaning. Use care because newspapers and garments that transfer color to your home furnishings may also transfer color to your vehicle’s interior. When cleaning your vehicle’s interior, only use cleaners specifically designed for the surfaces being cleaned. Permanent damage may result from using cleaners on surfaces for which they were not intended. Use glass cleaner only on glass.
451
If you use abrasive cleaners when
Remove any accidental over-spray from other surfaces immediately. To prevent over-spray, apply cleaner directly to the cleaning cloth. Notice: cleaning glass surfaces on your vehicle, you could scratch the glass and/or cause damage to the integrated radio antenna and the rear window defogger. When cleaning the glass on your vehicle, use only a soft cloth and glass cleaner. Many cleaners contain solvents that may become concentrated in your vehicle’s breathing space. Before using cleaners, read and adhere to all safety instructions on the label. While cleaning your vehicle’s interior, maintain adequate ventilation by opening your vehicle’s doors and windows. Dust may be removed from small buttons and knobs using a small brush with soft bristles. Your dealer has a product for cleaning your vehicle’s glass. Should it become necessary, you can also obtain a product from your dealer to remove odors from your vehicle’s upholstery.
452
Do not clean your vehicle using the following cleaners or techniques: (cid:127) Never use a knife or any other sharp object to
remove a soil from any interior surface.
(cid:127) Never use a stiff brush. It can cause damage
to your vehicle’s interior surfaces. (cid:127) Never apply heavy pressure or rub
aggressively with a cleaning cloth. Use of heavy pressure can damage your interior and does not improve the effectiveness of soil removal.
(cid:127) Use only mild, neutral-pH soaps. Avoid
laundry detergents or dishwashing soaps with degreasers. Using too much soap will leave a residue that leaves streaks and attracts dirt. For liquid cleaners, about 20 drops per gallon (3.78 L) of water is a good guide.
(cid:127) Do not heavily saturate your upholstery while
cleaning.
(cid:127) Damage to your vehicle’s interior may result from the use of many organic solvents such as naptha, alcohol, etc.
4. Continue to gently rub the soiled area until the
cleaning cloth remains clean.
5. If the soil is not completely removed, use a mild soap solution and repeat the cleaning process that was used with plain water. If any of the soil remains, a commercial fabric cleaner or spot lifter may be necessary. When a commercial upholstery cleaner or spot lifter is to be used, test a small hidden area for colorfastness first. If the locally cleaned area gives any impression that a ring formation may result, clean the entire surface. After the cleaning process has been completed, a paper towel can be used to blot excess moisture from the fabric or carpet.
Fabric/Carpet Use a vacuum cleaner with a soft brush attachment frequently to remove dust and loose dirt. A canister vacuum with a beater bar in the nozzle may only be used on floor carpet and carpeted floor mats. For soils, always try to remove them first with plain water or club soda. Before cleaning, gently remove as much of the soil as possible using one of the following techniques: (cid:127) For liquids: gently blot the remaining soil with a
paper towel. Allow the soil to absorb into the paper towel until no more can be removed.
(cid:127) For solid dry soils: remove as much as possible
and then vacuum.
To clean, use the following instructions: 1. Saturate a lint-free, clean white cloth with
water or club soda.
2. Wring the cloth to remove excess moisture. 3. Start on the outside edge of the soil and gently
rub toward the center. Continue cleaning, using a clean area of the cloth each time it becomes soiled.
453
Leather A soft cloth dampened with water may be used to remove dust. If a more thorough cleaning is necessary, a soft cloth dampened with a mild soap solution can be used. Allow the leather to dry naturally. Do not use heat to dry. Never use steam to clean leather. Never use spot lifters or spot removers on leather. Many commercial leather cleaners and coatings that are sold to preserve and protect leather may permanently change the appearance and feel of your leather and are not recommended. Do not use silicone or wax-based products, or those containing organic solvents to clean your vehicle’s interior because they can alter the appearance by increasing the gloss in a non-uniform manner. Never use shoe polish on your leather.
Instrument Panel, Vinyl, and Other Plastic Surfaces A soft cloth dampened with water may be used to remove dust. If a more thorough cleaning is necessary, a clean soft cloth dampened with a mild soap solution can be used to gently remove dust and dirt. Never use spot lifters or removers on plastic surfaces. Many commercial cleaners and coatings that are sold to preserve and protect soft plastic surfaces may permanently change the appearance and feel of your interior and are not recommended. Do not use silicone or wax-based products, or those containing organic solvents to clean your vehicle’s interior because they can alter the appearance by increasing the gloss in a non-uniform manner. Some commercial products may increase gloss on your instrument panel. The increase in gloss may cause annoying reflections in the windshield and even make it difficult to see through the windshield under certain conditions.
454
Care of Safety Belts Keep belts clean and dry.
{CAUTION:
Do not bleach or dye safety belts. If you do, it may severely weaken them. In a crash, they might not be able to provide adequate protection. Clean safety belts only with mild soap and lukewarm water.
Weatherstrips Silicone grease on weatherstrips will make them last longer, seal better, and not stick or squeak. Apply silicone grease with a clean cloth. During very cold, damp weather frequent application may be required. See Recommended Fluids and Lubricants on page 485.
Washing Your Vehicle The paint finish on the vehicle provides beauty, depth of color, gloss retention, and durability. The best way to preserve the vehicle’s finish is to keep it clean by washing it often with lukewarm or cold water. Do not wash the vehicle in the direct rays of the sun. Use a car washing soap. Do not use strong soaps or chemical detergents. Be sure to rinse the vehicle well, removing all soap residue completely. Approved cleaning products can be obtained from your dealer. See Vehicle Care/Appearance Materials on page 460. Do not use cleaning agents that are petroleum based, or that contain acid or abrasives. All cleaning agents should be flushed promptly and not allowed to dry on the surface, or they could stain. Dry the finish with a soft, clean chamois or an all-cotton towel to avoid surface scratches and water spotting. High pressure car washes may cause water to enter the vehicle.
455
Foreign materials such as calcium chloride and other salts, ice melting agents, road oil and tar, tree sap, bird droppings, chemicals from industrial chimneys, etc., can damage the vehicle’s finish if they remain on painted surfaces. Wash the vehicle as soon as possible. If necessary, use non-abrasive cleaners that are marked safe for painted surfaces to remove foreign matter. Exterior painted surfaces are subject to aging, weather, and chemical fallout that can take their toll over a period of years. To help keep the paint finish looking new, keep the vehicle in a garage or covered whenever possible.
Cleaning Exterior Lamps/Lenses Use only lukewarm or cold water, a soft cloth and a car washing soap to clean exterior lamps and lenses. Follow instructions under Washing Your Vehicle on page 455.
Finish Care Occasional waxing or mild polishing of the vehicle by hand may be necessary to remove residue from the paint finish. Approved cleaning products can be obtained from your dealer. See Vehicle Care/Appearance Materials on page 460. Notice: Machine compounding or aggressive polishing on a basecoat/clearcoat paint finish may damage it. Use only non-abrasive waxes and polishes that are made for a basecoat/ clearcoat paint finish on your vehicle. The vehicle has a basecoat/clearcoat paint finish. The clearcoat gives more depth and gloss to the colored basecoat. Always use waxes and polishes that are non-abrasive and made for a basecoat/ clearcoat paint finish.
456
Windshield, Backglass, and Wiper Blades If the windshield is not clear after using the windshield washer, or if the wiper blade chatters when running, wax, sap or other material may be on the blade or windshield. Clean the outside of the windshield with a full-strength glass cleaning liquid. The windshield is clean if beads do not form when you rinse it with water. Grime from the windshield will stick to the wiper blades and affect their performance. Clean the blade by wiping vigorously with a cloth soaked in full-strength windshield washer solvent. Then rinse the blade with water. Check the wiper blades and clean them as necessary; replace blades that look worn.
If you use strong soaps, chemicals,
Aluminum or Chrome-Plated Wheels Your vehicle may have either aluminum or chrome-plated wheels. Keep the wheels clean using a soft clean cloth with mild soap and water. Rinse with clean water. After rinsing thoroughly, dry with a soft clean towel. A wax may then be applied. Notice: abrasive polishes, cleaners, brushes, or cleaners that contain acid on aluminum or chrome-plated wheels, you could damage the surface of the wheel(s). The repairs would not be covered by your warranty. Use only GM-approved cleaners on aluminum or chrome-plated wheels. The surface of these wheels is similar to the painted surface of your vehicle. Do not use strong soaps, chemicals, abrasive polishes, abrasive cleaners, cleaners with acid, or abrasive cleaning brushes on them because you could damage the surface. Do not use chrome polish on aluminum wheels.
457
Notice: Using chrome polish on aluminum wheels could damage the wheels. The repairs would not be covered by your warranty. Use chrome polish on chrome wheels only. Use chrome polish only on chrome-plated wheels, but avoid any painted surface of the wheel, and buff off immediately after application. Notice: If you drive your vehicle through an automatic car wash that has silicone carbide tire cleaning brushes, you could damage the aluminum or chrome-plated wheels. The repairs would not be covered by your warranty. Never drive a vehicle equipped with aluminum or chrome-plated wheels through an automatic car wash that uses silicone carbide tire cleaning brushes. Do not take your vehicle through an automatic car wash that has silicone carbide tire cleaning brushes. These brushes can also damage the surface of these wheels.
Tires To clean the tires, use a stiff brush with tire cleaner. Notice: Using petroleum-based tire dressing products on your vehicle may damage the paint finish and/or tires. When applying a tire dressing, always wipe off any overspray from all painted surfaces on your vehicle.
Sheet Metal Damage If the vehicle is damaged and requires sheet metal repair or replacement, make sure the body repair shop applies anti-corrosion material to parts repaired or replaced to restore corrosion protection. Original manufacturer replacement parts will provide the corrosion protection while maintaining the warranty.
458
Chemical Paint Spotting Some weather and atmospheric conditions can create a chemical fallout. Airborne pollutants can fall upon and attack painted surfaces on the vehicle. This damage can take two forms: blotchy, ring-shaped discolorations, and small, irregular dark spots etched into the paint surface. Although no defect in the paint job causes this, GM will repair, at no charge to the owner, the surfaces of new vehicles damaged by this fallout condition within 12 months or 12,000 miles (20 000 km) of purchase, whichever occurs first.
Finish Damage Any stone chips, fractures or deep scratches in the finish should be repaired right away. Bare metal will corrode quickly and may develop into major repair expense. Minor chips and scratches can be repaired with touch-up materials available from your dealer. Larger areas of finish damage can be corrected in your dealer’s body and paint shop.
Underbody Maintenance Chemicals used for ice and snow removal and dust control can collect on the underbody. If these are not removed, corrosion and rust can develop on the underbody parts such as fuel lines, frame, floor pan, and exhaust system even though they have corrosion protection. At least every spring, flush these materials from the underbody with plain water. Clean any areas where mud and debris can collect. Dirt packed in close areas of the frame should be loosened before being flushed. Your dealer or an underbody car washing system can do this for you.
459
Vehicle Care/Appearance Materials
Description
Usage
Description
Usage
Polishing Cloth Wax-Treated
Tar and Road Oil Remover
Chrome Cleaner and Polish
White Sidewall Tire Cleaner
Vinyl Cleaner
Glass Cleaner
Chrome and Wire Wheel Cleaner
Interior and exterior polishing cloth.
Removes tar, road oil, and asphalt.
Use on chrome or stainless steel.
Removes soil and black marks from whitewalls.
Cleans vinyl.
Removes dirt, grime, smoke and fingerprints.
Removes dirt and grime from chrome wheels and wire wheel covers.
460
Finish Enhancer
Swirl Remover Polish
Cleaner Wax
Foaming Tire Shine Low Gloss
Wash Wax Concentrate
Spot Lifter
Odor Eliminator
Removes dust, fingerprints, and surface contaminants. Spray on and wipe off.
Removes swirl marks, fine scratches, and other light surface contamination.
Removes light scratches and protects finish.
Cleans, shines, and protects in one step. No wiping necessary.
Medium foaming shampoo. Cleans and lightly waxes. Biodegradable and phosphate free.
Quickly removes spots and stains from carpets, vinyl, and cloth upholstery.
Odorless spray odor eliminator used on fabrics, vinyl, leather and carpet.
Vehicle Identification
Vehicle Identification Number (VIN)
This is the legal identifier for your vehicle. It appears on a plate in the front corner of the instrument panel, on the driver’s side. You can see it if you look through the windshield from outside your vehicle. The VIN also appears on the Certification/Tire and Service Parts labels and the certificates of title and registration.
Engine Identification The eighth character in the VIN is the engine code. This code will help you identify your vehicle’s engine, specifications, and replacement parts.
Service Parts Identification Label You will find this label on the inside of the access panel located on the driver’s side of the rear of the vehicle. It is very helpful if you ever need to order parts. On this label, you will find the following: (cid:127) VIN (cid:127) Model designation (cid:127) Paint information (cid:127) Production options and special equipment Do not remove this label from the vehicle.
461
Electrical System
Add-On Electrical Equipment Notice: Do not add anything electrical to your vehicle unless you check with your dealer first. Some electrical equipment can damage your vehicle and the damage would not be covered by your warranty. Some add-on electrical equipment can keep other components from working as they should. Add-on equipment can drain your vehicle’s battery, even if your vehicle is not operating. Your vehicle has an airbag system. Before attempting to add anything electrical to your vehicle, see Servicing Your Airbag-Equipped Vehicle on page 102.
Headlamp Wiring The headlamp wiring is protected by internal fuses in the fuse block. An electrical overload will cause the lamps to go off and remain off. If this happens, have your headlamp wiring checked right away.
Windshield Wiper Fuses The windshield wiper motor is protected by an internal circuit breaker and a fuse. If the motor overheats due to heavy snow, etc., the wiper will stop until the motor cools. If the overload is caused by some electrical problem, be sure to get it fixed.
Power Windows and Other Power Options Circuit breakers in the floor console fuse block protect the power windows and other power accessories. When the current load is too heavy, the circuit breaker opens and closes, protecting the circuit until the problem is fixed.
462
Fuses and Circuit Breakers The wiring circuits in your vehicle are protected from short circuits by a combination of fuses, circuit breakers, and fusible thermal links. Look at the silver-colored band inside the fuse. If the band is broken or melted, replace the fuse. Be sure you replace a bad fuse with a new one of the identical size and rating. If you ever have a problem on the road and do not have a spare fuse, you can borrow one that has the same amperage. Just pick a feature of your vehicle that you can get along without – like the radio or cigarette lighter - and use its fuse, if it is the right amperage. Replace it as soon as you can. There are two fuse blocks in your vehicle: the floor console fuse block and the underhood fuse and relay center.
Floor Console Fuse Block
The floor console fuse block is located to the left of the glove box near the floor. Pull the door open to access the fuse block.
463
Fuse
Usage
10
11
12
13
14
15
16
17
18
19
21
22
24
25
Empty
Turn Signal and Hazard Lamp Flashers
Power Seats
Electronic Level Control (ELC) Compressor
Liftgate and Endgate
Rear Auxiliary Power Outlet
Electronic Level Control (ELC) Compressor Relay and Height Sensor
Heated Mirrors
Power Mirrors
Ignition 1 Module
Turn Signal Switch
Rear Defogger
Airbag Module
TCC Switch
HVAC Blower Motor
Fuse
Usage
464
Empty
Steering Wheel Radio Controls
Power Door Locks
Empty
Empty
Empty
Empty
Empty
Fuse
Usage
Fuse
Usage
26
28
29
30
31
32
34
35
36
37
38
39
40
HVAC Mode and Temperature Motors and Head-Up Display
Accessory Power
Windshield Wipers and Washer
Instrument Panel Cluster, Body Control Module (BCM), PASS-Key® III
Park Lock Ignition Key Solenoid
Rear Window Wiper/Washer
Power Sunroof
Power Windows
Map Lamps, Courtesy Lamps and Instrument Panel Lights
Radio
UQ3 Radio Amplifier
Head-Up Display
Hazard Flashers
41
42
44
46
Instrument Panel Cluster, Climate Control, Security LED and Remote Keyless Entry Mode PASS-Key® III
Body Control Module (BCM)
Automatic Occupant Sensing Module
Relay
Usage
20
23
27
33
43
45
Rear Defogger Relay
Ignition Relay
Accessory Relay
Retained Accessory Power Relay
Accessory Diode
Back-Up Lamps
465
Underhood Fuse Block
Fuse
Usage
Fuel Pump
Air Conditioning Compressor Clutch
Horn
Anti-lock Brake System (ABS)
Engine Control Module (ECM)
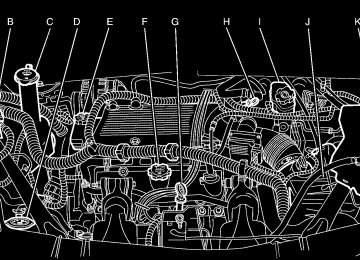
This fuse block is located in the engine compartment, on the passenger’s side of the vehicle. See Engine Compartment Overview on page 364 for more information on location. The back-up lamp relay (A) is located behind and to the left of the underhood fuse block. To remove the cover, press the two tabs in and lift up the cover.
466
Fuse
Usage
Fuse
Usage
10
11
13
14
15
16
17
18
19
20
Powertrain Relay
Powertrain Sensors
Transmission Control Module (TCM)
Anti-lock Brake System (ABS) Solenoids Valves
Oxygen Sensor/MAF Sensor
Fuel Injectors (Even)
Fuel Injectors (Odd)
Daytime Running Lamps (DRL)
Passenger’s Low-Beam Headlamp
Transmission
Driver’s Low-Beam Headlamp
Driver’s High-Beam Headlamp
Ignition Switch Battery Power
Parking Lamps
21
23
24
25
26
27
28
29
30
31
32
33
34
35
38
Engine Control Module (ECM)
Passenger’s High-Beam Headlamp
Vent Solenoids
DVD
Front Fog Lamps
Ignition Relay
Body Control Module (BCM)
S-Band
Not Used
Cruise Control Front Power Outlets/Lights, OnStar®
Automatic Transaxle Shift Lock Control System
Starter Solenoid Battery Fuse
Anti-lock Brake System (ABS) Motor
Engine Cooling Fan 2
467
Fuse
Usage
Relay
Usage
39
40
41
44
46
47
Engine Cooling Fan 1
Main Battery Fuse for Retained Accessory Power Relay and Accessory Relay
Main Battery Fuse for Heated Seats, Air Conditioning, Defogger
Main Battery Fuse for Power Outlets, Level Control, Power Seats, Mirrors, and Body Computer
Main Battery Fuse for Climate Control Blower and Ignition 3 Relay
Main Battery Fuse for Ignition Switch, Radio, Heads-Up Display (HUD), Remote Keyless Entry (RKE), Instrument Cluster, Air Conditioning, and Body Computer
70 § Diode for Air Conditioning § 71
Compressor Clutch
Diode for Ignition
49
50
51
52
53
54
55
56
57
58
59
60
61
62
Horn
Fuel Pump
Air Conditioning Clutch
Daytime Running Lamps (DRL)
Low-Beam Headlamps
Parking Lamps
High-Beam Headlamps
Fog Lamps
Starter Relay
Cooling Fan Series/Parallel
Powertrain
Cooling Fan 2
Cooling Fan 1
Ignition
468
Capacities and Specifications The following approximate capacities are given in English and metric conversions. See Recommended Fluids and Lubricants on page 485 for more information.
Application
English
Metric
Capacities
Air Conditioning Refrigerant R134a
Automatic Transaxle (Pan Removal and Replacement)
Cooling System
Engine Oil with Filter
Fuel Capacity
Wheel Nut Torque
For the air conditioning system refrigerant charge amount, see the refrigerant caution label located
under the hood. See your dealer for more
information.
7.4 qt
11.3 qt
4.0 qt
18.0 gal
100 ft lb
7.0 L
10.7 L
3.8 L
68.1 L 140 Y
Engine Specifications
Engine
3.5L V6
VIN Code
Transaxle
Automatic
Spark Plug Gap
0.060 inches (1.52 mm)
469
✍ NOTES
470
Section 6
Maintenance Schedule
Maintenance Schedule ................................ 472
Introduction ............................................... 472
Maintenance Requirements ........................ 472
Your Vehicle and the Environment ............ 473
Using the Maintenance Schedule ............... 473
Scheduled Maintenance ............................. 475
Additional Required Services ..................... 478
Maintenance Footnotes .............................. 479Owner Checks and Services ..................... 480
At Each Fuel Fill ....................................... 481
At Least Once a Month ............................. 481
At Least Once a Year ............................... 482
Recommended Fluids and Lubricants ........ 485
Normal Maintenance Replacement Parts ... 486
Engine Drive Belt Routing ......................... 487
Maintenance Record .................................. 488471
Maintenance Schedule
Introduction Important: Keep engine oil at the proper level and change as recommended.
Maintenance Requirements Notice: Maintenance intervals, checks, inspections, replacement parts, and recommended fluids and lubricants as prescribed in this manual are necessary to keep your vehicle in good working condition. Any damage caused by failure to follow scheduled maintenance may not be covered by warranty.
Have you purchased the GM Protection Plan? The Plan supplements your new vehicle warranties. See your Warranty and Owner Assistance booklet or your dealer for details.
472
Your Vehicle and the Environment Proper vehicle maintenance not only helps to keep your vehicle in good working condition, but also helps the environment. All recommended maintenance is important. Improper vehicle maintenance can even affect the quality of the air we breathe. Improper fluid levels or the wrong tire inflation can increase the level of emissions from your vehicle. To help protect our environment, and to keep your vehicle in good condition, be sure to maintain your vehicle properly.
Using the Maintenance Schedule We at General Motors want to help you keep your vehicle in good working condition. But we do not know exactly how you will drive it. You may drive very short distances only a few times a week. Or you may drive long distances all the time in very hot, dusty weather. You may use your vehicle in making deliveries. Or you may drive it to work, to do errands, or in many other ways. Because of all the different ways people use their vehicles, maintenance needs vary. You may need more frequent checks and replacements. So please read the following and note how you drive. If you have any questions on how to keep your vehicle in good condition, see your GM Goodwrench® dealer.
473
This schedule is for vehicles that: (cid:127) carry passengers and cargo within
recommended limits. You will find these limits on the Tire and Loading Information label. See Loading Your Vehicle on page 332.
(cid:127) are driven on reasonable road surfaces within
legal driving limits.
(cid:127) use the recommended fuel. See Gasoline
Octane on page 356.
The services in Scheduled Maintenance on page 475 should be performed when indicated. See Additional Required Services on page 478 and Maintenance Footnotes on page 479 for further information.
{CAUTION:
Performing maintenance work on a vehicle can be dangerous. In trying to do some jobs, you can be seriously injured. Do your own maintenance work only if you have the required know-how and the proper tools and equipment for the job. If you have any doubt, see your GM Goodwrench® dealer to have a qualified technician do the work. See Doing Your Own Service Work on page 355.
Some maintenance services can be complex. So, unless you are technically qualified and have the necessary equipment, you should have your GM Goodwrench® dealer do these jobs. When you go to your GM Goodwrench® dealer for your service needs, you will know that GM-trained and supported service technicians will perform the work using genuine GM parts.
474
If you want to purchase service information, see Service Publications Ordering Information on page 510. Owner Checks and Services on page 480 tells you what should be checked, when to check it, and what you can easily do to help keep your vehicle in good condition. The proper replacement parts, fluids, and lubricants to use are listed in Recommended Fluids and Lubricants on page 485 and Normal Maintenance Replacement Parts on page 486. When your vehicle is serviced, make sure these are used. All parts should be replaced and all necessary repairs done before you or anyone else drives the vehicle. We recommend the use of genuine GM parts.
Scheduled Maintenance When the CHANGE ENGINE OIL message comes on, it means that service is required for your vehicle. Have your vehicle serviced as soon as possible within the next 600 miles (1 000 km). It is possible that, if you are driving under the best conditions, the engine oil life system may not indicate that vehicle service is necessary for over a year. However, your engine oil and filter must be changed at least once a year and at this time the system must be reset. Your GM Goodwrench® dealer has GM-trained service technicians who will perform this work using genuine GM parts and reset the system.
475
If the engine oil life system is ever reset accidentally, you must service your vehicle within 3,000 miles (5 000 km) since your last service. Remember to reset the oil life system whenever the oil is changed. See Engine Oil Life System on page 368 for information on the Engine Oil Life System and resetting the system. When the CHANGE ENGINE OIL message appears, certain services, checks, and inspections are required. Required services are described in the following for “Maintenance I” and “Maintenance II.” Generally, it is recommended that your first service be Maintenance I, your second service be Maintenance II, and that you alternate Maintenance I and Maintenance II thereafter. However, in some cases, Maintenance II may be required more often.
Maintenance I — Use Maintenance I if the CHANGE ENGINE OIL message comes on within 10 months since the vehicle was purchased or Maintenance II was performed. Maintenance II — Use Maintenance II if the previous service performed was Maintenance I. Always use Maintenance II whenever the message comes on 10 months or more since the last service or if the message has not come on at all for one year.
476
Scheduled Maintenance
Service
Maintenance I Maintenance II
Change engine oil and filter. See Engine Oil on page 365. Reset oil life system. See Engine Oil Life System on page 368. An Emission Control Service. Visually check for any leaks or damage. See footnote (j). Inspect engine air cleaner filter. If necessary, replace filter. See Engine Air Cleaner/Filter on page 370. See footnote (l). Rotate tires and check inflation pressures and wear. See Tire Inspection and Rotation on page 416 and “Tire Wear Inspection” in At Least Once a Month on page 481. Inspect brake system. See footnote (a). Check engine coolant and windshield washer fluid levels and add fluid as needed. Perform any needed additional services. See “Additional Required Services” in this section. Inspect suspension and steering components. See footnote (b). Inspect engine cooling system. See footnote (c). Inspect wiper blades. See footnote (d). Inspect restraint system components. See footnote (e). Lubricate body components. See footnote (f). Check transaxle fluid level and add fluid as needed. Inspect throttle system. See footnote (j). Replace passenger compartment air filter. See footnote (k).
•
•
•
•
•
•
•
•
•
•
•
•
•
• • • • • • • •
477
Additional Required Services The following services should be performed at the first maintenance service (I or II) after the indicated miles (kilometers) shown for each item.
Service and Miles (Kilometers)
Additional Required Services 75,000
25,000
(40 000)50,000
(80 000)(120 000)
100,000
(160 000)125,000
(200 000)150,000
(240 000)Inspect fuel system for damage or leaks. Inspect exhaust system for loose or damaged components. Replace engine air cleaner filter. See Engine Air Cleaner/Filter on page 370. Change automatic transaxle fluid and filter (severe service). See footnote (h). Change automatic transaxle fluid and filter (normal service). Replace spark plugs and inspect spark plug wires. An Emission Control Service. Engine cooling system service (or every five years, whichever occurs first). An Emission Control Service. See footnote (i). Inspect engine accessory drive belt. An Emission Control Service. See footnote (m).
478
•
•
•
•
•
•
•
•
•
•
•
•
•
•
•
•
•
•
•
•
•
•
Maintenance Footnotes (a) Visually inspect brake lines and hoses for proper hook-up, binding, leaks, cracks, chafing, etc. Inspect disc brake pads for wear and rotors for surface condition. Inspect other brake parts, including calipers, parking brake, etc. Check parking brake adjustment. (b) Visually inspect front and rear suspension and steering system for damaged, loose, or missing parts or signs of wear. Inspect power steering lines and hoses for proper hook-up, binding, leaks, cracks, chafing, etc. (c) Visually inspect hoses and have them replaced if they are cracked, swollen, or deteriorated. Inspect all pipes, fittings and clamps; replace with genuine GM parts as needed. To help ensure proper operation, a pressure test of the cooling system and pressure cap and cleaning the outside of the radiator and air conditioning condenser is recommended at least once a year.
(d) Visually inspect wiper blades for wear or cracking. Replace wiper blades that appear worn or damaged or that streak or miss areas of the windshield. (e) Make sure the safety belt reminder light and all your belts, buckles, latch plates, retractors, and anchorages are working properly. Look for any other loose or damaged safety belt system parts. If you see anything that might keep a safety belt system from doing its job, have it repaired. Have any torn or frayed safety belts replaced. Also look for any opened or broken airbag coverings, and have them repaired or replaced. The airbag system does not need regular maintenance. (f) Lubricate all key lock cylinders, hood latch assemblies, secondary latches, pivots, spring anchor and release pawl, hood and door hinges, rear folding seats, and liftgate hinges. More frequent lubrication may be required when exposed to a corrosive environment. Applying silicone grease on weatherstrips with a clean cloth will make them last longer, seal better, and not stick or squeak.
479
(h) Change automatic transaxle fluid and filter if the vehicle is mainly driven under one or more of these conditions:
− In heavy city traffic where the outside
temperature regularly reaches 90°F (32°C) or higher.
− In hilly or mountainous terrain. − When doing frequent trailer towing. − Uses such as found in taxi, police, or delivery
service.
(i) Drain, flush, and refill cooling system. This service can be complex; you should have your dealer perform this service. See Engine Coolant on page 375 for what to use. Inspect hoses. Clean radiator, condenser, pressure cap, and filler neck. Pressure test the cooling system and pressure cap. (j) Check system for interference or binding and for damaged or missing parts. Replace parts as needed. Replace any components that have high effort or excessive wear. Do not lubricate accelerator or cruise control cables.
(k) If you drive regularly under dusty conditions, the filter may require replacement more often. (l) If you drive regularly under dusty conditions, inspect the filter at each engine oil change. (m) Visually inspect belt for fraying, excessive cracks, or obvious damage. Replace belt if necessary.
Owner Checks and Services These owner checks and services should be performed at the intervals specified to help ensure the safety, dependability, and emission control performance of your vehicle. Your GM Goodwrench® dealer can assist you with these checks and services. Be sure any necessary repairs are completed at once. Whenever any fluids or lubricants are added to your vehicle, make sure they are the proper ones, as shown in Recommended Fluids and Lubricants on page 485.
480
At Least Once a Month Tire Inflation Check Visually inspect your vehicle’s tires and make sure they are inflated to the correct pressures. Do not forget to check the spare tire. See Inflation - Tire Pressure on page 413. Check to make sure the spare tire is stored securely. See Changing a Flat Tire on page 428. Tire Wear Inspection Tire rotation may be required for high mileage highway drivers prior to the Engine Oil Life System service notification. Check the tires for wear and, if necessary, rotate the tires. See Tire Inspection and Rotation on page 416.
It is important to check your oil
At Each Fuel Fill It is important to perform these underhood checks at each fuel fill. Engine Oil Level Check Check the engine oil level and add the proper oil if necessary. See Engine Oil on page 365 for further details. Notice: regularly and keep it at the proper level. Failure to keep your engine oil at the proper level can cause damage to your engine not covered by your warranty. Engine Coolant Level Check Check the engine coolant level and add DEX-COOL® coolant mixture if necessary. See Engine Coolant on page 375 for further details. Windshield Washer Fluid Level Check Check the windshield washer fluid level in the windshield washer fluid reservoir and add the proper fluid if necessary.
481
3. Try to start the engine in each gear. The vehicle should start only in PARK (P) or NEUTRAL (N). If the vehicle starts in any other position, contact your GM Goodwrench® dealer for service.
At Least Once a Year Starter Switch Check
{CAUTION:
When you are doing this inspection, the vehicle could move suddenly. If the vehicle moves, you or others could be injured.
1. Before you start, be sure you have enough
room around the vehicle.
2. Firmly apply both the parking brake and the
regular brake. See Parking Brake on page 135. Do not use the accelerator pedal, and be ready to turn off the engine immediately if it starts.
482
Automatic Transaxle Shift Lock Control System Check
{CAUTION:
When you are doing this inspection, the vehicle could move suddenly. If the vehicle moves, you or others could be injured.
Ignition Transaxle Lock Check While parked, and with the parking brake set, try to turn the ignition to OFF in each shift lever position. (cid:127) The ignition should turn to OFF only when the
shift lever is in PARK (P).
(cid:127) The ignition key should come out only in OFF. Contact your GM Goodwrench® dealer if service is required.
1. Before you start, be sure you have enough
room around the vehicle. It should be parked on a level surface.
2. Firmly apply the parking brake. See Parking
Brake on page 135. Be ready to apply the regular brake immediately if the vehicle begins to move.
3. With the engine off, turn the ignition to ON,
but do not start the engine. Without applying the regular brake, try to move the shift lever out of PARK (P) with normal effort. If the shift lever moves out of PARK (P), contact your GM Goodwrench® dealer for service.
483
Parking Brake and Automatic Transaxle Park (P) Mechanism Check
{CAUTION:
When you are doing this check, your vehicle could begin to move. You or others could be injured and property could be damaged. Make sure there is room in front of your vehicle in case it begins to roll. Be ready to apply the regular brake at once should the vehicle begin to move.
Park on a fairly steep hill, with the vehicle facing downhill. Keeping your foot on the regular brake, set the parking brake. (cid:127) To check the parking brake’s holding ability:
With the engine running and transaxle in NEUTRAL (N), slowly remove foot pressure from the regular brake pedal. Do this until the vehicle is held by the parking brake only.
(cid:127) To check the PARK (P) mechanism’s holding
ability: With the engine running, shift to PARK (P). Then release the parking brake followed by the regular brake.
Contact your GM Goodwrench® dealer if service is required. Underbody Flushing Service At least every spring, use plain water to flush any corrosive materials from the underbody. Take care to clean thoroughly any areas where mud and other debris can collect.
484
Recommended Fluids and Lubricants Fluids and lubricants identified below by name, part number, or specification may be obtained from your dealer.
Usage
Engine Oil
Engine Coolant
Hydraulic Brake
System
Windshield
Washer
Fluid/Lubricant Engine oil which meets GM Standard GM6094M and displays the American Petroleum Institute Certified for Gasoline Engines starburst symbol. GM Goodwrench® oil meets all the requirements for your vehicle. To determine the proper viscosity for your vehicle’s engine, see Engine Oil on page 365. 50/50 mixture of clean, drinkable water and use only DEX-COOL® Coolant. See Engine Coolant on page 375. Delco® Supreme 11 Brake Fluid or equivalent DOT-3 brake fluid.
GM Optikleen® Washer Solvent.
Usage
Power Steering
System
Automatic Transaxle
Key Lock Cylinders
Fluid/Lubricant GM Power Steering Fluid (GM Part No. U.S. 89021184, in Canada 89021186). DEXRON®-VI Automatic Transmission Fluid. Multi-Purpose Lubricant, Superlube (GM Part No. U.S. 12346241, in Canada 10953474).
Hood Latch Assembly, Secondary
Latch, Pivots, Spring Anchor, and Release
Pawl
Hood and Door
Hinges and Rear Folding
Seat
Weatherstrip Conditioning
Lubriplate Lubricant Aerosol (GM Part No. U.S. 12346293, in Canada 992723) or lubricant meeting requirements of NLGI #2, Category LB or GC-LB.
Multi-Purpose Lubricant, Superlube (GM Part No. U.S. 12346241, in Canada 10953474).
Weatherstrip Lubricant (GM Part No. U.S. 3634770, in Canada 10953518) or Dielectric Silicone Grease (GM Part No. U.S. 12345579, in Canada 992887).
485
Normal Maintenance Replacement Parts Replacement parts identified below by name, part number, or specification can be obtained from your GM dealer.
Part
GM® Part Number
ACDelco® Part Number
Engine Air Cleaner/Filter Engine Oil Filter Passenger Compartment Air Filter Kit Spark Plugs Windshield Wiper Blades (Hook Type)
Driver’s Side – 24.0 inches (60.0 cm) Passenger’s Side – 22.0 inches (55.0 cm) Rear Wiper Blade – 15.7 inches (40.0 cm)
10354942
25010792
10322538
1256838710413111
10317151
10324491A1208C
PF47
CF123
41-101— — —
486
Engine Drive Belt Routing
3.5L V6 Engine
487
Maintenance Record After the scheduled services are performed, record the date, odometer reading, who performed the service, and the type of services performed in the boxes provided. See Maintenance Requirements on page 472. Any additional information from Owner Checks and Services on page 480 can be added on the following record pages. You should retain all maintenance receipts.
Date
Odometer Reading
Serviced By
Maintenance I or Maintenance II
Services Performed
Maintenance Record
488
Date
Odometer Reading
Serviced By
Maintenance I or Maintenance II
Services Performed
Maintenance Record (cont’d)
489
Date
Odometer Reading
Serviced By
Maintenance I or Maintenance II
Services Performed
Maintenance Record (cont’d)
490