- 2013 Volvo S60 Owners Manuals
- Volvo S60 Owners Manuals
- 2004 Volvo S60 Owners Manuals
- Volvo S60 Owners Manuals
- 2012 Volvo S60 Owners Manuals
- Volvo S60 Owners Manuals
- 2006 Volvo S60 Owners Manuals
- Volvo S60 Owners Manuals
- 2003 Volvo S60 Owners Manuals
- Volvo S60 Owners Manuals
- 2007 Volvo S60 Owners Manuals
- Volvo S60 Owners Manuals
- 2001 Volvo S60 Owners Manuals
- Volvo S60 Owners Manuals
- 2005 Volvo S60 Owners Manuals
- Volvo S60 Owners Manuals
- 2008 Volvo S60 Owners Manuals
- Volvo S60 Owners Manuals
- 2011 Volvo S60 Owners Manuals
- Volvo S60 Owners Manuals
- 2002 Volvo S60 Owners Manuals
- Volvo S60 Owners Manuals
- 2009 Volvo S60 Owners Manuals
- Volvo S60 Owners Manuals
- Download PDF Manual
-
10
7.5
17. Driver's side front foglight (option) 7.5
18. Passenger's side front foglight (option) 19. 20. 10
21. Transmission control module, reverse gear block (M66) 22. Driver's side high beam 10
10
23. Passenger's side high beam 24. 25. 26. 27. 28. Power passenger's seat (option), audio system 29. 30. 31. 32. 33. Vacuum pump 20
15
34. Windshield washer pump, headlight wipers (S60 R) 35. 36.pg. 193 Maintenance and servicing
Fuses
Fuse box on the edge of the dashboard Fuses are located inside the access panel on the edge of the dashboard. There are also a number of spare fuses.
No. 1. Power driver's seat (option) 2. Power passenger's seat (option) 3. Climate system blower 4. Control module - front passenger's door 5. Control module - driver's door 6. Ceiling lighting, upper electrical control module 7. Moon roof (option) 8. Ignition switch, SRS system, engine control module, immobilizer, transmission control module (R- models) 9. Onboard diagnostics, headlight switch, steering wheel angle sensor, steering wheel control module 10. Audio system 11. Audio system amplifier 12. Navigation system display (option) 13. 14. 15. 16. 17. 18. 19. 20. 21. 22. 23. 24. 25. 26. 27. 28.
Amperage 25
25
30
25
25
10
157.5
20
30
1029. 30. 31. 32. 33. 34. 35. 36. 37. 38.
pg. 194 Maintenance and servicing
Fuses
Fuses in the trunk The fuses in the cargo area are located behind the panel on the driver's side of the cargo compartment. When replacing a blown fuse, be sure to replace it with a new one of the same color and amperage (written on the fuse).
No. Amperage 1. Backup lights 10
2. Parking lights, foglights, cargo area lighting, license plate lighting, brake lights 20
3. Accessory control module 15
4. 10
5. Rear Electronic Module 6. CD-changer (option), Navigation system (option) 7.5
15
7. Trailer wiring (30-feed) 15
8. 12-volt socket - cargo area 9. Rear passenger's side door - power window, power window cutout function 20
20
10. Rear driver's side door - power window, power window cutout function 11. 12. 13.- 14. 15. 16. 17. Accessory audio 18. 15
19. Folding head restraints 20
20. Trailer wiring (15-feed) 21. 22. 7.5
23. All Wheel Drive 15
24. Four-C chassis system (option) 25. 26. Park assist (option) 30
27. Main fuse: trailer wiring, Four-C, park assist, All Wheel Drive 15
28. Central locking system 29. Driver's side trailer lighting: parking lights, turn signal 25
30. Passenger's side trailer lighting: parking light, brake light, fog light, turn signal 25
40
31. Main fuse: fuses 37 and 38
32. 33. 34.pg. 195 Maintenance and servicing
Fuses
No. 35. 36. 37. Heated rear window 20
38. Heated rear window 20Amperage
pg. 196 Maintenance and servicing
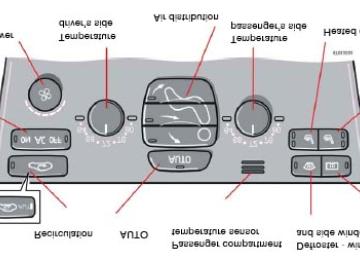
This page left intentionally blank.
Contents | Top of Page
2 0 0 7
VOLVOS60
Specifications
pg. 197 Specifications
Label information 198
Dimensions and weights 200
Capacities 202
Engine oil 203
Fluids and cooling system 204
Three way catalytic converter 205
206
Suspension Electrical system 207
209
Engine specifications Volvo programs 210All specifications are subject to change without prior notice.
pg. 198 Specifications
Label information
pg. 199 Specifications
Label information
1. Model plate Vehicle Identification Number (VIN). Codes for color and upholstery, etc.
2. Child safety lock labels1
3. Federal Motor Vehicle Safety Standards (FMVSS) specifications (USA) and Ministry of Transport (CMVSS) standards (Canada) Your Volvo is designed to meet all applicable safety standards, as evidenced by the certification label on the facing side of the driver's door. For further information regarding these regulations, please consult your Volvo retailer.
4. Loads and Tire Pressures The appearance of the decal will vary, depending on the market for which the vehicle is intended.
Canadian models: upper decal U.S. models: lower decal
5. Vehicle Identification Number (VIN) The VIN plate is located on the top left surface of the dashboard. The VIN is also stamped on the right hand door pillar. The Vehicle Identification Number (VIN) should always be quoted in all correspondence concerning your vehicle with the retailer and when ordering parts.
6. Vehicle Emission Control Information/ Vacuum hose routing Your Volvo is designed to meet all applicable emission standards, as evidenced by the certification label on the underside of the hood. For further information regarding these regulations, please consult your Volvo retailer.
1. Not on vehicles equipped with the optional power child safety locks.
pg. 200 Specifications
Dimensions and weights
Dimensions
Width
Height
Length
180 in. (458 cm) S60R - 181.7 in. (462 cm) 71 in. (180 cm) S60R - 71 in. (180 cm) 56.2 in. (143 cm) S60R - 55.7 in. (142 cm) 107 in. (272 cm) 61.5 in. (156 cm) 61.4 in. (156 cm) 35.4-38.7 ft. (10.8-11.8 m) S60R: 42.7 ft (13 m) Cargo capacity, trunk SAE V1 - 13.9 (394)
Wheelbase Front track Rear track
Turning circle
Max. loads
220 lbs (100 kg)
Max. roof load Max. trailer weight: - without brakes 1650 lbs (750 kg) - with brakes, 2" ball1
3300 lbs (1500 kg) 2000 lbs (900 kg) - with brakes, 1 7/8" ball Max. tongue weight: 165 lbs (75 kg) Trailer weights below 2,650 lbs (1,200 kg) 110 lbs (50 kg) Trailer weights above 2,650 lbs (1,200 kg) 165 lbs (75 kg)1. When driving for prolonged periods at temperatures above 86 °F (30 °C), the maximum recommended weight is 2000 lbs (900 kg).
See also page 131 for additional information.
WARNING!
When adding accessories, equipment, luggage and other cargo to your vehicle, the total capacity weight must not be exceeded.
pg. 201 Specifications
Dimensions and weights
Weights AWD = All Wheel Drive Gross vehicle weight1
USA 4430 lbs 5-cyl. turbo manual 4470 lbs 5-cyl. turbo automatic 5-cyl turbo AWD automatic 4540 lbs 5-cyl turbo AWD-R manual/automatic 4540 lbs Capacity weight 5-cyl. turbo 5 cyl. turbo AWD 5 cyl. turbo AWD-R Permissible axle weights, front1
5-cyl. turbo 5-cyl. turbo AWD automatic 5-cyl. turbo AWD-R manual 5-cyl. turbo AWD-R automatic Permissible axle weights, rear1
5-cyl., 5-cyl. turbo 5-cyl. turbo AWD, AWD-R Curb weight 5-cyl. turbo2400 lbs 2420 lbs 2400 lbs 2420 lbs
870 lbs 805 lbs 770 Ibs
2220 lbs 2310 lbs
Canada 2010 kg 2030 kg 2060 kg 2060 kg
395 kg 365 kg 350 kg
1090 kg 1100 kg 1090 kg 1100 kg
1010 kg 1050 kg
3430-3505 lbs 1545-1580 kg
5-cyl. turbo AWD 5-cyl. turbo AWD-R
3560-3595 lbs 1620-1640 kg 3660-3735 lbs 1680-1700 kg
1. Permissible axle weight or gross vehicle weight must never be exceeded.
pg. 202 Specifications
Capacities
Fuel tank: 18 US gal. (68 liters)
Transmission fluid 2.1 US qts. (2.0 liters) Manual (M 66) Automatic (AW 55-50) 7.6 US qts. (7.2 liters) Automatic (TF-80SC) S60 R 7.4 US qts (7.0 liters)
Miscellaneous Power steering 0.9 US qts. (0.9 liters) Windshield washer reservoir 4.8 US qts. (4.5 liters) 0.69 US qts. (0.65 liters) Brake and clutch fluid Air conditioning system 2.2 lbs. (1 kg) R 134a Windshield washer reservoir 6.8 US qts (6.4 liters)
S60 R 4.8 US qts (4.5 liters)
pg. 203 Specifications
Engine oil
Engine oil Engine oil must meet the minimum ILSAC specification GF-3, API SL, and ACEA A1/ B1. Lower quality oils may not offer the same fuel economy, engine performance, or engine protection.
Volvo recommends
Volume Engine designation Volume between MIN-MAX on dipstick Volume1
B5254T4
B5254T2
B5244T51.3 US qts (1.2 liters)
5.8 US qts. (5.5 liters)
1. Including filter replacement
pg. 204 Specifications
Fluids and cooling system
Fluids Transmission1
Oil grade Manual: Automatic: AW5 TF-80SC (S60R)MTF 97309
JWS 3309
JWS 3309Different types of oil should never be mixed.
Power steering Grade: Volvo synthetic power steering fluid (Pentosin CHF 11S) P/N 1161529 or equivalent.
Brake fluid Fluid type: DOT 4+ boiling point >536°F (280°C).
Cooling system Type Positive pressure, closed system. Coolant Volvo original coolant/ antifreeze Volume 9.3 US qts (8.8 liters)
The thermostat begins to open at 194°F (90°C).
1. The transmission oil does not normally need to be changed during the service life of the vehicle. However, it may be necessary to replace the oil if the vehicle is often driven in areas of sustained temperature extremes (hot or cold), when towing a trailer over long distances, for prolonged driving in mountainous areas, or if the vehicle is often driven short distances in temperatures under 40°F (5°C).
pg. 205 Specifications
Three way catalytic converter
Three-way catalytic converter cautions
Keep your engine properly tuned. Certain engine malfunctions, particularly involving the electrical, fuel or
distributor ignition systems, may cause unusually high three-way catalytic converter temperatures. Do not continue to operate your vehicle if you detect engine misfire, noticeable loss of power or other unusual operating conditions, such as engine overheating or backfiring. A properly tuned engine will help avoid malfunctions that could damage the three- way catalytic converter.
Do not park your vehicle over combustible materials, such as grass or leaves, which can come into contact with the
hot exhaust system and cause such materials to ignite under certain wind and weather conditions.
Excessive starter cranking (in excess of one minute), or an intermittently firing or flooded engine can cause three-
way catalytic converter or exhaust system overheating.
Remember that tampering or unauthorized modifications to the engine, the Electronic Control Module, or the vehicle
may be illegal and can cause three-way catalytic converter or exhaust system overheating. This includes: - Altering fuel injection setting or components. - Altering emission system components or location or removing components. - Repeated use of leaded fuel.
NOTE: Unleaded fuel is required for vehicles with three-way catalytic converters.
pg. 206 Specifications
Suspension
Rear suspension Individual rear wheel suspension with longitudinal support arms, double link arms and track rods.
Front suspension Spring strut suspension with integrated shock absorbers and control arms linked to the support frame. Power-assisted rack and pinion steering. Safety type steering column.
pg. 207 Specifications
Electrical system
Socket
W5W
Type H9 65W H11 55W
Bulbs Bulbs High beam Low beam D1S Active Bi-Xenon headlight (option) 65W
Front foglights H1 55
Front foglights (S60 R) H3 55W Front/rear parking lights, front side marker lights, rear footwell lighting, license plate lighting Front/rear turn signals (amber) Side turn signals Brake lights, backup lights, rear foglight Rear parking light Rear parking light Rear side marker light License plate lighting Front footwell lighting, cargo area lighting Vanity mirror1.2W
C5W
P21W BA15s
P21/4W BAZ15d R5W BA15s R10W BA15s SV8.5
WW5SV8.5
SV5.5
PY21W BAU15s WY5W W2.1x9.5d
W2.1x9.5d
WARNING!
Active Bi-Xenon headlights (option) - due to the high voltage used by these headlights, these bulbs should only be replaced by an authorized Volvo service technician.
pg. 208 Specifications
Electrical system
12-volt system with voltage controlled generator. Single wire system in which the chassis and engine block are used as conductors, grounded on the chassis.
Battery Voltage: 12 V Cold start capacity (CCA): 600 A Reserve capacity (RC): 115 min Capacity (Ah): 70
If you must replace your battery, be sure to replace it with a battery of the same cold start capacity and reserve capacity as the original (See the decal on the battery).Generator Max. current: 140 A
Starter motor Power: 1.4 kW
Spark plugs P/N272313-8 or equivalent Gap: 0.028-0.032 in. (0.7-0.8 mm) Tightening torque: 22 ft. lbs. (30 Nm) Firing order: 1-2-4-5-3
WARNING!
The distributor ignition system operates at very high voltages. Special safety precautions must be followed to prevent injury. Always turn the ignition off when:
Replacing distributor ignition components e.g. plugs, coil, etc. Do not touch any part of the distributor ignition system while the engine is running. This may result in unintended
movements and body injury.
pg. 209 Specifications
Engine specifications
Engine designation
B5254T2
154/83
208/5000
320/25-75Specification Output (kW/rps) Output(hp/rpm) Torque (Nm/rps) Torque(ft. lbs./rpm) No. of cylinders Bore (in./mm) Stroke (in./mm) Cylinder displacement (l) 2.4 (146.5 cu in) 2.52 (153.8) Compression ratio
B5244T5
191/92
257/5500
330/42-87
258/2100-5000 236/1500-4500 295/1950-52502
3.19/81
3.67/93.23.27/83
3.67/93.2
2.52 (153.8) 8.5:1B5254T4
220/921
300/55001
400/31-9523.19/81
3.67/93.28.5:1
9.0:1
1. Automatic transmission: 220 kW at 100 rps, 300 hp at 6000 rpm. 2. Automatic transmission: 350Nm at 32-100 rps, 258 ft. lbs at 1850-6000 rpm.
Charge air cooler (Intercooler) Turbocharged engines employ a turbocompressor to force air into the engine inlet manifold and a charge air cooler to cool the compressed inlet air. The resulting increase in air flow raises pressure in the intake manifold and increases engine power over that developed by the normally-aspirated engine. The charge air cooler (which resembles a radiator) is located between the turbo-compressor and inlet manifold.
Fuel system The engine is equipped with a multiport fuel injection system.
pg. 210 Specifications
Volvo programs
Volvo On Call Roadside Assistance Your new Volvo comes with a four year ON CALL roadside assistance. Additional information, features, and benefits are described in a separate information package in your glove compartment. If you have misplaced your package, dial: In the U.S.A.: 1-800-638-6586 (1-800-63-VOLVO) In Canada: 1-800-263-0475
Technician certification In addition to Volvo factory training, Volvo supports certification by the National Institute for Automotive Service Excellence (A.S.E.). Certified technicians have demonstrated a high degree of competence in specific areas. Besides passing exams, each technician must also have worked in the field for two or more years before a certificate is issued. These professional technicians are best able to analyze vehicle problems and perform the necessary service procedures to keep your Volvo at peak operating condition.
Contents | Top of Page
2 0 0 7
VOLVOS60
Audio
pg. 211 Audio
Introduction 212
Audio system HU-650 - overview 213
Audio system HU-850 - overview 214
Radio functions HU-650/HU-850
215
RBDS functions HU-650/HU-850
220
HU-650 - CD player 223
HU-850 - internal CD changer 224
External CD changer (option) 225
Dolby Surround Pro Logic II - HU-850 only 226
Audio systems - specifications 228
HomeLink® Universal Transceiver (option) 229pg. 212 Specifications
Introduction
The audio system in your vehicle is operated with the buttons and knobs in the system's front panel. Certain functions, such as adjusting the volume, changing radio stations or tracks on a CD, etc, can also be controlled with the optional steering wheel-mounted keypad. The audio system is available in two versions:
HU-650
Features: AM/FM radio, single-disc CD player, 4x25W output, four1 speakers.HU-850
Features: AM/FM radio, integrated 6-disc CD changer, 4x50W or 4x70W output plus 25W Dolby Pro Logic II, eleven speakers. A subwoofer mounted under the floor in the cargo area is available as an option. Consult your Volvo retailer.Compact disc care
Keep the discs clean. Wipe them with a soft, clean, lint-free cloth, working from the center outwards. If necessary,
dampen the cloth with a neutral soap solution. Dry thoroughly before using.
Never use cleaning spray or antistatic liquid. Use only cleaners specifically made for CDs. Use discs of the correct size only (3.5" discs should never be used). The discs should conform to the norms EN60908 (IEC60908). CDR discs can cause listening problems due to the
quality of the disc or recording equipment used.
DualDisc: The audio side of a DualDisc (combined CD/DVD) does not meet CD specifications and may not play in
your audio system.
Do not put tape or labels on the disc itself. Volvo does not recommend the use of plastic outer rings on the disc. Condensation may occur on discs/optical components of the changer in cold winter weather. The disc can be dried
with a clean, lint-free cloth. Optical components in the CD changer may, however, take up to one hour to dry off.
Never attempt to play a disc which is damaged in any way. When not in use, the discs should be stored in their covers. Avoid storing discs in excessive heat, direct sunlight or
dusty locations.
1. T5 and R-models: six speakers
pg. 213 Specifications
Audio system HU-650 - overview
1. On/off - press Volume - turn 2. Buttons for selecting stored radio stations/discs in optional CD changer 3. Bass (press to release control and turn to adjust) 4. Treble (press to release control and turn to adjust) 5. Balance (left/right) - press to release control and turn to adjust 6. Fader (front/rear) - press to release control and turn to adjust 7. Source/Menu Press to open main menu Turn to select FM, AM, CD, CD changer (option) 8. Scan function (automatically search for radio stations) 9. Exit (exit the menu) 10. Navigation buttons (seek/change radio station or CD track) 11. CD eject 12. CD slot 13. CD random play 14. FM (select FM1, FM2, FM3) 15. AM (select AM1 or AM2) 16. CD player 17. AUTO - automatically search for radio stations 18. Display
pg. 214 Specifications
Audio system HU-850 - overview
1. On/off - press Volume - turn 2. Buttons for selecting stored radio stations/discs in optional CD changer 3. Bass (press to release control and turn to adjust) 4. Treble (press to release control and turn to adjust) 5. Balance (left/right) - press to release control and turn to adjust 6. Fader (front/rear) - press to release control and turn to adjust 7. Source/Menu Press to open main menu Turn to select FM, AM, CD, CD changer (option) 8. Scan function (automatically search for radio stations) 9. Exit (exit the menu) 10. Navigation buttons (seek/change radio station or CD track) 11. CD eject 12. Dolby Surround Pro Logic II 13. 2-channel stereo 14. 3-channel stereo 15. CD slot 16. CD random play 17. FM (select FM1, FM2, FM3) 18. AM (select AM1 or AM2) 19. CD player 20. AUTO - automatically search for radio stations 21. Display
pg. 215 Specifications
Radio functions HU-650/HU-850
Switch on/off Press the knob to switch on or turn off the radio.
Volume control
Turn the knob clockwise to increase volume. Volume control is electronic and does not have an end stop. If you have a key pad in the steering wheel, increase or decrease the volume with the + or - buttons.
Volume control - ALARM If a CD is playing when the radio receives an alarm bulletin (available in certain areas only), the CD player enters pause mode. The bulletin is broadcast at the volume selected for this type of message. After the bulletin has been completed, the audio system reverts to the originally selected sound.
pg. 216 Specifications
Radio functions HU-650/HU-850
Sound settings Bass Adjust the bass by pressing the button to extend the control and turning it to the left (less bass) or to the right (more bass). A "detent" indicates "equalized" bass. Press the button back in when you have made the adjustment.
Treble Adjust the treble by pressing the button to extend the control and turning it to the left (less treble), or to the right (more treble). A "detent" indicates "equalized" treble. Press the button back in when you have made the adjustment.
Fader - Balance front/rear Adjust front/rear speaker balance by pressing the button to extend the control and turning it to the left (more sound from the rear speakers) or to the right (more sound from the front speakers). A "detent" indicates "equalized" balance. Press the button back in when you have made the adjustment.
Balance right/left Adjust left/right speaker balance by pressing the button to extend the control, and turning it to the left (more sound from the left speakers) or to the right (more sound from the right speakers). A "detent" indicates "equalized" balance. Press the button back in when you have made the adjustment.
MID EQ level This function is used to fine-tune the balance of sound in the speakers. To set the level: - Press SOURCE. - Turn the SOURCE knob, select ADVANCED MENU and press SOURCE. - Turn the SOURCE knob, select AUDIO SETTINGS and press SOURCE. - Turn the SOURCE knob, select MID EQ LEVEL and press SOURCE. - Turn the SOURCE knob, select the desired level and press SOURCE. - Press EXIT.
pg. 217 Specifications
Radio functions HU-650/HU-850
Selecting a sound source The sound source (e.g. AM, FM, etc.) can be selected in two ways:
Use the sound source buttons (see the center illustration above). Turn the SOURCE knob (see illustration above) to select a sound source (AM1, AM2, FM1, FM2, FM3, or CD).
Press the knob to select the AM or FM band of your choice. The sound source selected will be shown in the display.
Scan Press the SCAN button to start the station scan function. When a station is found, scanning stops for approximately 10
seconds, after which scanning will continue. Press the SCAN or SOURCE button when a station has been found if you would like to listen to that station and to discontinue the scan function.Station seek up/down Press procedure to continue the seek function.
or
to start the seek function. The radio seeks the next audible station and tunes it in. Repeat the
or
and hold it down. MAN will be shown in the display. The radio scans slowly in the selected
Manual station search Press direction and will increase the scanning speed after a few seconds. Release the button when the desired frequency appears in the display. The frequency can be fine-tuned by short presses on the The system will remain in manual search mode for 5 seconds after the button is released, after which it will return to seek mode.
keys.
or
pg. 218 Specifications
Radio functions HU-650/HU-850
Steering wheel key pad (option) If the vehicle is equipped with the key pad in the steering wheel press the right or left arrow to switch between preset stations.
Storing stations To store a selected station under one of the station setting buttons 1-6: - Tune to the desired station. - Press the button under which the station is to be stored and keep it depressed. The audio system sound will be interrupted for a few seconds and STORED will appear in the display. The station is now stored. A total of 30 stations can be stored; 6 stations each in AM1, AM2, FM1, FM2, and FM3.
Storing stations automatically This function automatically searches for and stores up to 10 strong AM or FM stations in a separate memory. If more than ten stations are found, the ten strongest ones are stored. This function is especially useful in areas in which you are not familiar with radio stations or their frequencies. To use the AUTO function: - Select radio mode using the AM or FM buttons, or by turning the SOURCE knob. - Start the search by pressing AUTO for more than 2 seconds. - AUTO appears in the display and a number of stations with strong signals
pg. 219 Specifications
Radio functions HU-650/HU-850
(max. 10) from the selected frequency band will be stored in the auto-store memory. If there are no stations with sufficient signal strength, NO STATION is displayed. - Press the AUTO button or the arrow keys on the optional steering wheel controls briefly to select the stored stations.
When the radio is in auto-store mode, AUTO is shown in the display. AUTO disappears when you return to the normal radio mode. Return to the normal radio mode by pressing the AM, FM, or EXIT button. To return to the Auto-store mode, press the AUTO button briefly.
pg. 220 Specifications
RBDS functions HU-650/HU-850
Radio Broadcast Data System - RBDS This feature, which may not be available in your area, functions only with FM broadcasts. The radio in your vehicle is equipped with an advanced system allowing information from broadcasters to be transmitted visually, as text, together with the audio signal. This information is then decoded by the radio and made available for several new and unique features. The RBDS or Radio Broadcast Data System operates in the FM band only, and the information transmitted is supplied exclusively by participating broadcasters. Volvo has no control over the accuracy of the data or information. Coverage by local broadcasters may be limited at this time, but as the technology and benefits grow, you will find the radio in your vehicle is equipped to take advantage of this system.
PI (Program Information) Seek: When an FM station has been stored as a preset, the radio also stores RBDS program information if it is available. When the preset is selected at a later time, the radio tries to access updated program information. In weak signal areas, there may be a delay before the station becomes audible. During this delay, "PI seek" will be displayed and there will be no sound. PI seek can be interrupted by pressing EXIT.
Radio text Certain RBDS stations broadcast program information, which can be shown in the display. The text will be shown twice in the display.
To start this function: Press the FM button for several seconds. To deactivate this function: Press FM briefly. Station information will be shown twice in the display.
Alarm Alarms bulletins are transmitted automatically by certain RBDS stations. The function cannot be deactivated. "Alarm!" is shown in the radio display when an alarm message is sent. The function is used to warn motorists of serious accidents, etc.
pg. 221 Specifications
RBDS functions HU-650/HU-850
Program type/station format - PTY The PTY function allows you to find stations whose programs suit your taste. Use the PTY function to select among the different station formats shown in the list. To select a station format:
- Select radio mode using the FM button, or by turning the SOURCE knob. - Turn the SOURCE knob, select PTY and press SOURCE. - Turn the SOURCE knob, select a station format from the list and press SOURCE to confirm the selected station format. The PTY (station format) of the selected station is now shown in the display.
NOTE: Not all RBDS radio stations have PTY designations.
Station formats Display text Format PTY OFF Off NEWS News AFFAIRS Current affairs INFO Information SPORT Sports EDUCATION Education DRAMA Drama CULTURE Art and culture SCIENCE Science VARIED Entertainment POP M Pop music ROCK M Rock music EASY M Easy listening LIGHT M Light classics CLASSICS Classical music OTHER M Other music WEATHER Weather Finance FINANCE Religious programs RELIGION Travel Leisure Jazz music Country music National music Oldies Folk music Documentary
TRAVEL LEISURE JAZZ COUNTRY NATION M "OLDIES" FOLK M DOCUMENT
pg. 222 Specifications
RBDS functions HU-650/HU-850
Automatic Frequency update (AF) The AF function tunes to the strongest transmitter for the current station, if that station supports alternative frequencies. AF is OFF by default. To deactivate AF: - Select radio mode using the FM button, or by turning the SOURCE knob. - Press SOURCE.
- Turn the SOURCE knob, select ADVANCED MENU and press SOURCE. - Turn the SOURCE knob, select RADIO SETTINGS and press SOURCE. - Turn the SOURCE knob, select AF ON/ OFF (flashing text) and press SOURCE. - Press EXIT. To reactivate the function, follow the procedure above and select AF ON in step 5.
Resetting RBDS functions RBDS functions can be returned to their factory settings as follows: - Select radio mode using the FM button, or by turning the SOURCE knob. - Press SOURCE. - Turn the SOURCE knob, select ADVANCED MENU and press SOURCE. - Turn the SOURCE knob, select RESET TO DEFAULT and press SOURCE. - Press EXIT.
ASC - speed compensated volume The audio system's volume is adjusted automatically according to the speed of the vehicle. There are three settings available: low, medium, or high. To activate ASC: - Select radio mode using the FM button, or by turning the SOURCE knob. - Press SOURCE. - Turn the SOURCE knob, select ADVANCED MENU and press SOURCE. - Turn the SOURCE knob, select AUDIO SETTINGS and press SOURCE. - Turn the SOURCE knob, select ASC LEVEL (flashing text) and press SOURCE. - Turn the SOURCE knob to select LOW, MEDIUM, HIGH, or OFF and press SOURCE. - Press EXIT.
NOTE: Please be aware that there are certain RBDS menu selections, for example EON, TP search, News, etc, that may not be available in North America.
pg. 223 Specifications
HU-650 - CD player
Starting the CD player Please refer to the illustration on page 213 for the location of the buttons referred to on this page. - Insert a disc into the player. - Press the CD button or turn the SOURCE knob to CD.
Changing tracks Briefly press the previous or next track. The track number is shown in the display.
or
keys (or the corresponding keys on the optional steering wheel keypad) to skip to the
Fast forward/back Press and hold down the as the buttons are held in.
or
keys to search within a track or the entire disc. The search continues for as long
NOTE: The corresponding keys on the optional steering wheel keypad cannot be used for fast forward/back.
Random play This function plays the tracks on a CD in random order (shuffle).
Select CD mode and press the RND button. RND is shown in the display as long as the function is activated. Press RND again to stop random play.
Scan This function plays the first 10 seconds of each track on the CD.
Press SCAN to start the function. Press SCAN again or EXIT to stop the scan function and listen to an entire track.
CD eject Press the button (no. 11 in the illustration on page 213) to eject the disc.
NOTE:
For reasons of traffic safety, the ejected CD must be removed within 12 seconds or it will be automatically drawn
back into the slot and the CD player will resume playing the most recently selected track.
See page 212 for information on caring for compact discs.
pg. 224 Specifications
HU-850 - internal CD changer
Starting the CD changer The HU-850 is equipped with an internal, 6- disc CD changer. Please refer to the illustration on page 214 for the location of the buttons referred to on this page.
To load discs into the changer: - Press the CD button or turn the SOURCE knob to CD. - Select an empty position by pressing one of the preset buttons. The display shows which positions are empty. LOAD DISC must be displayed before a disc is inserted into the player. - Insert a disc. If there are discs in the player when CD mode is selected, the changer will resume playing the disc and track that were most recently played.
Selecting a disc position (number) Use the station setting buttons 1-6 to select the disc to be played. The number of the disc and the track being played are shown in the display.
Changing tracks Briefly press the for compact discs. keypad) to skip to the previous or next track. The track number is shown in the display.
or
keys (or the corresponding keys on the optional steering wheel
Fast forward/back Press and hold down the as the buttons are held in. The corresponding keys on the optional steering wheel keypad cannot be used for fast forward/back.
keys to search within a track or the entire disc. The search continues for as long
or
Random play This function plays the tracks on a CD in random order (shuffle).
Select CD mode and press the RND button. RND is shown in the display as long as the function is activated.
Random tracks from randomly selected discs will be played.
Press RND again to stop random play.
Scan This function plays the first 10 seconds of each track on the CD.
Press SCAN to start the function. Press SCAN again or EXIT to stop the scan function and listen to an entire track. Scan only works on the selected
disc.
CD eject This function makes it possible to eject a single disc, or to eject all of the discs in the changer.
Press the eject button briefly to eject the disc that is currently playing. A longer press (more than two seconds) starts the process of ejecting all of the discs in the changer.
NOTE:
The EJECT ALL function can only be used while the vehicle is at a standstill and will be cancelled if the vehicle
begins to move.
For reasons of traffic safety, you have 12 seconds in which to remove the ejected disc. After that, the disc
automatically reinserts into the player, and the CD player will resume playing the most recently selected track.
See page 212 for information on caring for compact discs.
pg. 225 Specifications
External CD changer (option)
External CD changer The optional 10-CD changer is mounted in the cargo compartment. Please refer to the illustration on pages 214 and 218 for the location of the buttons referred to on this page. Turn the SOURCE knob to select the external CD changer.
To load discs into the changer: - Slide the cover on the CD change open. - Press the eject button on the CD changer. - Pull the magazine out of the changer and insert the disc(s). - Press the magazine back into the changer and slide the cover back into place. If there are discs in the player when CD mode is selected, the changer will resume playing the disc and track that were most recently played.
Selecting a disc position (number) Use the station setting buttons 1-6 to select the disc to be played. Continue to press button 6 to select discs 7-10. The number of the disc and the track being played are shown in the display.
Changing tracks Briefly press the previous or next track. The track number is shown in the display.
or
keys (or the corresponding keys on the optional steering wheel keypad) to skip to the
Fast forward/back Press and hold down the as the buttons are held in. The corresponding keys on the optional steering wheel keypad cannot be used for fast forward/back.
keys to search within a track or the entire disc. The search continues for as long
or
Random play This function plays the tracks on a CD in random order (shuffle).
Select CD mode and press the RND button. RND is shown in the display as long as the function is activated.
Random tracks from randomly selected discs will be played.
Press RND again to stop random play.
Scan This function plays the first 10 seconds of each track on the CD.
Press SCAN to start the function. Press SCAN or EXIT to stop the scan function and listen to an entire track.
Scan only works on the selected disc.
pg. 226 Specifications
Dolby Surround Pro Logic II - HU-850 only
Dolby Surround Pro Logic II Dolby Surround Pro Logic II is a further development of the previous version of the system and provides enhanced sound quality. The improved sound is particularly apparent to passengers in the rear seat. Dolby Surround Pro Logic II, together with a center speaker in the dashboard, offers you a sound experience very close to a live performance. The normal left-right stereo channels are divided to left-center-right. In addition, surround sound is produced by the rear speakers. This surround sound mirrors the ambience of a concert hall.
NOTE:
Dolby Surround Pro Logic II is optimized for CD mode. When listening to FM radio stations, Dolby Surround Pro Logic II functions best in areas with strong reception. If
reception is weak, selecting 2 or 3- channel stereo may provide better sound quality.
3 channel stereo is recommended for AM and FM broadcasts.
Dolby Surround Pro Logic II and the Dolby icon are trademarks of Dolby Laboratories Licensing Corporation.
Dolby Pro Logic II Surround System is manufactured under license from Dolby Laboratories Licensing Corporation.
Selecting Dolby Surround Pro Logic II To select Dolby Surround Pro Logic II mode during CD playback, press " Press "OFF" to return to 2 channel stereo.
". "Dolby Pro Logic II" is displayed.
3 Channel stereo To select 3 channel stereo mode press "3- CH". "3 ch" is displayed. Press "OFF" to return to 2 channel stereo.
pg. 227 Specifications
Dolby Surround Pro Logic II - HU-850 only
Center level This function is used to set the level of the center speaker in the dashboard. To set the level: - Press SOURCE. - Turn the SOURCE knob, select ADVANCED MENU and press SOURCE. - Turn the SOURCE knob, select AUDIO SETTINGS and press SOURCE. - Turn the SOURCE knob, select CENTER LEVEL and press SOURCE. - Turn the SOURCE knob, select the desired level and press SOURCE. - Press EXIT.
Surround level This function is used to set the level of the of the rear speakers. To set the level: - Press SOURCE. - Turn the SOURCE knob, select ADVANCED MENU and press SOURCE. - Turn the SOURCE knob, select AUDIO SETTINGS and press SOURCE. - Turn the SOURCE knob, select SURROUND LEVEL and press SOURCE. - Turn the SOURCE knob, select the desired level and press SOURCE. - Press EXIT.
pg. 228 Specifications
Audio systems - specifications
HU-650
Output: 4x25 W Impedance: 4 Ohm Voltage required: 12 V, negative ground External amplifier: 4x50 W or 4x75 W Radio frequency range: AM: 530 - 1710 kHz FM: 87.7 - 107.9 MHzHU-850
Output 1x25 W center speaker Impedance: 4 Ohm Voltage required: 12 V, negative ground External amplifier1: 4x50 W or 4x75 WRadio frequency range AM: 530 - 1710 kHz FM: 87.7 - 107.9 MHz
1. The HU-850 must be connected to an external amplifier.
Alarm
"Alarm!" is displayed when an alarm message is sent. The function is used to warn the driver of a serious accident or disaster situation.
CAUTION!
The optional supplementary amplifier (HU-850) may be mounted under the front passenger's seat. If the floor of the vehicle has become soaked for any reason, do not turn on the radio. This would cause damage to the amplifier. Contact a Volvo retailer.
Low battery voltage If the level of battery voltage is low, a message will be displayed. The vehicle's energy conservation function may switch off the audio system. Recharge the battery by starting the engine.
pg. 229 Specifications
HomeLink® Universal Transceiver (option)
HomeLink® Universal Transceiver HomeLink® is an advanced system that can be programmed to learn the codes of three different remote controlled- devices (e.g., garage door openers, remote lighting, entry door lock). HomeLink®'s sun visor-mounted transceiver, powered by your vehicle's electrical system, may then be used in place of your hand-held remote controls.
NOTE: For your security, the HomeLink® Universal Transceiver is designed to not function if you lock your vehicle from the outside.
Programming the transceiver - The ignition switch must be turned to the "accessory" position (II) before programming the HomeLink® Universal Transceiver. - Begin by erasing all 3 factory default channels. Hold down the two outside buttons (buttons 1 and 3 in the illustration) on the HomeLink® Universal Transceiver for about 20 seconds, until HomeLink®'s indicator light begins to flash. Then release the buttons. - Hold your hand-held transmitter (garage door opener, for example) 2 to 5 in. (5 to 12 cm) away from the
HomeLink® surface, keeping the indicator light in view. For placement questions, contact HomeLink® toll-free 1- 800-355-3515 (Internet: www.HomeLink.com). - Using two hands, push and hold both your hand-held transmitter's button and the transceiver button you wish to program. The indicator light will flash first slowly, then rapidly. Rapid flashing tells you the HomeLink® button has been successfully programmed. Release both buttons. - If you are programming a rolling code-equipped device (e.g., garage door opener or entry door lock), refer to "Programming rolling codes" on the next page to complete the programming process. Repeat the third and fourth steps to program the other two transceiver buttons. If, after several attempts, you are unable to successfully train the HomeLink® Universal Transceiver to learn your hand-held transmitter's signal, contact HomeLink® toll-free 1-800-355-3515 (Internet: www.HomeLink.com)
pg. 230 Specifications
HomeLink® Universal Transceiver (option)
WARNING!
If you use HomeLink® to open a garage door or gate, be sure no one is near the gate or door while it is in motion. Do not use the HomeLink® Universal Transceiver with any garage door opener that lacks safety "stop" and "reverse" features as required by federal safety standards. (This includes any garage door opener model manufactured before April 1, 1982) A garage door opener that cannot "detect" an object, signalling the door to "stop" and "reverse" does not meet current federal safety standards. Using a garage door opener without these features increases the risk of serious injury or death. For more information on this matter, call toll-free 1-800-355-3515
(Internet: www.HomeLink.com).NOTE: Canadian residents: During programming, your hand-held transmitter may automatically stop transmitting. To successfully train HomeLink®, continue to hold the HomeLink® button. At the same time, repeatedly press and hold your handheld transmitter's button at two-second intervals until HomeLink® has learned your transmitter's code. The HomeLink® indicator light will flash first slowly, and then rapidly to indicate that the button has been successfully programmed.
Determining if your garage door uses a rolling code Determine, in one of the following ways, if your garage door uses a rolling code system and is manufactured after 1996:
Refer to the garage door opener owner's manual for verification. If your hand-held transmitter appears to program the HomeLink® Universal Transceiver but the programmed button
does not activate the garage door, your garage door opener may have a rolling code.
Press the programmed HomeLink® button. If the garage door opener has the rolling code feature, the HomeLink®
indicator light flashes rapidly and then glows steadily after approximately 2 seconds.
To train a rolling code garage door opener, follow these instructions after programming the desired transceiver button according to "Programming the transceiver." The help of a second person may make training easier. - Locate the training button on the garage door opener motor head unit. The location and color of the training button may vary. If you encounter difficulty, refer to the garage door opener owner's manual or call toll-free 1-800-355-3515
(Internet: www.HomeLink.com). - Press the "training" button on the garage door opener motor head unit until the "training" light comes on. - Press and release the programmed HomeLink® button. Press and release the programmed HomeLink® button a second time to complete the training process. Some garage door openers may require you to do this procedure a third time to complete the training.The programmed button on your HomeLink® Universal Transceiver should now operate your garage door opener. The original handheld transmitter can also be used, as desired, to operate the garage door. The remaining two HomeLink® buttons can be programmed in the same way. In the event of any problems in programming the HomeLink® Universal Transceiver, call toll-free 1-800-355-3515 (Internet: www.HomeLink.com).
pg. 231 Specifications
HomeLink® Universal Transceiver (option)
Operating the HomeLink® Universal Transceiver Once programmed, the HomeLink® Universal Transceiver can be used in place of your hand-held transmitters. To operate, the key must be turned to the "accessory" position (II) or the engine must be running. Press the programmed HomeLink® button to activate the garage door, driveway gate, security lighting, home security system, etc. Your original hand-held transmitters may, of course, be used at any time.
Erasing programmed buttons Individual buttons cannot be erased. To erase all three programmed buttons: - Turn the ignition key to the "accessory" position (II). - Hold down the two outside buttons on the HomeLink® Universal Transceiver for about 20 seconds, until HomeLink®'s indicator light begins to flash. - Release both buttons. The HomeLink® buttons can be reprogrammed using the procedures described on the previous page.
Reprogramming a single HomeLink® button - Press and hold the desired HomeLink® button. Do not release the button until step 3 has been completed. - When the indicator light begins to flash slowly (after approximately 20 seconds), position your hand-held transmitter 2 to 5 in. (5 to 12 cm) away from the HomeLink® surface. - Press and hold the hand-held transmitter button. The HomeLink® indicator light will flash first slowly, then rapidly. When the indicator light flashes rapidly, release both buttons.
The previously programmed device has now been erased and the new device can be activated by pressing the HomeLink® button that has just been programmed. This procedure will not affect any other programmed HomeLink® buttons.
NOTE:
Retain the original transmitter(s) for future programming procedures (e.g., if you purchase a new vehicle). For your own security, erase all programmed buttons on the HomeLink® Universal Transceiver when you sell your
Metallic sun protection films should not be used on any windows in a vehicle equipped with HomeLink® Universal
Transceiver. This could interfere with the transceiver's function.
vehicle.
pg. 232 Specifications
This page left intentionally blank.
Contents | Top of Page
2 0 0 7
VOLVOS60
76
2, 47, 123
53
75
73, 76
77
73
103
120
129
2, 47
212
75
116
117
119
59
120187
90
171, 179
181
172
168
75
122
177
187
46, 122
182Index
pg. 233-237 Index A/C (air conditioning) ABS Accessory installation (special warnings) Active Bi-Xenon headlights (ABL) Air conditioning Air distribution Air quality sensor Air vents Alarm All Wheel Drive All Wheel Drive - towing Anti-lock Brake System (ABS) Audio system AUTO (climate control) Automatic transmission Automatic transmission - kickdown Automatic transmission, Sport mode Average speed AWD Back up light Backrest, rear seat, folding Battery Battery - replacing Belt check Black Box (Vehicle Event Data) Blower (fan) Brake circuit Brake fluid Brake light Brake system Bulbs
C Capacities Capacity weight Carbon Monoxide - Important Warning Catalytic converter Central locking system - remote control Changing coolant Check Engine warning light Child safety child restraints Child safety lock Climate system Clock Coat hanger Cold weather precautions Coolant changing checking level of Coolant - changing Cooling system Courtesy light Cruise control Cup holders center console rear seat Curb weight Current fuel consumption Defroster Detachable trailer hitch Door mirror defroster Door mirrors Driver distraction Driving economically DSTC Dynamic Stability and Traction Control (DSTC) Economical driving Electric socket Electrical system Electrically operated moonroof Emission inspection Engine - starting Engine compartment Engine oil
202
153
107
205
97
172
46
31
102
72
44
89
136
176
172
172
176
204
84
60
88
87
153
5975
133
58
51
113
50
50113
51
207
68
170
111
173
174, 203Engine specifications Federal Clean Air Act FIX NEXT SERVICE Fluids Fog light Fog light, rear Front fog light, changing Front park assist Front seat - backrest Front seats - power Front suspension Fuel Fuel filler cap Fuel filler door Fuel Formulations Fuel gauge Fuel tank, capacity Fuses Gasoline Geartronic manual shifting Generator warning light Glove compartment Grocery bag holder Gross vehicle weight (GVW) Handling Hazard warning flashers Head restraint - center, rear Headlight wiper blades Headlights Heated front seats High beam flash High beam headlights High beam indicator Hoisting the car Home safe lighting HomeLink¨ Universal Transceiver Hood - opening Ignition switch Immobilizer (start inhibitor)
209
168
49
204
46
187
186
138
81
82
206
106
2, 110
2, 109
107
44
202
190106
118
118
46
89
91
153114
58
92
178
55
76
55
55
44
171
55
229
173112
96Indicator and warning symbols Inflation pressure table Canadian models US models Inflation pressure, checking Inspection, preparing for Interior lighting Jack Jack, location of Keylock Kickdown Label information Load carriers Locking steering wheel Locking the car Long distance trips Long loads - carrying Low beam bulb, changing Low beam headlights Maintenance services Maintenance, periodic Malfunction indicator light Moonroof Multifilter with air quality sensor Occupant Weight Sensor Octane rating Odometer Oil pressure Oil quality Opening the trunk from the inside Opening/locking the trunk Owner maintenance P Park Paint - color code Park assist Parking brake Parking light bulb, changing Periodic owner-performed maintenance
44, 45
147
146
145
170
84159
932, 111
117199
134
112
100
137
91
183
55168
169
46
68
7718
107
44
46
174
101
100
169116, 118
166
138
46, 62
184
169Permissible axle weight Polishing Power moonroof Power seat Power steering fluid Power steering, speed sensitive Power windows PROPOSITION 65 WARNING Radiator Radio Rain sensor - windshield wipers Rear park assist Rear seat, folding backrests Rear suspension Rear window defroster Recirculation REDUCE SPEED Refrigerant (A/C system) Refueling Reporting safety defects Canada USA Roadholding Roof racks (load carriers) Run flat tires Safety defects, reporting Canada Safety defects, reporting USA SEE MANUAL Self supporting run flat tires Service Service key Service reminder SERVICE REQUIRED SERVICE URGENT Shiftlock Side marker light Side marker light, changing Ski hatch Snow chains Snow tires Spare wheel
153
163
68
82
177
114
63
130173
215
56
138
90
206
58
76
49
72
109
11
10
114
134
15011
10
49
150
168
96
45
49
49
2, 111
187
186
91
156
156
93Speedometer 44
Sport mode 119
Stability systems 125
Stability Traction Control (STC) 125
Start inhibitor (immobilizer) 96
Starting the car 111
STC 50, 125
Steering wheel lock 112
Stone chips, touching up 166
STOP ENGINE 49
Storage compartments 86, 87
Studded tires 156
Sun visor 69
Supplemental Restraint System (SRS) - warning light 45
Suspension 206
Tachometer Temperature control Temperature gauge Text window - messages TIME FOR REGULAR SERVICE Tire designations Tire economy, improving Tire inflation Tire inflation pressure table Canadian models Tire inflation pressure table US models Tire inflation pressure, checking Tire pressure monitoring system Tire Pressure Monitoring System (TPMS) Towing - cars with All Wheel Drive Towing a trailer Towing the car Trailer hitch - detachable Trailer indicator lamp Trailer towing Transmission - automatic Transmission - Geartronic Tread wear indicator Trip computer Trip odometer Trunk opening from the inside Trunk unlocking44
75
44
48
49
151
143
144
147
146
145
47
148
129
131
128
133
47
131
116
118
142
59
44
101
100Turn signal, rear Turn signals Type designations Uniform Tire Quality Grading Unlocking the car Unlocking the trunk Use of Additives Valet key Valet locking Vanity mirror Vanity mirror bulb, changing Vehicle Event Data Vehicle Identification Number (VIN) Vehicle loading Vehicle weights VIN (Vehicle Identification Number) Volvo and the environment W - Winter Warning symbol in center of dashboard Warranties Washer fluid reservoir Washing the car Waxing Weight distribution Weights Windshield washer fluid reservoir Windshield wipers Winter/Wet driving mode
187
55
198155, 159
100
100
10796
50
85
189
168
199
153
201
199117, 119
45
168
173, 176
162
163
114
201
176
56
136Contents | Top of Page