- Download PDF Manual
-
541
PRIUS PHV_OM_OM47818U_(U)
5-2. Steps to take in an emergency
■If the tire pressure warning light frequently comes on after blinking
for 1 minute If the tire pressure warning light frequently comes on after blinking for 1
minute when the “POWER” switch is turned to ON mode, have it checked by your Toyota dealer.■Customization
The vehicle speed linked seat belt reminder buzzer can be disabled. (Customizable features →P. 639) However, Toyota recommends that the seat belt reminder buzzer be operational to alert the driver and front passen- ger when seat belts are not fastened.
CAUTION
■If both the ABS and the brake system warning lights remain on
Stop your vehicle in a safe place immediately and contact your Toyota dealer. The vehicle will become extremely unstable during braking, and the ABS system may fail, which could cause an accident resulting in death or serious injury.
■When the electric power steering system warning light comes on
The steering wheel may become extremely heavy. If the steering wheel becomes heavier than usual when operating, hold firmly and operate using more force than usual.
542
PRIUS PHV_OM_OM47818U_(U)
5-2. Steps to take in an emergency
CAUTION
■If the tire pressure warning light comes on
Be sure to observe the following precautions. Failure to do so could cause a loss of vehicle control and result in death or serious injury. ●Stop your vehicle in a safe place as soon as possible. Adjust the tire
inflation pressure immediately.
●If the tire pressure warning light comes on even after tire inflation pres- sure adjustment, it is probable that you have a flat tire. Check the tires. If a tire is flat, repair the flat tire by using emergency tire puncture repair kit.
●Avoid abrupt maneuvering and braking. If the vehicle tires deteriorate,
you could lose control of the steering wheel or the brakes.
■If a blowout or sudden air leakage should occur
The tire pressure warning system may not activate immediately.
■Maintenance of the tires
Each tire, including the spare (if provided), should be checked monthly when cold and inflated to the inflation pressure recommended by the vehicle manufacturer on the vehicle placard or tire inflation pressure label (tire and load information label). (If your vehicle has tires of a differ- ent size than the size indicated on the vehicle placard or tire inflation pressure label [tire and load information label], you should determine the proper tire inflation pressure for those tires.)
543
PRIUS PHV_OM_OM47818U_(U)
5-2. Steps to take in an emergency
CAUTION
As an added safety feature, your vehicle has been equipped with a tire pressure monitoring system (TPMS-tire pressure warning system) that illuminates a low tire pressure telltale (tire pressure warning light) when one or more of your tires is significantly under-inflated. Accordingly, when the low tire pressure telltale (tire pressure warning light) illumi- nates, you should stop and check your tires as soon as possible, and inflate them to the proper pressure. Driving on a significantly under- inflated tire causes the tire to overheat and can lead to tire failure. Under-inflation also reduces fuel efficiency and tire tread life, and may affect the vehicle’s handling and stopping ability. Please note that the TPMS (tire pressure warning system) is not a sub- stitute for proper tire maintenance, and it is the driver’s responsibility to maintain correct tire pressure, even if under-inflation has not reached the level to trigger illumination of the TPMS low tire pressure telltale (tire pressure warning light). Your vehicle has also been equipped with a TPMS (tire pressure warning system) malfunction indicator to indicate when the system is not operat- ing properly. The TPMS (tire pressure warning system) malfunction indi- cator is combined with the low tire pressure telltale (tire pressure warning light). When the system detects a malfunction, the telltale will flash for approximately one minute and then remain continuously illumi- nated. This sequence will continue upon subsequent vehicle start-ups as long as the malfunction exists. When the malfunction indicator is illumi- nated, the system may not be able to detect or signal low tire pressure as intended.
544
PRIUS PHV_OM_OM47818U_(U)
5-2. Steps to take in an emergency
CAUTION
TPMS (tire pressure warning system) malfunctions may occur for a vari- ety of reasons, including the installation of replacement or alternate tires or wheels on the vehicle that prevent the TPMS (tire pressure warning system) from functioning properly. Always check the TPMS (tire pres- sure warning system) malfunction telltale after replacing one or more tires or wheels on your vehicle to ensure that the replacement or alter- nate tires and wheels allow the TPMS (tire pressure warning system) to continue to function properly.
NOTICE
■Precaution when installing a different tire
When a tire of a different specification or maker is installed, the tire pres- sure warning system may not operate properly.
545
PRIUS PHV_OM_OM47818U_(U)
5-2. Steps to take in an emergency If a warning message is displayed
If a warning is shown on the multi-information display, stay calm and perform the following actions:
Master warning light Multi-information display The master warning light also comes on or flashes in order to indicate that a message is cur- rently being displayed on the multi-information display.
If any of the warning light turns on again after performing the fol- lowing actions, contact your Toyota dealer.
546
PRIUS PHV_OM_OM47818U_(U)
5-2. Steps to take in an emergency
Stop the vehicle immediately.
A buzzer sounds and a warning message is shown on the multi-infor- mation display. The following warnings indicate the possibility of dam- age to the vehicle that may lead to an accident. Immediately stop the vehicle in a safe place and contact your Toyota dealer.
Warning message
Details
(U.S.A.)
(Canada)
Indicates an abnormal engine oil pressure. The warning light may turn on if the engine oil pres- sure is too low.
Indicates a malfunction in the hybrid system.
547
PRIUS PHV_OM_OM47818U_(U)
5-2. Steps to take in an emergency
Have the vehicle inspected immediately.
Failure to investigate the cause of the following warnings may lead to the system operating abnormally and possibly cause an accident. Have the vehicle inspected by your Toyota dealer immediately.
Warning message
Details
Indicates a malfunction in the LED headlight system.
(If equipped)
Indicates a malfunction in the P position control sys- tem. In this situation, there is a possibility that the parking lock mechanism will not work. When parking, park the vehicle on a flat surface and apply the parking brake securely. Also, it may not be possible to turn the “POWER” switch off. If this hap- pens, applying the parking brake will enable the switch to be turned off.
(Flashes)
Indicates a malfunction in the pre-collision system. A buzzer also sounds.
(If equipped)
548
PRIUS PHV_OM_OM47818U_(U)
5-2. Steps to take in an emergency
Warning message
Details
(Flashes)
(If equipped)
Indicates a malfunction in the radar cruise control sys- tem. A buzzer also sounds. Press the “ON-OFF” button once to deactivate the system, and then press the button again to reacti- vate the system.
Hybrid battery (traction battery) inspection or replace- ment time. Have the hybrid battery (traction battery) inspected by your Toyota dealer immediately. Hybrid system restarting will soon be disabled. A buzzer also sounds. If you continue to use the vehicle in this state, you will soon become unable to restart the hybrid sys- tem. Have the hybrid battery (traction battery) inspected by your Toyota dealer immediately.
Indicates that restarting of the hybrid system is not possible. Contact your Toyota dealer immediately.
549
PRIUS PHV_OM_OM47818U_(U)
5-2. Steps to take in an emergency
Follow the correction procedures.
After taking the specified steps to correct the suspected problem, check that the warning message turns off.
Warning message
Details
Correction procedure
Indicates that all maintenance according to the driven dis- tance on the maintenance schedule* should be per- formed soon. Comes on approximately 4500 miles (7200 km) after the main- tenance data has been reset. Indicates that all maintenance is required to correspond to the driven distance on the maintenance schedule*. Comes on approximately 5000 miles (8000 km) after the main- tenance data has been reset. (The indicator will not work properly unless the mainte- nance data has been reset.)
If necessary, per- form maintenance.
Perform the neces- sary maintenance. Please reset the maintenance data after the mainte- nance is per- formed. (→P. 432)
(U.S.A. only)
(U.S.A. only)
*: Refer to the separate “Scheduled Maintenance Guide” or “Owner’s Manual
Supplement” for the maintenance interval applicable to your vehicle.
550
PRIUS PHV_OM_OM47818U_(U)
5-2. Steps to take in an emergency
Warning message
Details
• Indicates that the pre-collision system is not currently func- tional because the grille or the sensor is dirty. • This message also appears when the pre-collision system is not functional due to over- heating.
(If equipped)
Correction procedure
• Check the grille and the sensor and clean them if they are dirty. • In case of over- heating, the system will become func- tional once the sys- tem cools down.
(Flashes)
Indicates that the radar cruise control sensor is dirty or cov- ered with ice.
Clean the sensor.
(If equipped)
(Flashes)
Indicates that the radar cruise control system is unable to judge vehicle-to-vehicle dis- tance.
If the windshield wipers are on, turn them off or set them to either the intermittent or the slow mode.
551
(If equipped)
PRIUS PHV_OM_OM47818U_(U)
5-2. Steps to take in an emergency
Warning message
Details
Correction procedure
(Flashes rapidly) (If equipped)
(If equipped)
(If equipped,
flashes)
Indicates that there is a high risk of a collision, or that the pre-collision braking function is operating. A buzzer also sounds.
At the same time,
will appear on the head-up display (the image flashes).
Slow the vehicle by applying the brakes.
Indicates that there is a high possibility of a collision.
Slow the vehicle by applying the brakes.
Indicates that your vehicle is nearing the vehicle ahead (in radar cruise mode). A buzzer also sounds.
At the same time, will appear on the head-up display (the image flashes). The hybrid system has over- heated. A buzzer also sounds. This message may be dis- played when driving under severe operating conditions. (For example, when driving up a long steep hill.)
Slow the vehicle by applying the brakes.
Stop and check. (→P. 600)
552
PRIUS PHV_OM_OM47818U_(U)
Warning message
Details
The hybrid battery (traction battery) is low. A buzzer also sounds.
(Flashes)
5-2. Steps to take in an emergency
Correction procedure
When stopping the vehicle for a long period of time, shift the shift position to P. The hybrid bat- tery (traction bat- tery) cannot be charged with the shift position in N.
Restart the hybrid system when start- ing the vehicle.
The hybrid battery (traction battery) power has dropped because a long period of time has elapsed after shifting the shift position to N. A buzzer also sounds.
(Flashes)
(Flashes)
(Flashes)
The transmission is out of P when attempting to start the hybrid system.
Shift the shift posi- tion to P before pressing the “POWER” switch.
The driver’s door is opened when the shift position is in N, D or B with the hybrid system on.
Shift the shift posi- tion to P.
553
PRIUS PHV_OM_OM47818U_(U)
5-2. Steps to take in an emergency
Warning message
Details
Correction procedure
Indicates that the accelerator pedal is depressed while the shift position is in N. A buzzer also sounds.
Release the accel- erator pedal and shift the shift posi- tion to D or R.
The accelerator pedal is depressed to stop the vehicle on an upward slope etc. A buzzer also sounds. If this continues, the hybrid system may overheat.
EV mode cannot be switched to.*1
A buzzer also sounds. The reason why EV mode cannot be used is shown (may not be shown in some instances.)EV mode has been automati- cally canceled.*1
A buzzer also sounds.*2
The reason why EV mode cannot be used is shown.Release the accel- erator pedal and depress the brake pedal.
Use the EV mode when it becomes available.
Use EV mode after making it avail- able, for example by lowering the set temperature of the heater.
(Flashes)
(Flashes)
*2
(Flashes 3 times)
*1: For EV mode operating conditions, see P. 40. *2: If EV mode has been canceled because of insufficient hybrid battery (trac- tion battery) charge, a warning message will not be shown on the multi- information display and the buzzer will not sound.
554
PRIUS PHV_OM_OM47818U_(U)
5-2. Steps to take in an emergency
Warning message
Details
The fuel filler door has been left open.
The charging port lid is open.
Correction procedure
Tighten the fuel tank cap and close the fuel filler door.
Close the charging port lid.
■Approach warning message
In the following instances, there is the possibility that the approach warning will not activate even when the vehicle-to-vehicle distance decreases. ●When your vehicle and the vehicle ahead are traveling at the same
speed or the vehicle ahead is traveling more quickly than your vehicle.
●When the vehicle ahead is traveling at very low speed. ●Immediately after cruise control speed is set. ●At the instant the accelerator pedal is depressed.
555
PRIUS PHV_OM_OM47818U_(U)
5-2. Steps to take in an emergency
Have the malfunction repaired immediately.
After taking the specified steps to correct the suspected problem, check that the warning message and light turn off.
Interior buzzer
Exterior buzzer
Warning message
Details
Once
⎯
(Comes on for 15 seconds.)
(Flashes)
Once
3 times
(Flashes)
The electronic key is not detected when attempting to start the hybrid system.
An open door other than the driver’s door is closed while the electronic key is outside the detection range and the “POWER” switch is in ACCESSORY or ON mode.
Correction procedure
Confirm the loca- tion of the electronic key.
Confirm the loca- tion of the electronic key.
556
PRIUS PHV_OM_OM47818U_(U)
5-2. Steps to take in an emergency
Interior buzzer
Exterior buzzer
Warning message
Details
Once
3 times
(Flashes)
Contin- uous
⎯
(Flashes)
An open door other than the driver’s door is closed while the electronic key is outside the detection range and the “POWER” switch is in ACCESSORY or ON mode with the shift position in P. The driver’s door has been opened with the shift position in a position other than P and with- out first turning the “POWER” switch is OFF.
Correction procedure
Turn the “POWER” switch to OFF or confirm the loca- tion of the electronic key.
Shift the shift posi- tion to P.
557
PRIUS PHV_OM_OM47818U_(U)
5-2. Steps to take in an emergency
Interior buzzer
Exterior buzzer
Warning message
Details
Once
Contin- uous
(Displayed alternately)
(Flashes)
The electronic key has been taken outside the vehicle and the doors have been locked without first turning the “POWER” switch to OFF. (vehicles with entry function)
Correction procedure
Turn the “POWER” switch to OFF and lock the doors again.
558
PRIUS PHV_OM_OM47818U_(U)
5-2. Steps to take in an emergency
Interior buzzer
Exterior buzzer
Warning message
Details
Correction procedure
Once
Contin- uous
(Flashes)
An attempt to lock the doors has been made using the smart key system while the elec- tronic key is inside the vehi- cle. (vehicles with entry func- tion) With the key inside the vehi- cle, a front door has been opened, the lock lever has been pulled in the lock direc- tion, the door has been closed and an attempt has been made to lock the door.
Take the electronic key out- side the vehicle, and lock the doors again.
559
PRIUS PHV_OM_OM47818U_(U)
5-2. Steps to take in an emergency
Interior buzzer
Exterior buzzer
Warning message
Details
Correction procedure
• Shift the shift posi- tion to P. • Confirm the loca- tion of the electronic key.
An open door other than the driver’s door is closed while the electronic key is outside the detection range and the “POWER” switch is in ACCESSORY or ON mode with the shift position not in P.
The electronic key battery is low.
Replace the bat- tery. (→P. 493)
An open door has been closed and the “POWER” switch has been turned twice to the ACCES- SORY mode from OFF.
Press the “POWER” switch while applying the brakes.
Contin- uous
Contin- uous
(Displayed alternately)
(Flashes)
Once
⎯
(Comes on for 15 seconds.)
Once
⎯
(Flashes)
560
PRIUS PHV_OM_OM47818U_(U)
5-2. Steps to take in an emergency
Interior buzzer
Exterior buzzer
Warning message
Details
Correction procedure
Once
⎯
(Flashes)
⎯
⎯
NOTICE
The elec- tronic key does not operate properly.
Power was turned off due to the auto- matic power off function.
→P. 591
Next time when starting the hybrid system, increase the engine speed slightly and maintain that level for approxi- mately 5 min- utes to charge the battery.
■While the engine oil level warning is displayed
Continued engine operation with low engine oil will damage the engine.
■Engine oil maintenance message
The warning message is based on the projected driving range after engine oil maintenance message is reset. The system does not monitor the purity of the engine oil.
561
PRIUS PHV_OM_OM47818U_(U)
5-2. Steps to take in an emergency
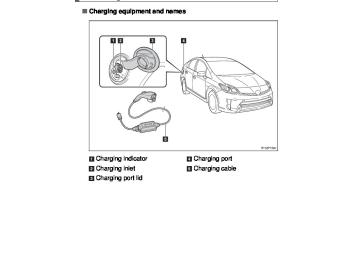
Charging messages
A message showing the charge results will be displayed if the “POWER” switch is turned to ON mode after charging has completed (when the vehicle’s charging indicator has turned off).
If one of the following messages is displayed, follow the correction proce- dures. If the message displays again after following the correction procedure, contact your Toyota dealer.
Message
Details
The charging cable has been connected to the vehicle while the “READY” indicator light was illuminated. A warning buzzer will sound.
An attempt has been made to start the hybrid system while the charg- ing cable was connected. A warning buzzer will sound.
Correction procedure
The hybrid system auto- matically stopped due to operation of the safety functions*. Turn the “POWER” switch off and perform charging according to the procedures on P. 80. The hybrid system can- not be started while the charging cable is con- nected due to the safety functions*. Disconnect the charging cable and start the hybrid system.
*: For information about the safety functions, refer to P. 91.
562
PRIUS PHV_OM_OM47818U_(U)
5-2. Steps to take in an emergency
Message
Details
Charging has been inter- rupted because the plug has been disconnected or some kind of power failure has occurred.
One of the following situ- ations has occurred: • The charging connector is not properly inserted • The latch release button has been pressed and held • The charging connector has been disconnected
Charging has been inter- rupted by a malfunction in the charging system.
Correction procedure
Charging has not fin- ished properly. Refer to the procedures on P. 80 and perform charging again. The vehicle can be used even if charging has not finished. However, the EV driving range decreases.
Reinsert the charging connector to restart charging.
Stop charging immedi- ately, and contact your Toyota dealer. Also, driving is possible when the hybrid system has been started.
563
PRIUS PHV_OM_OM47818U_(U)
5-2. Steps to take in an emergency
Message
Details
Charging has been stopped because of the high energy consumption of electrical compo- nents, such as the head- lights.
Charging has been stopped because of extremely low voltage, possibly caused by the plug not being inserted correctly.
Correction procedure
Switch the electrical appliance OFF, and restart charging by fol- lowing the procedure on P. 80. If the message is still displayed, the 12-volt battery may have a low charge. In this event, turn the “POWER” switch OFF approximately 15 min- utes after starting the hybrid system, and restart charging. Check that the plug is inserted correctly, and restart charging by fol- lowing the procedure on P. 80. Check that the plug is not connected to a power strip and that an extension cord, multi- outlet etc. is not being used.
564
PRIUS PHV_OM_OM47818U_(U)
5-2. Steps to take in an emergency
Message
Details
Charging has been stopped because of a problem with the charg- ing cable.
Charging has stopped because of the continued high temperature of the hybrid battery (traction battery) (in order to pro- tect the battery).
Correction procedure
If the charging cable is not a genuine Toyota product, or if you are charging using a charg- ing station (other than a Toyota dealer), try charg- ing with a genuine Toyota charging cable. If the message is still displayed, contact your Toyota dealer. If the desired charge level has not been achieved, restart charg- ing by following the pro- cedure on P. 80 after the hybrid battery (traction battery) has cooled down.
565
PRIUS PHV_OM_OM47818U_(U)
5-2. Steps to take in an emergency If you have a flat tire
A puncture caused by a nail or screw passing through the tire tread can be repaired temporarily using the emergency tire punc- ture repair kit. (The kit contains a bottle of sealant. The sealant can be used only once to temporarily repair one tire without removing the nail or screw from the tire.) After temporarily repair- ing the tire with the kit, have the tire repaired or replaced by your Toyota dealer. ■ Before repairing the tire
● Stop the vehicle in a safe place on a hard, flat surface. ● Set the parking brake. ● Shift the shift position to P. ● Stop the hybrid system. ● Turn on the emergency flashers.
■ Location of the emergency tire puncture repair kit
Side deck board Emergency tire puncture repair kit
566
PRIUS PHV_OM_OM47818U_(U)
5-2. Steps to take in an emergency
■ Emergency tire puncture repair kit components Bottle
Stickers
Hose
Air release cap
567
PRIUS PHV_OM_OM47818U_(U)
5-2. Steps to take in an emergency
Compressor
Air pressure gauge
Compressor switch
Power plug
568
PRIUS PHV_OM_OM47818U_(U)
5-2. Steps to take in an emergency
Before performing emergency repair
Check the degree of the tire damage.
A tire should only be repaired with the emergency tire puncture repair kit if the damage is caused by a nail or screw passing through the tire tread. • Do not remove the nail or screw from the tire. Removing the object may widen the opening and prevent emer- gency repair with the repair kit. leakage, move the vehicle until the area of the puncture, if known, is positioned at the top of the tire.
• To avoid sealant
569
PRIUS PHV_OM_OM47818U_(U)
5-2. Steps to take in an emergency
■In the following cases, the tire cannot be repaired with the emer-
gency tire puncture repair kit. Contact your Toyota dealer. ●When the tire is damaged due to driving without sufficient air pres-
sure
●When there are any cracks or damage at any location on the tire,
such as on the side wall, except the tread
●When the tire is visibly separated from the wheel ●When the cut or damage to the tread is 0.16 in. (4 mm) long or more ●When the wheel is damaged ●When two or more tires have been punctured ●When more than 2 sharp objects such as nails or screws have
passed through the tread on a single tire
●When the sealant has expired
570
PRIUS PHV_OM_OM47818U_(U)
5-2. Steps to take in an emergency
Taking out the emergency tire puncture repair kit
STEP 1
Lift the side deck board.
STEP 2
Unhook the tightening strap. Take out the emergency tire puncture repair kit.
571
PRIUS PHV_OM_OM47818U_(U)
5-2. Steps to take in an emergency
Emergency repair method
STEP 1
Take out the repair kit from the plastic bag.
STEP 2
STEP 3
Remove the valve cap from the valve of the punctured tire.
Remove the air release cap from the hose.
You will use the air release cap again. Therefore keep it in a safe place.
572
PRIUS PHV_OM_OM47818U_(U)
STEP 4
STEP 5
STEP 6
5-2. Steps to take in an emergency
Connect the hose to the valve.
Screw the end of the hose clockwise as far as possible.
Make sure that the compressor switch is off.
Remove the rubber stopper from the compressor.
573
PRIUS PHV_OM_OM47818U_(U)
5-2. Steps to take in an emergency
STEP 7
Connect the power plug to the power outlet socket. (→P. 395)
Instrument panel
Rear console box
574
PRIUS PHV_OM_OM47818U_(U)
STEP 8
5-2. Steps to take in an emergency
Connect the bottle to the com- pressor.
Connect by inserting the bottle straight into the compressor, and make sure that the protrud- ing part of the bottle is properly aligned with the groove in the case.
STEP 9
Attach the 2 stickers as shown.
Remove any dirt and moisture from the wheel before attaching the sticker. If you are unable to apply the stickers, the nearest Toyota dealer that sealant has been applied to the puncture when having the tire repaired or replaced.
inform
575
PRIUS PHV_OM_OM47818U_(U)
5-2. Steps to take in an emergency
STEP 10
Check the specified tire inflation pressure. Tire inflation pressure is specified on the label on the driver’s side pillar as shown. (→P. 619)
STEP 11
Start the hybrid system. (→P. 238)
ITO52P163
STEP 12
To inject the sealant and inflate the tire, turn the compressor switch on.
576
PRIUS PHV_OM_OM47818U_(U)
5-2. Steps to take in an emergency
STEP 13
Inflate the tire until the specified air pressure is reached.
tire
and
then
the actual
The sealant will be injected and the pressure will spike to 44 psi (300 kPa, 3.1 kgf/cm2 or bar) or 58 psi (400 kPa, 4.1 kgf/cm2 or bar), gradually decrease. The air pressure gauge will dis- play inflation pressure about 1 minute (15
minutes at temperature) after the switch is turned on. Inject to specified air pressure. • Turn the compressor switch off and then check the tire inflation pressure. Being careful not to over inflate, check and repeat the inflation procedure until the specified tire is reached.inflation pressure
low
577
PRIUS PHV_OM_OM47818U_(U)
5-2. Steps to take in an emergency
•
•
If the tire inflation pressure is still lower than the specified point after inflation for 10
minutes (40 minutes at low temperature) with the switch on, the tire is too damaged to be repaired. Turn the com- pressor switch off and con- tact your Toyota dealer. If the tire inflation pressure exceeds the specified air pressure, let out some air to adjust the tire inflation pres- sure. (→P. 582, 619)STEP 14
STEP 15
With the compressor switch off, disconnect the hose from the valve on the tire and then pull out the power plug from the power outlet socket. Some sealant may leak when the hose is removed. Install the valve cap onto the valve of the emergency repaired tire.
578
PRIUS PHV_OM_OM47818U_(U)
STEP 16
5-2. Steps to take in an emergency
Attach the air release cap to the end of the hose.
If the air release cap is not attached, the sealant may leak and the vehicle may get dirty.
STEP 17
STEP 18
STEP 19
Temporarily store the bottle in the luggage compartment while it is connected to the compressor. To spread the liquid sealant evenly within the tire, immediately drive safely for about 3 miles (5 km) below 50 mph (80 km/h). After driving for about 3 miles (5
km), stop your vehicle in a safe place on a hard, flat surface and remove the air release cap from the hose before reconnecting the repair kit.579
PRIUS PHV_OM_OM47818U_(U)
5-2. Steps to take in an emergency
STEP 20
Turn the compressor switch on and wait for several seconds, and then turn it off. Check the tire inflation pressure.
If the tire inflation pressure is under 19 psi (130 kPa, 1.3 kgf/ cm2 or bar): The puncture cannot be repaired. Contact your Toyota dealer. If the tire inflation pressure is 19 psi (130 kPa, 1.3 kgf/cm2
or bar) or higher, but less than the specified air pressure: Proceed to If the tire inflation pressure is the specified air pressure: Proceed toSTEP 21
STEP 22
580
PRIUS PHV_OM_OM47818U_(U)
5-2. Steps to take in an emergency
STEP 21
STEP 22
Turn the compressor switch on to inflate the tire until the spec- ified air pressure is reached. Drive for about 3 miles (5 km) and then perform
STEP 19
Attach the air release cap to the end of the hose.
If the air release cap is not attached, the sealant may leak and the vehicle may get dirty.
STEP 23
STEP 24
Store the bottle in the luggage compartment while it is con- nected to the compressor. Taking precautions to avoid sudden braking, sudden accelera- tion and sharp turns, drive carefully at under 50 mph (80 km/h) to the nearest Toyota dealer.
581
PRIUS PHV_OM_OM47818U_(U)
5-2. Steps to take in an emergency
■If the tire is inflated to more than the specified air pressure
STEP 1
Disconnect the hose from the valve.
STEP 2
STEP 3
STEP 4
Install the air release cap to the end of the hose and push the protrusion on the air release cap into the tire valve to let some air out.
Disconnect the hose from the valve, remove the air release cap from the hose and then reconnect the hose. Turn the compressor switch on and wait for several seconds, and then turn it off. Check that the air pressure indicator shows the specified air pressure. If the air pressure is under the designated pressure, turn the compressor switch on again and repeat the inflation procedure until the specified air pressure is reached.
■The valve of a tire that has been repaired
After a tire is repaired with the emergency tire puncture repair kit, the valve should be replaced.
■Note for checking the emergency tire puncture repair kit
Check the sealant expiry date occasionally. The expiry date is shown on the bottle. Do not use sealant that has passed its expiry date. You may be unable to complete the repair using the emergency tire puncture repair kit.
582
PRIUS PHV_OM_OM47818U_(U)
5-2. Steps to take in an emergency
■Emergency tire puncture repair kit
●The sealant stored in the emergency tire puncture repair kit can be used only once to temporarily repair a single tire. If the sealant has been used and needs to be purchased, contact your Toyota dealer.
●The sealant can be used when the outside temperature is from -40°F
(-40°C) to 140°F (60°C).
●The repair kit is exclusively designed for size and type of tires origi- nally installed on your vehicle. Do not use it for tires that a different size than the original ones, or for any other purposes.
●The sealant has a limited lifespan. The expiry date is shown on the bottle. The sealant should be replaced before the expiry date. Con- tact your Toyota dealer.
●If the sealant gets on your clothes, it may stain. ●If the sealant adheres to a wheel or the surface of the vehicle body, the stain may not be removable if it is not cleaned at once. Immedi- ately wipe away the sealant with a wet cloth.
●During operation of the repair kit, a loud operation noise is produced.
This does not indicate a malfunction.
●Do not use to check or to adjust the tire pressure.
583
PRIUS PHV_OM_OM47818U_(U)
5-2. Steps to take in an emergency
CAUTION
■Do not drive the vehicle with a flat tire
Do not continue driving with a flat tire. Driving even a short distance with a flat tire can damage the tire and the wheel beyond repair. Driving with a flat tire may cause a circumferential groove on the side wall. In such a case, the tire may explode when using a repair kit.
■Caution while driving
●Store the repair kit in the luggage compartment.
Injuries may result in the event of an accident or sudden braking.
●The repair kit is exclusively only for your vehicle.
Do not use repair kit on other vehicles, which could lead to an accident causing death or serious injury.
●Do not use repair kit for tires that are different size than the original ones, or for any other purpose. If the tires have not been completely repaired, it could lead to an accident causing death or serious injury.
■Precautions for use of the sealant
●Ingesting the sealant is hazardous to your health. If you ingest sealant, consume as much water as possible, and then immediately consult a doctor.
●If sealant gets in eyes or adheres to skin, immediately wash it off with
water. If discomfort persists, consult a doctor.
584
PRIUS PHV_OM_OM47818U_(U)
5-2. Steps to take in an emergency
CAUTION
■When fixing the flat tire
●Stop your vehicle in a safe and flat area. ●Do not touch the wheels or the area around the brakes immediately
after the vehicle has been driven. After the vehicle has been driven, the wheels and the area around the brakes may be extremely hot. Touching these areas with hands, feet or other body parts may result in burns.
●Connect the valve and hose securely with the tire installed on the vehi- cle. If the hose is not properly connected to the valve, air leakage may occur as sealant may be sprayed out.
●If the hose comes off the valve while inflating the tire, there is a risk
that the hose will move abruptly due to air pressure.
●After inflation of the tire has completed, the sealant may splatter when
the hose is disconnected or some air is let out of the tire.
●Follow the operation procedure to repair the tire. If the procedures not
followed, the sealant may spray out.
●Keep back from the tire while it is being repaired, as there is a chance of it bursting while the repair operation is being performed. If you notice any cracks or deformation of the tire, turn off the compressor switch and stop the repair operation immediately.
585
PRIUS PHV_OM_OM47818U_(U)
5-2. Steps to take in an emergency
CAUTION
●The repair kit may overheat if operated for a long period of time. Do not
operate the repair kit continuously for more than 60 minutes.
●Parts of the repair kit become hot during operation. Be careful handling the repair kit during and after operation. Do not touch the metal part connecting the bottle and the compressor. It will be extremely hot.
●Do not attach the vehicle speed warning sticker to an area other than the one indicated. If the sticker is attached to an area where an SRS airbag is located, such as the pad of the steering wheel, it may prevent the SRS airbag from operating properly.
■Driving to spread the liquid sealant evenly
Observe the following precautions to reduce the risk of accidents. Failing to do so may result in a loss of vehicle control and cause death or serious injury. ●Drive the vehicle carefully at a low speed. Be especially careful when
turning and cornering.
●If the vehicle does not drive straight or you feel a pull through the
steering wheel, stop the vehicle and check the following. • Tire condition. The tire may have separated from the wheel. • Tire inflation pressure. If the tire inflation pressure is 19 psi (130
kPa, 1.3 kgf/cm2 or bar) or less, the tire may be severely damaged.586
PRIUS PHV_OM_OM47818U_(U)
5-2. Steps to take in an emergency
NOTICE
■When performing an emergency repair
●A tire should only be repaired with the emergency tire puncture repair kit if the damage is caused by a sharp object such as nail or screw passing through the tire tread. Do not remove the sharp object from the tire. Removing the object may widen the opening and disenable emergency repair with the repair kit. ●The repair kit is not waterproof. Make sure that the repair kit is not
exposed to water, such as when it is being used in the rain.
●Do not put the repair kit directly onto dusty ground such as sand at the side of the road. If the repair kit vacuums up dust etc., a malfunction may occur.
■Precautions for the emergency tire puncture repair kit
●The repair kit power source should be 12 V DC suitable for vehicle
use. Do not connect the repair kit to any other source.
●If gasoline splatters on the repair kit, the repair kit may deteriorate.
Take care not to allow gasoline to contact it.
●Place the repair kit in a storage to prevent it from being exposed to dirt
or water.
●Store the repair kit in the luggage compartment out of reach of chil-