- 2011 Subaru Legacy and Outback Navigation System Owners Manuals
- Subaru Legacy and Outback Navigation System Owners Manuals
- 2009 Subaru Legacy and Outback Navigation System Owners Manuals
- Subaru Legacy and Outback Navigation System Owners Manuals
- 2008 Subaru Legacy and Outback Navigation System Owners Manuals
- Subaru Legacy and Outback Navigation System Owners Manuals
- 2006 Subaru Legacy and Outback Navigation System Owners Manuals
- Subaru Legacy and Outback Navigation System Owners Manuals
- 2012 Subaru Legacy and Outback Navigation System Owners Manuals
- Subaru Legacy and Outback Navigation System Owners Manuals
- 2010 Subaru Legacy and Outback Navigation System Owners Manuals
- Subaru Legacy and Outback Navigation System Owners Manuals
- Download PDF Manual
-
, then select
(stored locations), and then select
(memory
Stored Locations
Select the category of the memory point to be modified.
Select
(list).
91
Stored Locations
Select the memory point to be modified. You can change the sequence in which memory points are listed by selecting (distance),
(name), or
(icon),
(date).
Select the category key corresponding to the memory point to be modified.
(icon): Selecting this key allows you to choose a display icon.
and
of the CHANGE ICON screen contain
standard icons, whereas the “With Sound” (with sound) page contains icons that are accompanied by response sounds. Select (with sound) to listen to these sounds.
92
and set the direction using
or
NOTE The “With direction” ( sounds only when you come near the memory point from the specified direction. Select
) keys in the “With Sound” page are used to activate response
or
(category): Use this key to change the storage category. After selecting
this key, select the key of the new category.
Stored Locations
(name):
Select this key to change the name of a memory point. When (OK). Then select the change has been completed, select
(on) if the name is to be displayed on the map, or
(off) if it is not to be displayed.
(position):
Select this key to review the memory points and modify a memory point on the map screen. After checking or modifying it, select
(OK).
(telephone): Select this key to modify a telephone number. When the
modification has been completed, select
(OK).
93
Stored Locations
■ Deleting memory points You can delete stored memory points by using this function.
Press the points).
button or select
, then select
(stored locations), and then select
(memory
Select the category of the memory point to be deleted.
Select
(delete).
Select the memory point to be deleted.
Confirmation message will be displayed. Select Select
(no) to cancel the deletion.
(yes).
94
Stored Locations
■ Deleting all memory points Using this function, you can delete all memory points.
Press the points).
button or select
, then select
(stored locations), and then select
(memory
Select the category of the memory points to be deleted.
Select
(delete all).
Confirmation message will be displayed. Select Select
(no) to cancel the deletion.
(yes).
95
Stored Locations
■ Modifying category names Use this function if you want to change the category names - (business), and
(entertainment) .
(marked point),
(personal),
Press the points).
button or select
, then select
(stored locations), and then select
(memory
Select the category for which the name is to be changed.
Select
(edit category).
Erase the letters of the category name using letters, and then select
, enter the new
96
Avoid area
■ Storing avoid areas If you use this function to store into the system’s memory the areas you want to avoid, the system will avoid the areas when calculating routes.
Press the
button or select
, then select
(stored locations), and then select
(avoid area).
Stored Locations
Select
(add).
Set an avoid area using your preferred method. A map including the specified avoid area will appear. The method of setting avoid areas is identical to that of setting destinations.
97
Stored Locations
Select
(reduce) or
(enlarge).
(reduce): Reduces the size of the avoid area. (enlarge): Increases the size of the avoid area.
Select
(OK).
NOTE • Reduce the scale of the map to specify a larger area. • Avoid areas can be set only when the scale of the map is 0.6 mile (1 km) or less.
98
■ Reviewing and modifying avoid areas Using this function, you can review the stored avoid areas in the form of a list and modify them if necessary.
Press the
button or select
, then select
(stored locations), and then select
(avoid area).
Stored Locations
Select
(list).
Select the avoid area to be modified.
Select the key corresponding to the item to be modified. For details regarding the function of each key, refer to “Reviewing and modifying memory points” on Page 91.
NOTE The methods for deleting individual and all avoid areas are the same as those described on Page 94 and 95 for memory points.
99
Stored Locations
Home
■ Storing home Use this function to store your home location.
Press the
button or select
, then select
(stored locations), and then select
(home).
Select
(add).
Move the crosshair
to the location of your home and then select
(OK).
100
NOTE To change your home location, select
(list) and then follow the home location storage procedure described above. Select
(delete) to delete the stored home location. Refer to “Deleting memory points” on Page 94 for further details on the
home deletion methods.
Stored Locations
101
Stored Locations
Previous destination (deleting stored locations)
Use this function to delete previously set destinations.
Press the destinations).
button or select
, then select
(stored locations), and then select
(previous
Select If
(delete).
(all delete) is selected, all previously set destinations will be deleted.
Select the destination to be deleted.
: Use this key to display up to five previous destinations. : Use this key to display the previous destination. : Use this key to display the next destination. : Use this key to display up to five of the next destinations.
(name): Use this key to search through the list by name (alphabetical search). (date): Use this key to search through the list by date.
102
3
Confirmation message will be displayed. Select Select
(no) to cancel the deletion.
(yes).
Stored Locations
103
Stored Locations
Preset destinations
■ Storing preset destinations Using this function, you can program up to five frequently used destinations to keys for single-action retrieval later on.
Press the destinations).
button or select
, then select
(stored locations), and then select
(preset
Select
(add).
Select the desired key from preset keys 1 through 5.
104
3
Stored Locations
Set the location of a preset destination using your preferred method. The method of setting preset destinations is identical to that of setting destinations.
Select
(OK).
105
Stored Locations
■ Reviewing and modifying preset destinations Using this function, you can review the preset destinations in the form of a list and modify them if necessary.
Press the destinations).
button or select
, then select
(stored locations), and then select
(preset
Select
(list).
Select any one of keys 1 through 5 according to your modification requirements.
106
3
Select the editing keys appropriate to the item to be modified. For details on the function of each key, refer to “Reviewing and modifying memory points” on Page 91.
Stored Locations
NOTE The methods for deleting individual and all preset destinations are the same as those described on Page 94 and 95 for memory points.
107
Other Functions
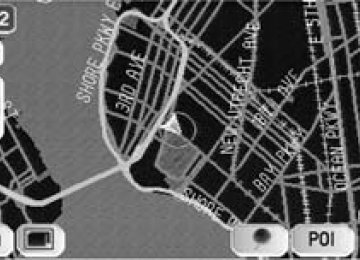
Displaying POIs on a map
Using this function, you can display POIs on the current map screen. Touch the current map screen.
Select
(points of interest).
Select desired POIs (up to five) using the displayed category keys. For selecting POIs of categories other than the six categories on the screen, select
(list categories) and select any POIs from the newly displayed categories. (all local POIs): Use this key to search for all local points of interest (see
below).
Once you have made your selection of POIs, corresponding markers will appear on the current map screen. To delete the markers for these POIs, see Page 112.
NOTE Displayed information about each POI facility might not include recent changes. It is recommended that you check the location or business days/hours before departure.
108
Other Functions
■ Local search
Touch the current map screen.
Select
(points of interest).
Select
(all local points of interest).
109
Select the POI you want to find from the list of categories.
: Use this key to display up to five previous POIs. : Use this key to display the previous POI. : Use this key to display the next POI. : Use this key to display up to five of the next POIs.
: Use this key to search through the list by distance. : Use this key to search through the list by icon type. : Use this key to search through the list by name (alphabetical search).
Once you have made your selection of POIs, corresponding markers will appear on the map.
Other Functions
110
Displaying POI data
You can display the information on a POI, such as the name, address and telephone number.
Other Functions
Display the desired POI markers on the current map screen. (See Pages 74 and 108 for the procedure.)
Select the POI marker for which you want information by moving the crosshair The name of the POI will appear. If no data is stored for the selected POI, no name is displayed.
over it.
Select The information on the POI will be displayed.
(information).
: Use this key to store the POI location as a memory point.
111
Other Functions
Deleting POI markers
Use this function when you want to delete any POI markers on the map.
Touch the current map screen.
Select
(point of interest).
Select The marker for the POI will disappear from the map.
(point of interest off).
112
Editing Quick POI categories
Use this function when you want to edit the Quick POI categories on this unit.
Other Functions
Select
(menu).
Select
(navigation set up).
Select
(quick POI selection).
113
Select the item that you want to edit. (Following procedure show how to change the category from ATM to SUBARU dealership on Quick POI for example.)
Select
(automotive).
Select
(SUBARU dealership).
Other Functions
114
7
SUBARU dealership bookmarked as Quick POI.
(SUBARU dealer) to
Other Functions
115
Other Functions
SUBARU dealership search
■ SUBARU dealership search from POI
First, choose either of the two procedures below to follow the “point of interest” method. • Press the • Press the
button or select button and select
(destination entry), and then select
(point of interest).
, select
(point of interest).
Press the
(category).
Press the
(automotive).
116
Select
(SUBARU dealership) from the list.
Other Functions
NOTE • Displayed information about a specific facility might not include recent changes. It is recommended that you check the location or
business days/hours of a desired point of interest before departure.
The system refine the destination search only for SUBARU dealership.
117
Other Functions
■ Displaying SUBARU dealership on map
Touch the current map screen.
Select
(points of interest).
Select
(list categories).
Select
(automotive).
118
5
Select The POI marker of SUBARU dealership will appear.
(SUBARU dealership) and press
(show).
Other Functions
Select the SUBARU dealership marker by moving the cross hair it.
over
Select
(information).
The information of SUBARU dealership will be displayed.
119
General Information
■ Accuracy of vehicle position Area in which GPS signals cannot be received
Because the radiowave signals from the GPS satellites travel primarily by line of sight, the navigation system might not be able to receive the signals in the areas described below. (If the GPS mark does not appear on the map screen, it means that the GPS radiowave signals are not being properly received.) Inside a tunnel (1) (2) Inside a building (3) Under a three-dimensional road system such as for high-
speed roads
(4) On boulevards lined with trees (5) Between buildings (6) Under a cliff or in a cave • If the GPS antenna or its surroundings are blocked by an obstacle (including cargo), it might not be possible for the system to receive the GPS radiowave signals.
• If multiple paths are created due to the reflection from
buildings, a large measurement error could occur, causing the vehicle’s mark to deviate from its actual position.
Deviation of the vehicle’s position mark
The vehicle’s position mark could deviate from its actual position when the vehicle is being driven under the conditions listed below or due to conditions of the GPS satellites.
120
If the vehicle travels on a road whose actual shape differs from that in the map data, the vehicle’s mark could deviate from the actual position. The correct position will eventually appear on the screen through the correction function. If the screen does not show the correct position for an excessively long time, correct the current position or make an automatic correction. (1) The vehicle’s mark could appear on a parallel road. (2) When the road splits into a narrow Y, the vehicle’s mark
could appear on the other fork of the Y.
(3) When the vehicle makes a right or left turn, the vehicle’s
(4)
mark could appear on one street ahead or behind. If the vehicle is transported by means other than the vehicle’s own power, such as on a ferryboat, the vehicle’s mark will remain in the position it was before the transport until the system can calculate the position through the GPS.
(5) When the vehicle is driven on a steep incline, the
(6)
(7)
(8)
vehicle’s mark could deviate from its actual position. If there are continuous gradual curves in the same direction, the vehicle’s mark could deviate from its actual position. If the vehicle is driven in a zigzag pattern, such as through frequent lane changes, the vehicle’s mark could deviate from its actual position. If the vehicle is placed on a turntable, such as in a parking area, and turned with the ignition OFF, the vehicle’s mark could deviate from its actual orientation.
General Information
Through the use of self-contained navigation, the vehicle’s position can be detected even in an area where the GPS radiowave signals cannot be received.
Making corrections to the detection of the vehicle’s position through map matching
• In map matching, the position information resulting from
the detection of the vehicle’s position and the locus of the travel of the vehicle up to the present are constantly compared to the shape of the roads on the map in order to correct the vehicle’s position mark to the most appropriate road.
• If the vehicle is driven on a road whose actual shape
differs from its map data, the vehicle’s position mark on the map could deviate from its actual position. Occasionally, the correction of the vehicle’s position mark to the actual road on the map can be observed, particularly after the vehicle has turned at an intersection or has exited from a parking area.
The vehicle’s mark could also deviate even after the vehicle has exited the parking area.
(9) The vehicle’s mark could deviate from its actual position if the vehicle is driven using tire chains or snow tires on a snow-covered road or on a mountainous road.
(10) The vehicle’s mark could deviate from its actual position
after the tires have been replaced.
■ How the vehicle position is detected Detecting the vehicle’s position through the GPS
GPS stands for “Global Positioning System”, which is a system used for detecting an object’s position through the use of satellites of the U.S. Department of Defense. Radiowave signals from three or more satellites are received by the navigation system, which utilizes the principle of triangulation to detect the position at which the radiowave signals are received. When the navigation unit is receiving the GPS radiowave signals, a “GPS” mark will appear on the map screen.
Detecting the vehicle’s position through self-contained navigation
Self-contained navigation is a system that detects the vehicle’s position by calculating the vehicle’s driven distance and turning angle though the use of various types of sensors that are mounted on the vehicle.
121
(12) The system might not output guidance even if the
vehicle is driven in reverse on the guided route.
(13) The system might not use a local ferryboat even if the
ferry priority is selected.
(14) If the intersection that you’re being guided to is near the
end of the route search, the system might not be able to provide guidance.
(15) The route might not go on a toll road even if the toll-road
priority is selected. Similarly, a route that uses a toll road could appear on the screen even if the toll-road priority is not selected. (The driver may or may not be able to select “toll-road priority” if both toll and free roads are available.)
General Information
■ Accuracy of the route guidance The conditions listed below do not indicate a malfunction.
(1) The guidance might prompt the driver to drive straight
even though the vehicle is being driven on a straight road.
(2) The directional guidance could display multiple place
names.
(3) If the vehicle makes a turn at an intersection before the guided route, the wrong type of voice guidance could be outputted.
(4) The guidance might not be outputted while the vehicle
is making a turn at an intersection.
(5) The system might not be able to search for the proper
route.
(6) If there is no road to the destination or if there is only a narrow road, the route might be indicated up to an area that is short of the destination.
(7) The repeat search could take a long time while the
vehicle is being driven at high speeds.
(8) While the system is searching again for the route, the route indication might not appear in time for the next right or left turn.
(9) The route might not change even if a search is made
again.
(10) The system might guide the driver to make a U-turn. (11) The system might guide the driver to a road that cannot
actually be travelled (such as a road to which entry is prohibited).
122
General Information
When a Problem Occurs Confirm whether the problem is due to a minor operational error or a malfunction in the system by referring to the table below before you contact your SUBARU dealer for any repair service.
The map does not scroll even when the vehicle is moving.
The screen shown might not be the current map screen.
The vehicle marker does not appear.
The screen shown might not be the current map screen.
The GPS marker is not displayed.
See Page 13 of this manual for instructions on displaying the current map screen.
See Page 13 of this manual for instructions on displaying the current map screen.
The GPS antenna or your vehicle might be in a position where GPS signals cannot be received.
Try moving the GPS antenna or your vehicle to a position where there are no obstacles around.
There is no voice guidance.
• Route guidance might be suspended. • The guidance volume might be too low.
• See “Volume” on Page 12.
123
General Information
Small spots or bright flashes appear on the screen display.
This is probably due to the natural characteristics of the liquid crystal display (LCD).
There is nothing wrong with the display and no need for concern.
The DVD-ROM disc cannot be ejected.
The disc might be incompatible or might have been inserted incorrectly.
124
NOTE This equipment has been tested and found to comply with the limits for a Class B digital device, pursuant to Part 15 of the FCC Rules. These limits are designed to provide reasonable protection against harmful interference in a residential installation. This equipment may cause harmful interference to radio communications, if it is not installed and used in accordance with the instructions. However, there is no guarantee that interference will not occur in a particular installation. If this equipment does cause harmful interference to radio or television reception, which can be determined by turning the equipment off and on, the user is encouraged to try to correct the interference by one or more of the following measures: • Reorient or relocate the receiving antenna. • Increase the separation between the equipment and receiver. • Connect the equipment into an outlet on a circuit different from that
to which the receiver is connected.
• Consult the dealer or an experienced radio/TV technician for help.
NOTE This Class B digital apparatus complies with Canadian ICES-003.
CAUTION
Use of controls or adjustments or performance of procedures other than those specified herein may result in hazardous radiation exposure. In compliance with Federal Regulations, following are reproductions of labels on, or inside the product relating to laser product safety.
Location : Bottom Unit
Location : Monitor top surface
FCC WARNING This equipment may generate or use radio frequency energy. Changes or modifications to this equipment may cause harmful interference unless the modifications are expressly approved in the instruction manual. The user could lose the authority to operate this equipment if an unauthorized change or modification is made.