Download PDF Manual

This supplement contains a detailed description of the Navigation System and instructions for proper operation. Please read this supplement carefully before using your navigation system. Please keep this supplement with your Owner’s Manual and leave it in the vehicle at the time of resale. The next owner will need the information it contains.


FUJI HEAVY INDUSTRIES LTD., TOKYO, JAPAN


is a registered trademark of FUJI HEAVY INDUSTRIES LTD.


Copyright © 2006, FUJI HEAVY INDUSTRIES LTD.


Contents


Safety Warnings.......................................................................3
Before Use ................................................................................4
System Components and Controls........................................8
Starting Up the Navigation System ....................................10
Volume....................................................................................12
Markers and Controls Displayed on Maps..........................13
Screens During Route Setting ......................................................13
Screens During Route Guidance ..................................................15
Menu Screen Keys and Functions........................................16
Map Operations .....................................................................18
Selecting Map Orientation ............................................................18
Changing Map Scale ......................................................................19
Setting Route .........................................................................21
Setting Destination ........................................................................21
Setting destination/waypoints by scrolling the map ........................................21
■ Selecting route ..........................................................................................23
Setting the destination from the navigation menu ..........................................24
■ “Address” method ....................................................................................26
■ “Memory Point” method ..........................................................................29
■ “Home” method or method using stored destinations ............................31
■ “Point of Interest” method ......................................................................32
■ “Previous Destination” method ................................................................34
■ “Select from Map” method ......................................................................35
■ “Freeway Entrance/Exit” method ............................................................36
■ “Emergency” method ..............................................................................38
■ “Coordinates” method ..............................................................................40
■ “Intersection” method ..............................................................................42
■ “Phone number” method..........................................................................44
■ Using “Change Search Area” function ....................................................46


Route Guidance .....................................................................47
Route Guidance Screen..................................................................47
Zoom-in Map at Intersection ........................................................48
Dual Map Display............................................................................49
Freeway Information ......................................................................50
Replaying Voice Guidance ............................................................50
Compass Mode ..............................................................................51
Route Options ........................................................................52
Setting Route Options ....................................................................52
Search condition ..............................................................................................54
Detour ..............................................................................................................55
Route preferences............................................................................................56
Destination and waypoints ..............................................................................57
■ Addition of waypoints ..............................................................................57
■ Modifying destination or waypoint positions ............................................59
■ Modifying visiting order ............................................................................61
■ Deleting destination or waypoints ............................................................63
■ Deleting destination and all waypoints......................................................64
Display route ....................................................................................................65
Route preview ..................................................................................................66
■ Setting conditions for simulation drive ......................................................67
Navigation Setup...................................................................69
Setting Your Navigation System ..................................................69
User settings ....................................................................................................71
Quick POI selection..........................................................................................74
Language Selection ..........................................................................................76
Navigation information ....................................................................................77
■ Vehicle signal ............................................................................................77
■ Version ......................................................................................................78
Calibration ........................................................................................................79
■ Adjusting current position and direction....................................................79
■ Distance ....................................................................................................81
Set clock ..........................................................................................................82
Restore system defaults ..................................................................................84


Contents


Stored Locations....................................................................86
Memory points ................................................................................................89
■ Storing new memory points......................................................................89
■ Reviewing and modifying memory points ................................................91
■ Deleting memory points ............................................................................94
■ Deleting all memory points........................................................................95
■ Modifying category names ........................................................................96
Avoid area ........................................................................................................97
■ Storing avoid areas ....................................................................................97
■ Reviewing and modifying avoid areas ......................................................99
Home..............................................................................................................100
■ Storing home ..........................................................................................100
Previous destination (deleting stored locations) ............................................102
Preset destinations ........................................................................................104
■ Storing preset destinations ....................................................................104
■ Reviewing and modifying preset destinations ........................................106
Other Functions ...................................................................108
Displaying POIs on a map ..............................................................................108
■ Local search ............................................................................................109
Displaying POI data ........................................................................................111
Deleting POI markers ....................................................................................112
Editing Quick POI categories ........................................................................113
SUBARU dealership search............................................................................116
■ SUBARU dealership search from POI ....................................................116
■ Displaying SUBARU dealership on map ..................................................118
General Information ............................................................120
■ Accuracy of vehicle position....................................................................120
■ How the vehicle position is detected......................................................121
■ Accuracy of the route guidance ..............................................................122
When a Problem Occurs ..............................................................123


Safety Warnings


You will find a number of WARNINGs, CAUTIONs and NOTEs in this supplement. These safety warnings alert you to potential hazards that could result in injury to you or others. Please read these safety warnings as well as all other portions of this supplement carefully in order to gain a better understanding of how to use your Navigation system safely.


WARNING


A WARNING indicates a situation in which serious injury or death could result if the warning is ignored.


CAUTION


A CAUTION indicates a situation in which injury or damage to your vehicle including Navigation system, or both, could result if the caution is ignored.


NOTE A NOTE gives informaton or suggestions how to make better use of your Navigation system.


Before Use


WARNING


READ THIS MANUAL FIRST


Read this supplement carefully before using your navigation system. We are not liable for accidents or other problems resulting from failure to follow the instructions in this supplement.


OBEY LOCAL ROAD SIGNS AND REGULATIONS


Always obey local road signs and regulations while following instructions given by the navigation system. Some of the data on the DVD-ROM disc may be outdated due to changes in local road signs and regulations. Furthermore, the data on the DVD-ROM disc does not take into account variable factors such as the weather, road congestion at different times of the day, temporary road closures due to road construction, and special events. Local road signs and regulations always take precedence over directions given by the system. Failure to obey them could place you in physical danger or in violation of the law.


DRIVE SAFELY • Before following an instruction (for example, in the case of changing direction) given by the system, check that the action would be safe to take in the current traffic conditions. Continue to pay attention to safety while following any instruction. • Do not be distracted by the navigation screen. Failure to keep your attention on the road could lead to an accident. When you need to look at the screen while driving, do so for the shortest time possible and avoid staring at the screen. • You must stop the vehicle in a safe place before operating the navigation system. For safety’s sake, some of the navigation system’s controls and functions cannot be used unless the vehicle is stationary. • Use this system only in locations where it is legal to do so. Some states/provinces may have laws prohibiting video screens within sight of the driver.


VOLUME LEVEL


Keep the system’s volume level low enough for you to be able to hear outside sounds while driving. To do otherwise may prevent you from reacting appropriately to traffic conditions and could result in an accident.


Before Use


CAUTION


CAUTION


FOREIGN OBJECTS


Do not allow foreign objects to enter the disc insertion slot, including your fingers. Foreign objects inside the system’s main unit could cause an electric shock or a fire. If the main unit emits smoke or an unusual smell, stop using the system immediately and you contact the nearest SUBARU dealer.


The displays contain mercury. Therefore, the displays must be removed before vehicle disposal. Once the displays have been removed, please reuse, recycle or dispose of them as hazardous waste.


NOTE Liquid-crystal displays may be difficult to read when wearing polarized glasses.


STOP OPERATION IN THE EVENT OF A PROBLEM


In the event of a problem such as the absence of sound or video, try pressing the reset button. Should the problem persist, stop using the system and you contact the nearest SUBARU dealer. (The reset button is also used when you need to upgrade the program. Insert an upgrade disc and press the reset button.)


NEVER DISASSEMBLE OR MODIFY THE SYSTEM


Any attempt to disassemble or modify any part of the system could lead to an electric shock or a fire, or some other type of accident.


Before Use


■ Points to note before use Starting the engine before using the system


The navigation system can be used with the ignition key in either the ON position or the ACC position. To preserve the battery, however, it should be used with the engine running whenever possible. Using the system for a long time with the engine off can cause the battery to run down.


Delay before display of current position


The system will not immediately display a correct indication of your vehicle’s current position after being switched on for the first time or after the battery has been disconnected for a long time. It will display a correct current position indication as soon as it receives Global Positioning System (GPS) signals.


Handling the GPS antenna


Do not paint the antenna. Doing so could impair or prevent signal reception.


Disabled switches


Some switches are disabled during operation of the system. These switches are displayed in fainter colors and no messages are displayed for them.


Risk of damage to the main unit


Be mindful of the occupant compartment temperature. Using the system when the occupant compartment temperature is extremely high or low can damage it or cause it to malfunction. Also, note that the system’s main unit can be damaged by strong vibration and by any metallic object or water that gets inside.


Program reloading after battery disconnection


Condensation


The navigation program will be erased from the system’s memory if the battery is disconnected. If this happens, load the provided DVD-ROM disc in the system’s main unit and turn the ignition switch to the ON or ACC position. The system will automatically reload the program and start operating normally again.


Incorrect operation on rough roads


The system may operate incorrectly or be unable to read the data on the DVD-ROM disc when subjected to severe vibration caused by driving on rough roads.


Condensation can form on the lens inside the main unit when there is a rapid change in occupant compartment temperature (for example, when the heater is switched on in cold weather). Such condensation can cause the system to operate abnormally. If you wait an hour or so for the condensation to disappear, the system should start working normally again. If normal operation is still not restored after several hours, we recommend that you contact the nearest SUBARU dealer.


Replacing the DVD-ROM disc


If you need to replace the DVD-ROM disc, make sure the replacement disc is compatible with your system’s main unit. Inserting an incompatible disc could damage the unit.


■ Handling precautions for DVD-ROM discs • Handle DVD-ROM discs carefully. Any DVD-ROM disc with


excessive warping or scratches on its surface can cause reading errors.


• Store DVD-ROM discs away from direct sunlight, which can


cause warping and render them unusable.


• DVD-ROM discs rotate at high speeds inside the system’s main unit. Never use a cracked or badly warped disc; doing so could damage the unit.


• To clean a DVD-ROM disc, lightly wipe it with a soft cloth in


straight lines from the center hole toward the outer edge. • Never clean DVD-ROM discs with benzene, thinner, record


spray, antistatic spray, or chemical swabs.


• Do not touch the DVD-ROM disc’s data surface (the surface


without a printed label). A dirty data surface can cause reading errors. Always hold a DVD-ROM disc by the center hole and at one point on the outer edge, or by two points on the outer edge.


• Do not write anything on DVD-ROM discs or affix anything,


such as stickers, to them.


Before Use


System Components and Controls


z Monitor


This button is used to display the destination entry screen of the navigation system.


This button is used to display the menu screen of the navigation system.


This button is used to switch to the navigation system’s current map screen from any other screen.


This button is used to display the vehicle information screen. Refer to the Owner’s Manual Supplement for Monitor System for further details.


This button is used to adjust the brightness and contrast of the screen image as well as to display a calendar. Refer to the Owner’s Manual Supplement for Monitor System for further details.


m Navigation system main unit


, Eject button


Depressing this button ejects the DVD-ROM disc.


. Disc insertion slot


Load a DVD-ROM disc into the system’s main unit through this slot. Inserting an edge of the disc in the slot causes it to be drawn in automatically.


⁄0 Reset button


You can use this button in the event of a problem. It is also used when you need to upgrade the program.


NOTE • The navigation system main unit is located under the driver's seat. • Before you load a DVD-ROM disc for the first time, press the reset


button for more than one second. Use the tip of a pen or similar item for this purpose.


• If a malfunction occurs during operation, try pressing the reset


button. The system may recover from the problem.


System Components and Controls


Starting Up the Navigation System


Use the following procedure to start up the navigation system and display the current map screen.


Start the engine. The CAUTION screen will appear, followed by the opening screen.


10


Starting Up the Navigation System


Carefully read the instructions on the CAUTION screen (cited below), then select


CAUTION Make selections only when vehicle is stopped. Watching screen while driving can lead to a serious accident. Some map data may be incorrect. Use judgment and obey traffic rules. See Owner’s Manual for complete operating instructions.


The current map screen will appear.


NOTE • To make a selection, touch the desired key displayed on the screen. • The CAUTION screen remains on the display unless you select • When you use the navigation system for the first time, Greenwich Mean Time will be displayed. Adjust the system’s clock to the right


time using the clock setting screen (“SET CLOCK”) as described on Page 82.


11


Volume


Use this function if you want to change the voice guidance volume setting from the default setting.


Press the


button or select


on the current map screen.


Select


(Volume).


Select the desired key from between (maximum).


(minimum) and


(off): Select this key to mute the sound.


12


Markers and Controls Displayed on Maps


Screens During Route Setting Touch a point on the map. A crosshair (scroll mark) will appear on the screen. Then touch a desired point on the map. The map will scroll with the selected point at the center.


Press button to return to the current map screen.


Scroll the map


1 Time


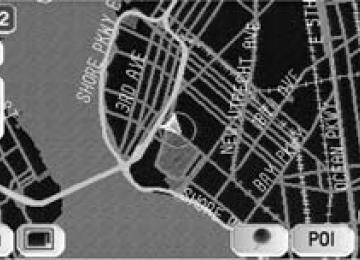
Indicates the current time.


2 GPS marker


Shows the status of the signal from GPS satellites. When this marker appears, your navigation system is receiving GPS signals and using them to calculate the position of your vehicle.


3 Map orientation control


Used to select either a “north up” display or “heading up” display of the map. (See Page 18.)


4 Zoom-out/zoom-in control and map scale


The up-pointing or down-pointing arrow is used to zoom out or zoom in the map. The number indicates the scale of the displayed map. 5 Menu control


Select this key to display the menu screen. (See Page 16.)


6 Screen configuration control


Allows you to select a preferred display type for route guidance. (See Page 47.)


7 Vehicle marker


Indicates the current position and direction of your vehicle.


13


Markers and Controls Displayed on Maps


8 “Store memory point” key Stores markers on the map. This key appears just for a few seconds after a map screen is selected.


9 Point of interest (POI) key


Allows you to display the POI selection screen (see Page 108). On the screen, you can program POIs to appear on a map as markers. This key appears just for a few seconds after a map screen is selected.


0 Distance from current position


Indicates the distance from the current position to the position marked by


- Destination/waypoint key


Used to program a destination or waypoint at the position marked by


on a scroll screen.


14


Screens During Route Guidance


(5 seconds)


Select the screen


Markers and Controls Displayed on Maps


1 Distance and time to destination


Indicates the time (either approximate time required or time of arrival) and the distance to the destination or a waypoint.


2 Route


A thick green line indicates the route you should follow.


3 Turn guidance arrow


Indicates the direction of your turn at the next intersection/junction as well as the distance to the intersection/junction. 4 “Repeat voice” key


If this key is selected, the last voice guidance will be repeated.


5 Current road name


Shows the name of the road you are currently driving on.


6 “Display whole route” key


If this key is selected, a map containing the entire route will be displayed. (See Page 65.)


7 “Change route” key


Selecting this key displays the route option menu. Selecting a new route option causes the system to calculate the selected route.


15


Menu Screen Keys and Functions


Press button or select to display the menu screen.


Select current map screen.


to return to the


The table below shows the keys displayed on the navigation menu (NAV. MENU) screen, the functions accessible by selecting these keys, and the pages of this manual that describe the instructions you should follow when using these functions.


16


Menu screen key


Function


Reference


page


Navigation Set Up


Destination Entry


Stored Locations


Volume


Address Point of Interest Select from Map Emergency Memory Point Previous Destination Intersection Freeway Ent/Exit Phone Number Coordinates Memory Points Avoid Area Dest. & Way Pt. Home Previous Dest. Preset Dests. Volume


page 26
page 32
page 35
page 38
page 29
page 34
page 42
page 36
page 44
page 40
page 89
page 97
page 57
page 100
page 102
page 104
page 12


Route Options


Menu Screen Keys and Functions


User Settings Quick POI Selection Language Selection Navigation Information Calibration Set Clock Restore System Defaults Search Condition Detour Route Pref. Dest. & Way Pt. Display Route Route Preview


page 71
page 74
page 76
page 77
page 79
page 82
page 84
page 54
page 55
page 56
page 57
page 65
page 66


17


Map Operations


Selecting Map Orientation You can select either “heading up” or “north up” display on the current map screen by using the following procedure.


<“Heading up” display>


Select


or


If you select direction in which you are heading is always directly upwards on the screen (the red arrow points to the north).


(“heading up” display), the system rotates the map so that the


<“North up” display>


If you select always directly upwards on the screen.


(“north up” display), the system rotates the map so that north is


18


Changing Map Scale You can increase or decrease the scale of the map using the following procedure:


Select


or


to change the map scale.


Map Operations


Selecting


or


changes the scale as shown to the left.


19


Map Operations


NOTE • You can keep selecting • If you touch an appropriate point on the right side of the scale bar after selecting


to continually change the map scale.


or


or


, you can choose directly from any of


the five scales.


Imperial display


Metric display


128 mi (mile)


256 km


16 mi (mile)


32 km


2 mi (mile)


4 km


1/4 mi (mile)


500 m


1/32 mi (mile)


50 m


Position before change


• The scale can be displayed in Imperial or metric units. To change the units, see Page 71.


20


Setting Route


Setting Destination


Setting destination/waypoints by scrolling the map


Even if you do not know the exact address of your destination or a waypoint on your route to the destination, you can set it by scrolling the map as follows:


Touch the screen and scroll the map until the crosshair destination or a waypoint.


reaches the


Select the The key will separate into the destination key and the waypoint key.


(destination or waypoint) key.


21


for setting the destination.


Select The system will calculate the route and display the entire route to the destination on the map.


Select on your route (see Page 86). You can set up to 5 waypoints per trip.


for a waypoint. The system will program the address of the waypoint


Select Route guidance will begin along the displayed route.


(start).


NOTE • If the system cannot find your desired route, select


(change route). This will allow you to access the ROUTE OPTIONS screen, from which you can prompt the system to calculate a new route. (See Page 52.)


• Selecting


for more than ten seconds will start the demonstration mode operation. Press


the


button or select


to cancel the demonstration mode.


Setting Route


22


■ Selecting route Upon setting the destination, the system prepares to calculate three types of routes to the destination (Quick, Alt., and Short). You can select from any of the three options as follows:


Setting Route


(3 routes).


Select The system will be ready for calculation of any route you select from the three options, namely, Quick (the fastest route), Alt. (alternative route), and Short (the shortest route).


(information).


Select The screen will display details (required time, total distance, roads used, etc.) regarding each option.


Select confirm your selection.


, or


as you desire, and then select


to


23


Setting Route


Setting the destination from the navigation menu


You can set your destination using a variety of methods if you start setting from the navigation menu screen. Before you can use any of these methods, perform the following steps:


Press the


button or select


Press the


button or select


(destination entry).


24


3


Select the method you want to use.


Setting Route


(Address)* (Point of Interest)* (Select from Map) (Emergency) (Memory Point) (Previous Destination) (Intersection)* (Freeway Ent/Exit) (Phone number) (Coordinates)


(Home)


See Page 26. See Page 32. See Page 35. See Page 38. See Page 29. See Page 34. See Page 42. See Page 36. See Page 44. See Page 40.


See Page 31.


You can switch between screens by selecting


(next page) or


(previous page).


NOTE • If the set destination area is different from the one displayed under “Search Area” in the right part of the screen, you must select the


(change) key and specify the desired area again.


• For the methods marked with an asterisk ( * ), you can use the “Change Search Area” function to narrow the area where a destination


or waypoint is located by selecting the


(change) key (see Page 46).


• Depending on the method used or the status of the map displayed, the located point may differ from where the facility you want to


visit actually exists.


25


Setting Route


■ “Address” method


First, choose either of the two procedures below to follow the “address” method. • Press the • Press the


button or select button and select


(destination entry), and then select


(address).


, select


(address).


26


Enter a house number using the keypad on the house number input screen and select


Enter the street name. If you enter enough letters to identify a street name and advance to Step 3, a list showing several street names will be displayed. Select the desired street name from the list.


: Use this key to delete the last character entered. Select it repeatedly if you want to delete all the characters entered.


You can switch between keypad screens showing different characters by selecting


(others),


(symbols) or


(alphabet).


3


Select


(list).


Setting Route


Select the desired street from the list. If the same street name exists in more than one city, a list of these cities will be shown.


Select the correct city from the list.


: Use this key to input the city name from the keypad.


27


Setting Route


(destination) to set the address entered in the above steps


Select as your final destination. The system will calculate the route and display the entire route on the map.


(waypoint) to set the address entered in the above steps as a waypoint


Select on your route. You can program up to five waypoints per trip.


Select Route guidance begins along the displayed route.


(start).


NOTE • If the system cannot find your desired route, select


(change route). This will allow you to access the ROUTE OPTIONS screen,


from which you can prompt the system to calculate a new route. (See Page 52.)


• If your DVD-ROM disc does not contain the relevant house number data, an error message will be displayed and a street map will


appear, allowing you to set the destination using the map.


• If your destination is not on a road, set a destination point on a main road nearest to your true destination. • Selecting the


will display a screen that searches the destination on a city basis.


: Search the destination from all cities. : Search the destination from the nearby five cities within 20 miles from the current position. : Search the destination by inputting the city name.


You can also search the destination from the five cities that you searched in the past.


28


■ “Memory Point” method If you have saved some locations in the system’s memory, you can make use of an appropriate one to set the destination.


Setting Route


First, choose either of the two procedures below to follow the “memory point” method. • Press the (destination entry), and then select • Press the


button or select button and select


(memory point).


, select


(memory point).


Select the category to which the address of the desired location (memory point) is classified in the memory.


Select the address of the desired location (memory point).


: Use this key to display up to five previous suggestions. : Use this key to display the previous suggestion. : Use this key to display the next suggestion. : Use this key to display up to five of the next suggestions.


29


Setting Route


NOTE • Select the displayed.


Select


(destination) or


(waypoint).


(destination),


(icon),


(name), or


(date) key to change the sequence in which memory points are


• You cannot use the “Memory Point” method unless there are memory points stored. To store memory points, see Page 89.


30


■ “Home” method or method using stored destinations If you have stored your home address in the system’s memory, you can use it for your destination or a waypoint. Similarly, if other locations are stored in the memory, they can be conveniently used for quick setting of destination and waypoints.


Setting Route


First, choose either of the two procedures below to follow the “home” method. • Press the • Press the


button or select button.


(destination entry).


, select


Select through The map including your home location or the selected location will be displayed.


(home) or one of the locations programmed to keys


Select


(destination) or


(waypoint).


NOTE Icon memory. For instructions on how to store your home location and other locations, see Page 100.


(home) and keys


through


are displayed only when you have stored your home location and other locations in the


31


Setting Route


■ “Point of Interest” method You can use a selection from the “Point of Interest” listing as your destination or a waypoint.


First, choose either of the two procedures below to follow the “point of interest” method. • Press the • Press the


button or select button and select


(destination entry), and then select


(point of interest).


, select


(point of interest).


32


Enter the name of the desired point of interest and select


Select the desired point of interest from the list.


: Use this key to display up to five previous suggestions. : Use this key to display the previous suggestion. : Use this key to display the next suggestion. : Use this key to display up to five of the next suggestions.


3


Select


(destination) or


(waypoint).


Setting Route


NOTE • If two or more points of interest share the same name, they will both be listed on the screen. Choose an appropriate one from the list. • If there are two or more points of interest with the same name, select • Displayed information about a specific facility might not include recent changes. It is recommended that you check the location or


(city) to shorten the list.


(category) or


business days/hours of a desired point of interest before departure.


33


Setting Route


■ “Previous Destination” method This method allows you to choose one of the most recently used 100 destinations or waypoints as your new destination or waypoint.


First, choose either of the two procedures below to follow the “previous destination” method. • Press the


(destination entry), and then select


button or select


, select


(previous


destination).


• Press the


button and select


(previous destination).


Select a desired location from the Previous Destination list.


: Use this key to display up to five previous suggestions. : Use this key to display the previous suggestion. : Use this key to display the next suggestion. : Use this key to display up to five of the next suggestions.


Select


(destination) or


(waypoint).


NOTE You can select


(name) or


(date) to change the sequence in which previous destinations are displayed.


34


■ “Select from Map” method You can specify a location on the map that was last displayed and use it for setting the destination or a waypoint.


Setting Route


First, choose either of the two procedures below to follow the “select from map” method. • Press the • Press the


button or select button and select


(destination entry), and then select


(select from map).


, select


(select from map).


Scroll the map until the crosshair waypoint.


is at the desired destination or


Select


(destination) or


(waypoint).


35


Setting Route


■ “Freeway Entrance/Exit” method You can use the name of a freeway entrance or exit selected from the “Freeway Entrance/Exit” list for setting your destination or a waypoint.


First, choose either of the two procedures below to follow the “freeway entrance/exit” method. • Press the


(destination entry), and then select


button or select


, select


(freeway


entrance/exit).


• Press the


button and select


(freeway entrance/exit).


Enter the name of the desired freeway and select


Select the name of the freeway from the list.


: Use this key to display up to five previous suggestions. : Use this key to display the previous suggestion. : Use this key to display the next suggestion. : Use this key to display up to five of the next suggestions.


36


3


Select


(entrance) or


(exit).


Setting Route


Select the name of the street from which you will enter the freeway or to which you will go after leaving the freeway.


: You must select this key before you can enter the street name. : Use this key to search through the list by distance. : Use this key to search through the list by name (alphabetical search).


Select


(destination) or


(waypoint).


37


Setting Route


■ “Emergency” method This function allows the nearest police station or hospital to be set as the destination.


First, choose either of the two procedures below to follow the “emergency” method. • Press the • Press the


button or select button and select


(destination entry), and then select


(emergency).


, select


(emergency).


38


Select either The nearest police stations or hospitals will be displayed accordingly.


or


Select the desired institution from the list.


: Use this key to display up to five previous suggestions. : Use this key to display the previous suggestion. : Use this key to display the next suggestion. : Use this key to display up to five of the next suggestions.


: Sorts the list by distance.


: Sorts the list in alphabetical order by name.


3


Select


(destination) or


(waypoint).


NOTE Displayed information about each facility might be changed. It is recommended that you check the location or business days/hours before departure.


Setting Route


39


Setting Route


■ “Coordinates” method You can set destinations or waypoints using their latitudes and longitudes as follows:


First, choose either of the two procedures below to follow the “coordinates” method. • Press the • Press the


button or select button and select


(destination entry), and then select


(coordinates).


, select


(coordinates).


40


Enter the latitude of the desired location. Use the numeric keys together with the [°] (degrees), [’] (minutes), and [“] (seconds) keys.


Enter the longitude of the location.


: Use this key to switch over to the north latitude. : Use this key to switch over to the south latitude. : Use this key to switch over to the west longitude. : Use this key to switch over to the east longitude. : Use this key to delete the character last entered. Select it repeatedly if you want to delete all the characters entered.


3


Select


Setting Route


Select


(destination) or


(waypoint).


41


Setting Route


■ “Intersection” method You can use a intersection defined by two street names as a location for setting your destination or a waypoint.


First, choose either of the two procedures below to follow the “intersection” method. • Press the • Press the


button or select button and select


(destination entry), and then select


(intersection).


, select


(intersection).


42


Enter the name of the first street and then select


Select the street from the “Intersection” list.


: Use this key to display up to five previous suggestions. : Use this key to display the previous suggestion. : Use this key to display the next suggestion. : Use this key to display up to five of the next suggestions.


3


Specify the second street using the same procedure as the first street.


Setting Route


Select


(destination) or


(waypoint).


NOTE No intersection is defined if • the two streets do not cross each other, • the two streets are a freeway and a highway, • either street is for right or left turns only, • both are one-way streets, • either street is for U-turns, • the two streets cross on the inside lane, • either street is an on/off ramp, • either street is a frontage street, and/or


43


Setting Route


■ “Phone number” method This function allows buildings and the like to be located using their phone numbers.


First, choose either of the two procedures below to follow the “phone number” method. • Press the • Press the


button or select button and select


(destination entry), and then select


(phone number).


, select


(phone number).


Enter the phone number starting with the area code.


Select


44


3


Select


(destination) or


(waypoint).


NOTE If a number of candidates exist as a result of, for example, different area codes, these will be displayed in a list. Your desired destination can then be selected from the list.


Setting Route


45


Setting Route


■ Using “Change Search Area” function This function designates a general geographical area where the destination or waypoint you want to set is located. This function can be used in the methods marked with an asterisk (*) on Page 25.


First, choose either of the two procedures below to follow the “change” method. • Press the • Press the


button or select button and select


(destination entry), and then select


(change).


, select


(change).


Select the desired area. The DESTINATION ENTRY menu screen will appear.


NOTE • The SEARCH AREA screen shown above is a sample image. It may be slightly different from the actual screen image. • The DVD-ROM disc containing map data is split into two discs, containing information regarding East and West U.S. respectively. Both


discs cover the Continental U.S. and the District of Columbia, but the POI (points of interest) are split depending on the disc, as follows: WEST: US1 ~ US7 and southern Canada EAST: US6 ~ US10 and southern Canada US6, US7 and southern Canada (CAN) are included in both discs. Please note that Alaska, Hawaii, Guam and the other Pacific islands are not covered.


46


Route Guidance


Route Guidance Screen During route guidance, the system can indicate on a second screen the directions in which you must make turns at the next and following intersections in either of two ways: “turn arrow” or “turn list”. Specify your preferred method of indication as follows:


Turn direction is indicated by an arrow.


Turn directions are indicated in a list.


Select


(screen configuration).


for turn arrow indication or


Select If you need not make any further selection, select disappear.


for turn list indication. . The relevant keys will


47


Route Guidance


Zoom-in Map at Intersection Before you arrive at an intersection, the system will automatically show a zoom-in map of the intersection on a second screen to make the guidance clearer.


As you approach an intersection during route guidance, a zoom-in map of the intersection automatically appears on a second screen. After you drive past the intersection, the zoom-in map disappears.


As you approach a fork on a freeway during route guidance, a zoom-in map of the freeway automatically appears on a second screen, making the route guidance clearer.


NOTE Use the following procedure to recall the most recently displayed zoom-in map of an intersection or a freeway fork. 1. Select 2. Select


(screen configuration). (re-display of intersection/range guidance).


If you need not make any further selection, select


. The relevant keys will disappear.


48


Dual Map Display You can configure the screen for a dual map display.


Route Guidance


Select


(screen configuration).


(dual map).


Select If you wish to return to the single map display, select If you need not make any further selection, select disappear.


(single map).


. The relevant keys will


NOTE If you wish to modify the display selections that have been made for a second screen, touch the top of the screen. After completing the modification, select • See Page 19 for details on scale changes. • See Page 108 for details on setting with


49


Route Guidance


Freeway Information A list of buildings and facilities along a freeway can be displayed on the screen.


Select


(screen configuration).


(freeway information).


Select If you need not make any further selection, select disappear.


. The relevant keys will


Replaying Voice Guidance If you want to listen to the last voice guidance again during route guidance, use the following procedure:


Select You can hear the voice guidance again.


50


Compass Mode Longitude and latitude of present location can be displayed on the screen.


Route Guidance


Select


(screen configuration).


Select


(compass).


Longitude and latitude of present location are displayed at lower right of the screen.


51


Route Options


Setting Route Options Using the functions available from the Route Options screen, you can change the route options, stop the route guidance or check the route. Use the following procedures:


52


Press the


button or select


(route options).


Select The Route Options screen will appear. Select any of the following displayed functions as necessary:


(search condition):


This function allows you to specify the way in which the system calculates the route to the destination. (See Page 54.)


(detour):


This function allows you to prompt the system to calculate an alternative route from your current position within a specified distance. (See Page 55.)


(route preferences):


This function allows you to prompt the system to alter the route search conditions and recalculate the route accordingly. (See Page 56.)


Route Options


(destination and waypoint):


This function allows you to modify the destination and waypoints, and prompt the system to recalculate the route accordingly. (See Page 57.)


(display route):


This function allows you to confirm the entire route and, if necessary, prompt the system to recalculate the route according to your specification. (See Page 65.)


(route preview):


This function allows you to simulate a drive along the system-calculated route before departure. (See Page 66.)


(calculate):


Selecting this key prompts the system to recalculate the route.


(cancel guidance):


Selecting this key prompts the system to stop route guidance. Note that this erases the destination and waypoints. To prompt the system to start guidance again, select


(calculate).


NOTE A recalculated route will sometimes be the same route as the one displayed before recalculation.


53


Route Options


Search condition


You can specify the way in which the system calculates your route.


Press the


button or select


, then select


(route options), and then select


(search condition).


(Quick),


Select calculating the route to reach the next waypoint or the destination from the current point.


(Short) to specify the way of


(Alt.), or


: The system will calculate a route with the shortest driving time required. : The system will calculate an alternative route.


(You can select


for the first waypoint. Only can be specified for the second and subsequent waypoints.) : The system will calculate a route with the shortest driving distance.


or


or


Select


(calculate).


Select


(start).


54


Detour


You can specify a detour distance from your current position. The system will calculate an alternative route according to the distance specification, enabling you to take a detour.


Press the


button or select


, then select


(route options), and then select


(detour).


Route Options


Select a detour distance using


, or


(whole route).


The system will then calculate an alternative route that detours from the current location within the specified distance.


Select


(start).


NOTE If you are driving off the route, it is not possible to calculate a detour route.


55


Route Options


Route preferences


Use this function to specify preferred route search conditions. The system will start recalculating the route according to your specified conditions.


Press the


button or select


, then select


(route options), and then select


(route preferences).


Specify conditions by selecting keys. Each time you select a key, it will toggle between “usage” and “non-usage” of the corresponding roads or ferries.


Select


(calculate).


NOTE • The • The route calculation will not always be able to follow the specified conditions.


(calculate) key can be selected during route guidance.


56


Destination and waypoints


You can change the destination or waypoints for the route calculation by using this function.


■ Addition of waypoints Use the following procedure to add new waypoints to the current route for recalculation.


Press the waypoints).


button or select


, then select


(route options), and then select


(destination and


Route Options


Select


(add).


Set a waypoint using any method available from the screen.


57


Route Options


Specify the order in which all the set waypoints are to be visited. Choose the location of the waypoint to be added, and then select (add).


Select


(calculate).


NOTE • When a new destination is set using


out again.


(destination), it will replace the current destination and the route calculation will be carried


• Step 3 must be performed for the second and any subsequent waypoints. • Repeat Steps 1 to 3 for each waypoint to be set.


58


■ Modifying destination or waypoint positions Use this procedure to modify the destination or waypoint positions. The screen will display the calculated route and the positions of the destination or waypoints that you will be able to modify.


Press the waypoints).


button or select


, then select


(route options), and then select


(destination and


Route Options


Select


(list).


Select


(change location).


Select the key corresponding to the location that is to be modified. The map for the area around your current location will be displayed.


59


Scroll the map to bring the crosshair


to the location and then select


Select


(calculate).


Route Options


60


■ Modifying visiting order You can change the order for visiting your waypoints by using this procedure.


Press the waypoints).


button or select


, then select


(route options), and then select


(destination and


Route Options


Select


(list).


Select the waypoint keys according to the order of your visit. If you wish to cancel the visiting order number indication, select


(undo).


When you complete the sequencing, the visiting order will be updated automatically.


61


Route Options


Select


Select


(calculate).


62


■ Deleting destination or waypoints Use this procedure when you wish to delete the previously set destination or waypoint.


Press the waypoints).


button or select


, then select


(route options), and then select


(destination and


Route Options


Select


(delete).


Select the key corresponding to the destination or waypoint you wish to delete.


Confirmation message will be displayed. Select Select


(no) to cancel the deletion.


(yes).


Select


(calculate).


63


Route Options


■ Deleting destination and all waypoints You can delete the destination and all previously set waypoints in a single process.


Press the waypoints).


button or select


, then select


(route options), and then select


(destination and


Select


(delete all).


Confirmation message will be displayed. Select Select


(no) to cancel the deletion.


(yes).


64


Display route


Use this function to display the entire route. You can also specify an area you wish to avoid and prompt the system to recalculate the route accordingly.


Press the


button or select


, then select


(route options), and then select


(display route).


Route Options


Select The entire route screen will appear and then it will change to the Turn List screen.


(turn list).


(avoid):


Select this key if you wish to specify any areas to avoid from the list of street names.


(recalculate): The system will recalculate the route.


If the data for the route cannot be shown on one screen, scroll the screen using the


and


keys.


Select


(start).


65


Route Options


Route preview


The system can show you an automated simulation of the calculated route.


Press the


button or select


, then select


(route options), and then select


(route preview).


Start the simulation drive according to the calculated route using the keys on the screen as follows:


: Move to the start point. : The simulation drive will start toward the start point. After the start, this key will , and when it is selected, the simulation drive will switch to


be displayed as high-speed driving.


: The simulation drive will stop. : The simulation drive will start toward the destination. After the start, this key


will be displayed as switch to high-speed driving.


, and when it is selected, the simulation drive will


: Move to the destination. : The EDIT ROUTE PREVIEW screen will be displayed. (See page 67.)


NOTE The visual speed of the simulation vehicle varies with the map scale selected. The speed appears to be faster with a wide-area map than with a zoom-in map.


66


■ Setting conditions for simulation drive You can change the simulation drive conditions using this procedure.


Press the


button or select


, then select


(route options), and then select


(route preview).


Route Options


Select The EDIT ROUTE PREVIEW screen will appear.


(edit).


(to destination or next waypoint):


The simulation drive will stop at the destination or the next waypoint.


(to next POI):


The simulation drive will stop at a point of interest that has been set up on the route.


(delete):


A selected POI will be deleted. POI keys: When you select one of the six POI category keys, the system will retrieve the selected POI from the Quick POI storage and display it on the map. When you select the Page 74.


key, you can find POIs of other categories. For more details, see


67


Route Options


If, for example, the simulation drive is started, your simulation vehicle will then stop at a restaurant on the route. If you then select restaurant.


(information), the system will display information on the


(restaurant) category key is selected and a


NOTE You must finish the simulation drive before you actually start to drive. Although the simulation drive will automatically stop when you actually start to drive, not finishing it properly can lead to an error in the display of your vehicle’s current position.


68


Navigation Setup


Setting Your Navigation System Using the functions available from the Navigation Setup screen, you can change the map display conditions and alter the route guidance conditions.


Press the


button or select


Select The NAVIGATION SET UP screen will appear.


(navigation setup).


69


Navigation Setup


70

Loading...
x