- Download PDF Manual
-
restraint in a rear seat. It is also better to secure a forward-facing child restraint in a rear seat. If you must secure a forward-facing child restraint in the right front seat, always move the front passenger seat as far back as it will go.
Children who are not restrained properly can strike other people, or can be thrown out of the vehicle.
{ CAUTION
Never do this. Never hold an infant or a child while riding in a vehicle. Due to crash forces, an infant or a child will become so heavy it is not possible to hold it during a crash. For example, in a crash at only 25 mph (40 km/h), a 12 lb (5.5 kg) infant will suddenly become a 240 lb (110 kg) force on a person’s arms. An infant should be secured in an appropriate restraint.
{ CAUTION
Never do this. Children who are up against, or very close to, any airbag when it inflates can be seriously injured or killed. Never put a rear-facing child restraint in the right front seat. Secure a rear-facing child
(Continued)
1-42
Seats and Restraints
Q: What are the different types of
add-on child restraints?
A: Add-on child restraints, which are
purchased by the vehicle’s owner, are available in four basic types. Selection of a particular restraint should take into consideration not only the child’s weight, height, and age but also whether or not the restraint will be compatible with the motor vehicle in which it will be used. For most basic types of child restraints, there are many different models available. When purchasing a child restraint, be sure it is designed to be used in a motor vehicle. If it is, the restraint will have a label saying that it meets federal motor vehicle safety standards.
The restraint manufacturer’s instructions that come with the restraint state the weight and height limitations for a particular child restraint. In addition, there are many kinds of restraints available for children with special needs.
{ CAUTION
To reduce the risk of neck and head injury during a crash, infants need complete support. This is because an infant’s neck is not fully developed and its head weighs so much compared with the rest of its body. In a crash, an infant in a rear-facing child restraint settles into the restraint, so the crash forces can be distributed across the strongest part of an infant’s body, the back and shoulders. Infants should always be secured in rear-facing child restraints.
{ CAUTION
A young child’s hip bones are still so small that the vehicle’s regular safety belt may not remain low on the hip bones, as it should. Instead, it may settle up around the child’s abdomen. In a crash, the belt would apply force on a body area that is unprotected by any bony structure. This alone could cause serious or fatal injuries. To reduce the risk of serious or fatal injuries during a crash, young children should always be secured in appropriate child restraints.
Child Restraint Systems
Seats and Restraints
1-43
(A) Rear-Facing Infant Seat
A rear-facing infant seat (A) provides restraint with the seating surface against the back of the infant. The harness system holds the infant in place and, in a crash, acts to keep the infant positioned in the restraint.
(B) Forward-Facing Child Seat
A forward-facing child seat (B) provides restraint for the child’s body with the harness.
(C) Booster Seats
A booster seat (C) is a child restraint designed to improve the fit of the vehicle’s safety belt system. A booster seat can also help a child to see out the window.
1-44
Seats and Restraints
Securing an Add-On Child Restraint in the Vehicle { CAUTION
A child can be seriously injured or killed in a crash if the child restraint is not properly secured in the vehicle. Secure the child restraint properly in the vehicle using the vehicle’s safety belt or LATCH system, following the instructions that came with that child restraint and the instructions in this manual.
To help reduce the chance of injury, the child restraint must be secured in the vehicle. Child restraint systems must be secured in vehicle seats by lap belts or the lap belt portion of a lap-shoulder belt, or by the LATCH system. See Lower
Anchors and Tethers for Children (LATCH) on page 1-46 for more information. A child can be endangered in a crash if the child restraint is not properly secured in the vehicle. When securing an add-on child restraint, refer to the instructions that come with the restraint which may be on the restraint itself or in a booklet, or both, and to this manual. The child restraint instructions are important, so if they are not available, obtain a replacement copy from the manufacturer. Keep in mind that an unsecured child restraint can move around in a collision or sudden stop and injure people in the vehicle. Be sure to properly secure any child restraint in the vehicle — even when no child is in it.
Securing the Child Within the Child Restraint
{ CAUTION
A child can be seriously injured or killed in a crash if the child is not properly secured in the child restraint. Secure the child properly following the instructions that came with that child restraint.
Where to Put the Restraint According to accident statistics, children and infants are safer when properly restrained in a child restraint system or infant restraint system secured in a rear seating position. We recommend that children and child restraints be secured in a rear seat, including: an infant or a child riding in a rear-facing child restraint;
Seats and Restraints
1-45
When securing a child restraint in a rear seating position, study the instructions that came with the child restraint to make sure it is compatible with this vehicle. Wherever a child restraint is installed, be sure to secure the child restraint properly. Keep in mind that an unsecured child restraint can move around in a collision or sudden stop and injure people in the vehicle. Be sure to properly secure any child restraint in the vehicle — even when no child is in it.
a child riding in a forward-facing child seat; an older child riding in a booster seat; and children, who are large enough, using safety belts. A label on the sun visor says, “Never put a rear-facing child restraint in the front.” This is because the risk to the rear-facing child is so great, if the airbag deploys.
{ CAUTION
A child in a rear-facing child restraint can be seriously injured or killed if the right front passenger airbag inflates. This is because the back of the rear-facing child restraint would be very close to the inflating airbag. A child in a forward-facing child restraint can be seriously injured or killed if the right front passenger airbag inflates and the passenger seat is in a forward position.
(Continued)
CAUTION (Continued)
Even if the passenger sensing system has turned off the right front passenger frontal airbag, no system is fail-safe. No one can guarantee that an airbag will not deploy under some unusual circumstance, even though it is turned off. Secure rear-facing child restraints in a rear seat, even if the airbag is off. If you secure a forward-facing child restraint in the right front seat, always move the front passenger seat as far back as it will go. It is better to secure the child restraint in a rear seat. See Passenger Sensing System on page 1-30 for additional information.
1-46
Seats and Restraints
Lower Anchors and Tethers for Children (LATCH) The LATCH system holds a child restraint during driving or in a crash. This system is designed to make installation of a child restraint easier. The LATCH system uses anchors in the vehicle and attachments on the child restraint that are made for use with the LATCH system. Make sure that a LATCH-compatible child restraint is properly installed using the anchors, or use the vehicle’s safety belts to secure the restraint, following the instructions that came with that restraint, and also the instructions in this manual. When installing a child restraint with a top tether, you must also use either the lower anchors or the safety belts to properly secure the child restraint. A child restraint must never be installed using only the top tether and anchor.
In order to use the LATCH system in your vehicle, you need a child restraint that has LATCH attachments. The child restraint manufacturer will provide you with instructions on how to use the child restraint and its attachments. The following explains how to attach a child restraint with these attachments in your vehicle. Not all vehicle seating positions or child restraints have lower anchors and attachments or top tether anchors and attachments. Lower Anchors
Lower anchors (A) are metal bars built into the vehicle. There are two lower anchors for each LATCH seating position that will accommodate a child restraint with lower attachments (B).
Top Tether Anchor
A top tether (A, C) anchors the top of the child restraint to the vehicle. A top tether anchor is built into the vehicle. The top tether attachment (B) on the child restraint connects to the top tether anchor in the vehicle in order to reduce the forward movement and rotation of the child restraint during driving or in a crash.
Your child restraint may have a single tether (A) or a dual tether (C). Either will have a single attachment (B) to secure the top tether to the anchor. Some child restraints with top tethers are designed for use with or without the top tether being attached. Others require the top tether always to be attached. In Canada, the law requires that forward-facing child restraints have a top tether, and that the tether be attached. Be sure to read and follow the instructions for your child restraint. If the child restraint does not have a top tether, one can be obtained, in kit form, for many child restraints. Ask the child restraint manufacturer whether or not a kit is available.
Seats and Restraints
1-47
Lower Anchor and Top Tether Anchor Locations
To assist you in locating the lower anchors, each seating position with lower anchors has two labels, near the crease between the seatback and the seat cushion.
Rear Seat
i (Top Tether Anchor): Seating positions with top tether anchors.
j (Lower Anchor): Seating positions with two lower anchors.
If the top tether anchors are covered, the top tether anchor symbol will be located on the cover to assist you in locating them.
1-48
Seats and Restraints
The top tether anchors are located on the seatback for each rear seating position. Be sure to use an anchor located on the same side of the vehicle as the seating position where the child restraint will be placed. Do not secure a child restraint in a position without a top tether anchor if a national or local law requires that the top tether be attached, or if the instructions that come with the child restraint say that the top tether must be attached. There is no place to attach the top tether in this position.
Accident statistics show that children are safer if they are restrained in the rear rather than the front seat. See Where to Put the Restraint on page 1-44 for additional information. Securing a Child Restraint Designed for the LATCH System
{ CAUTION
If a LATCH-type child restraint is not attached to anchors, the child restraint will not be able to protect the child correctly. In a crash, the child could be seriously injured or killed. Install a LATCH-type child restraint properly using the anchors, or use the vehicle’s safety belts to secure the restraint, following the instructions that came with the child restraint and the instructions in this manual.
{ CAUTION
Do not attach more than one child restraint to a single anchor. Attaching more than one child restraint to a single anchor could cause the anchor or attachment to come loose or even break during a crash. A child or others could be injured. To reduce the risk of serious or fatal injuries during a crash, attach only one child restraint per anchor.
{ CAUTION
Children can be seriously injured or strangled if a shoulder belt is wrapped around their neck and the safety belt continues to
(Continued)
Seats and Restraints
1-49
2. If the child restraint manufacturer
recommends that the top tether be attached, attach and tighten the top tether to the top tether anchor, if equipped. Refer to the child restraint instructions and the following steps: 2.1. Find the top tether anchor. 2.2. If the anchor is covered, open the cover to expose the anchor.
1. Attach and tighten the lower
attachments to the lower anchors. If the child restraint does not have lower attachments or the desired seating position does not have lower anchors, secure the child restraint with the top tether and the safety belts. Refer to your child restraint manufacturer instructions and the instructions in this manual. 1.1. Find the lower anchors for
the desired seating position.
1.2. Put the child restraint on
the seat.
1.3. Attach and tighten the
lower attachments on the child restraint to the lower anchors.
CAUTION (Continued)
tighten. Buckle any unused safety belts behind the child restraint so children cannot reach them. Pull the shoulder belt all the way out of the retractor to set the lock, if your vehicle has one, after the child restraint has been installed.
Notice: Do not let the LATCH attachments rub against the vehicle’s safety belts. This may damage these parts. If necessary, move buckled safety belts to avoid rubbing the LATCH attachments. Do not fold the empty rear seat with a safety belt buckled. This could damage the safety belt or the seat. Unbuckle and return the safety belt to its stowed position, before folding the seat.
1-50
Seats and Restraints
2.3. Route, attach, and tighten the top tether according to your child restraint instructions and the following instructions:
If the position you are using has an adjustable headrest or head restraint and you are using a dual tether, route the tether around the headrest or head restraint.
If the position you are using has an adjustable headrest or head restraint and you are using a single tether, raise the headrest or head restraint and route the tether under the headrest or head restraint and in between the headrest or head restraint posts.
3. Push and pull the child restraint in different directions to be sure it is secure.
Replacing LATCH System Parts After a Crash { CAUTION
A crash can damage the LATCH system in the vehicle. A damaged LATCH system may not properly secure the child restraint, resulting in serious injury or even death in a crash. To help make sure the LATCH system is working properly after a crash, see your dealer/retailer to have the system inspected and any necessary replacements made as soon as possible.
If the vehicle has the LATCH system and it was being used during a crash, new LATCH system parts may be needed. New parts and repairs may be necessary even if the LATCH system was not being used at the time of the crash.
Seats and Restraints
1-51
3. Push the latch plate into the
buckle until it clicks. Position the release button on the buckle so that the safety belt could be quickly unbuckled if necessary.
Securing Child Restraints (Rear Seat) When securing a child restraint in a rear seating position, study the instructions that came with your child restraint to make sure it is compatible with this vehicle. If the child restraint has the LATCH system, see Lower Anchors and Tethers for Children (LATCH) on page 1-46 for how and where to install your child restraint using LATCH. If a child restraint is secured in the vehicle using a safety belt and it uses a top tether, see Lower Anchors and Tethers for Children (LATCH) on page 1-46 for top tether anchor locations. Do not secure a child restraint in a position without a top tether anchor if a national or local law requires that the top tether be anchored, or if the instructions that come with the child restraint say that the top strap must be anchored.
In Canada, the law requires that forward-facing child restraints have a top tether, and that the tether be attached. If the child restraint does not have the LATCH system, you will be using the safety belt to secure the child restraint in this position. Be sure to follow the instructions that came with the child restraint. Secure the child in the child restraint when and as the instructions say. If more than one child restraint needs to be installed in the rear seat, be sure to read Where to Put the Restraint on page 1-44. 1. Put the child restraint on the seat. 2. Pick up the latch plate, and
run the lap and shoulder portions of the vehicle’s safety belt through or around the restraint. The child restraint instructions will show you how.
1-52
Seats and Restraints
4. Pull the rest of the shoulder belt all the way out of the retractor to set the lock.
5. To tighten the belt, push down
on the child restraint, pull the shoulder portion of the belt to tighten the lap portion of the belt, and feed the shoulder belt back into the retractor. When installing a forward-facing child restraint, it may be helpful to use your knee to push down on the child restraint as you tighten the belt.
6. If your child restraint has a top tether, follow the child restraint manufacturer’s instructions regarding the use of the top tether. See Lower Anchors and Tethers for Children (LATCH) on page 1-46 for more information.
7. Push and pull the child restraint in different directions to be sure it is secure.
To remove the child restraint, unbuckle the vehicle safety belt and let it return to the stowed position. If the top tether is attached to a top tether anchor, disconnect it.
Securing Child Restraints (Right Front Seat) This vehicle has airbags. A rear seat is a safer place to secure a forward-facing child restraint. See Where to Put the Restraint on page 1-44. In addition, the vehicle has a passenger sensing system which is designed to turn off the right front passenger frontal and seat-mounted side impact airbag under certain conditions. See Passenger Sensing System on page 1-30 and Passenger Airbag Status Indicator on page 4-15
for more information, including important safety information.Seats and Restraints
1-53
A label on the sun visor says, “Never put a rear-facing child seat in the front.” This is because the risk to the rear-facing child is so great, if the airbag deploys.
{ CAUTION
A child in a rear-facing child restraint can be seriously injured or killed if the right front passenger airbag inflates. This is because the back of the rear-facing child restraint would be very close to the inflating airbag. A child in a forward-facing child restraint can be seriously injured or killed if the right front passenger airbag inflates and the passenger seat is in a forward position.
(Continued)
CAUTION (Continued)
Even if the passenger sensing system has turned off the right front passenger frontal airbag, no system is fail-safe. No one can guarantee that an airbag will not deploy under some unusual circumstance, even though it is turned off. Secure rear-facing child restraints in a rear seat, even if the airbag is off. If you secure a forward-facing child restraint in the right front seat, always move the front passenger seat as far back as it will go. It is better to secure the child restraint in a rear seat. See Passenger Sensing System on page 1-30 for additional information.
1-54
Seats and Restraints
If the child restraint has the LATCH system, see Lower Anchors and Tethers for Children (LATCH) on page 1-46 for how and where to install the child restraint using LATCH. If a child restraint is secured in the seating position using a safety belt and it uses a top tether, see Lower Anchors and Tethers for Children (LATCH) on page 1-46
for top tether anchor locations. Do not secure a child seat in a position without a top tether anchor if a national or local law requires that the top tether be anchored, or if the instructions that come with the child restraint say that the top strap must be anchored. In Canada, the law requires that forward-facing child restraints have a top tether, and that the tether be attached.You will be using the lap-shoulder belt to secure the child restraint in this position. Follow the instructions that came with the child restraint. 1. Move the seat as far back as it
will go before securing the forward-facing child restraint. When the passenger sensing system has turned off the right front passenger frontal and seat-mounted side impact airbag, the off indicator on the passenger airbag status indicator should light and stay lit when you start the vehicle. See Passenger Airbag Status Indicator on page 4-15. 2. Put the child restraint on
the seat.
3. Pick up the latch plate, and run the lap and shoulder portions of the vehicle’s safety belt through or around the restraint. The child restraint instructions will show you how.
4. Push the latch plate into the
buckle until it clicks. Position the release button on the buckle so that the safety belt could be quickly unbuckled if necessary.
Seats and Restraints
1-55
7. Push and pull the child restraint in different directions to be sure it is secure.
If the airbags are off, the off indicator in the passenger airbag status indicator will come on and stay on when the vehicle is started. If a child restraint has been installed and the on indicator is lit, see “If the On Indicator is Lit for a Child Restraint” under Passenger Sensing System on page 1-30
for more information. To remove the child restraint, unbuckle the vehicle safety belt and let it return to the stowed position.5. Pull the rest of the shoulder belt all the way out of the retractor to set the lock.
6. To tighten the belt, push down
on the child restraint, pull the shoulder portion of the belt to tighten the lap portion of the belt and feed the shoulder belt back into the retractor. When installing a forward-facing child restraint, it may be helpful to use your knee to push down on the child restraint as you tighten the belt.
1-56
Seats and Restraints
✍ NOTES
Keys, Doors and Windows
2-1
Keys, Doors and Windows
Keys Keys ...................................2-2
Remote Keyless Entry (RKE) System ...................2-3
Remote Keyless Entry (RKE) System Operation ...2-4Doors and Locks Door Locks .........................2-5
Power Door Locks ..............2-6
Rear Door Security Locks ................................2-6
Liftgate ...............................2-6Theft-Deterrent Systems Theft-Deterrent Systems .....2-8
Immobilizer .........................2-8
Immobilizer Operation .........2-8
Content Theft-Deterrent ......2-9
Windows Windows ...........................2-10
Power Windows ................2-10
Sun Visors ........................2-11
Mirrors Manual Rearview Mirror ....2-11
Outside Mirror(s) ...............2-11
Outside Power Mirror(s) ....2-12
Sunroof Sunroof .............................2-122-2
Keys, Doors and Windows
Keys
{ CAUTION
Leaving children in a vehicle with the ignition key is dangerous for many reasons, children or others could be badly injured or even killed. They could operate the power windows or other controls or even make the vehicle move. The windows will function with the keys in the ignition and children could be seriously injured or killed if caught in the path of a closing window. Do not leave the keys in a vehicle with children.
The key, located in the Remote Keyless Entry (RKE) transmitter, is used for the ignition and all locks.
Press the button on the RKE transmitter to extend the key. Press the button and the key blade to retract the key. When a new vehicle is delivered, a key number is included in the vehicle documents. Each key number tells your dealer/retailer or a qualified locksmith how to make extra keys. Keep this number in a safe place. If you lose your keys, you will be able to have one made easily using this number. If you need a new key, go to your dealer/retailer for the correct key code.
If you ever lock your
Notice: keys in the vehicle, you may have to damage the vehicle to get in. Be sure you have spare keys. If you are locked out of your vehicle, contact Roadside Assistance or OnStar. See Roadside Assistance Program on page 12-6 or OnStar® System on page 4-38.
Remote Keyless Entry (RKE) System The Remote Keyless Entry (RKE) system operates on a radio frequency subject to Federal Communications Commission (FCC) Rules and with Industry Canada.
Keys, Doors and Windows
2-3
This device complies with Part 15 of the FCC Rules. Operation is subject to the following two conditions: 1. This device may not cause
interference.
2. This device must accept any
interference received, including interference that may cause undesired operation of the device.
This device complies with RSS-210 of Industry Canada. Operation is subject to the following two conditions: 1. This device may not cause
interference.
2. This device must accept any
interference received, including interference that may cause undesired operation of the device.
Changes or modifications to this system by other than an authorized service facility could void authorization to use this equipment. If there is a decrease in the RKE operating range, try this: (cid:129) Check the distance. The
transmitter may be too far from the vehicle. Stand closer during rainy or snowy weather.
(cid:129) Check the location. Other vehicles or objects may be blocking the signal. Take a few steps to the left or right, hold the transmitter higher, and try again.
(cid:129) Check the transmitter’s battery.
See “Battery Replacement” later in this section. If the transmitter is still not working correctly, see your dealer/retailer or a qualified technician for service.
(cid:129) 2-4
Keys, Doors and Windows
Remote Keyless Entry (RKE) System Operation
c (Lock): Press to lock the doors, liftgate and fuel tank door.
If the driver door is open, the doors will not lock. d (Unlock): Press to unlock the doors, liftgate and fuel tank door. Press and hold d to lower all the windows.
Programming Transmitters to the Vehicle Only RKE transmitters programmed to this vehicle will work. If a transmitter is lost or stolen, a replacement can be purchased and programmed through your dealer/ retailer. When the replacement transmitter is programmed to this vehicle, all remaining transmitters must also be reprogrammed. Any lost or stolen transmitters will no longer work once the new transmitter is programmed. Each vehicle can have up to five transmitters programmed to it.
Battery Replacement Replace the battery if the Remote Control Battery check message appears in the DIC. See “Remote Control Battery Check” under DIC Warnings and Messages (Base and Uplevel Systems) on page 4-36. Notice: When replacing the battery, do not touch any of the circuitry on the transmitter. Static from your body could damage the transmitter. To replace the battery: 1. Extend the key. See Keys on page 2-2 for additional information.
Keys, Doors and Windows
2-5
Doors and Locks Door Locks
{ CAUTION Unlocked doors can be dangerous.
(cid:129) Passengers, especially
children, can easily open the doors and fall out of a moving vehicle. When a door is locked, the handle will not open it. You increase the chance of being thrown out of the vehicle in a crash if the doors are not locked. So, wear safety belts properly and lock the doors whenever you drive.
(Continued)
CAUTION (Continued)
(cid:129) Young children who get into
unlocked vehicles may be unable to get out. A child can be overcome by extreme heat and can suffer permanent injuries or even death from heat stroke. Always lock your vehicle whenever you leave it.
(cid:129) Outsiders can easily enter through an unlocked door when you slow down or stop your vehicle. Locking your doors can help prevent this from happening.
To manually lock or unlock your vehicle, use the key in the driver’s door from the outside to unlock it. When the driver door is opened the entire vehicle is unlocked. There are also window sill knobs that unlock each door from the inside.
2. Open the RKE transmitter. 3. Remove the old battery. Do not
use a metal object.
4. Insert the new battery, positive side facing up. Replace with a CR2032 or equivalent battery.
5. Close the RKE transmitter.
Synchronization After changing the battery, turn the ignition to ON/RUN. This synchronizes the key.
2-6
Keys, Doors and Windows
Power Door Locks The power door lock switch is located on the instrument panel. T (Door Lock): Press to lock the doors, liftgate, and the fuel tank door. The button will illuminate when locked. Press again to unlock. If the driver’s door is not closed properly, the power door lock switch will not lock the doors. When the vehicle has been unlocked, the key is not in the ignition, and no door is opened the vehicle will automatically lock itself again after one minute.
Rear Door Security Locks Your vehicle has rear door security locks to prevent passengers from opening the rear doors from the inside.
Open the rear doors to access the security locks on the inside edge of each door. To set the locks, insert a key into the slot and turn it to the horizontal position. The door can only be opened from the outside with the door unlocked. To return the door to normal operation, turn the slot to the vertical position.
Liftgate
{ CAUTION
Exhaust gases may enter the vehicle if it is driven with the liftgate, trunk/hatch open, or with any objects that pass through the seal between the body and the trunk/hatch or liftgate. Engine exhaust contains Carbon Monoxide (CO) which cannot be seen or smelled. It can cause unconsciousness and even death. If the vehicle must be driven with the liftgate, or trunk/hatch open:
(cid:129) Close all of the windows. (cid:129) Fully open the air outlets on
or under the instrument panel.
(Continued)
Keys, Doors and Windows
2-7
Press the touchpad located in the handle of the liftgate and lift up to open.
Use the inside pull handle to lower and close the liftgate. Do not press the touchpad while closing the liftgate. This will cause the liftgate to be unlatched. Always close the liftgate before driving.
CAUTION (Continued)
(cid:129) Adjust the Climate Control
system to a setting that brings in only outside air and set the fan speed to the highest setting. See Climate Control System in the Index. If the vehicle is equipped with a power liftgate, disable the power liftgate function. For more information about carbon monoxide, see Engine Exhaust on page 8-14.
Notice: If you open the liftgate without checking for overhead obstructions such as a garage door, you could damage the liftgate or the liftgate glass. Always check to make sure the area above and behind the liftgate is clear before opening it.
(cid:129) 2-8
Keys, Doors and Windows
Theft-Deterrent Systems Vehicle theft is big business, especially in some cities. This vehicle has theft-deterrent features, however, they do not make it impossible to steal.
Immobilizer This device complies with Part 15 of the FCC Rules. Operation is subject to the following two conditions: 1. This device may not cause
interference.
2. This device must accept any
interference received, including interference that may cause undesired operation.
This device complies with RSS-210 of Industry Canada. Operation is subject to the following two conditions: 1. This device may not cause
interference.
2. This device must accept any
interference received, including interference that may cause undesired operation of the device.
Changes or modifications to this system by other than an authorized service facility could void authorization to use this equipment.
Immobilizer Operation This vehicle has a passive theft-deterrent system. The system is automatically armed when the key is removed from the ignition.
The system is automatically disarmed when the key is turned to ON/RUN. You do not have to manually arm or disarm the system.
The service vehicle soon light, located in the instrument panel cluster, comes on if there is a problem with arming or disarming the theft-deterrent system. The key uses a transponder that matches an immobilizer control unit in the vehicle. Only the correct key starts the vehicle. When starting the vehicle, the service vehicle soon light comes on briefly when the ignition is turned on.
If the engine does not start and the service vehicle soon light flashes there is a problem with the system. Turn the ignition off and try again. If the engine still does not start and the service vehicle soon light continues to flash, try another key. If the engine still does not start with the other key, the vehicle needs service. If the vehicle does start, the first key may be damaged. See your dealer/retailer who can service the theft-deterrent system and have a new key made. In an emergency, contact Roadside Service. See Roadside Assistance Program on page 12-6. Do not leave the key or device that disarms or deactivates the theft deterrent system in the vehicle.
Keys, Doors and Windows
2-9
Content Theft-Deterrent This vehicle has a content theft-deterrent alarm system.
The security light is located on the instrument panel. Do not use this system if there are people in the vehicle. The doors can not be unlocked from inside the vehicle.
Arming the System To arm the system: 1. Close all doors, windows, hood
and sunroof.
2. Press c on the Remote Keyless
Entry (RKE) transmitter.
The security light flashes when the vehicle is armed.
Disarming the System To disarm the system, do one of the following: (cid:129) Press d on the RKE transmitter.
Turn the ignition on.
The security light stays on for approximately one second when the vehicle is disarming. How the System Alarm is Activated To activate the system if it is armed, open any door, the liftgate or hood. The horn will sound and the hazard warning flashers will flash. How to Turn Off the System Alarm To turn off the system alarm, do one of the following: (cid:129) Press the unlock button on the
RKE transmitter. Insert the key in the ignition and turn it on.
The theft-deterrent system is disarmed when the alarm is turned off.
(cid:129) (cid:129) 2-10
Keys, Doors and Windows
Windows
{ CAUTION
Power Windows
{ CAUTION
Leaving children, helpless adults, or pets in a vehicle with the windows closed is dangerous. They can be overcome by the extreme heat and suffer permanent injuries or even death from heat stroke. Never leave a child, a helpless adult, or a pet alone in a vehicle, especially with the windows closed in warm or hot weather.
Leaving children in a vehicle with the keys is dangerous for many reasons, children or others could be badly injured or even killed. They could operate the power windows or other controls or even make the vehicle move. The windows will function and they could be seriously injured or killed if caught in the path of a closing window. Do not leave keys in a vehicle with children. When there are children in the rear seat use the window lockout button to prevent unintentional operation of the windows.
The window switches are located on each of the doors. To lower a window, press the switch down. To raise a window, pull the switch up.
Express-Down Window This feature is on all windows. It allows you to lower the window all the way without holding the switch down.
Keys, Doors and Windows
2-11
Press the front of the switch to the second position and release. If you want to stop the window as it is lowering, briefly pull up the switch. Press and hold the unlock button on the Remote Keyless Entry (RKE) transmitter to lower all of the windows from outside the vehicle.
Window Lockout o (Window Lockout): This button is located on the driver’s door armrest. Slide the switch forward to turn the lockout feature on. The rear windows can only be opened or closed by the driver window switches. The light on the button indicates the feature is in use. Press again to turn off.
Sun Visors Pull the visor toward you, or move it to the side to help reduce glare. To use the lighted mirror, lift the cover.
Mirrors Manual Rearview Mirror Hold the mirror in the center to move it for a clearer view of behind your vehicle.
Headlamp Glare To reduce headlamp glare from vehicles following from behind, pull the lever toward you. Push the lever forward after the vehicle glare is gone, to return the mirror back to the original position. Vehicles with OnStar® have three additional control buttons located at the bottom of the mirror. See your dealer/retailer for more information on the system and how to subscribe to OnStar®. See OnStar® System on page 4-38
for more information about the services OnStar provides.Cleaning the Mirror Do not spray glass cleaner directly on the mirror. Use a soft towel dampened with glass cleaner.
Outside Mirror(s) To maximize the viewing area, adjust each mirror to see the side of your vehicle and the area beside and behind your vehicle. Manually fold the mirrors inward to prevent damage when going through an automatic car wash. To fold, push the mirror toward the vehicle. Push the mirror outward, to return to its original position.
u Close: Press to close the sunroof. Press and hold to close completely.
Sunshade r Sunshade Open: Press to open the sunshade.
s Sunshade Close: Press to close the sunshade. Press and hold to close completely.
2-12
Keys, Doors and Windows
Outside Power Mirror(s)
Sunroof
On vehicles with a sunroof, the switches are located in the overhead console. To operate the sunroof, the ignition must be turned on.
t Vent/Open: With the sunroof in the closed position, press to vent the sunroof. With the sunroof in the vent position, press to open the sunroof. The sunshade will open automatically with the sunroof.
h i (Power Mirrors): Press to select the driver side or passenger side mirror. Press the arrows to move the selected mirror in the desired direction. Outside Heated Mirrors The vehicle may have outside heated mirrors which help clear the condensation, snow, and ice. < (Rear Window Defogger): Press to heat the mirrors. See “Rear Window Defogger” under, Climate Control System on page 7-1 for more information.
Storage
Storage Glove Box ..........................3-1
Cupholders .........................3-1
Sunglasses Storage Compartment ....................3-1
Cargo Cover .......................3-2
Cargo Tie Downs ...............3-2Storage Glove Box Pull up on the handle to open the glovebox. There may be a shelf inside that can be removed by lifting up on the shelf and pulling it out.
Cupholders
Storage
3-1
There is a cupholder on the rear center console.
Sunglasses Storage Compartment
The vehicle may have a sunglasses storage compartment located above the driver door. Pull the lid down to open the compartment.
There is a cupholder on the front edge of the rear seat cushion. To open or close, press on the cupholder.
3-2
Storage
Cargo Cover Your vehicle may have a cargo cover.
Cargo Tie Downs Four cargo tie-downs are located in the rear compartment of the vehicle. The tie-downs can be used to secure small loads.
To remove the cover, unhook the retaining straps from the liftgate and pull the cover from the side guides.
Instruments and Controls
4-1
Instruments and Controls
Instrument Panel Overview Instrument Panel Overview ...........................4-2
Hazard Warning Flashers ...4-4
Horn ...................................4-4
Tilt Wheel ...........................4-4
Turn Signal/Multifunction Lever ................................4-4
Cruise Control ....................4-5
Turn and Lane-Change Signals .............................4-8
Headlamp High/ Low-Beam Changer ..........4-8
Flash-to-Pass ......................4-8
Windshield Wipers ..............4-8
Windshield Washer .............4-9
Rear Window Wiper/ Washer .............................4-9
Accessory Power Outlet(s) ..........................4-10Warning Lights, Gages, and Indicators Warning Lights, Gages, and Indicators .................4-11
Instrument Panel Cluster ...4-12
Speedometer and Odometer ........................4-13
Trip Odometer(s) ...............4-13
Tachometer .......................4-13
Safety Belt Reminders ......4-13
Airbag Readiness Light .....4-14
Passenger Airbag Status Indicator ..........................4-15
Charging System Light ......4-16
Brake System Warning Light ................................4-16
Antilock Brake System (ABS) Warning Light .......4-17
StabiliTrak® Indicator Light ................................4-17
Engine Coolant Temperature Warning Light ................................4-18
Tire Pressure Light ...........4-18
Malfunction Indicator Lamp ................4-18
Oil Pressure Light .............4-21
Low Oil Level Light ...........4-22Winter Driving Mode Light ................................4-22
Fog Lamp Light ................4-22
Exterior Lamps Off Reminder ........................4-23
Cruise Control Light ..........4-23
Highbeam On Light ...........4-23
Door Ajar Light .................4-23
Service Vehicle Soon Light ................................4-23
Fuel Gage ........................4-24
Low Fuel Warning Light ....4-24
Driver Information Center (DIC) Driver Information Center (DIC) ...................4-25
DIC Operation and Displays (Uplevel DIC and Audio) .......................4-26
DIC Operation and Displays (Base Level DIC and Audio) ...............4-32
DIC Warnings and Messages (Base and Uplevel Systems) ............4-36OnStar® System OnStar® System ................4-38
4-2
Instruments and Controls
Instrument Panel Overview
Instruments and Controls
4-3
The main components of the instrument panel are the: A. Exterior Lamps Controls on
page 5-1.
B. Outlets. Outlet Adjustment on
page 7-4.
C. Turn Signal/Multifunction Lever
on page 4-4.
D. DIC Operation and Displays (Uplevel DIC and Audio) on page 4-26 or DIC Operation and Displays (Base Level DIC and Audio) on page 4-32 and Audio Steering Wheel Controls on page 6-23. (If Equipped)
E. Instrument Panel Cluster on
page 4-12.
F. Audio Steering Wheel Controls
on page 6-23. (If Equipped)
O. Fog Lamps on page 5-2.
(If Equipped)
G. Windshield Wipers on page 4-8. H. Heated Seats on page 1-6.
(If Equipped)
I. StabiliTrak® System on page 8-19. (If Equipped)
J. Driver Information Center (DIC)
on page 4-25. (If Equipped)
K. Hazard Warning Flashers on
page 4-4.
L. Power Door Locks on page 2-6. M. Passenger Safety Belt Reminder. Safety Belt Reminders on page 4-13. N. Front Passenger Airbag.
Airbag System on page 1-24.
P. Instrument Panel Brightness
on page 5-3.
Q. Hood Release on page 9-5. R. Tilt Wheel on page 4-4. S. Horn on page 4-4. T. Ignition Positions on page 8-2. U. Climate Control System on
page 7-1.
V. Accessory Power Outlet(s) on
page 4-10. (Covered)
W. Audio System(s) on page 6-1. X. Glove Box on page 3-1.
4-4
Instruments and Controls
Hazard Warning Flashers | : Press this button located on the instrument panel, to make the front and rear turn signal lamps flash on and off. This warns others that you are having trouble. Press the button again to turn the flashers off. While the hazard warning flashers are on, the turn signals do not work. An indicator light on the hazard warning flasher button comes on whenever the ignition is turned on. If the airbags are deployed, the hazard warning flashers turn on automatically. Press the button twice to turn them off.
Horn Press the horn symbol in the middle of the steering wheel to sound the horn.
Tilt Wheel A tilt and telescope wheel lets the steering wheel position be adjusted.
Turn Signal/Multifunction Lever
The adjustment lever is located on the left side of the steering column. It allows the steering column to be moved up or down and in or out. Do not adjust the steering wheel while driving.
The lever on the left side of the steering column includes the following: G : Turn and Lane-Change Signals 2 : Headlamp High/Low-Beam Changer J : Cruise Control (If Equipped) Flash-to-Pass Feature. Information for these features is on the pages following.
Cruise Control
{ CAUTION
Cruise control can be dangerous where you cannot drive safely at a steady speed. So, do not use the cruise control on winding roads or in heavy traffic. Cruise control can be dangerous on slippery roads. On such roads, fast changes in tire traction can cause excessive wheel slip, and you could lose control. Do not use cruise control on slippery roads.
Instruments and Controls
4-5
With cruise control, a speed of about 25 mph (40 km/h) or more can be maintained without keeping your foot on the accelerator. Cruise control does not work at speeds below about 25 mph (40 km/h).
9 (On/Off): Press and hold the button on the back end of the cruise control lever, to turn the cruise control system on or off. The CC on or CC off message will appear on the instrument panel cluster at the odometer display to show that the cruise control system is on or off. AJ (Set/Accelerate): Press to set a speed and to accelerate the speed.
B W (Resume/Coast): Press to resume a set speed and to decrease the speed.
The cruise control buttons are located on the turn signal/multifunction lever on the left side of the steering wheel.
4-6
Instruments and Controls
Setting Cruise Control For safety reasons the cruise control cannot be turned on until the brake has been applied once. With automatic transmission, only use cruise control in D (Drive). Press the On/Off button to turn on the cruise control. A message briefly appears on the instrument panel cluster at the odometer display when the cruise control has been turned on.
CC On Message
CC Off Message
{ CAUTION
If you leave your cruise control on when you are not using cruise, you might hit a button and go into cruise when you do not want to. You could be startled and even lose control. Keep the cruise control switch off until you want to use cruise control.
1. Press J and the current speed
is stored and maintained.
2. Take your foot off the accelerator pedal. The J indicator light on the instrument panel cluster turns on after the cruise control has been set to the desired speed.
The cruise control automatically disengages under the following conditions:
The vehicle speed drops below 25 mph (40 km/h). The brake is applied. The clutch pedal is applied (for manual transmission vehicles). The automatic transmission is in N (Neutral). The On/Off button is pressed.
(cid:129) (cid:129) (cid:129) (cid:129) (cid:129) Instruments and Controls
4-7
Resuming a Set Speed Once the vehicle speed reaches about 25 mph (40 km/h) or more and the cruise control is on, press W. The vehicle returns to the previous speed selected before the cruise was disengaged. The stored speed is deleted if the ignition is turned off. Increasing Speed While Using Cruise Control (cid:129) Press and hold J until the desired speed is reached, then release it. To increase vehicle speed in small increments, briefly press J repeatedly. Each time this is done, the vehicle speed increase by about 1 mph (1.6 km/h) without using the accelerator pedal.
When the J button is released the current speed is stored and maintained.
Reducing Speed While Using Cruise Control (cid:129) Press and hold W until the
desired lower speed is reached, then release it. To reduce vehicle speed in small increments, briefly press W repeatedly. Each time this is done, the vehicle speed decreases by about 1 mph (1.6 km/h).
When the W button is released the current speed is stored and maintained. Passing Another Vehicle While Using Cruise Control Use the accelerator pedal to increase the vehicle speed. When the accelerator pedal is released, the vehicle will return to the previously set cruise speed.
Using Cruise Control on Hills How well the cruise control will work on hills depends upon the vehicle speed, load, and the steepness of the hills. While going up steep hills, you might have to step on the accelerator pedal to maintain the vehicle’s speed. While going downhill, you might have to brake or shift to a lower gear to keep the vehicle’s speed down. Of course, applying the brake turns off the cruise control. Ending Cruise Control There are several ways to end cruise control: (cid:129) Step lightly on the brake or
clutch pedal. The automatic transmission is placed in N (Neutral). (cid:129) Press the 9 button. Erasing Speed Memory The cruise control set speed memory is erased when the cruise control or the ignition is turned off.
(cid:129) (cid:129) (cid:129) 4-8
Instruments and Controls
Headlamp High/ Low-Beam Changer 2 3 (Headlamp High/Low Beam Changer): To change the headlamps from low to high beam, push the multifunction lever towards the instrument panel. To return to low-beam headlamps, push the lever towards the instrument panel again or pull the lever toward you. Then release it.
This indicator light on the instrument panel cluster is on while the high beam headlamps are on.
Flash-to-Pass Pull the turn signal/multifunction lever towards you to flash the high beams from low beam.
Windshield Wipers Clear ice and snow from the wiper blades before using them. If the wiper blades are frozen to the windshield, gently loosen or thaw them. If the blades do become damaged, install new blades or blade inserts. See Windshield Wiper Blade Replacement on page 9-21. Heavy snow or ice can overload the wiper motor. A circuit breaker will stop the motor until it cools down. Clear away snow or ice to prevent an overload.
Turn and Lane-Change Signals
To signal a turn, move the lever all the way up or down, past the detent. The lever returns to its starting position when released. An arrow on the instrument panel cluster flashes in the direction of the turn or lane change. To signal a lane change, raise or lower the lever until the arrow starts to flash, and then release the lever. Do not move the lever past the detent. The turn signal will automatically flash three times and turn off. To cancel it before turning, move the lever slightly in either direction. Do not past the detent. If the turn signal is moved up or down and left engaged, the headlamps and taillamps will remain on and the battery could be drained.
Instruments and Controls
4-9
For a single wipe pull the lever down from the off position. The lever will return to its original position. For more cycles, hold the lever down before releasing it.
RainSense™ Wipers There is a moisture sensor mounted on the windshield next to the inside rearview mirror. When active, the sensor is able to detect moisture on the windshield and automatically control the frequency of the wipes according to the weather conditions. To turn on the RainSense feature, the wipers must be set to the intermittent delay setting on the windshield wiper lever. To turn off RainSense, move the lever downwards. Notice: Going through an automatic car wash with the wipers on can damage them. Turn the wipers off when going through an automatic car wash.
Windshield Washer { CAUTION
In freezing weather, do not use your washer until the windshield is warmed. Otherwise the washer fluid can form ice on the windshield, blocking your vision.
Pull the windshield wiper lever toward you to spray washer fluid on the windshield. The wipers will run for a few cycles to clear the windshield. For more wash cycles, pull the lever forward and hold.
Rear Window Wiper/Washer For vehicles with the rear wiper/washer feature, it is turned on by moving the windshield wiper lever. To turn the rear wiper on or off, push the windshield wiper lever.
The lever on the right side of the steering column operates the windshield wipers. Push up or pull down on the lever to place it in one of the following positions. [ (High): For rapid wiping cycles. — (Low): For slow, steady wiping cycles. -- (Intermittent/RainSense™): See RainSense™ wipers below. 9 (Off): Turns off the wipers.
4-10
Instruments and Controls
To turn on the rear washer, hold the windshield wiper lever toward the front of the vehicle to spray the rear window. The rear wiper turns on automatically when the windshield wiper is turned on and the shift lever is in R (Reverse). The rear window washer uses the same fluid bottle as the windshield washer. However, the rear window washer will run out of fluid before the windshield washer. If washer fluid sprays onto the windshield but not the rear window, check the fluid level. See Windshield Washer Fluid on page 9-20. For information on replacing the rear wiper blades, see Windshield Wiper Blade Replacement on page 9-21.
Accessory Power Outlet(s) The 12-volt accessory power outlets can be used to connect electrical equipment, such as a cellular phone. There may be a accessory power outlet located inside the console below the climate controls. Notice: Leaving electrical equipment on for extended periods will drain the battery. Always turn off electrical equipment when not in use and do not plug in equipment that exceeds the maximum 20 ampere rating. Certain electrical accessories may not be compatible with the accessory power outlet and could result in blown vehicle or adapter fuses. If there is a problem, see your dealer/retailer for additional information on the accessory power outlet.
Notice: Adding any electrical equipment to your vehicle may damage it or keep other components from working as they should. The repairs would not be covered by your warranty. Check with your dealer/retailer before adding electrical equipment. When adding electrical equipment, be sure to follow the installation instructions included with the equipment. Notice: power outlet can cause damage not covered by the warranty. Do not hang any type of accessory or accessory bracket from the plug because the power outlets are designed for accessory power plugs only.
Improper use of the
Instruments and Controls
4-11
Warning Lights, Gages, and Indicators Warning lights and gages can signal that something is wrong before it becomes serious enough to cause an expensive repair or replacement. Paying attention to the warning lights and gages could prevent injury. Warning lights come on when there may be or is a problem with one of the vehicle’s functions. Some warning lights come on briefly when the engine is started to indicate they are working.
Gages can indicate when there may be or is a problem with one of the vehicle’s functions. Often gages and warning lights work together to indicate a problem with the vehicle. When one of the warning lights comes on and stays on while driving, or when one of the gages shows there may be a problem, check the section that explains what to do. Follow this manual’s advice. Waiting to do repairs can be costly and even dangerous.
4-12
Instruments and Controls
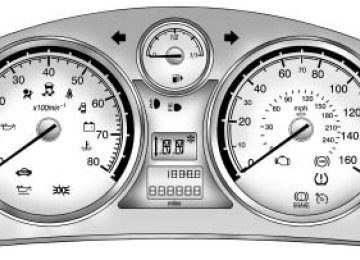
Instrument Panel Cluster The instrument cluster is designed to show at a glance how the vehicle is running. It shows how fast the vehicle is going, about how much fuel has been used, and many other things needed to drive safely and economically.
United States Base Automatic Transmission version shown, Canada, Manual Transmission and
Uplevel similar
Speedometer and Odometer The speedometer shows the vehicle’s speed in both miles per hour (mph) or kilometers per hour (km/h). The odometer shows how far the vehicle has been driven, in either miles or kilometers. If a new odometer is installed, the new one is set to the mileage total of the old odometer. If it cannot, it will be set at zero and a label must be put on the driver’s door to show the old mileage reading when the new odometer was installed. If the mileage is unknown, the label should then indicate “previous mileage unknown.”
Trip Odometer(s) The trip odometer, located at the center of the instrument panel cluster, tells how far the vehicle has been driven since the trip odometer was set to zero.
Instruments and Controls
4-13
To reset the trip odometer, hold the reset stem, located to the right of the speedometer, for approximately one second while the trip odometer is displayed. The engine must be turned on. Service Display The vehicle may have a display above the odometer that shows when service is needed. The number that displays with “INSP” is the remaining distance that can be driven until service is required. See Engine Oil Life System on page 9-9 and the index of the Saturn Astra Limited Warranty, Maintenance and Owner Assistance Information Manual. Tachometer
Safety Belt Reminders Driver Safety Belt Reminder Light There is a Driver Safety Belt Reminder Light on the instrument panel cluster.
When the engine is started this light and chime come on and stay on for several seconds to remind drivers to fasten their safety belts. The light also begins to flash. This cycle repeats if the driver remains unbuckled and the vehicle is moving. If the driver safety belt is already buckled, neither the light nor chime come on.
The tachometer displays the engine speed in revolutions per minute.
4-14
Instruments and Controls
Passenger Safety Belt Reminder Light
For vehicles with this light, it operates the same as the Safety Belt Reminder Light except that it is meant for the front passenger. If the passenger safety belt is buckled, neither the chime nor the light comes on. The front passenger safety belt warning light and chime may turn on if an object is put on the seat such as a briefcase, handbag, grocery bag, laptop or other electronic device. To turn off the warning light and or chime, remove the object from the seat or buckle the safety belt
Airbag Readiness Light This light shows if there is an electrical problem. The system check includes the airbag sensor, the pretensioners, the airbag modules, the wiring and the crash sensing and diagnostic module. For more information on the airbag system, see Airbag System on page 1-24.
This light will come on and stay on for several seconds when the vehicle is started. Then the light should go out.
If the airbag readiness light stays on after the vehicle has been started or comes on when while driving, the airbag system may not work properly. Have the vehicle serviced right away.
{ CAUTION
If the airbag readiness light stays on after the vehicle is started or comes on while driving, it means the airbag system might not be working properly. The airbags in the vehicle might not inflate in a crash, or they could even inflate without a crash. To help avoid injury, have the vehicle serviced right away.
Instruments and Controls
4-15
Passenger Airbag Status Indicator The vehicle has a passenger sensing system. See Passenger Sensing System on page 1-30
for important safety information. The rearview mirror has a passenger airbag status indicator.United States
Canada
When the vehicle is started, the passenger airbag status indicator will light ON and OFF, or the symbol for on and off, for several seconds
as a system check. Then, after several more seconds, the status indicator will light either ON or OFF, or either the on or off symbol to let you know the status of the right front passenger frontal and seat-mounted side impact airbags. If the word ON or the on symbol is lit on the passenger airbag status indicator, it means that the right front passenger frontal airbag and seat-mounted side impact airbag are enabled (may inflate). If the word OFF or the off symbol is lit on the passenger airbag status indicator, it means that the passenger sensing system has turned off the right front passenger frontal airbag and seat-mounted side impact airbag. See Passenger Sensing System on page 1-30
for more on this, including important safety information.