- Download PDF Manual
-
A/C
1 OFF | | ••
= 11
60G-05-015
60G-05-016
60G-05-017
Forced Ventilation The lever settings are the same as for natural ventilation except you move the fan switch to a position other than "OFF".
Normal Heating (Using outside air) Push the "HEAT" button and move the air intake lever to "FRESH AIR", the temperature control lever to the desired temperature position, and the fan switch to the desired fan speed position. Moving the fan switch to a higher fan speed position increases heating efficiency.
Quick Heating (Using recirculated air) The lever settings are the same as for normal heating except you move the air intake lever to "RECIRCULATED AIR". If you use this heating method for an extended period of time, the air the vehicle can become contaminated and the windows can become misty. Therefore, use this method only for quick heating and change to the normal heating method as soon as possible.
in
5-11
60G-74E
INSTRUMENT PANEL
60G-05-018
60G-05-019
60G-05-020
Cool Face/Warm Feet Push the "BI-LEVEL" button and move the air intake lever to "FRESH AIR", the temperature control lever to the desired temperature position, and the fan switch to the desired fan speed position. Unless the temperature control lever is in the fully "COOL" position or fully "HOT position, the air that comes out of the center and side outlets will be cooler than the air that comes out of the floor outlets.
Defrosting/Warm Feet Push the "HEAT & DEFROST' button and move the air intake lever to "FRESH AIR", the temperature control lever to the desired temperature position, and the fan switch to "HIGH". When the windscreen has become clear, move the fan switch to the desired fan speed position.
Defrosting Push the "DEFROST' button and move the air intake lever to "FRESH AIR", the temperature control lever to the desired temperature position, and the fan switch to "HIGH" Moving the temperature control lever to a higher temperature position increases defrosting efficiency. When the windscreen has become clear, move the fan switch to the desired fan speed position.
49
INSTRUMENT PANEL
AIR CONDITIONING SYSTEM (if equipped)
SYSTEM OPERATING INSTRUCTIONS
5-12
60G-74E
60G-05-021
The air conditioning system can be used to provide cooling and dehumidifying, as described below. To turn on the air conditioning system, push in the A/C button and move the fan switch to a position other than "OFF". An indicator light will come on when the air conditioning system is on. To turn off the air conditioning system, push the A/C button again. During operation of the air conditioner, you may notice slight changes in engine speed. These changes are normal, the system is designed so that the compressor turns on or off to maintain the desired temperature. Less operation of the compressor results in better fuel economy.5-13
60G-05-022
60G -05-023
in
the A/C button and
Normal Cooling (using outside air) Push the "VENTILATION" button, and the move the air intake lever to "FRESH AIR", the temperature control lever to the "COOL" position, and the fan switch to the desired fan speed position. Moving the fan switch to a higher fan speed position increases cooling efficiency.
If the ambient temperature is high enough to cause insufficient cooling, use the "Quick Cooling" as following.
Quick Cooling (Using recirculated air) The lever settings are the same as for normal cooling except you move the air intake lever to "RECIRCULATED AIR". If you use this cooling method for a extended period of time, the air the vehicle can become contaminated. Therefore, you should occasionally move the air intake lever to "FRESH AIR".
in
NOTE: If your vehicle has been left in the sun with the windows closed, it will cool faster if you open the windows briefly while you operate the air conditioner with the air intake lever at "FRESH AIR" and the fan at high speed.
50
60G-74E
INSTRUMENT PANEL
60G-05-024
Dehumidifying Push in the A/C button, and the desired function button and move the air intake lever to "FRESH AIR", the temperature control lever to the desired temperature position, and the fan switch to the desired fan speed position.
NOTE: Because the air conditioner dehumidifies the air, turning it on will help keep the windows clear, even when blowing heated air using the DEMIST or HEATER & DEMIST functions.
NOTE: There are two types of air conditioning systems used in MARUTI vehicles. One type uses refrigerant CFC-12, commonly called R- 12; the other type uses the new refrigerant HFC-134a, commonly called R-134a. For each system, the correct refrigerant must be used. To identify the system, a label that states "R134a" or "HFC 134a" is stuck on the front side of the engine compartment if the system uses R-134a refrigerant.
60G-05-025
CAUTION
Using the wrong refrigerant may damage the air conditioning system. Use correct refrigerant only. Do not mix the two refrigerants.
60G-74E
OTHER CONTROLS AND EQUIPMENT
OTHER CONTROLS AND EQUIPMENT
5-14
Parking Brake Lever Pedals Gear Lever Fuel Filler Cap Folding Rear Seats Sun Visor Interior Light Switch Assist Grips Bonnet Cup Holder (if equipped) Tyre Changing Tools Luggage Compartment Trim Trunk (Boot) Light Front Seat Back Pocket (if equipped) Rear spoiler with Stop lamp (if equipped) Alloy Wheels (if equipped) Power Antenna (if equipped) Leather Cover (if equipped) High Mount Stop Lamp
6-1
6-2
6-2
6-3
6-4
6-5
6-5
6-5
6-6
6-7
6-7
6-8
6-8
6-9
6-9
6-9
6-10
6-10
6-1053
60G-74E
INSTRUMENT PANEL
60G-05-024
Dehumidifying Push in the A/C button, and the desired function button and move the air intake lever to "FRESH AIR", the temperature control lever to the desired temperature position, and the fan switch to the desired fan speed position.
NOTE: Because the air conditioner dehumidifies the air, turning it on will help keep the windows clear, even when blowing heated air using the DEMIST or HEATER & DEMIST functions.
NOTE: There are two types of air conditioning systems used in MARUTI vehicles. One type uses refrigerant CFC-12, commonly called R- 12; the other type uses the new refrigerant HFC-134a, commonly called R-134a. For each system, the correct refrigerant must be used. To identify the system, a label that states "R134a" or "HFC 134a" is stuck on the front side of the engine compartment if the system uses R-134a refrigerant.
60G-05-025
CAUTION
Using the wrong refrigerant may damage the air conditioning system. Use correct refrigerant only. Do not mix the two refrigerants.
60G-74E
OTHER CONTROLS AND EQUIPMENT
OTHER CONTROLS AND EQUIPMENT
5-14
Parking Brake Lever Pedals Gear Lever Fuel Filler Cap Folding Rear Seats Sun Visor Interior Light Switch Assist Grips Bonnet Cup Holder (if equipped) Tyre Changing Tools Luggage Compartment Trim Trunk (Boot) Light Front Seat Back Pocket (if equipped) Rear spoiler with Stop lamp (if equipped) Alloy Wheels (if equipped) Power Antenna (if equipped) Leather Cover (if equipped) High Mount Stop Lamp
6-1
6-2
6-2
6-3
6-4
6-5
6-5
6-5
6-6
6-7
6-7
6-8
6-8
6-9
6-9
6-9
6-10
6-10
6-1053
OTHER CONTROLS AND EQUIPMENTS
PARKING BRAKE LEVER
63B-06-001E
63B-06-002E
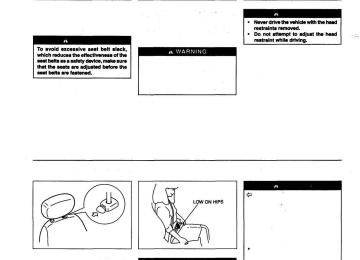
The parking brake lever is located between the seats. To apply the parking brake, hold the brake pedal down and pull the parking brake lever all the way up.
To release the parking brake, hold the brake pedal down, pull up slightly on the parking brake lever, push the button on the end of the lever with your thumb, and lower the lever to its original position.
6-1
60G-74E
PEDALS
Brake Pedal ® Your MARUTI vehicle is equipped with front disc brakes and rear drum brakes. Depressing the brake pedal applies both sets of brakes. You may hear occasional brake squeal when you apply the brakes. This is a normal condition caused by environmental factors such as cold, wet, snow, etc.
If brake squeal is excessive and occurs each time the brakes are applied, you should have the brakes checked by your MARUTI dealer.
A WARNING
Do not "ride" the brakes by applying them continuously or resting your foot on the pedal. This will result in overheating of the brakes which could cause unpredictable braking action, longer stopping distances, or permanent brake damage.
Accelerator Pedal ® This pedal controls the speed of the engine. Depressing the accelerator pedal increases power output and speed.
60G-06-001
Clutch Pedal © The clutch pedal is used to disengage the drive to the wheels when starting the engine, stopping, or shifting the transmission lever. Depressing the pedal disengages the clutch.
CAUTION
Do not drive with your foot resting on the clutch pedal. It could result in excessive clutch wear, clutch damage, or unexpected loss of engine braking.
60G-74E
Never drive your vehicle with the parking brake on: rear brake effectiveness can be reduced from over heating, brake life may be shortened, or permanent brake damage may result. If the parking brake does not hold the vehicle securely or does not fully release, have your vehicle inspected immediately by an authorized MARUTI dealer.
Always apply the parking brake fully before leaving your vehicle or it may move, causing injury or damage. When parking, make sure the gear shift lever is left in first gear or reverse. Remember, even the transmission is in gear, you must always apply the parking brake fully.
though
54
OTHER CONTROLS AND EQUIPMENT
GEAR LEVER
70F-04-005E
The gear change pattern is shown in the illustration. For details on how to use the transmission, to USING THE TRANSMISSION in the OPERATING YOUR VEHICLE section.
refer
55
6-2
OTHER CONTROLS AND EQUIPMENTS
FUEL FILLER CAP
60G-74E
60G-06-002
The fuel filler cap is located on the left rear side of the vehicle. The fuel filler lid can be unlocked by pulling up the opener lever located on the outboard side of the driver's seat and locked by simply closing the lid.Remove the fuel filler cap slowly. The fuel may be under pressure and may spray out, causing injury.
Petrol Is extremely flammable. Do not smoke when refuelling, and make sure there are no open flames or sparks in the area.
60G-06-OO3
The fuel tank filler cap has a "screw-on ratcheting type" feature. • To remove - turn the cap counterclockwise. Turn the cap slowly to allow any residual pressure to escape.
• To install - turn the cap clockwise and tighten it securely until a "ratcheting" (clicking) sound is heard. The "ratcheting" sound indicates that the cap is on properly.
6-3
60G-74E
56
FOLDING REAR SEATS
OTHER CONTROLS AND EQUIPMENT
70F-04-008E
If you need to replace the fuel cap, use only a cap specified for your model. Using an improper fuel cap can cause a serious malfunction of the fuel system. You can get the correct replacement cap from your MARUTI dealer.
63B-06-013
The rear seat of your vehicle can be folded forward ro provide additional luggage space. To lower the seatback, hook the webbing of both outboard lap-shoulder belts in the belt hangers, pull up the lock knobs (© and @) simultaneously and fold forward the seatback. To raise the seatback, lift it up and push back until it locks into place.When you move a seatback, make sure the belt webbing is hooked in the belt hangers (if equipped) so the seat belts are not caught by the seatback, seat hinge, or seat latch.This helps prevent damage to the belt system.
63B-06-014
When returning a rear seat to the normal position, make sure that movement of is unobstructed and the seatback is securely latched.
the seatback
57
6-4
OTHER CONTROLS AND EQUIPMENTS
60G-74E
SUN VISOR
INTERIOR LIGHT SWITCH
70F-04-024
60G-06-004
Luggage or other cargo should be stowed in the luggage compartment with the rear seat in an upright position, whenever possible. If you need to carry cargo in the passenger compartment with the rear seat back folded forward, be sure to secure the cargo or it may be thrown about, causing injury. Never pile cargo higher than the seatbacks.
The sun visors can be pulled down to block glare coming through the wind screen, or they can be unhooked and turned to the side to block glare coming through the side window.
CAUTION
When unhooking and hooking a sun visor, be sure to handle it by the hard plastic parts or the sun visor can be damaged.
This light switch has three positions which function as described below:
© The light comes on and stays on regardless of whether the door is open or closed.
© The light comes on when the door is
® The light remains off even when the door
opened.
is opened.
NOTE: Both Front and Rear doors are involved in lighting operation of the interior light.
6-5
58
60G-74E
ASSIST GRIPS
BONNET
OTHER CONTROLS AND EQUIPMENT
70F-04-015
60G-06-005
Assist grips are provided for passenger convenience.
Do not hang Herns on the assist grips. They could obstruct the driver's view, resulting in an accident, or could be thrown about in an accident or abrupt manoeuvre, causing injury.
To open the bonnet: 1) Pull the bonnet release handle located on the outboard side of the driver's side of the instrument panel. This will disengage the bonnet lock halfway.
60G-06-006
2) Push the under-bonnet release lever sideways with your finger, as shown in the illustration. While pushing the lever, lift up the bonnet.59
6-6
OTHER CONTROLS AND EQUIPMENTS
60G-74E
CUP HOLDER (if equipped)
TYRE CHANGING TOOLS
60G-06-007
3) Continue to lift up the bonnet until it is highenough to support with the prop rod.
To use the cup holder, pull it out fully. After using the holder, push it back in.
60G-06-008
60G-06-009
Make sure the bonnet Is fully closed and latched before driving. If it is not, it can fly up unexpectedly during driving, obstructing your view and resulting in an accident.
Do not use the cup holder to hold cups containing hot liquids, or objects other than cups. Objects in the cup holder may be thrown about during a sudden stop or impact, and could cause personal injury.
The jack, wheel wrench and jack crank are stowed in the luggage compartment behind the rear seat. To its shaft remove counterclockwise and pull the jack out of the storage bracket. To stow the jack, place it in the storage bracket and turn the shaft clockwise until the jack is securely held in place.
jack,
turn
the
6-7
60G-74E
60
LUGGAGE COMPARTMENT TRIM
TRUNK (BOOT) LIGHT (if equipped)
OTHER CONTROLS AND EQUIPMENT
Luggage or other cargo placed in the luggage compartment are hidden from view by a luggage compartment trim.
Do not carry items on top of the luggage compartment trim, even if they are small and light. Objects on top of the trim could be thrown about In an accident, causing injury, or could obstruct the driver's rear view.
60G-06-010
The jack should be used only to change wheels. It is important to read the jacking the EMERGENCY SERVICE section of this manual before attempting to use the jack.
Instructions
in
6OG-O6-O11
When you open the trunk (boot) lid, the trunk (boot) light comes on and remains on as long as you keep the lid open.
Do not leave the boot (trunk) lid open for a long time, or the battery will discharge.
After using the jack, jack crank and wheel wrench, be sure to stow them securely or they can cause injury if an accident occurs.
61
6-8
OTHER CONTROLS AND EQUIPMENTS
60G-74E
FRONT SEAT BACK POCKET (if equipped)
REAR SPOILER WITH STOP LAMP Other Controls (if equipped)
ALLOY WHEELS Maintenance with tyre wears (if equipped)
63B-06-022
60G-50-002E
60G-50-003E
This pocket is provided for holding light and soft things such as gloves, newspapers or magazines.
Do not put hard or breakable objects In the pocket. If an accident occurs, objects such as bottles, cans etc. can injure the occupants in the rear seat.
Rear Spoiler is provided to improve aerodynamic stability at higher speeds and better asthetics. Stop Lamp (if equipped) is fitted inside the Rear Spoiler. The stop lamp will glow as and when the Brake Pedal is depressed.
CAUTION
Never close the dicky door too hard or with jerk or lift the dicky by holding spoiler, rear spoiler may get damaged. Close the dicky door gently and make sure it is closed properly.
Wider alloy wheels are provided in the vehicle for better grip on the road and more fuel economy. For balancing of wheels please consult MARUTI authorised workshop.
CAUTION
Never try to remove the tyre from alloy wheel rim in convention manner (by hammering), it will damage the wheel rim. Always insist on tyre changing machine.
6-9
60G-74E
62
OTHER CONTROLS AND EQUIPMENT
POWER ANTENNA Other Controls (if equipped)
LEATHER COVER Steering Column Controls (if equipped)
HIGH MOUNT STOP LAMP (if equipped)
60G-50-004E
60G-50-006E
Power antenna on the rear side will automatically come up on switching on the AM/FM receiver fitted in the vehicle.
For better control on steering wheel leather cover is provided.
High mount stop lamp is provided with your vehicle and is fitted on rear parcel tray. The stop lamp will glow as when the brake pedal will be depressed. To change the bulb of the stop lamp, remove the clips at both sides of the cover, by pressing the inner pin inside so that the clip gets loose and remove the bulb on turning it anticlock-wise The rating of bulb is 21W/12V.There are one bulb in high mount stop lamp.
63
6-10
S0G-74E
OPERATING YOUR VEHICLE
OPERATING YOUR VEHICLE
Exhaust Gas Warning Daily Inspection Checklist Starting the Engine Using the Transmission Braking Running-in Catalytic Converter (if equipped) Improving Fuel Economy Trailer
Towing
7-1
7-1
7-2
7-3
7-4
7-5
7-6
7-7
7-765
OPERATING YOUR VECHILE
EXHAUST GAS WARNING
60G-07-001E
Avoid breathing exhaust gases. Exhaust gases contain carbon monoxide, a potentially lethal gas that is colourless and odourless. Since carbon monoxide is difficult to detect by itself, be sure to take the following precautions to help prevent carbon monoxide from entering your vehicle. • Do not leave the engine running in
garages or other confined areas.
• Do not park with the engine running for a long period of time, even in an open area. If it is necessary to sit for a short time in a parked vehicle <=>
with the engine running, make sure the air intake lever is set to "FRESH AIR" and the fan is at high speed. To allow proper operation of your vehicle's ventilation system, keep the air inlet grille in front of the windscreen clear of snow, leaves, or other obstructions at all times. Keep the exhaust tailpipe area clear of snow and other material to help reduce the buildup of exhaust gases under the vehicle.This is particularly important when parked in blizzard conditions. Have the exhaust system inspected periodically for damage and leaks. Any damage or leaks should be repaired immediately.
DAILY INSPECTION CHECKLIST
60G-74E
70F-05-007
Before driving: 1) Make sure that windows, mirrors, lights, and reflectors are clean and unobstructed.
2) Check the tyres. 3) Look for fluid and oil leaks.
NOTE: It is normal for water to drip from the air conditioning system after use. 4) Adjust the seat/head restraint. 5) Check the brake pedal and the parking
brake lever.
6) Adjust the mirrors. 7) Make sure that you and passengers have
properly fastened your seat belts.
8) Make sure that all warning lights come on as the key is turned to the "ON" or "START' position.
9) Check all gauges. 10) Make sure that the brake fluid level warning light is off when the parking brake is released with the ignition switch in "ON" position.
7-1
66
60G-74E
OPERATING YOUR VEHICLE
STARTING THE ENGINE
Once a week, or each time you fill your fuel tank, perform the following under-bonnet checks: 1) Engine oil level. 2) Coolant level. 3) Brake fluid level. 4) Power steering (if equipped) fluid level. 5) Windscreen washer fluid level. 6) Battery solution level. 7) Bonnet latch operation.
Pull the bonnet release handle inside the vehicle. Make sure that you can not open the hood all the way without releasing the secondary latch. Be sure to close the hood securely after checking for proper operation. See "All Latches, Hinges & Locks" of "PERIODIC MAINTENANCE SCHEDULE" in the "INSPECTION AND MAINTENANCE" section for lubrication schedule.
Make sure the bonnet is fully closed and latched before driving. If it is not, it can fly up unexpectedly during driving, obstructing your view and resulting in an accident.
67
OPERATING YOUR VECHILE
USING THE TRANSMISSION
Before starting the engine: 1) Make sure the parking brake is applied
fully.
2) Manual Transmission - Shift into "N" (neutral) and depress the clutch pedal all the way to the floor. Hold it while starting the engine.
Make sure that the parking brake is applied fully and the transmission is in Neutral before attempting to start the engine.
CAUTION
Stop turning the starter immediately after the engine has started or the starter system can be damaged. Do not crank the engine for more than 15 seconds at a time. If the engine doesn't start on the first try, wait about 15 seconds before trying again.
•
Starting a Cold Engine Engine which is started after 6 hours should be treated as cold engine. For Electronic fuel injection models • With your foot off the accelerator pedal, crank the engine by turning the ignition key to "START1. Release the key when the engine starts. If the engine does not start after 15
seconds of cranking, wait about 15
seconds, then press down the accelerator pedal to 1/3 of its travel and try cranking the engine again. Release the key and accelerator pedal when the engine starts. • If the engine still does not start, try holding the accelerator pedal all the way to the floor while cranking. This should clear the engine if it is flooded.Starting a Warm Engine For Electronic fuel injection models: Use the same procedure as for "Starting a cold Engine".
7-2
60G-74E
70F-04-005E
Starting off To start off, depress and maintain pressure upon the clutch pedal and change into 1st gear. After releasing the parking brake, gradually release the clutch. When you hear a change in the engine's sound (speed), gently apply pressure to the accelerator to keep the engine sound (speed) constant whilst continuing to gradually release the clutch.
Gear changing All forward gears are synchronized, which provides for quiet, easy changing. Always depress the clutch pedal fully before changing gears.The following table shows the maximum allowable speed for each gear.
GEAR First Second Third Fourth Fifth
MAXIMUM SPEED
50 km/h 95 km/h 140 km/h Top Speed Top Speed
7-3
68
60G-74E
Reduce your speed and change down to a lower gear before going down a long or steep hill. A lower gear will allow the engine to provide braking. Avoid riding the brakes or they may overheat, resulting in brake failure. When driving on slippery roads, be sure to slow down before changing down. Excessive and or sudden changes in engine speed may cause loss of traction, which could cause you to lose control. Make sure that the vehicle is completely stationary before you change into reverse.
CAUTION
To help avoid clutch damage, do not use the clutch pedal as a footrest while driving or use the clutch to keep the vehicle stationary on a hill. Depress the clutch fully when changing gear. When changing gears or starting off, do not race the engine. Racing the engine can shorten engine life and prevent smooth operation.
69
OPERATING YOUR VECHILE
Servo assisted brakes Your vehicle has servo assisted brakes which works with the assistance of engine vacuum.
Do not switch off the engine while vehicle is in motion, for example, while driving down a hill as this will cause loss of vacuum assistance leading to reduction of braking efficiency substantially.
If servo assistance is lost due to a stalled engine or other failures, the system is still fully operational on reserve power and you can bring the vehicle to a complete stop by pressing the brake pedal once and holding it down. The reserve power is partly used up each time you depress the brake pedal. Apply smooth and constant pressure to the pedal. Do not pump the pedal.
Even without reserve power in the brake system, you can still stop the vehicle by pressing the brake pedal harder than normally required. However, the stopping distance may be lonaer.
On loose surface where the wheels can easily loose traction (such as gravel, etc.), the stopping distance required for your vehicle may be greater than for a comparable vehicle with a conventional brake system. Allow for extra stopping distance when driving on loose surfaces.
OPERATING YOUR VEHICLE
BRAKING
The distance needed to bring any vehicle to a halt increases with the speed of the vehicle. The braking distance needed, for example, at 60 km/h will be approximately 4 times greater than the braking distance needed at 20 km/h. Start to brake the vehicle when there is plenty of distance between your vehicle and the stopping point, and slow down gradually.
If water gets into the brake drums, brake performance may become poor and unpredictable. After driving through water or washing the underside of the vehicle, test the brakes while driving at a slow speed to see if they have maintained their normal effectiveness. If the brakes are less effective than normal, dry them by repeatedly applying the brakes while driving slowly until the brakes have regained their normal effectiveness.
7-4
60G-74E
RUNNING-IN
CAUTION
The future performance and reliability of the engine depends on the care and restraint exercised during its early life. It is especially important to observe the following precautions during the initial 1000 km of vehicle operation. • After starting, do not race the
engine. Warm it up gradually.
• Avoid prolonged vehicle operation at a constant speed. Moving parts will bed in better if you vary your speed.
• Do not exceed 100 km/h. • Start off from a stop slowly. Avoid
•
full throttle starts. If possible, avoid hard braking, especially during the first 300 km of driving.
• Do not drive slowly with the
transmission in a high gear.
• Drive the vehicle at moderate engine
speeds.
7-5
70
60G-74E
CATALYTIC CONVERTER (if equipped)
CAUTION
OPERATING YOUR VEHICLE
70F-05-005
The purpose of the catalytic converter installed on your vehicle is to convert exhaust pollutants to harmless water vapour, carbon dioxide, and nitrogen. Use of leaded fuel in vehicles equipped with catalytic converters is prohibited, because lead deactivates the pollutant-reducing components of the catalyst system. It is very important to keep the engine properly tuned. Engine misfiring, which can result from an improperly tuned engine, may cause overheating of the catalyst. This may result in permanent heat damage to the catalyst and other vehicle components.
71
OPERATING YOUR VECHILE
IMPROVING FUEL ECONOMY
The following instructions will help you improve fuel economy.
Avoid excessive idling: If you are to wait for more than a minute while you are parked, stop the engine and start it again later. When warming up a cold engine, allow the engine to idle until the temperature gauge pointer comes up to the "C" position. In this position, the engine is sufficiently warm for starting off.
Avoid "fast" starts: Fast starts away from lights or stop signs will consume fuel unnecessarily and shorten engine life. Start off slowly.
Avoid unnecessary stops: Avoid unnecessary deceleration and stopping. Try to maintain a slow, steady speed whenever possible. Slowing down and then accelerating again uses more fuel.
Keep a steady cruising speed: Keep as constant a speed as road and traffic conditions will permit.
To minimize the possibility of catalyst or other vehicle damage: • Maintain the engine in the proper
operating condition. In the event of an engine malfunction, particularly one involving engine misfire or other apparent loss of performance, have the vehicle serviced promptly.
•
• Do not turn off the engine or interrupt the ignition when the transmission is in gear and the vehicle is in motion.
• Do not try to start the engine by pushing or towing the vehicle, or coasting down a hill.
• Do not idle the engine with any spark plug wires disconnected or removed, such as during diagnostic testing.
• Do not idle the vehicle for prolonged periods if idling seems rough or there are other malfunctions.
• Do not allow the fuel tank to get near
the empty level.
60Q-07-002E
Be careful where you park and drive; the catalytic converter and other exhaust components can get very hot. As with any vehicle, do not park or operate this vehicle in areas where combustible materials such as dry grass or leaves can come in contact with a hot exhaust system.
7-6
60G-74E
Air Outlet side (Facing up)
TRAILER TOWING
Your MARUTI was originally designed to carry people and a normal amount of cargo, not to tow a trailer. Maruti does not recommend you use your vehicle to tow a trailer.Towing a trailer can adversely affect handling, durability, and fuel economy.
60G-09-010
Keep the air cleaner clean: A dirty air cleaner will cause the carburation system to supply too much fuel to the engine for the amount of air being supplied. The result is waste of fuel due to incomplete combustion.
Keep weight to a minimum: The heavier the load, the more fuel the vehicle consumes. Take out any luggage or cargo when it is not necessary.
Keep tyre pressures correct: Under-inflation of the tyres can waste fuel due to increased running resistance of the tyres. Keep your tyres inflated to the correct pressure shown on the label on the driver's side door or door lock pillar.
7-7
72
60G-74E
DRIVING TIPS AND SAFE DRIVING
DRIVING TIPS AND SAFE DRIVING
High Speed Driving Driving on Hills Driving on Slippery Roads Driving on Wet Roads Do's and Don'ts for Safe Driving
8-1
8-1
8-2
8-2
8-373
DRIVING TIPS AND SAFE DRIVING
70F-06-001
Wear Your Seat Belts at All Times. The driver and passengers should be property restrained at all times, using the seatbelts provided. Refer to the "SEATBELTS" section for instructions on proper use of the seatbelts. Never drive while under the influence of alcohol or other drugs. Alcohol and drugs can seriously impair your ability to drive safely, greatly increasing the risk of injury to yourself and others. You should also avoid driving when you are tired, sick, irritated, or under stress.
8-1
HIGH-SPEED DRIVING When driving at a high-speed, pay attention to the following: • Stopping distance progressively increases with vehicle speed. Apply the brakes far enough ahead of the stopping point to allow for the extra stopping distance.
• On rainy days, "Aquaplaning" can occur. "Aquaplaning" is the loss of direct contact between the road surface and the vehicle's tyres due to a water film forming between them. Steering or braking the vehicle while "Aquaplaning" can be very difficult, and loss of control can occur. Keep speed down when the road surface is wet.
• At high speeds, the vehicle may be affected by side winds. Therefore, reduce speed and be prepared for unexpected buffeting, which can occur at the exits of tunnels, when passing by a cut of a hill, or when being overtaken by large vehicles, etc.
DRIVING ON HILLS • When climbing steep hills, the vehicle may begin to slow down and show a lack of power. If this happens, you should change to a lower gear so that the engine will again be operating in its normal power range. Change rapidly to prevent the vehicle from losing momentum.
60G-74E
When driving down a hill, the engine should be used for braking by shifting to next lower gear.
Try not to hold the brake pedal down too long or too often while going down a steep or long hill. This could cause the brakes to overheat, resulting in reduced braking efficiency. Failure to take this precaution could result in loss of vehicle control.
CAUTION
When descending a down hill, NEVER turn the ignition key to the "OFF" position. Emission control system and automatic transmission (if equipped) damage may result.
DRIVING ON SLIPPERY ROADS Under wet road conditions you should drive at a lower speed than on dry roads due to possible slippage of tyres during braking. When driving on icy, snowcovered, or muddy roads, reduce your speed and avoid sudden acceleration, abrupt braking, or sharp steering movements.
60G-74E
DRIVING TIPS AND SAFE DRIVING
Do not allow anyone to stand near the vehicle when you are rocking it, and do not spin the wheels faster than an indicated 40 km/h on the speedometer. Personal injury and/or vehicle damage may result from spinning the wheels too fast.
CAUTION
Do not continue rocking the vehicle for more than a few minutes. Prolonged rocking can cause engine overheating or transmission damage.
DRIVING ON WET ROADS
CAUTION
When driving on wet roads, avoid driv- ing through large amount of standing water on the road. Large amount of water entering the engine compart- ment may cause damage to the engine and or electrical components. If stuck in deep water, do not start till water level drops. Water Is incompressible substance, water inside engine is harmful to the engine."
Make sure your tyres are in good condition and always maintain the specified tyre pressure. Refer to "TYRES" in the "INSPECTION AND MAINTENANCE" section for details. Do not use tyres other than those specified by MARUTI. never use different sizes or types of tyres on the front and rear wheels. For information regarding the specified tyres, refer to ^"SPECIFICATIONS" section. Never use oversized tyres or special shock absorbers and springs to raise (jack up) your vehicle.This will change the handling characteristics. After driving through water, test the brakes while driving at a slow speed to see if they have maintained their normal effectiveness. If the brakes are less effective than normal, dry them by repeatedly applying the brakes while driving slowly until the brakes have regained their normal effectiveness.
8-2
60G-74E
Snow Chains If you must use snow chains to increase tyre traction, observe the following precautions: • Choose a safe place away from traffic to
install the chains.
• When installing the chains carefully follow
the manufacturer's instructions. Install the chains on the front tyres.
• • With the chains on, drive only at slow and
moderate speeds.
• If Your Vehicle Gets Stuck
If your vehicle gets stuck in snow, mud, or sand, follow the directions below:
1) Change back and forth between first gear and reverse. This will create a rocking motion which may give you enough momentum to free the vehicle. Press gently on the accelerator to keep wheel spin to a minimum. Remove your foot from the accelerator while changing gear. Do not race the engine. Excessive wheel spin will cause the tyres to dig deeper, making it more difficult to free the vehicle. 2) If your vehicle remains stuck after a few minutes of rocking, get another vehicle to pull you out.
75
DRIVING TIPS AND SAFE DRIVING
DO'S AND DON'TS FOR SAFE DRIVING Exercise care in handling your vehicle. Be conscious of not only your own safety but also the safety of others on the road, and thus enjoy the best and most comfortable driving experience.
This section contains basic rules for safe driving. Read for good understanding of the content so that you can enjoy safe and pleasant driving in your Maruti vehicle.
it carefully
72F-08-001
72F-08-002
Starting 1. Adjust the driver's seat for the proper
driving posture.
2. Adjust the rear view mirror so as to obtain
the best possible rear view.
3. Before moving off, look forward and back
to confirm safety.
8-3
72F-08-003
76
60G-74E
DRIVING TIPS AND SAFE DRIVING
4. Don't start quickly, for it is dangerous and
wastes fuel.
72F-08-004
72F-08-006
Always follow other vehicles at a safe distance in order to prevent a rear-end collision, should the vehicle ahead make a sudden stop.
72F-08-005
General driving 1. Be sure to stop before the stop light and stop sign. When moving into the intersection without any traffic lights or signs, drive slowly to confirm safety.
77
DRIVING TIPS AND SAFE DRIVING
8-4
60G-74E
72F-08-007
72F-08-008
72F-08-009
3. Turn ON the turn signal at least 30 meters before making a turn or changing the lane so as not to be hit from behind.
4. Before entering a corner, decelerate to a safe speed. Don't apply brakes during cornering, or a cornering skid may occur. 5. When overtaking other vehicles, watch out for the oncoming vehicle and carefully confirm the safety.
6. Don't attempt zigzag driving which will hinder your control over the vehicle and cause an accident.
8-5
72F-08-010
78
60G-74E
DRIVING TIPS AND SAFE DRIVING
72F-08-012
72F-08-013
Don't use handbraking unless unavoidable. It causes the vehicle to skid and a rear end collision occur. It is especially dangerous when the tyres are worn, for they allow a larger skid.
3. When driving on a downhill, try not to apply the brake but use the engine brake effectively. Overuse of the footbrake may result in total brake failure.
72F-08-011
Use foot brake in three stages
Braking 1. Use the parking brake when parking your vehicle and shift the gear shift lever into the first gear or reverse gear position for the sake of safety.
(1) Warn the vehicle behind you (2) Gradually apply the brake. (3) Bring the vehicle to a halt.
79
DRIVING TIPS AND SAFE DRIVING
8-6
60G-74E
72F-08-014
72F-08-015
72F-08-016
Avoid reckless high speed driving and try to drive at a safe speed suitable for the road conditions while maintaining a constant speed.
5.
The higher the speed, the narrower the driver's visual range becomes. In such a state, it is difficult to anticipate any hazard and the driver feels much fatigued. Never do sharp handling during high speed driving. You will lose your control over your car. When overtaking or changing the lane while driving at a high speed, keep an ample car-to-car distance.
8-7
72F-08-017
80
60G-74E
DRIVING TIPS AND SAFE DRIVING
72F-08-018
72F-08-019
72F-08-020
Long distance driving 1. Be sure to perform safety checks before
starting a trip.
2. Take rest at certain intervals to prevent an accident which may occur when you are sleepy or tired.
Night time driving 1. Drive more slowly at night than in the daytime, for the visual range is restricted at night.
81
DRIVING TIPS AND SAFE DRIVING
8-8
60G-74E
72F-08-021
72F-08-022
2. Don't overtake other vehicles at night. Darkness bothers your sense of speed and hinders your judgement on the car- to-car distance.
3. Don't use the high headlight beam unless its use is inevitable. Its dazzle may blitz the driver of the oncoming vehicle, thus causing an accident.
4. Always keep the window glasses clean. Don't operate the windshield wiper when the windshield glass is dry or the wiper blade and glass may get damaged.
MARGIN FOR SAFETY It is important to allow yourself a margin for safety during driving so that you can cope with erroneous or unexpected driving of other drivers. For that, observe the following. • Drive at a safe speed. • Maintain a sufficient distance between
your vehicle and the vehicle ahead.
• Don't force yourself to overtake other
• Don't make quick start, hard steering or
• Allow an ample time in the driving
vehicles.
sudden stops.
schedule.
• Observe traffic rules and regulations.
CONCLUSION A perfect driver does not exist. The endeavour of every motorist should be to strive for perfection. Safety consciousness not only ensures your safety and the safety of other road users, it also helps reduce the wear and tear on your vehicle, prolongs its life, gives more mileage and ensures a comfortable driving experience.
Follow the do's and don'ts listed, and driving will never be the same again.
72F-08-023
8-9
82
60G-74E
INSPECTION AND MAINTENANCE
INSPECTION AND MAINTENANCE
Periodic Maintenance Schedule.. Engine Oil and Filter Gear OH Engine Coolant Windscreen Washer Fluid Air Cleaner Spark Plugs Brakes Steering Power Steering (if equipped) Clutch Pedal Tyres... Battery Fuses Bulb Replacement Wiper Blades
9-2
9-7
9-10
9-11
9-13
9-13
9-14
9-15
9-17
9-18
9-18
9-19
9-22
9-23
9-25
9-2983
INSPECTION AND MAINTENANCE
60G-74E
When it is necessary to do service work with the engine running, make sure that the parking brake is applied fully and the transmission is in Neutral. Do not touch ignition wires or other ignition system parts when starting the engine or when the engine is running, or you could receive an electric shock. Be careful not to touch a hot engine, exhaust manifold and pipes, muffler, radiator and water hoses. Do not allow smoking, sparks, or flames around gasoline or the battery. Flammable fumes are present. Do not get under your vehicle if it is supported only with the portable jack provided in your vehicle. Be careful not to cause accidental short circuits between the positive and negative battery terminals. Keep used oil, coolant, and other fluids away from children and pets. Dispose of used fluids properly; never pour them on the ground, into sewers, etc.
70F-05-002
You should take extreme care when working on your vehicle to prevent accidental injury. Here are a few precautions that you should be especially careful to observe: • Do not leave the engine running in
garages or other confined areas.
• When the engine Is running, keep hands, clothing, tools, and other objects away from the fan and water pump belt. Even though the fan may not be moving, it can automatically turn on without warning.
9-1
84
INSPECTION AND MAINTENANCE
60G-74E
PERIODIC MAINTENANCE SCHEDULE
The following table shows when regular maintenance on your vehicle is required. This table shows in kilometres and months when inspections, adjustments, lubrication and other services should be performed.
Maruti recommends that maintenance on your Maruti vehicle be performed by Maruti Authorised Dealer/Service Station.
CAUTION
Whenever it becomes necessary to replace parts on your vehicle, it is recommended that you use MARUTI GENUINE PARTS (MGP).
85
INSPECTION AND MAINTENANCE
PERIODIC MAINTENANCE SCHEDULE
A....Ad]ust. T....Tighten to specified torque. R....Replace or change. L....Lubrlcate.
l....lnspect and correct or replace If necessary. C....CIean. O....Rotate
9-2
6OG-74E
Note: This table includes services as scheduled up to 80,000 km mileage. Beyond 80,000 km, carry out the same services at the same intervals respectively.
Interval: This interval should be judged by odometer reading or months, whichever comes first.
km (x 1,000) months
FREE INSPECTIONS
10
12PERIODIC MAINTENANCE SERVICE AT COST 80
20
24
96SO 60
60
7240
4870
8430
36ENGINE 1. Water pump drive belt (tension, wear) 2. Engine coolant (level, leakage) 3. Engine oil (API GRADE SF, SG, SH) & Oil filter 4. Cooling system hoses and connections (leakage, damage) 5. Engine bolts (All cylinder head and manifold fixings) 6. Engine mounting (loose, damage) 7. Valve clearance 8. Camshaft timing belt (damage, wear)
9. Exhaust system (noise, leakage or otherwise defective) 10. Positive crankcase ventilation System (Hoses, connections and valve; IGNITION 1. Ignition wiring, (damage, deterioration) 2. Spark plugs (clean and adjust the gap)
Replace every 1,00,000 km
9-3
86
60G-74E
Interval: This interval should be Judged by odometer reading or months, whichever comes first.
FUEL 1. Air cleaner
km (x 1,000) months
Paved-road Dusty condition
2. Accelerator cable and Throttle shafts 3. Fuel tank cap, fuel lines & connections(leakage,damage) 4. Fuel filter (leakage) CLUTCH AND TRANSMISSION 1. Clutch pedal (play) 2. Clutch slipping (dragging or excessive damage) 3. Manual Transmission/Transfer and Differential oil (level, leakage) DRIVE SHAFTS 1. Drive shafts boots (bent of boots damage) BRAKE 1. Brake fluid (level, leakage) 2. Brake pedal (pedal-to-wall clearance) 3. Parking brake lever and cable (play, damage) 4. a. Brake discs and pads, (wear)
b. Brake drums & shoes
5. Master cylinder and wheel cylinder or calliper (oil leakage.boot kit) 6. Brake hoses and pipes (leakage, damage)
87
INSPECTION AND MAINTENANCE
INSPECTION AND MAINTENANCE
FREE
INSPECTIONS
10
12PERIODIC MAINTENANCE 20
2430
3640
4850
60SERVICE
60
72AT 70
84COST 80
96Replace every 40,000 krr
Clean every 5,000 km. F Clean every 2,500 km or as required. Replace every 40,000 km. More frequent replacement if dust condition is severe.
I&L
I&L
I&L
I&L
I&L
I&L
I&L
I&L
I&L
9-4
60G-74E
Interval: This Interval should be judged by odometer reading or months, whichever comes first
km (x 1,000) months
FREE
INSPECTIONS