- Download PDF Manual
-
Front (if so equipped)
VEHICLE RECOVERY (freeing a stuck vehicle) Do not use the hook to tow the vehicle. ● Remove the cover bumper bracket using a
flat screwdriver or any flat tool.
● To protect the bumper body, place a piece of
cloth between the tool and the vehicle.
● The tool used should be inserted by the
lower portion of the cover.
In case of emergency 6-17
● Do not use the vehicle tie-downs to tow
or free a stuck vehicle.
● Only use devices specifically designed for vehicle recovery and follow the manufacturer’s instructions.
● Always pull the recovery device straight out from the front of the vehicle. Never pull at an angle.
● Route recovery devices so they do not touch any part of the vehicle except the attachment point.
If your vehicle is stuck in sand, snow, mud, etc., use a tow strap or other device designed specifi- cally for vehicle recovery. Always follow the manufacturer’s instructions for the recovery de- vice. Do not use the tie-down hooks for towing or vehicle recovery.
LCE2052
SCE0578
Front (if so equipped)
Rear (if so equipped)
● To remove the cover it is necessary to rotate the flat tool, as shown in the image, in order to avoid any damage to the body.
Do not use the hook to tow the vehicle. Pulling a stuck vehicle
WARNING
To avoid vehicle damage, serious personal injury or death when recovering a stuck vehicle: ● Contact a professional towing service to recover the vehicle if you have any questions recovery procedure.
regarding
the
6-18 In case of emergency
● Release the accelerator pedal before shifting between R (Reverse) and D (Drive) (CVT models) or 1st (Low) and R (Reverse) (M/T models).
● Do not spin the tires above 35 MPH
(55 km/h).
5.
If the vehicle cannot be freed after a few tries, contact a professional towing service to remove the vehicle.
Rocking a stuck vehicle
WARNING
● Stand clear of a stuck vehicle. ● Do not spin your tires at high speed. This could cause them to explode and result in serious injury. Parts of your vehicle could also overheat and be damaged.
If your vehicle is stuck in sand, snow, mud, etc., use the following procedure:
1. Turn off the Vehicle Dynamic Control (VDC)
System.
2. Make sure the area in front and behind the
vehicle is clear of obstructions.
3. Turn the steering wheel right and left to clear
an area around the front tires.
4. Slowly rock the vehicle forward and back-
ward. ● Shift back and forth between R (Reverse) and D (Drive) (CVT models) or 1st (Low) and R (Reverse) (M/T models).
● Apply the accelerator as little as possible
to maintain the rocking motion.
In case of emergency 6-19
MEMO
6-20 In case of emergency
7 Appearance and care
Cleaning exterior . . . . . . . . . . . . . . . . . . . . . . . . . . . . . . . . . . 7-2
Washing . . . . . . . . . . . . . . . . . . . . . . . . . . . . . . . . . . . . . . 7-2
Waxing . . . . . . . . . . . . . . . . . . . . . . . . . . . . . . . . . . . . . . . . 7-2
Removing spots . . . . . . . . . . . . . . . . . . . . . . . . . . . . . . . . 7-3
Underbody . . . . . . . . . . . . . . . . . . . . . . . . . . . . . . . . . . . . 7-3
Glass . . . . . . . . . . . . . . . . . . . . . . . . . . . . . . . . . . . . . . . . . 7-3
Aluminum alloy wheels (if so equipped) . . . . . . . . . . . 7-3
Chrome parts . . . . . . . . . . . . . . . . . . . . . . . . . . . . . . . . . . 7-3
Tire dressings . . . . . . . . . . . . . . . . . . . . . . . . . . . . . . . . . . 7-3
Cleaning interior. . . . . . . . . . . . . . . . . . . . . . . . . . . . . . . . . . . 7-4Air fresheners . . . . . . . . . . . . . . . . . . . . . . . . . . . . . . . . . . 7-4
Floor mats . . . . . . . . . . . . . . . . . . . . . . . . . . . . . . . . . . . . . 7-4
Seat belts . . . . . . . . . . . . . . . . . . . . . . . . . . . . . . . . . . . . . 7-5
Corrosion protection . . . . . . . . . . . . . . . . . . . . . . . . . . . . . . . 7-5Most common factors contributing to vehicle corrosion . . . . . . . . . . . . . . . . . . . . . . . . . . . . . . . . . . . . . . 7-5
Environmental factors influence the rate of corrosion . . . . . . . . . . . . . . . . . . . . . . . . . . . . . . . . . . . . . . 7-5
To protect your vehicle from corrosion . . . . . . . . . . . . 7-6CLEANING EXTERIOR
In order to maintain the appearance of your ve- hicle, it is important to take proper care of it.
To protect the paint surfaces, please wash your vehicle as soon as you can: ● after a rainfall to prevent possible damage
from acid rain.
● after driving on coastal roads. ● when contaminants such as soot, bird drop- pings, tree sap, metal particles or bugs get on the paint surface.
● when dust or mud builds up on the surface. Whenever possible, store or park your vehicle inside a garage or in a covered area.
When it is necessary to park outside, park in a shady area or protect the vehicle with a body cover. Be careful not to scratch the paint surface when putting on or removing the body cover. WASHING Wash dirt off with a wet sponge and plenty of water. Clean the vehicle thoroughly using a mild soap, a special vehicle soap or general purpose dishwashing liquid mixed with clean, lukewarm (never hot) water. 7-2 Appearance and care
CAUTION
● Do not use car washes that use acid in the detergent. Some car washes, espe- cially brushless ones, use some acid for cleaning. The acid may react with some plastic vehicle components, causing them to crack. This could affect their appearance, and also could cause them not to function properly. Always check with your car wash to confirm that acid is not used.
● Do not wash the vehicle with strong household soap, strong chemical deter- gents, gasoline or solvents.
● Avoid using tight-napped or
● Do not wash the vehicle in direct sun- light or while the vehicle body is hot, as the surface may become water-spotted. rough cloths, such as washing mitts. Care must removing caked-on dirt or other foreign sub- stances so the paint surface is not scratched or damaged.
taken when
be
Rinse the vehicle thoroughly with plenty of clean water.
Inside flanges, seams and folds on the doors, hatches and hood are particularly vulnerable to
the effects of road salt. Therefore, these areas must be cleaned regularly. Take care that the drain holes in the lower edge of the door are open. Spray water under the body and in the wheel wells to loosen the dirt and wash away road salt. A damp chamois can be used to dry the vehicle to avoid water spots. WAXING Regular waxing protects the paint surface and helps retain new vehicle appearance. Polishing is recommended to remove built-up wax residue and to avoid a weathered appearance before re-applying wax. A NISSAN dealer can assist you in choosing the proper product. ● Wax your vehicle only after a thorough wash- ing. Follow the instructions supplied with the wax.
● Do not use a wax containing any abrasives, cutting compounds or cleaners that may damage the vehicle finish.
Machine compounding or aggressive polishing on a base coat/clear coat paint finish may dull the finish or leave swirl marks.
REMOVING SPOTS Remove tar and oil spots, industrial dust, insects, and tree sap as quickly as possible from the surface of the paint to avoid lasting damage or staining. Special cleaning products are available at a NISSAN dealer or any automotive accessory store. UNDERBODY In areas where road salt is used in winter, it is necessary to clean the underbody regularly in order to prevent dirt and salt from building up and causing the acceleration of corrosion on the un- derbody and suspension. Before the winter pe- riod and again in the spring, the underseal must be checked and, if necessary, retreated. GLASS Use glass cleaner to remove smoke and dust film from the glass surfaces. It is normal for glass to become coated with a film after the vehicle is parked in the hot sun. Glass cleaner and a soft cloth will easily remove this film.
CAUTION
When cleaning the inside of the windows, do not use sharp-edged tools, abrasive cleaners or chlorine-based disinfectant cleaners. They could damage the electrical conductors, radio antenna elements or rear window defroster elements.
ALUMINUM ALLOY WHEELS (if so equipped) Wash the wheels regularly with a sponge damp- ened in a mild soap solution, especially during winter months in areas where road salt is used. If not removed, road salt can discolor the wheels.
CAUTION
Follow the directions below to avoid staining or discoloring the wheels: ● Do not use a cleaner that uses strong acid
or alkali contents to clean the wheels.
● Do not apply wheel cleaners to the wheels when they are hot. The wheel temperature should be the same as am- bient temperature.
● Rinse the wheel to completely remove the cleaner within 15 minutes after the cleaner is applied.
CHROME PARTS Clean all chrome parts regularly with a non- abrasive chrome polish to maintain the finish. TIRE DRESSINGS NISSAN does not recommend the use of tire dressings. Tire manufacturers apply a coating to the tires to help reduce discoloration of the rub- ber. If a tire dressing is applied to the tires, it may react with the coating and form a compound. This compound may come off the tire while driving and stain the vehicle paint. If you choose to use a tire dressing, take the following precautions: ● Use a water-based tire dressing. The coat- ing on the tire dissolves more easily than with an oil-based tire dressing.
● Apply a light coat of tire dressing to help prevent tire tread/grooves (where it would be difficult to remove).
from entering
the
it
● Wipe off excess tire dressing using a dry towel. Make sure the tire dressing is com- pletely removed from the tire tread/grooves. ● Allow the tire dressing to dry as recom- mended by the tire dressing manufacturer.
Appearance and care 7-3
CLEANING INTERIOR
Occasionally remove loose dust from the interior trim, plastic parts and seats using a vacuum cleaner or soft bristled brush. Wipe the vinyl and leather surfaces with a clean, soft cloth damp- ened in mild soap solution, then wipe clean with a dry, soft cloth. Regular care and cleaning is required in order to maintain the appearance of the leather. Before using any fabric protector, read the manu- facturer’s recommendations. Some fabric pro- tectors contain chemicals that may stain or bleach the seat material. Use a cloth dampened only with water to clean the meter and gauge lens.
WARNING
Do not use water or acidic cleaners (hot steam cleaners) on the seat. This can dam- age the seat or occupant classification sensor. This can also affect the operation of the air bag system and result in serious personal injury.
7-4 Appearance and care
CAUTION
● Never use benzine, thinner or any simi-
lar material.
● Small dirt particles can be abrasive and damaging to leather surfaces and should be removed promptly. Do not use saddle soap, car waxes, polishes, oils, cleaning fluids, solvents, deter- gents or ammonia-based cleaners as they may damage the leather’s natural finish.
● Never use fabric protectors unless rec-
ommended by the manufacturer.
● Do not use glass or plastic cleaner on meter or gauge lens covers. It may dam- age the lens cover.
AIR FRESHENERS Most air fresheners use a solvent that could affect the vehicle interior. If you use an air freshener, take the following precautions: ● Hanging-type air fresheners can cause per- manent discoloration when they contact ve- hicle interior surfaces. Place the air fresh- ener in a location that allows it to hang free and not contact an interior surface.
● Liquid-type air fresheners typically clip on the vents. These products can cause imme- diate damage and discoloration when spilled on interior surfaces.
Carefully read and follow the manufacturer’s in- structions before using the air fresheners. FLOOR MATS
WARNING
To avoid potential pedal interference that may result in a collision or injury: ● NEVER place a floor mat on top of an- front
in the driver
floor mat
other position.
● Use only genuine NISSAN floor mats specifically designed for use in your ve- hicle model. See your NISSAN dealer for more information.
● Properly position the mats in the floor- well using the floor mat positioning aid. See ⴖFloor mat positioning aidⴖ in this section.
The use of genuine NISSAN floor mats can ex- tend the life of your vehicle carpet and make it easier to clean the interior. Mats should be main- tained with regular cleaning and replaced if they become excessively worn.
SEAT BELTS The seat belts can be cleaned by wiping them with a sponge dampened in a mild soap solution. Allow the belts to dry completely in the shade before using them. See “Seat belt maintenance” in the “Safety – Seats, seat belts and supplemen- tal restraint system” section of this manual.
WARNING
Do not allow wet seat belts to roll up in the retractor. NEVER use bleach, dye or chemical solvents to clean the seat belts, since these materials may severely weaken the seat belt webbing.
CORROSION PROTECTION
MOST COMMON FACTORS CONTRIBUTING TO VEHICLE CORROSION ● The accumulation of moisture-retaining dirt and debris in body panel sections, cavities, and other areas.
● Damage to paint and other protective coat- ings caused by gravel and stone chips or minor traffic accidents.
ENVIRONMENTAL FACTORS INFLUENCE THE RATE OF CORROSION Moisture Accumulation of sand, dirt and water on the ve- hicle body underside can accelerate corrosion. Wet floor coverings will not dry completely inside the vehicle and should be removed for drying to avoid floor panel corrosion. Relative humidity Corrosion will be accelerated in areas of high relative humidity, especially those areas where the temperatures stay above freezing and where atmospheric pollution exists and road salt is used.
Appearance and care 7-5
LAI2010
Floor mat positioning aid (drivers’s side only) This vehicle includes two driver’s side front floor mat brackets to help keep your floor mats in place. Genuine NISSAN floor mats have been specially designed for your vehicle model. The driver’s side floor mat has two grommet holes incorporated in it. Position each mat by placing the floor mat bracket hook through the floor mat grommet holes while centering the mat in the floorwell. Periodically check to make certain the mats are properly positioned.
Temperature High temperatures accelerate the rate of corro- sion to those parts which are not well ventilated. Air pollution Industrial pollution, the presence of salt in the air in coastal areas, or heavy road salt use acceler- ates the corrosion process. Road salt also accel- erates the disintegration of paint surfaces. TO PROTECT YOUR VEHICLE FROM CORROSION ● Wash and wax your vehicle often to keep the
vehicle clean.
● Always check for minor damage to the paint
and repair it as soon as possible.
● Keep drain holes at the bottom of the doors
open to avoid water accumulation.
● Check the underbody for accumulation of sand, dirt or salt. If present, wash with water as soon as possible.
CAUTION
● NEVER remove dirt, sand or other de- bris from the passenger compartment by washing it out with a hose. Remove dirt with a vacuum cleaner or broom.
● Never allow water or other liquids to come in contact with electronic compo- nents inside the vehicle as this may damage them.
Chemicals used for road surface de-icing are extremely corrosive. They accelerate corrosion and deterioration of underbody components such as the exhaust system, fuel and brake lines, brake cables, floor pan and fenders. In winter, the underbody must be cleaned periodically.
For additional protection against rust and corro- sion, which may be required in some areas, con- sult a NISSAN dealer.
7-6 Appearance and care
8 Maintenance and do-it-yourself
Maintenance requirements. . . . . . . . . . . . . . . . . . . . . . . . . . 8-2
General maintenance . . . . . . . . . . . . . . . . . . . . . . . . . . . . . . 8-2
Explanation of general maintenance items . . . . . . . . . 8-2
Maintenance precautions . . . . . . . . . . . . . . . . . . . . . . . . . . . 8-5
Engine compartment check locations . . . . . . . . . . . . . . . . 8-6
Engine cooling system . . . . . . . . . . . . . . . . . . . . . . . . . . . . . 8-7
Checking engine coolant level . . . . . . . . . . . . . . . . . . . 8-8
Changing engine coolant . . . . . . . . . . . . . . . . . . . . . . . . 8-8
Engine oil. . . . . . . . . . . . . . . . . . . . . . . . . . . . . . . . . . . . . . . . . 8-8
Checking engine oil level . . . . . . . . . . . . . . . . . . . . . . . . 8-8
Changing engine oil . . . . . . . . . . . . . . . . . . . . . . . . . . . . 8-9
Changing engine oil filter . . . . . . . . . . . . . . . . . . . . . . . 8-10Continuously Variable Transmission (CVT) fluid (if so equipped) . . . . . . . . . . . . . . . . . . . . . . . . . . . . . . . . . . 8-11
Brake and clutch (if so equipped) fluid . . . . . . . . . . . . . . 8-11
Windshield-washer fluid. . . . . . . . . . . . . . . . . . . . . . . . . . . 8-12
Windshield-washer fluid reservoir . . . . . . . . . . . . . . . 8-12
Battery . . . . . . . . . . . . . . . . . . . . . . . . . . . . . . . . . . . . . . . . . . 8-13
Jump starting . . . . . . . . . . . . . . . . . . . . . . . . . . . . . . . . . 8-14
Variable voltage control system. . . . . . . . . . . . . . . . . . . . . 8-15
Drive belt . . . . . . . . . . . . . . . . . . . . . . . . . . . . . . . . . . . . . . . . 8-15
Spark plugs. . . . . . . . . . . . . . . . . . . . . . . . . . . . . . . . . . . . . . 8-16Replacing spark plugs . . . . . . . . . . . . . . . . . . . . . . . . . 8-16
Air cleaner . . . . . . . . . . . . . . . . . . . . . . . . . . . . . . . . . . . . . . . 8-17
Windshield wiper blades . . . . . . . . . . . . . . . . . . . . . . . . . . 8-17
Cleaning . . . . . . . . . . . . . . . . . . . . . . . . . . . . . . . . . . . . . 8-17
Replacing . . . . . . . . . . . . . . . . . . . . . . . . . . . . . . . . . . . . 8-18
Brakes . . . . . . . . . . . . . . . . . . . . . . . . . . . . . . . . . . . . . . . . . . 8-19
Fuses . . . . . . . . . . . . . . . . . . . . . . . . . . . . . . . . . . . . . . . . . . . 8-20
Engine compartment . . . . . . . . . . . . . . . . . . . . . . . . . . . 8-20
Passenger compartment . . . . . . . . . . . . . . . . . . . . . . . 8-20
Battery replacement . . . . . . . . . . . . . . . . . . . . . . . . . . . . . . 8-22
Keyfob (if so equipped) . . . . . . . . . . . . . . . . . . . . . . . . 8-22
NISSAN Intelligent Key® (if so equipped) . . . . . . . . 8-23
Lights . . . . . . . . . . . . . . . . . . . . . . . . . . . . . . . . . . . . . . . . . . . 8-24
Headlights . . . . . . . . . . . . . . . . . . . . . . . . . . . . . . . . . . . . 8-24
Fog lights (if so equipped) . . . . . . . . . . . . . . . . . . . . . . 8-25
Exterior and interior lights. . . . . . . . . . . . . . . . . . . . . . . 8-26
Wheels and tires . . . . . . . . . . . . . . . . . . . . . . . . . . . . . . . . . 8-29
Tire pressure. . . . . . . . . . . . . . . . . . . . . . . . . . . . . . . . . . 8-29
Tire labeling. . . . . . . . . . . . . . . . . . . . . . . . . . . . . . . . . . . 8-33
Types of tires. . . . . . . . . . . . . . . . . . . . . . . . . . . . . . . . . . 8-35
Tire chains. . . . . . . . . . . . . . . . . . . . . . . . . . . . . . . . . . . . 8-36
Changing wheels and tires . . . . . . . . . . . . . . . . . . . . . 8-36MAINTENANCE REQUIREMENTS
GENERAL MAINTENANCE
Your NISSAN has been designed to have mini- mum maintenance requirements with long ser- vice intervals to save you both time and money; however, some day-to-day and regular mainte- nance is essential to maintain your NISSAN’s good mechanical condition as well as its emis- sions and engine performance.
It is the owner’s responsibility to make sure that the scheduled maintenance, as well as general maintenance, is performed.
As the vehicle owner, you are the only one who can ensure that your vehicle receives proper maintenance. You are a vital link in the mainte- nance chain. Scheduled maintenance
For your convenience, both required and optional scheduled maintenance items are described and listed in your “NISSAN Service and Maintenance Guide”. You must refer to that guide to ensure that necessary maintenance is performed on your NISSAN at regular intervals. General maintenance
General maintenance includes those items which should be checked during normal day-to-day op- eration. They are essential for proper vehicle op- eration. It is your responsibility to perform these maintenance procedures regularly as prescribed. 8-2 Maintenance and do-it-yourself
Performing general maintenance checks requires minimal mechanical skill and only a few general automotive tools. These checks or inspections can be done by you, a qualified technician or, if you prefer, a NISSAN dealer. Where to go for service If maintenance service is required or your vehicle appears to malfunction, have the systems checked and corrected by a NISSAN dealer. NISSAN technicians are well-trained specialists who are kept up-to-date with the latest service information through technical bulletins, service tips and in-dealership training programs. They are completely qualified to work on NISSAN ve- hicles before they work on your vehicle rather than after they have worked on it. You can be confident that a NISSAN dealer’s service department performs the best job to meet the maintenance requirements on your vehicle — in a reliable and economical way.
During the normal day-to-day operation of the vehicle, general maintenance should be per- formed regularly as prescribed in this section. If you detect any unusual sounds, vibrations or smells, be sure to check for the cause or have a NISSAN dealer do it promptly. In addition, you should notify a NISSAN dealer if you think that repairs are required.
information on the following
When performing any checks or maintenance work, closely observe the “Maintenance precau- tions” in this section. EXPLANATION OF GENERAL MAINTENANCE ITEMS Additional items with “ * ” isfound in this section. Outside the vehicle The maintenance items listed here should be performed from time to time, unless otherwise specified. Doors and engine hood Check that the doors and engine hood operate properly. Also ensure that all latches lock securely. Lubricate hinges, latches, latch pins, rollers and links as necessary. Make sure that the secondary latch keeps the hood from opening when the primary latch is released.
When driving in areas using road salt or other corrosive materials, check lubrication frequently. Lights* Clean the headlights on a regular basis. Make sure that the headlights, stop lights, tail lights, turn signal lights, and other lights are all operating properly and installed securely. Also check headlight aim. Road wheel nuts (lug nuts)* When checking the tires, make sure no wheel nuts are missing, and check for any loose wheel nuts. Tighten if necessary. Tire rotation* Tires should be rotated every 7,500 miles (12,000 km). Tires* Check the pressure with a gauge often and always prior to long distance trips. If neces- sary, adjust the pressure in all tires, including the spare, to the pressure specified. Check carefully for damage, cuts or excessive wear. Tire Pressure Monitoring System (TPMS) transmitter components (if so equipped) Replace the TPMS transmitter grommet seal, valve core and cap when the tires are replaced due to wear or age. Wheel alignment and balance If the vehicle should pull to either side while driving on a straight and level road, or if you detect uneven or abnormal tire wear, there may be a need for wheel
alignment. If the steering wheel or seat vibrates at normal highway speeds, wheel balancing may be needed. ● For additional
information regarding tires, refer to “Important Tire Safety Information” (US) or “Tire Safety Information” (Canada) in the Warranty Information Booklet.
Windshield Clean the windshield on a regular basis. Check the windshield at least every six months for cracks or other damage. Have a dam- aged windshield repaired by a qualified repair facility. Windshield wiper blades* Check for cracks or wear if they do not wipe properly. Inside the vehicle The maintenance items listed here should be checked on a regular basis, such as when per- forming periodic maintenance, cleaning the ve- hicle, etc. Additional items with an “*” is found in this section. Accelerator pedal Check the pedal for smooth operation and make sure the pedal does not bind or require uneven effort. Keep the floor mat away from the pedal. Brake pedal Check the pedal for smooth opera- tion. If the brake pedal suddenly goes down fur-
information on the following
ther than normal, the pedal feels spongy or the vehicle seems to take longer to stop, see a NISSAN dealer immediately. Keep the floor mat away from the pedal. Brakes Check that the brakes do not pull the vehicle to one side when applied. Continuously Variable Transmission (CVT) P (Park) position mechanism (if so equipped) On a fairly steep hill check that the vehicle is held securely with the shift lever in the P (Park) position without applying any brakes. Parking brake Check the parking brake opera- tion regularly. The vehicle should be securely held on a fairly steep hill with only the parking brake applied. If the parking brake needs adjustment, see a NISSAN dealer. Seats Check seat position controls such as seat adjusters, seat back recliner, etc. to ensure they operate smoothly and all latches lock securely in head every position. Check restraints/headrests move down smoothly and the locks hold securely in all latched positions. Seat belts Check that all parts of the seat belt system (for example, buckles, anchors, adjusters and retractors) operate properly and smoothly, and are installed securely. Check the belt web- bing for cuts, fraying, wear or damage.
the and
that up
Maintenance and do-it-yourself 8-3
Steering wheel Check for changes in the steer- ing system, such as excessive freeplay, hard steering or strange noises. Warning lights and chimes Make sure all warning lights and chimes are operating properly. Windshield wiper and washer* Check that the wipers and washer operate properly and that the wipers do not streak. Windshield defroster Check that the air comes out of the defroster outlets properly and in sufficient quantity when operating the heater or air conditioner. Under the hood and vehicle The maintenance items listed here should be checked periodically (for example, each time you check the engine oil or refuel). Battery* Check the fluid level It should be between the MAX and MIN lines. Ve- hicles operated in high temperatures or under severe conditions require frequent checks of the battery fluid level.
in each cell.
8-4 Maintenance and do-it-yourself
NOTE:
Care should be taken to avoid situations that can lead to potential battery discharge and potential no-start conditions such as:
1.
Installation or extended use of electronic accessories that consume battery power when the engine is not running (Phone char- gers, GPS, DVD players, etc.)
2. Vehicle is not driven regularly and/or only driven short distances. In these cases, the battery may need to be charged to maintain battery health.
Brake and clutch (if so equipped) fluid lev- els* Make sure that the brake and clutch fluid level is between the MIN and MAX lines on the reservoir. Engine coolant level* Check the coolant level when the engine is cold. Engine drive belts* Make sure the drive belts are not frayed, worn, cracked or oily. Engine oil level* Check the level after parking the vehicle on a level surface with the engine off. Wait more than 10 minutes for the oil to drain back into the oil pan. Exhaust system Make sure there are no loose supports, cracks or holes. If the sound of the exhaust seems unusual or there is a smell of
exhaust fumes, immediately have the exhaust system inspected by a NISSAN dealer. See the carbon monoxide warning in the “Starting and driving” section of this manual. Fluid leaks Check under the vehicle for fuel, oil, water or other fluid leaks after the vehicle has been parked for a while. Water dripping from the air conditioner (if so equipped) after use is nor- mal. If you should notice any leaks or if gasoline fumes are evident, check for the cause and have it corrected immediately. Radiator and hoses Check the front of the radiator and clean off any dirt, insects, leaves, etc., that may have accumulated. Make sure the hoses have no cracks, deformation, rot or loose connections. Underbody The underbody is frequently ex- posed to corrosive substances such as those used on icy roads or to control dust. It is very important to remove these substances from the underbody, otherwise rust may form on the floor pan, frame, fuel lines and exhaust system. At the end of winter, the underbody should be thor- oughly flushed with plain water, in those areas where mud and dirt may have accumulated. See the “Appearance and care” section of this manual. Windshield–washer fluid* Check that there is adequate fluid in the reservoir.
MAINTENANCE PRECAUTIONS
When performing any inspection or maintenance work on your vehicle, always take care to prevent serious accidental injury to yourself or damage to the vehicle. The following are general precau- tions which should be closely observed.
WARNING
● Park the vehicle on a level surface, ap- ply the parking brake securely and block the wheels to prevent the vehicle from moving. For manual transmission models, move the shift lever to N (Neu- tral). For CVT models, move the shift lever to P (Park).
● Be sure the ignition switch is placed in the OFF or LOCK position when performing any parts replacement or repairs.
● Your vehicle is equipped with an auto- matic engine cooling fan. It may come on at any time without warning, even if the ignition switch is placed in the OFF position and the engine is not running. To avoid injury, always disconnect the negative battery cable before working near the fan.
● If you must work with the engine run- ning, keep your hands, clothing, hair and tools away from moving fans, belts and any other moving parts.
● It is advisable to secure or remove any loose clothing and remove any jewelry, such as rings, watches, etc. before working on your vehicle.
● Always wear eye protection whenever
you work on your vehicle.
● If you must run the engine in an en- closed space such as a garage, be sure there is proper ventilation for exhaust gases to escape.
● Never get under the vehicle while it is supported only by a jack. If it is neces- sary to work under the vehicle, support it with safety stands.
● Keep smoking materials,
flame and sparks away from the fuel tank and battery.
● The fuel filter or fuel lines should be serviced by a NISSAN dealer because the fuel lines are under high pressure even when the engine is off.
CAUTION
● Do not work under the hood while the engine is hot. Turn the engine off and wait until it cools down.
● Avoid contact with used engine oil and coolant. Improperly disposed engine oil, engine coolant and/or other vehicle fluids can damage the environment. Al- ways conform to local regulations for disposal of vehicle fluid.
● Never leave the engine or the transmis- sion related component harness con- nector disconnected while the ignition switch is in the ON position.
● Never connect or disconnect the battery or any transistorized component while the ignition switch is in the ON position.
This “Maintenance and do-it-yourself” section gives instructions regarding only those items which are relatively easy for an owner to perform. A genuine NISSAN service manual is also avail- able. See “Owner’s Manual/Service Manual or- der information” in the “Technical and consumer information” section of this manual. You should be aware that incomplete or improper servicing may result in operating difficulties or excessive emissions, and could affect warranty coverage. If in doubt about any servicing, have it done by a NISSAN dealer.
Maintenance and do-it-yourself 8-5
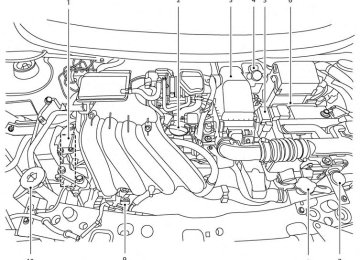
Drive belt location Engine oil filler cap Air cleaner Brake and clutch (*1) fluid reservoir Fusible link Battery Engine coolant reservoir Radiator cap Engine oil dipstick
HR16DE engine 1. 2. 3. 4. 5. 6. 7. 8. 9. 10. Windshield-washer fluid reservoir *1
For Manual Transmission (M/T) model
ENGINE COMPARTMENT CHECK LOCATIONS
8-6 Maintenance and do-it-yourself
LDI2377
ENGINE COOLING SYSTEM
The engine cooling system is filled at the factory with a pre-diluted mixture of 50% Genuine NISSAN Long Life Antifreeze/Coolant (blue) and 50% water to provide year-round anti-freeze and coolant protection. The antifreeze solution con- tains rust and corrosion inhibitors. Additional en- gine cooling system additives are not necessary.
WARNING
● Never remove the radiator or coolant reservoir cap when the engine is hot. Wait until the engine and radiator cool down. Serious burns could be caused by high pressure fluid escaping from the radiator. See precautions in “If your vehicle overheats” found in the “In case of emergency” section of this manual.
● The radiator is equipped with a pres- sure type radiator cap. To prevent en- gine damage, use only a genuine NISSAN radiator cap.
CAUTION
● Never use any cooling system additives such as radiator sealer. Additives may clog the cooling system and cause dam- age to the engine, transmission and/or cooling system.
(blue)
● When adding or replacing coolant, be sure to use only Genuine NISSAN Long Life Antifreeze/Coolant or equivalent. Genuine NISSAN Long Life Antifreeze/Coolant (blue) is pre-diluted to provide antifreeze protection to -34° F (-37° C). If additional freeze protection is needed due to weather where you operate your vehicle, add Genuine NISSAN Long Life Antifreeze/Coolant (blue) concentrate following the direc- tions on the container. If an equivalent coolant other than Genuine NISSAN Long Life Antifreeze/Coolant (blue) is used, follow the coolant manufacturer’s instructions to maintain minimum anti- freeze protection to -34° F (-37° C). The use of other types of coolant solutions other than Genuine NISSAN Long Life Antifreeze/Coolant (blue) or equivalent may damage the engine cooling system.
● The life expectancy of the factory-fill coolant is 105,000 miles (168,000 km) or 7 years. Mixing any other type of cool- ant other than Genuine NISSAN Long Life Antifreeze/Coolant (blue), includ- ing Genuine NISSAN Long Life Antifreeze/Coolant (green), or the use of non-distilled water will reduce the life expectancy of the factory-fill cool- ant. Refer to the NISSAN Service and Maintenance Guide for more details.
Maintenance and do-it-yourself 8-7
ENGINE OIL
CHANGING ENGINE COOLANT A NISSAN dealer can change the engine coolant. The service procedure can be found in the NISSAN Service Manual. Improper servicing can result in reduced heater performance and engine overheat- ing.
WARNING
● To avoid the danger of being scalded, never change the coolant when the en- gine is hot.
● Never remove the radiator cap when the engine is hot. Serious burns could be caused by high pressure fluid escaping from the radiator.
● Avoid direct skin contact with used coolant. If skin contact is made, wash thoroughly with soap or hand cleaner as soon as possible.
● Keep coolant out of the reach of chil-
dren and pets.
LDI2038
CHECKING ENGINE OIL LEVEL 1. Park the vehicle on a level surface and apply
the parking brake.
2. Start the engine and let it idle until it reaches
operating temperature.
3. Turn off
the engine. Wait more than 10 minutes for the oil to drain back into the oil pan.
Engine coolant must be disposed of properly. Check your local regulations.
4. Remove the dipstick and wipe it clean. Re-
insert it all the way.
SDI1860
CHECKING ENGINE COOLANT LEVEL Check the coolant level in the reservoir when the engine is cold. If the coolant level is below the MIN level 䊊2 , add coolant to the MAX level 䊊1 . If the reservoir is empty, check the coolant level in the radiator when the engine is cold. If there is insufficient coolant in the radiator, fill the radiator with coolant up to the filler opening and also add it to the reservoir up to the MAX level 䊊1 . If the cooling system frequently requires coolant, have it checked by a NISSAN dealer.
8-8 Maintenance and do-it-yourself
It is normal to add some engine oil be- tween oil maintenance intervals depending on the severity of operating conditions or depending on the property of the engine oil used. More engine oil is consumed by fre- quent acceleration/deceleration especially when the engine rpm is high. Consumption is likely to be higher when the engine is new. If the rate of oil consumption, after driving for 3,000 miles (5,000 km), is more than 0.5 liter per 600 miles (1,000 km), con- sult a NISSAN dealer
CAUTION
Oil level should be checked regularly. Op- erating the engine with an insufficient amount of oil can damage the engine, and such damage is not covered by warranty.
LHA2095
5. Remove the dipstick again and check the oil level. It should be between the H (High) and L (Low) marks 䊊1 . This is the normal oper- ating oil level range. If the oil level is below the L (Low) mark 䊊2 , remove the oil filler cap and pour recommended oil through the opening. Do not overfill 䊊3 .6. Recheck oil level with the dipstick.
LDI2065
䊊A Oil filler cap 䊊B Oil drain plug 䊊C Oil filter CHANGING ENGINE OIL 1. Park the vehicle on a level surface and apply
the parking brake.
2. Start the engine and let it idle until it reaches
operating temperature, then turn it off.
3. Remove the oil filler cap 䊊A by turning it
counterclockwise.
4. Place a large drain pan under the drain plug
䊊B . Maintenance and do-it-yourself 8-9
5. Remove the drain plug 䊊B with a wrench by turning it counterclockwise and completely drain the oil. If the oil filter is to be changed, remove and replace it at this time. See “Changing engine oil filter” later in this section.
WARNING
● Prolonged and repeated contact with used engine oil may cause skin cancer. ● Try to avoid direct skin contact with used oil. If skin contact is made, wash thoroughly with soap or hand cleaner as soon as possible.
● Keep used engine oil out of reach of
children.
CAUTION
● Be careful not to burn yourself. The en-
gine oil may be hot.
● Waste oil must be disposed of properly. ● Check your local regulations.
6. Clean and reinstall the drain plug and a new washer. Securely tighten the drain plug with a wrench. Do not use excessive force. Drain plug tightening torque: 22 - 29 ft-lb (29 - 39 N·m )
7. Refill engine with recommended oil through the oil filler opening, then install the oil filler cap securely. See “Recommended fluids/lubricants and capacities” in the “Technical and consumer information” section of this manual for drain and refill capacity. The drain and refill capacity depends on the oil temperature and drain time. Use these specifications for reference only. Always use the dipstick to determine when the proper amount of oil is in the engine.
8. Start the engine. Check for leakage around the drain plug and oil filter. Correct as re- quired.
9. Turn the engine off and wait more than level with the
10 minutes. Check the oil dipstick. Add engine oil if necessary.
8-10 Maintenance and do-it-yourself
LDI2064
䊊A Oil filler cap 䊊B Oil drain plug 䊊C Oil filter CHANGING ENGINE OIL FILTER 1. Park the vehicle on a level surface and apply
the parking brake.
2. Turn the engine off. 3. Place a large drain pan under the oil filter 䊊C . 4. Loosen the oil filter with an oil filter wrench by turning it counterclockwise. Then remove the oil filter by turning it by hand.
CONTINUOUSLY VARIABLE TRANSMISSION (CVT) FLUID (if so equipped)
BRAKE AND CLUTCH (if so equipped) FLUID
CAUTION
CAUTION
Be careful not to burn yourself. The engine oil may be hot.
● Use only Genuine NISSAN CVT Fluid
NS-3. Do not mix with other fluids.
5. Wipe the engine oil filter sealing surface with
a clean rag.
CAUTION
Be sure to remove any old gasket material remaining on the sealing surface of the engine. Failure to do so could lead to engine damage.
6. Coat the gasket on the new filter with clean
engine oil.
7. Screw on the oil filter until a slight resistance
is felt, then tighten an additional 2/3 turn.
● Using transmission fluid other than Genuine NISSAN CVT Fluid NS-3 will damage the CVT, which is not covered by the warranty.
When checking or replacement of CVT fluid is required, we recommend your NISSAN dealer for servicing.
8. Start
the engine and check for leakage
around the oil filter. Correct as required.
9. Turn the engine off and wait more than 10 minutes. Check the oil level. Add engine oil if necessary.
For further brake and clutch fluid specification information, “Recommended fluids/lubricants and capacities” in the “Technical and consumer this manual.
information” section of
refer
to
WARNING
● Use only new fluid from a sealed con- tainer. Old, inferior or contaminated fluid may damage the brake and clutch (if so equipped) systems. The use of improper fluids can damage the brake and clutch system and affect the vehi- cle’s stopping ability.
● Clean the filler cap before removing. ● Brake and clutch fluid is poisonous and should be stored carefully in marked containers out of reach of children.
CAUTION
Do not spill the fluid on any painted sur- faces. This will damage the paint. If fluid is spilled, immediately wash the surface with water.
Maintenance and do-it-yourself 8-11
WINDSHIELD-WASHER FLUID
LDI2184
Check the fluid level in the reservoir. If the level is below the MIN line䊊1 , add Genuine NISSAN Super Heavy Duty Brake Fluid or equivalent DOT 3 fluid up to the MAX line䊊2 . If fluid must be added frequently, the system should be checked by a NISSAN dealer.8-12 Maintenance and do-it-yourself
LDI2040
WINDSHIELD-WASHER FLUID RESERVOIR Add a washer solvent to the windshield-washer fluid reservoir for better cleaning. In the winter season, add a windshield-washer antifreeze. Fol- low the manufacturer’s instructions for the mix- ture ratio.
Refill the reservoir more frequently when driving conditions require an increased amount of windshield-washer fluid.
Recommended fluid is Genuine NISSAN Windshield-Washer Fluid Concentrate Cleaner & Anti-freeze or equivalent.
CAUTION
● Do not substitute engine anti-freeze coolant for windshield-washer solution. This may result in damage to the paint. ● Do not fill the windshield-washer fluid reservoir with washer fluid concen- trates at full strength. Some methyl al- cohol based washer fluid concentrates may permanently stain the grille if spilled while filling the windshield- washer fluid reservoir.
● Pre-mix windshield-washer fluid con- centrates with water to the manufactur- er’s recommended levels before pour- ing the fluid into the windshield-washer the fluid reservoir. Do not use windshield-washer to mix the washer fluid concentrate and water.
fluid reservoir
BATTERY
● Keep the battery surface clean and dry. Clean the battery with a solution of baking soda and water.
● Make certain the terminal connections are
clean and securely tightened.
● If the vehicle is not to be used for 30 days or longer, disconnect the negative (-) battery terminal cable to prevent discharge.
NOTE:
Care should be taken to avoid situations that can lead to potential battery discharge and potential no-start conditions such as: Installation or extended use of electronic 1. accessories that consume battery power when the engine is not running (Phone char- gers, GPS, DVD players, etc.)
2. Vehicle is not driven regularly and/or only driven short distances. In these cases, the battery may need to be charged to maintain battery health.
WARNING
● Do not expose the battery to electrical sparks, flames or smoking. Hydrogen gas generated by the battery is explo- sive. Explosive gases can cause blind- ness or injury. Do not allow battery fluid to contact your skin, eyes, fabrics or painted surfaces. Sulfuric acid can cause blindness or severe burns. After touching a battery or battery cap, do not touch or rub your eyes. Thoroughly wash your hands. If the acid contacts your eyes, skin or clothing, immediately flush with water for at least 15 minutes and seek medical attention.
● Do not operate the vehicle if the fluid in the battery is low. Low battery fluid can cause a higher load on the battery which can generate heat, reduce battery life, and in some cases lead to an explosion.
● When working on or near a battery, al- ways wear suitable eye protection and remove all jewelry.
● Do not tip the battery. Keep the vent
caps tight and the battery level.
● Battery posts, terminals and related ac- cessories contain lead and lead com- pounds. Wash hands after handling.
● Keep battery out of
children.
the reach of
Maintenance and do-it-yourself 8-13
Vehicles operated in high temperatures or under severe conditions require frequent checks of the battery fluid level. JUMP STARTING If jump starting is necessary, see “Jump starting” in the “In case of emergency” section of this manual. If the engine does not start by jump starting, the battery may have to be replaced. Contact a NISSAN dealer.
WDI0701
1. Remove the battery vent caps with a screw-driver as shown.
2. Check the fluid level
WDI0529
If it is necessary to add fluid , add only distilled water to bring the level up to the bottom of the filler opening. Do not overfill.in each cell.
8-14 Maintenance and do-it-yourself
3. Reinstall the battery vent caps.
VARIABLE VOLTAGE CONTROL SYSTEM
DRIVE BELT
The current sensor 䊊A is located near the battery along the negative battery cable. If you add elec- trical accessories to your vehicle, be sure to ground them to a suitable body ground such as the frame or engine block area.
LDI2250
CAUTION
● Do not ground accessories directly to the battery terminal. Doing so will by- pass the variable voltage control sys- tem and the vehicle battery may not charge completely.
● Use electrical accessories with the en- gine running to avoid discharging the vehicle battery.
Your vehicle is equipped with a variable voltage control system. This system measures the amount of electrical discharge from the battery and controls voltage generated by the generator.
WDI0695
1. Water pump 2. Generator 3. Crankshaft pulley 4. Air conditioner compressor (if so
equipped)
5. Manual tensioner 䉱 Tension checking point
WARNING
Be sure the ignition switch is placed in the OFF or LOCK position before servicing drive belt. The engine could rotate unexpectedly.
Maintenance and do-it-yourself 8-15
SPARK PLUGS
1. Visually inspect the belt for signs of unusual wear, cuts, or fraying. If the belt is in poor condition, have it replaced or adjusted by a NISSAN dealer.
2. Have the belt checked regularly for condi-
tion.
WARNING
Be sure the engine and ignition switch are off and that the parking brake is engaged securely.
CAUTION
Be sure to use the correct socket to re- move the spark plugs. An incorrect socket can damage the spark plugs.
SDI1895
REPLACING SPARK PLUGS Platinum-tipped spark plugs It is not necessary to replace platinum-tipped 䊊A spark plugs as frequently as conventional type spark plugs because they last much longer. Fol- low the maintenance log shown in the “NISSAN Service and Maintenance Guide”. Do not service platinum-tipped spark plugs by cleaning or re- gapping. ● Always replace spark plugs with rec-
ommended or equivalent ones.
8-16 Maintenance and do-it-yourself
AIR CLEANER
WINDSHIELD WIPER BLADES
The viscous paper type filter element should not be cleaned and reused. The dry paper type filter element may be cleaned and reused. Replace the air filter according to the maintenance log shown in a separate maintenance booklet. When replacing the air filter, wipe the inside of the air cleaner housing and the cover with a damp cloth.
CLEANING If your windshield is not clear after using the windshield washer or if a wiper blade chatters when running, wax or other material may be on the blade or windshield. Clean the outside of the windshield with a washer fluid or a mild detergent. Your windshield is clean if beads do not form when rinsing with clear water. Clean each blade by wiping it with a cloth soaked in a washer fluid or a mild detergent. Then rinse the blades with clear water. If your windshield is still not clear after cleaning the blades and using the wiper, install new windshield wiper blades.
CAUTION
Worn windshield wiper blades can dam- age the windshield and impair driver vision.
Maintenance and do-it-yourself 8-17
LDI2185
WARNING
● Operating the engine with the air cleaner filter off can cause you or others to be burned. The air cleaner filter not only cleans the intake air, it also stops the flame if the engine backfires. If the air cleaner is not installed and the en- gine backfires, you could be burned. Never drive with the air cleaner filter off. Be cautious working on the engine when the air cleaner is off.
To remove the filter from the air cleaner, release the retaining clips 䊊1 , then release the holders at the back of the unit. Pull the unit upward 䊊2 .
SDI1803
CAUTION
● After wiper blade replacement, return the wiper arm to its original position; otherwise it may be damaged when the hood is opened.
● Make sure the wiper blades contact the glass; otherwise the arms may be dam- aged from wind pressure.
REPLACING Replace the wiper blades if they are worn.
1. Lift the wiper arm away from the windshield. 2. Push and hold the release tab 䊊A , and then move the wiper blade down 䊊1 the wiper arm to remove.
3. Remove the wiper blade.
4.
Insert the new wiper blade onto the wiper arm until it clicks into place.
8-18 Maintenance and do-it-yourself
WDI0570
Be careful not to let anything get into the washer nozzle 䊊A . This may cause clogging or improper windshield washer operation. If something gets into the nozzle, remove it with a needle or small pin 䊊B .Rear window wiper blade Contact a NISSAN dealer if checking or replace- ment is required.
BRAKES
If the brakes do not operate properly, have the brakes checked by a NISSAN dealer. Self-adjusting brakes Your vehicle is equipped with self-adjusting brakes. The front disc-type brakes self-adjust every time the brake pedal is applied. The rear drum-type brakes self-adjust every time the parking brake is applied.
Under some driving or climate conditions, occa- sional brake squeak, squeal or other noise may be heard. Occasional brake noise during light to moderate stops is normal and does not affect the function or performance of the brake system. Proper brake inspection intervals should be followed. For more information regarding brake inspections, see the appropriate mainte- nance schedule information in the “NISSAN Ser- vice and Maintenance Guide”.
WARNING
See a NISSAN dealer for a brake system check if the brake pedal height does not return to normal. Brake pad wear indicators The disc brake pads on your vehicle have audible wear indicators. When a brake pad requires re- placement, a high pitched scraping or screech- ing sound will be heard when the vehicle is in motion. The noise will be heard whether or not the brake pedal is depressed. Have the brakes checked as soon as possible if the wear indicator sound is heard.
Maintenance and do-it-yourself 8-19
FUSES
LDI2186
ENGINE COMPARTMENT Fusible links If any electrical equipment does not operate and the fuses are in good condition, check the fusible links䊊1 in the holder. If any of the fusible links are melted, replace only with genuine NISSAN parts. For checking and replacing the fusible links in, see a NISSAN dealer.
PASSENGER COMPARTMENT
CAUTION
Never use a fuse of a higher or lower amperage rating than specified on the fuse box cover. This could damage the electrical system or cause a fire.
If any electrical equipment does not operate, check for an open fuse.
SDI2576
NOTE: The fuse box is located on the driver’s side of the instrument panel. 1. Be sure the ignition switch and the headlight
switch are OFF.
2. Remove the fuse box cover 䊊1 with a suit- able tool. Use a cloth to avoid damaging the trim.
3. Locate the fuse that needs to be replaced. 4. Remove the fuse with the fuse puller 䊊2 .
8-20 Maintenance and do-it-yourself
5.
LDI0456
If the fuse is open 䊊A , replace it with an equivalent good fuse 䊊B .6. Push the fuse box cover to install. If a new fuse also opens, have the electrical system checked and repaired by a NISSAN dealer.
Extended storage switch If any electrical equipment does not operate, remove the extended storage switch and check for an open fuse.
How to replace the extended storage switch: 1. To remove the extended storage switch, be sure the ignition switch is in the OFF or LOCK position.
LDI2175
NOTE: The extended storage switch is used for long term vehicle storage. Even if the ex- tended storage switch is broken it is not necessary to replace it. Replace only the open fuse in the switch with a new fuse.
2. Be sure the headlight switch is in the OFF
position.
3. Remove the fuse box cover. 4. Pinch the locking tabs 䊊1 and 䊊2 found on
each side of the storage switch.
5. Pull the storage switch straight out from the
fuse box 䊊3 .
Maintenance and do-it-yourself 8-21
BATTERY REPLACEMENT
CAUTION
Be careful not to allow children to swallow the battery or removed parts.
SDI2134A
KEYFOB (if so equipped) Replace the battery in the keyfob as follows: 1. Remove the screw 䊊A .
8-22 Maintenance and do-it-yourself
2.
Insert a small screwdriver into the slit of the corner 䊊B and twist it to separate the upper part from the lower part. Use a cloth to protect the casing.
3. Replace the battery with a new one.
● Do not touch the internal circuit and elec- tric terminals as doing so could cause a malfunction.
● Make sure that the + side faces the bot-
tom of the case 䊊C .
Recommended battery: CR1620 or equivalent.
4. Close the lid and install the screw securely.
5. Operate the buttons to check its operation.
See a NISSAN dealer if you need assistance for replacement. If the battery is removed for any reason other than replacement, perform step 5. ● An improperly disposed battery can hurt the environment. Always confirm local regulations for battery disposal. ● The keyfob is water-resistant; how- ever, if it does get wet, immediately wipe completely dry.
● Hold the battery by the edges. Holding the battery across the contact points will seriously deplete the storage capacity.
● Make sure that the + side faces the bot-
tom of the case.
● The operational range of the keyfob extends to approximately 33 ft (10 m) from the vehicle. This range may vary with conditions.
Operation is subject to the following two conditions: (1) This device may not cause harmful interference, and (2) this device must accept any interference received, in- cluding interference that may cause unde- sired operation of the device. NISSAN INTELLIGENT KEY® (if so equipped) Replace the battery in the Intelligent Key as fol- lows:
1. Remove the mechanical key from the Intelli-
2.
gent Key. Insert a small screwdriver 䊊A into the slit 䊊B of the corner and twist it to separate the upper part from the lower part. Use a cloth to protect the casing.
3. Replace the battery with a new one.
Recommended battery: CR2025 or equiva- lent. ● Do not touch the internal circuit and elec- tric terminals as doing so could cause a malfunction.
Maintenance and do-it-yourself 8-23
SDI1867
Note: Changes or modifications not ex- pressly approved by the party responsible for compliance could void the user’s au- thority to operate the equipment. For Canada: This device complies with RSS-210 of In- dustry Canada. Operation is subject to the following two conditions: (1) this device may not cause interference, and (2) this device must accept any interference, in- cluding interference that may cause unde- sired operation of the device.
LIGHTS
HEADLIGHTS Replacing the halogen headlight bulb The headlight is a semi-sealed beam type which uses a replaceable headlight (halogen) bulb. They can be replaced from inside the engine compartment without removing the headlight as- sembly.
CAUTION
● High-pressure halogen gas is sealed in- side the bulb. The bulb may break if the glass envelope is scratched or the bulb is dropped.
● Aiming should not be necessary after replacing the bulb. When aiming adjust- ment is necessary, contact a NISSAN dealer.
● Do not leave the headlight assembly open without a bulb installed for a long period of time. Dust, moisture, smoke, etc. entering the headlight body may affect bulb performance. Remove the bulb from the headlight assembly just before a replacement bulb is installed.
WDI0535
4. Close the lid securely as illustrated 䊊C 䊊D . 5. Operate the buttons to check the operation.See a NISSAN dealer if you need assistance for replacement. FCC Notice:
For USA: This device complies with Part 15 of the FCC Rules. Operation is subject to the fol- lowing two conditions: (1) This device may not cause harmful interference, and (2) this device must accept any interference re- ceived, including interference that may cause undesired operation. 8-24 Maintenance and do-it-yourself
● Only touch the base when handling the bulb. Never touch the glass envelope. Touching the glass could significantly affect bulb life and/or headlight performance.
● Use the same number and wattage as
shown in the chart.
LDI2240
1. Disconnect the battery negative cable. 2. Disconnect the electrical connector from the
rear end of the bulb.
3. Rotate the retaining pin counterclockwise to
loosen it.
4. Remove the headlight bulb. Do not shake or
rotate the bulb when removing it. Install the new bulb in the reverse order of removal.
5.
Fog may temporarily form inside the lens of the exterior lights in the rain or in a car wash. A temperature difference between the inside and the outside of the lens causes the fog. This is not a malfunction. If large drops of water collect inside the lens, contact a NISSAN dealer. FOG LIGHTS (if so equipped) Replacing the fog light bulb If replacement is required, see your NISSAN dealer.
CAUTION
● High pressure halogen gas is sealed inside the halogen bulb. The bulb may break if the glass envelope is scratched or the bulb is dropped.
● When handling the bulb, do not touch
the glass envelope.
● Use the same number and wattage as originally installed as shown in the chart.
● Do not leave the bulb out of the fog light for a long period of time as dust, mois- ture and smoke may enter the fog light body and affect the performance of the fog light.
Maintenance and do-it-yourself 8-25
EXTERIOR AND INTERIOR LIGHTS
Item
Wattage (W)
Headlight assembly*
High/low Turn/ position Sidemarker
Fog light (if so equipped) Map light Interior light Cargo light High-mounted stop light* Rear combination light* Turn signal light Stop/Tail Backup (reversing)
License plate light*
65/55
28/855
—21
21/5
21Bulb No.*1
HB5
3457 AK
W5W H11
W5W AL26
W5W—
WY21W W21/5W W21W W5W
Always check with the Parts Department at a NISSAN dealer for the latest parts information. * If replacement is required contact a NISSAN dealer.
8-26 Maintenance and do-it-yourself
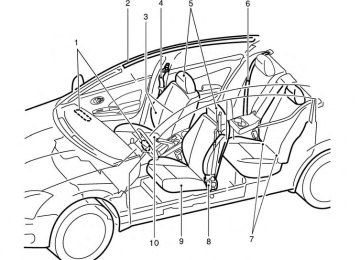
Fog light (if so equipped)
1. 2. Headlight assembly 3. Map light 4. 5. 6. High-mounted stop light 7. Cargo light 8.
Interior light Stop/tail light
License plate light
LDI2242
Maintenance and do-it-yourself 8-27
LDI2239
SDI1499A
Interior light
Use a cloth to protect the housing.
Clearance/ turn signal lights
To change the stop/tail, rear turn signal or backup (reversing) light bulb, perform the following: 1. Disconnect the battery negative cable. 2. Disconnect the electrical connector from the
rear end of the bulb.
3. Remove the bulb(s) and replace as neces-
sary.
SDI1805
Replacement procedures All other lights are either type A, B, C or D. When replacing a bulb, lamp and/or cover.
first remove the lens,
Indicates bulb removal Indicates bulb installation
8-28 Maintenance and do-it-yourself
Map lights
Use a cloth to protect the housing.
LDI2044
WHEELS AND TIRES
If you have a flat tire, see “Flat tire” in the “In case of emergency” section of this manual. TIRE PRESSURE Tire Pressure Monitoring System (TPMS) (if so equipped) This vehicle is equipped with the Tire Pressure Monitoring System (TPMS). It monitors tire pressure of all tires except the spare. When the low tire pressure warning light is lit, and the CHECK TIRE PRES (pressure) warning message dis- plays in the odometer, one or more of your tires is significantly under-inflated. The TPMS will activate only when the vehicle is driven at speeds above 16 MPH (25 km/h). Also, this system may not de- tect a sudden drop in tire pressure (for example a flat tire while driving). For more details, refer to “Low tire pres- sure warning light” in the “Instruments and controls” section, “Tire Pressure Monitor- ing System (TPMS)” in the “Starting and driving” section, and “Flat tire” in the “In case of emergency” section.
Tire inflation pressure Check the tire pressures (including the spare) often and always prior to long dis- tance trips. The recommended tire pres- sure specifications are shown on the F.M.V.S.S./C.M.V.S.S. certification label or the Tire and Loading Information label under the “Cold Tire Pressure” heading. The Tire and Loading Information label is affixed to the driver side center pillar. Tire pressures should be checked regularly because: ● Most tires naturally lose air over time. ● Tires can lose air suddenly when driven over potholes or other objects or if the vehicle strikes a curb while parking.
The tire pressures should be checked when the tires are cold. The tires are considered COLD after the vehicle has been parked for 3 or more hours, or driven less than 1 mile (1.6 km) at moderate speeds.
Maintenance and do-it-yourself 8-29
● For additional
information re- garding tires, refer to “Important Tire Safety Information” (US) or “Tire Information” (Canada) in the Warranty Infor- mation Booklet.
Safety
The TPMS with Easy Fill Tire Alert pro- vides visual and audible signals outside the vehicle for inflating the tires to the recommended COLD tire pressure. For more information, see “TPMS with Easy Fill Tire Alert” in the “Starting and driving” section. Incorrect tire pressure, including un- der inflation, may adversely affect tire life and vehicle handling.
WARNING
is
located on
● Improperly inflated tires can fail suddenly and cause an accident. ● The Gross Vehicle Weight Rating the (GVWR) certifica- F.M.V.S.S./C.M.V.S.S. tion label. The vehicle weight ca- pacity is indicated on the Tire and Loading Information label. Do not load your vehicle beyond this capacity. Overloading your ve- hicle may result in reduced tire life, unsafe operating conditions due to premature tire failure, or unfavorable handling character- istics and could also lead to a serious accident. Loading beyond the specified capacity may also result in failure of other vehicle components.
● Before taking a long trip, or whenever you heavily load your vehicle, use a tire pressure gauge to ensure that the tire pressures are at the specified level.
8-30 Maintenance and do-it-yourself
䊊6 Original tire size: The size of the tires originally installed on the vehicle at the factory.
Tire and loading information label 䊊1 Seating capacity: The maximum num- ber of occupants that can be seated in the vehicle.
䊊2 Vehicle load limit: See “Vehicle load- ing information” in the “Technical and consumer information” section.
䊊3 Tire size – refer to “Tire labeling” in
this section.
LDI2007
䊊4 Cold tire pressure: Inflate the tires to this pressure when the tires are cold. Tires are considered COLD after the vehicle has been parked for 3 or more hours, or driven less than 1 mile (1.6 km) at moderate speeds. The recommended cold tire inflation is set by the manufacturer to provide the best balance of tire wear, vehicle handling, driveability, tire noise, etc., up to the vehicle’s GVWR.䊊5 Spare tire size.
Maintenance and do-it-yourself 8-31
3. Remove the gauge. 4. Read the tire pressure on the gauge stem and compare to the specifica- tion shown on the Tire and Loading Information label.
5. Add air to the tire as needed. If too much air is added, press the core of the valve stem briefly with the tip of the gauge stem to release pressure. Recheck the pressure and add or release air as needed. Install the valve stem cap.
6. 7. Check the pressure of all other tires,
including the spare.
LDI0393
Checking tire pressure 1. Remove the valve stem cap from the
tire.
2. Press the pressure gauge squarely onto the valve stem. Do not press too hard or force the valve stem side- ways, or air will escape. If the hissing sound of air escaping from the tire is heard while checking the pressure, reposition the gauge to eliminate this leakage.
8-32 Maintenance and do-it-yourself
For USA market use the fallowing pres- sures:
Size
Cold Tire Inflation Pressure
250 kPa, 36 PSI
Front Original Tire: P185/65R15
P195/55R16
Rear Original Tire: P185/65R15
P195/55R16
T125/70D15
For CANADA market use the following pressures:250 kPa, 36 PSI
420 kPa, 60 PSI
Size
Front Original Tire: P185/65R15
P195/55R16
Rear Original Tire: P185/65R15
P195/55R16
T125/70D15Cold Tire Inflation Pressure
250 kPa, 36 PSI
250 kPa, 36 PSI
420 kPa, 60 PSI
Example
WDI0394
TIRE LABELING Federal law requires tire manufacturers to place standardized information on the sidewall of all tires. This information iden- tifies and describes the fundamental characteristics of the tire and also pro- vides the tire identification number (TIN) for safety standard certification. The TIN can be used to identify the tire in case of a recall.
䊊1 Tire size (example: P215/65R15 95H) 1. P: The “P” indicates the tire is de- signed for passenger vehicles (not all tires have this information).
2. Three-digit number (215): This num- ber gives the width in millimeters of the tire from sidewall edge to side- wall edge.
3. Two-digit number (65): This number, known as the aspect ratio, gives the tire’s ratio of height to width.
Example
WDI0395
4. R: The “R” stands for radial. 5. Two-digit number (15): This number