- 1998 Nissan Maxima Owners Manuals
- Nissan Maxima Owners Manuals
- 2002 Nissan Maxima Owners Manuals
- Nissan Maxima Owners Manuals
- 2009 Nissan Maxima Owners Manuals
- Nissan Maxima Owners Manuals
- 2003 Nissan Maxima Owners Manuals
- Nissan Maxima Owners Manuals
- 2001 Nissan Maxima Owners Manuals
- Nissan Maxima Owners Manuals
- 1997 Nissan Maxima Owners Manuals
- Nissan Maxima Owners Manuals
- 1996 Nissan Maxima Owners Manuals
- Nissan Maxima Owners Manuals
- 2005 Nissan Maxima Owners Manuals
- Nissan Maxima Owners Manuals
- 2007 Nissan Maxima Owners Manuals
- Nissan Maxima Owners Manuals
- 2006 Nissan Maxima Owners Manuals
- Nissan Maxima Owners Manuals
- 2010 Nissan Maxima Owners Manuals
- Nissan Maxima Owners Manuals
- 2008 Nissan Maxima Owners Manuals
- Nissan Maxima Owners Manuals
- 2012 Nissan Maxima Owners Manuals
- Nissan Maxima Owners Manuals
- 1999 Nissan Maxima Owners Manuals
- Nissan Maxima Owners Manuals
- 2004 Nissan Maxima Owners Manuals
- Nissan Maxima Owners Manuals
- 2000 Nissan Maxima Owners Manuals
- Nissan Maxima Owners Manuals
- 2011 Nissan Maxima Owners Manuals
- Nissan Maxima Owners Manuals
- Download PDF Manual
-
1. Apply the parking brake. 2. Automatic transmission:
Move the selector lever to “P” (Park) or “N” (Neutral). (“P” preferred.) The shift lever cannot be moved out of “P” and into any of the other gear posi- tions if the key is removed from the switch. The starter is designed not to operate if the selector lever is in one of the driving positions. Manual transmission:
Move the gearshift lever to “N” (Neutral), and depress the clutch pedal to the floor while cranking the engine. The starter is designed not to operate unless the clutch pedal is depressed.
3. Crank the engine with your foot off the accelerator pedal by turning the ignition key to “START”. Release the key when the engine starts. If the engine starts, but fails to run, repeat the above procedure. — If the engine is very hard to start in extremely cold or hot weather, depress the accelerator pedal and hold it to help start the engine.
4-10
Z 01.2.1/A32-D X
— In the summer, when restarting the engine within 30 minutes after it has been stopped, keep the accelerator pedal fully depressed while starting.
Do not operate the starter for more than 15 seconds at a time. If the engine does not start, wait 10 seconds before crank- ing again, otherwise the starter could be damaged.
4. Warm-up
least 30
Allow the engine to idle for at seconds after starting. Drive at moderate speed for a short distance first, especially in cold weather.PARKING BRAKE
SSD0018
To apply: pull the lever up. To release: pull the lever up slightly, push the button and lower completely. Before driving, be sure the parking brake warning light goes out.
4-11
Z 01.2.1/A32-D X
CRUISE CONTROL
The cruise control allows driving at a speed between 30 to 89 MPH (48 to 144 km/h) without keeping your foot on the accelerator pedal. To turn on the cruise control, push the main switch on. The indicator light on the switch will come on. To set at cruising speed, accelerate your vehicle to the desired speed, push the SET/COAST switch and release it. (The “CRUISE” light will come on.) Take your foot off the accelerator pedal. Your vehicle will maintain the set speed.
SSD0019
I To pass another vehicle, depress the accelerator pedal. When you release the pedal, the vehicle will return to the previ- ously set speed.I The vehicle may not maintain the set speed when going up or down steep hills. If this happens, drive without the cruise control.
To cancel the preset speed, follow either of these three methods: a) Push the cancel switch; The “CRUISE” light
will go out.
b) Tap the brake pedal; The “CRUISE” light
will go out.
4-12
c) Turn the main switch off. Both the “ON”
indicator and “CRUISE” lights will go out. I If you depress the brake pedal while push- ing the “ACCEL” set switch and reset at the cruising speed, turn the main switch off once and then turn it on again.
I The cruise control will automatically be can- the vehicle slows down below
celled if approximately 8 MPH (13 km/h).
I Depress the clutch pedal (manual transmis- sion), or move the selector lever to “N” (automatic transmission). The “CRUISE” light will go out.
To reset at a faster cruising speed, use one of the following three methods: a) Depress the accelerator pedal. When the vehicle attains the desired speed, push and release the “SET/COAST” switch.
b) Push and hold the “ACCEL” set switch. When the vehicle attains the speed you desire, release the switch.
c) Push, then quickly release the “ACCEL” set switch. Each time you do this, the set speed will increase by about 1 MPH (1.6 km/h).
Z 01.2.1/A32-D X
To reset at a slower cruising speed, use one of the following three methods:
a) Lightly tap the brake pedal. When the ve- hicle attains the desired speed, push the “SET/COAST” switch and release it.
b) Push and hold the “SET/COAST” switch. Release the switch when the vehicle slows down to the desired speed.
c) Push,
then
quickly
the “SET/COAST” switch. Each time you do this, the set speed will decrease by about 1
MPH (1.6 km/h).release
To resume the preset speed, push and re- lease the “RESUME” set switch. The vehicle will resume the last set cruising speed when the vehicle speed is over 30 MPH (48 km/h). Precautions Avoid using the cruise control when driv- ing under the following conditions: I when it is not possible to keep the vehicle at
set speed.
I in heavy traffic or in traffic that varies in
speed.
I on winding roads, or hilly roads. I on slippery roads (rain, snow, ice, etc.)
I in very windy areas.
On manual transmission models, do not shift into neutral without depressing the clutch pedal when the cruise control is on. This could cause engine damage. If this happens, depress the clutch pedal and off immediately.
the main
switch
turn
BREAK-IN SCHEDULE
During the first 1,000 miles (1,600 km), follow these recommendations for the future reliabil- ity and economy of your new vehicle. Failure to follow these recommendations may result in vehicle damage or shortened engine life. I Do not drive over 55 MPH (90 km/h) and do not run the engine over 4,000 rpm. Avoid driving for long periods at constant speed, either fast or slow.
I Do not accelerate at full throttle in any gear. I Avoid quick starts. I Avoid hard braking as much as possible. I Do not tow a trailer for the first 500 miles
(800 km).
4-13
Z 01.2.1/A32-D X
ECONOMY HINTS
I Keep your engine tuned up. I Follow the recommended periodic mainte-
nance schedule.
I Keep the tires inflated at the correct pres- sure. Low pressure will increase tire wear and waste fuel.
I Keep the front wheels in correct alignment. Improper alignment will cause not only tire wear but also lower fuel economy.
I Air
conditioner operation lowers
fuel economy. Use the air conditioner only when necessary.
SD1001M I Accelerate slowly and smoothly. Maintain cruising speeds with a constant accelerator position.
I When cruising at highway speeds,
is more economical to use the air conditioner and leave the windows closed to reduce drag.
it
I Drive at moderate speeds on the highway. fuel
Driving at high speed will economy.
lower
I Avoid unnecessary stopping and braking. Maintain a safe distance behind other ve- hicles.
I Use a proper gear range which suits road conditions. On level roads, shift into high gear as soon as possible.
I Avoid unnecessary engine idling.
4-14
Z 01.2.1/A32-D X
PARKING/PARKING ON HILLS
Do not park the vehicle over flammable materials such as dry grass, waste pa- per or rags, as they may burn easily.
1. Firmly apply the parking brake. 2. Manual transmission models:
Place the gearshift lever in the “REVERSE” position. When parking on an uphill grade, place the gearshift lever in the “1st” posi- tion.
MSD0002
Automatic transmission models:
Move the gearshift lever to the “P” (PARK) position.
Safe parking procedures require that both the parking brake be set and the transmission placed into “P” (park) po- sition. Make sure the shift lever has been pushed as far forward as it can go and cannot be moved without depress- ing the button at the end of the lever.
4-15
3. To help prevent the vehicle from rolling into the street when parked on a sloping drive way, it is a good practice to turn the wheels as illustrated.
I HEADED DOWNHILL WITH CURB: q1
Turn the wheels into the curb and move the vehicle forward until the curb side wheel gently touches the curb.
I HEADED UPHILL WITH CURB: q2
Turn the wheels away from the curb and move the vehicle back until the curb side wheel gently touches the curb.
I HEADED UPHILL OR DOWNHILL, NO
CURB: q3
Turn the wheels toward the side of the road so the vehicle will move away from the center of the road if it moves.4. Turn the ignition key to the “LOCK” position
and remove the key.
I Never leave the engine running while
the vehicle is unattended.
I Never leave children unattended in
Z 01.2.1/A32-D X
the vehicle.
brakes return to normal. Avoid driving the vehicle at high speeds until the brakes function correctly.
I Avoid resting your foot on the brake pedal while driving. This will overheat the brakes, wear out the brake linings and pads faster and reduce gas mileage.
I To help save the brakes and to prevent the brakes from overheating, reduce speed and downshift to a lower gear before going down a slope or long grade. Overheated brakes may reduce braking performance and could result in loss of vehicle control. I While driving on a slippery surface, be careful when braking, accelerating or down- shifting. Abrupt braking actions or sudden acceleration could cause the wheels to skid.
PRECAUTIONS WHEN DRIVING
I Driving with vacuum assisted brake:
The brake booster aids braking by using engine vacuum. If the engine stops, you can stop the vehicle by depressing the brake pedal. However, greater foot pres- sure on the brake pedal will be required to stop the vehicle and the stopping distance will be longer.
I Driving with the power assisted steer-
ing:
The power assisted steering is designed to use a hydraulic pump, driven by the engine, to assist steering.
If the engine stops or drive belt breaks, you will still have control of the vehicle. How- ever, much greater steering effort is needed, especially in sharp turns or at low speeds.
I Wet brakes:
When the vehicle is washed or driven through water, the brakes may get wet. As a result, your braking distance will be longer and the vehicle may pull to one side during braking. To dry brakes, drive the vehicle at a safe speed while lightly pressing the brake pedal to heat-up the brakes. Do this until the
4-16
Z 01.2.1/A32-D X
ANTI-LOCK BRAKE SYSTEM
The anti-lock brake system controls the brakes at each wheel so the wheels will not lock when braking abruptly or when braking on slippery surfaces. The system detects the rotation speed at each wheel and varies the brake fluid pressure to prevent each wheel from locking and sliding. By preventing wheel lockup, the system helps the driver maintain steering con- trol and helps to minimize swerving and spin- ning on slippery surfaces. Using the system Depress the brake pedal and hold it down. It is not necessary to pump the brake pedal. Doing so may result in increased stopping distances. Normal operation The anti-lock brake system will not operate at speeds below 3 to 6 MPH (5 to 10 km/h) to completely stop the vehicle. (The speeds will vary according to road conditions.) When the anti-lock system senses that one or more wheels are close to locking up, the actuator (under the hood) rapidly applies and releases hydraulic pressure (like pumping the brakes very quickly). While the actuator is working, you may feel a pulsation in the brake pedal and hear a noise or vibration from the actuator under the hood. This is normal and indicates that the anti-lock system is working properly.
However, the pulsation may indicate that road conditions are hazardous and extra care is required while driving. Self-test feature The anti-lock brake system consists of elec- tronic sensors, electric pumps, and hydraulic solenoids controlled by a computer. The com- puter has a built-in diagnostic feature that tests the system each time you start the engine and move the vehicle at a low speed in forward or reverse. When the “self-test” occurs, you may hear a “clunk” noise and/or feel a “pulsation” in the brake pedal. This is normal and is not an indication of any malfunction. If the computer senses any malfunction, it switches the anti- lock brake system OFF and turns on the “ABS” brake warning light in the dashboard. The brake system will then behave normally, but without anti-lock assistance. If the light comes on during the self check, or while you are driving, you should take your vehicle to your NISSAN dealer for repair at your earliest convenience.
The anti-lock brake system is a sophis- ticated device, but is cannot prevent accidents resulting from careless or dangerous driving techniques. It can help maintain vehicle control during braking on slippery surfaces, but re- member that the stopping distance on slippery surfaces will be longer than on normal surfaces, even with the anti-lock system. Stopping distances may also be longer on rough, gravel or snow covered roads, or if you are using tire chains. Always maintain a safe distance from the vehicle in front of you. Ultimately, the responsibility for safety of self and others rests in the hands of the driver.
Tire type and condition may also affect braking effectiveness. I When replacing tires,
the specified size of tires on all 4 wheels. I When installing a spare tire, make sure it is the proper size and type as specified on the tire placard. For tire placard location information, refer to
install
4-17
Z 01.2.1/A32-D X
“Tire placard” in the Owner’s Manual index.
COLD WEATHER DRIVING CAUTIONS Freeing a frozen door lock To prevent a door lock from freezing, apply de-icer or glycerin to it through the key hole. If the lock becomes frozen, heat the key before inserting it into the key hole. Anti-freeze In the winter when it is anticipated that the temperature will drop below 32°F (0°C), check anti-freeze (ethylene glycol base) to assure proper winter protection. For details, see “En- gine Cooling System” in the “Do-it-yourself operations” section. Battery If the battery is not fully charged during ex- tremely cold weather conditions, the battery fluid may freeze and damage the battery. To maintain maximum efficiency, the battery should be checked regularly. For details, see “Battery” in the “Do-it-yourself operations” sec- tion. Draining of coolant water If the vehicle is to be left outside without anti-freeze, drain the cooling system by open- ing the drain valves located under the radiator and on the engine block. Refill before operat- ing the vehicle. See “Changing Engine Cool- ant” in the “Do-it-yourself operations” section.
4-18
Tire equipment 1. The SUMMER tires are of a tread design to provide superior performance on dry pave- ment. However, the performance of these tires will be substantially reduced in snowy and icy conditions. If you operate your vehicle on snowy or icy roads, Nissan rec- ommends the use on all four wheels of MUD & SNOW or ALL SEASON tires. Please consult your Nissan dealer for the tire type, size, speed rating and availability information.
2. For additional traction on icy roads, studded tires may be used. However, some prov- inces and states prohibit their use. Check local, state and provincial laws before in- stalling studded tires.
Skid and traction capabilities of studded snow tires, on wet or dry surfaces, may be poorer than that of non-studded snow tires. 3. Snow chains may be used if desired. Make sure they are of proper size for the tires on your vehicle and are installed according to the chain manufacturer’s suggestions. Use chain tensioners when recommended by the tire chain manufacturer to ensure a tight fit. Loose end links of the tire chain must be secured or removed to prevent the possi- bility of whipping action damage to the
Z 01.2.1/A32-D X
tion and accelerate gently. If accelerated too fast, the drive wheels will spin and will lose even more traction.
I Allow more stopping distance under these conditions. Braking should be started sooner than on dry pavement.
I Allow greater following distances on
slippery roads.
I Watch for slippery spots (glare ice). These may appear on an otherwise clear road in shaded areas. If a patch of ice is seen ahead, brake before reaching it. Try not to brake while actually on the ice, and avoid any sudden steering ma- neuvers.
Engine block heater
Do not use your heater with an un- grounded electrical system or two- pronged (cheater) adapters. You can be injured by an electrical shock if you use an ungrounded connection.
fenders or undercarriage. In addition, drive at a reduced speed, otherwise, your vehicle may be damaged and/or vehicle handling and performance may be adversely af- fected.
Special winter equipment It is recommended that the following items be carried in the vehicle during winter: 1. A scraper and stiff-bristled brush to remove ice and snow from the windows and wiper blades.
2. A sturdy, flat board to be placed under the
jack to give it firm support.
3. A shovel to dig the vehicle out of snow-
drifts.
4. Extra window washer fluid to refill the res-
ervoir tank.
Driving on snow or ice I Wet ice (32°F, 0°C and freezing rain), very cold snow or ice can be slick and very hard to drive on. The vehicle will have a lot less traction or “grip” under these conditions. Try to avoid driving on wet the road is salted or sanded.
ice until
I Whatever the condition, drive with cau-
4-19
Z 01.2.1/A32-D X
MEMO
4-20
Z 01.2.1/A32-D X
5 In case of emergency
Flat tire ...................................................................... 5-2
Jump starting............................................................. 5-6
Push starting ............................................................. 5-8
If your vehicle overheats........................................... 5-8
Tow truck towing ....................................................... 5-9Z 01.2.1/A32-D X
FLAT TIRE
If you have a flat tire, follow the instructions below. Stopping the vehicle 1. Safely move the vehicle off the road away
from traffic.
2. Turn on the hazard warning flashers.
3. Park on a level surface and apply the parking brake. Shift the manual transmis- sion into reverse (automatic transmission in “P”).
4. Turn off the engine.
I Make sure that the parking brake is securely applied and the manual transmission is shifted into reverse (automatic transmission in “P”).
I Never change tires when the vehicle is on a slope, ice or slippery areas. This is dangerous.
I Never change tires if oncoming traffic is close to your vehicle. Wait for pro- fessional road assistance.
I Raise the hood to warn other traffic,
and to signal professional road assis- tance personnel that you need assis- tance.
I Have all passengers get out of the vehicle and stand in a safe place, away from traffic and clear of the vehicle.
SCE0036
Getting the spare tire and tools Remove jacking tools and spare tire from the storage area located inside the trunk as illus- trated.
5-2
Z 01.2.1/A32-D X
MCE0001
SCE0053
Blocking wheels Place suitable blocks at both the front and back of the wheel diagonally opposite the flat tire to prevent the vehicle from rolling when it is jacked up.
SCE0037
Be sure to block the wheel as the vehicle may move and could cause personal injury.
Removing wheel caps
Do not use your hands to pry off wheel caps. Doing so could result in personal injury.
5-3
Z 01.2.1/A32-D X
CE1089
Jacking up and removing tire To help avoid personal injury, carefully read the caution label attached to the jack body and the following instructions. 1. Place the jack directly under the jack-up point as illustrated above so that top of the jack contacts the vehicle at the jack up point. Align the jack head between the two notches in the front or the rear as shown. Also fit the groove of the jack head between the notches as shown.
The jack should be used on level firm ground. 2. Loosen each wheel nut one or two turns by turning counterclockwise with the wheel nut wrench. Do not remove the wheel nuts until the tire is off the ground. 3. Carefully raise the vehicle until
the tire clears the ground. Remove the wheel nuts, and then remove the tire.
CE1092
I Never get under the vehicle while it is
supported only by the jack.
I Use only the jack provided with your vehicle. Do not use the jack provided with your vehicle on other vehicles. The jack is designed only for lifting your vehicle during a tire change.
I To lift the vehicle, securely hold the jack lever and rod with both hands as shown above.
5-4
Z 01.2.1/A32-D X
I Use the correct jack up points; never use any other part of the vehicle for jack support.
I Never jack up the vehicle more than
necessary.
I Never use blocks on or under the
jack.
I Do not start or run engine while ve-
hicle is on the jack.
I Do not allow passengers to stay in
the vehicle while it is on the jack.
I Do not raise the vehicle using a
bumper jack.
4. Lower
the vehicle slowly until
the tire touches the ground. Then, with the wheel nut wrench, tighten the wheel nuts securely in the sequence as illustrated.
I As soon as possible tighten the wheel nuts to the specified torque with a torque wrench. Wheel nut tightening torque:
72 to 87 ft-lb (98 to 118 )
I Adjust tire pressure to the COLD pres-
sure.
COLD pressure: After vehicle has been parked for three hours or more or driven less than 1 mile (1.6 km). COLD tire pressures are shown on the tire placard affixed to the center console lid. I Retighten the wheel nuts when the ve- hicle has been run for 600 miles (1,000
km) after installing the aluminum wheel.SCE0039
Installing wheel The T-type spare tire is designed for emer- gency use. See specific instructions under the heading “Wheel and tire” in the “Do-it- yourself operations” section.
1. Clean any mud or dirt
from the surface
between the wheel and hub.
2. Carefully put the wheel on and tighten the
wheel nuts finger tight.
3. With the wheel nut wrench, tighten wheel nuts alternately and evenly until they are tight.
5-5
Z 01.2.1/A32-D X
JUMP STARTING
To start your engine with a booster battery, the instructions and precautions below must be followed.
I Keep battery out of
the reach of
children.
SCE0040
5. Securely store the spare tire and jacking
equipment in the vehicle.
I Always make sure that the spare tire and jacking equipment are properly secured after use. Such items can become dan- gerous projectiles in an accident or sud- den stop.
I The T-type spare tire and small size spare tire are designed for emergency use. See specific instructions under the heading “Wheel and tire” in the “Do-it- yourself operations” section.
I If done incorrectly, jump starting can
be hazardous.
I Explosive hydrogen gas is always present in the vicinity of the battery. Keep all sparks and flames away from the battery.
I Do not allow battery fluid to come into contact with eyes, skin, cloth or painted surfaces. Battery fluid is a corrosive sulphuric acid solution which can cause severe burns. If the fluid should come into contact with anything, immediately flush the con- tacted area with water.
I A battery rated at above 12 volts
should not be used for a booster.
I Whenever working on or near a bat- tery, always wear suitable eye protec- tors (e.g., goggles or industrial safety spectacles) and remove rings, metal bands, or any other metal jewelry.
5-6
Z 01.2.1/A32-D X
3. Remove vent caps on the battery (if so equipped). Cover the battery with an old cloth to reduce explosion hazard.
does not start right away, turn the key off and wait 3 to 4 seconds before trying again.
7. After starting your engine, carefully discon- nect the negative cable and then the posi- tive cable.
8. Replace the vent caps (if so equipped). Be sure to dispose of the cloth used to cover the vent holes as it may be contaminated with corrosive acid.
4. Connect jumper cables in the sequence as
illustrated.
I Always connect positive (+) to posi- to body tive (+) and negative (−) ground (e.g., strut mounting bolt, etc. — not to the battery).
I Make sure that cables do not touch moving parts in the engine compart- ment and that clamps do not contact any other metal.
5. Start the engine of the other vehicle and let
it run for a few minutes.
6. Keep the engine speed of the other vehicle at about 2,000 rpm, and start your engine in the normal manner.
Do not keep starter motor engaged for more than 10 seconds. If the engine
5-7
CE1005-A
Always follow the instructions below. Fail- ure to do so could result in damage to the charging system and cause personal in- jury.
1. If the booster battery is in another vehicle, position the two vehicles to bring their bat- teries into close proximity to each other. Do not allow the two vehicles to touch.
2. Apply parking brake. Move the shift lever to “Neutral” (On automatic transmission mod- els, move the lever to “P”). Switch off all unnecessary electrical (light, heater, air conditioner, etc.).
systems
Z 01.2.1/A32-D X
PUSH STARTING
IF YOUR VEHICLE OVERHEATS
I Automatic transmission models can- not be push started. This may cause transmission damage.
I Three-way catalyst equipped models should not be started by pushing since the three-way catalyst may be damaged.
I Never try to start the vehicle by tow- ing it; when the engine starts, the forward surge could cause the ve- hicle to collide with the tow vehicle.
If your vehicle is overheating (indicated by an extremely high temperature gauge reading), or if you feel a lack of engine power, detect abnormal noise, etc., take the following steps:
4. Open the engine hood.
To avoid the danger of being scalded, never remove the radiator cap while the engine is still hot. When the radiator cap is removed, pressurized hot water will spurt out, possibly causing serious injury.
1. Move the vehicle safely off the road, apply the parking brake and move the gearshift lever to neutral (automatic transmission to “P”). Do not stop the engine.
2. Turn off the air conditioner switch. Open all the windows, move the heater or air condi- tioner temperature control to “maximum hot” and fan control to “high speed”.
3. Get out of the vehicle. Look and listen for steam or coolant escaping from the radiator before opening the hood. Wait until no steam or coolant can be seen before pro- ceeding.
5-8
If steam or water is coming from the engine, stand clear to prevent getting burned.
5. If engine overheating is caused by climbing a long hill on a hot day, run the engine at a fast idle (approximately 1,500 rpm) until the temperature gauge indication returns to normal.
6. Visually check drive belts for damage or looseness. Also check if the cooling fan is running. The radiator hoses and radiator should not leak water.
Be careful not to allow your hands, hair or clothing to come into contact with, or to get caught in, the running fan, belts, or motor fan.
The fan motor can start at any time when the coolant temperature is high.
If coolant is leaking, the cooling fan belt
Z 01.2.1/A32-D X
is missing or loose, or the cooling fan does not run, stop the engine.
7. After the engine cools down, check the coolant level in the reservoir tank with the engine running. Add coolant to the reservoir tank if necessary. Have your vehicle re- paired at the nearest NISSAN dealer.
TOW TRUCK TOWING
When towing your vehicle, all State (Provincial in Canada) and local regulations for towing must be followed. Incorrect towing equipment could damage your vehicle. Towing instruc- tions are available from your NISSAN dealer. Local service operators will generally be famil- iar with the applicable laws and procedures for towing. To assure proper towing and to pre- vent accidental damage to your vehicle, NIS- SAN recommends that you have a service operator tow your vehicle. It is advisable to have the service operator carefully read the following precautions.
I When towing, make sure that
the transmission, axles, steering system and power train are in working condi- tion. If any unit is damaged, a dolly must be used.
I When towing with the front wheels on
the ground:
Turn the ignition key to the “OFF” position and secure the steering wheel in a straight-ahead position with a rope or similar device. Never place the ignition key in the “LOCK”
5-9
position. This will result in damage to the steering lock mechanism.
Move the gearshift lever to the neutral (“N” position).
On automatic transmission models, to move the shift lever to the Neutral position, turn the ignition key to the “OFF” or “ACC” position. After mov- ing the shift lever to the Neutral posi- tion, be sure to turn the ignition key to the “OFF” position.
I When towing with the rear wheels on release the parking
the ground, brake.
On automatic transmission models, to move the shift lever to the Neutral (“N” position), turn the ignition key to the “OFF” or “ACC” position. After moving the shift lever to the Neutral position, be sure to turn the ignition key to the “OFF” position.
I Attach safety chains for all towing.
Z 01.2.1/A32-D X
wheels.
If you have to tow an automatic transmission model with four wheels on ground Observe the following restricted towing speeds and distances. I Speed: Below 30 MPH (50 km/h) I Distance: Less than 40 miles (65 km)
Never tow an automatic transmission model from the rear (i.e., backward) with four wheels on the ground as this may cause serious and expensive damage to the transmission.
VEHICLE RECOVERY (Freeing a stuck vehicle) I Tow chains or cables must be attached only to the main structural members of the ve- hicle.
I Pulling devices should be routed so they do not touch any part of the suspension, steer-
CE1051
CE1052
NISSAN recommends that your vehicle be towed with the driving (front) wheels off the ground as illustrated. I Speed: Below 70MPH (115 km/h) I Distance: Less than 500 miles (800 km)
Towing an automatic transmission model with rear wheels raised (with front wheels on the ground)
Never tow an automatic transmission model with the rear wheels raised (with the front wheels on the ground) as this may cause serious and expensive damage to the transmission. If it is necessary to tow the vehicle with the rear wheels raised, always use a towing dolly under the front
5-10
Z 01.2.1/A32-D X
ing, brake or cooling systems.
I Always pull the cable straight out from the front or rear of the vehicle. Never pull on the vehicle at a sideways angle.
I Pulling devices such as ropes or canvas straps are not recommended for use in vehicle towing or recovery.
5-11
Z 01.2.1/A32-D X
MEMO
5-12
Z 01.2.1/A32-D X
6 Appearance and interior care
Cleaning exterior and interior.................................... 6-2
Corrosion protection.................................................. 6-5Z 01.2.1/A32-D X
CLEANING EXTERIOR AND INTERIOR
MAI0001
In order to maintain the appearance of your vehicle, it is important to take proper care of it.
In the following cases, please wash your ve- hicle as soon as possible to protect the paint surface. I After a rainfall I After driving on coastal roads I When things such as soot, bird droppings, tree sap, metal particles or bugs get on the paint surface
I When dust or mud builds up on the surface Whenever possible, store or park your vehicle
inside a garage or in a covered area.
When it is necessary to park outside, park in a shady area or protect the vehicle with a body cover. Be careful not to scratch the paint surface when putting on or removing the body cover. Washing Wash dirt off with a wet sponge and plenty of water. Clean the vehicle thoroughly using a mild soap or detergent (a special vehicle soap or general purpose dish-washing liquid) mixed with clean, lukewarm (never hot) water.
Do not use strong household soap, strong chemical detergents, gasoline or solvents.
Rinse the vehicle thoroughly with plenty of clean water. Inside flanges, seams and folds on the doors, hatches and hood are particularly vulnerable to the effects of road salt. Therefore, these areas must be regularly cleaned. Take care that the drain holes in the lower edge of the
6-2
door are open. Spray water under the body and in the wheel wells to loosen the dirt and wash away road salt. A damp chamois can be used to dry the vehicle to avoid water spots. Waxing Regular waxing protects the paint surface and helps retain new vehicle appearance. After waxing, polishing is recommended to remove built-up residue and to avoid a “weathered” appearance. If you wish to wax your vehicle, only use a wax specified for use over clear coats, such as Nissan Liquid or Spray Wax. Your Nissan dealer can assist you in choosing the proper product. I Wax your vehicle only after a thorough washing. Follow the instructions supplied with the wax.
I Do not use a wax containing any abrasives, cutting compounds or cleaners that may damage the vehicle finish.
I If the surface does not polish easily, use a
“road tar” remover and wax again.
Machine compounding or aggressive pol- ishing on a base coat/clear coat paint finish may dull the finish or leave swirl marks.
Z 01.2.1/A32-D X
Removing spots Remove tar and oil spots, industrial dust, in- sects, and tree sap as quickly as possible from the surface of the paint to avoid lasting dam- age or staining. Special cleaning products are available at your NISSAN dealer or any auto- motive accessory store. Underbody In areas where road salt is used in winter, the underbody must be cleaned regularly. This will prevent dirt and salt from building up and causing underbody and suspension corrosion. Before the winter period and again in the spring, the underseal must be checked and, if necessary, re-treated.
and a soft cloth will easily remove this film.
When cleaning the inside of the window, do not use sharp-edged tools, abrasive cleaners or chlorine based disinfectant cleaners. They could damage electrical conductors or rear window defogger elements.
Cleaning alloy wheels Wash regularly, especially during winter months in areas where road salt is used. Salt could discolor the wheel if not removed. Chrome parts Clean all chrome parts regularly with a non- abrasive chrome polish to maintain the finish. Plastic parts Plastic parts can be cleaned with a mild soap solution. If the dirt cannot be easily removed, use a plastic cleaner. Do not use solvents.
SAI0002
Cleaning glass When cleaning the rear window, it may be easier to clean if the high-mounted stop light is removed first. Be careful when removing the high-mounted stop light to reduce the risk of damaging the high-mounted stop light wires. The high-mounted stop light must be properly reinstalled before driving your vehicle. Use glass cleaner to remove smoke and dust film from the glass surfaces. It is normal for glass to become coated with a film after the vehicle is parked in the hot sun. Glass cleaner
6-3
Z 01.2.1/A32-D X
Cleaning interior Occasionally remove loose dust from the inte- rior trim and seats using a vacuum cleaner or soft brush. Wipe the vinyl and leather surfaces with a clean, soft cloth dampened in mild soap solution, then wipe clean with a dry soft cloth. Before using any fabric protector, read the manufacturer’s recommendations. Some fab- ric protectors contain chemicals that may stain or bleach the seat material.
I Never use benzine, thinner, or any
similar material.
I The leather seats should be regularly coated with a leather wax like saddle soap. Never use car wax.
I Never use fabric protectors unless recommended by the manufacturer.
SAI0003
Floor mat positioning aid (Driver side only) This model includes a front floor mat bracket to act as a floor mat positioning aid. NISSAN floor mats have been specially designed for your vehicle model. The driver’s side floor mat has a grommet hole incorporated in it. Simply position the mat by placing the floor mat bracket hook through the floor mat grommet hole while centering the mat in the floorpan contour.
Periodically check to make certain that the mats are properly positioned.
6-4
Floor mats The use of Genuine Nissan floor mats can extend the life of your vehicle carpet and make it easier to clean the interior. No matter what mats are used, be sure they are fitted for your vehicle and are properly positioned in the footwell to prevent interference with pedal op- eration. Mats should be maintained with regu- lar cleaning and replaced if they become ex- cessively worn. Seat belts The seat belts can be cleaned by wiping them with a sponge dampened in a mild soap solu- tion. Allow the belts to dry completely before using them. Do not allow wet belts to roll up in the retractor. NEVER use bleach, dye, or chemical solvents since these may severely weaken the seat belt webbing.
Z 01.2.1/A32-D X
I Never allow water or other liquids to come in contact with electronic compo- nents inside the vehicle.
CORROSION PROTECTION
Most common factors contributing to vehicle corrosion: 1. The accumulation of moisture-retaining dirt and debris in body panel sections, cavities, and other areas.
2. Damage to paint and other protective coat- ings caused by gravel and stone chips or minor traffic accidents.
Environmental factors influence the rate of corrosion: Moisture Accumulation of sand, dirt and water on the vehicle body underside can accelerate corro- sion. Wet floor coverings will not dry com- pletely inside the vehicle, and should be re- moved for drying to avoid floor panel corrosion. Relative humidity Corrosion will be accelerated in areas of high relative humidity, especially those areas where the temperatures stay above freezing and where atmospheric pollution exists and road salt is used.
Temperature
A temperature increase will accelerate the rate of corrosion to those parts which are not well ventilated.
Air pollution
Industrial pollution, the presence of salt in the air in coastal areas, or heavy road salt use will accelerate the corrosion process. Road salt will also accelerate the disintegration of paint surfaces. To protect your vehicle from corrosion: I Wash and wax your vehicle often to keep
the vehicle clean.
I Always check for minor damage to the paint
and repair it as soon as possible.
I Keep drain holes at the bottom of the doors
open to avoid water accumulation.
I Check the underbody for accumulation of sand, dirt or salt. If present, wash with water as soon as possible.
I NEVER remove dirt, sand or other debris from the passenger compartment by washing it out with a hose. Remove dirt with a vacuum cleaner or broom.
6-5
Z 01.2.1/A32-D X
MEMO
6-6
Z 01.2.1/A32-D X
7 Do-it-yourself operations
Precautions ............................................................... 7-2
Engine cooling system .............................................. 7-4
Engine oil .................................................................. 7-6
Automatic transmission fluid ..................................... 7-9
Power steering fluid ................................................ 7-10
Brake and clutch fluid ............................................. 7-11
Window washer fluid ............................................... 7-11
Battery ..................................................................... 7-12
Drive belts ............................................................... 7-13
Spark plug replacement .......................................... 7-14
Air cleaner filter ....................................................... 7-16
Wiper blades ........................................................... 7-17
Parking brake .......................................................... 7-18
Brake pedal ............................................................. 7-19
Brake booster.......................................................... 7-20
Clutch pedal ............................................................ 7-20
Fuses....................................................................... 7-20
Fusible links ............................................................ 7-22
Light bulbs............................................................... 7-22
Wheels and tires ..................................................... 7-29Z 01.2.1/A32-D X
PRECAUTIONS
When performing any inspection or mainte- nance work on your vehicle, always take care to prevent serious accidental injury to yourself or damage to the vehicle. The following are general precautions which should be closely observed. I Park the vehicle on a level surface, apply the parking brake securely and block the wheels to prevent the vehicle from mov- ing. Move the transmission control lever to neutral (“N”).
I Be sure the ignition key is “OFF” or “LOCK” when performing any replace- ment or repair. When the ignition key is in the “ON” or “ACC” position, the cooling fan may start to operate suddenly even when the engine is not running.
I Do not work under the hood while the engine is hot. Turn off the engine and wait until it cools down.
I If you must work with the engine run- ning, keep your hands, clothing, hair and tools away from moving fans, belts and any other moving parts.
I It is advisable to remove ties and any jewelry, such as rings, watches, etc. before working on your vehicle.
I If you must run the engine in an en- closed space such as a garage, be sure there is proper ventilation for exhaust gases.
I Never get under the vehicle while it is supported only by a jack. If it is neces- sary to work under the vehicle, support it with safety stands.
instructions regarding only those items which are relatively easy for an owner to perform. You should be aware that incomplete or im- proper servicing may result in operating diffi- culties or excessive emissions, and could af- fect your warranty coverage. If in doubt about any servicing, have it done by your NISSAN dealer.
I Keep smoking materials,
flame and
sparks away from fuel and battery.
I Never connect or disconnect either the battery or any transistorized component connector while the ignition is on.
I On gasoline engine models with the Mul- tiport fuel injection system, the fuel filter or fuel lines should be serviced by a NISSAN dealer because the fuel lines are under high pressure even when the engine is off.
I Failure to follow these or other common sense guidelines may lead to serious injury or vehicle damage.
I Improperly disposed motor oil and/or other vehicle fluids can hurt the environ- ment. Always conform to local regula- tions for disposal of vehicle fluid.
This “Do-it-yourself operations” section gives
7-2
Z 01.2.1/A32-D X
CHECK LOCATIONS IN ENGINE COMPARTMENT
7-3
SDI0112
Z 01.2.1/A32-D X
ENGINE COOLING SYSTEM
the The engine cooling system is filled at factory with a high-quality, year-round, anti- freeze coolant solution. The anti-freeze solu- tion contains rust and corrosion inhibitors, therefore additional cooling system additives are not necessary.
When adding or replacing coolant, be sure to use only an ethylene glycol anti- freeze with the proper mixture ratio of 50% anti-freeze 50% softwater.
Outside
temperature
down to
°C
−35
°F
−30
Anti- freeze
Soft water
50%
50%
The use of other types of coolant solutions may damage your cooling system. The radiator is equipped with a pressure cap. Use a NISSAN genuine cap or its equivalent when replacement is required. Never remove the radiator cap when the engine is hot. Serious burns could be caused by high pressure fluid escaping from the radiator.
Wait until the engine and radiator cool down. See precautions in “If Your Vehicle Overheats” found in the “In case of emer- gency” section.
SDI0113
CHECKING ENGINE COOLANT LEVEL With coolant reservoir Check the coolant level in the reservoir tank when the engine is cold. If the coolant level is below “MIN”, add coolant up to the “MAX” level. If the reservoir tank is empty, check the coolant level in the radiator when the engine is cold. If there is insufficient coolant in the radiator, fill the radiator with coolant up to the filler opening and also add it to the reservoir tank up to the “MAX” level. If the cooling system frequently requires
7-4
Z 01.2.1/A32-D X
coolant, have it checked by your NISSAN dealer.
I Improper servicing can result in reduced heater performance and engine overheat- ing.
I To avoid the danger of being scalded, never change the coolant when the engine is hot.
I Never remove the radiator cap when the engine is hot. Serious burns could be caused by high pressure fluid escaping from the radiator.
1. Open the radiator cap and drain plug. 2. Open the drain plug on the engine block. 3. Flush the cooling system by running fresh
water through the radiator.
4. Close the radiator drain plug and the drain
plug on the engine block securely.
5. See the “Technical information” section for cooling system capacity. Fill the radiator slowly with the proper mixture of coolant and water. Fill the reservoir tank up to the “MAX” level. Then install the radiator cap.
SDI0114
CHANGING ENGINE COOLANT I Major cooling system repairs should be performed by your NISSAN dealer. The service procedures can be found in the appropriate NISSAN Service Manual.
7-5
Z 01.2.1/A32-D X
ENGINE OIL
SDI0138
SDI0115
CHECKING ENGINE OIL LEVEL 1. Park the vehicle on a level surface and
apply parking brake. 2. Run the engine until
temperature.
it reaches operating
3. Turn off
the engine. Wait more than 5
minutes for the oil to drain back into the oil pan.4. Remove the dipstick and wipe it clean.
Reinsert it all the way.
7-6
Z 01.2.1/A32-D X
6. Start the engine, and warm it up until the radiator fan operates. Then race the engine 2 or 3 times under no load. Watch the coolant temperature gauge for signs of overheating.
7. Stop the engine. After it completely cools down, refill the radiator up to the filler opening. Fill the reservoir tank up to the “MAX” level.
8. Check the radiator drain plug and the drain plug on the engine block for any sign of leakage.
I It is normal to add some oil between oil maintenance intervals or during the break-in period, depending on the severity of operating conditions.
SDI0139
CHANGING ENGINE OIL 1. Park the vehicle on a level surface and
apply the parking brake.
2. Run the engine until
it reaches operating
temperature, and then turn it off.
3. Place a large drain pan under the drain
plug.
4. Remove the oil filler cap.
7-7
Z 01.2.1/A32-D X
SDI0116
5. Remove the dipstick again and check the oil level. It should be between the “H” and “L” marks. If the oil level is below the “L” mark, remove the oil filler cap and pour recommended oil through the opening. Do not overfill.
6. Recheck oil level with dipstick.
I Oil level should be checked regularly. Operating with insufficient amount of oil can damage the engine, and such damage is not covered by warranty.
5. Remove the drain plug with a wrench and
completely drain the oil.
See the “Technical information” section for refill capacity.
If oil filter is to be changed, remove and replace it at this time. See “Changing oil filter”.
Be careful not to burn yourself, as the engine oil is hot.
8. Start the engine.
Check for leakage around the drain plug. Correct as required.
9. Turn the engine off and wait several min- utes. Check the oil level with the dipstick. Add engine oil if necessary.
I Prolonged and repeated contact with used engine oil may cause skin can- cer.
I Try to avoid direct skin contact with used oil. If skin contact is made, wash thoroughly with soap or hand cleaner as soon as possible.
I Keep used engine oil out of reach of
children.
SDI0140
CHANGING OIL FILTER 1. Park the vehicle on a level surface and
apply the parking brake.
2. Turn the engine off. 3. Loosen the oil filter with an oil filter wrench. (Depending on the engine model, a special cap type wrench may be required. See your NISSAN dealer if in doubt.) Remove the oil filter by turning it by hand.
Waste oil must be disposed of properly. Check your local regulations.
6. Clean and re-install the drain plug and new washer. Securely tighten the drain plug with a wrench. Drain plug tightening torque:
22 to 29 ft-lb (29 to 39 )
Do not use excessive force.
7. Refill engine with recommended oil and
install the cap securely.
7-8
Z 01.2.1/A32-D X
Be careful not to burn yourself, as the engine oil may be hot.
4. Wipe the engine oil filter mounting surface
with a clean rag. Be sure to remove any old rubber gasket remaining on the mounting surface of the engine.
5. Coat the rubber gasket on the new filter
with clean engine oil.
6. Screw in the oil filter until a slight resistance is felt, then tighten additionally more than 2/3 turn. Oil filter tightening torque:
10.85 to 15.19 ft-lb (14.7 to 20.6 )
7. Start
the engine and check for leakage
around the oil filter. Correct as required.
8. Turn the engine off and wait several min- utes. Check the oil level. Add engine oil if necessary.
AUTOMATIC TRANSMISSION FLUID
SDI0117
When engine is running, keep hands and clothing away from any moving parts such as fan drive belt. I Automatic transmission fluid is poi- sonous and should be stored care- fully in marked containers out of the reach of children.
TEMPERATURE CONDITIONS FOR CHECKING I The fluid level should be checked using the “HOT” range on the dipstick after the follow- ing conditions have been met:
— The engine should be warmed up to oper-
ating temperature.
— The vehicle should be driven at
minutes.
least 5
— The automatic transmission fluid should be warmed to between 122 and 176°F (50 and 80°C).
I The fluid can be checked at fluid tempera- tures of 86 to 122°F (30 to 50°C) using the “COLD” range on the dipstick after the engine is warmed up and before driving. However, the fluid should be re-checked using the “HOT” range.
1. Park the vehicle on a level surface and set
the parking brake.
2. Start the engine and then move the selector lever through each gear range. Move the shift lever to “P” after you have moved it through all ranges.
7-9
Z 01.2.1/A32-D X
POWER STEERING FLUID
NOTE: If the vehicle has been driven for a long time at high speeds, or in city traffic in hot weather, or if it is being used to pull a trailer, the accurate fluid level cannot be read. You should wait until the fluid has cooled down (about 30 minutes).
SDI0334
3. Check the fluid level with the engine idling.
4. Remove the dipstick and wipe it clean with
lint-free paper.
5. Reinsert the dipstick into the charging pipe
as far as it will go.
6. Remove the dipstick and note the reading. If the level is at the low side of either range, add fluid to the charging pipe. DO NOT OVERFILL. USE Nissan Matic “D” (Continental U.S. and Alaska) or Genuine Nissan Auto- matic Transmission Fluid (Canada).
SDI0118
Check the fluid level in the reservoir tank. The fluid level should be checked using the “HOT” range at fluid temperatures of 122 to 176°F (50 to 80°C) or using the “COLD” range at fluid temperatures of 32 to 86°F (0 to 30°C).
I Do not overfill. I The recommended fluid is Type
DEXRON TMII or equivalent.
7-10
Z 01.2.1/A32-D X
BRAKE AND CLUTCH FLUID
WINDOW WASHER FLUID
brake system and affect the vehicle’s stopping ability.
I Do not spill the fluid on painted sur- faces. This will damage the paint. If fluid is spilled, wash with water.
SDI0119
Check the fluid level in the reservoir. If the fluid is below the Min. line or the brake warning light comes on, add DOT 3 fluid up to the Max. line. If fluid must be added frequently, the system should be thoroughly checked by your NIS- SAN dealer.
I Use only new fluid. Old, inferior, or contaminated fluid may damage the brake and clutch systems. The use of improper fluids can damage the
SDI0189
Type A Add fluid when the low washer fluid warning light comes on. Add a washer solvent to the water for better cleaning. In the winter season, add a windshield washer anti-freeze. Follow the manufacturer’s instructions for the mixture ratio.
7-11
Z 01.2.1/A32-D X
washer solvent to the water for better cleaning. In the winter season, add a windshield washer anti-freeze. Follow the manufacturer’s instruc- tions for the mixture ratio.
Do not substitute engine anti-freeze coolant for window washer solution. This may result in damage to the paint.
BATTERY
I Keep the battery surface clean and dry. Any corrosion should be washed off with a solution of baking soda and water.
I Make certain the terminal connections are
clean and securely tightened.
I If the vehicle is not to be used for 30 days or longer, disconnect the “—” negative battery terminal cable to prevent discharge.
Do not expose the battery to flames or electrical sparks. Hydrogen gas gener- ated by battery action is explosive. Do not allow battery fluid to contact your skin, eyes, fabrics, or painted surfaces. After touching a battery or battery cap, do not touch or rub your eyes. Thor- oughly wash your hands. If the acid contacts your eyes, skin or clothing, immediately flush with water for at least 15 minutes and seek medical attention.
7-12
Z 01.2.1/A32-D X
SDI0190
Type B To check the fluid level, use your finger to plug the center hole of the cap/tube assembly (as shown above), then remove it from the tank. If there is no fluid in the tube, add fluid. Add a
DRIVE BELTS
JUMP STARTING If jump starting is necessary, see the “In case of emergency” section. If the engine does not start by jump starting, the battery may have to be replaced. Contact your NISSAN dealer.
DI0137M
Check the fluid level in each cell. It should be between the MAX. and MIN. lines. If it is necessary to add fluid, add only distilled water to bring the level to the indicator in each filler opening. Do not overfill. 1. Remove the cell plugs. 2. Add distilled water up to the MAX. level. 3. Tighten cell plugs.
SDI0141
Be sure the ignition key is “OFF”.
1. Visually inspect each belt for signs of un- usual wear, cuts, fraying, oil adhesion or looseness. If the belt is in poor condition or loose, have it replaced or adjusted by your NISSAN dealer.
2. Have the belts checked regularly for condi- tion and tension in accordance with the maintenance schedule in this manual.
7-13
Z 01.2.1/A32-D X
SPARK PLUG REPLACEMENT
Be sure the engine and ignition switch are off and that the parking brake is engaged securely.
Be sure to use the correct wrench to remove the plugs. An incorrect wrench can cause damage.
7-14
Z 01.2.1/A32-D X
SDI0122
SDI0123
5. Fit the new plugs, one at a time, into the spark plug wrench and install them. Turn each plug in several full turns by hand, then tighten with a spark plug wrench to the correct torque. Do not overtighten. Spark plug tightening torque:
14 to 22 ft-lb (20 to 29 )
6. Holding the ignition coil, re-connect each to its proper spark plug by
ignition coil pushing it on until you feel a snap.
7. Tighten all ignition coils.
1. Remove the rocker cover ornament using a
suitable hexagon wrench. (Front side)
2. Disconnect the electrical connectors.
3. Loosen the ignition coil fixing bolts. And remove the ignition coil to give access to the spark plugs.
4. Remove the spark plugs with a spark plug
wrench. The plug wrench has a rubber seal that holds the spark plug so that it will not fall when it is pulled out. Make sure that each spark plug is snugly fitted into the plug wrench.
7-15
Z 01.2.1/A32-D X
AIR CLEANER FILTER
SDI0124
SDI0145
SDI0121
Platinum-tipped spark plug It is not necessary to replace the platinum- tipped spark plugs as frequently as the con- ventional type spark plugs since they will last much longer. Follow the maintenance sched- ule but, do not reuse them by cleaning or regapping. Always platinum-tipped spark plugs.
replace with
recommended
Viscous paper type The filter element should not be cleaned and reused. Replace it according to the mainte- nance intervals shown in the “Maintenance schedule” section. When replacing the filter, wipe the inside of the air cleaner housing and the cover with a damp cloth.
Operating the engine with the air cleaner off can cause you or others to be burned. The air cleaner not only cleans the air, it stops flame if the engine back-
7-16
Z 01.2.1/A32-D X
WIPER BLADES
If it isn’t there, and the engine fires. backfires, you could be burned. Don’t drive with it off, and be careful working on the engine with the air cleaner off.
DI1018M
after cleaning the blades and using the wiper, replace the blades.
2) REPLACEMENT 1. Pull the wiper arm. 2. Push the lock pin, then remove the wiper
blade.
3. Insert the new wiper blade to the wiper arm
until a click sounds.
1) CLEANING
If your windshield is not clear after using the windshield washer of the wiper blade chatters when running, wax or other mate- rial may be on the blade or windshield.
if
Clean the outside of the windshield with a washer solution or a mild detergent. Your windshield is clean if beads do not form when rinsing with clear water.
Clean the blade by wiping it with a cloth soaked in a washer solution or a mild detergent. Then rinse the blade with clear water. If your windshield is still not clear
7-17
Z 01.2.1/A32-D X
After wiper blade replacement, return the wiper arm to its original position.
Otherwise it may be damaged when the engine hood is opened.
Make sure the wiper blade contacts the glass, otherwise the arm may be dam- aged from wind pressure.
PARKING BRAKE
SDI0125
From the released position, pull the parking brake lever up slowly and firmly. If the number of clicks is out of the range listed above, see your NISSAN dealer.
SDI0146
If you wax the surface of the hood, be careful not to let wax get into the washer nozzle. This may cause clogging or im- proper windshield washer operation. If wax gets into the nozzle, remove it with a needle or small pin.
7-18
Z 01.2.1/A32-D X
Proper brake inspection intervals should be followed. For more information regarding brake inspections, see the appropriate main- tenance schedule information in the “Mainte- nance Schedule” section of this manual.
BRAKE PEDAL
DI1020MD
With the engine running, check the distance between the upper surface of the pedal and the metal floor. If it is out of the range shown above, see your NISSAN dealer. Self-adjusting brakes Your vehicle is equipped with self-adjusting brakes.
The front disc-type brakes self-adjust every time the brake pedal is applied. The rear drum-type brakes self-adjust every time the parking brake is applied. If the brake pedal goes down farther than normal, it may be due to a lack of adjustment of the rear drum
brakes. Apply the parking brake several times.
See your NISSAN dealer and have it checked if the brake pedal height does not return to normal.
Brake pad wear indicators The disc brake pads on your vehicle have audible wear indicators. When a brake pad requires replacement, it will make a high pitched scraping or screeching sound when the vehicle is in motion whether or not the brake pedal is depressed. Have the brakes checked as soon as possible if the wear indi- cator sound is heard. Under some driving or climate conditions, oc- casional brake squeak, squeal or other noise may be heard. Occasional brake noise during light to moderate stops is normal and does not affect the function or performance of the brake system. The rear drum brakes (if so equipped) do not have audible wear indicators. Should you ever hear an unusually loud noise from the rear drum brakes, have them inspected as soon as possible by your NISSAN dealer.
7-19
Z 01.2.1/A32-D X
BRAKE BOOSTER
CLUTCH PEDAL
FUSES
Check the brake booster function as follows: 1. With the engine off, press and release the times. When brake brake pedal several pedal movement (distance of travel) re- mains the same from one pedal application to the next, continue on to the next step.
2. While depressing the brake pedal, start the engine. The pedal height should drop a little.
3. With the brake pedal depressed, stop the engine. Keeping the pedal depressed for about 30 seconds, the pedal height should not change.
4. Run the engine for one minute without depressing the brake pedal, then turn it off. Depress the brake pedal several times. The pedal travel distance will decrease gradu- ally with each depression as the vacuum is released from the booster.
If the brakes do not operate properly, see your NISSAN dealer.
DI1021MA
SDI0126
Press the pedal by hand and be sure the free travel is within the limits shown above. If free travel is too little or too much, see your NIS- SAN dealer.
Engine compartment If the electrical equipment does not come on, check for a burned-out fuse. 1. Be sure the ignition key and headlight
switch are “OFF”.
2. Open the engine hood. 3. Remove the fusible link cover. 4. Remove the fuse with the fuse puller. 5. If the fuse is burned out, replace it with a
new fuse.
7-20
Z 01.2.1/A32-D X
Never use a fuse of higher amperage rating than that specified on the fuse box cover. 6. If a new fuse burns out again, have the electrical system checked and repaired by your NISSAN dealer.
SDI0335
5. If a new fuse opens again, have the elec- trical system checked and repaired by your NISSAN dealer.
Passenger compartment If any electrical equipment does not operate, check for a burned-out fuse.
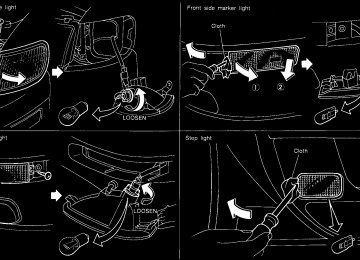
1. Be sure the ignition key and headlight