- Download PDF Manual
-
turns in the direction of the arrow.
Releasing the convertible top 1. Loosen bolt, arrow, with the Allen wrench
and remove.
4. Using the Allen wrench, loosen second bolt,
arrow, to unlock the convertible top.
5. Remove bolt. 6. Slightly lift side frame, arrow 1, and pull the
sensor with the cable forward out of the guide.
7. Swing cable out sideways, arrow 2.
When putting aside, ensure that the cable is not clamped.
2. Slide cover in travel direction, arrow 1, and rotate out sideways, arrow 2. If necessary, press plastic trim, arrow 3 slightly inward.
3. Pull out the sensor from cover, arrow, and
place on the inner side panel.
8. Release the second side frame.
42
Online Edition for Part no. 01 40 2 904 077 - © 03/12 BMW AG Opening and closing
CONTROLS
Closing the convertible top 1. Place both hands on the convertible top on
the respective side frame.
4.
Insert the pins into the respective recess in the cowl, refer to arrow.
2. Lift out both sides at the same time, and
swing the convertible top forward onto the cowl. Inside the vehicle, use a screwdriver to pry out the cover in the center of the roof.
3.
Closing the sliding sunroof 1.
Insert the hexagon wrench into the recess in the center of the roof and push upward, refer to arrow 1.
2. Turn the hexagon wrench in the direction of
arrow 2.
3. Open both locking mechanisms and remove
the locking pieces.
Ensure that the locking pieces do not fall on the vehicle; otherwise it could
be damaged.<
Locking the convertible top Turn hexagon wrench in the opposite direction of arrow 2 until the convertible top is securely locked.
Please contact your MINI dealer to have the electrical malfunction repaired.<
MINI Convertible: Wind deflector With the convertible top open, the wind deflec- tor keeps air movement in the passenger com- partment to a minimum, thus providing you with a more pleasant drive, even at higher speeds. Do not let the wind deflector come into contact with pointy objects as these may
damage the net. Do not place objects on the installed wind deflector. When stowing the wind deflector, ensure that it is not damaged by objects.<
Before installing 1. Take the wind deflector out of the pouch. 2. Unfold the wind deflector, refer to arrows 1.
43
Online Edition for Part no. 01 40 2 904 077 - © 03/12 BMW AG CONTROLS
Opening and closing
If a seat is in its rearmost position, do not recline the backrest too far; otherwise, the
wind deflector could be damaged.<
Removing and folding Remove the deflector following the reverse sequence.
Push the release lever toward the center of the wind deflector and fold both halves together.
MINI Roadster: Manual convertible top
General information The fully automatic convertible top provides protection from the weather, combined with simple and easy operation. Here are some helpful tips for getting the most enjoyment out of your MINI Roadster: > It is recommended that you close the con-
vertible top whenever the vehicle is parked. The closed convertible top not only protects the vehicle interior from damage due to unforeseen bad weather, but also provides a certain degree of protection against theft. Always keep your valuables inside the locked luggage compartment, even if the convertible top is closed.
> Do not mount any roof rack systems on the
convertible top.
Do not leave a wet convertible top open for more than one day, since the humidity
may cause damages.
3. Press the locking device together until it
engages, refer to arrow 2.
Installing and folding up
1. Push out retaining pin 2 on one side until it
2.
engages. Insert wind deflector with retaining pins into the openings 1 and 2 on that side of the vehicle.
3. On the opposite side of the vehicle, insert the retaining pin 1 into the opening, push- ing against the spring load.
4. Push out retaining pin 2 on one side until it
engages.
5. Fold up the upper part of the wind deflector.
44
Online Edition for Part no. 01 40 2 904 077 - © 03/12 BMW AG Opening and closing
CONTROLS
Do not place any objects on the convertible top, as they could otherwise fall off while the con- vertible top is being operated and result in property damage or personal injury. Always completely finish the operation of the convertible top. Driving off before an opening or closing procedure is completely finished can lead to property damage or personal injury. During the opening and closing operation, ensure that no one is injured by the convertible top linkage or other moving parts. Keep children away from the pivoting range of the convertible top. Only open or close the convertible top when the vehicle is stopped.<
While opening and closing, the convertible top pivots upward. When opening or clos- ing the convertible top in garages, under bridges or similar locations, ensure that there is a mini- mum clearance of 2 meters; otherwise damage may occur to the vehicle.<
Opening 1. Fold the handle out and rotate until it
reaches the end stop, arrow.
2. Using the handle, push the unlocked
convertible top upwards and open about six inches.
3. Get out of the vehicle. 4. Guide the convertible top toward the rear.
5. Push the convertible top downward with a slight momentum until it audibly engages.
Closing 1. Switch on the ignition so that the windows
can be automatically lowered slightly. Remove the wind deflector if necessary.
2. Press button 1.
The convertible top is unlocked and moves slightly upward.
3. Get out of the vehicle. 4. Guide the convertible top forward. 5. Pull convertible top onto the windshield
frame
45
Online Edition for Part no. 01 40 2 904 077 - © 03/12 BMW AG CONTROLS
Opening and closing
Do not place any objects on the convertible top, as they could otherwise fall off while the con- vertible top is being operated and result in property damage or personal injury. Always completely finish the operation of the convertible top. Driving off before an opening or closing procedure is completely finished can lead to property damage or personal injury. Do not leave a wet convertible top open for more than one day, since the humidity may cause damages.<
While opening and closing, the convertible top pivots upward. When opening or clos- ing the convertible top in garages, under bridges or similar locations, ensure that there is a mini- mum clearance of 2 meters; otherwise damage may occur to the vehicle.<
Operating while driving The convertible top may be opened or closed while driving not faster than 20 mph/30 km/h. Only operate the convertible top when traffic conditions permit and vehicle con- trol is not affected; otherwise, an accident may occur. Do not operate the convertible top when the vehicle is moving in reverse, because rear visibil- ity is severely restricted while the convertible top is opening or closing. Do not operate the con- vertible top when driving on winding and rough roads or during windy conditions.<
For better control
Indicator lamp lights up. Convertible top has stopped moving. Convertible top is fully open.
Indicator lamp lights up. Convertible top has stopped moving. Close convertible top using the handle.
6. Turn handle clockwise until there is an
audible click. The convertible top is locked.
If the convertible top has been open for a longer time, a greater force for
locking may be necessary.<
7. Fold the handle back in.
MINI Roadster: Semi- automatic convertible top
General information The fully automatic convertible top provides protection from the weather, combined with simple and easy operation. Here are some helpful tips for getting the most enjoyment out of your MINI Roadster: > It is recommended that you close the con-
vertible top whenever the vehicle is parked. The closed convertible top not only protects the vehicle interior from damage due to unforeseen bad weather, but also provides a certain degree of protection against theft. Always keep your valuables inside the locked luggage compartment, even if the convertible top is closed.
> If the temperature drops below +14 7/ –10 6, do not operate the convertible top; otherwise, damage may occur.
> Do not mount any roof rack systems on the
convertible top.
For reasons of safety, operate the convert- ible top only while the vehicle is not
moving, if possible. During the opening and closing operation, ensure that no one is injured by the convertible top linkage or other moving parts. Keep children away from the pivoting range of the convertible top.
46
Online Edition for Part no. 01 40 2 904 077 - © 03/12 BMW AG Opening and closing
CONTROLS
Malfunction The Convertible top not locked indicator lamp lights up and a message appears on the Control Display.
Interruption
A convertible top which is not completely open or closed is hazardous.<
The automatic movement is immediately inter- rupted when the switch for the convertible top operation is released. The procedure can be continued in the desired direction by pressing the appropriate switch. If the opening or closing operation is interrupted by releasing the switch, the convertible top remains in the current position. The procedure can be continued by pressing the appropriate switch. The opening and closing procedure is also inter- rupted in case of a mechanical blockage. In this case, in order to operate the convertible top again: 1. Switch off the ignition and then switch it on
again.
2. Press the switch to continue the procedure
in the desired direction.
Opening and closing the convertible top Switching on radio readiness or ignition, see page 60.
To spare the battery, operate the convert- ible top only when the engine is running, if
possible. Before closing the convertible top, remove any foreign objects from the windshield frame that may interfere with the closing of the convertible top.<
Opening 1. Fold the handle out and rotate until it
reaches the end stop, arrow.
2. Using the handle, push unlocked convertible
top upwards and open about six inches.
3. Push switch back to open the convertible
top. The windows open during this procedure.
Closing 1. Press the switch forward.
2. Pull convertible top onto the front windshielf
frame,
3. Turn handle clockwise until there is an
audible click. The convertible top is locked.
47
Online Edition for Part no. 01 40 2 904 077 - © 03/12 BMW AG CONTROLS
Opening and closing
If the convertible top has been open for a longer time, a greater force for
locking may be necessary.<
4. Fold the handle back in. 5.
If necessary, close windows.
Manual closing in the event of an electrical malfunction
Only close the convertible top manually if it is absolutely necessary. Never open it
manually. Improper handling of the convertible top can result in damage. The closing procedure must be completely finished. Otherwise, damage or injury could result.<
Before closing Move the side windows slightly down, stop the engine and switch off the ignition. 1. Remove the cover plate, see page 117. 2. Remove luggage area tray, arrow.
Closing 1. Grasp the convertible top by the convertible
top frame and guide to the windshield frame.
2. Unfold the handle and rotate counter-
clockwise all the way to the stop.
3. Pull the convertible top onto the windshield
frame,
4. Turn handle clockwise until there is an
audible click. The convertible top is locked.
MINI Roadster: Wind deflector With the convertible top open, the wind deflec- tor keeps air movement in the passenger compartment to a minimum, thus providing you with a pleasant drive, even at higher speeds. Do not let the wind deflector come into contact with pointy objects as these may
damage the net.<
Before installing 1. Take the wind deflector out of the storage
pouch.
3. Using the Allen wrench from the tool kit,
turn the gold-colored screw, see arrow, in the direction of the arrow by about four or five rotations all the way to the stop.
2. Fold the wind deflector open, arrow.
48
Online Edition for Part no. 01 40 2 904 077 - © 03/12 BMW AG Opening and closing
CONTROLS
Installing 1. With the parts 1 pointing rearward, insert
the wind deflector into the recesses 2 in the rollover bar.
2. Slide the wind deflector downward until it
engages, arrow 3.
The wind deflector must engage firmly; otherwise it can come loose at high
speeds.<
Removing Remove the deflector following the reverse sequence. Pull the wind deflector upward out of the recesses.
Storage
Fold the wind deflector 1 closed and slide it into the storage pouch 2. The wind deflector can be stored in the rear storage area behind the seats, refer to page 109.
49
Online Edition for Part no. 01 40 2 904 077 - © 03/12 BMW AG CONTROLS
Adjustments
Adjustments
Vehicle equipment In this chapter, all production, country, and optional equipment that is offered in the model range is described. Equipment is also described that is not available because of, for example, selected options or country version. This also applies to safety related functions and systems.
Sitting safely The ideal sitting position can make a vital contri- bution to relaxed, fatigue-free driving. In con- junction with the safety belts, the head restraints and the airbags, the seated position has a major influence on your safety in the event of an acci- dent. To ensure that the safety systems operate with optimal efficiency, we strongly urge you to observe the instructions contained in the follow- ing section. For additional information on transporting children safely, refer to page 56.
Airbags
Always maintain an adequate distance between yourself and the airbags. Always
grip the steering wheel on the rim, with your hands in the 3 o'clock and 9 o'clock positions, to minimize the risk of injury to the hands or arms in the event of the airbag being deployed. No one and nothing should come between the airbags and the seat occupant. Do not use the cover of the front airbag on the front passenger side as a storage area. Ensure that the front passenger is correctly seated, e.g. that no feet or legs are propped against the dashboard. Otherwise, leg injury could result if the front airbag suddenly deployed. Make sure that passengers keep their heads away from the side/head airbag; otherwise inju- ries can occur when airbags are deployed. <
50
Even if you follow all the instructions, injuries resulting from contact with airbags cannot be fully excluded, depending on the circumstances. The ignition and inflation noise may provoke a mild hearing loss in extremely sensitive individ- uals. This effect is usually only temporary. For airbag locations as well as additional infor- mation, refer to page 93.
Head restraint A correctly adjusted head restraint reduces the risk of neck injury in the event of an accident. Adjust the head restraint in such a way that its center is at approx. ear level.
Otherwise, there is an increased risk of injury in the event of an accident.< Head restraints, refer to page 52.
Safety belt Before every drive, make sure that all occupants wear their safety belts. Airbags complement the safety belt as an additional safety device, but they do not represent a substitute.
Number of safety belts
Never allow more than one person to wear a single safety belt. Never allow
infants or small children to ride in a passenger's lap. Make sure that the belt in the lap area sits low across the hips and does not press against the abdomen. The safety belt must not rest against the throat, run across sharp edges, pass over hard or fragile objects or be pinched. Fasten the safety belt so that it is pulled taut across the lap and shoulder, fitting the body snugly without any twists. Otherwise, the belt could slide over the hips in the event of a frontal collision and
Online Edition for Part no. 01 40 2 904 077 - © 03/12 BMW AG Adjustments
CONTROLS
injure the abdomen. Avoid wearing bulky cloth- ing and regularly pull the belt in the upper-body area taut; otherwise, its restraining effect could be impaired.< Safety belts, refer to page 53.
Longitudinal adjustment Pull the lever, arrow 1, and slide the seat into the desired position, arrows 2. After releasing the lever, move the seat slightly forward or back so that it engages properly.
Height
Pull up or push down the lever repeatedly, arrows 1, until the desired height is reached, arrows 2.
Backrest
Seats
Note before adjusting
Never attempt to adjust your seat while the vehicle is moving. The seat could
respond with unexpected movement, and the ensuing loss of vehicle control could lead to an accident. On the front passenger seat as well, do not incline the backrest too far to the rear while the vehicle is being driven; otherwise, there is a danger in the event of an accident of sliding under the safety belt, eliminating the protection normally provided by the belt.< Comply with the instructions on head restraint height on page 52 and on damaged safety belts on page 54.
Seat adjustment
Observe the instructions on page 51 to ensure the best possible personal
protection.<
Pull the lever, arrow 1, and apply your weight to the backrest or lift it off, as necessary, arrows 2.
Lumbar support You can also adjust the contour of the backrest to obtain additional support in the lumbar region. The upper hips and spinal column receive supplementary support to help you maintain a relaxed, upright sitting position.
51
Online Edition for Part no. 01 40 2 904 077 - © 03/12 BMW AG CONTROLS
Adjustments
Turn the wheel to increase or decrease the curvature.
MINI Convertible: getting in back MINI Coupe, MINI Roadster: access to lateral storage tray
1. Pull up the lever on the seat backrest,
arrow 1. The backrest folds forward.
2. Move the seat forward by pushing on the
backrest, arrow 2.
Return seat to original position The driver's seat has a mechanical memory function for the forward/back setting and the backrest adjustment. 1. Slide the seat to return to its starting
position.
Do not fold the backrest up until the seat is in its previous position. Other-
wise, the seat will engage in its current position. In this case, adjust the longitudinal position manually, page 51.<
2. Fold the backrest back up to lock the seat.
52
When moving the seat backward, ensure that you do not cause personal injury or
property damage. Before driving off, engage the front seats and seat backrests. Otherwise, there is a risk of accident due to unexpected movement.<
Head restraints
Correctly adjusted head restraint A correctly adjusted head restraint reduces the risk of neck injury in the event of an accident.
Correctly adjust the head restraints of all occupied seats; otherwise, there is an
increased risk of injury in an accident.<
Height Adjust the head restraint so that its center is approximately at ear level.
Distance Adjust the distance so that the head restraint is as close as possible to the back of the head.
Height adjustment
To raise: pull up. To lower: press the button, arrow 1, and slide the head restraint down.
Online Edition for Part no. 01 40 2 904 077 - © 03/12 BMW AG Adjustments
CONTROLS
Removing Only remove a head restraint if no one will be sitting on the seat in question.
Switching off Press button longer.
Reinstall the head restraint before transporting passengers, as otherwise the
Safety belts
head restraint cannot provide its protective function.<
Front 1. Pull up as far as it will go. 2. Fold the backrest forward slightly. 3. Press button 1 and pull the head restraint
out as far as it will go.
4. Fold back the backrest.
MINI Convertible: rear 1. Pull up as far as it will go. 2. Press button 1 and pull the head restraint
out completely.
Seat heating
Switching on Press once for each temperature level. Three LEDs indicate the highest temperature. If you continue driving within the next 15 minutes, the seat heating is automatically activated at the previously set temperature. The temperature is lowered or the heating is switched off entirely to reduce the drain on the battery. The LEDs stay lit.
Observe the instructions on page 51 to ensure the best possible personal
protection.< Before every drive, make sure that all occupants wear their safety belts. Airbags complement the safety belt as an additional safety device, but they do not represent a substitute.
Front and rear seats
Closing Make sure you hear the lock engage in the belt buckle. The upper belt anchor is suitable for adults of any stature as long as the seat is adjusted properly, page 51.
Opening 1. Grasp the belt firmly. 2. Press the red button in the buckle. 3. Guide the belt into its reel.
53
Online Edition for Part no. 01 40 2 904 077 - © 03/12 BMW AG CONTROLS
Adjustments
MINI Convertible: rear belt guide
Please ensure that the belt guide loop, arrow, is locked when putting on the rear
safety belts.<
Safety Belt Reminder
Front seats
The indicator lamps come on and an acoustic signal sounds. In addition, a message appears on the Control Dis- play. Check whether the safety belt has
been fastened correctly. The Safety Belt Reminder is issued when the driver's safety belt has not been fastened. The Safety Belt Reminder is also activated at road speeds above approx. 5 mph or 8 km/h if the front passenger's safety belt has not been fastened, if objects are placed on the front passenger seat, or if driver or front passenger unfasten their safety belts.
Damage to safety belts
If the safety belts are damaged or stressed in an accident: have the safety belt system
and its seat-belt tensioners replaced and the belt anchors checked. Have this work carried out only by a MINI dealer or by a workshop that has specially trained personnel working in accor- dance with the specifications of the MINI manu- facturer; otherwise, correct operation of these safety systems is not ensured.<
54
Mirrors
Exterior mirrors
The front passenger's mirror is more con- vex than the driver's mirror. The objects seen in the mirror are closer than they appear. Do not gauge your distance from traffic behind you on the basis of what you see in the mirror; otherwise, there is an increased risk of an accident.<
1 Adjusting the left or right exterior mirror 2 Tilting mirrors in and out
Manual adjustment The mirrors can also be adjusted manually: press the edge of the glass.
Tilting mirrors in and out Turn the knob beyond the pressure point in direction 2. The mirrors can be folded in at road speeds up to approx. 20 mph/30 km/h. This can be beneficial in narrow streets, for example, or for moving mirrors that were folded in by hand back out into their correct positions.
Automatic heating At external temperatures below a certain limit, both exterior mirrors are automatically heated while the engine is running or the ignition switched on.
Online Edition for Part no. 01 40 2 904 077 - © 03/12 BMW AG Adjustments
CONTROLS
Interior rearview mirror
Steering wheel
Adjustments
Do not adjust the steering wheel position while the car is in motion; otherwise, there
is a risk of accident due to an unexpected movement.<
To reduce glare from vehicles behind you when you are driving at night: Turn the knob.
Interior and exterior mirrors, automatic dimming feature
It is controlled by two photosensors: > Inside the interior rearview mirror, arrow > On the back of the mirror. For proper function: > Keep the photosensors clean > Do not cover the area between the interior
rearview mirror and the windshield
> Do not place stickers or decals on the wind-
shield in front of the mirror.
1. Fold the lever down. 2. Move the steering wheel to the preferred
distance and angle to suit your seated position.
3. Swing the lever back up.
Do not use force to swing the lever back up; otherwise, the mechanism
will be damaged.<
55
Online Edition for Part no. 01 40 2 904 077 - © 03/12 BMW AG CONTROLS
Transporting children safely
Transporting children safely
Vehicle equipment In this chapter, all production, country, and optional equipment that is offered in the model range is described. Equipment is also described that is not available because of, for example, selected options or country version. This also applies to safety related functions and systems.
The right place for children
Do not leave children unattended in the vehicle; otherwise, they could endanger
themselves and/or other persons by opening the doors, for example.<
MINI Convertible: children should always sit in the rear Accident research has shown that the safest place for children is on the rear seat.
Only transport children under the age of 13 or smaller than 5 ft/150 cm in the rear in a child restraint system suitable for their age, weight and size. Otherwise, there is an increased risk of injury in the event of an accident.< Children 13 years of age or older must be buckled in with a safety belt as soon as there no longer is any child restraint system that is appropriate for their age, size and weight.
Only install child seats in the rear when the rear seat backrest is folded all the way
back and engaged. Otherwise, there is an increased risk of injury in the event of an accident.<
Exception for front passenger seat
Front passenger airbags
Should it be necessary to use a child restraint system on the front passenger
seat, the front and side airbags must be deacti- vated. Otherwise, there is an increased risk of injury to the child if the airbags deploy, even if the child is seated in a child restraint system.< For more information on automatic deactivation of the front passenger airbags, refer to page 93.
Child restraint systems, installation
Observe the child restraint system manu- facturer's instructions when selecting, installing and using child restraint systems. Otherwise, the protective effect may be diminished.<
On the front passenger seat
After installing a child restraint system on the front passenger seat, make sure that the front and side airbags for the front passen- ger are deactivated; otherwise, there is an increased risk of injury if the airbags deploy.<
Seat position Before installing a child restraint system, move the front passenger seat as far back and up as possible to obtain the best possible position for the belt. Do not change the seat position after this.
56
Online Edition for Part no. 01 40 2 904 077 - © 03/12 BMW AG Transporting children safely
CONTROLS
Child seat security
MINI Coupe, MINI Roadster
The safety belt for the passenger can be pre- vented from being pulled out in order to secure child restraint systems.
MINI Convertible
Unlocking the safety belt 1. Open the belt buckle. 2. Remove the child restraint system. 3. Allow the safety belt strap to retract all the
way.
LATCH child restraint fixing system LATCH: lower Anchors and Tethers for Children. To install and use the LATCH child restraint system, follow the operating and safety
instructions provided by the manufacturer of the system; otherwise, the protective function of the seat may be compromised.<
MINI Convertible: anchor points for LATCH anchors Before installing the child seat, pull the belt out of the area for the child restraint fixing system.
All rear safety belts and the safety belt for the front passenger can be prevented from being pulled out in order to secure child restraint systems.
Locking the safety belt 1. Secure the child restraint system with the
belt.
2. Pull the belt strap all the way out. 3. Allow the belt strap to retract and pull it taut
against the child restraint system.
The safety belt is locked.
The anchor points for the lower LATCH anchors are located behind the labeled protective caps. Make sure that both lower LATCH anchors are properly engaged and that the child
restraint system rests firmly against the seat backrest; otherwise, the protective function of the seat may be compromised.<
57
Online Edition for Part no. 01 40 2 904 077 - © 03/12 BMW AG CONTROLS
Transporting children safely
Child restraint system with tether strap
MINI Coupe
Use the tether strap anchors to secure child restraint systems only; otherwise, the
anchors could be damaged.< MINI Coupe:
1 Direction of travel 2 Head restraint 3 Partition 4 Rear cargo well 5 Tether strap hook 6 Anchor 7 Seat backrest 8 Tether strap of the child restraint system
Attaching upper tether strap to the attachment point 1. Removing front cargo area cover, see
page 116.
2. Slide the head restraint upward. 3. Guide the tether strap between the head
restraint holders.
4. Attach the tether strap to the anchor using
the hook.
5. Push the head restraint into its lowermost
position.
6. Pull the tether strap tight.
For child restraint systems with tether straps, there is an additional anchor, arrow. MINI Convertible:
There are two additional anchors for child restraint systems with tether straps, arrows.
Placement of the tether strap
Make sure the upper tether strap does not run over sharp edges and is not twisted as it passes to the top anchor. Otherwise, the strap will not properly secure the child restraint system in the event of an accident.<
58
Online Edition for Part no. 01 40 2 904 077 - © 03/12 BMW AG Transporting children safely
CONTROLS
MINI Convertible
Ensure that the upper strap 9 is passed between the seat backrest 8 and the roll-
over protection system with cross member 3; otherwise, the strap will not properly secure the child restraint system.<
1 Direction of travel 2 Head restraint 3 Rollover protection system with cross
member
4 Cargo area cover 5 Rear cargo well 6 Tether strap hook 7 Anchor 8 Seat backrest 9 Tether strap of the child restraint system
Attaching upper tether strap to the attachment point 1. Slide the head restraint upward. 2. Unlock backrest and slightly fold forward,
refer to page 118.
3. Guide the tether strap between the head
restraint holders.
4. Attach the tether strap to the anchor using
the hook.
5. Fold backrest back and lock in place. Push
headrest down as far as possible.
6. Pull the tether strap tight.
59
Online Edition for Part no. 01 40 2 904 077 - © 03/12 BMW AG CONTROLS
Driving
Driving
Vehicle equipment In this chapter, all production, country, and optional equipment that is offered in the model range is described. Equipment is also described that is not available because of, for example, selected options or country version. This also applies to safety related functions and systems.
Ignition lock
Inserting the key into the ignition lock
Insert the key all the way into the ignition lock. Radio readiness Individual electrical consumers can operate.
Removing the key from the ignition lock Press in the key briefly. It is ejected slightly. At the same time: > The ignition is switched off if it was on
beforehand.
Automatic transmission The key can only be removed if the selector lever is in position P: interlock.
60
Start/Stop button
Press the Start/Stop button to switch radio readi- ness or the ignition on and off. Do not depress the brake or clutch while doing so.
If the Start/Stop button is pressed while the clutch is depressed in the manual
transmission or the brake pedal is depressed in the automatic transmission, the engine starts.<
Radio readiness Individual electrical consumers can operate. The time and external temperature are displayed in the tachometer. Radio readiness is switched off automatically: > When the key is removed from the ignition
lock
> When using Comfort Access by pressing
the button on the door handle or the
button on the remote control, refer to
Locking on page 37
> After a certain has elapsed
Ignition on Most indicator and warning lamps in indicator area 1, page 13, light up for varying lengths of time.
When the engine is off, switch off the ignition and any unnecessary electrical consumers in order to preserve the battery.<
Online Edition for Part no. 01 40 2 904 077 - © 03/12 BMW AG Radio readiness and ignition off All indicator and warning lamps in the displays go out. The ignition switches off automatically if the driver's door is opened. Pressing the Start/Stop button again switches the ignition back on. The ignition is not switched off in situations such as the following: > The clutch or brake is depressed > The low beams are switched on
Starting the engine
Do not allow the engine to run in enclosed areas; otherwise, inhalation of the noxious exhaust gases can lead to loss of consciousness and death. Exhaust gases contain carbon mon- oxide, an odorless and colorless, but highly toxic gas. Never leave an unattended vehicle with the engine running; otherwise, such a vehicle repre- sents a potential safety hazard. Before leaving the car while the engine is run- ning, place the transmission in neutral or move the selector lever to position P and forcefully apply the parking brake to prevent the car from moving.<
Avoid frequent starting in quick succes- sion or repeated start attempts in which the engine does not start. Otherwise, the fuel is not burned or inadequately burned and there is a danger of overheating and damaging the catalytic converter.< Do not let the engine warm up with the vehicle at a standstill. Move off immediately at a moder- ate engine speed. When starting the engine, do not depress the accelerator pedal.
Driving
CONTROLS
Manual transmission Key in ignition lock or inside vehicle with Comfort Access, refer to page 36. 1. Depress the brake. 2. Depress the clutch. 3. Press the Start/Stop button.
Automatic transmission Key in ignition lock or inside vehicle with Comfort Access, refer to page 36. 1. Depress the brake. 2. Shift the selector lever into position P or N. 3. Press the Start/Stop button. The starter operates automatically for a certain time, and stops automatically as soon as the engine has started.
Switching off the engine Always take the key with you when you leave the vehicle.
When parking, apply the parking brake force- fully; otherwise, the vehicle could begin to roll. Secure the vehicle on steep upward and down- ward slopes, for example, turn the steering wheel towards the curb.<
Manual transmission 1. With the car at a standstill, press the
Start/Stop button.
2. Shift into first gear or reverse. 3. Forcefully apply the parking brake.
61
Online Edition for Part no. 01 40 2 904 077 - © 03/12 BMW AG CONTROLS
Driving
Automatic transmission 1. With the car at a stop, move the selector
lever to position P.
2. Press the Start/Stop button. 3. Forcefully apply the parking brake.
Before driving into a car wash By following these steps, the vehicle is able to roll: 1. Place the remote control, even with Comfort
Access, in the ignition lock.
2. Depress the brake. 3. Move the selector lever to position N. 4. Switch off the engine.
Parking brake The parking brake is primarily intended to prevent the vehicle from rolling while parked; it brakes the rear wheels. In addition, follow the instructions on page 61 under Switching off the engine.
Applying The lever locks in position automatically.
Releasing
Pull slightly upward, press the button and lower the lever.
62
In exceptional cases, if the parking brake has to be used to slow or stop the car, do not pull the lever up too hard. In doing so, con- tinuously press the button of the parking brake lever. Otherwise, excessive force could lead to over- braking and loss of traction, i.e. fishtailing, at the rear axle.<
Manual transmission
When shifting into 5th or 6th gear, press the gearshift lever to the right. Otherwise,
the engine could be damaged if you inadvert- ently shift into 3rd or 4th gear.<
Reverse gear Select this only when the vehicle is stationary. When the gearshift lever is pressed to the left, a slight resistance has to be overcome.
Automatic transmission with Steptronic In addition to the fully automatic mode, you can shift gears manually using Steptronic, page 64.
Parking the vehicle
To prevent the vehicle from rolling, always select position P and apply the parking
brake before leaving the vehicle with the engine running.<
Online Edition for Part no. 01 40 2 904 077 - © 03/12 BMW AG Removing the key To remove the key from the ignition lock, first move the selector lever into position P and then switch off the engine: interlock. Remove the key from the ignition lock, refer to page 60.
Selector lever positions P R N D M/S + –
Displays in the tachometer
P R N D DS M1 to M6
The selector lever position is displayed, or the current gear in the manual mode.Changing selector lever positions > The selector lever can only be moved out of position P when the ignition is switched on or the engine is running.
> Before moving the lever away from P or N
with the vehicle stationary, first depress the brake; otherwise, the selector lever will refuse to move: shiftlock.
To prevent the vehicle from creeping after you select a driving position, depress the brake until you are ready to start.<
A lock prevents accidental shifting into selector lever positions R and P.
Driving
CONTROLS
Overriding the selector lever lock
Press the button on the front of the selector lever, arrow.
P Park Select this only when the vehicle is stationary. The front wheels are blocked.
R Reverse Select this only when the vehicle is stationary.
N Neutral Select this when you are in a car wash, for example. The vehicle can roll.
D Drive, automatic position Position for normal vehicle operation. All forward gears are selected automatically. Under normal operation conditions, fuel con- sumption is lowest when you drive in position D.
Kickdown Kickdown enables you to achieve maximum performance. Depress the accelerator pedal beyond the full- throttle resistance point.
63
Online Edition for Part no. 01 40 2 904 077 - © 03/12 BMW AG Shifting on the steering wheel With the selector lever in position D, automatic drive, you can shift gears using the shift paddles on the steering wheel. The transmission auto- matically switches to manual mode. If you do not shift gears with the shift paddles or accelerate for a certain amount of time, the transmission automatically returns to D, automatic drive.
> Pull one of the shift paddles.
Transmission shifts up.
> Push one of the shift paddles.
Transmission shifts down.
M1 through M6 are displayed in the tachometer.
Manually releasing the selector lever lock Should the selector lever refuse to move out of position P even though the ignition is switched on, the brake is depressed and the button on the selector lever is pressed, the selector lever lock can be overridden: 1. Unclip the sleeve of the selector lever. 2. Pull the sleeve up over the selector lever
until the sleeve is inside out. Disconnect the cable connector if necessary.
CONTROLS
Driving
Sport program and manual mode M/S
Move the selector lever from position D to the left into the M/S shifting slot: The Sport program is activated and DS is dis- played. This position is recommended for a performance-oriented driving style. To deactivate the Sport program or manual mode M/S, move the selector lever to the right into position D.
Shifting with the selector lever Push the selector lever forward or pull it back to activate manual operation. Steptronic shifts the gear. > Pull the selector lever in the + direction.
Transmission shifts up.
> Push the selector lever in the – direction.
Transmission shifts down.
The selected gear is displayed in the tachometer, e.g. M1. To use the automatic mode again, move the selector lever to the right into position D. Upshifts and downshifts are executed only when they will result in a plausible combination of engine and vehicle speed; thus, for example, a downshift that would cause the engine to over- rev will not be executed by the system. The selected gear is displayed briefly, followed by the current gear.
64
Online Edition for Part no. 01 40 2 904 077 - © 03/12 BMW AG Driving
CONTROLS
Signaling a turn briefly Press the lever as far as the resistance point for as long as you wish to signal a turn.
Triple turn signal activation Press the lever as far as the resistance point. You can set whether the turn signal flashes once or three times. 1. "Settings" 2. "Lighting" 3. "Triple turn signal"
The setting is stored for the remote control currently in use.
65
3.
Insert extractor hook 1 from the toolkit into the loop on the passenger's side.
4. Pull the loop up. 5. Move the selector lever into the desired
position by pressing the button on the front of the selector lever.
Before manually unlocking the selector lever lock, firmly set the parking brake to
prevent the vehicle from rolling away.<
Turn signals/ headlamp flasher
1 Turn signal 2 Headlamp flasher
Using turn signals Press the lever beyond the resistance point. To turn off manually, press the lever to the resistance point.
Unusually rapid flashing of the indicator lamp indicates that an indicator bulb has
failed.<
Online Edition for Part no. 01 40 2 904 077 - © 03/12 BMW AG depends on the intensity of the rainfall. The rain sensor is mounted on the windshield, directly in front of the interior rearview mirror.
Activating intermittent wipe or rain sensor Press button, arrow 3.
This symbol is displayed in the tachometer.
Deactivate the rain sensor before entering an automatic car wash. Failure to do so could result in damage caused by undesired wiper activation.<
Adjusting the sensitivity of the rain sensor 1. Switch on the ignition, refer to page 60. 2. Press the button in the turn signal indicator
as often as necessary until "SET/INFO" is displayed.
3. Press and hold the button until the display
changes.
4. Press the button as often as necessary until
the symbol and "SET" are displayed.
CONTROLS
Driving
Wiper system
Do not turn on the wipers when they are frozen; otherwise, the wiper blades and
the windshield wiper motor may be damaged.<
Do not use the windshield wipers when the windshield is dry; otherwise the wiper
blades may wear out faster or be damaged.<
1 Switching on wipers 2 Switching off wipers or brief wipe 3 Activating/deactivating intermittent wipe or
rain sensor
4 Cleaning windshield and headlamps
Switching on wipers Press the lever upward, arrow 1. The lever automatically returns to its initial position when released.
Normal wiper speed Press once. The system switches to intermittent operation when the vehicle is stationary.
Fast wiper speed Press twice or press beyond the resistance point. The system switches to normal speed when the vehicle is stationary.
Intermittent wipe or rain sensor If the car is not equipped with a rain sensor, the intermittent-wipe time is preset. If the car is equipped with a rain sensor, the time between wipes is controlled automatically and
66
Online Edition for Part no. 01 40 2 904 077 - © 03/12 BMW AG 5. Press and hold the button until the display
changes.
6. Press the button to select the desired
sensitivity.
7. Wait, or press and hold the button until the
display changes. The settings are stored.
Deactivating intermittent wipe or rain sensor Press the button again, arrow 3.
Brief wipe Press the lever downward once, arrow 2.
Cleaning windshield and headlamps Pull the lever, arrow 4. Washer fluid is sprayed onto the windshield and the wipers are operated briefly. When the vehicle lighting system is switched on, the headlamps are cleaned at regular and appropriate intervals. In cars equipped with an alarm system, the headlamps cannot be cleaned when the hood is open.
Do not use the washers when the washer fluid reservoir is empty; otherwise, you will
damage the washer pump. Only use the washers if the hood has been com- pletely closed; otherwise, the headlamp washer system may be damaged. Do not use the wash- ers if there is any danger that the fluid will freeze on the windshield. If you do, your vision could be obscured. For this reason, use antifreeze.<
Driving
CONTROLS
Window washer nozzles The window washer nozzles are heated auto- matically while the engine is running or the ignition is switched on.
Washer fluid
Washer fluid is flammable. Keep it away from ignition sources, only store it in the closed, original container, and keep out of reach of children; otherwise, there is a danger of injury. Comply with the instructions on the container.<
Washer fluid reservoir
Only refill washer fluid that contains antifreeze when the engine is cool, to
avoid contact with hot engine parts. Otherwise, fluid spills constitute a fire hazard and a risk to personal safety.<
Fill with water and, if required, with a washer antifreeze, according to manufacturer's recommendations.
Mix the water and antifreeze before filling the washer fluid reservoir to make sure
the correct concentration is maintained.<
Capacity Approx. 2.6 US quarts/2.5 liters. With headlamp washer system: Approx. 4.8 US quarts/4.5 liters.
67
Online Edition for Part no. 01 40 2 904 077 - © 03/12 BMW AG CONTROLS
Driving
Cruise control
The concept Cruise control is available at vehicle speeds of at least approx. 20 mph or 30 km/h. The car then stores and maintains the speed that you specify using the button on the steering wheel.
Do not use cruise control when driving at constant speed is prevented by adverse conditions, e.g. winding roads, dense traffic or poor road conditions due to, e.g. snow, rain, ice or loose surfaces. Otherwise, you could lose con- trol of the vehicle and cause an accident as a result.<
Activating Depending on the features with which your vehicle is equipped, you have one of the two buttons indicated 2 in your vehicle.
1 Resuming cruise control 2 Activating/deactivating cruise control 3 Maintaining, storing and increasing speed 4 Maintaining, storing and decreasing speed Indicator lamp in the speedometer lights up. The cruise control system is ready and can be activated.
Activating/deactivating cruise control Press button 2. The system is automatically deactivated if: > Braking takes place > The clutch is engaged
68
> The transmission is set on N > The stability control system is on Cruise control is not deactivated by depressing the accelerator pedal. Once the accelerator pedal is released, the stored speed is achieved again and maintained. The stored speed is cleared when the ignition is switched off.
Maintaining current speed Press button 3. The system maintains and stores the current vehicle speed. If, on a downhill grade, the engine braking effect is not sufficient, the controlled speed may be exceeded. On uphill grades vehicle speed may drop if the engine output is insufficient.
Increasing speed Press button 3 repeatedly until the desired speed is reached. Every time you press the but- ton, the speed increases by approx. 1 mph or 1 km/h.
Accelerating using the button Press and hold button 3. The vehicle accelerates without pressure on the accelerator pedal. After the button is released, the driving speed is maintained and stored.
Decreasing speed Press button 4 repeatedly until the desired speed is reached. The functions here are the same as for increas- ing the speed or accelerating, except that the speed will be decreased.
Resuming a speed stored beforehand Press button 1. The last speed stored is achieved again and maintained. The stored speed is cleared when the ignition is switched off.
Online Edition for Part no. 01 40 2 904 077 - © 03/12 BMW AG Driving
CONTROLS
Display on tachometer
Selected speed is displayed briefly.
If --- mph or --- km/h is displayed briefly in the tachometer, the conditions necessary
for operation may not be fulfilled.<
Malfunction
The warning lamp in the tachometer lights up if the system fails. A message appears on the Control Display.
69
Online Edition for Part no. 01 40 2 904 077 - © 03/12 BMW AG CONTROLS
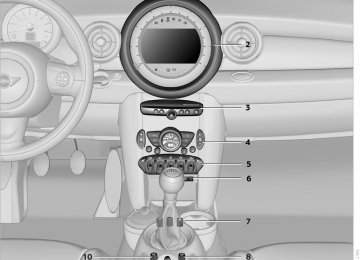
Controls overview
Controls overview
Vehicle equipment In this chapter, all production, country, and optional equipment that is offered in the model range is described. Equipment is also described that is not available because of, for example, selected options or country version. This also applies to safety related functions and systems.
Fuel gauge
Reserve Once the fuel level has fallen to the reserve zone of approx. 2.1 US gal/8 liters the remaining indi- cator lamps change from orange to red, arrow, and a message is displayed briefly on the Control Display. The tachometer displays the remaining cruising range. When the range is less than approx. 30 miles/50 km, the message remains in the Control Display.
If the range displayed is less than 30 miles/50 km, be sure to refuel; other- wise, engine functions are not guaranteed and damage may occur.< With a dynamic driving style, e.g. rapid corner- ing, engine functions are not always assured.
Tachometer
Fuel tank capacity Approx. 13.2 US gal/50 liters. You can find information on refueling on page 207. If the tilt of the vehicle varies for a longer period, when you are driving in mountainous areas, for example, the indicator may fluctuate slightly. The arrow next to the gas pump symbol of the fuel gauge points toward the side of the vehicle with the fuel filler flap.
Never operate the engine with the needle in the red overspeed zone of the gauge. In this range, the fuel supply is interrupted to protect the engine.
70
Online Edition for Part no. 01 40 2 904 077 - © 03/12 BMW AG Displays in tachometer
Controls overview
CONTROLS
Units of measure Select the respective units of measure, miles or km for the odometer as well as 7 or 6 for the external temperature, page 74.
Computer
Displays in tachometer
1 Current vehicle speed 2 Odometer in kilometers, trip recorder,
external temperature, time 3 Resetting the trip odometer Press button on turn signal indicator to call up information in the display area 2. The following information is displayed sequentially: > Trip odometer > Time > External temperature
Trip odometer To display trip recorder: Briefly press button 3. Resetting the trip odometer: While the trip recorder is displayed and the ignition is switched on, press button 3.
Time To set time, see page 76.
External temperature, external temperature warning When the displayed temperature sinks to approx. +377/+36, a signal sounds and a warning lamp lights up. There is an increased risk of black ice.
Even at temperatures above +377/+36 ice can form. Therefore, drive carefully,
e.g. on bridges and sections of road in the shade; otherwise, there is an increased accident risk.<
Press the button in the turn signal lever repeat- edly to call up various items of information. The following information is displayed sequentially: > Cruising range > Average fuel consumption > Current fuel consumption > Average speed > MINI Roadster, MINI Convertible: Always
Open Timer
To set the corresponding units of measure, refer to Units of measure on page 74.
Cruising range Displays the estimated cruising range available with the remaining fuel. The range is calculated on the basis of the way the car has been driven over the last 18 miles/30 km and the amount of fuel currently in the tank.
If the range displayed is less than 30 miles/50 km, be sure to refuel; other- wise, engine functions are not guaranteed and damage could occur.<
71
Online Edition for Part no. 01 40 2 904 077 - © 03/12 BMW AG CONTROLS
Controls overview
Average fuel consumption Calculated for the time the engine has been running. With the trip computer, page 73, you can have the average fuel consumption for another trip displayed. To reset average fuel consumption: press the button in the turn signal lever for approx. 2 seconds.
Current fuel consumption Displays the current fuel consumption to allow you to see whether your current driving style is conducive to fuel economy with minimum exhaust emissions.
Average speed Periods with the vehicle parked and the engine switched off are not included in the calculations of average speed. With the trip computer, page 73, you can have the average speed for another trip displayed. To reset average speed: press the button in the turn signal lever for approx. 2 seconds.
Always Open Timer When driving the MINI Convertible or the MINI Roadster with its convertible top down, the driving times are displayed digitally on the tachometer.
The following driving times are displayed: 1 Total driving time 2 Current driving time To reset the display 2: Press and hold the button in the turn signal lever or the "Reset trip odometer" button, page 12, for approx. 2 seconds. To reset the total driving time, contact your MINI dealer.
Analog Always Open Timer The analog Always Open Timer indicates the number of hours and minutes that you drove with the convertible top down. A maximum of 6 hours and 59 minutes can be displayed. The total driving time is displayed digitally in the tachometer.
1 LED hour display 2 Minute display
72
Online Edition for Part no. 01 40 2 904 077 - © 03/12 BMW AG Controls overview
CONTROLS
Displays on the Control Display 1. "Vehicle Info" 2. "Onboard info" or "Trip computer"
Both displays show the following: > Average fuel consumption > Average speed
Displays in the "Onboard info":
> Cruising range > Distance from destination > Probable arrival time when a destination has
been input into the navigation system, page 126.
Displays in the "Trip computer":
> Departure time > Trip duration > Trip distance
Reset fuel consumption and speed on the onboard computer To reset the values for the average speed and average fuel consumption: 1. Select the respective menu entry. 2. Press the MINI joystick to confirm the
message.
Resetting the trip computer To reset all values: 1. "Vehicle Info" 2. "Trip computer" 3. "Reset"
Settings and information
Operating principle Certain settings and information are only avail- able when the ignition is switched on, the vehi- cle is at a standstill and the doors are closed.
73
Online Edition for Part no. 01 40 2 904 077 - © 03/12 BMW AG CONTROLS
Controls overview
1 Button for:
Next setting or item of information
> Selecting display > Setting values > Confirming selected display or set values > Calling up computer information 71
Symbol
Function
Adjusting rain sensor 66
Calling up Check Control 77
Exiting the menu
Exiting displays
1. While in a setting or information item, press
the button in the turn signal indicator repeatedly until "NEXT" is displayed. 2. Press the button for a longer period. The display changes directly to the next setting or item of information.
Units of measure To set the units of measure. The settings are stored for the remote control currently in use, refer also to Personal Profile on page 28. 1. "Settings" 2. "Language/Units"
3. Select the desired menu item. 4. Select the desired unit.
1. Press the button in the turn signal lever
repeatedly until "HOME" is displayed.
2. Press the button for a longer period. Current vehicle speed is once again displayed. Displays are also exited if no entries are made for approx. 8 seconds.
74
Online Edition for Part no. 01 40 2 904 077 - © 03/12 BMW AG Controls overview
CONTROLS
You can request more detailed information on every entry: Select an entry and press the MINI joystick. To exit from the menu: Move the MINI joystick to the left. A list of selected maintenance schedules and, if required, legally mandated inspections, is shown.
Symbols
No service is currently required.
The deadline for service or a legally mandated inspection is approaching.
Please schedule a service appointment.
The service deadline has already passed.
Entering deadlines for legally required inspections Make sure the date on the Control Display is always set correctly, page 77; otherwise, the effectiveness of Condition Based Service CBS is not ensured. 1. "Vehicle Info" 2. "Vehicle status" 3. "Service required"
Service requirements
The remaining driving distance and the date of the next scheduled service are briefly displayed immediately after you start the engine or switch on the ignition.
The extent of service work required can be read out from the remote control by your
MINI dealer.< More information on the MINI Maintenance System can be found on page 225.
More information
Detailed information on service requirements You can have further information on the scope of maintenance displayed on the Control Display, refer to page 17. 1. "Vehicle Info" 2. "Vehicle status"
3. "Service required" Required maintenance procedures and legally mandated inspections are displayed.
75
Online Edition for Part no. 01 40 2 904 077 - © 03/12 BMW AG CONTROLS
Controls overview
4. "§ Vehicle inspection"
2. "Time/Date"
5. Open the deadline entry menu. 6. "Date:" 7. Create the settings. 8. Press the MINI joystick to apply the setting.
The year is highlighted.
9. Turn the MINI joystick to make the
adjustment.
10. Press the MINI joystick to apply the setting.
The date entry is stored.
To exit from the menu: Move the MINI joystick to the left.
Clock
Setting the time 1. "Settings"
3. "Time:"
4. Turn the MINI joystick to set the hours and
press the MINI joystick.
5. Turn the MINI joystick to set the minutes and
press the MINI joystick.
The system accepts the new time.
Setting the time format The settings are stored for the remote control currently in use, refer also to Personal Profile on page 28. 1. "Settings" 2. "Time/Date" 3. "Format:" 4. Select the desired format and press the MINI
joystick.
The time format is stored.
76
Online Edition for Part no. 01 40 2 904 077 - © 03/12 BMW AG Controls overview
CONTROLS
Setting time zone 1. "Settings" 2. "Time/Date" 3. "Time zone:" 4. Turn MINI joystick until the desired time
zone is set and press the MINI joystick. The time zone is stored.
Date
Setting date 1. "Settings" 2. "Time/Date" 3. "Date:" 4. Turn MINI joystick until the desired day is
displayed and press the MINI joystick.
5. Create the necessary settings for the month
and year.
The date is stored.
Setting the date format 1. "Settings" 2. "Time/Date" 3. "Format:"
Check Control
The concept The Check Control monitors vehicle functions and alerts you to any malfunctions in the systems monitored. Check Control messages involve indicator and warning lamps in the display and, in some circumstances, an acoustic signal as well as text messages at the bottom of the Control Display.
Indicator and warning lamps
Indicator and warning lamps can light up in various combinations and colors in the indicator areas 1 and 2.
Text messages Text messages at the upper edge of the Control Display explain the meaning of the displayed indicator and warning lamps.
4. Select the desired format. The settings are stored for the remote control currently in use, refer also to Personal Profile on page 28.
77
Online Edition for Part no. 01 40 2 904 077 - © 03/12 BMW AG CONTROLS
Controls overview
Supplemental text messages For most Check Control messages, you can view more information later, e.g. regarding the cause of a malfunction and how to respond, refer to page 79.
symbol indicates that Check Control
The messages have been stored. Check Control mes- sages can be viewed whenever it is convenient.
Viewing stored Check Control messages Stored Check Control messages can only be displayed if the driver's door is closed. 1. Press the button in the turn signal indicator
as often as necessary until "SET/INFO" is displayed.
In urgent cases, this information will be shown as soon as the corresponding lamp comes on. Exit display: "OK"
Hiding Check Control messages
2. Press and hold the button until the display
changes.
3. Press the button repeatedly until the corre- sponding symbol and "CHECK INFO" appear in the display.
Press the button in the turn signal lever. > Some Check Control messages are displayed until the malfunctions have been rectified. They cannot be hidden. If several malfunc- tions occur at the same time, they are displayed in succession.
>They are marked with the symbol shown here.
> Other Check Control messages are automat- ically hidden after approx. 20 seconds, but remain stored.
>They are marked with the symbol shown here.
78
Online Edition for Part no. 01 40 2 904 077 - © 03/12 BMW AG Controls overview
CONTROLS
4. Press and hold the button.
If there are no Check Control messages, then "CHECK OK" is displayed. If a Check Control message has been stored, the corresponding message is displayed. In addition, the text message appears on the Control Display.
5. Press the button to check for other
messages.
Displaying on the onboard computer 1. "Vehicle Info" 2. "Vehicle status" 3. "Check Control"
4. Select the text message. 5. Select a text message.
Speed limit Enter a speed, and a Check Control message will indicate when you reach this speed. This enables you, for example, to receive warnings if you exceed a speed limit in an urban area. You are only warned of reaching this speed a second time if your vehicle speed falls below it again by at least 3 mph or 5 km/h.
Displaying, setting or changing the limit 1. "Settings" 2. "Speed" 3. "Warning at:"
4. Turn the MINI joystick to set the limit. 5. Press the MINI joystick to apply the setting. The limit is stored.
Applying your current speed as limit 1. "Settings" 2. "Speed" 3. "Select current speed"
4. Press the MINI joystick. The system adopts your current speed as the