- 2009 Jeep Grand Cherokee Owners Manuals
- Jeep Grand Cherokee Owners Manuals
- 2005 Jeep Grand Cherokee Owners Manuals
- Jeep Grand Cherokee Owners Manuals
- 2013 Jeep Grand Cherokee Owners Manuals
- Jeep Grand Cherokee Owners Manuals
- 2008 Jeep Grand Cherokee Owners Manuals
- Jeep Grand Cherokee Owners Manuals
- 2006 Jeep Grand Cherokee Owners Manuals
- Jeep Grand Cherokee Owners Manuals
- 2004 Jeep Grand Cherokee Owners Manuals
- Jeep Grand Cherokee Owners Manuals
- 2007 Jeep Grand Cherokee Owners Manuals
- Jeep Grand Cherokee Owners Manuals
- 2011 Jeep Grand Cherokee Owners Manuals
- Jeep Grand Cherokee Owners Manuals
- 2012 Jeep Grand Cherokee Owners Manuals
- Jeep Grand Cherokee Owners Manuals
- 2010 Jeep Grand Cherokee Owners Manuals
- Jeep Grand Cherokee Owners Manuals
- Download PDF Manual
-
Low Fuel Low Tire . . . . . . . . . . . . . . . . . . . . . . . . . . . . 191
Malfunction Indicator (Check Engine) . . . . . . . . 188
Map Reading . . . . . . . . . . . . . . . . . . . . . . . . . 129
Oil Pressure . . . . . . . . . . . . . . . . . . . . . . . . . . 190
Passing . . . . . . . . . . . . . . . . . . . . . . . . . . . . . 128
Reading . . . . . . . . . . . . . . . . . . . . . . . . . . 129,158
Rear Servicing . . . . . . . . . . . . . . . . . . . . . . . . 43810
480 INDEX
. . . . . . . . . . . . . . . . . . . . . . . . . . . . 438
Rear Tail Seat Belt Reminder . . . . . . . . . . . . . . . . . . . . . 194
Security Alarm (Theft Alarm) . . . . . . . . . . . . . . 190
Service . . . . . . . . . . . . . . . . . . . . . . . . . . . . . . 435
Service Engine Soon (Malfunction Indicator) . . . 188
Side Marker . . . . . . . . . . . . . . . . . . . . . . . . . . 438
SmartBeams . . . . . . . . . . . . . . . . . . . . . . . . . . 125
Tire Pressure Monitoring (TPMS) . . . . . . . . . . . 191
. . . . . . . . . . . . . . . . . . . . 193
Tow/Haul Indicator Traction Control . . . . . . . . . . . . . . . . . . . . 151,190
Turn Signal . . . . . . . . . . . . . . . . . . 123,128,437,438
Vanity Mirror . . . . . . . . . . . . . . . . . . . . . . . . . . 80
. . . . . . . . . . . . . . . . . . . . . . . . . . . . . 195
Voltage Load Floor, Cargo . . . . . . . . . . . . . . . . . . . . . . . 176
Loading Vehicle . . . . . . . . . . . . . . . . . . . . . . . . . 348
. . . . . . . . . . . . . . . . . . . . . . . . . . . . . . . 314
Locks . . . . . . . . . . . . . . . . . . . . . . . . . . . . . . . . . 28
Automatic Door . . . . . . . . . . . . . . . . . . . . . . . . 29
Child Protection . . . . . . . . . . . . . . . . . . . . . . . . 30Tires
Door . . . . . . . . . . . . . . . . . . . . . . . . . . . . . . . . 28
Power Door . . . . . . . . . . . . . . . . . . . . . . . . . . . 28Lower Anchors and Tether for CHildren . . . . . . . . . . . . . . . . . . . . . . . . . . . . 62,63
(LATCH) Lubrication, Body . . . . . . . . . . . . . . . . . . . . . . . 405
Luggage Rack (Roof Rack) . . . . . . . . . . . . . . . . . 179
. . . . . . . . . . . . . . . . . . . . . . . . 110
Lumbar SupportMaintenance Free Battery . . . . . . . . . . . . . . . . . . 401
Maintenance Procedures . . . . . . . . . . . . . . . . . . . 394
Maintenance Schedule . . . . . . . . . . . . . . . . . 444,449
. . . . . . . . . . . . . . . . . . . . . . . . . . . . . . 449
Diesel Light Duty Schedule “A” . . . . . . . . . . . . . . . . 457
Light Duty Schedule “B” . . . . . . . . . . . . . . . . . 452
Schedule “A” . . . . . . . . . . . . . . . . . . . . . . . . . 457
Schedule “B” . . . . . . . . . . . . . . . . . . . . . . . . . 452
Malfunction Indicator Light (Check Engine) . . 188,391
Manual, Service . . . . . . . . . . . . . . . . . . . . . . . . . 464
Memory Feature (Memory Seat) . . . . . . . . . . . . . 118Memory Seat . . . . . . . . . . . . . . . . . . . . . . . . . . . 118
Memory Seats and Radio . . . . . . . . . . . . . . . . . . 118
Mini-Trip Computer . . . . . . . . . . . . . . . . . . . . . . 201
Mirrors . . . . . . . . . . . . . . . . . . . . . . . . . . . . . . . . 77
Automatic Dimming . . . . . . . . . . . . . . . . . . . . . 78
Electric Powered . . . . . . . . . . . . . . . . . . . . . . . 79
Electric Remote . . . . . . . . . . . . . . . . . . . . . . . . 79
Exterior Folding . . . . . . . . . . . . . . . . . . . . . . . . 79
Heated . . . . . . . . . . . . . . . . . . . . . . . . . . . . . . 80
Outside . . . . . . . . . . . . . . . . . . . . . . . . . . . . . . 78
Rearview . . . . . . . . . . . . . . . . . . . . . . . . . . . . . 77
Vanity . . . . . . . . . . . . . . . . . . . . . . . . . . . . . . . 80
Modifications/Alterations, Vehicle . . . . . . . . . . . . . 9
Monitor, Tire Pressure System . . . . . . . . . . . . . . . 326
Mopar Parts . . . . . . . . . . . . . . . . . . . . . . . . . 393,463
MP3 Player . . . . . . . . . . . . . . . . . . . . . . . . . . . . 241
Multi-Displacement Engine System . . . . . . . . . . . 309
. . . . . . . . . . . . . . . 123
Multi-Function Control LeverINDEX 481
Navigation Radio . . . . . . . . . . . . . . . . . . . . . . . . 244
Navigation System . . . . . . . . . . . . . . . . . . . . . . . 244
New Vehicle Break-In Period . . . . . . . . . . . . . . . . 68Occupant Restraints . . . . . . . . . . . . . . . . . . . . . . . 36
Octane Rating, Gasoline (Fuel) . . . . . . . . . . . . 336,337
Odometer . . . . . . . . . . . . . . . . . . . . . . . . . . 193,194
Trip . . . . . . . . . . . . . . . . . . . . . . . . . . . . . . . . 193
Off-Pavement Driving (Off-Road) . . . . . . . . . . 300,420
Off-Road Driving (Off-Pavement) . . . . . . . . . . 300,420
Oil Change Indicator . . . . . . . . . . . . . . . . . . . . . 201
Oil Change Indicator, Reset . . . . . . . . . . . . . . . . . 201
Oil, Engine . . . . . . . . . . . . . . . . . . . . . . . . . . . . 394
Capacity . . . . . . . . . . . . . . . . . . . . . . . . . . . . 440
Change Interval . . . . . . . . . . . . . . . . . . . . . . . 395
Dipstick . . . . . . . . . . . . . . . . . . . . . . . . . . . . . 394
Disposal . . . . . . . . . . . . . . . . . . . . . . . . . . . . 397
Filter . . . . . . . . . . . . . . . . . . . . . . . . . . . . . . . 397
Filter Disposal . . . . . . . . . . . . . . . . . . . . . . . . 39710
482 INDEX
Identification Logo . . . . . . . . . . . . . . . . . . . . . 395
Materials Added to . . . . . . . . . . . . . . . . . . . . . 397
Pressure Warning Light . . . . . . . . . . . . . . . . . . 190
Recommendation . . . . . . . . . . . . . . . . . . . 395,440
Synthetic . . . . . . . . . . . . . . . . . . . . . . . . . . . . 397
Viscosity . . . . . . . . . . . . . . . . . . . . . . . . . . 396,440
Onboard Diagnostic System . . . . . . . . . . . . . . 390,391
Opener, Garage Door (HomeLinkt) . . . . . . . . . . . 158
Outside Rearview Mirrors . . . . . . . . . . . . . . . . . . 78
Overdrive . . . . . . . . . . . . . . . . . . . . . . . . . . . . . 288
Overdrive OFF Switch . . . . . . . . . . . . . . . . . . . . 288
Overhead Console . . . . . . . . . . . . . . . . . . . . . . . 157
Overheating, Engine . . . . . . . . . . . . . . . . . . . 193,371
Owner’s Manual (Operator Manual) . . . . . . . . . . 464Paint Care . . . . . . . . . . . . . . . . . . . . . . . . . . . . . 421
Paint Damage . . . . . . . . . . . . . . . . . . . . . . . . . . 421
Panic Alarm . . . . . . . . . . . . . . . . . . . . . . . . . . . . 24
Park Sense System, Rear . . . . . . . . . . . . . . . . . . . 152Parking Brake . . . . . . . . . . . . . . . . . . . . . . . . . . 304
Passing Light . . . . . . . . . . . . . . . . . . . . . . . . . . . 128
Pedals, Adjustable . . . . . . . . . . . . . . . . . . . . . . . 134
Personal Settings . . . . . . . . . . . . . . . . . . . . . . . . 206
Pets . . . . . . . . . . . . . . . . . . . . . . . . . . . . . . . . . . 67
Pets, Transporting . . . . . . . . . . . . . . . . . . . . . . . . 67
. . . . . . . . . . . . . . . . . . . . . . . . . . 81
Phone, Cellular Phone, Hands-Free (UConnect™) . . . . . . . . . . . . . 81
Placard, Tire and Loading Information . . . . . . . . . 314
Polishing and Waxing . . . . . . . . . . . . . . . . . . . . . 422
PortUniversal Serial Bus (USB) . . . . . . . . . . . . . . . . 241
USB . . . . . . . . . . . . . . . . . . . . . . . . . . . . . . . . 241Power
. . . . . . . . . . . . . . . 429
Distribution Center (Fuses) Door Locks . . . . . . . . . . . . . . . . . . . . . . . . . . . 28
Inverter . . . . . . . . . . . . . . . . . . . . . . . . . . . . . 169
Mirrors . . . . . . . . . . . . . . . . . . . . . . . . . . . . . . 79
Outlet (Auxiliary Electrical Outlet) . . . . . . . . . . 168INDEX 483
Seats . . . . . . . . . . . . . . . . . . . . . . . . . . . . 110,111
Steering . . . . . . . . . . . . . . . . . . . . . . . . . . 308,403
Sunroof . . . . . . . . . . . . . . . . . . . . . . . . . . . . . 165
Windows . . . . . . . . . . . . . . . . . . . . . . . . . . . . . 31
Pregnant Women and Seat Belts . . . . . . . . . . . . . . 45
Preparation for Jacking . . . . . . . . . . . . . . . . . . . . 374
PretensionersSeat Belts . . . . . . . . . . . . . . . . . . . . . . . . . . . . . 43
Programmable Electronic Features . . . . . . . . . . . . 206
Programming Transmitters (Remote Keyless Entry) . . . . . . . . . . . . . . . . . . . . . . . . . . . . . . . . . 21Quadra-Trac
. . . . . . . . . . . . . . . . . . . . . . . . . . . 293
Radial Ply Tires . . . . . . . . . . . . . . . . . . . . . . . . . 321
Radio Broadcast Signals . . . . . . . . . . . . . . . . . . . 212
Radio, Navigation . . . . . . . . . . . . . . . . . . . . . . . 244
Radio Operation . . . . . . . . . . . . . . . . . . . . . . 241,258
Radio, Satellite . . . . . . . . . . . . . . . . . . . . 241,244,250Radio (Sound Systems) . . . . . . . . . . . . . . . . . . . . 241
Rain Sensitive Wiper System . . . . . . . . . . . . . . . . 131
Rear Axle (Differential) . . . . . . . . . . . . . . . . . . . . 415
Rear Camera . . . . . . . . . . . . . . . . . . . . . . . . . . . 156
Rear Cup Holder . . . . . . . . . . . . . . . . . . . . . . . . 171
Rear Heated Seats . . . . . . . . . . . . . . . . . . . . . . . 113
Rear Park Sense System . . . . . . . . . . . . . . . . . . . 152
Rear Seat, Folding . . . . . . . . . . . . . . . . . . . . . . . 115
Rear Window Defroster . . . . . . . . . . . . . . . . . . . 178
Rear Window Features . . . . . . . . . . . . . . . . . . . . 177
Rear Wiper/Washer . . . . . . . . . . . . . . . . . . . . . . 177
Rearview Mirrors . . . . . . . . . . . . . . . . . . . . . . . . 77
Reclining Front Seats . . . . . . . . . . . . . . . . . . . . . 108
Recorder, Event Data . . . . . . . . . . . . . . . . . . . . . . 56
Recreational Towing . . . . . . . . . . . . . . . . . . . . . . 364
. . . . . . . 365
. . . . . 367
Reformulated Gasoline . . . . . . . . . . . . . . . . . . . . 337
Refrigerant . . . . . . . . . . . . . . . . . . . . . . . . . . . . 403Shifting into Transfer Case Neutral (N) Shifting out of Transfer Case Neutral (N)
10
484 INDEX
Reminder, Lights On . . . . . . . . . . . . . . . . . . . . . 127
Reminder, Seat Belt . . . . . . . . . . . . . . . . . . . . . . . 43
Remote Keyless Entry (RKE) . . . . . . . . . . . . . . . . . 21
Remote Sound System (Radio) Controls . . . . . . . . 256
Remote Starting System . . . . . . . . . . . . . . . . . . . . 26
Replacement Bulbs . . . . . . . . . . . . . . . . . . . . . . . 434
Replacement Keys . . . . . . . . . . . . . . . . . . . . . . . . 18
Replacement Tires . . . . . . . . . . . . . . . . . . . . . . . 323
Reporting Safety Defects . . . . . . . . . . . . . . . . . . . 463
Restraints, Child . . . . . . . . . . . . . . . . . . . . . . . . . 58
Restraints, Occupant . . . . . . . . . . . . . . . . . . . . . . 36
Retractable Cargo Area Cover . . . . . . . . . . . . . . . 173
Rocking Vehicle When Stuck . . . . . . . . . . . . . . . . 292
Roll Over Warning . . . . . . . . . . . . . . . . . . . . . . . . 5
Roof Type Carrier . . . . . . . . . . . . . . . . . . . . . . . 179
Rotation, Tires . . . . . . . . . . . . . . . . . . . . . . . . . . 325Safety Checks Inside Vehicle . . . . . . . . . . . . . . . . . 69
Safety Checks Outside Vehicle . . . . . . . . . . . . . . . 70Safety Defects, Reporting . . . . . . . . . . . . . . . . . . 463
Safety Information, Tire . . . . . . . . . . . . . . . . . . . 310
Safety Tips . . . . . . . . . . . . . . . . . . . . . . . . . . . . . 69
Satellite Radio . . . . . . . . . . . . . . . . . . . . 241,244,250
Satellite Radio Antenna . . . . . . . . . . . . . . . . . . . 251
Schedule, Maintenance . . . . . . . . . . . . . . . . . 444,449
. . . . . . . . . . . . . . . . . . . . . 69
Seat Belt Maintenance Seat Belt Reminder . . . . . . . . . . . . . . . . . . . . . . . 43
. . . . . . . . . . . . . . . . . . . . . . . . . . . . . . 37
Seat Belts Adjustable Upper Shoulder Anchorage . . . . . . . . 41
And Pregnant Women . . . . . . . . . . . . . . . . . . . 45
Child Restraint . . . . . . . . . . . . . . . . . . . . . . . 58,65
. . . . . . . . . . . . . . . . . . . . . . . . . . . . . 45
Extender Front Seat . . . . . . . . . . . . . . . . . . . . . . . . . . . . 37
Inspection . . . . . . . . . . . . . . . . . . . . . . . . . . . . 69
Maintenance . . . . . . . . . . . . . . . . . . . . . . . . 69,426
Pretensioners . . . . . . . . . . . . . . . . . . . . . . . . . . 43
Reminder . . . . . . . . . . . . . . . . . . . . . . . . . . . . 194
Shoulder Belt Anchorage . . . . . . . . . . . . . . . . . . 41Seats . . . . . . . . . . . . . . . . . . . . . . . . . . . . . . . . . 108
. . . . . . . . . . . . . . . . . . . . . . . . . . 108
Adjustment Cleaning . . . . . . . . . . . . . . . . . . . . . . . . . 423,424
Easy Entry . . . . . . . . . . . . . . . . . . . . . . . . . . . 121
Head Restraints . . . . . . . . . . . . . . . . . . . . . . . 111
Heated . . . . . . . . . . . . . . . . . . . . . . . . . . . 111,113
Lumbar Support . . . . . . . . . . . . . . . . . . . . . . . 110
Memory . . . . . . . . . . . . . . . . . . . . . . . . . . . . . 118
Power . . . . . . . . . . . . . . . . . . . . . . . . . . . . 110,111
Rear Folding . . . . . . . . . . . . . . . . . . . . . . . . . 115
Reclining . . . . . . . . . . . . . . . . . . . . . . . . . . . . 108
. . . . . . . . . . . . . 20,190
Security Alarm (Theft Alarm) . . . . . . . . . . . . . . . . . . . . . . . . . 395
Selection of Oil Sentry Key (Immobilizer) . . . . . . . . . . . . . . . . . . . 17
Sentry Key Programming . . . . . . . . . . . . . . . . . . . 19
Sentry Key Replacement . . . . . . . . . . . . . . . . . . . 18
Service Assistance . . . . . . . . . . . . . . . . . . . . . . . 460
Service Contract . . . . . . . . . . . . . . . . . . . . . . . . . 462INDEX 485
Service Engine Soon Light (Malfunction . . . . . . . . . . . . . . . . . . . . . . . . . . . . . 188
Indicator) Service Manuals . . . . . . . . . . . . . . . . . . . . . . . . 464
Setting the Clock . . . . . . . . . . . . . . . . 215,230,242,244
Settings, Personal . . . . . . . . . . . . . . . . . . . . . . . . 206
Shift Lock Manual Override . . . . . . . . . . . . . . . . 284
Shifting . . . . . . . . . . . . . . . . . . . . . . . . . . . . . . . 284
Automatic Transmission . . . . . . . . . . . . . . . . . 284
Shoulder Belts . . . . . . . . . . . . . . . . . . . . . . . . . . . 37
Signals, Turn . . . . . . . . . . . . . . . . . . . 128,188,437,438
. . . . . . . . . . . . . . . . . . . . . . . . . . . 125
SmartBeams Snow Chains (Tire Chains) . . . . . . . . . . . . . . . . . 325
Snow Plow . . . . . . . . . . . . . . . . . . . . . . . . . . . . 368
Sound Systems (Radio) . . . . . . . . . . . . . . . . . . . . 241
Spare Tire . . . . . . . . . . . . . . . . . . . . . . . . . . . . . 373
Spark Plug Wires (Ignition Cables/Wires) . . . . . . 398
Spark Plugs . . . . . . . . . . . . . . . . . . . . . . . . . . . . 398
SpecificationsFuel (Gasoline)
. . . . . . . . . . . . . . . . . . . . . . . . 336
10
486 INDEX
Oil
. . . . . . . . . . . . . . . . . . . . . . . . . . . . . . . . 395
. . . . . . . . . . . . . . 135
Speed Control (Cruise Control) Speedometer . . . . . . . . . . . . . . . . . . . . . . . . . . . 188
Starting . . . . . . . . . . . . . . . . . . . . . . . . . . . . . . . 275
Automatic Transmission . . . . . . . . . . . . . . . . . 275
. . . . . . . . . . . . . . . . . . . . . . 276,283
Cold Weather . . . . . . . . . . . . . . . . . . . . 283
Engine Block Heater Engine Fails to Start . . . . . . . . . . . . . . . . . . . . 277
Remote . . . . . . . . . . . . . . . . . . . . . . . . . . . . . . 26Steering Power . . . . . . . . . . . . . . . . . . . . . . . . . . . 308,403
Tilt Column . . . . . . . . . . . . . . . . . . . . . . . . . . 133
. . . . . . . . . . . . . . . . . . . . . . . . . . . 133
Wheel, TiltSteering Wheel Mounted Sound System Controls . . . . . . . . . . . . . . . . . . . . . . . . . . . . . . 256
Storage . . . . . . . . . . . . . . . . . . . . . . . . . . . . . . . 433
Storage, Behind the Seat . . . . . . . . . . . . . . . . . . . 172
Storage Bin . . . . . . . . . . . . . . . . . . . . . . . . . . . . 172
Storage Compartment, Center Seat . . . . . . . . . . . . 117Storage, Vehicle . . . . . . . . . . . . . . . . . . . . . . 269,433
Storing Your Vehicle . . . . . . . . . . . . . . . . . . . . . . 433
Sun Roof . . . . . . . . . . . . . . . . . . . . . . . . . . . . . . 165
Sun Visor Extension . . . . . . . . . . . . . . . . . . . . . . . 81
Sunglasses Storage . . . . . . . . . . . . . . . . . . . . . . . 158
Supplemental Restraint System - Airbag . . . . . . . . 46
Sway Control, Trailer . . . . . . . . . . . . . . . . . . . . . 146
Synthetic Engine Oil . . . . . . . . . . . . . . . . . . . . . . 397
System, Navigation . . . . . . . . . . . . . . . . . . . . . . 244
System, Remote Starting . . . . . . . . . . . . . . . . . . . . 26. . . . . . . . . . . . . . . . . . . . . . . . . . . . 190
Tachometer Telescoping Steering Column . . . . . . . . . . . . . . . 133
Temperature Control, Automatic (ATC) . . . . . . . . 261
. . . . . . . . . . 192
Temperature Gauge, Engine Coolant Tether Anchor, Child Restraint . . . . . . . . . . . . . . . 62
Tie Down Hooks, Cargo . . . . . . . . . . . . . . . . . . . 174
Tilt Steering Column . . . . . . . . . . . . . . . . . . . . . 133
Time Delay, Headlight . . . . . . . . . . . . . . . . . . . . 128INDEX 487
Tip Start . . . . . . . . . . . . . . . . . . . . . . . . . . . . . . 280
Tire and Loading Information Placard . . . . . . . . . 314
Tire Identification Number (TIN) . . . . . . . . . . . . . 313
Tire Markings . . . . . . . . . . . . . . . . . . . . . . . . . . 310
Tire Safety Information . . . . . . . . . . . . . . . . . . . . 310
Tires . . . . . . . . . . . . . . . . . . . . . . . . . . . . 70,318,466
Air Pressure . . . . . . . . . . . . . . . . . . . . . . . . . . 319
Alignment and Balance . . . . . . . . . . . . . . . . . . 324
Chains . . . . . . . . . . . . . . . . . . . . . . . . . . . . . . 325
Changing . . . . . . . . . . . . . . . . . . . . . . . . . . . . 372
General Information . . . . . . . . . . . . . . . . . . . . 318
High Speed . . . . . . . . . . . . . . . . . . . . . . . . . . 321
Inflation Pressures . . . . . . . . . . . . . . . . . . . . . 319
Jacking . . . . . . . . . . . . . . . . . . . . . . . . . . . . . 372
Life of Tires . . . . . . . . . . . . . . . . . . . . . . . . . . 323
Load Capacity . . . . . . . . . . . . . . . . . . . . . 314,315
Pressure Monitor System (TPMS) . . . . . . . . . . . 326
Pressure Warning Light . . . . . . . . . . . . . . . . . . 191
Quality Grading . . . . . . . . . . . . . . . . . . . . . . . 466. . . . . . . . . . . . . . . . . . . . . . . . . . . . . . 321
Radial Replacement . . . . . . . . . . . . . . . . . . . . . . . . . 323
Rotation . . . . . . . . . . . . . . . . . . . . . . . . . . . . . 325
Safety . . . . . . . . . . . . . . . . . . . . . . . . . . . . 70,310
. . . . . . . . . . . . . . . . . . . . . . . . . . . . . . . 311
Sizes Spare Tire . . . . . . . . . . . . . . . . . . . . . . . . . . . 373
Spinning . . . . . . . . . . . . . . . . . . . . . . . . . . . . 321
Tread Wear Indicators . . . . . . . . . . . . . . . . . . . 322
Wheel Mounting . . . . . . . . . . . . . . . . . . . . . . . 377
Tongue Weight/Trailer Weight . . . . . . . . . . . . . . 357
Torque Converter Clutch . . . . . . . . . . . . . . . . . . 291
Tow Hooks, Emergency . . . . . . . . . . . . . . . . . . . 381
Tow/Haul Indicator Light . . . . . . . . . . . . . . . . . 193
Towing . . . . . . . . . . . . . . . . . . . . . . . . . . . . 351,382
Disabled Vehicle . . . . . . . . . . . . . . . . . . . . . . . 382
Guide . . . . . . . . . . . . . . . . . . . . . . . . . . . . . . 355
Recreational . . . . . . . . . . . . . . . . . . . . . . . . . . 364
Weight . . . . . . . . . . . . . . . . . . . . . . . . . . . . . . 355
Traction Control . . . . . . . . . . . . . . . . . . . . . . . . . 13910
488 INDEX
. . . . . . . . . . . . . . . . . . . . 190
Traction Control Light Trailer Sway Control (TSC) . . . . . . . . . . . . . . . . . 146
Trailer Towing . . . . . . . . . . . . . . . . . . . . . . . . . . 351
Cooling System Tips . . . . . . . . . . . . . . . . . . . . 363
. . . . . . . . . . . . . . . . . . . . . . . . . . . . . 354
Hitches Minimum Requirements . . . . . . . . . . . . . . . . . 358
Trailer and Tongue Weight . . . . . . . . . . . . . . . . 357
Wiring . . . . . . . . . . . . . . . . . . . . . . . . . . . . . . 361
Trailer Towing Guide . . . . . . . . . . . . . . . . . . . . . 355
Trailer Weight . . . . . . . . . . . . . . . . . . . . . . . . . . 355
Transfer Case . . . . . . . . . . . . . . . . . . . . . . . . . . . 416
Maintenance . . . . . . . . . . . . . . . . . . . . . . . . . . 416Transmission Automatic . . . . . . . . . . . . . . . . . . . . . . . . 285,417
Maintenance . . . . . . . . . . . . . . . . . . . . . . . . . . 417
Range Indicator . . . . . . . . . . . . . . . . . . . . . . . 195
Shifting . . . . . . . . . . . . . . . . . . . . . . . . . . . . . 284Transmitter Battery Service (Remote Keyless Entry) . . . . . . . . . . . . . . . . . . . . . . . . . . . . . . . . . 25
Transmitter, Garage Door Opener (HomeLinkt) Transmitter Programming (Remote Keyless Entry) . . . . . . . . . . . . . . . . . . . . . . . . . . . . . . . . . 21
Transmitter, Remote Keyless Entry (RKE) . . . . . . . . 21
Tread Wear Indicators . . . . . . . . . . . . . . . . . . . . 322
Turn Signals . . . . . . . . . . . . . . . . . . . 128,188,437,438. . 158
. . . . . . . . . . . . . . . . . . . . . . . . . 246
UCI Connector UConnect™ (Hands-Free Phone) . . . . . . . . . . . . . . 81
Underhood Fuses . . . . . . . . . . . . . . . . . . . . . 429,432
Uniform Tire Quality Grades . . . . . . . . . . . . . . . . 466
Universal Consumer Interface (UCI) Connector . . . 246
Universal Serial Bus (USB) Port . . . . . . . . . . . . . . 241
Universal Transmitter . . . . . . . . . . . . . . . . . . . . . 158
Upholstery Care . . . . . . . . . . . . . . . . . . . . . . . . 424
USB Port . . . . . . . . . . . . . . . . . . . . . . . . . . . . . . 241Vacuum/Vapor Harnesses . . . . . . . . . . . . . . . . . 412
Vanity Mirrors . . . . . . . . . . . . . . . . . . . . . . . . . . . 80Variance, Compass . . . . . . . . . . . . . . . . . . . . . . . 205
Vehicle Identification Number (VIN) . . . . . . . . . . . . 8
Vehicle Loading . . . . . . . . . . . . . . . . . . . . . . 315,348
Vehicle Modifications/Alterations . . . . . . . . . . . . . . 9
Vehicle Storage . . . . . . . . . . . . . . . . . . . . . . . 269,433
Video Entertainment System (Rear Seat Video System) . . . . . . . . . . . . . . . . . . . . . . . . . . . . . . . 254
Viscosity, Engine Oil . . . . . . . . . . . . . . . . . . . . . . 396Warning Flasher, Hazard . . . . . . . . . . . . . . . . . . 370
Warning, Roll Over . . . . . . . . . . . . . . . . . . . . . . . . 5
Warnings and Cautions . . . . . . . . . . . . . . . . . . . . . 8
Warranty Information . . . . . . . . . . . . . . . . . . . . . 463
Washer, Adding Fluid . . . . . . . . . . . . . . . . . . . . . 178
Washers, Windshield . . . . . . . . . . . . . . . . . . 129,405
Washing Vehicle . . . . . . . . . . . . . . . . . . . . . . . . . 422
Waxing and Polishing . . . . . . . . . . . . . . . . . . . . . 422
Wheel Alignment and Balance . . . . . . . . . . . . . . . 324INDEX 489
Wheel and Wheel Trim . . . . . . . . . . . . . . . . . . . . 423
Wheel and Wheel Trim Care . . . . . . . . . . . . . . . . 423
Wheel Mounting . . . . . . . . . . . . . . . . . . . . . . . . 377
Wind Buffeting . . . . . . . . . . . . . . . . . . . . . . . 33,167
Window Fogging . . . . . . . . . . . . . . . . . . . . . . . . 268
Windows . . . . . . . . . . . . . . . . . . . . . . . . . . . . . . 31
Power . . . . . . . . . . . . . . . . . . . . . . . . . . . . . . . 31
. . . . . . . . . . . . . . . . 70,259,266
Windshield Defroster Windshield Washers . . . . . . . . . . . . . . . . . . . . . . 129
Fluid . . . . . . . . . . . . . . . . . . . . . . . . . . . . . . . 405
Windshield Wiper Blades . . . . . . . . . . . . . . . . . . 405
Windshield Wipers . . . . . . . . . . . . . . . . . . . . . . . 129
. . . . . . . . . . . . . . . . . . . . . . 131
Wipers, Intermittent . . . . . . . . . . . . . . . . . . . . 131
Wipers, Rain Sensitive Wiring, Ignition (Spark Plug Wires) . . . . . . . . . . . 398YES Essentialst Fabric Cleaning Procedure . . . . . . 423
10
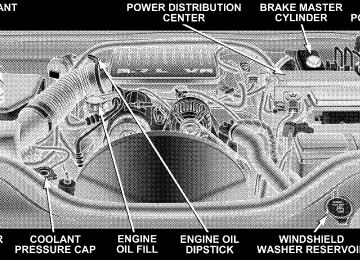
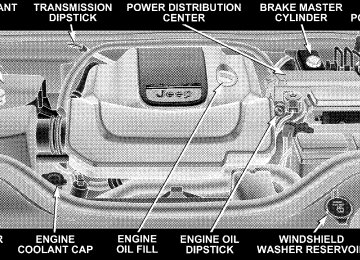
INTRODUCTION INTRODUCTION ROLLOVER WARNING HOW TO USE THIS MANUAL WARNINGS AND CAUTIONS VEHICLE IDENTIFICATION NUMBER VEHICLE MODIFICATIONS/ALTERATIONS THINGS TO KNOW BEFORE STARTING YOUR VEHICLE A WORD ABOUT YOUR KEYS Wireless Ignition Node (WIN)Fob with Integrated Key (FOBIK)Ignition Key RemovalKey-In-Ignition ReminderSENTRY KEY Replacement KeysCustomer Key (Fob) ProgrammingGeneral InformationSECURITY ALARM SYSTEM - IF EQUIPPED To Set the AlarmTo Disarm the SystemILLUMINATED ENTRY REMOTE KEYLESS ENTRY To Unlock the DoorsTo Lock the DoorsTo Release the Liftgate Flipper GlassUsing The Panic AlarmProgramming Additional TransmittersTransmitter Battery ServiceGeneral Information REMOTE STARTING SYSTEM - IF EQUIPPED DOOR LOCKS Manual Door LocksPower Door LocksChild Protection Door LockWINDOWS Power WindowsWind BuffetingLIFTGATE Liftgate Flipper GlassOCCUPANT RESTRAINTS Lap/Shoulder BeltsLap/Shoulder Belt Operating InstructionsAdjustable Upper Shoulder Belt AnchorageAutomatic Locking Mode - If EquippedEnergy Management FeatureSeat Belt PretensionersEnhanced Seat Belt Use Reminder System (BeltAlert)Seat Belts and Pregnant WomenSeat Belt ExtenderDriver And Front Passenger Supplemental Restraint Systems (SRS) Child RestraintENGINE BREAK-IN RECOMMENDATIONS SAFETY TIPS Exhaust GasSafety Checks You Should Make Inside The VehicleSafety Checks You Should Make Outside The VehicleUNDERSTANDING THE FEATURES OF YOUR VEHICLE MIRRORS Inside Day/Night MirrorAutomatic Dimming Mirror - If EquippedOutside MirrorsExterior Mirrors Folding FeatureDrivers and Front Passenger Outside Automatic Dimming Mirror - If EquippedPower Remote Control Mirrors - If EquippedHeated Remote Control Mirrors - If EquippedLighted Vanity Mirrors - If EquippedHANDS-FREE COMMUNICATION (UConnect) - IF EQUIPPED OperationPhone Call FeaturesUConnect System FeaturesAdvanced Phone ConnectivityThings You Should Know About Your UConnect SystemGeneral InformationSEATS Front Manual Seat AdjustmentFront Seat Adjustment - ReclineManual Lumbar Support Adjustment8 - Way Drivers Power Seat4 - Way Passengers Power Seat - If EquippedHead RestraintsFront Heated Seats-If EquippedRear Heated Seats - If Equipped60/40 Split Rear SeatDRIVER MEMORY SEAT - IF EQUIPPED Setting Memory Positions and Linking Remote Keyless Entry Transmitter to MemoryMemory Position RecallTo Disable A Transmitter Linked to MemoryEasy Entry/Exit SeatTO OPEN AND CLOSE THE HOOD LIGHTS Multi-Function Control LeverBattery Saver Feature-Exterior/Interior LightsHeadlights and Parking LightsAutomatic Headlight System - If EquippedSmartBeams - If EquippedInstrument Panel and Interior LightsDaytime Running Lights - If EquippedAutomatic Headlight Leveling - HID Headlights OnlyLights-On ReminderFog Lights - If EquippedTurn SignalsHigh Beam SwitchPassing LightHeadlight Time DelayInterior LightsFront Map/Reading LightsWINDSHIELD WIPERS AND WASHERS MistSpeed Sensitive Intermittent Wiper SystemRain Sensing Wipers-If EquippedTILT/TELESCOPING STEERING COLUMN ADJUSTABLE PEDALS - IF EQUIPPED ELECTRONIC SPEED CONTROL - IF EQUIPPED Electronic Speed Control OperationTo ActivateTo Set At A Desired SpeedTo DeactivateTo Resume SpeedTo Vary The Speed SettingTo Accelerate For PassingELECTRONIC BRAKE CONTROL SYSTEM ABS (Anti-Lock Brake System)TCS (Traction Control System)BAS (Brake Assist System)ERM (Electronic Roll Mitigation)ESP (Electronic Stability Program)TSC (Trailer Sway Control)HSA (Hill Start Assist) (4WD Models with NV245 Two-Speed Transfer Case Only)HDC (Hill Descent Control) (4WD Models with NV245 Two-Speed Transfer Case Only)ESP/BAS Warning Lamp and ESP/TCS Indicator LightREAR PARK ASSIST SYSTEM- IF EQUIPPED Rear Park Assist SensorsRear Park Assist Warning DisplayEnable/Disable the Rear Park Assist SystemService the Rear Park Assist SystemCleaning the Rear Park Assist SystemREAR CAMERA - IF EQUIPPED Turning the Rear Camera OnTurning the Rear Camera OffOVERHEAD CONSOLE Courtesy/Reading LightsSunglasses StorageGARAGE DOOR OPENER - IF EQUIPPED Programming HomeLinkGate Operator/Canadian ProgrammingUsing HomeLinkReprogramming a Single HomeLink ButtonSecurityTroubleshooting TipsGeneral InformationPOWER SUNROOF - IF EQUIPPED Opening Sunroof - ExpressClosing Sunroof - ExpressPinch Protect FeaturePinch Protect OverrideVenting Sunroof - ExpressSunshade OperationWind BuffetingSunroof Maintenance Ignition Off OperationSunroof Fully ClosedPOWER OUTLETS Front Power OutletRear Power Outlet - If EquippedPOWER INVERTER - IF EQUIPPED CUP HOLDERS CARGO AREA FEATURES Cargo LightRear Storage CompartmentRetractable Cargo Area Cover - If EquippedCargo Tie-Down HooksCargo Load FloorREAR WINDOW FEATURES Rear Window Wiper/Washer - If EquippedRear Window Defroster - If EquippedROOF LUGGAGE RACK - IF EQUIPPED UNDERSTANDING YOUR INSTRUMENT PANEL INSTRUMENT PANEL AND CONTROLS INSTRUMENT CLUSTER Gasoline Engine Diesel Engine INSTRUMENT CLUSTER DESCRIPTION ELECTRONIC VEHICLE INFORMATION CENTER (EVIC) Electronic Vehicle Information Center (EVIC) DisplaysEngine Oil Change Indicator System Trip FunctionsCompass DisplayPersonal Settings (Customer Programmable Features)System StatusRADIO GENERAL INFORMATION Radio Broadcast SignalsTwo Types of SignalsElectrical DisturbancesAM ReceptionFM ReceptionSALES CODE REQ - AM/FM STEREO RADIO AND 6-DISC CD/DVD CHANGER (MP3/WMA AUX JACK) Operating Instructions - Radio ModeOperation Instructions - (DISC MODE for CD and MP3/WMA Audio Play, DVD-VIDEO)Notes On Playing MP3/WMA FilesLIST Button (DISC Mode for MP3/WMA Play) INFO Button (DISC Mode for MP3/WMA Play)SALES CODE RES - AM/FM STEREO RADIO WITH CD PLAYER (MP3 AUX JACK) Operating Instructions - Radio ModeOperation Instructions - CD MODE for CD and MP3 Audio PlayNotes On Playing MP3 FilesLIST Button (CD Mode for MP3 Play)INFO Button (CD Mode for MP3 Play)SALES CODE REN - MULTIMEDIA SYSTEM - IF EQUIPPED Operating Instructions - Satellite Radio (If Equipped)Operating Instructions - Hands-Free Communication (UConnect) (If Equipped)Clock Setting ProcedureSALES CODE RER - AM/FM/CD/DVD RADIO WITH NAVIGATION SYSTEM - IF EQUIPPED Operating Instructions - Satellite RadioClock Setting ProcedureUNIVERSAL CONSUMER INTERFACE (UCI) - IF EQUIPPED Connecting the iPodControlling the iPod using Radio ButtonsPlay ModeList or Browse ModeSATELLITE RADIO (RSC) - IF EQUIPPED (REQ AND RES RADIOS ONLY) System ActivationElectronic Serial Number/Sirius Identification Number (ENS/SID)Selecting Satellite ModeSatellite AntennaReception Quality Operating Instructions - Satellite ModeOperating Instructions - Hands Free Phone (If Equipped)Operating Instructions - Video Entertainment System (VES) (If Equipped)VIDEO ENTERTAINMENT SYSTEM (SALES CODE XRV) - IF EQUIPPED REMOTE SOUND SYSTEM CONTROLS - IF EQUIPPED Radio OperationCD PlayerCD/DVD DISC MAINTENANCE RADIO OPERATION AND CELLULAR PHONES CLIMATE CONTROLS Manual Air Conditioning and Heating System - If EquippedAutomatic Temperature Control - If EquippedOperating TipsOperating Tips Chart STARTING AND OPERATING STARTING PROCEDURE Normal Starting - Gasoline EnginesExtremely Cold Weather (below -20 degrees F or -29 degrees C)If Engine Fails to StartAfter StartingNormal Starting - Diesel EnginesENGINE BLOCK HEATER - IF EQUIPPED AUTOMATIC TRANSMISSION Shift Lock Manual Override - If EquippedBrake/Transmission Interlock System5-Speed Automatic TransmissionGear RangesRocking the VehicleFOUR-WHEEL DRIVE OPERATION Quadra-Trac I Operating Instructions/Precautions - If EquippedQuadra-Trac II Operating Instructions/Precautions - If EquippedShift PositionsShifting ProceduresQuadra-Drive II System - If EquippedON-ROAD DRIVING TIPS OFF-ROAD DRIVING TIPS When To Use 4WD LOW Range - If Equipped Driving Through WaterDriving In Snow, Mud and SandHill ClimbingTraction DownhillAfter Driving Off-RoadPARKING BRAKE ANTI-LOCK BRAKE SYSTEM POWER STEERING MULTI DISPLACEMENT SYSTEM (MDS) - 5.7L Engine Only TIRE SAFETY INFORMATION Tire Markings Tire Identification Number (TIN)Tire Loading and Tire PressureTIRES - GENERAL INFORMATION Tire PressureTire Inflation PressuresTire Pressures for High Speed OperationRadial-Ply TiresTire SpinningTread Wear IndicatorsLife of TireReplacement Tires Alignment and BalanceTIRE CHAINS TIRE ROTATION RECOMMENDATIONS TIRE PRESSURE MONITOR SYSTEM (TPMS) Base System - If EquippedPremium System - If EquippedGeneral InformationFUEL REQUIREMENTS 3.7/4.7L Engines (If Equipped)5.7L Engines (If Equipped)Reformulated GasolineGasoline/Oxygenate BlendsMMT In GasolineMaterials Added To FuelFuel System CautionsCarbon Monoxide WarningsFLEXIBLE FUEL (4.7L ENGINE ONLY) - IF EQUIPPED E-85 General InformationETHANOL FUEL (E-85)Fuel RequirementsSelection Of Engine Oil For Flexible Fuel Vehicles (E-85) and Gasoline VehiclesStartingCruising RangeReplacement PartsFUEL REQUIREMENTS (DIESEL ENGINES) ADDING FUEL Fuel Filler Cap (Gas Cap)VEHICLE LOADING Certification LabelTRAILER TOWING Common Towing DefinitionsTrailer Hitch ClassificationTrailer Towing Weights (Maximum Trailer Weight Ratings)Trailer and Tongue WeightTowing RequirementsTowing TipsRECREATIONAL TOWING (BEHIND MOTORHOME, ETC.) Towing - 2WD ModelsTowing - Quadra-Trac I (Single-Speed Transfer Case) 4WD ModelsTowing - Quadra-Trac II /Quadra-Drive II 4WD ModelsSNOW PLOW WHAT TO DO IN EMERGENCIES HAZARD WARNING FLASHERS IF YOUR ENGINE OVERHEATS JACKING AND TIRE CHANGING Jack LocationSpare Tire StowageSpare Tire RemovalPreparations For JackingJacking InstructionsJUMP STARTING EMERGENCY TOW HOOKS - IF EQUIPPED TOWING A DISABLED VEHICLE 2WD Models Only4WD Models OnlyMAINTAINING YOUR VEHICLE ENGINE COMPARTMENT - 3.7L ENGINE COMPARTMENT - 4.7L ENGINE COMPARTMENT - 5.7L ENGINE COMPARTMENT - 3.0L DIESEL ONBOARD DIAGNOSTIC SYSTEM - OBD II Loose Fuel Filler Cap MessageEMISSIONS INSPECTION AND MAINTENANCE PROGRAMS REPLACEMENT PARTS DEALER SERVICE MAINTENANCE PROCEDURES Engine OilDrive Belts - Check Condition and TensionSpark PlugsSpark Plug WiresEngine Air Cleaner FilterCatalytic ConverterCrankcase Emission Control SystemMaintenance-Free BatteryAir Conditioner MaintenancePower Steering Fluid CheckBody LubricationWindshield Wiper BladesWindshield Washers - Front and RearExhaust SystemCooling SystemHoses and Vacuum/Vapor HarnessesFuel System ConnectionsBrake SystemFront/Rear Axle FluidTransfer CaseAutomatic TransmissionMaintenance After Off-Road DrivingAppearance Care And Protection From CorrosionFUSE PANEL Interior FusesUnderhood Fuses (Power Distribution Center) Underhood Fuses (Integrated Power Module) VEHICLE STORAGE REPLACEMENT BULBS BULB REPLACEMENT High Intensity Discharge Headlights (HID) - If EquippedHead LightFront Turn SignalFront Fog LightRear Tail, Stop, Turn Signal, and Back-Up LightsCenter High Mounted Stop Light (CHMSL)FLUIDS AND CAPACITIES FLUIDS, LUBRICANTS, AND GENUINE PARTS EngineChassisMAINTENANCE SCHEDULES EMISSION CONTROL SYSTEM MAINTENANCE MAINTENANCE SCHEDULE - GASOLINE ENGINES Required Maintenance IntervalsMAINTENANCE SCHEDULES - DIESEL ENGINE Schedule B - Diesel EngineSchedule A - Diesel EngineIF YOU NEED CONSUMER ASSISTANCE SUGGESTIONS FOR OBTAINING SERVICE FOR YOUR VEHICLE Prepare For The AppointmentPrepare A ListBe Reasonable With RequestsIF YOU NEED ASSISTANCE WARRANTY INFORMATION (U.S. Vehicles Only) MOPAR PARTS REPORTING SAFETY DEFECTS In CanadaPUBLICATION ORDER FORMS DEPARTMENT OF TRANSPORTATION UNIFORM TIRE QUALITY GRADES TreadwearTraction GradesTemperature GradesINDEX
SECTION
TABLE OF CONTENTS
PAGE
INTRODUCTION . . . . . . . . . . . . . . . . . . . . . . . . . . . . . . . . . . . . . . . . . . . . . . . . . . . . . . . . . . . . . 3
THINGS TO KNOW BEFORE STARTING YOUR VEHICLE . . . . . . . . . . . . . . . . . . . . . . . . . . . . . . 11
UNDERSTANDING THE FEATURES OF YOUR VEHICLE . . . . . . . . . . . . . . . . . . . . . . . . . . . . . . .71
UNDERSTANDING YOUR INSTRUMENT PANEL . . . . . . . . . . . . . . . . . . . . . . . . . . . . . . . . . . . 181
STARTING AND OPERATING . . . . . . . . . . . . . . . . . . . . . . . . . . . . . . . . . . . . . . . . . . . . . . . . . 271
WHAT TO DO IN EMERGENCIES . . . . . . . . . . . . . . . . . . . . . . . . . . . . . . . . . . . . . . . . . . . . . . .369
MAINTAINING YOUR VEHICLE . . . . . . . . . . . . . . . . . . . . . . . . . . . . . . . . . . . . . . . . . . . . . . . 383
MAINTENANCE SCHEDULES . . . . . . . . . . . . . . . . . . . . . . . . . . . . . . . . . . . . . . . . . . . . . . . . . . 443
IF YOU NEED CONSUMER ASSISTANCE . . . . . . . . . . . . . . . . . . . . . . . . . . . . . . . . . . . . . . . . . .459
10
INDEX . . . . . . . . . . . . . . . . . . . . . . . . . . . . . . . . . . . . . . . . . . . . . . . . . . . . . . . . . . . . . . . . . . . . 469
10
INTRODUCTION
CONTENTS
m Introduction . . . . . . . . . . . . . . . . . . . . . . . . . . . 4
m Rollover Warning . . . . . . . . . . . . . . . . . . . . . . . . 5
m How To Use This Manual . . . . . . . . . . . . . . . . . . 6m Warnings And Cautions . . . . . . . . . . . . . . . . . . . 8
m Vehicle Identification Number . . . . . . . . . . . . . . . 8
m Vehicle Modifications/Alterations . . . . . . . . . . . . 94 INTRODUCTION
INTRODUCTION This is a specialized utility vehicle designed for both on-road and off-road use. It can go places and perform tasks for which conventional two-wheel drive vehicles were not intended. However, on-road ride and handling will have a different feel from what drivers experience with other vehicles, so take time to become familiar with your vehicle. The two-wheel drive utility vehicle was designed for on-road use only. It is not intended for off-road driving or use in other severe conditions suited for a four-wheel drive vehicle. Before you start to drive this vehicle, read this manual. Be sure you are familiar with all vehicle controls, particu- larly those used for braking, steering and transmission and transfer case shifting. Learn how your vehicle handles on different road surfaces. Your driving skills will improve with experience. When driving off-road or
working the vehicle, don’t overload it or expect it to overcome the laws of nature. Always observe federal, state, provincial, and local laws wherever you drive. As with other vehicles of this type, failure to operate this vehicle correctly may result in loss of control or an accident. Be sure to read “On-Road/Off-Road Driving Tips” in Section 5 of this manual. This manual has been prepared with the assistance of service and engineering specialists to acquaint you with the operation and maintenance of your new vehicle. It is supplemented by a Warranty Information Booklet and various customer oriented documents. You are urged to read these publications carefully. Following the instruc- tions and recommendations in this manual will help assure safe and enjoyable operation of your vehicle.
NOTE: After you read the manual, it should be stored in the vehicle for convenient reference and remain with the vehicle when sold so that the new owner will be aware of all safety warnings. When it comes to service, remember that your authorized dealer knows your vehicle best, has the factory-trained technicians and genuine Mopart parts, and is interested in your satisfaction.
ROLLOVER WARNING Utility vehicles have a significantly higher rollover rate than other types of vehicles. This vehicle has a higher ground clearance, and a higher center of gravity than many passenger cars. It is capable of performing better in a wide variety of off-road applications. Driven in an unsafe manner, all vehicles can be caused to go out of control. Because of the higher center of gravity, if this vehicle is out of control it may rollover when some other vehicles may not.
INTRODUCTION 5
Do not attempt sharp turns or abrupt maneuvers or other unsafe driving actions that can cause loss of vehicle control. Failure to operate this vehicle safely may result in an accident, rollover of the vehicle, and severe or fatal injury. Drive carefully.
Rollover Warning Label
6 INTRODUCTION
Failure to use driver and passenger seat belts provided is a major cause of severe or fatal injury. In fact, the U.S. government notes that the universal use of existing seat belts could cut the highway death toll by 10,000 or more each year, and could reduce disabling injuries by 2
million annually. In a rollover crash, an unbelted person is significantly more likely to die than a person wearing a seat belt. Always buckle up.HOW TO USE THIS MANUAL Consult the table of contents to determine which section contains the information you desire. The detailed index, at the rear of this manual, contains a complete listing of all subjects. Consult the following table for a description of the symbols that may be used on your vehicle or throughout this owner manual:
INTRODUCTION 7
8 INTRODUCTION
WARNINGS AND CAUTIONS This manual contains WARNINGS against operating procedures, which could result in an accident or bodily injury. It also contains CAUTIONS against procedures, which could result in damage to your vehicle. If you do not read this entire manual, you may miss important information. Observe all Warnings and Cautions.
VEHICLE IDENTIFICATION NUMBER The vehicle identification number (VIN) is found on a label located on the left front corner of the instrument panel pad, visible from outside of the vehicle through the windshield. This number also appears on the Automobile Information Disclosure Label affixed to a window on your vehicle. Save this label for a convenient record of your vehicle identification number and optional equip- ment.
NOTE:
It is illegal to remove the VIN label.
VEHICLE MODIFICATIONS/ALTERATIONS
WARNING!
Any modifications or alterations to this vehicle could seriously affect its roadworthiness and safety and may lead to an accident resulting in serious injury or death.
INTRODUCTION 9
THINGS TO KNOW BEFORE STARTING YOUR VEHICLE
CONTENTS
N Wireless Ignition Node (WIN) N FOB With Integrated Key (FOBIK) N Ignition Key Removal N Key-In-Ignition Reminder
m A Word About Your Keys . . . . . . . . . . . . . . . . . .14
. . . . . . . . . . . . .14
. . . . . . . . . .15
. . . . . . . . . . . . . . . . . . .16
. . . . . . . . . . . . . . . .17
m Sentry Key . . . . . . . . . . . . . . . . . . . . . . . . . . . .17
N Replacement Keys . . . . . . . . . . . . . . . . . . . . . .18
N Customer Key (FOB) Programming . . . . . . . . . .19
N General Information . . . . . . . . . . . . . . . . . . . .20m Security Alarm System — If Equipped . . . . . . . . .20
N To Set The Alarm . . . . . . . . . . . . . . . . . . . . . .20
N To Disarm The System . . . . . . . . . . . . . . . . . . .21
m Illuminated Entry . . . . . . . . . . . . . . . . . . . . . . . .21
m Remote Keyless Entry . . . . . . . . . . . . . . . . . . . . .21
N To Unlock The Doors . . . . . . . . . . . . . . . . . . .22
N To Lock The Doors . . . . . . . . . . . . . . . . . . . . .23
N To Release The Liftgate Flipper Glass . . . . . . . .24
N Using The Panic Alarm . . . . . . . . . . . . . . . . . .2412 THINGS TO KNOW BEFORE STARTING YOUR VEHICLE
N Programming Additional Transmitters . . . . . . . .25
N Transmitter Battery Service . . . . . . . . . . . . . . .25
N General Information . . . . . . . . . . . . . . . . . . . .26
m Remote Starting System — If Equipped . . . . . . . .26
m Door Locks . . . . . . . . . . . . . . . . . . . . . . . . . . . .28
N Manual Door Locks . . . . . . . . . . . . . . . . . . . . .28
N Power Door Locks . . . . . . . . . . . . . . . . . . . . .28
N Child Protection Door Lock . . . . . . . . . . . . . . .30
. . . . . . . . . . . . . . . . . . . . . . . . . . . . .31
N Power Windows . . . . . . . . . . . . . . . . . . . . . . .31
N Wind Buffeting . . . . . . . . . . . . . . . . . . . . . . . .33
m Liftgate . . . . . . . . . . . . . . . . . . . . . . . . . . . . . . .34
. . . . . . . . . . . . . . . . . . .35N Liftgate Flipper Glass
m Windows
m Occupant Restraints . . . . . . . . . . . . . . . . . . . . . .36
N Lap/Shoulder Belts . . . . . . . . . . . . . . . . . . . . .37
N Lap/Shoulder Belt Operating Instructions . . . . .38
N Adjustable Upper Shoulder Belt Anchorage . . . .41
N Automatic Locking Mode — If Equipped . . . . .42
N Energy Management Feature . . . . . . . . . . . . . .42
N Seat Belt Pretensioners . . . . . . . . . . . . . . . . . . .43
N Enhanced Seat Belt Use Reminder System(BeltAlert)
. . . . . . . . . . . . . . . . . . . . . . . . . . .43
N Seat Belts And Pregnant Women . . . . . . . . . . . .45
N Seat Belt Extender . . . . . . . . . . . . . . . . . . . . . .45
N Driver And Front Passenger SupplementalRestraint Systems (SRS) . . . . . . . . . . . . . . . . . .46
N Child Restraint . . . . . . . . . . . . . . . . . . . . . . . .58m Engine Break-In Recommendations . . . . . . . . . . .68
m Safety Tips . . . . . . . . . . . . . . . . . . . . . . . . . . . .69
N Exhaust Gas . . . . . . . . . . . . . . . . . . . . . . . . . .69THINGS TO KNOW BEFORE STARTING YOUR VEHICLE 13
N Safety Checks You Should Make Inside The
Vehicle . . . . . . . . . . . . . . . . . . . . . . . . . . . . . .69
N Safety Checks You Should Make Outside The
Vehicle . . . . . . . . . . . . . . . . . . . . . . . . . . . . . .70
14 THINGS TO KNOW BEFORE STARTING YOUR VEHICLE
A WORD ABOUT YOUR KEYS Your vehicle uses a keyless ignition system. This system consists of a Fob with Integrated Key and a Wireless Ignition Node (WIN) with integral ignition switch. You can insert the double-sided integrated key into the igni- tion switch with either side up. Wireless Ignition Node (WIN) The Wireless Ignition Node (WIN) operates similar to an ignition switch. It has four operating positions, three of which are detented and one spring-loaded. The detented positions are LOCK, ACC, and ON. The START position is a spring-loaded momentary contact position. When released from the START position, the switch automati- cally returns to the detented ON position.
Wireless Ignition Node (WIN)
Fob with Integrated Key (FOBIK) The Fob with Integrated Key operates the ignition switch. It also contains the Remote Keyless Entry (RKE) trans- mitter and a valet key, which stores in the rear of the Fob. The valet key allows for entry into the vehicle should the battery in the vehicle or the Fob go dead. You can keep the valet key with you when valet parking. To remove the valet key from the Fob, slide the mechani- cal latch at the top of the Fob sideways with your thumb and then pull the key out of the Fob with your other hand.
THINGS TO KNOW BEFORE STARTING YOUR VEHICLE 15
3 Button FOBIK
NOTE: You can insert the double-sided valet key into the lock cylinders with either side up.
16 THINGS TO KNOW BEFORE STARTING YOUR VEHICLE
Ignition Key Removal Place the selector lever in “P” (Park). Turn the key to the LOCK position, and remove the key. NOTE: † If you try to remove the key before you place the selector lever in “P” (Park), it may become trapped temporarily in the ignition switch. If this occurs, rotate the key to the right slightly, then remove the key as described. If a malfunction occurs, the system will trap the key in the ignition switch to warn you that this safety feature is inoperable. The engine can be started and stopped, but the key cannot be removed until you obtain service. † For vehicles equipped with the Electronic Vehicle Information Center the power window switches, radio, power sunroof (if equipped), and power outlets will remain active for up to 60 minutes
(EVIC),
after the ignition switch is turned to the LOCK posi- tion. Opening either front door will cancel this feature. The time for this feature is programmable. For details, refer to “Delay Power Off to Accessories Until Exit,” under “Personal Settings (Customer Programmable Features),” under “Electronic Vehicle Information Center (EVIC)” in Section 4 of this manual.
WARNING!
Never leave children alone in a vehicle. Leaving children in a vehicle unattended is dangerous for a number of reasons. A child or others could be seri- ously or fatally injured. Don’t leave the keys in the ignition. A child could operate power windows, other controls, or move the vehicle.
CAUTION!
An unlocked car is an invitation to thieves. Always remove key from the ignition and lock all doors when leaving the vehicle unattended.
Key-In-Ignition Reminder If you open the driver’s door and the key is in the ignition, a chime will sound to remind you to remove the key. The Key-In-Ignition reminder only sounds NOTE: when the ignition key is placed in the LOCK or ACC position.
THINGS TO KNOW BEFORE STARTING YOUR VEHICLE 17
SENTRY KEY The Sentry Key Immobilizer System prevents unautho- rized vehicle operation by disabling the engine. The system does not need to be armed or activated. Operation is automatic, regardless of whether the vehicle is locked or unlocked. The system uses the factory-mated Fob with Integrated Key and Wireless Ignition Node (WIN) to prevent unau- thorized vehicle operation. Therefore, only Fobs that are programmed to the vehicle can be used to start and operate the vehicle. The system will shut the engine off in two (2) seconds if someone uses an invalid Fob to start the engine. After turning the ignition switch to the ON position, the Vehicle Security Alarm Indicator Light will turn on for three (3) seconds for a bulb check. If the light remains on after the bulb check, it indicates that there is a problem with the electronics. In addition, if the light begins to
18 THINGS TO KNOW BEFORE STARTING YOUR VEHICLE
flash after the bulb check, it indicates that someone used an invalid Fob to start the engine. Either of these condi- tions will result in the engine being shut off after two (2) seconds. If the Vehicle Security Alarm Indicator Light turns on during normal vehicle operation (vehicle running for longer than 10 seconds), it indicates that there is a fault in the electronics. Should this occur, have the vehicle ser- viced as soon as possible. NOTE: † The Sentry Key Immobilizer System is not compatible with aftermarket remote starting systems. Use of these systems may result in vehicle starting problems and loss of security protection. † Exxon/Mobil Speed Pass,™ additional Fobs, or any other transponder-equipped components on the same key chain will not cause a fault unless the additional part is physically held against the Fob being used to
start the vehicle. Cell phones, pagers, or other RF electronics will not cause interference with this system. All of the Fobs provided with your new vehicle have been programmed to the vehicle electronics. Replacement Keys
NOTE: Only Fobs that are programmed to the vehicle electronics can be used to start and operate the vehicle. Once a Fob is programmed to a vehicle, it cannot be programmed to any other vehicle.
CAUTION!
Always remove Sentry Keys from the vehicle and lock all doors when leaving the vehicle unattended.
At the time of purchase, the original owner is provided with a four-digit PIN number. Keep the PIN in a secure
location. This number is required for dealer replacement of Fobs. Duplication of Fobs may be performed at an authorized dealer or by using the Customer Key Pro- gramming procedure. This procedure consists of pro- gramming a blank Fob to the vehicle electronics. A blank Fob is one, which has never been programmed. NOTE: When having the Sentry Key Immobilizer System serviced, bring all vehicle Fobs with you to the dealer. Customer Key (Fob) Programming If you have two valid sentry keys, you can program new sentry keys to the system by performing the following procedure: 1. Insert the first valid key into the ignition switch and turn the ignition switch ON for at least 3 seconds but no longer than 15 seconds. Turn the ignition switch OFF and remove the first key.
THINGS TO KNOW BEFORE STARTING YOUR VEHICLE 19
2. Insert the second valid key and turn the ignition switch ON within 15 seconds. After ten seconds, a chime will sound and the Vehicle Security Alarm Indicator Light will begin to flash. Turn the ignition switch OFF and remove the second key. 3. Insert a blank Sentry Key into the ignition switch and turn the ignition switch ON within 60 seconds. After 10
seconds, a single chime will sound and the Vehicle Security Alarm Indicator Light will stop flashing, turn on again for 3 seconds, and then turn off. The new Sentry Key is programmed. The Keyless Entry Transmitter will also be programmed during this pro- cedure. Repeat this procedure to program up to 8 keys. If you do not have a programmed sentry key, contact your dealer for details.20 THINGS TO KNOW BEFORE STARTING YOUR VEHICLE
If a programmed key is lost, see your dealer to NOTE: have all remaining keys erased from the systems memory. This will prevent the lost key from starting your vehicle. The remaining keys must then be repro- grammed. All vehicle keys must be taken to the dealer at the time of service to be reprogrammed. General Information The Sentry Key system complies with FCC rules part 15
and with RSS-210 of Industry Canada. Operation is subject to the following conditions: † This device may not cause harmful interference. † This device must accept any interference that may be received, including interference that may cause undes- ired operation.SECURITY ALARM SYSTEM — IF EQUIPPED This system monitors the vehicle doors, liftgate, liftgate flipper glass, and ignition for unauthorized operation and movement inside of the vehicle. When the alarm is activated, the system provides both audible and visual signals. The horn will sound repeatedly for three minutes and the headlights and taillights will flash for an addi- tional 15 minutes. To Set the Alarm The alarm will set when you use the remote keyless entry transmitter to lock the doors and liftgate or when you use the power door lock switch while the door is open. After all the doors are locked and closed, a red light (located in the instrument cluster) will flash rapidly for about 16
seconds to signal that the system is arming. During this 16 second pre-arm period, opening any door or the liftgate will cancel the arming. If the system successfully arms, the red light will flash at a slower rate to indicate the alarm is set. A manual lock of the doors, either withthe door lock plunger located on the inside of the doors or with the driver’s door key lock cylinder, will not set the alarm. To Disarm the System To disarm the system, use the remote keyless entry transmitter. If something has triggered the system in your absence, the horn will sound three times when you unlock the doors. Check the vehicle for tampering. The Security Alarm System is designed to protect your vehicle; however, you can create conditions where the system will arm unexpectedly. If you remain in the vehicle and lock the doors with the transmitter, once the system is armed (after 16 seconds), when you pull the door handle to exit the alarm will sound. If this occurs, press the “Unlock” button on the remote keyless entry transmitter to disarm the system. The Security Alarm System will not disarm with a manual unlock, either
THINGS TO KNOW BEFORE STARTING YOUR VEHICLE 21
through the lock plunger located on the inside of the door, or through a key in the driver’s door key cylinder.
ILLUMINATED ENTRY The interior lights come on when you open any door. They will remain on for about 30 seconds after all doors are closed then fade to off. The lights also will fade to off if you turn on the ignition after you close all the doors.
REMOTE KEYLESS ENTRY This system allows you to lock or unlock the doors, liftgate, or activate the panic alarm from distances up to about 23 feet (7 meters) using a hand held radio trans- mitter. The transmitter need not be pointed at the vehicle to activate the system.
22 THINGS TO KNOW BEFORE STARTING YOUR VEHICLE
Inserting the Fob with Integrated Key into the NOTE: ignition switch disables all buttons on that transmitter; however, the buttons on the remaining transmitters will continue to work. Shifting the vehicle out of “P” (Park) disables all transmitter buttons for all Fobs.
3 Button FOBIK
To Unlock the Doors Press and release the UNLOCK button on the transmitter once to unlock the driver’s door, or twice to unlock all doors. The turn signal lights will flash to acknowledge the unlock signal. The illuminated entry system will also turn on. Remote Key Unlock, Driver Door/All Doors First This feature lets you program the system to unlock either the driver’s door or all doors on the first press of the UNLOCK button on the transmitter. To change the cur- rent setting, proceed as follows: † For vehicles equipped with the Electronic Vehicle Information Center (EVIC), refer to “Remote Key Unlock,” under “Personal Settings (Customer Pro- grammable Features),” under “Electronic Vehicle In- formation Center (EVIC)” in Section 4 of this manual for details.
Flash Lights with Remote Key Lock This feature will cause the turn signal lights to flash when the doors are locked or unlocked with the transmitter. This feature can be turned on or off. To change the current setting, proceed as follows: † For vehicles equipped with the Electronic Vehicle Information Center (EVIC), refer to “Flash Lights with Remote Key Lock,” under 9Personal Settings (Cus- tomer Programmable Features),” under “Electronic Vehicle Information Center (EVIC)” in Section 4 of this manual for details.
Turn Headlights On with Remote Key Unlock This feature activates the headlights for up to 90 seconds when the doors are unlocked with the transmitter. The time for this feature is programmable on vehicles equipped with the Electronic Vehicle Information Center (EVIC). For de- tails, refer to “Turn Headlights On with Remote Key
THINGS TO KNOW BEFORE STARTING YOUR VEHICLE 23
Unlock,” under “Personal Settings (Customer Program- mable Features),” under “Electronic Vehicle Information Center (EVIC)” in Section 4 of this manual. To Lock the Doors Press and release the LOCK button on the transmitter to lock all doors. The turn signal lights will flash and the horn will chirp to acknowledge the signal. Sound Horn with Remote Key Lock This feature will cause the horn to chirp when the doors are locked with the transmitter. This feature can be turned on or off. To change the current setting, proceed as follows: † For vehicles equipped with the Electronic Vehicle Information Center (EVIC), refer to “Sound Horn with Remote Key Lock,” under “Personal Settings (Cus- tomer Programmable Features),” under “Electronic Vehicle Information Center (EVIC)” in Section 4 of this manual for details.
24 THINGS TO KNOW BEFORE STARTING YOUR VEHICLE
To Release the Liftgate Flipper Glass Press the “Flipper Glass/Trunk Release” button on the transmitter two times to release the flipper glass.
WARNING!
Driving with the flipper glass open can allow poi- sonous exhaust gases into your vehicle. You and your passengers could be injured by these fumes. Keep the flipper glass closed when you are operating the vehicle.
Using The Panic Alarm To turn the panic alarm feature ON or OFF, press and hold the PANIC button on the transmitter for at least one second and release. When the panic alarm is on, the headlights and park lights will flash, the horn will pulse on and off, and the interior lights will turn on.
The panic alarm will stay on for 3 minutes unless you turn it off by either pressing the PANIC button a second time or drive the vehicle at a speed of 15 mph (24 km/h) or greater. NOTE: † The interior lights will turn off if you turn the ignition switch to the ACC or ON position while the panic alarm is activated. However, the exterior lights and horn will remain on. † You may need to be less than 23 feet (7 meters) from the vehicle when using the transmitter to turn off the panic alarm due to the radio frequency noises emitted by the system.
Programming Additional Transmitters Refer to SENTRY KEY “Customer Key (Fob) Program- ming.” If you do not have a programmed transmitter, contact your dealer for details. Transmitter Battery Service The recommended replacement battery is one CR2032
battery. NOTE: Perchlorate Material — special handling may apply. See www.dtsc.ca.gov/hazardouswaste/perchlorate NOTE: Do not touch the battery terminals that are on the back housing or the printed circuit board. 1. Battery access is through a door located on the rear of the FOBIK. Insert a small, flat bladed screwdriver into the slot and gently pry open the access door.THINGS TO KNOW BEFORE STARTING YOUR VEHICLE 25
FOBIK Battery Replacement
2. Remove and replace the batteries. Avoid touching the new batteries with your fingers. Skin oils may cause battery deterioration. If you touch a battery, clean it with rubbing alcohol. 3. Reposition the access door panel over the battery opening and snap into place.
26 THINGS TO KNOW BEFORE STARTING YOUR VEHICLE
General Information This device complies with part 15 of the FCC rules and RSS 210 of Industry Canada. Operation is subject to the following conditions: † This device may not cause harmful interference. † This device must accept any interference received, including interference that may cause undesired op- eration.
NOTE: Changes or modifications not expressly ap- proved by the party responsible for compliance could void the user’s authority to operate the equipment. If your Remote Keyless Entry (RKE) transmitter fails to operate from a normal distance, check for these two conditions. 1. A weak battery in the transmitter. The expected life of the battery is a minimum of three years.
2. Closeness to a radio transmitter such as a radio station tower, airport transmitter, and some mobile or CB radios.
REMOTE STARTING SYSTEM — IF EQUIPPED Your vehicle may be equipped with a remote starting system, which will allow the vehicle to be started up to 300 feet (91 meters) away from the vehicle using the remote keyless entry key fob which is part of your ignition key. In order to remote start your vehicle, the hood, liftgate, and all of the doors must be closed. To remote start your vehicle, press the “Remote Start” button on the key fob twice within three seconds. To indicate that the vehicle is about to start, the parking lights will flash and the horn will sound briefly (if programmed). To turn the horn on or off, refer to “Electronic Vehicle Information Center/Customer Pro- grammable Features/Sound Horn With Lock?” in Section 4 of this manual.
2
THINGS TO KNOW BEFORE STARTING YOUR VEHICLE 27
To enter the vehicle while the engine is running during a remote start, you must first unlock the vehicle using the “Unlock” button on the key fob. After the vehicle is unlocked, you have 15 minutes to enter the vehicle, insert the key into the ignition, and move it to the RUN position. Otherwise, the engine will cancel remote start and automatically turn off. Remote start will also cancel if any of the following occur: † If the engine stalls or RPM exceeds 2500
† Any engine warning lamps come on † The hood is opened † The hazard switch is pressed † The transmission is moved out of P (Park). † The brake pedal is pressed.Remote Start Button
Once the vehicle has started, the engine will run for 15
minutes. To cancel remote start, press the “Remote Start” button once. The parking lamps will remain illuminated to indicate that the vehicle has remote started and the engine is running. The lamps will turn off when the ignition is turned to RUN or the remote start is cancelled.28 THINGS TO KNOW BEFORE STARTING YOUR VEHICLE
The vehicle can be started remotely up to a maximum of two times. The vehicle is also allowed a maximum of one failed start, where the remote start sequence was initiated but the engine stopped cranking without starting. After either of these conditions, or if the Vehicle Theft Alarm is alarming, or if the PANIC button was pressed, the vehicle must be reset by inserting a valid key into the ignition and moving it to the RUN position, then back to LOCK.
DOOR LOCKS
Manual Door Locks Use the manual door lock plunger to lock the doors from inside the vehicle. If the plunger is down when the door is closed, the door will lock. Therefore, make sure the keys are not inside the vehicle before closing the door.
WARNING!
† For personal security and safety in the event of an accident, lock the vehicle doors when you drive as well as when you park and leave the vehicle. † When leaving the vehicle always remove the key from the ignition lock, and lock your vehicle. Do not leave children unattended in the vehicle, or with access to an unlocked vehicle. Unsupervised use of vehicle equipment may cause severe per- sonal injuries and death.
Power Door Locks The power door lock switch is located on each front door panel. Press the switch to lock or unlock the doors.
2
THINGS TO KNOW BEFORE STARTING YOUR VEHICLE 29
The rear doors cannot be opened from inside the vehicle until you pull up the lock plungers. Automatic Door Locks If this feature is selected your door locks will lock automatically if the vehicle speed is above 15 mph (24
km/h) and all doors are closed. It will reset whenever a door is opened. This feature is selectable and can be turned on or off. Refer to “Electronic Vehicle Information Center (EVIC) — Customer Programmable Features” in Section 4 of this manual or see your authorized dealer. Automatic Unlock on Exit Feature — Only Available if Auto Lock is Enabled This feature will unlock all the doors when the driver’s door is opened if the vehicle is stopped and in P (Park) or N (Neutral). Refer to “Electronic Vehicle Information Center (EVIC) — Customer Programmable Features” in Section 4 of this manual or see your authorized dealer.Power Door Lock Switch
If the plunger is down when the door is closed, the door will lock. Therefore, make sure the keys are not inside the vehicle before closing the door. If you press the door lock switch while the keys are in the ignition switch, and the driver’s door is open, the doors will not lock.
30 THINGS TO KNOW BEFORE STARTING YOUR VEHICLE
Child Protection Door Lock The rear doors of your vehicle are equipped with child protection locks. If you push up on the lever on the open edge of the door it cannot be opened from the inside of the vehicle. Push the lever down to disengage the child protection locks.
WARNING!
Avoid trapping anyone in the vehicle in a collision. Remember that the rear doors can only be opened from the outside when the child protection locks are engaged.
Child Protection Door Lock
WINDOWS
Power Windows The power window controls are located on the driver’s door trim panel. There is a single switch on the front passenger door/rear doors which operates the front passenger/rear passenger door windows. The window controls will operate only when the ignition switch is in the ON or ACCESSORY position.
THINGS TO KNOW BEFORE STARTING YOUR VEHICLE 31
Power Window Switches
The power window switches remain active for up to 10
minutes after the ignition switch has been turned off. Opening a vehicle front door will cancel this feature.32 THINGS TO KNOW BEFORE STARTING YOUR VEHICLE
Auto Down Both the driver and front passenger window switch has an “Auto Down” feature. Press the window switch past the first detent, release, and the window will go down automatically. To cancel the “Auto Down” movement, operate the switch in either the up or down direction and release the switch. To stop the window from going all the way down during the auto-down operation, pull up on the switch briefly. To open the window part way, press to the first detent and release it when you want the window to stop. The power window switches remain active for 10 min- utes after the ignition has been turned off. Opening either front door will cancel this feature.
Auto Up Feature with Anti-Pinch Protection (Driver’s and Front Passenger Door Only) Lift the window switch to the second detent, release, and the window will go up automatically. To stop the window from going all the way up during the auto-up operation, push down on the switch briefly. To close the window part way, lift the window switch to the first detent and release when you want the window to stop. If the window runs into any obstacle during the NOTE: auto-closure it will reverse direction and then stop. Remove the obstacle and use the window switch again to close the window. Any impact due to rough road condi- tions may trigger the auto reverse function unexpectedly during auto closure. If this happens pull the switch lightly to the first detent and hold to close the window manually.
WARNING!
There is no anti-pinch protection when the window is almost closed. Be sure to clear all objects from the window before closing.
Resetting the Auto-Up Feature Should the Auto-Up feature stop working the window probably needs to be reset. To reset Auto-Up: Pull the window switch up and close the window com- pletely, then pull and hold the switch for 1 second. Window Lockout Switch The window lockout switch on the driver’s door allows you to disable the window control on the other doors. To disable the window controls on the other doors, press the window lockout button. To enable the window controls, press the window lockout button again.
THINGS TO KNOW BEFORE STARTING YOUR VEHICLE 33
Wind Buffeting
Power Window Lock
Wind buffeting can be described as the perception of pressure on the ears or a helicopter type sound in the ears. Your vehicle may exhibit wind buffeting with the windows down, or the sunroof (if equipped) in certain
34 THINGS TO KNOW BEFORE STARTING YOUR VEHICLE
open or partially open positions. This is a normal occur- rence and can be minimized. If the buffeting occurs with the sunroof open, adjust the sunroof opening to minimize the buffeting.
LIFTGATE To open the liftgate, pull up (squeeze) on the handle and lift. Manually unlocking the vehicle doors with the plunger or a key in the lock cylinder will not unlock the liftgate.
Liftgate Release
WARNING!
Driving with the liftgate open can allow poisonous exhaust gases into your vehicle. You and your pas- sengers could be injured by these fumes. Keep the liftgate closed when you are operating the vehicle.
Liftgate Flipper Glass The liftgate flipper glass is also unlocked when the liftgate is unlocked. To open the flipper glass, push up on the window switch located on the liftgate.
THINGS TO KNOW BEFORE STARTING YOUR VEHICLE 35
Liftgate Glass Release
WARNING!
To avoid injury stand back when opening. Glass may automatically rise.
36 THINGS TO KNOW BEFORE STARTING YOUR VEHICLE
Once the liftgate flipper glass has been opened, connec- tion to the rear window wiper is interrupted, preventing activation of the rear wiper blade while the flipper glass is open. If a power malfunction to the power liftgate NOTE: latch should occur, an emergency liftgate latch release can be used to open the liftgate. The emergency liftgate latch release can be accessed through a snap-in cover located on the liftgate trim panel.
WARNING!
Driving with the flipper glass open can allow poi- sonous exhaust gases into your vehicle. You and your passengers could be injured by these fumes. Keep the flipper glass closed when you are operating the vehicle.
OCCUPANT RESTRAINTS Some of the most important safety features in your vehicle are the restraint systems. These include the front and rear seat belts for the driver and all passengers, front airbags for both the driver and right front passenger, and window bags for the driver and passengers seated next to a window. If you will be carrying children too small for adult-size belts, your seat belts also can be used to hold infant and child restraint systems. NOTE: The front airbags have a multi stage inflator design. This allows the airbag to have different rates of inflation that are based on collision severity. Please pay close attention to the information in this section. It tells you how to use your restraint system properly to keep you and your passengers as safe as possible.
WARNING!
In a collision, you and your passengers can suffer injuries, including fatalities, if you are not properly buckled up. You can strike the interior of your vehicle or other passengers, or you can be thrown out of the vehicle. Always be sure you and others in your vehicle are buckled up properly.
Buckle up even though you are an excellent driver, even on short trips. Someone on the road may be a poor driver and cause a collision which includes you. This can happen far away from home or on your own street.
THINGS TO KNOW BEFORE STARTING YOUR VEHICLE 37
Research has shown that seat belts save lives, and they can reduce the seriousness of injuries in a collision. Some of the worst injuries happen when people are thrown from the vehicle. Seat belts reduce the possibility of ejection and the risk of injury caused by striking the inside of the vehicle. Everyone in a motor vehicle should be belted at all times to reduce or prevent injuries. Lap/Shoulder Belts All seating positions in your vehicle have combination lap/shoulder belts. The belt webbing retractor is de- signed to lock during very sudden stops or collisions. This feature allows the shoulder part of the belt to move freely with you under normal conditions. But in a colli- sion, the belt will lock and reduce the risk of you striking the inside of the vehicle or being thrown out.
38 THINGS TO KNOW BEFORE STARTING YOUR VEHICLE
WARNING!
† Wearing a seat belt incorrectly is dangerous. Seat belts are designed to go around the large bones of your body. These are the strongest parts of your body and can take the forces of a collision the best. Wearing your belt in the wrong place could make your injuries in a collision much worse. You might suffer internal injuries, or you could even slide out of part of the belt. Follow these instructions to wear your seat belt safely and to keep your pas- sengers safe, too. † Two people should never be belted into a single seat belt. People belted together can crash into one another in an accident, hurting one another badly. Never use a lap/shoulder belt or a lap belt for more than one person, no matter what their size.
Lap/Shoulder Belt Operating Instructions 1. Enter the vehicle and close the door. Sit back and adjust the seat. 2. The seat belt latch plate is above the back of your seat. Grasp the latch plate and pull out the belt. Slide the latch plate up the webbing as far as necessary to make the belt go around your lap.
Latch Plate
3. When the belt is long enough to fit, insert the latch plate into the buckle until you hear a “click.”
WARNING!
THINGS TO KNOW BEFORE STARTING YOUR VEHICLE 39
A belt that is buckled into the wrong buckle will not protect you properly. The lap portion could ride too high on your body, possibly causing internal injuries. Always buckle your belt into the buckle nearest you. A belt that is too loose will not protect you as well. In a sudden stop you could move too far forward, increas- ing the possibility of injury. Wear your seat belt snugly. A belt that is worn under your arm is very dangerous. Your body could strike the inside surfaces of the vehicle in a collision, increasing head and neck injury. A belt worn under the arm can cause internal injuries. Ribs aren’t as strong as shoulder bones. Wear the belt over your shoulder so that your strongest bones will take the force in a collision. A shoulder belt placed behind will not protect you from injury during a collision. You are more likely to hit your head in a collision if you do not wear your shoulder belt. The lap and shoulder belt are meant to be used together.
Latch Plate To Buckle
40 THINGS TO KNOW BEFORE STARTING YOUR VEHICLE
4. Position the lap belt across your thighs, below your abdomen. To remove slack in the lap portion, pull up a bit on the shoulder belt. To loosen the lap belt if it is too tight, tilt the latch plate and pull on the lap belt. A snug belt reduces the risk of sliding under the belt in a collision.
WARNING!
A lap belt worn too high can increase the risk of injury in a collision. The belt forces won’t be at the strong hip and pelvic bones, but across your abdo- men. Always wear the lap part of your seat belt as low as possible and keep it snug. A twisted belt can’t do its job as well. In a collision it could even cut into you. Be sure the belt is straight. If you can’t straighten a belt in your vehicle, take it to your authorized dealer and have it fixed.
5. Position the shoulder belt on your chest so that it is comfortable and not resting on your neck. The retractor will withdraw any slack in the belt.
Removing Slack From Belt
THINGS TO KNOW BEFORE STARTING YOUR VEHICLE 41
Adjustable Upper Shoulder Belt Anchorage In the front seating positions, the shoulder belt can be adjusted upward or downward to position the belt away from your neck. Press the release button to release the anchorage, and then move it up or down to the position that serves you best.
6. To release the belt, push the red button marked PRESS on the buckle. The belt will automatically retract to its stowed position. If necessary, slide the latch plate down the webbing to allow it to retract fully.
WARNING!
A frayed or torn belt could rip apart in a collision and leave you with no protection. Inspect the belt system periodically, checking for cuts, frays, or loose parts. Damaged parts must be replaced immediately. Do not disassemble or modify the system. Seat belt assemblies must be replaced after an accident if they have been damaged (bent retractor, torn webbing, etc.).
Adjusting Upper Shoulder Belt
42 THINGS TO KNOW BEFORE STARTING YOUR VEHICLE
As a guide, if you are shorter than average, you will prefer a lower position, and if you are taller than average, you’ll prefer a higher position. When you release the anchorage, try to move it up or down to make sure that it is locked in position. Automatic Locking Mode — If Equipped In this mode, the shoulder belt is automatically pre- locked. The belt will still retract to remove any slack in the shoulder belt. When To Use The Automatic Locking Mode Anytime a child safety seat is installed in the rear center seating position. Children 12 years old and under should be properly restrained in the rear seat whenever possible. How To Use The Automatic Locking Mode 1. Buckle the combination lap and shoulder belt. 2. Grasp the shoulder portion and pull downward until the entire belt is extracted.
3. Allow the belt to retract. As the belt retracts, you will hear a clicking sound. This indicates the safety belt is now in the automatic locking mode. How to Disengage The Automatic Locking Mode Disconnect the combination lap/shoulder belt and allow it to retract completely to disengage the automatic lock- ing mode and activate the vehicle sensitive (emergency) locking mode. Energy Management Feature This vehicle has a safety belt system with an energy management feature in the front seating positions to help further reduce the risk of injury in the event of a head-on collision. This safety belt system has a retractor assembly that is designed to release webbing in a controlled manner. This feature is designed to help reduce the belt force acting on the occupant’s chest.
WARNING!
† The belt and retractor assembly must be replaced if the seat belt assembly “automatic locking retrac- tor” feature or any other seat belt function is not working properly when checked according to the procedures in the Service Manual. † Failure to replace the belt and retractor assembly
could increase the risk of injury in collisions.
Seat Belt Pretensioners The driver and front passenger seat belts are equipped with a pretensioning device that is designed to remove any slack from the seat belt systems in the event of a collision. This device improves the performance of the seat belt by assuring that the belt is tight around the occupant early in a collision. Pretensioners work for all size occupants, including those in child restraints.
THINGS TO KNOW BEFORE STARTING YOUR VEHICLE 43
NOTE: These devices are not a substitute for proper seat belt placement by the occupant. The seat belt must still be worn snugly and positioned properly. The pretensioners are triggered by the Occupant Re- straint Control (ORC) Module. Like the front airbags, the pretensioners are a single use item. After a collision that is severe enough to deploy the airbags and pretensioners, they must be replaced. Enhanced Seat Belt Use Reminder System (BeltAlert) If the driver’s seat belt has not been buckled within 60
seconds of starting the vehicle and if the vehicle speed is greater than 5 mph (8 km/h), the Enhanced Warning System (BeltAlert) will alert the driver to buckle their seat belt. The driver should also instruct all other occupants to buckle their seat belts. Once the warning is triggered, the Enhanced Warning System (BeltAlert) will continue to chime and flash the Seat Belt Warning Light for 9644 THINGS TO KNOW BEFORE STARTING YOUR VEHICLE
seconds or until the driver’s seat belt is buckled. The Enhanced Warning System (BeltAlert) will be reactivated if the driver’s seat belt is unbuckled for more than 10
seconds and the vehicle speed is greater than 5 mph (8
km/h). The Enhanced Warning System (BeltAlert) can be en- abled or disabled by your authorized dealer or by following these steps: NOTE: The following steps must occur within the first 60 seconds of the ignition switch being turned to the ON or START position. The manufacturer does not recom- mend deactivating the Enhanced Warning System (BeltAlert). 1. Turn the ignition switch to the OFF position, and buckle the driver’s seat belt.2. Turn the ignition key to the ACCESSORY/RUN posi- tion (engine does not need to be running), and wait for the Seat Belt Warning Light to turn off. 3. Within 60 seconds of starting the vehicle, unbuckle and then re-buckle the driver’s seat belt at least three times with 10 seconds, ending with the seat belt buckled. 4. Turn the ignition key to the OFF position. A single chime will sound to signify that you have successfully completed the programming. The Enhanced Warning System (BeltAlert) can be reacti- vated by repeating this procedure. NOTE: Although the Enhanced Warning System (BeltAlert) has been deactivated, the Seat Belt Warning Light will continue to illuminate while the driver’s seat belt remains unfastened.
THINGS TO KNOW BEFORE STARTING YOUR VEHICLE 45
WARNING!
Using a seat belt extender when not needed can increase the risk of injury in a collision. Only use when the lap belt is not long enough when it is worn low and snug, and in the recommended seating positions. Remove and store the extender when not needed.
Seat Belts and Pregnant Women We recommend that pregnant women use the seat belts throughout their pregnancy. Keeping the mother safe is the best way to keep the baby safe. Pregnant women should wear the lap part of the belt across the thighs and as snug across the hips as possible. Keep the belt low so that it does not come across the abdomen. That way the strong bones of the hips will take the force if there is a collision. Seat Belt Extender If a seat belt is too short, even when fully extended and when the adjustable upper shoulder belt anchorage (if equipped) is in its lowest position, your authorized dealer can provide you with a seat belt extender. This extender should be used only if the existing belt is not long enough. When it is not required, remove the ex- tender and store it.
46 THINGS TO KNOW BEFORE STARTING YOUR VEHICLE
Driver And Front Passenger Supplemental Restraint Systems (SRS)
1 — Driver Airbag 2 — Passenger Airbag 3 — Knee Bolster
This vehicle has airbags for both the driver and right front passenger as a supplement to the seat belt restraint systems. The driver’s front airbag is mounted in the steering wheel. The passenger side airbag is mounted in the instrument panel, above the glove compartment. The words SRS/AIRBAG are embossed on the airbag covers. NOTE: The front airbags are certified to the Federal regulations that allow less forceful deployment. The front airbags have a multistage inflator design. This may allow the airbag to have different rates of inflation that are based on collision severity and occupant size. This vehicle is equipped with window bags to protect the driver, front, and rear passengers sitting next to a win- dow. They are located above the side windows. Their covers are also labeled SRS/AIRBAG.
THINGS TO KNOW BEFORE STARTING YOUR VEHICLE 47
WARNING!
† Do not put anything on or around the front airbag covers or attempt to manually open them. You may damage the airbags and you could be injured be- cause the airbags are no longer functional. These protective covers for the airbag cushions are de- signed to open only when the airbags are inflating. † Do not stack luggage or other cargo up high enough to block the location of the window bag. The area where the window bag is located should remain free from any obstructions. † Do not have any accessory items installed which will alter the roof, including adding a sunroof to your vehicle. Do not add roof racks that require permanent attachments (bolts or screws) for instal- lation on the vehicle roof. Do not drill into the roof of the vehicle for any reason. † Do not cover or place items on the airbag covers. These items may cause serious injury during inflation.
Window Airbag Location
NOTE: Airbag covers may not be obvious in the interior trim; but they will open to allow airbag deployment.
48 THINGS TO KNOW BEFORE STARTING YOUR VEHICLE
NOTE: Do not use a clothing bar mounted to the coat hooks in this vehicle. A clothing bar will impede the proper performance of the window bags. The front airbags have a multi stage inflator design. This allows the airbag to have different rates of inflation that are based on collision severity. Along with the seat belts, front airbags work with the instrument panel knee bol- sters to provide improved protection for the driver and front passenger. Window bags also work with seat belts to improve occupant protection. The seat belts are designed to protect you in many types of collisions. The front airbags deploy in moderate to severe frontal collisions. The window bag on the crash side of the vehicle is triggered in moderate to severe side collisions. In certain types of collisions, both the front and side airbags may be
triggered. But even in collisions where the airbags work, you need the seat belts to keep you in the right position for the airbags to protect you properly. Here are some simple steps you can take to minimize the risk of harm from a deploying airbag. 1. Children 12 years and under should always ride buckled up in a rear seat. Infants in rear facing child restraints should NEVER ride in the front seat of a vehicle with a passenger airbag. An airbag deployment could cause severe injury or death to infants in that position. Children that are not big enough to properly wear the vehicle seat belt should be secured in the rear seat, in a child restraint or belt-positioning booster seat. Older children who do not use child restraints or belt- positioning booster seats should ride properly buckled
up in the rear seat. Never allow children to slide the shoulder belt behind them or under their arm. If a child from 1 to 12 years old must ride in the front passenger seat because the vehicle is crowded, move the seat as far back as possible, and use the proper child restraint. See “Child Restraint” in this section. You should read the instructions provided with your child restraint to make sure that you are using it properly. 2. All occupants should use their lap and shoulder belts properly.
THINGS TO KNOW BEFORE STARTING YOUR VEHICLE 49
3. The driver and front passenger seats should be moved back as far as practical to allow the front airbags room to inflate. 4. Do not lean against the door or window, airbags will inflate forcefully into the space between you and the door. 5. If the airbag system in this vehicle needs to be modified to accommodate a disabled person, contact the Customer Center. Phone numbers are provided under “If You Need Assistance” in Section 9 of this manual.
50 THINGS TO KNOW BEFORE STARTING YOUR VEHICLE
WARNING!
† Relying on the airbags alone could lead to more severe injuries in a collision. The airbags work with your seat belt to restrain you properly. In some collisions the airbags won’t deploy at all. Always wear your seat belts even though you have airbags. † Being too close to the steering wheel or instrument panel during airbag deployment could cause seri- ous injury. Airbags need room to inflate. Sit back, comfortably extending your arms to reach the steering wheel or instrument panel. † Side curtain airbags need room to inflate. Do not lean against the door or window. Sit upright in the center of the seat.
Airbag System Components The airbag system consists of the following: † Occupant Restraint Control Module † Airbag Warning Light † Driver Airbag † Passenger Airbag † Side Curtain Airbags above Side Windows † Side Remote Acceleration Sensors † Driver Side Seat Track Position Sensor † Steering Wheel and Column † Instrument Panel † Interconnecting Wiring † Knee Impact Bolsters † Front Acceleration Sensors † Driver and Front Passenger Seat Belt Pretensioners
How The Airbag System Works † The Occupant Restraint Control (ORC) Module de- termines if a frontal, side, or rollover collision is severe enough to require the front and/or side airbags to inflate. The front airbag inflators are designed to provide different rates of airbag inflation from direc- tion provided by the ORC. The ORC will detect roll overs, not rear impacts. The ORC also monitors the readiness of the electronic parts of the system whenever the ignition switch is in the START or ON positions. These include all of the items listed above except the knee bolster, the instru- ment panel, and the steering wheel and column. If the key is in the LOCK position, in the ACC position, or not in the ignition, the airbags are not on and will not inflate.
THINGS TO KNOW BEFORE STARTING YOUR VEHICLE 51
Also, the ORC turns on the “Airbag Warning Light” for 2.5 to 8 seconds for a self-check when the ignition is first turned on. After the self-check, the “Airbag Warning Light” will turn off. If the ORC detects a malfunction in any part of the system, it turns on the “Airbag Warning Light” either momentarily or continuously. A single chime will sound if the light comes on again after initial start up.
WARNING!
Ignoring the “Airbag Warning Light” in your instru- ment panel could mean you won’t have the airbags to protect you in a collision. If the light does not come on, stays on after you start the vehicle, or if it comes on as you drive, have the airbag system checked right away.
52 THINGS TO KNOW BEFORE STARTING YOUR VEHICLE
† The Driver and Passenger Airbag/Inflator Units are located in the center of the steering wheel and the right side of the instrument panel. When the ORC detects a collision requiring the airbags, it signals the inflator units. A large quantity of nontoxic gas is generated to inflate the front airbags. Different airbag inflation rates are possible, based on collision severity and occupant size. The steering wheel hub trim cover and the upper right side of the instrument panel separate and fold out of the way as the bags inflate to their full size. The bags fully inflate in about 50–70 milliseconds. This is about half of the time it takes to blink your eyes. The bags then quickly deflate while helping to restrain the driver and front passenger. The driver front airbag gas is vented through the vent holes in the sides of the airbag. The passenger front airbag gas is vented through the vent holes in the sides of the airbag. In this way, the airbags do not interfere with your control of the vehicle.
† The Side Impact SRS Side Curtain Airbags are de- signed to activate only in certain side or rollover collisions. When the Occupant Restraint Control Mod- ule (ORC) detects a collision requiring the window bags to inflate, it signals the inflators on the crash side of the vehicle both sides of the vehicle if equipped with rollover sensing. A quantity of nontoxic gas is generated to inflate the window bag. The inflating window bag pushes the outside edge of the headliner out of the way and covers the window. The airbag inflates in about 30 milliseconds (about one-quarter of the time it takes to blink your eyes) with enough force to injure you if you are not belted and seated properly, or if items are positioned in the area where the window bag inflates. This especially applies to chil- dren. The window bag is only about 3 inches (8 cm) thick when it is inflated.
† The Knee Impact Bolsters help protect the knees of the driver and the front passenger, and position every- one for the best interaction with the front airbag.
If A Deployment Occurs The airbag system is designed to deploy when the Occupant Restraint Control (ORC) Module detects a moderate-to-severe frontal collision, to help restrain the driver and front passenger, and then to immediately deflate. NOTE: A frontal collision that is not severe enough to need airbag protection will not activate the system. This does not mean something is wrong with the airbag system. If you do have a collision which deploys the airbags, any or all of the following may occur: † The nylon airbag material may sometimes cause abra- sions and/or skin reddening to the driver and front
THINGS TO KNOW BEFORE STARTING YOUR VEHICLE 53
passenger as the airbags deploy and unfold. The abrasions are similar to friction rope burns or those you might get sliding along a carpet or gymnasium floor. They are not caused by contact with chemicals. They are not permanent and normally heal quickly. However, if you haven’t healed significantly within a few days, or if you have any blistering, see your doctor immediately. † As the airbags deflate you may see some smoke-like particles. The particles are a normal by-product of the process that generates the nontoxic gas used for airbag inflation. These airborne particles may irritate the skin, eyes, nose, or throat. If you have skin or eye irritation, rinse the area with cool water. For nose or throat irritation, move to fresh air. If the irritation continues, see your doctor. If these particles settle on your clothing, follow the garment manufacturer’s instruc- tions for cleaning.
54 THINGS TO KNOW BEFORE STARTING YOUR VEHICLE
† It is not advisable to drive your vehicle after the airbags have deployed. If you are involved in another collision, the airbags will not be in place to protect you.
WARNING!
Deployed airbags and seat belt pretensioners cannot protect you in another collision. Have the airbags, seat belt pretensioners, and seat belt retractor assem- bly, replaced by an authorized dealer as soon as possible.
Enhanced Accident Response Feature If the airbags deploy after an impact and the electrical system remains functional, vehicles equipped with power door locks will unlock automatically. The hazard lights will flash and the fuel will be cut off to the engine. In addition, after the vehicle has stopped moving, the interior lights will illuminate to aid visibility and remain lit until the ignition switch is turned off. NOTE: The interior lights can only be deactivated if the key is removed from the ignition switch or the vehicle is driven.
Maintaining Your Airbag System
WARNING!
† Modifications to any part of the airbag system could cause it to fail when you need it. You could be injured if the airbag system is not there to protect you. Do not modify the components or wiring, including adding any kind of badges or stickers to the steering wheel hub trim cover or the upper right side of the instrument panel. Do not modify the front bumper or vehicle body structure. † You need proper knee impact protection in a collision. Do not mount or locate any aftermarket equipment on or behind the knee bolsters. † It is dangerous to try to repair any part of the airbag system yourself. Be sure to tell anyone who works on your vehicle that it has an airbag system.
THINGS TO KNOW BEFORE STARTING YOUR VEHICLE 55
NOTE: Perchlorate Material – special handling may ap- ply, See www.dtsc.ca.gov/hazardouswaste/perchlorate Airbag Warning Light You will want to have the airbag system ready to inflate for your protection in an impact. The airbag system is designed to be maintenance free. If any of the following occurs, have an authorized dealer service the system promptly: † Does not come on during the 2.5 to 8 seconds after the † Remains on after the 2.5 to 8 second interval. † Flickers, or comes on and remains on for any period of
ignition switch is first turned on.
time while driving.
If the speedometer, tachometer, or any engine NOTE: related gauges are not working, the airbag control mod- ule may also be disabled. The airbags may not be ready to inflate for your protection. Promptly check the fuse
56 THINGS TO KNOW BEFORE STARTING YOUR VEHICLE
block for blown fuses. Refer to “Fuse Panel” in Section 5
of this manual. See your dealer if the fuse is good. Event Data Recorder (EDR) In the event of an accident, your vehicle is designed to record up to 5-seconds of specific vehicle data parameters (see the following list) in an event data recorder prior to the moment of airbag deployment, or near deployment, and up to a quarter second of high-speed deceleration data during and/or after air bag deployment or near- deployment. EDR data are ONLY recorded if an airbag deploys, or nearly deploys, and are otherwise unavail- able. NOTE: † A near-deployment event occurs when the airbag sensor detects severe vehicle deceleration usually in- dicative of a crash, but not severe enough to warrant airbag deployment.† Under certain circumstances, EDR data may not be
recorded (e.g., loss of battery power).
In conjunction with other data gathered during a com- plete accident investigation, the electronic data may be used by DaimlerChrysler Corporation and others to learn more about the possible causes of crashes and associated injuries in order to assess and improve vehicle perfor- mance. In addition to crash investigations initiated by DaimlerChrysler Corporation, such investigations may be requested by customers, insurance carriers, govern- ment officials, and professional crash researchers, such as those associated with universities, and with hospital and insurance organizations. In the event that an investigation is undertaken by DaimlerChrysler Corporation (regardless of initiative), the company or its designated representative will first obtain permission of the appropriate custodial entity for the vehicle (usually the vehicle owner or lessee) before
accessing the electronic data stored, unless ordered to download data by a court with legal jurisdiction (i.e., pursuant to a warrant). A copy of the data will be provided to the custodial entity upon request. General data that does not identify particular vehicles or crashes may be released for incorporation in aggregate crash databases, such as those maintained by the US govern- ment and various states. Data of a potentially sensitive nature, such as would identify a particular driver, ve- hicle, or crash, will be treated confidentially. Confidential data will not be disclosed by DaimlerChrysler Corpora- tion to any third party except when: 1. Used for research purposes, such as to match data with a particular crash record in an aggregate database, provided confidentiality of personal data is thereafter preserved 2. Used DaimlerChrysler Corporation product
involving
litigation
defense
of
in
THINGS TO KNOW BEFORE STARTING YOUR VEHICLE 57
3. Requested by police under a legal warrant 4. Otherwise required by law Data Parameters that May Be Recorded: † Diagnostic trouble code(s) and warning lamp status for electronically-controlled safety systems, including the airbag system
cycles and vehicle mileage)
† Airbag disable lamp status (if equipped) † 9Time9 of airbag deployment (in terms of ignition † Airbag deployment level (if applicable) † Impact acceleration and angle † Seat belt status † Brake status (service and parking brakes) † Accelerator status (including vehicle speed)
58 THINGS TO KNOW BEFORE STARTING YOUR VEHICLE
† Engine control status (including engine speed) † Transmission gear selection † Cruise control status † Traction/stability control status † Tire pressure monitoring system status Child Restraint Everyone in your vehicle needs to be buckled up all the time — babies and children, too. Every state in the United States and all Canadian provinces require that small children ride in proper restraint systems. This is the law, and you can be prosecuted for ignoring it. Children 12 years and under should ride properly buck- led up in a rear seat, if available. According to crash statistics, children are safer when properly restrained in the rear seats rather than in the front.
There are different sizes and types of restraints for children from newborn size to the child almost large enough for an adult safety belt. Always check the child seat Owner’s Manual to ensure you have the right seat for your child. Use the restraint that is correct for your child:
WARNING!
In a collision, an unrestrained child, even a tiny baby, can become a missile inside the vehicle. The force required to hold even an infant on your lap can become so great that you could not hold the child, no matter how strong you are. The child and others could be badly injured. Any child riding in your vehicle should be in a proper restraint for the child’s size.
Infants and Child Restraints † Safety
experts
recommend that
children ride rearward-facing in the vehicle until they are at least one year old and weigh at least 20 lbs (9 kg). Two types of child restraints can be used rearward-facing: infant carriers and “convertible” child seats. † The infant carrier is only used rearward-facing in the vehicle. It is recommended for children who weigh up to about 20 lbs (9 kg). “Convertible” child seats often have a higher weight limit in the rearward-facing direction than infant carriers do, so they can be used rearward-facing by children who weigh more than 20
lbs (9 kg) but are less than one year old. Both types of child restraints are held in the vehicle by the lap/ shoulder belt or the LATCH child restraint anchorage system (Refer to LATCH — Child Seat Anchorage System in this section.)THINGS TO KNOW BEFORE STARTING YOUR VEHICLE 59
† Rearward-facing child seats must NEVER be used in the front seat of a vehicle with the front passenger airbag unless the airbag is turned off. An airbag deployment could cause severe injury or death to infants in this position.
WARNING!
† Improper installation can lead to failure of an infant or child restraint. It could come loose in a collision. The child could be badly injured or killed. Follow the manufacturer’s directions ex- actly when installing an infant or child restraint. † A rearward facing infant restraint should only be used in a rear seat. A rearward facing infant restraint in the front seat may be struck by a deploying passenger airbag which may cause se- vere or fatal injury to the infant.
60 THINGS TO KNOW BEFORE STARTING YOUR VEHICLE
Here are some tips for getting the most out of your child restraint: † Before buying any restraint system, make sure that it has a label certifying that it meets all applicable Safety Standards. The manufacturer also recommends that you try a child restraint in the vehicle seats where you will use it before you buy it. † The restraint must be appropriate for your child’s weight and height. Check the label on the restraint for weight and height limits. † Carefully follow the instructions that come with the restraint. If you install the restraint improperly, it may not work when you need it. † Except for the second row center seating position, all passenger seat belts are equipped with cinching latch plates. The second row center position has an auto- matic locking retractor. Both types of seat belts are
designed to keep the lap portion tight around the child restraint so that it is not necessary to use a locking clip. If the seat belt has a cinching latch plate, pulling up on the shoulder portion of the lap/shoulder belt will tighten the belt (the cinching latch plate will keep the belt tight, however, any seat belt system will loosen with time, so check the belt occasionally and pull it tight if necessary). For the second row center seat belt with the automatic locking retractor, pull the belt from the retractor until there is enough to allow you to pass through the child restraint and slide the latch plate into the buckle. Then, pull the belt until it is fully extracted from the retractor. Allow the belt to return to the retractor, pulling on the excess webbing to tighten the lap portion about the child restraint. For additional information, refer to 9Automatic Locking Mode9 ear- lier in this section. † In the rear seat, you may have trouble tightening the lap/shoulder belt on the child restraint because the