- 2009 Hyundai Tucson Owners Manuals
- Hyundai Tucson Owners Manuals
- 2005 Hyundai Tucson Owners Manuals
- Hyundai Tucson Owners Manuals
- 2008 Hyundai Tucson Owners Manuals
- Hyundai Tucson Owners Manuals
- 2010 Hyundai Tucson Owners Manuals
- Hyundai Tucson Owners Manuals
- 2012 Hyundai Tucson Owners Manuals
- Hyundai Tucson Owners Manuals
- 2011 Hyundai Tucson Owners Manuals
- Hyundai Tucson Owners Manuals
- Download PDF Manual
-
2. Channel Selection Button
3. Preset Selection Button
4. SCAN Selection Button
5. INFO Selection Button
6. CAT/FOLDER Button
7. Manual Channel Selection Button
❋There will be no
logo if the Bluetooth®/XM SATELLITE feature is not supported.
108
Using XM Satellite Radio Your vehicle is equipped with 3 months complimentary period of XM Satellite Radio so you have access to over 130
channels of music, information, and entertainment programming.3. Preset Selection Button Push [1]~[6] buttons less than 0.8 sec- onds to play the channel saved in each button. Push Preset button for 0.8 sec- onds or longer to save current channel to the respective button with a beep.
1. XM Selection Button Turns to XM Satellite Radio Mode. XM mode toggles in order to XM1➟XM2➟ XM3➟XM1... when the button is pressed each time.
2. Channel Selection Button (cid:129) Push [TRACK
] button for less than 0.8 seconds to select previous channel. ] button for 0.8 sec- onds or longer to continuously move to previous channel.
(cid:129) Push [TRACK
(cid:129) Push [SEEK
] button for less than
0.8 seconds to select next channel.
(cid:129) Push [SEEK
] button for 0.8 sec- onds or longer to continuously move to next channel.
(cid:129) Radio ID : Seek or Tune to XM channel
0 to display the Radio ID.
4. SCAN Selection Button Press to hear a brief sampling of all channel. To cancel the scan mode, press the button once again.
5. INFO Button Displays the information of the current channel in the order of Artist/Song title➟ Category/Channel name➟Current Play Channel➟Artist/Song title➟Category/ Channel name... when the button is pressed each time. If can not display the whole text informa- tion, rotate the tune button to see the next page.
Features of your vehicle
6. CATEGORY Search Button (cid:129) Push [FOLDER
] button to search
previous category.
(cid:129) Push [CAT
] button to search next category. To listen to the displayed cat- egory, press the TUNE/SETUP button. To scan channel in displayed category, press the scan button. To search chan- nel in displayed category, press seek buttons or turn the tune button clock- wise/counterclockwise.(CATEGORY icon is will be turned on in Category mode)
7. Manual Channel Selection Button While listening to XM broadcast, rotate this control to the right or left to search other channels while listening to current channel. (Turn to the right to searchhigh- er channels and left, lower channels)
4 109
(continued) (cid:129) Do not place the phone near or inside metallic objects,otherwise communications with Bluetooth® system or cellular service sta- tions can be disturbed.
(cid:129) While a phone is connected through Bluetooth® your phone may discharge quicker than usual for additional Bluetooth®-related operations.
(cid:129) Some cellular phones or other devices may cause interference noise or malfunction to audio system. In this case, store the device in a different location may resolve the situation.
Features of your vehicle
CAUTION IN USING BLUETOOTH® CELLULAR PHONE
(cid:129) Do not use a cellular phone or perform Bluetooth® settings (e.g. pairing a phone) while driving.
(cid:129) Some Bluetooth®-enabled phones may not be recognized by the system or fully compatible with the system.
(cid:129) Before using Bluetooth® related features of the audio system, refer your phone’s User’s Manual for phone-side Bluetooth® opera- tions.
(cid:129) The phone must be paired to the audio system to use Bluetooth® related features.
(cid:129) You will not be able to use the hands-free feature when your phone (in the car) is outside of the cellular service area (e.g.in a tunnel, in a underground, in a mountainous area,etc.).
(cid:129) If the cellular phone signal is poor or the vehicles interior noise is too loud,it may be difficult to hear the other person’s voice during a call.
(Continued)
110
BLUETOOTH® PHONE OPERA- TION (IF EQUIPPED)
1.VOLUME button : Raises or lowers
speaker volume.
2.MUTE : Mute the microphone during a
call
3.TALK button : Activates voice recogni-
tion.
4.CALL button : Places and transfers
calls.
5.END button : Ends calls or cancels
functions.
■■ What is Bluetooth®? Bluetooth® is a wireless technology that allows multiple devices to be connected in a short range, low-powered devices like hands-free, stereo headset, wireless remo- con, etc. For more information, visit the Bluetooth® website at www.Bluetooth.com
■ General Features (cid:129) This audio system supports Bluetooth® hands-free and stereo-headset features. - HANDS-FREE feature: Making or receiving calls wirelessly through voice recognition.
- STEREO-HEADSET feature: Playing music from cellular phones (that sup- ports A2DP feature) wirelessly.
(cid:129) Voice recognition engine of the Bluetooth®
system supports 3 types of languages: - English - US Spanish - Canadian French
✽✽ NOTICE • The phone must be paired to the sys- tem before using Bluetooth® features. • Only one selected (linked) cellular phone
can be used with the system at a time.
• Some phones are not fully compatible
with this system.
Features of your vehicle
■■ Bluetooth® Language Setting The system language can be changed by the following steps: 1. Power on the audio system with the
volume set to an audible level.
2. Press and hold
button on the steering wheel until the audio displays “Please Wait”. - The Bluetooth® system will reply in currently selected language that it is changing to the next language.
- System language cycles between English, Canadian French and US Spanish.
- Press and hold the
button on the
steering wheel for over 10 seconds.
3. When completed, the audio display
returns to normal.
4. Repeat steps 2 and 3 for the next lan-
guage selection.
NOTE: The phone needs to be paired again after changing system language. - Avoid resting your thumb or finger button as the language
on the could unintentionally change.
4 111
Features of your vehicle
■ Voice Recognition Activation (cid:129) The voice recognition engine con- tained in the Bluetooth® System can be activated in the following conditions: - Button Activation
The voice recognition system will be active when the button is pressed and after the sound of a Beep.
- Active Listening
The voice recognition system will be active for a period of time when the Voice Recognition system has asked for a customer response.
(cid:129) The system can recognize single dig- itsfrom zero to nine while number greater than ten will not be recognized.
(cid:129) If the command is not recognized, the system will announce "Pardon" or No input voice signal from microphone. (No response)
(cid:129) The system shall cancel voice recogni- tion mode in following cases : When pressing the button and saying cancel following the beep. When not making a call and pressing the but- ton. When voice recognition has failed 3 consecutive times.
112
(cid:129) At any time if you say “help”, the sys- tem will announce what commands are available.
■ Menu tree The menu tree identifies available voice recognition Bluetooth® functions.
Setup
Pair phone
Select phone
Delete phone
Change priority
Bluetooth off
Phonebook
Add entry
By voice
By Phone
Change Delete name
Call
By name
By number
✽✽ Tip ■ Voice Operation To get the best performance out of the Voice Recognition System, observe the followings: - Keep the interior of the vehicle as quiet as possible. Close the window to eliminate surrounding noise (traffic noise, vibration sounds, etc), which may disturb recogniz- ing the voice command correctly.
- Speak a command after a beep sound within 5 seconds. Otherwise the command will not be received properly.
- Speak in a natural voice without
pausing between words.
- While receiving voice commands, press the button on the steer- ing wheel remote controller to ter- minate guidance. Voice command will convert back to waiting mode to allow the user to say a new voice command.
■ Information Display
■ Phone Setup All Bluetooth® related operations can be performed by voice command or by man- ual operation.
- By Voice Command: Press to activate voice recognition.
button on the steering wheel
- By Manual Operation: 1) Push the [TUNE] knob to enter
SETUP mode.
The Bluetooth® icon appears on the upper side of audio display when a phone is connected.
2) Select “PHONE” item by rotating the
TUNE knob, then push the knob.
Features of your vehicle
3) Select desired item by rotating the TUNE knob, then push the knob.
(cid:129) Pairing phone Before using Bluetooth® features, the phone must be paired (registered) to the audio system. Up to 5 phones can be paired in the system.
Note: Before pairing a mobile phone, check to see that the Bluetooth® function in your mobile phone is set to “ON” state.
Note: The pairing procedure of the phone varies according to each phone model. Before attempting to pair phone, please see your phone’s User’s Guide for instructions.
4 113
Features of your vehicle
Note: Once pairing with the phone is com- pleted, there is no need to pair with that phone again unless the phone is deleted manually from the audio sys- tem (refer “Deleting Phone” section) or is removed from the phone.
the vehicle’s
information
By Voice Recognition ➀ Press ➁ Say “Set Up”. - The system replies with available
button.
commands.
- To skip the information message, press
again and then a beep is heard.
➂ Say “Pair Phone”. ➃ Say “Yes” to proceed. ➄ Say the name of your phone when
prompted. - Use any name to uniquely describe
your phone.
➅ Bluetooth® system will repeat the
name you stated.
➆ Say "Yes" to confirm. ➇ The audio displays “searching ---- passkey: 0000” and asks you to initiate pairing procedure from the phone.
➈ Search the Bluetooth® system on your phone .Your phone should display your [vehicle model name] on the
114
“My Phone” say “Yes” to proceed, otherwise say “Back” or “Cancel”
“Yes”
“Ready for pairing...please use your phone to connect to the system the pairing pass key is 0000”
Pair the device after searching for Bluetooth® devices in your mobile phone. Once pairing is complete, you will hear the following message.
“Pairing Complete”
“Connection Complete”
Bluetooth® device list. Then attempt pairing on your phone
➉ After Pairing is completed, your phone will start to transfer phone/contact list to the audio system. - This process may take from a few min- utes to over 10 minutes depending on the phone model and number of entries in the phone/contact list.
✽✽ Tip Press
button.
Beep~♪
“Setup”
“Setup” say “Pair phone”, “Select phone”, “Delete phone”, “Change priority” or “Bluetooth off”
“Pair Phone”
“Pair Phone” say “Yes” to proceed, otherwise say “Back” or “Cancel”
“Yes”
“Please say a name for the phone”
Ex: “My phone” or “John”
By Manual operation
➀ Select “PAIR” in PHONE menu, then-
proceed from step 5.
Note: Until the audio displays “Transfer Complete”, Bluetooth® hands-free fea- ture may not be fully operational.
Note: If the phone is paired to two or more vehicles of the same model, i.e. both vehicles are HMC TUCSON, some phones may not handle Bluetooth® devices of that name correctly. In this case, you may need to change the name displayed on your phone from TUCSON. Refer to your phone’s User’s Guide, or contact your cellular carrier or phone manufacturer for instructions.
Features of your vehicle
(cid:129) Connecting phone When the Bluetooth® system is enabled, the phone previously used is automati- cally selected and re-connected. If you want to select different phone previously paired, the phone can be selected through “Select Phone” menu. Only a selected phone can be used with the hands-free system at a time.
(cid:129) Deleting Phone The paired phone can be deleted. - When the phone is deleted, all the infor- mation associated with that phone is also be deleted (including phonebook). - If you want to use the deleted phone with the audio system again, pairing procedure must be completed once more.
button.
By Voice Recognition ➀ Press ➁ Say "Set Up". ➂ Say "Select Phone" after prompt - The system lists all the registered
button.
By Voice Recognition ➀ Press ➁ Say “Set Up”. ➂ Say “Delete Phone” after prompt. - The system lists all the registered
phone names.
phone names.
➃ Say the name or number of desired
➃ Say the name or number of desired
phone from the list.
➄ Say "Yes" to confirm.
phone from the list. ➄ Say “Yes” to confirm.
By Manual operation ➀ Select “SELECT” in PHONE menu, then select desired phone from the list.
By Manual operation ➀ Select “DELETE” in PHONE menu, then select desired phone from the list.
4 115
✽✽ NOTICE - The system can recognize single digits from zero to nine. Numbers that are ten or greater cannot be recognized.
- You can enter each digit individually or group digits together in preferred string lengths.
- To speed up input, it is a good idea to group all digits into a continuous string.
- The display corresponding to each operation appears on the screen as fol- lows:
- Input operation example: 1. Say: “Nine, nine, five” ➟ Display: “995” 2. And say: “Seven, three, four” ➟ Display: “995734”
Features of your vehicle
(cid:129) Changing Priority When several phones are paired to the audio system, the system attempts to connect the Bluetooth® system is enabled:
following order when
■ Phone Book (In-Vehicle) (cid:129) Adding Entry Phone numbers and voice tags can be registered. Entries registered in the phone can also be transferred.
1) “Priority” checked phone. 2) Previously connected phone 3) Gives up auto connection.
button.
By Voice Recognition ➀ Press ➁ Say “Set Up”. ➂ Say “Change Priority” after prompt. - The system lists all the registered
phone names.
➃ Say the name or number of desired
phone from the list. ➄ Say “Yes” to confirm.
By Manual operation ➀ Select “PRIORITY” in PHONE menu, then select desired phone from the list.
116
(cid:129) Adding Entry by Voice ➀ Press button. ➁ Say "Phonebook". - The system replies with all available
commands.
- To skip the information message, again and then a beep is
press heard.
➂ Say "Add Entry". ➃ Say "By Voice" to proceed. ➄ Say the name of the entry when
prompted.
➅ Say “Yes”to confirm. ➆ Say the phone number of that entry
when prompted.
➇ Say “Store” if phone number input is
finished.
➈ Say a phone number type. “Home”, “Work”, “Mobile”, “Other” or “Default” is available.
➉ Say “Yes” to complete adding entry. 11
Say “Yes” to store additional location for this contact, or say “Cancel” to fin- ish the process.
Features of your vehicle
(cid:129) Direct Calling ➀ Press ➁ Sat the following command.
button.
- Call
: Connects the call to John. - Call on : Connects the call to John’s mobile phone number. - Call at : Connects the call to john’s home number.
- Call
in : Connects the call to John’s office number.
Note: Calls can be immediately connected to contacts who name or voice tag are saved in the phonebook(or contacts).
(cid:129) Adding Entry by Phone ➀ Press button. ➁ Say "Phonebook". ➂ Say "Add Entry" after prompt. ➃ Say "By Phone" to proceed. ➄ Say “Yes” to confirm. ➅ Your phone will start to transfer phone/contact list to the audio system. This process may take over 10 min- utes depending on the phone model and number of entries.
➆ Wait till the audio displays “Transfer
Complete” message.
(cid:129) Changing Name The registered names can be modified.
➀ Press button. ➁ Say “Phonebook” ➂ Say “Change Name” after prompt. ➃ Say the name of the entry (voice tag) ➄ Say “Yes” to confirm. ➅ Say new desired name.
(cid:129) Deleting Name The registered names can be deleted. ➀ Press button. ➁ Say “Phonebook” ➂ Say “Delete Name” after prompt. ➃ Say the name of the entry (voice tag) ➄ Say “Yes” to confirm.
■ Making a Phone Call (cid:129) Calling by Name A phone call can be made by speaking names registered in the audio system.
button.
➀ Press ➁ Say "Call". ➂ Say “Name” when prompted. ➃ Say desired name (in phonebook or
voice tag).
➄ Say desired location (phone number type). Only stored locations can be selected.
➅ Say “Yes” to confirm and make a call.
✽✽ Tip A shortcut to each of the following func- tions is available: ➀ Say “Call Name”
4 117
■ Receiving a Phone Call When receiving a phone call, a ringtone is audible from speakers and the audio system changes into telephone mode. When receiving a phone call, “Incoming” message and incoming phone number (if available) are displayed on the audio.
button on the steering wheel.
(cid:129) To Answer a Call: - Press (cid:129) To Reject a Call: - Press (cid:129) To Adjust Ring Volume: - Use VOLUME buttons on the steering
button on the steering wheel.
wheel.
(cid:129) To Transfer a Call to the Phone (Secret
Call):
- Press and hold
button on the steer- ing wheel until the audio system trans- fers a call to the phone.
Features of your vehicle
(cid:129) Dialing by Number A phone call can be made by dialing the spoken numbers. The system can recog- nize single digits from zero to nine. ➀ Press ➁ Say “Call”. ➂ Say “Number” when prompted. ➃ Say desired phone numbers. ➄ Say “Dial” to complete the number and
button.
make a call.
✽✽ Tip A shortcut to each of the following func- tions is available: ➀ Say “Dial Number” ➁ Say “Dial
” 118
■ Talking on the Phone When talking on the phone, “Active Calls” message and the other party’s phone number (if available) are displayed on the audio.
(cid:129) To Mute the Microphone - Press (cid:129) To Finish a Call - Press
button on the steering wheel.
button on the steering wheel.
✽✽ NOTICE In the following situations, you or the other party may have difficulty hearing each other: 1. Speaking at the same time, your voice may not reach each other parties. (This is not a malfunction.) Speak alternate- ly with the other party on the phone.
2. Keep the Bluetooth® volume to a low level. High-level volume may result in distortion and echo.
3. When driving on a rough road. 4. When driving at high speeds. 5. When the window is open. 6. When the air conditioning vents are
facing the microphone.
7. When the sound of the air condition-
ing fan is loud.
■ Using the head unit as Bluetooth®
music
The head unit supports A2DP (Audio Advanced Distribution Profile) and AVRCP (Audio Video Remote Control Profile). Both profiles are available for listening to the MP3 music via Bluetooth® cellular phone supporting above Bluetooth® profiles. To play MP3 music from the Bluetooth® cellular phone, press the [AUX] button until “MP3 Play” is displayed on the LCD. Then try playing music by phone. When playing music from the Bluetooth® cellular phone, the head unit displays MP3 MODE.
NOTE: (cid:129) Not only MP3 files, all the sounds that the phone supports can be heard by the audio system.
(cid:129) The Bluetooth® cellular phones shall feature A2DP and AVRCP functions. (cid:129) Some A2DP and AVRCP Bluetooth® cellular phones may not play music through the head unit on first try. Please try the below; i.e : Menu➟Filemanager➟Music➟ Option➟Play via Bluetooth
Features of your vehicle
(cid:129) Please refer to User’s Guide of your phone for more detailed informa- tions. To stop music, try stop music by the phone and change audio mode to different one. (e.g. FM, CD, iPod, ...)
(cid:129) LANGUAGE (Language of Bluetooth®
voice recognition)
While in ADVANCED menu, press “LANGUAGE”. To change the language, select the desired language and press the [ENTER] button.
(cid:129) BT OFF While in ADVANCED menu, press “BT OFF” to turn off the Bluetooth® System.
■ ADVANCED Menu After pressing the [SETUP] button, press the PHONE menu. while in PHONE menu, press the “ADVANCED” menu to make Bluetooth® Phone settings.(The ADVANCED menu may differ according to audio specifications.)
(cid:129) IN VOL.
(Bluetooth® call volume adjustments)
While in ADVANCED menu, press “IN VOL.” Use the knob key to set the desired volume and press the [ENTER] button.
(cid:129) CONTACTS (Automatic Phonebook download setting) While in ADVANCED menu, press “CONTACTS”. To automatically save the contacts and call history in your mobile phone each time you connect a mobile device, press Yes. If you do not wish for automatic download, press No.
4 119
Features of your vehicle
■ Key matrix
No.
KEY
Paired H/P
Empty
Disconnected
Connected
Normal mode BT SETUP menu
Incoming Call Outgoing Call
Active Call
2nd Call
Class
SHORT
Not Paired
Not Connecting
LONG
Accept Call
2nd call
2nd Call
1st Call:waiting 2nd Call:active
2nd Call:waiting 1st Call:active
Transfer call:secret call
SHORT
VR
VR
VR
VR
MODE Cancel
MODE Cancel
MODE Cancel
MODE Cancel
Reject Call
End Call
End Call
End Call
LONG [10sec]
Speaker Adaptation
Speaker Adaptation
(Only English)
(Only English)
SHORT
Active
Active
Active
Active
LONG [10sec]
Change language
Change language
Change language
Change language
120
Before driving / 5-3
Key positions / 5-5
Manual transaxle / 5-7
Automatic transaxle / 5-10
All wheel drive (AWD) / 5-17
Brake system / 5-24
Cruise control system / 5-36
Economical operation / 5-40
Special driving conditions / 5-42
Winter driving / 5-46Driving your vehicle
Trailer towing / 5-50
Vehicle load limit / 5-57
Vehicle weight / 5-61Driving your vehicle
WARNING - ENGINE EXHAUST CAN BE DANGEROUS!
Engine exhaust fumes can be extremely dangerous. If, at any time, you smell exhaust fumes inside the vehicle, open the win- dows immediately.
• Do not inhale exhaust fumes.
Exhaust fumes contain carbon monoxide, a colorless, odorless gas that can cause unconsciousness and death by asphyxia- tion.
(cid:129) Be sure the exhaust system does not leak.
The exhaust system should be checked whenever the vehicle is raised to change the oil or for any other purpose. If you hear a change in the sound of the exhaust or if you drive over something that strikes the underneath side of the vehicle, have the exhaust system checked as soon as possible by an authorized HYUNDAI dealer.
(cid:129) Do not run the engine in an enclosed area.
Letting the engine idle in your garage, even with the garage door open, is a hazardous practice. Never run the engine in your garage any longer than it takes to start the engine and back the vehicle out.
(cid:129) Avoid idling the engine for prolonged periods with people inside the car.
If it is necessary to idle the engine for a prolonged period with people inside the vehicle, be sure to do so only in an open area with the air intake set at "Fresh" and fan operating at one of the higher speeds so fresh air is drawn into the interior.
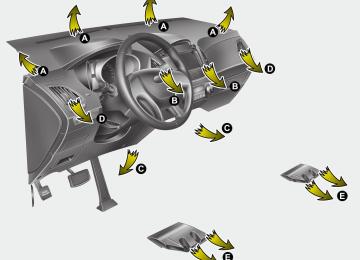
If you must drive with the tailgate open because you are carrying objects that make this necessary: 1. Close all windows. 2. Open side vents. 3. Set the air intake control at "Fresh", the air flow control at "Floor" or "Face" and the fan at one of the higher speeds.
To assure proper operation of the ventilation system, be sure the ventilation air intakes located just in front of the windshield are kept clear of snow, ice, leaves or other obstructions.
25
CALIFORNIA PROPOSI- TION 65 WARNING
Engine exhaust and a wide variety of automobile components and parts, including components found in the interior furnishings in a vehi- cle, contain or emit chemicals known to the State of California to cause cancer and birth defects and reproductive harm. In addition, cer- tain fluids contained in vehicles and certain products of component wear contain or emit chemicals known to the State of California to cause cancer and birth defects or other reproductive harm.
BEFORE DRIVING Before entering vehicle • Be sure that all windows, outside mir-
ror(s), and outside lights are clean.
(cid:129) Check the condition of the tires. (cid:129) Check under the vehicle for any sign of
leaks.
(cid:129) Be sure there are no obstacles behind
you if you intend to back up.
Necessary inspections Fluid levels, such as engine oil, engine coolant, brake fluid, and washer fluid should be checked on a regular basis, with the exact interval depending on the fluid. Further details are provided in sec- tion 7, “Maintenance”.
Before starting (cid:129) Close and lock all doors. (cid:129) Position the seat so that all controls are
easily reached.
(cid:129) Adjust the inside and outside rearview
mirrors.
Driving your vehicle
(cid:129) Be sure that all lights work. (cid:129) Check all gauges. (cid:129) Check the operation of warning lights when the ignition switch is turned to the ON position.
(cid:129) Release the parking brake and make sure the brake warning light goes out. For safe operation, be sure you are famil- iar with your vehicle and its equipment.
WARNING
All passengers must be properly belted whenever the vehicle is mov- ing. Refer to “Seat belts” in section 3 for more information on their proper use.
WARNING
Always check the surrounding areas near your vehicle for people, especially children, before putting a vehicle into “Drive” or “Reverse”.
5 3
WARNING
When you intend to park or stop the vehicle with the engine on, be care- ful not to depress the accelerator pedal for a long period of time. It may overheat the engine or exhaust system and cause fire.
Driving your vehicle
WARNING - Driving under the influence of alcohol or drugs
Drinking and driving is dangerous. Drunk driving is the number one contributor to the highway death toll each year. Even a small amount of alcohol will affect your reflexes, perceptions and judgment. Driving while under the influence of drugs is as dangerous or more dangerous than driving drunk. You are much more likely to have a serious accident if you drink or take drugs and drive. If you are drinking or taking drugs, don’t drive. Do not ride with a driv- er who has been drinking or taking drugs. Choose a designated driver or call a cab.
45
KEY POSITIONS
OUN036002
Ignition switch position LOCK The steering wheel locks to protect against theft. The ignition key can be removed only in the LOCK position. When turning the ignition switch to the LOCK position, push the key inward at the ACC position and turn the key toward the LOCK position.
ACC (Accessory) The steering wheel is unlocked and elec- trical accessories are operative.
✽✽ NOTICE If difficulty is experienced turning the ignition switch to the ACC position, turn the key while turning the steering wheel right and left to release the tension.
ON The warning lights can be checked before the engine is started. This is the normal running position after the engine is started. Do not leave the ignition switch ON if the engine is not running to prevent battery discharge.
START Turn the ignition key to the START posi- tion to start the engine. The engine will crank until you release the key; then it returns to the ON position. The brake warning lamp can be checked in this position.
Driving your vehicle
WARNING - Ignition key
(cid:129) Never turn the ignition key to LOCK or ACC while the vehicle is moving. This would result in loss of directional control and braking function, which could cause an accident.
(cid:129) The anti-theft steering column lock is not a substitute for the parking brake. Before leaving the driver's seat, always make sure the shift lever is engaged in P (Park) for the automatic transaxle, or reverse for the manual transaxle, set the park- ing brake fully, and shut the engine off. Unexpected and sudden vehi- cle movement may occur if these precautions are not taken.
(cid:129) Never reach for the ignition switch, or any other controls through the steering wheel while the vehicle is in motion. The presence of your hand or arm in this area could cause a loss of vehicle control, an accident and serious bodily injury or death.
(cid:129) Do not place any movable objects around the driver’s seat as they may move while driving, interfere with the driver and lead to an acci- dent.
5 5
Driving your vehicle
Starting the engine
WARNING
Always wear appropriate shoes when operating your vehicle. Unsuitable shoes (high heels, ski boots,etc.) may interfere with your ability to use the brake and accelerator pedal, and the clutch (if equipped).
65
1. Make sure the parking brake is
applied.
fully and shift
2. Manual Transaxle - Depress the clutch pedal the transaxle into Neutral. Keep the clutch pedal and brake pedal depressed while turning the ignition switch to the start position. Automatic Transaxle - Place the transaxle shift lever in P (Park). Depress the brake pedal fully. You can also start the engine when the shift lever is in the N (Neutral) position.
3. Turn the ignition switch to START and hold it there until the engine starts (a maximum of 10 seconds), then release the key.
4. In extremely cold weather (below -18°C / 0°F) or after the vehicle has not been operated for several days, let the engine warm up without depress- ing the accelerator.
Whether the engine is cold or warm, it should be started without depressing the accelerator.
CAUTION
If the engine stalls while the vehicle in motion, do not attempt to move the shift lever to the P (Park) posi- tion. If traffic and road conditions permit,you may put the shift lever in the N (Neutral) position while the vehicle is still moving and turn the ignition switch to the START posi- tion in an attempt to restart the engine.
CAUTION
Do not engage the starter for more than 10 seconds.If the engine stalls or fails to start,wait 5 to 10 seconds before re-engaging the starter. Improper use of the starter may damage it.
MANUAL TRANSAXLE (IF EQUIPPED)
Manual transaxle operation The manual transaxle has 5 (or 6*) for- ward gears. This shift pattern is imprinted on the shift knob. The transaxle is fully synchronized in all forward gears so shifting to either a higher or a lower gear is easily accom- plished. Press the clutch pedal down fully while shifting, then release it slowly. If your vehicle is equipped with an igni- tion lock switch, the engine will not start when starting the engine without depressing the clutch pedal. (if equipped) The gearshift lever must be returned to the neutral position before shifting into R (Reverse). The ring (1) located immediately below the shift knob must be pulled upward while moving the shift lever to the R posi- tion. (if equipped) Make sure the vehicle is completely stopped before shifting into R (Reverse). Never operate the engine with the tachometer (rpm) in the red zone.
■■ 6 speed
■■ 5 speed
The shift lever can be moved without pulling the ring (1). The ring (1) must be pulled up while moving the shift lever.
OLM059009/OLM059009L
Driving your vehicle
CAUTION
(cid:129) When downshifting from fifth gear to fourth gear, caution should be taken not to inadver- tently press the gear shift lever sideways in such a manner that second gear is engaged. Such a drastic downshift may cause the engine speed to increase to the point that the tachometer will enter the red-zone. Such over- revving of the engine may possi- bly cause engine damage.
(cid:129) Do not downshift more than 2
gears or downshift the gear when the engine is running at high speed (5,000 RPM or higher). Such a downshifting may damage the engine.5 7
Driving your vehicle
(cid:129) During cold weather, shifting may be difficult until the transaxle lubricant has warmed up. This is normal and not harmful to the transaxle.
(cid:129) If you've come to a complete stop and it's hard to shift into 1st or R (Reverse), put the shift lever in N (Neutral) posi- tion and release the clutch. Press the clutch pedal back down, and then shift into 1st or R (Reverse) gear position.
CAUTION
(cid:129) To avoid premature clutch wear and damage, do not drive with your foot resting on the clutch pedal. Also, don’t use the clutch to hold the vehicle stopped on an uphill grade, while waiting for a traffic light,etc.
(cid:129) Do not use the shift lever as a handrest during driving, as this can result in premature wear of the transaxle shift forks.
(cid:129) When operating the clutch pedal, press the clutch pedal down fully. If you don't press the clutch pedal fully,the clutch may be damaged or noise may occur.
85
WARNING
Before leaving the driver’s seat, always set the parking brake fully and shut the engine off. Then make sure the transaxle is shifted into 1st gear when the vehicle is parked on a level or uphill grade, and shifted into R (Reverse) on a downhill grade. Unexpected and sudden vehicle movement can occur if these precautions are not followed in the order identified.
Using the clutch The clutch should be pressed all the way to the floor before shifting, then released slowly. The clutch pedal should always be fully released while driving. Do not rest your foot on the clutch pedal while driv- ing. This can cause unnecessary wear. Do not partially engage the clutch to hold the vehicle on an incline. This causes unnecessary wear. Use the foot brake or parking brake to hold the vehicle on an incline. Do not operate the clutch pedal rapidly and repeatedly. This vehicle is equipped with a Hill-start Assist Control(HAC) that will hold the vehicle in place for about 2 seconds when the brake is released on a sleep enough uphill grade (about 8° incline). Practice releasing the brake and apply- ing the throttle with your right foot while releasing the clutch with your left foot, so you learn how the HAC works.
WARNING
The HAC is activated only for about 2 seconds, so when the vehicle is starting off always depress the accelerator pedal.
Downshifting When you must slow down in heavy traf- fic or while driving up steep hills, down- shift before the engine starts to labor. Downshifting reduces the chance of stalling and gives better acceleration when you again need to increase your speed. When the vehicle is traveling down steep hills, downshifting helps maintain safe speed and prolongs brake life. This vehicle is geared for improved fuel economy and may need to be driven in a lower gear when driving up hills or into high winds. Using top gear is best for fuel economy, but you should use the best gear for the road conditions.
Good driving practices (cid:129) Never take the vehicle out of gear and coast down a hill. This is extremely hazardous. Always leave the vehicle in gear.
(cid:129) Don't "ride" the brakes. This can cause them to overheat and malfunction. Instead, when you are driving down a long hill, slow down and shift to a lower gear. When you do this, engine braking will help slow down the vehicle.
(cid:129) Slow down before shifting to a lower gear. This will help avoid over-revving the engine, which can cause damage. (cid:129) Slow down when you encounter cross winds. This gives you much better con- trol of your vehicle.
(cid:129) Be sure the vehicle is completely stopped before you attempt to shift into reverse. The transaxle can be dam- aged if you do not. To shift into reverse, depress the clutch, move the shift lever to neutral, then shift to the reverse position.
(cid:129) Exercise extreme caution when driving on a slippery surface. Be especially careful when braking, accelerating or shifting gears. On a slippery surface, an abrupt change in vehicle speed can cause the drive wheels to lose traction and the vehicle to go out of control.
Driving your vehicle
WARNING
(cid:129) Always buckle-up! In a collision, an unbelted occupant is signifi- cantly more likely to be seriously injured or killed than a properly belted occupant.
(cid:129) Avoid high speeds when corner-
ing or turning.
(cid:129) Do not make quick steering wheel movements, such as sharp lane changes or fast, sharp turns. (cid:129) The risk of rollover is greatly increased if you lose control of your vehicle at highway speeds. (cid:129) Loss of control often occurs if two or more wheels drop off the roadway and the driver over- steers to reenter the roadway.
(cid:129) In the event your vehicle leaves the roadway, do not steer sharply. Instead, slow down before pulling back into the travel lanes.
(cid:129) Never exceed posted speed lim-
its.
5 9
Driving your vehicle
AUTOMATIC TRANSAXLE (IF EQUIPPED)
Automatic transaxle operation The automatic transaxle has 6 forward speeds and one reverse speed. The indi- vidual speeds are selected automatically, depending on the position of the shift lever.
✽✽ NOTICE The first few shifts on a new vehicle, if the battery has been disconnected, may be somewhat abrupt. This is a normal condition, and the shifting sequence will adjust after shifts are cycled a few times by (Transaxle Control Module) or PCM (Powertrain Control Module).
the TCM
+ (UP) + (UP)
- (DO- (DOWN)WN)
Depress the brake pedal when shifting.
The shift lever can be shifted freely.
10
OLM059010
For smooth operation, depress the brake pedal when shifting from N (Neutral) to a forward or reverse gear.
WARNING - Automatic transaxle
(cid:129) Always check the surrounding areas near your vehicle for peo- ple, especially children, before shifting a vehicle into D (Drive) or R (Reverse).
(cid:129) Before leaving the driver’s seat, always make sure the shift lever is in the P (Park) position; then set the parking brake fully and shut the engine off. Unexpected and sudden vehicle movement can occur if these precautions are not followed in the order iden- tified.
CAUTION
(cid:129) To avoid damage to your transaxle, do not accelerate the engine in R (Reverse) or any for- ward gear position with the brakes on.
(cid:129) When stopped on an incline, do not hold the vehicle stationary with engine power.Use the serv- ice brake or the parking brake.
(cid:129) Do not shift from N (Neutral) or P (Park) into D (Drive), or R (Reverse) when the engine is above idle speed.
Driving your vehicle
Transaxle ranges The indicator in the instrument cluster displays the shift lever position when the ignition switch is in the ON position.
P (Park) Always come to a complete stop before shifting into P (Park). This position locks the transaxle and prevents the front wheels from rotating.
WARNING
(cid:129) Shifting into P (Park) while the vehicle is in motion will cause the drive wheels to lock which will cause you to lose control of the vehicle.
(cid:129) Do not use the P (Park) position in place of the parking brake. Always make sure the shift lever is latched in the P (Park) position and set the parking brake fully.
(cid:129) Never leave a child unattended in
a vehicle.
5 11
Driving your vehicle
CAUTION
The transaxle may be damaged if you shift into P (Park) while the vehicle is in motion.
N (Neutral) The wheels and transaxle are not engaged. The vehicle will roll freely even on the slightest incline unless the parking brake or service brakes are applied.
D (Drive) This is the normal forward driving posi- tion. The transaxle will automatically shift through a 6-gear sequence, providing the best fuel economy and power.
For extra power when passing another vehicle or climbing grades, depress the accelerator fully, at which time the transaxle will automatically downshift to the next lower gear (or gears, as appro- priate).
✽✽ NOTICE Always come to a complete stop before shifting into D (Drive).
R (Reverse) Use this position to drive the vehicle backward.
CAUTION
Always come to a complete stop before shifting into or out of R (Reverse); you may damage the transaxle if you shift into R while the vehicle is in motion, except as explained in “Rocking the vehicle” in this section.
12
Driving your vehicle
(Continued) • In sports mode, when the engine rpm approaches the red zone the transaxle will upshift automatically.
• If the driver press the lever to +(up) or -(Down) position, the transaxle may not make the requested gear change if the next gear is outside of the allow- able engine rpm range.
• When driving on a slippery road, push the shift lever forward into the +(up) position. This causes the transaxle to shift into the 2nd gear which is better for smooth driving on a slippery road. Push the shift lever to the -(down) side to shift back to the 1st gear.
Up (+)
: Push the lever forward once to shift up one gear.
Down (-) : Pull the lever backwards once
to shift down one gear.
✽✽ NOTICE • In sports mode, the driver must exe- cute upshifts in accordance with road conditions, taking care to keep the engine speed below the red zone.
• In sports mode, only the 6 forward gears can be selected. To reverse or park the vehicle, move the shift lever to the R (Reverse) or P (Park) position as required.
• In sports mode, downshifts are made automatically when the vehicle slows down. When the vehicle stops, 1st gear is automatically selected.
(Continued)
Spor ts mode ts mode Spor
OLM059012
Sports mode Whether the vehicle is stationary or in motion, sports mode is selected by push- ing the shift lever from the D (Drive) posi- tion into the manual gate. To return to D (Drive) range operation, push the shift lever back into the main gate.
In sports mode, moving the shift lever backwards and forwards will allow you to make gearshifts rapidly. In contrast to a manual transaxle, the sports mode allows gearshifts with the accelerator pedal depressed.
5 13
Driving your vehicle
Shift lock system For your safety, the automatic transaxle has a shift lock system which prevents shifting the transaxle from P (Park) or N (Neutral) into R (Reverse) unless the brake pedal is depressed. To shift the transaxle from P (Park) or N (Neutral) into R (Reverse): 1. Depress and hold the brake pedal. 2. Start the engine or turn the ignition
switch to the ON position.
Ignition key interlock system The ignition key cannot be removed unless the shift lever is in the P (Park) position. If the ignition switch is in any other position, the key cannot be removed.
the brake pedal
3. Move the shift lever. If repeatedly depressed and released with the shift lever in the P (Park) position, a chattering noise near the shift lever may be heard. This is a normal condition.
is
WARNING
Always fully depress the brake pedal before and while shifting out of the P (Park) position into another position to avoid inadvertent motion of the vehicle which could injure persons in or around the vehicle.
14
OLM059013
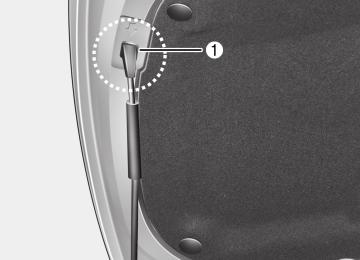
Shift-lock override If the shift lever cannot be moved from the P (Park) or N (Neutral) position into R (Reverse) position with the brake pedal depressed, continue depressing the brake, then do the following: 1. Carefully remove the cap (1) covering
the shift-lock override access hole.
2. Insert a screwdriver (or key) into the access hole and press down on the screwdriver (or key). 3. Move the shift lever. 4. Have your vehicle inspected by an authorized HYUNDAI dealer immedi- ately.
(cid:129) Always use the parking brake. Do not depend on placing the transaxle in P (Park) to keep the vehicle from moving. (cid:129) Exercise extreme caution when driving on a slippery surface. Be especially careful when braking, accelerating or shifting gears. On a slippery surface, an abrupt change in vehicle speed can cause the drive wheels to lose traction and the vehicle to go out of control.
(cid:129) Optimum vehicle performance and economy is obtained by smoothly depressing and releasing the accelera- tor pedal.
Good driving practices (cid:129) Never move the gear shift lever from P (Park) or N (Neutral) to any other posi- tion with the accelerator pedal depressed.
(cid:129) Never move the gear shift lever into P
(Park) when the vehicle is in motion.
(cid:129) Be sure the vehicle is completely stopped before you attempt to shift into R (Reverse) or D (Drive).
(cid:129) Never take the vehicle out of gear and coast down a hill. This may be extremely hazardous. Always leave the car in gear when moving.
(cid:129) Do not "ride" the brakes. This can cause them to overheat and malfunc- tion. Instead, when you are driving down a long hill, slow down and shift to a lower gear. When you do this, engine braking will help slow down the vehicle. (cid:129) Slow down before shifting to a lower gear. Otherwise, the lower gear may not be engaged.
Driving your vehicle
WARNING
(cid:129) Always buckle-up! In a collision, an unbelted occupant is signifi- cantly more likely to be seriously injured or killed than a properly belted occupant.
(cid:129) Avoid high speeds when corner-
ing or turning.
(cid:129) Do not make quick steering wheel movements, such as sharp lane changes or fast, sharp turns. (cid:129) The risk of rollover is greatly increased if you lose control of your vehicle at highway speeds. (cid:129) Loss of control often occurs if two or more wheels drop off the roadway and the driver over- steers to reenter the roadway.
(cid:129) In the event your vehicle leaves the roadway, do not steer sharply. Instead, slow down before pulling back into the travel lanes.
(cid:129) Never exceed posted speed lim-
its.
5 15
Driving your vehicle
WARNING
If your vehicle becomes stuck in snow, mud, sand, etc., then you may attempt to rock the vehicle free by moving it forward and backward. Do not attempt this procedure if people or objects are anywhere near the vehicle. During the rocking operation the vehicle may suddenly move forward or backward as it becomes unstuck, causing injury or damage to nearby people or objects.
Moving up a steep grade from a stand- ing start To move up a steep grade from a stand- ing start, depress the brake pedal, shift the shift lever to D (Drive). Release the brake pedal and gradually press the accelerator pedal. The Hill-start Assist Control(HAC) will hold the vehicle brakes for up to 2 sec- onds on grades steeper than 8° uphill.
WARNING
The HAC is activated only for about 2 seconds, so when the vehicle is starting off always depress the accelerator pedal.
16
ALL WHEEL DRIVE (AWD) (IF EQUIPPED) Engine power can be delivered to all front and rear wheels for maximum traction. AWD is useful when extra traction is required on road, such as, when driving on slippery, muddy, wet, or snow-covered roads. These vehicles are not designed for challenging off-road use. Occasional off-road use such as established unpaved roads and trails are OK. It is always important when traveling off-high- way that the driver carefully reduces the speed to a level that does not exceed the safe operating speed for those condi- tions. In general, off-road conditions pro- vide less traction and braking effective- ness than normal road conditions. The driver must be especially alert to avoid driving on slopes which tilt the vehicle to either side. These factors must be carefully consid- ered when driving off-road. Keeping the vehicle in contact with the driving surface and under control in these conditions is always the driver's responsibility for the safety of him/herself and his or her pas- sengers.
WARNING - Off road driving This vehicle is designed primarily for on road use although it can oper- ate effectively off road. However, it was not designed to drive in chal- lenging off-road conditions. Driving in conditions that exceed the vehi- cle's intended design or the driver's experience in severe injury or death.
level may result
WARNING
When AWD system warning light illuminates, AWD system does not operate. Contact an authorized HYUNDAI dealer as soon as possible.
Driving your vehicle
Tight corner brake effect
CAUTION - AWD
When turning sharply on a paved road at low speed while in four- wheel drive,steering control will be difficult.
Tight corner brake effect is a unique characteristic of all-wheel drive vehicles caused by the difference in tire rotation at the all wheels and the zero-degree align- ment of the front wheels and suspension. Sharp turns at low speeds should be car- ried out with caution.
5 17
Driving your vehicle
ALL Wheel Drive (AWD) transfer mode selection
Transfer mode
Selection button
Indicator light
Description
AWD AUTO (AWD LOCK is
deactivated)
AWD LOCK
(cid:129) When driving in AWD AUTO mode, the vehicle operates sim- ilar to conventional 2WD vehicles under normal operating conditions. However, if the system determines that there is a need for the AWD mode, the engine’s driving power is dis- tributed to all four wheels automatically without driver inter- vention.
(cid:129) When driving on normal roads and pavement, the vehicle
moves similar to conventional 2WD vehicles.
(cid:129) This mode is used for climbing or descending sharp grades, off-road driving, driving on sandy and muddy roads, etc., to maximize traction.
(cid:129) This mode automatically begins to deactivate at speeds above 19 mph (30 km/h) and is shifted to AWD AUTO mode at speed above 25 mph (40 km/h). If the vehicle decelerates to speeds below 19 mph (30 km/h), however, the transfer mode is shifted into AWD LOCK mode again.
(Indicator light is not illuminated)
(Indicator light is
illuminated)
✽✽ NOTICE • When driving on normal roads, deactivate the AWD LOCK mode by pushing the AWD LOCK button (the indicator light goes off). Driving on normal roads with AWD LOCK mode(especially, when cornering) may cause mechanical noise or vibration. The noise and vibration will disappear when the AWD LOCK mode is deactivated. Some parts of the power train may be dam- aged by prolonged driving with the noise and vibration.
• When the AWD LOCK mode is deactivated, a shock may be felt as the drive power is delivered entirely to the front wheels.
This shock is not a mechanical failure.
18
For safe all-wheel drive operation
WARNING - All-wheel driv-
ing
The conditions of on-road or off- road that demand all-wheel drive mean all functions of your vehicle are more exposed to extreme stress than under normal road con- ditions. Slow down and be ready for changes in the composition and traction of the surface under your tires. If you have any doubt about the safety of the conditions you are facing, stop and consider the best way to proceed. Do not exceed the ability of yourself or your vehicle to operate safely.
(cid:129) Do not try to drive in deep standing water or mud since such conditions can stall your engine and clog your exhaust pipes. Do not drive down steep hills since it requires extreme skill to maintain control of the vehicle.
HILL1
(cid:129) When you are driving up or down hills drive as straight as possible. Use extreme caution in going up or down steep hills, since you may flip your vehicle over depending on the grade, terrain and water/mud conditions.Driving your vehicle
HILL2
WARNING - Hills
Driving across the contour of steep hills can be extremely dangerous. This danger can come from slight changes in the wheel angle which can destabilize the vehicle or, even if the vehicle is maintaining stabili- ty under power, it can lose that sta- bility if the vehicle stops its forward motion. Your vehicle may roll over without warning and without time for you to correct a mistake that could cause serious injury or death.
5 19
Driving your vehicle
(cid:129) You must consciously take the effort to learn how to corner in a AWD vehicle. Do not rely on your experience in con- ventional 2WD vehicles in choosing safe cornering speed in AWD mode. For starters, you must drive more slow- ly in AWD.
(cid:129) Drive carefully off-road because your vehicle may be damaged by rocks or roots of trees. Become familiar with the off-road conditions where you are going to drive before you begin driving.
WARNING - AWD
Reduce speed when you turn cor- ners. The center of gravity of AWD vehicles is higher than that of con- ventional 2WD vehicles, making them more likely to roll over when you turn corners too fast.
20
WARNING - Wind danger
If you are driving in heavy wind, the vehicle's higher center of gravity decreases your steering control capacity and requires you to drive more slowly.
(cid:129) If you need to drive in the water, stop your vehicle, set your transfer to the AWD LOCK mode and drive at less than 5 mph (8 km/h).
OLM059022L
WARNING - Steering
wheel
Do not grab the inside of the steer- ing wheel when you are driving off- road. You may hurt your arm by a sudden steering maneuver or from steering wheel rebound due to impact with objects on the ground. You could lose control of the steer- ing wheel.
(cid:129) Always hold the steering wheel firmly
when you are driving off-road.
(cid:129) Make sure all passengers are wearing
seat belts.
WARNING - Driving
through water Drive slowly. If you are driving too fast in water, the water can get into the engine compartment and wet the ignition system, causing your vehicle to suddenly stop. If this happens and your vehicle is in a tilted position, your vehicle may roll over. Excessive water in the engine can cause irreversible engine damage, which is not covered under warran- ty.
✽✽ NOTICE • Do not drive in water if the level is higher than the bottom of the vehicle. • Check your brake condition once you are out of mud or water. Press the brake pedal several times as you move slowly until you feel normal braking forces return.
• Shorten your scheduled maintenance interval if you drive in off-road condi- tions such as sand, mud or water (see “Maintenance under severe usage conditions” in section 7). Always wash your vehicle thoroughly after off road use, especially cleaning the bottom of the vehicle.
• Since the driving torque is always applied to the 4 wheels the perform- ance of the AWD vehicle is greatly affected by the condition of the tires. Be sure to equip the vehicle with four tires of the same size and type.
• A full time four wheel drive vehicle cannot be towed by an ordinary tow truck. Make sure that the vehicle is placed on a flat bed truck for moving.
WARNING - AWD driving
(cid:129) Avoid high cornering speed. (cid:129) Do not make quick steering