- 2007 Hyundai Sonata Owners Manuals
- Hyundai Sonata Owners Manuals
- 2006 Hyundai Sonata Owners Manuals
- Hyundai Sonata Owners Manuals
- 2003 Hyundai Sonata Owners Manuals
- Hyundai Sonata Owners Manuals
- 2004 Hyundai Sonata Owners Manuals
- Hyundai Sonata Owners Manuals
- 2011 Hyundai Sonata Owners Manuals
- Hyundai Sonata Owners Manuals
- 2013 Hyundai Sonata Owners Manuals
- Hyundai Sonata Owners Manuals
- 2005 Hyundai Sonata Owners Manuals
- Hyundai Sonata Owners Manuals
- 2009 Hyundai Sonata Owners Manuals
- Hyundai Sonata Owners Manuals
- 2008 Hyundai Sonata Owners Manuals
- Hyundai Sonata Owners Manuals
- 2010 Hyundai Sonata Owners Manuals
- Hyundai Sonata Owners Manuals
- Download PDF Manual
-
: Fast wiper speed
Features of your vehicle
✽✽ NOTICE If there is heavy accumulation of snow or ice on the windshield, defrost the windshield for about 10 minutes, or until the snow and/or ice is removed before using the windshield wipers to ensure proper operation.
CAUTION
When starting the vehicle in winter, set the wiper switch in the OFF position. Otherwise, wipers may operate and ice may damage the windshield wiper blades. Always remove all snow and ice and defrost the windshield properly prior to operating the windshield wipers.
4 77
YF HMA 4a-111.qxp 1/16/2012 6:32 PM Page 78
Features of your vehicle
CAUTION
To prevent possible damage to the washer pump, do not operate the washer when the fluid reservoir is empty.
WARNING
Do not use the washer in freezing temperatures without first warming the windshield with the defrosters; the washer solution could freeze on contact with the windshield and obscure your vision.
CAUTION
(cid:127) To prevent possible damage to the wipers or windshield, do not operate the wipers when the windshield is dry.
(cid:127) To prevent damage to the wiper blades, do not use gasoline, kerosene, paint thinner, or other solvents on or near them.
(cid:127) To prevent damage to the wiper arms and other components, do not attempt to move the wipers manually.
OYF049101
Windshield washers In the OFF position, pull the lever gently toward you to spray washer fluid on the windshield and to run the wipers 1-3
cycles. Use this function when the windshield is dirty. The spray and wiper operation will con- tinue until you release the lever. If the washer does not work, check the washer fluid level. If the fluid level is not sufficient, you will need to add appropri- ate non-abrasive windshield washer fluid to the washer reservoir. The reservoir filler neck is located in the front of the engine compartment on the passenger side.78
YF HMA 4a-111.qxp 1/16/2012 6:32 PM Page 79
INTERIOR LIGHT
CAUTION
Do not use the interior lights for extended periods when the engine is not running. It may cause battery discharge.
WARNING
Do not use the interior lights when driving in the dark. Accidents could happen because the view may be obscured by interior lights.
Automatic turn off function (if equipped) The interior lights automatically turn off approximately 20 minutes after the igni- tion switch is turned off. If your vehicle is equipped with the theft alarm system, the interior lights automat- ically turns off approximately 5 seconds after the system is armed stage.
OYF049104K
Map lamp Push the lens to turn the map lamp on or off. This light produces a spot beam for convenient use as a map lamp at night or as a personal lamp for the driver and the front passenger. (cid:127) DOOR : In the DOOR position, the map lamp and the room lamp come on when any door is opened regardless of ignition switch position.
the
Features of your vehicle
When doors are unlocked by the transmitter (or smart key), the map lamp and the room lamp come on for approximate- ly 30 seconds as long as any door is not open. The map lamp and the room lamp goes out gradually after approximately 30
seconds if the door is closed. However, if the ignition switch is ON or all doors are locked, the map lamp and the room lamp will turn off immediately. If a door is opened with the ignition switch in the ACC or LOCK position, the map lamp and the room lamp stay on for about 20
minutes. However, if a door is opened with the ignition switch in the ON position, the map lamp and the room lamp stay on continuously.(cid:127) ON : The light stays on at all times. (cid:127) OFF : The lights turn off even if a door
is opened. ❈ When the lamp is turned ON by pressing the lens (1) the lamp does not turn off even if the switch (2) is in the OFF position.
4 79
YF HMA 4a-111.qxp 1/16/2012 6:32 PM Page 80
Features of your vehicle
OYF049108
OYF049107
Trunk lamp The trunk room lamp comes on when the trunk is opened.
Glove box lamp The glove box lamp comes on when the glove box is opened.
CAUTION
The trunk lamp comes on as long as the trunk lid is open.To prevent unnecessary charging system drain, close the trunk lid securely after using the trunk.
CAUTION
To prevent unnecessary charging system drain, close the glove box securely after using the glove box.
OYF049105
OYF049216
Room lamp To turn the room lamp ON or OFF, push the switch or lens.
CAUTION
Do not leave the lamp switches on for an extended period of time when the vehicle is not running.
80
YF HMA 4a-111.qxp 1/16/2012 6:32 PM Page 81
Features of your vehicle
OYF049209
Vanity mirror lamp Pull the sunvisor downward and you can turn the vanity mirror lamp ON or OFF by pushing the button. (cid:127) (cid:127) O : To turn the lamp OFF.
: To turn the lamp ON.
CAUTION
To prevent unnecessary charging system drain, turn off the lamp by pushing the O button after using the lamp.
4 81
YF HMA 4a-111.qxp 1/16/2012 6:32 PM Page 82
Features of your vehicle
DEFROSTER
CAUTION
To prevent damage to the conduc- tors bonded to the inside surface of the rear window, never use sharp instruments or window cleaners containing abrasives to clean the window.
✽✽ NOTICE If you want to defrost and defog the front windshield, refer to “Windshield defrosting and defogging” in this sec- tion.
indicator on
The the rear window defroster button illuminates when the defroster is ON. If there is heavy accumulation of snow on the rear window, brush it off before oper- ating the rear defroster. The rear window defroster automatically turns off after approximately 20 minutes or when the ignition switch is turned off. To turn off the defroster, press the rear window defroster button again.
Outside rearview mirror defroster (if equipped) If your vehicle is equipped with the out- side rearview mirror defrosters, they will operate at the same time you turn on the rear window defroster.
OYF049110
OYF049155
Rear window defroster The defroster heats the window to remove frost, fog and thin ice from the rear window, while the engine is running. To activate the rear window defroster, press the rear window defroster button located in the center facia switch panel.
82
YF HMA 4a-111.qxp 1/16/2012 6:33 PM Page 83
MANUAL CLIMATE CONTROL SYSTEM (IF EQUIPPED)
■ Type A
Features of your vehicle
■ Type B
1. Front windshield defrost button 2. Rear window defroster button 3. Fan speed control knob 4. Mode indicator 5. Mode selection button 6. Air intake control button 7. Air conditioning button 8. Temperature control knob
OYF049111/OYF042111N
4 83
YF HMA 4a-111.qxp 1/16/2012 6:33 PM Page 84
Features of your vehicle
Heating and air conditioning 1. Start the engine. 2. Set the mode to the desired position. To improve the effectiveness of heat- ing and cooling : - Heating: - Cooling:
3. Set the temperature control to the
desired position.
4. Set the air intake control to the outside (fresh) air or recirculated air position. 5. Set the fan speed control to the
desired speed.
6. If air conditioning is desired, turn the
air conditioning system on.
84
* : if equipped
OYF049114N
YF HMA 4a-111.qxp 1/16/2012 6:33 PM Page 85
■ Type A
OYF049112
Mode selection Type A The mode selection button controls the direction of the air flow through the venti- lation system. The air flow outlet port is converted as follows:
Features of your vehicle
Face-Level (B, D, E C, F)
Floor-Level (C, A, D, E)
Air flow is directed toward the upper body and face. Additionally, each outlet can be controlled to direct the air discharged from the outlet.
Most of the air flow is directed to the floor, with a small amount of the air being directed to the windshield and side win- dow defrosters.
Bi-Level (B, D, E, C, F)
Floor/Defrost-Level (A, C, D, E)
Air flow is directed towards the face and the floor.
Most of the air flow is directed to the floor and the windshield with a small amount directed to the side window defrosters.
Defrost-Level (A, D)
Most of the air flow is directed to the windshield with a small amount of air directed to the side window defrosters.
4 85
YF HMA 4a-111.qxp 1/16/2012 6:33 PM Page 86
Features of your vehicle
■ Type B
Defrost-Level (A, D) (Button 1)
Also you may select 2~3 modes at the same time for desired air flow.
Most of the air flow is directed to the windshield.
Face-Level (B, C, D, E, F) (Button 2)
OYF042112N
Type B If you push the button once, the corre- sponding switch will turn on, and if you push the button again, the switch will turn off.
Air flow is directed toward the upper body and face. Additionally, each outlet can be con- trolled to direct the air discharged from the outlet.
Floor-Level (A, C, D, E) (Button 3)
Most of the air flow is directed to the floor.
Defrost & Face Level (Button 1 and 2)
Defrost & Floor Level (Button 1 and 3)
Face & Floor Level (Button 2 and 3)
All mode (Button 1, 2 and 3)
86
YF HMA 4a-111.qxp 1/16/2012 6:33 PM Page 87
Features of your vehicle
OYF049113
OYF049115
OYF049116
MAX A/C-Level (B,D) To operate the MAX A/C, turn the tem- perature knob to extreme left. Air flow is directed toward the upper body and face. In this mode, the air conditioning and the recirculated air position will be selected automatically.
Instrument panel vents The outlet vents can be opened or closed separately using the thumbwheel. Also, you can adjust the direction of air delivered from these vents using the vent control lever as shown.
Temperature control The temperature control knob allows you to control the temperature of the air flow- ing from the ventilation system. To change the air temperature in the pas- senger compartment, turn the knob to the right for warm air or left for cooler air.
4 87
YF HMA 4a-111.qxp 1/16/2012 6:33 PM Page 88
Features of your vehicle
✽✽ NOTICE Prolonged operation of the heater in the recirculated air position (without air conditioning selected) may cause fog- ging of the windshield and side windows and the air within the passenger com- partment may become stale. In addition, prolonged operation of the air conditioning with the recirculated air position selected will result in exces- sively dry air in the passenger compart- ment.
Recirculated air position
The indicator light on the button illuminates when the recirculated air position is selected. With the recirculated air position selected, air from the passenger compart- ment will be drawn through the heating system and heated or cooled according to the function selected.
Outside (fresh) air position
The indicator light on the button will not illuminate when the outside (fresh) air position is selected. With the outside (fresh) air position selected, air enters the vehicle from outside and is heated or cooled accord- ing to the function selected.
OYF049117
Air intake control This is used to select outside (fresh) air position or recirculated air position. To change the air intake control position, push the control button.
88
YF HMA 4a-111.qxp 1/16/2012 6:33 PM Page 89
Features of your vehicle
WARNING
(cid:127) Continue using the climate con- trol system in the recirculated air position may allow humidity to increase inside the vehicle which may fog the glass and obscure visibility.
(cid:127) Do not sleep in a vehicle with the air conditioning or heating sys- tem on. It may cause serious harm or death due to a drop in the oxygen level and/or body temper- ature.
(cid:127) Continue using the climate con- trol system in the recirculated air position can cause drowsiness or sleepiness, and loss of vehicle control. Set the air intake control to the outside (fresh) air position as much as possible while driv- ing.
OYF049118
OYF049119
Fan speed control The ignition switch must be in the ON position for fan operation. The fan speed control knob allows you to control the fan speed of the air flowing from the ventilation system. To change the fan speed, turn the knob to the right for higher speed or left for lower speed. Setting the fan speed control knob to the “0” position turns off the fan.
Air conditioning Press the A/C button to turn the air con- ditioning system on (indicator light will illuminate). Press the button again to turn the air conditioning system off.
4 89
YF HMA 4a-111.qxp 1/16/2012 6:33 PM Page 90
Features of your vehicle
System operation Ventilation 1. Set the mode to the 2. Set the air intake control to the outside
position.
(fresh) air position.
3. Set the temperature control to the
desired position.
4. Set the fan speed control to the
desired speed.
Heating 1. Set the mode to the 2. Set the air intake control to the outside
position.
(fresh) air position.
3. Set the temperature control to the
desired position.
4. Set the fan speed control to the
desired speed.
5. If dehumidified heating is desired, turn (if
the air conditioning system equipped) on.
Operation Tips (cid:127) To prevent dust or unpleasant fumes from entering the vehicle through the ventilation system, temporarily set the air intake control to the recirculated air position. Be sure to return the control to the fresh air position when the irrita- tion has passed to keep fresh air in the vehicle. This will help keep the driver alert and comfortable.
(cid:127) Air for the heating/cooling system is drawn in through the grilles just ahead of the windshield. Care should be taken that these are not blocked by leaves, snow, ice or other obstructions. (cid:127) To prevent interior fog on the wind- shield, set the air intake control to the fresh air position and fan speed to the desired position, turn on the air condi- tioning system, and adjust the temper- ature control to desired temperature.
Air conditioning All HYUNDAI Air Conditioning Systems are filled with environmentally friendly R-134a refrigerant which does not dam- age the ozone layer. 1. Start the engine. Push the air condi-
tioning button.
position.
2. Set the mode to the 3. Set the air intake control to the recir- culated air position. However, pro- longed operation of the reticulated air position will excessively dry the air. In this case, change the air position.
4. Adjust the fan speed control and tem- perature control to maintain maximum comfort.
(cid:127) When maximum cooling is desired, set the temperature control to the extreme left position then set the fan speed control to the highest speed.
(cid:127) If the windshield fogs up, set the mode
to the
position.
90
YF HMA 4a-111.qxp 1/16/2012 6:33 PM Page 91
✽✽ NOTICE • While using the air conditioning sys- tem, monitor the engine temperature gauge closely while driving up hills or in heavy traffic when outside temper- atures are high. Air conditioning sys- tem operation may cause engine over- heating. Continue to use the blower fan but turn the air conditioning sys- tem off if the engine temperature gauge indicates engine overheating.
• Opening the windows
in humid weather while air conditioning oper- ates may create water droplets inside the vehicle. Since excessive water droplets may cause damage to electri- cal equipment, air conditioning should only be used with the windows closed.
Features of your vehicle
(cid:127) Operating the air conditioning system in the recirculated air position provides maximum cooling, however, continual operation in this mode may cause the air inside the vehicle to become stale. (cid:127) During cooling operation, you may occasionally notice a misty air flow because of rapid cooling and humid air intake. This is a normal system opera- tion characteristic.
(cid:127) If you operate air conditioner exces- sively, the difference between the tem- perature of the outside air and that of the windshield could cause the outer surface of the windshield to fog up, causing loss of visibility. In this case, set the mode selection knob or button to the position and fan speed con- trol to the lower speed.
Air conditioning system operation tips (cid:127) If the vehicle has been parked in direct sunlight during hot weather, open the windows for a short time to let the hot air inside the vehicle escape.
(cid:127) To help reduce moisture inside of the windows on rainy or humid days, decrease the humidity inside the vehi- cle by operating the air conditioning system.
(cid:127) During air conditioning system opera- tion, you may occasionally notice a slight change in engine speed as the air conditioning compressor cycles. This is a normal system operation characteristic.
(cid:127) Use the air conditioning system every month only for a few minutes to ensure maximum system performance.
(cid:127) When using the air conditioning sys- tem, you may notice clear water drip- ping (or even puddling) on the ground under the passenger side of the vehi- cle. This is a normal system operation characteristic.
4 91
YF HMA 4a-111.qxp 1/16/2012 6:33 PM Page 92
Features of your vehicle
Outside air
Recirculated
air
Blower
Climate control air filter
Evaporator core
Heater core
OMG075033
Climate control air filter The climate control air filter installed behind the glove box filters the dust or other pollutants that come into the vehi- cle from the outside through the heating and air conditioning system. If dust or other pollutants accumulate in the filter over a period of time, the air flow from the air vents may decrease, resulting in moisture accumulation on the inside of the windshield even when the outside (fresh) air position is selected. If this hap- pens, have the climate control air filter replaced by an authorized HYUNDAI dealer.
92
✽✽ NOTICE • Replace the filter according to the
Maintenance Schedule. If the vehicle is being driven in severe conditions such as dusty, rough roads, more frequent climate control air fil- ter inspections and changes are required.
• When the air flow rate suddenly decreases, the system should be checked at an authorized HYUNDAI dealer.
Checking the amount of air con- ditioner refrigerant and compres- sor lubricant When the amount of refrigerant is low, the performance of the air conditioning is reduced. Overfilling also has a negative influence on the air conditioning system. Therefore, if abnormal operation is found, have the system inspected by an authorized HYUNDAI dealer.
✽✽ NOTICE It is important that the correct type and amount of oil and refrigerant is used. Otherwise, damage to the compressor and abnormal system operation may occur.
WARNING
The air conditioning system should be serviced by an authorized HYUNDAI dealer. Improper service may cause serious injury to the person performing the service.
YF HMA 4a-111.qxp 1/16/2012 6:34 PM Page 93
AUTOMATIC CLIMATE CONTROL SYSTEM (IF EQUIPPED)
Features of your vehicle
■ Type A
■ Type B
1. Front windshield defrost button 2. Rear window defrost button 3. AUTO (automatic control) button 4. OFF button 5. Driver’s temperature control knob 6. Mode indicator 7. Mode selection button 8. Fan speed indicator (if equipped) 9. Fan speed control switch 10. Air intake control button 11. Air conditioning button 12. Dual temperature control selection button 13. Climate information screen selection
button (if equipped)
14. Passenger’s temperature control knob
OYF049157N/OYFH041157N
4 93
YF HMA 4a-111.qxp 3/5/2012 4:36 PM Page 94
Features of your vehicle
■ Type A
OYF049121
■ Type B
OYF049161N
Automatic heating and air condi- tioning 1. Press the AUTO button. The modes, fan speeds, air intake and air-condi- tioning will be controlled automatically according to the temperature setting.
OYFH041161N 2. Turn the temperature control knob to
set the desired temperature.
✽✽ NOTICE • To turn the automatic operation off,
select any button of the following: - Mode selection button - Front windshield defrost button - Fan speed control button The selected function will be con- trolled manually while other functions operate automatically.
• For your convenience and to improve the effectiveness of the climate con- trol, use the AUTO button and set the temperature to 73°F (23°C).
94
✽✽ NOTICE Never place anything over the sensor located on the instrument panel to ensure better control of the heating and cooling system.
YF HMA 4a-111.qxp 1/16/2012 6:34 PM Page 95
Manual heating and air condition- ing The heating and cooling system can be controlled manually by pressing buttons or turning knob(s) other than the AUTO button. In this case, the system works sequentially according to the order of buttons or knob(s) selected. 1. Start the engine. 2. Set the mode to the desired position. For improving the effectiveness of heating and cooling; - Heating: - Cooling:
3. Set the temperature control to the
desired position.
4. Set the air intake control to the outside
(fresh) air position.
5. Set the fan speed control to the
desired speed.
6. If air conditioning is desired, turn the
air conditioning system on.
Press the AUTO button in order to con- vert to full automatic control of the sys- tem.
■ Type A
OYF049112
Mode selection Type A The mode selection button controls the direction of the air flow through the venti- lation system. The air flow outlet port is converted as follows:
Refer to the illustration in the “Manual cli- mate control system”.
Features of your vehicle
Face-Level
Air flow is directed toward the upper body and face. Additionally, each outlet can be controlled to direct the air discharged from the outlet.
Bi-Level
Air flow is directed towards the face and the floor.
Floor-Level
Most of the air flow is directed to the floor, with a small amount of the air being directed to the windshield and side win- dow defrosters.
Floor & Defrost
Most of the air flow is directed to the floor and the windshield with a small amount directed to the side window defrosters.
4 95
YF HMA 4a-111.qxp 1/16/2012 6:34 PM Page 96
Features of your vehicle
■ Type B
Defrost-Level (Button 1)
Also you may select 2~3 modes at the same time for desired air flow.
Most of the air flow is directed to the windshield.
Face-Level (Button 2)
Air flow is directed toward the upper body and face. Additionally, each outlet can be con- trolled to direct the air discharged from the outlet.
Floor-Level (Button 3)
Most of the air flow is directed to the floor.
Defrost & Face Level (Button 1 and 2)
Defrost & Floor Level (Button 1 and 3)
Face & Floor Level (Button 2 and 3)
All mode (Button 1, 2 and 3)
OYFH041112N
Type B If you push the button once, the corre- sponding switch will turn on, and if you push the button again, the switch will turn off.
Refer to the illustration in the “Manual cli- mate control system”.
96
YF HMA 4a-111.qxp 1/16/2012 6:34 PM Page 97
OYF049124
Defrost-Level Most of the air flow is directed to the windshield with a small amount of air directed to the side window defrosters.
Features of your vehicle
■ Type A
OYF049115
■ Type B
OYF049161N
Instrument panel vents The outlet vents can be opened or closed separately using the horizontal thumb- wheel. To close the vent, rotate it left to the maximum position. To open the vent, rotate it right to the desired position. Also, you can adjust the direction of air delivery from these vents using the vent control lever as shown.
OYFH041161N
Temperature control The temperature will increase to the maximum by turning the knob to the right. The temperature will decrease to the minimum by turning the knob to the left. When turning the knob, the temperature will increase or decrease by 2°F for type A or 1°F for type B.
4 97
YF HMA 4a-111.qxp 1/16/2012 6:34 PM Page 98
Features of your vehicle
■ Type A
2. Turn the left temperature control knob to adjust the driver side temperature. Turn the right temperature control knob to adjust the passenger side tem- perature.
■ Type A
When the driver side temperature is set to the highest or lowest temperature set- ting, the DUAL mode is deactivated for maximum heating or cooling.
Adjusting the driver and passenger side temperature equally 1. Press the DUAL button again to deac- tivate DUAL mode. The passenger side temperature will be set to the same temperature as the driver side temperature.
2. Turn the left temperature control knob. The driver and passenger side tem- perature will be adjusted equally.
■ Type B
OYF049125
OYFH041125N
Air intake control This is used to select the outside (fresh) air position or recirculated air position. To change the air intake control position, push the control button.
■ Type B
OYF049226
OYFH041218A
Adjusting the driver and passenger side temperature individually 1. Press the DUAL button to operate the driver and passenger side temperature individually. Turning the right tempera- ture control knob will automatically switch to the DUAL mode as well.
98
YF HMA 4a-111.qxp 1/16/2012 6:34 PM Page 99
WARNING
(cid:127) Continued use of the climate con- trol system operation in the recir- culated air position may allow humidity to increase inside the vehicle which may fog the glass and obscure visibility.
(cid:127) Do not sleep in a vehicle with the air conditioning or heating system on. It may cause serious harm or death due to a drop in the oxygen level and/or body temperature.
(cid:127) Continued use of the climate con- trol system operation in the recir- culated air position can cause drowsiness or sleepiness, and loss of vehicle control. Set the air intake control to the outside (fresh) air position as much as possible while driving.
Recirculated air position
With the recirculated air position selected, air from the passenger compart- ment will be drawn through the heating system and heated or cooled according to the function selected.
Outside (fresh) air position ■ Type A
With the outside (fresh) air position selected, air enters the vehicle from outside and is heated or cooled accord- ing to the function selected.
■ Type B
✽✽ NOTICE Prolonged operation of the heater in the recirculated air position (without air conditioning selected) may cause fog- ging of the windshield and side windows and the air within the passenger com- partment may become stale. In addition, prolonged use of the air con- ditioning with the recirculated air posi- tion selected will result in excessively dry air in the passenger compartment.
Features of your vehicle
■ Type A
■ Type B
OYF049164
OYFH041161N
Fan speed control The fan speed can be set to the desired speed by pushing the fan speed control button. To change the fan speed, press the right of the button ( ) for higher speed, or press the left of the button ( ) for lower speed. To turn the fan speed control off, press the OFF button.
4 99
YF HMA 4a-111.qxp 1/16/2012 6:34 PM Page 100
Features of your vehicle
OYFH041127N
OYF049128
Air conditioning Push the A/C button to turn the air condi- tioning system on (indicator light will illu- minate). Push the button again to turn the air con- ditioning system off.
OFF mode Push the OFF button to turn off the air cli- mate control system. However, you can still operate the mode and air intake but- tons as long as the ignition switch is in the ON position. The vented air will be at the last set tem- perature. Adjust the desired vented tem- perature setting accordingly before pressing the OFF button.
OYFH041300N Climate information screen selec- tion button (if equipped) To change the screen into the climate information screen, press the climate information screen selection button.
100
YF HMA 4a-111.qxp 1/16/2012 6:34 PM Page 101
WINDSHIELD DEFROSTING AND DEFOGGING
Features of your vehicle
WARNING - Windshield
heating or
cooling operation
position Do not use the during in extremely humid weather. The dif- ference between the temperature of the outside air and that of the wind- shield could cause the outer sur- face of the windshield to fog up, causing loss of visibility. In this case, set the mode selection knob or button to the position and fan speed control knob or button to a lower speed.
(cid:127) For maximum defrosting, set the tem- perature control the extreme right/hot position and the fan speed control to the highest speed.
to
(cid:127) If warm air to the floor is desired while defrosting or defogging, set the mode to the floor-defrost position.
(cid:127) Before driving, clear all snow and ice from the windshield, rear window, out- side rear view mirrors, and all side win- dows.
(cid:127) Clear all snow and ice from the hood and air inlet in the cowl grill to improve heater and defroster efficiency and to reduce the probability of fogging up the inside of the windshield.
OYF049129N
Manual climate control system To defog inside windshield 1. Select any fan speed except “0” posi-
tion.
2. Select desired temperature. 3. Select the 4. The outside (fresh) air will be selected
position.
or
automatically.
If the outside (fresh) air position is not selected automatically, press the corre- sponding button manually.
4 101
YF HMA 4a-111.qxp 1/16/2012 6:35 PM Page 102
Features of your vehicle
■ Type A
If the outside (fresh) air position is not selected automatically, adjust the corre- sponding button manually. position is selected, lower fan If the speed is adjusted to a higher fan speed.
OYF049130N
■ Type B
OYF049218N
To defrost outside windshield 1. Set the fan speed to the highest
(extreme right) position.
2. Set the temperature to the extreme hot
position.
3. Select the 4. The outside (fresh) air will be selected
position.
automatically.
OYFH041252N-1
Automatic climate control system To defog inside windshield 1. Select desired fan speed. 2. Select desired temperature. 3. Press the defrost button ( 4. The outside (fresh) air position will be).
selected automatically.
102
YF HMA 4a-111.qxp 1/16/2012 6:35 PM Page 103
■ Type A
4. The outside (fresh) air position will be
selected automatically.
If the position is selected, lower fan speed is adjusted to a higher fan speed.
Features of your vehicle
Defogging logic To reduce the probability of fogging up the inside of the windshield, the air intake is controlled automatically according to certain conditions such as position. To cancel or return the defog- ging logic, perform the following steps.
or
■ Type B
OYF049219N
OYFH041253N-1
To defrost outside windshield 1. Set the fan speed to the highest
(extreme right) position.
2. Set the temperature to the extreme hot
(HI) position.
3. Press the defrost button (
).
4 103
YF HMA 4a-111.qxp 1/16/2012 6:35 PM Page 104
Features of your vehicle
OYF049133
OYF049222
Manual climate control system 1. Turn the ignition switch to the ON posi-
tion.
2. Turn the mode selection knob to the
defrost position (
).
3. Push the air intake control button at
least 5 times within 3 seconds.
The indicator light in the air intake control button will blink 3 times with 0.5 second of interval. It indicates that the defogging logic is canceled or returned to the pro- grammed status.
If the battery has been discharged or dis- connected, the system resets to the pro- grammed defogging logic.
104
Automatic climate control system 1. Turn the ignition switch to the ON
position.
2. Select the defrost position pressing
defrost button (
).
3. While holding the air conditioning but- ton (A/C) pressed, press the air intake control button at least 5 times within 3
seconds.The indicator on the air intake control button blinks 3 times with 0.5 second of interval. It indicates that the defogging logic is canceled or returned to the pro- grammed status.
If the battery has been discharged or dis- connected, the system resets
YF HMA 4a-111.qxp 1/16/2012 6:35 PM Page 105
Features of your vehicle
STORAGE COMPARTMENTS These compartments can be used to store small items.
CAUTION
(cid:127) To avoid possible theft, do not leave valuables in the storage compartments.
(cid:127) Always keep the storage com- partment covers closed while driving. Do not attempt to place so many items in the storage compartment that the storage compartment cover cannot close securely.
WARNING - Flammable
materials
Do not store cigarette lighters, propane cylinders, or other flamma- ble/explosive materials in the vehi- cle. These items may catch fire and/or explode if the vehicle is exposed to hot temperatures for extended periods.
OYF049137
OYF049138
Center console storage To open the center console storage, pull up the lever.
Glove box The glove box can be locked and unlocked with a master key (or the mechanical key of the smartkey) (1). To open the glove box, pull the handle and the glove box will automatically open. Close the glove box after use.
WARNING
To reduce the risk of injury in an accident or sudden stop, always keep the glove box door closed while driving.
CAUTION
Do not keep food in the glove box for a long time.
4 105
YF HMA 4a-111.qxp 1/16/2012 6:35 PM Page 106
Features of your vehicle
WARNING
(cid:127) Do not keep objects except sun- glasses inside the sunglass hold- er. Such objects can be thrown from the holder in the event of a sudden stop or an accident, pos- sibly injuring the passengers in the vehicle.
(cid:127) Do not open the sunglass holder while the vehicle is moving. The rear view mirror of the vehicle can be blocked by an open sun- glass holder.
OYF049140N
Multi box To open the cover, press the button and the multibox will automatically open.
OYF049139N
Sunglass holder To open the sunglass holder, press the cover and the holder will slowly open. Place your sunglasses in the compart- ment door with the lenses facing out. Push to close.
106
YF HMA 4a-111.qxp 1/16/2012 6:35 PM Page 107
INTERIOR FEATURES Cup holder
■ Front
Features of your vehicle
WARNING - Hot liquids
(cid:127) Do not place uncovered cups of hot liquid in the cup holder while the vehicle is in motion. If the hot liquid spills, you may burn your- self. Such a burn to the driver could lead to loss of control of the vehicle.
(cid:127) To reduce the risk of personal injury in the event of sudden stop or collision, do not place uncov- ered or unsecured bottles, glass- es, cans, etc., in the cup holder while the vehicle is in motion.
WARNING
Keep cans or bottles out of direct sun light and do not put them in a vehicle that is heated up. It may explode.
■ Rear
OYF049143N
OYF049145
OYF049144N Cups or small beverage cans may be placed in the cup holders.
HTG2174
Sunvisor Use the sunvisor to shield direct light through the front or side windows. To use a sunvisor, pull it downward. To use a sunvisor for a side window, pull it downward, unsnap it from the bracket (1) and swing it to the side (2).
4 107
YF HMA 4a-111.qxp 1/16/2012 6:35 PM Page 108
Features of your vehicle
Adjust the sunvisor extension forward or backward (4). To use the vanity mirror, pull down the visor and slide the mirror cover (3). Push the switch to turn the light on or off. (if equipped) (cid:127) : The light turns on. (cid:127) O : The light turns off.
CAUTION - Vanity mirror lamp (if equipped)
(cid:127) Always have the switch in the off position when the vanity mirror lamp is not in use.If the sunvisor is closed without the lamp off, it may discharge the battery or damage the sunvisor.
(cid:127) Always use the sunvisor exten- sion, after swing the sunvisor to the side.
WARNING
For your safety, do not obstruct your vision when using the sunvisor.
108
OYF049146N
Power outlet The power outlet is designed to provide power for mobile telephones or other devices designed to operate with vehicle electrical systems. The devices should draw less than 10 amps with the engine running.
CAUTION
(cid:127) Use the power outlet only when the engine is running and remove the accessory plug after use. Using the accessory plug for pro- longed periods of time with the engine off could cause the bat- tery to discharge.
(cid:127) Only use 12V electric accessories which are less than 10A in elec- tric capacity.
(cid:127) Adjust the air-conditioner or heater to the lowest operating level when using the power outlet. (cid:127) Close the cover when not in use. (cid:127) Some electronic devices can cause electronic interference when plugged into a vehicle’s power outlet.These devices may cause excessive audio static and malfunctions in other electronic systems or devices used in your vehicle.
WARNING
Do not put a finger or a foreign ele- ment (pin, etc.) into a power outlet and do not touch with a wet hand. You may get an electric shock.
YF HMA 4a-111.qxp 1/16/2012 6:35 PM Page 109
Features of your vehicle
OUN026348
Clothes hanger (if equipped) To use the hanger, pull down the upper portion of hanger.
CAUTION
Do not hang heavy clothes, because it may damage the hook.
Hour (1) Pressing the H button with your finger, a pencil or similar object will advance the time displayed by one hour.
Minute (2) Pressing the M button with your finger, a pencil or similar object will advance the time displayed by one minute.
Display conversion To change the 12 hour format to the 24
hour format, press the “H” and “M” but- tons at the same time for more than 3
seconds. For example, if the “H” and “M” buttons are pressed for more than 3 seconds while the time is 10:15 p.m., the display will be changed to 22:15.❈ For the type of the clock built in the audio or navigation, refer to a separately supplied manual.
4 109
Digital clock (if equipped)
OYF049224
WARNING
Do not adjust the clock while driv- ing. You may lose your steering control and cause an accident that results in severe personal injury or death.
Whenever the battery terminals or relat- ed fuses are disconnected, you must reset the time. When the ignition switch is in the ACC or ON position, the clock buttons operate as follows:
YF HMA 4a-111.qxp 1/16/2012 6:36 PM Page 110
Features of your vehicle
WARNING
The following must be observed when installing ANY floor mat to the vehicle. (cid:127) Ensure that the floor mats are securely attached to the vehicle’s floor mat anchor(s) before driving the vehicle.
(cid:127) Do not use ANY floor mat that cannot be firmly attached to the vehicle’s floor mat anchors.
(cid:127) Do not stack floor mats on top of one another (e.g. all-weather rub- ber mat on top of a carpeted floor mat). Only a single floor mat should be installed in each posi- tion.
IMPORTANT – Your vehicle was manufactured with driver’s side floor mat anchors that are designed to securely hold the floor mat in place. To avoid any interference with pedal operation, HYUNDAI recommends that only the HYUNDAI floor mat designed for use in your vehicle be installed.
OYF049147N
Aux, USB and iPod® port (if equipped) If your vehicle has an aux and/or USB(universal serial bus) port or iPod port, you can use an aux port to connect audio devices and a USB port to plug in a USB, and an iPod port to plug in an iPod.
✽✽ NOTICE When using a portable audio device connected to the power outlet, noise may occur during playback. If this happens, use the power source of the portable audio device.
❈ iPod is a trademark of Apple Inc.
OYF049234N
Floor mat anchor(s) When using a floor mat on the front floor carpet, make sure it attaches to the floor mat anchor(s) in your vehicle. This keeps the floor mat from sliding forward.
110
YF HMA 4a-111.qxp 3/5/2012 4:36 PM Page 111
Features of your vehicle
Navigation system (if equipped) The navigation system ascertains the present position of your vehicle by using information from satellites and guides you to the place you assign as the desti- nation. Detailed information for the navigation system is described in a separately sup- plied manual.
Bluetooth®Wireless Technology hands-free (if equipped) You can use the phone wirelessly by the Bluetooth® Wireless using Technology. Detailed information for the Bluetooth® Wireless Technology hands-free is described in the “audio” in this chapter or in the manual supplied separately.
4 111
YF HMA 4b-112~(Audio).qxp 3/5/2012 4:24 PM Page 112
Features of your vehicle
AUDIO SYSTEM ✽✽ NOTICE If you install an after market HID head lamp, your vehicle's audio and electron- ic device may malfunction.
CAUTION
• Do not clean the inside of the rear window glass with a cleaner or scraper to remove foreign deposits as this may cause dam- age to the antenna elements.
(cid:127) Avoid adding metallic coatings such as Ni,Cd,and so on.These can disturb receiving AM and FM broadcast signals.
OYF049150
Antenna Glass antenna (if equipped) When the radio power switch is turned on while the engine start/stop button is in either the “ON” or “ACC” position, your car will receive both AM and FM broad- cast signals through the antenna in the rear window glass.
112
YF HMA 4b-112~(Audio).qxp 3/5/2012 4:24 PM Page 113
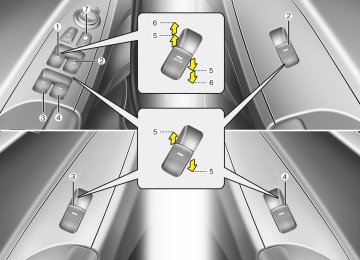
1.VOLUME (VOL+/-) (cid:127) Push the lever upward (+) to increase the
volume.
(cid:127) Push the lever downward (-) to decrease
the volume.
YF_HANDLE
Steering wheel audio control (if equipped) The steering wheel may incorporate audio control buttons.
CAUTION
Do not operate audio remote con- trol buttons simultaneously.
2.PRESET/SEEK ( The SEEK/PRESET button has different functions based on the system mode. For the following functions the button should be pressed for 0.8 second or more.
RADIO mode It will function as the AUTO SEEK select button.
CD/USB/iPod mode It will function as the FF/REW button.
If the SEEK/PRESET button is pressed for less than 0.8 second, it will work as follows in each mode.
Features of your vehicle
RADIO mode It will function as the PRESET STATION buttons.
CD/USB/iPod mode It will function as TRACK UP/DOWN button.
3.MODE Press the button to change audio source. - FM(1~2)➟AM➟SAT(1~3)➟CD➟USB
AUX(iPod) FM...
Detailed information for audio control buttons are described in the following pages in this section.
4 113
YF HMA 4b-112~(Audio).qxp 3/5/2012 4:24 PM Page 114
Features of your vehicle
■■ CD Player : Audio with internal amplifier / Audio with external amplifier
❋ No
logo will be shown if the HD Radio® feature is not supported.
114
YF HMA 4b-112~(Audio).qxp 3/5/2012 4:24 PM Page 115
Features of your vehicle
SYSTEM CONTROLLERS AND FUNCTIONS
Audio Head Unit
1. (cid:127) Ejects the disc.
(EJECT)
RADIO
2. (cid:127) Changes to FM/AM/XM mode. (cid:127) Each time the key is pressed, the mode is changed in order of FM1 ➟ FM2 ➟ AM ➟ XM1 ➟ XM2 ➟ XM3
❈ In Setup>Display, the radio pop up screen will be displayed when [Mode Pop up] is turned When the pop up screen is displayed, use the
TUNE knob or keys
to select the desired mode.
On
MEDIA
3. (cid:127) Changes to CD, USB, iPod, AUX, My
Music, BT Audio modes.
(cid:127) Each time the key is pressed, the mode is changed in order of CD, USB, iPod, AUX, My Music, BT Audio modes.
❈ In Setup>Display, the media pop up screen will be displayed when [Mode Pop up] is turned When the pop up screen is displayed, use the
TUNE knob or keys
to select the desired mode.
On
PHONE
4. (cid:127) Operates Phone Screen ❈ When a phone is not connected, the
connection screen is displayed.
SEEK TRACK
5. (cid:127) Radio Mode : Automatically searches
for broadcast frequencies.
(cid:127) CD, USB, iPod, My Music modes :
- Shortly press the key (under 0.8 sec- onds): Moves to next or previous song(file)
- Press and hold the key (over 0.8 sec- onds): Rewinds or fast-forwards the current song(file)
6. PWR/VOL knob (cid:127)
by pressing the knob
Power Knob: Turns power On/Off
(cid:127)
Volume Knob: Sets volume by turn-
ing the knob left/right
(Preset)
7. (cid:127) Radio Mode: Saves frequencies (chan- nels) or receives saved frequencies (channels)
(cid:127) CD, USB, iPod, My Music mode
: Repeat : Random
(cid:127) In the Radio, Media, Setup, and Menu pop up screen, the number menu is selected.
4 115
YF HMA 4b-112~(Audio).qxp 3/5/2012 4:24 PM Page 116
Features of your vehicle
DISP
8. (cid:127) Each time the button is shortly pressed (under 0.8 seconds), it sets the screen Off ➟ Screen On ➟ Screen Off
❈ Audio operation is maintained and only the screen will be turned Off. In the screen Off state, press any key to turn the screen On again.
SCAN
9. (cid:127) Radio Mode
MENU
11. (cid:127) Displays menus for the current mode.
- Shortly press the key (under 0.8 sec- onds): Previews each broadcast for 5
seconds each- Press and hold the key (over 0.8 sec- onds): Previews the broadcasts saved in Preset for 5 seconds each.
❈ Press the
SCAN
key again to contin-
ue listening to the current frequency.
❈ XM Radio does not support the Preset
scan feature.
(cid:127) CD, USB, iPod mode
- Shortly press the key (under 0.8 sec- onds): Previews each song (file) for 10
seconds each❈ Press the
SCAN
key again to contin-
ue listening to the current song (file).
CAT
FOLDER
12. (cid:127) Radio Mode
HD/CAT FOLDER
- XM RADIO : Category Search - HD RADIO : Channel Change
(cid:127) MP3, CD, USB mode : Folder Search (cid:127) iPod mode: Moves to parent folder ❈ May differ depending on the selected
audio.
TUNE knob
13. (cid:127) Radio mode : Changes frequency by
turning the knob left/right
(cid:127) CD, USB, iPod mode: Searches songs
(files) by turning the knob left/right
❈ When the desired song is displayed,
press the knob to play the song.
(cid:127) Moves focus in all selection menus and
selects menus
SETUP
10. (cid:127) Shortly press the key (under 0.8 sec- onds) : Moves to the Display, Sound, Phone, System setting modes
116
YF HMA 4b-112~(Audio).qxp 3/5/2012 4:24 PM Page 117
Features of your vehicle
On
Off
Mode Pop up [Mode Pop up] Changes selection mode (cid:127) During On state, press the
or key to display the mode
RADIO
MEDIA change pop up screen.
Text Scroll [Text Scroll] Set (cid:127) (cid:127)
On Off
On
Off
: Maintains scroll : Scrolls only one (1) time.
Media Display When playing an MP3 file, select the desired display info from ‘Folder/File’ or ‘Album/Artist/Song’.
DISPLAY SETTINGS
Press the through Select menu through
SETUP TUNE knob or
key Select [Display]
key
TUNE knob
4 117
YF HMA 4b-112~(Audio).qxp 3/5/2012 4:24 PM Page 118
Features of your vehicle
SOUND SETTINGS
Press the through Select menu through
SETUP TUNE knob or
TUNE knob
key Select [Sound]
key
Sound Settings This menu allows you to set the ‘Bass, Middle, Treble’ and the Sound Fader and Balance. Select [Sound Settings] Select menu through TUNE knob left/right to set (cid:127) Bass, Middle, Treble : Selects the
TUNE knob Turn
sound tone.
(cid:127) Fader, Balance : Moves the sound
fader and balance.
(cid:127) Default : Restores default settings. ❈ Back : While adjusting values, re- TUNE knob will
pressing the restore the parent menu.
118
Variable EQ (Audio with external amplifier only) This is a premium sound system feature in which the acoustical mode can be select- ed according to musical preferences. Select [Variable EQ] Set menu through
TUNE knob
(cid:127) Innocente(Normal) : Natural sound,
sound optimized for driver.
(cid:127) Forza(Dynamic)
: Powerful sound
emphasizing bass, stereo sound.
(cid:127) Concerto(Concert) : Sound similar to a
concert or live hall
❈ May differ depending on the selected
audio.
YF HMA 4b-112~(Audio).qxp 3/5/2012 4:24 PM Page 119
Features of your vehicle
Speed Dependent Volume Control This feature is used to automatically con- trol the volume level according to the speed of the vehicle. Select [SDVC] Set in 4 levels [Off/ Low/Mid/High] of
TUNE knob
Blue Link Voice Volume Sets the Blue Link voice recognition vol- ume. ❈ While using Blue Link voice recogni- tion, turning the tune knob will display the volume control popup screen.
❈ May differ depending on the selected
audio.
Voice Recognition Volume Adjusts voice recognition volume.