- Download PDF Manual
-
cluster. The steering wheel will require increase effort. We rec- ommend that the system be checked by an authorized HYUNDAI dealer as soon as possible.
3-18
✽ NOTICE The following symptoms may occur during normal vehicle operation: • The steering effort may be high immediately after placing the Engine Start/Stop button in the ON position. This happens as the system per- forms the EPS system diagnostics. When the diagnostics is complet- ed, the steering wheel will return to its normal condition.
• A click noise may be heard from the EPS relay after the Engine Start/Stop button is in the ON or OFF position.
• Motor noise may be heard when the vehicle is at stop or at a low driving speed.
• When you operate the steering wheel in low temperature, abnor- mal noise may occur. If tempera- ture rises, the noise will disappear. This is a normal condition.
Tilt steering / Telescope steering Manual type
ODH044361N To change the steering wheel angle and height: 1. Pull down the lock-release lever (1). 2. Adjust the steering wheel to the
desired angle (2) and height (3).
3. Pull up the lock-release lever to
lock the steering wheel in place.
Electric type
ODH043043
To change the steering wheel angle and height: • Move the switch (1) up and downto adjust the angle (2).
• Move the switch forward or rear-
ward to adjust the height (3).
WARNING
• NEVER adjust the steering wheel while driving. This may cause loss of vehicle control resulting in an accident.
• Always adjust the position of the steering wheel before driving.
CAUTION
Do not adjust the steering wheel longer than necessary when the engine is turned off. This may result in unnecessary battery drain.
Heated steering wheel (if equipped)
■ Type A
■ Type B
ODH043044
ODH043127
3-19
Convenient features of your vehicle
■ LCD display
ODH043224L/ODH043226L When the Engine Start/Stop button is in the ON position, press the heat- ed steering wheel button to warm the steering wheel. The indicator on the button will illuminate and notify you on the LCD display. To turn the heated steering wheel off, press the button again. The indicator on the button will turn off and notify you on the LCD display.
3-20
✽ NOTICE The heated steering wheel will turn off automatically approximately 30
minutes.Horn
CAUTION
Do not install any cover or acces- sory on the steering wheel. This cover or accessory could cause damage to the heated steering wheel system.
ODH043045
To sound the horn, press the area indicated by the horn symbol on your steering wheel (see illustration). The horn will operate only when this area is pressed.CAUTION
Do not strike the horn severely to operate it, or hit it with your fist. Do not press on the horn with a sharp-pointed object.
MIRRORS Inside rearview mirror Before you start driving, adjust the rearview mirror to the center on the view through the rear window.
WARNING
Make sure your line of sight is not obstructed. Do not place objects in the rear seat, cargo area, or behind the rear head- rests which could interfere with your vision through the rear window.
WARNING
To prevent serious injury during an accident or deployment of the air bag, do not modify the rearview mirror and do not install a wide mirror.
WARNING
NEVER adjust the mirror while driving. This may cause loss of vehicle control resulting in an accident.
Electric chromic Mirror (ECM) (if equipped) The electric rearview mirror automati- cally controls the glare from the head- lamp of the car behind you in night- time or low light driving conditions. When the engine is running, the glare is automatically controlled by the sensor mounted in the rearview mirror. The sensor detects the light level around the vehicle, and auto- matically adjusts to control the head- lamp glare from vehicles behind you. Whenever the shift lever is placed in R (Reverse), the mirror will automat- ically go to the brightest setting in order to improve the drivers view behind the vehicle.
3-21
Outside rearview mirror
CAUTION
When cleaning the mirror, use a paper towel or similar material dampened with glass cleaner. Do not spray glass cleaner directly on the mirror as that may cause the liquid cleaner to enter the mirror housing.
ODH043047
Your vehicle is equipped with both left-hand and right-hand outside rearview mirrors.Convenient features of your vehicle
Indicator
Sensor
ODH043046L
To operate the electric rearview mirror: • Press the ON/OFF button (1) to turn the automatic dimming func- tion off. The mirror indicator light will turn off. Press the ON/OFF button (1) to turn the automatic dimming func- tion on. The mirror indicator light will illuminate.
• The mirror defaults to the ON posi- tion whenever the Engine Start/Stop button is turned on.
3-22
WARNING
WARNING
• The right outside rearview mir- ror is convex. In some coun- tries, the left outside rearview mirror is also convex. Objects seen in the mirror are closer than they appear.
• Use your interior rearview mirror or turn your head and look to determine the actual distance of following vehicles when changing lanes.
Do not adjust or fold the outside rearview mirrors while driving. This may cause loss of vehicle control resulting in an accident.
CAUTION
• Do not scrape ice off the mir- ror face; this may damage the surface of the glass.
• If the mirror is jammed with ice, do not adjust the mirror by force. Use an approved spray de-icer (not radiator antifreeze) spray, or a sponge or soft cloth with very warm water, or move the vehicle to a warm place and allow the ice to melt.
ODH043048
Adjusting the rearview mirrors: 1. Press either the L (driver's side) or R (passenger's side) button (1) to select the rearview mirror you would like to adjust.
2. Use the mirror adjustment control (2) to position the selected mirror up, down, left or right.
3. After adjustment, press the L or R button (1) again to prevent inad- vertent adjustment.
3-23
Convenient features of your vehicle
CAUTION
• The mirrors stop moving when they reach the maxi- mum adjusting angles, but the motor continues to operate while the switch is pressed. Do not press the switch longer than necessary, the motor may be damaged.
• Do not attempt to adjust the outside rearview mirror by hand or the motor may be damaged.
Center (AUTO) : The mirror will fold or unfold auto- matically as follows: - The mirror will fold or unfold when the door is locked or unlocked by the smart key.
- The mirror will fold or unfold when the door is locked or unlocked by the button on the outside door handle.
- The mirror will unfold when you approach the vehicle (all doors closed and locked) with a smart key in possession. (if equipped)
Folding/Unfolding the outside rearview mirror
ODH043049
The outside rearview mirror can be folded or unfolded by pressing the switch as below. Left (1) : The mirror will unfold. Right (2) : The mirror will fold.3-24
CAUTION
The electric type outside rearview mirror operates even though the Engine Start/Stop button is in the OFF position. However, to prevent unneces- sary battery discharge, do not adjust the mirrors longer than necessary while the engine is not running.
CAUTION
Do not fold the electric type out- side rearview mirror by hand. It could cause motor failure.
Reverse parking aid function (if equipped)
The outside rearview mirrors will automatically revert to their original positions if any of the following occur: • The Engine Start/Stop button is pressed to either the OFF position or the ACC position.
• The shift lever is moved to any
position except R (Reverse).
• The remote control outside rearview
mirror switch is not selected.
ODH043042
When you move the shift lever to the R (Reverse) position, the outside rearview mirror(s) will rotate down- wards to aid with driving in reverse. The position of the outside rearview mirror switch (1) determines whether or not the mirrors will move: Left/Right : When either the L (Left) or R (Right) switch is select- ed, both outside rearview mirrors will move.Neutral : When neither switch is select- ed, the outside rearview mir- rors will not move.
3-25
Convenient features of your vehicle
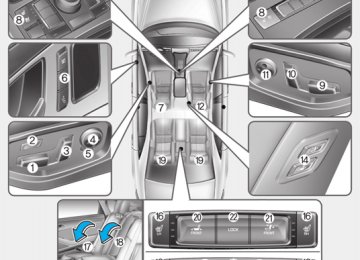
WINDOWS Power windows
(1) Driver’s door power window switch (2) Front passenger’s door power
window switch
(3) Rear door (left) power window
switch
(4) Rear door (right) power window
switch
(5) Window opening and closing (6) Automatic power window (7) Power window lock switch
3-26
ODH043026
The Engine Start/Stop button must be in the ON position to be able to raise or lower the windows. Each door has a Power Window switch to control that door's window. The driv- er has a Power Window Lock switch which can block the operation of pas- senger windows. The power windows will operate for approximately 30
seconds after the Engine Start/Stop button is placed in the ACC or OFF position. However, if the front doors are opened, the Power Windows cannot be operated even within the 30 second period.WARNING
To avoid serious injury or death, do not extend your head, arms or body outside the windows while driving.
✽ NOTICE • In cold and wet climates, power windows may not work properly due to freezing conditions.
• While driving with the rear win- dows down or with the sunroof (if equipped) opened (or partially opened), your vehicle may demon- strate a wind buffeting or pulsation noise. This noise is normal and can be reduced or eliminated by taking the following actions. If the noise occurs with one or both of the rear windows down, partially lower both front windows approximately one inch. If you experience the noise with the sunroof open, slight- ly close the sunroof.
Window opening and closing
ODH043027
To open: Press the window switch down to the first detent position (5). Release the switch when you want the window to stop.
To close: Pull the window switch up to the first detent position (5). Release the win- dow switch when you want the win- dow to stop.
3-27
Convenient features of your vehicle
Auto up/down window Pressing or pulling up the power win- dow switch momentarily to the sec- ond detent position (6) completely lowers or lifts the window even when the switch is released. To stop the window at the desired position while the window is in operation, pull up or press down and release the switch.
To reset the power windows If the power windows do not operate normally, the automatic power win- dow system must be reset as follows: 1. Place the Engine Start/Stop button
to the ON position.
2. Close the window and continue pulling up on the power window switch for at least one second.
If the power windows do not operate properly after resetting, it is recom- mended that the system be checked by an authorized HYUNDAI dealer.
3-28
Automatic reversal
ODH043136
If a window senses any obstacle while it is closing automatically, it will stop and lower approximately 30 cm (12 inches) to allow the object to be cleared. If the window detects the resistance while the power window switch is pulled up continuously, the window will stop upward movement then lower approximately 2.5 cm (1 inch). If the power window switch is pulled up continuously again within 5 sec- onds after the window is lowered by the automatic window reversal fea- ture, the automatic window reversal will not operate.✽ NOTICE The automatic reverse feature is only active when the “Auto Up” fea- ture is used by fully pulling up the switch to the second detent.
WARNING
Make sure body parts or other objects are safely out of the way before closing the windows to avoid injuries or vehicle damage. Objects less than 4 mm (0.16
inch) in diameter caught between the window glass and the upper window channel may not be detected by the automat- ic reverse window and the win- dow will not stop and reverse direction.Power window lock switch
ODH043028
The driver can disable the power window switches on the rear passen- gers' doors by pressing the power window lock switch. The indicator will be illuminated. When the power window lock switch is pressed: • The driver's master control can operate the front passenger's power window but cannot operate the rear passengers' power windows.• The front passenger's control can front passenger's
operate the power window.
• The rear passenger's control can- not operate the rear passengers' power window.
WARNING
Do not allow children to play with the power windows. Keep the driver’s door power window lock switch in the LOCK posi- tion. Serious injury or death can result from unintentional win- dow operation by a child.
CAUTION
• To prevent possible damage to the power window system, do not open or close two win- dows or more at the same time. This will also ensure the longevity of the fuse.
• Never try to operate the main switch on the driver's door and the individual door window switch in opposite directions at the same time. If this is done, the window will stop and cannot be opened or closed.
3-29
Convenient features of your vehicle
PANORAMA SUNROOF (IF EQUIPPED)
✽ NOTICE • In cold and wet climates, the sun- roof may not work properly due to freezing conditions.
• After washing the car or after there is rain, be sure to wipe off any water that is on the sunroof before operating it.
CAUTION
Do not continue to move the sunroof control lever after the sunroof is fully opened, closed, or tilted. Damage to the motor or system components could occur.
WARNING
Never adjust the sunroof or sun- shade while driving. This could result in loss of control and an accident that may cause death, serious injury, or property dam- age.
Sunshade
ODH043035
• To open the sunshade, press thesunshade control switch (1).
• To close the sunshade, press the sunshade control switch (2). If you press the switch when the sunroof glass is opened, the sunroof glass will close then the sunshade will close.
To stop the sliding at any point, press the sunshade control switch momen- tarily.
ODH043034
If your vehicle is equipped with a sunroof, you can slide or tilt your sunroof with the sunroof control lever located on the overhead console.The Engine Start/Stop button must be in the ON position before you can open or close the sunroof.
3-30
Sliding the sunroof When the sunshade is closed
Tilting the sunroof When the sunshade is closed
When the sunshade is opened If you pull the sunroof control lever backward, the sunroof glass will slide all the way open. To stop the sunroof movement at any point, pull or push the sunroof control lever momentarily.
✽ NOTICE Only the front glass of the panora- ma sunroof opens and closes.
ODH043036
If you pull the sunroof control lever backward, the sunshade will slide all the way open then the sunroof glass will slide all the way open. To stop the sunroof movement at any point, pull or push the sunroof control lever momentarily.ODH043037
If you push the sunroof control lever upward, the sunshade will slide all the way open then the sunroof glass will tilt. To stop the sunroof movement at any point, pull or push the sunroof control lever momentarily.When the sunshade is opened If you push the sunroof control lever upward, the sunroof glass will tilt. To stop the sunroof movement at any point, pull or push the sunroof control lever momentarily.
3-31
Convenient features of your vehicle
Closing the sunroof
Automatic reversal
ODH043038
Press the sunshade CLOSE button. The sunroof glass will close then the sunshade will close. To stop the sun- roof movement at any point, press the sunshade control switch momentarily. If you want to close the sunroof glass only, push the sunroof control lever. The sunroof glass will close and the sunshade will not close. To stop the sunroof movement at any point, pull or push the sunroof control lever momentarily.ODH043039
If an object or part of the body is detected while the sunroof glass or sunshade is closing automatically, it will reverse the direction, and then stop. The auto reverse function does not work if a tiny obstacle is between the sliding glass or sunshade and the sunroof sash. You should always check that all passengers and objects are away from the sunroof before closing it.3-32
WARNING
• Make sure heads, other body parts or other objects are safely out of the way before closing the sunroof to avoid injuries or vehicle damage.
• To avoid serious injury or death, do not extend your head, arms or body outside the sunroof while driving.
• A panorama sunroof is made of glass, therefore it may break in an accident. If you do not have your seat belt on, you may stick out of the broken glass and get injured or killed. For all passengers safety, have an appropriate protection on (ex. seat belt, CRS, etc.).
Resetting the sunroof
CAUTION
• Periodically remove any dirt that may accumulate on the sunroof guide rail or between the sunroof and roof panel, which can make a noise.
the
temperature
• Do not try to open the sunroof when is below freezing or when the sunroof is covered with snow or ice, the motor could be damaged. In cold and wet cli- mates, the sunroof may not work properly.
✽ NOTICE After washing the vehicle or after a rain, be sure to wipe off the water on the sunroof before operating the sunroof.
ODH043040
Sunroof needs to be reset if (in the followings) - Battery is discharged or discon- nected or the related fuse has been replaced or disconnected.- The one-touch sliding function of the sunroof does not normally oper- ate.
1. Turn the engine on and close the sunroof glass and sunshade com- pletely.
2. Release the control lever.
3. Push the sunroof control lever for- ward in the direction of close (about 10 seconds) until the sun- shade slides open and the sunroof glass tilts. Then, release the lever. 4. Push the sunroof control lever for- ward in the direction of close until the sunroof operates as follows:
Glass Tilt Close → Glass Slide Open → Glass Slide Close
Then, release the control lever.
When this is complete, the sunroof system is reset.
For more details, contact an author- ized HYUNDAI dealer.
✽ NOTICE If you do not reset the sunroof, it may not work properly.
3-33
Closing the hood 1. Before closing the hood, check the
following: • All filler caps in engine compart- ment must be correctly installed. • Gloves, rags or any other com- bustible material must be removed from the engine compartment.
2. Lower the hood halfway and push down to securely lock in place. Then double check to be sure the hood is secure.
Convenient features of your vehicle
HOOD Opening the hood
ODH043029
1. Park the vehicle and set the park-ing brake.
2. Pull the release lever to unlatch the hood. The hood should pop open slightly.
ODH044030CN 3. Raise the hood slightly, push the secondary latch up (1) inside of the hood center and lift the hood (2). After it has been raised about halfway, it will raise completely by itself.
3-34
WARNING
• Before closing
the hood, ensure all obstructions are removed from around hood opening.
• Always double check to be sure that the hood is firmly latched before driving away. If it is not latched, the hood could open while the vehicle is being driven, causing a total loss of visibility, which might result in an accident.
• Do not move the vehicle with the hood in the raised posi- tion, as vision is obstructed, which might result in an acci- dent, and the hood could fall or be damaged.
3-35
Convenient features of your vehicle
TRUNK Non-Powered Trunk (if equipped)
■ Outside
■ Inside
- Use the trunk release button.
ODH043128
ODH043014L
3. Lift the trunk lid up.
To open: 1. Make sure the shift lever is in P
(Park).
2. Then do one of the following :
- Press
the Smart Key Trunk Unlock button for more than one second.
- Press the button on the trunk itself with the Smart Key in your possession.
- Use the mechanical key.
To close: Lower the trunk lid and press down until it locks.
WARNING
Always keep the trunk lid com- pletely closed while the vehicle is in motion. If it is left open or ajar, poisonous exhaust gases con- taining carbon monoxide (CO) may enter the vehicle and seri- ous illness or death may result.
3-36
WARNING
Make sure there are no people or objects around the trunk before opening or closing the Power Trunk. Wait until the trunk is open fully and stopped before loading or unloading cargo from the vehicle.
CAUTION
To prevent damage to the trunk lift cylinders and the attached hardware, always close the trunk before driving.
✽ NOTICE In cold and wet climates, trunk lock and trunk mechanisms may not work properly due to freezing conditions.
Power Trunk (if equipped)
ODH043015
ODH043017
ODH043016L (1) Power Trunk Main Control button (2) Power Trunk Open button
(3) Power Trunk Close button (4) Power Trunk Lock button
ODH043018
To open: 1. Make sure the shift lever is in P
(Park).
2. Then do one of the following:
- Press the Smart Key Trunk Unlock button for more than one second. - Press the Open button (2) on the trunk. You need the Smart Key in your possession, when all doors are locked.
- Press the Power Trunk Main
Control button (1).
3-37
Convenient features of your vehicle
To close: Do one of the following: - Press
the Power Trunk Main Control button (1) until the Power Trunk is closed securely.
- Press the Close button (3) on the
trunk.
- Press the Lock button (4) on the trunk while carrying the Smart Key with all the vehicle’s doors closed. All doors will lock and arm the theft alarm system.
If you push a button or switch while the trunk is opening or closing, it could stop moving. Press any button to operate the Power Trunk again.
✽ NOTICE The Power Trunk Lock button will not work if you press the button when: - Any door is open. - The Engine Start/Stop button is
not in the OFF position.
- The Smart Key is in the vehicle.
WARNING
Never leave children or animals unattended in your vehicle. Children or animals might oper- ate the power trunk that could result in injury to themselves or others, or damage to the vehicle.
WARNING
Always keep the trunk lid com- pletely closed while the vehicle is in motion. If it is left open or ajar, poisonous exhaust gases con- taining carbon monoxide (CO) may enter the vehicle and seri- ous illness or death may result.
WARNING
Make sure there are no people or objects around the trunk before opening or closing the Power Trunk. Wait until the trunk is open fully and stopped before loading or unloading cargo from the vehicle.
3-38
CAUTION
• Do not close or open the Power Trunk manually. This may cause damage to the Power Trunk. If it is necessary to close or open the Power Trunk manu- ally when the battery is drained or disconnected, do not apply excessive force.
• Do not leave the Power Trunk open for a long period of time. This may drain the battery.
• To prevent damage to the trunk lift cylinders and the attached hardware, always close the trunk before driving.
✽ NOTICE In cold and wet climates, trunk lock and trunk mechanisms may not work properly due to freezing condi- tions.
Power Trunk Non-Opening or Closing Conditions: • The Power Trunk will not open or close automatically, when the vehi- cle is moving more than 3 km/h (1.8 mph).
• The Power Trunk can be operated when the engine is not running. However, the Power Trunk operation consumes large amounts of vehicle electric power. To prevent the bat- tery from draining, do not operate it excessively than approximately 10 times repeatedly.) • Do not modify or repair any part of the Power Trunk by yourself. This must be done by an authorized HYUNDAI dealer.
(e.g., more
• Before jacking up the vehicle to change a tire or repair the vehicle, open the Power Trunk. Do not oper- ate the Power Trunk when the vehi- cle is raised or this could cause the Power Trunk to operate improperly. • If there are obstacles such as snow on the Power Trunk, it may not open automatically. After removing the obstacle, try to open it again.
Automatic stop and reverse
ODH043019
If, during power opening or closing, the trunk is blocked by an object or part of someone’s body, the power trunk will detect the resistance and it will stop movement or move to the full open position to allow the object to be cleared. However, if the resistance is weak such as from an object that is thin or soft, or the trunk is near the latched position, the automatic stop and reversal may not detect the resist- ance and the closing operation will continue. Also, if the Power Trunk is forced by a strong impact, the auto- matic stop and reversal may operate.3-39
Convenient features of your vehicle
If the automatic stop and reverse fea- ture operates more than twice during one opening or closing operation, the Power Trunk may stop at that posi- tion. If this occurs, close the trunk manually and operate the trunk auto- matically again.
WARNING
To prevent serious injury and damage take the following pre- cautions when operating the power trunk: - Keep all faces, hands, arms, body parts and other objects away from the path of the power trunk.
- Do not intentionally place any body parts or objects in the path of the power trunk to make sure the automatic stop and reversal operates.
- Do not allow children to play
with the power trunk.
3-40
Trunk lid control button
To reset the power trunk If the battery has been discharged or disconnected, or if the related fuse has been replaced or disconnected, reset the Power Trunk as follows: 1. Move the shift lever to the P (Park)
position.
2. Close the trunk manually. If the Power Trunk doesn't work prop- erly after performing the above pro- cedure, have the system checked by an authorized HYUNDAI dealer.
ODH043007
When the trunk lid control button is UNLOCK (button not pressed), the power trunk can be controlled with the power trunk main control button, power trunk open, close button, and the smart key. When this trunk lid control button is LOCK (button pressed), the power trunk can be controlled using the mechanical key of the smart key only.Even though the trunk lid control but- ton is LOCK (button pressed), the trunk will still be propelled upward by mechanical force if the trunk is man- ually opened more than 10 degrees beyond the fully closed position. In addition, if the trunk is manually closed to the secondary latch posi- tion, the trunk will be electrically moved to the fully latched position.
WARNING
• Always keep the Trunk Lid Control Button in the LOCK (button pressed) position when not in use. Serious injury or death can result from uninten- tional operation by a child.
• Make sure heads, other body parts or other obstacles are safely out of the way before operating the power trunk.
CAUTION
Close the trunk, and keep the trunk lid control button in the LOCK (button pressed) position before washing the vehicle in an automatic car wash.
Emergency trunk safety release
ODH043020
Your vehicle is equipped with an Emergency Trunk Safety Release lever located inside the trunk. When someone is inadvertently locked in the trunk, the trunk can be opened by moving the lever in the direction of the arrow and pushing the trunk open.3-41
(Continued) • Your vehicle should be kept locked and the Smart Key should be kept out of the reach of children. Parents should teach their children about the dangers of playing in trunks.
• Use the release emergencies only.
lever for
Convenient features of your vehicle
WARNING
• You and your passengers must be aware of the location of the Emergency Trunk Safety Release lever in this vehicle and how to open the trunk in case you are acciden- tally locked in the trunk.
• NEVER allow anyone to occu- py the trunk of the vehicle at any time. If the trunk is par- tially or totally latched and the person is unable to get out, serious injury or death could occur due to lack of ventila- tion, exhaust fumes and rapid heat build-up, or because of exposure to cold weather con- ditions. The trunk is also a highly dangerous location in the event of a crash because it is not a protected occupant space but is a part of the vehi- cle’s crush zone.
(Continued)
3-42
SMART TRUNK (IF EQUIPPED)
ODH043022
On a vehicle equipped with a smart key, the trunk can be opened with no-touch activation using the Smart Trunk system.How to use the Smart Trunk The trunk can be opened with no- touch activation satisfying all the conditions below. • After 15 seconds when all doors
are closed and locked
• Positioned in the detecting area for
more than 3 seconds.
✽ NOTICE • The Smart Trunk does not operate
when: - The smart key is detected within 15 seconds after the doors are closed and locked, and is contin- uously detected.
- The smart key is detected within 15 seconds after the doors are closed and locked, and 1.5 m from the front door handles. (for vehicles equipped with Welcome Light)
- A door is not locked or closed. - The smart key is in the vehicle.
ODH043290L
1. Setting To activate the Smart Trunk, go to User Settings Mode and select Smart Trunk on the LCD display. For more details, refer to "LCD Display" in this chapter.
3-43
Convenient features of your vehicle
ODH043021L
ODH043023L
3. Automatic opening The hazard warning lights will blink and chime will sound 2 times and then the trunk will slowly open.
2. Detect and Alert If you are positioned in the detecting area (50 ~100 cm behind the vehi- cle) carrying a smart key, the hazard warning lights will blink and chime will sound for about 3 seconds to alert you the smart key has been detected and the trunk will open.
✽ NOTICE Do not approach the detecting area if you do not want the trunk to open. If you have unintentionally entered the detecting area and the hazard warning lights and chime starts to operate, leave the detecting area with the smart key. The trunk will stay closed. 3-44
WARNING
• Make sure you close the trunk
before driving your vehicle.
• Make sure there are no people or objects around the trunk before opening or closing the trunk.
• Make sure objects in the trunk do not come out when open- ing the trunk on a slope. It may cause serious injury.
• Make sure to deactivate the Smart Trunk when washing your vehicle. Otherwise, the trunk may open inadvertently. • The key should be kept out of reach of children. Children may inadvertently open the Smart Trunk while playing around the rear area of the vehicle.
How to deactivate the Smart Trunk function using the smart key
OHG040007L
1. Door lock 2. Door unlock 3. Trunk open
If you press any button of the smart key during the Detect and Alert stage, the Smart Trunk function will be deactivated. Make sure to be aware of how to deactivate the Smart Trunk function for emergency situations.
✽ NOTICE • If you press the door unlock but- ton (2), the Smart Trunk function will be deactivated temporarily. But, if you do not open any door for 30 seconds, the smart trunk function will be activated again.
• If you press the trunk open button (3) for more than 1 second, the trunk opens.
• If you press the door lock button (1) or trunk open button (3) when the Smart Trunk function is not in the Detect and Alert stage, the smart trunk function will not be deactivated.
• In case you have deactivated the Smart Trunk function by pressing the smart key button and opened a door, the smart trunk function can be activated again by closing and locking all doors.
Detecting area
ODH043025
• The Smart Trunk operates with a welcome alert if the smart key is detected within 50~100 cm from the trunk.• The alert stops at once if the smart the key detecting area during the Detect and Alert stage.
is positioned outside
3-45
Convenient features of your vehicle
✽ NOTICE • The Smart Trunk function will not work if any of the following occurs: - The smart key is close to a radio transmitter such as a radio sta- tion or an airport which can interfere with normal operation of the transmitter.
- The smart key is near a mobile two way radio system or a cellu- lar phone.
- Another vehicle's smart key is being operated close to your vehicle.
• The detecting range may decrease
or increase when : - One side of the tire is raised to replace a tire or to inspect the vehicle.
- The vehicle is slantingly parked on a slope or unpaved road, etc.
3-46
FUEL FILLER DOOR Opening the fuel filler door
ODH043031
1. Turn the engine off. 2. Push the fuel filler door opener
button.
Closing the fuel filler door 1. To install the fuel tank cap, turn it clockwise until it “clicks” one time. 2. Close the fuel filler door until it is
latched securely.
WARNING
Gasoline is highly flammable and explosive. Failure to follow these guidelines may result in SERIOUS INJURY or DEATH: • Read and follow all warnings
posted at the gas station.
• Before refueling, note the location of the Emergency Gasoline Shut-Off, if available, at the gas station.
• Before touching the fuel noz- zle, you should eliminate the potential build-up of static electricity by touching a metal part of the vehicle, a safe dis- tance away from the fuel filler neck, nozzle, or other gas source, with your bare hand.
(Continued)
3-47
ODH043032
3. Pull the fuel filler door (1) out tofully open.
4. To remove the fuel tank cap (2), turn it counterclockwise. You may hear a hissing noise as the pres- sure inside the tank equalizes. Place the cap on the fuel filler door.
✽ NOTICE If the fuel filler door does not open because ice has formed around it, tap lightly or push on the door to break the ice and release the door. Do not pry on the door. If necessary, spray around the door with an approved de-icer fluid (do not use radiator anti-freeze) or move the vehicle to a warm place and allow the ice to melt.
(Continued) • When using an approved portable fuel container, be sure to place the container on the ground prior to refueling. Static electricity discharge from the container can ignite fuel vapors causing a fire. Once refueling has begun, contact between your bare hand and the vehicle should be maintained until the filling is complete.
• Use only approved portable plastic fuel containers designed to carry and store gasoline.
(Continued)
(Continued) • When refueling, always move the shift lever to the P (Park) position, set the parking brake, and place the Engine Start/Stop button to the OFF position. Sparks produced by electrical components related to the engine can ignite fuel vapors causing a fire.
• Do not use matches or a lighter and do not smoke or leave a lit cigarette in your vehicle while at a gas station, especially during refueling.
• Do not over-fill or top-off your vehicle tank, which can cause gasoline spillage.
(Continued)
Convenient features of your vehicle
(Continued) • Do not use cellular phones while refueling. Electric cur- rent and/or electronic interfer- ence from cellular phones can potentially ignite fuel vapors and cause a fire.
• Do not get back into a vehicle once you have begun refuel- ing. You can generate a build- up of static electricity by touch- ing, rubbing or sliding against any item or fabric capable of producing static electricity. Static electricity discharge can ignite fuel vapors causing a fire. If you must re-enter the vehicle, you should once again eliminate potentially danger- ous static electricity discharge by touching a metal part of the vehicle, away from the fuel filler neck, nozzle or other gasoline source, with your bare hand.
(Continued)
3-48
(Continued) • If a fire breaks out during refu- eling, leave the vicinity of the vehicle, and immediately con- tact the manager of the gas station and then contact the local fire department. Follow any safety instructions they provide.
• If pressurized fuel sprays out, it can cover your clothes or skin and thus subject you to the risk of fire and burns. Always remove the fuel cap carefully and slowly. If the cap is venting fuel or if you hear a hissing sound, wait until the condition stops before com- pletely removing the cap.
• Always check that the fuel cap is installed securely to pre- vent fuel spillage in the event of an accident.
✽ NOTICE • Make sure to refuel your vehicle according "Fuel Requirements" suggested in the Introduction chapter.
the
to
• Do not spill fuel on the exterior surfaces of the vehicle. Any type of fuel spilled on painted surfaces may damage the paint.
CAUTION
If the fuel filler cap requires replacement, use only a gen- uine HYUNDAI cap or the equiv- alent specified for your vehicle. An incorrect fuel filler cap can result in a serious malfunction of the fuel system or emission control system.
Emergency fuel filler lid release
ODH043033
If the fuel filler lid does not open using lid release, you can open it manually by pulling the handle outward slightly.the remote
filler
fuel
✽ NOTICE Do not pull the handle excessively, otherwise the luggage area trim or release handle may be damaged.
3-49
Convenient features of your vehicle
INSTRUMENT CLUSTER ■ Type A
■ Type B
3-50
1. Tachometer
2. Speedometer
3. Engine coolant temperature gauge
4. Fuel gauge
5. Warning and indicator lights
6. LCD display (including Trip computer)
❈ The actual cluster in the vehicle may differ
from the illustration. For more details, refer to the "Gauges" in this chapter.
ODH043051L/ODH043052L
Instrument Cluster Control Instrument panel illumination
WARNING
Never adjust the instrument cluster while driving. This could result in loss of control and lead to an accident that may cause death, serious injury, or property damage.
ODH043053
When the Engine Start Stop button is in the ON position, press the illumina- tion control button to adjust the instru- ment panel illumination intensity and AVN monitor illumination intensity. When the vehicle’s parking lights or headlights are on, the interior switch illumination intensity is adjusted additionally by pressing the control button.
ODH043228L • The brightness of the instrument
panel illumination is displayed.
• If the brightness reaches to the maximum or minimum level, an alarm will sound.
3-51
Convenient features of your vehicle
LCD Display Control
For the LCD modes, refer to “LCD Display” in this chapter.
■ Type A
■ Type B
ODH043064L The LCD display modes can be changed by using the control but- tons.
(1)
: MODE button for changing modes