- Download PDF Manual
-
If the warning light remains on after adding oil or if oil is not avail- able, we recommend that you have the vehicle inspected by an authorized HYUNDAI dealer as soon as possible.
3-89
Low Fuel Level Warning Light
Door Ajar Warning Light
This warning light illuminates: When the fuel tank is nearly empty.
This warning light illuminates: When a door is not close securely.
If the fuel tank is nearly empty: Add fuel as soon as possible.
Trunk Open Warning Light
CAUTION
Low Fuel Level Driving with the Low Fuel Level warning light on or with the fuel level below “0 or E” can cause the engine to misfire and damage the catalytic converter (if equipped).
This warning light illuminates: When the trunk is not close securely.
Convenient features of your vehicle
CAUTION
Engine Oil Pressure Warning Light • If the engine does not stop immediately after the Engine Oil Pressure Warning Light is illuminated, severe damage could result.
• If the warning light stays on while the engine is running, it indicates that there may be serious engine damage or malfunction. In this case, 1. Stop the vehicle as soon as
it is safe to do so.
2. Turn off the engine and check the oil level. If the oil level is low, fill the engine oil to the proper level.
3. Start the engine again. If the warning light stays on after the engine is started, turn the engine off immediately. In this case, we recommend that you have the vehicle inspected by an authorized HYUNDAI dealer.
3-90
All Wheel Drive (AWD) Warning Light (if equipped)
Overspeed Warning Light (if equipped)
120
km/hLow Tire Pressure Warning Light (if equipped)
you
This warning light illuminates: • Once
the Engine Start/Stop button to the ON posi- tion. - It illuminates for approximately 3
set
seconds and then goes off.
• When there is a malfunction with
the AWD system. In this case, we recommend that you have the vehicle inspected by an authorized HYUNDAI dealer.
This warning light blinks: • When you drive the vehicle more
than 120 km/h. - This is to prevent you from driving
your vehicle with overspeed.
This warning light illuminates: • Once you set Engine Start/Stop
button to the ON position. - It illuminates for approximately 3
seconds and then goes off.
- The overspeed warning chime also sound for approximately 5
seconds.• When one or more of your tires are significantly underinflated (The location of the underinflated tires are displayed on the LCD display). For more details, refer to “Tire Pressure Monitoring System (TPMS)” in chapter 6.
3-91
Autonomous Emergency Braking (AEB) Warning light
Master Warning Light
This indicator light illuminates: • When there is a malfunction with
the AEB.
In this case, we recommend that you have the vehicle inspected by an authorized HYUNDAI dealer.
This indicator light illuminates: • When there is a malfunction on the pre-safe seat belt, electronic con- trol suspension, or advanced smart cruise control or other systems etc. To identify the details of the warn- ing, look at the LCD display.
Convenient features of your vehicle
This warning light remains on after blinking for approximately 60 sec- onds or repeats blinking and off at the intervals of approximately 3
seconds: • When there is a malfunction withthe TPMS. In this case, we recommend that you have the vehicle inspected by an authorized HYUNDAI dealer as soon as possible. For more details, refer to “Tire Pressure Monitoring System (TPMS)” in chapter 6.
WARNING
Safe Stopping • The TPMS cannot alert you to severe and sudden tire damage caused by external factors.
• If you notice any vehicle insta- bility, immediately take your foot off the accelerator pedal, apply the brakes gradually with light force, and slowly move to a safe position off the road.
3-92
Indicator Lights Electronic Stability Control (ESC) Indicator Light
Electronic Stability Control (ESC) OFF Indicator Light
Immobilizer Indicator Light (With Smart Key)
you
This indicator light illuminates: • Once
the Engine Start/Stop button to the ON posi- tion. - It illuminates for approximately
set
3 seconds and then goes off.
• When you deactivate the ESC sys- tem by selecting the “ESC OFF” item on the User Settings Mode in the cluster.
For more details, refer to “Electronic Stability Control (ESC)” in chapter 5.
you
This indicator light illuminates: • Once
the Engine Start/Stop button to the ON posi- tion. - It illuminates for approximately 3
set
seconds and then goes off.
• When there is a malfunction with
the ESC system. In this case, we recommend that you have the vehicle inspected by an authorized HYUNDAI dealer.
This indicator light blinks: While the ESC is operating.
For more details, refer to “Electronic Stability Control (ESC)” in chapter 5.
This indicator light illuminates for up to 30 seconds: • When the vehicle detects the smart key in the vehicle properly while the Engine Start/Stop button is ACC or ON. - At this time, you can start the
engine.
- The indicator light goes off after
starting the engine.
This indicator light blinks for a few seconds: • When the smart key is not in the
vehicle. - At this time, you can not start the
engine.
3-93
Turn Signal Indicator Light
Low Beam Indicator Light (if equipped)
This indicator light blinks: • When you turn the turn signal light
on.
This indicator light illuminates: • When the headlights are on.
If any of the following occurs, there may a malfunction with the turn signal system. In this case, we recommend that you have the vehicle inspected by an authorized HYUNDAI dealer.
- The indicator light does not blink
but illuminates.
- The indicator light blinks more
rapidly.
- The indicator light does not illumi-
nate at all.
High Beam Indicator Light
This indicator light illuminates: • When the headlights are on and in
the high beam position
• When the turn signal lever is pulled
into the Flash-to-Pass position.
Convenient features of your vehicle
This indicator light illuminates for 2 seconds and goes off: • When the vehicle can not detect the smart key which is in the vehi- cle while the Engine Start/Stop button is ON. In this case, we recommend that you have the vehicle inspected by an authorized HYUNDAI dealer.
This indicator light blinks: • When the battery of the smart key
is weak. - At this time, you can not start the engine. However, you can start the engine if you press the Engine Start/Stop button with the smart key. (For more details, refer to “Starting the Engine” in section 5). • When there is a malfunction with
the immobilizer system. In this case, we recommend that you have the vehicle inspected by an authorized HYUNDAI dealer.
3-94
Light ON Indicator Light
Smart High Beam Indicator
Cruise Indicator Light (if equipped)
This indicator light illuminates: • When the tail lights or headlights
are on.
Front Fog Indicator Light (if equipped)
This indicator light illuminates: • When the front fog lights are on.
Rear Fog Indicator Light (if equipped)
This indicator light illuminates: • When the rear fog lights are on.
This warning light illuminates: • When the high-beam is on with the light switch in the AUTO light position. • If your vehicle detects oncoming or preceding vehicles, the smart high beam system will switch the high beam to low beam automatically.
This indicator light illuminates: • When the cruise control system is
enabled.
For more details, refer to “Cruise Control System” in chapter 5.
For more details, refer to “Smart High Beam” in this chapter.
Cruise SET Indicator Light (if equipped)
SET
This indicator light illuminates: • When the cruise control speed is
set.
For more details, refer to “Cruise Control System” in chapter 5.
3-95
Convenient features of your vehicle
AUTO HOLD Indicator Light (if equipped)
AUTO HOLD
This indicator light illuminates: • [White] When you activate the auto hold system by pressing the AUTO HOLD button.
• [Green] When you stop the vehicle the completely by depressing brake pedal with the auto hold sys- tem activated.
• [Yellow] When there is a malfunc-
tion with the auto hold system. In this case, we recommend that you have the vehicle inspected by an authorized HYUNDAI dealer.
For more details, refer to “Auto Hold” in chapter 5.
Lane Departure Warning System (LDWS) Indicator Light (if equipped) This indicator light illuminates: • [Green] When you activate the lane departure warning system by pressing the LDWS button.
• [White] When system operating conditions are not satisfied or when the sensor does not detect the lane line.
• [Yellow] When there is a malfunc- tion with the lane departure warn- ing system. In this case, we recommend that you have the vehicle inspected by an authorized HYUNDAI dealer.
For more details, refer to “Lane Departure Warning System (LDWS)” in chapter 5.
LKAS (Lane Keeping Assistant System) Indicator (if equipped)
The LKAS indicator will illuminate when you turn the lane keeping assistant system on by pressing the LKAS button. If there is a problem with the system, the yellow LKAS indicator will illumi- nate. For more details, refer to "LKAS" in chapter 5.
3-96
SPORT/SNOW Mode Indicator Light
SPORT
ECO Mode Indicator Light
ECO
SNOW
This indicator light illuminates • When you select "SPORT/SNOW"
mode as drive mode.
For more details, refer to "Drive Mode Integrated Control System" in chapter 5.
This indicator light illuminates: • When you select “ECO” mode as
drive mode.
For more details, refer to “Drive Mode Integrated Control System” in chapter 5.
WARNING
Do not watch the ECO indicator light while driving. This will dis- tract you and may cause an accident that results in severe personal injury.
3-97
WARNING
Head Up Display • Do not tint the front wind- shield glass or add other types of metallic coating. Otherwise, the head up dis- play image may be invisible.
• Do not place any accessories on the crash pad or attach any objects on the windshield glass.
Convenient features of your vehicle
HEAD UP DISPLAY (HUD) (IF EQUIPPED) Description
• The head up display image on the windshield glass may be invisible when: - Sitting posture is bad. - Wearing a polarized sunglasses. - There is an object on the cover of
the head up display.
- Driving on a wet road. - An inadequate lighting is turned
on inside the vehicle.
- Any light comes from the outside. - Wearing glasses.
• If the head up display image is not shown well, adjust the height or illumination of the head up display in the LCD display.
For more details, refer to "LCD Display" in this chapter.
• When the head up display needs inspection or repair, we recom- mend that you consult an author- ized HYUNDAI dealer.
ODH043065L The head up display is a transparent display which projects a shadow of some information of the instrument cluster and navigation on the wind- shield glass.
3-98
Head Up Display ON/OFF
Head Up Display Information
CAUTION
When replacing the front wind- shield glass of the vehicles equipped with the head up dis- play, replace it with a wind- shield glass designed for the head up display operation. Otherwise, duplicated images may be displayed on the wind- shield glass.
ODH043283L To activate the head up display, select “Head-up Display” on the “User Settings Mode” in the cluster. If you do not select “Head-up Display”, the head up display will be deactivated.
ODH043312L 1. Turn By Turn (TBT) navigation
information 2. Road signs 3. Speedometer 4. Cruise setting speed 5. Advanced Smart Cruise Control
(ASCC) information (if equipped)
6. Lane Departure Warning System (LDWS)/ Lane Keeping Assist System (LKAS) information (if equipped)
3-99
Head Up Display Setting On the LCD display, you can change the head up display settings as fol- lows. 1. Head up display ON/OFF 2. Display height 3. Illumination 4. Contents setting 5. Speedometer number size 6. Speedometer number color
For more details, refer to "LCD Display" in this chapter.
Convenient features of your vehicle
7. Blind Spot Detection (BSD) sys-
tem information (if equipped)
8. Warning lights (Low fuel, BSD) 9. Audio/Video information
On the "User Settings Mode" of the LCD display, you can activate or deactivate the Turn By Turn (TBT) navigation, Smart Cruise Control (SCC), Lane Departure Warning System (LDWS), Lane Keeping Assist System(LKAS), and Blind Spot Detection (BSD) system infor- mation.
✽ NOTICE If you select the Turn By Turn (TBT) navigation information as HUD con- tents, the Turn By Turn (TBT) navi- gation information will not be dis- played on the LCD Display.
3-100
LIGHT Exterior lights Lighting control ■ Type A
■ Type B
ODH043171
ODH043073
AUTO light position When the light switch is in the AUTO position, the parking lamp and head- lamp will be turned ON or OFF auto- matically depending on the amount of light outside the vehicle.
Even with the AUTO light feature in operation, it is recommended to manually turn ON the lamps when driving at night or in a fog, or when you enter dark areas, such as tun- nels and parking facilities.
ODH043368L To operate the lights, turn the knob at the end of the control lever to one of the following positions: (1) OFF (O) position (2) AUTO light position (3) Parking lamp position (4) Headlamp position
CAUTION
• Do not cover or spill anything on the sensor (1) located on the instrument panel.
• Do not clean the sensor using a window the cleanser may leave a light film which could interfere with sensor operation.
cleaner,
• If your vehicle has window tint or other types of metallic coating on the front wind- shield, the AUTO light system may not work properly.
3-101
Convenient features of your vehicle
High beam operation
ODH043172
ODH043173
Parking lamp position ( When the light switch is in the parking lamp position (1st position), the park- ing lamp, license plate lamp and instrument panel lamp are turned ON.
Headlamp position ( When the light switch is in the head lamp position (2nd position), the headlamp, parking lamp, license plate lamp and instrument panel lamp are turned ON.
✽ NOTICE The Engine Start/Stop button must be in the ON position to turn on the headlamp.
ODH043175
To turn on the high beam headlamp, push the lever away from you. The lever will return to its original position. The high beam indicator will light when the headlamp high beams are switched on. To turn off the high beam headlamp, pull the lever towards you. The low beams will turn on.WARNING
Do not use high beam when there are other vehicles approaching you. Using high beam could obstruct the other driver's vision.
3-102
Smart High Beam (if equipped)
Operating condition 1. Place the light switch in the AUTO
position.
2. Turn on the high beam by pushing
the lever away from you. The smart high beam ( tor will illuminate.
) indica-
ODH043174
To flash the high beam headlamp, pull the lever towards you, then release the lever. The high beams will remain ON as long as you hold the lever towards you.ODH043135
The Smart High Beam is a system that automatically adjusts the head- lamp range (switches between high beam and low beam) according to the brightness of other vehicles and road conditions.3. The Smart High Beam will turn on when vehicle speed is above 45km/h (28 mph). • If the lever is pushed away when the Smart High Beam is operating, the Smart High Beam will turn off and the high beam will be on con- tinuously. The smart high beam
) indicator will turn off.
• If the lever is pulled towards you when the Smart High Beam is operating, the Smart High Beam will turn off.
4. If the light switch is placed to the headlamp position, the Smart High Beam will turn off and the low beam will be on continuously.
3-103
Convenient features of your vehicle
The high beam switches to low beam in the below conditions. - When the Smart High Beam is off. - When the light switch is not in the
AUTO position.
- When the headlamp is detected
from the on-coming vehicle.
- When the tail lamp is detected
from the front vehicle.
- When the surrounding is bright enough high beams are not need- ed.
- When streetlights or other lights
are detected.
- When vehicle speed is below
35km/h (22 mph).
3-104
CAUTION
The system may not operate nor- mally in the below conditions. • When the light from the on- coming or front vehicle is not detected because of lamp dam- age, hidden from sight, etc.
• When the lamp of the on-com- ing or front vehicle is covered with dust, snow or water.
• When the light from the on- coming or front vehicle is not detected because of exhaust fume, smoke, fog, snow, etc.
• When the front window is cov- ered with foreign matters such as ice, dust, fog, or is damaged. • When there is a similar shape lamp with the front vehicle’s lamps.
• When it is hard to see because
of fog, heavy rain or snow.
• When the headlamp is not repaired or replaced at an authorized dealer.
(continued)
(continued) • When headlamp aiming is not
properly adjusted.
• When driving on a narrow
curved road or rough road.
• When driving downhill or uphill. • When only part of the vehicle in front is visible on a cross- road or curved road.
• When there is a traffic light, reflecting sign, flashing sign or mirror.
• When the road conditions are bad such as being wet or cov- ered with snow.
• When the front vehicle’s head- lamps are off but the fog lamps on.
• When a vehicle suddenly
appears from a curve.
• When the vehicle is tilted from
a flat tire or being towed.
• When
the LDWS
(Lane Departure Warning System) warning light illuminates. (if equipped)
WARNING
• Do not place any accessories, stickers or tint the windshield. • Have the windshield glass replaced from an authorized dealer.
• Do not remove or impact relat- ed parts of the Smart High Beam system.
• Be careful that water doesn’t get into the Smart High Beam unit.
• Do not place objects on the dashboard that reflects light such as mirrors, white paper, etc. The system may malfunc- tion if sunlight is reflected.
• At times,
the Smart High Beam system may not work properly, always check the road conditions for your safe- ty. When the system does not operate normally, manually change between the high beam and low beam.
Turn signals and lane change signals
ODH043176
To signal a turn, move the lever up for a right turn or down for a left turn to position (A). The lever will return to the OFF position when the turn is completed. To signal a lane change, move the turn signal lever slightly and hold it in position (B). The lever will return to the OFF position when released.One-touch turn signal function (if equipped) To activate an one-touch turn signal function, move the turn signal lever slightly and then release it. The lane change signals will blink 3, 5 or 7
times. You can activate/deactivate the One Touch Turn Signal function or choose the number of blinking (3, 5, or 7) from the User Settings Mode on the LCD display. For more details, refer to "LCD Display" in this chapter.✽ NOTICE If the turn signal indicator stays on and does not blink, or if it blinks abnormally, a bulb may be burned out or have a poor electrical connec- tion in the circuit. The bulb may require replacement.
3-105
Rear fog lamp (if equipped)
3. To turn off the front fog lamp, turn the light switch to the front fog lamp position again or turn off the parking lamp.
CAUTION
When in operation, the fog lamps consume large amounts of vehicle electrical power. Only use the fog lamps when visibili- ty is poor.
ODH043371L
Vehicle with front fog lamp To turn on the rear fog lamp: Position the light switch in the park- ing lamp position, turn the light switch to the front fog lamp position, and then turn the lamp switch (1) to the rear fog lamp position.
Convenient features of your vehicle
Front fog lamp (if equipped)
■ Type A
■ Type B
ODH043372L
ODH043177
Fog lamps are used to provide improved visibility when visibility is poor due to fog, rain or snow, etc. Use the switch next to the headlamp switch to turn the fog lamps ON and OFF. 1. Turn on the parking lamp. 2. Turn the light switch (1) to the frontfog lamp position.
3-106
Battery saver function The purpose of this feature is to pre- vent the battery from being dis- charged. The system automatically turns off the parking lamp when the driver turns the engine off and opens the driver-side door. With this feature, the parking lamps will turn off automatically if the driver parks on the side of road at night. If necessary, to keep the lamps on when the engine is turned off, perform the following: 1) Open the driver-side door. 2) Turn the parking lamps OFF and ON again using the light switch on the steering column.
Headlamp delay function (if equipped) If you place the Engine Start/Stop button in to the ACC or OFF position with the headlamps ON, the head- lamps (and/or parking lamps) remain on for about 5 minutes. However, with the engine off if the driver’s door is opened and closed, the head- lamps (and/or parking lamps) are turned off after 15 seconds. The headlamps (and/or parking lamps) can be turned off by pressing the lock button on the smart key twice or turning the light switch to the OFF or AUTO position. However, if you turn the light switch to the AUTO position when it is dark outside, the headlamps will not be turned off. You can activate or deactivate the Headlamp Delay function from the User Settings Mode on the LCD dis- play. For more details, refer to "LCD Display" in this chapter.
3-107
ODH043369L
Vehicle without front fog lamp To turn on the rear fog lamp: Position the light switch in the head- lamp position, and then turn the light switch (1) to the rear fog lamp position.
To turn the rear fog lamps off, do one of the following: • Turn off the headlamp switch. • Turn the light switch to the rear fog
lamp position again.
• When the light switch is in the parking lamp position, if you turn off the front fog lamp, the rear fog lamp will also turn off.
Convenient features of your vehicle
CAUTION
If the driver gets out of the vehi- cle through other doors (except driver's door), the battery saver function does not operate and the headlamp delay function does not turn off automatically. Therefore, It causes the battery to be discharged. In this case, make sure to turn off the lamp before getting out of the vehicle.
3-108
Daytime running light (DRL) (if equipped) The Daytime Running Lights (DRL) can make it easier for others to see the front of your vehicle during the day, especially after dawn and before sunset.
The DRL system will turn the dedi- cated lamp OFF when: 1. The light switch is in the front fog lamp or headlamp position, includ- ing the operation that the head- lamp is turned on automatically in the AUTO light position. 2. The engine is turned off. 3. The hazard warning flasher is on. 4. You turn the turn signal light on.
- If you turn on the turn signal light, only the corresponding daytime running lights will turn off.
- If you turn on turn signal light with the position light turned on, the daytime running lights will turn off but the position light remains on.
Headlamp leveling device (if equipped) It automatically adjusts the headlamp beam level according to the number of passengers and loading weight in the luggage area. And it offers proper headlamp beam under various conditions.
WARNING
If it does not work properly even though your car is inclined backward according to passen- ger's posture, or the headlight beam is irradiated to the high or low position, we recommend that the system be inspected by an authorized HYUNDAI dealer. Do not attempt to inspect or replace the wiring yourself.
Headlamp washer (if equipped) Washer fluid will be sprayed on the headlamps at the same time you operate the windshield washer when: 1. The Engine Start/Stop button is in
the ON position.
2. The light switch is in the headlamp
position (low beam).
✽ NOTICE • Check the headlamp washers peri- odically to confirm that the wash- er fluid is being sprayed properly onto the headlamp lenses.
• The headlamp washer can be operated 15 minutes after the last operation.
Traffic change (for Europe) Use this function when you visit a country with opposite traffic direction. For more details, refer to “Light Bulbs” in chapter 7.
Welcome system (if equipped) Welcome light (if equipped)
ODH043134
Puddle lamp When all the doors (and trunk) are closed and locked, the puddle lamp will come on for about 15 seconds if any of the below is performed. • When the door unlock button is
pressed on the smart key.
• When the button of the outside
door handle is pressed.
• When the vehicle is approached with the smart key in possession. (if equipped)
3-109
Convenient features of your vehicle
Also, if the outside rearview mirror folding switch is in the AUTO posi- tion, the outside rearview mirror will unfold automatically.
Door handle lamp (if equipped) When all the doors (and trunk) are closed and locked, the door handle lamp will come on for about 15 sec- onds if any of the below is performed. • When the door unlock button is
pressed on the smart key.
• When the button of the outside
door handle is pressed.
• When the vehicle is approached
with the smart key in possession.
Headlamp and Parking lamp When the headlamp (lamp switch in the headlamp or AUTO position) is on and all doors (and trunk) are locked and closed, the parking lamp and headlamp will come on for 15 seconds if/or any of the below is performed. • When the door unlock button is
pressed on the smart key.
At this time, if you press the door lock or unlock button, the parking lamp and headlamp will turn off immediately.
You can activate or deactivate the Welcome Light the User Settings Mode on the LCD display. For more details, refer to "LCD Display" in this chapter.
from
Interior lamp When the interior lamp switch is in the DOOR position and all doors (and trunk) are closed and locked, the room lamp will come on for 30 sec- onds if any of the below is performed. • When the door unlock button is
pressed on the smart key.
• When the button of the outside
door handle is pressed.
At this time, if you press the door lock or unlock button, the room lamp will turn off immediately.
3-110
Interior lights
CAUTION
Do not use the interior lights for extended periods when the engine is turned off or the bat- tery will discharge.
WARNING
Do not use the interior lights when driving in the dark.The inte- rior lights may obscure your view and cause an accident.
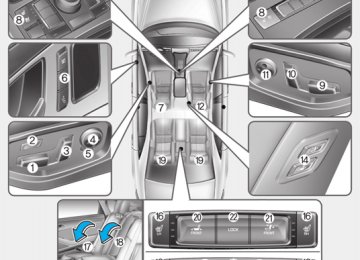
Front lamps
■ Type A
Interior lamp AUTO cut The interior lamps will automatically go off approximately 20 minutes after the engine is turned off and the doors closed. If a door is opened, the lamp will go off 40 minutes after the engine is turned off. If the doors are locked by the smart key and the vehi- cle enters the armed stage of the theft alarm system, the lamps will go off five seconds later.
■ Type B
ODH043363/Q
ODH043074/Q
(1) Front Map Lamp (2) Front Door Lamp (3) Front Room Lamp
3-111
Front Room Lamp ( Press this button to turn the front and rear room lamps on and off.
):
):
Front Door Lamp ( The front or rear room lamps come on when the front or rear doors are opened if the engine is running or not. When doors are unlocked by the Smart Key, the front and rear lamps come on for approximately 30 sec- onds as long as any door is not opened. The front and rear room lamps go out gradually after approxi- mately 30 seconds if the door is closed. However, the Engine Start/Stop button is in the ON position or all doors are locked, the front and rear lamps will turn off. If a door is opened with the Engine Start/Stop button in the ACC position or the OFF position, the front and rear lamps stay on for about 20 minutes.
if
Convenient features of your vehicle
):
Front Map Lamp ( Press either of these buttons to turn the map lamp on or off. This light pro- duces a spot beam for convenient use as a map lamp at night or as a personal lamp for the driver and the front passenger.
3-112
Rear lamps
■ Type A
Trunk room lamp (if equipped)
CAUTION
Do not leave the lamp switches on for an extended period of time when the engine is turned off.
■ Type B
ODH043364
ODH043075
Rear Room Lamp Switch ( Press this button to turn the room lamp on and off.
):
ODH043076
The trunk room lamp comes on when the trunk is opened.CAUTION
The trunk lamp comes on as long as the trunk lid is open. To prevent unnecessary charging system drain, close the trunk lid securely after using the trunk.
3-113
Convenient features of your vehicle
Door courtesy lamp
Glove box lamp
Vanity mirror lamp
ODH043077
The door courtesy lamp comes ON when the door is opened to assist entering or exiting the vehicle. It also serves as a warning to passing vehi- cles that the vehicle door is open. When the Engine Start/Stop button is in the OFF or ACC position, the door courtesy lamp turns off after 20 min- utes.ODH043078
The glove box lamp comes on when the glove box is opened. If the glove box is not closed, the lamp will turn off after 20 minutes.CAUTION
To prevent unnecessary charg- ing system drain, close the glove box securely after using the glove box.
ODH043356
Opening the lid of the vanity mirror will automatically turn on the mirror light.CAUTION
To prevent unnecessary charg- ing system drain, close the van- ity mirror cover after using the mirror.
3-114
Escort light When the Engine Start/Stop button is in the OFF position and the driver's door is opened, the puddle lamp will come on for 30 seconds. If the dri- ver's door is closed within the 30
seconds, the puddle lamp will turn off after 15 seconds. If the driver's door is closed and locked, the puddle lamp will turn off immediately. The Puddle Lamp Escort Light will turn on only the first time the driver's door is opened after the engine is turned off.Puddle lamp
ODH043355
Welcome light When all doors (and trunk) are closed and locked, the puddle lamp will come on for 15 seconds if the door is unlocked by the smart key or outside door handle button. For more details, refer to "Welcome System" in this chapter.
3-115
Convenient features of your vehicle
WIPERS AND WASHERS
■ Type A
A : Wiper speed control
) – Single wipe
· MIST ( · OFF (O) – Off · AUTO – Automatic control wipe · LO (1) – Low wiper speed · HI (2) – High wiper speed
B : Auto control wipe time adjust-
ment
■ Type B
C : Wash with brief wipes
ODH043178
ODH043370L
3-116
Windshield wipers Operates as follows when the Engine Start/Stop button is in the ON position. : For a single wiping MIST / cycle, move the lever to or MIST position and release. The wipers will operate continuous- ly if the lever is held in this position.
OFF / O : Wiper is not in operation. AUTO : The rain sensor located on the upper end of the wind- shield glass senses the amount of rainfall and con- trols the wiping cycle for the proper interval. The more it rains, the faster the wiper operates. When the rain stops, the wiper stops.To vary the speed setting, turn the speed control knob (B). LO / (1) : The wiper runs at a lower
speed.
HI / (2) : The wiper runs at a higher
speed.
✽ NOTICE If there is heavy accumulation of snow or ice on the windshield, defrost the windshield for about 10 minutes, or until the snow and/or ice is removed before using the windshield wipers to ensure proper operation. If you do not remove the snow and/or ice before using the wiper and washer, it may damage the wiper and washer system.
AUTO (Automatic) control The rain sensor located on the upper end of the windshield glass senses the amount of rainfall and controls the wiping cycle for the proper inter- val. The more it rains, the faster the wiper operates. When the rain stops, the wiper stops. To vary the speed setting, turn the speed control knob (B). If the wiper switch is set in AUTO mode when Engine Start/Stop button is in the ON position, the wiper will operate once to perform a self-check of the system. Set the wiper to OFF position when the wiper is not in use.
WARNING
CAUTION
To avoid personal injury from the windshield wipers, when the engine is running and the wind- shield wiper switch is placed in the AUTO mode: • Do not touch the upper end of the windshield glass facing the rain sensor.
• Do not wipe the upper end of the windshield glass with a damp or wet cloth.
• Do not put pressure on the
windshield glass.
• When washing the vehicle, set the wiper switch in the OFF (O) position to stop the auto wiper operation.The wiper may oper- ate and be damaged if the switch is set in the AUTO mode while washing the vehicle.
• Do not remove the sensor cover located on the upper end of the passenger side windshield glass. Damage to system parts could occur and may not be covered by your vehicle warranty.
3-117
If equipped with the Headlamp Washer, washer fluid will be sprayed on the headlamp at the same time you operate the windshield washer when: 1. The Engine Start/Stop button is in
the ON position.
2. The light switch is in the headlamp
position.
WARNING
When the outside temperature is below freezing, ALWAYS warm the windshield using the defroster to prevent the washer fluid from freezing on the wind- shield and obscuring your vision which could result in an acci- dent and serious injury or death.
CAUTION
• To prevent possible damage to the washer pump, do not operate the washer when the fluid reservoir is empty.
• To prevent possible damage to the wipers or windshield, do not operate the wipers when the windshield is dry.
• To prevent damage to the wiper arms and other compo- nents, do not attempt to move the wipers manually.
• To prevent possible damage to the wipers and washer sys- tem, use anti-freezing washer fluids in the winter season or cold weather.
Convenient features of your vehicle
Windshield washers
ODH043079
In the OFF (O) position, pull the lever gently toward you to spray washer fluid on the windshield and to run the wipers 1-3 cycles. The spray and wiper operation will continue until you release the lever. If the washer does not work, you may need to add wash- er fluid to the washer fluid reservoir.3-118
DRIVER ASSIST SYSTEM Rear view camera (if equipped)
ODH043072L
ODH043071L The Rear View Camera will activate when the engine is running and the shift lever is in the R (Reverse) posi- tion.
Whenever the vehicle ignition is cycled off and on, the rear view cam- era will turn on when the shift lever is put into R (Reverse). This is a supplemental system that shows behind the vehicle through the navigation display while backing-up.
WARNING
The rear camera display is not a safety device. It only serves to assist the driver in identifying objects directly behind the mid- dle of the vehicle. The camera does NOT cover the complete area behind the vehicle.
WARNING
• Never rely solely on the rear camera display when backing- up.
• ALWAYS look around your vehicle to make sure there are no objects or obstacles before moving the vehicle in any direction to prevent a collision. • Always pay close attention when the vehicle is driven close to objects, particularly pedestrians, and especially children.
✽ NOTICE Always keep the camera lens clean. The camera may not work normally if the lens is covered with foreign material.
3-119
Convenient features of your vehicle
Parking Assist System (if equipped)
■ Front
This system is a supplemental sys- tem that senses objects within the range and location of the sensors, it cannot detect objects in other areas where sensors are not installed.
Operation of the Parking Assist System
■ Type A
WARNING
• ALWAYS look around your vehi- cle to make sure there are not any objects or obstacles before moving the vehicle in any direc- tion to prevent a collision.
• Always pay close attention when the vehicle is driven close to objects, particularly pedestri- ans, and especially children.
• Be aware that some objects may not be visible on the screen or be detected by the sensors, due to the objects distance, size or material, all of which can limit the effective- ness of the sensor.
■ Type B
ODH043068
ODH043129
Sensor
■ Rear
ODH043066
Sensor
ODH043067L The Parking Assist System assists the driver during movement of the vehicle by chiming if any object is sensed within the distance of 100 cm (39 inches) in front and 120 cm (47
inches) behind the vehicle.3-120
Operating condition • This system will activate when the Parking Assist System button is pressed with the engine running.
• The Parking Assist System button turns on automatically and activates the Parking Assist System when you move the shift lever to the R (Reverse) position. However, if vehi- cle speed exceeds 10 km/h, the sys- tem will not warn you even though objects are detected, and if vehicle speed exceeds 20 km/h, the system will turn off automatically. To turn on the system, press the Parking Assist System button.
• When more than two objects are sensed at the same time, the clos- est one will be recognized first.
Types of warning sound and indicator
Distance
from object
Warning indicator
When driving
forward
When driving
rearward
100cm~61cm Front
120cm~61cm Rear