- 2000 Honda Prelude Owners Manuals
- Honda Prelude Owners Manuals
- 1998 Honda Prelude Owners Manuals
- Honda Prelude Owners Manuals
- 1997 Honda Prelude Owners Manuals
- Honda Prelude Owners Manuals
- 1995 Honda Prelude Owners Manuals
- Honda Prelude Owners Manuals
- 1990 Honda Prelude Owners Manuals
- Honda Prelude Owners Manuals
- 1996 Honda Prelude Owners Manuals
- Honda Prelude Owners Manuals
- 1994 Honda Prelude Owners Manuals
- Honda Prelude Owners Manuals
- 1993 Honda Prelude Owners Manuals
- Honda Prelude Owners Manuals
- 1992 Honda Prelude Owners Manuals
- Honda Prelude Owners Manuals
- 1991 Honda Prelude Owners Manuals
- Honda Prelude Owners Manuals
- Download PDF Manual
-
1996 Prelude Online Reference Owner's Manual Use these links (and links throughout this manual) to navigate through this reference. For a printed owner's manual, click on authorized manuals or go to www.helminc.com.
Contents
Owner's Identification Form Introduction ......................................................................................................................................... i A Few Words About Safety.................................................................................................................ii Driver and Passenger Safety ..............................................................................................................3
Proper use and care of your vehicle's seat belts, and Supplemental Restraint System. Instruments and Controls.................................................................................................................27
Instrument panel indicator and gauge, and how to use dashboard and steering column controls. Comfort and Convenience Features .............................................................................................. 69
How to operate the climate control system, the audio system, and other convenience features. Before Driving.................................................................................................................................. 93
What gasoline to use, how to break-in your new vehicle, and how to load luggage and other cargo. Driving ..............................................................................................................................................103 The proper way to start the engine, shift the transmission, and park, plus towing a trailer. Maintenance.....................................................................................................................................121 The Maintenance Schedule shows you when you need to take your vehicle to the dealer. Appearance Care..............................................................................................................................175 Tips on cleaning and protecting your vehicle. Things to look for if your vehicle ever needs body repairs. Taking Care of the Unexpected......................................................................................................183
This section covers several problems motorists sometimes experience, and how to handle them. Technical Information.....................................................................................................................205 ID numbers, dimensions, capacities, and technical information. Warranty and Customer Relations (U.S. and Canada)................................................................217
A summary of the warranties covering your new Acura, and how to contact us. Authorized Manuals (U.S. only)......................................................................................................223 How to order manuals and other technical literature. Index...................................................................................................................................................... I Gas Station Information A summary of information you need when you pull up to the fuel pump.Introduction
Congratulations ! Your selection of a 1996 Honda Prelude was a wise investment. It will give you years of driving pleasure.
One of the best ways to enhance the enjoyment of your new Honda is to read this manual. In it, you will learn about your vehicle's many safety features, and how to operate its driving controls and convenience items. Afterwards, keep this owner's manual in your vehicle so you can refer to it at any time.
Several warranties protect your new Honda. Read the warranty booklet thoroughly so you understand the coverages and are aware of your rights and responsibilities.
Maintaining your vehicle according to the schedules given in this manual helps to keep your driving trouble-free while it preserves your investment.When your vehicle needs maintenance, keep in mind that your Honda dealer's staff is specially-trained in servicing the many systems unique to your Honda. Your Honda dealer is dedicated to your satisfaction and will be pleased to answer any questions and concerns.
Main Menust Safety Messages
Your safety and the safety of others is very important. We have provided many important safety messages in this manual and on the vehicle. Please read these messages carefully.
You will also see another important symbol:
A safety message alerts you to potential hazards that could hurt you or others. Each safety message is preceded by a safety alert symbol one of three words, DANGER, WARNING or CAUTION. These mean:
and
NOTICE
Your Honda or other property can be damaged if you don't follow instruc- tions.
You WILL be KILLED or SERIOUSLY HURT if you don't follow instructions.
The purpose of these messages is to help prevent damage to your vehicle, other property, or the environment.
You CAN be KILLED or SERIOUSLY HURT if you don't follow instructions.
You CAN be HURT if you don't follow instructions.
Each safety message tells you what the hazard is, what can happen and what you can do to avoid or reduce injury.
Main Menust Driver and Passenger Safety
This section gives you important information about occupant protec- tion. It shows how to use seat belts properly. It explains the Supple- mental Restraint System. And it gives useful information about how to protect infants and children in your car.
Your Occupant Protection System.. 4
The Seat Belt Systemand How It Works...................... 5
Why Wear Seat Belts.................... 5
Important Safety Reminders........ 5
Seat Belt System Components..... 6
Lap/Shoulder Belt......................... 6
Wearing Seat Belts Properly........ 7
Wearing a Lap/Shoulder Belt...... 7
Advice for Pregnant Women........ 9
Seat Belt Maintenance.................. 9
Supplemental Restraint System..... 10
SRS Components......................... 10
What Happens In a Crash........... 10
Important Facts AboutAirbags...................................... 11
How the Driver's Airbag
Works........................................12
How the Passenger's Airbag
Works........................................13
How the SRS Indicator Light
Works........................................14
System Service............................. 14
System Service Precautions....... 15
Additional Safety Information........ 16
Seat-back Position........................ 16Door Locks................................... 16
Storing Cargo Safely................... 17
Driving with Pets......................... 17
Child Safety...................................... 18
Where Should Children Sit?....... 18
Important Safety Reminders...... 19
General Guidelines for Restraining Children Under 18 kg (40 Ibs)............... 19Restraining an Infant Who Weighs Less Than 9 kg (20 Ibs).......... 19
Restraining a Child Who Weighs Between 9 and 18 kg (20 and 40 Ibs)..... 20
Restraining a Child Who Weighs
Over 18 kg (40 Ibs).................. 21
Securing a Child Seat with a
Lap/Shoulder Belt................... 22
Using Child Restraints
with Tethers............................. 22
Storing a Child Seat..................... 23
Alcohol and Drugs........................... 24
Carbon Monoxide Hazard.............. 25
Safety Labels.................................... 26Driver and Passenger Safety
Main Menust Your Occupant Protection System
Your Honda is equipped with seat belts and other features that work together to protect you and your passengers during a crash.
Seat belts are the most important part of your occupant protection system. When worn properly, seat belts can reduce the chance of serious injury or death in a crash.
For added protection during a severe frontal collision, your Prelude has a Supplemental Restraint System (SRS) with a driver's airbag and a front passenger's airbag.
Two indicator lights are also part of your safety system. One reminds you to make sure you and your passen- gers wear seat belts. The other alerts you to a possible problem with your supplemental restraint system (see page 14).
The seats, head restraints, and door locks also play a role in occupant safety. For example, reclining the seat-back can decrease the effec- tiveness of your seat belt. Head restraints can help protect your neck and head, especially during rear-end impacts. Door locks help keep your doors from being accidentally opened during a crash.
Driver and Passenger Safety
To get the maximum protection from your occupant protection system, check the following before you drive away:
Everyone in the car is wearing a seat belt properly (see page 6). Infants and small children are properly secured in child safety seats (see page 18). Both doors are closed and locked (see page 16). Seat-backs are upright (see page 16). There are no loose items that could be thrown around and hurt someone during a crash or sudden stop (see page 17).
By following these guidelines, you can reduce injuries to yourself and your passengers in many crash situations. Remember, however, that no safety system can prevent all injuries or deaths that can occur in severe crashes.
Main MenuTable of Contentsst The Seat Belt System and How It Works
Why Wear Seat Belts Wearing seat belts, and wearing them properly, is fundamental to your safety and the safety of your passengers.
During a crash or emergency stop, seat belts can help keep you from being thrown against the inside of the car, against other occupants, or out of the car.
Of course, seat belts cannot com- pletely protect you in every crash. But, in most cases, seat belts reduce your chance of serious injury. They can even save your life. That is why many states and all Canadian pro- vinces require you to wear seat belts.
Not wearing a seat belt increases the chance of being killed or seriously hurt in a crash.
Be sure you and your passengers always wear seat belts and wear them properly.
Important Safety Reminders Seat belts are designed for adults and larger children. All infants and small children must be properly restrained in child safety seats (see page 18).
A pregnant woman needs to wear a seat belt to protect herself and her unborn child (see page 9).
Two people should never use the same seat belt. If they do, they could be very seriously injured in a crash.
Do not place the shoulder portion of a lap/shoulder belt under your arm or behind your back. This could increase the chance of serious injuries in a crash.
Do not put shoulder belt pads or other accessories on seat belts. They can reduce the effectiveness of the belts and increase the chance of injury.
Driver and Passenger Safety
Main MenuTable of Contentsst The lap/shoulder belt retractor in each passenger seating position has an additional locking mechanism that is intended to secure a child seat (see page 22). If the shoulder part of the belt is pulled all the way out, this mechanism will engage. The belt will retract, but it will not allow the passenger to move freely. If the belt feels too tight, unlatch it, let it retract fully, then pull it out as far as needed.
The Seat Belt System and How It Works
Seat Belt System Components Your Honda has lap/shoulder seat belts in all four seating positions.
Your seat belt system also includes a light on the instrument panel to remind you to fasten your seat belt, and to make sure your passengers fasten theirs. This light comes on when you turn on the ignition if you have not fastened your seat belt. A beeper also sounds for several seconds (see page 31).
The following pages cover more about the seat belt components and how they work.
Driver and Passenger Safety
Lap/Shoulder Belt
SHOULDER PORTION
UPPER SEAT BELT ANCHOR
LATCH PLATE
BUCKLE
LAP PORTION
This style of seat belt has a single belt that goes over your shoulder, across your chest, and across your hips. Each lap/shoulder belt has an emergency locking retractor. In normal driving, the retractor lets you move freely in your seat while it keeps some tension on the belt. During a collision or sudden stop, the retractor automatically locks the belt to help restrain your body.
Main MenuTable of Contentsst The Seat Belt System and How It Works
Wearing Seat Belts Properly You can increase the effectiveness of your seat belts if you take a little time to read the following pages and make sure you know how to wear seat belts properly.
Wearing a Lap/Shoulder Belt Before putting on the seat belt, move the driver's seat as far back as is practical while still allowing you to maintain full control of the vehicle. Make sure the seat-back is upright (see page 16). The front seat passenger should move the seat as far back as possible.
Not wearing seat belts properly increases the chance of serious injury or death in a crash.
Be sure you and your passengers always wear seat belts and wear them properly.
1. Pull the latch plate across your
body and insert it into the buckle. Tug on the belt to make sure the latch is securely locked.
CONTINUED
Driver and Passenger Safety
Main MenuTable of Contentsst The Seat Belt System and How It Works
2. Check that the belt is not twisted.
3. Position the lap portion of the belt
as low as possible across your hips, not across your stomach. This lets your strong pelvic bones take the force of a crash.
4. Pull up on the shoulder part of the
belt to remove any slack. Make sure the belt goes over your collarbone and across your chest.
To unlatch the seat belt, push the red PRESS button on the buckle. Guide the belt across your body to the door pillar.
After you exit the vehicle, make sure the seat belt is out of the way and will not get closed in the door.
Driver and Passenger Safety
Main MenuTable of Contentsst The Seat Belt System and How It Works
Advice for Pregnant Women
When using the seat belt, remember to keep the lap portion as low as possible (see page 7).
Seat Belt Maintenance For safety, you should check the condition of your seat belts regularly.
Each time you have a check-up, ask your doctor if it's okay for you to drive and how you should position a lap/shoulder seat belt.
Pull out each belt fully and look for frays, cuts, burns, and wear. Check that the latches work smoothly and the lap/shoulder belts retract easily. Any belt not in good condition or not working properly should be replaced.
If a seat belt is worn during a crash, have your dealer replace the belt and inspect the anchors for damage.
For information on how to clean your seat belts, see page 179.
Protecting the mother is the best way to protect her unborn child. Therefore, a pregnant woman should wear a properly-positioned seat belt whenever she drives or rides in a car.
Driver and Passenger Safety
Main MenuTable of Contentsst Supplemental Restraint System
Your car is equipped with a Supple- mental Restraint System (SRS) to help protect the head and chest of the driver and front seat passenger during a severe frontal collision.
This system does not replace your seat belts. It supplements, or adds to, the protection offered by seat belts and other occupant protection features.
Not wearing seat belts increases the chance of serious injury or death in a crash, even if you have airbags.
Be sure you and your passengers always wear seat belts and wear them properly.
SRS Components Your supplemental restraint system includes:
One airbag in the steering wheel for the driver and another in the dashboard for the front passenger.
Sensors that can detect a severe frontal collision.
A sophisticated electronic system that continually monitors the sensors, control unit, airbag activators, and all related wiring when the ignition is ON (II).
An indicator light on the instru- ment panel to alert you to a possible problem with the system.
Emergency backup power in case your car's electrical system is disconnected in a crash.
What Happens In a Crash If you ever have a severe frontal collision, the sensors will detect rapid deceleration and signal the control unit to instantly inflate the airbags.
During a crash, your seat belts will help to restrain your lower body and torso. The airbags will provide a cushion to absorb crash energy and help keep the head and chest of the driver and front passenger from striking the interior of the car.
After inflating, the airbags will immediately deflate. The entire process, from detection to deflation, takes a fraction of a second. This process occurs so quickly that you may not hear the loud noise created by the airbag inflators, or realize what has happened.
Driver and Passenger Safety
Main MenuTable of Contentsst After the crash, you may see what looks like smoke. This is actually powder from the airbag's surface. People with respiratory problems may experience some temporary discomfort from the chemicals used by the airbag's activators.
Important Facts About Airbags Airbags inflate only when needed; in a severe frontal collision. A severe collision would be similar to a crash into a parked vehicle of similar size at 25 mph (40 km/h). Airbags will not inflate in a moderate frontal collision, or during a rear impact, side impact, or rollover — even if the impact is severe.
Frontal collision range
Supplemental Restraint System
Just from viewing the vehicle damage after a crash, it is very difficult to accurately determine if the airbags should or should not have inflated. In some cases where the airbag did not inflate, extensive visible damage indicated that the car absorbed much of the crash energy, and the airbags were not needed. In other cases, a severe jolt, such as an impact to the undercarriage, may not cause extensive body damage but cause the airbags to inflate.
Airbags inflate and deflate only once. They cannot protect you during any additional impacts that can occur during a crash sequence.
Injuries, including fatal injuries, can occur in a severe collision, even if seat belts are worn properly and the airbags inflate. No safety system can provide complete protection in a severe crash.
Driver and Passenger Safety
Main MenuTable of Contentsst Supplemental Restraint System
How the Driver's Airbag Works
To do its job, the airbag inflates with considerable force. So, while it can reduce serious injuries and even save your life, the airbag might cause some facial abrasions or other injuries. To reduce the possibility of injury, you should always sit back as far from the steering wheel as is practical while still maintaining full vehicle control.
If you ever have a severe frontal collision, your airbag will instantly inflate to help protect your head and chest.
Driver and Passenger Safety
After the bag completely inflates, it immediately starts deflating so it won't interfere with your visibility, ability to steer, or ability to operate other controls. The total time for inflation and deflation takes a fraction of a second. You may not even be aware that the airbag has been fully inflated.
Main MenuTable of Contentsst Supplemental Restraint System
How the Passenger's Airbag Works
The driver's airbag is stored in the center of the steering wheel. For your safety, do not attach any items to the steering wheel. They could interfere with the proper operation of the airbag. Or, if the airbag inflates, they could be propelled inside the car and hurt someone.
If you ever have a severe frontal collision, the passenger's airbag will inflate at the same time as the driver's airbag.
This airbag is quite large and inflates with considerable force. It can seriously hurt a front seat passenger who is not in the proper position and wearing the seat belt properly. Front seat passengers should move the seat as far back as practical and sit well back in the seat.
We strongly recommend that you do not put an infant seat in the front passenger's seat. If the airbag inflates, it can hit the infant seat with great force. The infant seat can be dislodged or struck with enough force to cause very serious injury to the infant.
If a toddler seat is used in the front passenger's seat, the vehicle seat should be moved as far back as possible. If the passenger's bag inflates, it could seriously hurt a toddler who is not in the proper position or properly restrained.
CONTINUED
Driver and Passenger Safety
Main MenuTable of Contentsst Supplemental Restraint System
The passenger's airbag is stored near the top of the dashboard, under a lid marked SRS. Do not place any objects on top of this lid. If the airbag inflates, those objects can be propelled inside the car and possibly hurt someone.
Driver and Passenger Safety
How the SRS Indicator Light Works
SRS The purpose of the SRS light on your instrument panel is to alert you of a potential problem with your supple- mental restraint system.
System Service Your supplemental restraint system is virtually maintenance-free. There are no parts you can safely service. You must have the system serviced by an authorized Honda dealer:
Have the system checked if:
The light does not come on when you turn the ignition ON (II).
The light stays on after the engine starts.
The light comes on or flashes while you are driving.
If you see any of these indications, the airbag may not work when needed in an accident. Take the car to your dealer promptly for diagnosis and service.
If your airbags ever inflate, the airbags and control unit must be replaced. Do not try to remove or discard the airbags by yourself. This must be done by a Honda dealer.
If the SRS indicator light alerts you of a problem. Have the supplemental restraint system checked as soon as possible. Otherwise, your airbags might not inflate when you need them.
When the car is ten years old. Have the dealer inspect the system. The production date is on the driver's doorjamb for your convenience.
Main MenuTable of Contentsst Supplemental Restraint System
Scrapping an entire car that has uninflated airbags can be dangerous. Get assistance from a Honda dealer if your car must be scrapped.
If you sell your car, please be sure to tell the new owner that the car has a supplemental restraint system. Alert them to the information and precau- tions in this part of the owner's manual.
System Service Precautions Do not modify your steering wheel or any other part of the supplemental restraint system. Modifications could make the system ineffective.
Do not tamper with the system's components or wiring. This could cause the airbags to inflate inadver- tently, possibly injuring someone very seriously.
Tell anyone who works on your car that you have a supplemental restraint system. Failure to follow the procedures and precautions in the official Honda service manual could result in personal injury or damage to the system.
Driver and Passenger Safety
Main MenuTable of Contentsst Additional Safety Information
The seat belts and airbags are obvi- ously important parts of your occu- pant protection system.
In addition, you should know that sitting upright, locking the doors, and stowing things properly can also increase your safety and possibly even save your life.
Seat-back Position The seat-backs should be in an upright position for you and your passengers to get the most protec- tion from the seat belts.
If you recline a seat-back, you reduce the protective capability of your seat belt. The farther a seat-back is reclined, the greater the risk that you will slide under the belt in a severe crash and be very seriously injured.
For information on how to adjust the seat-back, see page 54.
Door Locks It is not safe to leave your car doors unlocked. A passenger, especially a child, could open a door and acci- dentally fall out. Also, there is a greater chance of being thrown out of the car during a crash when the doors are not locked.
Driver and Passenger Safety
Main MenuTable of Contentsst Additional Safety Information
Storing Cargo Safely Before you drive, make sure you first securely store or tie down any items that could be thrown around the car and hurt someone, or interfere with your ability to operate the controls.
Do not put any items on top of the rear shelf. They can block your view and they could be thrown about the car in a crash.
Be sure to keep compartment doors closed when the car is moving. If a front passenger hits the door of an open glove box, for example, he could injure his knees.
For information on loading cargo, see page 102.
Driving with Pets Loose pets can be a hazard while you are driving. An unrestrained pet can interfere with your ability to drive the car. In a crash or sudden stop, loose pets or cages can be thrown around inside the car and hurt you or your passengers. It is also for their safety that pets should be properly restrained in your car.
The recommended way to restrain a medium-sized or larger dog is with a special traveling harness. This har- ness can be secured to the rear seat with a seat belt. Travel harnesses are available at pet stores.
A small dog, cat, or other small animal will be safest in a pet carrier with rigid sides. Choose a style that allows you to secure it to the car's seat by routing a seat belt through the carrier's handle.
For further information, contact your veterinarian or local animal protec- tion society.
Driver and Passenger Safety
Main MenuTable of Contentsst Child Safety
Children depend on adults to protect them. To help make sure we do, every state and Canadian province has laws requiring infants and young children to be properly restrained whenever they ride in a car.
Driver and Passenger Safety
An infant or child who is not properly restrained can be killed or seriously injured in a crash.
Be sure any child too small for seat belts is properly secured in a child restraint.
Where Should Children Sit? According to accident statistics, children of all sizes and ages are safer when they are properly restrained in the rear seat rather than the front seat.
We recommend that, whenever possible, you secure your child's infant or toddler seat in the rear seat with the lap/shoulder belt. When you use the lap/shoulder belt, be sure to follow the instructions on page 22.
We strongly recommend that you do not put an infant seat in the front passenger's seat. If the airbag inflates, it can hit the infant seat with great force. The infant seat can be dislodged or struck with enough force to cause very serious injury to the infant.
If a toddler seat is used in the front passenger's seat, the vehicle seat should be moved as far back as possible. If the passenger's bag inflates, it could seriously hurt a toddler who is not in the proper position or properly restrained.
We also recommend that any child who is too large to use an infant or toddler seat ride in the rear seat. The child should then wear the lap/ shoulder belt properly for protection.
If the child is not large enough to wear the lap/shoulder belt properly, you should use a booster seat.
Main MenuTable of Contentsst Important Safety Reminders Never hold a baby or child on your lap when riding in a car. If you are wearing your seat belt, the violent forces created during a crash will tear the child from your arms. The child could be seriously hurt or killed.
If you are holding a child and not wearing a seat belt in a crash, you could crush the child against the car's interior.
Never put your seat belt over yourself and a child. During a crash, the belt could press deep into the child, causing serious internal injuries.
Two children should never use the same seat belt. If they do, they could be very seriously injured in a crash.
For their safety, do not leave children alone in your car without adult supervision.
Child Safety
General Guidelines for Restraining Children Under 18 kg (40 Ibs) Use an approved child seat. The seat must meet Federal Motor Vehicle Safety Standard 213 (FMVSS-213) or Canadian Motor Vehicle Safety Standards. Look for the manufac- turer's statement of compliance on the box and seat.
Use a seat of the right size. Make sure the seat fits your child. Check the seat manufacturer's instructions and labels for height and weight limits.
Secure the child seat to the car. All approved child seats are designed to be secured to the car seat by the lap belt portion of a lap/shoulder belt. A child whose seat is not properly secured to the car can be endan- gered in a crash.
To properly route a seat belt through a child seat, follow the seat maker's instructions. When you use a lap/ shoulder belt, follow the instructions on page 22.
Secure the child in the child seat. Make sure the infant or child is firmly secured to the child seat. Use the straps provided, and carefully follow the manufacturer's instructions.
Restraining an Infant Who Weighs Less Than 9 kg (20 Ibs) An infant up to about 9 kg (20 Ibs) must be restrained in an infant seat or a convertible seat designed for a baby. Because infants must ride in a reclining position, be sure the infant seat always faces the REAR of the car as shown.
CONTINUED
Driver and Passenger Safety
Main MenuTable of Contentsst Child Safety
We recommend that, whenever possible, you put the infant seat in the rear seat and secure it to the car with a lap/shoulder belt. Make sure the infant seat is held securely by the locking mechanism of the lap/ shoulder belt (see page 22).
Driver and Passenger Safety
We strongly recommend that you do not put an infant seat in the front passenger's seat. If the airbag inflates, it can hit the infant seat with great force. The infant seat can be dislodged or struck with enough force to cause very serious injury to the infant.
Restraining a Child Who Weighs Between 9 and 18 kg (20 and 40 Ibs) Toddler seats are designed for children who weigh between 9 and 18 kg (20 and 40 Ibs). The preferred place to put a toddler seat is in the rear seat. Use the car's lap/shoulder belt to secure the seat to the car. Make sure the toddler seat is held securely by the locking mechanism of the lap/shoulder belt (see page 22).
If you are using a toddler seat in the front passenger's seat, move the passenger's seat as far back as possible before installing the child seat. If the passenger's bag inflates, it could seriously hurt a toddler who is not in the proper position or properly restrained.
Main MenuTable of Contentsst Child Safety
Restraining a Child Who Weighs Over 18 kg (40 Ibs)
Put the seat belt on your child and check its fit. The shoulder belt should fit over the collarbone and across the chest. The lap belt should sit low on your child's hips, not across the stomach.
If the shoulder belt crosses the neck, you should use a booster seat.
Several styles of booster seats are available. We recommend a design that allows the child to use the car's lap/shoulder belt.
Whichever style you select, follow the booster seat manufacturer's instructions.
We recommend that, whenever possible, a child who has outgrown a toddler seat ride in the rear seat and use a lap/shoulder belt.
Driver and Passenger Safety
Main MenuTable of Contentsst Child Safety
Securing a Child Seat with a Lap/ Shoulder Belt The lap/shoulder belt retractors in the passenger seating positions have a built-in locking mechanism intended to secure a child seat. When you are placing a child seat in one of these seating positions, do the following:
1. Place the child restraint in the
desired seating position. Route the lap/shoulder belt through the seat according to the seat manufac- turer's instructions.
2. Insert the latch plate into the buckle. Make sure it is fully latched.
3. Slowly pull the shoulder portion of the belt out of the retractor until it stops.
Driver and Passenger Safety
4. Allow the belt to slowly feed back
into the retractor. You should hear a clicking noise that indicates the locking mechanism has engaged.
5. After the belt has retracted fully, pull up on the shoulder portion to remove any slack.
6. Push and pull on the child seat to
verify that it is held firmly in place. If not, unlatch the seat belt, allow it to retract fully, and repeat these steps.
To unlatch the seat belt, push the red PRESS button on the buckle. Guide the belt across to the door pillar. If the belt doesn't retract easily, pull it out and check for twists or kinks.
Using Child Restraints with Tethers
150 mm (5.9 in)
230 mm (9.1 in)
Your Honda has two attachment points for tether-style child seats. Use the dimensions in the above illustration to locate the attachment point you want to use. Cut a 12.7 mm (1/2 inch) diameter hole in the rear shelf.
Main MenuTable of Contentsst Then install the tether hardware that came with the child seat. Tighten the bolt to: 22 N.m (2.2 kgf.m , 16 lbf.ft)
If you are not sure how to install the bracket, have it installed by your Honda dealer.
If you need an anchor plate and mounting hardware, you can obtain them by writing to:
American Honda Motor Co., Inc. Consumer Affairs 1919 Torrance Blvd. Torrance, CA 90501-2746
Child Safety
Canadian Cars
TOOTHED WASHER
Storing a Child Seat When you are not using an infant seat or other child restraint, either remove it or make sure it is properly secured so it cannot be thrown around the car during a crash.
The anchor plate and mounting hardware for a top tether are supplied with the car. When install- ing, make sure the toothed washer is on the bottom of the bolt.
The supplied anchor plate is designed only for mounting a child restraint. Do not use it for any other purpose.
Driver and Passenger Safety
Main MenuTable of Contentsst The safest thing you can do is never drink and drive. This can be done if you plan ahead. If you know you are going to be drinking, make plans to ride with a friend who will not be drinking.
If you have no choice but to drive, stop drinking and give yourself lots of time to sober up. Time is the only thing that can make you sober. Things like coffee or a cold shower don't speed up the process.
What if you find that you've been drinking and cannot get a ride from a friend? Find alternative transpor- tation. Call a taxi. Take a bus. Many communities have transportation services devoted to shuttling people who have been drinking.
If you see friends trying to get behind the wheel after drinking, stop them. Drive them yourself or arrange other transportation. If you think you are interfering, remember that your interference will keep them from sharing the road with you.
Alcohol and Drugs
Driving a car requires your full at- tention and alertness. Traffic condi- tions change rapidly. You must be able to react just as rapidly. Alcohol or drugs directly affect your alert- ness and ability to react. Even pre- scription and non-prescription medi- cines can have this effect.
There are laws that deal with drunken driving. These laws define how much alcohol it takes in your system to be legally "drunk." How- ever, your judgment and reaction time get worse with every drink— even the first one.
Driver and Passenger Safety
Main MenuTable of Contentsst Your car's exhaust contains carbon monoxide gas. You should have no problem with carbon monoxide entering the car in normal driving if you maintain your car properly. Have the exhaust system inspected for leaks whenever:
High levels of carbon monoxide can collect rapidly in enclosed areas, such as a garage. Do not run the engine with the garage door closed. Even with the door open, run the engine only long enough to move the car out of the garage.
The car is raised for an oil change. You notice a change in the sound of the exhaust. The car was in an accident that may have damaged the underside.
With the trunk lid open, air flow can pull exhaust gas into your car's interior and create a hazardous condition. If you must drive with the trunk lid open, open all the windows and set the heating and cooling system as follows.
Carbon monoxide gas is toxic. Breathing it can cause unconsciousness and can even kill you.
Avoid any enclosed areas or activities that expose you to carbon monoxide.
Carbon Monoxide Hazard
If you must sit in your parked car, even in an unconfined area, with the engine running, adjust the heating and cooling system as follows:
1. Select the Fresh Air mode. 2. Select the 3. Turn the fan on high speed. 4. Set the temperature control to a
mode.
comfortable setting.
Driver and Passenger Safety
Main MenuTable of Contentsst Safety Labels
These labels are in the locations shown. They warn you of potential hazards that could cause serious injury. Read these labels carefully and don't remove them.
If a label comes off or becomes hard to read, contact your Honda dealer for a replacement.
BATTERY
Driver and Passenger Safety
RADIATOR CAP
Main MenuTable of Contentsst This section gives information about the controls and displays that contribute to the daily operation of your Honda. All the essential controls are within easy reach.
Control Locations............................ 28
Indicator Lights................................ 29
Gauges.............................................. 35
Speedometer................................ 36
Tachometer.................................. 36
Odometer...................................... 36
Trip Meter.................................... 37
Fuel Gauge................................... 38
Temperature Gauge.................... 38Controls Near the Steering
Wheel........................................ 39
Headlights.................................... 40
Daytime Running Lights............. 40
Instrument Panel Brightness..... 41
Turn Signals................................. 41
Windshield Wipers...................... 42
Windshield Washers................... 42
Steering Wheel Adjustment....... 43
Steering Wheel Controls ................ 44
Cruise Control.............................. 44
Keys and Locks................................ 47
Keys...............................................47
Ignition Switch............................. 48
Door Locks................................... 49
Power Door Locks....................... 49
Trunk............................................ 50Instruments and Controls
Seat Adjustments............................. 51
Rear Seat Access......................... 52
Additional Driver's SeatAdjustments............................. 53
Seat Heaters..................................... 54
Folding Rear Seat............................ 55
Hazard Warning............................... 56
Rear Window Defogger.................. 56
Power Windows............................... 57
Sunroof.............................................. 58
Mirrors.............................................. 59
Adjusting the Power Mirrors..... 60
Parking Brake.................................. 61
Glove Box......................................... 62
Digital Clock..................................... 62
Cigarette Lighter............................. 63
Ashtrays............................................ 64
Beverage Holder.............................. 65
Console Compartment.................... 66
Interior Lights.................................. 66
Ceiling Lights............................... 66
Ignition Switch Light................... 67Instruments and Controls
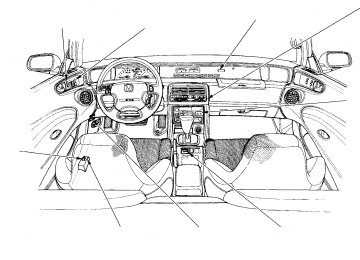
Main Menust Control Locations
FUEL FILL DOOR RELEASE (P.96)
DOOR LOCK SWITCH (P.49)
POWER WINDOW SWITCHES (P.57)
DIGITAL CLOCK (P.62)
HEATING/ COOLING CONTROL (P.70)
AUDIO SYSTEM (P.78)
TRUNK RELEASE HANDLE (P.50)
HOOD RELEASE HANDLE (P.97)
MIRROR CONTROLS (P.60)
Instruments and Controls
Main MenuTable of Contentsst The instrument panel has many indicators to give you important information about your car.
Lamp Check Many of the indicator lights come on when you turn the ignition switch ON (II), allowing you to see that they are working. If an indicator does not light during this test, it cannot alert you if that system develops a prob- lem. Have the dealer check your car for burned-out bulbs or other problems.
Indicator Lights
(S)
SUPPLEMENTAL RESTRAINT SYSTEM INDICATOR
HIGH BEAM INDICATOR
(Except S)
SUPPLEMENTAL RESTRAINT SYSTEM INDICATOR
HIGH BEAM INDICATOR
CONTINUED
Instruments and Controls
Main MenuTable of Contentsst Indicator Lights
CRUISE CONTROL INDICATOR
MALFUNCTION INDICATOR LAMP
* The U.S. instrument panel is shown. Differences for the Canadian model are noted in the text.
LOW FUEL INDICATOR
ANTI-LOCK BRAKE SYSTEM INDICATOR*
PARKING BRAKE AND BRAKE SYSTEM INDICATOR*
SEAT BELT REMINDER LIGHT
BRAKE LAMP INDICATOR
TRUNK-OPEN INDICATOR
DOOR-OPEN INDICATOR
CHARGING SYSTEM INDICATOR
LOW OIL PRESSURE INDICATOR
Instruments and Controls
Main MenuTable of Contentsst Seat Belt Reminder Light
This indicator lights when you turn the ignition ON (II). It is a reminder to you and your passengers to protect yourselves by fastening the seat belts. A beeper also sounds if you have not fastened your seat belt.
If you do not fasten your seat belt, the beeper will stop after a few seconds but the light stays on until you do. Both the light and the beeper stay off if you fasten your seat belt before turning on the ignition.
Charging System Indicator
If this light comes on when the engine is running, the battery is not being charged. For complete information, see page 196.
Low Oil Pressure Indicator
The engine can be severely damaged if this light flashes or stays on when the engine is running. For complete information, see page 195.
Indicator Lights
Canada
U.S. BRAKE
Parking Brake and Brake System Indicator This light has two functions:
1. It lights as a reminder that you
have set the parking brake. Driving with the parking brake set can damage the brakes and tires, and cause the Anti-lock brake system to turn off (see page 113).
2. It can indicate the brake fluid level
is low if it remains lit after you release the parking brake or comes on while driving. This is normally due to worn brake pads. Have your dealer check the braking system for worn pads or fluid leaks.
Instruments and Controls
Main MenuTable of Contentsst Indicator Lights
SRS See page 14.
Supplemental Restraint System Indicator
Canada
U.S. ABS
Anti-lock Brake System (ABS) Indicator
Malfunction Indicator Lamp See page 197.
Only on cars equipped with ABS (see page 113) This light normally comes on when you turn the ignition ON (II) and goes off after the engine starts. If it comes on at any other time, there is a problem in the ABS. If this happens, stop the car in a safe place and turn off the engine. Reset the system by restarting the engine. Watch the ABS light. If it does not go off, or comes back on again while driving, take the car to your dealer to have it checked. With the light on, your car still has normal braking ability but no anti-lock.
Instruments and Controls
Main MenuTable of Contentsst Indicator Lights
High Beam Indicator
This light comes on with the high beam headlights. See page 40 for information on the headlight controls.
Brake Lamp Indicator
BRAKE LAMP This light normally comes on for a few seconds when you turn the ignition switch ON (II). If this light comes on at any other time, it indicates a brake light does not work.
A burned out brake light is a hazard when drivers behind you cannot tell you are braking. Have your brake lights repaired right away.
Turn Signal and Hazard Warning Indicators
The left or right turn signal light blinks when you signal a lane change or turn. If the light does not blink or blinks rapidly, it usually means one of the turn signal bulbs is burned out (see page 166). Replace the bulb as soon as possible, since other drivers cannot see that you are signalling.
When you turn on the Hazard Warning switch, both turn signal lights blink. All turn signals on the outside of the car should flash.
Instruments and Controls
Main MenuTable of Contentsst "Daytime Running Lights" Indicator
Canadian models only This indicator lights when you turn the ignition to ON (II) with the headlight switch off and the parking brake set. It should go off if you turn on the headlights or release the parking brake. If it comes on at any other time, it means there is a problem with the DRL. There may also be a problem with the high beam headlights.
Indicator Lights
Low Fuel Indicator
Trunk-open Indicator
D R L
This light comes on as a reminder that you must refuel soon.
This light comes on if the trunk lid is not closed tightly.
Cruise Control Indicator
CRUISE CONTROL This lights when you set the cruise control. See page 44 for information on operating the cruise control.
Door-open Indicator
This light comes on if either door is not closed tightly.
Instruments and Controls
Main MenuTable of Contentsst (S)
ODOMETER
TRIP METER
TRIP METER RESET BUTTON
Gauges
TACHOMETER
SPEEDOMETER
(Except S)
RESET/CHANGE KNOB
TACHOMETER
SPEEDOMETER
ODOMETER/TRIP METER
Instruments and Controls
Main MenuTable of Contentsst Gauges
Speedometer U.S. Models This shows your speed in miles per hour (mph). The smaller inner numbers are the speed in kilometers per hour (km/h).
Tachometer The tachometer shows the engine speed in revolutions per minute (rpm). To protect the engine from damage, never drive with the tachometer needle in the red zone.
Canadian Models This shows your speed in kilometers per hour (km/h). The smaller inner numbers are the speed in miles per hour (mph).
Odometer The odometer shows the total dis- tance your car has been driven. It measures miles in U.S. models and kilometers in Canadian models. It is illegal under federal law (in the U.S.) and provincial regulations (in Canada) to disconnect, reset, or alter the odometer with the intent to change the number of miles or kilometers indicated.
(Except S model) The odometer and the trip meter use the same display. To change the display from the odometer to the trip meter or vice versa, turn the Change/Reset knob as explained in the next column.
Instruments and Controls
Main MenuTable of Contentsst Trip Meter This meter shows the number of miles (U.S.) or kilometers (Canada) driven since you last reset it.
(S model) To reset it, push the trip meter reset button.
(Except S model) Your meter can show traveling distances of two separate trips. Each time you turn the Change/Reset knob counterclockwise, the display changes from the odometer to TRIP 1, TRIP 2 then back to the odometer. Turning the knob clockwise changes the display in the reverse order.
Gauges
CHANGE/RESET KNOB
TRIP METER DISPLAY
To reset the trip meter, select the reading you want to reset, TRIP 1 or TRIP 2 by turning the Change/Reset knob. Then push the knob until the number resets to 0.0.
Instruments and Controls
Main MenuTable of Contentsst Gauges
FUEL GAUGE
TEMPERATURE GAUGE
As a test, all the indicator bars in the fuel gauge light for several seconds when you turn the ignition to ON (II).
Fuel Gauge This shows how much fuel you have. The fuel gauge is fully electronic, lighting the indicator bars to show the current fuel level. It is most accurate when you are driving or parked on level ground. The indicated fuel level may vary when you are driving on curved or hilly roads.
Instruments and Controls
Temperature Gauge The temperature gauge is fully electronic. It uses a series of illuminated indicator bars to show the engine coolant's temperature range. Under normal driving conditions, you will see the bars illuminate to the display's midpoint. In more severe driving conditions, such as very hot weather or climbing a long hill, the engine may get hot enough to illuminate the white indicators on the right side of the gauge. If the red indicator above the H comes on, pull safely to the side of the road. Turn to page 199 for instructions and precautions on checking the engine's cooling system.
As a test, all the indicator bars in the temperature gauge illuminate when you turn the ignition ON (II).
Main MenuTable of Contentsst Controls Near the Steering Wheel
SUNROOF
INSTRUMENT PANEL BRIGHTNESS
WINDSHIELD WIPERS/WASHERS
The two levers on the steering column contain controls for driving features you use most often. The left lever controls the turn signals, headlights, and high beams. The right lever controls the windshield wipers.
The controls on the dashboard to the left of the steering column are for the sunroof, cruise control and instrument panel brightness.
The lever on the underside of the steering column allows you to tilt the steering wheel.
CRUISE CONTROL
HEADLIGHTS/ TURN SIGNALS
TILT ADJUSTMENT
HORN
HAZARD WARNING
Instruments and Controls
Main MenuTable of Contentsst Controls Near the Steering Wheel
Headlights
If you leave the lights on with the ignition switch in ACCESSORY (I) or LOCK (0), you will hear a reminder chime when you open the driver's door.
The rotating switch on the left lever controls the lights. Turning this switch to the first position turns on the parking lights, taillights, instrument panel lights, side-marker lights, and rear license plate lights. Turning the switch to the second position headlights.
turns on the
To change between low beams and high beams, pull back on the turn signal lever until you hear a click, then let go. The blue high beam indicator will light (see page 33).
Instruments and Controls
To flash the high beams, pull back and hold the turn signal lever. Release the lever and the high beams will go off.
The high beams will stay on for as long as you hold the lever, no matter what position the headlight switch is in.
Daytime Running Lights (Canadian Models) With the headlight switch off, the high beam headlights come on with reduced brightness when you turn the ignition switch to ON (II) and release the parking brake. They remain on until you turn the ignition off, even if you set the parking brake.
The headlights revert to normal operation when you turn them on with the switch.
Main MenuTable of Contentsst Controls Near the Steering Wheel
Instrument Panel Brightness
the dial up as far as it will go to return the fuel and temperature gauges to their daytime brightness.
Turn Signals
To signal a lane change, push lightly on the turn signal lever in the proper direction and hold it. The lever will return to the center position as soon as you release it.
The dial on the dashboard to the left of the instrument panel controls the brightness of the instrument panel lights. Turn the dial to adjust the brightness.
To reduce glare at night, the fuel and temperature gauges dim when you turn on the parking lights or headlights. You then adjust their brightness when you adjust the instrument panel brightness. Turn
TURN SIGNAL LEVER
Signal a turn or lane change with this lever. Push down on the lever to signal a left turn, and up to signal a right turn. If you push it up or down all the way, the turn signal continues to blink even when you release the lever. It shuts off automatically as you complete the turn.
Instruments and Controls
Main MenuTable of Contentsst Controls Near the Steering Wheel
Windshield Wipers
Windshield Washers
To operate the wipers in mist mode, push the control lever down. The wipers run at high speed until you release the lever. This gives you a quick way to clear the windshield.
To clean the windshield, pull back on the wiper control lever. The washers spray until you release the lever.
The wipers run at low speed while you're pulling the lever, then complete one more sweep of the windshield after you release it.
The right lever controls the wind- shield wipers and washers. The rotary switch at the end of the lever has three positions: INT: intermittent
: low speed : high speed
In intermittent, the wipers operate every few seconds. In low speed and high speed, the wipers run continu- ously.
Instruments and Controls
Main MenuTable of Contentsst Steering Wheel Adjustment You can adjust the steering wheel height to suit your preference. Do this before you begin driving.
Adjusting the steering wheel position while driving may cause you to lose control of the car and be seriously injured in a crash.
Adjust the steering wheel only when the car is stopped.
Controls Near the Steering Wheel
3. Move the steering wheel up or down to the desired position. Position the wheel so you can see all the instrument panel gauges and warning lights. Push the lever up to lock the steering wheel in that position.
4. Make sure you have securely
locked the steering wheel in place by trying to move it up and down.
1. Adjust the seat so you are a
comfortable distance from the pedals.
2. The lever to tilt the steering wheel
is under the steering column to the left. Push this lever all the way down.
Instruments and Controls
Main MenuTable of Contentsst Steering Wheel Controls
Cruise Control Cruise control allows you to maintain a set speed above 25 mph (40 km/h) without keeping your foot on the accelerator pedal. It is for cruising on straight, open highways. It is not recommended for conditions such as city driving, winding roads, slippery roads, heavy rain, or bad weather. You should have full control of the car under those conditions.
Improper use of the cruise control can lead to a crash.
Use the cruise control only when traveling on open highways in good weather.
Instruments and Controls
NOTICE
Using the Cruise Control
The cruise control, as it operates, moves the accelerator pedal. You can damage your car's accelerator mechanism by resting your foot under the pedal and blocking the movement.
1. Push in the Cruise Control Master
Switch to the left of the steering column. The indicator in the switch will light.
2. Accelerate to the desired cruising speed above 25 mph (40 km/h).
Main MenuTable of Contentsst Changing the Set Speed You can increase the set cruising speed in either of two ways:
Press and hold the accel/ RESUME button. The car will accelerate slowly. When you reach the desired cruising speed, release the button.
Push on the accelerator pedal. Ac- celerate to the desired cruising speed and press the SET/decel button.
Steering Wheel Controls
You can decrease the set cruising speed in either of two ways:
Press and hold the SET/decel button. The car will decelerate. Release the button when you reach the desired speed.
Tap the brake or clutch pedal lightly with your foot. The CRUISE CONTROL light on the instrument panel will go out. When the car slows to the desired speed, press the SET/decel button. The car will then maintain the desired speed.
CONTINUED
Instruments and Controls
accel/ RESUME
SET/decel
3. Press and hold the SET/decel
button on the steering wheel until the CRUISE CONTROL light on the instrument panel comes on. This shows the system is now activated.
The set speed may vary slightly, particularly on hills.
Main MenuTable of Contentsst button.
Pressing the Cruise Control Master Switch turns the system completely off and erases the previous cruising speed from memory. To use the system again, refer to Using the Cruise Control.
Steering Wheel Controls
Even with the cruise control turned on, you can still use the accelerator pedal to speed up for passing. After completing the pass, take your foot off the accelerator pedal. The car will return to the set cruising speed.
Resting your foot on the brake or clutch pedal will cause the cruise control to cancel.
Cancelling the Cruise Control Any of these actions cause the cruise control to cancel.
Tap the brake or clutch pedal.
Press the SET/decel and accel/ RESUME buttons at the same time.
Press the Cruise Control Master Switch.
Instruments and Controls
When you tap the brake or clutch pedal, or press the SET and RE- SUME buttons at the same time, the CRUISE CONTROL light on the instrument panel will go out and the car will begin to slow down. You can use the accelerator pedal in the normal way.
If you use the brake or clutch pedal to cancel cruise control, the system retains the previously-set cruising speed. To return to that speed, ac- celerate to above 25 mph (40 km/h) and press the accel/RESUME button until the CRUISE CONTROL light comes on. The car will accelerate to the same cruising speed as before.
If you cancel cruise control by pressing the SET and RESUME buttons at the same time, the previously-set cruising speed is erased. To use the cruise control, accelerate to the desired cruising speed and press the SET/decel
Main MenuTable of Contentsst Steering Wheel Controls, Keys and Locks
Keys
VALET KEY
MASTER KEY
The valet key only works the ignition and the door locks. You can keep the trunk, trunk release handle and rear seat trunk access locked when you leave your car and valet key at a parking facility. (See Trunk, page 50.)
You should have received a key number plate with your set of keys. You will need this key number if you ever have to replace a lost key. Store this plate in a safe place. When replacing keys, use only Honda-approved key blanks.
Your car comes with two kinds of keys: a master key and a valet key. The master key fits all the locks on your car: Ignition Doors Trunk Trunk release handle Rear seat trunk access
Instruments and Controls
Main MenuTable of Contentsst Keys and Locks
Ignition Switch
The ignition switch is on the right side of the steering column. It has four positions: LOCK (0), ACCES- SORY (I), ON (II), and START (III).
Instruments and Controls
LOCK (0) — You can insert or remove the key only in this position. When you turn the key from LOCK to ACCESSORY, you may have to turn the steering wheel to release the anti-theft lock. To switch from ACCESSORY to LOCK, you must push the key in slightly as you turn it. If your car has an automatic trans- mission, it must also be in Park. The anti-theft lock will lock the steering column when you remove the key.
Removing the key from the ignition switch while driving locks the steering. This can cause you to lose control.
Remove the key from the ignition switch only when parked.
ACCESSORY (I) — In this position, you can operate the audio system and cigarette lighter.
ON (II) — This is the normal key position when driving. All features and accessories on the car are usable. Several of the lights on the instru- ment panel come on as a test when you turn the ignition switch from ACCESSORY to ON (see page 29).
START (III) — Use this position only to start the engine. The switch returns to ON when you let go of the key.
You will hear a reminder beeper if you open the driver's door with the key in the LOCK or ACCESSORY position. Remove the key to turn it off.
Main MenuTable of Contentsst Door Locks
The doors can also be locked and unlocked from the outside with the key.
Power Door Locks
Keys and Locks
Each door has a lock tab next to the inside door handle. Push the tab in to lock the door and pull it out to unlock.
To lock the passenger's door when getting out of the car, push the lock tab in and close the door. To lock the driver's door, pull the door handle and push the lock tab in. Release the handle, then close the door.
Available on U.S. Si, and VTEC models, and Canadian SR and SR-V models Each door has a master door lock switch. Either switch locks and unlocks both doors. Push the switch down to lock and up to unlock.
CONTINUED
Instruments and Controls
Main MenuTable of Contentsst Keys and Locks
Both doors lock when you push in the lock tab on the driver's door, or lock the driver's door from the outside with the key. Only the driver's door unlocks when you use the key or lock tab. To unlock the passenger's door, use the master door lock switch or pull out the lock tab on passenger's door.
Lockout Prevention If you forget and leave the key in the ignition switch, Lockout Prevention will not allow you to lock the driver's door. With either door open and the key in the ignition, the master door lock switches are disabled. If you try to lock the driver's door by pushing in the lock tab, the tabs on both doors immediately pop out.
Instruments and Controls
Trunk
MASTER KEY
TRUNK RELEASE HANDLE
You can open the trunk in two ways:
Pull the trunk release handle to the left of the driver's seat.
Use the master key to open the trunk lock. The valet key does not work in this lock.
To close the trunk, press down on the trunk lid.
See page 102 for cargo loading and weight limit information. Keep the trunk lid closed at all times while driving to avoid damaging the lid and getting exhaust gas in the interior. See Carbon Monoxide Hazard on page 25.
Main MenuTable of Contentsst Keys and Locks, Seat Adjustments
Seat Adjustments Adjust the seat before you start driving.
MASTER KEY
To protect items in the trunk when you need to give the key to someone else, lock the trunk release handle with the master key and give the other person the valet key.
To adjust the seat forward and backward, pull up on the lever under the seat cushion's front edge. Move the seat to the desired position and release the lever. Try to move the seat to make sure it is locked in position.
CONTINUED
Instruments and Controls
Main MenuTable of Contentsst Seat Adjustments
To change the angle of the seat-back, pull up on the lever on the outside of the seat bottom. Move the seat-back to the desired position and release the lever. Let the seat-back latch in the new position.
Instruments and Controls
Rear Seat Access
Reclining the seat-back can decrease the protection you get from your seat belt in a crash.
You can slide under the seat belt and be seriously injured.
Adjust the seat-back to an upright position and sit well back in the seat.
To tilt the front seat-back forward, pull up on the release lever. This lever is on the side of each seat-back. You can also tilt the seat-back forward by pulling up the seat-back angle adjustment lever.
Main MenuTable of Contentsst Seat Adjustments
Lumbar Support
Fine Adjustment of Seat-back Angle
Additional Driver's Seat Adjustments The driver's seat in the Si and VTEC models in the U.S., and the SR and SR-V models in Canada has additional features. They are: lumbar support adjustment, fine adjustment of seat-back angle, and seat-back angle memory.
Vary the lumbar support by moving the lever on the right side of the seat-back.
Adjust the seat-back angle to the desired position with the adjustment lever on the outside of the seat bottom. Then use the fine adjustment lever at the base of the seat-back to change the angle a small amount to suit your preference. Move the lever forward and backward.
CONTINUED
Instruments and Controls
Main MenuTable of Contentsst Seat Adjustments, Seat Heaters
Seat-back Angle Memory
Seat Heaters
INDICATORS