- 2000 Honda Prelude Owners Manuals
- Honda Prelude Owners Manuals
- 1998 Honda Prelude Owners Manuals
- Honda Prelude Owners Manuals
- 1997 Honda Prelude Owners Manuals
- Honda Prelude Owners Manuals
- 1995 Honda Prelude Owners Manuals
- Honda Prelude Owners Manuals
- 1990 Honda Prelude Owners Manuals
- Honda Prelude Owners Manuals
- 1996 Honda Prelude Owners Manuals
- Honda Prelude Owners Manuals
- 1994 Honda Prelude Owners Manuals
- Honda Prelude Owners Manuals
- 1993 Honda Prelude Owners Manuals
- Honda Prelude Owners Manuals
- 1992 Honda Prelude Owners Manuals
- Honda Prelude Owners Manuals
- 1991 Honda Prelude Owners Manuals
- Honda Prelude Owners Manuals
- Download PDF Manual
-
Main Menuts Spare Tire
COMPACT Spare Tire Your car is supplied with a COMPACT spare tire and wheel for temporary use only in the event of a flat tire. Use the COMPACT spare only when you have to, and only to go as far as the next garage or dealer to have the regular tire repaired and reinstalled.
Because you will rarely use the COMPACT spare, be sure to regularly check its condition and air pressure (415 kPa, 60 psi), so it will be ready when you need it. This type of tire holds less air at higher pressure than a regular tire, so it will inflate (or deflate if there is a leak) more rapidly; check its pressure often and add air gradually if it needs any.
The COMPACT spare tire has a different tire size, air pressure requirement, tread life and maximum speed rating than the four regular tires on your car. Disregarding these warnings may result in tire failure, loss of vehicle control and possible injury to vehicle occupants. Do not exceed 50 mph (80 km/h) under any circumstances when using the COMPACT spare. Do not mount snow chains on the COMPACT spare. They will not fit properly and will damage the tire and possibly your car. If you must use the COMPACT spare when driving on roads covered with snow or ice, use it as one of the rear tires and mount chains only on the front two regular tires.
Main Menuts The COMPACT spare tire has a much shorter tread life than regular tires. Replace the tire as soon as tread wear indicators appear as solid bands across the tread. Replace with a tire of exactly the same size and construction.
TREAD WEAR INDICATOR
INDICATOR LOCATION MARK
The COMPACT spare tire and wheel set was designed especially for your car; do not use it on any other vehicle; do not install any other tire on this wheel which is not identical to the original in size and construction, and do not use the COMPACT spare tire on any other wheel. Because the COMPACT spare is smaller in size and higher in air pressure than a regular tire, it will ride more harshly with less ground clearance and may have less traction on some road surfaces. Drive cautiously.
Main Menuts Changing a Flat Tire
Do not attempt to change a tire unless the car is on firm, level ground and well out of the flow of traffic.
Park the car on a firm, level surface, apply the parking brake, turn on the hazard warning switch and put the transmission in gear (Park for automatic).
1. Remove the jack,
lug wrench/jack handle and jack handle
extension (in the tool bag) from the location shown.
NOTE: To remove the jack, release its tension against the mount by turning the screw counterclockwise.
2. Remove the spare tire. 3. Place blocks in front and back of the wheel diagonally opposite
the tire you are changing.
COMPACT SPARE
TOOL BAG
JACK
Main Menuts 4. (2.0 Si,Si)
Remove the center cap from the wheel cover by turning the lock to 90°.
(Si with 4WS or ALB) Remove the center cap from the wheel by prying it out with a common flat screwdriver (not provided in the tool bag).
(2.0 Si,Si)
(Si with 4WS or ALB)
CENTER CAP
CENTER CAP
FLAT SCREWDRIVER
CAUTION: (On the Si model with 4WS or ALB) Hold the center cap with your hand then pry it off using a rag to protect the cap and the wheel.
RAG
5. Use the lug wrench to loosen the wheel lug nuts
counterclockwise one-half turn.
Follow tire changing preparations and procedures carefully to reduce the possibility of injury. The jack is designed for changing tires only. STAND CLEAR, DO NOT get under the car and DO NOT run the engine when the car Is supported only by the jack.
6. Place the jack under the jack point nearest the wheel you are removing; align the jack head so the car frame will fit in the recess as you raise the jack.
To reduce the possibility of injury, be sure to use the jack provided with the car and the correct jacking points; never use any other part of the car for jack support.
(cont'd)
Main Menuts Changing a Flat Tire (cont'd)
7. Set the jack handle extension in the connector on the end of the jack and install the lug wrench/jack handle. Turn the lug wrench/ jack handle clockwise until the tire is slightly off the ground.
JACK HANDLE EXTENSION
LUG WRENCH/JACK HANDLE
WHEEL COVER
NUT
VALVE
8. Remove the lug nuts, wheel
cover and wheel. (Wheel cover is not equipped with 4WS or ALB models)
9. Install the spare tire; and install
the lug nuts hand tight.
10. Lower the car, remove the jack, then tighten the lug nuts securely in an " X" pattern as shown.
11. Tighten the lug nuts securely. The recommended torque is: 110 N.m(11 kg-m,80 Ib-ft) If a torque wrench was not used, ask an authorized Honda dealer to verify the torque as soon as possible.
TIGHTENING TORQUE 110 N.m (11 kg-m, 80 Ib-ft) 12. Repair or replace the damaged tire as soon as you can, then reinstall it in its original position on the car, and put the spare back in the car.
CAUTION: Always stow the jack, tools and tire securely to prevent them from becoming dangerous projectiles in an accident. NOTE: Secure the tire and the spacer as shown in the illustration.
SPACER
SPACER
COMPACT SPARE
DAMAGED TIRE
Main Menuts Jump Starting
To start a car with a dead battery, use another battery of the same voltage, and the proper jumper cables.
Procedures other than those below could cause injury or damage from battery acid spray, explosion or charging system overload. Never connect the jumper cable directly to the negative post of the "dead" battery. Never allow the two cars to touch each other. Never allow the jumper cable clamps to touch each other. Never lean over the battery when making connections. Never attempt to jump start a vehicle with a frozen battery. The battery could rupture and explode. If you suspect a frozen battery, remove the vent caps and check the fluid. If there seems to be no fluid, or if you see ice, do not attempt a jump start until the fluid thaws.
CAUTION: If jumper cables are connected backwards, the car's main fuse may blow.
1.Turn off all lights, heater and other electrical loads, set parking
brake, and shift transmission to Neutral or Park.
2. Use one cable to connect the positive terminal of the booster
battery to the positive terminal of the "dead" battery.
Do not attach cable here
DEAD BATTERY
Positive to positive
BOOSTER BATTERY
Negative to the engine, not to the battery
(cont'd)
Main Menuts Jump Starting (cont'd)
3. Use the other cable to connect the negative terminal of the
booster battery to the engine at the ground cable as shown.
4.To remove the cables, reverse the above procedures exactly.
DO NOT push or tow a car to start it. The forward surge when the engine starts could cause a collision. Also, under some conditions, the catalytic converter could be damaged. A car equipped with an automatic transmission cannot be started by pushing or towing.
NOTE: After jump-starting the car, there is a possibility that the ALB warning light may come on due to insufficient battery voltage. After the battery is sufficiently recharged and the engine is turned off and restarted, the ALB warning light should indicate that the ALB system is OK, by coming on for a few seconds each time the engine is started. If the light remains on after recharging, have it checked by a Honda dealer.
Main Menuts If towing is necessary, contact a professional towing service. Your authorized Honda dealer can assist you with detailed towing instructions.
Towing
Never use tow chains or rope to tow a car; your ability to safety control the car may be adversely affected.
We recommend the following: Flat Bed Equipment — Entire car is winched on a flat bed vehicle. This is the best way of transporting your Honda. Wheel Lift Type — Tow with the front wheels off the ground.
If the car can only be towed with the front wheels on the ground: make sure the transmission is full of fluid (see page 86 — 87) and tow with the transmission in neutral (N) and the ignition key in the I position.
CAUTION: To avoid serious damage on automatic transmission cars, first start the engine and shift to D, then to N and shut the engine off. If the engine does not run or the transmission cannot be shifted while the engine is running, the car must be transported on flat bed equipment.
Check local regulations for towing.
CAUTION:
Do not exceed 35 mph (55 km/h) or tow for distances of more than 50 miles (80 km). If a Sling Type tow is used, the tow truck driver should position wood spacer blocks between your car's frame and the chains and lift straps to avoid damaging the bumper and the body. Do not use the bumpers to lift the car or to support the car's weight while towing. When towing a car with 4WS even with the front wheels off the ground, turn the wheels straight ahead and tie the steering wheel in place.
Main Menust If Your Car Gets Stuck
If your car gets stuck in sand, mud, or snow, call a professional towing service for assistance in getting your car out,
CAUTION:
Do not rev up the engine and allow the wheels to spin freely at high speed. Severe transmission damage may result if the wheels are allowed to spin for more than a few seconds. DO NOT try to free a car with automatic transmission from snow etc. by rocking the car alternately between forward and reverse gears. Severe transmission damage may result from shifting into gear with the wheels moving.
Main Menust Headlight Motors
Proceed as follows if either headlight motor fails to operate: 1. Lift
the cover from
remove
the engine
the hood and compartment fuse box.
FUSE BOX
RIGHT HEADLIGHT, MOTOR
LEFT HEADLIGHT MOTOR
RIGHT HEADLIGHT
LEFT HEADLIGHT
2. Use the label on the fuse box cover to locate the fuse for the headlight motor that doesn't work. Remove the fuse with the fuse remover located in the fuse box under the dashboard.
FUSE BOX COVER
FUSE REMOVER
Main Menust Headlight Motors (cont'd)
3. If the fuse has blown, replacing it with a new fuse of the same amperage should allow the motor to work. However, if the fuse hasn't blown, or if a new fuse did not solve the problem, remove the fuse and operate the headlight motor manually.
BLOWN FUSE
CAUTION: Always remove the fuse before manually operating a headlight motor, otherwise the motor may suddenly activate.
4. Remove the cap from the top of the headlight motor, then turn the knob in the direction of the arrow (clockwise) until the headlight is as far up or down as it will go.
CAP
Turn knob in direction of arro
NOTE: If foreign matter is the cause of the motor malfunction, it can usually be dislodged by turning the knob counterclockwise,
5. Replace the cap properly. 6. Reinstall the fuse and fuse box cover and have the headlight
motor inspected at the earliest opportunity.
Main Menust Specifications
* 1 Including the coolant in the reserve tank (0.75 l /0.79US qt/0.66 Imp qt)
but excluding that remaining in the engine.
* 2 Excluding the oil remaining in the engine,but including that remaining in the oil filter.
(cont'd)
Main Menuts Specifications (cont'd)
page 92
Main Menuts Identification Numbers
The Vehicle identification Number (V.I.N.) is stamped on a plate attached to the top left side of the dashboard. It also appears on the Certification label attached to the door jamb, as well as under the hood on the body, directly behind the air cleaner.
NOTE: The V.I.N. is also provided in bar code on the Certification label.
VEHICLE IDENTIFICATION NUMBER
CERTIFICATION LABEL
VEHICLE IDENTIFICATION NUMBER
TRANSMISSION NUMBER
ENGINE NUMBER
The Engine Number is stamped on the right front side of the engine block.
The Transmission Number appears on a label on the top edge of the transmission where it attaches to the engine.
Main Menuts DOT Tire Quality Grades
The tires on your car meet Federal Safety Requirements. AM tires are also "graded" according to Department of Transportation (DOT) standards for tread wear, traction and temperature.
Three grades are shown on the tire sidewall
TIRE
WHEEL RIM
Tread Wear The tread wear grade is a comparative rating based on the wear rate of the tire when tested under controlled conditions on a specified government test course. For example, a tire graded 150 would wear one and one half (1-1/2) times as well on the government course as a tire graded 100. The relative performance of tires depends upon the actual conditions of their use, however, and may depart significantly from the norm due to variations in driving habits, service practices and differences in road characteristics and climate.
Traction The traction grades, from highest to lowest, are A, B, and C, and they represent the tire's ability to stop on wet pavement as measured under controlled conditions on specified government test surfaces of asphalt and concrete. A tire marked C may have poor traction performance.
The traction grades assigned are based on braking (straight ahead) traction tests and do not include cornering (turning) traction.
Main Menuts Temperature The temperature grades are A (the highest), B and C representing the tire's resistance to the generation of heat and its ability to dissipate heat when tested under controlled conditions on a specified indoor laboratory test wheel. Sustained high temperature can cause the material of the tire to degenerate and reduce tire life, and excessive temperature can lead to sudden tire failure. The grade C corresponds to a level of performance which all passenger car tires must meet under the Federal Motor Vehicle Safety Standard No. 109. Grades B and A represent higher levels of performance on the laboratory test wheel than the minimum required by law.
The tire temperature grade is established for a tire that is properly inflated and not overloaded. Excessive speed, underinflation, or excessive loading, either separately or in combination, can cause heat buildup and possible tire failure.
Main Menuts Emission Controls
Sources of Emissions The combustion process produces carbon monoxide, oxides of nitrogen and hydrocarbons. The evaporation of fuel in the fuel tank also produces hydrocarbons. Control of oxides of nitrogen and hydrocarbons is very important since, under certain conditions, when subjected to sunlight, they react to form photochemical smog. Carbon monoxide does not react to form smog, but it is toxic.
Honda Motor Co., Ltd. has developed a number of systems which are highly effective in reducing carbon monoxide, oxides of nitrogen and hydrocarbons.
The Clean Air Act The Clean Air Act requires all vehicle manufacturers to explain in writing, the operation and maintenance of their emission control systems. Maintenance instructions are included on pages 76—81 ; the operation of each system is explained on the following.
Replacement Parts The emission control systems on your new Honda were designed, built and certified regulations implementing the Clean Air Act. Honda recommends only the use of new, genuine Honda parts or their equivalent. The use of other replacement parts which are not of equivalent quality may impair the effectiveness of your car's emission control systems.
to conform with
the Federal
Crankcase Emission Control System To prevent crankcase emissions, your car is equipped with a Positive Crankcase Ventilation (PCV) System which routes blowby gases from the crankcase, through the PCV valve and intake manifold, into the combustion chamber.
Main Menuts Evaporative Emission Control System The Evaporative Emission Control System is designed to prevent fuel vapors from escaping into the atmosphere.
(2.0 Si,Si) Fuel vapors from the fuel tank are directed into the charcoal canister where they are adsorbed and stored while the engine is stopped or idling. When the coolant temperature rises to a certain value, the vapors are drawn into the engine through the throttle body and the intake manifold during normal engine operation.
(2.0 S) Fuel vapors from the fuel tank and carburetor are directed into the charcoal canister where they are adsorbed and stored while the engine is stopped. When the engine is running and engine coolant temperature is above the set temperature of the thermo sensor, the purge control diaphragm valve is open so that fuel vapors in the charcoal canister may be drawn into the engine through the carburetor and the intake manifold.
Engine Exhaust Controls The engine exhaust emission control systems are designed to control combustion during idle, acceleration, cruise, and deceleration. These systems are entirely separate from the crankcase and evaporative emission control systems described previously.
HONDA PGM-FI System (2.0 Si,Si) The PGM-FI system consists of three independent sub-systems; Air intake, Electronic Control and Fuel Control, thus allowing more accurate control of air/fuel ratios under all operating conditions. The Electronic Control Unit (ECU) detects the amount of air drawn into the cylinders and determines the amount of fuel to be injected to provide the optimum air/fuel ratio for all engine needs.
(cont'd)
Main Menuts Emission Controls (cont'd)
Intake Air Temperature Control System (2.0 S) The air control valve mounted inside the air cleaner snorkel automatically opens and closes according to the intake air temperature. The carburetor then receives air of constant temperature which results in lower exhaust emissions.
Carburetor Controls —Throttle controller — This system controls the throttle during gear shifting, reducing the amount of HC caused by unburned fuel mixture.
(2.0 S)
— Choke opener — When starting a cold engine, this device opens the choke slightly. This reduces the amount of HC and CO.
— Altitude Compensation devices — The Air Jet Controller (AJC) has an atmospheric pressure sensing bellows. The AJC is designed to control the amount of additional air fed to the carburetor jets to maintain good driveability at any altitude.
Ignition Timing Control System This system automatically controls the ignition timing to reduce the amount of HC and NOx.
Exhaust Gas Recirculation (EGR) [Except California 2.0 S models] The EGR system is designed to control the formation of oxides of nitrogen (NOx) caused when fuel mixture burns at high temperature. It works by recirculating exhaust gas through the EGR valve and intake manifold into the combustion chambers where it reduces peak temperature by diluting the air/fuel mixture.
Catalytic Converter The catalyst is used to convert hydrocarbons (HC), carbon monoxide (CO) and oxides of nitrogen (NOx) in the exhaust gas, to carbon dioxide (CO 2), dinitrogen (N 2) and water vapor.
Main Menuts Air Supply System (2.0 S) A secondary air supply system helps improve emission performance by promoting more complete combustion during deceleration.
Air injection with Feedback System This system maintains the proper air/fuel ratio for the most efficient use of the three way catalytic converter by controlling the amount of air the oxygen concentration in the exhaust manifold.
in response
injection
(2.0 S)
to
Main Menuts Catalytic Converter
A catalytic converter is installed in the exhaust system to help clean-up the exhaust gases that can cause air pollution.
CATALYTIC CONVERTER
To be effective, the converter must work at high temperature, so don't park your car over dry grass, leaves or anything else that could burn easily. To stay effective, the converter must not be contaminated by leaded gasoline; use only unleaded gas as explained on page 55.
CAUTION: The converter can be overheated and damaged if it's fed too much unburned fuel mixture from the engine, so:
— Don't push or tow the car to start it; if the battery is dead.
jump start the car as shown on page 119.
— Don't turn the key off while the engine is running above idle
— Don't change the ignition timing, or remove any emission
speed.
control parts.
— Use only the spark plugs specified in this manual. — Don't keep driving your car if it isn't running properly, or if its Check Engine warning light comes on; have It checked by your Honda dealer.
Main Menuts Warranty Service
Warranty The following warranties are provided with every new vehicle: 1. New Car Limited Warranty 2. Emission Control Systems Defects Warranty 3. Emissions Performance Warranty 4. Battery Limited Warranty 5. Rust Perforation Limited Warranty 6. Accessory Limited Warranty 7. Replacement Parts Limited Warranty 8. Replacement Muffler Lifetime Limited Warranty 9. Seat Belt Limited Warranty. All warranties pertaining to your car can be found in the warranty booklet provided with your new car except the required maintenance schedule which is contained here in the Owner's Manual. If you are unable to obtain warranty service or are dissatisfied with the warranty decision or service you received at an authorized Honda dealership, you should review that dealership's Service Manager. This will normally resolve your problem. If it does not resolve your problem you should appeal the decision with the owner of the dealership. Please bear in mind that your problem will likely be resolved at the dealership, using the dealer's facilities, equipment and personnel. So it is very important that your initial contact be with the dealer or his management. After following these steps, if you wish to have the matter reviewed by American Honda you should contact the Automobile Zone Office serving your area, as shown on the map on the inside of the back cover. When contacting American Honda, please provide the Automobile Zone Office with the following information:
the matter with
Vehicle Identification Number Servicing Dealer Name and Address Date of Purchase Mileage on your Car Your Name, Address, and Phone Number Nature of Problem Selling Dealer
After a review of the facts, you will be advised of what can be done.
Main Menuts Service Manuals
A Honda Service Manual is available for your car. It is written for the Journeyman mechanic, but it is simple enough for most mechanically-inclined owners to understand.
An Electrical Troubleshooting Manual is also available for your car. This manual complements the Service Manual by providing t r o u b l e s h o o t i ng in-depth information for each electrical circuit in your car.
You can purchase these manuals through your Honda dealer's Parts Department.
Main Menuts Air Conditioner
Operation.....................................43
Service.......................................108
Air Filter ...........................................95
Air Pressure, Tires........................105
Aluminum Alloy Wheels...............111
Antifreeze..................See "Radiator coolant" Anti Lock Brakes(ALB) ..................18
ALB Warning Light .....................24
ALB Fluid .....................................99Anti-theft Steering Column Lock
System.........................................58
Appearance Care .........................110
Ashtrays..........................................38
Audio System .................................47
Automatic TransmissionDriving Technique ......................68
Fluid.............................................87
Operation....................................67
Shift Lever PositionIndicator .................................21
Battery
Charging System Warning
Light.......................................23
Jump Starting ...........................119
Maintenance .............................100
Specification ........................... 126Beeper System
Fasten Seat Belt Beeper ............13
Key Reminder .............................58
Light Reminder Chime ................30
Belts,Seat...............See "Seat Belts" Brake Lamp Warning Light.............25
BrakesBrake Failure Warning
Light .......................................23
Brake Fluid...................................99
Brake System Design .................98
Brake Wear .................................98
Brake Wear Indicators................98
Parking Brake ..............................39
Parking Brake WarningLight .......................................23
Index
Break-in Period ..................................2
BulbReplacement.............................103
Specification .............................126
Buzzer ............See "Beeper System"Capacities......................................125
Care and Cleaning.........................110
Catalytic Converter .....................134
Certification Label ........................127
Chains,Tires ................................. 106
Child Restraint System ..................14
Cigarette Lighter .............................38
Clock................................................37
COMPACT Spare Tire .................114
Coolant Temperature Gauge .........20
Cooling(with A/C) ...........................44
Cooling System ...............................88
Crankcase Emission Control System ..........................................130
Cruise ControlOpeartion...................................35
Indicator .....................................22Defogger.........................................28
Defroster .........................................45
Dimmer Switch, Headlights...........31
DoorsLocks............................................3
Warning Light ............................25Emergency
Changing Flat Tire ...................116
Hazard Warning System ..........33
If the Retractable Headlightsdo not operate ...................123
If the Sunroof Won't
Close .....................................54
If Your Car Gets Stuck ...........122
Jump Starting .........................119
Towing.....................................121
Warning and IndicatorLights....................................21
(cont'd)
Main Menuts Index (cont'd)
Emission Controls.........................130
EngineCoolant.......................................88
Coolant TemperatureGauge....................................20
Identification Number .............127
Oil and Filter...............................83
Oil Pressure WarningLight .......................................22
Specification ...........................125
Exhaust Controls....................131Engine Exhaust Gas Warning
....................................................64
Evaporative Emission Control
System ....................................131
Exhaust Gas Recirculation...........132
Exterior Care.................................110Filters
Air...........................................94
Engine Oil ...................................84
Fuel.............................................96
Fluid .....................................See "Oil" Foreign Countries,Operation in ...............................56
Four Wheel Steering.......................59
Front SeatAdjustment..................................5
Fuel
Filter Door and Cap...................56
Fuel Reserve WarningLight .......................................22
Gauge.........................................20
Gasohol......................................55
Gasoline ......................................55
Requirement..............................55
Filter...........................................96Checking and Replacing .........101
Specification...........................126Fuse
Hazard Warning
Indicator Light ...........................21
Hazard Warning System................33
HeadlightsFlasher.......................................31
Headlight Motor Switch ...........32
High Beam Indicator..................21
High Beam/Low BeamSwitch...................................31
If the Retractable Headlights
do not operate ...................123
Reminder Chime .......................30
Retractable Headlight MotorWarning Light .......................25
Switch.......................................30Headlight High Beam Indicator
Light ...........................................21
Head Restraints.................................8
Heating.............................................45
High BeamSwitch .......................................31
Indicator Light ...........................21
Hood Latch.....................................39Identification Numbers.................127
IgnitionKeys.............................................3
Switch........................................58
Indicator Lights ...............................20
Inflation Pressures, Tire..............105
Instrument Panel....................19
Instrument Panel BrightnessControl.......................................33
Interior light .....................................33
Interior Trim Care .........................110Jack .............................................116
Jump Starting ...............................119Gasoline............................See"Fuel" Gas Station Information ...........................................back cover Gauges............................................20
Glove Box ........................................39Main Menuts Keys
Door Locks ..................................3
Glove box ..................................39
Trunk Lid Lock ............................4
Ignition ........................................58
Key Reminder Beeper...............58
Keys.............................................3Lap/Shoulder Belts ................................See "Seat Belts" Light
Bulb Replacement...................103
Fuse Replacement ..................101
Light Reminder Chime ..............30
Operation.................................30
Warning and Indicator Light ......................................................21Locks
Fuel Filler Door ..........................56
Doors..........................................3
Glove Box ..................................39
Trunk Lid......................................4
Anti-theft Steering ColumnLock.......................................58
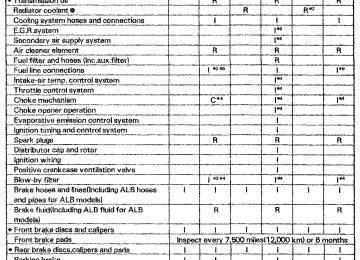
Lumbar Support,Driver's .................7Maintenace Schedule and
Records......................................76
Manual Transmission
Maximum Allowable Speeds ....................................................66
Oil........................................86
Recommended Shift Speeds ....................................................66
Shifting.....................................65
Meters Gauges.......See "Gauges" MirrorsPower Mirrors ...........................29
Rear View Mirrors ....................29Numbers, Identification................ 127
Octane Rating, Gasoline .......................................... See "Fuel" Odometer ........................................20
OilEngine Oil ...................................83
Fluid Locations ..........................82
Transmission Oil/Fluid ..............86
Oil Pressure Warning Light.......22
Power Steering Fluid ................97Operation In Foreign Countries ..........................................................56
Panel Brightness Control ...............33
Parking Brake.................................39
PowerMirrors .......................................29
Steering .....................................97
Windows................................40
PGM-FI System............................131
Pressures, Tire Inflation...............105
Preventive Service.......................112Radiator Coolant .............................88
Radio ................................................47
Rear View Mirrors ..........................29
Rear Window Defogger ..................28
Reminder Lights ..........................See "Warning lights"(cont'd)
Main Menuts Index (cont'd)
Replacement
Air Filter .....................................94
Bulbs........................................ 103
Engine Oil ...................................84
Fuel Filter ...................................96
Fuses .......................................101
Oil Filter ......................................84
Radiator Coolant .......................90
Spark Plugs...............................92
Tires.........................................107
Wiper Blades .............................93Retractable Headlights
If the Retractable Headlights
do not operate ...................123
Rust Prevention.........................111Safety Items ...................................63
Seat Belt Reminder Light andBeeper ..................................... .21
Seat Belts
Anchor Points ...........................16
Buckling the FrontSeat Belts .............................10
Buckling the Rear
Seat Belts............................12
Child Restraint......................14
Cleaning .....................................17
Warning Light andWarning Beeper ...................13
Inspection ..................................17
Lap/Shoulder Belts ...................10
Pregnant Women ......................16
Reminder Light ..........................20
Replacement .............................17Seats
Driver's Lumbar Support ...........7
Driver's Side Support..............7
Front Seat ....................................5
Head Restraints ...........................8
Shift Lever Position Indicator........20
ShiftingAutomatic..................................67
5-Speed......................................65Spare Tire
Changing a Flat Tire................116
COMPACT Spare Tire ...........114
Specifications .........................125
Spark Plugs...................................92Specifications...............................125
Speedometer ..................................20
Starting the Engine .........................61
SteeringAnti-theft Column Lock ...........58
Four Wheel Steering............59
Power Steering .........................97
Tilt Steering ........................26Stereo Sound System
Operation...................................47
Stuck Car ..............................122
SunroofIf the Sunroof Won't
Close .....................................54
Maintenance...........................54
Operation ........................53
Sunshade.......................................53Tachometer.............................20
Temperature Gauge, Coolant....................................................20
Thermostat...................................90
Tilt Steering.....................................26
TireAir Pressure ............................105
Balancing ................................106
Chains...................................106
Changing a Flat Tire................118
COMPACT Spare .................114
DOT Tire Quality Grades........128
Inflation Pressures ..................105
Requirement ..................................128
Rotation ...................................106
Snow Tires ........................ 105
Spare Tire................................114
Specification ........................ 126
To Get In/Out of Rear Seat..............6
Tools ..............................................116
Towing...........................................121
Towing a Trailer ..............................71
TransmissionIdentification Number............127
Oil/Fluid......................................86
Shifting the Automatic.............67
Shifting the Manual...................65
Capacity ...................................125Main Menuts Tread Wear................................... 128
Trip Meter........................................20
Trunk.................................................4Trunk Access From
Rear Seat ................................9
Trunk Lid......................................4
Trunk Light ................................34
Trunk-OpenIndicator Light .......................25
Turn Signals.....................................30Vehicle Identification Number
....................................................127
Ventilation .......................................41Warning Lights ................................21
Warranty Service .........................135
WasherReservoir Capacity ...................27
Windshield Washer ...................27
Washing.........................................110
Waxing ..........................................111
Wheels...........................................111
WindowsAppearance Care....................110
Power Windows .......................40
Windshield Defogger .......................28
Windshield Washer.........................27
Windshield Wipers ..........................27
Wiper Blades ...................................94
WipersWindshield Wipers ....................27
Main Menuts Zone Office Locations
Western Zone P.O. Box 2260
700 Van Ness Avenue Torrance, California 90509-2260
(310)781-4565Northwestern Zone P.O. Box 20186
12439 N.E. Airport Way Portland, Oregon 97230
(503) 256-0943
(also includes Alaska and Hawaii)South Central Zone 4529 Royal Lane Irving, Texas 75063
(972)929-5481Central Zone 101 South Stanfield Road
Troy, Ohio 45373
(937) 332-6250Northeastern Zone P.O. Box 337
Eastgate Industrial Park 115 Gaither Drive Moorestown, New Jersey 08057
(609) 235-5533
Includes: NYC Metro area and Fairfield County, CT areaMid-Atlantic Zone 902 Wind River Ln., Suite 200
Gaithersburg, Maryland 20878
(301)990-2020Southeastern Zone 1500 Morrison Parkway Alpharetta, Georgia 30004
(770) 442-2045North Central Zone 601 Campus Drive, Suite A-9
Arlington Heights, Illinois 60004
(847) 870-5600New England Zone 555 Old County Road
Windsor Locks, Connecticut 06096
(860)623-3310
See Zone 5 for: NYC Metro area and Fairfield County, CT areaWest Central Zone 1600 South Abilene Street, Suite D
Aurora, Colorado 80012
(303) 696-3935Puerto Rico and U.S. V.I. Bella International
P.O. Box 190816
San Juan, PR 00919-0816
(787)250-4318The above addresses and telephone numbers are subject to change. If you cannot reach your Zone office, ask your Honda dealer for the current information.
Main Menuts Gas Station Information Gasoline:
Gas Tank-Capacity: Tire Pressure (measured cold):
Si (with 4WS) Compact Spare Tire Other Tire Information: Hood Release: Engine Oil:
UNLEADED only Pump octane of 86 or higher. 60 l (15.9 US gal, 13.2 Imp gal)
Front/ Rear
195 kPa (28 psi) 180 kPa (26 psi) 195 kPa (28 psi) 195 kPa (28 psi) 415 kPa (60 psi) Label on driver's door edge. Pull handle under left side of dash.
An "Energy Conserving II" SG grade oil is recommended. See page 83 for viscosity recommendations. Capacity (including filter): 3.8 l ( 4.0 US qt, 3.3 Imp qt)
Manual Transmission Oil:
Recommended type—SAE 10W—30 or 10W—40 weight, grade SE or SF. Capacity (including differential): 2.1 l (2.2 US qt, 1.8 Imp qt)
Automatic Transmission Fluid:
Use DEXRON® II type Automatic Transmission Fluid (ATF). Unscrew dipstick in right end of transmission, wipe off, reinsert, remove and read fluid level-do not screw-in to check fluid level. Capacity (Including differential): 2.8 l (3.0 US qt, 2.5 Imp qt)
Power Steering Fluid:
Use only Honda power steering fluid: do not use ATF or any other brand of power steering fluid because it will damage the system.
AMERICAN HONDA MOTOR CO., INC.
1919 Torrance Blvd., Torrance, California 90501
1990 Honda Motor Co., Ltd. — All Rights Reserved
31SF1621
00X31-SF1-6211CRESTEC5009806 L PRINTED IN U.S.A.
Main Menuts