- 2007 Honda Civic Sedan Owners Manuals
- Honda Civic Sedan Owners Manuals
- 1997 Honda Civic Sedan Owners Manuals
- Honda Civic Sedan Owners Manuals
- 2013 Honda Civic Sedan Owners Manuals
- Honda Civic Sedan Owners Manuals
- 1999 Honda Civic Sedan Owners Manuals
- Honda Civic Sedan Owners Manuals
- 1992 Honda Civic Sedan Owners Manuals
- Honda Civic Sedan Owners Manuals
- 2012 Honda Civic Sedan Owners Manuals
- Honda Civic Sedan Owners Manuals
- 2006 Honda Civic Sedan Owners Manuals
- Honda Civic Sedan Owners Manuals
- 2004 Honda Civic Sedan Owners Manuals
- Honda Civic Sedan Owners Manuals
- 2000 Honda Civic Sedan Owners Manuals
- Honda Civic Sedan Owners Manuals
- 1993 Honda Civic Sedan Owners Manuals
- Honda Civic Sedan Owners Manuals
- 1995 Honda Civic Sedan Owners Manuals
- Honda Civic Sedan Owners Manuals
- 2005 Honda Civic Sedan Owners Manuals
- Honda Civic Sedan Owners Manuals
- 2008 Honda Civic Sedan Owners Manuals
- Honda Civic Sedan Owners Manuals
- 2010 Honda Civic Sedan Owners Manuals
- Honda Civic Sedan Owners Manuals
- 1998 Honda Civic Sedan Owners Manuals
- Honda Civic Sedan Owners Manuals
- 2003 Honda Civic Sedan Owners Manuals
- Honda Civic Sedan Owners Manuals
- 1994 Honda Civic Sedan Owners Manuals
- Honda Civic Sedan Owners Manuals
- 2011 Honda Civic Sedan Owners Manuals
- Honda Civic Sedan Owners Manuals
- 2001 Honda Civic Sedan Owners Manuals
- Honda Civic Sedan Owners Manuals
- 1996 Honda Civic Sedan Owners Manuals
- Honda Civic Sedan Owners Manuals
- 2002 Honda Civic Sedan Owners Manuals
- Honda Civic Sedan Owners Manuals
- 2009 Honda Civic Sedan Owners Manuals
- Honda Civic Sedan Owners Manuals
- Download PDF Manual
-
hydraulic system. You will also see the indicator blink.
VSA® System Indicator
236
1VSA® (Vehicle Stability Assist), aka ESC (Electronic Stability
Control), System The VSA® may not function properly if tire type and size are mixed. Make sure to use the same size and type of tire, and the air pressures as specified.
When the VSA® indicator comes on and stays on while driving, there may be a problem with the system. While this may not interfere with normal driving, have your vehicle checked by a dealer immediately.
VSA® cannot enhance stability in all driving situations and does not control the entire braking system. You still need to drive and corner at speeds appropriate for the conditions and always leave a sufficient margin of safety.
The main function of the VSA® system is generally known as Electronic Stability Control (ESC). The system also includes a traction control function.
uuWhen DrivinguVSA® (Vehicle Stability Assist), aka ESC (Electronic Stability Control), System
■ VSA® On and Off
1.8 ℓ engine models
VSA® OFF Indicator
2.4 ℓ engine models
VSA® OFF Indicator
This button is on the driver side control panel. To turn the VSA® system on and off, press and hold it until you hear a beep.
VSA® will stop and the indicator will come on.
To turn it on again, press the button until you hear a beep.
(VSA® OFF)
VSA® is turned on every time you start the engine, even if you turned it off the last time you drove the vehicle.
* Not available on all models
1VSA® (Vehicle Stability Assist), aka ESC (Electronic Stability
Control), System Without VSA®, your vehicle will have normal braking and cornering ability, but it will not have VSA® traction and stability enhancement.
In certain unusual conditions when your vehicle gets stuck in shallow mud or fresh snow, it may be easier to free it with the VSA® temporarily switched off.
When the VSA® system is off, the traction control system is also off. You should only attempt to free your vehicle with the VSA® off if you are not able to free it when the VSA® is on.
Immediately after freeing your vehicle, be sure to switch VSA® on again. We do not recommend driving your vehicle with the VSA® and traction control systems switched off.
If the low tire pressure/TPMS indicator * comes on or blinks, the VSA® system comes on automatically. In this case, you cannot turn the system off by pressing the
button.
You may hear a motor sound coming from the engine compartment while system checks are being performed immediately after starting the engine or while driving. This is normal.
237
uuWhen DrivinguTPMS (Tire Pressure Monitoring System)
U.S. models TPMS (Tire Pressure Monitoring System)
Monitors the tire pressure while you are driving. If your vehicle's tire pressure becomes significantly low, the low tire pressure/TPMS indicator comes on and a message appears on the i-MID.
1TPMS (Tire Pressure Monitoring System)
Conditions such as low ambient temperature and altitude change directly affect tire pressure and can trigger the low tire pressure/TPMS indicator to come on.
2 If the Low Tire Pressure/TPMS Indicator
Comes On or Blinks P. 340
CHECK TIRE PRESSURE is displayed when a tire has significantly low pressure.
Tire pressure checked and inflated in: • Warm weather can become under-inflated in
colder weather.
• Cold weather can become over-inflated in warmer
weather.
The low tire pressure/TPMS indicator will not come on as a result of over inflation.
238
uuWhen DrivinguTire Pressure Monitoring System (TPMS) - Required Federal Explanation
U.S. models Tire Pressure Monitoring System (TPMS) - Required Federal Explanation Each tire, including the spare (if provided), should be checked monthly when cold and inflated to the inflation pressure recommended by the vehicle manufacturer on the vehicle placard or tire inflation pressure label.
(If your vehicle has tires of a different size than the size indicated on the vehicle placard or tire inflation pressure label, you should determine the proper tire inflation pressure for those tires.)
As an added safety feature, your vehicle has been equipped with a tire pressure monitoring system (TPMS) that illuminates a low tire pressure telltale
when one or more of your tires is significantly under-inflated.
Accordingly, when the low tire pressure telltale illuminates, you should stop and check your tires as soon as possible, and inflate them to the proper pressure.
Driving on a significantly under-inflated tire causes the tire to overheat and can lead to tire failure. Under-inflation also reduces fuel efficiency and tire tread life, and may affect the vehicle's handling and stopping ability.
Continued
239
uuWhen DrivinguTire Pressure Monitoring System (TPMS) - Required Federal Explanation
Please note that the TPMS is not a substitute for proper tire maintenance, and it is the driver's responsibility to maintain correct tire pressure, even if under-inflation has not reached the level to trigger illumination of the TPMS low tire pressure telltale.
Your vehicle has also been equipped with a TPMS malfunction indicator to indicate when the system is not operating properly. The TPMS malfunction indicator is combined with the low tire pressure telltale. When the system detects a malfunction, the telltale will flash for approximately one minute and then remain continuously illuminated. This sequence will continue upon subsequent vehicle start-ups as long as the malfunction exists.
When the malfunction indicator is illuminated, the system may not be able to detect or signal low tire pressure as intended.
TPMS malfunctions may occur for a variety of reasons, including the installation of replacement or alternate tires or wheels on the vehicle that prevent the TPMS from functioning properly.
Always check the TPMS malfunction telltale after replacing one or more tires or wheels on your vehicle to ensure that the replacement or alternate tires and wheels allow the TPMS to continue to function properly.
240
Braking
Brake System ■ Parking Brake Use the parking brake to keep the vehicle stationary when parking.
To apply: Pull the lever fully up without pressing the release button.
1Parking Brake
NOTICE Release the parking brake fully before driving. The rear brakes and axle can be damaged if you drive with the parking brake applied.
If you start driving without fully releasing the parking brake, a buzzer sounds as a warning, and RELEASE PARKING BRAKE appears on the i-MID*.
Always apply the parking brake when parking.
To release: 1. Pull the lever slightly, and press and hold
the release button.
2. Lower the lever down all the way, then
release the button.
* Not available on all models
Continued
241
uuBrakinguBrake System
■ Foot Brake Your vehicle is equipped with front disc brakes. The brakes on the rear wheels may be disc or drum, depending on the model. A vacuum power assist helps reduce the effort needed on the brake pedal. The brake assist system increases the stopping force when you depress the brake pedal hard in an emergency situation. The anti- lock brake system (ABS) helps you retain steering control when braking very hard.
2 Brake Assist System P. 244
2 ABS (Anti-lock Brake System) P. 2431Foot Brake
Check the brakes after driving through deep water, or if there is a buildup of road surface water. If necessary, dry the brakes by lightly depressing the pedal several times.
If you hear a continuous metallic friction sound when applying the brakes, the brake pads need to be replaced. Have the vehicle checked by a dealer.
Constantly using the brake pedal while going down a long hill builds up heat, which reduces the brake effectiveness. Apply engine braking by taking your foot off the accelerator pedal and downshifting to a lower gear. With manual transmission use a lower gear for greater engine braking.
Do not rest your foot on the brake pedal while driving, as it will lightly apply the brakes and cause them to lose effectiveness over time and reduce pad life. It will also confuse drivers behind you.
242
ABS (Anti-lock Brake System) ■ ABS Helps prevent the wheels from locking up, and helps you retain steering control by pumping the brakes rapidly, much faster than you.
The electronic brake distribution (EBD) system, which is part of the ABS, also balances the front-to-rear braking distribution according to vehicle loading.
You should never pump the brake pedal. Let the ABS work for you by always keeping firm, steady pressure on the brake pedal. This is sometimes referred to as “stomp and steer.”
■ ABS operation The brake pedal may pulsate slightly when the ABS is working. Keep holding the pedal firmly down. On dry pavement, you will need to press on the brake pedal very hard before the ABS activates. However, you may feel the ABS activate immediately if you are trying to stop on snow or ice.
When the vehicle speed goes under 6 mph (10 km/h), the ABS stops.
uuBrakinguABS (Anti-lock Brake System)
1ABS (Anti-lock Brake System)
NOTICE The ABS may not function correctly if you use an incorrect tire type and size.
When the ABS indicator comes on while driving, there may be a problem with the system. While normal braking is not affected, there is a possibility of the ABS not operating. Have the vehicle checked by a dealer immediately.
The ABS does not reduce the time or distance it takes to stop the vehicle. It only helps with steering control during hard braking.
In the following cases, your vehicle may need more stopping distance than a vehicle without the ABS: • When driving on rough road surfaces, including
when driving on uneven surfaces, such as gravel or snow.
• When tire chains are installed.
You may hear a motor sound coming from the engine compartment while system checks are being performed immediately after starting the engine or while driving. This is normal.
243
uuBrakinguBrake Assist System
Brake Assist System ■ Brake Assist System Designed to assist the driver by generating greater braking force when you depress the brake pedal hard during emergency braking.
■ Brake assist system operation Press the brake pedal firmly for more powerful braking.
When brake assist operates, the pedal may wiggle slightly and an operating noise may be heard. This is normal. Keep holding the brake pedal firmly down.
244
Parking Your Vehicle
When Stopped 1. Depress the brake pedal firmly. 2. Firmly apply the parking brake. Automatic transmission models 3. Move the shift lever from (D to (P. Manual transmission models 3. Move the shift lever to (R or (1. All models 4. Turn off the engine.
Always set the parking brake firmly, in particular if you are parked on an incline.
1Parking Your Vehicle
Do not park your vehicle near flammable objects, such as dry grass, oil, or timber. Heat from the exhaust can cause a fire.
1When Stopped
NOTICE Automatic transmission models The following can damage the transmission: • Depressing the accelerator and brake pedals
simultaneously.
• Holding the vehicle in place when facing uphill by
depressing the accelerator pedal.
• Moving the shift lever into (P before the vehicle
stops completely.
Raise the wiper arms when snow is expected.
245
Rearview Camera *
About Your Rearview Camera Models with navigation system For models with the navigation system, see the Navigation System Manual for the rearview camera. Models without navigation system The i-MID * can display your vehicle’s rear view. The display automatically changes to a rear view when the shift lever is moved to (R.
■ Rearview Camera Display Area
Guidelines
Bumper
Approx. 118 in (3 m)
Approx. 79 in (2 m) Approx. 39 in (1 m)
1About Your Rearview Camera
The rear camera view is restricted. You cannot see the corner ends of the bumper or what is underneath the bumper. Its unique lens also makes objects appear closer or farther than they actually are.
Visually confirm that it is safe to drive before backing up. Certain conditions (such as weather, lighting, and high temperatures) may also restrict the rear view. Do not rely on the rearview display which does not give you all information about conditions at the back of your vehicle.
If the camera lens is covered with dirt or moisture, use a soft, moist cloth to keep the lens clean and free of debris.
Camera Approx. 20 in (0.5 m) Approx. 39 in (1 m)
Approx. 79 in (2 m)
Approx. 118 in (3 m)
The rearview camera has a unique lens that makes objects appear closer or further than they actually are.
246
* Not available on all models
Refueling
Fuel Information ■ Fuel recommendation
1.8 ℓ engine models Unleaded gasoline, pump octane number 87 or higher Use of a lower octane gasoline can cause a persistent, heavy metallic knocking noise that can lead to engine damage.
2.4 ℓ engine models Unleaded premium gasoline, pump octane number 91 or higher Use of a lower octane gasoline can cause occasional metallic knocking noise in the engine and will result in decreased engine performance. Use of a gasoline with a pump octane less than 87 can lead to engine damage.
■ Top tier detergent gasoline Because the level of detergency and additives in gasoline vary in the market, Honda endorses the use of “TOP TIER Detergent Gasoline” where available to help maintain the performance and reliability of your vehicle. TOP TIER Detergent Gasoline meets a new gasoline standard jointly established by leading automotive manufacturers to meet the needs of today’s advanced engines.
1Fuel Information
NOTICE We recommend quality gasoline containing detergent additives that help prevent fuel system and engine deposits. In addition, in order to maintain good performance, fuel economy, and emissions control, we strongly recommend the use of gasoline that does NOT contain harmful manganese-based fuel additives such as MMT, if such gasoline is available.
Use of gasoline with these additives may adversely affect performance, and cause the malfunction indicator lamp on your instrument panel to come on. If this happens, contact a dealer for service. Some gasoline today is blended with oxygenates such as ethanol. Your vehicle is designed to operate on oxygenated gasoline containing up to 10% ethanol by volume. Do not use gasoline containing methanol. If you notice any undesirable operating symptoms, try another service station or switch to another brand of gasoline.
Continued
247
uuRefuelinguHow to Refuel
Qualifying gasoline retailers will, in most cases, identify their gasoline as having met “TOP TIER Detergent Gasoline” standards at the retail location. This fuel is guaranteed to contain the proper level of detergent additives and be free of metallic additives. The proper level of detergent additives, and absence of harmful metallic additives in gasoline, help avoid build-up of deposits in your engine and emission control system.
For further important fuel-related information for your vehicle, or on information on gasoline that does not contain MMT, visit www.hondacars.com. In Canada, visit www.honda.ca for additional information on gasoline. For more information on top tier gasoline, visit www.toptiergas.com.
■ Fuel tank capacity: 13.2 US gal (50 liters)
1. Stop your vehicle with the service station pump on the left side of the vehicle in the rear.
2. Turn off the engine. 3. Push on the fuel fill door release handle at
the foot of the driver’s seat. u The fuel fill door opens.
1How to Refuel
3WARNING
Gasoline is highly flammable and explosive. You can be burned or seriously injured when handling fuel.
• Stop the engine, and keep heat, sparks,
and flame away.
• Handle fuel only outdoors. • Wipe up spills immediately.
How to Refuel
Push
248
uuRefuelinguHow to Refuel
1How to Refuel
The filler nozzle automatically stops to leave space in the fuel tank so that fuel does not overflow as a result of changes in air temperature.
If the fuel nozzle keeps turning off when the tank is not full, there may be a problem with the pump's fuel vapor recovery system. Try filling at another pump. If this does not fix the problem, consult a dealer.
Do not continue to add fuel after the nozzle has automatically stopped. Additional fuel can exceed the full tank capacity.
4. Remove the fuel fill cap slowly. If you hear a release of air, wait until this stops, then turn the knob slowly to open the fuel fill cap.
Cap
Cap
5. Place the fuel fill cap in the holder. 6. Insert the filler nozzle fully.
u When the tank is full, the fuel nozzle will click off automatically. This leaves space in the fuel tank in case the fuel expands with a change in the temperature. 7. After filling, replace the fuel fill cap,
tightening it until you hear it click at least once. u Shut the fuel fill door by hand.
Holder
249
Fuel Economy
Improving Fuel Economy Fuel economy depends on several conditions, including driving conditions, your driving habits, the condition of your vehicle, and loading. Depending on these and other conditions, you may or may not achieve the rated fuel economy of this vehicle.
■ Maintenance and Fuel Economy You can optimize your fuel economy with proper maintenance of your vehicle. Always maintain your vehicle in accordance with the messages displayed on the information display */i-MID *. • Use the recommended viscosity engine oil, displaying the API Certification Seal. • Maintain the specified tire pressure. • Do not load the vehicle with excess cargo. • Keep your vehicle clean. A buildup of snow or mud on your vehicle's underside
adds weight and increases wind resistance.
1Improving Fuel Economy
Direct calculation is the recommended method to determine actual fuel consumed while driving.
Miles driven
100
Gallons of
fuel
Liters of
fuel
Miles per
Gallon
Kilometers
driven
L per 100 km
In Canada, posted fuel economy numbers are established following a simulated test. For more information on how this test is performed, please visit http://oee.nrcan.gc.ca/
250
* Not available on all models
Accessories and Modifications
Accessories When installing accessories, check the following: • Do not install accessories on the windshield. They can obstruct your view and
delay your reaction to driving conditions.
• Do not install accessories on the side pillars or across the side windows.
Accessories installed in these areas may interfere with proper operation of the side curtain airbags.
• Be sure electronic accessories do not overload electrical circuits or interfere with
proper operation of your vehicle.
2 Fuses P. 341
• Before installing any electronic accessory, have the installer contact a dealer for
assistance. If possible, have a dealer inspect the final installation.
Modifications Do not modify your vehicle or use non-Honda components that can affect its handling, stability, and reliability.
Overall vehicle performance can be affected. Always make sure all equipment is properly installed and maintained, and that it meets federal, state, province, territory, and local regulations.
1Accessories and Modifications
3WARNING
Improper accessories or modifications can affect your vehicle's handling, stability, and performance, and cause a crash in which you can be seriously hurt or killed.
Follow all instructions in this owner's manual regarding accessories and modifications.
Honda Genuine accessories are recommended to ensure proper operation on your vehicle.
251
252
Maintenance
This chapter discusses basic maintenance.
Before Performing Maintenance
Inspection and Maintenance ............ 254
Safety When Performing Maintenance..... 255
Parts and Fluids Used in Maintenance Service ........................................... 256
Maintenance MinderTM..................... 257
Maintenance Under the HoodMaintenance Items Under the Hood..... 265
Opening the Hood ........................... 267
Recommended Engine Oil ................ 268
Oil Check......................................... 269
Adding Engine Oil............................ 271
Changing the Engine Oil and Oil Filter ..... 272Engine Coolant ................................ 275
Transmission Fluid............................ 277
Brake/Clutch Fluid............................ 280
Refilling Window Washer Fluid......... 281
Replacing Light Bulbs ....................... 282
Checking and Maintaining Wiper Blades .......................................... 295
Checking and Maintaining TiresChecking Tires ................................. 297
Tire and Loading Information Label...... 298
Tire Labeling .................................... 298
DOT Tire Quality Grading (U.S. Vehicles).......300
Wear Indicators................................ 302Tire Service Life................................ 302
Tire and Wheel Replacement ........... 303
Tire Rotation.................................... 304
Winter Tires ..................................... 305
Battery............................................... 306
Remote Transmitter Care *Replacing the Button Battery ........... 307
Heating and Cooling System */Climate Control System* Maintenance....... 308
CleaningInterior Care .................................... 309
Exterior Care.................................... 311* Not available on all models
253
Before Performing Maintenance
Inspection and Maintenance For your safety, perform all listed inspections and maintenance to keep your vehicle in good condition. If you become aware of any abnormality (noise, smell, insufficient brake fluid, oil residue on the ground, etc.), have your vehicle inspected by a dealer. (Note, however, that service at a dealer is not mandatory to keep your warranties in effect.) Refer to the separate maintenance booklet for detailed maintenance and inspection information.
■ Types of Inspection and Maintenance ■ Daily inspections Perform inspections before long distance trips, when washing the vehicle, or when refueling.
■ Periodic inspections • Check the automatic transmission fluid level monthly.
2 Automatic Transmission Fluid P. 277
• Check the brake fluid level monthly.
2 Brake/Clutch Fluid P. 280
• Check the tire pressure monthly. Examine the tread for wear and foreign objects.
2 Checking and Maintaining Tires P. 297
• Check the operation of the exterior lights monthly.
2 Replacing Light Bulbs P. 282
• Check the condition of the wiper blades at least every six months.
2 Checking and Maintaining Wiper Blades P. 295
1Inspection and Maintenance
U.S. models Maintenance, replacement, or repair of emissions control devices and systems may be done by any automotive repair establishment or individuals using parts that are “certified” to EPA standards.
According to state and federal regulations, failure to perform maintenance on the maintenance main items marked with # will not void your emissions warranties. However, all maintenance services should be performed in accordance with the intervals indicated by the information display */i-MID *.
2 Maintenance Service Items P. 259, 263
If you want to perform complex maintenance tasks that require more skills and tools, you can purchase a subscription to the Service Express website at www.techinfo.honda.com.
2 Authorized Manuals P. 357
If you want to perform maintenance yourself, make sure that you have the necessary tools and skills first. After performing maintenance, update the records in the separate maintenance booklet.
254
* Not available on all models
uuBefore Performing MaintenanceuSafety When Performing Maintenance
Safety When Performing Maintenance Some of the most important safety precautions are given here. However, we cannot warn you of every conceivable hazard that can arise in performing maintenance. Only you can decide whether or not you should perform a given task.
■ Maintenance Safety • To reduce the possibility of fire or explosion, keep cigarettes, sparks, and flames
away from the battery and all fuel related parts.
• Never leave rags, towels, or other flammable objects under the hood.
u Heat from the engine and exhaust can ignite them causing a fire.
• To clean parts, use a commercially available degreaser or parts cleaner, not
gasoline.
• Wear eye protection and protective clothing when working with the battery or
compressed air.
• Engine exhaust contains carbon monoxide, which is poisonous and can kill you.
u Only operate the engine if there is sufficient ventilation.
■ Vehicle Safety • The vehicle must be in a stationary condition.
u Make sure your vehicle is parked on level ground, the parking brake is set, and
the engine is off.
• Be aware that hot parts can burn you.
u Make sure to let the engine and exhaust system cool thoroughly before
touching vehicle parts.
• Be aware that moving parts can injure you.
u Do not start the engine unless instructed, and keep your hands and limbs away
from moving parts.
1Safety When Performing Maintenance
3WARNING
Improperly maintaining this vehicle or failing to correct a problem before driving can cause a crash in which you can be seriously hurt or killed.
Always follow the inspection and maintenance recommendations according to the schedules in this owner's manual.
3WARNING
Failure to properly follow maintenance instructions and precautions can cause you to be seriously hurt or killed.
Always follow the procedures and precautions in this owner's manual.
255
uuBefore Performing MaintenanceuParts and Fluids Used in Maintenance Service
Parts and Fluids Used in Maintenance Service The use of Honda genuine parts and fluids is recommended when maintaining and servicing your vehicle. Honda genuine parts are manufactured according to the same high quality standards used in Honda vehicles.
256
Maintenance MinderTM
If the engine oil life is less than 15%, you will see the Maintenance Minder messages appear on the information display * or the i-MID * every time you turn the ignition switch to ON (w. The messages notify you when to change the engine oil, or when to bring your vehicle to a dealer for indicated maintenance services.
Models with information display To Use Maintenance MinderTM ■ Displaying the Engine Oil Life
1. Turn the ignition switch to ON (w. 2. Press the
(Select/Reset) knob repeatedly
until the engine oil life appears on the information display.
The Maintenance Minder indicator ( ) stays on in the instrument panel after the engine oil life becomes 0%. Have the indicated maintenance done by a dealer immediately.
* Not available on all models
Continued
1Displaying the Engine Oil Life
Based on the engine operating conditions, the remaining engine oil life is calculated and displayed as a percentage.
Displayed Engine Oil
Calculated Engine Oil
Life (%)
100
90
80
70
60
50
40
30
20
15
10Life (%) 100 to 91
90 to 81
80 to 71
70 to 61
60 to 51
50 to 41
40 to 31
30 to 21
20 to 16
15 to 11
10 to 6
5 to 1257
uuMaintenance MinderTMuTo Use Maintenance MinderTM
■ Maintenance Minder Messages on the Information Display To switch the display, press the
(Select/Reset) knob.
Oil Life Display
Explanation
Information
Maintenance Minder Indicator
The engine oil life indicator starts to appear along with other due soon maintenance item codes when the remaining oil life becomes 15 percent.
The SERVICE message also starts to appear along with the engine oil life indicator and the maintenance item codes.
The remaining engine oil life has passed its service life, and a negative distance appears after driving over 10 miles (U.S. models) or 10 km (Canadian models). The negative distance on the display blinks.
The engine oil is approaching the end of its service life.
The engine oil has almost reached the end of its service life, and the maintenance items should be inspected and serviced as soon as possible.
The engine oil life has passed. The maintenance items must be inspected and serviced immediately.
Starts to come on when the remaining engine oil life becomes 15 percent. It goes off when the display is switched.
Stays on as a reminder even when the display is switched.
258
■ Maintenance Service Items
Maintenance Minder Indicator
Maintenance Minder Message
Main Item
Sub Items
uuMaintenance MinderTMuTo Use Maintenance MinderTM
1Maintenance Service Items
• Independent of the Maintenance Minder
information, replace the brake fluid every 3 years. • Inspect idle speed every 160,000 miles (256,000
km).
• Adjust the valves during services A, B, 1, 2, or 3 if
they are noisy.
CODE
Maintenance Main Items
CODE
Maintenance Sub Items
● Replace engine oil*1
● Replace engine oil*1 and oil filter ● Inspect front and rear brakes/service as necessary ● Check parking brake adjustment ● Inspect tie rod ends, steering gearbox, and boots ● Inspect suspension components ● Inspect driveshaft boots ● Inspect brake hoses and lines (Including ABS/VSA) ● Inspect all fluid levels and condition of fluids ● Inspect exhaust system# ● Inspect fuel lines and connections#● Rotate tires ● Replace air cleaner element*2
● Replace dust and pollen filter *,*3
● Inspect drive belt ● Replace transmission fluid ● Replace spark plugs ● Inspect valve clearance ● Replace engine coolant*2: *3:
If you drive in dusty conditions, replace the air cleaner element every 15,000 miles (24,000 km). If you drive primarily in urban areas that have high concentrations of soot in the air from industry and from diesel-powered vehicles, replace the dust and pollen filter every 15,000 miles (24,000 km).
*1:
# :
If a message SERVICE does not appear more than 12 months after the display is reset, change the engine oil every year. See information on maintenance and emissions warranty.
* Not available on all models
Continued
259
uuMaintenance MinderTMuTo Use Maintenance MinderTM
■ Resetting the Display Reset the engine oil life display if you have performed the maintenance service.
1. Turn the ignition switch to ON (w. 2. Display the engine oil life by repeatedly
pressing the
(Select/Reset) knob.
3. Press and hold the
knob for ten seconds
or more. u The engine oil life indicator and the
maintenance item codes blink.
4. Press the
knob for five seconds or more.
u The displayed maintenance items
disappear, and the engine oil life display returns to 100%.
1Resetting the Display
NOTICE Failure to reset the engine oil life after a maintenance service results in the system showing incorrect maintenance intervals, which can lead to serious mechanical problems.
The dealer will reset the engine oil life display after completing the required maintenance service. If someone other than a dealer performs maintenance service, reset the engine oil life display yourself.
260
uuMaintenance MinderTMuTo Use Maintenance MinderTM
Models with i-MID To Use Maintenance MinderTM ■ Displaying the Engine Oil Life and Maintenance Items Maintenance items, which should be serviced at the same time that you replace the engine oil, appear on the i-MID. You can view them on the Maintenance info screen at any time. 1. Turn the ignition switch to ON (w. 2. Press the MENU button to go to the Vehicle Menu screen. 3. Select Vehicle Information with the (+ button, then press the SOURCE button. 4. Press the SOURCE button again to go to the Maintenance info screen. The
engine oil life appears on the i-MID.
Engine Oil Life
2345
50Engine oil
Air filters
Main Item
Sub Item
(+ Button
SOURCE Button MENU Button
SOURCE
MENU
Continued
1Displaying the Engine Oil Life and Maintenance Items
Based on the engine operating conditions, the remaining engine oil life is calculated and displayed as a percentage.
Displayed Engine Oil
Calculated Engine Oil
Life (%)
100
90
80
70
60
50
40
30
20
15
10Life (%) 100 to 91
90 to 81
80 to 71
70 to 61
60 to 51
50 to 41
40 to 31
30 to 21
20 to 16
15 to 11
10 to 6
5 to 1There is a list of maintenance main and sub items you can view on the i-MID.
2 Maintenance Service Items P. 263
261
uuMaintenance MinderTMuTo Use Maintenance MinderTM
■ Maintenance Minder Messages on the i-MID
Maintenance Message
Oil Life Display
Explanation
Information
SERVICE DUE SOON
15 %
2345
Engine oil
Air filters
SERVICE DUE NOW
5 %
2345
152345
2345
Engine oil
Air filters
SERVICE PAST DUE
Negative Distance
2345
-30
2345The remaining engine oil life is 15 to 6 percent. Once you switch the display by pressing the information) button, this message will go off.
(display/
The engine oil is approaching the end of its service life, and the maintenance items should be inspected and serviced soon.
The remaining engine oil life is 5 to 1 percent. Press the switch to another display.
button to
The engine oil has almost reached the end of its service life, and the maintenance items should be inspected and serviced as soon as possible.
The remaining engine oil life has passed its service life, and a negative distance appears after driving over 10 miles (U.S. models) or 10 km (Canadian models). Press the
button to switch to another display.
The engine oil life has passed. The maintenance items must be inspected and serviced immediately.
The system message indicator (
) comes on along with the Maintenance Minder message.
262
uuMaintenance MinderTMuTo Use Maintenance MinderTM
1Maintenance Service Items
• Independent of the Maintenance Minder
information, replace the brake fluid every 3 years. • Inspect idle speed every 160,000 miles (256,000
km).
• Adjust the valves during services A, B, 1, 2, or 3 if
they are noisy.
■ Maintenance Service Items
System Message Indicator
Maintenance Minder Message
2345
Main Item
Sub Items
CODE
Maintenance Main Items
CODE
Maintenance Sub Items
● Replace engine oil*1
● Replace engine oil*1 and oil filter ● Inspect front and rear brakes/service as necessary ● Check parking brake adjustment ● Inspect tie rod ends, steering gearbox, and boots ● Inspect suspension components ● Inspect driveshaft boots ● Inspect brake hoses and lines (Including ABS/VSA) ● Inspect all fluid levels and condition of fluids ● Inspect exhaust system# ● Inspect fuel lines and connections# ● Check the expiration date for TRK bottle*2● Rotate tires ● Replace air cleaner element*2
● Replace dust and pollen filter*3
● Inspect drive belt ● Replace transmission fluid ● Replace spark plugs ● Inspect valve clearance ● Replace engine coolant*2: *3:
If you drive in dusty conditions, replace the air cleaner element every 15,000 miles (24,000 km). If you drive primarily in urban areas that have high concentrations of soot in the air from industry and from diesel-powered vehicles, replace the dust and pollen filter every 15,000 miles (24,000 km).
*1:
If a message SERVICE does not appear more than 12 months after the display is reset, change the engine oil every year.
*2: Models with tire repair kit # :
See information on maintenance and emissions warranty.
Continued
263
1Resetting the Display
NOTICE Failure to reset the engine oil life after a maintenance service results in the system showing incorrect maintenance intervals, which can lead to serious mechanical problems.
The dealer will reset the engine oil life display after completing the required maintenance service. If someone other than a dealer performs maintenance service, reset the engine oil life display yourself.
uuMaintenance MinderTMuTo Use Maintenance MinderTM
■ Resetting the Display Reset the engine oil life display if you have performed the maintenance service.
2345
Engine Oil Life
Engine oil
Air filters
Maintenance Item Codes
SOURCE
SOURCE Button
(- Button
1. Turn the ignition switch to ON (w. 2. Go to the Maintenance info screen.
2 Displaying the Engine Oil Life and Maintenance Items P. 261
3. Press the SOURCE button.
u The oil life reset mode is displayed on the i-MID.
4. Select Yes with the (- button, then press the SOURCE button.
u The displayed maintenance items disappear, and the engine oil life display
returns to 100%.
u Any maintenance items that are necessary for your vehicle at the next
maintenance service will appear.
To cancel the oil life reset mode, select No, then press the SOURCE button.
264
Maintenance Under the Hood
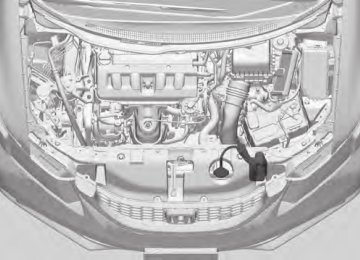
Maintenance Items Under the Hood 1.8 ℓ engine models
Engine Oil Dipstick (Orange Handle)
Engine Oil Fill Cap
Washer Fluid (Blue Cap)
Brake Fluid (Black Cap)
Manual transmission models Clutch Fluid (Light Gray Cap)
Automatic transmission models Automatic Transmission Fluid Dipstick (Yellow Loop)
Battery
Radiator Cap
Engine Coolant Reservoir
Continued
265
uuMaintenance Under the HooduMaintenance Items Under the Hood
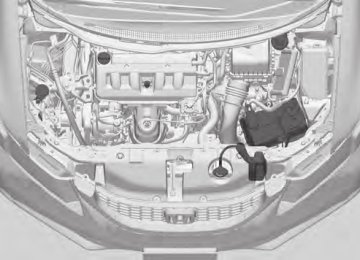
2.4 ℓ engine models
Engine Oil Fill Cap
Engine Oil Dipstick (Orange Handle)
Washer Fluid (Blue Cap)
266
Brake Fluid (Black Cap)
Clutch Fluid (Light Gray Cap)
Battery
Radiator Cap
Engine Coolant Reservoir
Opening the Hood
Hood Release Handle
Pull
uuMaintenance Under the HooduOpening the Hood
1. Park the vehicle on a level surface, and set
1Opening the Hood
the parking brake.
2. Pull the hood release handle under the
lower left corner of the dashboard. u The hood will pop up slightly.
NOTICE Do not open the hood when the wiper arms are raised. The hood will strike the wipers, and may damage either the hood or the wipers.
When closing the hood, check that the hood is securely latched.
3. Push up the hood latch lever in the center of the hood to release the lock mechanism, and open the hood.
If the hood latch lever moves stiffly, or if you can open the hood without lifting the lever, the latch mechanism should be cleaned and lubricated.
Lever
Support Rod Grip
Clamp
4. Remove the support rod from the clamp using the grip. Mount the support rod in the hood.
When closing, remove the support rod, and stow it in the clamp, then gently lower the hood. Remove your hand at a height of approximately 12 inches (30 cm) and let the hood close.
267
1Recommended Engine Oil
Engine Oil Additives Your vehicle does not require oil additives. In fact, they may adversely affect the engine performance and durability.
uuMaintenance Under the HooduRecommended Engine Oil
Recommended Engine Oil
• Genuine Honda Motor Oil • Premium-grade 0W-20 detergent oil with an API Certification Seal on the
container.
Oil is a major contributor to your engine's performance and longevity. If you drive the vehicle with insufficient or deteriorated oil, the engine may fail or be damaged.
This seal indicates the oil is energy conserving and that it meets the American Petroleum Institute’s latest requirements.
Use a Genuine Honda Motor Oil or another commercial engine oil of suitable viscosity for the ambient temperature as shown.
Ambient Temperature
■ Synthetic oil You may also use synthetic motor oil if it is labeled with the API Certification Seal and is the specified viscosity grade.
268
uuMaintenance Under the HooduOil Check
1Oil Check
If the oil level is near or below the lower mark, slowly add oil being careful not to overfill.
Oil Check We recommend that you check the engine oil level every time you refuel. Park the vehicle on level ground. Wait approximately three minutes after turning the engine off before you check the oil. 1.8 ℓ engine models
1. Remove the dipstick (orange handle). 2. Wipe the dipstick with a clean cloth or
paper towel.
3. Insert the dipstick back all the way into its
hole.
2.4 ℓ engine models
269
Continued
uuMaintenance Under the HooduOil Check
1.8 ℓ engine models
4. Remove the dipstick again, and check the level. It should be between the upper and lower marks. Add oil if necessary.
Upper Mark Lower Mark
2.4 ℓ engine models
Upper Mark Lower Mark
270
uuMaintenance Under the HooduAdding Engine Oil
1. Unscrew and remove the engine oil fill cap. 2. Add oil slowly. 3. Reinstall the engine oil fill cap, and tighten
it securely.
4. Wait for three minutes and recheck the
engine oil dipstick.
1Adding Engine Oil
If any oil spills, wipe it up immediately. Spilled oil may damage the engine compartment components.
NOTICE Do not fill the engine oil above the upper mark. Overfilling the engine oil can result in leaks and engine damage.
Adding Engine Oil
1.8 ℓ engine models
Engine Oil Fill Cap
2.4 ℓ engine models
Engine Oil Fill Cap
271
1Changing the Engine Oil and Oil Filter
NOTICE You may damage the environment if you do not dispose of the oil in a suitable way. If you are changing the oil by yourself, appropriately dispose of the used oil. Put the oil in a sealed container and take it to a recycling center. Do not throw the oil away into a garbage can or onto the ground.
uuMaintenance Under the HooduChanging the Engine Oil and Oil Filter
Changing the Engine Oil and Oil Filter You must change the engine oil and oil filter regularly in order to maintain the engine's lubrication. The engine may be damaged if they are not changed regularly.
Change the oil and filter in accordance with the maintenance message on the information display */i-MID *. 1.8 ℓ engine models
1. Run the engine until it reaches normal
operating temperature, and then turn the engine off.
2. Open the hood and remove the engine oil
fill cap.
1.8 ℓ engine models 3. Remove the bolts on the undercarriage
and remove the under cover.
Bolt
Under Cover
272
* Not available on all models
uuMaintenance Under the HooduChanging the Engine Oil and Oil Filter
1.8 ℓ engine models
Drain Bolt
All models 4. Remove the drain bolt and washer from the bottom of the engine, and drain the oil into a suitable container.
2.4 ℓ engine models
Washer
Drain Bolt
Washer
273
Continued
uuMaintenance Under the HooduChanging the Engine Oil and Oil Filter
1.8 ℓ engine models
2.4 ℓ engine models
5. Remove the oil filter and dispose of the
remaining oil.
6. Check that the filter gasket is not stuck to
the engine contact surface. u If it is stuck, you must detach it.
7. Wipe away dirt and dust adhering to the contact surface of the engine block, and install a new oil filter. u Apply a light coat of new engine oil to
the oil gasket.
Oil Filter
8. Put a new washer on the drain bolt, then
1Changing the Engine Oil and Oil Filter
You will need a special wrench to replace the oil filter. You can buy this wrench from a dealer.
When installing the new oil filter, follow the instructions supplied with the oil filter.
Reinstall the engine oil fill cap. Start the engine. The low oil pressure indicator should go off within five seconds. If it does not, turn off the engine, and check your work.
reinstall the drain bolt. u Tightening torque: 1.8 ℓ engine models 29 lbf∙ft (39 N∙m, 4.0 kgf∙m) 2.4 ℓ engine models 30 lbf∙ft (40 N∙m, 4.0 kgf∙m)
9. Pour the recommended engine oil into the engine.
u Engine oil change capacity (including
filter): 1.8 ℓ engine models 3.9 US qt (3.7 L) 2.4 ℓ engine models 4.4 US qt (4.2 L)
10. Reinstall the engine oil fill cap securely and
start the engine.
11. Run the engine for a few minutes, and
then check that there is no leak from the drain bolt or oil filter.
12. Stop the engine, wait for three minutes,
and then check the oil level on the dipstick. u If necessary, add more engine oil.
Oil Filter
274
Engine Coolant
Specified coolant: Honda Long Life Antifreeze/Coolant Type 2
1Engine Coolant
uuMaintenance Under the HooduEngine Coolant
NOTICE If temperatures consistently below −22°F (−30°C) are expected, the coolant mixture should be changed to a higher concentration. Consult a dealer for more information.
If Honda antifreeze/coolant is not available, you may use another major brand non-silicate coolant as a temporary replacement. Check that it is a high quality coolant recommended for aluminum engines. Continued use of any non-Honda coolant can result in corrosion, causing the cooling system to malfunction or fail. Have the cooling system flushed and refilled with Honda antifreeze/coolant as soon as possible.
Do not add rust inhibitors or other additives to your vehicle's coolant system. They may not be compatible with the coolant or with the engine components.
This coolant is premixed with 50% antifreeze and 50% water. Do not add any straight antifreeze or water.
We recommend you check the engine coolant level every time you refuel. Check the reserve tank first. If it is completely empty, also check the coolant level in the radiator. Add the engine coolant accordingly.
■ Reserve Tank
MAX
Reserve Tank
MIN
1. Check the amount of coolant in the reserve
tank.
2. If the coolant level is below the MIN mark,
add the specified coolant until it reaches the MAX mark.
3. Inspect the cooling system for leaks.
Continued
275
uuMaintenance Under the HooduEngine Coolant
■ Radiator
1.8 ℓ engine models
Radiator Cap
2.4 ℓ engine models
Radiator Cap
1. Make sure the engine and radiator are
cool.
2. Turn the radiator cap counterclockwise and relieve any pressure in the coolant system. Do not push the cap down when turning.
3. Push down and turn the radiator cap
counterclockwise to remove it.
4. The coolant level should be up to the base
of the filler neck. Add coolant if it is low.
5. Put the radiator cap back on, and tighten it
fully.
6. Pour coolant into the reserve tank until it reaches the MAX mark. Put the cap back on the reserve tank.
1Radiator
3WARNING
Removing the radiator cap while the engine is hot can cause the coolant to spray out, seriously scalding you.
Always let the engine and radiator cool down before removing the radiator cap.
NOTICE Pour the fluid slowly and carefully so you do not spill any. Clean up any spills immediately; they can damage components in the engine compartment.
276
Transmission Fluid ■ Automatic Transmission Fluid
Specified fluid: Honda ATF DW-1 (automatic transmission fluid)
Check the fluid level when the engine is at normal operating temperature.
HOT Range
Upper Mark Lower Mark
1. Park on level ground, and start the engine. 2. Wait until the radiator fan starts and then
turn off the engine. u Perform step 3 after waiting for about 60
seconds (less than 90 seconds).
3. Remove the dipstick (yellow loop) from the transmission and wipe it with a clean cloth. 4. Insert the dipstick all the way back into the
transmission securely, as shown in the image.
5. Remove the dipstick and check the fluid
level. u It should be between the upper and
lower marks in the HOT range.
6. If the level is below the lower mark, add
fluid into the dipstick hole to bring it to the level between the upper and lower marks, and have your vehicle checked by a dealer immediately.
Continued
uuMaintenance Under the HooduTransmission Fluid
1Automatic Transmission Fluid
NOTICE Do not mix Honda ATF DW-1 with other transmission fluids. Using a transmission fluid other than Honda ATF DW-1 may adversely affect the operation and durability of your vehicle's transmission, and damage the transmission. Any damage caused by using a transmission fluid that is not equivalent to Honda ATF DW-1 is not covered by Honda's new vehicle warranty.
NOTICE Pour the fluid slowly and carefully so you do not spill any. Clean up any spills immediately; they can damage components in the engine compartment.
277
uuMaintenance Under the HooduTransmission Fluid
■ Manual Transmission Fluid
Specified fluid: Honda Manual Transmission Fluid (MTF)
Check the fluid level when the engine is at normal operating temperature. 1.8 ℓ engine models
1. Park the vehicle on level ground. 1.8 ℓ engine models 2. Remove the bolts with a wrench, then
carefully remove the under cover.
1Manual Transmission Fluid