- 1993 Honda Accord Wagon Owners Manuals
- Honda Accord Wagon Owners Manuals
- 1995 Honda Accord Wagon Owners Manuals
- Honda Accord Wagon Owners Manuals
- 1991 Honda Accord Wagon Owners Manuals
- Honda Accord Wagon Owners Manuals
- 1996 Honda Accord Wagon Owners Manuals
- Honda Accord Wagon Owners Manuals
- 1997 Honda Accord Wagon Owners Manuals
- Honda Accord Wagon Owners Manuals
- 1994 Honda Accord Wagon Owners Manuals
- Honda Accord Wagon Owners Manuals
- 1992 Honda Accord Wagon Owners Manuals
- Honda Accord Wagon Owners Manuals
- Download PDF Manual
-
JACK
TOOL BAG
1. Lift the floor panel in
the cargo area.
2. Remove the jack.
NOTE: Turn the connector on the end of the jack counterclockwise to loosen it from its mount.
3. Remove the lug wrench/jack handle and jack handle extension
from the tool bag.
4. Remove the spare tire.
5. Place blocks (not provided with the car) in front of and in back of
the wheel diagonally opposite the tire you are changing.
6. Use the lug wrench to loosen the wheel lug nuts counterclockwise
one-half turn. — On the EX and EX-R models: First remove the center cap from the wheel by prying it out with a flat screwdriver (not provided in the tool bag), or coin.
CAUTION: Hold the center cap with your hand then pry it off using a cloth to protect the cap and the wheel.
CENTER CAP
SCREWDRIVER
CLOTH
-
On the LX model, remove the center cap by using a coin in the recess and turning the lock 90°.
7. Remove the lug nuts and wheel.
WHEEL COVER
LUG NUT
CENTER CAP
VALVE
Follow tire changing preparations and procedures carefully to reduce the possibility of injury. The jack is designed for changing tires only. STAND CLEAR, DO NOT get under the car and DO NOT run the engine when the car is supported only by the jack.
8. Place the jack under the car as shown and raise the car by turning
the handle clockwise until the tire is slightly off the ground.
To reduce the possibility of injury, be sure to use the jack provided with the car and the correct jacking points; never use any other part of the car for jack support.
JACK HANDLE EXTENSION
LUG WRENCH/ JACK HANDLE
Changing a Flat Tire (cont'd)
9. Use a clean rag to wipe any dirt off the mounting surface of the hub and the wheel. This will assure a tight, even contact between the wheel and hub.
10. Install the spare. Install the lug nuts finger tight.
11. Lower the car, remove the jack, then tighten the lug nuts securely
in an "X" pattern as shown.
Tighten the lug nuts to the recommended torque: 110 N.m (11 kg.m, 80 Ib.ft).
If a torque wrench was not used, ask an authorized Honda dealer to verify the torque as soon as possible.
12. Repair or replace the damaged tire as soon as you can, reinstall
it in its original position, then put the spare back in the car.
CAUTION: Always stow the jack, tools and tire securely to prevent them from becoming dangerous projectiles in an accident.
13. Secure the tire and the spacer as shown in the illustration.
SPACER
Jump Starting
To start a car with a dead battery, use another battery of the same voltage and the proper jumper cables.
Procedures other than those below could cause injury or damage from battery acid spray, explosion or charging system overload. Never connect the jumper cable directly to the negative post of the "dead" battery. Never allow the two cars to touch each other. Never allow the jumper cable clamps to touch each other. Never lean over the battery when making connections. Never attempt to jump start a vehicle with a frozen battery. The battery could rupture and explode. If you suspect a frozen battery, do not attempt a jump start until the fluid thaws.
CAUTION: If jumper cables are connected backwards, the car's main fuse may blow.
1. Turn off all lights, heater and other electrical loads, set the
parking brake, and shift the transmission to Neutral or Park.
2. Use one cable to connect the positive terminal of the booster
battery to the positive terminal of the "dead" battery.
DEAD BATTERY
Positive to positive.
Do not attach cable here.
Negative to the engine, not to the battery.
BOOSTER BATTERY
3. Use the other cable to connect the negative terminal of the booster
battery to the engine at the ground cable as shown.
4. To remove the cables, reverse the above procedures exactly.
DO NOT push or tow a car to start it. The forward surge when the engine starts could cause a collision. Also, under some conditions, the catalytic converter could be damaged. A car equipped with an automatic transmission cannot be started by pushing or towing.
Towing
If towing is necessary, contact a professional towing service. Your authorized Honda dealer can assist you with detailed towing instructions.
Never use tow chains or rope to tow a car; your ability
to safely control the car may be adversely affected.
We recommend the following: Flat-Bed Equipment — Entire car is winched on to a flat-bed vehicle. This is the best way of transporting your Honda. Wheel Lift Type — Tow with the front wheels off the ground. If the car can only be towed with the front wheels on the ground: make sure the transmission is full of fluid (see page 95 - 96) and tow with the transmission in neutral (N) and the ignition key in the I position.
CAUTION: To avoid serious damage on automatic transmission cars, first start the engine and shift to D4, then to N and shut the engine off. If the engine does not run or the transmission cannot be shifted while the engine is running, the car must be transported on flat-bed equipment.
Check local regulations for towing.
CAUTION:
Do not exceed 35 mph (55 km/h) or tow for distances of more than 50 miles (80 km). If a sling type tow is used, the tow truck driver should position wood spacer blocks between your car's frame and the chains and lift straps to avoid damaging the bumper and the body. Do not use the bumpers to lift the car or to support the car's weight while towing.
If Your Car Gets Stuck
If your car gets stuck in sand, mud, or snow, call a professional towing service for assistance in getting your car out.
CAUTION:
Do not rev up the engine and allow the wheels to spin freely at high speed. Severe transmission damage may result if the wheels are allowed to spin for more than a few seconds. DO NOT try to free a car with automatic transmission from snow etc., by rocking the car alternately between forward and reverse gears. Severe transmission damage may result from shifting into gear with the wheels moving.
Specifications
* 1: Including the coolant in reserve tank 0.6 *2: Excluding the oil remaining in the engine, but including that in the oil filter.
in the engine.
(0.5 Imp qt, 0.6 US qt) and that remaining
page 105
Identification Numbers
The Vehicle Identification Number (V.I.N.) is stamped on a plate attached to the top left side of the dashboard.
It also appears on the Certification label attached to the left rear door jamb, as well as under the hood on the body, directly behind the engine.
NOTE: The V.I.N. is also provided in bar code on the Certification label. The Engine Number is stamped on the right front side of the engine block.
The Transmission Num- ber appears on a label on top of the transmission.
VEHICLE IDENTIFICATION NUMBER
CERTIFICATION LABEL
VEHICLE IDENTIFICATION NUMBER
TRANSMISSION NUMBER
ENGINE NUMBER
DOT Tire Quality Grades
US Cars The tires on all Honda cars meet Federal Safety Requirements. All tires on the Accord are also "graded" according to Department of Transportation (DOT) standards for tread wear, traction and temperature.
Three grades are shown on the tire side wall.
TIRE
WHEEL RIM
Tread Wear The tread wear grade is a comparative rating based on the wear rate of the tire when tested under controlled conditions on a specified government test course. For example, a tire graded 150 would wear one and one half (1-1/2 ) times as well on the government course as a tire graded 100.
The relative performance of tires depends upon the actual conditions of their use, however, and may depart significantly from the norm due to variations in driving habits, service practices and differences in road characteristics and climate.
Traction The traction grades, from highest to lowest, are A, B, and C, and they represent the tire's ability to stop on wet pavement as measured under controlled conditions on specified government test surfaces of asphalt and concrete. A tire marked C may have poor traction performance.
The traction grades assigned are based on braking (straight ahead) traction tests and do not include cornering (turning) traction.
DOT Tire Quality Grades (cont'd)
Temperature The temperature grades are A (the highest), B and C representing the tire's resistance to the generation of heat and its ability to dissipate heat when tested under controlled conditions on a specified indoor laboratory test wheel. Sustained high temperature can cause the material of the tire to degenerate and reduce tire life, and excessive temperature can lead to sudden tire failure. The grade C corresponds to a level of performance which all passenger car tires must meet under the Federal Motor Vehicle Safety Standard No. 109. Grades B and A represent higher levels of performance on the laboratory test wheel than the minimum required by law.
The tire temperature grade is established for a tire that is properly inflated and not overloaded. Excessive speed, under- inflation, or excessive loading, either separately or in combination, can cause heat buildup and possible tire failure.
Emission Controls
Sources of Emissions The combustion process produces carbon monoxide (CO), oxides of nitrogen (NO ) and hydrocarbons. The evaporation of fuel in the fuel tank also produces hydrocarbons. Control of oxides of nitrogen and hydrocarbons is very important since, under certain conditions, when subjected to sunlight, they react to form photochemical smog. Carbon monoxide does not react to form smog, but it is toxic.
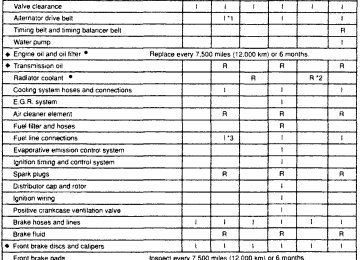
The Clean Air Act The Clean Air Act* requires all vehicle manufacturers to explain in writing the operation and maintenance of their emission control systems. Maintenance instructions are included on pages 85 - 89; the operation of each system is explained below and on the following page.
Replacement Parts The emission control systems on your new Honda were designed, built and certified to conform with the Federal regulations implementing the Clean Air Act. Honda recommends only the use of new, genuine Honda parts or their equivalent. The use of other replacement parts which are not of equivalent quality may impair the effectiveness of your car's emission control systems.
Evaporative Emission Control System The Evaporative Emission Control System is designed to prevent fuel vapors from escaping into the atmosphere.
Fuel vapors from the fuel tank are directed into the charcoal canister where they are adsorbed and stored while the engine is stopped or idling. When the coolant temperature rises to a certain value, the vapors are drawn into the engine through the throttle body and the intake manifold during normal engine operation.
*In Canada, Honda vehicles comply with the Canadian Motor Vehicle Safety Standards (CMVSS) on Emissions valid at the time they are manufactured.
Emissions (cont'd)
Crankcase Emission Control System To prevent crankcase emissions, your car is equipped with a Positive Crankcase Ventilation (PCV) System which routes blowby gases from the crankcase, through the PCV valve and intake manifold, into the combustion chamber.
Engine Exhaust Controls The engine exhaust emission control systems are designed to control combustion during idle, acceleration, cruise, and deceleration. These systems are entirely separate from the crankcase and evaporative emission control systems described previously.
PGM-FI System The PGM-FI system consists of three independent sub-systems; Air Intake, Electronic Control and Fuel Control, thus allowing more accurate control of air/fuel ratios under all operating conditions. The Electronic Control Unit (ECU) detects the amount of air drawn into the cylinders and determines the amount of fuel to be injected to provide the optimum air/fuel ratio for all engine needs.
Ignition Timing Control System This system automatically controls the ignition timing to reduce the amount of HC and NO
Catalytic Converter The catalyst is used to convert hydrocarbons (HC), carbon monoxide (CO) and oxides of nitrogen (NO ) in the exhaust gas, to carbon dioxide (CO
) and water vapor.
), dinitrogen (N
Exhaust Gas Recirculation (EGR) The EGR system is designed to control the formation of oxides of nitrogen (NO ) caused when fuel the mixture burns at high temperature. It works by recirculating exhaust gas through the EGR valve and intake manifold into the combustion chambers where it reduces peak temperature by diluting the air/fuel mixture.
Catalytic Converter
A catalytic converter is installed in the exhaust system to help clean up the harmful exhaust gases that can cause air pollution.
To be effective, the converter must work at high temperature, so don't park your car over dry grass, leaves or anything else that could burn easily.
To stay effective, the converter must not be contaminated by leaded gasoline; use only unleaded gas as explained on page 65.
CATALYTIC CONVERTER
CAUTION: The converter can be overheated and damaged if it's fed too much unburned fuel mixture from the engine, so: — Don't push or tow the car to start it; if the battery is dead, jump start
the car as shown on page 126.
— Don't turn the key off while the engine is running above idle speed. — Don't change the ignition timing, or remove any emission control
parts.
— Use only the spark plugs specified in this manual. — Don't keep driving your car if it isn't running properly, or if its CHARGE warning light or check engine light comes on; have it checked by your Honda dealer.
Warranty Service
Warranty (US Cars) The following warranties are provided with every new vehicle.
1. New Car Limited Warranty 2. Emission Control Systems Defects Warranty 3. Emission Performance Warranty 4. Original Equipment Battery Limited Warranty 5. Rust Perforation Limited Warranty 6. Accessory Limited Warranty 7. Replacement Parts Limited Warranty 8. Replacement Muffler Lifetime Limited Warranty 9. Seat Belt Limited Warranty 10. Replacement Battery Limited Warranty Your car's original tires are covered by their manufacturer. Tire warranty information is in a separate tire warranty booklet. The details of all warranties pertaining to your car can be found in the Warranty booklet provided with your new car. The required maintenance schedule is contained in this Owner's Manual. If you are unable to obtain warranty service or are dissatisfied with the warranty decision or service you received at an authorized Honda dealership, you should review the matter with that dealership's Service Manager. This will normally resolve your problem. If it does not, you should appeal the decision with the owner of the dealership. Please bear in mind that your problem will likely be resolved in the dealership, using the dealer's facilities, equipment and personnel. So it is very important that your initial contact be with the dealer or his management.
After following these steps, if you wish to have the matter reviewed by American Honda you should contact the Zone Office serving your area, as shown on the map on the inside of the back cover. When contacting American Honda, please provide the Zone Office with the following information:
Vehicle Identification Number Servicing Dealer Name and Address Date of Purchase Mileage on your Car
Your Name, Address, and Phone Number Nature of Problem Selling Dealer
After a review of the facts, you will be advised of what can be done.
Reporting Safety Defects
(US Cars) If you believe that your vehicle has a defect which could cause a crash or cause injury or death, you should immediately inform the National Highway Traffic Safety Administration (NHTSA) in addition to notifying American Honda Motor Co., Inc.
If NHTSA receives similar complaints, it may open an investigation, and if it finds that a safety defect exists in a group of vehicles, it may order a recall and remedy campaign. However, NHTSA cannot become involved in individual problems between you, your dealer, or American Honda Motor Co., Inc.
To contact NHTSA, you may either call the Auto Safety Hotline toll-free at 1-800-424-9393 (or 366-0123 in the Washington, D.C. area) or write to: NHTSA, U.S. Department of Transportation, Washington, D. C. 20590. You can also obtain other information about motor vehicle safety from the Hotline.
Index
Air Conditioner Care, 116 - 117
Operation, 51
Recycled Refrigerant, 117Air filter, 104
Air Pressure, Tires, 112
Aluminum Alloy Wheels, 119
Antenna, 58
Anti-theft SteeringColumn Lock, 69
Antifreeze. See "Radiator Coolant" Appearance Care, 118
Ashtrays, 47
Audio System, 58
Automatic Shift Lock, 75
Automatic TransmissionDriving Technique, 77
Fluid, 96
Operation, 76
Shift LeverPosition Indicator, 75
Battery
Charging System
Warning Light, 30
Jump Starting, 126
Maintenance, 107
Specifications, 131Beeper System
Fasten Seat Belt Beeper, 17
Key Reminder, 69
Light Reminder Chime, 38Beverage Holder, 46
Body Repair, 121
Brake Lamp Warnng Light, 32Brakes
Brake Failure Light, 29
Brake Fluid, 101
Brake System Design, 100
Brake Wear, 100
Brake Wear Indicators, 101
Lamp Warning Light, 32
Parking Brake, 43
Parking Brake Light, 29Break-in Period, 2
BulbReplacements, 110 - 111
Specifications, 131Capacities, 130
Care and Cleaning, 118 - 120
Cargo Area, 13Storage Compartments, 13
Tonneau Cover, 13
Cargo Area Light, 40
Catalytic Converter, 136, 137
Certification Label, 132
Chains, Tire, 113
Check Engine Warning Light, 30
Child Proof Door Locks, 7
Child Restraint, 18
Cigarette Lighter, 47
Clock, 45
Clutch Fluid, 102
Coolant Temperature Gauge, 27
Cooling (with A/C), 52
Cooling System, 97-99
Crankcase EmissionControl System, 136
Cruise Control Indicator, 28
To Cancel the Cruise Control, 42 To Set the Cruise Control, 41
Washing, 118
Waxing, 119Daytime Running
Lights (DRL), 31, 40
Defrost/Defog, 54
Dimensions, Specifications, 130
DoorsChild Proof Door Lock, 7
Locks, 6
Power Door Locks, 6
Warning Lights, 32Emergency
Changing a Flat Tire, 122 - 125
Hazard Warning System, 39
If Your Car Gets Stuck, 129
Indicator Lights, 28 - 31
Jump Starting, 126
Towing, 128Emission Controls, 135 - 136
EngineCoolant, 97
Coolant Temperature Gauge, 27
Exhaust Controls, 136
Identification Number, 132
Oil and Filter, 92 - 94
Oil Pressure Light, 29
Specifications, 131Engine Exhaust Gas Warning, 72
Evaporative EmissionControl System, 135
Exhaust Gas
Recirculation (EGR), 136
Exterior Care, 118 - 119
Aluminum Alloy Wheels, 119
Preventive Service (Rust), 120
Rust Prevention, 120Filters
Air, 104
Engine Oil, 93
Fuel, 104Fluid. See "Oil" Foreign Countries,
Operation in, 66
Fuel
Filter, 104
Fuel Filler Door and Cap, 67Fuel Reserve Light, 29
Gasohol, 65
Gauge, 26
Requirement, 65Fuse
Checking and
Replacing, 108 - 109
Specifications, 131
Gas Station Information, 142
Gasoline, 65 - 68
Gauges, 26 - 27
Glove Box, 45Hazard Warning System, 39
Head Restraints, 9
HeadlightsFlasher, 38
High BeamIndicator Light, 28, 38
High/Low Beam Switch, 38Index (cont'd)
Reminder Chime, 38
Headlights (cont'd)
Switch, 38
Heating, 53
Hood, 43
Hood Latch, 43Identification Numbers, 132
Ignition SwitchAnti-theft Lock, 69
Beeper Reminder (Key), 69
Daytime RunningLights (DRL), 40, 69
Key, 69
Light, 39Indicator Lights, 28 - 32
Inflation Pressure, Tires, 112
Instrument Panel, 25
Interior Lights, 40
Interior Trim Care, 118Jack, 122 - 125
Jump Starting, 126 - 127Keyless Entry System, 4
KeysAutomatic Shift Lock, 75
Glove Box, 45
Ignition, 69
Keyless Entry System, 4
Reminder Beeper, 69
Remote Access Key, 4Using the, 5
Tailgate, 3, 4, 5Lap/Shoulder Belts. See "Seat Belts"
Lights
Bulb Replacement, 110 - 111
Cargo Area Light, 40
Daytime RunningLights (DRL), 31, 40
Fuse Replacement, 108
Hazard Warning System, 39
Headlight Switch, 38
Ignition Switch, 39
Indicator Lights, 28 - 32
Interior Lights, 40
Light Reminder Chime, 38
Operation of, 38 - 40
Turn Signals, 38Loading the Car, 12
Lockout Prevention, 7
LocksAnti-theft Steering
Column Lock, 69
Child Proof Door Locks, 7
Door, 6
Fuel Filler Door, 67
Glove Box, 45
Lockout Prevention, 7
Power Door Locks, 6
Tailgate, 4Plunger, 6
Using Power Door Locks, 6
Using Remote Access Key, 5Lumbar Support, 8
Maintenance Record, 88
Schedule, 85 - 90Maintenance Indicator, 33
Manual TransmissionMaximum Allowable Speed, 74
Oil, 95 - 96
Recommended Shift Speeds, 74
Shifting, 73Meters, Gauges. See "Gauges" Mirrors
Power Mirrors, 37
Rearview Mirrors, 37Numbers
Vehicle Identification, 132
Octane Rating, 65
Odometer, 26
OilClutch Fluid, 102
Engine Oil, 92 - 93
Fluid Locations, 91
Oil Pressure Light, 29
Power Steering Fluid, 103
Transmission Oil/Fluid, 96Operation in
Foreign Countries, 66
Panel Brightness Control, 39
Parking Brake, 43
Parking Brake/Brake Failure Light, 29
Power
Door Locks, 6
Mirrors, 37
Steering, 103
Windows, 44Pregnant Women, 20
Pressures, Tire Inflation, 112Preventive Service, 120
Radiator, Coolant, 97 - 99
Radio Operation, 59
Rear Seat Arm Rest, 9
Rear Window Defogger, 36
Remote Access Key, 4Using the, 5
Glove Box, 45
Tailgate, 5
ReplacementAir Filter, 104
Bulbs, 110 - 111
Engine Oil, 93
Fuel Filter, 104
Oil Filter, 93
Radiator Coolant, 98 - 99
Spark Plugs, 105
Tires, 114
Wiper Blades, 106
Review Mirrors, 37
Rust Prevention, 120Safety Defects, Reporting, 139
Safety Items, 71
Seat BeltsAnchor Points, 19
Buckling theFront Seat Belts, 15
Buckling the Rear Seat Belts, 16
Child Restraint, 18
Cleaning, 21
Fasten Seat Belt Lightand Beeper, 17
Inspection, 20
Installation of Child Seat, 19
Pregnant Women, 20Index (cont'd)
Rear Center Seat Belt, 16
Replacements, 21
Seat Belt Warning Light, 29
Shoulder Anchor HeightAdjusting Mechanism, 16
Seats
Driver's Lumbar Support, 8
Seats (cont'd)
Folding Rear Seat, 10
Front Seat, 8
Head Restraints, 9
Rear Seat Arm Rest, 9Shift Lever Position Indicator, 28
Shifting5-Speed, 73
Automatic Transmission, 75Spare Tire, 114
Changing a Flat Tire, 122, 125
Specifications, 130Spark Plugs, 105
Specifications, 130 - 131
Speedometer, 26
Sports Switch, 77
Starting the Engine, 70
SteeringAnti-theft Column Lock, 69
Power Steering, 103
Tilt Steering, 34Stereo Sound System
Operation, 58
Storage Compartments, 13
Stuck Car, 129
SunroofIf the Sunroof Won't Close, 57
Maintenance, 57
Operation, 56Sunshade, 56
Supplemental Restraint System(SRS), 22 - 24, 31
Tachometer, 26
Tailgate, 3 - 7
Tape Operation, 61
Temperature GaugeCoolant, 27
Tilt Steering, 34
TireAir Pressure, 112, 114
Balancing, 115
Chains, 113
Changing a Flat Tire, 122
DOT TireQuality Grades, 133 - 134
Inflation Pressure, 112
Requirement, 133
Rotation, 115
Snow Tires, 113
Spare Tire, 114
Specifications, 130Tonneau Cover, 13
Tools, 122
Towing, 128
Towing a Trailer, 79 - 84
TransmissionCapacity, 130
Identification Number, 132
Oil/Fluid, 95
Shifting the Automatic, 75 - 78
Shifting the Manual, 73 - 74Tread Wear, 133
Trip Meter, 26
Turn Signals, 28, 38Vehicle Identification Number,
132
Ventilation, 48
Warranty Service, 138
WasherRear Window Washer, 35
Reservoir Capacity, 36
Windshield Washer, 35Washing, 118
Waxing, 119
Wheels, 119
WindowsAppearance Care, 118
Power Windows, 44Windshield Defogger, 36
Windshield Washer, 35
Windshield Wipers, 35
WipersBlades, 106
Rear Window Wiper, 35
Windshield Wipers, 35Authorized Manuals
A Factory-Authorized Manual is Available for Your Vehicle. The following publications covering the operation and servicing of your vehicle can be obtained from Helm Incorporated either by filling out the reverse side of this form or, for credit card holders, calling the toll free phone number on the form. For manuals prior to the year shown below, contact Helm Incorporated, P.O. Box 07280, Detroit, Michigan 48207, or call (313) 883-1430.
61SM403
61SM403-EL
N/A
31SM5600
HON-R
Service Manual This manual covers maintenance and recommended procedures for repair to engine and chassis components. It is written for the journey- man mechanic, but is simple enough for most mechanically-inclined owners to understand.
Electrical Troubleshooting Manual This manual complements the Service Manual by providing in-deph troubleshooting information for each electrical circuit in your car.
Body Repair Manual This manual describes the procedures involved in the replacement of damaged body parts.
By completing this form you can order the materials desired. You can pay by check or money order, or charge to your credit card. Mail to Helm, Incorporated at the address shown below.
P. O. BOX 072B0 DETROIT, MICHIGAN 48207 (313) 883-1430
Gas Station Information Gasoline: UNLEADED only
Pump octane of 86 or higher
Gas Tank-Capacity: 64.5
(14.2 Imp gal, 17.0 US gal)
Reserve Capacity: 10.0
(1.8 Imp gal, 2.6 US gal)
Tire Information: See label on driver's door jamb. Hood Release: Pull handle under left side of dash. Engine Oil: Use "Energy Conserving II" SG grade oil.
5W-30 preferred (see page 92 for viscosity recommendations). Capacity (Including filter): 3.8
(3.3 Imp qt, 4.0 US qt)
Manual Transmission Oil:
Automatic Transmission Fluid:
Use SF or SG grade oil. 10W-30 or 10W-40 preferred (see page 96 for complete viscosity recommendations). Capacity (Including differential): 1.9
(1.7 Imp qt, 2.0 US qt)
Use DEXRON® II type Automatic Transmission Fluid (ATF). Remove dipstick from right end of transmission, wipe off, reinsert, remove, and read fluid level - do not force the rubber plug in when reading fluid level or replacing dipstick. Capacity (Including differential): 2.4
(2.1 Imp qt, 2.5 US qt)
Power Steering Fluid:
Use only Honda power steering fluid: do not use ATF or any other brand of power steering fluid because it will damage the system.
AMERICAN HONDA MOTOR CO., INC. 1919 Torrance Blvd., Torrance, CA 90501-2746
1990 American Honda Motor Co., Inc. - All Rights Reserved.
31SM5603 00X31-SM5-6011
S 2000 9108
Printed in U.S.A.