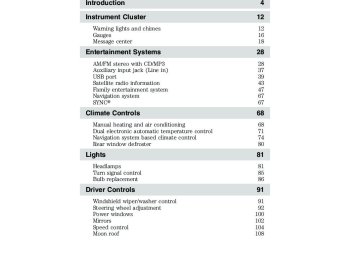
- 2015 Ford FLEX Owners Manuals
- Ford FLEX Owners Manuals
- 2014 Ford FLEX Owners Manuals
- Ford FLEX Owners Manuals
- 2013 Ford FLEX Owners Manuals
- Ford FLEX Owners Manuals
- 2010 Ford FLEX Owners Manuals
- Ford FLEX Owners Manuals
- 2009 Ford FLEX Owners Manuals
- Ford FLEX Owners Manuals
- 2011 Ford FLEX Owners Manuals
- Ford FLEX Owners Manuals
- 2012 Ford FLEX Owners Manuals
- Ford FLEX Owners Manuals
- Download PDF Manual
-
ranges. Allow a minimum of 10 seconds for each gear to engage. 4. Latch the gearshift lever in P (Park) and leave the engine running. 5. Remove the dipstick, wiping it clean with a clean, dry lint free rag. If necessary, refer to Identifying components in the engine compartment in this chapter for the location of the dipstick. (For vehicles with the EcoBoost™ engine, move the air filter assembly aside to access the transmission dipstick).
WARNING: Use gloves when moving the air filter assembly; components will be hot.
For vehicles equipped with the EcoBoost™ engine, do the following: A. Shut the engine off. B. Clean the area around the clamp that connects the air filter assembly to the rubber hose (1).
370
2011 Flex (471) Owners Guide, 2nd Printing USA (fus)
Maintenance and Specifications
C. Remove the bolt cover (if equipped).
D. Remove two bolts that attach the air filter assembly to the front of the vehicle (2). E. Loosen the clamp holding the air filter assembly to the rubber hose (1). F. Remove the harness retaining clip by pulling up (3). Do not disconnect the sensor (4). G. Without disconnecting the sensor (4), pull the air filter assembly up to disconnect the air filter assembly from the seated grommets located underneath the air filter assembly. H. Rotate the air filter assembly 90
degrees counterclockwise and reinstall into the rubber hose.I. Tighten the clamp (1). J. The transmission fluid level indicator can now be accessed.
371
2011 Flex (471) Owners Guide, 2nd Printing USA (fus)
Maintenance and Specifications
WARNING: Do not run engine with the air filter disconnected.
MIN
MAX
Start the engine and continue with Step 6. 6. Install the dipstick making sure it is fully seated in the filler tube by turning it to the locked position. 7. Remove the dipstick and inspect the fluid level. The fluid should be in the designated areas for normal operating temperature. Low fluid level If the fluid level is below the MIN range of the dipstick, add fluid to reach the hash mark level. Note: If the fluid level is below the MIN level, do not drive the vehicle. An underfill condition may cause shift and/or engagement concerns and/or possible damage. Correct fluid level The transmission fluid should be checked at normal operating temperature 180°F-200°F (82°C-93°C) on a level surface. The normal operating temperature can be reached after approximately 20 miles (30 km) of driving. The transmission fluid level should be targeted within the cross-hatch area if at normal operating temperature 180°F-200°F (82°C-93°C). High fluid level If the fluid level is above the MAX range of the dipstick, remove fluid to reach the hashmark level. Note: Fluid level above the MAX level may cause shift and/or engagement concerns and/or possible damage. High fluid levels can be caused by an overheating condition. If your vehicle has been operated for an extended period at high speeds, in city traffic during hot weather or pulling a trailer, the vehicle should be turned off until normal operating temperatures are reached. Depending on vehicle use, cooling times could take up to 30 minutes or longer. 372
MAX
MIN
2011 Flex (471) Owners Guide, 2nd Printing USA (fus)
Maintenance and Specifications
Adjusting automatic transmission fluid levels Before adding any fluid, make sure the correct type is used. The type of fluid used is normally indicated on the dipstick and also in the Maintenance product specifications and capacities section in this chapter. Use of a non-approved automatic transmission fluid may cause internal transmission component damage. If necessary, add fluid in 1/2 pint (250 ml) increments through the filler tube until the level is correct.
MIN
MAX
If an overfill occurs, excess fluid should be removed by an authorized dealer. An overfill condition of transmission fluid may cause shift and/or engagement concerns and/or possible damage. Do not use supplemental transmission fluid additives, treatments or cleaning agents. The use of these materials may affect transmission operation and result in damage to internal transmission components. For vehicles equipped with the EcoBoost engine, reinstall the air filter assembly. After the fluid level has been checked and adjusted as necessary, do the following: A. Shut the engine off. B. Loosen the clamp holding the air filter assembly to the rubber hose. C. Rotate the air filter assembly 90 degrees clockwise without disconnecting the sensor. D. Seat the air filter assembly back into the grommets by pushing down on the air filter assembly. E. Tighten the clamp. F. Install and tighten two bolts that attach air filter assembly to the front of the vehicle. G. Install the bolt cover (if equipped). H. Reinstall the harness retaining clip into the front of the air filter assembly.
373
2011 Flex (471) Owners Guide, 2nd Printing USA (fus)
Maintenance and Specifications
AIR FILTER Refer to scheduled maintenance information for the appropriate intervals for changing the air filter element. When changing the air filter element, use only the air filter element listed. Refer to Motorcraft威 part numbers in this chapter.
WARNING: To reduce the risk of vehicle damage and/or personal burn injuries do not start your engine with the air
cleaner removed and do not remove it while the engine is running.
For Ecoboost™ equipped vehicles, when servicing the air cleaner, it is important that no foreign material enter the air induction system. The engine and turbocharger are susceptible to damage from even small particles.
Changing the air filter element 3.5L V6 engine
3.5L V6 EcoBoost engine
1. Release the clamps that secure the air filter housing cover. 2. Carefully separate the two halves of the air filter housing. 3. Remove the air filter element from the air filter housing. 374
2011 Flex (471) Owners Guide, 2nd Printing USA (fus)
Maintenance and Specifications
4. Wipe the air filter housing and cover clean to remove any dirt or debris and to ensure good sealing. 5. Install a new air filter element. Be careful not to crimp the filter element edges between the air filter housing and cover. This could cause filter damage and allow unfiltered air to enter the engine if not properly seated. 6. Replace the air filter housing cover and secure the clamps. Be sure that the air cleaner cover tabs are engaged into the slots of the air cleaner housing.
Note: Failure to use the correct air filter element may result in severe engine damage. The customer warranty may be void for any damage to the engine if the correct air filter element is not used.
VEHICLE STORAGE If you plan on storing your vehicle for an extended period of time (30 days or more), refer to the following maintenance recommendations to ensure your vehicle stays in good operating condition. All motor vehicles and their components were engineered and tested for reliable, regular driving. Long term storage under various conditions may lead to component degradation or failure unless specific precautions are taken to preserve the components. General • Store all vehicles in a dry, ventilated place. • Protect from sunlight, if possible. • If vehicles are stored outside, they require regular maintenance to
protect against rust and damage.
Body • Wash vehicle thoroughly to remove dirt, grease, oil, tar or mud from exterior surfaces, rear-wheel housing and underside of front fenders. See the Cleaning chapter for more information.
• Periodically wash vehicles stored in exposed locations.
375
2011 Flex (471) Owners Guide, 2nd Printing USA (fus)
Maintenance and Specifications • Touch-up raw or primed metal to prevent rust. • Cover chrome and stainless steel parts with a thick coat of auto wax
to prevent discoloration. Re-wax as necessary when the vehicle is washed. See the Cleaning chapter for more information.
grade oil. See the Cleaning chapter for more information.
• Lubricate all hood, door and trunk lid hinges, and latches with a light • Cover interior trim to prevent fading. • Keep all rubber parts free from oil and solvents. Engine • The engine oil and filter should be changed prior to storage, as used • Start the engine every 15 days. Run at fast idle until it reaches normal • With your foot on the brake, shift through all the gears while the
engine oil contain contaminates that may cause engine damage.
operating temperature.
engine is running.
Fuel system • Fill the fuel tank with high-quality fuel until the first automatic shutoff
of the fuel pump nozzle.
Note: During extended periods of vehicle storage (30 days or more), fuel may deteriorate due to oxidation. Add Motorcraft威 Gas Stabilizer or equivalent meeting Ford material specification ESE-M99C112-A to the vehicle fuel system whenever actual or expected storage periods exceed 30 days. Follow the instructions on the additive label. The vehicle should then be operated at idle speed to circulate the additive throughout the fuel system. Cooling system • Protect against freezing temperatures. • When removing vehicle from storage, check coolant fluid level. Confirm there are no cooling system leaks, and fluid is at the recommended level.
Battery • Check and recharge as necessary. Keep connections clean. • If storing your vehicle for more than 30 days without recharging the battery, it may be advisable to disconnect the battery cables to ensure battery charge is maintained for quick starting.
Note: If battery cables are disconnected, it will be necessary to reset memory features. 376
2011 Flex (471) Owners Guide, 2nd Printing USA (fus)
Maintenance and Specifications
Brakes • Make sure brakes and parking brake are fully released. Tires • Maintain recommended air pressure. Miscellaneous • Make sure all linkages, cables, levers and pins under vehicle are • Move vehicles at least 25 feet (8 m) every 15 days to lubricate
covered with grease to prevent rust.
working parts and prevent corrosion.
window surfaces.
during storage (mice/squirrel nests).
Removing vehicle from storage When your vehicle is ready to come out of storage, do the following: • Wash your vehicle to remove any dirt or grease film build-up on • Check windshield wipers for any deterioration. • Check under the hood for any foreign material that may have collected • Check the exhaust for any foreign material that may have collected • Check tire pressures and set tire inflation per the Tire Label. • Check brake pedal operation. Drive the vehicle 15 ft (4.5 meters) back • Check fluid levels (including coolant, oil and gas) to make sure there • If the battery was removed, clean the battery cable ends and inspect. If you have any concerns or issues, contact your authorized dealer.
are no leaks, and fluids are at recommended levels.
and forth to remove rust build-up.
during storage.
377
2011 Flex (471) Owners Guide, 2nd Printing USA (fus)
Maintenance and Specifications
MOTORCRAFT PART NUMBERS Component
3.5L V6 Engine
3.5L V6 EcoBoost Engine FA-1884
FA-1884
BXT-65-650
FL-500-S SP-4111Engine air filter element Battery Oil filter Spark Plugs 1For spark plug replacement, see your authorized dealer. Refer to scheduled maintenance information for the appropriate intervals for changing the spark plugs. Replace the spark plugs with ones that meet Ford material and design specifications for your vehicle, such as Motorcraft威 or equivalent replacement parts. The customer warranty may be void for any damage to the engine if such spark plugs are not used.
BXT-65-750
FL-500-S SP-512-A1378
2011 Flex (471) Owners Guide, 2nd Printing USA (fus)
Maintenance and Specifications
威
威
威
威
—
—
威
威
威
379
2011 Flex (471) Owners Guide, 2nd Printing USA (fus)
Maintenance and Specifications
威 •
•
•
•
•
威 •
威 •
威 •
威 •
•
•
•
•
威 •
威 •
威 •
380
2011 Flex (471) Owners Guide, 2nd Printing USA (fus)
Maintenance and Specifications
•
•
•
•
威 •
威 •
威 •