- Download PDF Manual
-
transmissions do not have push-start capability. Attempting to push-start a vehicle with an automatic transmission may cause transmission damage. Note: Use only a 12-volt supply to start your vehicle. Note: Do not disconnect the battery of the disabled vehicle as this could damage the vehicle's electrical system.
Use your hazard warning flashers when your vehicle is creating a safety hazard for other motorists. • Press the flasher control and all front
and rear direction indicators flash.
• Press the flasher control again to turn
them off.
FUEL SHUTOFF
WARNING
Failure to inspect and, if necessary, repair fuel leaks after a collision may increase the risk of fire and serious injury. Ford Motor Company recommends that the fuel system be inspected by an authorized dealer after any collision.
205
Super Duty (TFA)
E142663E161463 Roadside Emergencies
Park the booster vehicle close to the hood of the disabled vehicle, making sure the two vehicles do not touch. Turn all accessories off. Connecting the Jumper Cables
WARNING
Do not attach the cables to fuel lines, engine rocker covers, the intake manifold or electrical components as grounding points. Stay clear of moving parts. To avoid reverse polarity connections, make sure that you correctly identify the positive (+) and negative (-) terminals on both the disabled and booster vehicles before connecting the cables.
Note: In the illustration, the bottom vehicle represents the booster vehicle.
1. Connect the positive (+) jumper cable
to the positive (+) terminal of the discharged battery.
2. Connect the other end of the positive (+) cable to the positive (+) terminal of the assisting battery.
3. Connect the negative (-) cable to the negative (-) terminal of the assisting battery.
4. Make the final connection of the
negative (-) cable to an exposed metal part of the stalled vehicle's engine, or connect the negative (-) cable to a ground connection point if available.
WARNING
Do not connect the end of the second cable to the negative (-) terminal of the battery to be jumped.
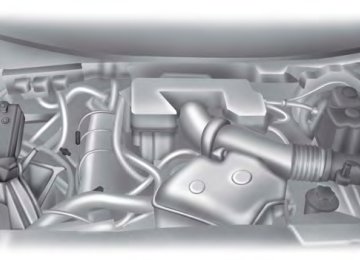
A spark may cause an explosion of the gases that surround the battery. Jump Starting 1. Start the engine of the booster vehicle and rev the engine moderately, or press the accelerator gently to keep your engine speed between 2000 and 3000
rpms, as shown in your tachometer.2. Start the engine of the disabled vehicle. 3. Once the disabled vehicle has been
started, run both vehicle engines for an additional three minutes before disconnecting the jumper cables. Removing the Jumper Cables Remove the jumper cables in the reverse order that they were connected.
206
Super Duty (TFA)
4213E142664 Roadside Emergencies
POST-CRASH ALERT SYSTEM The system flashes the turn signal lamps and sounds the horn (intermittently) in the event of a serious impact that deploys an airbag (front, side, side curtain or Safety Canopy) or the safety belt pretensioners. The horn and lamps will turn off when: • •
The hazard control button is pressed The panic button (if equipped) is pressed on the remote entry transmitter Your vehicle runs out of power
•
207
1. Remove the jumper cable from the ground metal surface or connecting point, if available.
2. Remove the jumper cable on the
negative (-) terminal of the booster vehicle's battery.
3. Remove the jumper cable from the positive (+) terminal of the booster vehicle's battery.
4. Remove the jumper cable from the positive (+) terminal of the disabled vehicle's battery.
After the disabled vehicle has been started and the jumper cables removed, allow it to idle for several minutes so the battery can recharge.
Super Duty (TFA)
4132E142665 Customer Assistance
These are some of the items that can be found online: • U.S. dealer locator by Dealer Name,
City/State, or Zip Code
Ford Extended Service Plans Ford Genuine Accessories Service specials and promotions.
• Owner Manuals • Maintenance Schedules • Recalls • • • In Canada: Mailing address Customer Relationship Centre Ford Motor Company of Canada, Limited P.O. Box 2000
Oakville, Ontario L6K 0C8
Telephone 1-800-565-3673 (FORD) Online www.ford.ca Additional Assistance If you have questions or concerns, or are unsatisfied with the service you are receiving, follow these steps: 1. Contact your Sales Representative or Service Advisor at your selling/servicing authorized dealer. If your inquiry or concern remains unresolved, contact the Sales Manager, Service Manager or Customer Relations Manager. If you require assistance or clarification on Ford Motor Company policies, please contact the Ford Customer Relationship Center.3.
2.
GETTING THE SERVICES YOU NEED Warranty repairs to your vehicle must be performed by an authorized dealer. While any authorized dealer handling your vehicle line will provide warranty service, we recommend you return to your selling authorized dealer who wants to ensure your continued satisfaction. Please note that certain warranty repairs require special training and equipment, so not all authorized dealers are authorized to perform all warranty repairs. This means that, depending on the warranty repair needed, you may have to take your vehicle to another authorized dealer. A reasonable time must be allowed to perform a repair after taking your vehicle to the authorized dealer. Repairs will be made using Ford or Motorcraft® parts, or remanufactured or other parts that are authorized by Ford. Away From Home If you are away from home when your vehicle needs service, contact the Ford Customer Relationship Center or use the online resources listed below to find the nearest authorized dealer. In the United States: Mailing address Ford Motor Company Customer Relationship Center P.O. Box 6248
Dearborn, MI 48121
Telephone 1-800-392-3673 (FORD) (TDD for the hearing impaired: 1-800-232-5952) Online Additional information and resources are available online at www.fordowner.com208
Super Duty (TFA)
Customer Assistance
California Civil Code Section 1793.22(b) presumes that the manufacturer has had a reasonable number of attempts to conform the vehicle to its applicable express warranties if, within the first 18
months of ownership of a new vehicle or the first 18000 miles (29 000 km), whichever occurs first: 1. Two or more repair attempts are made on the same non-conformity likely to cause death or serious bodily injury OR 2. Four or more repair attempts are made on the same nonconformity (a defect or condition that substantially impairs the use, value or safety of the vehicle) OR3. The vehicle is out of service for repair of nonconformities for a total of more than 30 calendar days (not necessarily all at one time).
In the case of 1 or 2 above, the consumer must also notify the manufacturer of the need for the repair of the nonconformity at the following address: Ford Motor Company 16800 Executive Plaza Drive Mail Drop 3NE-B Dearborn, MI 48126
You are required to submit your warranty dispute to BBB AUTO LINE before asserting in court any rights or remedies conferred by California Civil Code Section 1793.22(b). You are also required to use BBB AUTO LINE before exercising rights or seeking remedies created by the Federal Magnuson-Moss Warranty Act, 15 U.S.C. sec. 2301 et seq. If you choose to seek redress by pursuing rights and remedies not created by California Civil Code Section 1793.22(b) or the Magnuson-Moss Warranty Act, resort to BBB AUTO LINE is not required by those statutes.•
In order to help you serve you better, please have the following information available when contacting a Customer Relationship Center: • Vehicle Identification Number. •
Your telephone number (home and business). The name of the authorized dealer and city where located. The vehicle’s current odometer reading.
• In some states, you must directly notify Ford in writing before pursuing remedies under your state’s warranty laws. Ford is also allowed a final repair attempt in some states. In the United States, a warranty dispute must be submitted to the BBB AUTO LINE before taking action under the Magnuson-Moss Warranty Act, or to the extent allowed by state law, before pursuing replacement or repurchase remedies provided by certain state laws. This dispute handling procedure is not required prior to enforcing state created rights or other rights which are independent of the Magnuson-Moss Warranty Act or state replacement or repurchase laws. IN CALIFORNIA (U.S. ONLY) California Civil Code Section 1793.2(d) requires that, if a manufacturer or its representative is unable to repair a motor vehicle to conform to the vehicle’s applicable express warranty after a reasonable number of attempts, the manufacturer shall be required to either replace the vehicle with one substantially identical or repurchase the vehicle and reimburse the buyer in an amount equal to the actual price paid or payable by the consumer (less a reasonable allowance for consumer use). The consumer has the right to choose whether to receive a refund or replacement vehicle.
209
Super Duty (TFA)
Customer Assistance
THE BETTER BUSINESS BUREAU (BBB) AUTO LINE PROGRAM (U.S. ONLY) Your satisfaction is important to Ford Motor Company and to your dealer. If a warranty concern has not been resolved using the three-step procedure outlined earlier in this chapter in the Getting the Services you need section, you may be eligible to participate in the BBB AUTO LINE program. The BBB AUTO LINE program consists of two parts – mediation and arbitration. During mediation, a representative of the BBB will contact both you and Ford Motor Company to explore options for settlement of the claim. If an agreement is not reached during mediation or you do not want to participate in mediation, and if your claim is eligible, you may participate in the arbitration process. An arbitration hearing will be scheduled so that you can present your case in an informal setting before an impartial person. The arbitrator will consider the testimony provided and make a decision after the hearing. Disputes submitted to the BBB AUTO LINE program are usually decided within forty days after you file your claim with the BBB. You are not bound by the decision, and may reject the decision and proceed to court where all findings of the BBB Auto Line dispute, and decision, are admissible in the court action. Should you choose to accept the BBB AUTO LINE decision, Ford is then bound by the decision, and must comply with the decision within 30 days of receipt of your acceptance letter. BBB AUTO LINE Application: Using the information provided below, please call or write to request a program application. You will be asked for your name and address, general information about your new vehicle, information about your warranty concerns, and any steps you have
already taken to try to resolve them. A Customer Claim Form will be mailed that will need to be completed, signed and returned to the BBB along with proof of ownership. Upon receipt, the BBB will review the claim for eligibility under the Program Summary Guidelines. You can get more information by calling BBB AUTO LINE at 1-800-955-5100, or writing to: BBB AUTO LINE 4200 Wilson Boulevard, Suite 800
Arlington, Virginia 22203-1833
BBB AUTO LINE applications can also be requested by calling the Ford Motor Company Customer Relationship Center at 1-800-392-3673. Note: Ford Motor Company reserves the right to change eligibility limitations, modify procedures, or to discontinue this process at any time without notice and without obligation. UTILIZING THE MEDIATION/ARBITRATION PROGRAM (CANADA ONLY) For vehicles delivered to authorized Canadian dealers. In those cases where you continue to feel that the efforts by Ford of Canada and the authorized dealer to resolve a factory-related vehicle service concern have been unsatisfactory, Ford of Canada participates in an impartial third party mediation/arbitration program administered by the Canadian Motor Vehicle Arbitration Plan (CAMVAP). The CAMVAP program is a straight forward and relatively speedy alternative to resolve a disagreement when all other efforts to produce a settlement have failed. This procedure is without cost to you and is designed to eliminate the need for lengthy and expensive legal proceedings.210
Super Duty (TFA)
Customer Assistance
In the CAMVAP program, impartial third-party arbitrators conduct hearings at mutually convenient times and places in an informal environment. These impartial arbitrators review the positions of the parties, make decisions and, when appropriate, render awards to resolve disputes. CAMVAP decisions are fast, fair, and final as the arbitrator’s award is binding on both you and Ford of Canada. CAMVAP services are available in all Canadian territories and provinces. For more information, without charge or obligation, call your CAMVAP Provincial Administrator directly at 1-800-207-0685
or visit www.camvap.ca. GETTING ASSISTANCE OUTSIDE THE U.S. AND CANADA Before exporting your vehicle to a foreign country, contact the appropriate foreign embassy or consulate. These officials can inform you of local vehicle registration regulations and where to find unleaded fuel. If you cannot find unleaded fuel or can only get fuel with an anti-knock index lower than is recommended for your vehicle, contact our Customer Relationship Center. The use of leaded fuel in your vehicle without proper conversion may damage the effectiveness of your emission control system and may cause engine knocking or serious engine damage. Ford Motor Company or Ford of Canada is not responsible for any damage caused by use of improper fuel. Using leaded fuel may also result in difficulty importing your vehicle back into the United States.If your vehicle must be serviced while you are traveling or living in Asia-Pacific Region, Sub-Saharan Africa, U.S. Virgin Islands, Central America, the Caribbean, and Israel, contact the nearest authorized dealer. If the authorized dealer cannot help you, contact: FORD MOTOR COMPANY FORD EXPORT OPERATIONS & GLOBAL INITIATIVES Customer Relationship Center 1555 Fairlane Drive Fairlane Business Park #3
Allen Park, Michigan 48101
U.S.A. Telephone: (313) 594-4857
Fax: (313) 390-0804
Email: [email protected] For customers in Guam, the Commonwealth of the Northern Mariana Islands (CNMI), America Samoa, and the U.S. Virgin Islands, please feel free to call our Toll-Free Number: (800) 841-FORD (3673). If your vehicle must be serviced while you are traveling or living in Puerto Rico, contact the nearest authorized dealer. If the authorized dealer cannot help you, contact: FORD MOTOR COMPANY FORD EXPORT OPERATIONS & GLOBAL INITIATIVES Customer Relationship Center 1555 Fairlane Drive Fairlane Business Park #3
Allen Park, Michigan 48101
U.S.A. Telephone: (800) 841-FORD (3673) FAX: (313) 390-0804
Email: [email protected] www.ford.com.pr If your vehicle must be serviced while you are traveling or living in the Middle East, contact the nearest authorized dealer. If the authorized dealer cannot help you, contact:211
Super Duty (TFA)
Customer Assistance
Ford Middle East Customer Relationship Center P.O. Box 21470
Dubai, United Arab Emirates Telephone: +971 4 3326084
Toll-Free Number for the Kingdom of Saudi Arabia: 800 8971409
Local Telephone Number of Kuwait: 24810575
FAX: +971 4 3327299
Email: [email protected] www.me.ford.com If you buy your vehicle in North America and then relocate to any of the above locations, register your vehicle identification number (VIN) and new address with Ford Motor Company Export Operations & Global Growth Initiatives by emailing [email protected]. If you are in another foreign country, contact the nearest authorized dealer. In the event your inquiry is unresolved, communicate your concern with the dealership’s Sales Manager, Service Manager or Customer Relations Manager. If you require additional assistance or clarification, please contact the respective Customer Relationship Center as previously listed. Customers in the U.S. should call 1-800-392-3673. ORDERING ADDITIONAL OWNER'S LITERATURE To order the publications in this portfolio, contact Helm, Incorporated at: HELM, INCORPORATED 47911 Halyard Drive Plymouth, Michigan 48170
Attention: Customer Service Or to order a free publication catalog, call toll free: 1-800-782-4356
Monday-Friday 8:00 a.m. - 6:00 p.m. ESTHelm, Incorporated can also be reached by their website: www.helminc.com (Items in this catalog may be purchased by credit card, check or money order.) Obtaining a French Owner’s Manual French Owner’s Manual can be obtained from your authorized dealer or by contacting Helm, Incorporated using the contact information listed previously in this section. REPORTING SAFETY DEFECTS (U.S. ONLY)
If you believe that your vehicle has a defect which could cause a crash or could cause injury or death, you should immediately inform the National Highway Traffic Safety Administration (NHTSA) in addition to notifying Ford Motor Company. If NHTSA receives similar complaints, it may open an investigation, and if it finds that a safety defect exists in a group of vehicles, it may order a recall and remedy campaign. However, NHTSA cannot become involved in individual problems between you, your dealer, or Ford Motor Company.
212
Super Duty (TFA)
E142557 Customer Assistance
To contact NHTSA, you may call the Vehicle Safety Hotline toll-free at 1-888-327-4236 (TTY: 1-800-424-9153); go to http://www.safercar.gov; or write to: Administrator 1200 New Jersey Avenue, Southeast Washington, D.C. 20590
You can also obtain other information about motor vehicle safety from http://www.safercar.gov. REPORTING SAFETY DEFECTS (CANADA ONLY) If you believe that your vehicle has a defect which could cause a crash or could cause injury or death, you should immediately inform Transport Canada.
Transport Canada Contact Information
Website Phone
http://www.tc.gc.ca/eng/roadsafety/menu.htm 1–800–333–0510
213
Super Duty (TFA)
Fuses
CHANGING A FUSE Fuses
WARNING
Always replace a fuse with one that has the specified amperage rating. Using a fuse with a higher amperage rating can cause severe wire damage and could start a fire.
If electrical components in the vehicle are not working, a fuse may have blown. Blown fuses are identified by a broken wire within the fuse. Check the appropriate fuses before replacing any electrical components.
Standard Fuse Amperage Rating and Color
Color
Fuse rating
Mini fuses
2A 3A 4A 5A 7.5A 10A 15A 20A 25A 30A 40A 50A 60A 70A 80A
Grey Violet Pink Tan Brown Red Blue Yellow Natural Green
Standard
fuses Grey Violet Pink Tan Brown Red Blue Yellow Natural Green
Maxi fuses
Cartridge maxi fuses
Fuse link cartridge
Yellow
Green Orange
Red Blue Tan
Natural
Blue
Natural
Pink Green Red Yellow
Black
Blue
Natural
Pink Green Red Yellow Brown Black
214
Super Duty (TFA)
E142430 Fuses
FUSE SPECIFICATION CHART Power Distribution Box WARNINGS
Always disconnect the battery before servicing high current fuses. To reduce risk of electrical shock, always replace the cover to the power distribution box before
reconnecting the battery or refilling fluid reservoirs.
The power distribution box is located in the engine compartment. It has high-current fuses that protect your vehicle's main electrical systems from overloads. If you disconnect and reconnect the battery, you will need to reset some features. See Changing the 12V Battery (page 235).
Fuse or relay number
Fuse amp rating
Protected components
10
11Super Duty (TFA)
Relay
—
Relay
—
Relay
—
50A* 30A* 30A*
— —
Blower motor Not used Urea heaters (diesel engine) Not used Rear window defroster, Heated mirrors Not used Rear window defroster, Heated mirrors Passenger seat Driver seat Not used Not used
215
E163101 Fuses
Fuse or relay number
Fuse amp rating
Protected components
12
13
14
15
16
17
18
19
20
21
22
23
24
25
26
27
28
29
30
31
32
33
3435
3630A*
— —
Diode
—
15A**
— — — —
30A* 40A*
—
30A* 30A* 25A*
—
Relay Relay Relay
—
15A** 15A** 20A** 10A** 15A** 20A**
Driver smart window motor Not used Not used Fuel pump (diesel engine) Not used Heated mirror Not used Not used Not used Not used Trailer tow electric brake Blower motor Not used Wipers Trailer tow park lamps Urea heaters (diesel engine) Buss bar Trailer tow park lamps A/C clutch Wipers Not used Vehicle power 1
Vehicle power 2 (diesel engine) Vehicle power 2 (gas engine) Vehicle power 3
Vehicle power 4 (diesel engine) Vehicle power 4 (gas engine)216
Super Duty (TFA)
Fuses
Fuse or relay number
Fuse amp rating
37
3839
40
41
42
43
44
45
4647
48
49
50
51
5253
54
5556
57
58
5910A** Relay
10A** 15A**
—
20A**
— —
10A** 10A**
10A** Relay 10A** 10A**
—
10A**
10A** 10A** 10A**
20A**
Relay
— —
Protected components Vehicle power 5 (diesel engine) Powertrain control module (diesel engine), Electronic control module (gas engine) 4x4 hub lock 4x4 electronic lock Not used Rear heated seats Not used Not used Run/start relay coil Transmission control module keep-alive power (diesel engine) A/C clutch feed Run/start Rearview camera system Blower motor relay coil Not used Powertrain control module, Electronic control module, Transmission control module run/start 4x4 module Anti-lock brake system run/start Rear window defroster coil, Battery charge coil Passenger compartment fuse panel run/ start feed Fuel pump Not used Not used
217
Super Duty (TFA)
Fuses
Fuse or relay number
Fuse amp rating
Protected components
60
61
62
63
64
65
66
67
68
69
70
71
7273
74
75
76
77
78
79
80
81
82
83
84
85— — — — — —
20A**
—
10A**
—
10A** 10A** 10A**
—
Relay Relay Relay
— — — — —
20A* 20A* 30A* 30A*
Not used Not used Not used Not used Not used Not used Fuel pump Not used Fuel pump relay coil Not used Trailer tow backup lamp Canister vent (gas engine) Powertrain control module, Electronic control module relay coil feed keep-alive power Not used Trailer tow left-hand stop/turn Trailer tow right-hand stop/turn Trailer tow backup lamp Not used Not used Not used Not used Not used Auxiliary power point #2
Auxiliary power point #1
4x4 shift motor Heated/cooled seats218
Super Duty (TFA)
Fuses
Fuse or relay number
Fuse amp rating
86
87
88
89
90
91
92
93
94
95
96
97
98
99
100
101
102
103
104
105
106
10725A* 20A* 20A* 40A* 25A*
—
20A* 20A* 25A* 25A* 50A* 40A*
—
40A* 25A* Relay Relay
— — — — —
Protected components Anti-lock brake system coil feed Auxiliary power point #5
Auxiliary power point #6
Starter motor Trailer tow battery charge Not used Auxiliary power point #4
Auxiliary power point #3
Auxiliary switch #1
Auxiliary switch #2
Anti-lock brake system pump Inverter Not used Instrument panel power inverter Trailer tow turn signals Starter Trailer tow battery charge Not used Not used Not used Not used Not used*Cartridge fuses **Mini fuses
Super Duty (TFA)
219
Fuses
Passenger Compartment Fuse Panel The fuse panel is in the passenger footwell. Remove the panel cover to access the fuses.
Pull the fuse panel cover toward you to remove it. When the clips of the panel disengage, let the panel fall easily. Use the provided fuse puller tool to remove a fuse. It is on the fuse panel cover.
Fuse or relay number
Fuse amp rating
Protected components
Super Duty (TFA)
30A 15A 30A 10A 20A 5A 7.5A 10A
Not used (spare) Auxiliary switch relay #4
Passenger smart window motor Interior lights, Hood lamp Moonroof Driver seat module Driver seat switch, Driver lumbar motor Power mirror switch220
E163102 Fuses
Fuse or relay number
Fuse amp rating
Protected components
10
11
1213
14
15
16
17
1819
20
21
22
23
2425
26
27
28
2910A 10A
10A 15A
15A
15A
15A
10A 10A 10A
20A 20A 10A 20A 15A 15A
15A 5A 20A 15A 20A
Auxiliary switch relay #3
Run/accessory relay, Customer access feed Instrument cluster Interior lighting, Lighted running board lamps Right turn signals and brake lamps, Right trailer tow stop turn relay Left turn signals and brake lamps, Left trailer tow stop turn relay High-mounted stop lamps, Backup lamps, Trailer tow backup relay, Reverse signal interior mirror Right low beam headlamp Left low beam headlamp Keypad illumination, Passive anti-theft transceiver, Powertrain control module, Brake shift interlock Subwoofer, Amplifier Power door locks Brake on/off switch Horn Not used (spare) Steering wheel control module, Diagnostic connector, Power fold mirror relay, Remote keyless entry, Electronic finish panel Not used (spare) Steering wheel control module Not used (spare) Ignition switch SYNC, GPS module, Radio faceplate221
Super Duty (TFA)
Fuses
Fuse or relay number
Fuse amp rating
Protected components
30
31
32
33
3435
36
37
38
39
4041
42
43
44
45
46
47
4849
15A
5A
15A
10A 10A
5A
10A 10A 10A 15A 10A
7.5A 5A 10A 10A 5A 10A 15A
30A Circuit breaker
Relay
Parking lamp relay, Trailer tow parking lamp relay Trailer brake controller (brake signal), Customer access Moonroof motor, Telescoping mirror switch, Auto dimming mirrors, Power inverter, Driver and passenger door lock switch illumination, Rear heated seat switch illumination, Driver and passenger smart window motor, Passenger window switch Restraint control module Heated steering wheel module, Rear heated seats module Select shift switch, Reverse park aid module, Trailer brake control module Fuel tank select switch Positive temperature coefficient heater AM/FM radio faceplate High beam headlamps Parking lamps (in mirrors), Roof marker lamps Passenger airbag deactivation indicator Not used (spare) Wiper relay Auxiliary switches Not used (spare) Climate control Fog lamps, Fog lamp indicator (in switch) Power windows switch, Power rear sliding window switch, Moonroof switch Delayed accessory
222
Super Duty (TFA)
Maintenance
GENERAL INFORMATION Have your vehicle serviced regularly to help maintain its roadworthiness and resale value. There is a large network of Ford authorized dealers that are there to help you with their professional servicing expertise. We believe that their specially trained technicians are best qualified to service your vehicle properly and expertly. They are supported by a wide range of highly specialized tools developed specifically for servicing your vehicle. To help you service your vehicle, we provide scheduled maintenance information which makes tracking routine service easy. See Scheduled Maintenance (page 430). If your vehicle requires professional service, your authorized dealer can provide the necessary parts and service. Check your warranty information to find out which parts and services are covered. Use only recommended fuels, lubricants, fluids and service parts conforming to specifications. Motorcraft® parts are designed and built to provide the best performance in your vehicle. Precautions • Do not work on a hot engine. • Make sure that nothing gets caught in
moving parts.
• Do not work on a vehicle with the
engine running in an enclosed space, unless you are sure you have enough ventilation. Keep all open flames and other burning material (such as cigarettes) away from the battery and all fuel related parts.
•
Working with the Engine Off 1. Set the parking brake and shift to P
(Park).
2. Turn off the engine and remove the key
(if equipped).
3. Block the wheels. Working with the Engine On
WARNING
To reduce the risk of vehicle damage and/or personal burn injuries, do not start your engine with the air cleaner
removed and do not remove it while the engine is running.
1. Set the parking brake and shift to P
(Park).
2. Block the wheels OPENING AND CLOSING THE HOOD
1. To open the hood, go inside the vehicle
and pull the hood release handle located under the left hand side of the instrument panel.
223
Super Duty (TFA)
E142457 Maintenance
2. Go to the front of the vehicle and locate the secondary release lever, which is located under the front of the hood, to your right of the center of the vehicle (driver's side), toward the headlight.
3. Release the hood latch by pushing the
secondary release lever to your left, toward the center of the vehicle.
4. Raise the hood.
5. To close the hood, lower the hood and
allow it to drop the last 8 to 11 inches (20 to 30 centimeters).
Note: Make sure that the hood is closed properly. UNDER HOOD OVERVIEW - 6.2L Note: Refer to the diesel supplement for diesel engine component locations.
A. B. C. D. E. F.
Windshield washer fluid reservoir Engine oil dipstick Automatic transmission fluid dipstick Brake fluid reservoir Engine coolant reservoir Power distribution box
224
Super Duty (TFA)
E163634ADFEBCGHIJ Maintenance
G. H. I. J.
Air filter assembly Power steering fluid reservoir Engine oil filler cap Battery
UNDER HOOD OVERVIEW - 6.8L Note: Refer to the diesel supplement for diesel engine component locations.
A. B. C. D. E.
Windshield washer fluid reservoir Engine coolant reservoir Battery Automatic transmission fluid dipstick Engine oil filler cap Engine oil dipstick
225
Super Duty (TFA)
E163635ABCEHIJFDG Maintenance
6. Wipe the dipstick clean. Insert the dipstick fully, then remove it again. •
If the oil level is between the lower and upper holes, the oil level is acceptable. DO NOT ADD OIL. If the oil level is below the lower hole, add enough oil to raise the level within the lower and upper holes.
•
• Oil levels above the upper hole may
cause engine damage. Some oil must be removed from the engine by an authorized dealer.
7. Put the oil level dipstick back into the oil dipstick tube and ensure it is fully seated.
Adding Engine Oil Note: Do not remove the filler cap when the engine is running. Note: Do not remove the engine oil level dipstick when the engine is runnin Note: Do not add oil further than the MAX mark. Oil levels above the MAX mark may cause engine damage.
F. G. H. I. J.
Power steering fluid reservoir Brake fluid reservoir Engine coolant reservoir Air filter assembly Power distribution box
ENGINE OIL DIPSTICK
MIN MAX
ENGINE OIL CHECK Note: For diesel engine information, refer to the diesel supplement. 1. Make sure that your vehicle is on level
ground.
2. Turn the engine off and wait 15 minutes
for the oil to drain into the oil pan.
3. Set the parking brake and ensure the
gearshift is in P.
4. Open the hood. Protect yourself from
engine heat.
5. Locate and carefully remove the engine oil level dipstick. See the Under Hood Overview in this chapter for location of dipstick.
226
Super Duty (TFA)
E161560AB Maintenance
ENGINE COOLANT CHECK Checking the Engine Coolant Note: If your vehicle is equipped with a diesel engine, refer to the Diesel Supplement. When the engine is cold, check the concentration and level of the engine coolant at the intervals listed in the scheduled maintenance information. See Scheduled Maintenance (page 430). Note: Make sure that the level is between the MIN and MAX marks on the coolant reservoir. Note: Coolant expands when it is hot. The level may extend beyond the MAX mark Note: If the level is at the MIN mark, below the MIN mark, or empty, add coolant immediately. See Adding Engine Coolant in this chapter. The coolant concentration should be maintained within 48% to 50%, which equates to a freeze point between -29°F (-34°C) and -35°F (-37°C). Note: For best results, coolant concentration should be tested with a refractometer such as Rotunda tool 300-ROB75240 available from your authorized dealer. Ford does not recommend the use of hydrometers or coolant test strips for measuring coolant concentrations. Note: Automotive fluids are not interchangeable. Do not use engine coolant or antifreeze or windshield washer fluid outside of its specified function and vehicle location.
Only use oils certified for gasoline engines by the American Petroleum Institute (API). An oil with this trademark symbol conforms to the current engine and emission system protection standards and fuel economy requirements of the International Lubricants Specification Advisory Council (ILSAC), comprised of U.S. and Japanese automobile manufacturers. 1. Check the engine oil level. 2.
If the engine oil level is not within the normal range, add engine oil that meets Ford specifications. See Capacities and Specifications for more information.
3. Remove the engine oil filler cap and
use a funnel to pour the engine oil into the opening.
4. Recheck the engine oil level. Make sure
the oil level is not above the normal operating range on the engine oil level dipstick. Install the engine oil level dipstick and ensure it is fully seated.
5.
6. Fully install the engine oil filler cap by
turning the filler cap clockwise until three clicks are heard or until the cap is fully seated.
227
Super Duty (TFA)
E142732 Maintenance
Adding Engine Coolant WARNINGS
Do not add engine coolant when the engine is hot. Steam and scalding liquids released from a hot cooling system can burn you badly. Also, you can be burned if you spill coolant on hot engine parts.
Do not put engine coolant in the windshield washer fluid container. If sprayed on the windshield, engine
coolant could make it difficult to see through the windshield.
To reduce the risk of personal injury, make sure the engine is cool before unscrewing the coolant pressure relief cap. The cooling system is under pressure; steam and hot liquid can come out forcefully when the cap is loosened slightly.
Do not add coolant further than the MAX mark.
Note: Do not use stop leak pellets, cooling system sealants, or additives as they can cause damage to the engine cooling or heating systems. This damage would not be covered under your vehicle’s warranty. Note: During normal vehicle operation, the engine coolant may change color from orange to pink or light red. As long as the engine coolant is clear and uncontaminated, this color change does not indicate the engine coolant has degraded nor does it require the engine coolant to be drained, the system to be flushed, or the engine coolant to be replaced.
•
• Do not mix different colors or types of coolant in your vehicle. Make sure the correct coolant is used. Mixing of engine coolants may harm your engine’s cooling system. The use of an improper coolant may harm engine and cooling system components and may void the warranty. Use prediluted engine coolant meeting the Ford specification. See Capacities and Specifications (page 292). In case of emergency, a large amount of water without engine coolant may be added in order to reach a vehicle service location. In this instance, the cooling system must be drained, chemically cleaned with Motorcraft® Premium Cooling System Flush, and refilled with engine coolant as soon as possible. Water alone (without engine coolant) can cause engine damage from corrosion, overheating or freezing. • Do not use alcohol, methanol, brine or any engine coolants mixed with alcohol or methanol antifreeze (coolant). Alcohol and other liquids can cause engine damage from overheating or freezing.
• Do not add extra inhibitors or additives to the coolant. These can be harmful and compromise the corrosion protection of the engine coolant.
Unscrew the cap slowly. Any pressure will escape as you unscrew the cap. Add prediluted engine coolant meeting the Ford specification. See Capacities and Specifications (page 292). Whenever coolant has been added, the coolant level in the coolant reservoir should be checked the next few times you drive the vehicle. If necessary, add enough prediluted engine coolant to bring the coolant level to the proper level.
228
Super Duty (TFA)
Maintenance
Recycled Engine Coolant Ford Motor Company does not recommend the use of recycled engine coolant since a Ford-approved recycling process is not yet available. Used engine coolant should be disposed of in an appropriate manner. Follow your community’s regulations and standards for recycling and disposing of automotive fluids. Severe Climates If you drive in extremely cold climates: It may be necessary to have a Ford • authorized dealer increase the coolant concentration above 50%.
• A coolant concentration of 60% will
provide improved freeze point protection. Engine coolant concentrations above 60% will decrease the overheat protection characteristics of the engine coolant and may cause engine damage.
If you drive in extremely hot climates: It may be necessary to have a Ford • authorized dealer decrease the coolant concentration to 40%.
• A coolant concentration of 40% will
provide improved overheat protection. Engine coolant concentrations below 40% will decrease the corrosion/freeze protection characteristics of the engine coolant and may cause engine damage.
Vehicles driven year-round in non-extreme climates should use prediluted engine coolant for optimum cooling system and engine protection.
What You Should Know About Fail- Safe Cooling If the engine coolant supply is depleted, this feature allows the vehicle to be driven temporarily before incremental component damage is incurred. The “fail-safe” distance depends on ambient temperatures, vehicle load and terrain. How Fail-Safe Cooling Works If the engine begins to overheat, the engine coolant temperature gauge will move to the red (hot) area and:
The coolant temperature warning light will illuminate.
The service engine soon indicator will illuminate. If the engine reaches a preset over-temperature condition, the engine will automatically switch to alternating cylinder operation. Each disabled cylinder acts as an air pump and cools the engine. When this occurs the vehicle will still operate. However: • •
The engine power will be limited. The air conditioning system will be disabled.
Continued operation will increase the engine temperature and the engine will completely shut down, causing steering and braking effort to increase. Once the engine temperature cools, the engine can be re-started. Take your vehicle to an authorized dealer as soon as possible to minimize engine damage.
229
Super Duty (TFA)
Maintenance
Engine Fluid Temperature Management (If Equipped)
WARNING
To reduce the risk of collision and injury, be prepared that the vehicle speed may reduce and the vehicle may not be able to accelerate with full power until the fluid temperatures reduce.
Your vehicle has been designed to pull a trailer, but because of the added load, the vehicle’s engine may temporarily reach higher temperatures during severe operating conditions such as ascending a long or steep grade while pulling a trailer in hot ambient temperatures. At this time, you may notice your engine coolant temperature gauge needle move toward the H and the POWER REDUCED TO LOWER TEMP message may appear in the information display. You may notice a reduction in the vehicle’s speed caused by reduced engine power. Your vehicle has been designed to enter this mode if certain high temperature/high load conditions take place in order to manage the engine’s fluid temperatures. The amount of speed reduction will depend on the vehicle loading, towing, grade, ambient temperature, and other factors. If this occurs, there is no need to pull off the road. The vehicle can continue to be driven while this message is active The air conditioning may also cycle on and off during severe operating conditions to protect overheating of the engine. When the engine coolant temperature decreases to a more normal operating temperature, the air conditioning will turn on once again. If you notice any of the following:
When Fail-Safe Mode Is Activated
WARNINGS
Fail-safe mode is for use during emergencies only. Operate the vehicle in fail-safe mode only as long as necessary to bring the vehicle to rest in a safe location and seek immediate repairs. When in fail-safe mode, the vehicle will have limited power, will not be able to maintain high-speed operation, and may completely shut down without warning, potentially losing engine power, power steering assist, and power brake assist, which may increase the possibility of a crash resulting in serious injury.
Never remove the coolant reservoir cap while the engine is running or hot.
You have limited engine power when in the fail-safe mode, so drive the vehicle with caution. The vehicle will not be able to maintain high-speed operation and the engine will run rough. Remember that the engine is capable of completely shutting down automatically to prevent engine damage, therefore: 1. Pull off the road as soon as safely possible and turn off the engine.
2. Arrange for the vehicle to be taken to
3.
an authorized dealer. If this is not possible, wait a short period for the engine to cool.
4. Check the coolant level and replenish
if low.
5. Re-start the engine and take your
vehicle to an authorized dealer.
Note: Driving the vehicle without repairing the engine problem increases the chance of engine damage. Take your vehicle to an authorized dealer as soon as possible.
230
Super Duty (TFA)
Maintenance
•
•
•
the engine coolant temperature gauge moves fully into the red (hot) area the coolant temperature warning light illuminates the service engine soon indicator illuminates.
WARNING
Never remove the coolant reservoir cap while the engine is running or hot.
1. Pull off the road as soon as safely possible and place the vehicle in P (Park).
2. Leave the engine running until the coolant temperature gauge needle moves away from the H range. After several minutes, if this does not happen, follow the remaining steps. 3. Turn the engine off and wait for it to
cool before checking the coolant level. If the coolant level is normal, you may restart your engine and continue on. If the coolant is low, add coolant, restart the engine and take your vehicle to an authorized dealer. See Adding engine coolant in this chapter for more information. Refer to fail-safe cooling for additional information.
4.
5.
AUTOMATIC TRANSMISSION FLUID CHECK Have an authorized dealer check and change the transmission fluid and filter at the correct service interval. See Scheduled Maintenance (page 430). Do not use supplemental transmission fluid additives, treatments or cleaning agents. The use of these materials may affect transmission operation and result in damage to internal transmission components.
Super Duty (TFA)
Checking Automatic Transmission Fluid (If Equipped) For scheduled intervals of the fluid checks and changes, See Scheduled Maintenance (page 430). Your transmission does not consume fluid. However, the fluid level should be checked if the transmission is not working properly, i.e., if the transmission slips or shifts slowly or if you notice some sign of fluid leakage. Automatic transmission fluid expands when warmed. To obtain an accurate fluid check, drive the vehicle until it is at normal operating temperature (approximately 19 mi (30 km)). Verify that the transmission fluid temperature gauge, located on the instrument cluster, is within normal range. 1. Drive the vehicle 19 mi (30 km)until it reaches normal operating temperature. 2. Park the vehicle on a level surface and
engage the parking brake.
3. With the engine running, parking brake
engaged and your foot on the brake pedal, move the gearshift lever through all of the gear ranges. Allow sufficient time for each gear to engage.
4. Latch the gearshift lever in P and leave
the engine running.
5. Remove the dipstick, wiping it clean
with a clean, dry lint free rag. If necessary, refer to the Under Hood Overview in this chapter for the location of the dipstick. Install the dipstick making sure it is fully seated in the filler tube.
6.
7. Remove the dipstick and inspect the fluid level. The fluid should be in the designated area for normal operating temperature or ambient temperature.
Low Fluid Level Type A
231
Maintenance
For vehicles equipped with 5-speed transmissions, check the fluid at the normal operating temperature of 151°F (66°C) to 170°F (77°C) on a level surface. For vehicles equipped with 6-speed transmissions, check the fluid at the normal operating temperature of 196°F (91°C) to 215°F (102°C) on a level surface. The normal operating temperature can be reached after approximately 19 mi (30 km). High Fluid Level Type A
Type B
Do not drive the vehicle if there is no indication of fluid on the dipstick and the ambient temperature is above 50°F (10°C). Correct Fluid Level Type A
Type B
232
Type B
Super Duty (TFA)
E163739E163740E163741E163742E163743 Maintenance
Fluid levels above the safe range may result in transmission failure. An overfill condition of transmission fluid may cause shift and engagement concerns, and possible damage. High fluid levels can be caused by an overheating condition. Adjusting Automatic Transmission Fluid Levels Note: Use of a non-approved automatic transmission fluid may cause internal transmission component damage. Before adding any fluid, make sure the correct type is used. The type of fluid used is normally indicated on: the dipstick handle. • See Capacities and Specifications • (page 292).
If necessary, add fluid in 8 fl oz (250 ml) increments through the filler tube until the level is correct. Type A
Type B
If an overfill occurs, excess fluid should be removed by a qualified technician. Note: An overfill condition of transmission fluid may cause shift and engagement concerns, and possible damage. Do not use supplemental transmission fluid additives, treatments or cleaning agents. The use of these materials may affect transmission operation and result in damage to internal transmission components.
233
Super Duty (TFA)
E163744E163745E163746 Maintenance
BRAKE FLUID CHECK Fluid levels between the MIN and MAX lines are within the normal operating range; there is no need to add fluid. If the fluid levels are outside of the normal operating range, the performance of the system could be compromised; seek service from your authorized dealer immediately. POWER STEERING FLUID CHECK Check the power steering fluid. See Scheduled Maintenance (page 430). If adding fluid is necessary, use only MERCON LV ATF Note: This procedure is for vehicles with gasoline engines. Vehicles with diesel engines are similar. See Under Hood Overview in your diesel supplement. Check the fluid level when it is at ambient temperature. 1. Check the fluid level in the reservoir. It should be between the MIN and MAX range. Do not add fluid if the level is within this range. If the fluid level is low, add fluid to bring the fluid level up to between the MIN and MAX range.
2.
3. Switch the engine on. 4. While the engine idles, turn the steering
wheel left and right several times.
5. Switch the engine off.
TRANSFER CASE FLUID CHECK
1. Clean the filler plug. 2. Remove the filler plug and inspect the
fluid level.
3. Add only enough fluid through the filler opening so that the fluid level is at the bottom of the opening.
Use only fluid that meets Ford specifications. Refer to the See Capacities and Specifications (page 292). section.
234
Super Duty (TFA)
E164246 Maintenance
7.
6. Recheck the fluid level in the reservoir. Do not add fluid if the level is between the MIN and MAX range. If the fluid is low, add fluid in small amounts, continuously checking the level until it is between the MIN and MAX range. For proper fluid type, See Capacities and Specifications (page 292). Be sure to put the cap back on the reservoir.
WASHER FLUID CHECK
WARNING
If you operate your vehicle in temperatures below 40°F (5°C), use washer fluid with antifreeze
protection. Failure to use washer fluid with antifreeze protection in cold weather could result in impaired windshield vision and increase the risk of injury or accident.
Add fluid to fill the reservoir if the level is low. Only use a washer fluid that meets Ford specifications. See Capacities and Specifications (page 292). State or local regulations on volatile organic compounds may restrict the use of methanol, a common windshield washer antifreeze additive. Washer fluids containing non-methanol antifreeze agents should be used only if they provide cold weather protection without damaging the vehicle’s paint finish, wiper blades or washer system. FUEL FILTER Your vehicle is equipped with a lifetime fuel filter that is integrated with the fuel tank. Regular maintenance or replacement is not needed.
CHANGING THE 12V BATTERY
WARNINGS
This vehicle may be equipped with more than one battery, removal of cable from only one battery does not disconnect the vehicle electrical system. Be sure to disconnect cables from all batteries when disconnecting power. Failure to do so may cause serious personal injury or property damage.
Batteries normally produce explosive gases which can cause personal injury. Therefore, do not allow
flames, sparks or lighted substances to come near the battery. When working near the battery, always shield your face and protect your eyes. Always provide proper ventilation.
When lifting a plastic-cased battery, excessive pressure on the end walls