- Download PDF Manual
-
properly spaced. If the brakes get hot when driving or if they will not hold, chances are that they need adjustment.
• Anticipate the need to stop; allow much more distance and time to • Do not apply the trailer brakes for extended periods of time as they
stop than normal.
can overheat and lose effectiveness.
164
2006 F-250/350/450/550 (f23) Owners Guide (post-2002-fmt) USA (fus)
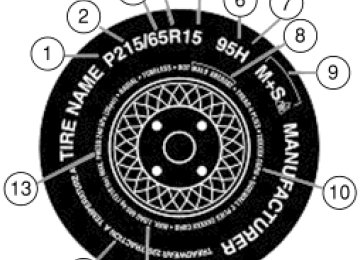
Tires, Wheels and Loading
Backing up • Practice backing up, particularly if you are a novice. Turn the steering • Sharp steering movements may cause the trailer to jackknife or go out
wheel to the right to move the trailer’s rear end to the right.
of control.
Tires• All trailer tires should be of the same size, and construction. • Select tires that meet the trailer loading requirements. • Always check tow vehicle and trailer tire pressure before towing. Launching or retrieving a boat When backing down a ramp during boat launching or retrieval, • Do not allow the static water level to rise above the bottom edge of • Do not allow waves to break higher than 6 inches (15 cm) above the • Disconnect the trailer tow electrical connector to prevent blown fuses
bottom edge of the rear bumper.
the rear bumper.
caused by water entering into your trailer’s electrical wiring. Exceeding these limits may allow water to enter critical vehicle components, adversely affecting driveability, emissions and reliability. Replace front and rear axle lubricants any time the axles have been submerged in water. Axle lubricant quantities are not to be checked unless a leak is suspected.
RECREATIONAL TOWING This applies to all 4x2 trucks with rear wheel drive capability. An example of recreational towing is towing your vehicle behind a motorhome. The following recreational towing guidelines are designed to ensure that your transmission is not damaged. • Place the transmission in N (Neutral). • Maximum speed is 35 mph (56 km/h). • Maximum distance is 50 miles (80 km). If a distance of 50 miles (80 km) or a speed of 35 mph (56 km/h) must be exceeded, you must disconnect the driveshaft. Ford recommends the driveshaft be removed/installed only by a qualified technician. See your local authorized dealer for driveshaft removal/installation.
165
2006 F-250/350/450/550 (f23) Owners Guide (post-2002-fmt) USA (fus)
Tires, Wheels and Loading
Improper removal/installation of the driveshaft can cause transmission fluid loss, damage to the driveshaft and internal transmission components. 4x4 with manual shift transfer case: • Place the transfer case in N (Neutral). • Front hub locks are in the FREE position. 4x4 electronic shift transfer case vehicles with automatic transmissions: Regarding recreational towing or having your vehicle towed, 4x4 vehicles with electronic shift on the fly cannot be towed with any wheels on the ground unless the rear driveshaft is removed and the front hub locks are in free mode (with the exception of moving it as a disabled vehicle off the road out of traffic). The hub locks can be set to free mode at any time by turning them from AUTO to LOCK and back to AUTO at least two times. Always make sure that both hub locks are set to the same position.
166
2006 F-250/350/450/550 (f23) Owners Guide (post-2002-fmt) USA (fus)
STARTING
Driving
Positions of the ignition 1. ACCESSORY, allows the electrical accessories such as the radio to operate while the engine is not running. 2. LOCK, locks the steering wheel, automatic transmission gearshift lever and allows key removal. For vehicles equipped with a manual transmission, you must depress the ignition release lever to release the key. 3. OFF, shuts off the engine and all accessories without locking the steering wheel. This position also allows the automatic transmission shift lever to be moved from the P (Park) position without the brake pedal being depressed.
When the key is in the ignition and in the OFF position, the automatic transmission shift lever can be moved from the P
(Park) position without the brake pedal depressed. To avoid unwanted vehicle movement, always set the parking brake.
4. ON, all electrical circuits operational. Warning lights illuminated. Key position when driving. 5. START, cranks the engine. Release the key as soon as the engine starts.
Preparing to start your vehicle Engine starting is controlled by the powertrain control system. This system meets all Canadian Interference-Causing Equipment standard requirements regulating the impulse electrical field strength of radio noise. When starting a fuel-injected engine, don’t press the accelerator before or during starting. Only use the accelerator when you have difficulty starting the engine. For more information on starting the vehicle, refer to Starting the engine in this chapter.
167
2006 F-250/350/450/550 (f23) Owners Guide (post-2002-fmt) USA (fus)
Driving
Extended idling at high engine speeds can produce very high temperatures in the engine and exhaust system, creating the risk
of fire or other damage.
Do not park, idle, or drive your vehicle in dry grass or other dry ground cover. The emission system heats up the engine
compartment and exhaust system, which can start a fire.
Do not start your vehicle in a closed garage or in other enclosed areas. Exhaust fumes can be toxic. Always open the garage door before you start the engine. See Guarding against exhaust fumes in this chapter for more instructions.
If you smell exhaust fumes inside your vehicle, have your dealer inspect your vehicle immediately. Do not drive if you smell
exhaust fumes.
Important safety precautions When the engine starts, the idle RPM runs faster to warm the engine. If the engine idle speed does not slow down automatically, have the vehicle checked. If your vehicle is operated in a heavy snow storm or blowing snow conditions, the engine air induction may become partially clogged with snow and/or ice. If this occurs, the engine may experience a significant reduction in power output. At the earliest opportunity, clear all the snow and/or ice away from the air induction inlet. The following starting instructions are for vehicles equipped with a gasoline engine; if your vehicle is equipped with a Diesel engine, refer to Starting the engine in your 6.0 Liter Power Stroke Direct Injection Turbo Diesel Owner’s Guide Supplement. Before starting the vehicle: 1. Make sure all occupants buckle their safety belts. For more information on safety belts and their proper usage, refer to the Seating and Safety Restraints chapter. 2. Make sure the headlamps and electrical accessories are off.
168
2006 F-250/350/450/550 (f23) Owners Guide (post-2002-fmt) USA (fus)
If starting a vehicle with an automatic transmission: 1. Make sure the parking brake is set.
Driving
2. Make sure the gearshift is in P (Park).
If starting a vehicle with a manual transmission: 1. Make sure the parking brake is set. 2. Push the clutch pedal to the floor.
• Turn the key to 4 (ON) without turning the key to 5 (START).
2006 F-250/350/450/550 (f23) Owners Guide (post-2002-fmt) USA (fus)
169
Driving
Make sure the corresponding lights illuminate or illuminate briefly. If a light fails to illuminate, have the vehicle serviced. • If the driver’s safety belt is fastened, the
light may not illuminate.
170
2006 F-250/350/450/550 (f23) Owners Guide (post-2002-fmt) USA (fus)
Starting the engine 1. Turn the key to 4 (ON) without turning the key to 5 (START). 2. Turn the key to 5 (START), then release the key as soon as the engine starts. Excessive cranking could damage the starter.
Driving
Note: If the engine does not start within five seconds on the first try, turn the key to 3 (OFF), wait 10 seconds and try again. If the engine still fails to start, press the accelerator to the floor and try again; this will allow the engine to crank with the fuel shut off in case the engine is flooded with fuel.
Guarding against exhaust fumes Carbon monoxide is present in exhaust fumes. Take precautions to avoid its dangerous effects.
If you smell exhaust fumes inside your vehicle, have your dealer inspect your vehicle immediately. Do not drive if you smell
exhaust fumes.
Important ventilating information If the engine is idling while the vehicle is stopped for a long period of time, open the windows at least one inch (2.5 cm) or adjust the heating or air conditioning to bring in fresh air.
171
2006 F-250/350/450/550 (f23) Owners Guide (post-2002-fmt) USA (fus)
Driving
USING THE ENGINE BLOCK HEATER (IF EQUIPPED) Use of an engine block heater is strongly recommended if you live in a region where temperatures reach -10°F (-23°C) or below. For best results, plug the heater in at least three hours before starting the vehicle. The heater can be plugged in the night before starting the vehicle. The plug for the block heater is exposed in the front of the vehicle, beneath the grille. Vehicles equipped with a gasoline engine have the plug exposed on the driver side of the vehicle; vehicles equipped with a Diesel engine have the plug exposed on the passenger side of the vehicle.
To reduce the risk of electrical shock, do not use your heater with ungrounded electrical systems or two-pronged (cheater)
adapters.
BRAKES Occasional brake noise is normal. If a metal-to-metal, continuous grinding or continuous squeal sound is present, the brake linings may be worn-out and should be inspected by your authorized dealer. If the vehicle has continuous vibration or shudder in the steering wheel while braking, the vehicle should be inspected by your authorized dealer. Refer to Brake system warning light in the Instrument Cluster chapter for information on the brake system warning light.
BRAKE
Four-wheel anti-lock brake system (ABS) Your vehicle is equipped with an Anti-lock Braking System (ABS). This system helps you maintain steering control during emergency stops by keeping the brakes from locking. Noise from the ABS pump motor and brake pedal pulsation may be observed during ABS braking and the brake pedal may suddenly travel a little farther as soon as ABS braking is done and normal brake operation resumes. These are normal characteristics of the ABS and should be no reason for concern.
172
2006 F-250/350/450/550 (f23) Owners Guide (post-2002-fmt) USA (fus)
Driving
ABS
ABS warning lamp The ABS lamp in the instrument cluster momentarily illuminates when the ignition is turned on. If the light does not illuminate during start up, remains on or flashes, the ABS may be disabled and may need to be serviced. Even when the ABS is disabled, normal braking is still effective. (If your BRAKE warning lamp illuminates with the parking brake released, have your brake system serviced immediately.) Using ABS When hard braking is required, apply continuous force on the brake pedal; do not pump the brake pedal since this will reduce the effectiveness of the ABS and will increase your vehicle’s stopping distance. The ABS will be activated immediately, allowing you to retain full steering control during hard braking and on slippery surfaces. However, the ABS does not decrease stopping distance.
BRAKE
Parking brake To set the parking brake, press the parking brake pedal down until the pedal stops.
173
2006 F-250/350/450/550 (f23) Owners Guide (post-2002-fmt) USA (fus)
!
BRAKE
Driving
The BRAKE warning lamp in the instrument cluster illuminates and remains illuminated until the parking brake is released.
Pull the right side of the release lever to release the parking brake; the release lever pulls at an angle toward the driver’s door. To prevent the pedal from releasing too quickly, place your left foot on the parking brake pedal, then pull the release lever, making sure the pedal fully releases. You may want to pull the release lever again to make sure the parking brake is full released.
Always set the parking brake fully and make sure that the gearshift is securely latched in P (Park) (automatic
transmission) or in 1 (First) (manual transmission).
Note: If your vehicle is equipped with a manual transmission, the engine may be required to run while power accessories operate and the parking brake is set. It is recommended that wheel chocks be used during this operation. If you’re parking your vehicle on a grade or with a trailer, press and hold the brake pedal down, then set the parking brake. There may be a little vehicle movement as the parking brake sets to hold the vehicle’s weight. This is normal and should be no reason for concern. If needed, press and hold the service brake pedal down, then try reapplying the parking brake. Chock the wheels if required. If the parking brake cannot hold the weight of the vehicle, the parking brake may need to be serviced or the vehicle may be overloaded.
STEERING To prevent damage to the power steering system: • Never hold the steering wheel at its furthest turning points (until it
stops) for more than a few seconds when the engine is running.
174
2006 F-250/350/450/550 (f23) Owners Guide (post-2002-fmt) USA (fus)
Driving • Do not operate the vehicle with a low power steering pump fluid level
(below the FULL COLD mark on the dipstick).
If the power steering system breaks down (or if the engine is turned off), you can steer the vehicle manually, but it takes more effort. If the steering wanders or pulls, check for: • an improperly inflated tire • uneven tire wear • loose or worn suspension components • loose or worn steering components • improper steering alignment If any steering components are serviced or replaced, install new fasteners (many are coated with thread adhesive or have prevailing torque features which may not be re-used). Never re-use a bolt or nut. Torque fasteners to specifications in Workshop Manual. A high crown in the road or high crosswinds may also make the steering seem to wander/pull.
TRACTION-LOK AXLE (IF EQUIPPED) This axle provides added traction on slippery surfaces, particularly when one wheel is on a poor traction surface. Under normal conditions, the Traction-Lok axle functions like a standard rear axle. The axle may exhibit a slight noise or vibration in tight turns with low vehicle speed. This is normal behavior and indicates the axle is working.
PREPARING TO DRIVE YOUR VEHICLE
Utility vehicles have a significantly higher rollover rate than other types of vehicles.
In a rollover crash, an unbelted person is significantly more likely to die than a person wearing a safety belt.
Your vehicle has larger tires and increased ground clearance, giving the vehicle a higher center of gravity than a passenger car.
175
2006 F-250/350/450/550 (f23) Owners Guide (post-2002-fmt) USA (fus)
Driving
Vehicles with a higher center of gravity such as utility and four-wheel drive vehicles handle differently than vehicles with a
lower center of gravity. Utility and four-wheel drive vehicles are not designed for cornering at speeds as high as passenger cars any more than low-slung sports cars are designed to perform satisfactorily under off-road conditions. Avoid sharp turns, excessive speed and abrupt maneuvers in these vehicles. Failure to drive cautiously could result in an increased risk of loss of vehicle control, vehicle rollover, personal injury and death.
Loaded vehicles, with a higher center of gravity, may handle differently than unloaded vehicles. Extra precautions such as
slower speeds and increased stopping distance should be taken when driving a heavily loaded vehicle.
AUTOMATIC TRANSMISSION OPERATION (IF EQUIPPED)
Brake-shift interlock This vehicle is equipped with a brake-shift interlock feature that prevents the gearshift lever from being moved from P (Park) when the ignition is in the 4 (ON) position unless brake pedal is depressed. If you cannot move the gearshift lever out of P (Park) with ignition in the 4 (ON) position and the brake pedal depressed: 1. Apply the parking brake, turn ignition key to 2 (LOCK), then remove the key. 2. Insert the key and turn it to 3 (OFF). Apply the brake pedal and shift to N (Neutral).
When the key is in the ignition and in the OFF position, the automatic transmission shift lever can be moved from the P
(Park) position without the brake pedal depressed. To avoid unwanted vehicle movement, always set the parking brake.
3. Start the vehicle. If it is necessary to use the above procedure to move the gearshift lever, it is possible that a fuse has blown or the vehicle’s brakelamps are not operating properly. Refer to Fuses and relays in the Roadside Emergencies chapter.
176
2006 F-250/350/450/550 (f23) Owners Guide (post-2002-fmt) USA (fus)
Driving
Do not drive your vehicle until you verify that the brakelamps are working.
Always set the parking brake fully and make sure the gearshift is latched in P (Park). Turn the ignition to the LOCK position and
remove the key whenever you leave your vehicle.
If the parking brake is fully released, but the brake warning lamp remains illuminated, the brakes may not be working properly.
See your authorized dealer as soon as possible.
Understanding the shift positions of the 5–speed automatic transmission
This vehicle is equipped with an adaptive Transmission Shift Strategy. Adaptive Shift Strategy offers the optimal transmission operation and shift quality. When the vehicle’s battery has been disconnected for any type of service or repair, the transmission will need to relearn the normal shift strategy parameters, much like having to reset your radio stations when your vehicle battery has been disconnected. The Adaptive Transmission Strategy allows the transmission to relearn these operating parameters. This learning process could take several transmission upshifts and downshifts; during this learning process, slightly firmer shifts may occur. After this learning process, normal shift feel and shift scheduling will resume. P (Park) This position locks the transmission and prevents the rear wheels from turning. To put your vehicle in gear: • Start the engine • Depress the brake pedal • Move the gearshift lever into the desired gear
177
2006 F-250/350/450/550 (f23) Owners Guide (post-2002-fmt) USA (fus)
Driving
To put your vehicle in P (Park): • Come to a complete stop • Move the gearshift lever and securely latch it in P (Park)
Always set the parking brake fully and make sure the gearshift is latched in P (Park). Turn the ignition to the LOCK position and
remove the key whenever you leave your vehicle.
R (Reverse) With the gearshift lever in R (Reverse), the vehicle will move backward. Always come to a complete stop before shifting into and out of R (Reverse). N (Neutral) With the gearshift lever in N (Neutral), the vehicle can be started and is free to roll. Hold the brake pedal down while in this position. D (Overdrive) with Tow/Haul OFF D (Overdrive) with Tow/Haul OFF is the normal driving position for the best fuel economy. The overdrive function allows automatic upshifts and downshifts through gears one through five. D (Overdrive) with Tow/Haul ON The Tow/Haul feature improves transmission operation when towing a trailer or a heavy load. All transmission gear ranges are available when using Tow/Haul. To activate Tow/Haul, press the button on the end of the gearshift lever.
The TOW HAUL indicator light will illuminate in the instrument cluster.
Tow/Haul delays upshifts to reduce frequency of transmission shifting. Tow/Haul also provides engine braking in all forward gears when the transmission is in the D (Overdrive) position; this engine braking will slow the vehicle and assist the driver in controlling the vehicle when descending a grade. Depending on driving conditions and load conditions, the transmission may downshift, slow the vehicle and control the vehicle speed when descending a hill, without the accelerator pedal being pressed. The amount of downshift braking provided will vary based upon the amount the brake pedal is depressed.
178
2006 F-250/350/450/550 (f23) Owners Guide (post-2002-fmt) USA (fus)
Driving
To deactivate the Tow/Haul feature and return to normal driving mode, press the button on the end of the gearshift lever. The TOW HAUL light will no longer be illuminated. When you shut-off and restart the engine, the transmission will automatically return to normal D (Overdrive) mode (Tow/Haul OFF).
Do not use the Tow/Haul feature when driving in icy or slippery conditions as the increased engine braking can cause the rear
wheels to slide and the vehicle to swing around with the possible loss of vehicle control.
3 (Third) Transmission starts and operates in third gear only. Used for improved traction on slippery roads. Selecting 3 (Third) provides engine braking. 2 (Second) Use 2 (Second) to start-up on slippery roads or to provide additional engine braking on downgrades. 1 (First) • Provides maximum engine braking. • Allows upshifts by moving gearshift lever. • The transmission will not downshift into 1 (First) at high speeds; it will downshift to a lower gear and then shift into 1 (First) when the vehicle reaches slower speeds.
Forced downshifts • Allowed in (Overdrive) or Drive. • Depress the accelerator to the floor. • Allows transmission to select an appropriate gear. If your vehicle gets stuck in mud or snow If your vehicle gets stuck in mud or snow, it may be rocked out by shifting between forward and reverse gears, stopping between shifts in a steady pattern. Press lightly on the accelerator in each gear. Do not rock the vehicle if the engine is not at normal operating temperature or damage to the transmission may occur. Do not rock the vehicle for more than a minute or damage to the transmission and tires may occur, or the engine may overheat.
179
2006 F-250/350/450/550 (f23) Owners Guide (post-2002-fmt) USA (fus)
Driving
MANUAL TRANSMISSION OPERATION (IF EQUIPPED)
3 D
2 4
Using the clutch The manual transmission has a starter interlock that prevents cranking the engine unless the clutch pedal is fully depressed. To start the vehicle: 1. Make sure the parking brake is fully set. 2. Press the clutch pedal to the floor, then put the gearshift lever in the neutral position. 3. Start the engine, then press the brake pedal and release the parking brake. 4. Move the gearshift lever to 1 (First) gear, then slowly release the clutch pedal while slowly pressing on the accelerator. During each shift, the clutch pedal must be fully depressed to the floor. Failure to fully depress the clutch pedal to the floor may cause increased shift efforts, prematurely wear transmission components or damage the transmission. Make sure the floor mat is properly positioned so it doesn’t interfere with the full extension of the clutch pedal. Do not drive with your foot resting on the clutch pedal or use the clutch pedal to hold your vehicle at a standstill while waiting on a hill. These actions will reduce the life of the clutch.
Recommended shift speeds Do not overspeed the engine when going downhill or steep grades. If equipped, use the tachometer and do not allow engine speed to exceed the redline area. Operating the engine beyond the recommended speeds can cause severe engine damage.
180
2006 F-250/350/450/550 (f23) Owners Guide (post-2002-fmt) USA (fus)
Driving
Shift according to the following shift speed charts:
Upshifts when accelerating (recommended for best fuel economy)
Shift from:
Transfer case position1 (if equipped)
6-speed transmission
LO-1
1-2
2-3
3-4- D (Overdrive)
2H or 4H
5 mph (8 km/h) 15 mph (24 km/h) 22 mph (35 km/h) 30 mph (48 km/h) 40 mph (64 km/h)
4L
2 mph (3 km/h) 6 mph (10 km/h) 9 mph (14 km/h) 12 mph (19 km/h) 15 mph (24 km/h)
Maximum downshift speeds1
6-speed transmission
Shift from:
Transfer case position (if equipped)2
2H or 4H
4L
D (Overdrive) -
45 mph (72 km/h)
16 mph (26 km/h)
4-3
3-2
2-1
1-LO35 mph (56 km/h) 20 mph (32 km/h) 5 mph (8 km/h)
12 mph (19 km/h) 8 mph (13 km/h) 2 mph (3 km/h)
Only shift to LO when at a stop.
1 Use 2H or 4H for 4WD equipped vehicles. 2 Downshift at lower speeds when driving on slippery surfaces.
Reverse 1. Make sure that your vehicle is at a complete stop before you shift into R (Reverse). Failure to do so may damage the transmission. 2. Move the gearshift lever into the neutral position and wait at least three seconds before shifting into R (Reverse). • The gearshift lever can only be moved into R (Reverse) by moving it from left of 3 (Third) and 4 (Fourth) before shifting into R (Reverse). This is a lockout feature that protects the transmission from accidentally being shifted into R (Reverse) from
(Overdrive).
181
2006 F-250/350/450/550 (f23) Owners Guide (post-2002-fmt) USA (fus)
Driving
Parking your vehicle 1. Apply the brake and shift into the neutral position. 2. Fully apply the parking brake, then shift into 1 (First). 3. Turn the ignition off.
Do not park your vehicle in Neutral, it may move unexpectedly and injure someone. Use 1 (First) gear and set the parking brake
fully.
Removing the key Turn the ignition off, push the release lever (located above the ignition), then turn the key toward you and remove the key.
P U S H
REVERSE SENSING SYSTEM (IF EQUIPPED) The Reverse Sensing System (RSS) sounds a tone to warn the driver of obstacles near the rear bumper when the R (Reverse) is selected and the vehicle is moving at speeds less than 3 mph (5 km/h). The system is not effective at speeds above 3 mph (5 km/h) and may not detect certain angular or moving objects.
To help avoid personal injury, please read and understand the limitations of the reverse sensing system as contained in this
section. Reverse sensing is only an aid for some (generally large and fixed) objects when moving in reverse on a flat surface at “parking speeds”. Inclement weather may also affect the function of the RSS; this may include reduced performance or a false activation.
To help avoid personal injury, always use caution when in reverse and when using the RSS.
182
2006 F-250/350/450/550 (f23) Owners Guide (post-2002-fmt) USA (fus)
Driving
This system is not designed to prevent contact with small or moving objects. The system is designed to provide a warning to
assist the driver in detecting large stationary objects to avoid damaging the vehicle. The system may not detect smaller objects, particularly those close to the ground.
Certain add-on devices such as large trailer hitches, bike or surfboard racks and any device that may block the normal
detection zone of the RSS system may create false beeps.
The RSS detects obstacles up to 6
feet (2 meters) from the rear bumper with a decreased coverage area at the outer corners of the bumper, (refer to the figures for approximate zone coverage areas). As you move closer to the obstacle, the rate of the tone increases. When the obstacle is less than 10 inches (25.0 cm) away, the tone will sound continuously. If the RSS detects a stationary or receding object further than 10 inches (25.0 cm) from the side of the vehicle, the tone will sound for only three seconds. Once the system detects an object approaching, the tone will sound again. The RSS may have reduced performance or an increased chance of false detection if the tailgate is not locked and in the upright position. If the tailgate is down, the RSS tone may be heard intermittently or continuously. The tone may also be heard if items in the truck bed protrude rearward outside the bed.183
2006 F-250/350/450/550 (f23) Owners Guide (post-2002-fmt) USA (fus)
Driving
The RSS automatically turns on when the gearshift lever is placed in R (Reverse) and the ignition is on. An RSS control allows the driver to turn the RSS on and off. To turn the RSS off, the ignition must be on, and the gear selector in R (Reverse). An indicator light on the control will illuminate when the system is turned off. If the indicator light illuminates when the RSS is not turned off, it may indicate a failure in the RSS. The RSS will remain off until either the RSS control is pushed again or the ignition switch is recycled. Keep the RSS sensors (located on the rear bumper/fascia) free from snow, ice and large accumulations of dirt (do not clean the sensors with sharp objects). If the sensors are covered, it will affect the accuracy of the RSS. If your vehicle sustains damage to the rear bumper/fascia, leaving it misaligned or bent, the sensing zone may be altered causing inaccurate measurement of obstacles or false alarms.
FOUR-WHEEL DRIVE (4WD) OPERATION (IF EQUIPPED)
For important information regarding safe operation of this type of vehicle, see Preparing to drive your vehicle in this chapter.
When four–wheel drive (4WD) is engaged, power is supplied to all four wheels through a transfer case. 4WD can be selected when additional driving power is desired. 4WD operation is not recommended on dry pavement. Doing so could result in difficult disengagement of the transfer case, increased tire wear and decreased fuel economy.
184
2006 F-250/350/450/550 (f23) Owners Guide (post-2002-fmt) USA (fus)
Driving
Manual Shift On Stop (MSOS) 4x4 system (if equipped) The 4WD system is engaged or disengaged by rotating the control for both front wheel hub locks from the FREE or LOCK position, then manually engaging or disengaging the transfer case with the floor-mounted shifter. For increased fuel economy in 2WD, rotate both hub locks to the FREE position. • For proper operation, make sure that each hub is fully engaged and that both hub locks are set to the same position (both set to LOCK or both set to FREE). To engage LOCK, turn the hub locks completely clockwise; to disengage the hubs (FREE), turn the hub locks completely counterclockwise. • Some vehicles may be equipped with wheel ornaments that cover the
4x4 manual hub lock. These ornaments must be removed to access the manual hub locks.
Electronic Shift On the Fly (ESOF) 4x4 system (if equipped) If equipped with the electronic shift 4WD System, and the instrument panel control is moved to 4X4 LOW (4WD Low) while the vehicle is moving above 3 mph (5 km/h), the system will not engage and no damage will occur to the 4WD system. Before 4X4
LOW (4WD Low) can be engaged, the vehicle speed must be below 3 mph (5 km/h) with the brake pedal depressed and the transmission in N (Neutral). This vehicle is equipped with a non-synchronous low range gearset which will not allow the transfer case to shift into 4X4 LOW (4WD Low) if vehicle speed is above 3 mph (5 km/h). It is recommended that a shift to 4X4
LOW (4WD Low) is performed while the vehicle is moving at a speed below 3 mph (5 km/h). The 4WD system: • provides 4x4 High engagement and disengagement while the vehicle is • is operated by a rotary control located on the instrument panel that • uses auto-manual hub locks that can be engaged and disengagedallows you select 2WD, 4x4 High or 4x4 Low operation.
moving.
automatically based on the 4x4 mode selected.
185
2006 F-250/350/450/550 (f23) Owners Guide (post-2002-fmt) USA (fus)
Driving • auto-manual hub locks can be manually overridden by rotating the hub lock control from AUTO to LOCK if desired.
• automatic operation of the
hub locks is recommended, and will increase fuel economy
• For proper operation, make sure that each hub is fully engaged and that both hub locks are set to the same position (both set to LOCK or both set to AUTO). To engage LOCK, turn the hub locks completely clockwise; to engage AUTO, turn the hub locks completely counterclockwise.
4WD system indicator lights The 4WD system indicator lights illuminate only under the following conditions. If these lights illuminate when driving in 2WD, contact your authorized dealer as soon as possible. • 4x4 - momentarily illuminates after the engine is started. Illuminates when 4H (4x4 High) or 4L (4x4 Low) is engaged. • LOW RANGE – momentarily illuminates when the ignition is turned to the ON position. Illuminates when 4L (4x4 Low) is engaged.
LOW RANGE
4x4
Using a Manual Shift On Stop (MSOS) 4WD system (if equipped) Note: Some noise may be heard as the 4WD system shifts or engages. This is normal. 2H (2WD High) – For general on-road driving. Sends power to the rear wheels only. 4H (4WD High) – For winter and off-road conditions. Sends power to front and rear wheels. N (Neutral) – Only used when towing the vehicle. 4L (4WD Low) – For low-speed off-road applications that require extra power such as steep grades, deep sand or pulling a boat out of the water. Sends power to front and rear wheels.
186
2006 F-250/350/450/550 (f23) Owners Guide (post-2002-fmt) USA (fus)
Driving
2H 4H
4L
2H 4H
4L
Shifting from 2H (2WD High) to 4H (4WD High) Engage the locking hubs by rotating the hub lock control from FREE to LOCK, then move the transfer case lever from 2H (2WD High) to 4H (4WD High) at a vehicle speed below 3 mph (5 km/h). • For proper operation, make
sure that both indicator arrows on the hub are aligned, and that both hubs are set to LOCK.
• Do not shift into 4H (4WD High) with the rear wheels slipping.
Shifting from 4H (4WD High) to 2H (2WD High) Move the transfer case lever to 2H (2WD High) at a stop or a vehicle speed below 3 mph (5 km/h). With the vehicle at complete stop, disengage the locking hubs (optional) by rotating the hub lock control from LOCK to FREE. • For proper operation, make
sure that both indicator arrows on the hub are aligned, and that both hubs are set to FREE
Shifting from 4H (4WD High) to 4L (4WD Low) 1. Bring the vehicle to a complete stop. 2. Place the gearshift lever in N (Neutral).
187
2006 F-250/350/450/550 (f23) Owners Guide (post-2002-fmt) USA (fus)
Driving
4L
2H 4H
3. Move the transfer case shift lever through N (Neutral) directly to 4L (4WD Low). If the shift lever does not, or only partially moves to the 4L (4WD Low) position, perform a shift with the transmission in N (Neutral) and the vehicle rolling at a speed below 3 mph (5 km/h). This will ensure the transfer case is fully engaged into 4L (4WD Low). Shifting from 4L (4WD Low) to 4H (4WD High) or 2H (2WD High) 1. Bring the vehicle to a speed below 3 mph (5 km/h). 2. Place the gearshift lever in N (Neutral). 3. Move the transfer case shift lever through N (Neutral) directly to 4H (4WD High) or 2H (2WD High). 4. If the transfer case will not engage into 4H (4WD High) or 2H (2WD High), let the vehicle creep at a speed above 1 mph (1.6 km/h), then repeat steps 2 and 3. 5. If shifting to 2H (2WD High) with the vehicle at a complete stop, disengage the locking hubs (optional) by rotating the hub lock control from LOCK to FREE. Using the N (Neutral) position The transfer case neutral position overrides the transmission and puts the vehicle in neutral regardless of transmission gearshift lever position. The vehicle can move forward or backwards. This position should only be used when towing the vehicle.
2H 4H
4L
2H 4H
4L
188
2006 F-250/350/450/550 (f23) Owners Guide (post-2002-fmt) USA (fus)
Do not leave the vehicle unattended with the transfer case in the N (Neutral) position. Always set the parking brake fully and turn
off the ignition when leaving the vehicle.
Driving
Using the Electronic Shift On the Fly (ESOF) 4WD system (if equipped) Positions of the electronic shift system The electronic shift 4WD system is designed to allow up to 45
seconds before a shift command is performed. In the event that conflicting shift commands are selected, allow up to 45 seconds for the shift command to be performed prior to reporting any shift concerns to your authorized dealer. Note: Some noise may be heard as the 4WD system shifts or engages. This is normal. 2H (2WD High) – For general on-road driving. Sends power to the rear wheels only. 4H (4WD High) – For winter and off-road conditions. Sends power to front and rear wheels. 4L (4WD Low) – For low-speed off-road applications that require extra power such as steep grades, deep sand or pulling a boat out of the water. Sends power to front and rear wheels. Shifting from 2WD (2WD High) to 4x4 HIGH (4WD High) Rotate the 4WD control to the 4x4
HIGH position at speeds up to 55
mph (88 km/h). • The electronic shift 4WDsystem is designed to engage 4x4 HIGH (4WD High) when the vehicle is moving. If shifted to 4x4 HIGH (4WD HIGH) while at complete stop, 4x4 may not engage and the 4x4 indicator may not illuminate until the vehicle is allowed to move at a speed above 1 mph (1.6 km/h).
• Do not shift into 4x4 HIGH with the rear wheels slipping.
189
2006 F-250/350/450/550 (f23) Owners Guide (post-2002-fmt) USA (fus)
Driving
Shifting from 4x4 HIGH (4WD High) to 2WD (2WD High) Rotate the 4WD control to 2WD at any forward speed. Disengagement of the transfer case and front hubs may be delayed due to torque bind which is caused by driving on dry hard surfaces or performing tight turns while using the 4WD system.
• You do not need to operate the vehicle in R (Reverse) to disengage your front hubs, but it will eliminate any torque bind and allow the system to immediately disengage.
Shifting from 4x4 HIGH (4WD High) to 4x4 LOW (4WD Low) 1. Bring the vehicle to a complete stop. 2. Depress the brake. 3. Place the gearshift in N (Neutral). 4. Move the 4WD control to the 4x4
LOW position. 5. Hold the shift conditions until the LOW RANGE indicator light illuminates. 6. If the LOW RANGE indicator light does not illuminate within 15
seconds, let the vehicle creep at a speed above 1 mph (1.6 km/h), then repeat steps 3 through 5 before reporting any shift concerns to your authorized dealer. Shifting from 4x4 LOW (4WD Low) to 4x4 HIGH (4WD High) or 2WD (2WD High) 1. Bring the vehicle to a complete stop. 2. Depress the brake. 3. Place the gearshift in N (Neutral).190
2006 F-250/350/450/550 (f23) Owners Guide (post-2002-fmt) USA (fus)
Driving
4. Move the 4WD control to the 4x4
HIGH (4WD High) or 2WD (2WD High) position. 5. Hold the shift conditions until the LOW RANGE indicator light shuts off. 6. If the LOW RANGE indicator light does not shut off within 15
seconds, allow the vehicle to move at a speed above 1 mph (1.6 km/h), then repeat steps 3 through 5 before reporting any shift concerns to your authorized dealer.Driving off-road with truck and utility vehicles 4WD vehicles are specially equipped for driving on sand, snow, mud and rough terrain and have operating characteristics that are somewhat different from conventional vehicles, both on and off the road. How your vehicle differs from other vehicles Truck and utility vehicles can differ from some other vehicles. Your vehicle may be higher to allow it to travel over rough terrain without getting hung up or damaging underbody components. The differences that make your vehicle so versatile also make it handle differently than an ordinary passenger car. Maintain steering wheel control at all times, especially in rough terrain. Since sudden changes in terrain can result in abrupt steering wheel motion, make sure you grip the steering wheel from the outside. Do not grip the spokes. Drive cautiously to avoid vehicle damage from concealed objects such as rocks and stumps. You should either know the terrain or examine maps of the area before driving. Map out your route before driving in the area. To maintain steering and braking control of your vehicle, you must have all four wheels on the ground and they must be rolling, not sliding or spinning. Basic operating principles • Do not use 4WD on dry, hard surfaced roads. Doing so will produce
excessive noise, increase tire wear and may damage drive components. 4WD modes are only intended for consistently slippery or loose surfaces.
191
2006 F-250/350/450/550 (f23) Owners Guide (post-2002-fmt) USA (fus)
Driving • Drive slower in strong crosswinds which can affect the normal steering • Be extremely careful when driving on pavement made slippery by
characteristics of your vehicle.
loose sand, water, gravel, snow or ice.
If your vehicle goes off the edge of the pavement • If your vehicle goes off the edge of the pavement, slow down, but avoid severe brake application, ease the vehicle back onto the pavement only after reducing your speed. Do not turn the steering wheel too sharply while returning to the road surface.
• It may be safer to stay on the apron or shoulder of the road and slow down gradually before returning to the pavement. You may lose control if you do not slow down or if you turn the steering wheel too sharply or abruptly.
• It often may be less risky to strike small objects, such as highway
reflectors, with minor damage to your vehicle rather than attempt a sudden return to the pavement which could cause the vehicle to slide sideways out of control or roll over. Remember, your safety and the safety of others should be your primary concern.
Vehicles with a higher center of gravity such as utility and four-wheel drive vehicles handle differently than vehicles with a
lower center of gravity. Utility and four-wheel drive vehicles are not designed for cornering at speeds as high as passenger cars any more than low-slung sports cars are designed to perform satisfactorily under off-road conditions. Avoid sharp turns, excessive speed and abrupt maneuvers in these vehicles. Failure to drive cautiously could result in an increased risk of loss of vehicle control, vehicle rollover, personal injury and death.
If your vehicle gets stuck If your vehicle gets stuck in mud or snow it may be rocked out by shifting between forward and reverse gears, stopping between shifts, in a steady pattern. Press lightly on the accelerator in each gear. Do not rock the vehicle if the engine is not at normal operating temperature or damage to the transmission may occur. Do not rock the vehicle for more than a few minutes or damage to the transmission and tires may occur or the engine may overheat.
192
2006 F-250/350/450/550 (f23) Owners Guide (post-2002-fmt) USA (fus)
Do not spin the wheels at over 35 mph (56 km/h). The tires may fail and injure a passenger or bystander.
Driving
Refer to Transmission temperature gauge in the Instrument Cluster chapter for transmission fluid temperature information. Emergency maneuvers • In an unavoidable emergency situation where a sudden sharp turn must be made, remember to avoid “over-driving” your vehicle, i.e., turn the steering wheel only as rapidly and as far as required to avoid the emergency. Excessive steering will result in less vehicle control, not more. Additionally, smooth variations of the accelerator and/or brake pedal pressure should be utilized if changes in vehicle speed are called for. Avoid abrupt steering, acceleration or braking which could result in an increased risk of loss of vehicle control, vehicle rollover and/or personal injury. Use all available road surface to return the vehicle to a safe direction of travel.
• In the event of an emergency stop, avoid skidding the tires and do not
attempt any sharp steering wheel movements.
Vehicles with a higher center of gravity such as utility and four-wheel drive vehicles handle differently than vehicles with a
lower center of gravity. Utility and four-wheel drive vehicles are not designed for cornering at speeds as high as passenger cars any more than low-slung sports cars are designed to perform satisfactorily under off-road conditions. Avoid sharp turns, excessive speed and abrupt maneuvers in these vehicles. Failure to drive cautiously could result in an increased risk of loss of vehicle control, vehicle rollover, personal injury and death. • If the vehicle goes from one type of surface to another (i.e., from concrete to gravel) there will be a change in the way the vehicle responds to a maneuver (steering, acceleration or braking). Again, avoid these abrupt inputs.
Parking On some 4WD vehicles, when the transfer case is in the N (Neutral) position, the engine and transmission are disconnected from the rest of the driveline. Therefore, the vehicle is free to roll even if the automatic transmission is in P (Park) or the manual transmission is in gear. Do not leave the vehicle unattended with the transfer case in the N (Neutral) position. Always set the parking brake fully and turn off the ignition when leaving the vehicle.
193
2006 F-250/350/450/550 (f23) Owners Guide (post-2002-fmt) USA (fus)
Driving
Always set the parking brake fully and make sure the gearshift is latched in P (Park). Turn the ignition to the LOCK position and
remove the key whenever you leave your vehicle.
If the parking brake is fully released, but the brake warning lamp remains illuminated, the brakes may not be working properly.
See your authorized dealer.
4WD Systems 4WD (when you select a 4WD mode), uses all four wheels to power the vehicle. This increases traction, enabling you to drive over terrain and road conditions that a conventional two-wheel drive vehicle cannot. Power is supplied to all four wheels through a transfer case. On 4WD vehicles, the transfer case allows you to select 4WD when necessary. Information on transfer case operation and shifting procedures can be found in the Driving chapter. Information on transfer case maintenance can be found in the Maintenance and Specifications chapter. You should become thoroughly familiar with this information before you operate your vehicle. Normal characteristics On some 4WD models, the initial shift from two-wheel drive to 4x4 while the vehicle is moving can cause some momentary clunk and ratcheting sounds. This is the front drivetrain coming up to speed and the automatic locking hubs engaging and is not cause for concern. Sand When driving over sand, try to keep all four wheels on the most solid area of the trail. Avoid reducing the tire pressures but shift to a lower gear and drive steadily through the terrain. Apply the accelerator slowly and avoid spinning the wheels. Avoid excessive speed because vehicle momentum can work against you and cause the vehicle to become stuck to the point that assistance may be required from another vehicle. Remember, you may be able to back out the way you came if you proceed with caution.
194
2006 F-250/350/450/550 (f23) Owners Guide (post-2002-fmt) USA (fus)
Driving
Mud and water If you must drive through high water, drive slowly. Traction or brake capability may be limited. When driving through water, determine the depth; avoid water higher than the bottom of the hubs (if possible) and proceed slowly. If the ignition system gets wet, the vehicle may stall. Once through water, always try the brakes. Wet brakes do not stop the vehicle as effectively as dry brakes. Drying can be improved by moving your vehicle slowly while applying light pressure on the brake pedal. Be cautious of sudden changes in vehicle speed or direction when you are driving in mud. Even 4WD vehicles can lose traction in slick mud. As when you are driving over sand, apply the accelerator slowly and avoid spinning your wheels. If the vehicle does slide, steer in the direction of the slide until you regain control of the vehicle. If the transmission, transfer case or front axle are submerged in water, their fluids should be checked and changed, if necessary. Driving through deep water may damage the transmission. Refer to Transmission temperature gauge in the Instrument Cluster chapter for transmission fluid temperature information. If the front or rear axle is submerged in water, the axle lubricant should be replaced. After driving through mud, clean off residue stuck to rotating driveshafts and tires. Excess mud stuck on tires and rotating driveshafts causes an imbalance that could damage drive components. “Tread Lightly” is an educational program designed to increase public awareness of land-use regulations and responsibilities in our nations wilderness areas. Ford Motor Company joins the U.S. Forest Service and the Bureau of Land Management in encouraging you to help preserve our national forest and other public and private lands by “treading lightly.”
195
2006 F-250/350/450/550 (f23) Owners Guide (post-2002-fmt) USA (fus)
Driving
Driving on hilly or sloping terrain Although natural obstacles may make it necessary to travel diagonally up or down a hill or steep incline, you should always try to drive straight up or straight down. Avoid driving crosswise or turning on steep slopes or hills. A danger lies in losing traction, slipping sideways and possibly rolling over. Whenever driving on a hill, determine beforehand the route you will use. Do not drive over the crest of a hill without seeing what conditions are on the other side. Do not drive in reverse over a hill without the aid of an observer. When climbing a steep slope or hill, start in a lower gear rather than downshifting to a lower gear from a higher gear once the ascent has started. This reduces strain on the engine and the possibility of stalling. If you do stall out, do not try to turn around because you might roll over. It is better to back down to a safe location. Apply just enough power to the wheels to climb the hill. Too much power will cause the tires to slip, spin or lose traction, resulting in loss of vehicle control. Descend a hill in the same gear you would use to climb up the hill to avoid excessive brake application and brake overheating. Do not descend in neutral; instead, manually shift to a lower gear. Your vehicle has anti-lock brakes, apply the brakes steadily. Do not “pump” the brakes.
Driving on snow and ice 4WD vehicles have advantages over 2WD vehicles in snow and ice but can skid like any other vehicle.
196
2006 F-250/350/450/550 (f23) Owners Guide (post-2002-fmt) USA (fus)
Driving
Should you start to slide while driving on snowy or icy roads, turn the steering wheel in the direction of the slide until you regain control. Avoid sudden applications of power and quick changes of direction on snow and ice. Apply the accelerator slowly and steadily when starting from a full stop. Avoid sudden braking as well. Although a 4WD vehicle may accelerate better than a two-wheel drive vehicle in snow and ice, it won’t stop any faster, because as in other vehicles, braking occurs at all four wheels. Do not become overconfident as to road conditions. Make sure you allow sufficient distance between you and other vehicles for stopping. Drive slower than usual and consider using one of the lower gears. In emergency stopping situations, avoid locking of the wheels. Use a “squeeze” technique, push on the brake pedal with a steadily increasing force which allows the wheels to brake yet continue to roll so that you may steer in the direction you want to travel. If you lock the wheels, release the brake pedal and repeat the squeeze technique. If your vehicle is equipped with a Four Wheel Anti-Lock Brake System (ABS), apply the brake steadily. Do not “pump” the brakes. Refer to the Brakes section of this chapter for additional information on the operation of the anti-lock brake system. Never drive with chains on the front tires of 4WD vehicles without also putting them on the rear tires. This could cause the rear to slide and swing around during braking. Maintenance and Modifications The suspension and steering systems on your vehicle have been designed and tested to provide predictable performance whether loaded or empty and durable load carrying capability. For this reason, Ford Motor Company strongly recommends that you do not make modifications such as adding or removing parts (such as lift kits or stabilizer bars) or by using replacement parts not equivalent to the original factory equipment. Any modifications to a vehicle that raise the center of gravity can make it more likely the vehicle will roll over as a result of a loss of control. Ford Motor Company recommends that caution be used with any vehicle equipped with a high load or device (such as ladder racks or pickup box cover). Failure to maintain your vehicle properly may void the warranty, increase your repair cost, reduce vehicle performance and operational capabilities and adversely affect driver and passenger safety. Frequent inspection of vehicle chassis components is recommended if the vehicle is subjected to heavy off-road usage.
197
2006 F-250/350/450/550 (f23) Owners Guide (post-2002-fmt) USA (fus)
Driving
VEHICLE USED AS A STATIONARY POWER SOURCE Auxiliary equipment called power take-off, or PTO, is often added to the engine or transmission to operate utility equipment. Examples include a wheel-lift for tow trucks, tools for construction and cranes. PTO applications draw auxiliary horsepower from the powertrain, often while the vehicle is stationary. In this condition, there is limited cooling air flow through the radiator and around the vehicle that normally occurs when a vehicle is moving. Depending on the level and duration of auxiliary horsepower draw, vehicle conditions and surrounding environmental conditions and other factors, this can contribute to elevated transmission fluid temperatures and result in accelerated fluid deterioration, fuel vapor over-pressurization, and other concerns. Ford trucks are fully qualified for stationary PTO operation for 10 minutes or less of continuous operation. For stationary PTO operation of extended duration (beyond 10 minutes), diesel engine is recommended. Further consult your aftermarket PTO installer, since the duration of operation limit for the aftermarket PTO may be less than 10 minutes. A more complete description of PTO operation is discussed in the Ford Truck Body Builders Layout Book, found at www.fleet.ford.com/truckbbas.
DRIVING THROUGH WATER If driving through deep or standing water is unavoidable, proceed very slowly especially when the depth is not known. Never drive through water that is higher than the bottom of the hubs (for trucks) or the bottom of the wheel rims (for cars). When driving through water, traction or brake capability may be limited. Also, water may enter your engine’s air intake and severely damage your engine or your vehicle may stall. Driving through deep water where the transmission vent tube is submerged may allow water into the transmission and cause internal transmission damage. Once through the water, always dry the brakes by moving your vehicle slowly while applying light pressure on the brake pedal. Wet brakes do not stop the vehicle as quickly as dry brakes.
198
2006 F-250/350/450/550 (f23) Owners Guide (post-2002-fmt) USA (fus)
SNOWPLOWING Ford recommends that the Super Duty F-Series used for snow removal include a snow plow package option.
Driving
Installing the snowplow Weight limits and guidelines for selecting and installing the snowplow can be found in the Ford Truck Body Builders Layout Book, Snowplow section, found at www.fleet.ford.com/truckbbas. A typical installation affects the following: • Certification to government safety laws such as occupant protection and airbag deployment, braking, and lighting. Look for an “Alterer’s Label” on the vehicle from the snowplow installer certifying that the installation meets all applicable Federal Motor Vehicle Safety Standards (FMVSS).
• The Total Accessory Reserve Capacity (TARC) is shown on the lower right side of the vehicle’s Safety Compliance Certification Label. This applies to Ford-completed vehicles of 10,000 lb. (4,536 kg) GVWR or less. This is the weight of permanently-attached auxiliary equipment, such as snowplow frame-mounting hardware, that can be added to the vehicle and satisfy Ford compliance certification to FMVSS. Exceeding this weight may require the auxiliary equipment installer additional safety certification responsibility. The Front Accessory Reserve Capacity (FARC) is added for customer convenience.
• Rear ballast weight behind the rear axle may be required to prevent exceeding the FGAWR, and provide front-to-rear weight balance for proper braking and steering.
• Front wheel toe may require re-adjustment to prevent premature uneven tire wear. Specifications are found in the Ford Workshop Manual.
• Headlight aim may require re-adjustment. • Federal and some local regulations require additional exterior lamps for snowplow-equipped vehicles. Consult your authorized dealer for additional information. • Snowplowing with vehicles equipped with a 6.0 Liter Power Stroke
diesel engine may result in engine overheating under certain operating conditions unless equipped with the special engine cooling fan clutch that is included with a snow plow package option.
199
2006 F-250/350/450/550 (f23) Owners Guide (post-2002-fmt) USA (fus)
Driving
Operating the vehicle with the snowplow attached Do not use your vehicle for snow removal until it has been driven at least 500 miles (800 km). The attached snowplow blade restricts airflow to the radiator, and may cause the engine to run at a higher temperature: • If you are driving more than 15 miles (24 km) where outside air
temperatures are above freezing, then angle the plow blade to full left or right to maximize airflow to the radiator. • If you are driving less than 15 miles (24 km) at speeds up to 40 mph (64 km/h) in cold weather you will not need to adjust blade position
Follow the severe duty schedule in your scheduled maintenance information for engine oil and transmission fluid change intervals.
Snowplowing with your airbag-equipped vehicle Your vehicle is equipped with a driver and passenger airbag Supplemental Restraint System (SRS) The SRS is designed to activate in certain frontal and offset frontal collisions when the vehicle sustains sufficient longitudinal deceleration. Careless or high speed driving while plowing snow which results in sufficient vehicle decelerations can deploy the airbag. Such driving also increases the risk of accidents.
All occupants of the vehicle, including the driver, should always properly wear their safety belts, even when an air bag
supplemental restraint system (SRS) is provided.
Never remove or defeat the “tripping mechanisms” designed into the snow removal equipment by its manufacturer. Doing so may cause damage to the vehicle and the snow removal equipment as well as possible airbag deployment.
Do not attempt to service, repair, or modify the air bag supplemental restraint system (SRS) or its fuses. See your Ford
or Lincoln Mercury dealer.
Additional equipment such as snowplow equipment may effect the performance of the airbag sensors increasing the risk of
injury. Please refer to the Body Builders Layout Book for instructions about the appropriate installation of additional equipment.
200
2006 F-250/350/450/550 (f23) Owners Guide (post-2002-fmt) USA (fus)
Driving
Transmission operation while plowing Operate the vehicle with the automatic transmission gearshift lever in the D (Overdrive) position and Tow/Haul OFF. • Shift transfer case to 4x4 LOW (4WD Low) when plowing in small • Shift transfer case to 4x4 HIGH (4WD High) when plowing larger
areas at speeds below 5 mph (8 km/h).
areas or light snow at higher speeds. Do not exceed 15 mph (24 km/h).
• Do not shift the transmission from a forward gear to R (Reverse) until • If the vehicle is stuck, shift the transmission in a steady motion
the engine is at idle and the wheels are stopped.
between forward and reverse gears. Do not rock the vehicle for more than a few minutes. The transmission and tires may be damaged or the engine can overheat.
Do not rock the vehicle if the engine is not at normal operating temperature. Do not rock the vehicle for more than a minute. The transmission and tires may be damaged or the engine may overheat. Refer to Transmission temperature gauge in the Instrument Cluster chapter for transmission fluid temperature information.
Do not spin the wheels at over 35 mph (55 km/h). The tires may fail and injure a passenger or bystander.
Removing the snowplow frame mount A metal crossmember is included below the front bumper on Super Duty vehicles called a “BlockerBeam”. Typical snowplow installations require removal of this BlockerBeam to install the snowplow mounting hardware to the vehicle frame. The BlockerBeam must be re-installed if the snowplow frame-mounting hardware is removed from the vehicle to ensure proper airbag deployment in a crash.
201
2006 F-250/350/450/550 (f23) Owners Guide (post-2002-fmt) USA (fus)
Roadside Emergencies
ROADSIDE ASSISTANCE
Getting roadside assistance To fully assist you should you have a vehicle concern, Ford Motor Company offers a complimentary roadside assistance program. This program is separate from the New Vehicle Limited Warranty. The service is available: • 24–hours, seven days a week • for the New Vehicle Limited Warranty period of three years or 36,000 miles (60,000 km), whichever occurs first on Ford and Mercury vehicles, and four years or 50,000 miles (80,000 km) on Lincoln vehicles.
inflation kit)
responsibility)
Roadside assistance will cover: • a flat tire change with a good spare (except Ford GT which has a tire • battery jump start • lock-out assistance (key replacement cost is the customer’s • fuel delivery – Independent Service Contractors, if not prohibited by state, local or municipal law shall deliver up to 2.0 gallons (7.5L) of gasoline or 5 gallons (18.9L) of diesel fuel to a disabled vehicle. • winch out – available within 100 feet (30.5 meters) of a paved or • towing – Ford/Mercury/Lincoln eligible vehicle towed to an authorized dealer within 35 miles (56.3 km) of the disablement location or to the nearest authorized dealer. If a member requests to be towed to an authorized dealer more than 35 miles (56.3 km) from the disablement location, the member shall be responsible for any mileage costs in excess of 35 miles (56.3 km).
county maintained road, no recoveries.
Trailers shall be covered up to $100 if the disabled eligible vehicle requires service at the nearest authorized dealer. If the trailer is disabled, but the towing vehicle is operational, the trailer does not qualify for any roadside services.
202
2006 F-250/350/450/550 (f23) Owners Guide (post-2002-fmt) USA (fus)
Roadside Emergencies
Canadian customers refer to your Owner Information Guide for information on: • coverage period • exact fuel amounts • towing of your disabled vehicle • emergency travel expense reimbursement • travel planning benefits
Using roadside assistance Complete the roadside assistance identification card and place it in your wallet for quick reference. In the United States, this card is found in the Owner Guide portfolio in the glove compartment. In Canada, the card is found in the Owner Information Guide in the glove compartment. U.S. Ford or Mercury vehicle customers who require roadside assistance, call 1–800–241–3673; Lincoln vehicle customers call 1–800–521–4140. Canadian customers who require roadside assistance, call 1–800–665–2006. If you need to arrange roadside assistance for yourself, Ford Motor Company will reimburse a reasonable amount. To obtain reimbursement information, U.S. Ford or Mercury vehicles customers call 1-800-241-3673; Lincoln vehicle customers call 1–800–521–4140. Canadian customers who need to obtain reimbursement information, call 1–800–665–2006.
Roadside coverage beyond basic warranty In the United States, you may purchase additional roadside assistance coverage beyond this period through the Ford Auto Club by contacting your authorized dealer. Similarly in Canada, for uninterrupted Roadside Assistance coverage, you may purchase extended coverage prior to your Basic Warranty’s Roadside Assistance expiring. For more information and enrollment, contact 1–877–294–2582 or visit our website at www.ford.ca.
203
2006 F-250/350/450/550 (f23) Owners Guide (post-2002-fmt) USA (fus)
Roadside Emergencies
HAZARD FLASHER The hazard flasher is located on the steering column, just behind the steering wheel. The hazard flashers will operate when the ignition is in any position or if the key is not in the ignition. Push in the flasher control and all front and rear direction signals will flash. Press the flasher control again to turn them off. Use it when your vehicle is disabled and is creating a safety hazard for other motorists. Note: With extended use, the flasher may run down your battery.
FUEL PUMP SHUT-OFF SWITCH This device stops the electric fuel pump from sending fuel to the engine when your vehicle has had a substantial jolt. After an accident, if the engine cranks but does not start, this switch may have been activated.
204
2006 F-250/350/450/550 (f23) Owners Guide (post-2002-fmt) USA (fus)
Roadside Emergencies
This switch is located in the front passenger’s footwell, behind the kick panel access cover. To reset the switch: 1. Turn the ignition off. 2. Check the fuel system for leaks. 3. If no leaks are apparent, reset the switch by pushing in on the reset button. 4. Turn the ignition on. 5. Wait a few seconds and return the key to off. 6. Make another check for leaks.
FUSES AND RELAYS
Fuses If electrical components in the vehicle are not working, a fuse may have blown. Blown fuses are identified by a broken wire within the fuse. Check the appropriate fuses before replacing any electrical components. Note: Always replace a fuse with one that has the specified amperage rating. Using a fuse with a higher amperage rating can cause severe wire damage and could start a fire.
15
205
2006 F-250/350/450/550 (f23) Owners Guide (post-2002-fmt) USA (fus)
Roadside Emergencies
Standard fuse amperage rating and color
COLOR
Fuse rating
2A 3A 4A 5A 7.5A 10A 15A 20A 25A 30A 40A 50A 60A 70A 80A
Mini fuses
Grey Violet Pink Tan
Brown
Red Blue Yellow Natural Green
— — — — —
Standard
fuses
Grey Violet Pink Tan
Brown
Red Blue Yellow Natural Green
— — — — —
Maxi fuses
— — — — — — —
Yellow
—
Green Orange
Red Blue Tan
Natural
Cartridge
maxi fuses
— — — — — — — Blue — Pink Green Red — — —
Fuse link cartridge
— — — — — — — Blue — Pink Green Red Yellow Brown Black
Passenger compartment fuse panel The fuse panel is located below and to the left of the steering wheel by the brake pedal. Remove the panel cover to access the fuses. To remove the fuse panel cover, pull the panel downward by the finger slots on top of the panel. When the top clips of the panel disengage, let the panel fall easily.
206
2006 F-250/350/450/550 (f23) Owners Guide (post-2002-fmt) USA (fus)
Roadside Emergencies
To remove a fuse use the fuse puller tool provided on the fuse panel cover.
To reinstall the cover, align and engage the two hooked clips at the bottom of the cover onto the instrument panel, then lift the panel and press the top clips firmly into place.
Always disconnect the battery before servicing high current fuses.
Always replace the cover to the passenger compartment fuse panel before reconnecting the battery. If the battery has been disconnected and reconnected, refer to the Battery section of the Maintenance and Specifications chapter.
207
2006 F-250/350/450/550 (f23) Owners Guide (post-2002-fmt) USA (fus)
Roadside Emergencies
The fuses are coded as follows.
Fuse/Relay Location
10
11
12
13
14208
Fuse Amp
Passenger Compartment Fuse
Rating 15A* 10A* 10A* 20A* 10A*
—
30A*
20A*
— —
20A* 20A* 5A* —
Panel Description
Adjustable pedals Cluster Upfitter #3
Power point (Instrument panel) Upfitter #4
Not used High beam headlamps, Flash-to-pass Back-up lamps Not used Not used Radio (Main) Cigar lighter, OBD II Power mirrors Not used2006 F-250/350/450/550 (f23) Owners Guide (post-2002-fmt) USA (fus)
Fuse/Relay Location
Fuse Amp
Rating
15
16
17
1819
20
21
22
2324
25
26
27
28
29
30
31
32
33
34
35
36
37
38
39— —
15A* 20A*
10A*
15A*
20A* 20A* 20A*
15A*
—
10A* 15A* 10A* 10A* 15A* 15A* 5A* 15A* 10A* 10A*
—
15A* 20A* 15A*
Roadside Emergencies
Passenger Compartment Fuse
Panel Description
Not used Not used Exterior lamps Flasher, Brake On-Off (BOO) lamps Body Security Module (BSM) (Security) Trailer tow Electric Brake Controller (EBC) Heated seats Engine control Engine control (gasoline engine only)/Climate control (Diesel engine only) Tow haul, Blower relay, Electronic Automatic Temperature Control (EATC) Not used Airbags Ignition switch RUN feed Trailer tow EBC logic Customer access High beam headlamps Starter relay Radio (start) Cluster, 4x4, Wipers BOO switch (Low current) Instrument cluster Not used Horn Trailer tow park lamps Heated mirrors
209
2006 F-250/350/450/550 (f23) Owners Guide (post-2002-fmt) USA (fus)
Roadside Emergencies
Fuse/Relay Location
40
41
42
43
44
45
46
47
48
101
102
103
104
105
106
107
108
109
110
111
112
113
114
115
116
210
211
212
301
302
303Fuse Amp
Passenger Compartment Fuse
Rating 20A* 10A* 15A* 10A*
—
10A* 10A* 10A*
—
30A** 30A** 30A**
— — —
20A** 30A** 30A** 30A**
—
30A** 30A** 30A** 20A** 30A**
—
1⁄2 ISO relay
—
Full ISO relay Full ISO relay
—
Panel Description
Fuel pump Instrument cluster Delayed accessory Fog lamps Not used Ignition switch RUN/START feed Left-hand low beam headlamp Right-hand low beam headlamp Not used Trailer tow EBC BSM (Door locks) Ignition switch Not used Not used Not used Trailer tow battery charge Upfitter #1
Upfitter #2
Ignition switch Not used Power seat (Driver) Starter Power seat (Passenger) Upfitter control Ignition switch Not used Back-up lamps Not used Trailer tow battery charge Powertrain Control Module (PCM) Not used210
2006 F-250/350/450/550 (f23) Owners Guide (post-2002-fmt) USA (fus)
Fuse/Relay Location
304
305
306
307
601Roadside Emergencies
Passenger Compartment Fuse
Panel Description
Not used Upfitter control
Full ISO relay Full ISO relay Delayed accessory Full ISO relay
Fuse Amp
Rating
—
30A circuit
breaker
Starter Delayed accessory, Power windows, Moonroof Not used
602
— * Mini fuse ** Cartridge fuse
Power distribution box The power distribution box is located in the engine compartment. The power distribution box contains high-current fuses that protect your vehicle’s main electrical systems from overloads.
Always disconnect the battery before servicing high current fuses.
To reduce risk of electrical shock, always replace the cover to the Power Distribution Box before reconnecting the battery or
refilling fluid reservoirs.
If the battery has been disconnected and reconnected, refer to the Battery section of the Maintenance and Specifications chapter.
211
2006 F-250/350/450/550 (f23) Owners Guide (post-2002-fmt) USA (fus)
Roadside Emergencies
The high-current fuses and relays are coded as follows.
Fuse/Relay Location