- 2004 Chevrolet Express Owners Manuals
- Chevrolet Express Owners Manuals
- 2013 Chevrolet Express Owners Manuals
- Chevrolet Express Owners Manuals
- 2000 Chevrolet Express Owners Manuals
- Chevrolet Express Owners Manuals
- 2012 Chevrolet Express Owners Manuals
- Chevrolet Express Owners Manuals
- 1998 Chevrolet Express Owners Manuals
- Chevrolet Express Owners Manuals
- 2002 Chevrolet Express Owners Manuals
- Chevrolet Express Owners Manuals
- 1996 Chevrolet Express Owners Manuals
- Chevrolet Express Owners Manuals
- 2003 Chevrolet Express Owners Manuals
- Chevrolet Express Owners Manuals
- 2007 Chevrolet Express Owners Manuals
- Chevrolet Express Owners Manuals
- 2008 Chevrolet Express Owners Manuals
- Chevrolet Express Owners Manuals
- 1999 Chevrolet Express Owners Manuals
- Chevrolet Express Owners Manuals
- 2006 Chevrolet Express Owners Manuals
- Chevrolet Express Owners Manuals
- 2009 Chevrolet Express Owners Manuals
- Chevrolet Express Owners Manuals
- 2010 Chevrolet Express Owners Manuals
- Chevrolet Express Owners Manuals
- 2011 Chevrolet Express Owners Manuals
- Chevrolet Express Owners Manuals
- 2014 Chevrolet Express Owners Manuals
- Chevrolet Express Owners Manuals
- 2015 Chevrolet Express Owners Manuals
- Chevrolet Express Owners Manuals
- 1997 Chevrolet Express Owners Manuals
- Chevrolet Express Owners Manuals
- 2016 Chevrolet Express Owners Manuals
- Chevrolet Express Owners Manuals
- 2001 Chevrolet Express Owners Manuals
- Chevrolet Express Owners Manuals
- 2005 Chevrolet Express Owners Manuals
- Chevrolet Express Owners Manuals
- Download PDF Manual
-
example, just a few drops of mineral-based oil, such as engine oil, in the brake hydraulic system can damage brake hydraulic system parts so badly that they will have to be replaced. Do not let someone put in the wrong kind of fluid.
. If brake fluid is spilled on the
vehicle's painted surfaces, the paint finish can be damaged. Be careful not to spill brake fluid on the vehicle. If you do, wash it off immediately.
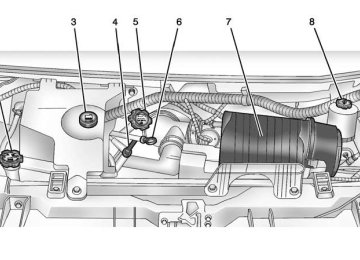
Battery Refer to the replacement number shown on the original battery label when a new battery is needed. See Engine Compartment Overview on page 10-6 for battery location.
{ Warning
Battery posts, terminals, and related accessories contain lead and lead compounds, chemicals known to the State of California to cause cancer and reproductive harm. Wash hands after handling.
Vehicle Storage
{ Warning
Batteries have acid that can burn you and gas that can explode. You can be badly hurt if you are not careful. See Jump Starting on page 10-79 for tips on working around a battery without getting hurt.
Infrequent Usage: Remove the black, negative (−) cable from the battery to keep the battery from running down. Extended Storage: Remove the black, negative (−) cable from the battery or use a battery trickle charger.
Chevrolet Express Owner Manual (GMNA-Localizing-U.S./Canada/Mexico- 6014662) - 2014 - crc - 8/26/13
Black plate (29,1)
All-Wheel Drive
Transfer Case
When to Check Lubricant Refer to the Maintenance Schedule to determine how often to check the lubricant. See Maintenance Schedule on page 11-3.
How to Check Lubricant To get an accurate reading, the vehicle should be on a level surface.
2. Fill Plug If the level is below the bottom of the fill plug hole, on the transfer case, some lubricant will need to be added. Add enough lubricant to raise the level to the bottom of the fill plug hole. Use care not to overtighten the plug.
What to Use Refer to Recommended Fluids and Lubricants on page 11-12 to determine what kind of lubricant to use.
Front Axle
When to Check and Change Lubricant Refer to the Maintenance Schedule to determine how often to check the lubricant and when to change it. See Maintenance Schedule on page 11-3.
1. Drain Plug
Vehicle Care
10-29
How to Check Lubricant To get an accurate reading, the vehicle should be on a level surface.
If the level is below the bottom of the fill plug hole, some lubricant may need to be added. When the differential is cold, add enough lubricant to raise the level to 10 mm (3/8 in) below the fill plug hole.
Chevrolet Express Owner Manual (GMNA-Localizing-U.S./Canada/Mexico- 6014662) - 2014 - crc - 8/26/13
Black plate (30,1)
10-30
Vehicle Care
When the differential is at operating temperature (warm), add enough lubricant to raise the level to the bottom of the fill plug hole.
What to Use Refer to Recommended Fluids and Lubricants on page 11-12 to determine what kind of lubricant to use.
Rear Axle
When to Check Lubricant Refer to the Maintenance Schedule on page 11-3 to determine how often to check the lubricant.
How to Check Lubricant
To get an accurate reading, the vehicle should be on a level surface. If you have the 1500 Series, the proper level is from 15 mm (5/8 in) to 40 mm (1 5/8 in) below the bottom of the fill plug hole. The proper level for the 2500 and 3500 Series is from 0 to 6 mm (1/4 in) below the bottom of the fill plug hole. Add only enough fluid to reach the proper level.
What to Use Refer to Recommended Fluids and Lubricants on page 11-12 to determine what kind of lubricant to use.
Noise Control System The following information relates to compliance with federal noise emission standards for vehicles with a Gross Vehicle Weight Rating (GVWR) of more than 4 536 kg (10,000 lbs). The Maintenance Schedule provides information on maintaining the noise control system to minimize degradation of the noise emission control system during the life of the vehicle. The noise control system warranty is given in the vehicle warranty booklet. These standards apply only to vehicles sold in the United States.
Chevrolet Express Owner Manual (GMNA-Localizing-U.S./Canada/Mexico- 6014662) - 2014 - crc - 8/26/13
Black plate (31,1)
Federal law prohibits the following acts or the causing thereof: 1. The removal or rendering
inoperative by any person, other than for purposes of maintenance, repair or replacement, of any device or element of design incorporated into any new vehicle for the purpose of noise control, prior to its sale or delivery to the ultimate purchaser or while it is in use; or 2. The use of the vehicle after such device or element of design has been removed or rendered inoperative by any person. Among those acts presumed to constitute tampering are the acts listed below.
Insulation: . Removal of the noise shields or
any underhood insulation.
Engine: . Removal or rendering engine speed governor, if the vehicle has one, inoperative so as to allow engine speed to exceed manufacturer specifications.
Fan and Drive: . Removal of fan clutch, if the
vehicle has one, or rendering clutch inoperative.
. Removal of the fan shroud, if the
vehicle has one.
Air Intake: . Removal of the air cleaner
silencer.
. Modification of the air cleaner.
Exhaust: . Removal of the muffler and/or
resonator.
. Removal of the exhaust pipes
and exhaust pipe clamps.
Vehicle Care
10-31
Fuel Operated Heater (FOH) — Diesel Engine: . Removal of the muffler.
Starter Switch Check
{ Warning When you are doing this inspection, the vehicle could move suddenly. If the vehicle moves, you or others could be injured.
1. Before starting this check, be
sure there is enough room around the vehicle.
2. Apply both the parking brake
and the regular brake. Do not use the accelerator pedal, and be ready to turn off the engine immediately if it starts.
3. Try to start the engine in each gear. The vehicle should start only in P (Park) or N (Neutral).
Chevrolet Express Owner Manual (GMNA-Localizing-U.S./Canada/Mexico- 6014662) - 2014 - crc - 8/26/13
Black plate (32,1)
10-32
Vehicle Care
If the vehicle starts in any other position, contact your dealer for service.
Automatic Transmission Shift Lock Control Function Check
{ Warning When you are doing this inspection, the vehicle could move suddenly. If the vehicle moves, you or others could be injured.
1. Before starting this check, be
sure there is enough room around the vehicle. It should be parked on a level surface.
2. Apply the parking brake. Be
ready to apply the regular brake immediately if the vehicle begins to move.
3. With the engine off, turn the
ignition on, but do not start the engine. Without applying the regular brake, try to move the shift lever out of P (Park) with normal effort. If the shift lever moves out of P (Park), contact your dealer for service.
Ignition Transmission Lock Check If equipped with a key type ignition, while parked and with the parking brake set, try to turn the ignition to LOCK/OFF in each shift lever position.
The ignition should turn to LOCK/OFF only when the shift lever is in P (Park). The ignition key should come out only in LOCK/OFF.
Contact your dealer if service is required.
Park Brake and P (Park) Mechanism Check { Warning
When you are doing this check, the vehicle could begin to move. You or others could be injured and property could be damaged. Make sure there is room in front of the vehicle in case it begins to roll. Be ready to apply the regular brake at once should the vehicle begin to move.
Park on a fairly steep hill, with the vehicle facing downhill. Keeping your foot on the regular brake, set the parking brake.
To check the parking brake's holding ability: With the engine running and the transmission in N (Neutral), slowly remove foot pressure from the regular brake pedal. Do this until the vehicle is held by the parking brake only.
Chevrolet Express Owner Manual (GMNA-Localizing-U.S./Canada/Mexico- 6014662) - 2014 - crc - 8/26/13
Black plate (33,1)
To check the P (Park) mechanism's holding ability: With the engine running, shift to P (Park). Then release the parking brake followed by the regular brake.
Contact your dealer if service is required.
Wiper Blade Replacement Windshield wiper blades should be inspected for wear and cracking. See Maintenance Schedule on page 11-3. Replacement blades come in different types and are removed in different ways. For proper type and length, see Maintenance Replacement Parts on page 11-14.
{ Caution
Allowing the wiper arm to touch the windshield when no wiper blade is installed could damage
(Continued)
Vehicle Care
10-33
Headlamp Aiming Headlamp aim has been preset and should need no further adjustment. If the vehicle is damaged in a crash, the headlamp aim may be affected. If adjustment to the headlamps is necessary, see your dealer.
Caution (Continued)
the windshield. Any damage that occurs would not be covered by your warranty. Do not allow the wiper arm to touch the windshield.
1. Lift the wiper arm away from the
windshield.
2. Push the release lever (2) to
disengage the hook and push the wiper arm (1) out of the blade assembly (3).
3. Push the new blade assembly securely on the wiper arm until the release lever clicks into place.
Chevrolet Express Owner Manual (GMNA-Localizing-U.S./Canada/Mexico- 6014662) - 2014 - crc - 8/26/13
Black plate (34,1)
10-34
Vehicle Care
Bulb Replacement For the proper type of replacement bulbs, see Replacement Bulbs on page 10-38. For any bulb‐changing procedure not listed in this section, contact your dealer.
Halogen Bulbs
{ Warning
Halogen bulbs have pressurized gas inside and can burst if you drop or scratch the bulb. You or others could be injured. Be sure to read and follow the instructions on the bulb package.
Headlamps
Composite Headlamp
1. High-Beam Headlamp 2. Low-Beam Headlamp To remove the headlamp assembly from the vehicle and access the bulbs: 1. Open the hood. See Hood on
page 10-4.
2. Remove the two bolts from the
headlamp assembly.
3. Lift the headlamp assembly to release the lower tabs from the radiator support.
4. Turn the headlamp forward and
upward to remove it from the grille.
Chevrolet Express Owner Manual (GMNA-Localizing-U.S./Canada/Mexico- 6014662) - 2014 - crc - 8/26/13
Black plate (35,1)
Vehicle Care
10-35
8. Reverse the steps to reinstall the
headlamp assembly. To prevent headlamp vibration and shortened bulb life, be sure to insert the headlamp assembly tabs in the slots at the lower portion of the housing.
Sealed-Beam Headlamp
To replace one of these bulbs: 1. Remove the four screws (1) from
the headlamp retainer (2). Pull the retainer (2) out and set it aside.
2. Pull the bulb (3) forward to gain
access to the electrical connector.
5. Disconnect the electrical
connector.
6. Turn the bulb counterclockwise
7.
one-quarter turn to remove it from the headlamp assembly. Install the new bulb into the headlamp assembly and connect the electrical connector.
1. Headlamp retainer screws 2. Headlamp retainer 3. Sealed-beam headlamp bulb
3. Disconnect the electrical
connector (2) and remove the headlamp bulb (1).
4. Reverse Steps 1–3 to reinstall
the headlamp.
Chevrolet Express Owner Manual (GMNA-Localizing-U.S./Canada/Mexico- 6014662) - 2014 - crc - 8/26/13
Black plate (36,1)
10-36
Vehicle Care
Front Turn Signal, Sidemarker, and Parking Lamps
1. Front Parking and Turn
Signal Lamp
2. Front Sidemarker Lamp To replace the front turn signal, sidemarker, and/or parking lamp bulb(s):
1. Use a small tool to unlatch the
outboard clip on the lamp by pushing inboard and prying the lamp assembly forward.
2. Remove the lamp from the grille. 3. Turn the bulb socket
counterclockwise one-quarter turn and remove it from the lamp assembly.
4. Remove the bulb from the
socket by pulling it straight out.
5. Replace the bulb. 6. Turn the bulb socket clockwise
to reinstall it in the lamp assembly.
7. Reinstall the lamp assembly into
the grille until the outboard clip snaps into place.
Taillamps To replace a taillamp/turn signal lamp or back-up lamp bulb:
1. Remove the two inboard nuts from the inside of the taillamp assembly.
Chevrolet Express Owner Manual (GMNA-Localizing-U.S./Canada/Mexico- 6014662) - 2014 - crc - 8/26/13
Black plate (37,1)
5. Remove the taillamp assembly
9. Reinstall the bulb socket by
Vehicle Care
10-37
turning it clockwise into the lamp assembly.
10. Reverse Steps 1–5 to reinstall
the taillamp assembly and applique.
Center High-Mounted Stoplamp (CHMSL) The CHMSL is above the rear doors at the center of the vehicle. To replace a bulb:
from the vehicle.
2. The third nut (3) is under the applique piece (2) above the lamp. Remove the two inboard applique nuts. Pull the applique (2) straight rearward slightly to clear the studs. Then rotate the applique (2) just far enough to gain access to the outer push pins (1).
3. Carefully disconnect the push
pins (1) from the applique bracket.
4. Remove the third nut (3) from
the upper outboard side of the lamp.
6. Remove the taillamp/turn signal
lamp (1) or back-up lamp (2) bulb socket by turning it counterclockwise one-quarter turn and pulling it out of the lamp assembly.
7. Remove the bulb by pulling it
straight out.
8. Push the new bulb into the
socket.
Chevrolet Express Owner Manual (GMNA-Localizing-U.S./Canada/Mexico- 6014662) - 2014 - crc - 8/26/13
Black plate (38,1)
10-38
Vehicle Care
1. Remove the two screws from the
CHMSL assembly.
2. Remove the CHMSL assembly. 3. Turn the bulb socket
counterclockwise one-quarter turn to remove it from the lamp assembly.
4. Pull the old bulb straight out of
the socket and push the new bulb into the socket.
5. Turn the bulb socket clockwise
one-quarter turn to install it in the lamp assembly.
6. Reinstall the CHMSL assembly
and two screws.
Do not block or damage the CHMSL when items are loaded on the roof of the vehicle.
License Plate Lamp
1. Bulb Socket 2. License Plate Bulb Assembly 3. Screws To replace one of these bulbs: 1. Remove the screws (3) that secure the license plate bulb assembly (2).
2. Turn the bulb socket (1)
counterclockwise and pull the bulb straight out of the socket. Install the new bulb.
3.
4. Reverse Steps 1 and 2 to
reinstall the license plate bulb assembly.
Replacement Bulbs
Exterior Lamp
Back-up, Rear Parking, Stoplamp, and Turn Signal Lamp Center High-Mounted Stoplamp (CHMSL) Front Parking and Turn Signal Lamp Front Sidemarker Lamp License Plate Lamp
Bulb
Number 3157KX
912LL
3157KX
194LL
194LL
Chevrolet Express Owner Manual (GMNA-Localizing-U.S./Canada/Mexico- 6014662) - 2014 - crc - 8/26/13
Black plate (39,1)
Exterior Lamp
Headlamps
Composite High-Beam Headlamp Composite Low-Beam Headlamp Sealed Beam Headlamp
Bulb
Number
9005LL
9006LL
H6054
For replacement bulbs not listed here, contact your dealer.
Vehicle Care
10-39
Headlamp Wiring An electrical overload may cause the lamps to go on and off, or in some cases to remain off. Have the headlamp wiring checked right away if the lamps go on and off or remain off. Windshield Wipers If the wiper motor overheats due to heavy snow or ice, the windshield wipers will stop until the motor cools and will then restart. Although the circuit is protected from electrical overload, overload due to heavy snow or ice may cause wiper linkage damage. Always clear ice and heavy snow from the windshield before using the windshield wipers. If the overload is caused by an electrical problem and not snow or ice, be sure to get it fixed.
Electrical System
Electrical System Overload The vehicle has fuses and circuit breakers to protect against an electrical system overload. When the current electrical load is too heavy, the circuit breaker opens and closes, protecting the circuit until the current load returns to normal or the problem is fixed. This greatly reduces the chance of circuit overload and fire caused by electrical problems. Fuses and circuit breakers protect power devices in the vehicle. Replace a bad fuse with a new one of the identical size and rating. If there is a problem on the road and a fuse needs to be replaced, the same amperage fuse can be borrowed. Choose some feature of the vehicle that is not needed to use and replace it as soon as possible.
Chevrolet Express Owner Manual (GMNA-Localizing-U.S./Canada/Mexico- 6014662) - 2014 - crc - 8/26/13
Black plate (40,1)
10-40
Vehicle Care
Fuses and Circuit Breakers The wiring circuits in the vehicle are protected from short circuits by a combination of fuses and circuit breakers. This greatly reduces the chance of fires caused by electrical problems. Look at the silver-colored band inside the fuse. If the band is broken or melted, replace the fuse. Be sure you replace a bad fuse with a new one of the identical size and rating.
Engine Compartment Fuse Block The fuse block is located in the engine compartment on the driver side of the vehicle.
{ Caution
Spilling liquid on any electrical component on the vehicle may damage it. Always keep the covers on any electrical component.
Chevrolet Express Owner Manual (GMNA-Localizing-U.S./Canada/Mexico- 6014662) - 2014 - crc - 8/26/13
Black plate (41,1)
Vehicle Care
10-41
The vehicle may not be equipped with all of the fuses, relays, and features shown.
Mini Fuse
Usage
10
11
1213
Right Stop/Turn Trailer Spare Spare Fuel System Control Module Ignition Body Control Module 5
Body Control Module 7
Body Control Module 4
Instrument Cluster Trailer Wiring Inside Rear Vision Camera Module SpareChevrolet Express Owner Manual (GMNA-Localizing-U.S./Canada/Mexico- 6014662) - 2014 - crc - 8/26/13
Black plate (42,1)
10-42
Vehicle Care
Mini Fuse
Usage
Mini Fuse
Usage
Mini Fuse
Usage
14
16
17
1819
20
2122
23
24
2526
27
28
Windshield Washer Horn Transmission Air Conditioning Compressor Engine Control Module Battery Spare Left Stop/Turn Trailer Spare Spare Fuel Pump Auxiliary Power Outlet Body Control Module 3
Special Equipment Option Airbag29
30
31
32
33
34
3536
51
Steering Wheel Sensor Engine Control Module Ignition/ Glow Plug Module Transmission Control Module Ignition Transmission Control Module Battery Rear Parking Aid Module Spare Fuel Operated Heater Module Fuel System Control Module Battery Left High-Beam Headlamp
52
53
54
55
5658
59
61
6263
64Right High-Beam Headlamp Left Low-Beam Headlamp Right Low-Beam Headlamp Wiper Canister Vent Solenoid Body Control Module 2
Body Control Module 1
Spare Oxygen Sensor 2
(Post), EV Fan (Diesel) Spare Mass Air Flow/ Canister VentChevrolet Express Owner Manual (GMNA-Localizing-U.S./Canada/Mexico- 6014662) - 2014 - crc - 8/26/13
Black plate (43,1)
Mini Fuse
65
66
67
68
69
70
7172
73
75
76Usage Odd Ignition/ Injectors Daytime Running Lamps 2
(LOLVL-V22) (If Equipped) Daytime Running Lamps 1 (UPLVL +V22) (If Equipped) Auxiliary Stop Lamps Trailer Stop Lamps Spare Fuel Heater/Flex Fuel Sensor Body Control Module 6
Lighter/Data Link Connection V6 Fuel Injectors SpareVehicle Care
10-43
Mini Fuse
Usage
Relay
Usage
77
78
79
Oxygen Sensor 2 (Pre) Engine Control Module Powertrain Even Ignition/ Injectors
J-Case Fuse
Usage
41
42
43
44
4546
47
74ABS Motor ABS Module Spare Trailer Wiring Fan High Starter Solenoid Engine Control Module/Powertrain Spare Fan Lo Front Blower
15
37
38
39
4048
49
50
57
60Run/Crank Spare Fuel Pump Crank Air Conditioning Compressor Fan High Powertrain Spare Fan Low Fan Control
Floor Console Fuse Block The floor console fuse block is under the driver seat.
Chevrolet Express Owner Manual (GMNA-Localizing-U.S./Canada/Mexico- 6014662) - 2014 - crc - 8/26/13
Black plate (44,1)
10-44
Vehicle Care
The vehicle may not be equipped with all of the fuses, relays, and features shown.
Mini-Fuse
Usage
F1
F2F3
F4
F5
F6F7
F8
F9
F10
F11
Empty Steering Wheel Sensor Auxiliary Parking Lamps (Cut-Away) Front Park Lamps Trailer Park Lamps Upfitter Park Lamps Right Rear Park Lamp Left Rear Park Lamp Outside Rearview Mirror Switch Airbag/Automatic Occupant Sensing OnStar® (If Equipped)
Chevrolet Express Owner Manual (GMNA-Localizing-U.S./Canada/Mexico- 6014662) - 2014 - crc - 8/26/13
Black plate (45,1)
Vehicle Care
10-45
Mini-Fuse
Usage
Mini-Fuse
Usage
Mini-Fuse
Usage
F12
F13F14
F15
F17F18
F19
F20F21
Empty Heating, Ventilation and Air Conditioning 2
Heating, Ventilation and Air Conditioning 1
Empty Outside Rearview Mirror Heater Rear Window Defogger Compass Radio/Chime/ SiriusXM Satellite Radio (If Equipped) Remote Function Actuator/Tire Pressure MonitorF22
F23
F25F26
F27
F30F31
F32
F33
F34F35
Ignition Switch/ Discrete Logic Ignition Sensor (PK3) Instrument Cluster Heating, Ventilation and Air Conditioning Control Auxiliary/Trailer Backup Taillamps Backup Upfitter Courtesy Lamps Front Door Lock Rear Door Lock Cargo Door Unlock Passenger Door Unlock Rear Passenger Door Unlock
F36
F37
F38Driver Door Unlock Empty Empty
J-Case Fuse
Usage
F16
F24
F28F29
Upfitter Auxiliary 1
Gas Ambulance Empty Upfitter Auxiliary 2
Reading Lamps Gas Ambulance Rear BlowerRelays
Usage
K1
K2
K3
Run (High Current Micro) Empty (High Current Micro) Park Lamps (High Current Micro)
Chevrolet Express Owner Manual (GMNA-Localizing-U.S./Canada/Mexico- 6014662) - 2014 - crc - 8/26/13
Black plate (46,1)
10-46
Vehicle Care
Relays
Usage
Wheels and Tires
K4
K5
K6
Upfitter Auxiliary 2
(High Current Mini) Rear Defogger (High Current Micro) Retained Accessory Power (RAP) (High Current Micro)Circuit Breaker
CB1
CB2Usage
Power Seats Power Windows
Tires Every new GM vehicle has high-quality tires made by a leading tire manufacturer. See the warranty manual for information regarding the tire warranty and where to get service. For additional information refer to the tire manufacturer.
{ Warning
. Poorly maintained and
improperly used tires are dangerous.
. Overloading the tires can
cause overheating as a result of too much flexing. There could be a blowout
(Continued)
Warning (Continued)
and a serious crash. See Vehicle Load Limits on page 9-10.
. Underinflated tires pose
the same danger as overloaded tires. The resulting crash could cause serious injury. Check all tires frequently to maintain the recommended pressure. Tire pressure should be checked when the tires are cold.
. Overinflated tires are more likely to be cut, punctured, or broken by a sudden impact — such as when hitting a pothole. Keep tires at the recommended pressure.
(Continued)
Chevrolet Express Owner Manual (GMNA-Localizing-U.S./Canada/Mexico- 6014662) - 2014 - crc - 8/26/13
Black plate (47,1)
All-Season Tires This vehicle may come with all-season tires. These tires are designed to provide good overall performance on most road surfaces and weather conditions. Original equipment tires designed to GM's specific tire performance criteria have a TPC specification code molded onto the sidewall. Original equipment all-season tires can be identified by the last two characters of this TPC code, which will be “MS.” Consider installing winter tires on the vehicle if frequent driving on snow or ice-covered roads is expected. All-season tires provide adequate performance for most winter driving conditions, but they may not offer the same level of traction or performance as winter tires on snow or ice-covered roads. See Winter Tires on page 10-47.
Vehicle Care
10-47
Winter Tires This vehicle was not originally equipped with winter tires. Winter tires are designed for increased traction on snow and ice-covered roads. Consider installing winter tires on the vehicle if frequent driving on ice or snow covered roads is expected. See your dealer for details regarding winter tire availability and proper tire selection. Also, see Buying New Tires on page 10-64. With winter tires, there may be decreased dry road traction, increased road noise, and shorter tread life. After changing to winter tires, be alert for changes in vehicle handling and braking. If using winter tires: . Use tires of the same brand and
tread type on all four wheel positions.
Warning (Continued)
. Worn or old tires can
cause a crash. If the tread is badly worn, replace them.
. Replace any tires that
have been damaged by impacts with potholes, curbs, etc.
. Improperly repaired tires can cause a crash. Only the dealer or an authorized tire service center should repair, replace, dismount, and mount the tires.
. Do not spin the tires in
excess of 56 km/h (35 mph) on slippery surfaces such as snow, mud, ice, etc. Excessive spinning may cause the tires to explode.
Chevrolet Express Owner Manual (GMNA-Localizing-U.S./Canada/Mexico- 6014662) - 2014 - crc - 8/26/13
Black plate (48,1)
10-48
Vehicle Care
. Use only radial ply tires of the
same size, load range, and speed rating as the original equipment tires.
Winter tires with the same speed rating as the original equipment tires may not be available for H, V, W, Y, and ZR speed rated tires. If winter tires with a lower speed rating are chosen, never exceed the tire's maximum speed capability.
All-Terrain Tires This vehicle may have All-Terrain Tires. These tires provide good performance on most road surfaces, weather conditions, and for off-road driving. The tread pattern on these tires may wear more quickly than other tires. Consider rotating the tires more frequently than at 12 000 km (7,500 mi) intervals if irregular wear is noted when the tires are inspected. See Tire Inspection on page 10-61.
Tire Sidewall Labeling Useful information about a tire is molded into the sidewall. The examples show a typical passenger vehicle and light truck tire sidewall.
Passenger (P-Metric) Tire
(1) Tire Size: The tire size code is a combination of letters and numbers used to define a particular tire's width, height, aspect ratio, construction type,
and service description. See the “Tire Size” illustration later in this section for more detail. (2) TPC Spec (Tire Performance Criteria Specification): Original equipment tires designed to GM's specific tire performance criteria have a TPC specification code molded onto the sidewall. GM's TPC specifications meet or exceed all federal safety guidelines. (3) DOT (Department of Transportation): The Department of Transportation (DOT) code indicates that the tire is in compliance with the U.S. Department of Transportation Motor Vehicle Safety Standards.
Chevrolet Express Owner Manual (GMNA-Localizing-U.S./Canada/Mexico- 6014662) - 2014 - crc - 8/26/13
Black plate (49,1)
Vehicle Care
10-49
(6) Uniform Tire Quality Grading (UTQG): Tire manufacturers are required to grade tires based on three performance factors: treadwear, traction, and temperature resistance. For more information, see Uniform Tire Quality Grading on page 10-66. (7) Maximum Cold Inflation Load Limit: Maximum load that can be carried and the maximum pressure needed to support that load. For information on recommended tire pressure see Tire Pressure on page 10-55 and Vehicle Load Limits on page 9-10.
DOT Tire Date of Manufacture: The last four digits of the TIN indicate the tire manufactured date. The first two digits represent the week (01-52) and the last two digits, the year. For example, the third week of the year 2010 would have a four-digit DOT date of 0310. (4) Tire Identification Number (TIN): The letters and numbers following the DOT code are the Tire Identification Number (TIN). The TIN shows the manufacturer and plant code, tire size, and date the tire was manufactured. The TIN is molded onto both sides of the tire, although only one side may have the date of manufacture. (5) Tire Ply Material: The type of cord and number of plies in the sidewall and under the tread.
Light Truck (LT-Metric) Tire
(1) Tire Size: The tire size code is a combination of letters and numbers used to define a particular tire's width, height, aspect ratio, construction type, and service description. See the “Tire Size” illustration later in this section for more detail.
Chevrolet Express Owner Manual (GMNA-Localizing-U.S./Canada/Mexico- 6014662) - 2014 - crc - 8/26/13
Black plate (50,1)
10-50
Vehicle Care
(2) TPC Spec (Tire Performance Criteria Specification): Original equipment tires designed to GM's specific tire performance criteria have a TPC specification code molded onto the sidewall. GM's TPC specifications meet or exceed all federal safety guidelines. This does not apply to Goodyear LT225/75R16 G949
RSA and Goodyear LT225/ 75R16 G933 RSD commercial truck tires. (3) Dual Tire Maximum Load: Maximum load that can be carried and the maximum pressure needed to support that load when used in a dual configuration. For information on recommended tire pressure see Tire Pressure on page 10-55
and Vehicle Load Limits on page 9-10.(4) DOT (Department of Transportation): The Department of Transportation (DOT) code indicates that the tire is in compliance with the U.S. Department of Transportation Motor Vehicle Safety Standards. DOT Tire Date of Manufacture: The last four digits of the TIN indicate the tire manufactured date. The first two digits represent the week (01-52) and the last two digits, the year. For example, the third week of the year 2010 would have a four-digit DOT date of 0310. (5) Tire Identification Number (TIN): The letters and numbers following the DOT code are the Tire Identification Number (TIN). The TIN shows the manufacturer and plant code, tire size, and date the tire was
manufactured. The TIN is molded onto both sides of the tire, although only one side may have the date of manufacture. (6) Tire Ply Material: The type of cord and number of plies in the sidewall and under the tread. (7) Single Tire Maximum Load: Maximum load that can be carried and the maximum pressure needed to support that load when used as a single. For information on recommended tire pressure see Tire Pressure on page 10-55 and Vehicle Load Limits on page 9-10.
Chevrolet Express Owner Manual (GMNA-Localizing-U.S./Canada/Mexico- 6014662) - 2014 - crc - 8/26/13
Black plate (51,1)
Tire Designations
Tire Size The following examples show the different parts of a tire size.
Passenger (P-Metric) Tire
(1) Passenger (P-Metric) Tire: The United States version of a metric tire sizing system. The letter P as the first character in the tire size means a passenger vehicle tire engineered to standards set by the U.S. Tire and Rim Association. (2) Tire Width: The three-digit number indicates the tire section width in millimeters from sidewall to sidewall.
(3) Aspect Ratio: A two-digit number that indicates the tire height-to-width measurements. For example, if the tire size aspect ratio is 75, as shown in item 3 of the illustration, it would mean that the tire's sidewall is 75 percent as high as it is wide. (4) Construction Code: A letter code is used to indicate the type of ply construction in the tire. The letter R means radial ply construction; the letter D means diagonal or bias ply construction; and the letter B means belted-bias ply construction. (5) Rim Diameter: Diameter of the wheel in inches. (6) Service Description: These characters represent the load index and speed rating of the tire. The load index represents the load carrying capacity a tire
Vehicle Care
10-51
is certified to carry. The speed rating is the maximum speed a tire is certified to carry a load.
Light Truck (LT-Metric) Tire
(1) Light Truck (LT-Metric) Tire: The United States version of a metric tire sizing system. The letters LT as the first two characters in the tire size mean a light truck tire engineered to standards set by the U.S. Tire and Rim Association. (2) Tire Width: The three-digit number indicates the tire section width in millimeters from sidewall to sidewall.
Chevrolet Express Owner Manual (GMNA-Localizing-U.S./Canada/Mexico- 6014662) - 2014 - crc - 8/26/13
Black plate (52,1)
10-52
Vehicle Care
(3) Aspect Ratio: A two-digit number that indicates the tire height-to-width measurements. For example, if the tire size aspect ratio is 75, as shown in item 3 of the light truck (LT-Metric) tire illustration, it would mean that the tire's sidewall is 75 percent as high as it is wide. (4) Construction Code: A letter code is used to indicate the type of ply construction in the tire. The letter R means radial ply construction; the letter D means diagonal or bias ply construction; and the letter B means belted-bias ply construction. (5) Rim Diameter: Diameter of the wheel in inches.
(6) Load Range: Load Range. (7) Service Description: The service description indicates the load index and speed rating of a tire. If two numbers are given as in the example, 120/116, then this represents the load index for single versus dual wheel usage (single/dual). The speed rating is the maximum speed a tire is certified to carry a load. This does not apply to Goodyear LT225/75R16 G949 RSA and Goodyear LT225/75R16 G933
RSD commercial truck tires; see the dual tire and single tire maximum load and load range letter designations on the tire sidewall.Tire Terminology and Definitions Air Pressure: The amount of air inside the tire pressing outward on each square inch of the tire. Air pressure is expressed in kPa (kilopascal) or psi (pounds per square inch). Accessory Weight: The combined weight of optional accessories. Some examples of optional accessories are automatic transmission, power windows, power seats, and air conditioning. Aspect Ratio: The relationship of a tire's height to its width. Belt: A rubber coated layer of cords between the plies and the tread. Cords may be made from steel or other reinforcing materials.
Chevrolet Express Owner Manual (GMNA-Localizing-U.S./Canada/Mexico- 6014662) - 2014 - crc - 8/26/13
Black plate (53,1)
Bead: The tire bead contains steel wires wrapped by steel cords that hold the tire onto the rim. Bias Ply Tire: A pneumatic tire in which the plies are laid at alternate angles less than 90 degrees to the centerline of the tread. Cold Tire Pressure: The amount of air pressure in a tire, measured in kPa (kilopascal) or psi (pounds per square inch) before a tire has built up heat from driving. See Tire Pressure on page 10-55. Curb Weight: The weight of a motor vehicle with standard and optional equipment including the maximum capacity of fuel, oil, and coolant, but without passengers and cargo.
DOT Markings: A code molded into the sidewall of a tire signifying that the tire is in compliance with the U.S. Department of Transportation (DOT) Motor Vehicle Safety Standards. The DOT code includes the Tire Identification Number (TIN), an alphanumeric designator which can also identify the tire manufacturer, production plant, brand, and date of production. GVWR: Gross Vehicle Weight Rating. See Vehicle Load Limits on page 9-10. GAWR FRT: Gross Axle Weight Rating for the front axle. See Vehicle Load Limits on page 9-10. GAWR RR: Gross Axle Weight Rating for the rear axle. See Vehicle Load Limits on page 9-10.
Vehicle Care
10-53
Intended Outboard Sidewall: The side of an asymmetrical tire that must always face outward when mounted on a vehicle. Kilopascal (kPa): The metric unit for air pressure. Light Truck (LT-Metric) Tire: A tire used on light duty trucks and some multipurpose passenger vehicles. Load Index: An assigned number ranging from 1 to 279
that corresponds to the load carrying capacity of a tire. Maximum Inflation Pressure: The maximum air pressure to which a cold tire can be inflated. The maximum air pressure is molded onto the sidewall. Maximum Load Rating: The load rating for a tire at the maximum permissible inflation pressure for that tire.Chevrolet Express Owner Manual (GMNA-Localizing-U.S./Canada/Mexico- 6014662) - 2014 - crc - 8/26/13
Black plate (54,1)
10-54
Vehicle Care
Maximum Loaded Vehicle Weight: The sum of curb weight, accessory weight, vehicle capacity weight, and production options weight. Normal Occupant Weight: The number of occupants a vehicle is designed to seat multiplied by 68 kg (150 lb). See Vehicle Load Limits on page 9-10. Occupant Distribution: Designated seating positions. Outward Facing Sidewall: The side of an asymmetrical tire that has a particular side that faces outward when mounted on a vehicle. The side of the tire that contains a whitewall, bears white lettering, or bears manufacturer, brand, and/or model name molding that is higher or deeper than the same moldings on the other sidewall of the tire.
Passenger (P-Metric) Tire: A tire used on passenger cars and some light duty trucks and multipurpose vehicles. Recommended Inflation Pressure: Vehicle manufacturer's recommended tire inflation pressure as shown on the tire placard. See Tire Pressure on page 10-55 and Vehicle Load Limits on page 9-10. Radial Ply Tire: A pneumatic tire in which the ply cords that extend to the beads are laid at 90 degrees to the centerline of the tread. Rim: A metal support for a tire and upon which the tire beads are seated. Sidewall: The portion of a tire between the tread and the bead.
Speed Rating: An alphanumeric code assigned to a tire indicating the maximum speed at which a tire can operate. Traction: The friction between the tire and the road surface. The amount of grip provided. Tread: The portion of a tire that comes into contact with the road. Treadwear Indicators: Narrow bands, sometimes called wear bars, that show across the tread of a tire when only 1.6 mm (1/16 in) of tread remains. See When It Is Time for New Tires on page 10-63. UTQGS (Uniform Tire Quality Grading Standards): A tire information system that provides consumers with ratings for a tire's traction, temperature, and treadwear. Ratings are
Chevrolet Express Owner Manual (GMNA-Localizing-U.S./Canada/Mexico- 6014662) - 2014 - crc - 8/26/13
Black plate (55,1)
determined by tire manufacturers using government testing procedures. The ratings are molded into the sidewall of the tire. See Uniform Tire Quality Grading on page 10-66. Vehicle Capacity Weight: The number of designated seating positions multiplied by 68 kg (150 lb) plus the rated cargo load. See Vehicle Load Limits on page 9-10. Vehicle Maximum Load on the Tire: Load on an individual tire due to curb weight, accessory weight, occupant weight, and cargo weight. Vehicle Placard: A label permanently attached to a vehicle showing the vehicle capacity weight and the original equipment tire size and recommended inflation pressure.
See “Tire and Loading Information Label” under Vehicle Load Limits on page 9-10.
Tire Pressure Tires need the correct amount of air pressure to operate effectively.
{ Caution
Neither tire underinflation nor overinflation is good. Underinflated tires, or tires that do not have enough air, can result in:
. Tire overloading and
overheating which could lead to a blowout.
. Premature or irregular wear. . Poor handling. . Reduced fuel economy.
(Continued)
Vehicle Care
10-55
Caution (Continued)
Overinflated tires, or tires that have too much air, can result in:
. Unusual wear. . Poor handling. . Rough ride. . Needless damage from
road hazards.
The Tire and Loading Information label on the vehicle indicates the original equipment tires and the correct cold tire inflation pressures. The recommended pressure is the minimum air pressure needed to support the vehicle's maximum load carrying capacity.
Chevrolet Express Owner Manual (GMNA-Localizing-U.S./Canada/Mexico- 6014662) - 2014 - crc - 8/26/13
Black plate (56,1)
10-56
Vehicle Care
For additional information regarding how much weight the vehicle can carry, and an example of the Tire and Loading Information label, see Vehicle Load Limits on page 9-10. How the vehicle is loaded affects vehicle handling and ride comfort. Never load the vehicle with more weight than it was designed to carry.
When to Check Check the tires once a month or more. Do not forget the spare tire, if the vehicle has one. See Full-Size Spare Tire on page 10-79 for additional information.
How to Check Use a good quality pocket-type gauge to check tire pressure. Proper tire inflation cannot be determined by looking at the tire.
Check the tire inflation pressure when the tires are cold, meaning the vehicle has not been driven for at least three hours or no more than 1.6 km (1 mi). Remove the valve cap from the tire valve stem. Press the tire gauge firmly onto the valve to get a pressure measurement. If the cold tire inflation pressure matches the recommended pressure on the Tire and Loading Information label, no further adjustment is necessary. If the inflation pressure is low, add air until the recommended pressure is reached. If the inflation pressure is high, press on the metal stem in the center of the tire valve to release air. Re-check the tire pressure with the tire gauge. Return the valve caps on the valve stems to prevent leaks and keep out dirt and moisture.
Tire Pressure Monitor System The Tire Pressure Monitor System (TPMS) uses radio and sensor technology to check tire pressure levels. The TPMS sensors monitor the air pressure in your tires and transmit tire pressure readings to a receiver located in the vehicle. Each tire, including the spare (if provided), should be checked monthly when cold and inflated to the inflation pressure recommended by the vehicle manufacturer on the vehicle placard or tire inflation pressure label. (If your vehicle has tires of a different size than the size indicated on the vehicle placard or tire inflation pressure label, you should determine the proper tire inflation pressure for those tires.) As an added safety feature, your vehicle has been equipped with a tire pressure monitoring system (TPMS) that illuminates a low tire
Chevrolet Express Owner Manual (GMNA-Localizing-U.S./Canada/Mexico- 6014662) - 2014 - crc - 8/26/13
Black plate (57,1)
pressure telltale when one or more of your tires is significantly under-inflated. Accordingly, when the low tire pressure telltale illuminates, you should stop and check your tires as soon as possible, and inflate them to the proper pressure. Driving on a significantly under-inflated tire causes the tire to overheat and can lead to tire failure. Under-inflation also reduces fuel efficiency and tire tread life, and may affect the vehicle's handling and stopping ability. Please note that the TPMS is not a substitute for proper tire maintenance, and it is the driver's responsibility to maintain correct tire pressure, even if under-inflation has not reached the level to trigger illumination of the TPMS low tire pressure telltale. Your vehicle has also been equipped with a TPMS malfunction indicator to indicate when the system is not operating properly.
The TPMS malfunction indicator is combined with the low tire pressure telltale. When the system detects a malfunction, the telltale will flash for approximately one minute and then remain continuously illuminated. This sequence will continue upon subsequent vehicle start-ups as long as the malfunction exists. When the malfunction indicator is illuminated, the system may not be able to detect or signal low tire pressure as intended. TPMS malfunctions may occur for a variety of reasons, including the installation of replacement or alternate tires or wheels on the vehicle that prevent the TPMS from functioning properly. Always check the TPMS malfunction telltale after replacing one or more tires or wheels on your vehicle to ensure that the replacement or alternate tires and wheels allow the TPMS to continue to function properly. See Tire Pressure Monitor Operation on page 10-57.
Vehicle Care
10-57
See Radio Frequency Statement on page 13-15.
Tire Pressure Monitor Operation This vehicle may have a Tire Pressure Monitor System (TPMS). The TPMS is designed to warn the driver when a low tire pressure condition exists. TPMS sensors are mounted onto each tire and wheel assembly, excluding the spare tire and wheel assembly. The TPMS sensors monitor the air pressure in the tires and transmit the tire pressure readings to a receiver located in the vehicle.
When a low tire pressure condition is detected, the TPMS illuminates the low tire pressure warning light
Chevrolet Express Owner Manual (GMNA-Localizing-U.S./Canada/Mexico- 6014662) - 2014 - crc - 8/26/13
Black plate (58,1)
10-58
Vehicle Care
located on the instrument cluster. If the warning light comes on, stop as soon as possible and inflate the tires to the recommended pressure shown on the Tire and Loading Information label. See Vehicle Load Limits on page 9-10. A message to check the pressure in a specific tire displays in the Driver Information Center (DIC). The low tire pressure warning light and the DIC warning message come on at each ignition cycle until the tires are inflated to the correct inflation pressure. If the vehicle has DIC buttons, tire pressure levels can be viewed. For additional information and details about the DIC operation and displays, see Driver Information Center (DIC) on page 5-25 and Tire Messages on page 5-37. The low tire pressure warning light may come on in cool weather when the vehicle is first started, and then turn off as the vehicle is driven. This could be an early indicator that the
{ Caution
Tire sealant materials are not all the same. A non-approved tire sealant could damage the TPMS sensors. TPMS sensor damage caused by using an incorrect tire sealant is not covered by the vehicle warranty. Always use only the GM approved tire sealant available through your dealer or included in the vehicle.
air pressure is getting low and needs to be inflated to the proper pressure. A Tire and Loading Information label shows the size of the original equipment tires and the correct inflation pressure for the tires when they are cold. See Vehicle Load Limits on page 9-10, for an example of the Tire and Loading Information label and its location. Also see Tire Pressure on page 10-55. The TPMS can warn about a low tire pressure condition but it does not replace normal tire maintenance. See Tire Inspection on page 10-61, Tire Rotation on page 10-61 and Tires on page 10-46.
Chevrolet Express Owner Manual (GMNA-Localizing-U.S./Canada/Mexico- 6014662) - 2014 - crc - 8/26/13
Black plate (59,1)
TPMS Malfunction Light and Message The TPMS will not function properly if one or more of the TPMS sensors are missing or inoperable. When the system detects a malfunction, the low tire pressure warning light flashes for about one minute and then stays on for the remainder of the ignition cycle. A DIC warning message also displays. The malfunction light and DIC warning message come on at each ignition cycle until the problem is corrected. Some of the conditions that can cause these to come on are: . One of the road tires has been
replaced with the spare tire. The spare tire does not have a TPMS sensor. The malfunction light and the DIC message should go off after the road tire is replaced and the sensor matching process is performed successfully. See "TPMS Sensor Matching Process" later in this section.