- Download PDF Manual
-
2006 DURAMAX® Diesel Engine M
Starting and Operating Your Vehicle
Features and Controls ..................................... 2-1
............. 2-2
Instrument Panel ............................................. 3-1
........... 3-2
Driving Your Vehicle ....................................... 4-1
..................................................... 4-2Warning Lights, Gages and Indicators
Towing
Service and Appearance Care .......................... 5-1
Diesel Fuel Requirements and Fuel System ..... 5-2
Checking Things Under the Hood ............... 5-18
Capacities and Specifications ..................... 5-50
Maintenance Schedule ..................................... 6-1
................................ 6-2
Index ......................................................................... 1Maintenance Schedule
Canadian Owners A French language copy of this manual can be obtained from your dealer or from:
Helm, Incorporated P.O. Box 07130
Detroit, MI 48207General Motors, GM, GMC, CHEVROLET, the GM Emblem, the GMC Truck Emblem, the CHEVROLET Emblem, and the names SIERRA, SILVERADO, SAVANA and EXPRESS are registered trademarks of General Motors Corporation. This manual contains information that pertains to the operation of your diesel engine. It also contains your Diesel Maintenance Schedule. The sections in this manual correspond to the sections in your owner manual. This manual, along with your owner manual, will assist you in the proper use and maintenance of your vehicle. Keep this manual with the owner manual in your vehicle, so it will be there if you ever need it while you are on the road. If you sell your vehicle, leave this manual and the owner manual with the vehicle. This manual includes the latest information at the time it was printed. We reserve the rights to make changes in the product after that time without notice.
Litho in U.S.A. Part No. 15105920 B Second Printing
©2005 General Motors Corporation. All Rights Reserved.
ii
Section 2
Features and Controls
Starting and Operating Your Vehicle .................2-2
Starting the Diesel Engine ...............................2-2
Winter Cover (Pickup Models Only) ...................2-6Fuel Operated Heater (FOH) (Van Models Only) ....2-8
Engine Coolant Heater ....................................2-82-1
Starting and Operating Your Vehicle
Starting the Diesel Engine Your diesel engine starts differently than a gasoline engine. Automatic Transmission Move your shift lever to PARK (P) or NEUTRAL (N). Your engine won’t start in any other position — that’s a safety feature. To restart when you’re already moving, use NEUTRAL (N) only. Notice: Do not try to shift to PARK (P) if your vehicle is moving. If you do, you could damage the transmission. Shift to PARK (P) only when your vehicle is stopped. Manual Transmission (Pickup Models Only) Move your shift lever to neutral and hold the clutch pedal to the floor while starting the engine. Your vehicle won’t start if the clutch pedal is not all the way down — that’s a safety feature.
2-2
Starting Your Engine 1. Turn your ignition key to RUN.
Observe the wait to start light. See Wait to Start Light on page 3-7. This light may not come on if the engine is hot.
2. As soon as the wait to start light goes off,
immediately turn the ignition key to START. When the engine starts, let go of the key. Your engine has a fast warm-up glow plug system. The wait to start light will illuminate for a much shorter time than most diesel engines, due to the rapid heating of the glow plug system.
Notice: Holding your key in START for longer than 15 seconds at a time will cause your battery to be drained much sooner. And the excessive heat can damage your starter motor. Notice: starting your vehicle, your vehicle may not run properly. Have your vehicle serviced right away. 3. If the engine does not start after 15 seconds of
If the wait to start light stays on after
cranking, turn the ignition key to LOCK. Wait one minute for the starter to cool, then try the same steps again.
If you’re trying to start your engine after you’ve run out of fuel, follow the steps in Running Out of Fuel on page 5-11.
If you are not in an idling vehicle and the
When your engine is cold, let it run for a few minutes before you move your vehicle. This lets oil pressure build up. Your engine will sound louder when it’s cold. Notice: engine overheats, you would not be there to see the overheated engine indication. This could damage your vehicle. Do not let your engine run when you are not in your vehicle. Cold Weather Starting (Diesel Engine) The following tips will help you get good starting in cold weather. Use the recommended engine oil when the outside temperature drops below freezing. See Engine Oil on page 5-21. When the outside temperature drops below 0° F (–18°C), use of the engine coolant heater is recommended. If you experience longer cranking times, notice an unusual amount of exhaust smoke or are at higher altitudes (over 7,000 ft. or 2 135 m), you may use your engine coolant heater. See Engine Coolant Heater on page 2-8. See Diesel Fuel Requirements and Fuel System on page 5-2 for information on what fuel to use in cold weather.
If Your Diesel Engine Won’t Start If you’ve run out of fuel, look at Running Out of Fuel on page 5-11. See Diesel Fuel Requirements and Fuel System on page 5-2. If you’re not out of fuel, and your engine won’t start, do this: Turn your ignition key to RUN. Immediately after the wait to start light goes off, turn the ignition key to START. If the light doesn’t go off, wait a few seconds, then try starting your engine again. See your dealer as soon as you can for a starting system check. If the light comes on and then goes off and you know your batteries are charged, but your engine still won’t start, your vehicle needs service. If the light does not come on when the engine is cold, your vehicle needs service. If your batteries don’t have enough charge to start your engine, see “Battery” in the owner’s manual Index. Be sure you have the right oil for your engine, and that you’ve changed the oil at the proper times. If you use the wrong oil, your engine may be harder to start.
2-3
For pickup models, this feature can be turned off and on using the DIC steering wheel control buttons. If your vehicle is not equipped with the DIC steering wheel control buttons, do the following to turn on this feature: 1. Turn the ignition to RUN, with the vehicle off. 2. Press the accelerator pedal to the floor and hold
while quickly pressing the brake pedal three times in less than eight seconds.
3. Release the accelerator pedal and start the engine. When the engine is started, it will slowly ramp up to the high idle speed after a delay of a few seconds up to approximately two minutes. For this method to work properly there must be no throttle or brake pedal faults. The engine idle speed will return to normal once the following conditions are met: • Once engine coolant temperature reaches
150°F (65°C).
• Air intake temperature reaches 32°F (0°C).
Be sure you are using the proper fuel for existing weather conditions. See Diesel Fuel Requirements and Fuel System on page 5-2. If the engine starts, runs a short time, then stops, your vehicle needs service.
{CAUTION:
Do not use gasoline or starting aids, such as ether, in the air intake. They could damage your engine. There could also be a fire, which could cause serious personal injury.
Elevated Idle/Exhaust Restrictor The engine has a cold temperature high idle and exhaust restrictor feature which elevates the engines idle speed from 680 to 1200 rpms, and restricts the exhaust gas flow, when outside temperatures are below 32°F (0°C), and the engine coolant temperature is below 150°F (65°C.) This feature enhances heater performance by raising the engine coolant temperature faster.
2-4
The high idle speed will be temporarily interrupted and the engine speed will return to normal if any of the following conditions occur: • The brake pedal is applied. • The accelerator pedal is pressed. • The automatic transmission is shifted out of
PARK (P) or NEUTRAL (N).
• The clutch pedal on the manual transmission is
pressed (pickup models). • Vehicle speed is detected. Once these inputs are removed, the engine idle speed will slowly ramp back up to high idle after the normal delay, if the conditions for engine coolant temperature and air intake temperature are still met.
Manual High Idle System (Van Models Only)
If your vehicle has this feature, the manual high idle switch is located on the instrument panel.
This system can be used to increase your engine idle speed whenever the following conditions are met: • The brake pedal is not pressed. • The vehicle speed is below about 5 mph (8 km/h). • The transmission is in NEUTRAL (N) or PARK (P). The manual high idle feature is activated by pressing the switch on the instrument panel. When the switch is pressed again, or any of the previous conditions are not met, manual high idle will be deactivated. The manual high idle has been preset at the factory. Your dealer may change the setting to fit your needs.
2-5
Winter Cover (Pickup Models Only) If your vehicle includes a winter cover, it will enhance heater performance and will reduce the amount of time it takes to warm the inside of your vehicle in extremely cold conditions (below 0°F (−18°C)). The winter cover consists of two parts, the front bumper cover (if equipped) and the grille cover. The winter cover installs over the front bumper of your vehicle and restricts the air flowing to the engine compartment by covering the radiator grille.
Usage Guidelines The winter cover should only be used while operating your vehicle in extremely cold temperatures. In these temperatures, the vehicle does not need a large amount of air to properly cool the engine. During periods of operation when more airflow is required to cool the vehicle, the winter cover should not be used. The following usage guidelines will allow adequate airflow for proper radiator grille and air cooler performance: • Do not use the winter cover when temperatures are expected to be above 32°F (0°C). Use of the cover in these conditions could cause your vehicle to overheat. If this happens while the cover is being used, remove the cover.
• Do not use the winter cover if towing a trailer. The added power needed to tow a trailer requires the radiator grille to have full airflow under all conditions. Your vehicle may overheat if the cover is used while towing a trailer.
• Do not modify the cover. The winter cover does
not cover some sections of the front of the vehicle because these openings are needed to provide enough airflow to the radiator grille and air cooler in extremely cold temperatures.
2-6
• When the winter cover is used, the temperature
sensor found on the inside rearview mirror will not function properly. The temperature that is shown will be incorrect.
Installation Instructions The following instructions explain how to install and remove your vehicle’s winter cover. When installing or removing the cover please refer to the “Usage Guidelines” mentioned previously. When you first try to fit the cover it may appear to be undersized. This is due to the nature of the special vinyl, which will stretch during installation to ensure a tight fit. For this reason, the initial installation of the cover is best performed when the winter cover is warm. If you are required to use a front license plate, simply cut the black stitches on the back of the patch. Grille Cover Installation 1. Pre-bend all the small black tabs into the
shape of a J.
2. Fasten the snaps. 3. Wrap the elastic loop around the hood stopper. 4. Hook all the tabs to the edge of the grille. 5. Hook all clips to the bottom of the grille.
Lower Cover Installation 1. Pre-bend all of the small black tabs into the
shape of a J.
2. Fasten each tab to
edge of the bumper, as illustrated.
To remove the winter cover, reverse the steps listed previously.
2-7
Fuel Operated Heater (FOH) (Van Models Only) If your vehicle includes a fuel operated heater (FOH), it will enhance heater performance and will reduce the amount of time it takes to warm the inside of your vehicle in cold conditions below 40°F (4.4°C). The fuel operated heater is installed in the frame rail on the driver’s side of the vehicle and uses diesel to warm up the engine coolant, which finally warms up the passenger’s cabin air. The FOH works automatically, depending on the fuel level, engine coolant temperature and outside air temperature. It works only with the engine running.
Engine Coolant Heater In very cold weather, 0°F (−18°C) or colder, the engine coolant heater can help. You’ll get easier starting and better fuel economy during engine warm-up. Usually, the coolant heater should be plugged in a minimum of four hours prior to starting your vehicle.
To Use the Engine Coolant Heater 1. Turn off the engine. 2. Open the hood and unwrap the electrical cord. The cord is located in the engine compartment, on the passenger’s side of the vehicle, near the right side engine mount.
3. Plug it into a normal, grounded 110-volt AC outlet.
{CAUTION:
Plugging the cord into an ungrounded outlet could cause an electrical shock. Also, the wrong kind of extension cord could overheat and cause a fire. You could be seriously injured. Plug the cord into a properly grounded three-prong 110-volt AC outlet. If the cord will not reach, use a heavy-duty three-prong extension cord rated for at least 15 amps.
2-8
4. Before starting the engine, be sure to unplug and
store the cord as it was before to keep it away from moving engine parts. If you don’t, it could be damaged.
How long should you keep the coolant heater plugged in? The answer depends on the outside temperature. You may wish to use your coolant heater to improve ease of starting at temperatures between 0°F (−18°C) and −20°F (−29°C).
Keep the coolant heater plugged in for a minimum of four hours. At temperatures below −20°F (−29°C), the coolant heater should remain plugged in for at least eight hours. It will not harm either the coolant heater or the vehicle to leave the coolant heater plugged in longer than the times stated. Be sure to remove and store the cord before starting the engine. See Diesel Fuel Requirements and Fuel System on page 5-2 for information on what fuel to use in cold weather.
2-9
✍ NOTES
2-10
Section 3
Instrument Panel
Warning Lights, Gages and Indicators ...............3-2
Instrument Panel Cluster .................................3-2
Malfunction Indicator Lamp ..............................3-4
Oil Pressure Gage ..........................................3-6
Wait to Start Light ..........................................3-7Reduced Engine Power Light (Van Models Only) ...3-7
Fuel Gage .....................................................3-8
Water in Fuel Warning Light (Van Models Only) .....3-9
Driver Information Center (DIC)(Pickup Models Only) ....................................3-9
3-1
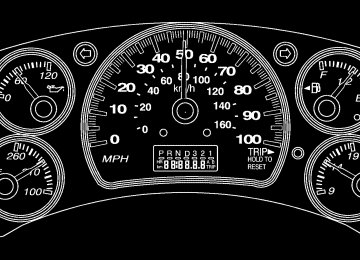
Warning Lights, Gages and Indicators Instrument Panel Cluster
United States Pickup automatic transmission version shown, manual transmission and Canada similar
3-2
United States Van version shown, Canada similar
Your instrument cluster is designed to let you know at a glance how your vehicle is running. You’ll know how fast you’re going, about how much fuel you have and many other things you’ll need to know to drive safely and economically.
3-3
Malfunction Indicator Lamp Check Engine Light
Pickup Models
Van Models
Your vehicle has a computer which monitors operation of the fuel, timing, and emission control systems. This system is called OBD II (On-Board Diagnostics-Second Generation) and is intended to assure that emissions are at acceptable levels for the life of the vehicle, helping to produce a cleaner environment.
If you keep driving your vehicle with this
The check engine light comes on to indicate when service is required. Malfunctions often will be indicated by the system before any problem is apparent. This may prevent more serious damage to your vehicle. This system is also designed to assist your service technician in correctly diagnosing any malfunction. Notice: light on, after awhile, your emission controls may not work as well, your fuel economy may not be as good, and your engine may not run as smoothly. This could lead to costly repairs that may not be covered by your warranty. Notice: Modifications made to the engine, transmission, exhaust, intake, or fuel system of your vehicle or the replacement of the original tires with other than those of the same Tire Performance Criteria (TPC) can affect your vehicle’s emission controls and may cause this light to come on. Modifications to these systems could lead to costly repairs not covered by your warranty. This may also result in a failure to pass a required Emission Inspection/Maintenance test.
3-4
If the Light Comes On This light should come on, as a check to show you it is working, when the ignition is on and the engine is not running. If it does not, have it repaired. This light will also come on if an emission control system malfunction has been detected on your vehicle. Diagnosis and service may be required. You also may be able to correct the emission system malfunction by considering the following: Did you just drive through a deep puddle of water? If so, your electrical system may be wet. The condition will usually be corrected when the electrical system dries out. A few driving trips should turn the light off. Are you low on fuel? As your engine starts to run out of fuel, your engine may not run as efficiently as designed since small amounts of air are sucked into the fuel line. The system can detect this. Adding fuel should correct this condition. It will take a few driving trips to turn the light off. If none of the above steps have made the light turn off, your dealer can check the vehicle. Your dealer has the proper test equipment and diagnostic tools to fix any mechanical or electrical problems that may have developed.
Emissions Inspection and Maintenance Programs Some state/provincial and local governments have or may begin programs to inspect the emission control equipment on your vehicle. Failure to pass this inspection could prevent you from getting a vehicle registration. Here are some things you need to know in order to help your vehicle pass an inspection: Your vehicle will not pass this inspection if the check engine light is on or not working properly. Your vehicle will not pass this inspection if the OBD (on-board diagnostic) system determines that critical emission control systems have not been completely diagnosed by the system. The vehicle would be considered not ready for inspection. This can happen if you have recently replaced your battery or if your battery has run down. The diagnostic system is designed to evaluate critical emission control systems during normal driving. This may take several days of routine driving. If you have done this and your vehicle still does not pass the inspection for lack of OBD system readiness, your GM dealer can prepare the vehicle for inspection.
3-5
Oil Pressure Gage
United States
(Pickup Models)
Canada
(Pickup Models)
United States (Van Models)
Canada
(Van Models)
3-6
The oil pressure gage shows the engine oil pressure in psi (pounds per square inch) when the engine is running. Canadian vehicles indicate pressure in kPa (kilopascals). Oil pressure may vary under different driving conditions and oil types. The DURAMAX® engine may generate oil pressure in excess of 80 psi (548 kPa) under certain conditions, especially in cold temperatures. This is a normal operating range.
{CAUTION:
Do not keep driving if the oil pressure is low. If you do, your engine can become so hot that it catches fire. You or others could be burned. Check your oil as soon as possible and have your vehicle serviced.
Notice: Lack of proper engine oil maintenance may damage the engine. The repairs would not be covered by your warranty. Always follow the maintenance schedule in this manual for changing engine oil.
Reduced Engine Power Light (Van Models Only)
If the reduced engine power light comes on while you are driving, the computer is indicating that your vehicle has a problem. You should take your vehicle in for service soon.
Wait to Start Light
Your diesel engine has a glow plug system to aid in starting your vehicle.
For pickup models, this light shows that the system is functioning properly and tells you when the engine is ready to be started. For van models, an instrument panel WAIT TO START indicator light shows that the system is functioning properly and tells you when the engine is ready to be started. Your vehicle has a fast warm-up glow plug system. The wait to start light will illuminate for a considerably shorter time than most diesel engines due to the rapid heating of the glow plug system. For more information, see Starting the Diesel Engine on page 2-2.
3-7
Fuel Gage
Pickup Models, United States version shown
Pickup Models,
Canada
version shown
Van Models
3-8
When the ignition is on, the fuel gage shows you approximately how much fuel you have left in your tank. The gage will first indicate E (empty) before you are out of fuel, but you should get more fuel as soon as possible. Listed are four situations you may experience with your fuel gage: • At the gas station, the fuel pump shuts off before
the gage reads F (full).
• It takes a little more or less fuel to fill up than the fuel gage indicated. For example, the gage may have indicated the tank was half full, but it actually took a little more or less than half the tank’s capacity to fill the tank.
• The gage moves a little when you turn a corner or
speed up.
• The gage doesn’t go back to E (empty) when you
turn off the ignition.
None of these indicate a problem with the fuel gage. For information on how to fill your fuel tank, see Filling the Tank on page 5-15. Your vehicle also has a fuel cooler. To clean, powerwash the bottom of the vehicle.
Water in Fuel Warning Light (Van Models Only)
The light will come on to warn you if there is water in the diesel fuel system.
For more information on how this light works, see Diesel Fuel Requirements and Fuel System on page 5-2. Driver Information Center (DIC) (Pickup Models Only) The Driver Information Center (DIC) is located on the instrument panel cluster above the steering wheel. The DIC comes on when the ignition is on. After a short delay the DIC will display the current driver and the information that was last displayed before the engine was last turned off. If a problem is detected, a warning message will appear on the display. Pressing the select button on the DIC steering wheel buttons, or the trip odometer reset stem for vehicles without DIC steering wheel buttons, will acknowledge some current warning or service messages.
Some messages that your DURAMAX® diesel may show are: ELEVATED IDLE OFF This message will appear when the elevated idle/exhaust restrictor feature has been turned off. For more information on the elevated idle/exhaust restrictor feature, see Starting the Diesel Engine on page 2-2. ELEVATED IDLE ON This message will appear when the elevated idle/exhaust restrictor feature has been turned on. For more information on the elevated idle/exhaust restrictor feature, see Starting the Diesel Engine on page 2-2. REDUCED ENGINE POWER A computer monitors the operation of the electric accelerator. If the REDUCED ENGINE POWER message comes on while you are driving, the computer is indicating that your vehicle has a problem. You should take your vehicle in for service soon. WATER IN FUEL This message will come on to warn you if there is water in the diesel fuel system. For more information on how this message works, see Diesel Fuel Requirements and Fuel System on page 5-2.
3-9
FUEL FILTER LIFE ###% This feature is available on vehicles with steering wheel controls. When the fuel button is pressed and FUEL FILTER LIFE appears on the display, this information will give the percentage of fuel filter life remaining. FUEL FILTER LIFE RESET This message will appear when a reset is performed either by using the steering wheel controls or the following manual procedure. For vehicles with steering wheel controls, press and hold the select button for five seconds while the FUEL FILTER LIFE message is displayed. This message will appear on the DIC for ten seconds.
For vehicles without steering wheel controls, do the following: 1. Without pressing the pedals, turn the ignition key to
the on position without starting the engine.
2. Wait five seconds. 3. Completely press the brake and the accelerator pedals simultaneously and hold for ten seconds. The system is now reset. 4. Turn the ignition key off. The next time the engine is started, the message will no longer be displayed. Always reset the FUEL FILTER LIFE system after a fuel filter change. CHANGE FUEL FILTER This message will appear on the DIC for ten seconds when a fuel filter change is required. See Fuel Filter Replacement on page 5-12 for more information.
3-10
Section 4
Driving Your Vehicle
Towing ............................................................4-2
Towing a Trailer .............................................4-24-1
Towing
Towing a Trailer When towing at high altitude on steep uphill grades, consider the following: Engine coolant will boil at a lower temperature than sea level. If you turn your engine off immediately after towing at high altitude on steep uphill grades, your vehicle may show signs similar to engine overheating.
To avoid this, let the engine run while parked (preferably on level ground) with automatic transmission equipped vehicles in PARK (P) or manual transmission equipped vehicles in NEUTRAL with the park brake applied for at least five minutes before turning the engine off. If you do get the overheat warning, see Engine Overheating on page 5-39.
4-2
Section 5
Service and Appearance Care
Diesel Fuel Requirements and Fuel System .......5-2
Diesel Engine Fuel .........................................5-2
What Fuel to Use ...........................................5-3
Very Cold Weather Operation ...........................5-5
Water in Fuel .................................................5-5
Water in Fuel Light Chart ................................5-6
Running Out of Fuel .....................................5-11
Fuel Filter Replacement .................................5-12
Filling the Tank ............................................5-15
Filling a Portable Fuel Container .....................5-17Checking Things Under the Hood ....................5-18
Engine Compartment Overview .......................5-18
Engine Oil ...................................................5-21
Engine Oil Life System ..................................5-24
Engine Air Cleaner/Filter ................................5-25
Automatic Transmission Fluid .........................5-29
Engine Coolant .............................................5-34
Radiator Pressure Cap ..................................5-39
Coolant Surge Tank Pressure Cap ..................5-39
Engine Overheating .......................................5-39
Cooling System ............................................5-41
Capacities and Specifications ..........................5-50
Specification Charts ......................................5-505-1
Diesel Fuel Requirements and Fuel System Some states and provinces have restrictions on the purchase of diesel fuel for light-duty vehicles and require you to buy permits or pay special taxes. Some of these restrictions apply only to residents, and others apply to both residents and visitors. These restrictions can change. To learn the current restrictions in any state or province, contact your auto club, the police or other officials.
Diesel Engine Fuel Notice: Diesel fuel or fuel additives not recommended in this manual could damage your fuel system, fuel-operated heater (FOH) (Van models only) and engine. Your warranty would not cover this damage. And: (cid:127) Diesel fuel that has been mixed with engine oil or automatic transmission fluid could damage your engine and emission controls.
(cid:127) Aftermarket diesel fuel additives are not tested by General Motors. Some additives, particularly those which contain alcohol or water emulsifiers, may damage your fuel system. If you believe that unique circumstances call for a fuel additive to be used, consult your dealer for advice.
(cid:127) If you ever run out of diesel fuel, it can be difficult to restart your engine. To avoid all this, never let your tank get empty.
If gasoline is ever accidentally added to the fuel tank, to avoid severe engine damage, do not run the engine until the fuel tank can be drained. If you run out of fuel, Running Out of Fuel on page 5-11
tells you how to restart your engine.5-2
What Fuel to Use In the United States, for best results use No. 2-D diesel fuel year-round (above and below freezing conditions) as oil companies blend No. 2-D fuel to address climate differences. No. 1-D diesel fuel may be used in very cold temperatures (when it stays below 0°F or −18°C); however, it will produce a power and fuel economy loss. Avoid the use of No. 1-D diesel fuel in warm or hot climates. It may result in stalling, poor starting when the engine is hot, and may damage the fuel injection system. At a minimum, the diesel fuel you use should meet the latest version of ASTM specification D 975 (Grade Low Sulfur) in the United States. In addition, the Engine Manufacturers Association (EMA) has identified properties of an improved diesel fuel for better engine performance and durability. Diesel fuels corresponding to the EMA Recommended Guideline on Premium Diesel Fuel (FQP-1A) could provide better starting, less noise, and better vehicle performance. If there are questions about the fuel you are using, contact your fuel supplier.
It is acceptable to use diesel fuel containing up to 5% biodiesel (B5), but the final blended fuel must meet the same specification, ASTM D 975 (Grade Low Sulfur), as other fuels used in your vehicle, and the biodiesel used for making this fuel must meet the latest version of ASTM specification D 6751. Biodiesel is produced from vegetable oils or animal fat that have been chemically modified to reduce the possibility of damage to your fuel system and engine. Higher concentration (i.e., greater than B5) biodiesel-containing fuels or the use of unmodified bio-oils blended into diesel fuel at any concentration is not recommended and could damage your fuel system and engine. Such damage would not be covered by your warranty. If there are questions about the biodiesel-containing fuels you are using, contact your fuel supplier.
5-3
Diesel fuel may foam when you fill your tank. This can cause the automatic pump nozzle to shut off, even though your tank is not full. If this happens, just wait for the foaming to stop and then continue to fill your tank.
{CAUTION:
Heat coming from the engine may cause the fuel to expand and force the fuel out of your tank. If something ignites the fuel, a fire could start and people could be burned. To help avoid this, fill your fuel tank only until the automatic nozzle shuts off. Do not try to top it off.
What Fuel to Use in Canada Canadian fuels are blended for seasonal changes. Diesel Type “A” fuel is blended for better cold weather starting (below 0°F or −18°C); however, you may notice some power and fuel economy loss. If Type “A” fuel is used in warmer temperatures, stalling and hard starting may occur. Diesel Type “B” fuel is blended for temperatures above 0°F (−18°C). The emission control system requires the use of diesel fuel with low-sulfur (.05% by weight) content. Both low- and higher-sulfur fuels will be available in Canada. Only low-sulfur diesel fuels are available in the United States. It is important that diesel-powered trucks are refueled only with low-sulfur fuel. Use of fuels with higher-sulfur content will affect the function of the emission components and may cause reduced performance, excessive smoke, and unpleasant odor. At a minimum, the diesel fuel you use should meet the latest version of specification CAN/CGSB-3.517
(Low Sulfur Diesel) in Canada. In addition, the Engine Manufacturers Association (EMA) has identified properties of an improved diesel fuel for better engine performance and durability (FQP-1A). Diesel fuels corresponding to the EMA description could provide better starting, less noise, and better vehicle performance. If there are questions about the fuel you are using, contact your fuel supplier.5-4
It is acceptable to use diesel fuel containing up to 5% biodiesel (B5), but the final blended fuel must meet the same specification, CAN/CGSB-3.517 (Low Sulfur Diesel) in Canada, as other fuels used in your vehicle, and the biodiesel used for making this fuel must meet the latest version of ASTM specification D 6751. Biodiesel is produced from vegetable oils or animal fat that have been chemically modified to reduce the possibility of damage to your fuel system and engine. Higher concentration (i.e., greater than B5) biodiesel-containing fuels or the use of unmodified bio-oils blended into diesel fuel at any concentration is not recommended and could damage your fuel system and engine. Such damage would not be covered by your warranty. If there are questions about the biodiesel-containing fuels you are using, contact your fuel supplier.
Very Cold Weather Operation Follow the instructions listed previously under the heading “What Fuel to Use.” Notice: Never use home heating oil or gasoline in your diesel engine. They can cause engine damage. In cold weather, your fuel filter may become clogged (waxed). To unclog it, move the vehicle to a warm garage area and warm the filter to between 32°F and 50°F (0°C to 10°C). You will not need to replace it. Additional information on the fuel filter follows.
Water in Fuel
{CAUTION:
Diesel fuel containing water is still flammable. You could be burned. If you ever try to drain water from your fuel, keep sparks, flames and smoking materials away from the mixture.
Notice: If there is water in your diesel fuel and the weather is warm or humid, fungus and bacteria can grow in the fuel. They can damage your fuel system and fuel operated heater (FOH) (if equipped). A diesel fuel biocide can be used to sterilize your fuel system. However, your fuel system may still need to be cleaned. Your dealer can advise you of the appropriate solution. If your fuel tank needs to be purged to remove water, see your dealer or a qualified technician. Improper purging can damage your fuel system and block your FOH. Sometimes, water can be pumped into your fuel tank along with your diesel fuel. This can happen if a service station doesn’t regularly inspect and clean its fuel tanks, or if it gets contaminated fuel from its suppliers.
5-5
If you have a pickup model and this happens, a WATER IN FUEL message will appear on the Driver Information Center (DIC). The water must be drained.
If you have a van model and this happens, this water in fuel warning light will appear on the instrument panel cluster.
The water must be drained from both chassis mounted fuel filters. Your dealer can show you how to do this.
Water in Fuel Light Chart If the WATER IN FUEL DIC message or water in fuel warning light comes on, use this chart.
Water In Fuel Light/Message Chart
Problem
Light/Message comes on intermittently. Light/Message stays on:
• At temperatures above freezing.
• At temperatures below freezing.
Recommended Action Drain water from fuel filter.
Drain fuel filter immediately. If no water can be drained and light stays on, see your dealer for assistance. Drain fuel filter immediately. If no water can be drained — water may be frozen in water drain system. Water may be frozen in the fuel lines. Move the vehicle to a warm location to thaw out, and then drain filter system.
5-6
Water In Fuel Light/Message Chart
(cont’d)
Problem
• Immediately after
refueling, large amount of water possibly pumped into fuel tank.
Recommended Action Fuel tank purging required. See your dealer for assistance.
Notice: If you drive when this warning indicator is on, you can damage your fuel injection system and your engine. If the indicator comes on right after you refuel, it means water was pumped into your fuel tank. Turn off your engine immediately. Then, have the water drained at once. Hard starting, hesitation or flat performance at high speed or during hard acceleration may be an indication of premature fuel filter plugging due to dirty or contaminated fuel. The filter element may need to be changed if this happens. See Fuel Filter Replacement on page 5-12.
To drain water, do the following: 1. Stop and park the vehicle in a safe place.
Turn off the engine and apply the parking brake.
2. Remove the fuel cap. 3. Place a fuel-resistant container under the fuel
filter(s). For pickup models, the filter drain valve is located in the engine compartment, on the passenger’s side of the vehicle, on the bottom of the fuel filter. For van models, the filter drain valves for the primary and secondary fuel filters are located in the chassis (inside frame rail) compartment. They are on the driver’s side of the vehicle, below the fuel filters.
4. For pickup models, open the drain valve by turning it two to three turns. When fuel empties from the valve, all the water has been drained. Close the valve hand tight. To help remove all the water, press the priming pump several times.
5-7
6. Remove the fuel-resistant container and properly dispose of the contaminated fuel. To find out how to properly dispose of contaminated diesel fuel, see “What to Do With Used Oil” under Engine Oil on page 5-21.
7. Install the fuel cap. 8. For pickup models, start the engine and let it run for a few minutes. If the engine stalls, the fuel system may need to be primed. While draining the water from the fuel filter, air may enter the fuel system. If air has entered the fuel system the fuel system will need to be primed. For van models, start the engine and let it run for a few minutes.
If the WATER IN FUEL message/warning light comes on again after driving a short distance or the engine runs rough or stalls, a large amount of water has probably been pumped into the fuel tank. The fuel tank should be purged.
5. For van models, in order to drain the water from the system, you will have to repeat the operation for the primary and secondary fuel filters.
5-8
Fuel Priming In order for the fuel system to work properly, the fuel lines must be full of fuel and contain no air. If air gets into the fuel lines, it will be necessary to prime the fuel lines, to eliminate air before operating the vehicle.
Q: How does air get into the fuel lines? A: One of the following may have happened: • The vehicle ran out of fuel • The fuel filter was removed for servicing or
replacement
• The fuel lines were removed or disconnected for
servicing
• The fuel filter water drain valve was opened while
the engine was running
If one or more of the above occur, it is very likely that air has entered your fuel system and that you will need to prime the fuel system before operating the vehicle. Air in the fuel lines will not harm the engine or the vehicle.
However, the engine may not be able to start until the fuel system is primed and the air is removed.
Q: How do I prime the vehicle? (Pickup Models) A: Your vehicle is equipped with a priming pump which is part of the engine mounted fuel filter. The priming pump is hand operated (pickup only) and is designed to bring fuel to the engine to eliminate any air that may be in the fuel lines. To prime the engine, do the following:
1. You must correct the condition which caused the loss
of prime by making sure there is fuel in the tank. 2. Make sure the fuel filter has been installed and
properly tightened.
3. Make sure the fuel lines are properly connected
and the fuel filter is cool enough to touch.
4. Remove any dirt from the fuel filter head and vent
valve by wiping with a cloth.
5-9
5. Open the fuel filter vent
valve by turning the screw counterclockwise several full turns. The vent valve is located on top of the fuel filter housing.
7. Operate the priming pump until a small amount of fuel seeps from the vent valve. When you see the fuel, the filter is now full of fuel and the system should be primed.
8. Close the vent valve. Clean any fuel which
accumulated on the fuel filter. Start the engine and let idle for a few minutes. Check the filter for leaks.
6. Repeatedly push down on the fuel filter priming pump with the palm of your hand. The pump is located on top of the fuel filter housing. Let the pump return upward between pushes.
Q: How do I prime the vehicle? (Van Models) A: Your vehicle is equipped with an electric priming
pump which is located in front of the fuel tank under your vehicle. The priming pump is operated electrically and is designed to bring fuel to the engine to eliminate any air that may be in the fuel lines. To prime the engine, do the following:
1. Turn the ignition key on for two minutes. The fuel
pump will be operating and starting the priming process. Do not start the engine during the first two minutes.
2. After completing the initial prime in Step 1, turn the ignition off, then back to start and crank the engine for 15 seconds.
3. If the engine does not start, repeat Steps 1 and 2
until the engine starts.
5-10
4. If the engine does not run after repeating Steps 1
and 2 three times, turn the ignition key off for 60 seconds, allowing the Electronic Control Module (ECM) to reset.
5. Repeat the above steps until the engine starts. 6. If the engine runs, but does not run smoothly, increase the engine speed slightly by pressing the accelerator pedal. This will help to force out air through the system.
7. If the engine starts and runs but stalls again, turn the ignition key off for 60 seconds to reset the ECM and repeat the steps above.
8. When the engine starts, let it idle for a few minutes
and check the filters for any leaks.
Running Out of Fuel Pickup Models If the engine stalls and you think that you have run out of fuel, do this to restart your engine:
{CAUTION:
Diesel fuel is flammable. It could start a fire if it gets on hot engine parts. You could be burned. Do not let too much fuel flow from the air bleed valve, and wipe up any spilled fuel with a cloth.
1. If you are parked on a level surface, add at least
two gallons of fuel. However, if you are parked on a slope, you may need to add up to five gallons of fuel.
2. Follow the fuel priming procedure earlier in this
section to prime the fuel filter.
3. Close the air bleed valve. 4. Turn the ignition key to START for 10 to 15 seconds at a time until your engine starts. If the engine tries to run, but does not run smoothly, increase the rpm a little using the accelerator pedal. This will help force air through the system.
5-11
Van Models If the engine stalls and you think that you may have run out of fuel, do this to restart your engine: 1. If you are parked on a level surface, add at least
one gallon of fuel. However, if you are parked on a slope, you may need to add up to five gallons of fuel.
2. Follow the vehicle fuel system priming procedure earlier in this section to re-prime the system and re-start the engine.
Your check engine light may come on if the vehicle has run out of fuel. This light may stay on for a few drive cycles after the condition is corrected, but will eventually clear itself.
Fuel Filter Replacement Pickup Models If you want to change the fuel filter yourself, here’s how to do it:
{CAUTION:
Diesel fuel is flammable. It could start a fire if something ignites it, and you could be burned. Do not let it get on hot engine parts, and keep matches or other ignition sources away.
First, drain any water from the filter following the procedure for draining water listed previously. Your vehicle’s engine should be off until the end of this procedure. The fuel filter is located in the engine compartment on the passenger’s side of the vehicle, or on the driver’s side frame rail in front of the fuel tank. 1. Apply the parking brake.
5-12
2. Unplug the water
sensor wire connected to the fuel filter and unscrew the filter element.
3. Remove the filter element. If there is any dirt on the filter sealing surface, clean it off. Remove and reuse the water sensor float switch located on the bottom of the fuel filter.
4. Install the new filter element. 5. Reinstall and tighten the filter container and reconnect the water sensor wire to the filter.
6. Use the fuel filter priming procedure earlier in this
section to prime the fuel filter.
7. Tighten the air bleed valve by turning it clockwise
until hand tight.
8. Start your engine and let it idle for five minutes.
Check your fuel filter and air bleed valve for leaks.
9. Reset the fuel filter monitor. See Driver Information Center (DIC) (Pickup Models Only) on page 3-9 for more information.
Van Models If your fuel operated heater (FOH) is not working, your FOH line requires priming. See your dealer for service. See Fuel Operated Heater (FOH) (Van Models Only) on page 2-8 for more information. If you want to change the fuel filter yourself, here’s how to do it:
{CAUTION:
Diesel fuel is flammable. It could start a fire if something ignites it, and you could be burned. Do not let it get on hot engine parts, and keep matches or other ignition sources away.
First, drain any water from the filter following the procedure for draining water listed previously. Your vehicle’s engine should be off until the end of this procedure. The fuel filters are located on the driver’s side frame rail in front of the fuel tank.
5-13
4. Install the new filter element. 5. Reinstall and tighten the filter’s cap and reconnect
the water sensor wire to the filter.
6. Prime the fuel system. 7. Start your engine and let it idle for five minutes.
Secondary Filter (B) 1. Apply the parking brake. 2. Unscrew the filter element. 3. Remove the filter element. If there is any dirt on the filter sealing surface, clean it off. Remove and reuse the water drain valve located at the bottom of the fuel filter.
4. Install and tighten the new filter element. 5. Prime the fuel system. 6. Start your vehicle and let it idle for five minutes.
Primary Filter (A) 1. Apply the parking brake.
2. Unplug the water sensor wire connected to the fuel
filter (lowest wire) and unscrew the filter’s cap.
3. Remove the filter element. If there is any dirt on the
filter sealing surface, clean it off.
5-14
Filling the Tank
{CAUTION:
Fuel vapor burns violently and a fuel fire can cause bad injuries. To help avoid injuries to you and others, read and follow all the instructions on the pump island. Turn off your engine when you are refueling. Do not smoke if you are near fuel or refueling your vehicle. Keep sparks, flames, and smoking materials away from fuel. Do not leave the fuel pump unattended when refueling your vehicle — this is against the law in some places. Keep children away from the fuel pump; never let children pump fuel.
The fuel cap is located behind a hinged door on the driver’s side of the vehicle. For chassis-cab models, refuel the front tank first, or in instances when only a partial fuel fill is desired. An automatic transfer mechanism will maintain approximately equal fuel levels in both tanks, so no switching is required by the operator.
5-15
To remove the fuel cap, turn it slowly to the left (counterclockwise).
{CAUTION:
If you spill fuel and then something ignites it, you could be badly burned. Fuel can spray out on you if you open the fuel cap too quickly. This spray can happen if your tank is nearly full, and is more likely in hot weather. Open the fuel cap slowly and wait for any hiss noise to stop. Then unscrew the cap all the way.
Be careful not to spill diesel fuel. Don’t top off or overfill your tank, and wait a few seconds after you’ve finished pumping before you remove the nozzle. Clean fuel from painted surfaces as soon as possible. See “Washing Your Vehicle” in your owner’s manual. When you put the fuel cap back on, turn it to the right (clockwise) until you hear a clicking sound. Make sure you fully install the cap. The diagnostic system can determine if the fuel cap has been left off or improperly installed. This would allow fuel to evaporate into the atmosphere. See Malfunction Indicator Lamp on page 3-4.
5-16
{CAUTION:
If a fire starts while you are refueling, do not remove the nozzle. Shut off the flow of fuel by shutting off the pump or by notifying the station attendant. Leave the area immediately.
If you need a new fuel cap, be sure to get
Notice: the right type. Your dealer can get one for you. If you get the wrong type, it may not fit properly. This may cause your malfunction indicator lamp to light and may damage your fuel tank and emissions system. See Malfunction Indicator Lamp on page 3-4. Notice: with gasoline, do not run the engine or severe engine damage can occur. Contact your dealer to have the fuel system flushed.
If your vehicle has been accidentally filled
Filling a Portable Fuel Container
{CAUTION:
Never fill a portable fuel container while it is in your vehicle. Static electricity discharge from the container can ignite the gasoline vapor. You can be badly burned and your vehicle damaged if this occurs. To help avoid injury to you and others:
(cid:127) Dispense gasoline only into approved
containers.
(cid:127) Do not fill a container while it is inside a vehicle, in a vehicle’s trunk, pickup bed, or on any surface other than the ground.
(cid:127) Bring the fill nozzle in contact with the
inside of the fill opening before operating the nozzle. Contact should be maintained until the filling is complete.
(cid:127) Do not smoke while pumping gasoline.
5-17
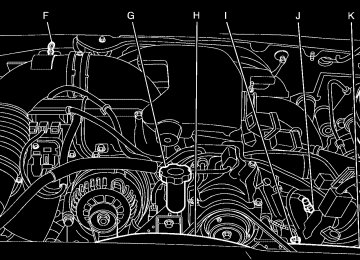
Checking Things Under the Hood Engine Compartment Overview When you open the hood on the 6.6L DURAMAX® Diesel Engine, you’ll see:
United States pickup models shown, Canada similar
5-18
A. Engine Air Cleaner/Filter B. Coolant Surge Tank C. Battery D. Engine Air Cleaner/Filter Restriction Indicator
(If Equipped)
E. Engine Oil Dipstick F. Automatic Transmission Dipstick (If Equipped) G. Engine Oil Fill Cap
H. Engine Fan I. Power Steering Fluid Reservoir J. Remote Negative (−) Terminal K. Remote Positive (+) Terminal L. Brake Fluid Reservoir M. Clutch Fluid Reservoir (If Equipped) N. Underhood Fuse Block O. Windshield Washer Fluid Reservoir
5-19
United States van models shown, Canada similar
5-20
A. Battery B. Coolant Surge Tank C. Automatic Transmission Dipstick D. Engine Fan E. Engine Air Cleaner/Filter F. Engine Oil Fill Cap G. Power Steering Fluid Reservoir H. Brake Fluid Reservoir I. Windshield Washer Fluid Reservoir
Engine Oil Checking Engine Oil It is a good idea to check your engine oil level every time you get fuel. The engine oil dipstick handle is a yellow loop. See Engine Compartment Overview on page 5-18
for the location of the engine oil dipstick.In order to get an accurate reading, the oil must be warm, at normal operating temperature, and the vehicle must be on level ground. 1. Turn off the engine and give the oil at least
five minutes to drain back into the oil pan. With a cool engine, allow 30 minutes. If you do not do this, the oil dipstick might not show the actual level.
2. Pull out the dipstick and clean it with a paper towel or a cloth, then push it back in all the way. Remove it again, keeping the tip down.
When to Add Engine Oil If the oil is below the cross-hatched area at the tip of the dipstick, you will need to add at least two quarts/liters of oil. But you must use the right kind. This section explains what kind of oil to use. For engine oil crankcase capacity, see Specification Charts on page 5-50. Notice: Do not add too much oil. If the engine has so much oil that the oil level gets above the cross-hatched area that shows the proper operating range, the engine could be damaged.
5-21
See Engine Compartment Overview on page 5-18 for the location of the engine oil fill cap.
What Kind of Engine Oil to Use Look for these two things: • CI-4 or CH-4
Be sure to add enough oil to put the level somewhere in the proper operating range. Push the dipstick all the way back in when you are through.
Oils designated as API CI-4 or CH-4 are recommended for your vehicle. The CI-4 or CH-4
designations may appear either alone, together, or in combination with other API designations, such as API CI-4/SL. These letters show American Petroleum Institute (API) levels of quality.Notice: Use only engine oils that have one of these designations CI-4 or CH-4 for the DURAMAX® diesel engine. Failure to use the recommended oils can result in engine damage not covered by your warranty.
5-22
• SAE 15W-40
As shown in the viscosity chart, SAE 15W-40 is best for your vehicle. However, you can use SAE 10W-30 at temperatures above 0°F (−18°C). When it is very cold, below 0°F (−18°C), you should use SAE 5W-40 to improve cold starting. 5W-40
is not recommended for use at high temperatures, above 100°F (38°C). These numbers on the oil container show its viscosity, or thickness. Do not use other viscosity oils such as SAE 10W-40 or SAE 20W-50.This doughnut-shaped logo (symbol) is used on most oil containers to help you select the correct oil. It means that the oil has been certified by the American Petroleum Institute.
You should look for this on the oil container, and use only those oils that display this logo. GM Goodwrench® oil of the recommended viscosity grades meets all the requirements for your vehicle.
5-23
Engine Oil Additives Do not add anything to your oil. The recommended oils with the API service symbol are all you will need for good performance and engine protection. Engine Oil Life System When to Change Engine Oil Your vehicle has a computer system that lets you know when to change the engine oil and filter. This is based on engine timing, engine load, and engine temperature, and not on mileage. Based on driving conditions, the mileage at which an engine oil change will be indicated can vary considerably. For the oil life system to work properly, you must reset the system every time the oil is changed. When the system has calculated that oil life has been diminished, it will indicate that an oil change is necessary. A CHANGE ENGINE OIL message in pickup models or a change engine oil light in van models will come on. Change your oil as soon as possible within the next 600 miles (1 000 km). It is possible that, if you are driving under the best conditions, the oil life system may not indicate that an oil change is necessary for over a year. However, your engine oil and filter must be changed at least once a year and at this time the system must be reset. Your dealer has GM-trained service people who will perform this work using genuine GM parts and reset the system. It is also important to check your oil regularly and keep it at the proper level.
5-24
If the system is ever reset accidentally, you must change your oil at 3,000 miles (5 000 km) since your last oil change. Remember to reset the oil life system whenever the oil is changed. How to Reset the Engine Oil Life System The Engine Oil Life System calculates when to change your engine oil and filter based on vehicle use. Anytime your oil is changed, reset the system so it can calculate when the next oil change is required. If a situation occurs where you change your oil prior to a CHANGE ENGINE OIL message (pickup models) or a change engine oil light (van models) being turned on, reset the system. To reset the Engine Oil Life System, do the following: 1. Turn the ignition key to RUN with the engine off. 2. Fully press and release the accelerator pedal
three times within five seconds. Pickup Models: If the OIL LIFE RESET message flashes for 10 seconds, the system is resetting. Van Models: If the change engine oil light flashes for five seconds, the system is reset.
3. Turn the key to LOCK. If the message or light comes back on when you start your vehicle, the engine oil life system has not reset. Repeat the procedure. If it still does not reset, see your dealer for service.
What to Do with Used Oil Used engine oil contains certain elements that may be unhealthy for your skin and could even cause cancer. Do not let used oil stay on your skin for very long. Clean your skin and nails with soap and water, or a good hand cleaner. Wash or properly throw away clothing or rags containing used engine oil. See the manufacturer’s warning about the use and disposal of oil products. Used oil can be a threat to the environment. If you change your own oil, be sure to drain all the oil from the filter before disposal. Never dispose of oil by putting it in the trash, pouring it on the ground, into sewers, or into streams or bodies of water. Instead, recycle it by taking it to a place that collects used oil. If you have a problem properly disposing of your used oil, ask your dealer, a service station, or a local recycling center for help.
Engine Air Cleaner/Filter Pickup Models
The air cleaner/filter assembly may have an air cleaner/filter restriction indicator that lets you know when the engine air cleaner/filter is dirty and needs to be serviced.
The air cleaner/filter restriction indicator is located on the air cleaner cover. When to Inspect Inspect the air cleaner/filter every 15,000 miles (25 000 km) and replace the filter if necessary. How to Inspect When the restriction indicator turns black, or is in the red/orange “change” zone, replace the filter and reset the restriction indicator.
5-25
To inspect and replace the filter and reset the restriction indicator, do the following:
The air cleaner/filter assembly is located on the front corner of the engine compartment on the passenger’s side of the vehicle.
1. Loosen the screw on the cover of the housing and
lift up the cover.
2. Remove the air cleaner/filter from the housing. Care should be taken to dislodge as little dirt as possible.
3. Clean the filter sealing surface and the housing.
5-26
4. Install the new engine air cleaner/filter. 5. Reinstall the cover and tighten the screw. 6. Reset the air cleaner/filter restriction indicator, if equipped, by pressing the top button on the indicator.
See Scheduled Maintenance on page 6-4 to determine when to replace the engine air cleaner/filter.
{CAUTION:
Operating the engine with the air cleaner/filter off can cause you or others to be burned. The air cleaner not only cleans the air; it helps to stop flames if the engine backfires. If it is not there and the engine backfires, you could be burned. Do not drive with it off, and be careful working on the engine with the air cleaner/ filter off.
If the air cleaner/filter is off, a backfire can
Notice: cause a damaging engine fire. And, dirt can easily get into your engine, which will damage it. Always have the air cleaner/filter in place when you are driving.
Van Models
The air cleaner/filter assembly may have an air cleaner/filter restriction indicator that lets you know when the engine air cleaner/filter is dirty and needs to be serviced.
How to Inspect When the restriction indicator is in the red/orange “change” zone, replace the filter and reset the restriction indicator. To inspect and replace the filter and reset the restriction indicator, do the following:
The air cleaner/filter restriction indicator is located on the air cleaner resonator. When to Inspect Inspect the air cleaner/filter every 15,000 miles (25 000 km) and replace the filter if necessary.
The air cleaner/filter assembly is located at the front of the engine compartment.
5-27
See Scheduled Maintenance on page 6-4 to determine when to replace the engine air cleaner/filter.
{CAUTION:
Operating the engine with the air cleaner/filter off can cause you or others to be burned. The air cleaner not only cleans the air; it helps to stop flames if the engine backfires. If it is not there and the engine backfires, you could be burned. Do not drive with it off, and be careful working on the engine with the air cleaner/filter off.
If the air cleaner/filter is off, a backfire can
Notice: cause a damaging engine fire. And, dirt can easily get into your engine, which will damage it. Always have the air cleaner/filter in place when you are driving.
1. Loosen the screws on the cover of the housing and
lift up the cover.
2. Remove the air cleaner/filter from the housing. Care should be taken to dislodge as little dirt as possible.
3. Clean the filter sealing surface and the housing. 4. Install the new engine air cleaner/filter. 5. Reinstall the cover and tighten the screws. 6. Reset the air cleaner/filter restriction indicator, if equipped, by pressing the top button on the indicator.
5-28
Automatic Transmission Fluid When to Check and Change (Pickup Models) A good time to check your automatic transmission fluid level is when the engine oil is changed. Change both the fluid and filter every 25,000 miles (41 500 km) if the vehicle is mainly driven under one or more of these conditions: • In heavy city traffic where the outside temperature
regularly reaches 90°F (32°C) or higher.
• In hilly or mountainous terrain. • When doing frequent trailer towing. • Uses such as found in taxi, police or
delivery service.
If you do not use your vehicle under any of these conditions, change the fluid and filter every 50,000 miles (83 000 km). See Scheduled Maintenance on page 6-4.
How to Check Because this operation can be a little difficult, you may choose to have this done at the dealership service department. If you do it yourself, be sure to follow all the instructions here, or you could get a false reading on the dipstick. Notice: Too much or too little fluid can damage your transmission. Too much can mean that some of the fluid could come out and fall on hot engine part or exhaust system parts, starting a fire. Too little fluid could cause the transmission to overheat. Be sure to get an accurate reading if you check your transmission fluid. Wait at least 30 minutes before checking the transmission fluid level if you have been driving: • When outside temperatures are above 90°F (32°C). • At high speed for quite a while. • In heavy traffic — especially in hot weather. • While pulling a trailer.
5-29
Checking the Fluid Level Prepare your vehicle as follows: • Park your vehicle on a level place. Keep the
engine running.
• With the parking brake applied, place the shift lever
in PARK (P).
• With your foot on the brake pedal, run the engine
for at least one minute and shift to DRIVE (D). Then shift to NEUTRAL (N) and then REVERSE (R) to fill the hydraulic system. Then, put the shift lever in PARK (P).
• Allow the engine to run at idle (500 – 800 rpm).
Slowly release the brake pedal.
Then, without shutting off the engine, follow these steps: Cold Check Procedure The purpose of the cold check is to determine if the transmission has enough fluid to be operated safely until a hot check can be made. The fluid level rises as fluid temperature increases. DO NOT fill above the COLD CHECK band if the transmission fluid is below normal operating temperatures. 1. Pull out the dipstick and wipe it with a clean rag or paper towel. The transmission dipstick is located near the center of the engine compartment. See Engine Compartment Overview on page 5-18 for more information on location.
2. Push it back in all the way, wait three seconds and
then pull it back out again.
3. Check the fluid level reading. Repeat the check
procedure to verify the reading.
4. If the fluid level is within the COLD CHECK band, the
transmission may be operated until the fluid is hot enough to perform a hot check. If the fluid level is not within the COLD CHECK band, add or drain fluid as necessary to bring the level into the middle of the COLD CHECK band.
5-30
5. Perform a hot check at the first opportunity after the
normal operating temperature of 160°F (71°C) to 200°F (93°C) is reached.
6. If the fluid level is in the acceptable range, push the
dipstick back in all the way.
Hot Check Procedure The fluid must be hot to ensure an accurate check. The fluid level rises as temperature increases. 1. Operate the transmission in DRIVE (D) until the normal operating temperature of 160°F (71°C) to 200°F (93°C) is reached.
2. Pull out the dipstick and wipe it with a clean rag or
paper towel.
3. Push it back in all the way, wait three seconds
and then pull it back out again. Repeat the check procedure to verify the reading.
4. Safe operating level is within the HOT RUN band on the dipstick. The width of the HOT RUN band represents approximately 1.06 quart (1.0 liter) of fluid at normal operating temperature.
5. If the fluid level is not within the HOT RUN band, add or drain fluid as necessary to bring the fluid level to within the HOT RUN band.
6. If the fluid level is in the acceptable range, push the
dipstick back in all the way.
Consistency of Readings Always check the fluid level at least twice using the procedures described previously. Consistency (repeatable readings) is important to maintaining proper fluid level. If inconsistent readings persist, check the transmission breather to be sure it is clean and unclogged. If readings are still inconsistent, contact your dealer. How to Add Fluid Refer to the Maintenance Schedule to determine what kind of transmission fluid to use. See Recommended Fluids and Lubricants on page 6-15. Add fluid only after checking the transmission fluid while it is hot. A cold check is used only as a reference. If the fluid level is low, add only enough of the proper fluid to bring the level up to the HOT area for a hot check. It doesn’t take much fluid, generally less than one pint (0.5 L). Don’t overfill. Notice: Use of the incorrect automatic transmission fluid may damage your vehicle, and the damages may not be covered by your warranty. Always use the automatic transmission fluid listed in Recommended Fluids and Lubricants on page 6-15. • After adding fluid, recheck the fluid level as described
under “How to Check.”
• When the correct fluid level is obtained, push the
dipstick back in all the way.
5-31
When to Check and Change (Van Models) A good time to check your automatic transmission fluid level is when the engine oil is changed. Change the fluid and filter at the intervals listed in “Additional Required Services”. See Additional Required Services on page 6-7. And be sure to use the transmission fluid listed in “Recommended Fluids and Lubricants”. See Recommended Fluids and Lubricants on page 6-15
for more information. How to Check Because this operation can be a little difficult, you may choose to have this done at the dealership service department. If you do it yourself, be sure to follow all the instructions here, or you could get a false reading on the dipstick. Notice: Too much or too little fluid can damage your transmission. Too much can mean that some of the fluid could come out and fall on hot engine part or exhaust system parts, starting a fire. Too little fluid could cause the transmission to overheat. Be sure to get an accurate reading if you check your transmission fluid.5-32
Wait at least 30 minutes before checking the transmission fluid level if you have been driving: • When outside temperatures are above 90°F (32° C). • At high speed for quite a while. • In heavy traffic — especially in hot weather. • While pulling a trailer. To get the right reading, the fluid should be at normal operating temperature, which is 180°F to 200°F (82°C to 93°C). Get the vehicle warmed up by driving about 15 miles (24 km) when outside temperatures are above 50°F (10°C). If it is colder than 50°F (10°C), drive the vehicle until the engine temperature gage moves and then remains steady for 10 minutes. A cold check can be made after the vehicle has been sitting for eight hours or more with the engine off, but this is used only as a reference. Let the engine run at idle for five minutes if outside temperatures are 50°F (10°C) or more. If it is colder than 50°F (10 C), you may have to idle the engine longer. Should the fluid level be low during this cold check, you must check the fluid hot before adding fluid. Checking the fluid hot will give you a more accurate reading of the fluid level.
Checking the Fluid Level Prepare your vehicle as follows: • Park your vehicle on a level place. Keep the engine
running.
• With the parking brake applied, place the shift lever
in PARK (P).
• With your foot on the brake pedal, move the shift lever through each gear range, pausing for about three seconds in each range. Then, position the shift lever in PARK (P).
• Let the engine run at idle for three minutes or more. Then, without shutting off the engine, follow these steps:
The transmission dipstick is located near the center of the engine compartment and will be labeled with the graphic shown. See Engine Compartment Overview on page 5-18 for more information on location.
1. Flip the handle up and then pull out the dipstick
and wipe it with a clean rag or paper towel.
2. Push it back in all the way, wait three seconds and
then pull it back out again.
Check both sides of the dipstick, and read the lower level. The fluid level must be in the COLD area for a cold check or in the HOT or cross-hatched area for a hot check. Be sure to keep the dipstick pointed down to get an accurate reading.
3. If the fluid level is in the acceptable range, push the dipstick in all the way, then flip the handle down to lock the dipstick in place.
5-33
How to Add Fluid Refer to the Maintenance Schedule to determine what kind of transmission fluid to use. See Recommended Fluids and Lubricants on page 6-15. Using a funnel, add fluid down the transmission dipstick tube only after checking the transmission fluid while it is hot. A cold check is used only as a reference. If the fluid level is low, add only enough of the proper fluid to bring the level up to the HOT area for a hot check. It does not take much fluid, generally less than one pint (0.5L). Do not overfill. Notice: Use of the incorrect automatic transmission fluid may damage your vehicle, and the damages may not be covered by your warranty. Always use the automatic transmission fluid listed in Recommended Fluids and Lubricants on page 6-15. • After adding fluid, recheck the fluid level as
described under “How to Check” earlier in this section.
• When the correct fluid level is obtained, push the dipstick back in all the way. Then flip the handle down to lock the dipstick in place.
5-34
Engine Coolant Pickup Models The cooling system in your vehicle is filled with DEX-COOL® engine coolant. This coolant is designed to remain in your vehicle for 5 years or 150,000 miles (240 000 km), whichever occurs first, if you add only DEX-COOL® extended life coolant. The following explains your cooling system and how to add coolant when it is low. If you have a problem with engine overheating, see Engine Overheating on page 5-39. A 50/50 mixture of clean, drinkable water and DEX-COOL® coolant will: • Give freezing protection down to −34°F (−37°C) • Give boiling protection up to 265°F (129°C) • Protect against rust and corrosion • Help keep the proper engine temperature • Let the warning lights and gages work as they should Notice: Using coolant other than DEX-COOL® may cause premature engine, heater core, or radiator corrosion. In addition, the engine coolant may require changing sooner, at the first maintenance service after each 30,000 miles (50 000 km) or 24 months, whichever occurs first. Any repairs would not be covered by your warranty. Always use DEX-COOL® (silicate-free) coolant in your vehicle.
If you use an improper coolant mixture, your
Notice: engine could overheat and be badly damaged. The repair cost would not be covered by your warranty. Too much water in the mixture can freeze and crack the engine, radiator, heater core, and other parts. If you have to add coolant more than four times a year, have your dealer check your cooling system. Notice: If you use extra inhibitors and/or additives in your vehicle’s cooling system, you could damage your vehicle. Use only the proper mixture of the engine coolant listed in this manual for the cooling system. See Recommended Fluids and Lubricants on page 6-15 for more information.
What to Use Use a mixture of one-half clean, drinkable water and one-half DEX-COOL® coolant which won’t damage aluminum parts. If you use this coolant mixture, you don’t need to add anything else.
{CAUTION:
Adding only plain water to your cooling system can be dangerous. Plain water, or some other liquid such as alcohol, can boil before the proper coolant mixture will. Your vehicle’s coolant warning system is set for the proper coolant mixture. With plain water or the wrong mixture, your engine could get too hot but you would not get the overheat warning. Your engine could catch fire and you or others could be burned. Use a 50/50 mixture of clean, drinkable water and DEX-COOL® coolant.
5-35
The vehicle must be on a level surface. When your engine is cold, the coolant level should be at the FULL COLD mark. Adding Coolant If you need more coolant, add the proper DEX-COOL® coolant mixture at the surge tank, but only when the engine is cool. If the surge tank is empty, see Engine Overheating on page 5-39.
{CAUTION:
You can be burned if you spill coolant on hot engine parts. Coolant contains ethylene glycol, and it will burn if the engine parts are hot enough. Do not spill coolant on a hot engine.
When replacing the pressure cap, make sure it is hand- tight.
Checking Coolant
The coolant surge tank is located in the engine compartment on the passenger’s side of the vehicle. See Engine Compartment Overview on page 5-18 for more information on its location.
{CAUTION:
Turning the surge tank pressure cap when the engine and radiator are hot can allow steam and scalding liquids to blow out and burn you badly. Never turn the surge tank pressure cap — even a little — when the engine and radiator are hot.
5-36
Van Models The cooling system in your vehicle is filled with DEX-COOL® engine coolant. This coolant is designed to remain in your vehicle for 5 years or 150,000 miles (240 000 km), whichever occurs first, if you add only DEX-COOL® extended life coolant. The following explains your cooling system and how to add coolant when it is low. If you have a problem with engine overheating, see Engine Overheating on page 5-39. A 50/50 mixture of clean, drinkable water and DEX-COOL® coolant will: • Give freezing protection down to −34°F (−37°C) • Give boiling protection up to 265°F (129°C) • Protect against rust and corrosion • Help keep the proper engine temperature • Let the warning lights and gages work as they should Notice: Using coolant other than DEX-COOL® may cause premature engine, heater core, radiator and fuel operated heater (FOH) corrosion. In addition, the engine coolant may require changing sooner, at 30,000 miles (50 000 km) or 24 months, whichever occurs first. Any repairs would not be covered by your warranty. Always use DEX-COOL® (silicate-free) coolant in your vehicle.
What to Use Use a mixture of one-half clean, drinkable water and one-half DEX-COOL® coolant which won’t damage aluminum parts. If you use this coolant mixture, you don’t need to add anything else.
{CAUTION:
Adding only plain water to your cooling system can be dangerous. Plain water, or some other liquid such as alcohol, can boil before the proper coolant mixture will. Your vehicle’s coolant warning system is set for the proper coolant mixture. With plain water or the wrong mixture, your engine could get too hot but you would not get the overheat warning. Your engine could catch fire and you or others could be burned. Use a 50/50 mixture of clean, drinkable water and DEX-COOL® coolant.
If you use an improper coolant mixture,
Notice: your engine could overheat and be badly damaged. The repair cost would not be covered by your warranty. Too much water in the mixture can freeze and crack the engine, radiator, heater core, and other parts.
5-37
If you have to add coolant more than four times a year, have your dealer check your cooling system. Notice: If you use extra inhibitors and/or additives in your vehicle’s cooling system, you could damage your vehicle. Use only the proper mixture of the engine coolant listed in this manual for the cooling system. See Recommended Fluids and Lubricants on page 6-15 for more information.
Checking Coolant
The coolant recovery tank is located near the center of the engine compartment. See Engine Compartment Overview on page 5-18
for more information on its location.{CAUTION:
Turning the radiator pressure cap when the engine and radiator are hot can allow steam and scalding liquids to blow out and burn you badly. With the coolant recovery tank, you will almost never have to add coolant at the radiator. Never turn the radiator pressure cap — even a little — when the engine and radiator are hot.
The vehicle must be on a level surface. When your engine is cold, the coolant level should be at the COLD FILL mark.
5-38
Adding Coolant If you need more coolant, add the proper DEX-COOL® coolant mixture at the coolant recovery tank, but be careful not to spill it.
{CAUTION:
You can be burned if you spill coolant on hot components in the engine compartment. Coolant contains ethylene glycol, and it will burn if the engine parts are hot enough. Do not spill coolant on a hot engine or components in the engine compartment.
When replacing the pressure cap, make sure it is hand-tight. Radiator Pressure Cap The radiator pressure cap must be tightly installed. Notice: coolant loss and possible engine damage may occur. Be sure the cap is properly and tightly secured.
If the pressure cap is not tightly installed,
Coolant Surge Tank Pressure Cap
The surge tank pressure cap must be tightly installed.
If the pressure cap is not tightly installed,
Notice: coolant loss and possible engine damage may occur. Be sure the cap is properly and tightly secured. Engine Overheating You will find an engine coolant temperature gage on the instrument panel cluster. For pickup models, the ENGINE OVERHEATED message may appear in the Driver Information Center (DIC). See your owner’s manual for more information.
5-39
If No Steam Is Coming From Your Engine An overheat warning, along with a low coolant condition, can indicate a serious problem. If you get an engine overheat warning and don’t have a low coolant condition, but see or hear no steam, the problem may not be too serious. Sometimes the engine can get a little too hot when you: • Climb a long hill on a hot day. • Stop after high-speed driving. • Idle for long periods in traffic. • Tow a trailer. See “Driving on Grades” in the
owner’s manual Index.
If Steam Is Coming From Your Engine
{CAUTION:
Steam from an overheated engine can burn you badly, even if you just open the hood. Stay away from the engine if you see or hear steam coming from it. Just turn it off and get everyone away from the vehicle until it cools down. Wait until there is no sign of steam or coolant before you open the hood. If you keep driving when your engine is overheated, the liquids in it can catch fire. You or others could be badly burned. Stop your engine if it overheats, and get out of the vehicle until the engine is cool.
If your engine catches fire because you keep
Notice: driving with no coolant, your vehicle can be badly damaged. The costly repairs would not be covered by your warranty.
5-40
If you get the overheat warning with no sign of steam, try this for a minute or so: 1. In heavy traffic, let the engine idle in NEUTRAL (N) while stopped. If it is safe to do so, pull off the road, shift to PARK (P) or NEUTRAL (N), and let the engine idle.
2. Turn on your heater to full hot at the highest fan
speed and open the window as necessary.
If you no longer have the overheat warning, you can drive. Just to be safe, drive slower for about 10 minutes. If the warning doesn’t come back on, you can drive normally. If the warning continues, pull over, stop, and park your vehicle right away. If there’s still no sign of steam and your vehicle is equipped with an engine driven cooling fan, push down the accelerator until the engine speed is about twice as fast as normal idle speed for at least three minutes while you’re parked. If there is no sign of steam and your vehicle is equipped with an electric cooling fan, idle the engine for three minutes while you’re parked. If you still have the warning, turn off the engine and get everyone out of the vehicle until it cools down. You may decide not to lift the hood but to get service help right away.
Cooling System Pickup Models When you decide it’s safe to lift the hood, here’s what you’ll see:
A. Coolant Surge Tank Pressure Cap B. Coolant Surge Tank C. Engine Fan If the coolant inside the coolant surge tank is boiling, don’t do anything else until it cools down. The vehicle should be parked on a level surface.
5-41
If there seems to be no leak, start the engine again. If your vehicle is equipped with an engine driven cooling fan, the engine cooling fan speed should increase when idle speed is doubled by pushing the accelerator pedal down. If it doesn’t, your vehicle needs service. Turn off the engine. Notice: Engine damage from running your engine without coolant is not covered by your warranty. Notice: Using coolant other than DEX-COOL® may cause premature engine, heater core or radiator