- Download PDF Manual
-
corrosion. In addition, the engine coolant may require changing sooner, at 30,000 miles (50 000 km) or 24 months, whichever occurs first. Any repairs would not be covered by your warranty. Always use DEX-COOL® (silicate-free) coolant in your vehicle.
The coolant level should be at or above the FULL COLD mark. If it isn’t, you may have a leak at the pressure cap or in the radiator hoses, heater hoses, radiator, water pump or somewhere else in the cooling system.
{CAUTION:
Heater and radiator hoses, and other engine parts, can be very hot. Do not touch them. If you do, you can be burned. Do not run the engine if there is a leak. If you run the engine, it could lose all coolant. That could cause an engine fire, and you could be burned. Get any leak fixed before you drive the vehicle.
5-42
How to Add Coolant to the Coolant Surge Tank Notice: The diesel engine has a specific coolant fill procedure. Failure to follow this procedure could cause your engine to overheat and be severely damaged. If you haven’t found a problem yet, check to see if coolant is visible in the surge tank. If coolant is visible but the coolant level isn’t at or above the FULL COLD mark, add a 50/50 mixture of clean, drinkable water and DEX-COOL® coolant at the coolant surge tank, but be sure the cooling system, including the coolant surge tank pressure cap, is cool before you do it. See Engine Coolant on page 5-34 for more information. If no coolant is visible in the surge tank, add coolant as follows:
{CAUTION:
Steam and scalding liquids from a hot cooling system can blow out and burn you badly. They are under pressure, and if you turn the coolant surge tank pressure cap — even a little — they can come out at high speed.
CAUTION:
(Continued)
CAUTION:
(Continued)
Never turn the cap when the cooling system, including the coolant surge tank pressure cap, is hot. Wait for the cooling system and coolant surge tank pressure cap to cool if you ever have to turn the pressure cap.
{CAUTION:
Adding only plain water to your cooling system can be dangerous. Plain water, or some other liquid such as alcohol, can boil before the proper coolant mixture will. Your vehicle’s coolant warning system is set for the proper coolant mixture. With plain water or the wrong mixture, your engine could get too hot but you would not get the overheat warning. Your engine could catch fire and you or others could be burned. Use a 50/50 mixture of clean, drinkable water and DEX-COOL® coolant.
5-43
In cold weather, water can freeze and crack
Notice: the engine, radiator, heater core and other parts. Use the recommended coolant and the proper coolant mixture.
{CAUTION:
You can be burned if you spill coolant on hot engine parts. Coolant contains ethylene glycol and it will burn if the engine parts are hot enough. Do not spill coolant on a hot engine.
Park the vehicle on a level surface. You can remove the coolant surge tank pressure cap when the cooling system, including the coolant surge tank pressure cap and upper radiator hose, is no longer hot.
1. Turn the pressure cap slowly counterclockwise (left) until it first stops. Don’t press down while turning the pressure cap. If you hear a hiss, wait for that to stop. A hiss means there is still some pressure left.
5-44
2. Then keep turning the cap, but now push down as
you turn it. Remove the pressure cap.
3. After the engine cools, open the air bleed valve on
the thermostat housing. Fill with the proper mixture. Add coolant until you see a steady stream of coolant coming from the bleed valve.
4. Close the bleed valve. 5. Rinse or wipe the spilled coolant from the engine
and compartment.
6. Then fill the coolant surge tank with the proper
mixture, to slightly above the fill mark.
7. With the coolant surge tank pressure cap off, start
the engine and let it run until you can feel the upper radiator hose getting hot. Watch out for the engine cooling fan. By this time, the coolant level inside the coolant surge tank may be lower. If the level is lower, add more of the proper mixture to the coolant surge tank until the level reaches the FULL COLD mark.
8. Then replace the pressure cap.
5-45
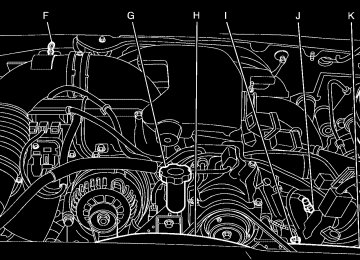
Van Models When you decide it is safe to lift the hood, here is what you will see:
When the engine is cold, the coolant level should be at or above the COLD FILL mark.
If it is not, you may have a leak at the pressure cap or in the radiator hoses, heater hoses, radiator, water pump, fuel operated heater (FOH) or somewhere else in the cooling system.
A. Coolant Surge Tank B. Coolant Surge Tank Pressure Cap C. Engine Cooling Fan If the coolant inside the coolant surge tank is boiling, do not do anything else until it cools down.
5-46
{CAUTION:
Heater and radiator hoses, and other engine parts, can be very hot. Do not touch them. If you do, you can be burned. Do not run the engine if there is a leak. If you run the engine, it could lose all coolant. That could cause an engine fire, and you could be burned. Get any leak fixed before you drive the vehicle.
If there seems to be no leak, start the engine again. See if the engine cooling fan speed increases when idle speed is doubled by pushing the accelerator pedal down. If it does not, your vehicle needs service. Turn off the engine. Notice: Engine damage from running your engine without coolant is not covered by your warranty.
Notice: Using coolant other than DEX-COOL® may cause premature engine, heater core, radiator and fuel operated heater (FOH) corrosion. In addition, the engine coolant may require changing sooner, at 30,000 miles (50 000 km) or 24 months, whichever occurs first. Any repairs would not be covered by your warranty. Always use DEX-COOL® (silicate-free) coolant in your vehicle. How to Add Coolant to the Coolant Surge Tank Notice: The diesel engine has a specific coolant fill procedure. Failure to follow this procedure could cause your engine to overheat and be severely damaged. If you have not found a problem yet, but the coolant level is not at the COLD FILL mark, add a 50/50 mixture of clean, drinkable water and DEX-COOL® engine coolant at the coolant surge tank. See Engine Coolant on page 5-34 for more information.
5-47
If no coolant is visible in the surge tank, add coolant as follows:
{CAUTION:
{CAUTION:
Steam and scalding liquids from a hot cooling system can blow out and burn you badly. They are under pressure, and if you turn the coolant surge tank pressure cap — even a little — they can come out at high speed. Never turn the cap when the cooling system, including the coolant surge tank pressure cap, is hot. Wait for the cooling system and coolant surge tank pressure cap to cool if you ever have to turn the pressure cap.
Adding only plain water to your cooling system can be dangerous. Plain water, or some other liquid such as alcohol, can boil before the proper coolant mixture will. Your vehicle’s coolant warning system is set for the proper coolant mixture. With plain water or the wrong mixture, your engine could get too hot but you would not get the overheat warning. Your engine could catch fire and you or others could be burned. Use a 50/50 mixture of clean, drinkable water and DEX-COOL® coolant.
In cold weather, water can freeze and crack
Notice: the engine, radiator, fuel operated heater (FOH), heater core and other parts. Use the recommended coolant and the proper coolant mixture.
5-48
{CAUTION:
You can be burned if you spill coolant on hot components in the engine compartment. Coolant contains ethylene glycol, and it will burn if the engine parts are hot enough. Do not spill coolant on a hot engine or components in the engine compartment.
When the coolant in the coolant surge tank is at the COLD FILL mark, start your vehicle.
1. You can remove the coolant surge tank pressure cap when the cooling system, including the coolant surge tank pressure cap and upper radiator hose, is no longer hot. Turn the pressure cap slowly counterclockwise about one full turn. If you hear a hiss, wait for that to stop. A hiss means there is still some pressure left.
2. Then keep turning the pressure cap slowly, and
remove it.
3. Fill the coolant surge tank with the proper mixture, up to the FULL COLD mark. See Engine Coolant on page 5-34
4. With the coolant surge tank pressure cap off, start
the engine and let it run until you can feel the upper radiator hose getting hot. Watch out for the engine cooling fan. By this time, the coolant level inside the coolant surge tank may be lower. If the level is lower, add more of the proper mixture to the coolant surge tank until the level reaches the FULL COLD mark.
5. Then replace the pressure cap. Be sure the pressure cap is hand-tight and fully seated.
5-49
Capacities and Specifications
Specification Charts
Engine
6.6L V8 Turbo Diesel
VIN Code
Capacities
Application
Cooling System (Pickup Models)
Automatic Transmission Manual Transmission
Cooling System (Van Models)
Front Heat or AC Only Front Heat or AC Plus Fuel Operated Heater (FOH) Front and Rear Heat or AC Only Front and Rear Heat or AC Plus Fuel Operated Heater (FOH)
Engine Oil With Filter
Capacities
English
25.4 quarts 25.0 quarts
21.0 quarts 22.0 quarts 22.5 quarts 23.5 quarts
10.0 quarts
Type V8
Metric
24.0 L 23.6 L
20.0 L 20.5 L 21.5 L 22.5 L
9.5 L
All quantities are approximate. When adding, be sure to fill to the appropriate level, as recommended in this manual. Recheck fluid level after filling. See Recommended Fluids and Lubricants on page 6-15 for more information.
5-50
Section 6
Maintenance Schedule
Maintenance Schedule ......................................6-2
Introduction ...................................................6-2
Maintenance Requirements ..............................6-2
Your Vehicle and the Environment ....................6-2
Using the Maintenance Schedule ......................6-2
Scheduled Maintenance ...................................6-4
Additional Required Services ............................6-7
Maintenance Footnotes ...................................6-9Owner Checks and Services ..........................6-11
At Each Fuel Fill ..........................................6-11
At Least Once a Month .................................6-12
At Least Once a Year ...................................6-12
Recommended Fluids and Lubricants ...............6-15
Normal Maintenance Replacement Parts ..........6-18
Engine Drive Belt Routing ..............................6-19
Maintenance Record .....................................6-206-1
Maintenance Schedule
Introduction Important: Keep engine oil at the proper level and change as recommended.
Have you purchased the GM Protection Plan? The Plan supplements your new vehicle warranties. See your Warranty and Owner Assistance booklet or your dealer for details.
Maintenance Requirements Notice: Maintenance intervals, checks, inspections, replacement parts, and recommended fluids and lubricants as prescribed in this manual are necessary to keep your vehicle in good working condition. Any damage caused by failure to follow scheduled maintenance may not be covered by warranty.
6-2
Your Vehicle and the Environment Proper vehicle maintenance not only helps to keep your vehicle in good working condition, but also helps the environment. All recommended maintenance is important. Improper vehicle maintenance can even affect the quality of the air we breathe. Improper fluid levels or the wrong tire inflation can increase the level of emissions from your vehicle. To help protect our environment, and to keep your vehicle in good condition, be sure to maintain your vehicle properly.
Using the Maintenance Schedule We at General Motors want to help you keep your vehicle in good working condition. But we do not know exactly how you will drive it. You may drive very short distances only a few times a week. Or you may drive long distances all the time in very hot, dusty weather. You may use your vehicle in making deliveries. Or you may drive it to work, to do errands, or in many other ways. Because of all the different ways people use their vehicles, maintenance needs vary. You may need more frequent checks and replacements. So please read the following and note how you drive. If you have any questions on how to keep your vehicle in good condition, see your GM Goodwrench® dealer.
This schedule is for vehicles that: • carry passengers and cargo within recommended
limits. You will find these limits on the Tire and Loading Information label. See “Loading Your Vehicle” in your owner manual.
• are driven on reasonable road surfaces within legal
driving limits.
• are driven off-road in the recommended manner,
pickup models only. See “Off-Road Driving” in your owner manual.
• use the recommended fuel. See Diesel Engine Fuel
on page 5-2.
The services in Scheduled Maintenance on page 6-4
should be performed when indicated. See Additional Required Services on page 6-7 and Maintenance Footnotes on page 6-9 for further information.{CAUTION:
Performing maintenance work on a vehicle can be dangerous. In trying to do some jobs, you can be seriously injured. Do your own maintenance work only if you have the required know-how and the proper tools and equipment for the job. If you have any doubt, see your GM Goodwrench® dealer to have a qualified technician do the work. See “Doing Your Own Service Work” in your owner manual.
Some maintenance services can be complex. So, unless you are technically qualified and have the necessary equipment, you should have your GM Goodwrench® dealer do these jobs. When you go to your GM Goodwrench® dealer for your service needs, you will know that GM-trained and supported service technicians will perform the work using genuine GM parts. If you want to purchase service information, see “Service Publications Ordering Information” in your owner manual.
6-3
If the engine oil life system is ever reset accidentally, you must service your vehicle within 3,000 miles (5 000 km) since your last service. Remember to reset the oil life system whenever the oil is changed. See Engine Oil Life System on page 5-24 for information on the Engine Oil Life System and resetting the system. When the message or light appears, certain services, checks, and inspections are required. Required services are described in the following for “Maintenance I” and “Maintenance II.” Generally, it is recommended that your first service be Maintenance I, your second service be Maintenance II, and that you alternate Maintenance I and Maintenance II thereafter. However, in some cases, Maintenance II may be required more often. Maintenance I — Use Maintenance I if the message or light comes on within 10 months since the vehicle was purchased or Maintenance II was performed. Maintenance II — Use Maintenance II if the previous service performed was Maintenance I. Always use Maintenance II whenever the message or light comes on 10 months or more since the last service or if the message or light has not come on at all for one year.
Owner Checks and Services on page 6-11 tells you what should be checked, when to check it, and what you can easily do to help keep your vehicle in good condition. The proper replacement parts, fluids, and lubricants to use are listed in Recommended Fluids and Lubricants on page 6-15 and Normal Maintenance Replacement Parts on page 6-18. When your vehicle is serviced, make sure these are used. All parts should be replaced and all necessary repairs done before you or anyone else drives the vehicle. We recommend the use of genuine GM parts.
Scheduled Maintenance When the CHANGE ENGINE OIL message (pickup models) or the change engine oil light (van models) comes on, it means that service is required for your vehicle. Have your vehicle serviced as soon as possible within the next 600 miles (1 000 km). It is possible that, if you are driving under the best conditions, the engine oil life system may not indicate that vehicle service is necessary for over a year. However, your engine oil and filter must be changed at least once a year and at this time the system must be reset. Your GM Goodwrench® dealer has GM-trained service technicians who will perform this work using genuine GM parts and reset the system.
6-4
Scheduled Maintenance
Service
Maintenance I Maintenance II
Change engine oil and filter. See Engine Oil on page 5-21. Reset oil life system. See Engine Oil Life System on page 5-24. An Emission Control Service. Allison Transmission® only: Replace external transmission filter at the first maintenance service performed on the vehicle. Lubricate chassis components. See footnote #. Visually check for any leaks or damage. See footnote (a). Inspect engine air cleaner filter or change indicator, if equipped. If necessary, replace filter. See Engine Air Cleaner/Filter on page 5-25. See footnote (b). Rotate tires and check inflation pressures and wear. See “Tire Inspection and Rotation” in your owner manual. See “Tire Wear Inspection” in At Least Once a Month on page 6-12. Inspect brake system. See footnote (c). Check engine coolant and windshield washer fluid levels and add fluid as needed. Perform any needed additional services. See “Additional Required Services” in this section. Inspect suspension and steering components. See footnote (d).
•
• •
•
•
•
•
•
• •
•
•
•
•
•
•
6-5
Scheduled Maintenance (cont’d) Service
Maintenance I Maintenance II
Inspect engine cooling system. See footnote (e). Inspect wiper blades. See footnote (f). Inspect restraint system components. See footnote (g). Lubricate body components. See footnote (h). Check transmission fluid level and add fluid as needed. Van models: Replace both fuel filters. An Emission Control Service. See footnotes † and (i). Pickup models: Fuel filter service. An Emission Control Service. See footnotes † and (j). Inspect shields and underhood insulation, vans with GVWR above 10,000 lbs (4 536 kg) and all pickups. See footnote (k). Check air intake system. See footnote (l). Van models: Inspect throttle system. See footnote (m).
• • • • •
•
•
•
• •
6-6
Additional Required Services The following services should be performed at the first maintenance service (I or II) after the indicated miles (kilometers) shown for each item.
Service and Miles (Kilometers)
Inspect fuel system for damage or leaks. Inspect exhaust system for loose or damaged components. Pickup models: 6-speed manual transmission only: Change clutch fluid. See footnote (n). Pickup models: 5-speed manual transmission only: Change manual transmission fluid. Pickup models: Change automatic transmission fluid and external transmission filter (severe service). See footnote (p). Pickup models: Change automatic transmission fluid and external transmission filter (normal service).
Additional Required Services 75,000
25,000
(40 000)50,000
(80 000)(120 000)
100,000
(160 000)125,000
(200 000)150,000
(240 000)•
•
•
•
•
•
•
•
•
•
•
•
•
•
•
•
•
•
•
•
•
•
•
•
•
•
•
•
6-7
Additional Required Services (cont’d)
25,000
(40 000)50,000
(80 000)75,000
(120 000)
100,000
(160 000)125,000
(200 000)150,000
(240 000)•
•
•
•
•
•
•
•
•
•
Service and Miles (Kilometers)
Van models: Change automatic transmission fluid and filter (severe service). See footnote (p). Van models: Change automatic transmission fluid and filter (normal service). Pickup models: Four-wheel drive with automatic transfer case only: Change transfer case fluid. See footnote (q). Van models: Replace spark plugs and inspect spark plug wires. An Emission Control Service. Engine cooling system service (or every five years, whichever occurs first). An Emission Control Service. See footnote (r). Inspect engine accessory drive belt. An Emission Control Service. See footnote (s).
6-8
Maintenance Footnotes † The U.S. Environmental Protection Agency or the California Air Resources Board has determined that the failure to perform this maintenance item will not nullify the emission warranty or limit recall liability prior to the completion of the vehicle’s useful life. We, however, urge that all recommended maintenance services be performed at the indicated intervals and the maintenance be recorded. # Lubricate the front suspension, steering linkage, transmission shift linkage (pickup models), rear driveline center splines (van models), and parking brake cable guides. Pickup models only: Control arm ball joints require lubrication but should not be lubricated unless their temperature is 10°F (-12°C) or higher, or they could be damaged. Vehicles used under severe commercial operating conditions require lubrication on a regular basis every 3,000 miles (5 000 km). (a) A fluid loss in any vehicle system could indicate a problem. Have the system inspected and repaired and the fluid level checked. Add fluid if needed. (b) If you drive regularly under dusty conditions, inspect the filter or change indicator, if equipped, at each engine oil change.
(c) Visually inspect brake lines and hoses for proper hook-up, binding, leaks, cracks, chafing, etc. Inspect disc brake pads for wear and rotors for surface condition. Inspect drum brake linings/shoes for wear or cracks. Inspect other brake parts, including drums, wheel cylinders, calipers, parking brake, etc. (d) Visually inspect front and rear suspension and steering system for damaged, loose, or missing parts, signs of wear or lack of lubrication. Inspect power steering lines and hoses for proper hook-up, binding, leaks, cracks, chafing, etc. Pickup models: Visually check constant velocity joints, rubber boots, and axle seals for leaks. (e) Visually inspect hoses and have them replaced if they are cracked, swollen, or deteriorated. Inspect all pipes, fittings, and clamps; replace with genuine GM parts as needed. To help ensure proper operation, a pressure test of the cooling system and pressure cap and cleaning the outside of the radiator and air conditioning condenser is recommended at least once a year. (f) Visually inspect wiper blades for wear or cracking. Replace wiper blades that appear worn or damaged or that streak or miss areas of the windshield.
6-9
(g) Make sure the safety belt reminder light and all your belts, buckles, latch plates, retractors, and anchorages are working properly. Look for any other loose or damaged safety belt system parts. If you see anything that might keep a safety belt system from doing its job, have it repaired. Have any torn or frayed safety belts replaced. Also look for any opened or broken airbag coverings, and have them repaired or replaced. The airbag system does not need regular maintenance. (h) Lubricate all key lock cylinders, body door hinges, hood latch assembly, secondary latch, pivots, spring anchor, release pawl, fuel door hinge, locks, latches, and any folding or moving seat hardware. Pickup models: Lubricate tailgate hinges, tailgate linkage, tailgate handle pivot points, and latch bolt. Van models: Lubricate hood hinges and rear compartment hinges. More frequent lubrication may be required when exposed to a corrosive environment. Applying silicone grease on weatherstrips with a clean cloth will make them last longer, seal better, and not stick or squeak. (i) Van Models: If the two chassis mounted fuel filters have not been replaced, or if the vehicle has been driven 20,000 miles (32 000 km) or more since the fuel filters were last replaced, replace both fuel filters.
(j) Pickup Models: This vehicle has a CHANGE FUEL FILTER message in the Driver Information Center (DIC) to tell you when to replace the fuel filter. See Driver Information Center (DIC) (Pickup Models Only) on page 3-9 for more information and how to reset the message after the fuel filter is replaced. If the fuel filter has not been replaced, or if the vehicle has been driven 15,000 miles (25 000 km) or more since the fuel filter was last replaced, replace the filter and reset the message. (k) Inspect shields and underhood insulation for damage or looseness. Adjust or replace as required. This is a Noise Emission Control Service. Applicable to vehicles sold in the United States and recommended for vehicles sold in Canada. (l) Check the air intake system installation to assure that gaskets are properly sealed and that all hose connections, fasteners, and other components are tight. Also check to be sure that the air cleaner housing is properly seated and the cover fits tightly. Tighten connections and fasteners or replace damaged parts as necessary. This is a Noise Emission Control Service. Applicable to vehicles sold in the United States and recommended for vehicles sold in Canada. (m) Check system for interference or binding and for damaged or missing parts. Replace parts as needed. Replace any components that have high effort or excessive wear. Do not lubricate accelerator or cruise control cables.
6-10
(n) Change clutch fluid (or every 24 months, whichever occurs first). (p) Change automatic transmission fluid and external transmission filter if the vehicle is mainly driven under one or more of these conditions:
− In heavy city traffic where the outside temperature
regularly reaches 90°F (32°C) or higher.
− In hilly or mountainous terrain. − When doing frequent trailer towing. − Uses such as found in taxi, police, or delivery
service.
(q) Check vent hose at transfer case for kinks and proper installation. (r) Drain, flush, and refill cooling system. This service can be complex; you should have your dealer perform this service. See Engine Coolant on page 5-34 for what to use. Inspect hoses. Clean radiator, condenser, van model fuel operated heater (if equipped), pressure cap, and filler neck. Pressure test the cooling system and pressure cap. For van models, see Fuel Operated Heater (FOH) (Van Models Only) on page 2-8. (s) Visually inspect belt for fraying, excessive cracks, or obvious damage. Replace belt if necessary.
Owner Checks and Services These owner checks and services should be performed at the intervals specified to help ensure the safety, dependability, and emission control performance of your vehicle. Your GM Goodwrench® dealer can assist you with these checks and services. Be sure any necessary repairs are completed at once. Whenever any fluids or lubricants are added to your vehicle, make sure they are the proper ones, as shown in Recommended Fluids and Lubricants on page 6-15.
At Each Fuel Fill It is important to perform these underhood checks at each fuel fill. Engine Oil Level Check Check the engine oil level and add the proper oil if necessary. See Engine Oil on page 5-21 for further details. Notice: and keep it at the proper level. Failure to keep your engine oil at the proper level can cause damage to your engine not covered by your warranty.
It is important to check your oil regularly
6-11
Engine Coolant Level Check Check the engine coolant level and add DEX-COOL® coolant mixture if necessary. See Engine Coolant on page 5-34 for further details. Windshield Washer Fluid Level Check Check the windshield washer fluid level in the windshield washer fluid reservoir and add the proper fluid if necessary.
At Least Once a Month Tire Inflation Check Visually inspect your vehicle’s tires and make sure they are inflated to the correct pressures. Do not forget to check the spare tire. See “Tires” in your owner manual for further details. Check to make sure the spare tire is stored securely. See “Changing a Flat Tire” in your owner manual. Tire Wear Inspection Tire rotation may be required for high mileage highway drivers prior to the Engine Oil Life System service notification. Check the tires for wear and, if necessary, rotate the tires. See “Tire Inspection and Rotation” in your owner manual.
6-12
At Least Once a Year Starter Switch Check
{CAUTION:
When you are doing this inspection, the vehicle could move suddenly. If the vehicle moves, you or others could be injured.
1. Before you start, be sure you have enough room
around the vehicle.
2. Firmly apply both the parking brake and the regular brake. See “Parking Brake” in your owner manual. Do not use the accelerator pedal, and be ready to turn off the engine immediately if it starts.
3. Try to start the engine in each gear. The vehicle should start only in PARK (P) or NEUTRAL (N). If the vehicle starts in any other position, contact your GM Goodwrench® dealer for service.
Automatic Transmission Shift Lock Control System Check
{CAUTION:
When you are doing this inspection, the vehicle could move suddenly. If the vehicle moves, you or others could be injured.
1. Before you start, be sure you have enough room around the vehicle. It should be parked on a level surface.
2. Firmly apply the parking brake. See “Parking Brake”
in your owner manual. Be ready to apply the regular brake immediately if the vehicle begins to move.
3. With the engine off, turn the ignition to RUN, but do
not start the engine. Without applying the regular brake, try to move the shift lever out of PARK (P) with normal effort. If the shift lever moves out of PARK (P), contact your GM Goodwrench® dealer for service.
Ignition Transmission Lock Check While parked, and with the parking brake set, try to turn the ignition to LOCK in each shift lever position. • The ignition should turn to LOCK only when the
shift lever is in PARK (P).
• The key should come out only in LOCK. Contact your GM Goodwrench® dealer if service is required.
6-13
Parking Brake and Automatic Transmission Park (P) Mechanism Check
{CAUTION:
When you are doing this check, your vehicle could begin to move. You or others could be injured and property could be damaged. Make sure there is room in front of your vehicle in case it begins to roll. Be ready to apply the regular brake at once should the vehicle begin to move.
Park on a fairly steep hill, with the vehicle facing downhill. Keeping your foot on the regular brake, set the parking brake. • To check the parking brake’s holding ability: With the
engine running and transmission in NEUTRAL (N), slowly remove foot pressure from the regular brake pedal. Do this until the vehicle is held by the parking brake only.
• To check the PARK (P) mechanism’s holding
ability: With the engine running, shift to PARK (P). Then release the parking brake followed by the regular brake.
Contact your GM Goodwrench® dealer if service is required. Underbody Flushing Service At least every spring, use plain water to flush any corrosive materials from the underbody. Take care to clean thoroughly any areas where mud and other debris can collect.
6-14
Recommended Fluids and Lubricants Fluids and lubricants identified below by name, part number, or specification may be obtained from your dealer.
Usage
Fluid/Lubricant
Engine oils with the letters CI-4 or CH-4 are best for your vehicle. The CI-4 or CH-4 designation may appear either alone, or in combination with other API designations, such as API CI-4/SL. These letters show American Petroleum Institute (API) levels of quality. GM Goodwrench® oil meets all the requirements for your vehicle. To determine the preferred viscosity for your vehicle’s diesel engine, see Engine Oil on page 5-21. 50/50 mixture of clean, drinkable water and use only DEX-COOL® Coolant. See Engine Coolant on page 5-34. Delco® Supreme 11 Brake Fluid or equivalent DOT-3 brake fluid.
Engine Oil
Engine Coolant
Hydraulic Brake
System
Usage
Windshield
Washer
Van Models: Parking Brake Cable Guides
Pickup Models:
Hydraulic
Clutch System
(5-Speed Trans.)
Pickup Models:
Hydraulic
Clutch System
(6-Speed Trans.)
Fluid/Lubricant
GM Optikleen® Washer Solvent.
Chassis Lubricant (GM Part No. U.S. 12377985, in Canada 88901242) or lubricant meeting requirements of NLGI #2, Category LB or GC-LB.
Hydraulic Clutch Fluid (GM Part No. U.S. 12345347, in Canada 10953517) or equivalent DOT-3 brake fluid.
Hydraulic Clutch Fluid. Use only GM Part No. U.S. 88958860, in Canada 88901244, Super DOT-4
brake fluid.Power Steering
System
GM Power Steering Fluid (GM Part No. U.S. 89021184, in Canada 89021186).
Pickup Models:
Manual
Transmission
(5-Speed
with Low Gear,
RPO MW3)
GM Goodwrench® Synthetic Manual Transmission Fluid (GM Part No. U.S. 12346190, in Canada 10953477) or equivalent SAE 75W-85 GL-4 gear oil.
6-15
Usage
Fluid/Lubricant
Usage
Fluid/Lubricant
Synchromesh Transmission Fluid (GM Part No. U.S. 12345349, in Canada 10953465).
Synthetic Transmission Fluid approved to Allison Transmission® specification TES-295
(GM Part No. U.S. 12378515, in Canada 88900701). DEXRON®-VI Automatic Transmission Fluid. Multi-Purpose Lubricant, Superlube (GM Part No. U.S. 12346241, in Canada 10953474). Lubriplate Lubricant Aerosol (GM Part No. U.S. 12346293, in Canada 992723) or lubricant meeting requirements of NLGI #2
Category LB or GC-LB. Chassis Lubricant (GM Part No. U.S. 12377985, in Canada 88901242) or lubricant meeting requirements of NLGI #2, Category LB or GC-LB.Pickup Models:
Manual
Transmission
(5-Speed without
Low Gear, RPO MG5)
Pickup Models:
Manual
Transmission
(6-Speed)
Automatic
Transmission
Key Lock Cylinders
Pickup Models:
Floor Shift Linkage
Chassis
Lubrication
6-16
Van Models: Front Wheel
Bearings
Van Models:
Front and Rear Axle
Pickup Models:
Front Axle
Pickup Models:
Rear Axle
Pickup Models:
Manual
Transfer Case
Pickup Models:
Automatic
Transfer Case
Van Models: Transfer Case
Wheel bearing lubricant meeting requirements of NLGI #2, Category GC or GC-LB (GM Part No. U.S. 1051344, in Canada 993037). SAE 75W-90 Synthetic Axle Lubricant (GM Part No. U.S. 12378261, in Canada 10953455) or equivalent meeting GM Specification 9986115. SAE 80W-90 Axle Lubricant (GM Part No. U.S. 1052271, in Canada 10950849). SAE 75W-90 Synthetic Axle Lubricant (GM Part No. U.S. 12378261, in Canada 10953455) meeting GM Specification 9986115. DEXRON®-III Automatic Transmission Fluid. Look for “Approved for the H-Specification” on the label. AUTO-TRAK II Fluid (GM Part No. U.S. 12378508, in Canada 10953626). DEXRON®-III Automatic Transmission Fluid. Look for “Approved for the H-Specification” on the label.
Usage
Fluid/Lubricant
Usage
Fluid/Lubricant
Van Models: One-Piece
Propshaft Slip Yoke Spline, Two-Piece Propshaft Slip-in-Tube
Spline
Pickup Models:
Front Axle Propshaft Spline or One-Piece Propshaft
Spline
(Two-Wheel Drive with
Auto. Trans.)
Spline Lubricant, Special Lubricant (GM Part No. U.S. 12345879, in Canada 10953511) or lubricant meeting requirements of GM 9985830.
Spline Lubricant, Special Lubricant (GM Part No. U.S. 12345879, in Canada 10953511) or lubricant meeting requirements of GM 9985830.
Pickup Models: Rear Driveline Center Spline
Chassis Lubricant (GM Part No. U.S. 12377985, in Canada 88901242) or lubricant meeting requirements of NLGI #2, Category LB or GC-LB.
Hood Hinges
Multi-Purpose Lubricant, Superlube (GM Part No. U.S. 12346241, in Canada 10953474).
Pickup Models:
Body Door Hinge Pins,
Tailgate Hinge and Linkage, Folding Seats, and Fuel Door
Hinge
Pickup Models: Tailgate Handle
Pivot Points, Hinges, Latch
Bolt, and Linkage
Multi-Purpose Lubricant, Superlube (GM Part No. U.S. 12346241, in Canada 10953474).
Multi-Purpose Lubricant, Superlube (GM Part No. U.S. 12346241, in Canada 10953474).
Weatherstrip Conditioning
Weatherstrip
Squeaks
Dielectric Silicone Grease (GM Part No. U.S. 12345579, in Canada 992887). Synthetic Grease with Teflon, Superlube (GM Part No. U.S. 12371287, in Canada 10953437).
6-17
Normal Maintenance Replacement Parts Replacement parts identified below by name, part number, or specification can be obtained from your dealer.
Part
GM Part Number
ACDelco® Part Number
Oil Filter
Engine Air Cleaner/Filter
Pickups Models Van Models
Fuel Filter(s)
Pickup Models Van Models (Primary and Secondary Filter Kit)
Use only the specified filters. *Racor service kit includes primary filter, secondary filter and o-rings.
88917036
25332443
1510254697385488
19121764PF2232
A1618C A2959C
TP1298A RK58095*
6-18
Engine Drive Belt Routing
6-19
Maintenance Record After the scheduled services are performed, record the date, odometer reading, who performed the service, and the type of services performed in the boxes provided. See Maintenance Requirements on page 6-2. Any additional information from Owner Checks and Services on page 6-11 can be added on the following record pages. You should retain all maintenance receipts.
Date
Odometer Reading
Serviced By
Maintenance I or Maintenance II
Services Performed
Maintenance Record
6-20
Date
Odometer Reading
Serviced By
Maintenance I or Maintenance II
Services Performed
Maintenance Record (cont’d)
6-21
Date
Odometer Reading
Serviced By
Maintenance I or Maintenance II
Services Performed
Maintenance Record (cont’d)
6-22
Automatic Transmission, Fluid ........................... 5-29
Canadian Owners ................................................ ii Capacities and Specifications
Specification Charts ..................................... 5-50
Coolant
Engine ....................................................... 5-34
Surge Tank Pressure Cap ............................. 5-39
Cooling System .............................................. 5-41Diesel
Engine Fuel .................................................. 5-2
Filling a Portable Fuel Container .................... 5-17
Filling Your Tank .......................................... 5-15Diesel (cont.)
Fuel Requirements and Fuel System ................ 5-2
Running Out of Fuel .................................... 5-11
Very Cold Weather Operation .......................... 5-5
Water in Fuel ............................................... 5-5
Water in Fuel Light Chart ............................... 5-6
What Fuel to Use .......................................... 5-3
Driver Information Center (DIC) .......................... 3-9Engine
Air Cleaner/Filter ......................................... 5-25
Compartment Overview ................................ 5-18
Coolant ...................................................... 5-34
Oil ............................................................. 5-21
Overheating ................................................ 5-39
.................................... 3-7
Reduced Power Light Engine Coolant Heater ...................................... 2-8Instrument Panel Cluster ................................... 3-2
Light
Lights
Reduced Engine Power .................................. 3-7
Water in Fuel Warning ................................... 3-9Malfunction Indicator Lamp ............................. 3-4
Wait to Start ................................................. 3-7
Water in Fuel Light Chart ............................... 5-6Fuel
At Each Fuel Fill ......................................... 6-11
Diesel Engine ............................................... 5-2
Diesel Requirements and Fuel System ............. 5-2
Filling a Portable Fuel Container .................... 5-17
Filling Your Tank .......................................... 5-15
Filter Replacement ....................................... 5-12
Gage ........................................................... 3-8
Running Out of ........................................... 5-11
Water in Warning Light .................................. 3-9
What to Use ................................................. 5-3
Fuel Operated Heater (FOH) .............................. 2-8Gage
Fuel ............................................................ 3-8
Oil Pressure ................................................. 3-6M
Maintenance Schedule
At Each Fuel Fill ......................................... 6-11
At Least Once a Month ................................ 6-12
At Least Once a Year .................................. 6-12
Introduction .................................................. 6-2
Maintenance Requirements ............................. 6-2
Scheduled Maintenance ................................. 6-4
Using .......................................................... 6-2
Your Vehicle and the Environment ................... 6-2
Malfunction Indicator Lamp ................................ 3-4Oil, Engine ..................................................... 5-21
Oil Pressure Gage ............................................ 3-6
Overheating, Engine ........................................ 5-39
Owners, Canadian ............................................... iiPower
Reduced Engine Light .................................... 3-7
Radiator Pressure Cap .................................... 5-39
Reduced Engine Power Light ............................. 3-7
Running Out of Fuel ........................................ 5-11Scheduled Maintenance ..................................... 6-4
Specification Charts ......................................... 5-50
Starting the Diesel Engine ................................. 2-2
Surge Tank Pressure Cap, Coolant .................... 5-39T
Towing
Trailer .......................................................... 4-2
Transmission, Automatic Fluid ........................... 5-29Wait to Start Light ............................................ 3-7
Water in Fuel ................................................... 5-5
Water in Fuel Light Chart .................................. 5-6
Water in Fuel Warning Light ............................... 3-9
Winter Cover ................................................... 2-62006 DURAMAX® Diesel Engine M
Starting and Operating Your Vehicle
Features and Controls ..................................... 2-1
............. 2-2
Instrument Panel ............................................. 3-1
........... 3-2
Driving Your Vehicle ....................................... 4-1
..................................................... 4-2Warning Lights, Gages and Indicators
Towing
Service and Appearance Care .......................... 5-1
Diesel Fuel Requirements and Fuel System ..... 5-2
Checking Things Under the Hood ............... 5-18
Capacities and Specifications ..................... 5-50
Maintenance Schedule ..................................... 6-1
................................ 6-2
Index ......................................................................... 1Maintenance Schedule
Canadian Owners A French language copy of this manual can be obtained from your dealer or from:
Helm, Incorporated P.O. Box 07130
Detroit, MI 48207General Motors, GM, GMC, CHEVROLET, the GM Emblem, the GMC Truck Emblem, the CHEVROLET Emblem, and the names SIERRA, SILVERADO, SAVANA and EXPRESS are registered trademarks of General Motors Corporation. This manual contains information that pertains to the operation of your diesel engine. It also contains your Diesel Maintenance Schedule. The sections in this manual correspond to the sections in your owner manual. This manual, along with your owner manual, will assist you in the proper use and maintenance of your vehicle. Keep this manual with the owner manual in your vehicle, so it will be there if you ever need it while you are on the road. If you sell your vehicle, leave this manual and the owner manual with the vehicle. This manual includes the latest information at the time it was printed. We reserve the rights to make changes in the product after that time without notice.
Litho in U.S.A. Part No. 15105920 B Second Printing
©2005 General Motors Corporation. All Rights Reserved.
ii
Section 2
Features and Controls
Starting and Operating Your Vehicle .................2-2
Starting the Diesel Engine ...............................2-2
Winter Cover (Pickup Models Only) ...................2-6Fuel Operated Heater (FOH) (Van Models Only) ....2-8
Engine Coolant Heater ....................................2-82-1
Starting and Operating Your Vehicle
Starting the Diesel Engine Your diesel engine starts differently than a gasoline engine. Automatic Transmission Move your shift lever to PARK (P) or NEUTRAL (N). Your engine won’t start in any other position — that’s a safety feature. To restart when you’re already moving, use NEUTRAL (N) only. Notice: Do not try to shift to PARK (P) if your vehicle is moving. If you do, you could damage the transmission. Shift to PARK (P) only when your vehicle is stopped. Manual Transmission (Pickup Models Only) Move your shift lever to neutral and hold the clutch pedal to the floor while starting the engine. Your vehicle won’t start if the clutch pedal is not all the way down — that’s a safety feature.
2-2
Starting Your Engine 1. Turn your ignition key to RUN.
Observe the wait to start light. See Wait to Start Light on page 3-7. This light may not come on if the engine is hot.
2. As soon as the wait to start light goes off,
immediately turn the ignition key to START. When the engine starts, let go of the key. Your engine has a fast warm-up glow plug system. The wait to start light will illuminate for a much shorter time than most diesel engines, due to the rapid heating of the glow plug system.
Notice: Holding your key in START for longer than 15 seconds at a time will cause your battery to be drained much sooner. And the excessive heat can damage your starter motor. Notice: starting your vehicle, your vehicle may not run properly. Have your vehicle serviced right away. 3. If the engine does not start after 15 seconds of
If the wait to start light stays on after
cranking, turn the ignition key to LOCK. Wait one minute for the starter to cool, then try the same steps again.
If you’re trying to start your engine after you’ve run out of fuel, follow the steps in Running Out of Fuel on page 5-11.
If you are not in an idling vehicle and the
When your engine is cold, let it run for a few minutes before you move your vehicle. This lets oil pressure build up. Your engine will sound louder when it’s cold. Notice: engine overheats, you would not be there to see the overheated engine indication. This could damage your vehicle. Do not let your engine run when you are not in your vehicle. Cold Weather Starting (Diesel Engine) The following tips will help you get good starting in cold weather. Use the recommended engine oil when the outside temperature drops below freezing. See Engine Oil on page 5-21. When the outside temperature drops below 0° F (–18°C), use of the engine coolant heater is recommended. If you experience longer cranking times, notice an unusual amount of exhaust smoke or are at higher altitudes (over 7,000 ft. or 2 135 m), you may use your engine coolant heater. See Engine Coolant Heater on page 2-8. See Diesel Fuel Requirements and Fuel System on page 5-2 for information on what fuel to use in cold weather.
If Your Diesel Engine Won’t Start If you’ve run out of fuel, look at Running Out of Fuel on page 5-11. See Diesel Fuel Requirements and Fuel System on page 5-2. If you’re not out of fuel, and your engine won’t start, do this: Turn your ignition key to RUN. Immediately after the wait to start light goes off, turn the ignition key to START. If the light doesn’t go off, wait a few seconds, then try starting your engine again. See your dealer as soon as you can for a starting system check. If the light comes on and then goes off and you know your batteries are charged, but your engine still won’t start, your vehicle needs service. If the light does not come on when the engine is cold, your vehicle needs service. If your batteries don’t have enough charge to start your engine, see “Battery” in the owner’s manual Index. Be sure you have the right oil for your engine, and that you’ve changed the oil at the proper times. If you use the wrong oil, your engine may be harder to start.
2-3
For pickup models, this feature can be turned off and on using the DIC steering wheel control buttons. If your vehicle is not equipped with the DIC steering wheel control buttons, do the following to turn on this feature: 1. Turn the ignition to RUN, with the vehicle off. 2. Press the accelerator pedal to the floor and hold
while quickly pressing the brake pedal three times in less than eight seconds.
3. Release the accelerator pedal and start the engine. When the engine is started, it will slowly ramp up to the high idle speed after a delay of a few seconds up to approximately two minutes. For this method to work properly there must be no throttle or brake pedal faults. The engine idle speed will return to normal once the following conditions are met: • Once engine coolant temperature reaches
150°F (65°C).
• Air intake temperature reaches 32°F (0°C).
Be sure you are using the proper fuel for existing weather conditions. See Diesel Fuel Requirements and Fuel System on page 5-2. If the engine starts, runs a short time, then stops, your vehicle needs service.
{CAUTION:
Do not use gasoline or starting aids, such as ether, in the air intake. They could damage your engine. There could also be a fire, which could cause serious personal injury.
Elevated Idle/Exhaust Restrictor The engine has a cold temperature high idle and exhaust restrictor feature which elevates the engines idle speed from 680 to 1200 rpms, and restricts the exhaust gas flow, when outside temperatures are below 32°F (0°C), and the engine coolant temperature is below 150°F (65°C.) This feature enhances heater performance by raising the engine coolant temperature faster.
2-4
The high idle speed will be temporarily interrupted and the engine speed will return to normal if any of the following conditions occur: • The brake pedal is applied. • The accelerator pedal is pressed. • The automatic transmission is shifted out of
PARK (P) or NEUTRAL (N).
• The clutch pedal on the manual transmission is
pressed (pickup models). • Vehicle speed is detected. Once these inputs are removed, the engine idle speed will slowly ramp back up to high idle after the normal delay, if the conditions for engine coolant temperature and air intake temperature are still met.
Manual High Idle System (Van Models Only)
If your vehicle has this feature, the manual high idle switch is located on the instrument panel.
This system can be used to increase your engine idle speed whenever the following conditions are met: • The brake pedal is not pressed. • The vehicle speed is below about 5 mph (8 km/h). • The transmission is in NEUTRAL (N) or PARK (P). The manual high idle feature is activated by pressing the switch on the instrument panel. When the switch is pressed again, or any of the previous conditions are not met, manual high idle will be deactivated. The manual high idle has been preset at the factory. Your dealer may change the setting to fit your needs.
2-5
Winter Cover (Pickup Models Only) If your vehicle includes a winter cover, it will enhance heater performance and will reduce the amount of time it takes to warm the inside of your vehicle in extremely cold conditions (below 0°F (−18°C)). The winter cover consists of two parts, the front bumper cover (if equipped) and the grille cover. The winter cover installs over the front bumper of your vehicle and restricts the air flowing to the engine compartment by covering the radiator grille.
Usage Guidelines The winter cover should only be used while operating your vehicle in extremely cold temperatures. In these temperatures, the vehicle does not need a large amount of air to properly cool the engine. During periods of operation when more airflow is required to cool the vehicle, the winter cover should not be used. The following usage guidelines will allow adequate airflow for proper radiator grille and air cooler performance: • Do not use the winter cover when temperatures are expected to be above 32°F (0°C). Use of the cover in these conditions could cause your vehicle to overheat. If this happens while the cover is being used, remove the cover.
• Do not use the winter cover if towing a trailer. The added power needed to tow a trailer requires the radiator grille to have full airflow under all conditions. Your vehicle may overheat if the cover is used while towing a trailer.
• Do not modify the cover. The winter cover does
not cover some sections of the front of the vehicle because these openings are needed to provide enough airflow to the radiator grille and air cooler in extremely cold temperatures.
2-6
• When the winter cover is used, the temperature
sensor found on the inside rearview mirror will not function properly. The temperature that is shown will be incorrect.
Installation Instructions The following instructions explain how to install and remove your vehicle’s winter cover. When installing or removing the cover please refer to the “Usage Guidelines” mentioned previously. When you first try to fit the cover it may appear to be undersized. This is due to the nature of the special vinyl, which will stretch during installation to ensure a tight fit. For this reason, the initial installation of the cover is best performed when the winter cover is warm. If you are required to use a front license plate, simply cut the black stitches on the back of the patch. Grille Cover Installation 1. Pre-bend all the small black tabs into the
shape of a J.
2. Fasten the snaps. 3. Wrap the elastic loop around the hood stopper. 4. Hook all the tabs to the edge of the grille. 5. Hook all clips to the bottom of the grille.
Lower Cover Installation 1. Pre-bend all of the small black tabs into the
shape of a J.
2. Fasten each tab to
edge of the bumper, as illustrated.
To remove the winter cover, reverse the steps listed previously.
2-7
Fuel Operated Heater (FOH) (Van Models Only) If your vehicle includes a fuel operated heater (FOH), it will enhance heater performance and will reduce the amount of time it takes to warm the inside of your vehicle in cold conditions below 40°F (4.4°C). The fuel operated heater is installed in the frame rail on the driver’s side of the vehicle and uses diesel to warm up the engine coolant, which finally warms up the passenger’s cabin air. The FOH works automatically, depending on the fuel level, engine coolant temperature and outside air temperature. It works only with the engine running.
Engine Coolant Heater In very cold weather, 0°F (−18°C) or colder, the engine coolant heater can help. You’ll get easier starting and better fuel economy during engine warm-up. Usually, the coolant heater should be plugged in a minimum of four hours prior to starting your vehicle.
To Use the Engine Coolant Heater 1. Turn off the engine. 2. Open the hood and unwrap the electrical cord. The cord is located in the engine compartment, on the passenger’s side of the vehicle, near the right side engine mount.
3. Plug it into a normal, grounded 110-volt AC outlet.
{CAUTION:
Plugging the cord into an ungrounded outlet could cause an electrical shock. Also, the wrong kind of extension cord could overheat and cause a fire. You could be seriously injured. Plug the cord into a properly grounded three-prong 110-volt AC outlet. If the cord will not reach, use a heavy-duty three-prong extension cord rated for at least 15 amps.
2-8
4. Before starting the engine, be sure to unplug and
store the cord as it was before to keep it away from moving engine parts. If you don’t, it could be damaged.
How long should you keep the coolant heater plugged in? The answer depends on the outside temperature. You may wish to use your coolant heater to improve ease of starting at temperatures between 0°F (−18°C) and −20°F (−29°C).
Keep the coolant heater plugged in for a minimum of four hours. At temperatures below −20°F (−29°C), the coolant heater should remain plugged in for at least eight hours. It will not harm either the coolant heater or the vehicle to leave the coolant heater plugged in longer than the times stated. Be sure to remove and store the cord before starting the engine. See Diesel Fuel Requirements and Fuel System on page 5-2 for information on what fuel to use in cold weather.
2-9
✍ NOTES
2-10
Section 3
Instrument Panel
Warning Lights, Gages and Indicators ...............3-2
Instrument Panel Cluster .................................3-2
Malfunction Indicator Lamp ..............................3-4
Oil Pressure Gage ..........................................3-6
Wait to Start Light ..........................................3-7Reduced Engine Power Light (Van Models Only) ...3-7
Fuel Gage .....................................................3-8
Water in Fuel Warning Light (Van Models Only) .....3-9
Driver Information Center (DIC)(Pickup Models Only) ....................................3-9
3-1
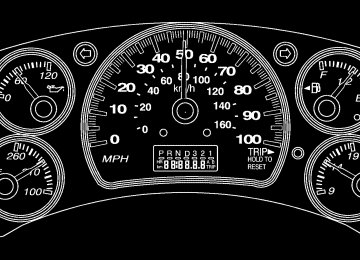
Warning Lights, Gages and Indicators Instrument Panel Cluster
United States Pickup automatic transmission version shown, manual transmission and Canada similar
3-2
United States Van version shown, Canada similar
Your instrument cluster is designed to let you know at a glance how your vehicle is running. You’ll know how fast you’re going, about how much fuel you have and many other things you’ll need to know to drive safely and economically.
3-3
Malfunction Indicator Lamp Check Engine Light
Pickup Models
Van Models
Your vehicle has a computer which monitors operation of the fuel, timing, and emission control systems. This system is called OBD II (On-Board Diagnostics-Second Generation) and is intended to assure that emissions are at acceptable levels for the life of the vehicle, helping to produce a cleaner environment.
If you keep driving your vehicle with this
The check engine light comes on to indicate when service is required. Malfunctions often will be indicated by the system before any problem is apparent. This may prevent more serious damage to your vehicle. This system is also designed to assist your service technician in correctly diagnosing any malfunction. Notice: light on, after awhile, your emission controls may not work as well, your fuel economy may not be as good, and your engine may not run as smoothly. This could lead to costly repairs that may not be covered by your warranty. Notice: Modifications made to the engine, transmission, exhaust, intake, or fuel system of your vehicle or the replacement of the original tires with other than those of the same Tire Performance Criteria (TPC) can affect your vehicle’s emission controls and may cause this light to come on. Modifications to these systems could lead to costly repairs not covered by your warranty. This may also result in a failure to pass a required Emission Inspection/Maintenance test.
3-4
If the Light Comes On This light should come on, as a check to show you it is working, when the ignition is on and the engine is not running. If it does not, have it repaired. This light will also come on if an emission control system malfunction has been detected on your vehicle. Diagnosis and service may be required. You also may be able to correct the emission system malfunction by considering the following: Did you just drive through a deep puddle of water? If so, your electrical system may be wet. The condition will usually be corrected when the electrical system dries out. A few driving trips should turn the light off. Are you low on fuel? As your engine starts to run out of fuel, your engine may not run as efficiently as designed since small amounts of air are sucked into the fuel line. The system can detect this. Adding fuel should correct this condition. It will take a few driving trips to turn the light off. If none of the above steps have made the light turn off, your dealer can check the vehicle. Your dealer has the proper test equipment and diagnostic tools to fix any mechanical or electrical problems that may have developed.
Emissions Inspection and Maintenance Programs Some state/provincial and local governments have or may begin programs to inspect the emission control equipment on your vehicle. Failure to pass this inspection could prevent you from getting a vehicle registration. Here are some things you need to know in order to help your vehicle pass an inspection: Your vehicle will not pass this inspection if the check engine light is on or not working properly. Your vehicle will not pass this inspection if the OBD (on-board diagnostic) system determines that critical emission control systems have not been completely diagnosed by the system. The vehicle would be considered not ready for inspection. This can happen if you have recently replaced your battery or if your battery has run down. The diagnostic system is designed to evaluate critical emission control systems during normal driving. This may take several days of routine driving. If you have done this and your vehicle still does not pass the inspection for lack of OBD system readiness, your GM dealer can prepare the vehicle for inspection.
3-5
Oil Pressure Gage
United States
(Pickup Models)
Canada
(Pickup Models)
United States (Van Models)
Canada
(Van Models)
3-6
The oil pressure gage shows the engine oil pressure in psi (pounds per square inch) when the engine is running. Canadian vehicles indicate pressure in kPa (kilopascals). Oil pressure may vary under different driving conditions and oil types. The DURAMAX® engine may generate oil pressure in excess of 80 psi (548 kPa) under certain conditions, especially in cold temperatures. This is a normal operating range.
{CAUTION:
Do not keep driving if the oil pressure is low. If you do, your engine can become so hot that it catches fire. You or others could be burned. Check your oil as soon as possible and have your vehicle serviced.
Notice: Lack of proper engine oil maintenance may damage the engine. The repairs would not be covered by your warranty. Always follow the maintenance schedule in this manual for changing engine oil.
Reduced Engine Power Light (Van Models Only)
If the reduced engine power light comes on while you are driving, the computer is indicating that your vehicle has a problem. You should take your vehicle in for service soon.
Wait to Start Light
Your diesel engine has a glow plug system to aid in starting your vehicle.
For pickup models, this light shows that the system is functioning properly and tells you when the engine is ready to be started. For van models, an instrument panel WAIT TO START indicator light shows that the system is functioning properly and tells you when the engine is ready to be started. Your vehicle has a fast warm-up glow plug system. The wait to start light will illuminate for a considerably shorter time than most diesel engines due to the rapid heating of the glow plug system. For more information, see Starting the Diesel Engine on page 2-2.
3-7
Fuel Gage
Pickup Models, United States version shown
Pickup Models,
Canada
version shown
Van Models
3-8
When the ignition is on, the fuel gage shows you approximately how much fuel you have left in your tank. The gage will first indicate E (empty) before you are out of fuel, but you should get more fuel as soon as possible. Listed are four situations you may experience with your fuel gage: • At the gas station, the fuel pump shuts off before
the gage reads F (full).
• It takes a little more or less fuel to fill up than the fuel gage indicated. For example, the gage may have indicated the tank was half full, but it actually took a little more or less than half the tank’s capacity to fill the tank.
• The gage moves a little when you turn a corner or
speed up.
• The gage doesn’t go back to E (empty) when you
turn off the ignition.
None of these indicate a problem with the fuel gage. For information on how to fill your fuel tank, see Filling the Tank on page 5-15. Your vehicle also has a fuel cooler. To clean, powerwash the bottom of the vehicle.
Water in Fuel Warning Light (Van Models Only)
The light will come on to warn you if there is water in the diesel fuel system.
For more information on how this light works, see Diesel Fuel Requirements and Fuel System on page 5-2. Driver Information Center (DIC) (Pickup Models Only) The Driver Information Center (DIC) is located on the instrument panel cluster above the steering wheel. The DIC comes on when the ignition is on. After a short delay the DIC will display the current driver and the information that was last displayed before the engine was last turned off. If a problem is detected, a warning message will appear on the display. Pressing the select button on the DIC steering wheel buttons, or the trip odometer reset stem for vehicles without DIC steering wheel buttons, will acknowledge some current warning or service messages.
Some messages that your DURAMAX® diesel may show are: ELEVATED IDLE OFF This message will appear when the elevated idle/exhaust restrictor feature has been turned off. For more information on the elevated idle/exhaust restrictor feature, see Starting the Diesel Engine on page 2-2. ELEVATED IDLE ON This message will appear when the elevated idle/exhaust restrictor feature has been turned on. For more information on the elevated idle/exhaust restrictor feature, see Starting the Diesel Engine on page 2-2. REDUCED ENGINE POWER A computer monitors the operation of the electric accelerator. If the REDUCED ENGINE POWER message comes on while you are driving, the computer is indicating that your vehicle has a problem. You should take your vehicle in for service soon. WATER IN FUEL This message will come on to warn you if there is water in the diesel fuel system. For more information on how this message works, see Diesel Fuel Requirements and Fuel System on page 5-2.
3-9
FUEL FILTER LIFE ###% This feature is available on vehicles with steering wheel controls. When the fuel button is pressed and FUEL FILTER LIFE appears on the display, this information will give the percentage of fuel filter life remaining. FUEL FILTER LIFE RESET This message will appear when a reset is performed either by using the steering wheel controls or the following manual procedure. For vehicles with steering wheel controls, press and hold the select button for five seconds while the FUEL FILTER LIFE message is displayed. This message will appear on the DIC for ten seconds.
For vehicles without steering wheel controls, do the following: 1. Without pressing the pedals, turn the ignition key to
the on position without starting the engine.
2. Wait five seconds. 3. Completely press the brake and the accelerator pedals simultaneously and hold for ten seconds. The system is now reset. 4. Turn the ignition key off. The next time the engine is started, the message will no longer be displayed. Always reset the FUEL FILTER LIFE system after a fuel filter change. CHANGE FUEL FILTER This message will appear on the DIC for ten seconds when a fuel filter change is required. See Fuel Filter Replacement on page 5-12 for more information.
3-10
Section 4
Driving Your Vehicle
Towing ............................................................4-2
Towing a Trailer .............................................4-24-1
Towing
Towing a Trailer When towing at high altitude on steep uphill grades, consider the following: Engine coolant will boil at a lower temperature than sea level. If you turn your engine off immediately after towing at high altitude on steep uphill grades, your vehicle may show signs similar to engine overheating.
To avoid this, let the engine run while parked (preferably on level ground) with automatic transmission equipped vehicles in PARK (P) or manual transmission equipped vehicles in NEUTRAL with the park brake applied for at least five minutes before turning the engine off. If you do get the overheat warning, see Engine Overheating on page 5-39.
4-2
Section 5
Service and Appearance Care
Diesel Fuel Requirements and Fuel System .......5-2
Diesel Engine Fuel .........................................5-2
What Fuel to Use ...........................................5-3
Very Cold Weather Operation ...........................5-5
Water in Fuel .................................................5-5
Water in Fuel Light Chart ................................5-6
Running Out of Fuel .....................................5-11
Fuel Filter Replacement .................................5-12
Filling the Tank ............................................5-15
Filling a Portable Fuel Container .....................5-17Checking Things Under the Hood ....................5-18
Engine Compartment Overview .......................5-18
Engine Oil ...................................................5-21
Engine Oil Life System ..................................5-24
Engine Air Cleaner/Filter ................................5-25
Automatic Transmission Fluid .........................5-29
Engine Coolant .............................................5-34
Radiator Pressure Cap ..................................5-39
Coolant Surge Tank Pressure Cap ..................5-39
Engine Overheating .......................................5-39
Cooling System ............................................5-41
Capacities and Specifications ..........................5-50