- 2014 Buick Lacrosse Owners Manuals
- Buick Lacrosse Owners Manuals
- 2010 Buick Lacrosse Owners Manuals
- Buick Lacrosse Owners Manuals
- 2008 Buick Lacrosse Owners Manuals
- Buick Lacrosse Owners Manuals
- 2015 Buick Lacrosse Owners Manuals
- Buick Lacrosse Owners Manuals
- 2006 Buick Lacrosse Owners Manuals
- Buick Lacrosse Owners Manuals
- 2005 Buick Lacrosse Owners Manuals
- Buick Lacrosse Owners Manuals
- 2013 Buick Lacrosse Owners Manuals
- Buick Lacrosse Owners Manuals
- 2016 Buick Lacrosse Owners Manuals
- Buick Lacrosse Owners Manuals
- 2007 Buick Lacrosse Owners Manuals
- Buick Lacrosse Owners Manuals
- 2012 Buick Lacrosse Owners Manuals
- Buick Lacrosse Owners Manuals
- 2011 Buick Lacrosse Owners Manuals
- Buick Lacrosse Owners Manuals
- 2009 Buick Lacrosse Owners Manuals
- Buick Lacrosse Owners Manuals
- Download PDF Manual
-
Example 1
A. Vehicle Capacity Weight for
Example 1 = 453 kg (1,000 lbs).
B. Subtract Occupant Weight @
68 kg (150 lbs) × 2 = 136 kg (300 lbs).
C. Available Occupant and Cargo Weight = 317 kg (700 lbs).
Driving and Operating
8-15
seating positions. The combined weight of the driver, passengers, and cargo should never exceed the vehicle's capacity weight.
Certification Label
Example 2
Example 3
A. Vehicle Capacity Weight for
Example 2 = 453 kg (1,000 lbs).
A. Vehicle Capacity Weight for
Example 3 = 453 kg (1,000 lbs).
B. Subtract Occupant Weight @
68 kg (150 lbs) × 5 = 340 kg (750 lbs).
B. Subtract Occupant Weight @
91 kg (200 lbs) × 5 = 453 kg (1,000 lbs).
C. Available Cargo Weight =
113 kg (250 lbs).
C. Available Cargo Weight =
0 kg (0 lbs).
Refer to the vehicle's Tire and Loading Information label for specific information about the vehicle's capacity weight and
Label Example
A vehicle specific Certification label is attached to the driver side center pillar. The label tells the gross weight capacity of the vehicle, called the Gross Vehicle Weight Rating (GVWR).
8-16
Driving and Operating
The GVWR includes the weight of the vehicle, all occupants, fuel, and cargo. Never exceed the GVWR for the vehicle, or the Gross Axle Weight Rating (GAWR) for either the front or rear axle. And, if there is a heavy load, it should be spread out. See “Steps for Determining Correct Load Limit” earlier in this section.
{ WARNING
Do not load the vehicle any heavier than the Gross Vehicle Weight Rating (GVWR), or either the maximum front or rear Gross Axle Weight Rating (GAWR).
(Continued)
WARNING (Continued)
If you do, parts on the vehicle can break, and it can change the way the vehicle handles. These could cause you to lose control and crash. Also, overloading can shorten the life of the vehicle.
If you put things inside the vehicle — like suitcases, tools, packages, or anything else — they will go as fast as the vehicle goes. If you have to stop or turn quickly, or if there is a crash, they will keep going.
{ WARNING
Things you put inside the vehicle can strike and injure people in a sudden stop or turn, or in a crash.
. Put things in the cargo
area of the vehicle. In the cargo area, put them as far forward as you can. Try to spread the weight evenly.
. Never stack heavier
things, like suitcases, inside the vehicle so that some of them are above the tops of the seats.
(Continued)
WARNING (Continued)
. Do not leave an
unsecured child restraint in the vehicle.
. When you carry something
inside the vehicle, secure it whenever you can.
. Do not leave a seat folded down unless you need to.
Driving and Operating
8-17
Starting and Operating
New Vehicle Break-In Notice: The vehicle does not need an elaborate break-in. But it will perform better in the long run if you follow these guidelines:
. Do not drive at any one
constant speed, fast or slow, for the first 805 km (500 miles). Do not make full-throttle starts. Avoid downshifting to brake or slow the vehicle.
. During the first 1 000 km
(600 miles), avoid using more than moderate acceleration in lower gears and avoid vehicle speeds above 110 km/h (68 mph).
. Between the first 1 000 km
(600 miles) and 5 000 km (3,000 miles), heavy acceleration in lower gears
can be used. Vehicle speeds above 110 km/h (68 mph) should be limited to five minutes per use.
. Avoid making hard stops for the first 322 km (200 miles) or so. During this time the new brake linings are not yet broken in. Hard stops with new linings can mean premature wear and earlier replacement. Follow this breaking-in guideline every time you get new brake linings.
. Do not tow a trailer during
break-in. See Driving Characteristics and Towing Tips on page 8‑54 for the trailer towing capabilities of your vehicle and more information.
Following break‐in, engine speed and load can be gradually increased.
8-18
Driving and Operating
Ignition Positions (Keyless Access)
The vehicle has an electronic keyless ignition with push‐button start. Pressing the button cycles it through three positions, ACC/ACCESSORY, ON/RUN/START and OFF.
The transmitter must be in the vehicle for the system to operate. If the push-button start is not working, the vehicle may be near a strong radio antenna signal causing interference to the keyless access system. See Remote Keyless Entry (RKE) System Operation (Key Access) on page 1‑4 or Remote Keyless Entry (RKE) System Operation (Keyless Access) on page 1‑5 for more information. To shift out of P (Park), the vehicle must be in ACC/ACCESSORY or ON/RUN and the brake pedal must be applied. OFF: When this button is pressed with the engine running, the engine will be turned off. If the vehicle is in P (Park), the ignition will turn off, and Retained Accessory Power (RAP) will remain active. See Retained Accessory Power (RAP) on page 8‑20 for more information.
If the vehicle is not in P (Park), the ignition will return to ACC/ ACCESSORY and display the message SHIFT TO PARK in the Driver Information Center (DIC). See Driver Information Center (DIC) on page 4‑25 for more information. When the vehicle is shifted into P (Park), the ignition system will switch to OFF. ACC/ACCESSORY: This position allows you to use some electrical accessories when the engine is off. With the ignition off, pressing the button one time without the brake pedal applied, will place the ignition system in ACC/ACCESSORY. The ignition will switch from ACC/ACCESSORY to OFF after five minutes to prevent battery run down.
ON/RUN/START: This position is for driving and starting. With the ignition off, and the brake pedal applied, pressing the button once will place the ignition system in ON/ RUN/START. Once engine cranking begins, release the button. Engine cranking will continue until the engine starts. See Starting the Engine on page 8‑20 for more information. The ignition will then remain in ON/RUN. To place the ignition in ON/RUN/ START from OFF without starting the engine, press the button two times without your foot on the brake pedal. The battery could be drained if you leave the ignition in the ON/RUN/ START position with the engine off. You may not be able to start the vehicle if the battery is allowed to drain for an extended period of time.
Ignition Positions (Key Access)
The ignition switch has four different positions. Notice: Using a tool to force the key to turn in the ignition could cause damage to the switch or break the key. Use the correct key, make sure it is all the way in, and turn it only with your hand. If the key cannot be turned by hand, see your dealer/retailer.
Driving and Operating
8-19
To shift out of P (Park), turn the ignition to ON/RUN and apply the brake pedal. A (LOCK/OFF): This is the only position from which the key can be removed. This locks the ignition and automatic transmission. The shift lever must be in P (Park) to turn the ignition switch to the LOCK/OFF position. The ignition switch can bind in the LOCK/OFF position with the wheels turned off center. If this happens, move the steering wheel from right to left while turning the key to ACC/ ACCESSORY. If this does not work, then the vehicle needs service. B (ACC/ACCESSORY) : This position provides power to some of the electrical accessories. It unlocks the ignition. The transmission is also unlocked in this position on automatic transmission vehicles. To move the key from ACC/ ACCESSORY to LOCK/OFF, the shift lever must be in P (Park).
8-20
Driving and Operating
C (ON/RUN): The ignition switch stays in this position when the engine is running. This position can be used to operate the electrical accessories, including the ventilation fan and 12 volt power outlet, as well as to display some warning and indicator lights. The battery could be drained if the key is left in the ACC/ACCESSORY or ON/RUN position with the engine off. The vehicle might not restart if the battery is allowed to drain for an extended period of time. D (START) : This position starts the engine. When the engine starts, release the key. The ignition switch will return to ON/RUN for normal driving. A warning tone sounds when the driver door is opened when the ignition is still in ACC/ACCESSORY and the key is in the ignition.
Retained Accessory Power (RAP) These vehicle accessories can be used for up to 10 minutes after the engine is turned off: . Audio System . Power Windows . Sunroof (if equipped) . Auxiliary Power Outlet Power to the audio system will continue to operate for up to 10 minutes or until the driver door is opened. Power to the power windows and sunroof will continue to operate for up to 10 minutes or until any door is opened. All these features will work when the ignition is in ON/RUN or ACC/ ACCESSORY.
Starting the Engine Move the shift lever to P (Park) or N (Neutral). The engine will not start in any other position. To restart the engine when the vehicle is already moving, use N (Neutral) only. Notice: Do not try to shift to P (Park) if the vehicle is moving. If you do, you could damage the transmission. Shift to P (Park) only when the vehicle is stopped. Notice: The engine is designed to work with the electronics in the vehicle. If you add electrical parts or accessories, you could change the way the engine operates. Before adding electrical equipment, check with your dealer/retailer. If you do not, the engine might not perform properly. Any resulting damage would not be covered by the vehicle warranty.
Starting Procedure (Key Access) 1. With your foot off the accelerator
pedal, turn the ignition key to START. When the engine starts, let go of the ignition. The idle speed will go down as your engine gets warm. Do not race the engine immediately after starting it. Operate the engine and transmission gently to allow the oil to warm up and lubricate all moving parts. The vehicle has a Computer-Controlled Cranking System. This feature assists in starting the engine and protects components. If the ignition key is turned to the START position, and then released when the engine begins cranking, the engine will continue cranking for a few seconds or until the vehicle starts. If the engine does
not start and the key is held in START for many seconds, cranking will be stopped after 15 seconds to prevent cranking motor damage. To prevent gear damage, this system also prevents cranking if the engine is already running. Engine cranking can be stopped by turning the ignition switch to ACC/ACCESSORY or LOCK/OFF.
Notice: Cranking the engine for long periods of time, by returning the key to the START position immediately after cranking has ended, can overheat and damage the cranking motor, and drain the battery. Wait at least 15 seconds between each try, to let the cranking motor cool down.
Driving and Operating
8-21
2.
If the engine does not start after 5‐10 seconds, especially in very cold weather (below −18°C or 0°F), it could be flooded with too much gasoline. Try pushing the accelerator pedal all the way to the floor and holding it there as you hold the key in START, or press the START button, for up to a maximum of 15 seconds. Wait at least 15 seconds between each try, to allow the cranking motor to cool down. When the engine starts, let go of the key or button, and the accelerator. If the vehicle starts briefly but then stops again, do the same thing. This clears the extra gasoline from the engine. Do not race the engine immediately after starting it. Operate the engine and transmission gently until the oil warms up and lubricates all moving parts.
8-22
Driving and Operating
Starting Procedure (Keyless Access) 1.
If the vehicle has the keyless access system, the transmitter must be in the vehicle. Put your foot on the brake pedal and push the START button. When the engine begins cranking, let go of the button. The idle speed will go down as your engine gets warm. Do not race the engine immediately after starting it. Operate the engine and transmission gently to allow the oil to warm up and lubricate all moving parts. If the transmitter is not in the vehicle or something is interfering with the transmitter, the Driver Information Center (DIC) will display NO REMOTE DETECTED. See Driver Information Center (DIC) on page 4‑25 for more information.
If the battery in the keyless access transmitter needs replacing, the DIC displays REPLACE BATTERY IN REMOTE KEY. The vehicle can still be driven. See Starting the Vehicle with a Low Transmitter Battery in Remote Keyless Entry (RKE) System Operation (Key Access) on page 1‑4 or Remote Keyless Entry (RKE) System Operation (Keyless Access) on page 1‑5 for more information. The vehicle has a Computer-Controlled Cranking System. This feature assists in starting the engine and protects components. If the START button is pressed, and then released when the engine begins cranking, the engine will continue cranking for a few seconds or until the vehicle starts. If the engine does not start and the button is pressed for many seconds, cranking will
be stopped after 15 seconds to prevent cranking motor damage. To prevent gear damage, this system also prevents cranking if the engine is already running. Engine cranking can be stopped by pressing the START button a second time.
Notice: Cranking the engine for long periods of time, by returning the key to the START position immediately after cranking has ended, can overheat and damage the cranking motor, and drain the battery. Wait at least 15 seconds between each try, to let the cranking motor cool down. 2.
If the engine does not start after 5‐10 seconds, especially in very cold weather (below −18°C or 0°F), it could be flooded with too much gasoline. Try pushing the accelerator pedal all the way to the floor and holding it there as you hold the key in START, or press the START button, for up to a maximum of 15 seconds.
Wait at least 15 seconds between each try, to allow the cranking motor to cool down. When the engine starts, let go of the key or button, and the accelerator. If the vehicle starts briefly but then stops again, do the same thing. This clears the extra gasoline from the engine. Do not race the engine immediately after starting it. Operate the engine and transmission gently until the oil warms up and lubricates all moving parts.
Engine Heater The engine coolant heater, if available, can help in cold weather conditions at or below −18°C (0°F) for easier starting and better fuel economy during engine warm-up. Plug in the coolant heater at least four hours before starting the vehicle. An internal thermostat in the plug-end of the cord will prevent engine coolant heater operation at temperatures above −18°C (0°F).
To Use The Engine Coolant Heater 1. Turn off the engine. 2. Open the hood and unwrap the
electrical cord.
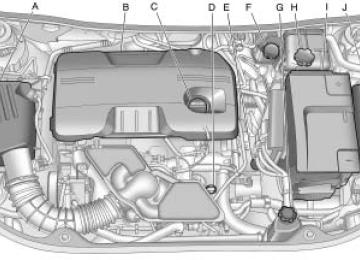
The electrical cord is located on the driver side of the engine compartment, between the fender and the engine compartment fuse block.
3. Plug it into a normal, grounded
110-volt AC outlet.
Driving and Operating
8-23
{ WARNING Plugging the cord into an ungrounded outlet could cause an electrical shock. Also, the wrong kind of extension cord could overheat and cause a fire. You could be seriously injured. Plug the cord into a properly grounded three-prong 110-volt AC outlet. If the cord will not reach, use a heavy-duty three-prong extension cord rated for at least 15 amps.
4. Before starting the engine, be
sure to unplug and store the cord as it was before to keep it away from moving engine parts. The length of time the heater should remain plugged in depends on several factors. Ask a dealer/retailer in the area where you will be parking the vehicle for the best advice on this.
8-24
Driving and Operating
Shifting Into Park { WARNING
It can be dangerous to get out of the vehicle if the shift lever is not fully in P (Park) with the parking brake firmly set. The vehicle can roll. If you have left the engine running, the vehicle can move suddenly. You or others could be injured. To be sure the vehicle will not move, even when you are on fairly level ground, use the steps that follow.
1. Hold the brake pedal down and
set the parking brake. See Parking Brake on page 8‑32 for more information. 2. Move the shift lever into P (Park) by pushing the lever all the way toward the front of the vehicle.
3. Turn the ignition off.
Leaving the Vehicle With the Engine Running
{ WARNING
It can be dangerous to leave the vehicle with the engine running. The vehicle could move suddenly if the shift lever is not fully in P (Park) with the parking brake firmly set. And, if you leave the vehicle with the engine running, it could overheat and even catch fire. You or others could be injured. Do not leave the vehicle with the engine running.
If you have to leave the vehicle with the engine running, be sure the vehicle is in P (Park) and the parking brake is firmly set before you leave it. After you have moved the shift lever into P (Park), hold down the regular brake pedal.
See if you can move the shift lever away from P (Park) without first pulling it toward you. If you can, it means that the shift lever was not fully locked into P (Park). Torque Lock Torque lock is when the weight of the vehicle puts too much force on the parking pawl in the transmission. This happens when parking on a hill and shifting the transmission into P (Park) is not done properly and then it is difficult to shift out of P (Park). To prevent torque lock, set the parking brake and then shift into P (Park). To find out how, see "Shifting Into P (Park)" listed previously. If torque lock does occur, your vehicle may need to be pushed uphill by another vehicle to relieve the parking pawl pressure, so you can shift out of P (Park).
Driving and Operating
8-25
Shifting Out of Park
Automatic Transmission Shift Lock The vehicle has an electronic shift lock release system. The shift lock release is designed to: . Prevent ignition key removal
unless the shift lever is in P (Park).
. Prevent movement of the shift
lever out of P (Park), unless the ignition is in ON/RUN and the brake pedal is applied.
The shift lock is always functional except in the case of a an uncharged or low voltage (less than 9 volt) battery.
If the vehicle has an uncharged battery or a battery with low voltage, try charging or jump starting the battery. See Jump Starting on page 9‑77 . If the console shift lever cannot be moved out of P (Park): 1. Apply and maintain the regular
brakes.
2. Turn the ignition to ON/RUN
position. See Ignition Positions (Keyless Access) on page 8‑18
or Ignition Positions (Key Access) on page 8‑19 for more information.3. Let up on the shift lever and make sure the shift lever is pushed all the way into P (Park).
4. Press the shift lever button 5. Then, move the shift lever into
the desired gear.
If you still cannot move the shift lever from P (Park), consult your dealer/retailer or a professional towing service.
Parking Over Things That Burn
{ WARNING
Things that can burn could touch hot exhaust parts under the vehicle and ignite. Do not park over papers, leaves, dry grass, or other things that can burn.
8-26
Driving and Operating
Engine Exhaust { WARNING
Engine exhaust contains Carbon Monoxide (CO) which cannot be seen or smelled. Exposure to CO can cause unconsciousness and even death. Exhaust may enter the vehicle if:
. The vehicle idles in areas
with poor ventilation (parking garages, tunnels, deep snow that may block underbody airflow or tail pipes).
. The exhaust smells or
sounds strange or different.
. The exhaust system leaks
due to corrosion or damage.
(Continued)
WARNING (Continued)
. The vehicle’s exhaust system has been modified, damaged or improperly repaired.
. There are holes or openings
in the vehicle body from damage or after-market modifications that are not completely sealed.
If unusual fumes are detected or if it is suspected that exhaust is coming into the vehicle:
. Drive it only with the windows
completely down.
. Have the vehicle repaired
immediately.
Never park the vehicle with the engine running in an enclosed area such as a garage or a building that has no fresh air ventilation.
Running the Vehicle While Parked It is better not to park with the engine running. But if you ever have to, here are some things to know.
{ WARNING
Idling a vehicle in an enclosed area with poor ventilation is dangerous. Engine exhaust may enter the vehicle. Engine exhaust contains Carbon Monoxide (CO) which cannot be seen or smelled. It can cause unconsciousness and even death. Never run the engine in an enclosed area that has no fresh air ventilation. For more information, see Engine Exhaust on page 8‑26.
{ WARNING
It can be dangerous to get out of the vehicle if the automatic transmission shift lever is not fully in P (Park) with the parking brake firmly set. The vehicle can roll. Do not leave the vehicle when the engine is running unless you have to. If you have left the engine running, the vehicle can move suddenly. You or others could be injured. To be sure the vehicle will not move, even when you are on fairly level ground, always set the parking brake and move the shift lever to P (Park).
Follow the proper steps to be sure the vehicle will not move. See Shifting Into Park on page 8‑24. If parking on a hill and pulling a trailer, see Driving Characteristics and Towing Tips on page 8‑54.
Automatic Transmission The automatic transmission has a shift lever located on the console between the seats.
P (Park): This position locks the front wheels. It is the best position to use when starting the engine because the vehicle cannot move easily.
Driving and Operating
8-27
{ WARNING
It is dangerous to get out of the vehicle if the shift lever is not fully in P (Park) with the parking brake firmly set. The vehicle can roll. Do not leave the vehicle when the engine is running unless you have to. If you have left the engine running, the vehicle can move suddenly. You or others could be injured. To be sure the vehicle will not move, even when you are on fairly level ground, always set the parking brake and move the shift lever to P (Park). See Shifting Into Park on page 8‑24 . If you are pulling a trailer, see Driving Characteristics and Towing Tips on page 8‑54.
Make sure the shift lever is fully in P (Park) before starting the engine. The vehicle has an automatic transmission shift lock control system.
8-28
Driving and Operating
The regular brake must be fully applied first and then the shift lever button pressed before shifting from P (Park) when the ignition key is in ON/RUN. If you cannot shift out of P (Park), ease pressure on the shift lever, then push the shift lever all the way into P (Park) as you maintain brake application. Then press the shift lever button and move the shift lever into another gear. See Shifting Out of Park on page 8‑25 . R (Reverse): Use this gear to back up. Notice: Shifting to R (Reverse) while the vehicle is moving forward could damage the transmission. The repairs would not be covered by the vehicle warranty. Shift to R (Reverse) only after the vehicle is stopped.
To rock the vehicle back and forth to get out of snow, ice or sand without damaging the transmission, see If the Vehicle is Stuck on page 8‑12. In this position, the N (Neutral): engine does not connect with the wheels. To restart the engine when the vehicle is already moving, use N (Neutral) only. Also, use N (Neutral) when the vehicle is being towed.
{ WARNING
Shifting into a drive gear while the engine is running at high speed is dangerous. Unless your foot is firmly on the brake pedal, the vehicle could move very rapidly. You could lose control and hit people or objects. Do not shift into a drive gear while the engine is running at high speed.
Notice: Shifting out of P (Park) or N (Neutral) with the engine running at high speed may damage the transmission. The repairs would not be covered by the vehicle warranty. Be sure the engine is not running at high speed when shifting the vehicle. D (Drive): This position is for normal driving. It provides the best fuel economy. If more power is needed for passing, and the vehicle is: . Going less than 35 mph
(56 km/h), push the accelerator pedal about halfway down.
. Going about 35 mph (56 km/h) or
more, push the accelerator all the way down.
Notice: If the vehicle seems to accelerate slowly or not shift gears when you go faster, and you continue to drive the vehicle that way, you could damage the transmission. Have the vehicle serviced right away. You can drive in L (Low) when you are driving less than 56 km/h (35 mph) and D (Drive) for higher speeds until then. Manual Mode: This position is shown on the shifter as a +/−. It allows the driver to select the gears appropriate for current driving conditions. See Manual Mode on page 8‑29 for more information.
Driving and Operating
8-29
Manual Mode
Driver Shift Control (DSC) Notice: If you drive the vehicle at high RPMs without upshifting while using Driver Shift Control (DSC), you could damage the vehicle. Always upshift when necessary while using DSC. Driver Shift Control (DSC) allows you to shift an automatic transmission similar to a manual transmission. To use the DSC feature:
With Selective Ride Control 1. Move the shift lever to the left
from D (Drive). The vehicle will be in Sport Mode. The gear indicator in the DIC will still display a D for Drive, and the Sport Mode On message will be displayed momentarily. See Driver Information Center (DIC) on page 4‑25 . When you are in Sport Mode, the vehicle will still
shift automatically, but chassis tuning is modified. See Selective Ride Control on page 8‑36 . If you move the shift lever forward or rearward, the transmission will enter Manual Mode, and the DIC gear indicator will change to an M followed by a number representing the gear the vehicle is currently in. In Manual Mode, press the shift lever forward to upshift or rearward to downshift.
2.
Without Selective Ride Control 1. Move the shift lever to the left
from D (Drive). The transmission will enter Manual Mode. The DIC gear indicator will change to an M followed by a number representing the gear the vehicle is currently in. In Manual Mode, press the shift lever forward to upshift or rearward to downshift.
2.
8-30
Driving and Operating
The transmission will only allow you to shift into gears appropriate for the vehicle speed and engine Revolutions Per Minute (RPM). The transmission will not automatically shift to the next lower gear if the engine RPM is too high, nor to the next higher gear when the maximum engine RPM is reached. While in the DSC mode, the transmission will automatically downshift when the vehicle comes to a stop. This will allow for more power during take-off. When accelerating the vehicle from a stop in snowy and icy conditions, you may want to shift into second gear. A higher gear allows you to gain more traction on slippery surfaces.
Drive Systems
All-Wheel Drive With this feature, engine power is always sent to all four wheels. It is fully automatic, and adjusts itself as needed for road conditions. When using a compact spare tire on an AWD vehicle, the system automatically detects the compact spare and disables AWD. To restore AWD operation and prevent excessive wear on system, replace the compact spare with a full-size tire as soon as possible. See Compact Spare Tire on page 9‑76
for more information.Uplevel Display Shown, Base
Model Similar
The display on the instrument panel cluster will show which gear the vehicle is in. The number indicates the requested gear range when moving the shift lever forward or rearward.
Driving and Operating
8-31
If driving safely on a wet road and it becomes necessary to slam on the brakes and continue braking to avoid a sudden obstacle, a computer senses that the wheels are slowing down. If one of the wheels is about to stop rolling, the computer will separately work the brakes at each wheel. ABS can change the brake pressure to each wheel, as required, faster than any driver could. This can help the driver steer around the obstacle while braking hard. As the brakes are applied, the computer keeps receiving updates on wheel speed and controls braking pressure accordingly. Remember: ABS does not change the time needed to get a foot up to the brake pedal or always decrease stopping distance. If you get too close to the vehicle in front of you,
there will not be enough time to apply the brakes if that vehicle suddenly slows or stops. Always leave enough room up ahead to stop, even with ABS. Using ABS Do not pump the brakes. Just hold the brake pedal down firmly and let ABS work. The ABS pump or motor might be heard operating, and the brake pedal might be felt to pulsate, but this is normal. Braking in Emergencies ABS allows the driver to steer and brake at the same time. In many emergencies, steering can help more than even the very best braking.
Brakes
Antilock Brake System (ABS) This vehicle has the Antilock Brake System (ABS), an advanced electronic braking system that helps prevent a braking skid. When the engine is started and the vehicle begins to drive away, ABS checks itself. A momentary motor or clicking noise might be heard while this test is going on, and it might even be noticed that the brake pedal moves a little. This is normal.
If there is a problem with ABS, this warning light stays on. See Antilock Brake System (ABS) Warning Light on page 4‑21 .
8-32
Driving and Operating
Parking Brake
The vehicle has an Electric Parking Brake (EPB). The switch for the EPB is in the center console. The EPB can always be activated, even if the ignition is OFF. To prevent draining the battery, avoid repeated cycles of the EPB system when the engine is not running. The system has a Park Brake Status light and a Park Brake Warning light. See Electric Parking Brake Light on page 4‑20 .
There are also three Driver Information Center (DIC) messages. See Brake System Messages on page 4‑33 for more information. In case of insufficient electrical power, the EPB cannot be applied or released. Before leaving the vehicle, check the park brake status lamp to insure the park brake is applied. EPB Apply The EPB can be applied any time the vehicle is stopped. The EPB is applied by momentarily lifting up on the EPB switch. Once fully applied, the park brake status light will be on. While the brake is being applied, the status lamp will flash until full apply is reached. If the light does not come on, or remains flashing, you need to have the vehicle serviced. Do not drive the vehicle if the park brake status light is flashing. See your dealer/retailer. See Electric Parking Brake Light on page 4‑20 for more information.
If the EPB is applied while the vehicle is in motion, a chime will sound, and the DIC message RELEASE PARK BRAKE SWITCH will be displayed. The vehicle will decelerate as long as the switch is held in the up position. Releasing the EPB switch during the deceleration will release the parking brake. If the switch is held in the up position until the vehicle comes to a stop, the EPB will remain applied. If the park brake status light flashes continuously, the EPB is only partially applied or released, or there is a problem with the EPB. The DIC message SERVICE PARK BRAKE will be displayed. If this light flashes continuously, release the EPB, and attempt to apply it again. If this light continues to flash, do not drive the vehicle. See your dealer/ retailer.
If the park brake warning light is on, the EPB has detected an error in another system and is operating with reduced functionality. To apply the EPB when this light is on, lift up on the EPB switch and hold it in the up position. Full application of the parking brake by the EPB system may take a longer period of time than normal when this light is on. Continue to hold the switch until the park brake status light remains on. If the park brake warning light is on, see your dealer/retailer. If the EPB fails to apply, the rear wheels should be blocked to prevent vehicle movement.
Driving and Operating
8-33
EPB Release To release the EPB, place the ignition in the ON/RUN position, apply and hold the brake pedal, and push down momentarily on the EPB switch. If you attempt to release the EPB without the brake pedal applied, a chime will sound, and the DIC message PRESS BRAKE PEDAL TO RELEASE PARK BRAKE will be displayed. The EPB is released when the park brake status light is off. If the park brake warning light is on, the EPB has detected an error in another system and is operating with reduced functionality. To release the EPB when this light is on, push down on the EPB switch and hold it in the down position. EPB release may take a longer period of time than normal when this light is on. Continue to hold the switch until the park brake status light is off. If the light is on, see your dealer/retailer.
Notice: Driving with the parking brake on can overheat the brake system and cause premature wear or damage to brake system parts. Make sure that the parking brake is fully released and the brake warning light is off before driving. Automatic EPB Release The EPB will automatically release if the vehicle is running, placed into gear and an attempt is made to drive away. Avoid rapid acceleration when the EPB is applied, to preserve park brake lining life. For maximum EPB force when towing a trailer or parking on a hill, pull the EPB switch twice. If you are towing a trailer and parking on a hill, see Driving Characteristics and Towing Tips on page 8‑54 for more information.
8-34
Driving and Operating
Brake Assist This vehicle has a brake assist feature designed to assist the driver in stopping or decreasing vehicle speed in emergency driving conditions. This feature uses the stability system hydraulic brake control module to supplement the power brake system under conditions where the driver has quickly and forcefully applied the brake pedal in an attempt to quickly stop or slow down the vehicle. The stability system hydraulic brake control module increases brake pressure at each corner of the vehicle until the ABS activates. Minor brake pedal pulsations or pedal movement during this time is normal and the driver should continue to apply the brake pedal as the driving situation dictates. The brake assist feature will automatically disengage when the brake pedal is released or brake pedal pressure is quickly decreased.
Ride Control Systems
Traction Control System (TCS) The vehicle has a traction control system that limits wheel spin. This is especially useful in slippery road conditions. On a front-wheel-drive vehicle, the system operates if it senses that one or both of the front wheels are spinning or beginning to lose traction. On an All-Wheel-Drive (AWD) vehicle, the system will operate if it senses that any of the wheels are spinning or beginning to lose traction. When this happens, the system brakes the spinning wheel(s) and/or reduces engine power to limit wheel spin. The system may be heard or felt while it is working, but this is normal.
The TCS/StabiliTrak warning light flashes to indicate that the traction control system is active. This warning light comes on if there is a problem with the traction control system. See Traction Off Light on page 4‑21 . When this warning light is on, the system does not limit wheel spin. Adjust your driving accordingly. TCS automatically comes on whenever the vehicle is started. To limit wheel spin, especially in slippery road conditions, the system should always be left on. But, TCS can be turned off if needed.
Driving and Operating
8-35
Notice: Do not repeatedly brake or accelerate heavily when TCS is off. The vehicle's driveline could be damaged.
Driving on page 8‑9 for information on using TCS when driving in snowy or icy conditions.
The TCS off light comes on to indicate that the traction control system has been turned off. When TCS is switched off on AWD vehicles, the system may still make noise. This is normal and necessary with the AWD hardware on the vehicle. It might be necessary to turn the system off if the vehicle gets stuck in sand, mud or snow and rocking the vehicle is required. See If the Vehicle is Stuck on page 8‑12 for more information. See also Winter
To turn the system off, press g located on the console to the right of the shifter. Press and release g and the traction control system turns off and the traction control system warning light comes on. Press g again to turn the system back on. For information on turning StabiliTrak off and on, see StabiliTrak System following in this section. Adding non‐GM accessories can affect the vehicle's performance. See Accessories and Modifications on page 9‑3 for more information.
Electronic Stability Control (ESC) The vehicle has a vehicle stability enhancement system called StabiliTrak. It is an advanced computer controlled system that assists with directional control of the vehicle in difficult driving conditions. StabiliTrak activates when the computer senses a difference between the intended path and the direction the vehicle is actually traveling. StabiliTrak selectively applies braking pressure at any one of the vehicle's brakes to help steer the vehicle in the intended direction.
When the stability control system activates, the Traction Control System (TCS)/StabiliTrak light flashes on the instrument panel.
8-36
Driving and Operating
This also occurs when traction control is activated. A noise might be heard or vibration might be felt in the brake pedal. This is normal. Continue to steer the vehicle in the intended direction. If there is a problem detected with StabiliTrak, the TCS/StabiliTrak light comes on and the system is not operational. See Electronic Stability Control (ESC)/Traction Control System (TCS) Indicator/Warning Light on page 4‑22 . Driving should be adjusted accordingly. StabiliTrak comes on automatically whenever the vehicle is started. To assist with directional control of the vehicle, the system should always be left on.
StabiliTrak can be turned off if needed by pressing and holding g until the StabiliTrak Off light comes on the instrument panel. For information on turning TCS off and on, see Traction Control System (TCS) in this section. If cruise control is being used when StabiliTrak activates, the cruise control automatically disengages. Press the cruise control button to reengage when road conditions allow. See Cruise Control on page 8‑37 for more information.
Limited-Slip Differential Vehicles with a limited-slip differential can give more traction on snow, mud, ice, sand or gravel. It works like a standard differential most of the time, but when traction is low, this feature allows the drive wheel with the most traction to move the vehicle.
Selective Ride Control The vehicle may have a ride control system called Selective Ride Control. The system provides the following performance benefits: . Reduced Impact Harshness
Improved Road Isolation Improved High-Speed Stability Improved Handling Response
. Better Control of Body Ride
Motions
To switch from TOUR to SPORT mode, move the shift lever to the left while the transmission is in D (Drive).
TOUR: Use for normal city and highway driving. This setting provides a smooth, soft ride. SPORT: Use where road conditions or personal preference demand more control. This setting provides more “feel”, or response to road conditions through increased steering effort and suspension tuning. The setting can be changed at any time. Based on road conditions, steering wheel angle and the vehicle speed, the system automatically adjusts to provide the best handling while providing a smooth ride. The Tour and Sport modes will feel similar on a smooth road.
Cruise Control With cruise control, the vehicle can maintain a speed of about 40 km/h (25 mph) or more without keeping your foot on the accelerator. Cruise control does not work at speeds below 40 km/h (25 mph). On vehicles with the Traction Control System (TCS) or Electronic Stability Control (ESC), the system may begin to limit wheel spin while you are using cruise control. If this happens, the cruise control will automatically disengage. See Traction Control System (TCS) on page 8‑34 or Electronic Stability Control (ESC) on page 8‑35.
Driving and Operating
8-37
{ WARNING
Cruise control can be dangerous where you cannot drive safely at a steady speed. So, do not use the cruise control on winding roads or in heavy traffic. Cruise control can be dangerous on slippery roads. On such roads, fast changes in tire traction can cause excessive wheel slip, and you could lose control. Do not use cruise control on slippery roads.
8-38
Driving and Operating
Setting Cruise Control
{ WARNING
If you leave your cruise control on when you are not using cruise, you might hit a button and go into cruise when you do not want to. You could be startled and even lose control. Keep the cruise control switch off until you want to use cruise control.
The cruise control buttons are located on the steering wheel.
5 (On/Off): Press to turn the cruise control system on and off. An indicator light will turn on or off in the instrument panel cluster. \ (Cancel): Press to cancel cruise control without erasing the set speed from memory. RES/+ (Resume/Accel): Move the thumbwheel up to resume a set speed or to accelerate to a higher speed. SET/− (Set/Coast): Move the thumbwheel down to set a speed or to decrease the speed. To set a speed: 1. Press 5 to turn the cruise
control system on. The indicator light in the instrument panel cluster comes on.
2. Get to the speed desired.
3. Move the thumbwheel down toward SET/− and release it. The desired set speed briefly appears in the instrument panel cluster.
4. Take your foot off the accelerator
pedal.
When the brakes are applied, the cruise control shuts off.
Resuming a Set Speed If the brakes are applied or the Cancel button is pressed while the cruise control is at a set speed, the cruise control disengages without erasing the set speed from memory. Once the vehicle reaches about 40 km/h (25 mph) or more, move the thumbwheel up toward RES/+ briefly . The vehicle returns to the speed selected previously and stays there.
Driving and Operating
8-39
Ending Cruise Control There are three ways to disengage the cruise control: . Step lightly on the brake pedal or clutch; when cruise control disengages, the indicator light will not be lit.
. Press \ . . Press 5 to turn the cruise
control system off completely. The cruise control cannot be resumed.
Erasing Speed Memory The cruise control set speed memory is erased when the cruise control or the ignition is turned off.
Increasing Speed While Using Cruise Control If the cruise control system is already engaged, . Move the thumbwheel up toward
RES/+ and hold it until the vehicle accelerates to the desired speed, and then release it. To increase the speed in small amounts, move the thumbwheel up toward RES/+ briefly and then release it. Each time this is done, the vehicle goes about 1.6 km/h (1 mph) faster.
Reducing Speed While Using Cruise Control If the cruise control system is already engaged, . Move the thumbwheel toward
SET/− and hold until the desired lower speed is reached, then release it.
To slow down in very small amounts, move the thumbwheel toward SET/− briefly and then release it. Each time this is done, the vehicle goes about 1.6 km/h (1 mph) slower.
Passing Another Vehicle While Using Cruise Control Use the accelerator pedal to increase the vehicle's speed. When you take your foot off the pedal, the vehicle will slow down to the previously set cruise control speed.
Using Cruise Control on Hills How well the cruise control works on hills depends upon the vehicle's speed, load, and the steepness of the hills. When going up steep hills, you might have to step on the accelerator pedal to maintain the vehicle's speed. When going downhill, you might have to brake or shift to a lower gear to maintain the vehicle's speed. When the brakes are applied the cruise control shuts off.
8-40
Driving and Operating
Object Detection Systems
Ultrasonic Parking Assist For vehicles with the Ultrasonic Rear Parking Assist (URPA) system, it assists the driver with parking and avoiding objects while in R (Reverse). URPA operates at speeds less than 8 km/h (5 mph), and the sensors on the rear bumper detect objects up to 2.5 m (8 ft.) behind the vehicle, and at least 20 cm (8 in.) off the ground.
{ WARNING
The Ultrasonic Rear Parking Assist (URPA) system does not replace driver vision. It cannot detect:
. Objects that are below the
bumper, underneath the vehicle, or if they are too close or far from the vehicle
. Children, pedestrians,
bicyclists, or pets.
If you do not use proper care before and while backing; vehicle damage, injury, or death could occur. Even with URPA, always check behind the vehicle before backing up. While backing, be sure to look for objects and check the vehicle's mirrors.
How the System Works URPA comes on automatically when the shift lever is moved into R (Reverse). A single tone sounds to indicate the system is working. URPA operates only at speeds less than 8 km/h (5 mph). An obstacle is indicated by audible beeps. The interval between the beeps becomes shorter as the vehicle gets closer to the obstacle. When the distance is less than 30 cm (12 in.) the beeps are continuous. To be detected, objects must be at least 20 cm (8 in.) off the ground and below trunk level. Objects must also be within 2.5 m (8 ft.) from the rear bumper. The distance objects can be detected may be less during warmer or humid weather. PARK ASSIST OFF displays on the Driver Information Center (DIC) to indicate that URPA is off. The message disappears after a short period of time.
Turning the System On and Off The URPA system can be turned on and off using the park assist button located next to the shift lever.
The park assist button lights up when the system is on and turns off when it has been disabled. URPA defaults to the on setting each time the vehicle is started.
Driving and Operating
8-41
. An object was hanging out of the trunk during the last drive cycle. Once the object is removed, URPA will return to normal operation. The vehicle's bumper is damaged. Take the vehicle to your dealer/retailer to repair the system.
. Other conditions may affect
system performance, such as vibrations from a jackhammer or the compression of air brakes on a very large truck.
If the system is still disabled, after driving forward at least 40 km/h (25 mph), take the vehicle to your dealer/retailer.
If this
When the System Does Not Seem to Work Properly SERVICE PARK ASSIST: message occurs, take the vehicle to your dealer/retailer to repair the system. PARK ASSIST OFF: If the URPA system does not activate due to a temporary condition, the message displays on the DIC, see Driver Information Center (DIC) on page 4‑25 for more information. This can occur under the following conditions:
The driver has disabled the system. The ultrasonic sensors are not clean. Keep the vehicle's rear bumper free of mud, dirt, snow, ice and slush. For cleaning instructions, see Exterior Care on page 9‑84 .
8-42
Driving and Operating
Side Blind Zone Alert (SBZA) The vehicle may have a Side Blind Zone Alert (SBZA) system. Read this entire section before using the system.
{ WARNING
SBZA is only a lane changing aid and does not replace driver vision. SBZA does not detect: . Vehicles outside the side blind zones which may be rapidly approaching.
. Pedestrians, bicyclists,
or animals.
(Continued)
WARNING (Continued)
Failure to use proper care when changing lanes may result in damage to the vehicle, injury, or death. Always check the outside and rearview mirrors, glance over your shoulder, and use the turn signal before changing lanes.
When the system detects a vehicle in the side blind zone, amber SBZA displays will light up in the side mirrors. This indicates that it may be unsafe to change lanes. Before making a lane change, always check the SBZA display, check the outside and rearview mirrors, look over your shoulder for vehicles and hazards, and use the turn signal.
SBZA Detection Zones The SBZA sensor covers a zone of approximately one lane over from both sides of the vehicle, 3.5 m (11 ft.). This zone starts at each side mirror and goes back approximately 5.0 m (16 ft.). The height of the zone is approximately between 0.5 m (1.5 ft.) and 2.0 m (6 ft.) off the ground. The SBZA detection zones do not change if the vehicle is towing a trailer. So be extra careful when changing lanes while towing a trailer.
SBZA displays do not come on while the vehicle is approaching or passing other vehicles. At speeds greater than 32 km/h (20 mph), SBZA displays may come on when a vehicle you have passed remains in or drops back into the detection zone. SBZA can be disabled through Vehicle Personalization. See Vehicle Personalization on page 4‑38 for more information. If the SBZA is disabled by the driver, the SBZA mirror displays will not light up during normal driving.
How the System Works
Left Side Mirror
Right Side Mirror
Display
Display
When the vehicle is started, both outside mirror displays will briefly come on to indicate that the system is operating. While driving forward, the left or right side mirror SBZA display will light up if a vehicle is detected in that blind zone. If you activate a turn signal and a vehicle has been detected on the same side, the SBZA display will flash to give you extra warning not to change lanes.
Driving and Operating
8-43
When the System Does Not Seem To Work Properly Occasional missed alerts can occur under normal circumstances and will increase in wet conditions. The system does not need to be serviced due to an occasional missed alert. The number of missed alerts will increase with increased rainfall or road spray. If the SBZA displays do not light up when the system is on and vehicles are in the blind zone, the system may need service. Take the vehicle to your dealer/retailer. SBZA is designed to ignore stationary objects; however, the system may occasionally light up due to guard rails, signs, trees, shrubs, and other stationary objects. This is normal system operation, the vehicle does not need service.
8-44
Driving and Operating
SBZA does not operate when the left or right corners of the rear bumper are covered with mud, dirt, snow, ice, slush, or in heavy rainstorms. For cleaning instructions, see Exterior Care on page 9‑84 . If the infotainment display still shows the SIDE BLIND ZONE SYS. UNAVAILABLE message after cleaning the bumper, see your dealer/retailer. The SBZA displays may remain on if a trailer is attached to the vehicle, or a bicycle or object is extending out to either side of the vehicle.
When SBZA is disabled for any reason other than the driver turning it off, the driver will not be able to turn SBZA back on using Vehicle Personalization. The SIDE BLIND ZONE ALERT ON option will not be selectable if the conditions for normal system operation are not met. Until normal operating conditions for SBZA are met, you should not rely upon SBZA while driving.
SBZA Error Messages The following messages may appear on the infotainment display: SIDE BLIND ZONE ALERT SYSTEM OFF: This message indicates that the driver has turned the system off.
SIDE BLIND ZONE SYS. UNAVAILABLE: This message indicates that the SBZA system is disabled because the sensor is blocked and cannot detect vehicles in the blind zone. The sensor may be blocked by mud, dirt, snow, ice, slush, or even heavy rainstorms. This message may also activate during heavy rain or due to road spray. The vehicle does not need service. For cleaning, see Exterior Care on page 9‑84. SERVICE SIDE BLIND ZONE ALERT SYSTEM: appears, both SBZA displays will remain on indicating there is a problem with the SBZA system. If these displays remain on after continued driving, the system needs service. Take the vehicle to your dealer/retailer.
If this message
FCC Information See Radio Frequency Statement on page 12‑17 for FCC information.
Rear Vision Camera (RVC) This vehicle may have an RVC system. Read this entire section before using it. The RVC system can assist the driver when backing up by displaying a view of the area behind the vehicle.
Driving and Operating
8-45
WARNING (Continued)
Even though the vehicle has the RVC system, always check carefully before backing up by checking behind and around the vehicle.
An image appears on the navigation screen with the message Check Surroundings for Safety when the vehicle is shifted into R (Reverse). The navigation screen goes to the previous screen after approximately 10 seconds once the vehicle is shifted out of R (Reverse). To cancel the delay, do one of the following: . Pressing a hard key on the
navigation system.
. Shifting in to P (Park). . Reach a vehicle speed of
8 km/h (5 mph).
{ WARNING
The Rear Vision Camera (RVC) system does not replace driver vision. RVC does not:
. Detect objects that are
outside the camera's field of view, below the bumper, or underneath the vehicle.
. Detect children, pedestrians,
bicyclists, or pets.
Do not back the vehicle by only looking at the RVC screen, or use the screen during longer, higher speed backing maneuvers or where there could be cross-traffic. Your judged distances using the screen will differ from actual distances. So if you do not use proper care before backing up, you could hit a vehicle, child, pedestrian, bicyclist, or pet, resulting in vehicle damage, injury, or death.
(Continued)
8-46
Driving and Operating
Turning the Rear Vision Camera System On or Off To turn the RVC system on or off: 1. Shift into P (Park). 2. Press the CONFIG button to
enter the configure menu options.
3. Select Display.
4. Select Rear Camera Options. 5. Select Camera. When a check
mark appears next to the Camera option, then the RVC system is on.
Symbols The navigation system may have a feature that lets the driver view symbols on the navigation screen while using the RVC. The Ultrasonic Rear Park Assist (URPA) system must not be disabled to use the caution symbols. The error message Rear Parking Assist Symbols Unavailable may display if URPA has been disabled and the symbols have been turned on. See Ultrasonic Parking Assist on page 8‑40 . The symbols appear and may cover an object when viewing the navigation screen when an object is detected by the URPA system.
To turn the symbols on or off: 1. Shift into P (Park). 2. Press the CONFIG button to
enter the configure menu options.
3. Select Display 4. Select Rear Camera Options. 5. Select Symbols. When a check
mark appears next to the Symbols option, symbols will appear.
Guidelines The RVC system has a guideline overlay that can help the driver align the vehicle when backing into a parking spot. To turn the guidelines on or off: 1. Shift into P (Park). 2. Press the CONFIG button to
enter the configure menu options.
3. Select Display 4. Select Rear Camera Options. 5. Select Guidelines. When a
check mark appears next to the Guidelines option, guidelines will appear.
Rear Vision Camera Error Messages Service Rear Vision Camera System: This message can display when the system is not receiving information it requires from other vehicle systems. If any other problem occurs or if a problem persists, see your dealer/ retailer.
Driving and Operating
8-47
Rear Vision Camera Location
The camera is located above the license plate. The area displayed by the camera is limited, it does not display objects that are close to either corner or under the bumper and can vary depending on vehicle orientation or road conditions. The distance of the image that appears on the screen is different from the actual distance. The following illustration shows the field of view that the camera provides.
A. View displayed by the camera. B. Corner of the rear bumper.
8-48
Driving and Operating
Fuel Use of the recommended fuel is an important part of the proper maintenance of this vehicle. To help keep the engine clean and maintain optimum vehicle performance, we recommend the use of gasoline advertised as TOP TIER Detergent Gasoline. Look for the TOP TIER label on the fuel pump to ensure gasoline meets enhanced detergency standards developed by auto companies. A list of marketers providing TOP TIER Detergent Gasoline can be found at www.toptiergas.com.
When the System Does Not Seem To Work Properly The RVC system may not work properly or display a clear image if:
The RVC is turned off. See “Turning the Rear Camera System On or Off” earlier in this section. It is dark. The sun or the beam of headlamps are shining directly into the camera lens. Ice, snow, mud, or anything else builds up on the camera lens. Clean the lens, rinse it with water, and wipe it with a soft cloth. The back of the vehicle is in an accident, the position and mounting angle of the camera can change or the camera can be affected. Be sure to have the camera and its position and mounting angle checked at your dealer/retailer.
Driving and Operating
8-49
Gasoline Specifications At a minimum, gasoline should meet ASTM specification D 4814 in the United States or CAN/CGSB‐3.5 or 3.511 in Canada. Some gasolines contain an octane-enhancing additive called methylcyclopentadienyl manganese tricarbonyl (MMT). We recommend against the use of gasolines containing MMT. See Fuel Additives on page 8‑50 for additional information.
The 8th digit of the Vehicle Identification Number (VIN) shows the code letter or number that identifies the vehicle's engine. The VIN is at the top left of the instrument panel. See Vehicle Identification Number (VIN) on page 11‑1 .
Recommended Fuel If the vehicle has a 2.4L L4 engine (VIN Code C) or the 3.0L V6 engine (VIN Code G), use regular unleaded gasoline with a posted octane rating of 87 or higher. If the octane rating is less than 87, an audible knocking noise, commonly referred to as spark knock, might be heard when driving. If this occurs, use a gasoline rated at 87 octane or higher as soon as possible. If heavy knocking is heard when using gasoline rated at 87 octane or higher, the engine needs service.
If the vehicle has the 3.6L V6 engine (VIN Code V), use premium unleaded gasoline with a posted octane rating of 91 or higher. You can also use regular unleaded gasoline rated at 87 octane or higher, but the vehicle's acceleration could be slightly reduced, and a slight audible knocking noise, commonly referred to as spark knock, might be heard. If the octane is less than 87, a heavy knocking noise might be heard when driving. If this occurs, use a gasoline rated at 87 octane or higher as soon as possible. Otherwise, you could damage the engine. If heavy knocking is heard when using gasoline rated at 87 octane or higher, the engine needs service.
8-50
Driving and Operating
Fuels in Foreign Countries If you plan on driving in another country outside the United States or Canada, the proper fuel might be hard to find. Never use leaded gasoline or any other fuel not recommended in the previous text on fuel. Costly repairs caused by use of improper fuel would not be covered by the vehicle warranty. To check the fuel availability, ask an auto club, or contact a major oil company that does business in the country where you will be driving.
California Fuel Requirements If the vehicle is certified to meet California Emissions Standards, it is designed to operate on fuels that meet California specifications. See the underhood emission control label. If this fuel is not available in states adopting California emissions standards, the vehicle will operate satisfactorily on fuels meeting federal specifications, but emission