- Download PDF Manual
-
Downloaded from www.Manualslib.com manuals search engine
Downloaded from www.Manualslib.com manuals search engine
Downloaded from www.Manualslib.com manuals search engine
Suspension, Wheels, Brakes, Steering 00 - General, Technical data Suspension, Wheels, Brakes, Steering Technical data Steering Brakes Wheels, tires 40 - Front suspension Front Wheel Suspension, Shafts and Axle Front suspension, servicing (Base suspension) Sub-frame, stabilizer bar and control arm (Base suspension) Ball joint, checking (Base and Plus suspension) Reworking cap nut in side member (Base and Plus suspension) Wheel bearing, suspension strut and drive shaft, removing and installing (Base running gear) Front suspension strut, servicing (Base and Plus suspension) Front suspension, servicing (Plus suspension) Sub-frame, stabilizer bar and control arm, removing and installing (Plus suspension) Ball joint, removing and installing (Plus running gear) Wheel bearing and suspension strut, removing and installing (Plus suspension) Drive shaft, removing and installing (Plus running gear) Drive shaft, repairing Outer constant velocity joint, checking Inner constant velocity joint, checking Drive shaft with tripod joint, repairing Drive axle with triple-rotor joint, removing and installing Drive axle with triple-rotor joint, servicing Triple-rotor joint, disassembling Triple-rotor joint, assembling 42 - Rear suspension Rear Wheel Suspension, Shafts and Axle Rear axle, servicing (vehicles with front wheel drive) Reworking cap nut in side member (front wheel drive vehicles) Suspension strut, disassembling and assembling (front wheel drive vehicles) Wheel bearings, servicing Drum brakes (front wheel drive vehicles), wheel bearings, servicing Wheel bearings, servicing - disc brakes (front wheel drive vehicles) Downloaded from www.Manualslib.com manuals search engine
Rear axle, servicing (four wheel drive vehicles) Rear drive shafts, servicing Reworking cap nut in side member (four wheel drive vehicles) Suspension strut, disassembling and assembling (four wheel drive vehicles) Wheel bearings, servicing - disc brakes (four wheel drive vehicles) 44 - Wheels, Tires, Wheel alignment Vehicle alignment Test requirements: Vehicle alignment specifications (front wheel drive vehicles) Vehicle alignment specifications (four wheel drive vehicles) Front wheel camber, adjusting Calculating the direction of travel: 45 - Anti-lock brake system Anti-locking Brake System (ABS) and Anti-locking Brake System with Electronic Differential Lock (ABS/EDL) Teves 04 Notes for repair work on ABS, ABS/EDL Control module, removing and installing Wheel speed sensor and rotor for speed sensor, removing and installing Anti-lock Brake System (ABS) and ABS with Electronic Differential Lock (ABS/EDL), Teves 20 GI Safety precautions ABS, ABS/EDL hydraulic unit, vacuum brake booster and brake master cylinder (Teves 20 GI), servicing ABS hydraulic unit and ABS control module (Teves 20 GI), removing and installing Brake hydraulic system, bleeding and filling Assembly overview - hydraulic unit, brake servo/brake master cylinder Hydraulic unit, removing and installing Brake Pedal Position Sensor, removing and installing 46 - Brakes - Mechanical components Front brakes, servicing (Girling caliper) Brake pads, removing and installing Downloaded from www.Manualslib.com manuals search engine
Front brakes, servicing (Teves/Ate) Brake pads, removing and installing Rear wheel brakes, servicing (drum brakes) Brake shoe adjustment, releasing Rear wheel brakes, servicing Brake shoes, removing and installing Parking brake, adjusting (drum brakes) Rear wheel brakes, servicing (disc brakes) Girling rear wheel disc brakes (front and four wheel drive vehicles) Brake pads, removing and installing Parking brake, adjusting (disc brakes) Parking brake lever assembly overview Brake pedal/brake servo, removing and installing Brake pedal, removing and installing Brake Light Switch, adjusting 47 - Brakes - Hydraulic components Assembly overview: brake master cylinder/brake servo Girling front brake caliper, servicing Front brake caliper pistons, removing and installing Front brake caliper, servicing (Teves/Ate) Rear brake caliper, servicing Rear brake caliper piston, removing and installing Pre-bleeding brake caliper Brake pressure regulator, checking and adjusting Vehicles without ABS, vehicles with ABS, ABS/EDS, Teves 04 Load dependent brake pressure regulator specifications Adjusting regulator Brake system, bleeding Brake system, bleeding (vehicles with and without ABS, ABS/EDL) Brake system, bleeding (with pressure bleeder VAS 5234) Brake system, bleeding (without pressure bleeder) Downloaded from www.Manualslib.com manuals search engine
48 - Steering Steering Assembly overview: steering column, column tube, steering wheel and airbag steering wheel Airbag unit, removing and installing Airbag steering wheel, removing and installing Airbag Spiral Spring, removing and installing Column tube for height adjustable steering wheel, removing and installing Pump delivery pressure, checking Power steering gear, removing and installing Assembly overview: power assisted steering box (TRW) Power steering gear, adjusting (TRW) Power steering gear, disassembling and reassembling (TRW) Power steering gear, disassembling Inner sealing ring for toothed rod, pulling out Checking toothed rod for scoring Sealing ring on toothed rod, replacing Sealing rings, installing on toothed rod piston Power steering gear, assembling Inner sealing ring for toothed rod, installing Toothed rod, installing in housing Adhesive tape, applying Power steering gear, adjusting with new toothed rod Assembly overview: power steering gear (ZF) Power steering gear, adjusting (ZF) Power steering gear, disassembling and reassembling (ZF) Power steering gear, disassembling Checking toothed rod for scoring Sealing ring on toothed rod, replacing Power steering gear, assembling Tie rods, removing and installing (power steering gear - TRW and ZF) Left-hand tie rod length, checking and adjusting Assembly overview: vane pump, reservoir and hydraulic lines (vehicles with 4-Cyl. engines) Assembly overview: Hydraulic lines, reservoir (vehicles with 4-Cyl. engines) Power steering vane pump, removing and installing (vehicles with 4-Cyl. engines) V-belts, tensioning (4-Cyl. engines) Assembly overview: Pressure and cooling lines (vehicles with VR6 engine) Power steering vane pump, removing and installing (vehicles with VR6 engine] Downloaded from www.Manualslib.com manuals search engine
00-1 Suspension, Wheels, Brakes, Steering Technical data Model Sedan/Wagon and syncro Base Suspension 1) Sedan/Wagon and syncro Base Suspension 2) Wheelbase mm 2625 2625 Track, unladen mm 1479 front, wheel offset 38 1422 rear, wheel offset 38 1485 front, wheel offset 35 1428 rear, wheel offset 35 1489 front, wheel offset 33 3) 1432 rear, wheel offset 3) 1485 front, wheel offset 35 1441 rear, wheel offset 35 1489 front, wheel offset 33 3) 1445 rear, wheel offset 33 3) Turning circle m 10.7 11.5 Steering roll radius (negative) mm 0.5 with offset 35 3.5 with offset 38 12 with offset 35 15 with offset 38 Wheel lock angle inner outer 42 36 3745' 34 30' 1) Base Suspension, explanation Page 40-1 2) Plus Suspension, explanation Page 40-26 3) Syncro Page 1 of 8Suspension, Wheels, Brakes, Steering12/7/2004http://ebahn.bentleypublishers.com/vw/servlet/Display?action=Goto&type=repair&id=VW.B4.SU01.00.1 Downloaded from www.Manualslib.com manuals search engine
00-2 Steering Model Sedan/Wagon and syncro Suspension version Base Suspension Plus Suspension Steering gear Power assisted steering gear Power assisted steering gear Steering wheel turns from lock to lock 3.33 3.14 Overall steering ratio 17.5:1 16.4:1 Wheel alignment specifications Page 44-2 Page 2 of 8Suspension, Wheels, Brakes, Steering12/7/2004http://ebahn.bentleypublishers.com/vw/servlet/Display?action=Goto&type=repair&id=VW.B4.SU01.00.1 Downloaded from www.Manualslib.com manuals search engine
00-3 Brakes Model Sedan/Wagon Output kW (hp) 55 (75) Brake master cylinder mm dia. 22.2 (Vehicles with ABS: 23.81) Brake servo dia. in inches 10 Front brake caliper, piston diameter mm 54 Front brake disc mm dia. 256 Front brake disc, thickness mm 13 Pad thickness mm 14 Rear brake drum mm dia. 230 Wheel cylinder mm dia. 20.64 Lining thickness mm 5 Lining width mm 40 Page 3 of 8Suspension, Wheels, Brakes, Steering12/7/2004http://ebahn.bentleypublishers.com/vw/servlet/Display?action=Goto&type=repair&id=VW.B4.SU01.00.1 Downloaded from www.Manualslib.com manuals search engine
00-4 Model Sedan/Wagon Output kW (hp) 85 (115) 128 (172) Brake master cylinder mm dia. 23.81 Brake servo dia. in inches 10 Front brake caliper dia. mm 54 Front brake disc mm dia. 256 288 Front brake thickness mm 20 13 Pad thickness mm 11 14 Rear brake caliper dia. mm 38 Rear brake disc mm dia. 226 Rear brake disc, thickness mm 10 Pad thickness mm 12 Page 4 of 8Suspension, Wheels, Brakes, Steering12/7/2004http://ebahn.bentleypublishers.com/vw/servlet/Display?action=Goto&type=repair&id=VW.B4.SU01.00.1 Downloaded from www.Manualslib.com manuals search engine
00-5 Model Passat syncro Output kW (hp) 85 (115) 128 (172) Brake master cylinder mm dia. 23.81 Brake servo dia. in inches 10 Front brake caliper dia. mm 54 Front brake disc mm dia. 256 288 Front brake disc thickness mm 20 25 Pad thickness mm 11 14 Rear brake caliper dia. mm 38 Rear brake disc mm dia. 239 Rear brake disc, thickness mm 10 Pad thickness mm 12 Page 5 of 8Suspension, Wheels, Brakes, Steering12/7/2004http://ebahn.bentleypublishers.com/vw/servlet/Display?action=Goto&type=repair&id=VW.B4.SU01.00.1 Downloaded from www.Manualslib.com manuals search engine
00-6 Wheels, tires Engine output (kW) Model Tire size 1) Wheel Offset Hole pattern 55 gas 55, 66 - Diesel Sedan/Wagon 185/65 R 14 86 S 195/60 R 14 86 S 205/50 R 15 86 S 185/65 R 14 85 Q (M+S) 195/60 R 14 85 Q (M+S) 205/50 R 15 85 Q (M+S) 6 J x 14 6 J x 14 6 J x 15 6 J x 14 6 J x 14 6 J x 15 38 38 38 38 38 38 4-hole 55 Sedan/Wagon T 125/70 R 15 95 M (Temp. spare) 3 1/2 J x 15 40 1) Tire pressures Sticker on vehicle Page 6 of 8Suspension, Wheels, Brakes, Steering12/7/2004http://ebahn.bentleypublishers.com/vw/servlet/Display?action=Goto&type=repair&id=VW.B4.SU01.00.1 Downloaded from www.Manualslib.com manuals search engine
00-7 Engine output (kW) Model Tire size 1) Wheel Offset Hole pattern 85 kW Sedan/Wagon 185/65 R 14 86 H 195/60 R 14 86 H 205/50 R 15 86 H 185/65 R 14 85 Q (M+S) 195/60 R 14 85 Q (M+S) 205/50 R 15 85 Q (M+S) 6 J x 14 6 J x 14 6 J x 15 6 J x 14 6 J x 14 6 J x 15 38 38 35 38 38 35 4-hole 85 kW Sedan/Wagon T 125/70 R 15 95 M (Temp. spare) 3 1/2 J x 15 40 128 kW Sedan/Wagon 205/50 ZR 15 86 W 195/55 R 15 85 T (M+S) 195/55 R 15 85 T (M+S) 205/50 R 15 85 T (M+S) 6 J x 15 6 J x 15 6 1/2 J x 15 6 J x 15 35 35 33 35 128 kW Sedan/Wagon T 125/70 R 16 95 M (Temp. spare) 3 1/2 J x 16 38 1) Tire pressures Sticker on vehicle Page 7 of 8Suspension, Wheels, Brakes, Steering12/7/2004http://ebahn.bentleypublishers.com/vw/servlet/Display?action=Goto&type=repair&id=VW.B4.SU01.00.1 Downloaded from www.Manualslib.com manuals search engine
00-8 Engine output (kW) Model Tire size 1) Wheel Offset Hole pattern 85 kW Sedan/Wagon syncro 185/65 R 14 86 H 195/60 R 14 86 H 205/50 R 15 86 H 185/65 R 14 86 Q (M+S) 195/60 R 14 86 Q (M+S) 205/50 R 15 86 Q (M+S) 6 J x 14 6 J x 14 6 J x 15 6 J x 14 6 J x 14 6 J x 15 38 38 35 38 38 35 4-hole 85 kW Sedan/Wagon syncro T 125/80 R 15 95 M (Temp. spare) 3 1/2 J x 15 40 128 kW Sedan/Wagon syncro 205/50 ZR 15 86 W 205/50 R 15 86 (M+S) 6 J x 15 6 J x 15 35 35 5-hole 128 kW Sedan/Wagon syncro T 125/70 R 16 95 M (Temp. spare) 3 1/2 J x 16 38 1) Tire pressures Sticker on vehicle Page 8 of 8Suspension, Wheels, Brakes, Steering12/7/2004http://ebahn.bentleypublishers.com/vw/servlet/Display?action=Goto&type=repair&id=VW.B4.SU01.00.1 Downloaded from www.Manualslib.com manuals search engine
40-1 Front Wheel Suspension, Shafts and Axle Front suspension, servicing (Base suspension) I - Removing and installing subframe, stabilizer bar and control arm (Base suspension) Page 40-2 II - Removing and installing wheel bearings, suspension strut and drive shaft (Base suspension) Page 40-14 The Base suspension is installed in Passat 1995 vehicles up to 85 kW. Page 1 of 82Front Wheel Suspension, Shafts and Axle12/7/2004http://ebahn.bentleypublishers.com/vw/servlet/Display?action=Goto&type=repair&id=VW.B4.SU01.40.1 Downloaded from www.Manualslib.com manuals search engine
40-2 Sub-frame, stabilizer bar and control arm (Base suspension) Note: If a vehicle has to be moved after removing the drive shaft, first install outer joint and tighten to 50 Nm (37 ft lb) otherwise the wheel bearing will be damaged. Specifications for wheel alignment Page 44-2 . Welding and straightening operations are not permitted on load bearing suspension components or those components which locate the wheels. Always replace self-locking nuts. Always replace corroded nuts/bolts. Page 2 of 82Front Wheel Suspension, Shafts and Axle12/7/2004http://ebahn.bentleypublishers.com/vw/servlet/Display?action=Goto&type=repair&id=VW.B4.SU01.40.1 Downloaded from www.Manualslib.com manuals search engine
40-3 1 - Hex bolt, 35 Nm (26 ft lb) 2 - Ball joint Checking Page 40-10 Check rubber boot for damage and if necessary, replace ball joint Mark installation position. If replaced set to center of elongated hole and check toe Elongated holes are not for camber adjustment. Failure to observe this instruction may result in damage to drive shafts! 3 - Captive lock nuts 4 - Air deflector plate Secured to control arm by clip 5 - Control arm Page 3 of 82Front Wheel Suspension, Shafts and Axle12/7/2004http://ebahn.bentleypublishers.com/vw/servlet/Display?action=Goto&type=repair&id=VW.B4.SU01.40.1 Downloaded from www.Manualslib.com manuals search engine
40-4 6 - Control arm rear mounting Installation position Fig. 3 Pressing out and in Fig. 4 7 - Hex bolt M 12 x 1.5 x 82 50 Nm (37 ft lb) and turn 90 further 8 - Hex bolt M 12 x 1.5 x 65 70 Nm (52 ft lb) and turn 90further 9 - Hex bolt M 12 x 1.5 x 78 70 Nm (52 ft lb) and turn 90further 10 - Control arm front mounting Pressing out Fig. 1 Pressing in Fig. 2 11 - Connecting link With rubber mounting Page 4 of 82Front Wheel Suspension, Shafts and Axle12/7/2004http://ebahn.bentleypublishers.com/vw/servlet/Display?action=Goto&type=repair&id=VW.B4.SU01.40.1 Downloaded from www.Manualslib.com manuals search engine
40-5 Repair Manual, Engine Mechanical, Repair Group 10 12 - Connecting link mounting Conical side toward control arm 13 - Washer Collar faces away from mounting 14 - Self-locking hex nut, 25 Nm (18 ft lb) 15 - Sub-frame Removing and installing with assemblies installed: supporting assemblies Fig. 5 Remove sub-frame from below with VAG 1383 (with control arm but without steering gear). After installing check position of steering wheel and align front end. Aligning engine-transmission assembly Page 5 of 82Front Wheel Suspension, Shafts and Axle12/7/2004http://ebahn.bentleypublishers.com/vw/servlet/Display?action=Goto&type=repair&id=VW.B4.SU01.40.1 Downloaded from www.Manualslib.com manuals search engine
40-6 16 - Hex bolt, 65 Nm (48 ft lb) 17 - Stabilizer bar mounting 18 - Stabilizer bar 19 - Stabilizer bar clamp 20 - Hex bolt, 25 Nm (18 ft lb) To secure stabilizer bar 21 - Vibration damper Note installation position, large part must protrude from sub-frame 22 - Self-locking hex nut, 25 Nm (18 ft lb) 23 - Cap nut Repairing in side member Page 40-11 Page 6 of 82Front Wheel Suspension, Shafts and Axle12/7/2004http://ebahn.bentleypublishers.com/vw/servlet/Display?action=Goto&type=repair&id=VW.B4.SU01.40.1 Downloaded from www.Manualslib.com manuals search engine
40-7 Fig. 1 Front control arm mounting, pressing out Note: Before pressing in, coat with acid-free lubricant, e.g. soft soap. Fig. 2 Front control arm mounting, pressing in Page 7 of 82Front Wheel Suspension, Shafts and Axle12/7/2004http://ebahn.bentleypublishers.com/vw/servlet/Display?action=Goto&type=repair&id=VW.B4.SU01.40.1 Downloaded from www.Manualslib.com manuals search engine
40-8 One of the embossed arrows points toward the recess in the control arm and the kidney shaped opening (arrow A) faces towards center of vehicle. Fig. 3 Control arm rear mounting, installation position Note: If bonded rubber bushing is tight because of corrosion, cut rubber out, saw through steel casing and drive bushing out. Fig. 4 Control arm rear mounting, pressing out and in Page 8 of 82Front Wheel Suspension, Shafts and Axle12/7/2004http://ebahn.bentleypublishers.com/vw/servlet/Display?action=Goto&type=repair&id=VW.B4.SU01.40.1 Downloaded from www.Manualslib.com manuals search engine
40-9 Fig. 5 Supporting engine/transmission assembly with 10-222 A and legs 10-222 A/1 Page 9 of 82Front Wheel Suspension, Shafts and Axle12/7/2004http://ebahn.bentleypublishers.com/vw/servlet/Display?action=Goto&type=repair&id=VW.B4.SU01.40.1 Downloaded from www.Manualslib.com manuals search engine
40-10 Ball joint, checking (Base and Plus suspension) Checking axial clearance Checking radial play - Forcibly pull ball joint down and press up again. Note: - Press lower part of wheel outward and inward. There must be no perceptible or visual "play" during either test. Observe ball joint during checks. Take into account possible existing wheel bearing play or "play" in upper suspension strut mounting. Page 10 of 82Front Wheel Suspension, Shafts and Axle12/7/2004http://ebahn.bentleypublishers.com/vw/servlet/Display?action=Goto&type=repair&id=VW.B4.SU01.40.1 Downloaded from www.Manualslib.com manuals search engine
40-11 Reworking cap nut in side member (Base and Plus suspension) If the threads of the cap nut in the side member are damaged, the thread must either be retapped or the cap nut must be drilled out. When drilling out proceed as follows. - Support engine/transmission assembly with 10-222 A and legs 10-222 A/1. - Remove the sub-frame. - Drill out the damaged side member cap nut with a 10.2 mm diameter drill from underneath. Note: When drilling do not tilt the drill. WARNING! Wear protective goggles. - Cut new M 12 x 1.5 thread in cap nut. - Use a new bolt/washer assembly to secure sub-frame Page 40-13 . Page 11 of 82Front Wheel Suspension, Shafts and Axle12/7/2004http://ebahn.bentleypublishers.com/vw/servlet/Display?action=Goto&type=repair&id=VW.B4.SU01.40.1 Downloaded from www.Manualslib.com manuals search engine
40-12 Bolt/washer assemblies for sub-frame Securing point Thread Bolt Part No. Front sub-frame M12 x 1.5 M12 x 1.5 x 95 10.9 N 101 612.01 1) Rear sub-frame M12 x 1.5 M12 x 1.5 x 95 10.9 N 101 612.01 Sub-frame bracket M10 M10 x 38 10.9 N 019 541.1 Engine front cross-member to side member M10 M10 x 75 10.9 N 904 078.01 1) 1) These bolts are not listed in the parts catalog. They must be specially ordered. Page 12 of 82Front Wheel Suspension, Shafts and Axle12/7/2004http://ebahn.bentleypublishers.com/vw/servlet/Display?action=Goto&type=repair&id=VW.B4.SU01.40.1 Downloaded from www.Manualslib.com manuals search engine
40-13 Note: Tightening torque remains unchanged. 1 - Bolt/washer 2 - Cap nut 3 - Side member 4 - Sub-frame 5 - Bonded rubber mounting/control arm Page 13 of 82Front Wheel Suspension, Shafts and Axle12/7/2004http://ebahn.bentleypublishers.com/vw/servlet/Display?action=Goto&type=repair&id=VW.B4.SU01.40.1 Downloaded from www.Manualslib.com manuals search engine
40-14 Wheel bearing, suspension strut and drive shaft, removing and installing (Base running gear) Note: If a vehicle has to be moved after removing the drive shaft, first install outer joint and tighten to 50 Nm (37 ft lb) otherwise the wheel bearing will be damaged. Welding and straightening operations are not permitted on load bearing suspension components or those components which locate the wheels. Always replace self-locking nuts. Always replace corroded nuts/bolts. Wheel bolt tightening torque: 110 Nm (81 ft lb). Page 14 of 82Front Wheel Suspension, Shafts and Axle12/7/2004http://ebahn.bentleypublishers.com/vw/servlet/Display?action=Goto&type=repair&id=VW.B4.SU01.40.1 Downloaded from www.Manualslib.com manuals search engine
40-15 Repair Manual, Suspension, Wheels, Brakes, Steering, Repair Group 00 1 - Self-locking nut, 265 Nm (195 ft lb) Only loosen and tighten with the vehicle standing on its wheels (danger of accident) Any paint residue and/or corrosion on the thread of the outer joint must be removed before the nut is installed 2 - Washer 3 - Brake disc Application 4 - Brake caliper Do not loosen brake hose when working on front suspension Hang up with wire or similar 5 - Hub Pressing out Fig. 3 Pressing in Fig. 8 Pulling off bearing inner race Fig. 5 Page 15 of 82Front Wheel Suspension, Shafts and Axle12/7/2004http://ebahn.bentleypublishers.com/vw/servlet/Display?action=Goto&type=repair&id=VW.B4.SU01.40.1 Downloaded from www.Manualslib.com manuals search engine
40-16 6 - Speed sensor rotor Only on vehicles with ABS 7 - Hex bolt, 10 Nm (7 ft lb) 8 - Splash plate 9 - Circlip Ensure correctly seated 10 - Wheel bearing Pressing out Fig. 6 Replace, as it is destroyed during pressing out Pressing in Fig. 7 11 - Self-locking hex nut, 35 Nm (26 ft lb) 12 - Wheel bearing housing 13 - Self-locking hex nut, 50 Nm (37 ft lb) 14 - Hex bolt Clamping bolt for ball joint Page 16 of 82Front Wheel Suspension, Shafts and Axle12/7/2004http://ebahn.bentleypublishers.com/vw/servlet/Display?action=Goto&type=repair&id=VW.B4.SU01.40.1 Downloaded from www.Manualslib.com manuals search engine
40-17 15 - Self-locking bolt/washer assembly, 125 Nm (92 ft lb) For securing brake carrier 16 - Socket head multi-point bolt, 45 Nm (33 ft lb) 17 - Drive shaft To remove and install separate ball joint/control arm connection Fig. 2 Repairing Page 40-46 18 - Circlip Ensure correctly seated 19 - Self-locking hex nut, 95 Nm (70 ft lb) 20 - Hex bolt Shank diameter 11 mm Adjusting camber Page 44-6 Mark position before loosening Page 17 of 82Front Wheel Suspension, Shafts and Axle12/7/2004http://ebahn.bentleypublishers.com/vw/servlet/Display?action=Goto&type=repair&id=VW.B4.SU01.40.1 Downloaded from www.Manualslib.com manuals search engine
40-18 21 - Self-locking hex nut, 60 Nm (44 ft lb) Loosening and tightening Fig. 1 22 - Stop 23 - Suspension strut bearing 24 - Suspension strut Removing and installing Fig. 1 and Fig. 2 Disassembling and assembling Page 40-23 25 - Bracket 26 - Hex bolt 27 - Tie rod Removing and installing Page 48-77 28 - Countersunk screw 29 - Screw Page 18 of 82Front Wheel Suspension, Shafts and Axle12/7/2004http://ebahn.bentleypublishers.com/vw/servlet/Display?action=Goto&type=repair&id=VW.B4.SU01.40.1 Downloaded from www.Manualslib.com manuals search engine
40-19 Fig. 1 Suspension strut to body, loosening and tightening Note: Camber must be adjusted each time joint is loosened. Fig. 2 Wheel bearing housing/suspension strut joint, separating Page 19 of 82Front Wheel Suspension, Shafts and Axle12/7/2004http://ebahn.bentleypublishers.com/vw/servlet/Display?action=Goto&type=repair&id=VW.B4.SU01.40.1 Downloaded from www.Manualslib.com manuals search engine
40-20 To take drive shaft out, remove bolts (arrows). Note: First mark installation position. Fig. 3 Ball joint/control arm connection, separating Fig. 4 Hub, pressing out of wheel bearing housing Page 20 of 82Front Wheel Suspension, Shafts and Axle12/7/2004http://ebahn.bentleypublishers.com/vw/servlet/Display?action=Goto&type=repair&id=VW.B4.SU01.40.1 Downloaded from www.Manualslib.com manuals search engine
40-21 Only use puller with leg clamp e.g. Kukko 204-2 (commercial type). Fig. 5 Bearing race, pulling out of hub Fig. 6 Wheel bearing, pressing out of wheel bearing housing Page 21 of 82Front Wheel Suspension, Shafts and Axle12/7/2004http://ebahn.bentleypublishers.com/vw/servlet/Display?action=Goto&type=repair&id=VW.B4.SU01.40.1 Downloaded from www.Manualslib.com manuals search engine
40-22 Fig. 7 Wheel bearing, pressing into wheel bearing housing Fig. 8 Hub, pressing into wheel bearing housing Page 22 of 82Front Wheel Suspension, Shafts and Axle12/7/2004http://ebahn.bentleypublishers.com/vw/servlet/Display?action=Goto&type=repair&id=VW.B4.SU01.40.1 Downloaded from www.Manualslib.com manuals search engine
40-23 Front suspension strut, servicing (Base and Plus suspension) 1 - Shock absorber Can be replaced individually Check shock absorber for leaks and noises After replacing, adjust camber and toe Page 44-1 2 - Buffer stop 3 - Protective sleeve Page 23 of 82Front Wheel Suspension, Shafts and Axle12/7/2004http://ebahn.bentleypublishers.com/vw/servlet/Display?action=Goto&type=repair&id=VW.B4.SU01.40.1 Downloaded from www.Manualslib.com manuals search engine
40-24 4 - Coil spring Removing and installing Fig. 2 Observe color coding Outer surface of spring must not be damaged Is slightly curved 5 - Spring plate 6 - Axial bearing 7 - Hex nut, 60 Nm (44 ft lb) Loosening and tightening Fig. 2 8 - Suspension strut mounting 9 - Stop 10 - Self-locking hex nut, 60 Nm (44 ft lb) Loosening and tightening Fig. 1 Page 24 of 82Front Wheel Suspension, Shafts and Axle12/7/2004http://ebahn.bentleypublishers.com/vw/servlet/Display?action=Goto&type=repair&id=VW.B4.SU01.40.1 Downloaded from www.Manualslib.com manuals search engine
40-25 Fig. 1 Hex nut, loosening and tightening Fig. 2 Spring, removing and installing Page 25 of 82Front Wheel Suspension, Shafts and Axle12/7/2004http://ebahn.bentleypublishers.com/vw/servlet/Display?action=Goto&type=repair&id=VW.B4.SU01.40.1 Downloaded from www.Manualslib.com manuals search engine
40-26 Front suspension, servicing (Plus suspension) I - Removing and installing subframe, stabilizer bar and control arm (plus suspension) Page 40-27 II - Removing and installing wheel bearing, suspension strut and drive shaft (plus suspension) Page 40-36 The following components are different when comparing the plus suspension with the base suspension: Control arm, ball joint, wheel bearing housing, stabilizer bar, drive shaft, brake disc, hub, wheel and tie rods. The Plus suspension is installed in Passat models with engine output 110 kW (148 hp) and above. Page 26 of 82Front Wheel Suspension, Shafts and Axle12/7/2004http://ebahn.bentleypublishers.com/vw/servlet/Display?action=Goto&type=repair&id=VW.B4.SU01.40.1 Downloaded from www.Manualslib.com manuals search engine
40-27 Sub-frame, stabilizer bar and control arm, removing and installing (Plus suspension) Notes Page 40-2 1 - Hex bolt, 35 Nm (26 ft lb) 2 - Ball joint Checking Page 40-10 Check rubber boot for damage and if necessary, replace ball joint Removing and installing Page 40-33 Mark installation position. If replaced set to center of elongated hole and check track 3 - Self-locking hex nut, 45 Nm (33 ft lb) 4 - Captive locknuts Page 27 of 82Front Wheel Suspension, Shafts and Axle12/7/2004http://ebahn.bentleypublishers.com/vw/servlet/Display?action=Goto&type=repair&id=VW.B4.SU01.40.1 Downloaded from www.Manualslib.com manuals search engine
40-28 5 - Control arm rear mounting Installation position Fig. 2 Pressing out and in Fig. 3 6 - Control arm Elongated holes are not for camber adjustment! 7 - Air guide plate Secured to control arm by clip 8 - Control arm front mounting Pressing out and in Fig. 1 9 - Hex bolt M 12 x 1.5 x 78 70 Nm (52 ft lb) and turn 90 further 10 - Hex bolt M 12 x 1.5 x 65 70 Nm (62 ft lb) and turn 90 further 11 - Connecting link With rubber mounting Page 28 of 82Front Wheel Suspension, Shafts and Axle12/7/2004http://ebahn.bentleypublishers.com/vw/servlet/Display?action=Goto&type=repair&id=VW.B4.SU01.40.1 Downloaded from www.Manualslib.com manuals search engine
40-29 12 - Mounting for connecting link Conical side towards control arm 13 - Washer Collar faces away from mounting 14 - Self-locking hex nut, 25 Nm (18 ft lb) 15 - Hex bolt M 12 x 1.5 x 82 50 Nm (37 ft lb) and turn 90 further 16 - 25 Nm (18 ft lb) 17 - Hex bolt, 25 Nm (18 ft lb) To secure stabilizer bar 18 - Hex bolt, 65 Nm (48 ft lb) 19 - Clamp for stabilizer bar Page 29 of 82Front Wheel Suspension, Shafts and Axle12/7/2004http://ebahn.bentleypublishers.com/vw/servlet/Display?action=Goto&type=repair&id=VW.B4.SU01.40.1 Downloaded from www.Manualslib.com manuals search engine
40-30 Repair Manual, Engine Mechanical, Repair Group 10 20 - Vibration damper Not installed on vehicles with VR 6 engine 21 - Sub-frame Removing and installing with assemblies installed: supporting assemblies Fig. 4 Remove sub-frame from below with control arm but without steering gear using transmission jack VAG 1383 or equivalent. After installing check position of steering wheel and align front end. Aligning engine/transmission assembly 22 - Stabilizer bar mounting 23 - Stabilizer bar 24 mm diameter 24 - Cap nut Reworking in side member Page 40-11 Page 30 of 82Front Wheel Suspension, Shafts and Axle12/7/2004http://ebahn.bentleypublishers.com/vw/servlet/Display?action=Goto&type=repair&id=VW.B4.SU01.40.1 Downloaded from www.Manualslib.com manuals search engine
40-31 Note: Before pressing in, coat with lubricant, e.g. soft soap. Fig. 1 Control arm front mounting, pressing out and in One of the embossed arrows points toward the recess in the control arm and the kidney shaped opening -arrow -A- in mounting faces towards center of vehicle. Fig. 2 Control arm rear mounting, installation position Page 31 of 82Front Wheel Suspension, Shafts and Axle12/7/2004http://ebahn.bentleypublishers.com/vw/servlet/Display?action=Goto&type=repair&id=VW.B4.SU01.40.1 Downloaded from www.Manualslib.com manuals search engine
40-32 Fig. 3 Control arm rear mounting, pressing out and in Fig. 4 Engine/transmission assembly, supporting with 10-222 A and 10-222 A/3 Page 32 of 82Front Wheel Suspension, Shafts and Axle12/7/2004http://ebahn.bentleypublishers.com/vw/servlet/Display?action=Goto&type=repair&id=VW.B4.SU01.40.1 Downloaded from www.Manualslib.com manuals search engine
40-33 Ball joint, removing and installing (Plus running gear) Removing - Loosen 12-point nut with vehicle standing on its wheels. - Disconnect drive shaft at transmission drive flange. - Remove bolts -arrow -A-. - Loosen bolt -arrow -B-. - Separate connection between ball joint/control arm. (First mark installation position). - Swing wheel and suspension strut outward and support. Page 33 of 82Front Wheel Suspension, Shafts and Axle12/7/2004http://ebahn.bentleypublishers.com/vw/servlet/Display?action=Goto&type=repair&id=VW.B4.SU01.40.1 Downloaded from www.Manualslib.com manuals search engine
40-34 Note: Installing - Install ball joint splitter as shown in illustration and press out ball joint. 1 - Splitter. Matra V 176 Place transmission jack VAG 1383/A, or equivalent, underneath (danger of accident through falling parts when pressing out the ball joint). Protect ball joint threads by threading nut on a few turns. - Install ball joint in wheel bearing housing. - Thread on new self-locking nut, and counterhold with hex key (6 mm AF). 1 - Hex key (6 mm AF), shortened by approx. 10 mm. 2 - Crowfoot insert or slotted ring socket insert Page 40-35 3 - VAG 1331 - Secure ball joint to control arm (align to old marks). Page 34 of 82Front Wheel Suspension, Shafts and Axle12/7/2004http://ebahn.bentleypublishers.com/vw/servlet/Display?action=Goto&type=repair&id=VW.B4.SU01.40.1 Downloaded from www.Manualslib.com manuals search engine
40-35 Note: Make sure that the boot is not damaged or twisted. Tightening torques Ball joint to wheel bearing housing: 45 Nm (33 ft lb) Ball joint to control arm: 35 Nm (26 ft lb) 1 - Box insert (commercial type, 19 mm AF) 2 - Crowfoot insert (commercial type, 19 mm AF) Page 35 of 82Front Wheel Suspension, Shafts and Axle12/7/2004http://ebahn.bentleypublishers.com/vw/servlet/Display?action=Goto&type=repair&id=VW.B4.SU01.40.1 Downloaded from www.Manualslib.com manuals search engine
40-36 Wheel bearing and suspension strut, removing and installing (Plus suspension) Notes Page 40-14 1 - Wheel bolt, 110 Nm (81 ft lb) 2 - Self-locking 12-point nut 90 Nm (66 ft lb) and turn 45 further (1/8 ) Loosening and tightening Page 40-44 Any paint residue and/or corrosion on thread of the outer joint must be removed before the nut is installed. 3 - Screw 4 - Brake disc Repair instructions Page 46-1 Page 36 of 82Front Wheel Suspension, Shafts and Axle12/7/2004http://ebahn.bentleypublishers.com/vw/servlet/Display?action=Goto&type=repair&id=VW.B4.SU01.40.1 Downloaded from www.Manualslib.com manuals search engine
40-37 5 - Brake caliper Do not loosen brake hose when working on front suspension Hang up with wire or similar Replacing brake pads Page 46-6 6 - Countersunk screw 7 - Hub Pressing out Fig. 2 Pressing in Fig. 6 Pulling off inner race Fig. 3 8 - Speed sensor rotor Only for vehicles with ABS 9 - Hex bolt, 10 Nm (7 ft lb) 10 - Splash plate Page 37 of 82Front Wheel Suspension, Shafts and Axle12/7/2004http://ebahn.bentleypublishers.com/vw/servlet/Display?action=Goto&type=repair&id=VW.B4.SU01.40.1 Downloaded from www.Manualslib.com manuals search engine
40-38 11 - Circlip Ensure seated correctly 12 - Wheel bearing Pressing out Fig. 4 Always replace, as it is destroyed during pressing out Pressing in Fig. 5 13 - Self-locking hex nut, 35 Nm (26 ft lb) 14 - Wheel bearing housing 15 - Self-locking bolt/washer, 125 Nm (92 ft lb) 16 - Drive shaft Removing and installing Page 40-43 Repairing Page 40-46 17 - Socket head multi-point bolt, 45 Nm (33 ft lb) Page 38 of 82Front Wheel Suspension, Shafts and Axle12/7/2004http://ebahn.bentleypublishers.com/vw/servlet/Display?action=Goto&type=repair&id=VW.B4.SU01.40.1 Downloaded from www.Manualslib.com manuals search engine
40-39 18 - Hex bolt Camber adjustment Page 44-1 Before loosening, mark installation position 19 - Hex bolt 20 - Bracket 21 - Stop 22 - Self-locking hex nut, 60 Nm (44 ft lb) Loosening and tightening Fig. 1 23 - Suspension strut Disassembling and assembling Page 40-23 24 - Self-locking hex nut, 95 Nm (70 ft lb) 25 - Tie rod Removing and installing Page 48-77 Page 39 of 82Front Wheel Suspension, Shafts and Axle12/7/2004http://ebahn.bentleypublishers.com/vw/servlet/Display?action=Goto&type=repair&id=VW.B4.SU01.40.1 Downloaded from www.Manualslib.com manuals search engine
40-40 Fig. 1 Suspension strut to body, loosening and tightening Fig. 2 Hub, pressing out of wheel bearing housing Page 40 of 82Front Wheel Suspension, Shafts and Axle12/7/2004http://ebahn.bentleypublishers.com/vw/servlet/Display?action=Goto&type=repair&id=VW.B4.SU01.40.1 Downloaded from www.Manualslib.com manuals search engine
40-41 Only use puller with leg clamp e.g. Kukko 204-2 (commercial type). Fig. 3 Inner race, pulling off hub Fig. 4 Wheel bearing, pressing out of wheel bearing housing Page 41 of 82Front Wheel Suspension, Shafts and Axle12/7/2004http://ebahn.bentleypublishers.com/vw/servlet/Display?action=Goto&type=repair&id=VW.B4.SU01.40.1 Downloaded from www.Manualslib.com manuals search engine
40-42 Fig. 5 Wheel bearing, pressing into wheel bearing housing Fig. 6 Hub, pressing into wheel bearing housing Page 42 of 82Front Wheel Suspension, Shafts and Axle12/7/2004http://ebahn.bentleypublishers.com/vw/servlet/Display?action=Goto&type=repair&id=VW.B4.SU01.40.1 Downloaded from www.Manualslib.com manuals search engine
40-43 Drive shaft, removing and installing (Plus running gear) Removing - Loosen 12-point nut with vehicle standing on its wheels. - Disconnect drive shaft from transmission drive flange. - Remove bolts (arrow -A-). - Loosen bolt (arrow -B-). - Separate connection between ball joint/control arm. (First mark installation position). Note: When pressing drive shaft out ensure sufficient clearance is available. - Press drive shaft out. Install tool as shown in illustration. Page 43 of 82Front Wheel Suspension, Shafts and Axle12/7/2004http://ebahn.bentleypublishers.com/vw/servlet/Display?action=Goto&type=repair&id=VW.B4.SU01.40.1 Downloaded from www.Manualslib.com manuals search engine
40-44 Installing - Remove remains of locking fluid from outer joint and hub splines. (Splines must be free of oil and grease). - Apply locking fluid D 185 400 A2 to splines as shown in illustration. Bead cross section approx. 3 mm. - Install drive shaft. - Connect ball joint to control arm. - Install drive shaft to transmission flange shaft and secure. Note: - Install 12-point nut to drive shaft and tighten. To tighten 12-point nut we recommend the angle measuring wrench VAG 1756 or equivalent. Only loosen and tighten with vehicle standing on its wheels (danger of accident). Page 44 of 82Front Wheel Suspension, Shafts and Axle12/7/2004http://ebahn.bentleypublishers.com/vw/servlet/Display?action=Goto&type=repair&id=VW.B4.SU01.40.1 Downloaded from www.Manualslib.com manuals search engine
40-45 Tightening torques: Drive shaft to flange shaft/transmission 45 Nm (33 ft lb) Drive shaft to wheel bearing 90 Nm (66 ft lb) and housing turn 45 further (1/8 turn) Ball joint/control arm 35 Nm (26 ft lb) Page 45 of 82Front Wheel Suspension, Shafts and Axle12/7/2004http://ebahn.bentleypublishers.com/vw/servlet/Display?action=Goto&type=repair&id=VW.B4.SU01.40.1 Downloaded from www.Manualslib.com manuals search engine
40-46 Drive shaft, repairing Drive shafts on vehicles with Plus suspension have shorter and finer splines on the outer joint. The wheel bearing is secured by a 12-point nut. The splines of the outer joint and the hub on Plus suspensions are secured with locking fluid D 185 400 A2. Drive shaft, removing and installing Vehicles with Base suspension Page 40-14 Vehicles with Plus suspension Page 40-43 Note: Grease quantity: - - Outer constant velocity joint 100 g of G-6.3 grease - - Inner constant velocity joint 110 g of G-6.3 grease Greasing outer joint: press half of the grease into the joint, and the other half evenly into the boot. Greasing inner joint: press half of the grease into the inner joint from both sides, the other half evenly into the boot. When replacing the boot grease joint as required. Page 46 of 82Front Wheel Suspension, Shafts and Axle12/7/2004http://ebahn.bentleypublishers.com/vw/servlet/Display?action=Goto&type=repair&id=VW.B4.SU01.40.1 Downloaded from www.Manualslib.com manuals search engine
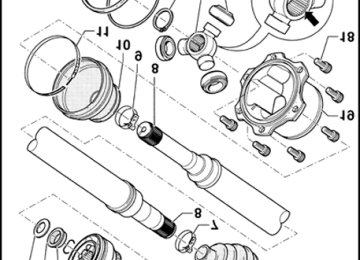
40-47 1 - Circlip Always replace Remove and install with VW161 a 2 - Gasket Always replace. Pull off protective foil and stick onto joint. (Only on 100 mm diameter constant velocity joints 3 - Inner constant velocity joint 100 mm diameter Only replace complete Pressing off Fig. 3 Pressing on Fig. 4 Greasing Notes Page 40-46 Checking Page 40-62 4 - Dished washer Inner diameter splined Installation position: outer diameter (concave side) contacts constant velocity joint Page 47 of 82Front Wheel Suspension, Shafts and Axle12/7/2004http://ebahn.bentleypublishers.com/vw/servlet/Display?action=Goto&type=repair&id=VW.B4.SU01.40.1 Downloaded from www.Manualslib.com manuals search engine
40-48 5 - Boot for 100 mm diameter constant velocity joint Rubber version With vent hole Check for tears and chafing Installation position for left drive shaft Fig. 5 Installation position for right drive shaft Fig. 6 Coat inside of cap with D3 Drive off with drift 6 - Drive shaft Left shaft, solid bar (not illustrated) Right shaft, tube 7 - Clamp Always replace Tensioning Fig. 7 and Fig. 8 Page 48 of 82Front Wheel Suspension, Shafts and Axle12/7/2004http://ebahn.bentleypublishers.com/vw/servlet/Display?action=Goto&type=repair&id=VW.B4.SU01.40.1 Downloaded from www.Manualslib.com manuals search engine
40-49 8 - Boot for 90 mm diameter constant velocity joint Polyester elastomer version Check for tears and chafing The balance pressure briefly ventilate boot before tensioning the small clamp Fig. 7 Installation position for left shaft, wheel end Fig. 10 and Fig. 11 Installation position for right shaft, wheel end Fig. 12 9 - Clamp Always replace Tensioning Fig. 7 and Fig. 8 Page 49 of 82Front Wheel Suspension, Shafts and Axle12/7/2004http://ebahn.bentleypublishers.com/vw/servlet/Display?action=Goto&type=repair&id=VW.B4.SU01.40.1 Downloaded from www.Manualslib.com manuals search engine
40-50 10 - Dished washer Outer diameter (concave side) contacts thrust washer 11 - Thrust washer 12 - Circlip Always replace Insert in shaft groove 13 - Outer constant velocity joint, 90 mm diameter Only replace complete Removing Fig. 2 Installing: drive onto shaft with plastic hammer until compressed circlip seats Greasing Notes Page 40-46 Checking Page 40-60 Page 50 of 82Front Wheel Suspension, Shafts and Axle12/7/2004http://ebahn.bentleypublishers.com/vw/servlet/Display?action=Goto&type=repair&id=VW.B4.SU01.40.1 Downloaded from www.Manualslib.com manuals search engine
40-51 14 - Outer constant velocity joint, 90 mm diameter For vehicles with 16V and VR6 Wedge splines, larger diameter Only replace complete Removing Fig. 2 Installing: drive onto shaft with plastic hammer until compressed circlip seats Greasing Notes Page 40-46 Checking Page 40-60 15 - Vibration damper Removing and installing Fig. 1 Installation position Fig. 1 Available as spare part Is only installed on the right drive shaft tube. Exception: On vehicles with 85 kW (115 hp) and manual transmission 02C only installed on left solid drive shaft Page 51 of 82Front Wheel Suspension, Shafts and Axle12/7/2004http://ebahn.bentleypublishers.com/vw/servlet/Display?action=Goto&type=repair&id=VW.B4.SU01.40.1 Downloaded from www.Manualslib.com manuals search engine
40-52 16 - Clamp Always replace 17 - Support rings On rubber type boot only On transmission end only See Parts catalog 18 - Boot for 100 mm diameter constant velocity joint Polyester elastomer version Check for tears and chafing To balance pressure briefly ventilate boot before tensioning the small clamp Fig. 7 19 - Protective cap 20 - Hex bolt, 35 Nm (26 ft lb) Page 52 of 82Front Wheel Suspension, Shafts and Axle12/7/2004http://ebahn.bentleypublishers.com/vw/servlet/Display?action=Goto&type=repair&id=VW.B4.SU01.40.1 Downloaded from www.Manualslib.com manuals search engine
40-53 The damper consists of two halves. Both halves are joined to one another by spring pins (arrow). Installation position Fig. 1 Note: Fig. 1 Vibration damper, removing and installing Only replace vibration damper with drive shaft removed Before driving in spring pin protect shaft paint finish against damage. To prevent axial movement apply adhesive tape or a suitable adhesive to internal diameter. When installing vibration damper -A- note correct installation position. Ensure dimension "a" is maintained. Dim. "a" = 521 1 mm right shaft 264 1 mm left shaft (if installed) Fig. 1 1 Vibration damper, installation position Page 53 of 82Front Wheel Suspension, Shafts and Axle12/7/2004http://ebahn.bentleypublishers.com/vw/servlet/Display?action=Goto&type=repair&id=VW.B4.SU01.40.1 Downloaded from www.Manualslib.com manuals search engine
40-54 Fig. 2 Outer constant velocity joint, removing - Drive joint off drive shaft with a firm blow from an aluminium hammer. Note: Fig. 3 Inner constant velocity joint, pressing off First drive boot off with drift Support ball hub Page 54 of 82Front Wheel Suspension, Shafts and Axle12/7/2004http://ebahn.bentleypublishers.com/vw/servlet/Display?action=Goto&type=repair&id=VW.B4.SU01.40.1 Downloaded from www.Manualslib.com manuals search engine
40-55 Note: Chamfer on inner diameter of ball hub (splines) must face the contact shoulder on the drive shaft. Fig. 4 Inner constant velocity joint, pressing on - Press on joint up to stop. - Install circlip. Dimension "a" = 17 mm Note: Before assembling boot on drive shaft mark position, dimension "a", with for example paint or adhesive tape. Under no circumstances should paint surface be damaged with a sharp tool. Fig. 5 Installation position of left drive shaft transmission end joint boot - rubber version Page 55 of 82Front Wheel Suspension, Shafts and Axle12/7/2004http://ebahn.bentleypublishers.com/vw/servlet/Display?action=Goto&type=repair&id=VW.B4.SU01.40.1 Downloaded from www.Manualslib.com manuals search engine
40-56 The large diameter of vent chamber -A- must fit on the larger diameter. Fig. 6 Installation position of right drive shaft transmission end joint boot B - Vent hole Often the boot is pushed in when installing on the joint body. This creates a vacuum inside the boot which draws a fold in (arrow) while driving. After installing, lift the boot at small diameter end to equalize pressure. Fig. 7 Joint boot, ventilating Page 56 of 82Front Wheel Suspension, Shafts and Axle12/7/2004http://ebahn.bentleypublishers.com/vw/servlet/Display?action=Goto&type=repair&id=VW.B4.SU01.40.1 Downloaded from www.Manualslib.com manuals search engine
40-57 Fig. 8 Larger clamp, tensioning - Use pliers VAG 1682 as shown in illustration. Ensure that the jaws of the pliers seat in the -arrow -B- of the clamp. - Tension clamp by turning the spindle with a torque wrench (do not tilt pliers). Note: Fig. 9 Smaller clamp, tensioning 40 The clamp can only be tensioned with pliers V.A.G 1682. Tightening torque: 25 Nm (18 ft Ib). Use torque wrench with 5 - 50 Nm range (e.g. V.A.G 1331). Make sure the spindle thread is not tight. If necessary lubricate with MOS 2 grease If the thread is tight, e.g. dirty, the required tensioning force for the hose clamp will not be achieved inspite of correct tightening torque settings. Page 57 of 82Front Wheel Suspension, Shafts and Axle12/7/2004http://ebahn.bentleypublishers.com/vw/servlet/Display?action=Goto&type=repair&id=VW.B4.SU01.40.1 Downloaded from www.Manualslib.com manuals search engine
40-58 Cuff seating tolerance "a": 1/2 to 11/2 grooves visible at end of cuff. Note: This installation position tolerance is also valid for the left drive shaft transmission end boot (polyester elastomer version). Fig. 10 Installation position of left drive shaft wheel end joint boot, shaft diameter 27 mm Cuff installation position: Cuff butts against shaft shoulder (arrow). Fig. 11 Installation position of left drive shaft, wheel end, shaft diameter 22 mm Page 58 of 82Front Wheel Suspension, Shafts and Axle12/7/2004http://ebahn.bentleypublishers.com/vw/servlet/Display?action=Goto&type=repair&id=VW.B4.SU01.40.1 Downloaded from www.Manualslib.com manuals search engine
40-59 Cuff seating tolerance "a": From cuff position to chamfer up to 1/2 a groove visible. Fig. 12 Installation position of right drive shaft, wheel end joint boot Page 59 of 82Front Wheel Suspension, Shafts and Axle12/7/2004http://ebahn.bentleypublishers.com/vw/servlet/Display?action=Goto&type=repair&id=VW.B4.SU01.40.1 Downloaded from www.Manualslib.com manuals search engine
40-60 Outer constant velocity joint, checking The joint should be disassembled to replace dirty grease or for checking the balls and ball tracks for wear and damage. Removing - Before disassembling mark position of the ball hub in relation to the ball cage and housing with an electric scriber or oil stone. - Swivel ball hub and ball cage. - Remove balls one after the other. - Turn cage until the two rectangular windows (arrow) are aligned with the joint housing. - Lift out cage together with hub. Page 60 of 82Front Wheel Suspension, Shafts and Axle12/7/2004http://ebahn.bentleypublishers.com/vw/servlet/Display?action=Goto&type=repair&id=VW.B4.SU01.40.1 Downloaded from www.Manualslib.com manuals search engine
40-61 Note: The 6 balls of each joint belong to one tolerance group. Check stub axle, hub, cage and balls for indentations (pitting) and signs of seizure. Excessive backlash in joint will be noticed as a knock during load changes. In such cases the joint must be replaced. Polished areas and ball track marks are not a reason for changing the joint. Installing - Swing segment of hub into rectangular cage window. - Tilt hub out of cage. - Press half of the total amount of grease Page 40-46 or Page 42-46 into the joint housing. - Install cage with hub in the joint housing. - Press in the balls one after the other from opposite sides whereby the original position of the hub to cage and joint housing must be restored. - Install new circlip in the hub. - Distribute the remaining grease in the boot. Page 61 of 82Front Wheel Suspension, Shafts and Axle12/7/2004http://ebahn.bentleypublishers.com/vw/servlet/Display?action=Goto&type=repair&id=VW.B4.SU01.40.1 Downloaded from www.Manualslib.com manuals search engine
40-62 Inner constant velocity joint, checking The joint should be disassembled to replace dirty grease and when checking the balls and ball tracks for wear and damage. Note: The ball hub and joint are paired and must not be interchanged. - Swivel ball hub and ball cage. - Press out ball cage in direction of arrow. - Press balls out of cage. - Tilt ball hub out of ball cage over ball track (arrows). - Check joint housing, ball hub, ball cage and balls for indentations (pitting) and signs of seizure. Page 62 of 82Front Wheel Suspension, Shafts and Axle12/7/2004http://ebahn.bentleypublishers.com/vw/servlet/Display?action=Goto&type=repair&id=VW.B4.SU01.40.1 Downloaded from www.Manualslib.com manuals search engine
40-63 Note: Excessive backlash in joint will be noticed as a knock during load changes. In such cases the joint must be replaced. Polished areas and ball track marks are not a reason for changing the joint. Installing Note: - Insert ball hub over both chamfers into the ball cage. Any installed position is acceptable. Press balls into the cage. - Insert hub with cage and balls at right angle to the joint. When inserting make sure that the wide spacing -a- on joint housing is aligned with the narrow spacing -b- on the hub after swivelling in. Chamfer on inner diameter of ball hub (splines) must face larger diameter of joint housing. Page 63 of 82Front Wheel Suspension, Shafts and Axle12/7/2004http://ebahn.bentleypublishers.com/vw/servlet/Display?action=Goto&type=repair&id=VW.B4.SU01.40.1 Downloaded from www.Manualslib.com manuals search engine
40-64 - Swivel in ball hub, whereby the hub must be swivelled out of the cage (arrows) far enough to allow the balls to fit into the ball tracks. Checking operation of constant velocity joint: The constant velocity joint is correctly assembled when the ball hub can be moved by hand backward and forward over its entire axial movement range. - Swivel in the hub with balls by applying firm pressure on the cage (arrow). Page 64 of 82Front Wheel Suspension, Shafts and Axle12/7/2004http://ebahn.bentleypublishers.com/vw/servlet/Display?action=Goto&type=repair&id=VW.B4.SU01.40.1 Downloaded from www.Manualslib.com manuals search engine
40-65 Drive shaft with tripod joint, repairing 1 - Outer constant velocity joint Replace complete Removing Fig. 1 Installing: Drive onto the shaft with plastic hammer until circlip comes out Greasing Notes Page 40-46 Checking Page 40-62 2 - Circlip Always replace Install in groove of shaft 3 - Thrust ring 4 - Dished washer Larger diameter (concave side) contacts thrust ring Page 65 of 82Front Wheel Suspension, Shafts and Axle12/7/2004http://ebahn.bentleypublishers.com/vw/servlet/Display?action=Goto&type=repair&id=VW.B4.SU01.40.1 Downloaded from www.Manualslib.com manuals search engine
40-66 5 - Clamp Always replace Tightening, Fig. 2 and Fig. 3 6 - Boot for constant velocity joint, 90 mm dia. Check for cracks and abrasion Before tightening the small clamp, ventilate boot briefly so pressure is equalized, Fig. 2 7 - Clamp Always replace Tightening, Fig. 2 and Fig. 4 8 - Drive shaft, left, with inner tripod joint Repair of inner joint and replacement of boot not possible at this time Replace if damaged Page 66 of 82Front Wheel Suspension, Shafts and Axle12/7/2004http://ebahn.bentleypublishers.com/vw/servlet/Display?action=Goto&type=repair&id=VW.B4.SU01.40.1 Downloaded from www.Manualslib.com manuals search engine
40-67 9 - Inner splined screw, 45 Nm (33 ft lb) 10 - Drive shaft, right, with inner tripod joint Repair of inner joint and replacement of boot not possible at this time Replace if damaged Page 67 of 82Front Wheel Suspension, Shafts and Axle12/7/2004http://ebahn.bentleypublishers.com/vw/servlet/Display?action=Goto&type=repair&id=VW.B4.SU01.40.1 Downloaded from www.Manualslib.com manuals search engine
40-68 Fig. 1 Constant velocity joint, outer, removing - Drive off from drive shaft with forceful blow using an alloy hammer. The boot is pressed on forcefully when installing on the joint body. This creates a vacuum in the boot that makes a dent during driving (arrow). Briefly ventilate the boot at the small diameter after installation to provide equalize pressure. Fig. 2 Boot, ventilating Page 68 of 82Front Wheel Suspension, Shafts and Axle12/7/2004http://ebahn.bentleypublishers.com/vw/servlet/Display?action=Goto&type=repair&id=VW.B4.SU01.40.1 Downloaded from www.Manualslib.com manuals search engine
40-69 Note: Fig. 3 Clamp, tightening on large diameter - Install pliers VAG 1682 as in illustration. Make sure that the blades of the pliers lie in the corners (arrow -B-) of the clamp. - Tighten clamp by turning the spindle with a torque wrench (do not tilt pliers during this process). Because of the hard material (compared to rubber) of the boot and the stainless steel hose clamp that is necessary, only tighten the clamp with pliers VAG 1682. Tightening torque: 25 Nm (18 ft lb) Use torque wrench with adjustment range: 5 - 50 Nm (e.g. VAG 1331) Make sure that threads of spindle on the pliers are easy to move. If necessary lubricate with MoS2 grease. If difficult to move, e.g. dirt in the threads, the required tightening force of the clamp is not achieved with the specified torque. Fig. 4 Clamp, tightening on small diameter Page 69 of 82Front Wheel Suspension, Shafts and Axle12/7/2004http://ebahn.bentleypublishers.com/vw/servlet/Display?action=Goto&type=repair&id=VW.B4.SU01.40.1 Downloaded from www.Manualslib.com manuals search engine
40-70 Drive axle with triple-rotor joint, removing and installing Removing right-side drive axle The right drive axle removal instructions remain unchanged from the current repair manual procedure. Removing left-side drive axle - Set up engine support bridge. Page 70 of 82Front Wheel Suspension, Shafts and Axle12/7/2004http://ebahn.bentleypublishers.com/vw/servlet/Display?action=Goto&type=repair&id=VW.B4.SU01.40.1 Downloaded from www.Manualslib.com manuals search engine
40-71 - Remove rear transmission mounting bolt (arrow). - Remove front engine mounting bolt (arrow). - Lift engine/transmission assembly - Loosen drive axle nut while vehicle is standing on its wheels. Page 71 of 82Front Wheel Suspension, Shafts and Axle12/7/2004http://ebahn.bentleypublishers.com/vw/servlet/Display?action=Goto&type=repair&id=VW.B4.SU01.40.1 Downloaded from www.Manualslib.com manuals search engine
40-72 - Disconnect drive axle from transmission drive flange. - Mark installation position of bolts (arrows) and remove. Installing - Swing wheel outward (if necessary, place block of wood or equivalent between strut and wheel housing as shown). - Push engine/transmission assembly toward front and remove drive axle. - Install in reverse order of removal. Page 72 of 82Front Wheel Suspension, Shafts and Axle12/7/2004http://ebahn.bentleypublishers.com/vw/servlet/Display?action=Goto&type=repair&id=VW.B4.SU01.40.1 Downloaded from www.Manualslib.com manuals search engine
40-73 Drive axle with triple-rotor joint, servicing 1 - Outer constant velocity (CV) joint Replace complete part only Removing Fig. 1 Installing: drive onto shaft with plastic hammer until circlip seats (springs into groove) Greasing page 40-12 2 - Circlip Always replace Insert in groove in shaft 3 - Thrust ring 4 - Belleville spring Larger diameter (concave side) contacts with thrust ring 5 - Clamp Always replace Tightening page 40-7 6 - Boot Check for tears and chafing 7 - Clamp 8 - Axle shaft Page 73 of 82Front Wheel Suspension, Shafts and Axle12/7/2004http://ebahn.bentleypublishers.com/vw/servlet/Display?action=Goto&type=repair&id=VW.B4.SU01.40.1 Downloaded from www.Manualslib.com manuals search engine
40-74 9 - Clamp For triple-rotor joint 10 - Boot 11 - Clamp For triple-rotor joint 12 - Cover Destroyed when disassembling No longer required for assembly; not available as replacement part 13 - Rectangular sealing ring Included in repair kit; not used in production 14 - O-ring Not required for assembly 15 - Circlip 16 - Roller 17 - Triple-rotor star Chamfer -arrow- goes onto axle shaft splines first 18 - Multi-point socket-head bolt M10 x 20 80 Nm (59 ft lb) 19 - Housing Page 74 of 82Front Wheel Suspension, Shafts and Axle12/7/2004http://ebahn.bentleypublishers.com/vw/servlet/Display?action=Goto&type=repair&id=VW.B4.SU01.40.1 Downloaded from www.Manualslib.com manuals search engine
40-75 Fig. 1 Removing outer CV joint - Drive joint off axle shaft with firm blow from soft mallet. Page 75 of 82Front Wheel Suspension, Shafts and Axle12/7/2004http://ebahn.bentleypublishers.com/vw/servlet/Display?action=Goto&type=repair&id=VW.B4.SU01.40.1 Downloaded from www.Manualslib.com manuals search engine
40-76 Make sure plier jaws seat in grooves of clamp (arrows -B-) Note: Fig. 2 Tightening outer CV joint boot clamp - Position VAG 1682 pliers or equivalent (e.g. Snap-On YA 3080) as shown in illustration. - Tension clamp by using torque wrench to turn spindle (keep pliers at right angle to shaft). Tightening torque: 20 Nm (15 ft lb) Due to the hardness of the boot material (compared to rubber), it is necessary to use a stainless steel clamp. The clamp can only be properly tightened using VAG 1682 pliers. Use a torque wrench with 5-50Nm (4-37 ft lb) range (e.g. VAG 1331 or equivalent). Make sure that the spindle threads of the pliers are not tight. If necessary coat the threads with MoS2 grease to ensure smooth operation. If the spindle threads are tight (e.g. dirty) the force necessary for correctly tightening the clamp will not be achieved, despite correct torque readings. Fig. 3 Tightening small end clamp Page 76 of 82Front Wheel Suspension, Shafts and Axle12/7/2004http://ebahn.bentleypublishers.com/vw/servlet/Display?action=Goto&type=repair&id=VW.B4.SU01.40.1 Downloaded from www.Manualslib.com manuals search engine
40-77 Triple-rotor joint, disassembling - Open hose clamp - Open clamp on shaft small end and push back boot. Note: - Drive screwdriver or similar tool into cover and pry open. If the cover will not pry open, insert screwdriver and pry from the opposite side. The cover is destroyed in the removal process. It does not need to be replaced. Page 77 of 82Front Wheel Suspension, Shafts and Axle12/7/2004http://ebahn.bentleypublishers.com/vw/servlet/Display?action=Goto&type=repair&id=VW.B4.SU01.40.1 Downloaded from www.Manualslib.com manuals search engine
40-78 1 - Triple-rotor joint housing 2 - Triple-rotor star 3 - Axle shaft Note: CAUTION! Do not let the rollers slide off the triple-rotor star and fall to the floor. - Remove O-ring -arrow- from groove. - Mark installation positions of parts -1-, -2- and -3-. Noises while driving may result if the indicated parts are not reassembled to their prior positions. Use a waterproof felt-tipped pen for marking parts. - Remove rubber gasket (arrow) from groove. - With triple-rotor joint housing clamped in vise, pull axle shaft together with triple-rotor star upward out of housing. - Hold axle shaft in straight alignment to triple-rotor joint and slowly push back triple-rotor joint housing with other hand. - Mark installation position of rollers -1- on triple-rotor star -2- using felt-tipped marker. Page 78 of 82Front Wheel Suspension, Shafts and Axle12/7/2004http://ebahn.bentleypublishers.com/vw/servlet/Display?action=Goto&type=repair&id=VW.B4.SU01.40.1 Downloaded from www.Manualslib.com manuals search engine
40-79 - Remove rollers and place on clean surface. -1- Pliers Commercially available - Remove circlip. - Press triple-rotor star off axle shaft. - Pull triple-rotor joint housing off axle shaft. - Clean shaft and triple-rotor joint housing. Page 79 of 82Front Wheel Suspension, Shafts and Axle12/7/2004http://ebahn.bentleypublishers.com/vw/servlet/Display?action=Goto&type=repair&id=VW.B4.SU01.40.1 Downloaded from www.Manualslib.com manuals search engine
40-80 Triple-rotor joint, assembling - Slide small diameter boot clamp onto shaft. - Slide triple-rotor joint boot onto shaft. - Slide triple-rotor joint housing onto shaft. Mounting triple-rotor star Note: The side of the star with a chamfer (arrow) goes onto the axle shaft splines first. - Place triple-rotor star on axle shaft according to previously marked position. - Install circlip and make sure that it is correctly seated. - Install rollers according to previously marked positions. - Push triple-rotor joint housing over rollers and secure (clamp housing in vise). Page 80 of 82Front Wheel Suspension, Shafts and Axle12/7/2004http://ebahn.bentleypublishers.com/vw/servlet/Display?action=Goto&type=repair&id=VW.B4.SU01.40.1 Downloaded from www.Manualslib.com manuals search engine
40-81 Note: A seal is formed directly between the triple-rotor joint and the drive flange by the rectanular sealing ring. The cover is no longer required. - Install rectangular sealing ring (arrow) from repair kit. 90 grams into joint and 90 grams behind joint - Press 180 grams of axle shaft grease from repair kit into triple-rotor joint . - Install triple-rotor joint boot. - Install boot clamp. Page 81 of 82Front Wheel Suspension, Shafts and Axle12/7/2004http://ebahn.bentleypublishers.com/vw/servlet/Display?action=Goto&type=repair&id=VW.B4.SU01.40.1 Downloaded from www.Manualslib.com manuals search engine
40-82 - Tighten small diameter clamp with VAG 1275 pliers or equivalent (e.g. KD 474). CAUTION! Secure the triple-rotor joint with tape so that the housing is not inadvertently pushed back when installing the axle shaft. Remove tape just prior to bolting to drive flange. Page 82 of 82Front Wheel Suspension, Shafts and Axle12/7/2004http://ebahn.bentleypublishers.com/vw/servlet/Display?action=Goto&type=repair&id=VW.B4.SU01.40.1 Downloaded from www.Manualslib.com manuals search engine
42-1 Rear Wheel Suspension, Shafts and Axle Rear axle, servicing (vehicles with front wheel drive) Note: The rear axle and wheel bearings are identical on Base and Plus suspension versions. Welding and straightening of the axle beam is not permissible. 1 - Wheel bolt 110 Nm (81 ft lb) 2 - Self-locking hex nut, 70 Nm (52 ft lb) When tightening the nut the axle beam must be in the horizontal position (unladened vehicle state) 3 - Hex bolt, 25 Nm (18 ft lb) 4 - Suspension strut Removing and installing Fig. 1 to Fig. 3 Disassembling and assembling Page 42-9 Page 1 of 14Rear Wheel Suspension, Shafts and Axle12/7/2004http://ebahn.bentleypublishers.com/vw/servlet/Display?action=Goto&type=repair&id=VW.B4.SU01.42.1 Downloaded from www.Manualslib.com manuals search engine
42-2 5 - Wheel bearing Servicing Vehicles with drum brakes Page 42-15 Vehicles with disc brakes Page 42-24 6 - 80 Nm (59 ft lb) Use only self-locking nuts with captive washers When tightening nut, the axle beam must be in the horizontal position (unladened vehicle state) 7 - Hex bolt Installed from center of vehicle 8 - Shouldered bolt, 70 Nm (52 ft lb) If threads are damaged, rework captive nut in side member Page 42-7 Page 2 of 14Rear Wheel Suspension, Shafts and Axle12/7/2004http://ebahn.bentleypublishers.com/vw/servlet/Display?action=Goto&type=repair&id=VW.B4.SU01.42.1 Downloaded from www.Manualslib.com manuals search engine
42-3 9 - Mounting bracket with retainer for brake pressure regulator Installation position Fig. 4 Check and if necessary adjust rear axle total toe after installation If possible do not loosen when removing the rear axle 10 - Hex nut/washer, 35 Nm (26 ft lb) 11 - Regulator spring bracket 12 - Bonded rubber mounting Note installation position Fig. 7 Pressing out Fig. 5 and Fig. 6 Pressing in Fig. 8 Only replace as pair 13 - Axle beam Stub axle contact surfaces and threaded holes are to be free of paint and dirt 14 - Parking brake cable bracket Page 3 of 14Rear Wheel Suspension, Shafts and Axle12/7/2004http://ebahn.bentleypublishers.com/vw/servlet/Display?action=Goto&type=repair&id=VW.B4.SU01.42.1 Downloaded from www.Manualslib.com manuals search engine
42-4 Repair Manual, Body Exterior, Interior, Repair Group 70. Repair Manual, Body Exterior, Interior, Repair Group 68. Inertia reel bolt (arrow) tightening torque: 40 Nm (30 ft lb) Fig. 1 Suspension strut at body, removing and installing - Removing and installing inertia reel cover - Removing and installing inertia reel Remove and install both securing bolts (arrows) from interior of vehicle (viewed through rear left side window). Tightening torque: 25 Nm (18 ft lb) Fig. 2 Suspension strut at body, removing and installing Page 4 of 14Rear Wheel Suspension, Shafts and Axle12/7/2004http://ebahn.bentleypublishers.com/vw/servlet/Display?action=Goto&type=repair&id=VW.B4.SU01.42.1 Downloaded from www.Manualslib.com manuals search engine
42-5 Suspension strut is attached to the body by 4 retaining lugs in addition to the bolts. To remove, turn suspension strut until retaining lugs are positioned above the cut-outs. Fig. 3 Suspension strut, removing and installing Angle of inclination to axle beam 13 30' 1. Fig. 4 Bolting mounting bracket to axle beam Page 5 of 14Rear Wheel Suspension, Shafts and Axle12/7/2004http://ebahn.bentleypublishers.com/vw/servlet/Display?action=Goto&type=repair&id=VW.B4.SU01.42.1 Downloaded from www.Manualslib.com manuals search engine
42-6 Note: Before using special tool 3111 it is important to grease spindle with Molybdenum grease. Fig. 5 Bonded rubber mounting, pressing 1st half out of axle beam Thread base plate into the pressure plate 3111/5 from the opposite side. Note: Mounting must not be driven out. Otherwise the mounting seat will be widened and a tight seating of the new mounting cannot be assured. Fig. 6 Bonded rubber mounting, pressing 2nd half out of axle beam Page 6 of 14Rear Wheel Suspension, Shafts and Axle12/7/2004http://ebahn.bentleypublishers.com/vw/servlet/Display?action=Goto&type=repair&id=VW.B4.SU01.42.1 Downloaded from www.Manualslib.com manuals search engine
42-7 Protruding segment of bonded rubber mounting faces forward on inside and rearward on outside. Fig. 7 Rubber bonded mounting, installation position Press both halves in one after the other until the mounting conical section contacts the axle beam. Fig. 8 Rubber bonded mounting, presssing into axle beam Page 7 of 14Rear Wheel Suspension, Shafts and Axle12/7/2004http://ebahn.bentleypublishers.com/vw/servlet/Display?action=Goto&type=repair&id=VW.B4.SU01.42.1 Downloaded from www.Manualslib.com manuals search engine
42-8 Reworking cap nut in side member (front wheel drive vehicles) If the threads of the cap nut in the side member are damaged, it must either be retapped or the cap nut must be drilled out. When drilling out proceed as follows: - Remove rear axle. - Drill through damaged cap nut in the side member using a 10.2 mm diameter drill from underneath. Note: Do not tilt the drill when drilling. WARNING! Wear protective goggles. - Cut new thread in the cap nut, M 12 x 1.5. - Use new bolts, Part No. N 010.127.4 (M 12 x 1.5 x 30), and washer, Part No. N 011.531.7, to secure the rear axle. Tightening torque: 70 Nm (52 ft lb) Note: The procedure described here must only be performed on one cap nut on each side of the vehicle. Page 8 of 14Rear Wheel Suspension, Shafts and Axle12/7/2004http://ebahn.bentleypublishers.com/vw/servlet/Display?action=Goto&type=repair&id=VW.B4.SU01.42.1 Downloaded from www.Manualslib.com manuals search engine
42-9 Suspension strut, disassembling and assembling (front wheel drive vehicles) 1 - Cap Pry out with screwdriver Pressing on Fig. 4 2 - O-ring 3 - Self-locking hex nut, 25 Nm (18 ft lb) 4 - Dished washer 5 - Upper rubber mounting 6 - Gasket (foam) Always replace Page 9 of 14Rear Wheel Suspension, Shafts and Axle12/7/2004http://ebahn.bentleypublishers.com/vw/servlet/Display?action=Goto&type=repair&id=VW.B4.SU01.42.1 Downloaded from www.Manualslib.com manuals search engine
42-10 7 - Suspension strut bearing Always replace foam gasket Welded nuts must be located in the spring seat recesses Align welded nuts and cap to shock absorber lower bushing Fig. 3 8 - Spacer tube 9 - Lower rubber mounting 10 - Metal cap Higher on Wagon than Sedan 11 - Washer 12 - Spring seat Thinner on Wagon than Sedan Installation position Fig. 2 Page 10 of 14Rear Wheel Suspension, Shafts and Axle12/7/2004http://ebahn.bentleypublishers.com/vw/servlet/Display?action=Goto&type=repair&id=VW.B4.SU01.42.1 Downloaded from www.Manualslib.com manuals search engine
42-11 13 - Stop buffer Shorter on Wagon than Sedan 14 - Protective tube Longer on Wagon than Sedan 15 - Plastic cap 16 - Coil spring Removing and installing Fig. 1 Allocation Parts catalog Wagon has protective hose at top 17 - Packing 18 - Circlip 19 - Lower spring plate Page 11 of 14Rear Wheel Suspension, Shafts and Axle12/7/2004http://ebahn.bentleypublishers.com/vw/servlet/Display?action=Goto&type=repair&id=VW.B4.SU01.42.1 Downloaded from www.Manualslib.com manuals search engine
42-12 20 - Shock absorber Can be replaced individually Removing and installing Page 42-4 Application see Parts catalog Page 12 of 14Rear Wheel Suspension, Shafts and Axle12/7/2004http://ebahn.bentleypublishers.com/vw/servlet/Display?action=Goto&type=repair&id=VW.B4.SU01.42.1 Downloaded from www.Manualslib.com manuals search engine
42-13 Note: Instead of VAG 1403, VAG 1752/1 may be used. Fig. 1 Spring, removing and installing Fig. 2 Spring seat, installation position Page 13 of 14Rear Wheel Suspension, Shafts and Axle12/7/2004http://ebahn.bentleypublishers.com/vw/servlet/Display?action=Goto&type=repair&id=VW.B4.SU01.42.1 Downloaded from www.Manualslib.com manuals search engine
42-14 Fig. 3 Suspension strut mounting to shock absorber bushing, aligning A - Shock absorber bushing axis B - Suspension strut mounting axis "a" 50 C - Cap axis 90 offset to shock absorber bushing axis -A-. Fig. 4 Cap in suspension strut mounting, pressing in. Page 14 of 14Rear Wheel Suspension, Shafts and Axle12/7/2004http://ebahn.bentleypublishers.com/vw/servlet/Display?action=Goto&type=repair&id=VW.B4.SU01.42.1 Downloaded from www.Manualslib.com manuals search engine
42-15 Wheel bearings, servicing Drum brakes (front wheel drive vehicles), wheel bearings, servicing Note: Careful sealing, absolute cleanliness and precise adjustment are requirements for long wheel bearing service life. Therefore note the following points: Install oil seal and grease cap as shown. Only reinstall clean bearings, do not wash bearings. Adjust wheel bearing play carefully. 1 - Grease cap Pressing off Fig. 1 and Fig. 2 Driving in Fig. 3 Page 1 of 18Wheel bearings, servicing12/7/2004http://ebahn.bentleypublishers.com/vw/servlet/Display?action=Goto&type=repair&id=VW.B4.SU01.42.2 Downloaded from www.Manualslib.com manuals search engine
42-16 2 - Cotter pin Always replace 3 - Locking ring 4 - Hex nut Adjusting wheel bearing play Fig. 4 5 - Thrust washer 6 - Outer wheel bearing Drive out outer race with copper drift Pressing in Fig. 6 7 - Hex socket head bolt, 10 Nm (7 ft lb) 8 - Speed sensor Only on vehicles with ABS 9 - Stub axle Straightening operations are not permitted! Page 2 of 18Wheel bearings, servicing12/7/2004http://ebahn.bentleypublishers.com/vw/servlet/Display?action=Goto&type=repair&id=VW.B4.SU01.42.2 Downloaded from www.Manualslib.com manuals search engine
42-17 10 - Brake backing plate Bolt together with stub axle onto rear axle 11 - Oil seal Fill between sealing lips with multi-purpose grease. Driving in Fig. 8 12 - Dished washer Larger contact surface (concave side) to brake backing plate 13 - Hex bolt, 60 Nm (44 ft lb) 14 - Inner wheel bearing Drive out outer race with copper drift Pressing in Fig. 7 15 - Speed sensor rotor Pressing on Fig. 9 Page 3 of 18Wheel bearings, servicing12/7/2004http://ebahn.bentleypublishers.com/vw/servlet/Display?action=Goto&type=repair&id=VW.B4.SU01.42.2 Downloaded from www.Manualslib.com manuals search engine
42-18 16 - Brake drum Before removing release brake shoe adjustment through wheel bolt hole Fig. 5 When removing the brake drum make sure that the outer wheel bearing does not fall out. Fill hub with multi-purpose grease before installing Page 4 of 18Wheel bearings, servicing12/7/2004http://ebahn.bentleypublishers.com/vw/servlet/Display?action=Goto&type=repair&id=VW.B4.SU01.42.2 Downloaded from www.Manualslib.com manuals search engine
42-19 Loosen grease cap from seat by tapping lightly on the claw. Fig. 1 Grease cap, pressing off Fig. 2 Grease cap, pressing off Page 5 of 18Wheel bearings, servicing12/7/2004http://ebahn.bentleypublishers.com/vw/servlet/Display?action=Goto&type=repair&id=VW.B4.SU01.42.2 Downloaded from www.Manualslib.com manuals search engine
42-20 Note: Fig. 3 Grease cap, driving on Always replace damaged (dented) grease caps. Damaged (dented) grease caps allow ingress of moisture, therefore always use the illustrated tool. Note: Using a screwdriver it must be possible to move the thrust washer by finger pressure (without prying). Fig. 4 Wheel bearing play, adjusting - Secure with locking ring and new cotter pin. Page 6 of 18Wheel bearings, servicing12/7/2004http://ebahn.bentleypublishers.com/vw/servlet/Display?action=Goto&type=repair&id=VW.B4.SU01.42.2 Downloaded from www.Manualslib.com manuals search engine
42-21 Fig. 5 Brake shoe adjustment, releasing - Insert a screwdriver through a hole in the brake drum and push the wedge upward. Fig. 6 Outer wheel bearing outer race, pressing in Page 7 of 18Wheel bearings, servicing12/7/2004http://ebahn.bentleypublishers.com/vw/servlet/Display?action=Goto&type=repair&id=VW.B4.SU01.42.2 Downloaded from www.Manualslib.com manuals search engine
42-22 Fig. 7 Inner wheel bearing outer race, pressing in Fig. 8 Oil seal, driving in Page 8 of 18Wheel bearings, servicing12/7/2004http://ebahn.bentleypublishers.com/vw/servlet/Display?action=Goto&type=repair&id=VW.B4.SU01.42.2 Downloaded from www.Manualslib.com manuals search engine
42-23 Fig. 9 Rotor, pressing in Page 9 of 18Wheel bearings, servicing12/7/2004http://ebahn.bentleypublishers.com/vw/servlet/Display?action=Goto&type=repair&id=VW.B4.SU01.42.2 Downloaded from www.Manualslib.com manuals search engine
42-24 Wheel bearings, servicing - disc brakes (front wheel drive vehicles) Note: Careful sealing, absolute cleanliness and precise adjustment are requirements for long wheel bearing service life. Therefore note the following points: Install oil seal and grease cap as shown. Only reinstall clean bearings. Adjust wheel bearing play carefully. 1 - Stub axle 2 - Hex socket head bolt, 10 Nm (7 ft lb) Page 10 of 18Wheel bearings, servicing12/7/2004http://ebahn.bentleypublishers.com/vw/servlet/Display?action=Goto&type=repair&id=VW.B4.SU01.42.2 Downloaded from www.Manualslib.com manuals search engine
42-25 3 - Speed sensor Only on vehicles with ABS Before installing sensor, clean mounting hole inner surface and coat with lubricating paste G 000 650 4 - Brake hose bracket 5 - Hex socket head bolt, 65 Nm (48 ft lb) 6 - Self-locking hex bolt, 35 Nm (26 ft lb) Always replace 7 - Guide pins 8 - Protective cap 9 - Pad retaining spring Replace when changing pads Page 11 of 18Wheel bearings, servicing12/7/2004http://ebahn.bentleypublishers.com/vw/servlet/Display?action=Goto&type=repair&id=VW.B4.SU01.42.2 Downloaded from www.Manualslib.com manuals search engine
42-26 10 - Cover ring Always replace Installation position Fig. 5 Drive on with tube VW 519 11 - Pad carrier 12 - Brake pads Removing and installing Page 46-33 13 - Brake caliper Servicing Page 47-15 14 - Outer wheel bearing Drive out outer race with copper drift Pressing in Fig. 6 15 - Hex nut Adjusting wheel bearing play Fig. 4 16 - Cotter pin Always replace Page 12 of 18Wheel bearings, servicing12/7/2004http://ebahn.bentleypublishers.com/vw/servlet/Display?action=Goto&type=repair&id=VW.B4.SU01.42.2 Downloaded from www.Manualslib.com manuals search engine
42-27 17 - Grease cap Pressing off Fig. 1 and Fig. 2 Driving on Fig. 3 18 - Locking ring 19 - Thrust washer 20 - Wheel bolt, 110 Nm (81 ft lb) 21 - Brake disc Before installing fill hub with multi-purpose grease 22 - Inner wheel bearing Drive out outer race with copper drift Pressing in Fig. 7 23 - Oil seal Fill between sealing lips with multi-purpose grease Driving in Fig. 8 24 - Speed sensor rotor Only on vehicles with ABS 25 - Hex bolt, 60 Nm (44 ft lb) Page 13 of 18Wheel bearings, servicing12/7/2004http://ebahn.bentleypublishers.com/vw/servlet/Display?action=Goto&type=repair&id=VW.B4.SU01.42.2 Downloaded from www.Manualslib.com manuals search engine
42-28 26 - Dished washer Large contact surface (concave side) to backing plate 27 - Backing plate 28 - Axle beam Straightening work is not permissible! Only use stub axles with 6 mounting holes. 29 - Parking brake cable Adjusting parking brake Page 46-36 30 - Spring clip Page 14 of 18Wheel bearings, servicing12/7/2004http://ebahn.bentleypublishers.com/vw/servlet/Display?action=Goto&type=repair&id=VW.B4.SU01.42.2 Downloaded from www.Manualslib.com manuals search engine
42-29 Fig. 1 Grease cap, pressing off - Loosen grease cap by tapping lightly on the claw. Fig. 2 Grease cap, pressing off Page 15 of 18Wheel bearings, servicing12/7/2004http://ebahn.bentleypublishers.com/vw/servlet/Display?action=Goto&type=repair&id=VW.B4.SU01.42.2 Downloaded from www.Manualslib.com manuals search engine
42-30 Note: Fig. 3 Grease cap, driving on Always replace damaged (dented) grease caps. Damaged (dented) grease caps allow ingress of moisture, therefore always use the illustrated tool. Note: Using a screwdriver it must be possible to move the thrust washer by finger pressure (without prying). Fig. 4 Wheel bearing play, adjusting - Secure with locking ring and new cotter pin. Page 16 of 18Wheel bearings, servicing12/7/2004http://ebahn.bentleypublishers.com/vw/servlet/Display?action=Goto&type=repair&id=VW.B4.SU01.42.2 Downloaded from www.Manualslib.com manuals search engine
42-31 Dimension "a" = 9.5 mm Fig. 5 Cover ring, installation position - Drive on cover ring with tube VW 519 Fig. 6 Outer wheel bearing outer race, pressing in Page 17 of 18Wheel bearings, servicing12/7/2004http://ebahn.bentleypublishers.com/vw/servlet/Display?action=Goto&type=repair&id=VW.B4.SU01.42.2 Downloaded from www.Manualslib.com manuals search engine
42-32 Fig. 7 Inner wheel bearing outer race, pressing in Fig. 8 Oil seal, driving in Page 18 of 18Wheel bearings, servicing12/7/2004http://ebahn.bentleypublishers.com/vw/servlet/Display?action=Goto&type=repair&id=VW.B4.SU01.42.2 Downloaded from www.Manualslib.com manuals search engine
42-33 Rear axle, servicing (four wheel drive vehicles) Note: When removing and installing the rear axle, it is recommended to remove axle and differential together and to separate away from the vehicle. If only the axle beam is to be removed and installed, the wishbones can remain attached to the shock absorber. In both cases, disconnect vacuum lines and wiring before lowering the assembly. Always replace self-locking nuts and bolts. Always replace corroded nuts and bolts. The ABS speed sensor wiring connections are located under the rear seat. Page 1 of 13Rear axle, servicing (four wheel drive vehicles)12/7/2004http://ebahn.bentleypublishers.com/vw/servlet/Display?action=Goto&type=repair&id=VW.B4.SU01.42.3 Downloaded from www.Manualslib.com manuals search engine
42-34 1 - Suspension strut Removing and installing Page 42-4 , Fig. 1 and Page 42-37 Disassembling and assembling Page 42-53 Application see Parts catalog 2 - Drive shaft Removing and installing Fig. 2 and Fig. 3 Servicing Page 42-46 3 - Final drive Removing and installing from axle beam Fig. 9 4 - Final drive mounting bracket and carrier Removing and installing Fig. 12 Replacing rubber bonded mounting Fig. 13 Page 2 of 13Rear axle, servicing (four wheel drive vehicles)12/7/2004http://ebahn.bentleypublishers.com/vw/servlet/Display?action=Goto&type=repair&id=VW.B4.SU01.42.3 Downloaded from www.Manualslib.com manuals search engine
42-35 5 - Propshaft Removing and installing Fig. 2 Mark installation position before removing 6 - Anti-roll bar Removing and installing Fig. 4 7 - Axle beam Replacing rubber bonded mounting Fig. 10 and Fig. 11 8 - Rear axle mounting bracket Removing and installing at body Fig. 14 9 - Control arm Removing and installing Fig. 5 Replacing rubber bonded mounting Fig. 6 and Fig. 7 Rubber bonded mounting with eccentric bushing Fig. 8 Page 3 of 13Rear axle, servicing (four wheel drive vehicles)12/7/2004http://ebahn.bentleypublishers.com/vw/servlet/Display?action=Goto&type=repair&id=VW.B4.SU01.42.3 Downloaded from www.Manualslib.com manuals search engine
42-36 Repair Manual, Suspension, Wheels,Brakes, Steering, Repair Group 46 and47 10 - Wheel bearing Servicing Page 42-59 Servicing brakes 11 - Hex bolt, 85 Nm (63 ft lb) 12 - Hex bolt for seat belt strut, 25 Nm (18 ft lb) Page 4 of 13Rear axle, servicing (four wheel drive vehicles)12/7/2004http://ebahn.bentleypublishers.com/vw/servlet/Display?action=Goto&type=repair&id=VW.B4.SU01.42.3 Downloaded from www.Manualslib.com manuals search engine
42-37 Before installing, bring control arm into horizontal position (unladen state). Removing and installing suspension strut at body Page 42-4 . Tightening torque -A-: 65 Nm (48 ft lb) Note: Support control arm otherwise damage may occur to constant velocity joint as a result of over-stressing. Fig. 1 Suspension strut from control arm, removing and installing Before removing propshaft, mark installation position. If installed offset, imbalance will be excessive. Tightening torque -A- and -B-: 45 Nm (33 ft lb) Note: Always support propshaft with wire otherwise constant universal joint will be damaged. Fig. 2 Driveshaft and drive axle, removing and installing at differential Page 5 of 13Rear axle, servicing (four wheel drive vehicles)12/7/2004http://ebahn.bentleypublishers.com/vw/servlet/Display?action=Goto&type=repair&id=VW.B4.SU01.42.3 Downloaded from www.Manualslib.com manuals search engine
42-38 Loosen and tighten only when vehicle is standing on its wheels (danger of accident). Tightening torque: 90 Nm (66 ft lb) and turn 45 further (1/8 turn) Note: Any paint residue and/or corrosion on the thread of the outer joint must be removed before the nut is installed. Fig. 3 Drive shaft, removing and installing Tightening torque -A- and -B-: 25 Nm (18 ft lb) Fig. 4 Stabilizer bar, removing and installing Page 6 of 13Rear axle, servicing (four wheel drive vehicles)12/7/2004http://ebahn.bentleypublishers.com/vw/servlet/Display?action=Goto&type=repair&id=VW.B4.SU01.42.3 Downloaded from www.Manualslib.com manuals search engine
42-39 Before tightening bring control arm into horizontal position (unladen state). To remove the right-hand control arm inner bolt, remove brake pressure regulator from axle beam. Tightening torque -A-: 120 Nm (89 ft lb) Fig. 5 Control arm, removing and installing Fig. 6 Rubber bonded mounting, removing A - 17 mm socket B - Separating device 12 - 75 mm, e.g. Kukko 17/1 Page 7 of 13Rear axle, servicing (four wheel drive vehicles)12/7/2004http://ebahn.bentleypublishers.com/vw/servlet/Display?action=Goto&type=repair&id=VW.B4.SU01.42.3 Downloaded from www.Manualslib.com manuals search engine
42-40 Before installing coat with acid free lubricant, e.g. soft soap. Installation position: Shoulder on outer mounting to outside, to inside on inner mounting (to center of vehicle). Note: Deviations from the rear axle toe and camber specifications can be corrected by using a bonded rubber mounting with eccentric bushing Fig. 8 Fig. 7 Bonded rubber mounting, installing Page 8 of 13Rear axle, servicing (four wheel drive vehicles)12/7/2004http://ebahn.bentleypublishers.com/vw/servlet/Display?action=Goto&type=repair&id=VW.B4.SU01.42.3 Downloaded from www.Manualslib.com manuals search engine
42-41 The rubber mounting -A- is equipped with an eccentric bushing which can change the position of the control arm. This rubber mounting may only be installed in the control arm inner mounting. The camber and/or toe can be changed according to installation position. Note: With this mounting the camber or toe can be altered up to 18'. Fig. 8 Rubber mounting to correct camber/toe Installation position Alteration Eccentric upward Camber alteration negative Eccentric downward Camber alteration pos. Eccentric forward Toe alteration positive Eccentric rearward Toe alteration negative Page 9 of 13Rear axle, servicing (four wheel drive vehicles)12/7/2004http://ebahn.bentleypublishers.com/vw/servlet/Display?action=Goto&type=repair&id=VW.B4.SU01.42.3 Downloaded from www.Manualslib.com manuals search engine
42-42 Removing and installing viscous coupling Repair Manual, 5 Spd. Manual Transmission 02A; Repair Group 39 Tightening torque -A-: 45 Nm (33 ft lb) Fig. 9 Final drive, removing and installing from axle beam Page 10 of 13Rear axle, servicing (four wheel drive vehicles)12/7/2004http://ebahn.bentleypublishers.com/vw/servlet/Display?action=Goto&type=repair&id=VW.B4.SU01.42.3 Downloaded from www.Manualslib.com manuals search engine
42-43 Connect segment corners of bonded rubber mounting metal core with a line. The continued line must pass through the center of hole (arrow). Note: The kidney-shaped recess must be pointing in direction of travel when viewed from the center of vehicle. Fig. 10 Installation position, determining Place one half of the rubber bonded mounting in correct position and pull in with tool 3128 and 3128/1. Then place 2nd half in position and pull in. Fig. 11 Rubber bonded mounting, installing Page 11 of 13Rear axle, servicing (four wheel drive vehicles)12/7/2004http://ebahn.bentleypublishers.com/vw/servlet/Display?action=Goto&type=repair&id=VW.B4.SU01.42.3 Downloaded from www.Manualslib.com manuals search engine
42-44 Remove and install complete When assembling mounting bracket and final drive carrier away from the vehicle, make sure parts are correctly located relative to each other. It is essential that the bonded rubber mounting is installed stress free in the vehicle. Fig. 12 Mounting bracket and final drive carrier, removing and installing Tightening torque -A- 45 Nm (33 ft lb) -B- 65 Nm (48 ft lb) -C- 85 Nm (63 ft lb) -D- 85 Nm (63 ft lb) No specific installation position Insertion depth: flush with lower edge (arrow) Fig. 13 Final drive bonded rubber bushing, pressing in and out Page 12 of 13Rear axle, servicing (four wheel drive vehicles)12/7/2004http://ebahn.bentleypublishers.com/vw/servlet/Display?action=Goto&type=repair&id=VW.B4.SU01.42.3 Downloaded from www.Manualslib.com manuals search engine
42-45 Mark mounting bracket installation position relative to body longitudinal member, otherwise the rear axle must be realigned on an axle alignment stand after reinstalling. Fig. 14 Mounting bracket on body, removing and installing Tightening torque -A- 130 Nm (96 ft lb) -B- 60 Nm (44 ft lb) -C- 85 Nm (63 ft lb) Page 13 of 13Rear axle, servicing (four wheel drive vehicles)12/7/2004http://ebahn.bentleypublishers.com/vw/servlet/Display?action=Goto&type=repair&id=VW.B4.SU01.42.3 Downloaded from www.Manualslib.com manuals search engine
42-46 Rear drive shafts, servicing Removing and installing drive shafts Page 42-37 Note: Grease quantity: - - outer constant velocity joint 80 g G-6.3 - - inner constant velocity joint 80 9 G-6.3 Greasing outer joint: press half of the grease into the joint, and the other half evenly into the boot. Greasing inner joint: press half of the grease into the inner joint from both sides, the other half evenly into the boot. When replacing the boot, regrease joint if required. Page 1 of 7Rear drive shafts, servicing12/7/2004http://ebahn.bentleypublishers.com/vw/servlet/Display?action=Goto&type=repair&id=VW.B4.SU01.42.4 Downloaded from www.Manualslib.com manuals search engine
42-47 1 - Circlip Always replace Remove and install with VW161 a 2 - Inner constant velocity joint, 81 mm diameter Only replace complete Pressing off Page 40-54 Pressing on Page 40-55 Greasing Notes Page 42-46 Checking Page 40-62 3 - Dished washer Inner diameter splined Installation position: outer diameter (concave side) contacts constant velocity joint Page 2 of 7Rear drive shafts, servicing12/7/2004http://ebahn.bentleypublishers.com/vw/servlet/Display?action=Goto&type=repair&id=VW.B4.SU01.42.4 Downloaded from www.Manualslib.com manuals search engine
42-48 4 - Boot for 94 mm diameter constant velocity joint Rubber version Check for tears and chafing Installation position: At cuff 1 to 1-1/2 grooves visible Coat inside of cap with D3 Drive off with drift 5 - Drive axle Different drive axle lengths - short shaft right 6 - Hose clamp Always replace Tensioning Page 40-57 Page 3 of 7Rear drive shafts, servicing12/7/2004http://ebahn.bentleypublishers.com/vw/servlet/Display?action=Goto&type=repair&id=VW.B4.SU01.42.4 Downloaded from www.Manualslib.com manuals search engine
42-49 7 - Boot for 81 mm diameter constant velocity joint Polyester elastomer version Check for tears and chafing Installation position: At cuff 1 to 1-1/2 grooves visible To balance pressure briefly ventilate boot before tensioning the small clamp 8 - Hose clamp Always replace Tensioning Page 40-57 9 - Dished washer Outer diameter (concave side) contacts thrust washer 10 - Thrust washer Page 4 of 7Rear drive shafts, servicing12/7/2004http://ebahn.bentleypublishers.com/vw/servlet/Display?action=Goto&type=repair&id=VW.B4.SU01.42.4 Downloaded from www.Manualslib.com manuals search engine
42-50 11 - Circlip Always replace Insert in shaft groove 12 - Outer constant velocity joint: 81 mm diameter Only replace complete Removing Page 40-54 Installing: drive onto shaft with plastic hammer until compressed circlip seats Greasing Notes Page 42-46 Checking Page 40-60 13 - Inner support rings Prevents boot inflating Only installed on left drive shaft transmission end Page 5 of 7Rear drive shafts, servicing12/7/2004http://ebahn.bentleypublishers.com/vw/servlet/Display?action=Goto&type=repair&id=VW.B4.SU01.42.4 Downloaded from www.Manualslib.com manuals search engine
42-51 Reworking cap nut in side member (four wheel drive vehicles) If the threads of the cap nut in the side member are damaged, it must either be retapped or the cap nut must be drilled out. - Remove control arm if necessary. - Drill through damaged cap nut in the side member using a 10.2 mm diameter drill from underneath. Note: Do not tilt the drill when drilling. WARNING! Wear protective goggles. 1 - Cap nut 2 - Reinforcing plate 3 - Side member Page 6 of 7Rear drive shafts, servicing12/7/2004http://ebahn.bentleypublishers.com/vw/servlet/Display?action=Goto&type=repair&id=VW.B4.SU01.42.4 Downloaded from www.Manualslib.com manuals search engine
42-52 - Cut new thread in the cap nut, M 12 x 1.5. - Use new bolts, Part No. N 010 137.1 and washer, Part No. N 011 531.7 to secure the rear axle. Tightening torque: 65 Nm (48 ft lb) Note: The procedure described here must only be performed on one cap nut on each side of the vehicle. Page 7 of 7Rear drive shafts, servicing12/7/2004http://ebahn.bentleypublishers.com/vw/servlet/Display?action=Goto&type=repair&id=VW.B4.SU01.42.4 Downloaded from www.Manualslib.com manuals search engine
42-53 Suspension strut, disassembling and assembling (four wheel drive vehicles) 1 - Cap Pry out with screwdriver Pressing on Fig. 5 Installation position Fig. 5 2 - Seal 3 - Self locking hex nut, 30 Nm (22 ft lb) Always replace 4 - Dished washer 5 - Upper rubber mounting 6 - Gasket (foam) Always replace Page 1 of 6Suspension strut, disassembling and assembling (four wheel drive vehicles)12/7/2004http://ebahn.bentleypublishers.com/vw/servlet/Display?action=Goto&type=repair&id=VW.B4.SU01.42.5 Downloaded from www.Manualslib.com manuals search engine
42-54 7 - Suspension strut mounting Welded nuts must be located in the spring seat recesses Installation position to spring seat Fig. 3 8 - Spring seat 9 - Spacer tube 10 - Lower rubber mounting 11 - Stop buffer mounting 12 - Washer 13 - Stop buffer 14 - Ring (Aluminium) 15 - Boot 16 - Protective cap Page 2 of 6Suspension strut, disassembling and assembling (four wheel drive vehicles)12/7/2004http://ebahn.bentleypublishers.com/vw/servlet/Display?action=Goto&type=repair&id=VW.B4.SU01.42.5 Downloaded from www.Manualslib.com manuals search engine
42-55 17 - Coil spring Removing and installing Page 42-13 Allocation Parts catalog 18 - Packing 19 - Circlip 20 - Lower spring plate Installation position Fig. 1 21 - Shock absorber Can be replaced individually Removing and installing Page 42-4 and Page 42-37 Check shock absorber for leaks and noises Application see Parts catalog Page 3 of 6Suspension strut, disassembling and assembling (four wheel drive vehicles)12/7/2004http://ebahn.bentleypublishers.com/vw/servlet/Display?action=Goto&type=repair&id=VW.B4.SU01.42.5 Downloaded from www.Manualslib.com manuals search engine
42-56 The spring plate must be installed so that the holes "a" align with the bushing -2- in the shock absorber eye. Otherwise, in extreme driving situations spring plate -1- could contact the tire. Fig. 1 Lower spring plate, installation position 1 - Lower spring plate 2 - Shock absorber eye bushing Fig. 2 Spring seat, installation position Page 4 of 6Suspension strut, disassembling and assembling (four wheel drive vehicles)12/7/2004http://ebahn.bentleypublishers.com/vw/servlet/Display?action=Goto&type=repair&id=VW.B4.SU01.42.5 Downloaded from www.Manualslib.com manuals search engine
42-57 The upper suspension strut mounting and the spring seat (arrow A) both have markings (arrow B). These must be installed pointing forward, otherwise damage will occur to the suspension strut piston rod. Fig. 3 Suspension strut mounting to spring seat, installation position Fig. 4 Suspension strut mounting to shock absorber bushing, aligning -A- Shock absorber bushing axis -B- Suspension strut mounting axis -C- Cap axis at 90 to shock absorber bushing axis -A-. Page 5 of 6Suspension strut, disassembling and assembling (four wheel drive vehicles)12/7/2004http://ebahn.bentleypublishers.com/vw/servlet/Display?action=Goto&type=repair&id=VW.B4.SU01.42.5 Downloaded from www.Manualslib.com manuals search engine
42-58 Fig. 5 Cap, pressing into suspension strut mounting Page 6 of 6Suspension strut, disassembling and assembling (four wheel drive vehicles)12/7/2004http://ebahn.bentleypublishers.com/vw/servlet/Display?action=Goto&type=repair&id=VW.B4.SU01.42.5 Downloaded from www.Manualslib.com manuals search engine
42-59 Wheel bearings, servicing - disc brakes (four wheel drive vehicles) Note: If a vehicle has to be moved after removing the drive shaft, first install an outer joint and tighten to 50 Nm (37 ft lb). Otherwise the wheel bearing will be damaged. 1 - Control arm 2 - Self locking hex socket head bolt, 60 Nm (44 ft lb) 3 - Self locking hex bolt, 35 Nm (26 ft lb) Always replace When loosening and tightening counter-hold on guide pins Page 1 of 8Wheel bearings, servicing - disc brakes (four wheel drive vehicles)12/7/2004http://ebahn.bentleypublishers.com/vw/servlet/Display?action=Goto&type=repair&id=VW.B4.SU01.42.6 Downloaded from www.Manualslib.com manuals search engine
42-60 Repair Manual, Suspension, Wheels, Brakes, Steering, Repair Group 46 Repair Manual, Suspension, Wheels,Brakes, Steering, Repair Group 47 4 - Guide pins 5 - Protective cap 6 - Pad securing springs Always replace when changing pads 7 - Brake pads Repair information 8 - Brake caliper Servicing 9 - Pad carrier 10 - Screw 11 - Wheel bolt, 110 Nm (81 ft lb) Page 2 of 8Wheel bearings, servicing - disc brakes (four wheel drive vehicles)12/7/2004http://ebahn.bentleypublishers.com/vw/servlet/Display?action=Goto&type=repair&id=VW.B4.SU01.42.6 Downloaded from www.Manualslib.com manuals search engine
42-61 Repair Manual, Suspension, Wheels, Brakes, Steering, Repair Group 46 12 - Self-locking hex nut Always Tighten to 90 Nm (66 ft lb) and turn 45 further (1/8 turn) To tighten use recommend angle measuring wrench VAG 1756 or equivalent Before installing nut on outer joint remove any paint remains and/or corrosion from threads. 13 - Shim 14 - Brake disc Repair information 15 - Hub Pressing out Fig. 1 Pulling off inner race Fig. 3 Pressing in Fig. 5 Page 3 of 8Wheel bearings, servicing - disc brakes (four wheel drive vehicles)12/7/2004http://ebahn.bentleypublishers.com/vw/servlet/Display?action=Goto&type=repair&id=VW.B4.SU01.42.6 Downloaded from www.Manualslib.com manuals search engine
42-62 16 - Circlip Ensure seated correctly 17 - Wheel bearing 72 mm diameter Pressing out Page 42-64 Pressing in page. Page 42-65 18 - Hex bolt, 10 Nm (7 ft lb) 19 - Backing plate 20 - Parking brake cable Adjusting parking brake Page 46-36 21 - Spring clip 22 - Hex socket head bolt, 10 Nm (7 ft lb) 23 - Speed sensor Before inserting, clean and coat with lubricating paste G 000 650 Page 4 of 8Wheel bearings, servicing - disc brakes (four wheel drive vehicles)12/7/2004http://ebahn.bentleypublishers.com/vw/servlet/Display?action=Goto&type=repair&id=VW.B4.SU01.42.6 Downloaded from www.Manualslib.com manuals search engine
42-63 24 - Drive shaft with speed sensor rotor Removing and installing drive shaft Page 42-37 and Page 42-38 Removing and installing rotor, Fig. 6 25 - Brake line Page 5 of 8Wheel bearings, servicing - disc brakes (four wheel drive vehicles)12/7/2004http://ebahn.bentleypublishers.com/vw/servlet/Display?action=Goto&type=repair&id=VW.B4.SU01.42.6 Downloaded from www.Manualslib.com manuals search engine
42-64 Fig. 1 Hub, pressing out Fig. 2 Wheel bearing, pressing out Page 6 of 8Wheel bearings, servicing - disc brakes (four wheel drive vehicles)12/7/2004http://ebahn.bentleypublishers.com/vw/servlet/Display?action=Goto&type=repair&id=VW.B4.SU01.42.6 Downloaded from www.Manualslib.com manuals search engine
42-65 Note: Only use puller with leg clamp e.g. Kukko 204-2 (commercial type). Fig. 3 Inner race, pulling off of hub Note: First install lower circlip. Fig. 4 Wheel bearing, pressing in Page 7 of 8Wheel bearings, servicing - disc brakes (four wheel drive vehicles)12/7/2004http://ebahn.bentleypublishers.com/vw/servlet/Display?action=Goto&type=repair&id=VW.B4.SU01.42.6 Downloaded from www.Manualslib.com manuals search engine
42-66 Note: First install backing plate on control arm. Tightening torque: 10 Nm (7 ft lb) Fig. 5 Hub, pressing in Fig. 6 Speed sensor rotor, pressing in - Drive rotor off outer joint using a drift (rotor will be destroyed). - Drive new rotor carefully onto stop using a plastic hammer. Page 8 of 8Wheel bearings, servicing - disc brakes (four wheel drive vehicles)12/7/2004http://ebahn.bentleypublishers.com/vw/servlet/Display?action=Goto&type=repair&id=VW.B4.SU01.42.6 Downloaded from www.Manualslib.com manuals search engine
44-1 Vehicle alignment Test requirements: Measuring equipment correctly calibrated Vehicle unladen1) Tires inflated to correct pressure Vehicle accurately aligned, suspension bounced and rocked several times Suspension, steering and steering linkage checked for excessive play and damage. Note: Vehicle alignment should not be checked before the vehicle has completed 1000 to 2000 km (600 to 1200 miles) as then the coil springs have had time to settle. The cause of vehicle imbalance may also be, excessive residual imbalance and/or vertical wheel runout. 1) Unladened means: the weight of the vehicle ready for the road (fuel tank completely filled, spare wheel, vehicle tools and vehicle jack). Page 1 of 7Vehicle alignment12/7/2004http://ebahn.bentleypublishers.com/vw/servlet/Display?action=Goto&type=repair&id=VW.B4.SU01.44.1 Downloaded from www.Manualslib.com manuals search engine
44-2 Vehicle alignment specifications (front wheel drive vehicles) Front axle Suspension strut axle Engine up to 85 kW (115 hp) 110 - 128 kW (148 - 172 hp) Version Base suspension Plus suspension Total toe1) (not pressed) 0 10' 0 10' Camber2) (in straight- ahead position) Maximum permissible difference between sides -1 20' 20' max. 20' -1 10' 20' max. 20' Toe angle difference at 20left and right lock -1 10' 30' -1 40' 30' Caster (not adjustable) Maximum permissible difference between sides +1 40' 30' max. 30' +3 20' 30' max. 30' 1) Only adjust total toe on right toe rod 2) Camber corrections can only be made at the wheel bearing housing/suspension strut connection. Camber adjustment Page 44-6 . Note: After adjusting steering geometry check position of steering wheel; correct if necessary. Page 2 of 7Vehicle alignment12/7/2004http://ebahn.bentleypublishers.com/vw/servlet/Display?action=Goto&type=repair&id=VW.B4.SU01.44.1 Downloaded from www.Manualslib.com manuals search engine
44-3 Rear axle Torsion beam trailing arm axle Engine/version all Camber1) Maximum permissible difference between sides -1 30' 10' max. 20' Total toe 1) (at specified wheel camber) Maximum permissible deviation from direction of travel +20' 10' max. 20' 1) not adjustable Page 3 of 7Vehicle alignment12/7/2004http://ebahn.bentleypublishers.com/vw/servlet/Display?action=Goto&type=repair&id=VW.B4.SU01.44.1 Downloaded from www.Manualslib.com manuals search engine
44-4 Vehicle alignment specifications (four wheel drive vehicles) Front axle Suspension strut axle Engine 85 kW (115 hp) 128 kW (172 hp) Version Base suspension Plus suspension Total toe1) (not pressed) 0 10' 0 10' Camber2) (in straight- ahead position) Maximum permissible difference between sides -1 20' 20' max. 30' -1 10' 20' max. 20' Toe angle difference at 20left and right lock -1 10' 30' -1 40' 30' Caster (not adjustable) Maximum permissible difference between sides +1 40' 30' max. 30' +3 20' 30' max. 30' 1) Only adjust total toe on right toe rod 2) Camber corrections can only be made at the wheel bearing housing/suspension strut connection. Camber adjustment Page 44-6 . Note: After adjusting steering geometry check position of steering wheel; correct if necessary. Page 4 of 7Vehicle alignment12/7/2004http://ebahn.bentleypublishers.com/vw/servlet/Display?action=Goto&type=repair&id=VW.B4.SU01.44.1 Downloaded from www.Manualslib.com manuals search engine
44-5 Rear axle Semi-trailing arm axle Engine 85 kW, 128 kW (115 hp, 172 hp) Camber1) Maximum permissible difference between sides -1 15' 30' max. 30' Total toe 1) (at specified camber) Maximum permissible deviation from direction of travel +15' 20' max. 20' 1) Camber and toe corrections possible using eccentric rubber mounting Repair Manual, Suspension, Wheels, Brakes, Steering, Repair Group 42 . Page 5 of 7Vehicle alignment12/7/2004http://ebahn.bentleypublishers.com/vw/servlet/Display?action=Goto&type=repair&id=VW.B4.SU01.44.1 Downloaded from www.Manualslib.com manuals search engine
44-6 Front wheel camber, adjusting Note: - Install special tool as shown in illustration and slightly pre-tension. - Loosen suspension strut/wheel bearing housing connection. - Adjust camber by turning the spindle to specified setting. - Tighten suspension strut/wheel bearing housing connection. - Check camber and if necessary, repeat adjustment. Slight cant of tool is permitted. Do not move steering with tool in place! Before adjusting camber, it is essential to examine all suspension components for damage (visual inspection) and to replace any damaged parts. Because bolts with a shank diameter of 11 mm diameter have been installed as standard it is no longer necessary to replace bolts to correct camber. Page 6 of 7Vehicle alignment12/7/2004http://ebahn.bentleypublishers.com/vw/servlet/Display?action=Goto&type=repair&id=VW.B4.SU01.44.1 Downloaded from www.Manualslib.com manuals search engine
44-7 Calculating the direction of travel: - If both toe figures have the same preceding sign (+/+ or -/-), subtract the smaller figure from the larger figure and divide by 2 Example. Left rear wheel toe Right rear wheel toe + 15' + 5' 15' - 5' = 10' 10' : 2 = 5' Deviation from direction of travel = 5' - Add figures with different sign (+/-) and divide by 2 Example. Left rear wheel toe Right rear wheel toe + 15' - 5' 15' + 5' = 20' 20' : 2 = 10' Deviation from direction of travel = 10' The individual result is the actual alignment deviation from the vehicle longitudinal axis. Page 7 of 7Vehicle alignment12/7/2004http://ebahn.bentleypublishers.com/vw/servlet/Display?action=Goto&type=repair&id=VW.B4.SU01.44.1 Downloaded from www.Manualslib.com manuals search engine
45-1 Anti-locking Brake System (ABS) and Anti-locking Brake System with Electronic Differential Lock (ABS/EDL) Teves 04 The ABS, ABS/EDL brake system is divided diagonally. The servo-assist is effected pneumatically, by the vacuum brake servo unit. Located between the brake master cylinder and the vacuum servo unit is a mounting bracket for the hydraulic unit with pump. The hydraulic unit together with pump, supplies only the anti-locking brake system (ABS) or anti-locking brake system and traction control system (ABS/EDL). Malfunctions on the ABS, ABS/EDL systems do not influence the brake system and servo. The vehicle can be driven without the ABS, ABS/EDL functions operating. Page 1 of 5Anti-locking Brake System (ABS) and Anti-locking Brake System with Electronic Differential Lock (A...12/7/2004http://ebahn.bentleypublishers.com/vw/servlet/Display?action=Goto&type=repair&id=VW.B4.SU01.45.1 Downloaded from www.Manualslib.com manuals search engine
45-2 Notes for repair work on ABS, ABS/EDL Before doing any repair work on the anti-locking system, determine the cause of the malfunction using On Board Diagnostic (OBD). Repair Manual, Brake System On Board Diagnostic (OBD), Repair Group 01 Before working on the ABS, ABS/EDL system, disconnect the battery Ground strap. On vehicles with coded radio, obtain cooling. When working with brake fluid, observe the relevant safety precautions and notes Page 47-27 . After work for which the brake system had to be opened, bleed the brake system with brake filler and bleeder unit VAS 5234 Page 47-27 . During the final road test, make sure that a controlled brake test is performed at least once (pulsations must be felt at the brake pedal). Absolute cleanliness is required when working on the anti-locking brake system; it is not permitted to use any products which contain mineral oils, such as oils, greases etc. Page 2 of 5Anti-locking Brake System (ABS) and Anti-locking Brake System with Electronic Differential Lock (A...12/7/2004http://ebahn.bentleypublishers.com/vw/servlet/Display?action=Goto&type=repair&id=VW.B4.SU01.45.1 Downloaded from www.Manualslib.com manuals search engine
45-3 Thoroughly clean all unions and the adjacent areas before loosening, do not use aggressive cleaning agents such as brake cleaner, petrol, thinners or similar. Place removed parts on a clean surface and cover. Do not use fluffy cloth. Carefully cover or seal open components if repairs cannot be carried out immediately. Only remove replacement parts from packaging immediately prior to installation. Only use genuine packed parts. When the system is open do not work with compressed air and do not move the vehicle. Make sure that no brake fluid enters harness connectors. During painting operations, the electronic control module can be exposed to a max. temperature of 95C (203F) for only a short period, and to a maximum of 85C (185F) for longer periods (approx. 2 hours). Page 3 of 5Anti-locking Brake System (ABS) and Anti-locking Brake System with Electronic Differential Lock (A...12/7/2004http://ebahn.bentleypublishers.com/vw/servlet/Display?action=Goto&type=repair&id=VW.B4.SU01.45.1 Downloaded from www.Manualslib.com manuals search engine
45-4 Control module, removing and installing Location Under the rear seat, left Note: Switch off ignition before disconnecting and connecting connectors. Removing - Fold up rear seat. - Press control module securing clips together and pull out. - To pull connector off control module, release control module locking bar. Installing - Install in reverse order. - Engage connector catch in control module slots (arrow A), press connector on (arrow B) and secure with locking bar (arrow C). Page 4 of 5Anti-locking Brake System (ABS) and Anti-locking Brake System with Electronic Differential Lock (A...12/7/2004http://ebahn.bentleypublishers.com/vw/servlet/Display?action=Goto&type=repair&id=VW.B4.SU01.45.1 Downloaded from www.Manualslib.com manuals search engine
45-5 Wheel speed sensor and rotor for speed sensor, removing and installing Speed sensor When installing speed sensor ensure wiring is not twisted. Before installing speed sensor, clean mounting hole and coat with lubricating paste, G 000 650. Rotors Before installing check that rotor is clean and undamaged. Front axle Vehicles with base suspension Page 40-14 . Vehicles with plus suspension Page 40-23 . Rear axle Vehicles with rear drum brakes Page 42-15 . Vehicles with rear disc brakes (front and four wheel drive Page 42-24 . Page 5 of 5Anti-locking Brake System (ABS) and Anti-locking Brake System with Electronic Differential Lock (A...12/7/2004http://ebahn.bentleypublishers.com/vw/servlet/Display?action=Goto&type=repair&id=VW.B4.SU01.45.1 Downloaded from www.Manualslib.com manuals search engine
45-6 Anti-lock Brake System (ABS) and ABS with Electronic Differential Lock (ABS/EDL), Teves 20 GI General information The ABS or ABS/EDL braking system is divided diagonally. Brake pedal pressure is boosted pneumatically, by the vacuum brake booster. Vehicles with Teves 20 GI ABS or ABS/EDL do not have a mechanical brake pressure regulator. Specially matched software in the ABS control module regulates rear axle brake pressure. The ABS hydraulic unit -a- and ABS control module -b- together make up one component. Separating them for service is only possible after the assembly has been removed. New ABS control units supplied as replacement parts from the Parts department are not coded, and require coding after installation: Repair Manual, Brake System On Board Diagnostic (OBD), Repair Group 01 Malfunctions of the ABS or ABS/EDL system do not influence the brake system or the vacuum brake booster. The conventional brake system remains functional even without ABS. Before working on the ABS or ABS/EDL system, determine the cause of the malfunction using the On Board Diagnostic (OBD) program % Repair Manual, ABS & ABS/EDL On Board Diagnostic. Page 1 of 3Anti-lock Brake System (ABS) and ABS with Electronic Differential Lock (ABS/EDL), Teves 20 GI12/7/2004http://ebahn.bentleypublishers.com/vw/servlet/Display?action=Goto&type=repair&id=VW.B4.SU01.45.2 Downloaded from www.Manualslib.com manuals search engine
45-7 Safety precautions WARNING! Brake fluid is poisonous. CAUTION! Before working on the ABS or ABS/EDL system, disconnect the battery Ground (GND) strap. For anti-theft coded radios, first make sure that the radio code is available. Brake fluid must not contact painted parts. Brake fluid absorbs moisture from the air and must therefore be replaced every two years. Use only new, approved brake fluid that complies with MVSS 116 DOT 4. DO NOT use silicone-brake fluid (DOT 5). Even the smallest traces can cause sever corrosion in the brake system. Before doing any welding repairs on the vehicle using electric welding equipment, disconnect the ABS control module. After work that requires opening the brake hydraulic system, bleed the system Page 47-29 . Page 2 of 3Anti-lock Brake System (ABS) and ABS with Electronic Differential Lock (ABS/EDL), Teves 20 GI12/7/2004http://ebahn.bentleypublishers.com/vw/servlet/Display?action=Goto&type=repair&id=VW.B4.SU01.45.2 Downloaded from www.Manualslib.com manuals search engine
45-8 CAUTION! During the final road test, make sure that at least one controlled brake test is included (pulsations must be felt at the brake pedal). Absolute cleanliness is required when working on the ABS or ABS/EDL system. DO NOT use any products that contain mineral oil, such as oils, greases, etc. Thoroughly clean all connections and the immediate vicinity before loosening. DO NOT use aggressive cleaning agents such as brake cleaner, gasoline or thinners. Place removed parts on a clean surface and cover. DO NOT use fluffy cloths. Carefully seal or cover opened components if a repair cannot be completed immediately. After separating the ABS hydraulic unit and ABS control module, always use the plastic foam transportation protection for the valve dome, and always use the sealing plug kit Part No. 1 H0 693 311 A. Only install replacement parts that were packed in their original packaging. Only remove them immediately before installation. When the hydraulic system is open DO NOT work with compressed air in the vicinity and DO NOT move the vehicle. Take precautions to make sure that brake fluid does not enter any wiring harness connectors. Page 3 of 3Anti-lock Brake System (ABS) and ABS with Electronic Differential Lock (ABS/EDL), Teves 20 GI12/7/2004http://ebahn.bentleypublishers.com/vw/servlet/Display?action=Goto&type=repair&id=VW.B4.SU01.45.2 Downloaded from www.Manualslib.com manuals search engine
45-9 ABS, ABS/EDL hydraulic unit, vacuum brake booster and brake master cylinder (Teves 20 GI), servicing CAUTION! DO NOT separate the ABS hydraulic pump from the valve block. 1 - Brake servo (vacuum brake booster) 2 - Brake master cylinder 3 - Brake fluid reservoir 4 - Cap 5 - Self-locking nut Always replace 25 Nm (18 ft lb) 6 - Torx socket-head bolt T25 4 Nm (35 in lb) 7 - Torx socket-head bolt T25 8 Nm (71 in lb) Page 1 of 9ABS, ABS/EDL hydraulic unit, vacuum brake booster and brake master cylinder (Teves 20 GI), servicing12/7/2004http://ebahn.bentleypublishers.com/vw/servlet/Display?action=Goto&type=repair&id=VW.B4.SU01.45.3 Downloaded from www.Manualslib.com manuals search engine
45-10 8 - Rubber damper 9 - Retainer 10 - ABS hydraulic unit 11 - ABS control module 12 - Brake line connection ABS hydraulic unit to right-front brake caliper 13 - Brake line connection ABS hydraulic unit to left-rear brake caliper or wheel cylinder 14 - Brake line connection ABS hydraulic unit to right-rear brake caliper or wheel cylinder 15 - Brake line connection ABS hydraulic unit to left-front brake caliper 16 - Brake line Brake master cylinder (secondary piston circuit) to ABS hydraulic unit 17 - Brake line Brake master cylinder (primary piston circuit) to ABS hydraulic unit Page 2 of 9ABS, ABS/EDL hydraulic unit, vacuum brake booster and brake master cylinder (Teves 20 GI), servicing12/7/2004http://ebahn.bentleypublishers.com/vw/servlet/Display?action=Goto&type=repair&id=VW.B4.SU01.45.3 Downloaded from www.Manualslib.com manuals search engine
45-11 ABS hydraulic unit and ABS control module (Teves 20 GI), removing and installing Carefully read and follow all cautions and warnings Page 45-7 before beginning work. Location The ABS control module is bolted to the ABS hydraulic unit, located on the left-side of the engine compartment. CAUTION! Do not bend brake lines at or near the ABS hydraulic unit. Switch ignition OFF when disconnecting and reconnecting the ABS control module connector. Part numbers are listed here for reference only. Always check with your Parts department for the latest information. Sealing plug kit Part No. 1H0 698 311 A: 1 - Valve dome transportation protection (plastic foam) 2 - Sealing plugs -M10- 3 - Sealing plugs -M12- Page 3 of 9ABS, ABS/EDL hydraulic unit, vacuum brake booster and brake master cylinder (Teves 20 GI), servicing12/7/2004http://ebahn.bentleypublishers.com/vw/servlet/Display?action=Goto&type=repair&id=VW.B4.SU01.45.3 Downloaded from www.Manualslib.com manuals search engine
45-12 After separating ABS control module from ABS hydraulic unit, always install valve dome transportation protection on hydraulic unit. Warranty claims for ABS hydraulic units on which the valve dome transportation protection was not used will not be accepted. Removing CAUTION! Determine correct radio anti-theft coding before disconnecting the battery. - Disconnect battery Ground (GND) strap. - Remove coolant expansion tank and swing to one side. Page 4 of 9ABS, ABS/EDL hydraulic unit, vacuum brake booster and brake master cylinder (Teves 20 GI), servicing12/7/2004http://ebahn.bentleypublishers.com/vw/servlet/Display?action=Goto&type=repair&id=VW.B4.SU01.45.3 Downloaded from www.Manualslib.com manuals search engine
45-13 - Release retainer and disconnect ABS control module connector (arrows). - Connect bleeder hose and bleeder bottle to left-front brake caliper bleeder screw, and open bleeder screw. - Depress brake pedal at least 60 mm (2-3/8 in.). - Install brake pedal loading device from special tool VAG 1238B. - Close left-front bleeder screw. - Remove heat shield from brake master cylinder. - Disconnect brake lines from brake master cylinder and ABS hydraulic unit. - Seal lines and threaded holes with plugs from repair kit Page 45-11 . Page 5 of 9ABS, ABS/EDL hydraulic unit, vacuum brake booster and brake master cylinder (Teves 20 GI), servicing12/7/2004http://ebahn.bentleypublishers.com/vw/servlet/Display?action=Goto&type=repair&id=VW.B4.SU01.45.3 Downloaded from www.Manualslib.com manuals search engine
45-14 - Remove Torx socket-head bolts (T25) from ABS hydraulic unit bracket. - Remove ABS hydraulic unit/ABS control module assembly. - Disconnect ABS hydraulic pump connector from ABS control module. CAUTION! - Remove ABS control module mounting bolts (arrows) and pull off ABS control module. Pull control module straight off. Do not tilt. Cover control unit magnetic coils with a lint-free cloth. After separating the ABS hydraulic unit and ABS control module, always use the plastic foam valve dome transportation protection Page 45-11 . Page 6 of 9ABS, ABS/EDL hydraulic unit, vacuum brake booster and brake master cylinder (Teves 20 GI), servicing12/7/2004http://ebahn.bentleypublishers.com/vw/servlet/Display?action=Goto&type=repair&id=VW.B4.SU01.45.3 Downloaded from www.Manualslib.com manuals search engine
45-15 Installing Note: Remove the sealing plugs from a new ABS hydraulic unit one at a time, and only when the corresponding brake line is to be connected. If the plugs are removed too soon, brake fluid can escape and it can no longer be certain that the unit is sufficiently filled or adequately bled. - Mount ABS control module to hydraulic unit using new bolts. Tightening torque: 4 Nm (35 in lb) - Reconnect ABS hydraulic pump connector. The remainder of the installation procedure is the reverse of removal, with the following additions: - Bleed brake system Page 47-29 . Page 7 of 9ABS, ABS/EDL hydraulic unit, vacuum brake booster and brake master cylinder (Teves 20 GI), servicing12/7/2004http://ebahn.bentleypublishers.com/vw/servlet/Display?action=Goto&type=repair&id=VW.B4.SU01.45.3 Downloaded from www.Manualslib.com manuals search engine
45-16 Note: For vehicles equipped with ABS/EDL, on which the brake fluid reservoir has been completely empty (e.g. leaks in brake system), it is necessary to initiate the "Basic Setting" function of the On Board Diagnostic (OBD) program: Repair Manual, Brake System On Board Diagnostic (OBD), Repair Group 01 Otherwise the standard brake bleeding procedures apply. - Code ABS control module: Repair Manual, Brake System On Board Diagnostic (OBD), Repair Group 01 Tightening torques ABS control unit to ABS hydraulic unit 4 Nm (35 in. lb) ABS hydraulic unit to bracket (Torx T25 socket-head bolts) 8 Nm (71 in. lb) Brake master cylinder to vacuum booster 25 Nm (18 ft lb) Heat shield to brake master cylinder 8 Nm (71 in. lb) Brake lines to ABS hydraulic unit M10 x 1 15 Nm (11 ft lb) M12 x 1 15 Nm (11 ft lb) Page 8 of 9ABS, ABS/EDL hydraulic unit, vacuum brake booster and brake master cylinder (Teves 20 GI), servicing12/7/2004http://ebahn.bentleypublishers.com/vw/servlet/Display?action=Goto&type=repair&id=VW.B4.SU01.45.3 Downloaded from www.Manualslib.com manuals search engine
45-17 Brake hydraulic system, bleeding and filling Vehicles with ABS/EDL For vehicles with ABS/EDL, when the brake fluid reservoir has been completely emptied (e.g. due to leaks in the brake system) it is necessary to initiate the "Basic Setting" function of the On Board Diagnostic (OBD) program. Repair Manual, Brake System On Board Diagnostic (OBD), Repair Group 01 Otherwise the standard brake bleeding procedures apply Page 47-29 . Page 9 of 9ABS, ABS/EDL hydraulic unit, vacuum brake booster and brake master cylinder (Teves 20 GI), servicing12/7/2004http://ebahn.bentleypublishers.com/vw/servlet/Display?action=Goto&type=repair&id=VW.B4.SU01.45.3 Downloaded from www.Manualslib.com manuals search engine
45-18 Assembly overview - hydraulic unit, brake servo/brake master cylinder Note: Repair Manual, Brake System On Board Diagnostic (OBD), Repair group 01 Pump and valve block must not be separated from one another. Illustration shows an exploded view of the ABS/EDL unit. Servicing of ABS unit is identical. Distinguishing features 1 - Brake Pedal Position Sensor Removing and installing Page 45-25 . Checking Page 1 of 10Assembly overview - hydraulic unit, brake servo/brake master cylinder12/7/2004http://ebahn.bentleypublishers.com/vw/servlet/Display?action=Goto&type=repair&id=VW.B4.SU01.45.4 Downloaded from www.Manualslib.com manuals search engine
45-19 2 - Spacer cap Various versions Page 45-25 3 - Sealing ring Always replace 4 - Circlip Always replace 5 - Brake line Brake master cylinder/primary piston circuit to hydraulic unit 6 - Brake servo 7 - Carrier plate 8 - Sealing ring 9 - Pin 10 - Securing clip 11 - Brake fluid reservoir Page 2 of 10Assembly overview - hydraulic unit, brake servo/brake master cylinder12/7/2004http://ebahn.bentleypublishers.com/vw/servlet/Display?action=Goto&type=repair&id=VW.B4.SU01.45.4 Downloaded from www.Manualslib.com manuals search engine
45-20 Repair Manual, Brake System On Board Diagnostic (OBD), Repair group 01 12 - Cap 13 - Hex socket head screw for brake fluid reservoir 14 - Series resistor Only on vehicles with ABS/EDL Checking 15 - Self-locking hex nut, 25 Nm (18 ft lb) 16 - Tandem brake master cylinder 17 - Protective plate 18 - Hex bolt for protective plate Page 3 of 10Assembly overview - hydraulic unit, brake servo/brake master cylinder12/7/2004http://ebahn.bentleypublishers.com/vw/servlet/Display?action=Goto&type=repair&id=VW.B4.SU01.45.4 Downloaded from www.Manualslib.com manuals search engine
45-21 19 - ABS Hydraulic unit Connections (arrow) show pipe work from tandem master cylinder to ABS hydraulic unit Removing and installing Page 45-23 20 - ABS/EDL Hydraulic unit Removing and installing Page 45-23 21 - Brake line connection Hydraulic unit to front right brake caliper Thread connection: M10 x 1, 15 Nm (11 ft lb) 22 - Torx bolts (T 25) 23 - Brake line connection Hydraulic unit to rear left wheel cylinder Thread connection: M10 x 1, 15Nm (11 ft lb) Page 4 of 10Assembly overview - hydraulic unit, brake servo/brake master cylinder12/7/2004http://ebahn.bentleypublishers.com/vw/servlet/Display?action=Goto&type=repair&id=VW.B4.SU01.45.4 Downloaded from www.Manualslib.com manuals search engine
45-22 24 - Brake line connection Hydraulic unit to rear right wheel cylinder Thread connection: M12 x1, 18 Nm (13 ft lb) 25 - Brake line connection Hydraulic unit to front left brake caliper Thread connection: M10 x1, 15 Nm (11 ft lb) 26 - Brake line Master brake cylinder/secondary piston circuit to hydraulic unit Page 5 of 10Assembly overview - hydraulic unit, brake servo/brake master cylinder12/7/2004http://ebahn.bentleypublishers.com/vw/servlet/Display?action=Goto&type=repair&id=VW.B4.SU01.45.4 Downloaded from www.Manualslib.com manuals search engine
45-23 Hydraulic unit, removing and installing Note: For easier disassembling and assembling, it is more practical to remove the hydraulic unit complete with brake servo and brake master cylinder. Removing - Disconnect battery Ground (GND) strap. - Separate all electrical connections on ABS unit. - Remove as much brake fluid as possible from brake fluid reservoir using a suction bottle. - Disconnect brake lines from ABS hydraulic unit and seal threaded holes with plugs from repair kit, Part No. 1HO 698 311. - Remove left-hand trim under instrument panel. - Disconnect brake pedal from brake servo unit Page 46-44 . Page 6 of 10Assembly overview - hydraulic unit, brake servo/brake master cylinder12/7/2004http://ebahn.bentleypublishers.com/vw/servlet/Display?action=Goto&type=repair&id=VW.B4.SU01.45.4 Downloaded from www.Manualslib.com manuals search engine
45-24 - Remove nuts from brake servo/bulkhead. - Carefully remove hydraulic unit and brake servo with brake master cylinder from engine compartment. Installing Note: Hydraulic units supplied as replacement parts are already filled with hydraulic fluid and bled. Only remove sealing plugs on hydraulic unit when the relevant brake line is going to be connected. If the sealing plugs are removed too early, brake fluid can escape, it is then no longer guaranteed that the unit is sufficiently filled or adequately bled. - Preassemble hydraulic unit and brake servo with tandem master cylinder away from vehicle. - Secure hydraulic unit, brake servo with tandem master cylinder to bulkhead. - Connect brake lines. - Reconnect all electrical connections on ABS unit (ensure correctly connected). - Bleed brake system Page 47-27 . - Install left-hand trim under instrument panel. Page 7 of 10Assembly overview - hydraulic unit, brake servo/brake master cylinder12/7/2004http://ebahn.bentleypublishers.com/vw/servlet/Display?action=Goto&type=repair&id=VW.B4.SU01.45.4 Downloaded from www.Manualslib.com manuals search engine
45-25 Brake Pedal Position Sensor, removing and installing Note: The Brake Pedal Position Sensor is only supplied as a repair kit. Apart from the sender, this repair kit contains a sealing ring, circlip and four different spacer caps. - - one white spacer cap - - one green spacer cap - - one blue spacer cap - - one red spacer cap The spacer caps are of differing length. When replacing the sensor note the color of spacer cap. The new sensor must have the same color cap as the old sensor. On the brake servo housing in the vicinity of the sever location there is a colored spot, which is identical to that of the spacer cap. Page 8 of 10Assembly overview - hydraulic unit, brake servo/brake master cylinder12/7/2004http://ebahn.bentleypublishers.com/vw/servlet/Display?action=Goto&type=repair&id=VW.B4.SU01.45.4 Downloaded from www.Manualslib.com manuals search engine
45-26 Removing - Release brake servo vacuum by operating the brake pedal several times. - Remove connector from expansion tank. - Swing coolant expansion tank to side. - Pull connector off sensor. - Expand circlip with a small screwdriver in a clockwise direction and pull sensor (arrow) out of brake servo. Page 9 of 10Assembly overview - hydraulic unit, brake servo/brake master cylinder12/7/2004http://ebahn.bentleypublishers.com/vw/servlet/Display?action=Goto&type=repair&id=VW.B4.SU01.45.4 Downloaded from www.Manualslib.com manuals search engine
45-27 Installing Note: When installing new circlip ensure opening is uppermost - installation position (arrow). - Install new sealing ring to sensor. (Coat sealing ring with lubricant e.g. soft soap). Note: - Sensor notch must point downward when inserting into brake servo and be heard to engage. - Connect sensor unit connection and ensure correctly located. To ensure correctly seated pull senor by hand. Leaks at the sensor sealing ring, result in insufficient braking vacuum and poor engine idling. For ease of illustration, shows installing the sensor with brake fluid reservoir removed. Page 10 of 10Assembly overview - hydraulic unit, brake servo/brake master cylinder12/7/2004http://ebahn.bentleypublishers.com/vw/servlet/Display?action=Goto&type=repair&id=VW.B4.SU01.45.4 Downloaded from www.Manualslib.com manuals search engine
46-1 Front brakes, servicing (Girling caliper) Note: After replacing brake pads, depress brake pedal firmly several times with vehicle stationary so that the brake pads are properly seated in their normal operating position. To remove brake fluid from the reservoir, use a bleeder bottle which is used only for brake fluid. Brake fluid is poisonous and must on not be siphoned by mouth using a hose! Wheel bolt tightening torque: 110 Nm (81 ft lb) Page 1 of 7Front brakes, servicing (Girling caliper)12/7/2004http://ebahn.bentleypublishers.com/vw/servlet/Display?action=Goto&type=repair&id=VW.B4.SU01.46.1 Downloaded from www.Manualslib.com manuals search engine
46-2 1 - Brake disc, not ventilated When worn always replace on both sides Brake disc diameter: 256 mm Brake disc thickness: 13 mm Wear limit: 11 mm 2 - Brake disc, ventilated When worn always replace on both sides Brake disc diameter: 256 mm Brake disc thickness: 20 mm Wear limit: 18 mm 3 - Screw 4 - Countersunk screw To secure rotor Only on vehicles with ABS Page 2 of 7Front brakes, servicing (Girling caliper)12/7/2004http://ebahn.bentleypublishers.com/vw/servlet/Display?action=Goto&type=repair&id=VW.B4.SU01.46.1 Downloaded from www.Manualslib.com manuals search engine
46-3 Repair Manual, Maintenance 5 - Brake pad With brake pad wear indicator Always replace on both sides Removing and installing Page 46-6 Pad thickness: non-ventilated brake disc, 14 mm Pad thickness: ventilated brake disc, 11 mm Checking thickness Wear limit: 7 mm (including backplate) 6 - Hub Removing and installing from Page 40-14 7 - Wheel speed sensor rotor Only on vehicles with ABS 8 - Hex bolt, 10 Nm (7 ft lb) 9 - Splash plate Page 3 of 7Front brakes, servicing (Girling caliper)12/7/2004http://ebahn.bentleypublishers.com/vw/servlet/Display?action=Goto&type=repair&id=VW.B4.SU01.46.1 Downloaded from www.Manualslib.com manuals search engine
46-4 10 - Wheel bearing housing 11 - Brake carrier with guide pins and protective caps Supplied as replacement part assembled with sufficient amount of grease on guide pins If protective caps are damaged use repair kit Use grease packet supplied to lubricate guide pins 12 - Heat shield Install in piston 13 - Brake caliper housing Do not disconnect brake hose when changing brake pads Page 4 of 7Front brakes, servicing (Girling caliper)12/7/2004http://ebahn.bentleypublishers.com/vw/servlet/Display?action=Goto&type=repair&id=VW.B4.SU01.46.1 Downloaded from www.Manualslib.com manuals search engine
46-5 14 - Self-locking hex bolt, 35 Nm (26 ft lb) Always replace 15 - Guide pin 16 - Ribbed bolt, 125 Nm (92 ft lb) 17 - Protective cap 18 - Hex socket head bolt, 10 Nm (7 ft lb) 19 - Speed sensor Only on vehicles with ABS Before inserting sensor clean mounting hole inner surface and coat with lubricating paste, G 000 650 Page 5 of 7Front brakes, servicing (Girling caliper)12/7/2004http://ebahn.bentleypublishers.com/vw/servlet/Display?action=Goto&type=repair&id=VW.B4.SU01.46.1 Downloaded from www.Manualslib.com manuals search engine
46-6 Brake pads, removing and installing Removing - Remove lower brake caliper housing securing bolt. Counter-hold on guide pin. - Swing brake caliper housing upward. - Remove brake pads. Page 6 of 7Front brakes, servicing (Girling caliper)12/7/2004http://ebahn.bentleypublishers.com/vw/servlet/Display?action=Goto&type=repair&id=VW.B4.SU01.46.1 Downloaded from www.Manualslib.com manuals search engine
46-7 Installing Note: Before inserting new brake pads, press piston back into the cylinder with resetting tool. Before pressing the piston back, remove some brake fluid from the reservoir with a bleeder bottle. If reservoir has been topped up, fluid may overflow and cause damage. Note: - Press piston back. - Install brake pads. - Swing brake caliper housing down and tighten bolt. The repair kit contains two self-locking bolts which must always be installed. After replacing the brake pads, depress brake pedal firmly several times with the vehicle stationary so that the brake pads are properly seated in their normal operating position. Page 7 of 7Front brakes, servicing (Girling caliper)12/7/2004http://ebahn.bentleypublishers.com/vw/servlet/Display?action=Goto&type=repair&id=VW.B4.SU01.46.1 Downloaded from www.Manualslib.com manuals search engine
46-8 Front brakes, servicing (Teves/Ate) Repair Manual, Maintenance 1 - Screw 2 - Brake disc When worn always replace on both sides Remove brake caliper prior to removing Ventilated brake disc diameter: 288 mm Brake disc thickness: 25 mm Wear limit: 23 mm 3 - Brake pads Always replace on both sides Pads are different; pad on piston side has retaining spring Removing and installing Page 46-12 Pad thickness: 14 mm Checking thickness Wear limit: 7 mm (including backing plate) Page 1 of 7Front brakes, servicing (Teves/Ate)12/7/2004http://ebahn.bentleypublishers.com/vw/servlet/Display?action=Goto&type=repair&id=VW.B4.SU01.46.2 Downloaded from www.Manualslib.com manuals search engine
46-9 4 - Retaining spring Insert in both brake caliper housing drillings 5 - Brake carrier Supplied as replacement part assembled with sufficient amount of grease on guide pins If protective caps are damaged use repair kit Use grease packet supplied to lubricate guide pins 6 - Brake caliper housing Do not disconnect brake hose when changing brake pads Removing and installing Page 46-12 Page 2 of 7Front brakes, servicing (Teves/Ate)12/7/2004http://ebahn.bentleypublishers.com/vw/servlet/Display?action=Goto&type=repair&id=VW.B4.SU01.46.2 Downloaded from www.Manualslib.com manuals search engine
46-10 7 - Guide pins, 25 Nm (18 ft lb) Removing and installing from Page 46-12 8 - Protective cap 9 - Seal Always replace Pry out with suitable tool 10 - Brake hose 11 - Banjo bolt, 30 Nm (22 ft lb) 12 - Ribbed bolt, 125 Nm (92 ft lb) 13 - Wheel bearing housing 14 - Hex socket head bolt, 10 Nm (7 ft lb) 15 - Speed sensor Only on vehicles with ABS Before inserting sensor, clean mounting hole inner surface and coat with lubricating paste, G 000 650 Page 3 of 7Front brakes, servicing (Teves/Ate)12/7/2004http://ebahn.bentleypublishers.com/vw/servlet/Display?action=Goto&type=repair&id=VW.B4.SU01.46.2 Downloaded from www.Manualslib.com manuals search engine
46-11 16 - Splash plate 17 - Hex bolt, 10 Nm (7 ft lb) 18 - Speed sensor rotor Only on vehicles with ABS 19 - Hub Removing and installing Page 40-14 20 - Countersunk bolt Page 4 of 7Front brakes, servicing (Teves/Ate)12/7/2004http://ebahn.bentleypublishers.com/vw/servlet/Display?action=Goto&type=repair&id=VW.B4.SU01.46.2 Downloaded from www.Manualslib.com manuals search engine
46-12 Brake pads, removing and installing Removing Note: If reusing brake pads mark location and install in same position or uneven braking may result. - Remove protective caps. - Pry off brake pad retaining spring from brake caliper housing with a screwdriver and remove. Page 5 of 7Front brakes, servicing (Teves/Ate)12/7/2004http://ebahn.bentleypublishers.com/vw/servlet/Display?action=Goto&type=repair&id=VW.B4.SU01.46.2 Downloaded from www.Manualslib.com manuals search engine
46-13 Installing Note: Before installing new brake pads, press piston back into the cylinder with resetting tool. Before pressing the piston back, remove some brake fluid from the reservoir with a bleeder bottle. If reservoir has been topped up, fluid may overflow and cause damage. - Remove both guide pins from brake caliper. - Remove brake caliper housing and lay to one side so that weight of brake caliper does not stress or damage brake hose. - Take brake pads out of brake caliper housing or from brake carrier. - Pressing piston back. Page 6 of 7Front brakes, servicing (Teves/Ate)12/7/2004http://ebahn.bentleypublishers.com/vw/servlet/Display?action=Goto&type=repair&id=VW.B4.SU01.46.2 Downloaded from www.Manualslib.com manuals search engine
46-14 - Install brake pad with retaining spring in brake caliper housing (piston). - Install outer brake pad in brake carrier. - Secure brake caliper housing with both guide pins to brake carrier. - Install both protective caps. - Install retaining spring into brake caliper housing. Note: After replacing the brake pads, depress brake pedal firmly several times with the vehicle stationary, so that the brake pads are proper/y seated in their normal operating position. Page 7 of 7Front brakes, servicing (Teves/Ate)12/7/2004http://ebahn.bentleypublishers.com/vw/servlet/Display?action=Goto&type=repair&id=VW.B4.SU01.46.2 Downloaded from www.Manualslib.com manuals search engine
46-15 Rear wheel brakes, servicing (drum brakes) Notes Page 42-15 1 - Grease cap Removing and installing from Page 42-19 2 - Cotter pin Always replace 3 - Locking ring 4 - Hex nut Adjusting wheel bearing play Page 42-20 5 - Thrust washer Page 1 of 4Rear wheel brakes, servicing (drum brakes)12/7/2004http://ebahn.bentleypublishers.com/vw/servlet/Display?action=Goto&type=repair&id=VW.B4.SU01.46.3 Downloaded from www.Manualslib.com manuals search engine
46-16 6 - Outer wheel bearing 7 - Wheel speed sensor rotor Only on vehicles with ABS 8 - Brake drum Vehicles with front wheel drive Brake drum diameter: 230 mm Wear limit: 231.5 mm Clean thoroughly, check for wear, damage, tolerances, damaged wheel bolt threads and condition of braking surface Fill hub with multi-purpose grease Check for ovality 9 - Stub axle Page 2 of 4Rear wheel brakes, servicing (drum brakes)12/7/2004http://ebahn.bentleypublishers.com/vw/servlet/Display?action=Goto&type=repair&id=VW.B4.SU01.46.3 Downloaded from www.Manualslib.com manuals search engine
46-17 10 - Hex socket head bolt, 10 Nm (7 ft lb) 11 - Wheel speed sensor Only on vehicles with ABS Insert with lubricating paste, G 000 650 12 - Backing plate with brake shoes Release adjustment before removing brake drum Page 46-18 13 - Dished washer Large contact surface faces back plate 14 - Hex bolt, 60 Nm (44 ft lb) Page 3 of 4Rear wheel brakes, servicing (drum brakes)12/7/2004http://ebahn.bentleypublishers.com/vw/servlet/Display?action=Goto&type=repair&id=VW.B4.SU01.46.3 Downloaded from www.Manualslib.com manuals search engine
46-18 Brake shoe adjustment, releasing - Insert a screwdriver through hole in brake drum and push wedge upward. Page 4 of 4Rear wheel brakes, servicing (drum brakes)12/7/2004http://ebahn.bentleypublishers.com/vw/servlet/Display?action=Goto&type=repair&id=VW.B4.SU01.46.3 Downloaded from www.Manualslib.com manuals search engine
46-19 Rear wheel brakes, servicing Note: After working on the rear wheel brakes: Release parking brake. Firmly depress the brake pedal once. 1 - Spring plate To remove, push against the spring and turn through 90 2 - Spring 3 - Brake shoe with lever for parking brake Removing and installing Page 46-23 Adjusting parking brake Page 46-26 Page 1 of 8Rear wheel brakes, servicing12/7/2004http://ebahn.bentleypublishers.com/vw/servlet/Display?action=Goto&type=repair&id=VW.B4.SU01.46.4 Downloaded from www.Manualslib.com manuals search engine
46-20 Repair Manual, Maintenance 4 - Upper return spring Unhook with pliers 5 - Lower return spring Lubricate contact points with G 000 650 paste 6 - Wedge spring 7 - Brake shoe Removing and installing Page 46-23 Minimum lining thickness 2.5 mm Checking thickness 8 - Cap Remove to check brake lining thickness 9 - Pin 10 - Wheel speed sensor Only on vehicles with ABS Page 2 of 8Rear wheel brakes, servicing12/7/2004http://ebahn.bentleypublishers.com/vw/servlet/Display?action=Goto&type=repair&id=VW.B4.SU01.46.4 Downloaded from www.Manualslib.com manuals search engine
46-21 11 - Backing plate 12 - Hex socket head bolt, 10 Nm (7 ft) 13 - Wheel cylinder Checking for leaks Fig. 1 14 - Wedge To remove and install the brake drum, push upwards through a wheel bolt hole Page 46-18 15 - Push rod Lubricate contact points with G 000 650 paste 16 - Locating spring Unhook with pliers Page 3 of 8Rear wheel brakes, servicing12/7/2004http://ebahn.bentleypublishers.com/vw/servlet/Display?action=Goto&type=repair&id=VW.B4.SU01.46.4 Downloaded from www.Manualslib.com manuals search engine
46-22 Note: Care is to be exercised to ensure the seal is not damaged when lifting the dust boot (only use a blunt instrument, e.g. plastic wedge). Fig. 1 Wheel cylinder, checking for leaks - Lift dust boot - If brake fluid is found in the dust boot then replace wheel cylinder Page 4 of 8Rear wheel brakes, servicing12/7/2004http://ebahn.bentleypublishers.com/vw/servlet/Display?action=Goto&type=repair&id=VW.B4.SU01.46.4 Downloaded from www.Manualslib.com manuals search engine
46-23 Brake shoes, removing and installing Removing - Remove brake drum. - Remove spring plate. - Unhook lower return spring. - Remove brake shoes. - Unhook parking brake cable. - Clamp brake shoes in vice. - Remove wedge spring. - Remove upper return spring. - Unhook locating spring. Page 5 of 8Rear wheel brakes, servicing12/7/2004http://ebahn.bentleypublishers.com/vw/servlet/Display?action=Goto&type=repair&id=VW.B4.SU01.46.4 Downloaded from www.Manualslib.com manuals search engine
46-24 Installing - Connect locating spring and install brake shoes on the push rod. - Insert wedge. - Insert brake shoe with brake lever in push rod. - Connect upper return spring. - Connect parking brake cable to brake lever. - Place brake shoes on wheel cylinder pistons. - Connect lower return spring and lift brake shoes onto lower support. Page 6 of 8Rear wheel brakes, servicing12/7/2004http://ebahn.bentleypublishers.com/vw/servlet/Display?action=Goto&type=repair&id=VW.B4.SU01.46.4 Downloaded from www.Manualslib.com manuals search engine
46-25 - Attach wedge spring. - Install springs and spring plates. - Install brake drum and adjust wheel bearing play. Adjusting wheel bearing play Page 42-20 - Firmly depress brake pedal once, this adjusts the rear brakes. Page 7 of 8Rear wheel brakes, servicing12/7/2004http://ebahn.bentleypublishers.com/vw/servlet/Display?action=Goto&type=repair&id=VW.B4.SU01.46.4 Downloaded from www.Manualslib.com manuals search engine
46-26 Parking brake, adjusting (drum brakes) Note: Due to the automatic rear wheel brake adjustment there is no requirement to adjust the parking brake. Adjustment is only necessary after replacing parking brake cables, backing plate or brake linings - Release parking brake. - Firmly depress brake pedal once. - Pull parking brake lever up four notches. Note: The hand grip and center console must be moved to access the adjusting nuts (arrow) Page 46-39 . - Tighten adjusting nuts (arrows) until both wheels are difficult to turn by hand. - Release parking brake and check that both wheels turn freely. Page 8 of 8Rear wheel brakes, servicing12/7/2004http://ebahn.bentleypublishers.com/vw/servlet/Display?action=Goto&type=repair&id=VW.B4.SU01.46.4 Downloaded from www.Manualslib.com manuals search engine
46-27 Rear wheel brakes, servicing (disc brakes) Girling rear wheel disc brakes (front and four wheel drive vehicles) Note: Only items 5, 6, 7, 8, 9, 10, 11 and 12 apply for four wheel drive. 1 - Axle beam 2 - Hex socket head bolt, 10 Nm (7 ft lb) 3 - Wheel speed sensor Only for vehicles with ABS Insert with lubricating paste, G 000 650 Page 1 of 10Rear wheel brakes, servicing (disc brakes)12/7/2004http://ebahn.bentleypublishers.com/vw/servlet/Display?action=Goto&type=repair&id=VW.B4.SU01.46.5 Downloaded from www.Manualslib.com manuals search engine
46-28 4 - Brake hose bracket 5 - Hex socket head bolt, 65 Nm (48 ft lb) 6 - Self-locking bolt, 35 Nm (26 ft lb) Always replace When loosening and tightening, counter-hold on guide pin 7 - Guide pin 8 - Protective cap 9 - Pad retaining springs Always replace when changing pads 10 - Backing plate ring Distance between ring collar and backing plate: 9.5 mm Page 2 of 10Rear wheel brakes, servicing (disc brakes)12/7/2004http://ebahn.bentleypublishers.com/vw/servlet/Display?action=Goto&type=repair&id=VW.B4.SU01.46.5 Downloaded from www.Manualslib.com manuals search engine
46-29 Repair Manual, Maintenance 11 - Brake carrier with guide pins and protective cap Supplied as replacement part assembled with sufficient grease on guide pins If protective caps or guide pins are damaged use repair kit. Use grease packet supplied to lubricate guide pins. 12 - Brake pads Thickness: 12 mm Checking thickness: Wear limit: 7mm (including backing plate) Always replace on both sides Removing and installing Page 46-33 13 - Brake caliper Servicing Page 47-15 Page 3 of 10Rear wheel brakes, servicing (disc brakes)12/7/2004http://ebahn.bentleypublishers.com/vw/servlet/Display?action=Goto&type=repair&id=VW.B4.SU01.46.5 Downloaded from www.Manualslib.com manuals search engine
46-30 14 - Outer wheel bearing 15 - Hex nut Adjusting wheel bearing play Using a screwdriver it must be possible to move the thrust washer by finger pressure (without leverage) Page 42-20 Secure with locking ring and new cotter pin 16 - Cotter pin Always replace 17 - Grease cap Removing and installing Page 42-29 18 - Lock ring 19 - Thrust washer 20 - Wheel bolt, 110 Nm (81 ft lb) Page 4 of 10Rear wheel brakes, servicing (disc brakes)12/7/2004http://ebahn.bentleypublishers.com/vw/servlet/Display?action=Goto&type=repair&id=VW.B4.SU01.46.5 Downloaded from www.Manualslib.com manuals search engine
46-31 21 - Brake disc Brake disc diameter for vehicles with front wheel drive: 226 mm Removing and installing Page 42-24 Brake disc diameter for vehicles with four wheel drive: 239 mm Removing and installing Page 42-59 Brake disc thickness, for both versions: 10 mm Wear limit: 8 mm When worn, always replace on both sides Assembly sequence for run-in brake discs: - Brake caliper - Brake pads - Brake carrier 22 - Inner wheel bearing 23 - Seal Page 5 of 10Rear wheel brakes, servicing (disc brakes)12/7/2004http://ebahn.bentleypublishers.com/vw/servlet/Display?action=Goto&type=repair&id=VW.B4.SU01.46.5 Downloaded from www.Manualslib.com manuals search engine
46-32 24 - Wheel speed sensor rotor Insert drift through wheel bolt holes and drive off Drive on with suitable sleeve 25 - Hex bolt, 60 Nm (44 ft lb) 26 - Dished spring washer Larger seating surface towards backing plate 27 - Backing plate 28 - Stub axle 29 - Parking brake cable Adjusting parking brake Page 46-36 30 - Spring clip Page 6 of 10Rear wheel brakes, servicing (disc brakes)12/7/2004http://ebahn.bentleypublishers.com/vw/servlet/Display?action=Goto&type=repair&id=VW.B4.SU01.46.5 Downloaded from www.Manualslib.com manuals search engine
46-33 Brake pads, removing and installing Note: Mark brake pads when removing if they are to be reused. Re-install in their original position to prevent uneven braking! Removing - Remove wheels. - Remove parking brake cable from brake caliper (arrow). - Remove securing bolts from brake caliper housing; counter-hold on guide pins. - Remove brake pads. Page 7 of 10Rear wheel brakes, servicing (disc brakes)12/7/2004http://ebahn.bentleypublishers.com/vw/servlet/Display?action=Goto&type=repair&id=VW.B4.SU01.46.5 Downloaded from www.Manualslib.com manuals search engine
46-34 Installing Note: Before pressing the piston back, remove some brake fluid from the reservoir. Use a bleeder bottle or a plastic bottle which is only used for brake fluid. Brake fluid is poisonous and must not be siphoned by mouth through a hose. Note: - Thread in piston by turning knurled wheel of special tool 3272 clockwise. - Install brake pads. Install special tool 3272 so that the collar (arrow) of the tool is seated against the brake caliper. If the piston is difficult to move, use a 13 mm open end wrench on the flats (arrow A) provided for this purpose. If the piston is pushed back with a piston resetting tool or by operating the foot brake, the automatic adjustment in the brake caliper will be destroyed. Page 8 of 10Rear wheel brakes, servicing (disc brakes)12/7/2004http://ebahn.bentleypublishers.com/vw/servlet/Display?action=Goto&type=repair&id=VW.B4.SU01.46.5 Downloaded from www.Manualslib.com manuals search engine
46-35 - Secure brake caliper housing with new self-locking bolts. Note: - Attach parking brake cable (arrow) to brake caliper housing. After each brake pad change firmly depress brake pedal several times with vehicle stationary, so that the brake pads are properly seated in their normal operating position. After changing brake pads check brake fluid level. Page 9 of 10Rear wheel brakes, servicing (disc brakes)12/7/2004http://ebahn.bentleypublishers.com/vw/servlet/Display?action=Goto&type=repair&id=VW.B4.SU01.46.5 Downloaded from www.Manualslib.com manuals search engine
46-36 Parking brake, adjusting (disc brakes) Note: Due to the self-adjusting rear brakes there is no requirement to adjust the parking brake. Adjustment is only necessary after replacing parking brake cables, brake calipers, brake pads and brake discs. Remove hand grip and central console to allow access to adjusting nuts (arrows) Page 46-39 . - Parking brake lever in "off" position. Tighten adjusting nut until lever (arrow) lifts off the brake caliper stop. - A gap of max. 1.5 mm from stop (arrow) is permissible each side but should be set the same on both sides. - Pull parking brake on and then release again. - Check that both wheels turn freely. Page 10 of 10Rear wheel brakes, servicing (disc brakes)12/7/2004http://ebahn.bentleypublishers.com/vw/servlet/Display?action=Goto&type=repair&id=VW.B4.SU01.46.5 Downloaded from www.Manualslib.com manuals search engine
46-37 Parking brake lever assembly overview 1 - Parking brake lever Different versions for rear drum and disc brakes Before removing remove center console 2 - Hand grip Pry trim up with a small screwdriver then pull forward to remove Fig. 2 3 - Adjusting nut Adjusting parking brake: - Vehicles with drum brakes Page 46-26 - Vehicles with disc brakes Page 46-36 Page 1 of 9Parking brake lever assembly overview12/7/2004http://ebahn.bentleypublishers.com/vw/servlet/Display?action=Goto&type=repair&id=VW.B4.SU01.46.6 Downloaded from www.Manualslib.com manuals search engine
46-38 4 - Lock nut 5 - Compensator 6 - Parking brake lever trim First pull off parking brake hand grip then pull trim forward Fig. 2 7 - Hex nut 8 - Parking brake cable Different versions for rear drum and disc brakes Allocation see Parts catalog Page 2 of 9Parking brake lever assembly overview12/7/2004http://ebahn.bentleypublishers.com/vw/servlet/Display?action=Goto&type=repair&id=VW.B4.SU01.46.6 Downloaded from www.Manualslib.com manuals search engine
46-39 The parking brake cable is secured by clamps to the axle beam in the center of the two colored marks (arrow). Fig. 1 Parking brake cable installation position Fig. 2 Hand grip, removing - Pry up parking brake cable trim with a screwdriver and pull grip and trim off forward. Page 3 of 9Parking brake lever assembly overview12/7/2004http://ebahn.bentleypublishers.com/vw/servlet/Display?action=Goto&type=repair&id=VW.B4.SU01.46.6 Downloaded from www.Manualslib.com manuals search engine
46-40 Fig. 3 Center console, removing - Remove rear ashtray (center console). - Remove console rear securing screws (arrows). Page 4 of 9Parking brake lever assembly overview12/7/2004http://ebahn.bentleypublishers.com/vw/servlet/Display?action=Goto&type=repair&id=VW.B4.SU01.46.6 Downloaded from www.Manualslib.com manuals search engine
46-41 Brake pedal/brake servo, removing and installing CAUTION! The brake pedal travel must not be restricted by additional floor coverings. Note: Grease all mountings before installing with G 000 602 grease. 1 - Securing clip Ensure securely seated 2 - Pin 3 - Brake servo push rod clevis 4 - Self-locking hex nut, 20 Nm (15 ft lb) 5 - Brake pedal pivot pin Page 5 of 9Parking brake lever assembly overview12/7/2004http://ebahn.bentleypublishers.com/vw/servlet/Display?action=Goto&type=repair&id=VW.B4.SU01.46.6 Downloaded from www.Manualslib.com manuals search engine
46-42 Repair Manual, 5 Spd. Manual Transmission 02A, Repair Group 30 Repair Manual, 5 Spd. Manual Transmission 02A, Repair Group 30 6 - Brake pedal return spring 7 - Return spring mounting tube 8 - Brake pedal mounting bushing 9 - Brake pedal 10 - Clutch pedal Removing and installing 11 - Pedal cluster mounting bracket 12 - Clutch pedal pivot pin 13 - Clutch pedal mounting bushing 14 - Over-center spring mounting 15 - Over-center spring Before removing, remove clutch pedal Page 6 of 9Parking brake lever assembly overview12/7/2004http://ebahn.bentleypublishers.com/vw/servlet/Display?action=Goto&type=repair&id=VW.B4.SU01.46.6 Downloaded from www.Manualslib.com manuals search engine
46-43 16 - Securing clip Ensure seated securely 17 - Brake Light Switch Adjusting Page 46-45 Page 7 of 9Parking brake lever assembly overview12/7/2004http://ebahn.bentleypublishers.com/vw/servlet/Display?action=Goto&type=repair&id=VW.B4.SU01.46.6 Downloaded from www.Manualslib.com manuals search engine
46-44 Brake pedal, removing and installing Note: Grease all mounting and contact surfaces with MoS2 grease. To remove brake servo disconnect brake pedal at clevis only. Removing - Before removing brake pedal remove trim - Remove brake pedal clevis pin connection securing clip. - Remove pin. - Remove brake pedal pivot pin securing clip. - Remove pivot pin. - Remove mounting sleeve, return spring mounting tube with brake pedal. Installing - Install in reverse order. Page 8 of 9Parking brake lever assembly overview12/7/2004http://ebahn.bentleypublishers.com/vw/servlet/Display?action=Goto&type=repair&id=VW.B4.SU01.46.6 Downloaded from www.Manualslib.com manuals search engine
46-45 Brake Light Switch, adjusting Note: The Brake Light Switch must be removed for adjusting. - Remove trim under instrument panel. - Disconnect harness connector for Brake Light Switch. - Remove Brake Light Switch by turning to right through 90. - Pull Brake Light Switch plunger fully out. - Depress brake pedal as far as possible by hand, guide Brake Light Switch through the locating hole and secure by turning through 90to left. - Pull brake pedal back up by hand to stop (Brake Light Switch is pushed back by one notch). - Connect harness connector for Brake Light Switch - Check function of Brake Light Switch. - Install instrument panel trim. Page 9 of 9Parking brake lever assembly overview12/7/2004http://ebahn.bentleypublishers.com/vw/servlet/Display?action=Goto&type=repair&id=VW.B4.SU01.46.6 Downloaded from www.Manualslib.com manuals search engine
47-1 Assembly overview: brake master cylinder/brake servo Note: Brake master cylinders and brake servos from different manufacturers are installed. Complete master cylinders and brake servos can be replaced independently of each other. 1 - Seal For brake servo 2 - Self-locking hex nut, 20 Nm (15 ft lb) 3 - Mounting bracket 4 - Mounting bracket For brake servo 5 - Seal Page 1 of 4Assembly overview: brake master cylinder/brake servo12/7/2004http://ebahn.bentleypublishers.com/vw/servlet/Display?action=Goto&type=repair&id=VW.B4.SU01.47.1 Downloaded from www.Manualslib.com manuals search engine
47-2 6 - Brake servo On gas engines the vacuum required is taken from the intake manifold. On Diesel engines an exhauster is installed to create the required vacuum. Functional check - With engine switched off, depress brake pedal firmly several times (to exhaust the vacuum in the unit). - Now depress brake pedal with average foot pressure, hold and start engine. If the servo unit is working properly, the pedal will be felt to give slightly under foot (servo assistance becomes effective). If faulty replace complete. Check valve (item 14 ) is in vacuum hose Functional check - It must be possible to blow through in direction of arrow. - Blowing against the arrow the valve must seat. Page 2 of 4Assembly overview: brake master cylinder/brake servo12/7/2004http://ebahn.bentleypublishers.com/vw/servlet/Display?action=Goto&type=repair&id=VW.B4.SU01.47.1 Downloaded from www.Manualslib.com manuals search engine
47-3 7 - Sealing ring Always replace 8 - Self-locking hex nut, 20 Nm (15 ft lb) 9 - Brake master cylinder Cannot be repaired. If faulty, replace complete. 10 - Sealing plug Moisten with brake fluid and press into reservoir 11 - Seal Page 3 of 4Assembly overview: brake master cylinder/brake servo12/7/2004http://ebahn.bentleypublishers.com/vw/servlet/Display?action=Goto&type=repair&id=VW.B4.SU01.47.1 Downloaded from www.Manualslib.com manuals search engine
47-4 12 - Cap 13 - Brake fluid reservoir 14 - Non-return valve Page 4 of 4Assembly overview: brake master cylinder/brake servo12/7/2004http://ebahn.bentleypublishers.com/vw/servlet/Display?action=Goto&type=repair&id=VW.B4.SU01.47.1 Downloaded from www.Manualslib.com manuals search engine
47-5 Girling front brake caliper, servicing Note: When repairing install all parts supplied in repair kit. Apply thin coat of brake cylinder paste to brake cylinders, pistons and sea/s. 1 - Protective seal 2 - Bleed valve Apply thin coat of brake cylinder paste to threads before screwing in 3 - Brake caliper housing 4 - Self-locking hex bolt, 35 Nm (26 ft lb) Always replace When loosening and tightening counter-hold on guide pin Page 1 of 5Girling front brake caliper, servicing12/7/2004http://ebahn.bentleypublishers.com/vw/servlet/Display?action=Goto&type=repair&id=VW.B4.SU01.47.2 Downloaded from www.Manualslib.com manuals search engine
47-6 5 - Seal Remove using a screwdriver Page 47-7 6 - Piston Removing and installing Page 47-7 Apply thin coat of brake cylinder paste before inserting 7 - Protective seal Do not damage when inserting piston 8 - Brake carrier with guide pins and protective caps Brake carrier with guide pins and protective cap Supplied as replacement part assembled with sufficient grease on guide pins If protective caps or guide pins are damaged use repair kit. Use grease packet supplied to lubricate guide pins Page 2 of 5Girling front brake caliper, servicing12/7/2004http://ebahn.bentleypublishers.com/vw/servlet/Display?action=Goto&type=repair&id=VW.B4.SU01.47.2 Downloaded from www.Manualslib.com manuals search engine
47-7 Front brake caliper pistons, removing and installing Removing Note: Place a piece of wood in the recess to prevent damaging the piston. - Force piston out of brake caliper housing using compressed air. Note: When removing ensure that the surface of the cylinder is not damaged. - Remove seal with a screwdriver. Page 3 of 5Girling front brake caliper, servicing12/7/2004http://ebahn.bentleypublishers.com/vw/servlet/Display?action=Goto&type=repair&id=VW.B4.SU01.47.2 Downloaded from www.Manualslib.com manuals search engine
47-8 Installing - Place protective seal with the outer sealing lip on the piston. Note: Hold piston in front of caliper housing. - Using a screwdriver, insert the inner sealing lip into the cylinder groove. Page 4 of 5Girling front brake caliper, servicing12/7/2004http://ebahn.bentleypublishers.com/vw/servlet/Display?action=Goto&type=repair&id=VW.B4.SU01.47.2 Downloaded from www.Manualslib.com manuals search engine
47-9 Note: The protective seal outer sealing lip will then locate in the piston groove. - Press piston into the brake caliper housing using piston resetting tool. Page 5 of 5Girling front brake caliper, servicing12/7/2004http://ebahn.bentleypublishers.com/vw/servlet/Display?action=Goto&type=repair&id=VW.B4.SU01.47.2 Downloaded from www.Manualslib.com manuals search engine
47-10 Front brake caliper, servicing (Teves/Ate) Note: When repairing install all parts supplied in repair kit. Apply thin coat of brake cylinder paste to brake cylinders, pistons and seals. 1 - Protective seal Push onto bleed valve 2 - Bleed valve Apply thin coat of brake cylinder paste to threads before threading in 3 - Cap Install in mounting bushing 4 - Guide pin, 25 Nm (18 ft lb) 5 - Mounting bushing Insert into brake caliper housing Page 1 of 5Front brake caliper, servicing (Teves/Ate)12/7/2004http://ebahn.bentleypublishers.com/vw/servlet/Display?action=Goto&type=repair&id=VW.B4.SU01.47.3 Downloaded from www.Manualslib.com manuals search engine
47-11 6 - Brake cylinder housing 7 - Brake carrier Install on brake caliper housing 8 - Retaining spring Install with both ends in the drillings in brake caliper housing 9 - Piston seal Remove using a screwdriver Fig. 2 10 - Piston Force piston out of brake caliper using compressed air Fig. 1 Installing Fig. 3 and Fig. 4 and Fig. 5 First coat the piston lightly with brake cylinder paste. Piston diameter 54 mm 11 - Protective seal Do not damage when installing piston Page 2 of 5Front brake caliper, servicing (Teves/Ate)12/7/2004http://ebahn.bentleypublishers.com/vw/servlet/Display?action=Goto&type=repair&id=VW.B4.SU01.47.3 Downloaded from www.Manualslib.com manuals search engine
47-12 Note: Place a piece of wood in the recess to prevent damaging the piston. Fig. 1 Piston, pressing out of cylinder using compressed air Fig. 2 Piston seal, removing Page 3 of 5Front brake caliper, servicing (Teves/Ate)12/7/2004http://ebahn.bentleypublishers.com/vw/servlet/Display?action=Goto&type=repair&id=VW.B4.SU01.47.3 Downloaded from www.Manualslib.com manuals search engine
47-13 Fig. 3 Protective seal, installing Note: Hold piston in front of caliper housing. Fig. 4 Protective seal, installing - Using a screwdriver, insert inner sealing lip into cylinder groove Page 4 of 5Front brake caliper, servicing (Teves/Ate)12/7/2004http://ebahn.bentleypublishers.com/vw/servlet/Display?action=Goto&type=repair&id=VW.B4.SU01.47.3 Downloaded from www.Manualslib.com manuals search engine
47-14 Note: The protective seal outer sealing lip will then locate in the piston groove. Fig. 5 Piston, installing Page 5 of 5Front brake caliper, servicing (Teves/Ate)12/7/2004http://ebahn.bentleypublishers.com/vw/servlet/Display?action=Goto&type=repair&id=VW.B4.SU01.47.3 Downloaded from www.Manualslib.com manuals search engine
47-15 Rear brake caliper, servicing Note: Apply thin coat of brake cylinder paste to brake cylinder pistons and seal. When repairing install all parts supplied in repair kit. New brake calipers are filled with brake fluid and are pre-bled. When repairing it is essential to pre-bleed the brake calipers (without brake pads) before installing in the vehicle Page 47-21 1 - Self-locking bolts, 35 Nm (26 ft lb) Always replace When loosening and tightening counter-hold on guide pin Page 1 of 8Rear brake caliper, servicing12/7/2004http://ebahn.bentleypublishers.com/vw/servlet/Display?action=Goto&type=repair&id=VW.B4.SU01.47.4 Downloaded from www.Manualslib.com manuals search engine
47-16 2 - Sealing ring Remove using a screwdriver Page 47-19 3 - Piston with automatic adjustment Removing and installing Page 47-19 4 - Protective seal Pull outer sealing lip onto piston Install inner sealing lip in brake caliper housing groove Page 47-20 5 - Dust cap 6 - Bleeder valve Apply thin coat of brake cylinder paste before screwing in. Page 2 of 8Rear brake caliper, servicing12/7/2004http://ebahn.bentleypublishers.com/vw/servlet/Display?action=Goto&type=repair&id=VW.B4.SU01.47.4 Downloaded from www.Manualslib.com manuals search engine
47-17 7 - Brake caliper housing with parking brake cable lever If a leak exists at the parking brake cable lever replace brake caliper housing After repairing, pre-bleed caliper housing Page 47-21 8 - Guide pins Grease before pulling on protective cap 9 - Protective cap Pull onto brake carrier and guide pin Page 3 of 8Rear brake caliper, servicing12/7/2004http://ebahn.bentleypublishers.com/vw/servlet/Display?action=Goto&type=repair&id=VW.B4.SU01.47.4 Downloaded from www.Manualslib.com manuals search engine
47-18 10 - Brake carrier with guide pin and protective cap Supplied as replacement part, assembled with sufficient grease on guide pins If protective caps or guide pins are damaged, install repair kit. Use grease packet supplied to lubricate the guide pins. Page 4 of 8Rear brake caliper, servicing12/7/2004http://ebahn.bentleypublishers.com/vw/servlet/Display?action=Goto&type=repair&id=VW.B4.SU01.47.4 Downloaded from www.Manualslib.com manuals search engine
47-19 Rear brake caliper piston, removing and installing Removing Note: - Thread piston out of brake caliper housing by turning the knurled wheel counter-clockwise. If piston is difficult to move, use a 13 mm open end wrench on the flats (arrow A) provided for this purpose. Install special tool 3272 so that the collar (arrow) is before the piston. Note: Make sure that the surface of the cylinder is not damaged during removal. - Remove seal with a screwdriver Page 5 of 8Rear brake caliper, servicing12/7/2004http://ebahn.bentleypublishers.com/vw/servlet/Display?action=Goto&type=repair&id=VW.B4.SU01.47.4 Downloaded from www.Manualslib.com manuals search engine
47-20 Installing - Place protective seal with the outer sealing lip on the piston. Note: Hold piston in front of brake caliper housing. - Insert protective seal inner sealing lip into the caliper housing groove using a screwdriver. Page 6 of 8Rear brake caliper, servicing12/7/2004http://ebahn.bentleypublishers.com/vw/servlet/Display?action=Goto&type=repair&id=VW.B4.SU01.47.4 Downloaded from www.Manualslib.com manuals search engine
47-21 Note: - Thread piston into housing by turning knurled wheel clockwise. Install special tool 3272 so that the collar (arrow) of the tool is seated against the brake carrier. If piston is difficult to move, use a 13 mm open end wrench on flats (arrow A) provided for this purpose. If the piston is pushed back with a piston resetting tool or by operating the foot brake the automatic adjustment in the brake caliper is destroyed. - Install brake pads. Page 7 of 8Rear brake caliper, servicing12/7/2004http://ebahn.bentleypublishers.com/vw/servlet/Display?action=Goto&type=repair&id=VW.B4.SU01.47.4 Downloaded from www.Manualslib.com manuals search engine
47-22 Pre-bleeding brake caliper Note: Position brake caliper as illustrated to pre-bleed. - Open bleeder valve and using a standard bleeder bottle, fill with brake fluid until bubble-free brake fluid flows from the threaded hole (brake hose connection). Close bleeder screw. Page 8 of 8Rear brake caliper, servicing12/7/2004http://ebahn.bentleypublishers.com/vw/servlet/Display?action=Goto&type=repair&id=VW.B4.SU01.47.4 Downloaded from www.Manualslib.com manuals search engine
47-23 Brake pressure regulator, checking and adjusting Vehicles without ABS, vehicles with ABS, ABS/EDS, Teves 04 The brake pressure regulator is mounted on a bracket which is in turn fixed to a rear axle mounting bracket and is controlled from the rear axle by a spring. Checking operation Firmly depress the brake pedal and release quickly (vehicle standing on its wheels). This must cause the brake pressure regulator lever to move. Checking and adjusting pressure Note: The brake pressure regulator is set with the vehicle unladened 1). 1) The term "unladen" means: The weight of the vehicle ready for the road (full fuel tank, spare wheel, tool kit and jack). Page 1 of 4Brake pressure regulator, checking and adjusting12/7/2004http://ebahn.bentleypublishers.com/vw/servlet/Display?action=Goto&type=repair&id=VW.B4.SU01.47.5 Downloaded from www.Manualslib.com manuals search engine
47-24 Note: Bleeding brake system on vehicles with ABS Page 47-27 . - Lift vehicle and connect pressure gauges to front left brake caliper and to rear right wheel cylinder/caliper. - Bleed both gauges. - Lower vehicle and bounce the rear of the vehicle several times. - Depress brake pedal and check pressures. - Compare figures attained with specifications Page 47-25 and if necessary adjust. Page 2 of 4Brake pressure regulator, checking and adjusting12/7/2004http://ebahn.bentleypublishers.com/vw/servlet/Display?action=Goto&type=repair&id=VW.B4.SU01.47.5 Downloaded from www.Manualslib.com manuals search engine
47-25 Load dependent brake pressure regulator specifications Model / Version Bar (psi) Bar (psi) Rear axle drum Front axle 50 (725) Front axle 100 (1450) brakes Rear axle 30 - 36 (435 - 522) Rear axle 51 - 57 (740 - 827) Rear axle disc Front axle 50 (725) Front axle 100 (1450) brakes Rear axle 35 - 41 (508 - 595) Rear axle 56 - 62 (812 - 899) Four wheel drive Front axle 50 (725) Front axle 100 (1450) Rear axle 41 - 47 (595 - 682) Rear axle 66 - 72 (957 - 1044) Page 3 of 4Brake pressure regulator, checking and adjusting12/7/2004http://ebahn.bentleypublishers.com/vw/servlet/Display?action=Goto&type=repair&id=VW.B4.SU01.47.5 Downloaded from www.Manualslib.com manuals search engine
47-26 Adjusting regulator Rear axle test pressure too high: - Release tension on regulator spring. Rear axle test pressures too low: - Tension regulator spring. Note: Do not adjust with brake pedal depressed, therefore observe the following sequence: - Read off figures. - Release pedal. - Adjust spring. - Depress pedal again. - Read off figures and if necessary, readjust. - Remove pressure gauges and bleed brake system Page 47-27 . Page 4 of 4Brake pressure regulator, checking and adjusting12/7/2004http://ebahn.bentleypublishers.com/vw/servlet/Display?action=Goto&type=repair&id=VW.B4.SU01.47.5 Downloaded from www.Manualslib.com manuals search engine
47-27 Brake system, bleeding Brake system, bleeding (vehicles with and without ABS, ABS/EDL) Changing brake fluid Repair Manual, Maintenance Note: Bleeding the brake system on vehicles with ABS, ABS/EDL is performed as for vehicles with conventional braking systems. Only use new brake fluid conforming to US standard FMVSS 116 DOT 4. Genuine VW/Audi brake fluid conforms to this specification. Brake fluid is poisonous. Also due to its corrosive effect brake fluid must not come into contact with paintwork. Brake fluid is hygroscopic, which means it absorbs moisture from the ambient air and should always be stored in air tight containers. Rinse off spillages using plenty of water. Repair Manual, Brake System On Board Diagnostic (OBD), Repair Group 01 Page 1 of 3Brake system, bleeding12/7/2004http://ebahn.bentleypublishers.com/vw/servlet/Display?action=Goto&type=repair&id=VW.B4.SU01.47.6 Downloaded from www.Manualslib.com manuals search engine
47-28 Brake system, bleeding (with pressure bleeder VAS 5234) Opening the hydraulic unit bleed screws on vehicles with ABS, ABS/EDL is not permitted! Bleeding sequence Note: - Connect VAS 5234 Brake filler and bleeder unit. - Open bleeder screws in the specified order and bleed brake calipers and wheel cylinders. 1 - Right rear wheel cylinder/brake caliper 2 - Left rear wheel cylinder/brake caliper 3 - Right front brake caliper 4 - Left front brake caliper On vehicles with brake pressure regulator move the regulator lever when bleeding rear brakes. Depress the brake pedal several times during bleeding. Page 2 of 3Brake system, bleeding12/7/2004http://ebahn.bentleypublishers.com/vw/servlet/Display?action=Goto&type=repair&id=VW.B4.SU01.47.6 Downloaded from www.Manualslib.com manuals search engine
47-29 Brake system, bleeding (without pressure bleeder) Opening the hydraulic unit bleed screws on vehicles with ABS, ABS/EDL is not permitted! - Build-up brake pressure in brake system by pumping the brake pedal. - Attach bleeder bottle hose and open bleeder screw. - With brake pedal held down, close bleeder screw. - Repeat operation until no air is present. Bleeding sequence Page 47-28 Changing brake fluid Repair Manual, Maintenance Page 3 of 3Brake system, bleeding12/7/2004http://ebahn.bentleypublishers.com/vw/servlet/Display?action=Goto&type=repair&id=VW.B4.SU01.47.6 Downloaded from www.Manualslib.com manuals search engine
48-1 Steering Assembly overview: steering column, column tube, steering wheel and airbag steering wheel Airbag system functional check and interrogating Diagnostic Trouble Code (DTC) Memory. Repair Manual, Body Exterior, Interior, Repair Group 68; General body repairs Safety precautions when working on airbag Repair Manual, Body Exterior, Interior, Repair Group 68, General body repairs Note: All parts marked with a "1)" can be pre-assembled outside of the vehicle Pre-assembling steering column Page 48-6 Always replace self-locking nuts and bolts. Welding and straightening work on steering components is not permitted. Page 1 of 99Steering12/7/2004http://ebahn.bentleypublishers.com/vw/servlet/Display?action=Goto&type=repair&id=VW.B4.SU01.48.1 Downloaded from www.Manualslib.com manuals search engine
48-2 1 - Cover plate 2 - Hex nut, 50 Nm (37 ft lb) 3 - Steering wheel Install in center position 4 - Airbag unit Removing and installing Page 48-7 5 - Steering wheel for airbag Removing and installing Page 48-8 Removing and installing Airbag Spiral Spring Page 48-10 6 - Hex socket head bolt, 6.5 Nm (57 in lb) Always replace 7 - Connector 8 - Splined adapter sleeve Removing Page 48-5 Installing Page 48-5 Page 2 of 99Steering12/7/2004http://ebahn.bentleypublishers.com/vw/servlet/Display?action=Goto&type=repair&id=VW.B4.SU01.48.1 Downloaded from www.Manualslib.com manuals search engine
48-3 9 - Spring 10 - Steering column switch/steering lock housing1) Distance between steering wheel/steering column switch is not adjustable 11 - Upper trim 12 - Support ring1) With washer 13 - Steering column1) Remove by pulling upwards out of column tube Checking length Page 48-6 14 - Hex bolt, 30 Nm (22 ft lb) 15 - Hex nut, 25 Nm (18 ft lb) 16 - Hex nut, 30 Nm (22 ft lb) 17 - Steering column universal joint 18 - Spring Page 3 of 99Steering12/7/2004http://ebahn.bentleypublishers.com/vw/servlet/Display?action=Goto&type=repair&id=VW.B4.SU01.48.1 Downloaded from www.Manualslib.com manuals search engine
48-4 19 - Lower steering column bearing Pull in with VW 771 and large washer Drive out downward with a tube 20 - Washer Tighten until head shears off Drill out to remove 21 - Shear bolt 22 - Column tube 23 - Lower trim Page 4 of 99Steering12/7/2004http://ebahn.bentleypublishers.com/vw/servlet/Display?action=Goto&type=repair&id=VW.B4.SU01.48.1 Downloaded from www.Manualslib.com manuals search engine
48-5 Only use puller with leg clamp (e.g. Kukko 204/2 commercial type). Fig. 1 Splined adapter sleeve, removing Fig. 2 Splined adapter sleeve, installing - Place sleeve on steering column and press on with hex nut. - Remove nut, place on washer and press sleeve fully on with nut until sleeve is firmly seated. Page 5 of 99Steering12/7/2004http://ebahn.bentleypublishers.com/vw/servlet/Display?action=Goto&type=repair&id=VW.B4.SU01.48.1 Downloaded from www.Manualslib.com manuals search engine
48-6 The small metal lug on the lower section must be visible in the hole in the upper section (arrow). If necessary pull both sections firmly apart onto stop or press together. Fig. 3 Length of steering column, checking Fig. 4 Steering column, pre-assembling - Carefully clamp the lower section of the steering column in a vice so that the upper part is supported on the jaws. Page 6 of 99Steering12/7/2004http://ebahn.bentleypublishers.com/vw/servlet/Display?action=Goto&type=repair&id=VW.B4.SU01.48.1 Downloaded from www.Manualslib.com manuals search engine
48-7 Airbag unit, removing and installing Removing - Disconnect battery Ground strap. - Center steering wheel (wheels straight-ahead). Installing Install in reverse order Note: Only use new hex socket head bolts for airbag unit. Tightening torque: 6.5 Nm (57 in. Ib). CAUTION! Make sure that no one is in the vehicle when connecting the battery Ground strap. - Remove both socket head bolts from airbag unit. - Remove airbag unit from steering wheel and disconnect wiring connector from airbag unit. - After installing the airbag unit, switch on ignition then connect battery Ground strap. Page 7 of 99Steering12/7/2004http://ebahn.bentleypublishers.com/vw/servlet/Display?action=Goto&type=repair&id=VW.B4.SU01.48.1 Downloaded from www.Manualslib.com manuals search engine
48-8 Airbag steering wheel, removing and installing Removing - Remove airbag unit. Page 48-7 - Remove trim below steering column switch. Note: - Separate connector (arrow). (Pull foam rubber sleeve off connector, if installed). - Remove nut and pull steering wheel off steering column. After pulling steering wheel off, turn Airbag Spiral Spring slightly so that the wire (arrow) faces downward. (Hold steering wheel in installation position). The spring then locates and is prevented from turning. If this step is not performed or if the spring is tufted in an uncontrolled manner, it can lead to the spring being overstressed at full lock, causing irreparable damage. Page 8 of 99Steering12/7/2004http://ebahn.bentleypublishers.com/vw/servlet/Display?action=Goto&type=repair&id=VW.B4.SU01.48.1 Downloaded from www.Manualslib.com manuals search engine
48-9 Installing - Install steering wheel, install nut and tighten. Tightening torque: 50 Nm (37 ft lb). - Connect airbag unit connector below steering wheel. - Install trim panel below steering column. Make sure that the centering ring wiring connection is located in the recess in the trim panel. - Connect connector in steering wheel to airbag unit connector. - Install airbag unit Page 48-7 Note: Use new hex socket head bolts for airbag unit. - After installing the airbag steering wheel first switch on ignition, then connect battery Ground strap. CAUTION! Make sure that no one is in the vehicle when connecting the battery Ground strap. Page 9 of 99Steering12/7/2004http://ebahn.bentleypublishers.com/vw/servlet/Display?action=Goto&type=repair&id=VW.B4.SU01.48.1 Downloaded from www.Manualslib.com manuals search engine
48-10 Airbag Spiral Spring, removing and installing Remove airbag unit Page 48-7 Remove steering wheel Page 48-8 - Separate single connector for horn. Install steering wheel Page 48-9 Install airbag unit Page 48-7 Note: - Remove screws -1- and remove Airbag Spiral Spring -2- from steering wheel. When removing and installing the Airbag Spiral Spring, ensure that it is in the center position. As a new part the Airbag Spiral Spring is secured in the center position by a cable tie. Page 10 of 99Steering12/7/2004http://ebahn.bentleypublishers.com/vw/servlet/Display?action=Goto&type=repair&id=VW.B4.SU01.48.1 Downloaded from www.Manualslib.com manuals search engine
48-11 Column tube for height adjustable steering wheel, removing and installing The column tube can be adjusted in height by approx. 50 mm 1 - Operating lever 2 - Packing plate 3 - Column tube Square housing fits over mounting bracket 4 - Rubber stop 5 - Return spring Hooked into mounting bracket and column tube 6 - Thrust washer 7 - Packing plate Page 11 of 99Steering12/7/2004http://ebahn.bentleypublishers.com/vw/servlet/Display?action=Goto&type=repair&id=VW.B4.SU01.48.1 Downloaded from www.Manualslib.com manuals search engine
48-12 8 - Clamping sleeve 9 - Mounting bracket Before assembling, coat side sliding surfaces with MoS2 paste 10 - Bolt with left-hand thread Tighten to 22 Nm (16 ft lb), After tightening install locking plate 11 - Locking plate 12 - Locking plate nut, 8 Nm (70 in. Ib) Self-locking Always replace 13 - Washer 14 - Shear bolt Tighten until head shears off Page 12 of 99Steering12/7/2004http://ebahn.bentleypublishers.com/vw/servlet/Display?action=Goto&type=repair&id=VW.B4.SU01.48.1 Downloaded from www.Manualslib.com manuals search engine
48-13 Pump delivery pressure, checking - Disconnect pump pressure line. Test requirements: - Install adapter and test equipment. Cut-off valve on gauge open. - Start engine and if necessary add fluid to reservoir. A - VAG 1402/2 B - VAG 1402/1 C - Hose from adapter kit VAG 1402/6 D - VAG 1402 V-belt/V-belt tension OK. System not leaking. Hoses/lines are not kinked or restricted. Page 13 of 99Steering12/7/2004http://ebahn.bentleypublishers.com/vw/servlet/Display?action=Goto&type=repair&id=VW.B4.SU01.48.1 Downloaded from www.Manualslib.com manuals search engine
48-14 - With engine running at idling speed. Close cut-off valve (not longer than 5 seconds) and read off pressure. Specification: 85 - 95 bar (1232 - 1377 psi) Note: If the reading is higher or lower than specified replace pump. Vehicles with up to 110 kW engine Page 48-90 . Vehicles with 128 kW engine Page 48-97 . If reservoir fluid level is low then check steering system for leaks. For leaks at the pinion first check the lines/line connections for leaks and if necessary tighten and wipe dry. If the pinion seal or the rack seals in steering box housing are leaking then replace steering gear. To check the rack seals loosen the clamp on the boot and push to one side. Page 14 of 99Steering12/7/2004http://ebahn.bentleypublishers.com/vw/servlet/Display?action=Goto&type=repair&id=VW.B4.SU01.48.1 Downloaded from www.Manualslib.com manuals search engine
48-15 Power steering gear, removing and installing When working on the power assisted steering gear: Absolute cleanliness is required when working on the power steering. Thoroughly clean connections and immediate vicinity before loosening. Place parts on a clean surface and cover if not re-installing immediately. Do not use fluffy cloths. Only unpack parts immediately prior to installation. Only use genuine packed parts. Vehicles with four wheel drive observe installing heat shield. Page 15 of 99Steering12/7/2004http://ebahn.bentleypublishers.com/vw/servlet/Display?action=Goto&type=repair&id=VW.B4.SU01.48.1 Downloaded from www.Manualslib.com manuals search engine
48-16 Removing - Press tie rods off steering arm. A - Ball joint splitter (commercial type) e.g. Kukko No. 128/2 - Remove partition behind pedals from bulkhead and from steering column tube to loosen the universal joint/power steering gear. If an oil extraction unit is not available, disconnect vane pump supply hose and drain hydraulic fluid. - Loosen nut on the universal joint (arrow). - Remove hydraulic fluid from reservoir with an oil extraction unit, e.g. VAG 1358 A or VAG 1307 A. Page 16 of 99Steering12/7/2004http://ebahn.bentleypublishers.com/vw/servlet/Display?action=Goto&type=repair&id=VW.B4.SU01.48.1 Downloaded from www.Manualslib.com manuals search engine
48-17 Instead of plastic sealing plugs a plug consisting of Part No.113 301 229 A and banjo bolt, Part No. N 904 674 01 can be used. But when using these, several 16 mm diameter sealing rings must be used so that the holes in the banjo bolt are sealed. - Support engine/transmission assembly with 10-222 A and 10-222 A/1 (support VR6 engine with 10-222A and 10-222A/3). - Remove boot from seat on steering gear. - Remove subframe bolts. - Lower engine/transmission assembly; this will pull the two halves of the universal joint apart. - Disconnect hoses from steering gear and seal with plastic bag and adhesive tape. - Seal power steering gear threaded holes with plastic sealing plugs. - Remove steering gear securing nuts (bolts remain in subframe). - Remove steering gear rearward. Page 17 of 99Steering12/7/2004http://ebahn.bentleypublishers.com/vw/servlet/Display?action=Goto&type=repair&id=VW.B4.SU01.48.1 Downloaded from www.Manualslib.com manuals search engine
48-18 Installing Install in reverse order. - Check position of steering wheel and, if necessary, align front end. Note: Tightening torques: When lifting the engine/transmission assembly guide the lower half of the universal joint shaft -A- into the upper half -B- at the same time (second mechanic necessary). Coat boot with lubricant, e.g. soft soap, before pulling onto steering gear. Universal joint shaft 25 Nm (18 ft lb) halves Steering gear 30 Nm (22 ft lb) Tie rod joint 35 Nm (26 ft lb) Subframe front and rear 70 Nm (52 ft lb) and turn 90 further Rear subframe bracket 65 Nm (48 ft lb) Page 18 of 99Steering12/7/2004http://ebahn.bentleypublishers.com/vw/servlet/Display?action=Goto&type=repair&id=VW.B4.SU01.48.1 Downloaded from www.Manualslib.com manuals search engine
48-19 Assembly overview: power assisted steering box (TRW) Determine cause of any malfunctions using pressure and leak testing, Page 48-13 . Note: Always replace self-locking nuts and bolts. Welding and straightening work on steering components is not permitted. To grease the rack only use steering gear grease, Part No. AOF 063 000 04. Type of oil: Hydraulic oil G 002 000 Oil system capacity: 0.7 - 0.9 ltr. (0.74 - 0.95 qt) Supply and pressure line routing from Page 48-85 . Page 19 of 99Steering12/7/2004http://ebahn.bentleypublishers.com/vw/servlet/Display?action=Goto&type=repair&id=VW.B4.SU01.48.1 Downloaded from www.Manualslib.com manuals search engine
48-20 1 - Self-locking nut 35 Nm (26 ft lb) 2 - Self-locking 30 Nm (22 ft lb) 3 - Clamp 4 - Rubber mounting Internal diameter ZF: 50 mm TRW: 44 mm 5 - Right-hand tie rod 70 Nm (52 ft lb) Removing and installing Page 48-77 Vehicle alignment Page 44-1 Tie rod boot seat diameter ZF: 15 mm dia. TRW: 12.7 mm dia. It must not be installed on a ZF power steering gear Page 20 of 99Steering12/7/2004http://ebahn.bentleypublishers.com/vw/servlet/Display?action=Goto&type=repair&id=VW.B4.SU01.48.1 Downloaded from www.Manualslib.com manuals search engine
48-21 6 - Left-hand tie rod 70 Nm (52 ft lb) Removing and installing Page 48-77 Adjusting to length Page 48-84 Tie rod boot seat diameter ZF: 15 mm TRW: 12.7 mm Must not be installed on a ZF power steering gear 7 - Hex nut 50 Nm (37 ft lb) 8 - Boot Pull on and off over tie rod Can be replaced with steering gear installed Must not be twisted after adjusting toe Must not be installed on a ZF power steering gear Page 21 of 99Steering12/7/2004http://ebahn.bentleypublishers.com/vw/servlet/Display?action=Goto&type=repair&id=VW.B4.SU01.48.1 Downloaded from www.Manualslib.com manuals search engine
48-22 Repair Manual, Maintenance 9 - Steering gear Removing and installing Page 48-15 Adjusting Page 48-24 10 - Tie rod end Separating Page 48-16 Checking: 11 - Hex nut 30 Nm (22 ft lb) 12 - Universal joint Page 22 of 99Steering12/7/2004http://ebahn.bentleypublishers.com/vw/servlet/Display?action=Goto&type=repair&id=VW.B4.SU01.48.1 Downloaded from www.Manualslib.com manuals search engine
Downloaded from www.Manualslib.com manuals search engine
48-24 Power steering gear, adjusting (TRW) Note: Two Mechanics are required when adjusting. Adjust with engine switched off Adjusting steering box By turning the steering wheel back and forth (about 30 to center axis) a knocking noise will be heard if there is excessive play. - Raise vehicle on hoist. - Wheels in straight-ahead position. - Loosen locking nut (counter-hold with 3315/9). - Carefully turn adjustment screw (arrow) into cover until knocking noise can no longer be heard inside vehicle. - Tighten locking nut. - Complete a road test ensuring that when maneuvring or negotiating corners the steering self-centers without binding. Page 24 of 99Steering12/7/2004http://ebahn.bentleypublishers.com/vw/servlet/Display?action=Goto&type=repair&id=VW.B4.SU01.48.1 Downloaded from www.Manualslib.com manuals search engine
48-25 Power steering gear, disassembling and reassembling (TRW) This repair is limited to replacing the sealing rings and, if necessary, the toothed rod. Steering gears that are damaged by an accident must be replaced. For a satisfactory and successful repair, the greatest care, safety and proper tools are required. The special tool set 3315 that is pictured is also a part of this. Note: Clean hose connections and their surroundings thoroughly before opening. Thoroughly clean work place (workbench, vise) before starting work if necessary place paper towels on the working surface. Place parts that have been removed on a clean surface. If the repair will not be carried out immediately, cover parts. Do not use cloths with lint. All the replacement parts that are needed are contained in the repair kit. Only take replacement parts out of the package right before installing. Use only parts in original packaging. Always install all of the parts in the repair kit Page 25 of 99Steering12/7/2004http://ebahn.bentleypublishers.com/vw/servlet/Display?action=Goto&type=repair&id=VW.B4.SU01.48.1 Downloaded from www.Manualslib.com manuals search engine
48-26 1 - Tie rod For removing, see tie rod, removing and installing (TRW and ZF power steering gear) Page 48-77 2 - Boot Installing, see tie rod, removing and installing (TRW and ZF) power steering), Page 48-77 3 - Hose clamp Open with nipper pliers Installation position and tightening, see tie rod, removing and installing (TRW and ZF power steering), Page 48-77 Always replace 4 - Circlip Always replace 5 - Lock washer 6 - Toothed rod guide Supplied in repair kit as assembly with sealing ring Always replace Page 26 of 99Steering12/7/2004http://ebahn.bentleypublishers.com/vw/servlet/Display?action=Goto&type=repair&id=VW.B4.SU01.48.1 Downloaded from www.Manualslib.com manuals search engine
48-27 7 - O-ring Is assembled on toothed rod guide (item -6-) contained in the repair kit 8 - Pressure compensating tube Check for damage (dents and kinks) 9 - Toothed rod Check for scoring After removing lubricate immediately with hydraulic oil (corrosion protection) Supplied as a replacement part, for assignment see replacement parts fiche 10 - Plug Is only installed if the toothed rod was replaced To install, drill hole in the adjusting bolt Page 48-51 Supplied in repair kit Page 27 of 99Steering12/7/2004http://ebahn.bentleypublishers.com/vw/servlet/Display?action=Goto&type=repair&id=VW.B4.SU01.48.1 Downloaded from www.Manualslib.com manuals search engine
48-28 11 - Adjusting screw with lock nut, 60 Nm (44 ft lb) Before removing, mark position of adjusting bolt and lock nut on housing Steering gear, adjusting Page 48-24 12 - Pressure spring 13 - Pressure piece Mark installation position 14 - Housing Check cylinder race for scoring, if necessary replace steering gear complete 15 - Inverted tube nut, 30 Nm (22 ft lb) 16 - O-ring Always replace Is not included in repair kit - see Parts catalog Page 28 of 99Steering12/7/2004http://ebahn.bentleypublishers.com/vw/servlet/Display?action=Goto&type=repair&id=VW.B4.SU01.48.1 Downloaded from www.Manualslib.com manuals search engine
48-29 17 - Sealing ring Always replace 18 - Valve body Removing Page 48-32 Cannot be repaired Is not supplied as replacement part, if damaged replace steering gear 19 - Support ring Eliminated starting 4/92 If present, it must be reinstalled 20 - Adhesive film Thoroughly clean housing in this area before sticking on, e.g. with thinner, adhesive surface must be free of oil and grease Always replace Page 29 of 99Steering12/7/2004http://ebahn.bentleypublishers.com/vw/servlet/Display?action=Goto&type=repair&id=VW.B4.SU01.48.1 Downloaded from www.Manualslib.com manuals search engine
48-30 21 - Roller bearing installation position: inscription points up 22 - Sealing ring Always replace 23 - Circlip 24 - Ball bearing Drive from top downward with VW 439 Grease with steering gear grease AOF 063 000 04 25 - Self-locking hex nut, 30 Nm (22 ft lb) Always replace 26 - Locking screw, 40 Nm (30 ft lb) Always replace Is already pre-mounted on new toothed rods that are supplied as replacement parts Page 30 of 99Steering12/7/2004http://ebahn.bentleypublishers.com/vw/servlet/Display?action=Goto&type=repair&id=VW.B4.SU01.48.1 Downloaded from www.Manualslib.com manuals search engine
48-31 27 - Pipe Do not disconnect Not supplied as replacement part Sealing ring cannot be replaced 28 - O-ring 29 - Sealing ring Replace if there is scoring that can be seen or felt Already pre-mounted on new toothed rods that are supplied as replacement parts 30 - Sealing ring Not supplied as a replacement part 31 - Sealing ring Always replace Page 31 of 99Steering12/7/2004http://ebahn.bentleypublishers.com/vw/servlet/Display?action=Goto&type=repair&id=VW.B4.SU01.48.1 Downloaded from www.Manualslib.com manuals search engine
48-32 Power steering gear, disassembling - Tie rods, removing - see tie rod, removing and installing (TRW and ZF power steering), Page 48-77 - Close hose connections on power steering gear if not already done 1 - Plastic locking screw 2 - Plastic locking screw Note: Use jaw covers and check jaw covers for contamination; e.g. metal chips or the like - Clean outside of power steering gear - Open hose clamp and push back boot - Clamp steering gear with toothed rod in vise and remove tie rod - Remove tie rod - Take steering gear out of vise, screw on bracket 3315/1 and tighten bracket in vise Page 32 of 99Steering12/7/2004http://ebahn.bentleypublishers.com/vw/servlet/Display?action=Goto&type=repair&id=VW.B4.SU01.48.1 Downloaded from www.Manualslib.com manuals search engine
48-33 - Mark position of adjusting screw and lock nut to the housing (arrow) Note: - Screw lock nut together with adjusting screw Do not change position of adjusting screw to lock nut when removing If necessary, remove adjusting screw together with lock nut using tool 3115/6 Pressure piece/adjusting screw are slightly stressed with slight spring pressure 1 - Ratchet (standard commercial) 2 - Adjusting screw Page 33 of 99Steering12/7/2004http://ebahn.bentleypublishers.com/vw/servlet/Display?action=Goto&type=repair&id=VW.B4.SU01.48.1 Downloaded from www.Manualslib.com manuals search engine
48-34 - Mark installation position of pressure piece and remove 1 - Spreading pliers (standard commercial) 2 - Pressure piece - Remove circlip for valve body 1 - Needle nose pliers (standard commercial) Page 34 of 99Steering12/7/2004http://ebahn.bentleypublishers.com/vw/servlet/Display?action=Goto&type=repair&id=VW.B4.SU01.48.1 Downloaded from www.Manualslib.com manuals search engine
48-35 If very tightly seated, loosen locking screw with a hammer and driver - Remove lower locking screw for valve body 1 - Ratchet (standard commercial) - Remove hex nut below valve body 1 - Ratchet (standard commercial) 2 - Open-end wrench (standard commercial) - Drive valve body upward from below with driver - Remove grease from teeth of valve body Page 35 of 99Steering12/7/2004http://ebahn.bentleypublishers.com/vw/servlet/Display?action=Goto&type=repair&id=VW.B4.SU01.48.1 Downloaded from www.Manualslib.com manuals search engine
48-36 - Pull adhesive tape out of the housing Valve body sealing ring, removing - Pull toothed rod all the way to the left - Turn lock washer so that the opening of the circlip (arrow) is in the groove of the housing - Continue to turn the lock washer (direction of rotation left or right) so that the circlip turns out of the housing - Pull toothed rod with toothed rod guide out of the housing, pull off toothed rod guide and place toothed rod so that toothed rod piston sealing ring will not be damaged 1 - Needle nose pliers (standard commercial) - Lubricate toothed rod - Drive sealing ring upward A - Puller, e.g. Kukko 21/4 B - Driver When installing the puller -A- make sure that the claws (arrow on illustration page 13) engage properly under the sealing ring. The puller must not be spread too wide because otherwise the seat for the sealing ring and housing will be damaged or the sealing ring can jam in the housing. Page 36 of 99Steering12/7/2004http://ebahn.bentleypublishers.com/vw/servlet/Display?action=Goto&type=repair&id=VW.B4.SU01.48.1 Downloaded from www.Manualslib.com manuals search engine
48-37 For easier installation of the puller, it is recommended that a rubber band be placed around the claws. Illustration shows the housing in cross section for better view 1 - Puller, e.g. Kukko 21/4 2 - Rubber band 3 - Sealing ring 4 - Glide bearing do not remove Page 37 of 99Steering12/7/2004http://ebahn.bentleypublishers.com/vw/servlet/Display?action=Goto&type=repair&id=VW.B4.SU01.48.1 Downloaded from www.Manualslib.com manuals search engine
48-38 Inner sealing ring for toothed rod, pulling out - Install puller for sealing ring far enough so that the marking on the tool (arrow) matches the housing edge (only then will the claws engage behind the support ring) - Spread claws -2- of the tool by turning the spindle forcefully Note: When introducing the tool, make sure that the cylinder race is not damaged 1 - Support ring 2 - Claws 3 - Sealing ring 4 - Tool 3315/11 Page 38 of 99Steering12/7/2004http://ebahn.bentleypublishers.com/vw/servlet/Display?action=Goto&type=repair&id=VW.B4.SU01.48.1 Downloaded from www.Manualslib.com manuals search engine
48-39 Parts, cleaning and checking - Install tool VW 771 in the puller - Pull out sealing ring - Before assembly, the housing must be checked for contamination (paint residue, chips, dirt) and thoroughly cleaned with compressed air and alcohol - Clean adhesive surface for adhesive tape in area of the slot with solvent (e.g. L160 or alcohol) - Check cylinder race for scoring or other damage. If scoring can be felt, replace entire steering gear - Clean toothed rod (remove old grease in the tooth pockets) Page 39 of 99Steering12/7/2004http://ebahn.bentleypublishers.com/vw/servlet/Display?action=Goto&type=repair&id=VW.B4.SU01.48.1 Downloaded from www.Manualslib.com manuals search engine
48-40 Checking toothed rod for scoring If corroded areas or deep scratches are not noticeable on the toothed rod, the toothed rod must be replaced An evaluation of whether the toothed rod was damaged by force, e.g. by an accident, is not possible with this visual inspection If slight scoring (arrows) can be seen/felt on the toothed rod that are only deep enough that they can be ground off with sand paper (grain 350-600) the toothed rod can still be used After sanding, lubricate toothed rod lightly If the old toothed rod is used again, check the sealing ring for scoring (visual inspection). If there is scoring that can be seen or felt, the sealing ring and the O-ring under it must be replaced. - Sand toothed rod with sandpaper in radial direction (this is only possible with slight scoring) - Check chamfer on the front sides of the toothed rod for damage, if necessary remove with a fine grinding stone and/or sandpaper 1 - Toothed rod 2 - Sand paper (grain 350-600) 3 - Jaw covers Page 40 of 99Steering12/7/2004http://ebahn.bentleypublishers.com/vw/servlet/Display?action=Goto&type=repair&id=VW.B4.SU01.48.1 Downloaded from www.Manualslib.com manuals search engine
48-41 Sealing ring on toothed rod, replacing - Press pliers together with slight pressure on the sealing ring - Pry out sealing ring and O-ring A - Needle nose pliers (standard commercial) 1 - Toothed rod with piston 2 - Sealing rod 3 - O-ring Page 41 of 99Steering12/7/2004http://ebahn.bentleypublishers.com/vw/servlet/Display?action=Goto&type=repair&id=VW.B4.SU01.48.1 Downloaded from www.Manualslib.com manuals search engine
48-42 Sealing rings, installing on toothed rod piston - Slide mounting sleeve on toothed rod - Pull O-ring over tool and install in groove of piston - Lubricate sealing ring with hydraulic oil, pull over tool and install in groove of piston Page 42 of 99Steering12/7/2004http://ebahn.bentleypublishers.com/vw/servlet/Display?action=Goto&type=repair&id=VW.B4.SU01.48.1 Downloaded from www.Manualslib.com manuals search engine
48-43 Power steering gear, assembling Note; All sealing rings should be lubricated with hydraulic oil before installing. - Check whether the valve body housing -2- is absolutely clean on the inside, otherwise clean - Place sealing ring -1- on tool. The sealing lip -arrow- points toward tool - Drive sealing ring into stop 1 - Sealing ring 2 - Valve body housing - Make sure correct installation position of sealing ring in valve body - For better view, illustration shows valve tower in cross section Page 43 of 99Steering12/7/2004http://ebahn.bentleypublishers.com/vw/servlet/Display?action=Goto&type=repair&id=VW.B4.SU01.48.1 Downloaded from www.Manualslib.com manuals search engine
48-44 Inner sealing ring for toothed rod, installing - Place sealing ring on tool - Ensure correct installation position of sealing ring for toothed rod - Drive sealing ring -1- into the cylinder pipe far enough so that the groove (arrow) on the tool matches the edge (arrow A) of the housing 1 - Sealing ring A - Edge of housing For better view, illustration shows housing in cross section 1 - Support ring 2 - Sealing ring 3 - Valve body housing Page 44 of 99Steering12/7/2004http://ebahn.bentleypublishers.com/vw/servlet/Display?action=Goto&type=repair&id=VW.B4.SU01.48.1 Downloaded from www.Manualslib.com manuals search engine
48-45 Toothed rod, installing in housing No grease must get into the oil circulation system! - Grease teeth of toothed rod with AOF 063 000 04 grease - Slide protective tube on to toothed rod to stop - Wipe excess grease off completely Page 45 of 99Steering12/7/2004http://ebahn.bentleypublishers.com/vw/servlet/Display?action=Goto&type=repair&id=VW.B4.SU01.48.1 Downloaded from www.Manualslib.com manuals search engine
48-46 - Coat piston of toothed rod and protective tube with hydraulic oil When sliding, make sure that the sealing ring is pressed into the groove of the piston without jamming - Install installation sleeve 3315/22 into the housing - Slide toothed rod into the housing - Slowly introduce the toothed rod into the housing - Pull protective tube 3315/13 off the toothed rod Align teeth of toothed rod in such a way that they point toward the teeth of the pinion - Screw mounting sleeve 3315/18 on toothed rod and coat with hydraulic oil - Carefully slide toothed rod guide 1 over the toothed rod into the housing to stop - Slide toothed rod completely into the housing. Page 46 of 99Steering12/7/2004http://ebahn.bentleypublishers.com/vw/servlet/Display?action=Goto&type=repair&id=VW.B4.SU01.48.1 Downloaded from www.Manualslib.com manuals search engine
48-47 - Place lock washer in the housing and press in far enough until the groove in the lock washer in the slot of the housing is visible - Install new safety wire in the hole of the lock washer (arrow) - Pull safety wire in by turning the lock washer. (after pulling in, turn the lock washer approx. 1/2 revolution further) 1 - Safety wire in repair kit is not formed as a ring, but supplied as a straight wire 2 - Pliers (standard commercial) Valve body, installing Ball bearing must not be tipped when driving in - Carefully drive lower ball bearing for valve body into stop Page 47 of 99Steering12/7/2004http://ebahn.bentleypublishers.com/vw/servlet/Display?action=Goto&type=repair&id=VW.B4.SU01.48.1 Downloaded from www.Manualslib.com manuals search engine
48-48 Make sure that the sealing ring in the housing is not damaged by the teeth of the pinion - Screw assembly mandrel 3315/17 on valve body - Lubricate valve body with hydraulic oil and carefully install by hand into the valve body housing (note position of toothed rod) - Tape teeth of valve body with adhesive tape to protect the sealing ring. Avoid wrinkles. - Install upper roller bearing for valve body (inscription on roller bearing points upward) A - Adhesive tape B - Valve body Page 48 of 99Steering12/7/2004http://ebahn.bentleypublishers.com/vw/servlet/Display?action=Goto&type=repair&id=VW.B4.SU01.48.1 Downloaded from www.Manualslib.com manuals search engine
48-49 - Drive sealing ring in far enough sot that the groove for circlip in the housing is visible - Install circlip - Remove adhesive tape - Remove assembly mandrel 3315/17 - Install hex nut for valve body and tighten, 30 Nm (22 ft lb) with torque wrench SW 14 2 Note: - Install locking screw - Grease pressure piece and spring in housing in old position - Install lock nut together with adjusting screw After tightening, the marking made during removal (arrow) on the adjusting nut and lock nut must match If the toothed rod was replaced, before installing the tie rods the steering gear must be readjusted Page 49 of 99Steering12/7/2004http://ebahn.bentleypublishers.com/vw/servlet/Display?action=Goto&type=repair&id=VW.B4.SU01.48.1 Downloaded from www.Manualslib.com manuals search engine
48-50 Adhesive tape, applying - Fill slot with sealing compound AKL 450 005 05 - Tape slot with adhesive tape 1 - Adhesive surface must be dry and free from grease Page 50 of 99Steering12/7/2004http://ebahn.bentleypublishers.com/vw/servlet/Display?action=Goto&type=repair&id=VW.B4.SU01.48.1 Downloaded from www.Manualslib.com manuals search engine
48-51 Power steering gear, adjusting with new toothed rod If a new toothed rod was used, the steering play should be adjusted according to the following description. - Drill a hole 5.1 mm in diameter in the center of the adjusting screw (on the back side center) - Thoroughly clean adjusting screw - Place toothed rod in center position (measure toothed rod excess right and left) - Install pressure piece and spring in housing if not done yet - Screw adjusting screw and lock nut far enough into the housing so that the markings match Page 51 of 99Steering12/7/2004http://ebahn.bentleypublishers.com/vw/servlet/Display?action=Goto&type=repair&id=VW.B4.SU01.48.1 Downloaded from www.Manualslib.com manuals search engine
48-52 - Install gauge and set to "O" with approx. 1 mm pre-load (make sure that the key does not stick, front of key must not be crowned) 1 - 3315/8 2 - 3315/9 3 - 3315/1 4 - VW 387 - Screw right rod onto toothed rod and tighten by hand - Turn toothed rod radially from stop to stop, during this process observe pointer on gauge. Page 52 of 99Steering12/7/2004http://ebahn.bentleypublishers.com/vw/servlet/Display?action=Goto&type=repair&id=VW.B4.SU01.48.1 Downloaded from www.Manualslib.com manuals search engine
48-53 Needle run-out max. 0.10 mm If needle run-out is greater than 0.10 mm, screw pressure piece slightly into housing If the needle run-out is less than 0.10 mm, screw pressure piece slightly out of housing - Tighten lock nut - Check needle run-out again, if necessary repeat adjustment - Remove gauge Close hole in adjusting screw with a stopper from repair kit Tie rods, installing - First install clip -2- with gasket -1- in the hole - Apply 1 drop sealing compound, Part No. AMV 188 001 02, in the hole of the clip -arrow- and press plug -3- into the clip - See tie rods, removing and installing (TRW and ZF steering gear), Page 48-77 Page 53 of 99Steering12/7/2004http://ebahn.bentleypublishers.com/vw/servlet/Display?action=Goto&type=repair&id=VW.B4.SU01.48.1 Downloaded from www.Manualslib.com manuals search engine
48-54 Assembly overview: power steering gear (ZF) It is not intended that repair work be carried out on the power steering gear. If complaints are received determine cause with the help of pressure tests, leakage test and troubleshooting programs. If a malfunction exists replace the power steering gear. Note: Always replace self-locking nuts and bolts. Welding and straightening work on steering components is not permitted. To grease the rack use only steering gear grease, Part No. AOF 063 000 04. Type of oil: Hydraulic oil G 002 000 Oil system capacity: 0.7 - 0.9 Itr. (0.74 - 0.95 qt) Supply and pressure line routing Page 48-85 . Page 54 of 99Steering12/7/2004http://ebahn.bentleypublishers.com/vw/servlet/Display?action=Goto&type=repair&id=VW.B4.SU01.48.1 Downloaded from www.Manualslib.com manuals search engine
48-55 1 - Power steering gear Removing and installing Page 48-15 Adjusting Page 48-59 Checking steering moment Steering gear with reduced steering moment only permissible for vehicles up to 85 kW Steering moment on 16 V and VR 6 vehicles is approx. 2 Nm higher 2 - Hose clip Always replace- use pliers to open Tensioning Page 48-81 Page 55 of 99Steering12/7/2004http://ebahn.bentleypublishers.com/vw/servlet/Display?action=Goto&type=repair&id=VW.B4.SU01.48.1 Downloaded from www.Manualslib.com manuals search engine
48-56 3 - Boot Remove ball joint before removing Check for wear (cuts, cracks), ensure sealing surfaces and sealing lips are clean and undamaged The end diameters are larger than the boot for TRW power steering gears Must not be installed on TRW power steering gear 4 - Hose clip Always replace - use pliers to open Tensioning Page 48-81 Must not be installed on a TRW power steering gear Page 56 of 99Steering12/7/2004http://ebahn.bentleypublishers.com/vw/servlet/Display?action=Goto&type=repair&id=VW.B4.SU01.48.1 Downloaded from www.Manualslib.com manuals search engine
48-57 5 - Right-hand tie rod Removing and installing Page 48-77 Vehicle alignment Page 44-1 Tie rod boot seat diameter ZF: 15 mm TRW: 12.7 mm Must not be installed on a TRW power steering gear 6 - Left-hand tie rod Removing and installing Page 48-77 Tie rod boot seat diameter ZF: 15 mm TRW: 12.7 mm Must not be installed on a TRW power steering gear Adjusting length Page 48-84 Page 57 of 99Steering12/7/2004http://ebahn.bentleypublishers.com/vw/servlet/Display?action=Goto&type=repair&id=VW.B4.SU01.48.1 Downloaded from www.Manualslib.com manuals search engine
48-58 Repair Manual, Maintenance 7 - Lock nut, 50 Nm (37 ft lb) 8 - Tie rod ball joint Splitting Page 48-16 Checking: 9 - Pressure balance pipe 10 - 30 Nm (22 ft lb) 11 - Clamp 12 - Rubber mounting Internal diameter ZF: 50 mm TRW: 44 mm 13 - Data plate and company initials Page 58 of 99Steering12/7/2004http://ebahn.bentleypublishers.com/vw/servlet/Display?action=Goto&type=repair&id=VW.B4.SU01.48.1 Downloaded from www.Manualslib.com manuals search engine
48-59 Power steering gear, adjusting (ZF) Note: Two mechanics are required when adjusting. Adjust with engine switched off. - Raise vehicle on hoist. - Wheels in straight-ahead position. - By turning the steering wheel to and fro (about 30 to center axis) a knocking noise will be heard if there is excessive play. - The second mechanic carefully screws the adjustment screw -arrow- into the cover until the knocking noise can no longer be heard inside the vehicle. - Complete a road test ensuring that when maneuvering or negotiating corners the steering self-centers without sticking. Page 59 of 99Steering12/7/2004http://ebahn.bentleypublishers.com/vw/servlet/Display?action=Goto&type=repair&id=VW.B4.SU01.48.1 Downloaded from www.Manualslib.com manuals search engine
48-60 Power steering gear, disassembling and reassembling (ZF) This repair is limited to replacing the sealing rings and, if necessary, the toothed rod. Steering gears that are damaged by an accident must be replaced For a satisfactory and successful repair, the greatest care, safety and proper tools are required. Note: Clean hose connections and their surroundings thoroughly before opening Thoroughly clean work place (workbench, vise) before starting work if necessary place paper towels on the working surface Place parts that have been removed on a clean surface. If the repair will not be carried out immediately, cover parts Do not use cloths with lint All the replacement parts that are needed are contained in the repair kit Only take replacement parts out of the package right before installing. Use only parts in original packaging Always install all of the parts in the repair kit Page 60 of 99Steering12/7/2004http://ebahn.bentleypublishers.com/vw/servlet/Display?action=Goto&type=repair&id=VW.B4.SU01.48.1 Downloaded from www.Manualslib.com manuals search engine
48-61 Power steering gear, disassembling Note: Use jaw covers, check jaw covers for contamination; e.g. metal chips or the like - Tie rods, removing - see tie rod, removing and installing (TRW and ZF power steering), Page 48-34 - Close hose connections on power steering gear if not already done 1 - Plastic locking screw 2 - Plastic locking screw - Clean outside of power steering gear - Open hose clamp and push back boot - Clamp steering gear with toothed rod in vise and remove tie rod - Remove tie rod - Take steering gear out of vise, screw on bracket 3315/1 and tighten bracket in vise - Remove cover Page 61 of 99Steering12/7/2004http://ebahn.bentleypublishers.com/vw/servlet/Display?action=Goto&type=repair&id=VW.B4.SU01.48.1 Downloaded from www.Manualslib.com manuals search engine
48-62 Note: Do not change position of the adjusting screw (arrow) Cover is stressed with slight spring pressure - Remove pressure piece 1 - Spreading pliers (standard commercial) Page 62 of 99Steering12/7/2004http://ebahn.bentleypublishers.com/vw/servlet/Display?action=Goto&type=repair&id=VW.B4.SU01.48.1 Downloaded from www.Manualslib.com manuals search engine
48-63 - Remove lower locking screw for valve body 1 - Locking screw - Remove Torx screw for valve body 1 - Open-end wrench (standard commercial SW 14) 2 - Torx insert (standard commercial E10) 3 - Ratchet (standard commercial 3/8") Page 63 of 99Steering12/7/2004http://ebahn.bentleypublishers.com/vw/servlet/Display?action=Goto&type=repair&id=VW.B4.SU01.48.1 Downloaded from www.Manualslib.com manuals search engine
48-64 - Remove circlip for valve body with needle nose pliers 1 - Drive valve body out from below with driver - Slide toothed rod all the way in the direction of the valve body - Turn circlip so that the pointed end of the circlip is in the groove (arrow) of the housing Page 64 of 99Steering12/7/2004http://ebahn.bentleypublishers.com/vw/servlet/Display?action=Goto&type=repair&id=VW.B4.SU01.48.1 Downloaded from www.Manualslib.com manuals search engine
48-65 Center roller bearing for valve body, removing - First lift circlip with slotted screwdriver then pull out with pliers - Before removing toothed rod, clean housing opening with compressed air - Remove dirt and any chips that may be present - Pull toothed rod out of the housing to the right with toothed rod guide A - Screwdriver B - Pliers (standard commercial) - Lubricate toothed rod When installing the puller A, make sure that the claws (arrows on fig. N48-0058, page 45) engage correctly under the sealing ring. The puller must not be spread too wide because otherwise the seat for the sealing ring and the housing will be damaged or the sealing ring can jam in the housing. - Drive center roller bearing out toward the top A - Puller, e,g, Kukko 21/4 B - Driver Page 65 of 99Steering12/7/2004http://ebahn.bentleypublishers.com/vw/servlet/Display?action=Goto&type=repair&id=VW.B4.SU01.48.1 Downloaded from www.Manualslib.com manuals search engine
48-66 For easier installation of the puller, it is recommended that a rubber band be placed around the jaws. Illustration shows the housing in cross section for better view. Sealing ring for valve body, removing 1 - Puller e.g. Kukko 21/4 2 - Rubber band 3 - Sealing ring 4 - Housing When installing the puller A, make sure that the claws (arrows on fig. N48-0058, page 46) engage correctly under the sealing ring. The puller must not be spread too wide because otherwise the seat for the sealing ring and the housing will be damaged or the sealing ring can jam in the housing. - Drive sealing ring out toward the top A - Puller, e.g. Kukko 21/4 B - Driver - Drive out lower ball bearing with VW 439 Page 66 of 99Steering12/7/2004http://ebahn.bentleypublishers.com/vw/servlet/Display?action=Goto&type=repair&id=VW.B4.SU01.48.1 Downloaded from www.Manualslib.com manuals search engine
48-67 For easier installation of the puller, it is recommended that a rubber band be placed around the jaws. Illustration shows the housing in cross section for better view. Inner sealing ring for toothed rod, removing 1 - Puller, e.g. Kukko 21/4 2 - Rubber band 3 - Roller bearing 4 - Housing - Remove sealing ring for toothed rod from the housing - Disconnect hose line from valve body housing to cylinder line - Clean hose line, housing. Check threaded connection for contamination (rubber residue, chips) Page 67 of 99Steering12/7/2004http://ebahn.bentleypublishers.com/vw/servlet/Display?action=Goto&type=repair&id=VW.B4.SU01.48.1 Downloaded from www.Manualslib.com manuals search engine
48-68 Parts, cleaning and checking - Before assembly, the housing must be checked for contamination (paint residue, chips, dirt) and clean thoroughly with compressed air and alcohol if necessary - Check cylinder race for scoring or other damage. If scoring can be felt, replace the complete steering gear - Clean toothed rod (remove old grease in tooth pockets) Page 68 of 99Steering12/7/2004http://ebahn.bentleypublishers.com/vw/servlet/Display?action=Goto&type=repair&id=VW.B4.SU01.48.1 Downloaded from www.Manualslib.com manuals search engine
48-69 Checking toothed rod for scoring If corroded areas or deep scratches are noticeable on the toothed rod, the toothed rod must be replaced An evaluation of whether the toothed rod was damaged by force, e.g. by an accident, is not possible with this visual inspection After sanding, lubricate toothed rod lightly If the old toothed rod is used again, check the sealing ring for scoring (visual inspection). If there is scoring that can be seen or felt, the sealing ring and the O-ring under it must be replaced. - Sand toothed rod with sand paper in radial direction (this is only possible with slight scoring) - Check chamfer on the front sides of the toothed rod for damage, if necessary remove with fine grinding stone and/or sandpaper 1 - Toothed rod 2 - Sand paper (grain 350-600) Page 69 of 99Steering12/7/2004http://ebahn.bentleypublishers.com/vw/servlet/Display?action=Goto&type=repair&id=VW.B4.SU01.48.1 Downloaded from www.Manualslib.com manuals search engine
48-70 Sealing ring on toothed rod, replacing When the sealing rod is replaced it must be replaced with a new one of the same color Note the matching of the O-ring to the sealing ring - Press pliers together with slight pressure on the sealing ring - Pry out sealing ring and O-ring A - Needle nose pliers (standard commercial) O-ring 30.0 x 1.78/ white sealing ring O-ring 31.0 x 1.5/black sealing ring - Slide mounting sleeve 3315/19 onto toothed rod - Pull O-ring over the tool and insert in the groove of the piston Page 70 of 99Steering12/7/2004http://ebahn.bentleypublishers.com/vw/servlet/Display?action=Goto&type=repair&id=VW.B4.SU01.48.1 Downloaded from www.Manualslib.com manuals search engine
48-71 Power steering gear, assembling Note: The sealing lip (arrow) of the sealing ring points upward toward the teeth 1 on the valve body For better viewing, the illustration shows the body housing in cross section with installed valve body. The valve body is shown slightly raised for better viewing Inner sealing rod for toothed rod, installing Lubricate the sealing rings with hydraulic oil before installing - Note correct installation position of the sealing ring - Place sealing ring for valve body on the tool and drive in to stop. For installation position, see next illustration - Drive center roller bearing for valve body into stop The sealing lip (arrow) of sealing ring -3- points toward cylinder -4-. For better illustration, the drawing shows the housing in cross section. 1 - Valve body 2 - Support ring 3 - Sealing ring 4 - Cylinder Page 71 of 99Steering12/7/2004http://ebahn.bentleypublishers.com/vw/servlet/Display?action=Goto&type=repair&id=VW.B4.SU01.48.1 Downloaded from www.Manualslib.com manuals search engine
48-72 When the groove -arrow- matches the edge -arrow -A- of the housing, the sealing ring is properly seated. - Place support ring -1- and sealing ring -2- on tool - Drive sealing ring for toothed rod into housing to stop Page 72 of 99Steering12/7/2004http://ebahn.bentleypublishers.com/vw/servlet/Display?action=Goto&type=repair&id=VW.B4.SU01.48.1 Downloaded from www.Manualslib.com manuals search engine
48-73 Toothed rod, installing in the housing No grease must get into the oil circulation system! - Grease teeth of toothed rod with AOF 063 000 04 grease - Slide protective tube over toothed rod to stop - Wipe away excess grease completely When sliding, make sure that the sealing ring is pressed into the groove of the piston without jamming - Coat piston of toothed rod and protective tube with hydraulic oil - Install installation sleeve 3315/21 into the housing - Slide toothed rod into the housing - Slowly introduce the toothed rod into the housing - Pull protective tube 3315/5 off the toothed rod Page 73 of 99Steering12/7/2004http://ebahn.bentleypublishers.com/vw/servlet/Display?action=Goto&type=repair&id=VW.B4.SU01.48.1 Downloaded from www.Manualslib.com manuals search engine
Downloaded from www.Manualslib.com manuals search engine
48-75 Make sure that the sealing ring in the housing is not damaged by the teeth of the pinion. - Thread assembly mandrel 3315/17 onto valve body. - Lubricate valve body with hydraulic oil and carefully install by hand into the valve body housing (note position of toothed rod). - Tape the valve body with adhesive tape. Page 75 of 99Steering12/7/2004http://ebahn.bentleypublishers.com/vw/servlet/Display?action=Goto&type=repair&id=VW.B4.SU01.48.1 Downloaded from www.Manualslib.com manuals search engine
48-76 - Carefully slide bushing with roller bearing onto the valve body. - Drive bushing into the housing far enough so that the groove for the circlip is visible. - Install circlip. - Remove adhesive tape. - Remove installation mandrel 3315/17. - Install Torx screw into valve body and tighten to 35 Nm (26 ft lb). - Thread in locking screw, tighten to 30 Nm (22 ft lb) and crimp at corner points. - Grease pressure piece with AOF 063 000 04. - Install pressure piece, spring and washer in housing. - Install cover with adjusting screw. Adjust steering gear after installation in vehicle. Page 76 of 99Steering12/7/2004http://ebahn.bentleypublishers.com/vw/servlet/Display?action=Goto&type=repair&id=VW.B4.SU01.48.1 Downloaded from www.Manualslib.com manuals search engine
48-77 Tie rods, removing and installing (power steering gear - TRW and ZF) Note: Observe how tie rods are threaded into power steering gear: - Tie rods not secured with locking fluid - Tie rods secured with locking fluid When exchanging secured version tie rods use locking fluid D6 when installing. Removing The tie rods can only be removed/installed with the steering gear removed. - Seal line connections on power steering gear. 1 - Plastic sealing plugs 2 - Plastic sealing plugs - Clean outside of power steering gear in vicinity of the boot. Page 77 of 99Steering12/7/2004http://ebahn.bentleypublishers.com/vw/servlet/Display?action=Goto&type=repair&id=VW.B4.SU01.48.1 Downloaded from www.Manualslib.com manuals search engine
48-78 - Open hose clips and push boot back. Note: Use vice clamps, check vice clamps for impurities e.g. metal filings or similar and thoroughly remove. Installing Installing tie rod without locking fluid D6. Install in reverse order. Tightening torque: 70 Nm (52 ft lb) Installing tie rods with locking fluid D6 If parts are reused, it is essential to clean any residue of locking fluid off the threaded studs of the inner joint or the thread tapped hole as described below. Otherwise there is a danger of the thread being damaged when being reinstalled or removed. - Clamp steering gear with rack in a vice. - Remove tie rod. Page 78 of 99Steering12/7/2004http://ebahn.bentleypublishers.com/vw/servlet/Display?action=Goto&type=repair&id=VW.B4.SU01.48.1 Downloaded from www.Manualslib.com manuals search engine
48-79 Note: Do not tilt tap when positioning. If it is difficult to turn the tap onto the thread or if metal swarf forms, this indicates the thread is deformed. - Clean threaded stud or tie rod with M 14 x 1.5 tap or wire brush. - Check if joint stud threads are deformed replace if necessary. - Cover steering gear housing opening (arrow) with a cloth. - Clean threaded hole in rack with M 14 x 1.5 tap. - Clean thread with nitro thinners e.g. L 160 (thread must be oil and grease free). - Clean with compressed air. Page 79 of 99Steering12/7/2004http://ebahn.bentleypublishers.com/vw/servlet/Display?action=Goto&type=repair&id=VW.B4.SU01.48.1 Downloaded from www.Manualslib.com manuals search engine
48-80 Installing Note: Apply one drop only in 2nd thread of rack. If too much D6 is used the release torque when next disassembling will be too high. No D6 must get onto steering rack. - Adjust new tie rod to length Page 48-84 . - Coat tapped hole thread with D6 locking fluid (arrow). - Tighten tie rod to the specified torque, 70 Nm (52 ft lb). Always use a torque wrench. Page 80 of 99Steering12/7/2004http://ebahn.bentleypublishers.com/vw/servlet/Display?action=Goto&type=repair&id=VW.B4.SU01.48.1 Downloaded from www.Manualslib.com manuals search engine
48-81 Boot, installing Note: - Check boot for wear (cuts, cracks) and ensure sealing surfaces are clean. - Install boot, but first turn the tie rod so that the tie rod ball joint shank is in the installation position. - Install pressure balance line. Do not damage sticker -A- when pushing the boot on (only on TRW power steering gears). Make sure that the boot and the pressure balance line are installed correctly. During assembly of the boot ensure that the bead -arrows- contacts the housing. Only use genuine hose clips -B- 1 - Boot 2 - Housing Page 81 of 99Steering12/7/2004http://ebahn.bentleypublishers.com/vw/servlet/Display?action=Goto&type=repair&id=VW.B4.SU01.48.1 Downloaded from www.Manualslib.com manuals search engine
48-82 1 - Hose clamp 2 - Pressure compensating tube 3 - Boot 4 - Approx. 90 - Tension hose clamps with pliers VAG 1275 or equivalent. Page 82 of 99Steering12/7/2004http://ebahn.bentleypublishers.com/vw/servlet/Display?action=Goto&type=repair&id=VW.B4.SU01.48.1 Downloaded from www.Manualslib.com manuals search engine
48-83 Note: The boot must not be installed twisted. Page 83 of 99Steering12/7/2004http://ebahn.bentleypublishers.com/vw/servlet/Display?action=Goto&type=repair&id=VW.B4.SU01.48.1 Downloaded from www.Manualslib.com manuals search engine
48-84 Left-hand tie rod length, checking and adjusting - Check dimension "a" on left-hand tie rod and if necessary adjust. Dimension "a" = 395 + 1 mm (all except from VR6 and 16V) Dimension "a" = 413 1 mm (VR6 and 16V) Note: Only adjust toe on right-hand tie rod. Before installing new left-hand tie rod check dimension "a" and if necessary adjust. Page 84 of 99Steering12/7/2004http://ebahn.bentleypublishers.com/vw/servlet/Display?action=Goto&type=repair&id=VW.B4.SU01.48.1 Downloaded from www.Manualslib.com manuals search engine
48-85 Assembly overview: vane pump, reservoir and hydraulic lines (vehicles with 4-Cyl. engines) It is not intended that repair work be carried out on the vane pump. If complaints are received determine cause with the help of pressure and leakage tests. Replace pump if faulty. Note: Pumps supplied as spare parts are not filled with oil. Fill the pump with G 002 000 hydraulic oil to rotate it by hand, otherwise the pump may be damaged or noisy during operation. Type of oil: hydraulic oil G 002 000 Oil system capacity: 0.7 - 0.9 Itr. (0.74 - 0.95 qt.) Do not reuse drained hydraulic oil. Always replace O-rings. Page 85 of 99Steering12/7/2004http://ebahn.bentleypublishers.com/vw/servlet/Display?action=Goto&type=repair&id=VW.B4.SU01.48.1 Downloaded from www.Manualslib.com manuals search engine
48-86 1 - Cooling line Secured to crossmember item 9 2 - Bracket Various versions depending on engine/transmission Page 48-96 3 - Pressure line 4 - Suction line Hydraulic pump - Cooling line 5 - Hose clamp, 3 Nm (27 in lb) 6 - Hydraulic pump With V-belt pulley 7 - Hydraulic pump With ribbed belt sprocket 8 - O-ring Always replace Page 86 of 99Steering12/7/2004http://ebahn.bentleypublishers.com/vw/servlet/Display?action=Goto&type=repair&id=VW.B4.SU01.48.1 Downloaded from www.Manualslib.com manuals search engine
48-87 9 - Pressure line union 10 - Banjo bolt, 35 Nm (26 ft lb) 11 - Hex bolt, 10 Nm (7 ft lb) Page 87 of 99Steering12/7/2004http://ebahn.bentleypublishers.com/vw/servlet/Display?action=Goto&type=repair&id=VW.B4.SU01.48.1 Downloaded from www.Manualslib.com manuals search engine
48-88 Assembly overview: Hydraulic lines, reservoir (vehicles with 4-Cyl. engines) Notes Page 48-85 1 - Power steering gear 2 - O-ring Always replace 3 - Return line, 30 Nm (22 ft lb) 4 - Pressure line, 30 Nm (22 ft lb) 5 - Reservoir 6 - Rubber ring 7 - Hose clamp 8 - Rubber insert 9 - Captive nut 10 - Bracket Page 88 of 99Steering12/7/2004http://ebahn.bentleypublishers.com/vw/servlet/Display?action=Goto&type=repair&id=VW.B4.SU01.48.1 Downloaded from www.Manualslib.com manuals search engine
48-89 11 - Self-tapping screw 12 - Hose clamp 13 - Return hose 14 - Suction hose Reservoir - Cooling line 15 - Cooling line 16 - Threaded stud 17 - Bracket Page 89 of 99Steering12/7/2004http://ebahn.bentleypublishers.com/vw/servlet/Display?action=Goto&type=repair&id=VW.B4.SU01.48.1 Downloaded from www.Manualslib.com manuals search engine
48-90 Power steering vane pump, removing and installing (vehicles with 4-Cyl. engines) Note: Always replace self-locking nuts and bolts. Pumps supplied as spare parts are not filled with hydraulic oil. Fill the pump with G 002 000 hydraulic oil and rotate it by hand, otherwise the pump may be damaged or noisy during operation. Do not reuse drained hydraulic oil. 1 - Suction hose 2 - Pressure hose 3 - Hose clamp 4 - Tensioning bolt Tensioning V-belts item 11 Page 90 of 99Steering12/7/2004http://ebahn.bentleypublishers.com/vw/servlet/Display?action=Goto&type=repair&id=VW.B4.SU01.48.1 Downloaded from www.Manualslib.com manuals search engine
48-91 Maintenance Manual 5 - 20 Nm(15 ft Ib) 6 - Front swivel bracket 7 - 20 Nm (15 ft lb) 8 - Adjustment bracket 9 - 20 Nm (15 ft lb) 10 - Bracket 11 - V-belts 11.5 x 685 Gas engine 11.5 x 730 Diesel engine 11.5 x 755 Gas engine with air conditioner 11.5 x 790 Diesel engine with air conditioner Tensioning Page 48-93 Checking condition 12 - 25 Nm (18 ft lb) Page 91 of 99Steering12/7/2004http://ebahn.bentleypublishers.com/vw/servlet/Display?action=Goto&type=repair&id=VW.B4.SU01.48.1 Downloaded from www.Manualslib.com manuals search engine
48-92 13 - V-belt pulley When installing the V-belt pulley ensure that the crankshaft pulley and the vane pump pulley are aligned 14 - Shim Only installed on vehicles with Diesel engine 15 - 20 Nm (15 ft lb) 16 - Rear swivel bracket 17 - Vane pump Checking delivery pressure Page 48-13 Page 92 of 99Steering12/7/2004http://ebahn.bentleypublishers.com/vw/servlet/Display?action=Goto&type=repair&id=VW.B4.SU01.48.1 Downloaded from www.Manualslib.com manuals search engine
48-93 V-belts, tensioning (4-Cyl. engines) Specification: - Tension V-belts by turning adjustment bolt with torque wrench -A- (VAG 1410 and VAG 1410/2). Used belts, 4 Nm (35 in. Ib) New belts, 7 Nm (62 in. Ib) Note: Nut 4 - is only installed on gasoline engines. - Tighten adjustment clamping bolt -3- to 25 Nm (18 ft lb). - Tighten bolt -1- to 45 Nm (33 ft lb). - Tighten bolt -2- and nut -4- to 25 Nm (18 ft lb). Page 93 of 99Steering12/7/2004http://ebahn.bentleypublishers.com/vw/servlet/Display?action=Goto&type=repair&id=VW.B4.SU01.48.1 Downloaded from www.Manualslib.com manuals search engine
48-94 Assembly overview: Pressure and cooling lines (vehicles with VR6 engine) Note: Securing of pressure line varies according to type of transmission Fig. 1 and Fig. 2 1 - Reservoir 2 - Suction hose Reservoir - Cooling line 3 - Cooling line Secured to crossmember item 8 4 - Pressure line 5 - Suction line Cooling line - Hydraulic pump 6 - Hose clamp, 3 Nm (27 in. Ib) Page 94 of 99Steering12/7/2004http://ebahn.bentleypublishers.com/vw/servlet/Display?action=Goto&type=repair&id=VW.B4.SU01.48.1 Downloaded from www.Manualslib.com manuals search engine
48-95 7 - Hydraulic pump 8 - Seal Always replace 9 - Pressure line union 10 - Banjo bolt, 35 Nm (26 ft lb) 11 - Hex bolt, 10 Nm (7 ft lb) 12 - Hose clamp, 3 Nm (27 in. Ib) 13 - Return line Power steering gear - Reservoir Page 95 of 99Steering12/7/2004http://ebahn.bentleypublishers.com/vw/servlet/Display?action=Goto&type=repair&id=VW.B4.SU01.48.1 Downloaded from www.Manualslib.com manuals search engine
48-96 Fig. 1 Pressure hose, securing (vehicles with manual transmission) Fig. 2 Pressure hose, securing (vehicles with automatic transmission) Page 96 of 99Steering12/7/2004http://ebahn.bentleypublishers.com/vw/servlet/Display?action=Goto&type=repair&id=VW.B4.SU01.48.1 Downloaded from www.Manualslib.com manuals search engine
48-97 Power steering vane pump, removing and installing (vehicles with VR6 engine] Note: Always replace seals. Do not reuse drained hydraulic oil. Pumps supplied as spare parts are not filled with oil. Fill the pump with G 002 000 hydraulic oil and rotate it by hand, otherwise the pump may be damaged or noisy during operation. 1 - Suction hose A cooling line is installed between vane pump suction hose and reservoir 2 - Hose clamp Page 97 of 99Steering12/7/2004http://ebahn.bentleypublishers.com/vw/servlet/Display?action=Goto&type=repair&id=VW.B4.SU01.48.1 Downloaded from www.Manualslib.com manuals search engine
48-98 Repair Manual, Engine Mechanics; Repair Group13 Repair Manual, Engine Mechanics; Repair Group13 Repair Manual, Maintenance 3 - Pressure hose Attachment varies according to type of transmission Page 48-96 4 - Seal 5 - Banjo bolt, 30 Nm (22 ft lb) 6 - Vane pump Checking delivery pressure Page 48-13 7 - Ribbed belts Removing Tensioning ensured by tensioning roller Belt routing Checking condition 8 - Belt pulley Page 98 of 99Steering12/7/2004http://ebahn.bentleypublishers.com/vw/servlet/Display?action=Goto&type=repair&id=VW.B4.SU01.48.1 Downloaded from www.Manualslib.com manuals search engine
48-99 9 - Hex socket head bolt, 25 Nm (18 ft lb) 10 - Hex bolt, M8 x 30, 25 Nm (18 ft lb) 11 - Hex socket head bolt, M8 x 30, 25 Nm (18 ft lb) 12 - Hex socket head bolt, M8 x 20, 25 Nm (18 ft lb) 13 - Hex socket head bolt, M8 x 30, 25 Nm (18 ft lb) 14 - Hex bolt, M8 x 30, 25 Nm (18 ft lb) 15 - Bracket On vehicles with air conditioner can only be removed having first removed the air conditioner bracket Page 99 of 99Steering12/7/2004http://ebahn.bentleypublishers.com/vw/servlet/Display?action=Goto&type=repair&id=VW.B4.SU01.48.1 Downloaded from www.Manualslib.com manuals search engine
Downloaded from www.Manualslib.com manuals search engine
Downloaded from www.Manualslib.com manuals search engine
Suspension, Wheels, Brakes, Steering 00 - General, Technical data Suspension, Wheels, Brakes, Steering Technical data Steering Brakes Wheels, tires 40 - Front suspension Front Wheel Suspension, Shafts and Axle Front suspension, servicing (Base suspension) Sub-frame, stabilizer bar and control arm (Base suspension) Ball joint, checking (Base and Plus suspension) Reworking cap nut in side member (Base and Plus suspension) Wheel bearing, suspension strut and drive shaft, removing and installing (Base running gear) Front suspension strut, servicing (Base and Plus suspension) Front suspension, servicing (Plus suspension) Sub-frame, stabilizer bar and control arm, removing and installing (Plus suspension) Ball joint, removing and installing (Plus running gear) Wheel bearing and suspension strut, removing and installing (Plus suspension) Drive shaft, removing and installing (Plus running gear) Drive shaft, repairing Outer constant velocity joint, checking Inner constant velocity joint, checking Drive shaft with tripod joint, repairing Drive axle with triple-rotor joint, removing and installing Drive axle with triple-rotor joint, servicing Triple-rotor joint, disassembling Triple-rotor joint, assembling 42 - Rear suspension Rear Wheel Suspension, Shafts and Axle Rear axle, servicing (vehicles with front wheel drive) Reworking cap nut in side member (front wheel drive vehicles) Suspension strut, disassembling and assembling (front wheel drive vehicles) Wheel bearings, servicing Drum brakes (front wheel drive vehicles), wheel bearings, servicing Wheel bearings, servicing - disc brakes (front wheel drive vehicles) Downloaded from www.Manualslib.com manuals search engine
Rear axle, servicing (four wheel drive vehicles) Rear drive shafts, servicing Reworking cap nut in side member (four wheel drive vehicles) Suspension strut, disassembling and assembling (four wheel drive vehicles) Wheel bearings, servicing - disc brakes (four wheel drive vehicles) 44 - Wheels, Tires, Wheel alignment Vehicle alignment Test requirements: Vehicle alignment specifications (front wheel drive vehicles) Vehicle alignment specifications (four wheel drive vehicles) Front wheel camber, adjusting Calculating the direction of travel: 45 - Anti-lock brake system Anti-locking Brake System (ABS) and Anti-locking Brake System with Electronic Differential Lock (ABS/EDL) Teves 04 Notes for repair work on ABS, ABS/EDL Control module, removing and installing Wheel speed sensor and rotor for speed sensor, removing and installing Anti-lock Brake System (ABS) and ABS with Electronic Differential Lock (ABS/EDL), Teves 20 GI Safety precautions ABS, ABS/EDL hydraulic unit, vacuum brake booster and brake master cylinder (Teves 20 GI), servicing ABS hydraulic unit and ABS control module (Teves 20 GI), removing and installing Brake hydraulic system, bleeding and filling Assembly overview - hydraulic unit, brake servo/brake master cylinder Hydraulic unit, removing and installing Brake Pedal Position Sensor, removing and installing 46 - Brakes - Mechanical components Front brakes, servicing (Girling caliper) Brake pads, removing and installing Downloaded from www.Manualslib.com manuals search engine
Front brakes, servicing (Teves/Ate) Brake pads, removing and installing Rear wheel brakes, servicing (drum brakes) Brake shoe adjustment, releasing Rear wheel brakes, servicing Brake shoes, removing and installing Parking brake, adjusting (drum brakes) Rear wheel brakes, servicing (disc brakes) Girling rear wheel disc brakes (front and four wheel drive vehicles) Brake pads, removing and installing Parking brake, adjusting (disc brakes) Parking brake lever assembly overview Brake pedal/brake servo, removing and installing Brake pedal, removing and installing Brake Light Switch, adjusting 47 - Brakes - Hydraulic components Assembly overview: brake master cylinder/brake servo Girling front brake caliper, servicing Front brake caliper pistons, removing and installing Front brake caliper, servicing (Teves/Ate) Rear brake caliper, servicing Rear brake caliper piston, removing and installing Pre-bleeding brake caliper Brake pressure regulator, checking and adjusting Vehicles without ABS, vehicles with ABS, ABS/EDS, Teves 04 Load dependent brake pressure regulator specifications Adjusting regulator Brake system, bleeding Brake system, bleeding (vehicles with and without ABS, ABS/EDL) Brake system, bleeding (with pressure bleeder VAS 5234) Brake system, bleeding (without pressure bleeder) Downloaded from www.Manualslib.com manuals search engine
48 - Steering Steering Assembly overview: steering column, column tube, steering wheel and airbag steering wheel Airbag unit, removing and installing Airbag steering wheel, removing and installing Airbag Spiral Spring, removing and installing Column tube for height adjustable steering wheel, removing and installing Pump delivery pressure, checking Power steering gear, removing and installing Assembly overview: power assisted steering box (TRW) Power steering gear, adjusting (TRW) Power steering gear, disassembling and reassembling (TRW) Power steering gear, disassembling Inner sealing ring for toothed rod, pulling out Checking toothed rod for scoring Sealing ring on toothed rod, replacing Sealing rings, installing on toothed rod piston Power steering gear, assembling Inner sealing ring for toothed rod, installing Toothed rod, installing in housing Adhesive tape, applying Power steering gear, adjusting with new toothed rod Assembly overview: power steering gear (ZF) Power steering gear, adjusting (ZF) Power steering gear, disassembling and reassembling (ZF) Power steering gear, disassembling Checking toothed rod for scoring Sealing ring on toothed rod, replacing Power steering gear, assembling Tie rods, removing and installing (power steering gear - TRW and ZF) Left-hand tie rod length, checking and adjusting Assembly overview: vane pump, reservoir and hydraulic lines (vehicles with 4-Cyl. engines) Assembly overview: Hydraulic lines, reservoir (vehicles with 4-Cyl. engines) Power steering vane pump, removing and installing (vehicles with 4-Cyl. engines) V-belts, tensioning (4-Cyl. engines) Assembly overview: Pressure and cooling lines (vehicles with VR6 engine) Power steering vane pump, removing and installing (vehicles with VR6 engine] Downloaded from www.Manualslib.com manuals search engine
00-1 Suspension, Wheels, Brakes, Steering Technical data Model Sedan/Wagon and syncro Base Suspension 1) Sedan/Wagon and syncro Base Suspension 2) Wheelbase mm 2625 2625 Track, unladen mm 1479 front, wheel offset 38 1422 rear, wheel offset 38 1485 front, wheel offset 35 1428 rear, wheel offset 35 1489 front, wheel offset 33 3) 1432 rear, wheel offset 3) 1485 front, wheel offset 35 1441 rear, wheel offset 35 1489 front, wheel offset 33 3) 1445 rear, wheel offset 33 3) Turning circle m 10.7 11.5 Steering roll radius (negative) mm 0.5 with offset 35 3.5 with offset 38 12 with offset 35 15 with offset 38 Wheel lock angle inner outer 42 36 3745' 34 30' 1) Base Suspension, explanation Page 40-1 2) Plus Suspension, explanation Page 40-26 3) Syncro Page 1 of 8Suspension, Wheels, Brakes, Steering12/7/2004http://ebahn.bentleypublishers.com/vw/servlet/Display?action=Goto&type=repair&id=VW.B4.SU01.00.1 Downloaded from www.Manualslib.com manuals search engine
00-2 Steering Model Sedan/Wagon and syncro Suspension version Base Suspension Plus Suspension Steering gear Power assisted steering gear Power assisted steering gear Steering wheel turns from lock to lock 3.33 3.14 Overall steering ratio 17.5:1 16.4:1 Wheel alignment specifications Page 44-2 Page 2 of 8Suspension, Wheels, Brakes, Steering12/7/2004http://ebahn.bentleypublishers.com/vw/servlet/Display?action=Goto&type=repair&id=VW.B4.SU01.00.1 Downloaded from www.Manualslib.com manuals search engine
00-3 Brakes Model Sedan/Wagon Output kW (hp) 55 (75) Brake master cylinder mm dia. 22.2 (Vehicles with ABS: 23.81) Brake servo dia. in inches 10 Front brake caliper, piston diameter mm 54 Front brake disc mm dia. 256 Front brake disc, thickness mm 13 Pad thickness mm 14 Rear brake drum mm dia. 230 Wheel cylinder mm dia. 20.64 Lining thickness mm 5 Lining width mm 40 Page 3 of 8Suspension, Wheels, Brakes, Steering12/7/2004http://ebahn.bentleypublishers.com/vw/servlet/Display?action=Goto&type=repair&id=VW.B4.SU01.00.1 Downloaded from www.Manualslib.com manuals search engine
00-4 Model Sedan/Wagon Output kW (hp) 85 (115) 128 (172) Brake master cylinder mm dia. 23.81 Brake servo dia. in inches 10 Front brake caliper dia. mm 54 Front brake disc mm dia. 256 288 Front brake thickness mm 20 13 Pad thickness mm 11 14 Rear brake caliper dia. mm 38 Rear brake disc mm dia. 226 Rear brake disc, thickness mm 10 Pad thickness mm 12 Page 4 of 8Suspension, Wheels, Brakes, Steering12/7/2004http://ebahn.bentleypublishers.com/vw/servlet/Display?action=Goto&type=repair&id=VW.B4.SU01.00.1 Downloaded from www.Manualslib.com manuals search engine
00-5 Model Passat syncro Output kW (hp) 85 (115) 128 (172) Brake master cylinder mm dia. 23.81 Brake servo dia. in inches 10 Front brake caliper dia. mm 54 Front brake disc mm dia. 256 288 Front brake disc thickness mm 20 25 Pad thickness mm 11 14 Rear brake caliper dia. mm 38 Rear brake disc mm dia. 239 Rear brake disc, thickness mm 10 Pad thickness mm 12 Page 5 of 8Suspension, Wheels, Brakes, Steering12/7/2004http://ebahn.bentleypublishers.com/vw/servlet/Display?action=Goto&type=repair&id=VW.B4.SU01.00.1 Downloaded from www.Manualslib.com manuals search engine
00-6 Wheels, tires Engine output (kW) Model Tire size 1) Wheel Offset Hole pattern 55 gas 55, 66 - Diesel Sedan/Wagon 185/65 R 14 86 S 195/60 R 14 86 S 205/50 R 15 86 S 185/65 R 14 85 Q (M+S) 195/60 R 14 85 Q (M+S) 205/50 R 15 85 Q (M+S) 6 J x 14 6 J x 14 6 J x 15 6 J x 14 6 J x 14 6 J x 15 38 38 38 38 38 38 4-hole 55 Sedan/Wagon T 125/70 R 15 95 M (Temp. spare) 3 1/2 J x 15 40 1) Tire pressures Sticker on vehicle Page 6 of 8Suspension, Wheels, Brakes, Steering12/7/2004http://ebahn.bentleypublishers.com/vw/servlet/Display?action=Goto&type=repair&id=VW.B4.SU01.00.1 Downloaded from www.Manualslib.com manuals search engine
00-7 Engine output (kW) Model Tire size 1) Wheel Offset Hole pattern 85 kW Sedan/Wagon 185/65 R 14 86 H 195/60 R 14 86 H 205/50 R 15 86 H 185/65 R 14 85 Q (M+S) 195/60 R 14 85 Q (M+S) 205/50 R 15 85 Q (M+S) 6 J x 14 6 J x 14 6 J x 15 6 J x 14 6 J x 14 6 J x 15 38 38 35 38 38 35 4-hole 85 kW Sedan/Wagon T 125/70 R 15 95 M (Temp. spare) 3 1/2 J x 15 40 128 kW Sedan/Wagon 205/50 ZR 15 86 W 195/55 R 15 85 T (M+S) 195/55 R 15 85 T (M+S) 205/50 R 15 85 T (M+S) 6 J x 15 6 J x 15 6 1/2 J x 15 6 J x 15 35 35 33 35 128 kW Sedan/Wagon T 125/70 R 16 95 M (Temp. spare) 3 1/2 J x 16 38 1) Tire pressures Sticker on vehicle Page 7 of 8Suspension, Wheels, Brakes, Steering12/7/2004http://ebahn.bentleypublishers.com/vw/servlet/Display?action=Goto&type=repair&id=VW.B4.SU01.00.1 Downloaded from www.Manualslib.com manuals search engine
00-8 Engine output (kW) Model Tire size 1) Wheel Offset Hole pattern 85 kW Sedan/Wagon syncro 185/65 R 14 86 H 195/60 R 14 86 H 205/50 R 15 86 H 185/65 R 14 86 Q (M+S) 195/60 R 14 86 Q (M+S) 205/50 R 15 86 Q (M+S) 6 J x 14 6 J x 14 6 J x 15 6 J x 14 6 J x 14 6 J x 15 38 38 35 38 38 35 4-hole 85 kW Sedan/Wagon syncro T 125/80 R 15 95 M (Temp. spare) 3 1/2 J x 15 40 128 kW Sedan/Wagon syncro 205/50 ZR 15 86 W 205/50 R 15 86 (M+S) 6 J x 15 6 J x 15 35 35 5-hole 128 kW Sedan/Wagon syncro T 125/70 R 16 95 M (Temp. spare) 3 1/2 J x 16 38 1) Tire pressures Sticker on vehicle Page 8 of 8Suspension, Wheels, Brakes, Steering12/7/2004http://ebahn.bentleypublishers.com/vw/servlet/Display?action=Goto&type=repair&id=VW.B4.SU01.00.1 Downloaded from www.Manualslib.com manuals search engine
40-1 Front Wheel Suspension, Shafts and Axle Front suspension, servicing (Base suspension) I - Removing and installing subframe, stabilizer bar and control arm (Base suspension) Page 40-2 II - Removing and installing wheel bearings, suspension strut and drive shaft (Base suspension) Page 40-14 The Base suspension is installed in Passat 1995 vehicles up to 85 kW. Page 1 of 82Front Wheel Suspension, Shafts and Axle12/7/2004http://ebahn.bentleypublishers.com/vw/servlet/Display?action=Goto&type=repair&id=VW.B4.SU01.40.1 Downloaded from www.Manualslib.com manuals search engine
40-2 Sub-frame, stabilizer bar and control arm (Base suspension) Note: If a vehicle has to be moved after removing the drive shaft, first install outer joint and tighten to 50 Nm (37 ft lb) otherwise the wheel bearing will be damaged. Specifications for wheel alignment Page 44-2 . Welding and straightening operations are not permitted on load bearing suspension components or those components which locate the wheels. Always replace self-locking nuts. Always replace corroded nuts/bolts. Page 2 of 82Front Wheel Suspension, Shafts and Axle12/7/2004http://ebahn.bentleypublishers.com/vw/servlet/Display?action=Goto&type=repair&id=VW.B4.SU01.40.1 Downloaded from www.Manualslib.com manuals search engine
40-3 1 - Hex bolt, 35 Nm (26 ft lb) 2 - Ball joint Checking Page 40-10 Check rubber boot for damage and if necessary, replace ball joint Mark installation position. If replaced set to center of elongated hole and check toe Elongated holes are not for camber adjustment. Failure to observe this instruction may result in damage to drive shafts! 3 - Captive lock nuts 4 - Air deflector plate Secured to control arm by clip 5 - Control arm Page 3 of 82Front Wheel Suspension, Shafts and Axle12/7/2004http://ebahn.bentleypublishers.com/vw/servlet/Display?action=Goto&type=repair&id=VW.B4.SU01.40.1 Downloaded from www.Manualslib.com manuals search engine
40-4 6 - Control arm rear mounting Installation position Fig. 3 Pressing out and in Fig. 4 7 - Hex bolt M 12 x 1.5 x 82 50 Nm (37 ft lb) and turn 90 further 8 - Hex bolt M 12 x 1.5 x 65 70 Nm (52 ft lb) and turn 90further 9 - Hex bolt M 12 x 1.5 x 78 70 Nm (52 ft lb) and turn 90further 10 - Control arm front mounting Pressing out Fig. 1 Pressing in Fig. 2 11 - Connecting link With rubber mounting Page 4 of 82Front Wheel Suspension, Shafts and Axle12/7/2004http://ebahn.bentleypublishers.com/vw/servlet/Display?action=Goto&type=repair&id=VW.B4.SU01.40.1 Downloaded from www.Manualslib.com manuals search engine
40-5 Repair Manual, Engine Mechanical, Repair Group 10 12 - Connecting link mounting Conical side toward control arm 13 - Washer Collar faces away from mounting 14 - Self-locking hex nut, 25 Nm (18 ft lb) 15 - Sub-frame Removing and installing with assemblies installed: supporting assemblies Fig. 5 Remove sub-frame from below with VAG 1383 (with control arm but without steering gear). After installing check position of steering wheel and align front end. Aligning engine-transmission assembly Page 5 of 82Front Wheel Suspension, Shafts and Axle12/7/2004http://ebahn.bentleypublishers.com/vw/servlet/Display?action=Goto&type=repair&id=VW.B4.SU01.40.1 Downloaded from www.Manualslib.com manuals search engine
40-6 16 - Hex bolt, 65 Nm (48 ft lb) 17 - Stabilizer bar mounting 18 - Stabilizer bar 19 - Stabilizer bar clamp 20 - Hex bolt, 25 Nm (18 ft lb) To secure stabilizer bar 21 - Vibration damper Note installation position, large part must protrude from sub-frame 22 - Self-locking hex nut, 25 Nm (18 ft lb) 23 - Cap nut Repairing in side member Page 40-11 Page 6 of 82Front Wheel Suspension, Shafts and Axle12/7/2004http://ebahn.bentleypublishers.com/vw/servlet/Display?action=Goto&type=repair&id=VW.B4.SU01.40.1 Downloaded from www.Manualslib.com manuals search engine
40-7 Fig. 1 Front control arm mounting, pressing out Note: Before pressing in, coat with acid-free lubricant, e.g. soft soap. Fig. 2 Front control arm mounting, pressing in Page 7 of 82Front Wheel Suspension, Shafts and Axle12/7/2004http://ebahn.bentleypublishers.com/vw/servlet/Display?action=Goto&type=repair&id=VW.B4.SU01.40.1 Downloaded from www.Manualslib.com manuals search engine
40-8 One of the embossed arrows points toward the recess in the control arm and the kidney shaped opening (arrow A) faces towards center of vehicle. Fig. 3 Control arm rear mounting, installation position Note: If bonded rubber bushing is tight because of corrosion, cut rubber out, saw through steel casing and drive bushing out. Fig. 4 Control arm rear mounting, pressing out and in Page 8 of 82Front Wheel Suspension, Shafts and Axle12/7/2004http://ebahn.bentleypublishers.com/vw/servlet/Display?action=Goto&type=repair&id=VW.B4.SU01.40.1 Downloaded from www.Manualslib.com manuals search engine
40-9 Fig. 5 Supporting engine/transmission assembly with 10-222 A and legs 10-222 A/1 Page 9 of 82Front Wheel Suspension, Shafts and Axle12/7/2004http://ebahn.bentleypublishers.com/vw/servlet/Display?action=Goto&type=repair&id=VW.B4.SU01.40.1 Downloaded from www.Manualslib.com manuals search engine
40-10 Ball joint, checking (Base and Plus suspension) Checking axial clearance Checking radial play - Forcibly pull ball joint down and press up again. Note: - Press lower part of wheel outward and inward. There must be no perceptible or visual "play" during either test. Observe ball joint during checks. Take into account possible existing wheel bearing play or "play" in upper suspension strut mounting. Page 10 of 82Front Wheel Suspension, Shafts and Axle12/7/2004http://ebahn.bentleypublishers.com/vw/servlet/Display?action=Goto&type=repair&id=VW.B4.SU01.40.1 Downloaded from www.Manualslib.com manuals search engine
40-11 Reworking cap nut in side member (Base and Plus suspension) If the threads of the cap nut in the side member are damaged, the thread must either be retapped or the cap nut must be drilled out. When drilling out proceed as follows. - Support engine/transmission assembly with 10-222 A and legs 10-222 A/1. - Remove the sub-frame. - Drill out the damaged side member cap nut with a 10.2 mm diameter drill from underneath. Note: When drilling do not tilt the drill. WARNING! Wear protective goggles. - Cut new M 12 x 1.5 thread in cap nut. - Use a new bolt/washer assembly to secure sub-frame Page 40-13 . Page 11 of 82Front Wheel Suspension, Shafts and Axle12/7/2004http://ebahn.bentleypublishers.com/vw/servlet/Display?action=Goto&type=repair&id=VW.B4.SU01.40.1 Downloaded from www.Manualslib.com manuals search engine
40-12 Bolt/washer assemblies for sub-frame Securing point Thread Bolt Part No. Front sub-frame M12 x 1.5 M12 x 1.5 x 95 10.9 N 101 612.01 1) Rear sub-frame M12 x 1.5 M12 x 1.5 x 95 10.9 N 101 612.01 Sub-frame bracket M10 M10 x 38 10.9 N 019 541.1 Engine front cross-member to side member M10 M10 x 75 10.9 N 904 078.01 1) 1) These bolts are not listed in the parts catalog. They must be specially ordered. Page 12 of 82Front Wheel Suspension, Shafts and Axle12/7/2004http://ebahn.bentleypublishers.com/vw/servlet/Display?action=Goto&type=repair&id=VW.B4.SU01.40.1 Downloaded from www.Manualslib.com manuals search engine
40-13 Note: Tightening torque remains unchanged. 1 - Bolt/washer 2 - Cap nut 3 - Side member 4 - Sub-frame 5 - Bonded rubber mounting/control arm Page 13 of 82Front Wheel Suspension, Shafts and Axle12/7/2004http://ebahn.bentleypublishers.com/vw/servlet/Display?action=Goto&type=repair&id=VW.B4.SU01.40.1 Downloaded from www.Manualslib.com manuals search engine
40-14 Wheel bearing, suspension strut and drive shaft, removing and installing (Base running gear) Note: If a vehicle has to be moved after removing the drive shaft, first install outer joint and tighten to 50 Nm (37 ft lb) otherwise the wheel bearing will be damaged. Welding and straightening operations are not permitted on load bearing suspension components or those components which locate the wheels. Always replace self-locking nuts. Always replace corroded nuts/bolts. Wheel bolt tightening torque: 110 Nm (81 ft lb). Page 14 of 82Front Wheel Suspension, Shafts and Axle12/7/2004http://ebahn.bentleypublishers.com/vw/servlet/Display?action=Goto&type=repair&id=VW.B4.SU01.40.1 Downloaded from www.Manualslib.com manuals search engine
40-15 Repair Manual, Suspension, Wheels, Brakes, Steering, Repair Group 00 1 - Self-locking nut, 265 Nm (195 ft lb) Only loosen and tighten with the vehicle standing on its wheels (danger of accident) Any paint residue and/or corrosion on the thread of the outer joint must be removed before the nut is installed 2 - Washer 3 - Brake disc Application 4 - Brake caliper Do not loosen brake hose when working on front suspension Hang up with wire or similar 5 - Hub Pressing out Fig. 3 Pressing in Fig. 8 Pulling off bearing inner race Fig. 5 Page 15 of 82Front Wheel Suspension, Shafts and Axle12/7/2004http://ebahn.bentleypublishers.com/vw/servlet/Display?action=Goto&type=repair&id=VW.B4.SU01.40.1 Downloaded from www.Manualslib.com manuals search engine
40-16 6 - Speed sensor rotor Only on vehicles with ABS 7 - Hex bolt, 10 Nm (7 ft lb) 8 - Splash plate 9 - Circlip Ensure correctly seated 10 - Wheel bearing Pressing out Fig. 6 Replace, as it is destroyed during pressing out Pressing in Fig. 7 11 - Self-locking hex nut, 35 Nm (26 ft lb) 12 - Wheel bearing housing 13 - Self-locking hex nut, 50 Nm (37 ft lb) 14 - Hex bolt Clamping bolt for ball joint Page 16 of 82Front Wheel Suspension, Shafts and Axle12/7/2004http://ebahn.bentleypublishers.com/vw/servlet/Display?action=Goto&type=repair&id=VW.B4.SU01.40.1 Downloaded from www.Manualslib.com manuals search engine
40-17 15 - Self-locking bolt/washer assembly, 125 Nm (92 ft lb) For securing brake carrier 16 - Socket head multi-point bolt, 45 Nm (33 ft lb) 17 - Drive shaft To remove and install separate ball joint/control arm connection Fig. 2 Repairing Page 40-46 18 - Circlip Ensure correctly seated 19 - Self-locking hex nut, 95 Nm (70 ft lb) 20 - Hex bolt Shank diameter 11 mm Adjusting camber Page 44-6 Mark position before loosening Page 17 of 82Front Wheel Suspension, Shafts and Axle12/7/2004http://ebahn.bentleypublishers.com/vw/servlet/Display?action=Goto&type=repair&id=VW.B4.SU01.40.1 Downloaded from www.Manualslib.com manuals search engine
40-18 21 - Self-locking hex nut, 60 Nm (44 ft lb) Loosening and tightening Fig. 1 22 - Stop 23 - Suspension strut bearing 24 - Suspension strut Removing and installing Fig. 1 and Fig. 2 Disassembling and assembling Page 40-23 25 - Bracket 26 - Hex bolt 27 - Tie rod Removing and installing Page 48-77 28 - Countersunk screw 29 - Screw Page 18 of 82Front Wheel Suspension, Shafts and Axle12/7/2004http://ebahn.bentleypublishers.com/vw/servlet/Display?action=Goto&type=repair&id=VW.B4.SU01.40.1 Downloaded from www.Manualslib.com manuals search engine
40-19 Fig. 1 Suspension strut to body, loosening and tightening Note: Camber must be adjusted each time joint is loosened. Fig. 2 Wheel bearing housing/suspension strut joint, separating Page 19 of 82Front Wheel Suspension, Shafts and Axle12/7/2004http://ebahn.bentleypublishers.com/vw/servlet/Display?action=Goto&type=repair&id=VW.B4.SU01.40.1 Downloaded from www.Manualslib.com manuals search engine
40-20 To take drive shaft out, remove bolts (arrows). Note: First mark installation position. Fig. 3 Ball joint/control arm connection, separating Fig. 4 Hub, pressing out of wheel bearing housing Page 20 of 82Front Wheel Suspension, Shafts and Axle12/7/2004http://ebahn.bentleypublishers.com/vw/servlet/Display?action=Goto&type=repair&id=VW.B4.SU01.40.1 Downloaded from www.Manualslib.com manuals search engine
40-21 Only use puller with leg clamp e.g. Kukko 204-2 (commercial type). Fig. 5 Bearing race, pulling out of hub Fig. 6 Wheel bearing, pressing out of wheel bearing housing Page 21 of 82Front Wheel Suspension, Shafts and Axle12/7/2004http://ebahn.bentleypublishers.com/vw/servlet/Display?action=Goto&type=repair&id=VW.B4.SU01.40.1 Downloaded from www.Manualslib.com manuals search engine
40-22 Fig. 7 Wheel bearing, pressing into wheel bearing housing Fig. 8 Hub, pressing into wheel bearing housing Page 22 of 82Front Wheel Suspension, Shafts and Axle12/7/2004http://ebahn.bentleypublishers.com/vw/servlet/Display?action=Goto&type=repair&id=VW.B4.SU01.40.1 Downloaded from www.Manualslib.com manuals search engine
40-23 Front suspension strut, servicing (Base and Plus suspension) 1 - Shock absorber Can be replaced individually Check shock absorber for leaks and noises After replacing, adjust camber and toe Page 44-1 2 - Buffer stop 3 - Protective sleeve Page 23 of 82Front Wheel Suspension, Shafts and Axle12/7/2004http://ebahn.bentleypublishers.com/vw/servlet/Display?action=Goto&type=repair&id=VW.B4.SU01.40.1 Downloaded from www.Manualslib.com manuals search engine
40-24 4 - Coil spring Removing and installing Fig. 2 Observe color coding Outer surface of spring must not be damaged Is slightly curved 5 - Spring plate 6 - Axial bearing 7 - Hex nut, 60 Nm (44 ft lb) Loosening and tightening Fig. 2 8 - Suspension strut mounting 9 - Stop 10 - Self-locking hex nut, 60 Nm (44 ft lb) Loosening and tightening Fig. 1 Page 24 of 82Front Wheel Suspension, Shafts and Axle12/7/2004http://ebahn.bentleypublishers.com/vw/servlet/Display?action=Goto&type=repair&id=VW.B4.SU01.40.1 Downloaded from www.Manualslib.com manuals search engine
40-25 Fig. 1 Hex nut, loosening and tightening Fig. 2 Spring, removing and installing Page 25 of 82Front Wheel Suspension, Shafts and Axle12/7/2004http://ebahn.bentleypublishers.com/vw/servlet/Display?action=Goto&type=repair&id=VW.B4.SU01.40.1 Downloaded from www.Manualslib.com manuals search engine
40-26 Front suspension, servicing (Plus suspension) I - Removing and installing subframe, stabilizer bar and control arm (plus suspension) Page 40-27 II - Removing and installing wheel bearing, suspension strut and drive shaft (plus suspension) Page 40-36 The following components are different when comparing the plus suspension with the base suspension: Control arm, ball joint, wheel bearing housing, stabilizer bar, drive shaft, brake disc, hub, wheel and tie rods. The Plus suspension is installed in Passat models with engine output 110 kW (148 hp) and above. Page 26 of 82Front Wheel Suspension, Shafts and Axle12/7/2004http://ebahn.bentleypublishers.com/vw/servlet/Display?action=Goto&type=repair&id=VW.B4.SU01.40.1 Downloaded from www.Manualslib.com manuals search engine
40-27 Sub-frame, stabilizer bar and control arm, removing and installing (Plus suspension) Notes Page 40-2 1 - Hex bolt, 35 Nm (26 ft lb) 2 - Ball joint Checking Page 40-10 Check rubber boot for damage and if necessary, replace ball joint Removing and installing Page 40-33 Mark installation position. If replaced set to center of elongated hole and check track 3 - Self-locking hex nut, 45 Nm (33 ft lb) 4 - Captive locknuts Page 27 of 82Front Wheel Suspension, Shafts and Axle12/7/2004http://ebahn.bentleypublishers.com/vw/servlet/Display?action=Goto&type=repair&id=VW.B4.SU01.40.1 Downloaded from www.Manualslib.com manuals search engine
40-28 5 - Control arm rear mounting Installation position Fig. 2 Pressing out and in Fig. 3 6 - Control arm Elongated holes are not for camber adjustment! 7 - Air guide plate Secured to control arm by clip 8 - Control arm front mounting Pressing out and in Fig. 1 9 - Hex bolt M 12 x 1.5 x 78 70 Nm (52 ft lb) and turn 90 further 10 - Hex bolt M 12 x 1.5 x 65 70 Nm (62 ft lb) and turn 90 further 11 - Connecting link With rubber mounting Page 28 of 82Front Wheel Suspension, Shafts and Axle12/7/2004http://ebahn.bentleypublishers.com/vw/servlet/Display?action=Goto&type=repair&id=VW.B4.SU01.40.1 Downloaded from www.Manualslib.com manuals search engine
40-29 12 - Mounting for connecting link Conical side towards control arm 13 - Washer Collar faces away from mounting 14 - Self-locking hex nut, 25 Nm (18 ft lb) 15 - Hex bolt M 12 x 1.5 x 82 50 Nm (37 ft lb) and turn 90 further 16 - 25 Nm (18 ft lb) 17 - Hex bolt, 25 Nm (18 ft lb) To secure stabilizer bar 18 - Hex bolt, 65 Nm (48 ft lb) 19 - Clamp for stabilizer bar Page 29 of 82Front Wheel Suspension, Shafts and Axle12/7/2004http://ebahn.bentleypublishers.com/vw/servlet/Display?action=Goto&type=repair&id=VW.B4.SU01.40.1 Downloaded from www.Manualslib.com manuals search engine
40-30 Repair Manual, Engine Mechanical, Repair Group 10 20 - Vibration damper Not installed on vehicles with VR 6 engine 21 - Sub-frame Removing and installing with assemblies installed: supporting assemblies Fig. 4 Remove sub-frame from below with control arm but without steering gear using transmission jack VAG 1383 or equivalent. After installing check position of steering wheel and align front end. Aligning engine/transmission assembly 22 - Stabilizer bar mounting 23 - Stabilizer bar 24 mm diameter 24 - Cap nut Reworking in side member Page 40-11 Page 30 of 82Front Wheel Suspension, Shafts and Axle12/7/2004http://ebahn.bentleypublishers.com/vw/servlet/Display?action=Goto&type=repair&id=VW.B4.SU01.40.1 Downloaded from www.Manualslib.com manuals search engine
40-31 Note: Before pressing in, coat with lubricant, e.g. soft soap. Fig. 1 Control arm front mounting, pressing out and in One of the embossed arrows points toward the recess in the control arm and the kidney shaped opening -arrow -A- in mounting faces towards center of vehicle. Fig. 2 Control arm rear mounting, installation position Page 31 of 82Front Wheel Suspension, Shafts and Axle12/7/2004http://ebahn.bentleypublishers.com/vw/servlet/Display?action=Goto&type=repair&id=VW.B4.SU01.40.1 Downloaded from www.Manualslib.com manuals search engine
40-32 Fig. 3 Control arm rear mounting, pressing out and in Fig. 4 Engine/transmission assembly, supporting with 10-222 A and 10-222 A/3 Page 32 of 82Front Wheel Suspension, Shafts and Axle12/7/2004http://ebahn.bentleypublishers.com/vw/servlet/Display?action=Goto&type=repair&id=VW.B4.SU01.40.1 Downloaded from www.Manualslib.com manuals search engine
40-33 Ball joint, removing and installing (Plus running gear) Removing - Loosen 12-point nut with vehicle standing on its wheels. - Disconnect drive shaft at transmission drive flange. - Remove bolts -arrow -A-. - Loosen bolt -arrow -B-. - Separate connection between ball joint/control arm. (First mark installation position). - Swing wheel and suspension strut outward and support. Page 33 of 82Front Wheel Suspension, Shafts and Axle12/7/2004http://ebahn.bentleypublishers.com/vw/servlet/Display?action=Goto&type=repair&id=VW.B4.SU01.40.1 Downloaded from www.Manualslib.com manuals search engine
40-34 Note: Installing - Install ball joint splitter as shown in illustration and press out ball joint. 1 - Splitter. Matra V 176 Place transmission jack VAG 1383/A, or equivalent, underneath (danger of accident through falling parts when pressing out the ball joint). Protect ball joint threads by threading nut on a few turns. - Install ball joint in wheel bearing housing. - Thread on new self-locking nut, and counterhold with hex key (6 mm AF). 1 - Hex key (6 mm AF), shortened by approx. 10 mm. 2 - Crowfoot insert or slotted ring socket insert Page 40-35 3 - VAG 1331 - Secure ball joint to control arm (align to old marks). Page 34 of 82Front Wheel Suspension, Shafts and Axle12/7/2004http://ebahn.bentleypublishers.com/vw/servlet/Display?action=Goto&type=repair&id=VW.B4.SU01.40.1 Downloaded from www.Manualslib.com manuals search engine
40-35 Note: Make sure that the boot is not damaged or twisted. Tightening torques Ball joint to wheel bearing housing: 45 Nm (33 ft lb) Ball joint to control arm: 35 Nm (26 ft lb) 1 - Box insert (commercial type, 19 mm AF) 2 - Crowfoot insert (commercial type, 19 mm AF) Page 35 of 82Front Wheel Suspension, Shafts and Axle12/7/2004http://ebahn.bentleypublishers.com/vw/servlet/Display?action=Goto&type=repair&id=VW.B4.SU01.40.1 Downloaded from www.Manualslib.com manuals search engine
40-36 Wheel bearing and suspension strut, removing and installing (Plus suspension) Notes Page 40-14 1 - Wheel bolt, 110 Nm (81 ft lb) 2 - Self-locking 12-point nut 90 Nm (66 ft lb) and turn 45 further (1/8 ) Loosening and tightening Page 40-44 Any paint residue and/or corrosion on thread of the outer joint must be removed before the nut is installed. 3 - Screw 4 - Brake disc Repair instructions Page 46-1 Page 36 of 82Front Wheel Suspension, Shafts and Axle12/7/2004http://ebahn.bentleypublishers.com/vw/servlet/Display?action=Goto&type=repair&id=VW.B4.SU01.40.1 Downloaded from www.Manualslib.com manuals search engine
40-37 5 - Brake caliper Do not loosen brake hose when working on front suspension Hang up with wire or similar Replacing brake pads Page 46-6 6 - Countersunk screw 7 - Hub Pressing out Fig. 2 Pressing in Fig. 6 Pulling off inner race Fig. 3 8 - Speed sensor rotor Only for vehicles with ABS 9 - Hex bolt, 10 Nm (7 ft lb) 10 - Splash plate Page 37 of 82Front Wheel Suspension, Shafts and Axle12/7/2004http://ebahn.bentleypublishers.com/vw/servlet/Display?action=Goto&type=repair&id=VW.B4.SU01.40.1 Downloaded from www.Manualslib.com manuals search engine
40-38 11 - Circlip Ensure seated correctly 12 - Wheel bearing Pressing out Fig. 4 Always replace, as it is destroyed during pressing out Pressing in Fig. 5 13 - Self-locking hex nut, 35 Nm (26 ft lb) 14 - Wheel bearing housing 15 - Self-locking bolt/washer, 125 Nm (92 ft lb) 16 - Drive shaft Removing and installing Page 40-43 Repairing Page 40-46 17 - Socket head multi-point bolt, 45 Nm (33 ft lb) Page 38 of 82Front Wheel Suspension, Shafts and Axle12/7/2004http://ebahn.bentleypublishers.com/vw/servlet/Display?action=Goto&type=repair&id=VW.B4.SU01.40.1 Downloaded from www.Manualslib.com manuals search engine
40-39 18 - Hex bolt Camber adjustment Page 44-1 Before loosening, mark installation position 19 - Hex bolt 20 - Bracket 21 - Stop 22 - Self-locking hex nut, 60 Nm (44 ft lb) Loosening and tightening Fig. 1 23 - Suspension strut Disassembling and assembling Page 40-23 24 - Self-locking hex nut, 95 Nm (70 ft lb) 25 - Tie rod Removing and installing Page 48-77 Page 39 of 82Front Wheel Suspension, Shafts and Axle12/7/2004http://ebahn.bentleypublishers.com/vw/servlet/Display?action=Goto&type=repair&id=VW.B4.SU01.40.1 Downloaded from www.Manualslib.com manuals search engine
40-40 Fig. 1 Suspension strut to body, loosening and tightening Fig. 2 Hub, pressing out of wheel bearing housing Page 40 of 82Front Wheel Suspension, Shafts and Axle12/7/2004http://ebahn.bentleypublishers.com/vw/servlet/Display?action=Goto&type=repair&id=VW.B4.SU01.40.1 Downloaded from www.Manualslib.com manuals search engine
40-41 Only use puller with leg clamp e.g. Kukko 204-2 (commercial type). Fig. 3 Inner race, pulling off hub Fig. 4 Wheel bearing, pressing out of wheel bearing housing Page 41 of 82Front Wheel Suspension, Shafts and Axle12/7/2004http://ebahn.bentleypublishers.com/vw/servlet/Display?action=Goto&type=repair&id=VW.B4.SU01.40.1 Downloaded from www.Manualslib.com manuals search engine
40-42 Fig. 5 Wheel bearing, pressing into wheel bearing housing Fig. 6 Hub, pressing into wheel bearing housing Page 42 of 82Front Wheel Suspension, Shafts and Axle12/7/2004http://ebahn.bentleypublishers.com/vw/servlet/Display?action=Goto&type=repair&id=VW.B4.SU01.40.1 Downloaded from www.Manualslib.com manuals search engine
40-43 Drive shaft, removing and installing (Plus running gear) Removing - Loosen 12-point nut with vehicle standing on its wheels. - Disconnect drive shaft from transmission drive flange. - Remove bolts (arrow -A-). - Loosen bolt (arrow -B-). - Separate connection between ball joint/control arm. (First mark installation position). Note: When pressing drive shaft out ensure sufficient clearance is available. - Press drive shaft out. Install tool as shown in illustration. Page 43 of 82Front Wheel Suspension, Shafts and Axle12/7/2004http://ebahn.bentleypublishers.com/vw/servlet/Display?action=Goto&type=repair&id=VW.B4.SU01.40.1 Downloaded from www.Manualslib.com manuals search engine
40-44 Installing - Remove remains of locking fluid from outer joint and hub splines. (Splines must be free of oil and grease). - Apply locking fluid D 185 400 A2 to splines as shown in illustration. Bead cross section approx. 3 mm. - Install drive shaft. - Connect ball joint to control arm. - Install drive shaft to transmission flange shaft and secure. Note: - Install 12-point nut to drive shaft and tighten. To tighten 12-point nut we recommend the angle measuring wrench VAG 1756 or equivalent. Only loosen and tighten with vehicle standing on its wheels (danger of accident). Page 44 of 82Front Wheel Suspension, Shafts and Axle12/7/2004http://ebahn.bentleypublishers.com/vw/servlet/Display?action=Goto&type=repair&id=VW.B4.SU01.40.1 Downloaded from www.Manualslib.com manuals search engine
40-45 Tightening torques: Drive shaft to flange shaft/transmission 45 Nm (33 ft lb) Drive shaft to wheel bearing 90 Nm (66 ft lb) and housing turn 45 further (1/8 turn) Ball joint/control arm 35 Nm (26 ft lb) Page 45 of 82Front Wheel Suspension, Shafts and Axle12/7/2004http://ebahn.bentleypublishers.com/vw/servlet/Display?action=Goto&type=repair&id=VW.B4.SU01.40.1 Downloaded from www.Manualslib.com manuals search engine
40-46 Drive shaft, repairing Drive shafts on vehicles with Plus suspension have shorter and finer splines on the outer joint. The wheel bearing is secured by a 12-point nut. The splines of the outer joint and the hub on Plus suspensions are secured with locking fluid D 185 400 A2. Drive shaft, removing and installing Vehicles with Base suspension Page 40-14 Vehicles with Plus suspension Page 40-43 Note: Grease quantity: - - Outer constant velocity joint 100 g of G-6.3 grease - - Inner constant velocity joint 110 g of G-6.3 grease Greasing outer joint: press half of the grease into the joint, and the other half evenly into the boot. Greasing inner joint: press half of the grease into the inner joint from both sides, the other half evenly into the boot. When replacing the boot grease joint as required. Page 46 of 82Front Wheel Suspension, Shafts and Axle12/7/2004http://ebahn.bentleypublishers.com/vw/servlet/Display?action=Goto&type=repair&id=VW.B4.SU01.40.1 Downloaded from www.Manualslib.com manuals search engine
40-47 1 - Circlip Always replace Remove and install with VW161 a 2 - Gasket Always replace. Pull off protective foil and stick onto joint. (Only on 100 mm diameter constant velocity joints 3 - Inner constant velocity joint 100 mm diameter Only replace complete Pressing off Fig. 3 Pressing on Fig. 4 Greasing Notes Page 40-46 Checking Page 40-62 4 - Dished washer Inner diameter splined Installation position: outer diameter (concave side) contacts constant velocity joint Page 47 of 82Front Wheel Suspension, Shafts and Axle12/7/2004http://ebahn.bentleypublishers.com/vw/servlet/Display?action=Goto&type=repair&id=VW.B4.SU01.40.1 Downloaded from www.Manualslib.com manuals search engine
40-48 5 - Boot for 100 mm diameter constant velocity joint Rubber version With vent hole Check for tears and chafing Installation position for left drive shaft Fig. 5 Installation position for right drive shaft Fig. 6 Coat inside of cap with D3 Drive off with drift 6 - Drive shaft Left shaft, solid bar (not illustrated) Right shaft, tube 7 - Clamp Always replace Tensioning Fig. 7 and Fig. 8 Page 48 of 82Front Wheel Suspension, Shafts and Axle12/7/2004http://ebahn.bentleypublishers.com/vw/servlet/Display?action=Goto&type=repair&id=VW.B4.SU01.40.1 Downloaded from www.Manualslib.com manuals search engine
40-49 8 - Boot for 90 mm diameter constant velocity joint Polyester elastomer version Check for tears and chafing The balance pressure briefly ventilate boot before tensioning the small clamp Fig. 7 Installation position for left shaft, wheel end Fig. 10 and Fig. 11 Installation position for right shaft, wheel end Fig. 12 9 - Clamp Always replace Tensioning Fig. 7 and Fig. 8 Page 49 of 82Front Wheel Suspension, Shafts and Axle12/7/2004http://ebahn.bentleypublishers.com/vw/servlet/Display?action=Goto&type=repair&id=VW.B4.SU01.40.1 Downloaded from www.Manualslib.com manuals search engine
40-50 10 - Dished washer Outer diameter (concave side) contacts thrust washer 11 - Thrust washer 12 - Circlip Always replace Insert in shaft groove 13 - Outer constant velocity joint, 90 mm diameter Only replace complete Removing Fig. 2 Installing: drive onto shaft with plastic hammer until compressed circlip seats Greasing Notes Page 40-46 Checking Page 40-60 Page 50 of 82Front Wheel Suspension, Shafts and Axle12/7/2004http://ebahn.bentleypublishers.com/vw/servlet/Display?action=Goto&type=repair&id=VW.B4.SU01.40.1 Downloaded from www.Manualslib.com manuals search engine
40-51 14 - Outer constant velocity joint, 90 mm diameter For vehicles with 16V and VR6 Wedge splines, larger diameter Only replace complete Removing Fig. 2 Installing: drive onto shaft with plastic hammer until compressed circlip seats Greasing Notes Page 40-46 Checking Page 40-60 15 - Vibration damper Removing and installing Fig. 1 Installation position Fig. 1 Available as spare part Is only installed on the right drive shaft tube. Exception: On vehicles with 85 kW (115 hp) and manual transmission 02C only installed on left solid drive shaft Page 51 of 82Front Wheel Suspension, Shafts and Axle12/7/2004http://ebahn.bentleypublishers.com/vw/servlet/Display?action=Goto&type=repair&id=VW.B4.SU01.40.1 Downloaded from www.Manualslib.com manuals search engine
40-52 16 - Clamp Always replace 17 - Support rings On rubber type boot only On transmission end only See Parts catalog 18 - Boot for 100 mm diameter constant velocity joint Polyester elastomer version Check for tears and chafing To balance pressure briefly ventilate boot before tensioning the small clamp Fig. 7 19 - Protective cap 20 - Hex bolt, 35 Nm (26 ft lb) Page 52 of 82Front Wheel Suspension, Shafts and Axle12/7/2004http://ebahn.bentleypublishers.com/vw/servlet/Display?action=Goto&type=repair&id=VW.B4.SU01.40.1 Downloaded from www.Manualslib.com manuals search engine
40-53 The damper consists of two halves. Both halves are joined to one another by spring pins (arrow). Installation position Fig. 1 Note: Fig. 1 Vibration damper, removing and installing Only replace vibration damper with drive shaft removed Before driving in spring pin protect shaft paint finish against damage. To prevent axial movement apply adhesive tape or a suitable adhesive to internal diameter. When installing vibration damper -A- note correct installation position. Ensure dimension "a" is maintained. Dim. "a" = 521 1 mm right shaft 264 1 mm left shaft (if installed) Fig. 1 1 Vibration damper, installation position Page 53 of 82Front Wheel Suspension, Shafts and Axle12/7/2004http://ebahn.bentleypublishers.com/vw/servlet/Display?action=Goto&type=repair&id=VW.B4.SU01.40.1 Downloaded from www.Manualslib.com manuals search engine
40-54 Fig. 2 Outer constant velocity joint, removing - Drive joint off drive shaft with a firm blow from an aluminium hammer. Note: Fig. 3 Inner constant velocity joint, pressing off First drive boot off with drift Support ball hub Page 54 of 82Front Wheel Suspension, Shafts and Axle12/7/2004http://ebahn.bentleypublishers.com/vw/servlet/Display?action=Goto&type=repair&id=VW.B4.SU01.40.1 Downloaded from www.Manualslib.com manuals search engine
40-55 Note: Chamfer on inner diameter of ball hub (splines) must face the contact shoulder on the drive shaft. Fig. 4 Inner constant velocity joint, pressing on - Press on joint up to stop. - Install circlip. Dimension "a" = 17 mm Note: Before assembling boot on drive shaft mark position, dimension "a", with for example paint or adhesive tape. Under no circumstances should paint surface be damaged with a sharp tool. Fig. 5 Installation position of left drive shaft transmission end joint boot - rubber version Page 55 of 82Front Wheel Suspension, Shafts and Axle12/7/2004http://ebahn.bentleypublishers.com/vw/servlet/Display?action=Goto&type=repair&id=VW.B4.SU01.40.1 Downloaded from www.Manualslib.com manuals search engine
40-56 The large diameter of vent chamber -A- must fit on the larger diameter. Fig. 6 Installation position of right drive shaft transmission end joint boot B - Vent hole Often the boot is pushed in when installing on the joint body. This creates a vacuum inside the boot which draws a fold in (arrow) while driving. After installing, lift the boot at small diameter end to equalize pressure. Fig. 7 Joint boot, ventilating Page 56 of 82Front Wheel Suspension, Shafts and Axle12/7/2004http://ebahn.bentleypublishers.com/vw/servlet/Display?action=Goto&type=repair&id=VW.B4.SU01.40.1 Downloaded from www.Manualslib.com manuals search engine
40-57 Fig. 8 Larger clamp, tensioning - Use pliers VAG 1682 as shown in illustration. Ensure that the jaws of the pliers seat in the -arrow -B- of the clamp. - Tension clamp by turning the spindle with a torque wrench (do not tilt pliers). Note: Fig. 9 Smaller clamp, tensioning 40 The clamp can only be tensioned with pliers V.A.G 1682. Tightening torque: 25 Nm (18 ft Ib). Use torque wrench with 5 - 50 Nm range (e.g. V.A.G 1331). Make sure the spindle thread is not tight. If necessary lubricate with MOS 2 grease If the thread is tight, e.g. dirty, the required tensioning force for the hose clamp will not be achieved inspite of correct tightening torque settings. Page 57 of 82Front Wheel Suspension, Shafts and Axle12/7/2004http://ebahn.bentleypublishers.com/vw/servlet/Display?action=Goto&type=repair&id=VW.B4.SU01.40.1 Downloaded from www.Manualslib.com manuals search engine
40-58 Cuff seating tolerance "a": 1/2 to 11/2 grooves visible at end of cuff. Note: This installation position tolerance is also valid for the left drive shaft transmission end boot (polyester elastomer version). Fig. 10 Installation position of left drive shaft wheel end joint boot, shaft diameter 27 mm Cuff installation position: Cuff butts against shaft shoulder (arrow). Fig. 11 Installation position of left drive shaft, wheel end, shaft diameter 22 mm Page 58 of 82Front Wheel Suspension, Shafts and Axle12/7/2004http://ebahn.bentleypublishers.com/vw/servlet/Display?action=Goto&type=repair&id=VW.B4.SU01.40.1 Downloaded from www.Manualslib.com manuals search engine
40-59 Cuff seating tolerance "a": From cuff position to chamfer up to 1/2 a groove visible. Fig. 12 Installation position of right drive shaft, wheel end joint boot Page 59 of 82Front Wheel Suspension, Shafts and Axle12/7/2004http://ebahn.bentleypublishers.com/vw/servlet/Display?action=Goto&type=repair&id=VW.B4.SU01.40.1 Downloaded from www.Manualslib.com manuals search engine
40-60 Outer constant velocity joint, checking The joint should be disassembled to replace dirty grease or for checking the balls and ball tracks for wear and damage. Removing - Before disassembling mark position of the ball hub in relation to the ball cage and housing with an electric scriber or oil stone. - Swivel ball hub and ball cage. - Remove balls one after the other. - Turn cage until the two rectangular windows (arrow) are aligned with the joint housing. - Lift out cage together with hub. Page 60 of 82Front Wheel Suspension, Shafts and Axle12/7/2004http://ebahn.bentleypublishers.com/vw/servlet/Display?action=Goto&type=repair&id=VW.B4.SU01.40.1 Downloaded from www.Manualslib.com manuals search engine
40-61 Note: The 6 balls of each joint belong to one tolerance group. Check stub axle, hub, cage and balls for indentations (pitting) and signs of seizure. Excessive backlash in joint will be noticed as a knock during load changes. In such cases the joint must be replaced. Polished areas and ball track marks are not a reason for changing the joint. Installing - Swing segment of hub into rectangular cage window. - Tilt hub out of cage. - Press half of the total amount of grease Page 40-46 or Page 42-46 into the joint housing. - Install cage with hub in the joint housing. - Press in the balls one after the other from opposite sides whereby the original position of the hub to cage and joint housing must be restored. - Install new circlip in the hub. - Distribute the remaining grease in the boot. Page 61 of 82Front Wheel Suspension, Shafts and Axle12/7/2004http://ebahn.bentleypublishers.com/vw/servlet/Display?action=Goto&type=repair&id=VW.B4.SU01.40.1 Downloaded from www.Manualslib.com manuals search engine
40-62 Inner constant velocity joint, checking The joint should be disassembled to replace dirty grease and when checking the balls and ball tracks for wear and damage. Note: The ball hub and joint are paired and must not be interchanged. - Swivel ball hub and ball cage. - Press out ball cage in direction of arrow. - Press balls out of cage. - Tilt ball hub out of ball cage over ball track (arrows). - Check joint housing, ball hub, ball cage and balls for indentations (pitting) and signs of seizure. Page 62 of 82Front Wheel Suspension, Shafts and Axle12/7/2004http://ebahn.bentleypublishers.com/vw/servlet/Display?action=Goto&type=repair&id=VW.B4.SU01.40.1 Downloaded from www.Manualslib.com manuals search engine
40-63 Note: Excessive backlash in joint will be noticed as a knock during load changes. In such cases the joint must be replaced. Polished areas and ball track marks are not a reason for changing the joint. Installing Note: - Insert ball hub over both chamfers into the ball cage. Any installed position is acceptable. Press balls into the cage. - Insert hub with cage and balls at right angle to the joint. When inserting make sure that the wide spacing -a- on joint housing is aligned with the narrow spacing -b- on the hub after swivelling in. Chamfer on inner diameter of ball hub (splines) must face larger diameter of joint housing. Page 63 of 82Front Wheel Suspension, Shafts and Axle12/7/2004http://ebahn.bentleypublishers.com/vw/servlet/Display?action=Goto&type=repair&id=VW.B4.SU01.40.1 Downloaded from www.Manualslib.com manuals search engine
40-64 - Swivel in ball hub, whereby the hub must be swivelled out of the cage (arrows) far enough to allow the balls to fit into the ball tracks. Checking operation of constant velocity joint: The constant velocity joint is correctly assembled when the ball hub can be moved by hand backward and forward over its entire axial movement range. - Swivel in the hub with balls by applying firm pressure on the cage (arrow). Page 64 of 82Front Wheel Suspension, Shafts and Axle12/7/2004http://ebahn.bentleypublishers.com/vw/servlet/Display?action=Goto&type=repair&id=VW.B4.SU01.40.1 Downloaded from www.Manualslib.com manuals search engine
40-65 Drive shaft with tripod joint, repairing 1 - Outer constant velocity joint Replace complete Removing Fig. 1 Installing: Drive onto the shaft with plastic hammer until circlip comes out Greasing Notes Page 40-46 Checking Page 40-62 2 - Circlip Always replace Install in groove of shaft 3 - Thrust ring 4 - Dished washer Larger diameter (concave side) contacts thrust ring Page 65 of 82Front Wheel Suspension, Shafts and Axle12/7/2004http://ebahn.bentleypublishers.com/vw/servlet/Display?action=Goto&type=repair&id=VW.B4.SU01.40.1 Downloaded from www.Manualslib.com manuals search engine
40-66 5 - Clamp Always replace Tightening, Fig. 2 and Fig. 3 6 - Boot for constant velocity joint, 90 mm dia. Check for cracks and abrasion Before tightening the small clamp, ventilate boot briefly so pressure is equalized, Fig. 2 7 - Clamp Always replace Tightening, Fig. 2 and Fig. 4 8 - Drive shaft, left, with inner tripod joint Repair of inner joint and replacement of boot not possible at this time Replace if damaged Page 66 of 82Front Wheel Suspension, Shafts and Axle12/7/2004http://ebahn.bentleypublishers.com/vw/servlet/Display?action=Goto&type=repair&id=VW.B4.SU01.40.1 Downloaded from www.Manualslib.com manuals search engine
40-67 9 - Inner splined screw, 45 Nm (33 ft lb) 10 - Drive shaft, right, with inner tripod joint Repair of inner joint and replacement of boot not possible at this time Replace if damaged Page 67 of 82Front Wheel Suspension, Shafts and Axle12/7/2004http://ebahn.bentleypublishers.com/vw/servlet/Display?action=Goto&type=repair&id=VW.B4.SU01.40.1 Downloaded from www.Manualslib.com manuals search engine
40-68 Fig. 1 Constant velocity joint, outer, removing - Drive off from drive shaft with forceful blow using an alloy hammer. The boot is pressed on forcefully when installing on the joint body. This creates a vacuum in the boot that makes a dent during driving (arrow). Briefly ventilate the boot at the small diameter after installation to provide equalize pressure. Fig. 2 Boot, ventilating Page 68 of 82Front Wheel Suspension, Shafts and Axle12/7/2004http://ebahn.bentleypublishers.com/vw/servlet/Display?action=Goto&type=repair&id=VW.B4.SU01.40.1 Downloaded from www.Manualslib.com manuals search engine
40-69 Note: Fig. 3 Clamp, tightening on large diameter - Install pliers VAG 1682 as in illustration. Make sure that the blades of the pliers lie in the corners (arrow -B-) of the clamp. - Tighten clamp by turning the spindle with a torque wrench (do not tilt pliers during this process). Because of the hard material (compared to rubber) of the boot and the stainless steel hose clamp that is necessary, only tighten the clamp with pliers VAG 1682. Tightening torque: 25 Nm (18 ft lb) Use torque wrench with adjustment range: 5 - 50 Nm (e.g. VAG 1331) Make sure that threads of spindle on the pliers are easy to move. If necessary lubricate with MoS2 grease. If difficult to move, e.g. dirt in the threads, the required tightening force of the clamp is not achieved with the specified torque. Fig. 4 Clamp, tightening on small diameter Page 69 of 82Front Wheel Suspension, Shafts and Axle12/7/2004http://ebahn.bentleypublishers.com/vw/servlet/Display?action=Goto&type=repair&id=VW.B4.SU01.40.1 Downloaded from www.Manualslib.com manuals search engine
40-70 Drive axle with triple-rotor joint, removing and installing Removing right-side drive axle The right drive axle removal instructions remain unchanged from the current repair manual procedure. Removing left-side drive axle - Set up engine support bridge. Page 70 of 82Front Wheel Suspension, Shafts and Axle12/7/2004http://ebahn.bentleypublishers.com/vw/servlet/Display?action=Goto&type=repair&id=VW.B4.SU01.40.1 Downloaded from www.Manualslib.com manuals search engine
40-71 - Remove rear transmission mounting bolt (arrow). - Remove front engine mounting bolt (arrow). - Lift engine/transmission assembly - Loosen drive axle nut while vehicle is standing on its wheels. Page 71 of 82Front Wheel Suspension, Shafts and Axle12/7/2004http://ebahn.bentleypublishers.com/vw/servlet/Display?action=Goto&type=repair&id=VW.B4.SU01.40.1 Downloaded from www.Manualslib.com manuals search engine
40-72 - Disconnect drive axle from transmission drive flange. - Mark installation position of bolts (arrows) and remove. Installing - Swing wheel outward (if necessary, place block of wood or equivalent between strut and wheel housing as shown). - Push engine/transmission assembly toward front and remove drive axle. - Install in reverse order of removal. Page 72 of 82Front Wheel Suspension, Shafts and Axle12/7/2004http://ebahn.bentleypublishers.com/vw/servlet/Display?action=Goto&type=repair&id=VW.B4.SU01.40.1 Downloaded from www.Manualslib.com manuals search engine
40-73 Drive axle with triple-rotor joint, servicing 1 - Outer constant velocity (CV) joint Replace complete part only Removing Fig. 1 Installing: drive onto shaft with plastic hammer until circlip seats (springs into groove) Greasing page 40-12 2 - Circlip Always replace Insert in groove in shaft 3 - Thrust ring 4 - Belleville spring Larger diameter (concave side) contacts with thrust ring 5 - Clamp Always replace Tightening page 40-7 6 - Boot Check for tears and chafing 7 - Clamp 8 - Axle shaft Page 73 of 82Front Wheel Suspension, Shafts and Axle12/7/2004http://ebahn.bentleypublishers.com/vw/servlet/Display?action=Goto&type=repair&id=VW.B4.SU01.40.1 Downloaded from www.Manualslib.com manuals search engine
40-74 9 - Clamp For triple-rotor joint 10 - Boot 11 - Clamp For triple-rotor joint 12 - Cover Destroyed when disassembling No longer required for assembly; not available as replacement part 13 - Rectangular sealing ring Included in repair kit; not used in production 14 - O-ring Not required for assembly 15 - Circlip 16 - Roller 17 - Triple-rotor star Chamfer -arrow- goes onto axle shaft splines first 18 - Multi-point socket-head bolt M10 x 20 80 Nm (59 ft lb) 19 - Housing Page 74 of 82Front Wheel Suspension, Shafts and Axle12/7/2004http://ebahn.bentleypublishers.com/vw/servlet/Display?action=Goto&type=repair&id=VW.B4.SU01.40.1 Downloaded from www.Manualslib.com manuals search engine
40-75 Fig. 1 Removing outer CV joint - Drive joint off axle shaft with firm blow from soft mallet. Page 75 of 82Front Wheel Suspension, Shafts and Axle12/7/2004http://ebahn.bentleypublishers.com/vw/servlet/Display?action=Goto&type=repair&id=VW.B4.SU01.40.1 Downloaded from www.Manualslib.com manuals search engine
40-76 Make sure plier jaws seat in grooves of clamp (arrows -B-) Note: Fig. 2 Tightening outer CV joint boot clamp - Position VAG 1682 pliers or equivalent (e.g. Snap-On YA 3080) as shown in illustration. - Tension clamp by using torque wrench to turn spindle (keep pliers at right angle to shaft). Tightening torque: 20 Nm (15 ft lb) Due to the hardness of the boot material (compared to rubber), it is necessary to use a stainless steel clamp. The clamp can only be properly tightened using VAG 1682 pliers. Use a torque wrench with 5-50Nm (4-37 ft lb) range (e.g. VAG 1331 or equivalent). Make sure that the spindle threads of the pliers are not tight. If necessary coat the threads with MoS2 grease to ensure smooth operation. If the spindle threads are tight (e.g. dirty) the force necessary for correctly tightening the clamp will not be achieved, despite correct torque readings. Fig. 3 Tightening small end clamp Page 76 of 82Front Wheel Suspension, Shafts and Axle12/7/2004http://ebahn.bentleypublishers.com/vw/servlet/Display?action=Goto&type=repair&id=VW.B4.SU01.40.1 Downloaded from www.Manualslib.com manuals search engine
40-77 Triple-rotor joint, disassembling - Open hose clamp - Open clamp on shaft small end and push back boot. Note: - Drive screwdriver or similar tool into cover and pry open. If the cover will not pry open, insert screwdriver and pry from the opposite side. The cover is destroyed in the removal process. It does not need to be replaced. Page 77 of 82Front Wheel Suspension, Shafts and Axle12/7/2004http://ebahn.bentleypublishers.com/vw/servlet/Display?action=Goto&type=repair&id=VW.B4.SU01.40.1 Downloaded from www.Manualslib.com manuals search engine
40-78 1 - Triple-rotor joint housing 2 - Triple-rotor star 3 - Axle shaft Note: CAUTION! Do not let the rollers slide off the triple-rotor star and fall to the floor. - Remove O-ring -arrow- from groove. - Mark installation positions of parts -1-, -2- and -3-. Noises while driving may result if the indicated parts are not reassembled to their prior positions. Use a waterproof felt-tipped pen for marking parts. - Remove rubber gasket (arrow) from groove. - With triple-rotor joint housing clamped in vise, pull axle shaft together with triple-rotor star upward out of housing. - Hold axle shaft in straight alignment to triple-rotor joint and slowly push back triple-rotor joint housing with other hand. - Mark installation position of rollers -1- on triple-rotor star -2- using felt-tipped marker. Page 78 of 82Front Wheel Suspension, Shafts and Axle12/7/2004http://ebahn.bentleypublishers.com/vw/servlet/Display?action=Goto&type=repair&id=VW.B4.SU01.40.1 Downloaded from www.Manualslib.com manuals search engine
40-79 - Remove rollers and place on clean surface. -1- Pliers Commercially available - Remove circlip. - Press triple-rotor star off axle shaft. - Pull triple-rotor joint housing off axle shaft. - Clean shaft and triple-rotor joint housing. Page 79 of 82Front Wheel Suspension, Shafts and Axle12/7/2004http://ebahn.bentleypublishers.com/vw/servlet/Display?action=Goto&type=repair&id=VW.B4.SU01.40.1 Downloaded from www.Manualslib.com manuals search engine
40-80 Triple-rotor joint, assembling - Slide small diameter boot clamp onto shaft. - Slide triple-rotor joint boot onto shaft. - Slide triple-rotor joint housing onto shaft. Mounting triple-rotor star Note: The side of the star with a chamfer (arrow) goes onto the axle shaft splines first. - Place triple-rotor star on axle shaft according to previously marked position. - Install circlip and make sure that it is correctly seated. - Install rollers according to previously marked positions. - Push triple-rotor joint housing over rollers and secure (clamp housing in vise). Page 80 of 82Front Wheel Suspension, Shafts and Axle12/7/2004http://ebahn.bentleypublishers.com/vw/servlet/Display?action=Goto&type=repair&id=VW.B4.SU01.40.1 Downloaded from www.Manualslib.com manuals search engine
40-81 Note: A seal is formed directly between the triple-rotor joint and the drive flange by the rectanular sealing ring. The cover is no longer required. - Install rectangular sealing ring (arrow) from repair kit. 90 grams into joint and 90 grams behind joint - Press 180 grams of axle shaft grease from repair kit into triple-rotor joint . - Install triple-rotor joint boot. - Install boot clamp. Page 81 of 82Front Wheel Suspension, Shafts and Axle12/7/2004http://ebahn.bentleypublishers.com/vw/servlet/Display?action=Goto&type=repair&id=VW.B4.SU01.40.1 Downloaded from www.Manualslib.com manuals search engine
40-82 - Tighten small diameter clamp with VAG 1275 pliers or equivalent (e.g. KD 474). CAUTION! Secure the triple-rotor joint with tape so that the housing is not inadvertently pushed back when installing the axle shaft. Remove tape just prior to bolting to drive flange. Page 82 of 82Front Wheel Suspension, Shafts and Axle12/7/2004http://ebahn.bentleypublishers.com/vw/servlet/Display?action=Goto&type=repair&id=VW.B4.SU01.40.1 Downloaded from www.Manualslib.com manuals search engine
42-1 Rear Wheel Suspension, Shafts and Axle Rear axle, servicing (vehicles with front wheel drive) Note: The rear axle and wheel bearings are identical on Base and Plus suspension versions. Welding and straightening of the axle beam is not permissible. 1 - Wheel bolt 110 Nm (81 ft lb) 2 - Self-locking hex nut, 70 Nm (52 ft lb) When tightening the nut the axle beam must be in the horizontal position (unladened vehicle state) 3 - Hex bolt, 25 Nm (18 ft lb) 4 - Suspension strut Removing and installing Fig. 1 to Fig. 3 Disassembling and assembling Page 42-9 Page 1 of 14Rear Wheel Suspension, Shafts and Axle12/7/2004http://ebahn.bentleypublishers.com/vw/servlet/Display?action=Goto&type=repair&id=VW.B4.SU01.42.1 Downloaded from www.Manualslib.com manuals search engine
42-2 5 - Wheel bearing Servicing Vehicles with drum brakes Page 42-15 Vehicles with disc brakes Page 42-24 6 - 80 Nm (59 ft lb) Use only self-locking nuts with captive washers When tightening nut, the axle beam must be in the horizontal position (unladened vehicle state) 7 - Hex bolt Installed from center of vehicle 8 - Shouldered bolt, 70 Nm (52 ft lb) If threads are damaged, rework captive nut in side member Page 42-7 Page 2 of 14Rear Wheel Suspension, Shafts and Axle12/7/2004http://ebahn.bentleypublishers.com/vw/servlet/Display?action=Goto&type=repair&id=VW.B4.SU01.42.1 Downloaded from www.Manualslib.com manuals search engine
42-3 9 - Mounting bracket with retainer for brake pressure regulator Installation position Fig. 4 Check and if necessary adjust rear axle total toe after installation If possible do not loosen when removing the rear axle 10 - Hex nut/washer, 35 Nm (26 ft lb) 11 - Regulator spring bracket 12 - Bonded rubber mounting Note installation position Fig. 7 Pressing out Fig. 5 and Fig. 6 Pressing in Fig. 8 Only replace as pair 13 - Axle beam Stub axle contact surfaces and threaded holes are to be free of paint and dirt 14 - Parking brake cable bracket Page 3 of 14Rear Wheel Suspension, Shafts and Axle12/7/2004http://ebahn.bentleypublishers.com/vw/servlet/Display?action=Goto&type=repair&id=VW.B4.SU01.42.1 Downloaded from www.Manualslib.com manuals search engine
42-4 Repair Manual, Body Exterior, Interior, Repair Group 70. Repair Manual, Body Exterior, Interior, Repair Group 68. Inertia reel bolt (arrow) tightening torque: 40 Nm (30 ft lb) Fig. 1 Suspension strut at body, removing and installing - Removing and installing inertia reel cover - Removing and installing inertia reel Remove and install both securing bolts (arrows) from interior of vehicle (viewed through rear left side window). Tightening torque: 25 Nm (18 ft lb) Fig. 2 Suspension strut at body, removing and installing Page 4 of 14Rear Wheel Suspension, Shafts and Axle12/7/2004http://ebahn.bentleypublishers.com/vw/servlet/Display?action=Goto&type=repair&id=VW.B4.SU01.42.1 Downloaded from www.Manualslib.com manuals search engine
42-5 Suspension strut is attached to the body by 4 retaining lugs in addition to the bolts. To remove, turn suspension strut until retaining lugs are positioned above the cut-outs. Fig. 3 Suspension strut, removing and installing Angle of inclination to axle beam 13 30' 1. Fig. 4 Bolting mounting bracket to axle beam Page 5 of 14Rear Wheel Suspension, Shafts and Axle12/7/2004http://ebahn.bentleypublishers.com/vw/servlet/Display?action=Goto&type=repair&id=VW.B4.SU01.42.1 Downloaded from www.Manualslib.com manuals search engine
42-6 Note: Before using special tool 3111 it is important to grease spindle with Molybdenum grease. Fig. 5 Bonded rubber mounting, pressing 1st half out of axle beam Thread base plate into the pressure plate 3111/5 from the opposite side. Note: Mounting must not be driven out. Otherwise the mounting seat will be widened and a tight seating of the new mounting cannot be assured. Fig. 6 Bonded rubber mounting, pressing 2nd half out of axle beam Page 6 of 14Rear Wheel Suspension, Shafts and Axle12/7/2004http://ebahn.bentleypublishers.com/vw/servlet/Display?action=Goto&type=repair&id=VW.B4.SU01.42.1 Downloaded from www.Manualslib.com manuals search engine
42-7 Protruding segment of bonded rubber mounting faces forward on inside and rearward on outside. Fig. 7 Rubber bonded mounting, installation position Press both halves in one after the other until the mounting conical section contacts the axle beam. Fig. 8 Rubber bonded mounting, presssing into axle beam Page 7 of 14Rear Wheel Suspension, Shafts and Axle12/7/2004http://ebahn.bentleypublishers.com/vw/servlet/Display?action=Goto&type=repair&id=VW.B4.SU01.42.1 Downloaded from www.Manualslib.com manuals search engine
42-8 Reworking cap nut in side member (front wheel drive vehicles) If the threads of the cap nut in the side member are damaged, it must either be retapped or the cap nut must be drilled out. When drilling out proceed as follows: - Remove rear axle. - Drill through damaged cap nut in the side member using a 10.2 mm diameter drill from underneath. Note: Do not tilt the drill when drilling. WARNING! Wear protective goggles. - Cut new thread in the cap nut, M 12 x 1.5. - Use new bolts, Part No. N 010.127.4 (M 12 x 1.5 x 30), and washer, Part No. N 011.531.7, to secure the rear axle. Tightening torque: 70 Nm (52 ft lb) Note: The procedure described here must only be performed on one cap nut on each side of the vehicle. Page 8 of 14Rear Wheel Suspension, Shafts and Axle12/7/2004http://ebahn.bentleypublishers.com/vw/servlet/Display?action=Goto&type=repair&id=VW.B4.SU01.42.1 Downloaded from www.Manualslib.com manuals search engine
42-9 Suspension strut, disassembling and assembling (front wheel drive vehicles) 1 - Cap Pry out with screwdriver Pressing on Fig. 4 2 - O-ring 3 - Self-locking hex nut, 25 Nm (18 ft lb) 4 - Dished washer 5 - Upper rubber mounting 6 - Gasket (foam) Always replace Page 9 of 14Rear Wheel Suspension, Shafts and Axle12/7/2004http://ebahn.bentleypublishers.com/vw/servlet/Display?action=Goto&type=repair&id=VW.B4.SU01.42.1 Downloaded from www.Manualslib.com manuals search engine
42-10 7 - Suspension strut bearing Always replace foam gasket Welded nuts must be located in the spring seat recesses Align welded nuts and cap to shock absorber lower bushing Fig. 3 8 - Spacer tube 9 - Lower rubber mounting 10 - Metal cap Higher on Wagon than Sedan 11 - Washer 12 - Spring seat Thinner on Wagon than Sedan Installation position Fig. 2 Page 10 of 14Rear Wheel Suspension, Shafts and Axle12/7/2004http://ebahn.bentleypublishers.com/vw/servlet/Display?action=Goto&type=repair&id=VW.B4.SU01.42.1 Downloaded from www.Manualslib.com manuals search engine
42-11 13 - Stop buffer Shorter on Wagon than Sedan 14 - Protective tube Longer on Wagon than Sedan 15 - Plastic cap 16 - Coil spring Removing and installing Fig. 1 Allocation Parts catalog Wagon has protective hose at top 17 - Packing 18 - Circlip 19 - Lower spring plate Page 11 of 14Rear Wheel Suspension, Shafts and Axle12/7/2004http://ebahn.bentleypublishers.com/vw/servlet/Display?action=Goto&type=repair&id=VW.B4.SU01.42.1 Downloaded from www.Manualslib.com manuals search engine
42-12 20 - Shock absorber Can be replaced individually Removing and installing Page 42-4 Application see Parts catalog Page 12 of 14Rear Wheel Suspension, Shafts and Axle12/7/2004http://ebahn.bentleypublishers.com/vw/servlet/Display?action=Goto&type=repair&id=VW.B4.SU01.42.1 Downloaded from www.Manualslib.com manuals search engine
42-13 Note: Instead of VAG 1403, VAG 1752/1 may be used. Fig. 1 Spring, removing and installing Fig. 2 Spring seat, installation position Page 13 of 14Rear Wheel Suspension, Shafts and Axle12/7/2004http://ebahn.bentleypublishers.com/vw/servlet/Display?action=Goto&type=repair&id=VW.B4.SU01.42.1 Downloaded from www.Manualslib.com manuals search engine
42-14 Fig. 3 Suspension strut mounting to shock absorber bushing, aligning A - Shock absorber bushing axis B - Suspension strut mounting axis "a" 50 C - Cap axis 90 offset to shock absorber bushing axis -A-. Fig. 4 Cap in suspension strut mounting, pressing in. Page 14 of 14Rear Wheel Suspension, Shafts and Axle12/7/2004http://ebahn.bentleypublishers.com/vw/servlet/Display?action=Goto&type=repair&id=VW.B4.SU01.42.1 Downloaded from www.Manualslib.com manuals search engine
42-15 Wheel bearings, servicing Drum brakes (front wheel drive vehicles), wheel bearings, servicing Note: Careful sealing, absolute cleanliness and precise adjustment are requirements for long wheel bearing service life. Therefore note the following points: Install oil seal and grease cap as shown. Only reinstall clean bearings, do not wash bearings. Adjust wheel bearing play carefully. 1 - Grease cap Pressing off Fig. 1 and Fig. 2 Driving in Fig. 3 Page 1 of 18Wheel bearings, servicing12/7/2004http://ebahn.bentleypublishers.com/vw/servlet/Display?action=Goto&type=repair&id=VW.B4.SU01.42.2 Downloaded from www.Manualslib.com manuals search engine
42-16 2 - Cotter pin Always replace 3 - Locking ring 4 - Hex nut Adjusting wheel bearing play Fig. 4 5 - Thrust washer 6 - Outer wheel bearing Drive out outer race with copper drift Pressing in Fig. 6 7 - Hex socket head bolt, 10 Nm (7 ft lb) 8 - Speed sensor Only on vehicles with ABS 9 - Stub axle Straightening operations are not permitted! Page 2 of 18Wheel bearings, servicing12/7/2004http://ebahn.bentleypublishers.com/vw/servlet/Display?action=Goto&type=repair&id=VW.B4.SU01.42.2 Downloaded from www.Manualslib.com manuals search engine
42-17 10 - Brake backing plate Bolt together with stub axle onto rear axle 11 - Oil seal Fill between sealing lips with multi-purpose grease. Driving in Fig. 8 12 - Dished washer Larger contact surface (concave side) to brake backing plate 13 - Hex bolt, 60 Nm (44 ft lb) 14 - Inner wheel bearing Drive out outer race with copper drift Pressing in Fig. 7 15 - Speed sensor rotor Pressing on Fig. 9 Page 3 of 18Wheel bearings, servicing12/7/2004http://ebahn.bentleypublishers.com/vw/servlet/Display?action=Goto&type=repair&id=VW.B4.SU01.42.2 Downloaded from www.Manualslib.com manuals search engine
42-18 16 - Brake drum Before removing release brake shoe adjustment through wheel bolt hole Fig. 5 When removing the brake drum make sure that the outer wheel bearing does not fall out. Fill hub with multi-purpose grease before installing Page 4 of 18Wheel bearings, servicing12/7/2004http://ebahn.bentleypublishers.com/vw/servlet/Display?action=Goto&type=repair&id=VW.B4.SU01.42.2 Downloaded from www.Manualslib.com manuals search engine
42-19 Loosen grease cap from seat by tapping lightly on the claw. Fig. 1 Grease cap, pressing off Fig. 2 Grease cap, pressing off Page 5 of 18Wheel bearings, servicing12/7/2004http://ebahn.bentleypublishers.com/vw/servlet/Display?action=Goto&type=repair&id=VW.B4.SU01.42.2 Downloaded from www.Manualslib.com manuals search engine
42-20 Note: Fig. 3 Grease cap, driving on Always replace damaged (dented) grease caps. Damaged (dented) grease caps allow ingress of moisture, therefore always use the illustrated tool. Note: Using a screwdriver it must be possible to move the thrust washer by finger pressure (without prying). Fig. 4 Wheel bearing play, adjusting - Secure with locking ring and new cotter pin. Page 6 of 18Wheel bearings, servicing12/7/2004http://ebahn.bentleypublishers.com/vw/servlet/Display?action=Goto&type=repair&id=VW.B4.SU01.42.2 Downloaded from www.Manualslib.com manuals search engine
42-21 Fig. 5 Brake shoe adjustment, releasing - Insert a screwdriver through a hole in the brake drum and push the wedge upward. Fig. 6 Outer wheel bearing outer race, pressing in Page 7 of 18Wheel bearings, servicing12/7/2004http://ebahn.bentleypublishers.com/vw/servlet/Display?action=Goto&type=repair&id=VW.B4.SU01.42.2 Downloaded from www.Manualslib.com manuals search engine
42-22 Fig. 7 Inner wheel bearing outer race, pressing in Fig. 8 Oil seal, driving in Page 8 of 18Wheel bearings, servicing12/7/2004http://ebahn.bentleypublishers.com/vw/servlet/Display?action=Goto&type=repair&id=VW.B4.SU01.42.2 Downloaded from www.Manualslib.com manuals search engine
42-23 Fig. 9 Rotor, pressing in Page 9 of 18Wheel bearings, servicing12/7/2004http://ebahn.bentleypublishers.com/vw/servlet/Display?action=Goto&type=repair&id=VW.B4.SU01.42.2 Downloaded from www.Manualslib.com manuals search engine
42-24 Wheel bearings, servicing - disc brakes (front wheel drive vehicles) Note: Careful sealing, absolute cleanliness and precise adjustment are requirements for long wheel bearing service life. Therefore note the following points: Install oil seal and grease cap as shown. Only reinstall clean bearings. Adjust wheel bearing play carefully. 1 - Stub axle 2 - Hex socket head bolt, 10 Nm (7 ft lb) Page 10 of 18Wheel bearings, servicing12/7/2004http://ebahn.bentleypublishers.com/vw/servlet/Display?action=Goto&type=repair&id=VW.B4.SU01.42.2 Downloaded from www.Manualslib.com manuals search engine
42-25 3 - Speed sensor Only on vehicles with ABS Before installing sensor, clean mounting hole inner surface and coat with lubricating paste G 000 650 4 - Brake hose bracket 5 - Hex socket head bolt, 65 Nm (48 ft lb) 6 - Self-locking hex bolt, 35 Nm (26 ft lb) Always replace 7 - Guide pins 8 - Protective cap 9 - Pad retaining spring Replace when changing pads Page 11 of 18Wheel bearings, servicing12/7/2004http://ebahn.bentleypublishers.com/vw/servlet/Display?action=Goto&type=repair&id=VW.B4.SU01.42.2 Downloaded from www.Manualslib.com manuals search engine
42-26 10 - Cover ring Always replace Installation position Fig. 5 Drive on with tube VW 519 11 - Pad carrier 12 - Brake pads Removing and installing Page 46-33 13 - Brake caliper Servicing Page 47-15 14 - Outer wheel bearing Drive out outer race with copper drift Pressing in Fig. 6 15 - Hex nut Adjusting wheel bearing play Fig. 4 16 - Cotter pin Always replace Page 12 of 18Wheel bearings, servicing12/7/2004http://ebahn.bentleypublishers.com/vw/servlet/Display?action=Goto&type=repair&id=VW.B4.SU01.42.2 Downloaded from www.Manualslib.com manuals search engine
42-27 17 - Grease cap Pressing off Fig. 1 and Fig. 2 Driving on Fig. 3 18 - Locking ring 19 - Thrust washer 20 - Wheel bolt, 110 Nm (81 ft lb) 21 - Brake disc Before installing fill hub with multi-purpose grease 22 - Inner wheel bearing Drive out outer race with copper drift Pressing in Fig. 7 23 - Oil seal Fill between sealing lips with multi-purpose grease Driving in Fig. 8 24 - Speed sensor rotor Only on vehicles with ABS 25 - Hex bolt, 60 Nm (44 ft lb) Page 13 of 18Wheel bearings, servicing12/7/2004http://ebahn.bentleypublishers.com/vw/servlet/Display?action=Goto&type=repair&id=VW.B4.SU01.42.2 Downloaded from www.Manualslib.com manuals search engine
42-28 26 - Dished washer Large contact surface (concave side) to backing plate 27 - Backing plate 28 - Axle beam Straightening work is not permissible! Only use stub axles with 6 mounting holes. 29 - Parking brake cable Adjusting parking brake Page 46-36 30 - Spring clip Page 14 of 18Wheel bearings, servicing12/7/2004http://ebahn.bentleypublishers.com/vw/servlet/Display?action=Goto&type=repair&id=VW.B4.SU01.42.2 Downloaded from www.Manualslib.com manuals search engine
42-29 Fig. 1 Grease cap, pressing off - Loosen grease cap by tapping lightly on the claw. Fig. 2 Grease cap, pressing off Page 15 of 18Wheel bearings, servicing12/7/2004http://ebahn.bentleypublishers.com/vw/servlet/Display?action=Goto&type=repair&id=VW.B4.SU01.42.2 Downloaded from www.Manualslib.com manuals search engine
42-30 Note: Fig. 3 Grease cap, driving on Always replace damaged (dented) grease caps. Damaged (dented) grease caps allow ingress of moisture, therefore always use the illustrated tool. Note: Using a screwdriver it must be possible to move the thrust washer by finger pressure (without prying). Fig. 4 Wheel bearing play, adjusting - Secure with locking ring and new cotter pin. Page 16 of 18Wheel bearings, servicing12/7/2004http://ebahn.bentleypublishers.com/vw/servlet/Display?action=Goto&type=repair&id=VW.B4.SU01.42.2 Downloaded from www.Manualslib.com manuals search engine
42-31 Dimension "a" = 9.5 mm Fig. 5 Cover ring, installation position - Drive on cover ring with tube VW 519 Fig. 6 Outer wheel bearing outer race, pressing in Page 17 of 18Wheel bearings, servicing12/7/2004http://ebahn.bentleypublishers.com/vw/servlet/Display?action=Goto&type=repair&id=VW.B4.SU01.42.2 Downloaded from www.Manualslib.com manuals search engine
42-32 Fig. 7 Inner wheel bearing outer race, pressing in Fig. 8 Oil seal, driving in Page 18 of 18Wheel bearings, servicing12/7/2004http://ebahn.bentleypublishers.com/vw/servlet/Display?action=Goto&type=repair&id=VW.B4.SU01.42.2 Downloaded from www.Manualslib.com manuals search engine
42-33 Rear axle, servicing (four wheel drive vehicles) Note: When removing and installing the rear axle, it is recommended to remove axle and differential together and to separate away from the vehicle. If only the axle beam is to be removed and installed, the wishbones can remain attached to the shock absorber. In both cases, disconnect vacuum lines and wiring before lowering the assembly. Always replace self-locking nuts and bolts. Always replace corroded nuts and bolts. The ABS speed sensor wiring connections are located under the rear seat. Page 1 of 13Rear axle, servicing (four wheel drive vehicles)12/7/2004http://ebahn.bentleypublishers.com/vw/servlet/Display?action=Goto&type=repair&id=VW.B4.SU01.42.3 Downloaded from www.Manualslib.com manuals search engine
42-34 1 - Suspension strut Removing and installing Page 42-4 , Fig. 1 and Page 42-37 Disassembling and assembling Page 42-53 Application see Parts catalog 2 - Drive shaft Removing and installing Fig. 2 and Fig. 3 Servicing Page 42-46 3 - Final drive Removing and installing from axle beam Fig. 9 4 - Final drive mounting bracket and carrier Removing and installing Fig. 12 Replacing rubber bonded mounting Fig. 13 Page 2 of 13Rear axle, servicing (four wheel drive vehicles)12/7/2004http://ebahn.bentleypublishers.com/vw/servlet/Display?action=Goto&type=repair&id=VW.B4.SU01.42.3 Downloaded from www.Manualslib.com manuals search engine
42-35 5 - Propshaft Removing and installing Fig. 2 Mark installation position before removing 6 - Anti-roll bar Removing and installing Fig. 4 7 - Axle beam Replacing rubber bonded mounting Fig. 10 and Fig. 11 8 - Rear axle mounting bracket Removing and installing at body Fig. 14 9 - Control arm Removing and installing Fig. 5 Replacing rubber bonded mounting Fig. 6 and Fig. 7 Rubber bonded mounting with eccentric bushing Fig. 8 Page 3 of 13Rear axle, servicing (four wheel drive vehicles)12/7/2004http://ebahn.bentleypublishers.com/vw/servlet/Display?action=Goto&type=repair&id=VW.B4.SU01.42.3 Downloaded from www.Manualslib.com manuals search engine
42-36 Repair Manual, Suspension, Wheels,Brakes, Steering, Repair Group 46 and47 10 - Wheel bearing Servicing Page 42-59 Servicing brakes 11 - Hex bolt, 85 Nm (63 ft lb) 12 - Hex bolt for seat belt strut, 25 Nm (18 ft lb) Page 4 of 13Rear axle, servicing (four wheel drive vehicles)12/7/2004http://ebahn.bentleypublishers.com/vw/servlet/Display?action=Goto&type=repair&id=VW.B4.SU01.42.3 Downloaded from www.Manualslib.com manuals search engine
42-37 Before installing, bring control arm into horizontal position (unladen state). Removing and installing suspension strut at body Page 42-4 . Tightening torque -A-: 65 Nm (48 ft lb) Note: Support control arm otherwise damage may occur to constant velocity joint as a result of over-stressing. Fig. 1 Suspension strut from control arm, removing and installing Before removing propshaft, mark installation position. If installed offset, imbalance will be excessive. Tightening torque -A- and -B-: 45 Nm (33 ft lb) Note: Always support propshaft with wire otherwise constant universal joint will be damaged. Fig. 2 Driveshaft and drive axle, removing and installing at differential Page 5 of 13Rear axle, servicing (four wheel drive vehicles)12/7/2004http://ebahn.bentleypublishers.com/vw/servlet/Display?action=Goto&type=repair&id=VW.B4.SU01.42.3 Downloaded from www.Manualslib.com manuals search engine
42-38 Loosen and tighten only when vehicle is standing on its wheels (danger of accident). Tightening torque: 90 Nm (66 ft lb) and turn 45 further (1/8 turn) Note: Any paint residue and/or corrosion on the thread of the outer joint must be removed before the nut is installed. Fig. 3 Drive shaft, removing and installing Tightening torque -A- and -B-: 25 Nm (18 ft lb) Fig. 4 Stabilizer bar, removing and installing Page 6 of 13Rear axle, servicing (four wheel drive vehicles)12/7/2004http://ebahn.bentleypublishers.com/vw/servlet/Display?action=Goto&type=repair&id=VW.B4.SU01.42.3 Downloaded from www.Manualslib.com manuals search engine
42-39 Before tightening bring control arm into horizontal position (unladen state). To remove the right-hand control arm inner bolt, remove brake pressure regulator from axle beam. Tightening torque -A-: 120 Nm (89 ft lb) Fig. 5 Control arm, removing and installing Fig. 6 Rubber bonded mounting, removing A - 17 mm socket B - Separating device 12 - 75 mm, e.g. Kukko 17/1 Page 7 of 13Rear axle, servicing (four wheel drive vehicles)12/7/2004http://ebahn.bentleypublishers.com/vw/servlet/Display?action=Goto&type=repair&id=VW.B4.SU01.42.3 Downloaded from www.Manualslib.com manuals search engine
42-40 Before installing coat with acid free lubricant, e.g. soft soap. Installation position: Shoulder on outer mounting to outside, to inside on inner mounting (to center of vehicle). Note: Deviations from the rear axle toe and camber specifications can be corrected by using a bonded rubber mounting with eccentric bushing Fig. 8 Fig. 7 Bonded rubber mounting, installing Page 8 of 13Rear axle, servicing (four wheel drive vehicles)12/7/2004http://ebahn.bentleypublishers.com/vw/servlet/Display?action=Goto&type=repair&id=VW.B4.SU01.42.3 Downloaded from www.Manualslib.com manuals search engine
42-41 The rubber mounting -A- is equipped with an eccentric bushing which can change the position of the control arm. This rubber mounting may only be installed in the control arm inner mounting. The camber and/or toe can be changed according to installation position. Note: With this mounting the camber or toe can be altered up to 18'. Fig. 8 Rubber mounting to correct camber/toe Installation position Alteration Eccentric upward Camber alteration negative Eccentric downward Camber alteration pos. Eccentric forward Toe alteration positive Eccentric rearward Toe alteration negative Page 9 of 13Rear axle, servicing (four wheel drive vehicles)12/7/2004http://ebahn.bentleypublishers.com/vw/servlet/Display?action=Goto&type=repair&id=VW.B4.SU01.42.3 Downloaded from www.Manualslib.com manuals search engine
42-42 Removing and installing viscous coupling Repair Manual, 5 Spd. Manual Transmission 02A; Repair Group 39 Tightening torque -A-: 45 Nm (33 ft lb) Fig. 9 Final drive, removing and installing from axle beam Page 10 of 13Rear axle, servicing (four wheel drive vehicles)12/7/2004http://ebahn.bentleypublishers.com/vw/servlet/Display?action=Goto&type=repair&id=VW.B4.SU01.42.3 Downloaded from www.Manualslib.com manuals search engine
42-43 Connect segment corners of bonded rubber mounting metal core with a line. The continued line must pass through the center of hole (arrow). Note: The kidney-shaped recess must be pointing in direction of travel when viewed from the center of vehicle. Fig. 10 Installation position, determining Place one half of the rubber bonded mounting in correct position and pull in with tool 3128 and 3128/1. Then place 2nd half in position and pull in. Fig. 11 Rubber bonded mounting, installing Page 11 of 13Rear axle, servicing (four wheel drive vehicles)12/7/2004http://ebahn.bentleypublishers.com/vw/servlet/Display?action=Goto&type=repair&id=VW.B4.SU01.42.3 Downloaded from www.Manualslib.com manuals search engine
42-44 Remove and install complete When assembling mounting bracket and final drive carrier away from the vehicle, make sure parts are correctly located relative to each other. It is essential that the bonded rubber mounting is installed stress free in the vehicle. Fig. 12 Mounting bracket and final drive carrier, removing and installing Tightening torque -A- 45 Nm (33 ft lb) -B- 65 Nm (48 ft lb) -C- 85 Nm (63 ft lb) -D- 85 Nm (63 ft lb) No specific installation position Insertion depth: flush with lower edge (arrow) Fig. 13 Final drive bonded rubber bushing, pressing in and out Page 12 of 13Rear axle, servicing (four wheel drive vehicles)12/7/2004http://ebahn.bentleypublishers.com/vw/servlet/Display?action=Goto&type=repair&id=VW.B4.SU01.42.3 Downloaded from www.Manualslib.com manuals search engine
42-45 Mark mounting bracket installation position relative to body longitudinal member, otherwise the rear axle must be realigned on an axle alignment stand after reinstalling. Fig. 14 Mounting bracket on body, removing and installing Tightening torque -A- 130 Nm (96 ft lb) -B- 60 Nm (44 ft lb) -C- 85 Nm (63 ft lb) Page 13 of 13Rear axle, servicing (four wheel drive vehicles)12/7/2004http://ebahn.bentleypublishers.com/vw/servlet/Display?action=Goto&type=repair&id=VW.B4.SU01.42.3 Downloaded from www.Manualslib.com manuals search engine
42-46 Rear drive shafts, servicing Removing and installing drive shafts Page 42-37 Note: Grease quantity: - - outer constant velocity joint 80 g G-6.3 - - inner constant velocity joint 80 9 G-6.3 Greasing outer joint: press half of the grease into the joint, and the other half evenly into the boot. Greasing inner joint: press half of the grease into the inner joint from both sides, the other half evenly into the boot. When replacing the boot, regrease joint if required. Page 1 of 7Rear drive shafts, servicing12/7/2004http://ebahn.bentleypublishers.com/vw/servlet/Display?action=Goto&type=repair&id=VW.B4.SU01.42.4 Downloaded from www.Manualslib.com manuals search engine
42-47 1 - Circlip Always replace Remove and install with VW161 a 2 - Inner constant velocity joint, 81 mm diameter Only replace complete Pressing off Page 40-54 Pressing on Page 40-55 Greasing Notes Page 42-46 Checking Page 40-62 3 - Dished washer Inner diameter splined Installation position: outer diameter (concave side) contacts constant velocity joint Page 2 of 7Rear drive shafts, servicing12/7/2004http://ebahn.bentleypublishers.com/vw/servlet/Display?action=Goto&type=repair&id=VW.B4.SU01.42.4 Downloaded from www.Manualslib.com manuals search engine
42-48 4 - Boot for 94 mm diameter constant velocity joint Rubber version Check for tears and chafing Installation position: At cuff 1 to 1-1/2 grooves visible Coat inside of cap with D3 Drive off with drift 5 - Drive axle Different drive axle lengths - short shaft right 6 - Hose clamp Always replace Tensioning Page 40-57 Page 3 of 7Rear drive shafts, servicing12/7/2004http://ebahn.bentleypublishers.com/vw/servlet/Display?action=Goto&type=repair&id=VW.B4.SU01.42.4 Downloaded from www.Manualslib.com manuals search engine
42-49 7 - Boot for 81 mm diameter constant velocity joint Polyester elastomer version Check for tears and chafing Installation position: At cuff 1 to 1-1/2 grooves visible To balance pressure briefly ventilate boot before tensioning the small clamp 8 - Hose clamp Always replace Tensioning Page 40-57 9 - Dished washer Outer diameter (concave side) contacts thrust washer 10 - Thrust washer Page 4 of 7Rear drive shafts, servicing12/7/2004http://ebahn.bentleypublishers.com/vw/servlet/Display?action=Goto&type=repair&id=VW.B4.SU01.42.4 Downloaded from www.Manualslib.com manuals search engine
42-50 11 - Circlip Always replace Insert in shaft groove 12 - Outer constant velocity joint: 81 mm diameter Only replace complete Removing Page 40-54 Installing: drive onto shaft with plastic hammer until compressed circlip seats Greasing Notes Page 42-46 Checking Page 40-60 13 - Inner support rings Prevents boot inflating Only installed on left drive shaft transmission end Page 5 of 7Rear drive shafts, servicing12/7/2004http://ebahn.bentleypublishers.com/vw/servlet/Display?action=Goto&type=repair&id=VW.B4.SU01.42.4 Downloaded from www.Manualslib.com manuals search engine
42-51 Reworking cap nut in side member (four wheel drive vehicles) If the threads of the cap nut in the side member are damaged, it must either be retapped or the cap nut must be drilled out. - Remove control arm if necessary. - Drill through damaged cap nut in the side member using a 10.2 mm diameter drill from underneath. Note: Do not tilt the drill when drilling. WARNING! Wear protective goggles. 1 - Cap nut 2 - Reinforcing plate 3 - Side member Page 6 of 7Rear drive shafts, servicing12/7/2004http://ebahn.bentleypublishers.com/vw/servlet/Display?action=Goto&type=repair&id=VW.B4.SU01.42.4 Downloaded from www.Manualslib.com manuals search engine
42-52 - Cut new thread in the cap nut, M 12 x 1.5. - Use new bolts, Part No. N 010 137.1 and washer, Part No. N 011 531.7 to secure the rear axle. Tightening torque: 65 Nm (48 ft lb) Note: The procedure described here must only be performed on one cap nut on each side of the vehicle. Page 7 of 7Rear drive shafts, servicing12/7/2004http://ebahn.bentleypublishers.com/vw/servlet/Display?action=Goto&type=repair&id=VW.B4.SU01.42.4 Downloaded from www.Manualslib.com manuals search engine
42-53 Suspension strut, disassembling and assembling (four wheel drive vehicles) 1 - Cap Pry out with screwdriver Pressing on Fig. 5 Installation position Fig. 5 2 - Seal 3 - Self locking hex nut, 30 Nm (22 ft lb) Always replace 4 - Dished washer 5 - Upper rubber mounting 6 - Gasket (foam) Always replace Page 1 of 6Suspension strut, disassembling and assembling (four wheel drive vehicles)12/7/2004http://ebahn.bentleypublishers.com/vw/servlet/Display?action=Goto&type=repair&id=VW.B4.SU01.42.5 Downloaded from www.Manualslib.com manuals search engine
42-54 7 - Suspension strut mounting Welded nuts must be located in the spring seat recesses Installation position to spring seat Fig. 3 8 - Spring seat 9 - Spacer tube 10 - Lower rubber mounting 11 - Stop buffer mounting 12 - Washer 13 - Stop buffer 14 - Ring (Aluminium) 15 - Boot 16 - Protective cap Page 2 of 6Suspension strut, disassembling and assembling (four wheel drive vehicles)12/7/2004http://ebahn.bentleypublishers.com/vw/servlet/Display?action=Goto&type=repair&id=VW.B4.SU01.42.5 Downloaded from www.Manualslib.com manuals search engine
42-55 17 - Coil spring Removing and installing Page 42-13 Allocation Parts catalog 18 - Packing 19 - Circlip 20 - Lower spring plate Installation position Fig. 1 21 - Shock absorber Can be replaced individually Removing and installing Page 42-4 and Page 42-37 Check shock absorber for leaks and noises Application see Parts catalog Page 3 of 6Suspension strut, disassembling and assembling (four wheel drive vehicles)12/7/2004http://ebahn.bentleypublishers.com/vw/servlet/Display?action=Goto&type=repair&id=VW.B4.SU01.42.5 Downloaded from www.Manualslib.com manuals search engine
42-56 The spring plate must be installed so that the holes "a" align with the bushing -2- in the shock absorber eye. Otherwise, in extreme driving situations spring plate -1- could contact the tire. Fig. 1 Lower spring plate, installation position 1 - Lower spring plate 2 - Shock absorber eye bushing Fig. 2 Spring seat, installation position Page 4 of 6Suspension strut, disassembling and assembling (four wheel drive vehicles)12/7/2004http://ebahn.bentleypublishers.com/vw/servlet/Display?action=Goto&type=repair&id=VW.B4.SU01.42.5 Downloaded from www.Manualslib.com manuals search engine
42-57 The upper suspension strut mounting and the spring seat (arrow A) both have markings (arrow B). These must be installed pointing forward, otherwise damage will occur to the suspension strut piston rod. Fig. 3 Suspension strut mounting to spring seat, installation position Fig. 4 Suspension strut mounting to shock absorber bushing, aligning -A- Shock absorber bushing axis -B- Suspension strut mounting axis -C- Cap axis at 90 to shock absorber bushing axis -A-. Page 5 of 6Suspension strut, disassembling and assembling (four wheel drive vehicles)12/7/2004http://ebahn.bentleypublishers.com/vw/servlet/Display?action=Goto&type=repair&id=VW.B4.SU01.42.5 Downloaded from www.Manualslib.com manuals search engine
42-58 Fig. 5 Cap, pressing into suspension strut mounting Page 6 of 6Suspension strut, disassembling and assembling (four wheel drive vehicles)12/7/2004http://ebahn.bentleypublishers.com/vw/servlet/Display?action=Goto&type=repair&id=VW.B4.SU01.42.5 Downloaded from www.Manualslib.com manuals search engine
42-59 Wheel bearings, servicing - disc brakes (four wheel drive vehicles) Note: If a vehicle has to be moved after removing the drive shaft, first install an outer joint and tighten to 50 Nm (37 ft lb). Otherwise the wheel bearing will be damaged. 1 - Control arm 2 - Self locking hex socket head bolt, 60 Nm (44 ft lb) 3 - Self locking hex bolt, 35 Nm (26 ft lb) Always replace When loosening and tightening counter-hold on guide pins Page 1 of 8Wheel bearings, servicing - disc brakes (four wheel drive vehicles)12/7/2004http://ebahn.bentleypublishers.com/vw/servlet/Display?action=Goto&type=repair&id=VW.B4.SU01.42.6 Downloaded from www.Manualslib.com manuals search engine
42-60 Repair Manual, Suspension, Wheels, Brakes, Steering, Repair Group 46 Repair Manual, Suspension, Wheels,Brakes, Steering, Repair Group 47 4 - Guide pins 5 - Protective cap 6 - Pad securing springs Always replace when changing pads 7 - Brake pads Repair information 8 - Brake caliper Servicing 9 - Pad carrier 10 - Screw 11 - Wheel bolt, 110 Nm (81 ft lb) Page 2 of 8Wheel bearings, servicing - disc brakes (four wheel drive vehicles)12/7/2004http://ebahn.bentleypublishers.com/vw/servlet/Display?action=Goto&type=repair&id=VW.B4.SU01.42.6 Downloaded from www.Manualslib.com manuals search engine
42-61 Repair Manual, Suspension, Wheels, Brakes, Steering, Repair Group 46 12 - Self-locking hex nut Always Tighten to 90 Nm (66 ft lb) and turn 45 further (1/8 turn) To tighten use recommend angle measuring wrench VAG 1756 or equivalent Before installing nut on outer joint remove any paint remains and/or corrosion from threads. 13 - Shim 14 - Brake disc Repair information 15 - Hub Pressing out Fig. 1 Pulling off inner race Fig. 3 Pressing in Fig. 5 Page 3 of 8Wheel bearings, servicing - disc brakes (four wheel drive vehicles)12/7/2004http://ebahn.bentleypublishers.com/vw/servlet/Display?action=Goto&type=repair&id=VW.B4.SU01.42.6 Downloaded from www.Manualslib.com manuals search engine
42-62 16 - Circlip Ensure seated correctly 17 - Wheel bearing 72 mm diameter Pressing out Page 42-64 Pressing in page. Page 42-65 18 - Hex bolt, 10 Nm (7 ft lb) 19 - Backing plate 20 - Parking brake cable Adjusting parking brake Page 46-36 21 - Spring clip 22 - Hex socket head bolt, 10 Nm (7 ft lb) 23 - Speed sensor Before inserting, clean and coat with lubricating paste G 000 650 Page 4 of 8Wheel bearings, servicing - disc brakes (four wheel drive vehicles)12/7/2004http://ebahn.bentleypublishers.com/vw/servlet/Display?action=Goto&type=repair&id=VW.B4.SU01.42.6 Downloaded from www.Manualslib.com manuals search engine
42-63 24 - Drive shaft with speed sensor rotor Removing and installing drive shaft Page 42-37 and Page 42-38 Removing and installing rotor, Fig. 6 25 - Brake line Page 5 of 8Wheel bearings, servicing - disc brakes (four wheel drive vehicles)12/7/2004http://ebahn.bentleypublishers.com/vw/servlet/Display?action=Goto&type=repair&id=VW.B4.SU01.42.6 Downloaded from www.Manualslib.com manuals search engine
42-64 Fig. 1 Hub, pressing out Fig. 2 Wheel bearing, pressing out Page 6 of 8Wheel bearings, servicing - disc brakes (four wheel drive vehicles)12/7/2004http://ebahn.bentleypublishers.com/vw/servlet/Display?action=Goto&type=repair&id=VW.B4.SU01.42.6 Downloaded from www.Manualslib.com manuals search engine
42-65 Note: Only use puller with leg clamp e.g. Kukko 204-2 (commercial type). Fig. 3 Inner race, pulling off of hub Note: First install lower circlip. Fig. 4 Wheel bearing, pressing in Page 7 of 8Wheel bearings, servicing - disc brakes (four wheel drive vehicles)12/7/2004http://ebahn.bentleypublishers.com/vw/servlet/Display?action=Goto&type=repair&id=VW.B4.SU01.42.6 Downloaded from www.Manualslib.com manuals search engine
42-66 Note: First install backing plate on control arm. Tightening torque: 10 Nm (7 ft lb) Fig. 5 Hub, pressing in Fig. 6 Speed sensor rotor, pressing in - Drive rotor off outer joint using a drift (rotor will be destroyed). - Drive new rotor carefully onto stop using a plastic hammer. Page 8 of 8Wheel bearings, servicing - disc brakes (four wheel drive vehicles)12/7/2004http://ebahn.bentleypublishers.com/vw/servlet/Display?action=Goto&type=repair&id=VW.B4.SU01.42.6 Downloaded from www.Manualslib.com manuals search engine
44-1 Vehicle alignment Test requirements: Measuring equipment correctly calibrated Vehicle unladen1) Tires inflated to correct pressure Vehicle accurately aligned, suspension bounced and rocked several times Suspension, steering and steering linkage checked for excessive play and damage. Note: Vehicle alignment should not be checked before the vehicle has completed 1000 to 2000 km (600 to 1200 miles) as then the coil springs have had time to settle. The cause of vehicle imbalance may also be, excessive residual imbalance and/or vertical wheel runout. 1) Unladened means: the weight of the vehicle ready for the road (fuel tank completely filled, spare wheel, vehicle tools and vehicle jack). Page 1 of 7Vehicle alignment12/7/2004http://ebahn.bentleypublishers.com/vw/servlet/Display?action=Goto&type=repair&id=VW.B4.SU01.44.1 Downloaded from www.Manualslib.com manuals search engine
44-2 Vehicle alignment specifications (front wheel drive vehicles) Front axle Suspension strut axle Engine up to 85 kW (115 hp) 110 - 128 kW (148 - 172 hp) Version Base suspension Plus suspension Total toe1) (not pressed) 0 10' 0 10' Camber2) (in straight- ahead position) Maximum permissible difference between sides -1 20' 20' max. 20' -1 10' 20' max. 20' Toe angle difference at 20left and right lock -1 10' 30' -1 40' 30' Caster (not adjustable) Maximum permissible difference between sides +1 40' 30' max. 30' +3 20' 30' max. 30' 1) Only adjust total toe on right toe rod 2) Camber corrections can only be made at the wheel bearing housing/suspension strut connection. Camber adjustment Page 44-6 . Note: After adjusting steering geometry check position of steering wheel; correct if necessary. Page 2 of 7Vehicle alignment12/7/2004http://ebahn.bentleypublishers.com/vw/servlet/Display?action=Goto&type=repair&id=VW.B4.SU01.44.1 Downloaded from www.Manualslib.com manuals search engine
44-3 Rear axle Torsion beam trailing arm axle Engine/version all Camber1) Maximum permissible difference between sides -1 30' 10' max. 20' Total toe 1) (at specified wheel camber) Maximum permissible deviation from direction of travel +20' 10' max. 20' 1) not adjustable Page 3 of 7Vehicle alignment12/7/2004http://ebahn.bentleypublishers.com/vw/servlet/Display?action=Goto&type=repair&id=VW.B4.SU01.44.1 Downloaded from www.Manualslib.com manuals search engine
44-4 Vehicle alignment specifications (four wheel drive vehicles) Front axle Suspension strut axle Engine 85 kW (115 hp) 128 kW (172 hp) Version Base suspension Plus suspension Total toe1) (not pressed) 0 10' 0 10' Camber2) (in straight- ahead position) Maximum permissible difference between sides -1 20' 20' max. 30' -1 10' 20' max. 20' Toe angle difference at 20left and right lock -1 10' 30' -1 40' 30' Caster (not adjustable) Maximum permissible difference between sides +1 40' 30' max. 30' +3 20' 30' max. 30' 1) Only adjust total toe on right toe rod 2) Camber corrections can only be made at the wheel bearing housing/suspension strut connection. Camber adjustment Page 44-6 . Note: After adjusting steering geometry check position of steering wheel; correct if necessary. Page 4 of 7Vehicle alignment12/7/2004http://ebahn.bentleypublishers.com/vw/servlet/Display?action=Goto&type=repair&id=VW.B4.SU01.44.1 Downloaded from www.Manualslib.com manuals search engine
44-5 Rear axle Semi-trailing arm axle Engine 85 kW, 128 kW (115 hp, 172 hp) Camber1) Maximum permissible difference between sides -1 15' 30' max. 30' Total toe 1) (at specified camber) Maximum permissible deviation from direction of travel +15' 20' max. 20' 1) Camber and toe corrections possible using eccentric rubber mounting Repair Manual, Suspension, Wheels, Brakes, Steering, Repair Group 42 . Page 5 of 7Vehicle alignment12/7/2004http://ebahn.bentleypublishers.com/vw/servlet/Display?action=Goto&type=repair&id=VW.B4.SU01.44.1 Downloaded from www.Manualslib.com manuals search engine
44-6 Front wheel camber, adjusting Note: - Install special tool as shown in illustration and slightly pre-tension. - Loosen suspension strut/wheel bearing housing connection. - Adjust camber by turning the spindle to specified setting. - Tighten suspension strut/wheel bearing housing connection. - Check camber and if necessary, repeat adjustment. Slight cant of tool is permitted. Do not move steering with tool in place! Before adjusting camber, it is essential to examine all suspension components for damage (visual inspection) and to replace any damaged parts. Because bolts with a shank diameter of 11 mm diameter have been installed as standard it is no longer necessary to replace bolts to correct camber. Page 6 of 7Vehicle alignment12/7/2004http://ebahn.bentleypublishers.com/vw/servlet/Display?action=Goto&type=repair&id=VW.B4.SU01.44.1 Downloaded from www.Manualslib.com manuals search engine
44-7 Calculating the direction of travel: - If both toe figures have the same preceding sign (+/+ or -/-), subtract the smaller figure from the larger figure and divide by 2 Example. Left rear wheel toe Right rear wheel toe + 15' + 5' 15' - 5' = 10' 10' : 2 = 5' Deviation from direction of travel = 5' - Add figures with different sign (+/-) and divide by 2 Example. Left rear wheel toe Right rear wheel toe + 15' - 5' 15' + 5' = 20' 20' : 2 = 10' Deviation from direction of travel = 10' The individual result is the actual alignment deviation from the vehicle longitudinal axis. Page 7 of 7Vehicle alignment12/7/2004http://ebahn.bentleypublishers.com/vw/servlet/Display?action=Goto&type=repair&id=VW.B4.SU01.44.1 Downloaded from www.Manualslib.com manuals search engine
45-1 Anti-locking Brake System (ABS) and Anti-locking Brake System with Electronic Differential Lock (ABS/EDL) Teves 04 The ABS, ABS/EDL brake system is divided diagonally. The servo-assist is effected pneumatically, by the vacuum brake servo unit. Located between the brake master cylinder and the vacuum servo unit is a mounting bracket for the hydraulic unit with pump. The hydraulic unit together with pump, supplies only the anti-locking brake system (ABS) or anti-locking brake system and traction control system (ABS/EDL). Malfunctions on the ABS, ABS/EDL systems do not influence the brake system and servo. The vehicle can be driven without the ABS, ABS/EDL functions operating. Page 1 of 5Anti-locking Brake System (ABS) and Anti-locking Brake System with Electronic Differential Lock (A...12/7/2004http://ebahn.bentleypublishers.com/vw/servlet/Display?action=Goto&type=repair&id=VW.B4.SU01.45.1 Downloaded from www.Manualslib.com manuals search engine
45-2 Notes for repair work on ABS, ABS/EDL Before doing any repair work on the anti-locking system, determine the cause of the malfunction using On Board Diagnostic (OBD). Repair Manual, Brake System On Board Diagnostic (OBD), Repair Group 01 Before working on the ABS, ABS/EDL system, disconnect the battery Ground strap. On vehicles with coded radio, obtain cooling. When working with brake fluid, observe the relevant safety precautions and notes Page 47-27 . After work for which the brake system had to be opened, bleed the brake system with brake filler and bleeder unit VAS 5234 Page 47-27 . During the final road test, make sure that a controlled brake test is performed at least once (pulsations must be felt at the brake pedal). Absolute cleanliness is required when working on the anti-locking brake system; it is not permitted to use any products which contain mineral oils, such as oils, greases etc. Page 2 of 5Anti-locking Brake System (ABS) and Anti-locking Brake System with Electronic Differential Lock (A...12/7/2004http://ebahn.bentleypublishers.com/vw/servlet/Display?action=Goto&type=repair&id=VW.B4.SU01.45.1 Downloaded from www.Manualslib.com manuals search engine
45-3 Thoroughly clean all unions and the adjacent areas before loosening, do not use aggressive cleaning agents such as brake cleaner, petrol, thinners or similar. Place removed parts on a clean surface and cover. Do not use fluffy cloth. Carefully cover or seal open components if repairs cannot be carried out immediately. Only remove replacement parts from packaging immediately prior to installation. Only use genuine packed parts. When the system is open do not work with compressed air and do not move the vehicle. Make sure that no brake fluid enters harness connectors. During painting operations, the electronic control module can be exposed to a max. temperature of 95C (203F) for only a short period, and to a maximum of 85C (185F) for longer periods (approx. 2 hours). Page 3 of 5Anti-locking Brake System (ABS) and Anti-locking Brake System with Electronic Differential Lock (A...12/7/2004http://ebahn.bentleypublishers.com/vw/servlet/Display?action=Goto&type=repair&id=VW.B4.SU01.45.1 Downloaded from www.Manualslib.com manuals search engine
45-4 Control module, removing and installing Location Under the rear seat, left Note: Switch off ignition before disconnecting and connecting connectors. Removing - Fold up rear seat. - Press control module securing clips together and pull out. - To pull connector off control module, release control module locking bar. Installing - Install in reverse order. - Engage connector catch in control module slots (arrow A), press connector on (arrow B) and secure with locking bar (arrow C). Page 4 of 5Anti-locking Brake System (ABS) and Anti-locking Brake System with Electronic Differential Lock (A...12/7/2004http://ebahn.bentleypublishers.com/vw/servlet/Display?action=Goto&type=repair&id=VW.B4.SU01.45.1 Downloaded from www.Manualslib.com manuals search engine
45-5 Wheel speed sensor and rotor for speed sensor, removing and installing Speed sensor When installing speed sensor ensure wiring is not twisted. Before installing speed sensor, clean mounting hole and coat with lubricating paste, G 000 650. Rotors Before installing check that rotor is clean and undamaged. Front axle Vehicles with base suspension Page 40-14 . Vehicles with plus suspension Page 40-23 . Rear axle Vehicles with rear drum brakes Page 42-15 . Vehicles with rear disc brakes (front and four wheel drive Page 42-24 . Page 5 of 5Anti-locking Brake System (ABS) and Anti-locking Brake System with Electronic Differential Lock (A...12/7/2004http://ebahn.bentleypublishers.com/vw/servlet/Display?action=Goto&type=repair&id=VW.B4.SU01.45.1 Downloaded from www.Manualslib.com manuals search engine
45-6 Anti-lock Brake System (ABS) and ABS with Electronic Differential Lock (ABS/EDL), Teves 20 GI General information The ABS or ABS/EDL braking system is divided diagonally. Brake pedal pressure is boosted pneumatically, by the vacuum brake booster. Vehicles with Teves 20 GI ABS or ABS/EDL do not have a mechanical brake pressure regulator. Specially matched software in the ABS control module regulates rear axle brake pressure. The ABS hydraulic unit -a- and ABS control module -b- together make up one component. Separating them for service is only possible after the assembly has been removed. New ABS control units supplied as replacement parts from the Parts department are not coded, and require coding after installation: Repair Manual, Brake System On Board Diagnostic (OBD), Repair Group 01 Malfunctions of the ABS or ABS/EDL system do not influence the brake system or the vacuum brake booster. The conventional brake system remains functional even without ABS. Before working on the ABS or ABS/EDL system, determine the cause of the malfunction using the On Board Diagnostic (OBD) program % Repair Manual, ABS & ABS/EDL On Board Diagnostic. Page 1 of 3Anti-lock Brake System (ABS) and ABS with Electronic Differential Lock (ABS/EDL), Teves 20 GI12/7/2004http://ebahn.bentleypublishers.com/vw/servlet/Display?action=Goto&type=repair&id=VW.B4.SU01.45.2 Downloaded from www.Manualslib.com manuals search engine
45-7 Safety precautions WARNING! Brake fluid is poisonous. CAUTION! Before working on the ABS or ABS/EDL system, disconnect the battery Ground (GND) strap. For anti-theft coded radios, first make sure that the radio code is available. Brake fluid must not contact painted parts. Brake fluid absorbs moisture from the air and must therefore be replaced every two years. Use only new, approved brake fluid that complies with MVSS 116 DOT 4. DO NOT use silicone-brake fluid (DOT 5). Even the smallest traces can cause sever corrosion in the brake system. Before doing any welding repairs on the vehicle using electric welding equipment, disconnect the ABS control module. After work that requires opening the brake hydraulic system, bleed the system Page 47-29 . Page 2 of 3Anti-lock Brake System (ABS) and ABS with Electronic Differential Lock (ABS/EDL), Teves 20 GI12/7/2004http://ebahn.bentleypublishers.com/vw/servlet/Display?action=Goto&type=repair&id=VW.B4.SU01.45.2 Downloaded from www.Manualslib.com manuals search engine
45-8 CAUTION! During the final road test, make sure that at least one controlled brake test is included (pulsations must be felt at the brake pedal). Absolute cleanliness is required when working on the ABS or ABS/EDL system. DO NOT use any products that contain mineral oil, such as oils, greases, etc. Thoroughly clean all connections and the immediate vicinity before loosening. DO NOT use aggressive cleaning agents such as brake cleaner, gasoline or thinners. Place removed parts on a clean surface and cover. DO NOT use fluffy cloths. Carefully seal or cover opened components if a repair cannot be completed immediately. After separating the ABS hydraulic unit and ABS control module, always use the plastic foam transportation protection for the valve dome, and always use the sealing plug kit Part No. 1 H0 693 311 A. Only install replacement parts that were packed in their original packaging. Only remove them immediately before installation. When the hydraulic system is open DO NOT work with compressed air in the vicinity and DO NOT move the vehicle. Take precautions to make sure that brake fluid does not enter any wiring harness connectors. Page 3 of 3Anti-lock Brake System (ABS) and ABS with Electronic Differential Lock (ABS/EDL), Teves 20 GI12/7/2004http://ebahn.bentleypublishers.com/vw/servlet/Display?action=Goto&type=repair&id=VW.B4.SU01.45.2 Downloaded from www.Manualslib.com manuals search engine
45-9 ABS, ABS/EDL hydraulic unit, vacuum brake booster and brake master cylinder (Teves 20 GI), servicing CAUTION! DO NOT separate the ABS hydraulic pump from the valve block. 1 - Brake servo (vacuum brake booster) 2 - Brake master cylinder 3 - Brake fluid reservoir 4 - Cap 5 - Self-locking nut Always replace 25 Nm (18 ft lb) 6 - Torx socket-head bolt T25 4 Nm (35 in lb) 7 - Torx socket-head bolt T25 8 Nm (71 in lb) Page 1 of 9ABS, ABS/EDL hydraulic unit, vacuum brake booster and brake master cylinder (Teves 20 GI), servicing12/7/2004http://ebahn.bentleypublishers.com/vw/servlet/Display?action=Goto&type=repair&id=VW.B4.SU01.45.3 Downloaded from www.Manualslib.com manuals search engine
45-10 8 - Rubber damper 9 - Retainer 10 - ABS hydraulic unit 11 - ABS control module 12 - Brake line connection ABS hydraulic unit to right-front brake caliper 13 - Brake line connection ABS hydraulic unit to left-rear brake caliper or wheel cylinder 14 - Brake line connection ABS hydraulic unit to right-rear brake caliper or wheel cylinder 15 - Brake line connection ABS hydraulic unit to left-front brake caliper 16 - Brake line Brake master cylinder (secondary piston circuit) to ABS hydraulic unit 17 - Brake line Brake master cylinder (primary piston circuit) to ABS hydraulic unit Page 2 of 9ABS, ABS/EDL hydraulic unit, vacuum brake booster and brake master cylinder (Teves 20 GI), servicing12/7/2004http://ebahn.bentleypublishers.com/vw/servlet/Display?action=Goto&type=repair&id=VW.B4.SU01.45.3 Downloaded from www.Manualslib.com manuals search engine
45-11 ABS hydraulic unit and ABS control module (Teves 20 GI), removing and installing Carefully read and follow all cautions and warnings Page 45-7 before beginning work. Location The ABS control module is bolted to the ABS hydraulic unit, located on the left-side of the engine compartment. CAUTION! Do not bend brake lines at or near the ABS hydraulic unit. Switch ignition OFF when disconnecting and reconnecting the ABS control module connector. Part numbers are listed here for reference only. Always check with your Parts department for the latest information. Sealing plug kit Part No. 1H0 698 311 A: 1 - Valve dome transportation protection (plastic foam) 2 - Sealing plugs -M10- 3 - Sealing plugs -M12- Page 3 of 9ABS, ABS/EDL hydraulic unit, vacuum brake booster and brake master cylinder (Teves 20 GI), servicing12/7/2004http://ebahn.bentleypublishers.com/vw/servlet/Display?action=Goto&type=repair&id=VW.B4.SU01.45.3 Downloaded from www.Manualslib.com manuals search engine
45-12 After separating ABS control module from ABS hydraulic unit, always install valve dome transportation protection on hydraulic unit. Warranty claims for ABS hydraulic units on which the valve dome transportation protection was not used will not be accepted. Removing CAUTION! Determine correct radio anti-theft coding before disconnecting the battery. - Disconnect battery Ground (GND) strap. - Remove coolant expansion tank and swing to one side. Page 4 of 9ABS, ABS/EDL hydraulic unit, vacuum brake booster and brake master cylinder (Teves 20 GI), servicing12/7/2004http://ebahn.bentleypublishers.com/vw/servlet/Display?action=Goto&type=repair&id=VW.B4.SU01.45.3 Downloaded from www.Manualslib.com manuals search engine
45-13 - Release retainer and disconnect ABS control module connector (arrows). - Connect bleeder hose and bleeder bottle to left-front brake caliper bleeder screw, and open bleeder screw. - Depress brake pedal at least 60 mm (2-3/8 in.). - Install brake pedal loading device from special tool VAG 1238B. - Close left-front bleeder screw. - Remove heat shield from brake master cylinder. - Disconnect brake lines from brake master cylinder and ABS hydraulic unit. - Seal lines and threaded holes with plugs from repair kit Page 45-11 . Page 5 of 9ABS, ABS/EDL hydraulic unit, vacuum brake booster and brake master cylinder (Teves 20 GI), servicing12/7/2004http://ebahn.bentleypublishers.com/vw/servlet/Display?action=Goto&type=repair&id=VW.B4.SU01.45.3 Downloaded from www.Manualslib.com manuals search engine
45-14 - Remove Torx socket-head bolts (T25) from ABS hydraulic unit bracket. - Remove ABS hydraulic unit/ABS control module assembly. - Disconnect ABS hydraulic pump connector from ABS control module. CAUTION! - Remove ABS control module mounting bolts (arrows) and pull off ABS control module. Pull control module straight off. Do not tilt. Cover control unit magnetic coils with a lint-free cloth. After separating the ABS hydraulic unit and ABS control module, always use the plastic foam valve dome transportation protection Page 45-11 . Page 6 of 9ABS, ABS/EDL hydraulic unit, vacuum brake booster and brake master cylinder (Teves 20 GI), servicing12/7/2004http://ebahn.bentleypublishers.com/vw/servlet/Display?action=Goto&type=repair&id=VW.B4.SU01.45.3 Downloaded from www.Manualslib.com manuals search engine
45-15 Installing Note: Remove the sealing plugs from a new ABS hydraulic unit one at a time, and only when the corresponding brake line is to be connected. If the plugs are removed too soon, brake fluid can escape and it can no longer be certain that the unit is sufficiently filled or adequately bled. - Mount ABS control module to hydraulic unit using new bolts. Tightening torque: 4 Nm (35 in lb) - Reconnect ABS hydraulic pump connector. The remainder of the installation procedure is the reverse of removal, with the following additions: - Bleed brake system Page 47-29 . Page 7 of 9ABS, ABS/EDL hydraulic unit, vacuum brake booster and brake master cylinder (Teves 20 GI), servicing12/7/2004http://ebahn.bentleypublishers.com/vw/servlet/Display?action=Goto&type=repair&id=VW.B4.SU01.45.3 Downloaded from www.Manualslib.com manuals search engine
45-16 Note: For vehicles equipped with ABS/EDL, on which the brake fluid reservoir has been completely empty (e.g. leaks in brake system), it is necessary to initiate the "Basic Setting" function of the On Board Diagnostic (OBD) program: Repair Manual, Brake System On Board Diagnostic (OBD), Repair Group 01 Otherwise the standard brake bleeding procedures apply. - Code ABS control module: Repair Manual, Brake System On Board Diagnostic (OBD), Repair Group 01 Tightening torques ABS control unit to ABS hydraulic unit 4 Nm (35 in. lb) ABS hydraulic unit to bracket (Torx T25 socket-head bolts) 8 Nm (71 in. lb) Brake master cylinder to vacuum booster 25 Nm (18 ft lb) Heat shield to brake master cylinder 8 Nm (71 in. lb) Brake lines to ABS hydraulic unit M10 x 1 15 Nm (11 ft lb) M12 x 1 15 Nm (11 ft lb) Page 8 of 9ABS, ABS/EDL hydraulic unit, vacuum brake booster and brake master cylinder (Teves 20 GI), servicing12/7/2004http://ebahn.bentleypublishers.com/vw/servlet/Display?action=Goto&type=repair&id=VW.B4.SU01.45.3 Downloaded from www.Manualslib.com manuals search engine
45-17 Brake hydraulic system, bleeding and filling Vehicles with ABS/EDL For vehicles with ABS/EDL, when the brake fluid reservoir has been completely emptied (e.g. due to leaks in the brake system) it is necessary to initiate the "Basic Setting" function of the On Board Diagnostic (OBD) program. Repair Manual, Brake System On Board Diagnostic (OBD), Repair Group 01 Otherwise the standard brake bleeding procedures apply Page 47-29 . Page 9 of 9ABS, ABS/EDL hydraulic unit, vacuum brake booster and brake master cylinder (Teves 20 GI), servicing12/7/2004http://ebahn.bentleypublishers.com/vw/servlet/Display?action=Goto&type=repair&id=VW.B4.SU01.45.3 Downloaded from www.Manualslib.com manuals search engine
45-18 Assembly overview - hydraulic unit, brake servo/brake master cylinder Note: Repair Manual, Brake System On Board Diagnostic (OBD), Repair group 01 Pump and valve block must not be separated from one another. Illustration shows an exploded view of the ABS/EDL unit. Servicing of ABS unit is identical. Distinguishing features 1 - Brake Pedal Position Sensor Removing and installing Page 45-25 . Checking Page 1 of 10Assembly overview - hydraulic unit, brake servo/brake master cylinder12/7/2004http://ebahn.bentleypublishers.com/vw/servlet/Display?action=Goto&type=repair&id=VW.B4.SU01.45.4 Downloaded from www.Manualslib.com manuals search engine
45-19 2 - Spacer cap Various versions Page 45-25 3 - Sealing ring Always replace 4 - Circlip Always replace 5 - Brake line Brake master cylinder/primary piston circuit to hydraulic unit 6 - Brake servo 7 - Carrier plate 8 - Sealing ring 9 - Pin 10 - Securing clip 11 - Brake fluid reservoir Page 2 of 10Assembly overview - hydraulic unit, brake servo/brake master cylinder12/7/2004http://ebahn.bentleypublishers.com/vw/servlet/Display?action=Goto&type=repair&id=VW.B4.SU01.45.4 Downloaded from www.Manualslib.com manuals search engine
45-20 Repair Manual, Brake System On Board Diagnostic (OBD), Repair group 01 12 - Cap 13 - Hex socket head screw for brake fluid reservoir 14 - Series resistor Only on vehicles with ABS/EDL Checking 15 - Self-locking hex nut, 25 Nm (18 ft lb) 16 - Tandem brake master cylinder 17 - Protective plate 18 - Hex bolt for protective plate Page 3 of 10Assembly overview - hydraulic unit, brake servo/brake master cylinder12/7/2004http://ebahn.bentleypublishers.com/vw/servlet/Display?action=Goto&type=repair&id=VW.B4.SU01.45.4 Downloaded from www.Manualslib.com manuals search engine
45-21 19 - ABS Hydraulic unit Connections (arrow) show pipe work from tandem master cylinder to ABS hydraulic unit Removing and installing Page 45-23 20 - ABS/EDL Hydraulic unit Removing and installing Page 45-23 21 - Brake line connection Hydraulic unit to front right brake caliper Thread connection: M10 x 1, 15 Nm (11 ft lb) 22 - Torx bolts (T 25) 23 - Brake line connection Hydraulic unit to rear left wheel cylinder Thread connection: M10 x 1, 15Nm (11 ft lb) Page 4 of 10Assembly overview - hydraulic unit, brake servo/brake master cylinder12/7/2004http://ebahn.bentleypublishers.com/vw/servlet/Display?action=Goto&type=repair&id=VW.B4.SU01.45.4 Downloaded from www.Manualslib.com manuals search engine
45-22 24 - Brake line connection Hydraulic unit to rear right wheel cylinder Thread connection: M12 x1, 18 Nm (13 ft lb) 25 - Brake line connection Hydraulic unit to front left brake caliper Thread connection: M10 x1, 15 Nm (11 ft lb) 26 - Brake line Master brake cylinder/secondary piston circuit to hydraulic unit Page 5 of 10Assembly overview - hydraulic unit, brake servo/brake master cylinder12/7/2004http://ebahn.bentleypublishers.com/vw/servlet/Display?action=Goto&type=repair&id=VW.B4.SU01.45.4 Downloaded from www.Manualslib.com manuals search engine
45-23 Hydraulic unit, removing and installing Note: For easier disassembling and assembling, it is more practical to remove the hydraulic unit complete with brake servo and brake master cylinder. Removing - Disconnect battery Ground (GND) strap. - Separate all electrical connections on ABS unit. - Remove as much brake fluid as possible from brake fluid reservoir using a suction bottle. - Disconnect brake lines from ABS hydraulic unit and seal threaded holes with plugs from repair kit, Part No. 1HO 698 311. - Remove left-hand trim under instrument panel. - Disconnect brake pedal from brake servo unit Page 46-44 . Page 6 of 10Assembly overview - hydraulic unit, brake servo/brake master cylinder12/7/2004http://ebahn.bentleypublishers.com/vw/servlet/Display?action=Goto&type=repair&id=VW.B4.SU01.45.4 Downloaded from www.Manualslib.com manuals search engine
45-24 - Remove nuts from brake servo/bulkhead. - Carefully remove hydraulic unit and brake servo with brake master cylinder from engine compartment. Installing Note: Hydraulic units supplied as replacement parts are already filled with hydraulic fluid and bled. Only remove sealing plugs on hydraulic unit when the relevant brake line is going to be connected. If the sealing plugs are removed too early, brake fluid can escape, it is then no longer guaranteed that the unit is sufficiently filled or adequately bled. - Preassemble hydraulic unit and brake servo with tandem master cylinder away from vehicle. - Secure hydraulic unit, brake servo with tandem master cylinder to bulkhead. - Connect brake lines. - Reconnect all electrical connections on ABS unit (ensure correctly connected). - Bleed brake system Page 47-27 . - Install left-hand trim under instrument panel. Page 7 of 10Assembly overview - hydraulic unit, brake servo/brake master cylinder12/7/2004http://ebahn.bentleypublishers.com/vw/servlet/Display?action=Goto&type=repair&id=VW.B4.SU01.45.4 Downloaded from www.Manualslib.com manuals search engine
45-25 Brake Pedal Position Sensor, removing and installing Note: The Brake Pedal Position Sensor is only supplied as a repair kit. Apart from the sender, this repair kit contains a sealing ring, circlip and four different spacer caps. - - one white spacer cap - - one green spacer cap - - one blue spacer cap - - one red spacer cap The spacer caps are of differing length. When replacing the sensor note the color of spacer cap. The new sensor must have the same color cap as the old sensor. On the brake servo housing in the vicinity of the sever location there is a colored spot, which is identical to that of the spacer cap. Page 8 of 10Assembly overview - hydraulic unit, brake servo/brake master cylinder12/7/2004http://ebahn.bentleypublishers.com/vw/servlet/Display?action=Goto&type=repair&id=VW.B4.SU01.45.4 Downloaded from www.Manualslib.com manuals search engine
45-26 Removing - Release brake servo vacuum by operating the brake pedal several times. - Remove connector from expansion tank. - Swing coolant expansion tank to side. - Pull connector off sensor. - Expand circlip with a small screwdriver in a clockwise direction and pull sensor (arrow) out of brake servo. Page 9 of 10Assembly overview - hydraulic unit, brake servo/brake master cylinder12/7/2004http://ebahn.bentleypublishers.com/vw/servlet/Display?action=Goto&type=repair&id=VW.B4.SU01.45.4 Downloaded from www.Manualslib.com manuals search engine
45-27 Installing Note: When installing new circlip ensure opening is uppermost - installation position (arrow). - Install new sealing ring to sensor. (Coat sealing ring with lubricant e.g. soft soap). Note: - Sensor notch must point downward when inserting into brake servo and be heard to engage. - Connect sensor unit connection and ensure correctly located. To ensure correctly seated pull senor by hand. Leaks at the sensor sealing ring, result in insufficient braking vacuum and poor engine idling. For ease of illustration, shows installing the sensor with brake fluid reservoir removed. Page 10 of 10Assembly overview - hydraulic unit, brake servo/brake master cylinder12/7/2004http://ebahn.bentleypublishers.com/vw/servlet/Display?action=Goto&type=repair&id=VW.B4.SU01.45.4 Downloaded from www.Manualslib.com manuals search engine
46-1 Front brakes, servicing (Girling caliper) Note: After replacing brake pads, depress brake pedal firmly several times with vehicle stationary so that the brake pads are properly seated in their normal operating position. To remove brake fluid from the reservoir, use a bleeder bottle which is used only for brake fluid. Brake fluid is poisonous and must on not be siphoned by mouth using a hose! Wheel bolt tightening torque: 110 Nm (81 ft lb) Page 1 of 7Front brakes, servicing (Girling caliper)12/7/2004http://ebahn.bentleypublishers.com/vw/servlet/Display?action=Goto&type=repair&id=VW.B4.SU01.46.1 Downloaded from www.Manualslib.com manuals search engine
46-2 1 - Brake disc, not ventilated When worn always replace on both sides Brake disc diameter: 256 mm Brake disc thickness: 13 mm Wear limit: 11 mm 2 - Brake disc, ventilated When worn always replace on both sides Brake disc diameter: 256 mm Brake disc thickness: 20 mm Wear limit: 18 mm 3 - Screw 4 - Countersunk screw To secure rotor Only on vehicles with ABS Page 2 of 7Front brakes, servicing (Girling caliper)12/7/2004http://ebahn.bentleypublishers.com/vw/servlet/Display?action=Goto&type=repair&id=VW.B4.SU01.46.1 Downloaded from www.Manualslib.com manuals search engine
46-3 Repair Manual, Maintenance 5 - Brake pad With brake pad wear indicator Always replace on both sides Removing and installing Page 46-6 Pad thickness: non-ventilated brake disc, 14 mm Pad thickness: ventilated brake disc, 11 mm Checking thickness Wear limit: 7 mm (including backplate) 6 - Hub Removing and installing from Page 40-14 7 - Wheel speed sensor rotor Only on vehicles with ABS 8 - Hex bolt, 10 Nm (7 ft lb) 9 - Splash plate Page 3 of 7Front brakes, servicing (Girling caliper)12/7/2004http://ebahn.bentleypublishers.com/vw/servlet/Display?action=Goto&type=repair&id=VW.B4.SU01.46.1 Downloaded from www.Manualslib.com manuals search engine
46-4 10 - Wheel bearing housing 11 - Brake carrier with guide pins and protective caps Supplied as replacement part assembled with sufficient amount of grease on guide pins If protective caps are damaged use repair kit Use grease packet supplied to lubricate guide pins 12 - Heat shield Install in piston 13 - Brake caliper housing Do not disconnect brake hose when changing brake pads Page 4 of 7Front brakes, servicing (Girling caliper)12/7/2004http://ebahn.bentleypublishers.com/vw/servlet/Display?action=Goto&type=repair&id=VW.B4.SU01.46.1 Downloaded from www.Manualslib.com manuals search engine
46-5 14 - Self-locking hex bolt, 35 Nm (26 ft lb) Always replace 15 - Guide pin 16 - Ribbed bolt, 125 Nm (92 ft lb) 17 - Protective cap 18 - Hex socket head bolt, 10 Nm (7 ft lb) 19 - Speed sensor Only on vehicles with ABS Before inserting sensor clean mounting hole inner surface and coat with lubricating paste, G 000 650 Page 5 of 7Front brakes, servicing (Girling caliper)12/7/2004http://ebahn.bentleypublishers.com/vw/servlet/Display?action=Goto&type=repair&id=VW.B4.SU01.46.1 Downloaded from www.Manualslib.com manuals search engine
46-6 Brake pads, removing and installing Removing - Remove lower brake caliper housing securing bolt. Counter-hold on guide pin. - Swing brake caliper housing upward. - Remove brake pads. Page 6 of 7Front brakes, servicing (Girling caliper)12/7/2004http://ebahn.bentleypublishers.com/vw/servlet/Display?action=Goto&type=repair&id=VW.B4.SU01.46.1 Downloaded from www.Manualslib.com manuals search engine
46-7 Installing Note: Before inserting new brake pads, press piston back into the cylinder with resetting tool. Before pressing the piston back, remove some brake fluid from the reservoir with a bleeder bottle. If reservoir has been topped up, fluid may overflow and cause damage. Note: - Press piston back. - Install brake pads. - Swing brake caliper housing down and tighten bolt. The repair kit contains two self-locking bolts which must always be installed. After replacing the brake pads, depress brake pedal firmly several times with the vehicle stationary so that the brake pads are properly seated in their normal operating position. Page 7 of 7Front brakes, servicing (Girling caliper)12/7/2004http://ebahn.bentleypublishers.com/vw/servlet/Display?action=Goto&type=repair&id=VW.B4.SU01.46.1 Downloaded from www.Manualslib.com manuals search engine
46-8 Front brakes, servicing (Teves/Ate) Repair Manual, Maintenance 1 - Screw 2 - Brake disc When worn always replace on both sides Remove brake caliper prior to removing Ventilated brake disc diameter: 288 mm Brake disc thickness: 25 mm Wear limit: 23 mm 3 - Brake pads Always replace on both sides Pads are different; pad on piston side has retaining spring Removing and installing Page 46-12 Pad thickness: 14 mm Checking thickness Wear limit: 7 mm (including backing plate) Page 1 of 7Front brakes, servicing (Teves/Ate)12/7/2004http://ebahn.bentleypublishers.com/vw/servlet/Display?action=Goto&type=repair&id=VW.B4.SU01.46.2 Downloaded from www.Manualslib.com manuals search engine
46-9 4 - Retaining spring Insert in both brake caliper housing drillings 5 - Brake carrier Supplied as replacement part assembled with sufficient amount of grease on guide pins If protective caps are damaged use repair kit Use grease packet supplied to lubricate guide pins 6 - Brake caliper housing Do not disconnect brake hose when changing brake pads Removing and installing Page 46-12 Page 2 of 7Front brakes, servicing (Teves/Ate)12/7/2004http://ebahn.bentleypublishers.com/vw/servlet/Display?action=Goto&type=repair&id=VW.B4.SU01.46.2 Downloaded from www.Manualslib.com manuals search engine
46-10 7 - Guide pins, 25 Nm (18 ft lb) Removing and installing from Page 46-12 8 - Protective cap 9 - Seal Always replace Pry out with suitable tool 10 - Brake hose 11 - Banjo bolt, 30 Nm (22 ft lb) 12 - Ribbed bolt, 125 Nm (92 ft lb) 13 - Wheel bearing housing 14 - Hex socket head bolt, 10 Nm (7 ft lb) 15 - Speed sensor Only on vehicles with ABS Before inserting sensor, clean mounting hole inner surface and coat with lubricating paste, G 000 650 Page 3 of 7Front brakes, servicing (Teves/Ate)12/7/2004http://ebahn.bentleypublishers.com/vw/servlet/Display?action=Goto&type=repair&id=VW.B4.SU01.46.2 Downloaded from www.Manualslib.com manuals search engine
46-11 16 - Splash plate 17 - Hex bolt, 10 Nm (7 ft lb) 18 - Speed sensor rotor Only on vehicles with ABS 19 - Hub Removing and installing Page 40-14 20 - Countersunk bolt Page 4 of 7Front brakes, servicing (Teves/Ate)12/7/2004http://ebahn.bentleypublishers.com/vw/servlet/Display?action=Goto&type=repair&id=VW.B4.SU01.46.2 Downloaded from www.Manualslib.com manuals search engine
46-12 Brake pads, removing and installing Removing Note: If reusing brake pads mark location and install in same position or uneven braking may result. - Remove protective caps. - Pry off brake pad retaining spring from brake caliper housing with a screwdriver and remove. Page 5 of 7Front brakes, servicing (Teves/Ate)12/7/2004http://ebahn.bentleypublishers.com/vw/servlet/Display?action=Goto&type=repair&id=VW.B4.SU01.46.2 Downloaded from www.Manualslib.com manuals search engine
46-13 Installing Note: Before installing new brake pads, press piston back into the cylinder with resetting tool. Before pressing the piston back, remove some brake fluid from the reservoir with a bleeder bottle. If reservoir has been topped up, fluid may overflow and cause damage. - Remove both guide pins from brake caliper. - Remove brake caliper housing and lay to one side so that weight of brake caliper does not stress or damage brake hose. - Take brake pads out of brake caliper housing or from brake carrier. - Pressing piston back. Page 6 of 7Front brakes, servicing (Teves/Ate)12/7/2004http://ebahn.bentleypublishers.com/vw/servlet/Display?action=Goto&type=repair&id=VW.B4.SU01.46.2 Downloaded from www.Manualslib.com manuals search engine
46-14 - Install brake pad with retaining spring in brake caliper housing (piston). - Install outer brake pad in brake carrier. - Secure brake caliper housing with both guide pins to brake carrier. - Install both protective caps. - Install retaining spring into brake caliper housing. Note: After replacing the brake pads, depress brake pedal firmly several times with the vehicle stationary, so that the brake pads are proper/y seated in their normal operating position. Page 7 of 7Front brakes, servicing (Teves/Ate)12/7/2004http://ebahn.bentleypublishers.com/vw/servlet/Display?action=Goto&type=repair&id=VW.B4.SU01.46.2 Downloaded from www.Manualslib.com manuals search engine
46-15 Rear wheel brakes, servicing (drum brakes) Notes Page 42-15 1 - Grease cap Removing and installing from Page 42-19 2 - Cotter pin Always replace 3 - Locking ring 4 - Hex nut Adjusting wheel bearing play Page 42-20 5 - Thrust washer Page 1 of 4Rear wheel brakes, servicing (drum brakes)12/7/2004http://ebahn.bentleypublishers.com/vw/servlet/Display?action=Goto&type=repair&id=VW.B4.SU01.46.3 Downloaded from www.Manualslib.com manuals search engine
46-16 6 - Outer wheel bearing 7 - Wheel speed sensor rotor Only on vehicles with ABS 8 - Brake drum Vehicles with front wheel drive Brake drum diameter: 230 mm Wear limit: 231.5 mm Clean thoroughly, check for wear, damage, tolerances, damaged wheel bolt threads and condition of braking surface Fill hub with multi-purpose grease Check for ovality 9 - Stub axle Page 2 of 4Rear wheel brakes, servicing (drum brakes)12/7/2004http://ebahn.bentleypublishers.com/vw/servlet/Display?action=Goto&type=repair&id=VW.B4.SU01.46.3 Downloaded from www.Manualslib.com manuals search engine
46-17 10 - Hex socket head bolt, 10 Nm (7 ft lb) 11 - Wheel speed sensor Only on vehicles with ABS Insert with lubricating paste, G 000 650 12 - Backing plate with brake shoes Release adjustment before removing brake drum Page 46-18 13 - Dished washer Large contact surface faces back plate 14 - Hex bolt, 60 Nm (44 ft lb) Page 3 of 4Rear wheel brakes, servicing (drum brakes)12/7/2004http://ebahn.bentleypublishers.com/vw/servlet/Display?action=Goto&type=repair&id=VW.B4.SU01.46.3 Downloaded from www.Manualslib.com manuals search engine
46-18 Brake shoe adjustment, releasing - Insert a screwdriver through hole in brake drum and push wedge upward. Page 4 of 4Rear wheel brakes, servicing (drum brakes)12/7/2004http://ebahn.bentleypublishers.com/vw/servlet/Display?action=Goto&type=repair&id=VW.B4.SU01.46.3 Downloaded from www.Manualslib.com manuals search engine
46-19 Rear wheel brakes, servicing Note: After working on the rear wheel brakes: Release parking brake. Firmly depress the brake pedal once. 1 - Spring plate To remove, push against the spring and turn through 90 2 - Spring 3 - Brake shoe with lever for parking brake Removing and installing Page 46-23 Adjusting parking brake Page 46-26 Page 1 of 8Rear wheel brakes, servicing12/7/2004http://ebahn.bentleypublishers.com/vw/servlet/Display?action=Goto&type=repair&id=VW.B4.SU01.46.4 Downloaded from www.Manualslib.com manuals search engine
46-20 Repair Manual, Maintenance 4 - Upper return spring Unhook with pliers 5 - Lower return spring Lubricate contact points with G 000 650 paste 6 - Wedge spring 7 - Brake shoe Removing and installing Page 46-23 Minimum lining thickness 2.5 mm Checking thickness 8 - Cap Remove to check brake lining thickness 9 - Pin 10 - Wheel speed sensor Only on vehicles with ABS Page 2 of 8Rear wheel brakes, servicing12/7/2004http://ebahn.bentleypublishers.com/vw/servlet/Display?action=Goto&type=repair&id=VW.B4.SU01.46.4 Downloaded from www.Manualslib.com manuals search engine
46-21 11 - Backing plate 12 - Hex socket head bolt, 10 Nm (7 ft) 13 - Wheel cylinder Checking for leaks Fig. 1 14 - Wedge To remove and install the brake drum, push upwards through a wheel bolt hole Page 46-18 15 - Push rod Lubricate contact points with G 000 650 paste 16 - Locating spring Unhook with pliers Page 3 of 8Rear wheel brakes, servicing12/7/2004http://ebahn.bentleypublishers.com/vw/servlet/Display?action=Goto&type=repair&id=VW.B4.SU01.46.4 Downloaded from www.Manualslib.com manuals search engine
46-22 Note: Care is to be exercised to ensure the seal is not damaged when lifting the dust boot (only use a blunt instrument, e.g. plastic wedge). Fig. 1 Wheel cylinder, checking for leaks - Lift dust boot - If brake fluid is found in the dust boot then replace wheel cylinder Page 4 of 8Rear wheel brakes, servicing12/7/2004http://ebahn.bentleypublishers.com/vw/servlet/Display?action=Goto&type=repair&id=VW.B4.SU01.46.4 Downloaded from www.Manualslib.com manuals search engine
46-23 Brake shoes, removing and installing Removing - Remove brake drum. - Remove spring plate. - Unhook lower return spring. - Remove brake shoes. - Unhook parking brake cable. - Clamp brake shoes in vice. - Remove wedge spring. - Remove upper return spring. - Unhook locating spring. Page 5 of 8Rear wheel brakes, servicing12/7/2004http://ebahn.bentleypublishers.com/vw/servlet/Display?action=Goto&type=repair&id=VW.B4.SU01.46.4 Downloaded from www.Manualslib.com manuals search engine
46-24 Installing - Connect locating spring and install brake shoes on the push rod. - Insert wedge. - Insert brake shoe with brake lever in push rod. - Connect upper return spring. - Connect parking brake cable to brake lever. - Place brake shoes on wheel cylinder pistons. - Connect lower return spring and lift brake shoes onto lower support. Page 6 of 8Rear wheel brakes, servicing12/7/2004http://ebahn.bentleypublishers.com/vw/servlet/Display?action=Goto&type=repair&id=VW.B4.SU01.46.4 Downloaded from www.Manualslib.com manuals search engine
46-25 - Attach wedge spring. - Install springs and spring plates. - Install brake drum and adjust wheel bearing play. Adjusting wheel bearing play Page 42-20 - Firmly depress brake pedal once, this adjusts the rear brakes. Page 7 of 8Rear wheel brakes, servicing12/7/2004http://ebahn.bentleypublishers.com/vw/servlet/Display?action=Goto&type=repair&id=VW.B4.SU01.46.4 Downloaded from www.Manualslib.com manuals search engine
46-26 Parking brake, adjusting (drum brakes) Note: Due to the automatic rear wheel brake adjustment there is no requirement to adjust the parking brake. Adjustment is only necessary after replacing parking brake cables, backing plate or brake linings - Release parking brake. - Firmly depress brake pedal once. - Pull parking brake lever up four notches. Note: The hand grip and center console must be moved to access the adjusting nuts (arrow) Page 46-39 . - Tighten adjusting nuts (arrows) until both wheels are difficult to turn by hand. - Release parking brake and check that both wheels turn freely. Page 8 of 8Rear wheel brakes, servicing12/7/2004http://ebahn.bentleypublishers.com/vw/servlet/Display?action=Goto&type=repair&id=VW.B4.SU01.46.4 Downloaded from www.Manualslib.com manuals search engine
46-27 Rear wheel brakes, servicing (disc brakes) Girling rear wheel disc brakes (front and four wheel drive vehicles) Note: Only items 5, 6, 7, 8, 9, 10, 11 and 12 apply for four wheel drive. 1 - Axle beam 2 - Hex socket head bolt, 10 Nm (7 ft lb) 3 - Wheel speed sensor Only for vehicles with ABS Insert with lubricating paste, G 000 650 Page 1 of 10Rear wheel brakes, servicing (disc brakes)12/7/2004http://ebahn.bentleypublishers.com/vw/servlet/Display?action=Goto&type=repair&id=VW.B4.SU01.46.5 Downloaded from www.Manualslib.com manuals search engine
46-28 4 - Brake hose bracket 5 - Hex socket head bolt, 65 Nm (48 ft lb) 6 - Self-locking bolt, 35 Nm (26 ft lb) Always replace When loosening and tightening, counter-hold on guide pin 7 - Guide pin 8 - Protective cap 9 - Pad retaining springs Always replace when changing pads 10 - Backing plate ring Distance between ring collar and backing plate: 9.5 mm Page 2 of 10Rear wheel brakes, servicing (disc brakes)12/7/2004http://ebahn.bentleypublishers.com/vw/servlet/Display?action=Goto&type=repair&id=VW.B4.SU01.46.5 Downloaded from www.Manualslib.com manuals search engine
46-29 Repair Manual, Maintenance 11 - Brake carrier with guide pins and protective cap Supplied as replacement part assembled with sufficient grease on guide pins If protective caps or guide pins are damaged use repair kit. Use grease packet supplied to lubricate guide pins. 12 - Brake pads Thickness: 12 mm Checking thickness: Wear limit: 7mm (including backing plate) Always replace on both sides Removing and installing Page 46-33 13 - Brake caliper Servicing Page 47-15 Page 3 of 10Rear wheel brakes, servicing (disc brakes)12/7/2004http://ebahn.bentleypublishers.com/vw/servlet/Display?action=Goto&type=repair&id=VW.B4.SU01.46.5 Downloaded from www.Manualslib.com manuals search engine
46-30 14 - Outer wheel bearing 15 - Hex nut Adjusting wheel bearing play Using a screwdriver it must be possible to move the thrust washer by finger pressure (without leverage) Page 42-20 Secure with locking ring and new cotter pin 16 - Cotter pin Always replace 17 - Grease cap Removing and installing Page 42-29 18 - Lock ring 19 - Thrust washer 20 - Wheel bolt, 110 Nm (81 ft lb) Page 4 of 10Rear wheel brakes, servicing (disc brakes)12/7/2004http://ebahn.bentleypublishers.com/vw/servlet/Display?action=Goto&type=repair&id=VW.B4.SU01.46.5 Downloaded from www.Manualslib.com manuals search engine
46-31 21 - Brake disc Brake disc diameter for vehicles with front wheel drive: 226 mm Removing and installing Page 42-24 Brake disc diameter for vehicles with four wheel drive: 239 mm Removing and installing Page 42-59 Brake disc thickness, for both versions: 10 mm Wear limit: 8 mm When worn, always replace on both sides Assembly sequence for run-in brake discs: - Brake caliper - Brake pads - Brake carrier 22 - Inner wheel bearing 23 - Seal Page 5 of 10Rear wheel brakes, servicing (disc brakes)12/7/2004http://ebahn.bentleypublishers.com/vw/servlet/Display?action=Goto&type=repair&id=VW.B4.SU01.46.5 Downloaded from www.Manualslib.com manuals search engine
46-32 24 - Wheel speed sensor rotor Insert drift through wheel bolt holes and drive off Drive on with suitable sleeve 25 - Hex bolt, 60 Nm (44 ft lb) 26 - Dished spring washer Larger seating surface towards backing plate 27 - Backing plate 28 - Stub axle 29 - Parking brake cable Adjusting parking brake Page 46-36 30 - Spring clip Page 6 of 10Rear wheel brakes, servicing (disc brakes)12/7/2004http://ebahn.bentleypublishers.com/vw/servlet/Display?action=Goto&type=repair&id=VW.B4.SU01.46.5 Downloaded from www.Manualslib.com manuals search engine
46-33 Brake pads, removing and installing Note: Mark brake pads when removing if they are to be reused. Re-install in their original position to prevent uneven braking! Removing - Remove wheels. - Remove parking brake cable from brake caliper (arrow). - Remove securing bolts from brake caliper housing; counter-hold on guide pins. - Remove brake pads. Page 7 of 10Rear wheel brakes, servicing (disc brakes)12/7/2004http://ebahn.bentleypublishers.com/vw/servlet/Display?action=Goto&type=repair&id=VW.B4.SU01.46.5 Downloaded from www.Manualslib.com manuals search engine
46-34 Installing Note: Before pressing the piston back, remove some brake fluid from the reservoir. Use a bleeder bottle or a plastic bottle which is only used for brake fluid. Brake fluid is poisonous and must not be siphoned by mouth through a hose. Note: - Thread in piston by turning knurled wheel of special tool 3272 clockwise. - Install brake pads. Install special tool 3272 so that the collar (arrow) of the tool is seated against the brake caliper. If the piston is difficult to move, use a 13 mm open end wrench on the flats (arrow A) provided for this purpose. If the piston is pushed back with a piston resetting tool or by operating the foot brake, the automatic adjustment in the brake caliper will be destroyed. Page 8 of 10Rear wheel brakes, servicing (disc brakes)12/7/2004http://ebahn.bentleypublishers.com/vw/servlet/Display?action=Goto&type=repair&id=VW.B4.SU01.46.5 Downloaded from www.Manualslib.com manuals search engine
46-35 - Secure brake caliper housing with new self-locking bolts. Note: - Attach parking brake cable (arrow) to brake caliper housing. After each brake pad change firmly depress brake pedal several times with vehicle stationary, so that the brake pads are properly seated in their normal operating position. After changing brake pads check brake fluid level. Page 9 of 10Rear wheel brakes, servicing (disc brakes)12/7/2004http://ebahn.bentleypublishers.com/vw/servlet/Display?action=Goto&type=repair&id=VW.B4.SU01.46.5 Downloaded from www.Manualslib.com manuals search engine
46-36 Parking brake, adjusting (disc brakes) Note: Due to the self-adjusting rear brakes there is no requirement to adjust the parking brake. Adjustment is only necessary after replacing parking brake cables, brake calipers, brake pads and brake discs. Remove hand grip and central console to allow access to adjusting nuts (arrows) Page 46-39 . - Parking brake lever in "off" position. Tighten adjusting nut until lever (arrow) lifts off the brake caliper stop. - A gap of max. 1.5 mm from stop (arrow) is permissible each side but should be set the same on both sides. - Pull parking brake on and then release again. - Check that both wheels turn freely. Page 10 of 10Rear wheel brakes, servicing (disc brakes)12/7/2004http://ebahn.bentleypublishers.com/vw/servlet/Display?action=Goto&type=repair&id=VW.B4.SU01.46.5 Downloaded from www.Manualslib.com manuals search engine
46-37 Parking brake lever assembly overview 1 - Parking brake lever Different versions for rear drum and disc brakes Before removing remove center console 2 - Hand grip Pry trim up with a small screwdriver then pull forward to remove Fig. 2 3 - Adjusting nut Adjusting parking brake: - Vehicles with drum brakes Page 46-26 - Vehicles with disc brakes Page 46-36 Page 1 of 9Parking brake lever assembly overview12/7/2004http://ebahn.bentleypublishers.com/vw/servlet/Display?action=Goto&type=repair&id=VW.B4.SU01.46.6 Downloaded from www.Manualslib.com manuals search engine
46-38 4 - Lock nut 5 - Compensator 6 - Parking brake lever trim First pull off parking brake hand grip then pull trim forward Fig. 2 7 - Hex nut 8 - Parking brake cable Different versions for rear drum and disc brakes Allocation see Parts catalog Page 2 of 9Parking brake lever assembly overview12/7/2004http://ebahn.bentleypublishers.com/vw/servlet/Display?action=Goto&type=repair&id=VW.B4.SU01.46.6 Downloaded from www.Manualslib.com manuals search engine
46-39 The parking brake cable is secured by clamps to the axle beam in the center of the two colored marks (arrow). Fig. 1 Parking brake cable installation position Fig. 2 Hand grip, removing - Pry up parking brake cable trim with a screwdriver and pull grip and trim off forward. Page 3 of 9Parking brake lever assembly overview12/7/2004http://ebahn.bentleypublishers.com/vw/servlet/Display?action=Goto&type=repair&id=VW.B4.SU01.46.6 Downloaded from www.Manualslib.com manuals search engine
46-40 Fig. 3 Center console, removing - Remove rear ashtray (center console). - Remove console rear securing screws (arrows). Page 4 of 9Parking brake lever assembly overview12/7/2004http://ebahn.bentleypublishers.com/vw/servlet/Display?action=Goto&type=repair&id=VW.B4.SU01.46.6 Downloaded from www.Manualslib.com manuals search engine
46-41 Brake pedal/brake servo, removing and installing CAUTION! The brake pedal travel must not be restricted by additional floor coverings. Note: Grease all mountings before installing with G 000 602 grease. 1 - Securing clip Ensure securely seated 2 - Pin 3 - Brake servo push rod clevis 4 - Self-locking hex nut, 20 Nm (15 ft lb) 5 - Brake pedal pivot pin Page 5 of 9Parking brake lever assembly overview12/7/2004http://ebahn.bentleypublishers.com/vw/servlet/Display?action=Goto&type=repair&id=VW.B4.SU01.46.6 Downloaded from www.Manualslib.com manuals search engine
46-42 Repair Manual, 5 Spd. Manual Transmission 02A, Repair Group 30 Repair Manual, 5 Spd. Manual Transmission 02A, Repair Group 30 6 - Brake pedal return spring 7 - Return spring mounting tube 8 - Brake pedal mounting bushing 9 - Brake pedal 10 - Clutch pedal Removing and installing 11 - Pedal cluster mounting bracket 12 - Clutch pedal pivot pin 13 - Clutch pedal mounting bushing 14 - Over-center spring mounting 15 - Over-center spring Before removing, remove clutch pedal Page 6 of 9Parking brake lever assembly overview12/7/2004http://ebahn.bentleypublishers.com/vw/servlet/Display?action=Goto&type=repair&id=VW.B4.SU01.46.6 Downloaded from www.Manualslib.com manuals search engine
46-43 16 - Securing clip Ensure seated securely 17 - Brake Light Switch Adjusting Page 46-45 Page 7 of 9Parking brake lever assembly overview12/7/2004http://ebahn.bentleypublishers.com/vw/servlet/Display?action=Goto&type=repair&id=VW.B4.SU01.46.6 Downloaded from www.Manualslib.com manuals search engine
46-44 Brake pedal, removing and installing Note: Grease all mounting and contact surfaces with MoS2 grease. To remove brake servo disconnect brake pedal at clevis only. Removing - Before removing brake pedal remove trim - Remove brake pedal clevis pin connection securing clip. - Remove pin. - Remove brake pedal pivot pin securing clip. - Remove pivot pin. - Remove mounting sleeve, return spring mounting tube with brake pedal. Installing - Install in reverse order. Page 8 of 9Parking brake lever assembly overview12/7/2004http://ebahn.bentleypublishers.com/vw/servlet/Display?action=Goto&type=repair&id=VW.B4.SU01.46.6 Downloaded from www.Manualslib.com manuals search engine
46-45 Brake Light Switch, adjusting Note: The Brake Light Switch must be removed for adjusting. - Remove trim under instrument panel. - Disconnect harness connector for Brake Light Switch. - Remove Brake Light Switch by turning to right through 90. - Pull Brake Light Switch plunger fully out. - Depress brake pedal as far as possible by hand, guide Brake Light Switch through the locating hole and secure by turning through 90to left. - Pull brake pedal back up by hand to stop (Brake Light Switch is pushed back by one notch). - Connect harness connector for Brake Light Switch - Check function of Brake Light Switch. - Install instrument panel trim. Page 9 of 9Parking brake lever assembly overview12/7/2004http://ebahn.bentleypublishers.com/vw/servlet/Display?action=Goto&type=repair&id=VW.B4.SU01.46.6 Downloaded from www.Manualslib.com manuals search engine
47-1 Assembly overview: brake master cylinder/brake servo Note: Brake master cylinders and brake servos from different manufacturers are installed. Complete master cylinders and brake servos can be replaced independently of each other. 1 - Seal For brake servo 2 - Self-locking hex nut, 20 Nm (15 ft lb) 3 - Mounting bracket 4 - Mounting bracket For brake servo 5 - Seal Page 1 of 4Assembly overview: brake master cylinder/brake servo12/7/2004http://ebahn.bentleypublishers.com/vw/servlet/Display?action=Goto&type=repair&id=VW.B4.SU01.47.1 Downloaded from www.Manualslib.com manuals search engine
47-2 6 - Brake servo On gas engines the vacuum required is taken from the intake manifold. On Diesel engines an exhauster is installed to create the required vacuum. Functional check - With engine switched off, depress brake pedal firmly several times (to exhaust the vacuum in the unit). - Now depress brake pedal with average foot pressure, hold and start engine. If the servo unit is working properly, the pedal will be felt to give slightly under foot (servo assistance becomes effective). If faulty replace complete. Check valve (item 14 ) is in vacuum hose Functional check - It must be possible to blow through in direction of arrow. - Blowing against the arrow the valve must seat. Page 2 of 4Assembly overview: brake master cylinder/brake servo12/7/2004http://ebahn.bentleypublishers.com/vw/servlet/Display?action=Goto&type=repair&id=VW.B4.SU01.47.1 Downloaded from www.Manualslib.com manuals search engine
47-3 7 - Sealing ring Always replace 8 - Self-locking hex nut, 20 Nm (15 ft lb) 9 - Brake master cylinder Cannot be repaired. If faulty, replace complete. 10 - Sealing plug Moisten with brake fluid and press into reservoir 11 - Seal Page 3 of 4Assembly overview: brake master cylinder/brake servo12/7/2004http://ebahn.bentleypublishers.com/vw/servlet/Display?action=Goto&type=repair&id=VW.B4.SU01.47.1 Downloaded from www.Manualslib.com manuals search engine
47-4 12 - Cap 13 - Brake fluid reservoir 14 - Non-return valve Page 4 of 4Assembly overview: brake master cylinder/brake servo12/7/2004http://ebahn.bentleypublishers.com/vw/servlet/Display?action=Goto&type=repair&id=VW.B4.SU01.47.1 Downloaded from www.Manualslib.com manuals search engine
47-5 Girling front brake caliper, servicing Note: When repairing install all parts supplied in repair kit. Apply thin coat of brake cylinder paste to brake cylinders, pistons and sea/s. 1 - Protective seal 2 - Bleed valve Apply thin coat of brake cylinder paste to threads before screwing in 3 - Brake caliper housing 4 - Self-locking hex bolt, 35 Nm (26 ft lb) Always replace When loosening and tightening counter-hold on guide pin Page 1 of 5Girling front brake caliper, servicing12/7/2004http://ebahn.bentleypublishers.com/vw/servlet/Display?action=Goto&type=repair&id=VW.B4.SU01.47.2 Downloaded from www.Manualslib.com manuals search engine
47-6 5 - Seal Remove using a screwdriver Page 47-7 6 - Piston Removing and installing Page 47-7 Apply thin coat of brake cylinder paste before inserting 7 - Protective seal Do not damage when inserting piston 8 - Brake carrier with guide pins and protective caps Brake carrier with guide pins and protective cap Supplied as replacement part assembled with sufficient grease on guide pins If protective caps or guide pins are damaged use repair kit. Use grease packet supplied to lubricate guide pins Page 2 of 5Girling front brake caliper, servicing12/7/2004http://ebahn.bentleypublishers.com/vw/servlet/Display?action=Goto&type=repair&id=VW.B4.SU01.47.2 Downloaded from www.Manualslib.com manuals search engine
47-7 Front brake caliper pistons, removing and installing Removing Note: Place a piece of wood in the recess to prevent damaging the piston. - Force piston out of brake caliper housing using compressed air. Note: When removing ensure that the surface of the cylinder is not damaged. - Remove seal with a screwdriver. Page 3 of 5Girling front brake caliper, servicing12/7/2004http://ebahn.bentleypublishers.com/vw/servlet/Display?action=Goto&type=repair&id=VW.B4.SU01.47.2 Downloaded from www.Manualslib.com manuals search engine
47-8 Installing - Place protective seal with the outer sealing lip on the piston. Note: Hold piston in front of caliper housing. - Using a screwdriver, insert the inner sealing lip into the cylinder groove. Page 4 of 5Girling front brake caliper, servicing12/7/2004http://ebahn.bentleypublishers.com/vw/servlet/Display?action=Goto&type=repair&id=VW.B4.SU01.47.2 Downloaded from www.Manualslib.com manuals search engine
47-9 Note: The protective seal outer sealing lip will then locate in the piston groove. - Press piston into the brake caliper housing using piston resetting tool. Page 5 of 5Girling front brake caliper, servicing12/7/2004http://ebahn.bentleypublishers.com/vw/servlet/Display?action=Goto&type=repair&id=VW.B4.SU01.47.2 Downloaded from www.Manualslib.com manuals search engine
47-10 Front brake caliper, servicing (Teves/Ate) Note: When repairing install all parts supplied in repair kit. Apply thin coat of brake cylinder paste to brake cylinders, pistons and seals. 1 - Protective seal Push onto bleed valve 2 - Bleed valve Apply thin coat of brake cylinder paste to threads before threading in 3 - Cap Install in mounting bushing 4 - Guide pin, 25 Nm (18 ft lb) 5 - Mounting bushing Insert into brake caliper housing Page 1 of 5Front brake caliper, servicing (Teves/Ate)12/7/2004http://ebahn.bentleypublishers.com/vw/servlet/Display?action=Goto&type=repair&id=VW.B4.SU01.47.3 Downloaded from www.Manualslib.com manuals search engine
47-11 6 - Brake cylinder housing 7 - Brake carrier Install on brake caliper housing 8 - Retaining spring Install with both ends in the drillings in brake caliper housing 9 - Piston seal Remove using a screwdriver Fig. 2 10 - Piston Force piston out of brake caliper using compressed air Fig. 1 Installing Fig. 3 and Fig. 4 and Fig. 5 First coat the piston lightly with brake cylinder paste. Piston diameter 54 mm 11 - Protective seal Do not damage when installing piston Page 2 of 5Front brake caliper, servicing (Teves/Ate)12/7/2004http://ebahn.bentleypublishers.com/vw/servlet/Display?action=Goto&type=repair&id=VW.B4.SU01.47.3 Downloaded from www.Manualslib.com manuals search engine
47-12 Note: Place a piece of wood in the recess to prevent damaging the piston. Fig. 1 Piston, pressing out of cylinder using compressed air Fig. 2 Piston seal, removing Page 3 of 5Front brake caliper, servicing (Teves/Ate)12/7/2004http://ebahn.bentleypublishers.com/vw/servlet/Display?action=Goto&type=repair&id=VW.B4.SU01.47.3 Downloaded from www.Manualslib.com manuals search engine
47-13 Fig. 3 Protective seal, installing Note: Hold piston in front of caliper housing. Fig. 4 Protective seal, installing - Using a screwdriver, insert inner sealing lip into cylinder groove Page 4 of 5Front brake caliper, servicing (Teves/Ate)12/7/2004http://ebahn.bentleypublishers.com/vw/servlet/Display?action=Goto&type=repair&id=VW.B4.SU01.47.3 Downloaded from www.Manualslib.com manuals search engine
47-14 Note: The protective seal outer sealing lip will then locate in the piston groove. Fig. 5 Piston, installing Page 5 of 5Front brake caliper, servicing (Teves/Ate)12/7/2004http://ebahn.bentleypublishers.com/vw/servlet/Display?action=Goto&type=repair&id=VW.B4.SU01.47.3 Downloaded from www.Manualslib.com manuals search engine
47-15 Rear brake caliper, servicing Note: Apply thin coat of brake cylinder paste to brake cylinder pistons and seal. When repairing install all parts supplied in repair kit. New brake calipers are filled with brake fluid and are pre-bled. When repairing it is essential to pre-bleed the brake calipers (without brake pads) before installing in the vehicle Page 47-21 1 - Self-locking bolts, 35 Nm (26 ft lb) Always replace When loosening and tightening counter-hold on guide pin Page 1 of 8Rear brake caliper, servicing12/7/2004http://ebahn.bentleypublishers.com/vw/servlet/Display?action=Goto&type=repair&id=VW.B4.SU01.47.4 Downloaded from www.Manualslib.com manuals search engine
47-16 2 - Sealing ring Remove using a screwdriver Page 47-19 3 - Piston with automatic adjustment Removing and installing Page 47-19 4 - Protective seal Pull outer sealing lip onto piston Install inner sealing lip in brake caliper housing groove Page 47-20 5 - Dust cap 6 - Bleeder valve Apply thin coat of brake cylinder paste before screwing in. Page 2 of 8Rear brake caliper, servicing12/7/2004http://ebahn.bentleypublishers.com/vw/servlet/Display?action=Goto&type=repair&id=VW.B4.SU01.47.4 Downloaded from www.Manualslib.com manuals search engine
47-17 7 - Brake caliper housing with parking brake cable lever If a leak exists at the parking brake cable lever replace brake caliper housing After repairing, pre-bleed caliper housing Page 47-21 8 - Guide pins Grease before pulling on protective cap 9 - Protective cap Pull onto brake carrier and guide pin Page 3 of 8Rear brake caliper, servicing12/7/2004http://ebahn.bentleypublishers.com/vw/servlet/Display?action=Goto&type=repair&id=VW.B4.SU01.47.4 Downloaded from www.Manualslib.com manuals search engine
47-18 10 - Brake carrier with guide pin and protective cap Supplied as replacement part, assembled with sufficient grease on guide pins If protective caps or guide pins are damaged, install repair kit. Use grease packet supplied to lubricate the guide pins. Page 4 of 8Rear brake caliper, servicing12/7/2004http://ebahn.bentleypublishers.com/vw/servlet/Display?action=Goto&type=repair&id=VW.B4.SU01.47.4 Downloaded from www.Manualslib.com manuals search engine
47-19 Rear brake caliper piston, removing and installing Removing Note: - Thread piston out of brake caliper housing by turning the knurled wheel counter-clockwise. If piston is difficult to move, use a 13 mm open end wrench on the flats (arrow A) provided for this purpose. Install special tool 3272 so that the collar (arrow) is before the piston. Note: Make sure that the surface of the cylinder is not damaged during removal. - Remove seal with a screwdriver Page 5 of 8Rear brake caliper, servicing12/7/2004http://ebahn.bentleypublishers.com/vw/servlet/Display?action=Goto&type=repair&id=VW.B4.SU01.47.4 Downloaded from www.Manualslib.com manuals search engine
47-20 Installing - Place protective seal with the outer sealing lip on the piston. Note: Hold piston in front of brake caliper housing. - Insert protective seal inner sealing lip into the caliper housing groove using a screwdriver. Page 6 of 8Rear brake caliper, servicing12/7/2004http://ebahn.bentleypublishers.com/vw/servlet/Display?action=Goto&type=repair&id=VW.B4.SU01.47.4 Downloaded from www.Manualslib.com manuals search engine
47-21 Note: - Thread piston into housing by turning knurled wheel clockwise. Install special tool 3272 so that the collar (arrow) of the tool is seated against the brake carrier. If piston is difficult to move, use a 13 mm open end wrench on flats (arrow A) provided for this purpose. If the piston is pushed back with a piston resetting tool or by operating the foot brake the automatic adjustment in the brake caliper is destroyed. - Install brake pads. Page 7 of 8Rear brake caliper, servicing12/7/2004http://ebahn.bentleypublishers.com/vw/servlet/Display?action=Goto&type=repair&id=VW.B4.SU01.47.4 Downloaded from www.Manualslib.com manuals search engine
47-22 Pre-bleeding brake caliper Note: Position brake caliper as illustrated to pre-bleed. - Open bleeder valve and using a standard bleeder bottle, fill with brake fluid until bubble-free brake fluid flows from the threaded hole (brake hose connection). Close bleeder screw. Page 8 of 8Rear brake caliper, servicing12/7/2004http://ebahn.bentleypublishers.com/vw/servlet/Display?action=Goto&type=repair&id=VW.B4.SU01.47.4 Downloaded from www.Manualslib.com manuals search engine
47-23 Brake pressure regulator, checking and adjusting Vehicles without ABS, vehicles with ABS, ABS/EDS, Teves 04 The brake pressure regulator is mounted on a bracket which is in turn fixed to a rear axle mounting bracket and is controlled from the rear axle by a spring. Checking operation Firmly depress the brake pedal and release quickly (vehicle standing on its wheels). This must cause the brake pressure regulator lever to move. Checking and adjusting pressure Note: The brake pressure regulator is set with the vehicle unladened 1). 1) The term "unladen" means: The weight of the vehicle ready for the road (full fuel tank, spare wheel, tool kit and jack). Page 1 of 4Brake pressure regulator, checking and adjusting12/7/2004http://ebahn.bentleypublishers.com/vw/servlet/Display?action=Goto&type=repair&id=VW.B4.SU01.47.5 Downloaded from www.Manualslib.com manuals search engine
47-24 Note: Bleeding brake system on vehicles with ABS Page 47-27 . - Lift vehicle and connect pressure gauges to front left brake caliper and to rear right wheel cylinder/caliper. - Bleed both gauges. - Lower vehicle and bounce the rear of the vehicle several times. - Depress brake pedal and check pressures. - Compare figures attained with specifications Page 47-25 and if necessary adjust. Page 2 of 4Brake pressure regulator, checking and adjusting12/7/2004http://ebahn.bentleypublishers.com/vw/servlet/Display?action=Goto&type=repair&id=VW.B4.SU01.47.5 Downloaded from www.Manualslib.com manuals search engine
47-25 Load dependent brake pressure regulator specifications Model / Version Bar (psi) Bar (psi) Rear axle drum Front axle 50 (725) Front axle 100 (1450) brakes Rear axle 30 - 36 (435 - 522) Rear axle 51 - 57 (740 - 827) Rear axle disc Front axle 50 (725) Front axle 100 (1450) brakes Rear axle 35 - 41 (508 - 595) Rear axle 56 - 62 (812 - 899) Four wheel drive Front axle 50 (725) Front axle 100 (1450) Rear axle 41 - 47 (595 - 682) Rear axle 66 - 72 (957 - 1044) Page 3 of 4Brake pressure regulator, checking and adjusting12/7/2004http://ebahn.bentleypublishers.com/vw/servlet/Display?action=Goto&type=repair&id=VW.B4.SU01.47.5 Downloaded from www.Manualslib.com manuals search engine
47-26 Adjusting regulator Rear axle test pressure too high: - Release tension on regulator spring. Rear axle test pressures too low: - Tension regulator spring. Note: Do not adjust with brake pedal depressed, therefore observe the following sequence: - Read off figures. - Release pedal. - Adjust spring. - Depress pedal again. - Read off figures and if necessary, readjust. - Remove pressure gauges and bleed brake system Page 47-27 . Page 4 of 4Brake pressure regulator, checking and adjusting12/7/2004http://ebahn.bentleypublishers.com/vw/servlet/Display?action=Goto&type=repair&id=VW.B4.SU01.47.5 Downloaded from www.Manualslib.com manuals search engine
47-27 Brake system, bleeding Brake system, bleeding (vehicles with and without ABS, ABS/EDL) Changing brake fluid Repair Manual, Maintenance Note: Bleeding the brake system on vehicles with ABS, ABS/EDL is performed as for vehicles with conventional braking systems. Only use new brake fluid conforming to US standard FMVSS 116 DOT 4. Genuine VW/Audi brake fluid conforms to this specification. Brake fluid is poisonous. Also due to its corrosive effect brake fluid must not come into contact with paintwork. Brake fluid is hygroscopic, which means it absorbs moisture from the ambient air and should always be stored in air tight containers. Rinse off spillages using plenty of water. Repair Manual, Brake System On Board Diagnostic (OBD), Repair Group 01 Page 1 of 3Brake system, bleeding12/7/2004http://ebahn.bentleypublishers.com/vw/servlet/Display?action=Goto&type=repair&id=VW.B4.SU01.47.6 Downloaded from www.Manualslib.com manuals search engine
47-28 Brake system, bleeding (with pressure bleeder VAS 5234) Opening the hydraulic unit bleed screws on vehicles with ABS, ABS/EDL is not permitted! Bleeding sequence Note: - Connect VAS 5234 Brake filler and bleeder unit. - Open bleeder screws in the specified order and bleed brake calipers and wheel cylinders. 1 - Right rear wheel cylinder/brake caliper 2 - Left rear wheel cylinder/brake caliper 3 - Right front brake caliper 4 - Left front brake caliper On vehicles with brake pressure regulator move the regulator lever when bleeding rear brakes. Depress the brake pedal several times during bleeding. Page 2 of 3Brake system, bleeding12/7/2004http://ebahn.bentleypublishers.com/vw/servlet/Display?action=Goto&type=repair&id=VW.B4.SU01.47.6 Downloaded from www.Manualslib.com manuals search engine
47-29 Brake system, bleeding (without pressure bleeder) Opening the hydraulic unit bleed screws on vehicles with ABS, ABS/EDL is not permitted! - Build-up brake pressure in brake system by pumping the brake pedal. - Attach bleeder bottle hose and open bleeder screw. - With brake pedal held down, close bleeder screw. - Repeat operation until no air is present. Bleeding sequence Page 47-28 Changing brake fluid Repair Manual, Maintenance Page 3 of 3Brake system, bleeding12/7/2004http://ebahn.bentleypublishers.com/vw/servlet/Display?action=Goto&type=repair&id=VW.B4.SU01.47.6 Downloaded from www.Manualslib.com manuals search engine
48-1 Steering Assembly overview: steering column, column tube, steering wheel and airbag steering wheel Airbag system functional check and interrogating Diagnostic Trouble Code (DTC) Memory. Repair Manual, Body Exterior, Interior, Repair Group 68; General body repairs Safety precautions when working on airbag Repair Manual, Body Exterior, Interior, Repair Group 68, General body repairs Note: All parts marked with a "1)" can be pre-assembled outside of the vehicle Pre-assembling steering column Page 48-6 Always replace self-locking nuts and bolts. Welding and straightening work on steering components is not permitted. Page 1 of 99Steering12/7/2004http://ebahn.bentleypublishers.com/vw/servlet/Display?action=Goto&type=repair&id=VW.B4.SU01.48.1 Downloaded from www.Manualslib.com manuals search engine
48-2 1 - Cover plate 2 - Hex nut, 50 Nm (37 ft lb) 3 - Steering wheel Install in center position 4 - Airbag unit Removing and installing Page 48-7 5 - Steering wheel for airbag Removing and installing Page 48-8 Removing and installing Airbag Spiral Spring Page 48-10 6 - Hex socket head bolt, 6.5 Nm (57 in lb) Always replace 7 - Connector 8 - Splined adapter sleeve Removing Page 48-5 Installing Page 48-5 Page 2 of 99Steering12/7/2004http://ebahn.bentleypublishers.com/vw/servlet/Display?action=Goto&type=repair&id=VW.B4.SU01.48.1 Downloaded from www.Manualslib.com manuals search engine
48-3 9 - Spring 10 - Steering column switch/steering lock housing1) Distance between steering wheel/steering column switch is not adjustable 11 - Upper trim 12 - Support ring1) With washer 13 - Steering column1) Remove by pulling upwards out of column tube Checking length Page 48-6 14 - Hex bolt, 30 Nm (22 ft lb) 15 - Hex nut, 25 Nm (18 ft lb) 16 - Hex nut, 30 Nm (22 ft lb) 17 - Steering column universal joint 18 - Spring Page 3 of 99Steering12/7/2004http://ebahn.bentleypublishers.com/vw/servlet/Display?action=Goto&type=repair&id=VW.B4.SU01.48.1 Downloaded from www.Manualslib.com manuals search engine
48-4 19 - Lower steering column bearing Pull in with VW 771 and large washer Drive out downward with a tube 20 - Washer Tighten until head shears off Drill out to remove 21 - Shear bolt 22 - Column tube 23 - Lower trim Page 4 of 99Steering12/7/2004http://ebahn.bentleypublishers.com/vw/servlet/Display?action=Goto&type=repair&id=VW.B4.SU01.48.1 Downloaded from www.Manualslib.com manuals search engine
48-5 Only use puller with leg clamp (e.g. Kukko 204/2 commercial type). Fig. 1 Splined adapter sleeve, removing Fig. 2 Splined adapter sleeve, installing - Place sleeve on steering column and press on with hex nut. - Remove nut, place on washer and press sleeve fully on with nut until sleeve is firmly seated. Page 5 of 99Steering12/7/2004http://ebahn.bentleypublishers.com/vw/servlet/Display?action=Goto&type=repair&id=VW.B4.SU01.48.1 Downloaded from www.Manualslib.com manuals search engine
48-6 The small metal lug on the lower section must be visible in the hole in the upper section (arrow). If necessary pull both sections firmly apart onto stop or press together. Fig. 3 Length of steering column, checking Fig. 4 Steering column, pre-assembling - Carefully clamp the lower section of the steering column in a vice so that the upper part is supported on the jaws. Page 6 of 99Steering12/7/2004http://ebahn.bentleypublishers.com/vw/servlet/Display?action=Goto&type=repair&id=VW.B4.SU01.48.1 Downloaded from www.Manualslib.com manuals search engine
48-7 Airbag unit, removing and installing Removing - Disconnect battery Ground strap. - Center steering wheel (wheels straight-ahead). Installing Install in reverse order Note: Only use new hex socket head bolts for airbag unit. Tightening torque: 6.5 Nm (57 in. Ib). CAUTION! Make sure that no one is in the vehicle when connecting the battery Ground strap. - Remove both socket head bolts from airbag unit. - Remove airbag unit from steering wheel and disconnect wiring connector from airbag unit. - After installing the airbag unit, switch on ignition then connect battery Ground strap. Page 7 of 99Steering12/7/2004http://ebahn.bentleypublishers.com/vw/servlet/Display?action=Goto&type=repair&id=VW.B4.SU01.48.1 Downloaded from www.Manualslib.com manuals search engine
48-8 Airbag steering wheel, removing and installing Removing - Remove airbag unit. Page 48-7 - Remove trim below steering column switch. Note: - Separate connector (arrow). (Pull foam rubber sleeve off connector, if installed). - Remove nut and pull steering wheel off steering column. After pulling steering wheel off, turn Airbag Spiral Spring slightly so that the wire (arrow) faces downward. (Hold steering wheel in installation position). The spring then locates and is prevented from turning. If this step is not performed or if the spring is tufted in an uncontrolled manner, it can lead to the spring being overstressed at full lock, causing irreparable damage. Page 8 of 99Steering12/7/2004http://ebahn.bentleypublishers.com/vw/servlet/Display?action=Goto&type=repair&id=VW.B4.SU01.48.1 Downloaded from www.Manualslib.com manuals search engine
48-9 Installing - Install steering wheel, install nut and tighten. Tightening torque: 50 Nm (37 ft lb). - Connect airbag unit connector below steering wheel. - Install trim panel below steering column. Make sure that the centering ring wiring connection is located in the recess in the trim panel. - Connect connector in steering wheel to airbag unit connector. - Install airbag unit Page 48-7 Note: Use new hex socket head bolts for airbag unit. - After installing the airbag steering wheel first switch on ignition, then connect battery Ground strap. CAUTION! Make sure that no one is in the vehicle when connecting the battery Ground strap. Page 9 of 99Steering12/7/2004http://ebahn.bentleypublishers.com/vw/servlet/Display?action=Goto&type=repair&id=VW.B4.SU01.48.1 Downloaded from www.Manualslib.com manuals search engine
48-10 Airbag Spiral Spring, removing and installing Remove airbag unit Page 48-7 Remove steering wheel Page 48-8 - Separate single connector for horn. Install steering wheel Page 48-9 Install airbag unit Page 48-7 Note: - Remove screws -1- and remove Airbag Spiral Spring -2- from steering wheel. When removing and installing the Airbag Spiral Spring, ensure that it is in the center position. As a new part the Airbag Spiral Spring is secured in the center position by a cable tie. Page 10 of 99Steering12/7/2004http://ebahn.bentleypublishers.com/vw/servlet/Display?action=Goto&type=repair&id=VW.B4.SU01.48.1 Downloaded from www.Manualslib.com manuals search engine
48-11 Column tube for height adjustable steering wheel, removing and installing The column tube can be adjusted in height by approx. 50 mm 1 - Operating lever 2 - Packing plate 3 - Column tube Square housing fits over mounting bracket 4 - Rubber stop 5 - Return spring Hooked into mounting bracket and column tube 6 - Thrust washer 7 - Packing plate Page 11 of 99Steering12/7/2004http://ebahn.bentleypublishers.com/vw/servlet/Display?action=Goto&type=repair&id=VW.B4.SU01.48.1 Downloaded from www.Manualslib.com manuals search engine
48-12 8 - Clamping sleeve 9 - Mounting bracket Before assembling, coat side sliding surfaces with MoS2 paste 10 - Bolt with left-hand thread Tighten to 22 Nm (16 ft lb), After tightening install locking plate 11 - Locking plate 12 - Locking plate nut, 8 Nm (70 in. Ib) Self-locking Always replace 13 - Washer 14 - Shear bolt Tighten until head shears off Page 12 of 99Steering12/7/2004http://ebahn.bentleypublishers.com/vw/servlet/Display?action=Goto&type=repair&id=VW.B4.SU01.48.1 Downloaded from www.Manualslib.com manuals search engine
48-13 Pump delivery pressure, checking - Disconnect pump pressure line. Test requirements: - Install adapter and test equipment. Cut-off valve on gauge open. - Start engine and if necessary add fluid to reservoir. A - VAG 1402/2 B - VAG 1402/1 C - Hose from adapter kit VAG 1402/6 D - VAG 1402 V-belt/V-belt tension OK. System not leaking. Hoses/lines are not kinked or restricted. Page 13 of 99Steering12/7/2004http://ebahn.bentleypublishers.com/vw/servlet/Display?action=Goto&type=repair&id=VW.B4.SU01.48.1 Downloaded from www.Manualslib.com manuals search engine
48-14 - With engine running at idling speed. Close cut-off valve (not longer than 5 seconds) and read off pressure. Specification: 85 - 95 bar (1232 - 1377 psi) Note: If the reading is higher or lower than specified replace pump. Vehicles with up to 110 kW engine Page 48-90 . Vehicles with 128 kW engine Page 48-97 . If reservoir fluid level is low then check steering system for leaks. For leaks at the pinion first check the lines/line connections for leaks and if necessary tighten and wipe dry. If the pinion seal or the rack seals in steering box housing are leaking then replace steering gear. To check the rack seals loosen the clamp on the boot and push to one side. Page 14 of 99Steering12/7/2004http://ebahn.bentleypublishers.com/vw/servlet/Display?action=Goto&type=repair&id=VW.B4.SU01.48.1 Downloaded from www.Manualslib.com manuals search engine
48-15 Power steering gear, removing and installing When working on the power assisted steering gear: Absolute cleanliness is required when working on the power steering. Thoroughly clean connections and immediate vicinity before loosening. Place parts on a clean surface and cover if not re-installing immediately. Do not use fluffy cloths. Only unpack parts immediately prior to installation. Only use genuine packed parts. Vehicles with four wheel drive observe installing heat shield. Page 15 of 99Steering12/7/2004http://ebahn.bentleypublishers.com/vw/servlet/Display?action=Goto&type=repair&id=VW.B4.SU01.48.1 Downloaded from www.Manualslib.com manuals search engine
48-16 Removing - Press tie rods off steering arm. A - Ball joint splitter (commercial type) e.g. Kukko No. 128/2 - Remove partition behind pedals from bulkhead and from steering column tube to loosen the universal joint/power steering gear. If an oil extraction unit is not available, disconnect vane pump supply hose and drain hydraulic fluid. - Loosen nut on the universal joint (arrow). - Remove hydraulic fluid from reservoir with an oil extraction unit, e.g. VAG 1358 A or VAG 1307 A. Page 16 of 99Steering12/7/2004http://ebahn.bentleypublishers.com/vw/servlet/Display?action=Goto&type=repair&id=VW.B4.SU01.48.1 Downloaded from www.Manualslib.com manuals search engine
48-17 Instead of plastic sealing plugs a plug consisting of Part No.113 301 229 A and banjo bolt, Part No. N 904 674 01 can be used. But when using these, several 16 mm diameter sealing rings must be used so that the holes in the banjo bolt are sealed. - Support engine/transmission assembly with 10-222 A and 10-222 A/1 (support VR6 engine with 10-222A and 10-222A/3). - Remove boot from seat on steering gear. - Remove subframe bolts. - Lower engine/transmission assembly; this will pull the two halves of the universal joint apart. - Disconnect hoses from steering gear and seal with plastic bag and adhesive tape. - Seal power steering gear threaded holes with plastic sealing plugs. - Remove steering gear securing nuts (bolts remain in subframe). - Remove steering gear rearward. Page 17 of 99Steering12/7/2004http://ebahn.bentleypublishers.com/vw/servlet/Display?action=Goto&type=repair&id=VW.B4.SU01.48.1 Downloaded from www.Manualslib.com manuals search engine
48-18 Installing Install in reverse order. - Check position of steering wheel and, if necessary, align front end. Note: Tightening torques: When lifting the engine/transmission assembly guide the lower half of the universal joint shaft -A- into the upper half -B- at the same time (second mechanic necessary). Coat boot with lubricant, e.g. soft soap, before pulling onto steering gear. Universal joint shaft 25 Nm (18 ft lb) halves Steering gear 30 Nm (22 ft lb) Tie rod joint 35 Nm (26 ft lb) Subframe front and rear 70 Nm (52 ft lb) and turn 90 further Rear subframe bracket 65 Nm (48 ft lb) Page 18 of 99Steering12/7/2004http://ebahn.bentleypublishers.com/vw/servlet/Display?action=Goto&type=repair&id=VW.B4.SU01.48.1 Downloaded from www.Manualslib.com manuals search engine
48-19 Assembly overview: power assisted steering box (TRW) Determine cause of any malfunctions using pressure and leak testing, Page 48-13 . Note: Always replace self-locking nuts and bolts. Welding and straightening work on steering components is not permitted. To grease the rack only use steering gear grease, Part No. AOF 063 000 04. Type of oil: Hydraulic oil G 002 000 Oil system capacity: 0.7 - 0.9 ltr. (0.74 - 0.95 qt) Supply and pressure line routing from Page 48-85 . Page 19 of 99Steering12/7/2004http://ebahn.bentleypublishers.com/vw/servlet/Display?action=Goto&type=repair&id=VW.B4.SU01.48.1 Downloaded from www.Manualslib.com manuals search engine
48-20 1 - Self-locking nut 35 Nm (26 ft lb) 2 - Self-locking 30 Nm (22 ft lb) 3 - Clamp 4 - Rubber mounting Internal diameter ZF: 50 mm TRW: 44 mm 5 - Right-hand tie rod 70 Nm (52 ft lb) Removing and installing Page 48-77 Vehicle alignment Page 44-1 Tie rod boot seat diameter ZF: 15 mm dia. TRW: 12.7 mm dia. It must not be installed on a ZF power steering gear Page 20 of 99Steering12/7/2004http://ebahn.bentleypublishers.com/vw/servlet/Display?action=Goto&type=repair&id=VW.B4.SU01.48.1 Downloaded from www.Manualslib.com manuals search engine
48-21 6 - Left-hand tie rod 70 Nm (52 ft lb) Removing and installing Page 48-77 Adjusting to length Page 48-84 Tie rod boot seat diameter ZF: 15 mm TRW: 12.7 mm Must not be installed on a ZF power steering gear 7 - Hex nut 50 Nm (37 ft lb) 8 - Boot Pull on and off over tie rod Can be replaced with steering gear installed Must not be twisted after adjusting toe Must not be installed on a ZF power steering gear Page 21 of 99Steering12/7/2004http://ebahn.bentleypublishers.com/vw/servlet/Display?action=Goto&type=repair&id=VW.B4.SU01.48.1 Downloaded from www.Manualslib.com manuals search engine
48-22 Repair Manual, Maintenance 9 - Steering gear Removing and installing Page 48-15 Adjusting Page 48-24 10 - Tie rod end Separating Page 48-16 Checking: 11 - Hex nut 30 Nm (22 ft lb) 12 - Universal joint Page 22 of 99Steering12/7/2004http://ebahn.bentleypublishers.com/vw/servlet/Display?action=Goto&type=repair&id=VW.B4.SU01.48.1 Downloaded from www.Manualslib.com manuals search engine
Downloaded from www.Manualslib.com manuals search engine
48-24 Power steering gear, adjusting (TRW) Note: Two Mechanics are required when adjusting. Adjust with engine switched off Adjusting steering box By turning the steering wheel back and forth (about 30 to center axis) a knocking noise will be heard if there is excessive play. - Raise vehicle on hoist. - Wheels in straight-ahead position. - Loosen locking nut (counter-hold with 3315/9). - Carefully turn adjustment screw (arrow) into cover until knocking noise can no longer be heard inside vehicle. - Tighten locking nut. - Complete a road test ensuring that when maneuvring or negotiating corners the steering self-centers without binding. Page 24 of 99Steering12/7/2004http://ebahn.bentleypublishers.com/vw/servlet/Display?action=Goto&type=repair&id=VW.B4.SU01.48.1 Downloaded from www.Manualslib.com manuals search engine
48-25 Power steering gear, disassembling and reassembling (TRW) This repair is limited to replacing the sealing rings and, if necessary, the toothed rod. Steering gears that are damaged by an accident must be replaced. For a satisfactory and successful repair, the greatest care, safety and proper tools are required. The special tool set 3315 that is pictured is also a part of this. Note: Clean hose connections and their surroundings thoroughly before opening. Thoroughly clean work place (workbench, vise) before starting work if necessary place paper towels on the working surface. Place parts that have been removed on a clean surface. If the repair will not be carried out immediately, cover parts. Do not use cloths with lint. All the replacement parts that are needed are contained in the repair kit. Only take replacement parts out of the package right before installing. Use only parts in original packaging. Always install all of the parts in the repair kit Page 25 of 99Steering12/7/2004http://ebahn.bentleypublishers.com/vw/servlet/Display?action=Goto&type=repair&id=VW.B4.SU01.48.1 Downloaded from www.Manualslib.com manuals search engine
48-26 1 - Tie rod For removing, see tie rod, removing and installing (TRW and ZF power steering gear) Page 48-77 2 - Boot Installing, see tie rod, removing and installing (TRW and ZF) power steering), Page 48-77 3 - Hose clamp Open with nipper pliers Installation position and tightening, see tie rod, removing and installing (TRW and ZF power steering), Page 48-77 Always replace 4 - Circlip Always replace 5 - Lock washer 6 - Toothed rod guide Supplied in repair kit as assembly with sealing ring Always replace Page 26 of 99Steering12/7/2004http://ebahn.bentleypublishers.com/vw/servlet/Display?action=Goto&type=repair&id=VW.B4.SU01.48.1 Downloaded from www.Manualslib.com manuals search engine
48-27 7 - O-ring Is assembled on toothed rod guide (item -6-) contained in the repair kit 8 - Pressure compensating tube Check for damage (dents and kinks) 9 - Toothed rod Check for scoring After removing lubricate immediately with hydraulic oil (corrosion protection) Supplied as a replacement part, for assignment see replacement parts fiche 10 - Plug Is only installed if the toothed rod was replaced To install, drill hole in the adjusting bolt Page 48-51 Supplied in repair kit Page 27 of 99Steering12/7/2004http://ebahn.bentleypublishers.com/vw/servlet/Display?action=Goto&type=repair&id=VW.B4.SU01.48.1 Downloaded from www.Manualslib.com manuals search engine
48-28 11 - Adjusting screw with lock nut, 60 Nm (44 ft lb) Before removing, mark position of adjusting bolt and lock nut on housing Steering gear, adjusting Page 48-24 12 - Pressure spring 13 - Pressure piece Mark installation position 14 - Housing Check cylinder race for scoring, if necessary replace steering gear complete 15 - Inverted tube nut, 30 Nm (22 ft lb) 16 - O-ring Always replace Is not included in repair kit - see Parts catalog Page 28 of 99Steering12/7/2004http://ebahn.bentleypublishers.com/vw/servlet/Display?action=Goto&type=repair&id=VW.B4.SU01.48.1 Downloaded from www.Manualslib.com manuals search engine
48-29 17 - Sealing ring Always replace 18 - Valve body Removing Page 48-32 Cannot be repaired Is not supplied as replacement part, if damaged replace steering gear 19 - Support ring Eliminated starting 4/92 If present, it must be reinstalled 20 - Adhesive film Thoroughly clean housing in this area before sticking on, e.g. with thinner, adhesive surface must be free of oil and grease Always replace Page 29 of 99Steering12/7/2004http://ebahn.bentleypublishers.com/vw/servlet/Display?action=Goto&type=repair&id=VW.B4.SU01.48.1 Downloaded from www.Manualslib.com manuals search engine
48-30 21 - Roller bearing installation position: inscription points up 22 - Sealing ring Always replace 23 - Circlip 24 - Ball bearing Drive from top downward with VW 439 Grease with steering gear grease AOF 063 000 04 25 - Self-locking hex nut, 30 Nm (22 ft lb) Always replace 26 - Locking screw, 40 Nm (30 ft lb) Always replace Is already pre-mounted on new toothed rods that are supplied as replacement parts Page 30 of 99Steering12/7/2004http://ebahn.bentleypublishers.com/vw/servlet/Display?action=Goto&type=repair&id=VW.B4.SU01.48.1 Downloaded from www.Manualslib.com manuals search engine
48-31 27 - Pipe Do not disconnect Not supplied as replacement part Sealing ring cannot be replaced 28 - O-ring 29 - Sealing ring Replace if there is scoring that can be seen or felt Already pre-mounted on new toothed rods that are supplied as replacement parts 30 - Sealing ring Not supplied as a replacement part 31 - Sealing ring Always replace Page 31 of 99Steering12/7/2004http://ebahn.bentleypublishers.com/vw/servlet/Display?action=Goto&type=repair&id=VW.B4.SU01.48.1 Downloaded from www.Manualslib.com manuals search engine
48-32 Power steering gear, disassembling - Tie rods, removing - see tie rod, removing and installing (TRW and ZF power steering), Page 48-77 - Close hose connections on power steering gear if not already done 1 - Plastic locking screw 2 - Plastic locking screw Note: Use jaw covers and check jaw covers for contamination; e.g. metal chips or the like - Clean outside of power steering gear - Open hose clamp and push back boot - Clamp steering gear with toothed rod in vise and remove tie rod - Remove tie rod - Take steering gear out of vise, screw on bracket 3315/1 and tighten bracket in vise Page 32 of 99Steering12/7/2004http://ebahn.bentleypublishers.com/vw/servlet/Display?action=Goto&type=repair&id=VW.B4.SU01.48.1 Downloaded from www.Manualslib.com manuals search engine
48-33 - Mark position of adjusting screw and lock nut to the housing (arrow) Note: - Screw lock nut together with adjusting screw Do not change position of adjusting screw to lock nut when removing If necessary, remove adjusting screw together with lock nut using tool 3115/6 Pressure piece/adjusting screw are slightly stressed with slight spring pressure 1 - Ratchet (standard commercial) 2 - Adjusting screw Page 33 of 99Steering12/7/2004http://ebahn.bentleypublishers.com/vw/servlet/Display?action=Goto&type=repair&id=VW.B4.SU01.48.1 Downloaded from www.Manualslib.com manuals search engine
48-34 - Mark installation position of pressure piece and remove 1 - Spreading pliers (standard commercial) 2 - Pressure piece - Remove circlip for valve body 1 - Needle nose pliers (standard commercial) Page 34 of 99Steering12/7/2004http://ebahn.bentleypublishers.com/vw/servlet/Display?action=Goto&type=repair&id=VW.B4.SU01.48.1 Downloaded from www.Manualslib.com manuals search engine
48-35 If very tightly seated, loosen locking screw with a hammer and driver - Remove lower locking screw for valve body 1 - Ratchet (standard commercial) - Remove hex nut below valve body 1 - Ratchet (standard commercial) 2 - Open-end wrench (standard commercial) - Drive valve body upward from below with driver - Remove grease from teeth of valve body Page 35 of 99Steering12/7/2004http://ebahn.bentleypublishers.com/vw/servlet/Display?action=Goto&type=repair&id=VW.B4.SU01.48.1 Downloaded from www.Manualslib.com manuals search engine
48-36 - Pull adhesive tape out of the housing Valve body sealing ring, removing - Pull toothed rod all the way to the left - Turn lock washer so that the opening of the circlip (arrow) is in the groove of the housing - Continue to turn the lock washer (direction of rotation left or right) so that the circlip turns out of the housing - Pull toothed rod with toothed rod guide out of the housing, pull off toothed rod guide and place toothed rod so that toothed rod piston sealing ring will not be damaged 1 - Needle nose pliers (standard commercial) - Lubricate toothed rod - Drive sealing ring upward A - Puller, e.g. Kukko 21/4 B - Driver When installing the puller -A- make sure that the claws (arrow on illustration page 13) engage properly under the sealing ring. The puller must not be spread too wide because otherwise the seat for the sealing ring and housing will be damaged or the sealing ring can jam in the housing. Page 36 of 99Steering12/7/2004http://ebahn.bentleypublishers.com/vw/servlet/Display?action=Goto&type=repair&id=VW.B4.SU01.48.1 Downloaded from www.Manualslib.com manuals search engine
48-37 For easier installation of the puller, it is recommended that a rubber band be placed around the claws. Illustration shows the housing in cross section for better view 1 - Puller, e.g. Kukko 21/4 2 - Rubber band 3 - Sealing ring 4 - Glide bearing do not remove Page 37 of 99Steering12/7/2004http://ebahn.bentleypublishers.com/vw/servlet/Display?action=Goto&type=repair&id=VW.B4.SU01.48.1 Downloaded from www.Manualslib.com manuals search engine
48-38 Inner sealing ring for toothed rod, pulling out - Install puller for sealing ring far enough so that the marking on the tool (arrow) matches the housing edge (only then will the claws engage behind the support ring) - Spread claws -2- of the tool by turning the spindle forcefully Note: When introducing the tool, make sure that the cylinder race is not damaged 1 - Support ring 2 - Claws 3 - Sealing ring 4 - Tool 3315/11 Page 38 of 99Steering12/7/2004http://ebahn.bentleypublishers.com/vw/servlet/Display?action=Goto&type=repair&id=VW.B4.SU01.48.1 Downloaded from www.Manualslib.com manuals search engine
48-39 Parts, cleaning and checking - Install tool VW 771 in the puller - Pull out sealing ring - Before assembly, the housing must be checked for contamination (paint residue, chips, dirt) and thoroughly cleaned with compressed air and alcohol - Clean adhesive surface for adhesive tape in area of the slot with solvent (e.g. L160 or alcohol) - Check cylinder race for scoring or other damage. If scoring can be felt, replace entire steering gear - Clean toothed rod (remove old grease in the tooth pockets) Page 39 of 99Steering12/7/2004http://ebahn.bentleypublishers.com/vw/servlet/Display?action=Goto&type=repair&id=VW.B4.SU01.48.1 Downloaded from www.Manualslib.com manuals search engine
48-40 Checking toothed rod for scoring If corroded areas or deep scratches are not noticeable on the toothed rod, the toothed rod must be replaced An evaluation of whether the toothed rod was damaged by force, e.g. by an accident, is not possible with this visual inspection If slight scoring (arrows) can be seen/felt on the toothed rod that are only deep enough that they can be ground off with sand paper (grain 350-600) the toothed rod can still be used After sanding, lubricate toothed rod lightly If the old toothed rod is used again, check the sealing ring for scoring (visual inspection). If there is scoring that can be seen or felt, the sealing ring and the O-ring under it must be replaced. - Sand toothed rod with sandpaper in radial direction (this is only possible with slight scoring) - Check chamfer on the front sides of the toothed rod for damage, if necessary remove with a fine grinding stone and/or sandpaper 1 - Toothed rod 2 - Sand paper (grain 350-600) 3 - Jaw covers Page 40 of 99Steering12/7/2004http://ebahn.bentleypublishers.com/vw/servlet/Display?action=Goto&type=repair&id=VW.B4.SU01.48.1 Downloaded from www.Manualslib.com manuals search engine
48-41 Sealing ring on toothed rod, replacing - Press pliers together with slight pressure on the sealing ring - Pry out sealing ring and O-ring A - Needle nose pliers (standard commercial) 1 - Toothed rod with piston 2 - Sealing rod 3 - O-ring Page 41 of 99Steering12/7/2004http://ebahn.bentleypublishers.com/vw/servlet/Display?action=Goto&type=repair&id=VW.B4.SU01.48.1 Downloaded from www.Manualslib.com manuals search engine
48-42 Sealing rings, installing on toothed rod piston - Slide mounting sleeve on toothed rod - Pull O-ring over tool and install in groove of piston - Lubricate sealing ring with hydraulic oil, pull over tool and install in groove of piston Page 42 of 99Steering12/7/2004http://ebahn.bentleypublishers.com/vw/servlet/Display?action=Goto&type=repair&id=VW.B4.SU01.48.1 Downloaded from www.Manualslib.com manuals search engine
48-43 Power steering gear, assembling Note; All sealing rings should be lubricated with hydraulic oil before installing. - Check whether the valve body housing -2- is absolutely clean on the inside, otherwise clean - Place sealing ring -1- on tool. The sealing lip -arrow- points toward tool - Drive sealing ring into stop 1 - Sealing ring 2 - Valve body housing - Make sure correct installation position of sealing ring in valve body - For better view, illustration shows valve tower in cross section Page 43 of 99Steering12/7/2004http://ebahn.bentleypublishers.com/vw/servlet/Display?action=Goto&type=repair&id=VW.B4.SU01.48.1 Downloaded from www.Manualslib.com manuals search engine
48-44 Inner sealing ring for toothed rod, installing - Place sealing ring on tool - Ensure correct installation position of sealing ring for toothed rod - Drive sealing ring -1- into the cylinder pipe far enough so that the groove (arrow) on the tool matches the edge (arrow A) of the housing 1 - Sealing ring A - Edge of housing For better view, illustration shows housing in cross section 1 - Support ring 2 - Sealing ring 3 - Valve body housing Page 44 of 99Steering12/7/2004http://ebahn.bentleypublishers.com/vw/servlet/Display?action=Goto&type=repair&id=VW.B4.SU01.48.1 Downloaded from www.Manualslib.com manuals search engine
48-45 Toothed rod, installing in housing No grease must get into the oil circulation system! - Grease teeth of toothed rod with AOF 063 000 04 grease - Slide protective tube on to toothed rod to stop - Wipe excess grease off completely Page 45 of 99Steering12/7/2004http://ebahn.bentleypublishers.com/vw/servlet/Display?action=Goto&type=repair&id=VW.B4.SU01.48.1 Downloaded from www.Manualslib.com manuals search engine
48-46 - Coat piston of toothed rod and protective tube with hydraulic oil When sliding, make sure that the sealing ring is pressed into the groove of the piston without jamming - Install installation sleeve 3315/22 into the housing - Slide toothed rod into the housing - Slowly introduce the toothed rod into the housing - Pull protective tube 3315/13 off the toothed rod Align teeth of toothed rod in such a way that they point toward the teeth of the pinion - Screw mounting sleeve 3315/18 on toothed rod and coat with hydraulic oil - Carefully slide toothed rod guide 1 over the toothed rod into the housing to stop - Slide toothed rod completely into the housing. Page 46 of 99Steering12/7/2004http://ebahn.bentleypublishers.com/vw/servlet/Display?action=Goto&type=repair&id=VW.B4.SU01.48.1 Downloaded from www.Manualslib.com manuals search engine
48-47 - Place lock washer in the housing and press in far enough until the groove in the lock washer in the slot of the housing is visible - Install new safety wire in the hole of the lock washer (arrow) - Pull safety wire in by turning the lock washer. (after pulling in, turn the lock washer approx. 1/2 revolution further) 1 - Safety wire in repair kit is not formed as a ring, but supplied as a straight wire 2 - Pliers (standard commercial) Valve body, installing Ball bearing must not be tipped when driving in - Carefully drive lower ball bearing for valve body into stop Page 47 of 99Steering12/7/2004http://ebahn.bentleypublishers.com/vw/servlet/Display?action=Goto&type=repair&id=VW.B4.SU01.48.1 Downloaded from www.Manualslib.com manuals search engine
48-48 Make sure that the sealing ring in the housing is not damaged by the teeth of the pinion - Screw assembly mandrel 3315/17 on valve body - Lubricate valve body with hydraulic oil and carefully install by hand into the valve body housing (note position of toothed rod) - Tape teeth of valve body with adhesive tape to protect the sealing ring. Avoid wrinkles. - Install upper roller bearing for valve body (inscription on roller bearing points upward) A - Adhesive tape B - Valve body Page 48 of 99Steering12/7/2004http://ebahn.bentleypublishers.com/vw/servlet/Display?action=Goto&type=repair&id=VW.B4.SU01.48.1 Downloaded from www.Manualslib.com manuals search engine
48-49 - Drive sealing ring in far enough sot that the groove for circlip in the housing is visible - Install circlip - Remove adhesive tape - Remove assembly mandrel 3315/17 - Install hex nut for valve body and tighten, 30 Nm (22 ft lb) with torque wrench SW 14 2 Note: - Install locking screw - Grease pressure piece and spring in housing in old position - Install lock nut together with adjusting screw After tightening, the marking made during removal (arrow) on the adjusting nut and lock nut must match If the toothed rod was replaced, before installing the tie rods the steering gear must be readjusted Page 49 of 99Steering12/7/2004http://ebahn.bentleypublishers.com/vw/servlet/Display?action=Goto&type=repair&id=VW.B4.SU01.48.1 Downloaded from www.Manualslib.com manuals search engine
48-50 Adhesive tape, applying - Fill slot with sealing compound AKL 450 005 05 - Tape slot with adhesive tape 1 - Adhesive surface must be dry and free from grease Page 50 of 99Steering12/7/2004http://ebahn.bentleypublishers.com/vw/servlet/Display?action=Goto&type=repair&id=VW.B4.SU01.48.1 Downloaded from www.Manualslib.com manuals search engine
48-51 Power steering gear, adjusting with new toothed rod If a new toothed rod was used, the steering play should be adjusted according to the following description. - Drill a hole 5.1 mm in diameter in the center of the adjusting screw (on the back side center) - Thoroughly clean adjusting screw - Place toothed rod in center position (measure toothed rod excess right and left) - Install pressure piece and spring in housing if not done yet - Screw adjusting screw and lock nut far enough into the housing so that the markings match Page 51 of 99Steering12/7/2004http://ebahn.bentleypublishers.com/vw/servlet/Display?action=Goto&type=repair&id=VW.B4.SU01.48.1 Downloaded from www.Manualslib.com manuals search engine
48-52 - Install gauge and set to "O" with approx. 1 mm pre-load (make sure that the key does not stick, front of key must not be crowned) 1 - 3315/8 2 - 3315/9 3 - 3315/1 4 - VW 387 - Screw right rod onto toothed rod and tighten by hand - Turn toothed rod radially from stop to stop, during this process observe pointer on gauge. Page 52 of 99Steering12/7/2004http://ebahn.bentleypublishers.com/vw/servlet/Display?action=Goto&type=repair&id=VW.B4.SU01.48.1 Downloaded from www.Manualslib.com manuals search engine
48-53 Needle run-out max. 0.10 mm If needle run-out is greater than 0.10 mm, screw pressure piece slightly into housing If the needle run-out is less than 0.10 mm, screw pressure piece slightly out of housing - Tighten lock nut - Check needle run-out again, if necessary repeat adjustment - Remove gauge Close hole in adjusting screw with a stopper from repair kit Tie rods, installing - First install clip -2- with gasket -1- in the hole - Apply 1 drop sealing compound, Part No. AMV 188 001 02, in the hole of the clip -arrow- and press plug -3- into the clip - See tie rods, removing and installing (TRW and ZF steering gear), Page 48-77 Page 53 of 99Steering12/7/2004http://ebahn.bentleypublishers.com/vw/servlet/Display?action=Goto&type=repair&id=VW.B4.SU01.48.1 Downloaded from www.Manualslib.com manuals search engine
48-54 Assembly overview: power steering gear (ZF) It is not intended that repair work be carried out on the power steering gear. If complaints are received determine cause with the help of pressure tests, leakage test and troubleshooting programs. If a malfunction exists replace the power steering gear. Note: Always replace self-locking nuts and bolts. Welding and straightening work on steering components is not permitted. To grease the rack use only steering gear grease, Part No. AOF 063 000 04. Type of oil: Hydraulic oil G 002 000 Oil system capacity: 0.7 - 0.9 Itr. (0.74 - 0.95 qt) Supply and pressure line routing Page 48-85 . Page 54 of 99Steering12/7/2004http://ebahn.bentleypublishers.com/vw/servlet/Display?action=Goto&type=repair&id=VW.B4.SU01.48.1 Downloaded from www.Manualslib.com manuals search engine
48-55 1 - Power steering gear Removing and installing Page 48-15 Adjusting Page 48-59 Checking steering moment Steering gear with reduced steering moment only permissible for vehicles up to 85 kW Steering moment on 16 V and VR 6 vehicles is approx. 2 Nm higher 2 - Hose clip Always replace- use pliers to open Tensioning Page 48-81 Page 55 of 99Steering12/7/2004http://ebahn.bentleypublishers.com/vw/servlet/Display?action=Goto&type=repair&id=VW.B4.SU01.48.1 Downloaded from www.Manualslib.com manuals search engine
48-56 3 - Boot Remove ball joint before removing Check for wear (cuts, cracks), ensure sealing surfaces and sealing lips are clean and undamaged The end diameters are larger than the boot for TRW power steering gears Must not be installed on TRW power steering gear 4 - Hose clip Always replace - use pliers to open Tensioning Page 48-81 Must not be installed on a TRW power steering gear Page 56 of 99Steering12/7/2004http://ebahn.bentleypublishers.com/vw/servlet/Display?action=Goto&type=repair&id=VW.B4.SU01.48.1 Downloaded from www.Manualslib.com manuals search engine
48-57 5 - Right-hand tie rod Removing and installing Page 48-77 Vehicle alignment Page 44-1 Tie rod boot seat diameter ZF: 15 mm TRW: 12.7 mm Must not be installed on a TRW power steering gear 6 - Left-hand tie rod Removing and installing Page 48-77 Tie rod boot seat diameter ZF: 15 mm TRW: 12.7 mm Must not be installed on a TRW power steering gear Adjusting length Page 48-84 Page 57 of 99Steering12/7/2004http://ebahn.bentleypublishers.com/vw/servlet/Display?action=Goto&type=repair&id=VW.B4.SU01.48.1 Downloaded from www.Manualslib.com manuals search engine
48-58 Repair Manual, Maintenance 7 - Lock nut, 50 Nm (37 ft lb) 8 - Tie rod ball joint Splitting Page 48-16 Checking: 9 - Pressure balance pipe 10 - 30 Nm (22 ft lb) 11 - Clamp 12 - Rubber mounting Internal diameter ZF: 50 mm TRW: 44 mm 13 - Data plate and company initials Page 58 of 99Steering12/7/2004http://ebahn.bentleypublishers.com/vw/servlet/Display?action=Goto&type=repair&id=VW.B4.SU01.48.1 Downloaded from www.Manualslib.com manuals search engine
48-59 Power steering gear, adjusting (ZF) Note: Two mechanics are required when adjusting. Adjust with engine switched off. - Raise vehicle on hoist. - Wheels in straight-ahead position. - By turning the steering wheel to and fro (about 30 to center axis) a knocking noise will be heard if there is excessive play. - The second mechanic carefully screws the adjustment screw -arrow- into the cover until the knocking noise can no longer be heard inside the vehicle. - Complete a road test ensuring that when maneuvering or negotiating corners the steering self-centers without sticking. Page 59 of 99Steering12/7/2004http://ebahn.bentleypublishers.com/vw/servlet/Display?action=Goto&type=repair&id=VW.B4.SU01.48.1 Downloaded from www.Manualslib.com manuals search engine
48-60 Power steering gear, disassembling and reassembling (ZF) This repair is limited to replacing the sealing rings and, if necessary, the toothed rod. Steering gears that are damaged by an accident must be replaced For a satisfactory and successful repair, the greatest care, safety and proper tools are required. Note: Clean hose connections and their surroundings thoroughly before opening Thoroughly clean work place (workbench, vise) before starting work if necessary place paper towels on the working surface Place parts that have been removed on a clean surface. If the repair will not be carried out immediately, cover parts Do not use cloths with lint All the replacement parts that are needed are contained in the repair kit Only take replacement parts out of the package right before installing. Use only parts in original packaging Always install all of the parts in the repair kit Page 60 of 99Steering12/7/2004http://ebahn.bentleypublishers.com/vw/servlet/Display?action=Goto&type=repair&id=VW.B4.SU01.48.1 Downloaded from www.Manualslib.com manuals search engine
48-61 Power steering gear, disassembling Note: Use jaw covers, check jaw covers for contamination; e.g. metal chips or the like - Tie rods, removing - see tie rod, removing and installing (TRW and ZF power steering), Page 48-34 - Close hose connections on power steering gear if not already done 1 - Plastic locking screw 2 - Plastic locking screw - Clean outside of power steering gear - Open hose clamp and push back boot - Clamp steering gear with toothed rod in vise and remove tie rod - Remove tie rod - Take steering gear out of vise, screw on bracket 3315/1 and tighten bracket in vise - Remove cover Page 61 of 99Steering12/7/2004http://ebahn.bentleypublishers.com/vw/servlet/Display?action=Goto&type=repair&id=VW.B4.SU01.48.1 Downloaded from www.Manualslib.com manuals search engine
48-62 Note: Do not change position of the adjusting screw (arrow) Cover is stressed with slight spring pressure - Remove pressure piece 1 - Spreading pliers (standard commercial) Page 62 of 99Steering12/7/2004http://ebahn.bentleypublishers.com/vw/servlet/Display?action=Goto&type=repair&id=VW.B4.SU01.48.1 Downloaded from www.Manualslib.com manuals search engine
48-63 - Remove lower locking screw for valve body 1 - Locking screw - Remove Torx screw for valve body 1 - Open-end wrench (standard commercial SW 14) 2 - Torx insert (standard commercial E10) 3 - Ratchet (standard commercial 3/8") Page 63 of 99Steering12/7/2004http://ebahn.bentleypublishers.com/vw/servlet/Display?action=Goto&type=repair&id=VW.B4.SU01.48.1 Downloaded from www.Manualslib.com manuals search engine
48-64 - Remove circlip for valve body with needle nose pliers 1 - Drive valve body out from below with driver - Slide toothed rod all the way in the direction of the valve body - Turn circlip so that the pointed end of the circlip is in the groove (arrow) of the housing Page 64 of 99Steering12/7/2004http://ebahn.bentleypublishers.com/vw/servlet/Display?action=Goto&type=repair&id=VW.B4.SU01.48.1 Downloaded from www.Manualslib.com manuals search engine
48-65 Center roller bearing for valve body, removing - First lift circlip with slotted screwdriver then pull out with pliers - Before removing toothed rod, clean housing opening with compressed air - Remove dirt and any chips that may be present - Pull toothed rod out of the housing to the right with toothed rod guide A - Screwdriver B - Pliers (standard commercial) - Lubricate toothed rod When installing the puller A, make sure that the claws (arrows on fig. N48-0058, page 45) engage correctly under the sealing ring. The puller must not be spread too wide because otherwise the seat for the sealing ring and the housing will be damaged or the sealing ring can jam in the housing. - Drive center roller bearing out toward the top A - Puller, e,g, Kukko 21/4 B - Driver Page 65 of 99Steering12/7/2004http://ebahn.bentleypublishers.com/vw/servlet/Display?action=Goto&type=repair&id=VW.B4.SU01.48.1 Downloaded from www.Manualslib.com manuals search engine
48-66 For easier installation of the puller, it is recommended that a rubber band be placed around the jaws. Illustration shows the housing in cross section for better view. Sealing ring for valve body, removing 1 - Puller e.g. Kukko 21/4 2 - Rubber band 3 - Sealing ring 4 - Housing When installing the puller A, make sure that the claws (arrows on fig. N48-0058, page 46) engage correctly under the sealing ring. The puller must not be spread too wide because otherwise the seat for the sealing ring and the housing will be damaged or the sealing ring can jam in the housing. - Drive sealing ring out toward the top A - Puller, e.g. Kukko 21/4 B - Driver - Drive out lower ball bearing with VW 439 Page 66 of 99Steering12/7/2004http://ebahn.bentleypublishers.com/vw/servlet/Display?action=Goto&type=repair&id=VW.B4.SU01.48.1 Downloaded from www.Manualslib.com manuals search engine
48-67 For easier installation of the puller, it is recommended that a rubber band be placed around the jaws. Illustration shows the housing in cross section for better view. Inner sealing ring for toothed rod, removing 1 - Puller, e.g. Kukko 21/4 2 - Rubber band 3 - Roller bearing 4 - Housing - Remove sealing ring for toothed rod from the housing - Disconnect hose line from valve body housing to cylinder line - Clean hose line, housing. Check threaded connection for contamination (rubber residue, chips) Page 67 of 99Steering12/7/2004http://ebahn.bentleypublishers.com/vw/servlet/Display?action=Goto&type=repair&id=VW.B4.SU01.48.1 Downloaded from www.Manualslib.com manuals search engine
48-68 Parts, cleaning and checking - Before assembly, the housing must be checked for contamination (paint residue, chips, dirt) and clean thoroughly with compressed air and alcohol if necessary - Check cylinder race for scoring or other damage. If scoring can be felt, replace the complete steering gear - Clean toothed rod (remove old grease in tooth pockets) Page 68 of 99Steering12/7/2004http://ebahn.bentleypublishers.com/vw/servlet/Display?action=Goto&type=repair&id=VW.B4.SU01.48.1 Downloaded from www.Manualslib.com manuals search engine
48-69 Checking toothed rod for scoring If corroded areas or deep scratches are noticeable on the toothed rod, the toothed rod must be replaced An evaluation of whether the toothed rod was damaged by force, e.g. by an accident, is not possible with this visual inspection After sanding, lubricate toothed rod lightly If the old toothed rod is used again, check the sealing ring for scoring (visual inspection). If there is scoring that can be seen or felt, the sealing ring and the O-ring under it must be replaced. - Sand toothed rod with sand paper in radial direction (this is only possible with slight scoring) - Check chamfer on the front sides of the toothed rod for damage, if necessary remove with fine grinding stone and/or sandpaper 1 - Toothed rod 2 - Sand paper (grain 350-600) Page 69 of 99Steering12/7/2004http://ebahn.bentleypublishers.com/vw/servlet/Display?action=Goto&type=repair&id=VW.B4.SU01.48.1 Downloaded from www.Manualslib.com manuals search engine
48-70 Sealing ring on toothed rod, replacing When the sealing rod is replaced it must be replaced with a new one of the same color Note the matching of the O-ring to the sealing ring - Press pliers together with slight pressure on the sealing ring - Pry out sealing ring and O-ring A - Needle nose pliers (standard commercial) O-ring 30.0 x 1.78/ white sealing ring O-ring 31.0 x 1.5/black sealing ring - Slide mounting sleeve 3315/19 onto toothed rod - Pull O-ring over the tool and insert in the groove of the piston Page 70 of 99Steering12/7/2004http://ebahn.bentleypublishers.com/vw/servlet/Display?action=Goto&type=repair&id=VW.B4.SU01.48.1 Downloaded from www.Manualslib.com manuals search engine
48-71 Power steering gear, assembling Note: The sealing lip (arrow) of the sealing ring points upward toward the teeth 1 on the valve body For better viewing, the illustration shows the body housing in cross section with installed valve body. The valve body is shown slightly raised for better viewing Inner sealing rod for toothed rod, installing Lubricate the sealing rings with hydraulic oil before installing - Note correct installation position of the sealing ring - Place sealing ring for valve body on the tool and drive in to stop. For installation position, see next illustration - Drive center roller bearing for valve body into stop The sealing lip (arrow) of sealing ring -3- points toward cylinder -4-. For better illustration, the drawing shows the housing in cross section. 1 - Valve body 2 - Support ring 3 - Sealing ring 4 - Cylinder Page 71 of 99Steering12/7/2004http://ebahn.bentleypublishers.com/vw/servlet/Display?action=Goto&type=repair&id=VW.B4.SU01.48.1 Downloaded from www.Manualslib.com manuals search engine
48-72 When the groove -arrow- matches the edge -arrow -A- of the housing, the sealing ring is properly seated. - Place support ring -1- and sealing ring -2- on tool - Drive sealing ring for toothed rod into housing to stop Page 72 of 99Steering12/7/2004http://ebahn.bentleypublishers.com/vw/servlet/Display?action=Goto&type=repair&id=VW.B4.SU01.48.1 Downloaded from www.Manualslib.com manuals search engine
48-73 Toothed rod, installing in the housing No grease must get into the oil circulation system! - Grease teeth of toothed rod with AOF 063 000 04 grease - Slide protective tube over toothed rod to stop - Wipe away excess grease completely When sliding, make sure that the sealing ring is pressed into the groove of the piston without jamming - Coat piston of toothed rod and protective tube with hydraulic oil - Install installation sleeve 3315/21 into the housing - Slide toothed rod into the housing - Slowly introduce the toothed rod into the housing - Pull protective tube 3315/5 off the toothed rod Page 73 of 99Steering12/7/2004http://ebahn.bentleypublishers.com/vw/servlet/Display?action=Goto&type=repair&id=VW.B4.SU01.48.1 Downloaded from www.Manualslib.com manuals search engine
Downloaded from www.Manualslib.com manuals search engine
48-75 Make sure that the sealing ring in the housing is not damaged by the teeth of the pinion. - Thread assembly mandrel 3315/17 onto valve body. - Lubricate valve body with hydraulic oil and carefully install by hand into the valve body housing (note position of toothed rod). - Tape the valve body with adhesive tape. Page 75 of 99Steering12/7/2004http://ebahn.bentleypublishers.com/vw/servlet/Display?action=Goto&type=repair&id=VW.B4.SU01.48.1 Downloaded from www.Manualslib.com manuals search engine
48-76 - Carefully slide bushing with roller bearing onto the valve body. - Drive bushing into the housing far enough so that the groove for the circlip is visible. - Install circlip. - Remove adhesive tape. - Remove installation mandrel 3315/17. - Install Torx screw into valve body and tighten to 35 Nm (26 ft lb). - Thread in locking screw, tighten to 30 Nm (22 ft lb) and crimp at corner points. - Grease pressure piece with AOF 063 000 04. - Install pressure piece, spring and washer in housing. - Install cover with adjusting screw. Adjust steering gear after installation in vehicle. Page 76 of 99Steering12/7/2004http://ebahn.bentleypublishers.com/vw/servlet/Display?action=Goto&type=repair&id=VW.B4.SU01.48.1 Downloaded from www.Manualslib.com manuals search engine
48-77 Tie rods, removing and installing (power steering gear - TRW and ZF) Note: Observe how tie rods are threaded into power steering gear: - Tie rods not secured with locking fluid - Tie rods secured with locking fluid When exchanging secured version tie rods use locking fluid D6 when installing. Removing The tie rods can only be removed/installed with the steering gear removed. - Seal line connections on power steering gear. 1 - Plastic sealing plugs 2 - Plastic sealing plugs - Clean outside of power steering gear in vicinity of the boot. Page 77 of 99Steering12/7/2004http://ebahn.bentleypublishers.com/vw/servlet/Display?action=Goto&type=repair&id=VW.B4.SU01.48.1 Downloaded from www.Manualslib.com manuals search engine
48-78 - Open hose clips and push boot back. Note: Use vice clamps, check vice clamps for impurities e.g. metal filings or similar and thoroughly remove. Installing Installing tie rod without locking fluid D6. Install in reverse order. Tightening torque: 70 Nm (52 ft lb) Installing tie rods with locking fluid D6 If parts are reused, it is essential to clean any residue of locking fluid off the threaded studs of the inner joint or the thread tapped hole as described below. Otherwise there is a danger of the thread being damaged when being reinstalled or removed. - Clamp steering gear with rack in a vice. - Remove tie rod. Page 78 of 99Steering12/7/2004http://ebahn.bentleypublishers.com/vw/servlet/Display?action=Goto&type=repair&id=VW.B4.SU01.48.1 Downloaded from www.Manualslib.com manuals search engine
48-79 Note: Do not tilt tap when positioning. If it is difficult to turn the tap onto the thread or if metal swarf forms, this indicates the thread is deformed. - Clean threaded stud or tie rod with M 14 x 1.5 tap or wire brush. - Check if joint stud threads are deformed replace if necessary. - Cover steering gear housing opening (arrow) with a cloth. - Clean threaded hole in rack with M 14 x 1.5 tap. - Clean thread with nitro thinners e.g. L 160 (thread must be oil and grease free). - Clean with compressed air. Page 79 of 99Steering12/7/2004http://ebahn.bentleypublishers.com/vw/servlet/Display?action=Goto&type=repair&id=VW.B4.SU01.48.1 Downloaded from www.Manualslib.com manuals search engine
48-80 Installing Note: Apply one drop only in 2nd thread of rack. If too much D6 is used the release torque when next disassembling will be too high. No D6 must get onto steering rack. - Adjust new tie rod to length Page 48-84 . - Coat tapped hole thread with D6 locking fluid (arrow). - Tighten tie rod to the specified torque, 70 Nm (52 ft lb). Always use a torque wrench. Page 80 of 99Steering12/7/2004http://ebahn.bentleypublishers.com/vw/servlet/Display?action=Goto&type=repair&id=VW.B4.SU01.48.1 Downloaded from www.Manualslib.com manuals search engine
48-81 Boot, installing Note: - Check boot for wear (cuts, cracks) and ensure sealing surfaces are clean. - Install boot, but first turn the tie rod so that the tie rod ball joint shank is in the installation position. - Install pressure balance line. Do not damage sticker -A- when pushing the boot on (only on TRW power steering gears). Make sure that the boot and the pressure balance line are installed correctly. During assembly of the boot ensure that the bead -arrows- contacts the housing. Only use genuine hose clips -B- 1 - Boot 2 - Housing Page 81 of 99Steering12/7/2004http://ebahn.bentleypublishers.com/vw/servlet/Display?action=Goto&type=repair&id=VW.B4.SU01.48.1 Downloaded from www.Manualslib.com manuals search engine
48-82 1 - Hose clamp 2 - Pressure compensating tube 3 - Boot 4 - Approx. 90 - Tension hose clamps with pliers VAG 1275 or equivalent. Page 82 of 99Steering12/7/2004http://ebahn.bentleypublishers.com/vw/servlet/Display?action=Goto&type=repair&id=VW.B4.SU01.48.1 Downloaded from www.Manualslib.com manuals search engine
48-83 Note: The boot must not be installed twisted. Page 83 of 99Steering12/7/2004http://ebahn.bentleypublishers.com/vw/servlet/Display?action=Goto&type=repair&id=VW.B4.SU01.48.1 Downloaded from www.Manualslib.com manuals search engine
48-84 Left-hand tie rod length, checking and adjusting - Check dimension "a" on left-hand tie rod and if necessary adjust. Dimension "a" = 395 + 1 mm (all except from VR6 and 16V) Dimension "a" = 413 1 mm (VR6 and 16V) Note: Only adjust toe on right-hand tie rod. Before installing new left-hand tie rod check dimension "a" and if necessary adjust. Page 84 of 99Steering12/7/2004http://ebahn.bentleypublishers.com/vw/servlet/Display?action=Goto&type=repair&id=VW.B4.SU01.48.1 Downloaded from www.Manualslib.com manuals search engine
48-85 Assembly overview: vane pump, reservoir and hydraulic lines (vehicles with 4-Cyl. engines) It is not intended that repair work be carried out on the vane pump. If complaints are received determine cause with the help of pressure and leakage tests. Replace pump if faulty. Note: Pumps supplied as spare parts are not filled with oil. Fill the pump with G 002 000 hydraulic oil to rotate it by hand, otherwise the pump may be damaged or noisy during operation. Type of oil: hydraulic oil G 002 000 Oil system capacity: 0.7 - 0.9 Itr. (0.74 - 0.95 qt.) Do not reuse drained hydraulic oil. Always replace O-rings. Page 85 of 99Steering12/7/2004http://ebahn.bentleypublishers.com/vw/servlet/Display?action=Goto&type=repair&id=VW.B4.SU01.48.1 Downloaded from www.Manualslib.com manuals search engine
48-86 1 - Cooling line Secured to crossmember item 9 2 - Bracket Various versions depending on engine/transmission Page 48-96 3 - Pressure line 4 - Suction line Hydraulic pump - Cooling line 5 - Hose clamp, 3 Nm (27 in lb) 6 - Hydraulic pump With V-belt pulley 7 - Hydraulic pump With ribbed belt sprocket 8 - O-ring Always replace Page 86 of 99Steering12/7/2004http://ebahn.bentleypublishers.com/vw/servlet/Display?action=Goto&type=repair&id=VW.B4.SU01.48.1 Downloaded from www.Manualslib.com manuals search engine
48-87 9 - Pressure line union 10 - Banjo bolt, 35 Nm (26 ft lb) 11 - Hex bolt, 10 Nm (7 ft lb) Page 87 of 99Steering12/7/2004http://ebahn.bentleypublishers.com/vw/servlet/Display?action=Goto&type=repair&id=VW.B4.SU01.48.1 Downloaded from www.Manualslib.com manuals search engine
48-88 Assembly overview: Hydraulic lines, reservoir (vehicles with 4-Cyl. engines) Notes Page 48-85 1 - Power steering gear 2 - O-ring Always replace 3 - Return line, 30 Nm (22 ft lb) 4 - Pressure line, 30 Nm (22 ft lb) 5 - Reservoir 6 - Rubber ring 7 - Hose clamp 8 - Rubber insert 9 - Captive nut 10 - Bracket Page 88 of 99Steering12/7/2004http://ebahn.bentleypublishers.com/vw/servlet/Display?action=Goto&type=repair&id=VW.B4.SU01.48.1 Downloaded from www.Manualslib.com manuals search engine
48-89 11 - Self-tapping screw 12 - Hose clamp 13 - Return hose 14 - Suction hose Reservoir - Cooling line 15 - Cooling line 16 - Threaded stud 17 - Bracket Page 89 of 99Steering12/7/2004http://ebahn.bentleypublishers.com/vw/servlet/Display?action=Goto&type=repair&id=VW.B4.SU01.48.1 Downloaded from www.Manualslib.com manuals search engine
48-90 Power steering vane pump, removing and installing (vehicles with 4-Cyl. engines) Note: Always replace self-locking nuts and bolts. Pumps supplied as spare parts are not filled with hydraulic oil. Fill the pump with G 002 000 hydraulic oil and rotate it by hand, otherwise the pump may be damaged or noisy during operation. Do not reuse drained hydraulic oil. 1 - Suction hose 2 - Pressure hose 3 - Hose clamp 4 - Tensioning bolt Tensioning V-belts item 11 Page 90 of 99Steering12/7/2004http://ebahn.bentleypublishers.com/vw/servlet/Display?action=Goto&type=repair&id=VW.B4.SU01.48.1 Downloaded from www.Manualslib.com manuals search engine
48-91 Maintenance Manual 5 - 20 Nm(15 ft Ib) 6 - Front swivel bracket 7 - 20 Nm (15 ft lb) 8 - Adjustment bracket 9 - 20 Nm (15 ft lb) 10 - Bracket 11 - V-belts 11.5 x 685 Gas engine 11.5 x 730 Diesel engine 11.5 x 755 Gas engine with air conditioner 11.5 x 790 Diesel engine with air conditioner Tensioning Page 48-93 Checking condition 12 - 25 Nm (18 ft lb) Page 91 of 99Steering12/7/2004http://ebahn.bentleypublishers.com/vw/servlet/Display?action=Goto&type=repair&id=VW.B4.SU01.48.1 Downloaded from www.Manualslib.com manuals search engine
48-92 13 - V-belt pulley When installing the V-belt pulley ensure that the crankshaft pulley and the vane pump pulley are aligned 14 - Shim Only installed on vehicles with Diesel engine 15 - 20 Nm (15 ft lb) 16 - Rear swivel bracket 17 - Vane pump Checking delivery pressure Page 48-13 Page 92 of 99Steering12/7/2004http://ebahn.bentleypublishers.com/vw/servlet/Display?action=Goto&type=repair&id=VW.B4.SU01.48.1 Downloaded from www.Manualslib.com manuals search engine
48-93 V-belts, tensioning (4-Cyl. engines) Specification: - Tension V-belts by turning adjustment bolt with torque wrench -A- (VAG 1410 and VAG 1410/2). Used belts, 4 Nm (35 in. Ib) New belts, 7 Nm (62 in. Ib) Note: Nut 4 - is only installed on gasoline engines. - Tighten adjustment clamping bolt -3- to 25 Nm (18 ft lb). - Tighten bolt -1- to 45 Nm (33 ft lb). - Tighten bolt -2- and nut -4- to 25 Nm (18 ft lb). Page 93 of 99Steering12/7/2004http://ebahn.bentleypublishers.com/vw/servlet/Display?action=Goto&type=repair&id=VW.B4.SU01.48.1 Downloaded from www.Manualslib.com manuals search engine
48-94 Assembly overview: Pressure and cooling lines (vehicles with VR6 engine) Note: Securing of pressure line varies according to type of transmission Fig. 1 and Fig. 2 1 - Reservoir 2 - Suction hose Reservoir - Cooling line 3 - Cooling line Secured to crossmember item 8 4 - Pressure line 5 - Suction line Cooling line - Hydraulic pump 6 - Hose clamp, 3 Nm (27 in. Ib) Page 94 of 99Steering12/7/2004http://ebahn.bentleypublishers.com/vw/servlet/Display?action=Goto&type=repair&id=VW.B4.SU01.48.1 Downloaded from www.Manualslib.com manuals search engine
48-95 7 - Hydraulic pump 8 - Seal Always replace 9 - Pressure line union 10 - Banjo bolt, 35 Nm (26 ft lb) 11 - Hex bolt, 10 Nm (7 ft lb) 12 - Hose clamp, 3 Nm (27 in. Ib) 13 - Return line Power steering gear - Reservoir Page 95 of 99Steering12/7/2004http://ebahn.bentleypublishers.com/vw/servlet/Display?action=Goto&type=repair&id=VW.B4.SU01.48.1 Downloaded from www.Manualslib.com manuals search engine
48-96 Fig. 1 Pressure hose, securing (vehicles with manual transmission) Fig. 2 Pressure hose, securing (vehicles with automatic transmission) Page 96 of 99Steering12/7/2004http://ebahn.bentleypublishers.com/vw/servlet/Display?action=Goto&type=repair&id=VW.B4.SU01.48.1 Downloaded from www.Manualslib.com manuals search engine
48-97 Power steering vane pump, removing and installing (vehicles with VR6 engine] Note: Always replace seals. Do not reuse drained hydraulic oil. Pumps supplied as spare parts are not filled with oil. Fill the pump with G 002 000 hydraulic oil and rotate it by hand, otherwise the pump may be damaged or noisy during operation. 1 - Suction hose A cooling line is installed between vane pump suction hose and reservoir 2 - Hose clamp Page 97 of 99Steering12/7/2004http://ebahn.bentleypublishers.com/vw/servlet/Display?action=Goto&type=repair&id=VW.B4.SU01.48.1 Downloaded from www.Manualslib.com manuals search engine
48-98 Repair Manual, Engine Mechanics; Repair Group13 Repair Manual, Engine Mechanics; Repair Group13 Repair Manual, Maintenance 3 - Pressure hose Attachment varies according to type of transmission Page 48-96 4 - Seal 5 - Banjo bolt, 30 Nm (22 ft lb) 6 - Vane pump Checking delivery pressure Page 48-13 7 - Ribbed belts Removing Tensioning ensured by tensioning roller Belt routing Checking condition 8 - Belt pulley Page 98 of 99Steering12/7/2004http://ebahn.bentleypublishers.com/vw/servlet/Display?action=Goto&type=repair&id=VW.B4.SU01.48.1 Downloaded from www.Manualslib.com manuals search engine
48-99 9 - Hex socket head bolt, 25 Nm (18 ft lb) 10 - Hex bolt, M8 x 30, 25 Nm (18 ft lb) 11 - Hex socket head bolt, M8 x 30, 25 Nm (18 ft lb) 12 - Hex socket head bolt, M8 x 20, 25 Nm (18 ft lb) 13 - Hex socket head bolt, M8 x 30, 25 Nm (18 ft lb) 14 - Hex bolt, M8 x 30, 25 Nm (18 ft lb) 15 - Bracket On vehicles with air conditioner can only be removed having first removed the air conditioner bracket Page 99 of 99Steering12/7/2004http://ebahn.bentleypublishers.com/vw/servlet/Display?action=Goto&type=repair&id=VW.B4.SU01.48.1