- Download PDF Manual
-
Downloaded from www.Manualslib.com manuals search engine
Protected by copyright. Copying for private or commercial purposes, in partor in whole, is not permitted unless authorised by Volkswagen AG. Volkswagen AG does notguarantee or accept any liability with respect to the correctness ofinformation in this document.Copyright by Volkswagen AG.Workshop ManualGolf Variant 2007 ➤Jetta 2005 ➤General body repairs, exteriorEdition 10.2009ServiceService Department. Technical Information Downloaded from www.Manualslib.com manuals search engine
Protected by copyright. Copying for private or commercial purposes, in partor in whole, is not permitted unless authorised by Volkswagen AG. Volkswagen AG does notguarantee or accept any liability with respect to the correctness ofinformation in this document.Copyright by Volkswagen AG.List of Workshop Manual Repair GroupsList of Workshop ManualRepair GroupsList of Workshop Manual Repair GroupsRepair Group50 - Body - front55 - Bonnet, rear lid57 - Front doors, door components, central locking58 - Rear doors, door components60 - Sunroof63 - Bumpers64 - Glazing66 - Exterior equipmentTechnical information should always be available to the foremen and mechanics, because theircareful and constant adherence to the instructions is essential to ensure vehicle road-worthiness andsafety. In addition, the normal basic safety precautions for working on motor vehicles must, as amatter of course, be observed.ServiceAll rights reserved.No reproduction without prior agreement from publisher.Copyright © 2010 Volkswagen AG, WolfsburgMEX5R005620 Downloaded from www.Manualslib.com manuals search engine
Protected by copyright. Copying for private or commercial purposes, in partor in whole, is not permitted unless authorised by Volkswagen AG. Volkswagen AG does notguarantee or accept any liability with respect to the correctness ofinformation in this document.Copyright by Volkswagen AG.Contents50 - Body - front . . . . . . . . . . . . . . . . . . . . . . . . . . . . . . . . . . . . . . . . . . . . . . . . . . . . . .11Lock carrier . . . . . . . . . . . . . . . . . . . . . . . . . . . . . . . . . . . . . . . . . . . . . . . . . . . . . . . . . . . . . .11.1Tools . . . . . . . . . . . . . . . . . . . . . . . . . . . . . . . . . . . . . . . . . . . . . . . . . . . . . . . . . . . . . . . . . .11.2Assembly overview - lock carrier, service position . . . . . . . . . . . . . . . . . . . . . . . . . . . . . . . .21.3Service position . . . . . . . . . . . . . . . . . . . . . . . . . . . . . . . . . . . . . . . . . . . . . . . . . . . . . . . . . .21.4Removing and installing lock carrier with add-on parts . . . . . . . . . . . . . . . . . . . . . . . . . . . .42Wing . . . . . . . . . . . . . . . . . . . . . . . . . . . . . . . . . . . . . . . . . . . . . . . . . . . . . . . . . . . . . . . . . .62.1Tools . . . . . . . . . . . . . . . . . . . . . . . . . . . . . . . . . . . . . . . . . . . . . . . . . . . . . . . . . . . . . . . . . .62.2Assembly overview - front wing . . . . . . . . . . . . . . . . . . . . . . . . . . . . . . . . . . . . . . . . . . . . . .72.3Removing and installing wing . . . . . . . . . . . . . . . . . . . . . . . . . . . . . . . . . . . . . . . . . . . . . . . .72.4Removing and installing wing bracket . . . . . . . . . . . . . . . . . . . . . . . . . . . . . . . . . . . . . . . .83Noise insulation . . . . . . . . . . . . . . . . . . . . . . . . . . . . . . . . . . . . . . . . . . . . . . . . . . . . . . . . . .103.1Tools . . . . . . . . . . . . . . . . . . . . . . . . . . . . . . . . . . . . . . . . . . . . . . . . . . . . . . . . . . . . . . . . . .103.2Assembly overview - noise insulation . . . . . . . . . . . . . . . . . . . . . . . . . . . . . . . . . . . . . . . . . .114Underbody cladding . . . . . . . . . . . . . . . . . . . . . . . . . . . . . . . . . . . . . . . . . . . . . . . . . . . . . .124.1Tools . . . . . . . . . . . . . . . . . . . . . . . . . . . . . . . . . . . . . . . . . . . . . . . . . . . . . . . . . . . . . . . . . .124.2Assembly overview - underbody cladding . . . . . . . . . . . . . . . . . . . . . . . . . . . . . . . . . . . . . .134.3Assembly overview - rear underbody cladding . . . . . . . . . . . . . . . . . . . . . . . . . . . . . . . . . .145Plenum chamber bulkhead . . . . . . . . . . . . . . . . . . . . . . . . . . . . . . . . . . . . . . . . . . . . . . . . . .155.1Tools . . . . . . . . . . . . . . . . . . . . . . . . . . . . . . . . . . . . . . . . . . . . . . . . . . . . . . . . . . . . . . . . . .155.2Assembly overview - plenum chamber bulkhead . . . . . . . . . . . . . . . . . . . . . . . . . . . . . . . .1555 - Bonnet, rear lid . . . . . . . . . . . . . . . . . . . . . . . . . . . . . . . . . . . . . . . . . . . . . . . . . . . .161Bonnet . . . . . . . . . . . . . . . . . . . . . . . . . . . . . . . . . . . . . . . . . . . . . . . . . . . . . . . . . . . . . . . .161.1Tools . . . . . . . . . . . . . . . . . . . . . . . . . . . . . . . . . . . . . . . . . . . . . . . . . . . . . . . . . . . . . . . . . .161.2Assembly overview - bonnet . . . . . . . . . . . . . . . . . . . . . . . . . . . . . . . . . . . . . . . . . . . . . . . .171.3Removing and installing bonnet . . . . . . . . . . . . . . . . . . . . . . . . . . . . . . . . . . . . . . . . . . . . . .171.4Removing gas strut . . . . . . . . . . . . . . . . . . . . . . . . . . . . . . . . . . . . . . . . . . . . . . . . . . . . . .191.5Releasing gas from gas strut . . . . . . . . . . . . . . . . . . . . . . . . . . . . . . . . . . . . . . . . . . . . . . . .191.6Removing and installing lid hinge . . . . . . . . . . . . . . . . . . . . . . . . . . . . . . . . . . . . . . . . . . . .191.7Removing and installing insulation . . . . . . . . . . . . . . . . . . . . . . . . . . . . . . . . . . . . . . . . . . . .201.8Assembly overview - bonnet latch and release components . . . . . . . . . . . . . . . . . . . . . . . .231.9Removing and installing bonnet lock . . . . . . . . . . . . . . . . . . . . . . . . . . . . . . . . . . . . . . . . . .231.10Disconnecting Bowden cable . . . . . . . . . . . . . . . . . . . . . . . . . . . . . . . . . . . . . . . . . . . . . . . .241.11Adjusting bonnet . . . . . . . . . . . . . . . . . . . . . . . . . . . . . . . . . . . . . . . . . . . . . . . . . . . . . . . . . .251.12Removing and installing release lever . . . . . . . . . . . . . . . . . . . . . . . . . . . . . . . . . . . . . . . .272Rear lid (saloon) . . . . . . . . . . . . . . . . . . . . . . . . . . . . . . . . . . . . . . . . . . . . . . . . . . . . . . . . . .292.1Tools . . . . . . . . . . . . . . . . . . . . . . . . . . . . . . . . . . . . . . . . . . . . . . . . . . . . . . . . . . . . . . . . . .292.2Assembly overview - rear lid . . . . . . . . . . . . . . . . . . . . . . . . . . . . . . . . . . . . . . . . . . . . . . . .292.3Removing and installing rear lid . . . . . . . . . . . . . . . . . . . . . . . . . . . . . . . . . . . . . . . . . . . . . .302.4Removing gas strut . . . . . . . . . . . . . . . . . . . . . . . . . . . . . . . . . . . . . . . . . . . . . . . . . . . . . .302.5Releasing gas from gas strut . . . . . . . . . . . . . . . . . . . . . . . . . . . . . . . . . . . . . . . . . . . . . . . .312.6Removing and installing lid hinge . . . . . . . . . . . . . . . . . . . . . . . . . . . . . . . . . . . . . . . . . . . .312.7Removing and installing striker pin . . . . . . . . . . . . . . . . . . . . . . . . . . . . . . . . . . . . . . . . . . . .322.8Adjusting rear lid . . . . . . . . . . . . . . . . . . . . . . . . . . . . . . . . . . . . . . . . . . . . . . . . . . . . . . . . . .332.9Assembly overview - lid lock and lock cylinder carrier . . . . . . . . . . . . . . . . . . . . . . . . . . . .352.10Removing and installing lock cylinder . . . . . . . . . . . . . . . . . . . . . . . . . . . . . . . . . . . . . . . .352.11Removing and installing handle trim . . . . . . . . . . . . . . . . . . . . . . . . . . . . . . . . . . . . . . . . . .362.12Removing and installing lid lock . . . . . . . . . . . . . . . . . . . . . . . . . . . . . . . . . . . . . . . . . . . . . .362.13Rear lid seal . . . . . . . . . . . . . . . . . . . . . . . . . . . . . . . . . . . . . . . . . . . . . . . . . . . . . . . . . . . .372.14Removing and installing rear lid seal . . . . . . . . . . . . . . . . . . . . . . . . . . . . . . . . . . . . . . . . . .383Rear lid (Variant) . . . . . . . . . . . . . . . . . . . . . . . . . . . . . . . . . . . . . . . . . . . . . . . . . . . . . . . .39Golf Variant 2007 ➤ , Jetta 2005 ➤General body repairs, exterior - Edition 10.2009Contents i Downloaded from www.Manualslib.com manuals search engine
Protected by copyright. Copying for private or commercial purposes, in partor in whole, is not permitted unless authorised by Volkswagen AG. Volkswagen AG does notguarantee or accept any liability with respect to the correctness ofinformation in this document.Copyright by Volkswagen AG.3.1Tools . . . . . . . . . . . . . . . . . . . . . . . . . . . . . . . . . . . . . . . . . . . . . . . . . . . . . . . . . . . . . . . . . .393.2Assembly overview - rear lid . . . . . . . . . . . . . . . . . . . . . . . . . . . . . . . . . . . . . . . . . . . . . . . .393.3Removing and installing rear lid . . . . . . . . . . . . . . . . . . . . . . . . . . . . . . . . . . . . . . . . . . . . . .403.4Removing and installing gas strut . . . . . . . . . . . . . . . . . . . . . . . . . . . . . . . . . . . . . . . . . . . .413.5Releasing gas from gas strut . . . . . . . . . . . . . . . . . . . . . . . . . . . . . . . . . . . . . . . . . . . . . . . .423.6Removing and installing rear lid hinge . . . . . . . . . . . . . . . . . . . . . . . . . . . . . . . . . . . . . . . .423.7Adjusting rear lid . . . . . . . . . . . . . . . . . . . . . . . . . . . . . . . . . . . . . . . . . . . . . . . . . . . . . . . . . .443.8Removing and installing release button . . . . . . . . . . . . . . . . . . . . . . . . . . . . . . . . . . . . . . . .473.9Removing and installing lid lock . . . . . . . . . . . . . . . . . . . . . . . . . . . . . . . . . . . . . . . . . . . . . .483.10Rear lid seal . . . . . . . . . . . . . . . . . . . . . . . . . . . . . . . . . . . . . . . . . . . . . . . . . . . . . . . . . . . .503.11Removing and installing rear lid seal . . . . . . . . . . . . . . . . . . . . . . . . . . . . . . . . . . . . . . . . . .513.12Registration plate carrier . . . . . . . . . . . . . . . . . . . . . . . . . . . . . . . . . . . . . . . . . . . . . . . . . .534Fuel tank flap unit (saloon) . . . . . . . . . . . . . . . . . . . . . . . . . . . . . . . . . . . . . . . . . . . . . . . . . .544.1Assembly overview - tank flap unit . . . . . . . . . . . . . . . . . . . . . . . . . . . . . . . . . . . . . . . . . . . .544.2Removing and installing tank flap unit . . . . . . . . . . . . . . . . . . . . . . . . . . . . . . . . . . . . . . . .544.3Removing and installing tank filler flap locking motor V155 . . . . . . . . . . . . . . . . . . . . . . . .565Fuel tank flap unit (Variant) . . . . . . . . . . . . . . . . . . . . . . . . . . . . . . . . . . . . . . . . . . . . . . . .585.1Assembly overview - tank flap unit . . . . . . . . . . . . . . . . . . . . . . . . . . . . . . . . . . . . . . . . . . . .585.2Removing and installing tank flap unit . . . . . . . . . . . . . . . . . . . . . . . . . . . . . . . . . . . . . . . .585.3Removing and installing tank filler flap locking motor V155 . . . . . . . . . . . . . . . . . . . . . . . .6057 - Front doors, door components, central locking . . . . . . . . . . . . . . . . . . . . . . . . . .631Front door . . . . . . . . . . . . . . . . . . . . . . . . . . . . . . . . . . . . . . . . . . . . . . . . . . . . . . . . . . . . . .631.1Tools . . . . . . . . . . . . . . . . . . . . . . . . . . . . . . . . . . . . . . . . . . . . . . . . . . . . . . . . . . . . . . . . . .631.2Materials . . . . . . . . . . . . . . . . . . . . . . . . . . . . . . . . . . . . . . . . . . . . . . . . . . . . . . . . . . . . . . . .641.3Assembly overview - door assembly . . . . . . . . . . . . . . . . . . . . . . . . . . . . . . . . . . . . . . . . . .641.4Assembly overview - door hinges . . . . . . . . . . . . . . . . . . . . . . . . . . . . . . . . . . . . . . . . . . . .661.5Removing and installing door . . . . . . . . . . . . . . . . . . . . . . . . . . . . . . . . . . . . . . . . . . . . . . . .681.6Adjusting door . . . . . . . . . . . . . . . . . . . . . . . . . . . . . . . . . . . . . . . . . . . . . . . . . . . . . . . . . .701.7Removing and installing outer panel on door . . . . . . . . . . . . . . . . . . . . . . . . . . . . . . . . . . . .731.8Installing new outer panel on door . . . . . . . . . . . . . . . . . . . . . . . . . . . . . . . . . . . . . . . . . . . .761.9Removing and installing retaining rail on door outer panel . . . . . . . . . . . . . . . . . . . . . . . .801.10Installation notes for bonding a new outer panel on door . . . . . . . . . . . . . . . . . . . . . . . . . .821.11Minimum curing period . . . . . . . . . . . . . . . . . . . . . . . . . . . . . . . . . . . . . . . . . . . . . . . . . . . .821.12Cleaning off excess adhesive sealing material . . . . . . . . . . . . . . . . . . . . . . . . . . . . . . . . . .831.13Assembly overview - door inner part . . . . . . . . . . . . . . . . . . . . . . . . . . . . . . . . . . . . . . . . . .841.14Assembly overview - door handle and door lock . . . . . . . . . . . . . . . . . . . . . . . . . . . . . . . .851.15Removing and installing housing . . . . . . . . . . . . . . . . . . . . . . . . . . . . . . . . . . . . . . . . . . . .861.16Removing and installing door handle . . . . . . . . . . . . . . . . . . . . . . . . . . . . . . . . . . . . . . . . . .861.17Removing and installing bearing bracket . . . . . . . . . . . . . . . . . . . . . . . . . . . . . . . . . . . . . .891.18Removing and installing door lock . . . . . . . . . . . . . . . . . . . . . . . . . . . . . . . . . . . . . . . . . . . .901.19Assembly overview - side impact protection . . . . . . . . . . . . . . . . . . . . . . . . . . . . . . . . . . . .921.20Door inner seal . . . . . . . . . . . . . . . . . . . . . . . . . . . . . . . . . . . . . . . . . . . . . . . . . . . . . . . . . .921.21Removing and installing door inner seal . . . . . . . . . . . . . . . . . . . . . . . . . . . . . . . . . . . . . .931.22Removing and installing door outer seal . . . . . . . . . . . . . . . . . . . . . . . . . . . . . . . . . . . . . .942Central locking . . . . . . . . . . . . . . . . . . . . . . . . . . . . . . . . . . . . . . . . . . . . . . . . . . . . . . . . . .982.1Fitting location overview - central locking components . . . . . . . . . . . . . . . . . . . . . . . . . . . .982.2Adapting keys with remote control . . . . . . . . . . . . . . . . . . . . . . . . . . . . . . . . . . . . . . . . . . . .1002.3Assembly overview - battery for folding key with remote control . . . . . . . . . . . . . . . . . . . .1002.4Removing and installing battery for folding key with remote control . . . . . . . . . . . . . . . . . .10158 - Rear doors, door components . . . . . . . . . . . . . . . . . . . . . . . . . . . . . . . . . . . . . . . .1021Rear door (saloon) . . . . . . . . . . . . . . . . . . . . . . . . . . . . . . . . . . . . . . . . . . . . . . . . . . . . . . . .1021.1Tools . . . . . . . . . . . . . . . . . . . . . . . . . . . . . . . . . . . . . . . . . . . . . . . . . . . . . . . . . . . . . . . . . .1021.2Materials . . . . . . . . . . . . . . . . . . . . . . . . . . . . . . . . . . . . . . . . . . . . . . . . . . . . . . . . . . . . . . . .103Golf Variant 2007 ➤ , Jetta 2005 ➤General body repairs, exterior - Edition 10.2009ii Contents Downloaded from www.Manualslib.com manuals search engine
Protected by copyright. Copying for private or commercial purposes, in partor in whole, is not permitted unless authorised by Volkswagen AG. Volkswagen AG does notguarantee or accept any liability with respect to the correctness ofinformation in this document.Copyright by Volkswagen AG.1.3Assembly overview - door assembly . . . . . . . . . . . . . . . . . . . . . . . . . . . . . . . . . . . . . . . . . .1031.4Assembly overview - door hinges . . . . . . . . . . . . . . . . . . . . . . . . . . . . . . . . . . . . . . . . . . . .1051.5Removing and installing door . . . . . . . . . . . . . . . . . . . . . . . . . . . . . . . . . . . . . . . . . . . . . . . .1071.6Adjusting door . . . . . . . . . . . . . . . . . . . . . . . . . . . . . . . . . . . . . . . . . . . . . . . . . . . . . . . . . .1091.7Removing and installing outer panel on door . . . . . . . . . . . . . . . . . . . . . . . . . . . . . . . . . . . .1121.8Installing new outer panel on door . . . . . . . . . . . . . . . . . . . . . . . . . . . . . . . . . . . . . . . . . . . .1151.9Removing and installing retaining rail on door outer panel . . . . . . . . . . . . . . . . . . . . . . . .1191.10Installation notes for bonding a new outer panel on door . . . . . . . . . . . . . . . . . . . . . . . . . .1211.11Minimum curing period . . . . . . . . . . . . . . . . . . . . . . . . . . . . . . . . . . . . . . . . . . . . . . . . . . . .1211.12Cleaning off excess adhesive sealing material . . . . . . . . . . . . . . . . . . . . . . . . . . . . . . . . . .1221.13Assembly overview - door inner part . . . . . . . . . . . . . . . . . . . . . . . . . . . . . . . . . . . . . . . . . .1231.14Assembly overview - door handle and door lock . . . . . . . . . . . . . . . . . . . . . . . . . . . . . . . .1241.15Removing and installing housing . . . . . . . . . . . . . . . . . . . . . . . . . . . . . . . . . . . . . . . . . . . .1241.16Removing and installing door handle . . . . . . . . . . . . . . . . . . . . . . . . . . . . . . . . . . . . . . . . . .1251.17Removing bearing bracket . . . . . . . . . . . . . . . . . . . . . . . . . . . . . . . . . . . . . . . . . . . . . . . . . .1271.18Removing and installing door lock . . . . . . . . . . . . . . . . . . . . . . . . . . . . . . . . . . . . . . . . . . . .1291.19Assembly overview - side impact protection . . . . . . . . . . . . . . . . . . . . . . . . . . . . . . . . . . . .1311.20Door inner seals . . . . . . . . . . . . . . . . . . . . . . . . . . . . . . . . . . . . . . . . . . . . . . . . . . . . . . . . . .1311.21Removing and installing door inner seal . . . . . . . . . . . . . . . . . . . . . . . . . . . . . . . . . . . . . .1321.22Removing and installing door outer seal . . . . . . . . . . . . . . . . . . . . . . . . . . . . . . . . . . . . . .1332Rear door (Variant) . . . . . . . . . . . . . . . . . . . . . . . . . . . . . . . . . . . . . . . . . . . . . . . . . . . . . . . .1372.1Tools . . . . . . . . . . . . . . . . . . . . . . . . . . . . . . . . . . . . . . . . . . . . . . . . . . . . . . . . . . . . . . . . . .1372.2Assembly overview - rear door . . . . . . . . . . . . . . . . . . . . . . . . . . . . . . . . . . . . . . . . . . . . . .1382.3Assembly overview - door hinges . . . . . . . . . . . . . . . . . . . . . . . . . . . . . . . . . . . . . . . . . . . .1382.4Removing and installing door . . . . . . . . . . . . . . . . . . . . . . . . . . . . . . . . . . . . . . . . . . . . . . . .1402.5Adjusting door . . . . . . . . . . . . . . . . . . . . . . . . . . . . . . . . . . . . . . . . . . . . . . . . . . . . . . . . . .1422.6Assembly overview - assembly carrier . . . . . . . . . . . . . . . . . . . . . . . . . . . . . . . . . . . . . . . .1442.7Removing and installing assembly carrier . . . . . . . . . . . . . . . . . . . . . . . . . . . . . . . . . . . . . .1452.8Assembly overview - door handle and door lock . . . . . . . . . . . . . . . . . . . . . . . . . . . . . . . .1502.9Removing and installing housing . . . . . . . . . . . . . . . . . . . . . . . . . . . . . . . . . . . . . . . . . . . .1512.10Removing and installing door handle . . . . . . . . . . . . . . . . . . . . . . . . . . . . . . . . . . . . . . . . . .1512.11Removing and installing bearing bracket . . . . . . . . . . . . . . . . . . . . . . . . . . . . . . . . . . . . . .1542.12Removing and installing door lock . . . . . . . . . . . . . . . . . . . . . . . . . . . . . . . . . . . . . . . . . . . .1552.13Door inner seals . . . . . . . . . . . . . . . . . . . . . . . . . . . . . . . . . . . . . . . . . . . . . . . . . . . . . . . . . .1552.14Removing and installing door inner seal . . . . . . . . . . . . . . . . . . . . . . . . . . . . . . . . . . . . . .1562.15Removing and installing door outer seal . . . . . . . . . . . . . . . . . . . . . . . . . . . . . . . . . . . . . .15760 - Sunroof . . . . . . . . . . . . . . . . . . . . . . . . . . . . . . . . . . . . . . . . . . . . . . . . . . . . . . . .1611Sliding/tilting sunroof with glass panel (Meritor) . . . . . . . . . . . . . . . . . . . . . . . . . . . . . . . . . .1611.1Tools . . . . . . . . . . . . . . . . . . . . . . . . . . . . . . . . . . . . . . . . . . . . . . . . . . . . . . . . . . . . . . . . . .1611.2Function . . . . . . . . . . . . . . . . . . . . . . . . . . . . . . . . . . . . . . . . . . . . . . . . . . . . . . . . . . . . . . . .1611.3Assembly overview - sliding/tilting sunroof with glass panel . . . . . . . . . . . . . . . . . . . . . . . .1631.4Removing and installing bellows . . . . . . . . . . . . . . . . . . . . . . . . . . . . . . . . . . . . . . . . . . . .1641.5Removing and installing sliding/tilting sunroof glass panel . . . . . . . . . . . . . . . . . . . . . . . .1661.6Adjusting height of sliding/tilting sunroof glass panel . . . . . . . . . . . . . . . . . . . . . . . . . . . . . .1671.7Adjusting panel seal . . . . . . . . . . . . . . . . . . . . . . . . . . . . . . . . . . . . . . . . . . . . . . . . . . . . . .1681.8Renewing panel seal . . . . . . . . . . . . . . . . . . . . . . . . . . . . . . . . . . . . . . . . . . . . . . . . . . . . . .1691.9Removing and installing wind deflector . . . . . . . . . . . . . . . . . . . . . . . . . . . . . . . . . . . . . . . .1691.10Removing and installing sliding headliner . . . . . . . . . . . . . . . . . . . . . . . . . . . . . . . . . . . . . .1701.11Removing and installing sliding/tilting sunroof glass panel drive . . . . . . . . . . . . . . . . . . . .1711.12Adjusting drive for sliding/tilting sunroof glass panel (0 position) . . . . . . . . . . . . . . . . . . . .1721.13Removing and installing sliding/tilting sunroof glass panel automatic preselection switch . . . . . . . . . . . . . . . . . . . . . . . . . . . . . . . . . . . . . . . . . . . . . . . . . . . . . . . . . . . . . . . . . . . . . . . .1721.14Checking parallel running . . . . . . . . . . . . . . . . . . . . . . . . . . . . . . . . . . . . . . . . . . . . . . . . . .1721.15Adjusting parallel running . . . . . . . . . . . . . . . . . . . . . . . . . . . . . . . . . . . . . . . . . . . . . . . . . .1731.16Assembly overview - carrier unit . . . . . . . . . . . . . . . . . . . . . . . . . . . . . . . . . . . . . . . . . . . .174Golf Variant 2007 ➤ , Jetta 2005 ➤General body repairs, exterior - Edition 10.2009Contents iii Downloaded from www.Manualslib.com manuals search engine
Protected by copyright. Copying for private or commercial purposes, in partor in whole, is not permitted unless authorised by Volkswagen AG. Volkswagen AG does notguarantee or accept any liability with respect to the correctness ofinformation in this document.Copyright by Volkswagen AG.1.17Removing and installing carrier unit . . . . . . . . . . . . . . . . . . . . . . . . . . . . . . . . . . . . . . . . . .1741.18Operating without current . . . . . . . . . . . . . . . . . . . . . . . . . . . . . . . . . . . . . . . . . . . . . . . . . .1771.19Removing and installing guide plate . . . . . . . . . . . . . . . . . . . . . . . . . . . . . . . . . . . . . . . . . .1771.20Removing and installing guide plate . . . . . . . . . . . . . . . . . . . . . . . . . . . . . . . . . . . . . . . . . .1781.21Cleaning water drain hoses . . . . . . . . . . . . . . . . . . . . . . . . . . . . . . . . . . . . . . . . . . . . . . . .1792Panorama sliding sunroof (Arvin-Meritor) . . . . . . . . . . . . . . . . . . . . . . . . . . . . . . . . . . . . . .1822.1Tools . . . . . . . . . . . . . . . . . . . . . . . . . . . . . . . . . . . . . . . . . . . . . . . . . . . . . . . . . . . . . . . . . .1822.2Function . . . . . . . . . . . . . . . . . . . . . . . . . . . . . . . . . . . . . . . . . . . . . . . . . . . . . . . . . . . . . . . .1822.3Establishing reference points of panorama sliding roof . . . . . . . . . . . . . . . . . . . . . . . . . . . .1832.4Assembly overview - panorama sliding roof . . . . . . . . . . . . . . . . . . . . . . . . . . . . . . . . . . . .1842.5Removing and installing front glass panel . . . . . . . . . . . . . . . . . . . . . . . . . . . . . . . . . . . . . .1852.6Removing and installing rear glass panel . . . . . . . . . . . . . . . . . . . . . . . . . . . . . . . . . . . . . .1872.7Adjusting height of front and rear glass panel . . . . . . . . . . . . . . . . . . . . . . . . . . . . . . . . . .1882.8Renewing seals for rear glass panel . . . . . . . . . . . . . . . . . . . . . . . . . . . . . . . . . . . . . . . . . .1902.9Renewing outer seal . . . . . . . . . . . . . . . . . . . . . . . . . . . . . . . . . . . . . . . . . . . . . . . . . . . . . .1912.10Renewing inner seal . . . . . . . . . . . . . . . . . . . . . . . . . . . . . . . . . . . . . . . . . . . . . . . . . . . . . .1932.11Removing and installing wind deflector . . . . . . . . . . . . . . . . . . . . . . . . . . . . . . . . . . . . . . . .1932.12Removing and installing wind deflector bracket . . . . . . . . . . . . . . . . . . . . . . . . . . . . . . . . . .1952.13Removing and installing preselector for glass panel and sun blind . . . . . . . . . . . . . . . . . .1962.14Removing and installing sliding sunroof motor . . . . . . . . . . . . . . . . . . . . . . . . . . . . . . . . . .1962.15Removing and installing sun blind motor . . . . . . . . . . . . . . . . . . . . . . . . . . . . . . . . . . . . . .1982.16Removing and installing sun blind . . . . . . . . . . . . . . . . . . . . . . . . . . . . . . . . . . . . . . . . . . . .1992.17Assembly overview - assembly frame . . . . . . . . . . . . . . . . . . . . . . . . . . . . . . . . . . . . . . . .2032.18Installing and removing motor plate and sun blind cable . . . . . . . . . . . . . . . . . . . . . . . . . .2042.19Removing and installing assembly frame . . . . . . . . . . . . . . . . . . . . . . . . . . . . . . . . . . . . . .2072.20Removing and installing rear part . . . . . . . . . . . . . . . . . . . . . . . . . . . . . . . . . . . . . . . . . . . .2092.21Removing and installing front motor plate . . . . . . . . . . . . . . . . . . . . . . . . . . . . . . . . . . . . . .2122.22Removing and installing tilting mechanism and front glass panel cable . . . . . . . . . . . . . .2152.23Maintenance and care . . . . . . . . . . . . . . . . . . . . . . . . . . . . . . . . . . . . . . . . . . . . . . . . . . . .2172.24Operating without current . . . . . . . . . . . . . . . . . . . . . . . . . . . . . . . . . . . . . . . . . . . . . . . . . .2172.25Cleaning water drain hoses . . . . . . . . . . . . . . . . . . . . . . . . . . . . . . . . . . . . . . . . . . . . . . . .21963 - Bumpers . . . . . . . . . . . . . . . . . . . . . . . . . . . . . . . . . . . . . . . . . . . . . . . . . . . . . . . .2221Front bumper . . . . . . . . . . . . . . . . . . . . . . . . . . . . . . . . . . . . . . . . . . . . . . . . . . . . . . . . . . . .2221.1Tools . . . . . . . . . . . . . . . . . . . . . . . . . . . . . . . . . . . . . . . . . . . . . . . . . . . . . . . . . . . . . . . . . .2221.2Repairing bumper cover . . . . . . . . . . . . . . . . . . . . . . . . . . . . . . . . . . . . . . . . . . . . . . . . . . . .2221.3Assembly overview - bumper cover . . . . . . . . . . . . . . . . . . . . . . . . . . . . . . . . . . . . . . . . . .2231.4Removing and installing front bumper cover . . . . . . . . . . . . . . . . . . . . . . . . . . . . . . . . . . . .2231.5Front bumper cover add-on parts . . . . . . . . . . . . . . . . . . . . . . . . . . . . . . . . . . . . . . . . . . . .2251.6Front bumper cover substructure parts . . . . . . . . . . . . . . . . . . . . . . . . . . . . . . . . . . . . . . . .2271.7Assembly overview - bumper carrier . . . . . . . . . . . . . . . . . . . . . . . . . . . . . . . . . . . . . . . . . .2281.8Installing small registration plate carrier . . . . . . . . . . . . . . . . . . . . . . . . . . . . . . . . . . . . . . . .2282Front bumper, Cup Edition . . . . . . . . . . . . . . . . . . . . . . . . . . . . . . . . . . . . . . . . . . . . . . . . . .2292.1Front bumper cover . . . . . . . . . . . . . . . . . . . . . . . . . . . . . . . . . . . . . . . . . . . . . . . . . . . . . .2293Rear bumper (saloon) . . . . . . . . . . . . . . . . . . . . . . . . . . . . . . . . . . . . . . . . . . . . . . . . . . . .2363.1Tools . . . . . . . . . . . . . . . . . . . . . . . . . . . . . . . . . . . . . . . . . . . . . . . . . . . . . . . . . . . . . . . . . .2363.2Repairing bumper cover . . . . . . . . . . . . . . . . . . . . . . . . . . . . . . . . . . . . . . . . . . . . . . . . . . . .2363.3Assembly overview - bumper cover . . . . . . . . . . . . . . . . . . . . . . . . . . . . . . . . . . . . . . . . . .2373.4Removing and installing bumper cover . . . . . . . . . . . . . . . . . . . . . . . . . . . . . . . . . . . . . . . .2373.5Rear bumper cover with add-on parts . . . . . . . . . . . . . . . . . . . . . . . . . . . . . . . . . . . . . . . .2393.6Rear bumper cover substructure parts . . . . . . . . . . . . . . . . . . . . . . . . . . . . . . . . . . . . . . . .2403.7Assembly overview - bumper carrier . . . . . . . . . . . . . . . . . . . . . . . . . . . . . . . . . . . . . . . . . .2414Rear bumper, saloon, Cup Edition . . . . . . . . . . . . . . . . . . . . . . . . . . . . . . . . . . . . . . . . . . . .2424.1Rear bumper cover, saloon . . . . . . . . . . . . . . . . . . . . . . . . . . . . . . . . . . . . . . . . . . . . . . . .2425Rear bumper (Variant) . . . . . . . . . . . . . . . . . . . . . . . . . . . . . . . . . . . . . . . . . . . . . . . . . . . .249Golf Variant 2007 ➤ , Jetta 2005 ➤General body repairs, exterior - Edition 10.2009iv Contents Downloaded from www.Manualslib.com manuals search engine
Protected by copyright. Copying for private or commercial purposes, in partor in whole, is not permitted unless authorised by Volkswagen AG. Volkswagen AG does notguarantee or accept any liability with respect to the correctness ofinformation in this document.Copyright by Volkswagen AG.5.1Tools . . . . . . . . . . . . . . . . . . . . . . . . . . . . . . . . . . . . . . . . . . . . . . . . . . . . . . . . . . . . . . . . . .2495.2Repairing bumper cover . . . . . . . . . . . . . . . . . . . . . . . . . . . . . . . . . . . . . . . . . . . . . . . . . . . .2495.3Assembly overview - bumper cover . . . . . . . . . . . . . . . . . . . . . . . . . . . . . . . . . . . . . . . . . .2505.4Removing and installing bumper cover . . . . . . . . . . . . . . . . . . . . . . . . . . . . . . . . . . . . . . . .2505.5Rear bumper cover with add-on parts . . . . . . . . . . . . . . . . . . . . . . . . . . . . . . . . . . . . . . . .2535.6Rear bumper cover substructure parts . . . . . . . . . . . . . . . . . . . . . . . . . . . . . . . . . . . . . . . .2545.7Assembly overview - bumper carrier . . . . . . . . . . . . . . . . . . . . . . . . . . . . . . . . . . . . . . . . . .2555.8Assembly overview - towing bracket . . . . . . . . . . . . . . . . . . . . . . . . . . . . . . . . . . . . . . . . . .2565.9Removing and installing towing bracket . . . . . . . . . . . . . . . . . . . . . . . . . . . . . . . . . . . . . . . .25664 - Glazing . . . . . . . . . . . . . . . . . . . . . . . . . . . . . . . . . . . . . . . . . . . . . . . . . . . . . . . . . .2591Flush bonded windows . . . . . . . . . . . . . . . . . . . . . . . . . . . . . . . . . . . . . . . . . . . . . . . . . . . .2591.1Tools . . . . . . . . . . . . . . . . . . . . . . . . . . . . . . . . . . . . . . . . . . . . . . . . . . . . . . . . . . . . . . . . . .2591.2Materials . . . . . . . . . . . . . . . . . . . . . . . . . . . . . . . . . . . . . . . . . . . . . . . . . . . . . . . . . . . . . . . .2601.3Assembly overview - windscreen . . . . . . . . . . . . . . . . . . . . . . . . . . . . . . . . . . . . . . . . . . . .2611.4Assembly overview - plenum chamber cover . . . . . . . . . . . . . . . . . . . . . . . . . . . . . . . . . . . .2621.5Removing and installing plenum chamber cover . . . . . . . . . . . . . . . . . . . . . . . . . . . . . . . .2621.6Removing and installing windscreen . . . . . . . . . . . . . . . . . . . . . . . . . . . . . . . . . . . . . . . . . .2641.7Assembly overview - rear window (saloon) . . . . . . . . . . . . . . . . . . . . . . . . . . . . . . . . . . . .2661.8Removing and installing rear window (saloon) . . . . . . . . . . . . . . . . . . . . . . . . . . . . . . . . . .2661.9Assembly overview - rear window (Variant) . . . . . . . . . . . . . . . . . . . . . . . . . . . . . . . . . . . .2691.10Removing and installing rear window (Variant) . . . . . . . . . . . . . . . . . . . . . . . . . . . . . . . . . .2691.11Assembly overview - side window (Variant) . . . . . . . . . . . . . . . . . . . . . . . . . . . . . . . . . . . .2711.12Removing undamaged side window (Variant) . . . . . . . . . . . . . . . . . . . . . . . . . . . . . . . . . .2721.13Removing broken side window (Variant) . . . . . . . . . . . . . . . . . . . . . . . . . . . . . . . . . . . . . .2731.14Installing side window (Variant) . . . . . . . . . . . . . . . . . . . . . . . . . . . . . . . . . . . . . . . . . . . . . .2731.15Preparing old undamaged window for glazing . . . . . . . . . . . . . . . . . . . . . . . . . . . . . . . . . .2741.16Preparing new window for glazing . . . . . . . . . . . . . . . . . . . . . . . . . . . . . . . . . . . . . . . . . . . .2741.17Touching up paint damage . . . . . . . . . . . . . . . . . . . . . . . . . . . . . . . . . . . . . . . . . . . . . . . . . .2751.18Preparing body flange for glazing . . . . . . . . . . . . . . . . . . . . . . . . . . . . . . . . . . . . . . . . . . . .2751.19Installation instructions . . . . . . . . . . . . . . . . . . . . . . . . . . . . . . . . . . . . . . . . . . . . . . . . . . . .2761.20Minimum curing period . . . . . . . . . . . . . . . . . . . . . . . . . . . . . . . . . . . . . . . . . . . . . . . . . . . .2761.21Touching up paint damage . . . . . . . . . . . . . . . . . . . . . . . . . . . . . . . . . . . . . . . . . . . . . . . . . .2761.22Cleaning off excess adhesive sealing material . . . . . . . . . . . . . . . . . . . . . . . . . . . . . . . . . .2772Front door windows . . . . . . . . . . . . . . . . . . . . . . . . . . . . . . . . . . . . . . . . . . . . . . . . . . . . . .2782.1Tools . . . . . . . . . . . . . . . . . . . . . . . . . . . . . . . . . . . . . . . . . . . . . . . . . . . . . . . . . . . . . . . . . .2782.2Assembly overview- front door window . . . . . . . . . . . . . . . . . . . . . . . . . . . . . . . . . . . . . . . .2792.3Removing and installing door window . . . . . . . . . . . . . . . . . . . . . . . . . . . . . . . . . . . . . . . .2792.4Adjusting door window . . . . . . . . . . . . . . . . . . . . . . . . . . . . . . . . . . . . . . . . . . . . . . . . . . . .2822.5Assembly overview - window regulator motor . . . . . . . . . . . . . . . . . . . . . . . . . . . . . . . . . .2842.6Removing and installing window regulator motor . . . . . . . . . . . . . . . . . . . . . . . . . . . . . . . .2842.7Assembly overview - window channel . . . . . . . . . . . . . . . . . . . . . . . . . . . . . . . . . . . . . . . .2872.8Removing and installing window channel . . . . . . . . . . . . . . . . . . . . . . . . . . . . . . . . . . . . . .2872.9Removing and installing window channel trim strip . . . . . . . . . . . . . . . . . . . . . . . . . . . . . .2892.10Assembly overview - window regulator . . . . . . . . . . . . . . . . . . . . . . . . . . . . . . . . . . . . . . . .2912.11Removing and installing window regulator . . . . . . . . . . . . . . . . . . . . . . . . . . . . . . . . . . . . . .2913Rear door window (saloon) . . . . . . . . . . . . . . . . . . . . . . . . . . . . . . . . . . . . . . . . . . . . . . . .2933.1Tools . . . . . . . . . . . . . . . . . . . . . . . . . . . . . . . . . . . . . . . . . . . . . . . . . . . . . . . . . . . . . . . . . .2933.2Assembly overview - rear door window . . . . . . . . . . . . . . . . . . . . . . . . . . . . . . . . . . . . . . . .2943.3Removing and installing door window . . . . . . . . . . . . . . . . . . . . . . . . . . . . . . . . . . . . . . . .2943.4Assembly overview - door with fixed window with window channel . . . . . . . . . . . . . . . . . .2973.5Removing and installing door with fixed window with window channel . . . . . . . . . . . . . . . .2973.6Removing and installing window channel trim strip . . . . . . . . . . . . . . . . . . . . . . . . . . . . . .3003.7Assembly overview - window regulator motor . . . . . . . . . . . . . . . . . . . . . . . . . . . . . . . . . .3023.8Removing and installing window regulator motor . . . . . . . . . . . . . . . . . . . . . . . . . . . . . . . .3023.9Assembly overview - window regulator . . . . . . . . . . . . . . . . . . . . . . . . . . . . . . . . . . . . . . . .305Golf Variant 2007 ➤ , Jetta 2005 ➤General body repairs, exterior - Edition 10.2009Contents v Downloaded from www.Manualslib.com manuals search engine
Protected by copyright. Copying for private or commercial purposes, in partor in whole, is not permitted unless authorised by Volkswagen AG. Volkswagen AG does notguarantee or accept any liability with respect to the correctness ofinformation in this document.Copyright by Volkswagen AG.3.10Removing and installing window regulator . . . . . . . . . . . . . . . . . . . . . . . . . . . . . . . . . . . . . .3054Rear door window (Variant) . . . . . . . . . . . . . . . . . . . . . . . . . . . . . . . . . . . . . . . . . . . . . . . .3074.1Tools . . . . . . . . . . . . . . . . . . . . . . . . . . . . . . . . . . . . . . . . . . . . . . . . . . . . . . . . . . . . . . . . . .3074.2Assembly overview - rear door window . . . . . . . . . . . . . . . . . . . . . . . . . . . . . . . . . . . . . . . .3084.3Removing and installing door window . . . . . . . . . . . . . . . . . . . . . . . . . . . . . . . . . . . . . . . .3084.4Removing and installing window slot outer seal . . . . . . . . . . . . . . . . . . . . . . . . . . . . . . . . . .3104.5Assembly overview - door with fixed window with window channel . . . . . . . . . . . . . . . . . .3114.6Removing and installing door with fixed window with window channel . . . . . . . . . . . . . . . .3124.7Removing and installing window channel trim strip . . . . . . . . . . . . . . . . . . . . . . . . . . . . . .3164.8Assembly overview - window regulator motor . . . . . . . . . . . . . . . . . . . . . . . . . . . . . . . . . .3174.9Removing and installing window regulator motor . . . . . . . . . . . . . . . . . . . . . . . . . . . . . . . .31766 - Exterior equipment . . . . . . . . . . . . . . . . . . . . . . . . . . . . . . . . . . . . . . . . . . . . . . . .3201Wheel housing liner . . . . . . . . . . . . . . . . . . . . . . . . . . . . . . . . . . . . . . . . . . . . . . . . . . . . . .3201.1Tools . . . . . . . . . . . . . . . . . . . . . . . . . . . . . . . . . . . . . . . . . . . . . . . . . . . . . . . . . . . . . . . . . .3201.2Assembly overview - front wheel housing liner . . . . . . . . . . . . . . . . . . . . . . . . . . . . . . . . . .3211.3Removing and installing front wheel housing liner . . . . . . . . . . . . . . . . . . . . . . . . . . . . . . . .3211.4Assembly overview - rear wheel housing liner . . . . . . . . . . . . . . . . . . . . . . . . . . . . . . . . . .3231.5Removing and installing rear wheel housing liner . . . . . . . . . . . . . . . . . . . . . . . . . . . . . . . .3231.6Installing protective cover for wheel housing . . . . . . . . . . . . . . . . . . . . . . . . . . . . . . . . . . . .3242Exterior mirror . . . . . . . . . . . . . . . . . . . . . . . . . . . . . . . . . . . . . . . . . . . . . . . . . . . . . . . . . . . .3262.1Tools . . . . . . . . . . . . . . . . . . . . . . . . . . . . . . . . . . . . . . . . . . . . . . . . . . . . . . . . . . . . . . . . . .3262.2Assembly overview - exterior mirror . . . . . . . . . . . . . . . . . . . . . . . . . . . . . . . . . . . . . . . . . .3272.3Removing and installing mirror glass . . . . . . . . . . . . . . . . . . . . . . . . . . . . . . . . . . . . . . . . . .3282.4Removing and installing mirror housing . . . . . . . . . . . . . . . . . . . . . . . . . . . . . . . . . . . . . . . .3282.5Removing and installing trim . . . . . . . . . . . . . . . . . . . . . . . . . . . . . . . . . . . . . . . . . . . . . . . .3292.6Removing and installing side turn signal repeaters . . . . . . . . . . . . . . . . . . . . . . . . . . . . . .3302.7Removing and installing entry light . . . . . . . . . . . . . . . . . . . . . . . . . . . . . . . . . . . . . . . . . . . .3302.8Removing and installing adjustment unit with motor for exterior mirror . . . . . . . . . . . . . . . .3312.9Removing and installing exterior mirror . . . . . . . . . . . . . . . . . . . . . . . . . . . . . . . . . . . . . . . .3313Roof railing . . . . . . . . . . . . . . . . . . . . . . . . . . . . . . . . . . . . . . . . . . . . . . . . . . . . . . . . . . . . . .3333.1Tools . . . . . . . . . . . . . . . . . . . . . . . . . . . . . . . . . . . . . . . . . . . . . . . . . . . . . . . . . . . . . . . . . .3333.2Assembly overview - roof railing . . . . . . . . . . . . . . . . . . . . . . . . . . . . . . . . . . . . . . . . . . . . . .3343.3Removing and installing roof railing . . . . . . . . . . . . . . . . . . . . . . . . . . . . . . . . . . . . . . . . . .3344Radiator grille . . . . . . . . . . . . . . . . . . . . . . . . . . . . . . . . . . . . . . . . . . . . . . . . . . . . . . . . . . . .3364.1Tools . . . . . . . . . . . . . . . . . . . . . . . . . . . . . . . . . . . . . . . . . . . . . . . . . . . . . . . . . . . . . . . . . .3364.2Radiator grille . . . . . . . . . . . . . . . . . . . . . . . . . . . . . . . . . . . . . . . . . . . . . . . . . . . . . . . . . . . .3374.3Radiator grille, Cup Edition . . . . . . . . . . . . . . . . . . . . . . . . . . . . . . . . . . . . . . . . . . . . . . . . . .3405Mouldings and trims . . . . . . . . . . . . . . . . . . . . . . . . . . . . . . . . . . . . . . . . . . . . . . . . . . . . . .3445.1Tools . . . . . . . . . . . . . . . . . . . . . . . . . . . . . . . . . . . . . . . . . . . . . . . . . . . . . . . . . . . . . . . . . .3445.2Removing and installing side panel trim strips on GLI vehicles . . . . . . . . . . . . . . . . . . . . . .3455.3Side member extension, Jetta Cup Edition . . . . . . . . . . . . . . . . . . . . . . . . . . . . . . . . . . . .3466Special add-on parts . . . . . . . . . . . . . . . . . . . . . . . . . . . . . . . . . . . . . . . . . . . . . . . . . . . . . .3516.1Safety requirements . . . . . . . . . . . . . . . . . . . . . . . . . . . . . . . . . . . . . . . . . . . . . . . . . . . . . .3516.2Fitting notes for extensions . . . . . . . . . . . . . . . . . . . . . . . . . . . . . . . . . . . . . . . . . . . . . . . .3516.3Materials . . . . . . . . . . . . . . . . . . . . . . . . . . . . . . . . . . . . . . . . . . . . . . . . . . . . . . . . . . . . . . . .3516.4Special add-on parts, Jetta Cup Edition . . . . . . . . . . . . . . . . . . . . . . . . . . . . . . . . . . . . . . . .3526.5Preparing body kit component for bonding . . . . . . . . . . . . . . . . . . . . . . . . . . . . . . . . . . . . . .3526.6Preparing new add-on part for bonding . . . . . . . . . . . . . . . . . . . . . . . . . . . . . . . . . . . . . . . .3536.7Installation instructions . . . . . . . . . . . . . . . . . . . . . . . . . . . . . . . . . . . . . . . . . . . . . . . . . . . .3536.8Minimum curing period . . . . . . . . . . . . . . . . . . . . . . . . . . . . . . . . . . . . . . . . . . . . . . . . . . . .3546.9Touching up paint damage . . . . . . . . . . . . . . . . . . . . . . . . . . . . . . . . . . . . . . . . . . . . . . . . . .3546.10Cleaning off excess adhesive sealing material . . . . . . . . . . . . . . . . . . . . . . . . . . . . . . . . . .3547Protective backing . . . . . . . . . . . . . . . . . . . . . . . . . . . . . . . . . . . . . . . . . . . . . . . . . . . . . . . .3557.1Scuff protection film . . . . . . . . . . . . . . . . . . . . . . . . . . . . . . . . . . . . . . . . . . . . . . . . . . . . . .355Golf Variant 2007 ➤ , Jetta 2005 ➤General body repairs, exterior - Edition 10.2009vi Contents Downloaded from www.Manualslib.com manuals search engine
Protected by copyright. Copying for private or commercial purposes, in partor in whole, is not permitted unless authorised by Volkswagen AG. Volkswagen AG does notguarantee or accept any liability with respect to the correctness ofinformation in this document.Copyright by Volkswagen AG.8Lettering . . . . . . . . . . . . . . . . . . . . . . . . . . . . . . . . . . . . . . . . . . . . . . . . . . . . . . . . . . . . . . . .3578.1Tools . . . . . . . . . . . . . . . . . . . . . . . . . . . . . . . . . . . . . . . . . . . . . . . . . . . . . . . . . . . . . . . . . .3578.2Installation instructions for lettering and emblems . . . . . . . . . . . . . . . . . . . . . . . . . . . . . . . .3578.3Rear lettering dimensions (saloon) . . . . . . . . . . . . . . . . . . . . . . . . . . . . . . . . . . . . . . . . . . . .3588.4Rear lettering dimensions (Variant) . . . . . . . . . . . . . . . . . . . . . . . . . . . . . . . . . . . . . . . . . .3598.5Side lettering dimensions - Individual . . . . . . . . . . . . . . . . . . . . . . . . . . . . . . . . . . . . . . . . . .361Golf Variant 2007 ➤ , Jetta 2005 ➤General body repairs, exterior - Edition 10.2009Contents vii Downloaded from www.Manualslib.com manuals search engine
Protected by copyright. Copying for private or commercial purposes, in partor in whole, is not permitted unless authorised by Volkswagen AG. Volkswagen AG does notguarantee or accept any liability with respect to the correctness ofinformation in this document.Copyright by Volkswagen AG.Golf Variant 2007 ➤ , Jetta 2005 ➤General body repairs, exterior - Edition 10.2009viii Contents Downloaded from www.Manualslib.com manuals search engine
Protected by copyright. Copying for private or commercial purposes, in partor in whole, is not permitted unless authorised by Volkswagen AG. Volkswagen AG does notguarantee or accept any liability with respect to the correctness ofinformation in this document.Copyright by Volkswagen AG.50 –Body - front1Lock carrier1.1ToolsSpecial tools and workshopequipment required♦Guide pins -T10093-♦Torque wrench -V.A.G1331-♦Torque wrench -V.A.G1332-Golf Variant 2007 ➤ , Jetta 2005 ➤General body repairs, exterior - Edition 10.20091. Lock carrier 1 Downloaded from www.Manualslib.com manuals search engine
Protected by copyright. Copying for private or commercial purposes, in partor in whole, is not permitted unless authorised by Volkswagen AG. Volkswagen AG does notguarantee or accept any liability with respect to the correctness ofinformation in this document.Copyright by Volkswagen AG.1.2Assembly overview - lock carrier, service position1 - Lock carrier with add-onparts❑Removing and installing⇒ page 4❑Service position⇒ page 22 - Bolt❑Qty. 4❑8 Nm3 - Bolt❑Qty. 8❑60 Nm1.3Service position1.3.1Moving to service position–Remove front bumper cover ⇒ page 223 .–Remove air duct from lock carrier -1- ⇒ Rep. Gr. 24 ; Repair‐ing injection system .–Unhook Bowden cable from coupling for bonnet release⇒ page 24–If vehicle has charge air cooler, disconnect pressure hoses⇒ page 4 .–Unscrew horn -4- with bracket on right side of longitudinalmember ⇒ Electrical system; Rep. Gr. 96 ; Horn .–Pull connector off high-pressure sender -G65- ⇒ Heating, airconditioning system; Rep. Gr. 87 .–Remove bolts -3- from left and right longitudinal members.Golf Variant 2007 ➤ , Jetta 2005 ➤General body repairs, exterior - Edition 10.20092 Rep. Gr.50 - Body - front Downloaded from www.Manualslib.com manuals search engine
Protected by copyright. Copying for private or commercial purposes, in partor in whole, is not permitted unless authorised by Volkswagen AG. Volkswagen AG does notguarantee or accept any liability with respect to the correctness ofinformation in this document.Copyright by Volkswagen AG.–Attach special tool guide pins -T10093- to left and right longi‐tudinal members.–Remove bolts -2- on left and right from upper part of lock car‐rier -1-.–The lock carrier -1- can be pulled forwards on the guide pins-T10093- .NoteIf necessary, disconnect upper coolant hose from radiator, but drain coolant first ⇒ Rep. Gr. 19 ; Removingand installing parts of coolant system .1.3.2Moving from service positionInstall in reverse order of removal.–Align lock carrier on longitudinal members and between wings⇒ Body Repairs; Rep. Gr. 00 ; Body dimensions .Golf Variant 2007 ➤ , Jetta 2005 ➤General body repairs, exterior - Edition 10.20091. Lock carrier 3 Downloaded from www.Manualslib.com manuals search engine
Protected by copyright. Copying for private or commercial purposes, in partor in whole, is not permitted unless authorised by Volkswagen AG. Volkswagen AG does notguarantee or accept any liability with respect to the correctness ofinformation in this document.Copyright by Volkswagen AG.Note♦Ensure that the charge air cooler pressure hoses are properlyengaged again.♦Hoses and lines must not be pinched.♦If necessary, replenish coolant ⇒ Rep. Gr. 19 ; Removing andinstalling parts of coolant system .1.3.3Releasing pressure hoses–Release push-on coupling -1- and pull pressure hose -2- indirection of -arrow- out of coupling.During installation of pressure hoses, ensure that push-on cou‐pling engages audibly.1.4Removing and installing lock carrier withadd-on parts1.4.1RemovingNote♦Because the lock carrier is a safety-relevant component, it must not be repaired.♦If damaged, the lock carrier must be renewed.–Set lock carrier with add-on parts -1- to service position⇒ page 2 .–Disconnect all electrical connectors.–Drain coolant and disconnect coolant hoses ⇒ Rep. Gr. 19 ;Removing and installing parts of coolant system .–Disconnect lines for condenser ⇒ Heating, air conditioningsystem; Rep. Gr. 87 .–Together with a second mechanic, unscrew guide pins -T10093- from left and right longitudinal member and lift lockcarrier out -1-.CautionDo not start the engine if the air conditioning system and/or thecoolant system lines are disconnected.Golf Variant 2007 ➤ , Jetta 2005 ➤General body repairs, exterior - Edition 10.20094 Rep. Gr.50 - Body - front Downloaded from www.Manualslib.com manuals search engine
Protected by copyright. Copying for private or commercial purposes, in partor in whole, is not permitted unless authorised by Volkswagen AG. Volkswagen AG does notguarantee or accept any liability with respect to the correctness ofinformation in this document.Copyright by Volkswagen AG.Note♦Do not hang condenser and hydraulic oil cooler from lines.♦Do not kink lines for condenser and hydraulic systems.1.4.2InstallingInstall in reverse order of removal.During assembly, ensure that all connectors and hose connec‐tions are properly installed.–Align lock carrier on longitudinal members and between wings⇒ Body Repairs; Rep. Gr. 00 ; Body dimensions .Golf Variant 2007 ➤ , Jetta 2005 ➤General body repairs, exterior - Edition 10.20091. Lock carrier 5 Downloaded from www.Manualslib.com manuals search engine
Protected by copyright. Copying for private or commercial purposes, in partor in whole, is not permitted unless authorised by Volkswagen AG. Volkswagen AG does notguarantee or accept any liability with respect to the correctness ofinformation in this document.Copyright by Volkswagen AG.2Wing2.1ToolsSpecial tools and workshop equipment required♦Torque wrench -V.A.G 1783-Golf Variant 2007 ➤ , Jetta 2005 ➤General body repairs, exterior - Edition 10.20096 Rep. Gr.50 - Body - front Downloaded from www.Manualslib.com manuals search engine
Protected by copyright. Copying for private or commercial purposes, in partor in whole, is not permitted unless authorised by Volkswagen AG. Volkswagen AG does notguarantee or accept any liability with respect to the correctness ofinformation in this document.Copyright by Volkswagen AG.2.2Assembly overview - front wingNoteOnly the left side is shown. The right side is similar.1 - Wing❑Removing and installing⇒ page 72 - Bolt❑Qty. 2, A-pillar❑Qty. 2, side member❑Qty. 2, wing bracket❑Qty. 3, wing connectionpiece❑6 Nm3 - Foam element❑Loosely inserted be‐tween wing and top oflongitudinal member4 - Wing bracket❑Removing and installing⇒ page 85 - Moulded foam element❑Inserted on top of longi‐tudinal member❑Bonds to wing6 - Hexagon nut❑Qty. 1, on wing connec‐tion piece❑6 Nm2.3Removing and installing wingNoteThe removal and installation sequence is only described for theleft wing. The removal and installation of the right wing is similar.2.3.1Removing–Remove front bumper cover ⇒ page 223 .–Remove front and rear parts of wheel housing liner⇒ page 321 .–Remove guide ⇒ Item 4 (page 227) .Golf Variant 2007 ➤ , Jetta 2005 ➤General body repairs, exterior - Edition 10.20092. Wing 7 Downloaded from www.Manualslib.com manuals search engine
Protected by copyright. Copying for private or commercial purposes, in partor in whole, is not permitted unless authorised by Volkswagen AG. Volkswagen AG does notguarantee or accept any liability with respect to the correctness ofinformation in this document.Copyright by Volkswagen AG.–Loosen hexagon nut -6- and remove bolts -2-.–Pull out foam element -3- between wing and longitudinal mem‐ber and remove wing -1-.2.3.2InstallingInstall in reverse order of removal.Ensure parallelism and gap dimensions are maintained ⇒ BodyRepairs; Rep. Gr. 00 ; Body dimensions .2.4Removing and installing wing bracketNoteThe removal and installation sequence is described for the leftwing bracket. The removal and installation of the right wing brack‐et is similar.2.4.1Removing•The wing has been removed.Golf Variant 2007 ➤ , Jetta 2005 ➤General body repairs, exterior - Edition 10.20098 Rep. Gr.50 - Body - front Downloaded from www.Manualslib.com manuals search engine
Protected by copyright. Copying for private or commercial purposes, in partor in whole, is not permitted unless authorised by Volkswagen AG. Volkswagen AG does notguarantee or accept any liability with respect to the correctness ofinformation in this document.Copyright by Volkswagen AG.–Remove bolts -2- and remove wing bracket -1-.2.4.2Installing–Install wing bracket -1-.Specified torque for bolts -2-: 6 Nm.Wing and wing bracket must be aligned with bonnet and bumpercover ⇒ Body Repairs; Rep. Gr. 00 ; Body dimensions .Golf Variant 2007 ➤ , Jetta 2005 ➤General body repairs, exterior - Edition 10.20092. Wing 9 Downloaded from www.Manualslib.com manuals search engine
Protected by copyright. Copying for private or commercial purposes, in partor in whole, is not permitted unless authorised by Volkswagen AG. Volkswagen AG does notguarantee or accept any liability with respect to the correctness ofinformation in this document.Copyright by Volkswagen AG.3Noise insulation3.1ToolsSpecial tools and workshop equipment required♦Torque wrench -V.A.G 1783-Golf Variant 2007 ➤ , Jetta 2005 ➤General body repairs, exterior - Edition 10.200910 Rep. Gr.50 - Body - front Downloaded from www.Manualslib.com manuals search engine
Protected by copyright. Copying for private or commercial purposes, in partor in whole, is not permitted unless authorised by Volkswagen AG. Volkswagen AG does notguarantee or accept any liability with respect to the correctness ofinformation in this document.Copyright by Volkswagen AG.3.2Assembly overview - noise insulationNoteThe removal and installation procedures may have to be modified slightly depending on engine fitted.1 - Noise insulation❑-Arrow- points forwards❑To remove, unbolt bolts⇒ Item 2 (page 11)2 - Bolt❑Qty. 8❑2 NmGolf Variant 2007 ➤ , Jetta 2005 ➤General body repairs, exterior - Edition 10.20093. Noise insulation 11 Downloaded from www.Manualslib.com manuals search engine
Protected by copyright. Copying for private or commercial purposes, in partor in whole, is not permitted unless authorised by Volkswagen AG. Volkswagen AG does notguarantee or accept any liability with respect to the correctness ofinformation in this document.Copyright by Volkswagen AG.4Underbody cladding4.1ToolsSpecial tools and workshop equipment required♦Torque wrench -V.A.G 1783-Golf Variant 2007 ➤ , Jetta 2005 ➤General body repairs, exterior - Edition 10.200912 Rep. Gr.50 - Body - front Downloaded from www.Manualslib.com manuals search engine
Protected by copyright. Copying for private or commercial purposes, in partor in whole, is not permitted unless authorised by Volkswagen AG. Volkswagen AG does notguarantee or accept any liability with respect to the correctness ofinformation in this document.Copyright by Volkswagen AG.4.2Assembly overview - underbody claddingNoteOnly the left side is shown. The right side is similar.1 - Underbody cladding❑-Arrow- points forwards❑To remove, unbolt hex‐agon nuts⇒ Item 2 (page 13)2 - Hexagon nut❑Qty. 8❑1.5 Nm3 - Cover❑To remove, unbolt bolts⇒ Item 4 (page 13)4 - Bolt❑Qty. 2❑2 NmGolf Variant 2007 ➤ , Jetta 2005 ➤General body repairs, exterior - Edition 10.20094. Underbody cladding 13 Downloaded from www.Manualslib.com manuals search engine
Protected by copyright. Copying for private or commercial purposes, in partor in whole, is not permitted unless authorised by Volkswagen AG. Volkswagen AG does notguarantee or accept any liability with respect to the correctness ofinformation in this document.Copyright by Volkswagen AG.4.3Assembly overview - rear underbody cladding1 - Bolt❑Qty. 3❑2 Nm2 - Rear underbody cladding❑Installed only on rightside.❑To remove, removebolts⇒ Item 1 (page 14) andhexagon nuts⇒ Item 3 (page 14)3 - Hexagon nut❑Qty. 2❑1.5 NmGolf Variant 2007 ➤ , Jetta 2005 ➤General body repairs, exterior - Edition 10.200914 Rep. Gr.50 - Body - front Downloaded from www.Manualslib.com manuals search engine
Protected by copyright. Copying for private or commercial purposes, in partor in whole, is not permitted unless authorised by Volkswagen AG. Volkswagen AG does notguarantee or accept any liability with respect to the correctness ofinformation in this document.Copyright by Volkswagen AG.5Plenum chamber bulkhead5.1ToolsSpecial tools and workshop equipment required♦Torque wrench -V.A.G 1783-5.2Assembly overview - plenum chamber bulkhead1 - Plenum chamber bulkhead2 - Hexagon nut❑8 Nm3 - Plenum chamber bulkheadseal❑When installing bulk‐head, ensure seal is cor‐rectly seated.4 - Bolt❑8 NmGolf Variant 2007 ➤ , Jetta 2005 ➤General body repairs, exterior - Edition 10.20095. Plenum chamber bulkhead 15 Downloaded from www.Manualslib.com manuals search engine
Protected by copyright. Copying for private or commercial purposes, in partor in whole, is not permitted unless authorised by Volkswagen AG. Volkswagen AG does notguarantee or accept any liability with respect to the correctness ofinformation in this document.Copyright by Volkswagen AG.55 –Bonnet, rear lid1Bonnet1.1ToolsSpecial tools and workshop equipment required♦Torque wrench -V.A.G 1331-♦Removal lever -80-200-Golf Variant 2007 ➤ , Jetta 2005 ➤General body repairs, exterior - Edition 10.200916 Rep. Gr.55 - Bonnet, rear lid Downloaded from www.Manualslib.com manuals search engine
Protected by copyright. Copying for private or commercial purposes, in partor in whole, is not permitted unless authorised by Volkswagen AG. Volkswagen AG does notguarantee or accept any liability with respect to the correctness ofinformation in this document.Copyright by Volkswagen AG.1.2Assembly overview - bonnet1 - Bonnet❑Removing and installing⇒ page 17❑Adjusting ⇒ page 252 - Adjustment buffer❑Qty. 2❑Adjusting ⇒ page 253 - Stop buffer❑Qty. 24 - Insulation❑Removing and installing⇒ page 205 - Guide❑Qty. 26 - Lid hinge❑Removing and installing⇒ page 19❑Adjust bonnet⇒ page 25 .7 - Gas strut❑Removing ⇒ page 19❑Releasing gas⇒ page 198 - Seal❑Secured to inner bonnetwith clips1.3Removing and installing bonnet1.3.1Removing–Remove left and right washer jets -6- ⇒ Electrical system;Rep. Gr. 92 ; Windscreen washer system .–Unclip line -2- from bonnet hinge -3- and bonnet -5-.–Pull line -2- out through aperture in bonnet -5-.–Loosen hexagon nuts -1- on left and right (do not remove).Further dismantling requires the assistance of a second mechan‐ic.–Disconnect gas strut -4- from bonnet -5- ⇒ page 19 .Golf Variant 2007 ➤ , Jetta 2005 ➤General body repairs, exterior - Edition 10.20091. Bonnet 17 Downloaded from www.Manualslib.com manuals search engine
Protected by copyright. Copying for private or commercial purposes, in partor in whole, is not permitted unless authorised by Volkswagen AG. Volkswagen AG does notguarantee or accept any liability with respect to the correctness ofinformation in this document.Copyright by Volkswagen AG.–Now remove hexagon nuts -1- and lift bonnet -5- out of bonnethinges -3-.1.3.2InstallingInstall in reverse order of removal.Specified torque for bonnet hexagon nut: 22 Nm.Adjusting bonnet -1- ⇒ page 25 .–Route line -2- in an arc -arrow-. If line is installed twisted it willkink.Golf Variant 2007 ➤ , Jetta 2005 ➤General body repairs, exterior - Edition 10.200918 Rep. Gr.55 - Bonnet, rear lid Downloaded from www.Manualslib.com manuals search engine
Protected by copyright. Copying for private or commercial purposes, in partor in whole, is not permitted unless authorised by Volkswagen AG. Volkswagen AG does notguarantee or accept any liability with respect to the correctness ofinformation in this document.Copyright by Volkswagen AG.1.4Removing gas strut–Open bonnet and support it.–Position a small screwdriver beneath spring clip -2-.–Raise spring clip -2- until it can be moved over ball socket indirection of -arrow-.–Pull gas strut -1- off ball-head pins -3- and -4-.–Slide spring clip -2- back immediately after removing gas strut-1-.WARNINGProceed with care if gas strut is reused. Spring clip must notbe levered completely out of ball socket, as it will otherwise bedamaged. Gas strut will spring out of mounting, causing dam‐age or injury to operator.Specified torque for ball-head pins -3- and -4-: 22 Nm.Releasing gas from gas strut ⇒ page 191.5Releasing gas from gas strut–Clamp gas strut in vice in area marked -x- = 50 mm (2 in).WARNINGClamp gas strut only within area -x-; otherwise danger of ac‐cident!–Saw through cylinder of gas strut within first third of cylinder'soverall length using piston rod end of cylinder as referencepoint.Note♦Wear eye protection when sawing.♦Cover area of saw cut with a cloth.♦Dispose of oil and cloth via existing disposal channels.1.6Removing and installing lid hingeNoteThe removal and installation sequence is only described for theleft hinge. The removal and installation of the right hinge is similar.Golf Variant 2007 ➤ , Jetta 2005 ➤General body repairs, exterior - Edition 10.20091. Bonnet 19 Downloaded from www.Manualslib.com manuals search engine
Protected by copyright. Copying for private or commercial purposes, in partor in whole, is not permitted unless authorised by Volkswagen AG. Volkswagen AG does notguarantee or accept any liability with respect to the correctness ofinformation in this document.Copyright by Volkswagen AG.1.6.1Removing–Remove front bonnet ⇒ page 17 .–Remove bolts -2- and remove bonnet hinge -1-.1.6.2Installing–Install lid hinge -1-.Specified torque for bolts -2-: 22 Nm.–Install bonnet ⇒ page 18 .1.7Removing and installing insulation1.7.1Removing–Lever retaining clips -1- out of insulation -2- using removallever -80-200- .Golf Variant 2007 ➤ , Jetta 2005 ➤General body repairs, exterior - Edition 10.200920 Rep. Gr.55 - Bonnet, rear lid Downloaded from www.Manualslib.com manuals search engine
Protected by copyright. Copying for private or commercial purposes, in partor in whole, is not permitted unless authorised by Volkswagen AG. Volkswagen AG does notguarantee or accept any liability with respect to the correctness ofinformation in this document.Copyright by Volkswagen AG.–Pull insulation -2- out of elongated holes.1.7.2Installing–Push insulation -2- underneath gas strut and place assemblytongues in elongated holes.–Engage all retaining clips -1- in insulation -2-.Golf Variant 2007 ➤ , Jetta 2005 ➤General body repairs, exterior - Edition 10.20091. Bonnet 21 Downloaded from www.Manualslib.com manuals search engine
Protected by copyright. Copying for private or commercial purposes, in partor in whole, is not permitted unless authorised by Volkswagen AG. Volkswagen AG does notguarantee or accept any liability with respect to the correctness ofinformation in this document.Copyright by Volkswagen AG.When installing insulation -2- ensure that retaining clips -1- arefitted with wider side outwards.Golf Variant 2007 ➤ , Jetta 2005 ➤General body repairs, exterior - Edition 10.200922 Rep. Gr.55 - Bonnet, rear lid Downloaded from www.Manualslib.com manuals search engine
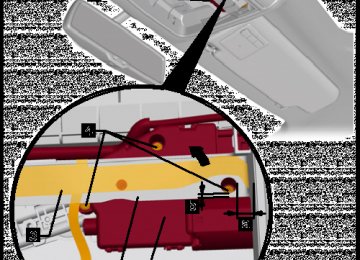
Protected by copyright. Copying for private or commercial purposes, in partor in whole, is not permitted unless authorised by Volkswagen AG. Volkswagen AG does notguarantee or accept any liability with respect to the correctness ofinformation in this document.Copyright by Volkswagen AG.1.8Assembly overview - bonnet latch and release components1 - Arrester❑To remove, unbolt bolts⇒ Item 2 (page 23)❑Adjustment is carriedout by moving arresterto left or right in elonga‐ted holes.2 - Bolt❑Qty. 3❑10 Nm3 - Expanding nut❑Qty. 24 - Mounting bracket5 - Bowden cable❑Clipped into bearingbracket6 - Bolt❑Qty. 2❑1.5 Nm7 - Release lever❑Removing and installing⇒ page 278 - Bowden cable❑Clipped onto wheelhousing and lock carrier9 - Bowden cable coupling❑Separating Bowden ca‐ble ⇒ page 2410 - Lid lock❑Removing and installing⇒ page 23❑Adjusting ⇒ page 261.9Removing and installing bonnet lock1.9.1Removing–Open bonnet.–Remove radiator grille ⇒ page 337 .–Disconnect Bowden cable ⇒ page 24 .Golf Variant 2007 ➤ , Jetta 2005 ➤General body repairs, exterior - Edition 10.20091. Bonnet 23 Downloaded from www.Manualslib.com manuals search engine
Protected by copyright. Copying for private or commercial purposes, in partor in whole, is not permitted unless authorised by Volkswagen AG. Volkswagen AG does notguarantee or accept any liability with respect to the correctness ofinformation in this document.Copyright by Volkswagen AG.–Disconnect connector -5- for bonnet contact switch -F266- .The connector is secured over the right headlight.–Unclip wiring for bonnet contact switch -F266- on lock carrier-3-.–Remove bolts -4- (Qty. 3) on lock carrier -3- and remove bon‐net lock -1- upwards.–To unclip Bowden cable -2-, press tabs on Bowden cable to‐gether -arrows-.–Fastener is released and Bowden cable -2- can be removedfrom bonnet lock -1-.1.9.2Installing–Clip Bowden cable -2- into bonnet lock -1-.–Install bonnet lock -1- into lock carrier -3-.Specified torque for bolts -4-: 12 Nm–Reconnect connector -5- for bonnet contact switch -F266- andclip wiring onto lock carrier -3-.–Install Bowden cable -2- ⇒ page 24 .–Adjust bonnet lock ⇒ page 26 .Before closing bonnet, check function of release lever and Bow‐den cable.1.10Disconnecting Bowden cable–Open bonnet.–Unclip Bowden coupling -1- above right headlight for lock car‐rier -2-.–Open Bowden cable coupling -1- upwards and remove Bow‐den cable -3- in direction of -arrow- out of Bowden cablecoupling.NoteWhen installing, ensure that the Bowden cable sleeve is insertedcorrectly and the coupling engages.Before closing bonnet, check function of release lever and Bow‐den cable.Golf Variant 2007 ➤ , Jetta 2005 ➤General body repairs, exterior - Edition 10.200924 Rep. Gr.55 - Bonnet, rear lid Downloaded from www.Manualslib.com manuals search engine
Protected by copyright. Copying for private or commercial purposes, in partor in whole, is not permitted unless authorised by Volkswagen AG. Volkswagen AG does notguarantee or accept any liability with respect to the correctness ofinformation in this document.Copyright by Volkswagen AG.1.11Adjusting bonnetFor initial adjustment of bonnet, -1-, the vehicle must be standingon the ground and the arrester be removed.–Remove latch hook -9- ⇒ Item 1 (page 23) .–Disconnect gas strut -2- from bonnet -1- ⇒ page 19 .–Bonnet -1- can be centred between wings by loosening hex‐agon nuts -5- and bolt -3- (do not remove) on left and rightbonnet hinges -4-.–Bonnet -1- can be adjusted in height to wings at rear by meansof adjustment screw -6- on left and right.–The stop buffers -7- (Qty. 2) are not used for adjustment. Theyhave the function of stabilising and damping the bonnet -1-.–The front part of the bonnet -1- can be adjusted to wing heightby using the adjustment buffers -8- (Qty. 2).Ensure that gaps are uniform ⇒ Body Repairs; Rep. Gr. 00 ; Bodydimensions .–After refitting or adjustment work, apply corrosion protectionto bonnet hinge, -4-, hexagon nuts -55- and bolts -3-.Golf Variant 2007 ➤ , Jetta 2005 ➤General body repairs, exterior - Edition 10.20091. Bonnet 25 Downloaded from www.Manualslib.com manuals search engine
Protected by copyright. Copying for private or commercial purposes, in partor in whole, is not permitted unless authorised by Volkswagen AG. Volkswagen AG does notguarantee or accept any liability with respect to the correctness ofinformation in this document.Copyright by Volkswagen AG.–After adjusting bonnet -1-, install and adjust arrester⇒ Item 1 (page 23) .1.11.1Adjusting bonnet lockIf gaps change when bonnet is closed, minor corrections can bemade via bonnet lock and arrester.–Remove radiator grille ⇒ page 337 .Golf Variant 2007 ➤ , Jetta 2005 ➤General body repairs, exterior - Edition 10.200926 Rep. Gr.55 - Bonnet, rear lid Downloaded from www.Manualslib.com manuals search engine
Protected by copyright. Copying for private or commercial purposes, in partor in whole, is not permitted unless authorised by Volkswagen AG. Volkswagen AG does notguarantee or accept any liability with respect to the correctness ofinformation in this document.Copyright by Volkswagen AG.–Now loosen bolts -1- to correct or adjust gaps at front of bonnet⇒ Body Repairs; Rep. Gr. 00 ; Body dimensions .Specified torque for bolts -1-: 12 Nm.–Adjust arrester ⇒ Item 1 (page 23) .1.12Removing and installing release lever1.12.1Removing–Pull operating lever -1- and release bonnet.–Insert a small screwdriver in gap between release lever -1- andclip -2-.–Lever clip -2- out of release lever -1- and pull off release lever.Golf Variant 2007 ➤ , Jetta 2005 ➤General body repairs, exterior - Edition 10.20091. Bonnet 27 Downloaded from www.Manualslib.com manuals search engine
Protected by copyright. Copying for private or commercial purposes, in partor in whole, is not permitted unless authorised by Volkswagen AG. Volkswagen AG does notguarantee or accept any liability with respect to the correctness ofinformation in this document.Copyright by Volkswagen AG.1.12.2Installing–Slide clip -2- completely into release lever -1-.–Then press release lever -1- onto mounting in mounting brack‐et and fasten release lever.Before closing bonnet, check function of release lever and Bow‐den cable.Golf Variant 2007 ➤ , Jetta 2005 ➤General body repairs, exterior - Edition 10.200928 Rep. Gr.55 - Bonnet, rear lid Downloaded from www.Manualslib.com manuals search engine
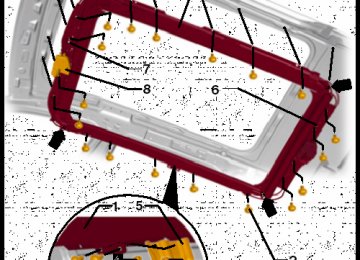
Protected by copyright. Copying for private or commercial purposes, in partor in whole, is not permitted unless authorised by Volkswagen AG. Volkswagen AG does notguarantee or accept any liability with respect to the correctness ofinformation in this document.Copyright by Volkswagen AG.2Rear lid (saloon)2.1ToolsSpecial tools and workshop equipment required♦Torque wrench -V.A.G 1331-2.2Assembly overview - rear lid1 - Hinge cover2 - Wiring harness3 - Rear lid❑Removing and installing⇒ page 30❑Adjusting ⇒ page 334 - Rear lid trim❑Removing and installing⇒ General body repairs,exterior; Rep. Gr. 70 ;Removing and installingrear lid trim5 - Adjustment buffer❑Left and right❑When installing, turn 90°anti-clockwise -arrow-❑Adjusting ⇒ page 336 - Hexagon nut❑Qty. 2❑22 Nm7 - Lid hinge❑Removing and installing⇒ page 318 - Rubber buffer9 - Bolt❑Qty. 3❑22 Nm10 - Gas strut❑Removing ⇒ page 30❑Releasing gas⇒ page 31Golf Variant 2007 ➤ , Jetta 2005 ➤General body repairs, exterior - Edition 10.20092. Rear lid (saloon) 29 Downloaded from www.Manualslib.com manuals search engine
Protected by copyright. Copying for private or commercial purposes, in partor in whole, is not permitted unless authorised by Volkswagen AG. Volkswagen AG does notguarantee or accept any liability with respect to the correctness ofinformation in this document.Copyright by Volkswagen AG.11 - Bolt❑Qty. 2❑23 Nm12 - Locking wedge❑Removing and installing ⇒ page 3213 - Pop rivet nut14 - Base for registration plate❑Different versions are possible.❑Assignment ⇒ Parts catalogue “ETKA”2.3Removing and installing rear lid2.3.1Removing–Open rear lid.–Remove rear lid trim ⇒ General body repairs, interior; Rep.Gr. 70 ; Rear lid trim .–Disconnect connectors -1- and pull wiring -2- with rubbergrommet out of lid.–Loosen hexagon nuts -3- on left and right lid hinges (do notunbolt completely).Further dismantling requires the assistance of a second mechan‐ic.–Detach gas struts -4- on left and right of rear lid ⇒ page 30 .–Now, and only now, unbolt bolts -3- and remove rear lid.2.3.2InstallingInstall in reverse order of removal.Specified torque for rear lid hexagon nut: 22 Nm.Adjust rear lid ⇒ page 33 .Before closing rear lid, check function of lid release components.2.4Removing gas strut–Open rear lid and support it.Golf Variant 2007 ➤ , Jetta 2005 ➤General body repairs, exterior - Edition 10.200930 Rep. Gr.55 - Bonnet, rear lid Downloaded from www.Manualslib.com manuals search engine
Protected by copyright. Copying for private or commercial purposes, in partor in whole, is not permitted unless authorised by Volkswagen AG. Volkswagen AG does notguarantee or accept any liability with respect to the correctness ofinformation in this document.Copyright by Volkswagen AG.–Position a small screwdriver beneath spring clip -2-.–Raise spring clip -2- until it can be moved over ball socket indirection of -arrow-.–Pull gas strut -1- off ball-head pins -3- and -4-.–Slide spring clip -2- back immediately after removing gas strut-1-.WARNINGProceed with care if gas strut is reused. Spring clip must notbe levered completely out of ball socket, as it will otherwise bedamaged. Gas strut will spring out of mounting, causing dam‐age or injury to operator.Releasing gas from gas strut ⇒ page 312.5Releasing gas from gas strut–Clamp gas strut in vice in area marked -x- = 50 mm (2 in).WARNINGClamp gas strut only within area -x-; otherwise danger of ac‐cident!–Saw through cylinder of gas strut within first third of cylinder'soverall length using piston rod end of cylinder as referencepoint.Note♦Wear eye protection when sawing.♦Cover area of saw cut with a cloth.♦Dispose of oil and cloth via existing disposal channels.2.6Removing and installing lid hingeNoteRemoval and installation is described for hinge on right of lid.Follow same instructions for hinge on left of lid as appropriate.2.6.1Removing–Remove rear lid ⇒ page 30Golf Variant 2007 ➤ , Jetta 2005 ➤General body repairs, exterior - Edition 10.20092. Rear lid (saloon) 31 Downloaded from www.Manualslib.com manuals search engine
Protected by copyright. Copying for private or commercial purposes, in partor in whole, is not permitted unless authorised by Volkswagen AG. Volkswagen AG does notguarantee or accept any liability with respect to the correctness ofinformation in this document.Copyright by Volkswagen AG.–Remove bolts -1- and remove lid hinge -2-.2.6.2InstallingInstall in reverse order of removal.Specified torque for lid hinge bolts: 22 NmAdjust rear lid ⇒ page 33 .Before closing rear lid, check function of lid release components.2.7Removing and installing striker pin2.7.1Removing–Remove lock carrier cover ⇒ General body repairs, interior;Rep. Gr. 70 ; Luggage and load compartment trim .–Remove bolts -1- and remove striker pin -2-.2.7.2Installing–Install striker pin -2-.Specified torque for bolts -1-: 23 Nm.Further installation is performed in reverse order of removal.Golf Variant 2007 ➤ , Jetta 2005 ➤General body repairs, exterior - Edition 10.200932 Rep. Gr.55 - Bonnet, rear lid Downloaded from www.Manualslib.com manuals search engine
Protected by copyright. Copying for private or commercial purposes, in partor in whole, is not permitted unless authorised by Volkswagen AG. Volkswagen AG does notguarantee or accept any liability with respect to the correctness ofinformation in this document.Copyright by Volkswagen AG.2.8Adjusting rear lidNote♦Vehicle must be standing on the ground to perform the basicadjustment of the rear lid.♦The rear lid lock is bolted directly to the rear lid. It does nothave elongated holes, so it cannot be adjusted.♦Adjusting buffers cannot be used to adjust rear lid as they arein some other vehicles. They have the function of stabilisingand damping the rear lid.The rear lid adjustment is described step by step below.Use setting gauge -3371- ⇒ Body Repairs; Rep. Gr. 00 ; Bodydimensions to check or set gap dimensions.–Remove gas strut ⇒ page 30 .–Adjust rear lid on rear lid hinges by loosening bolts⇒ Item 9 (page 29) .–Adjust rear lid with rear lid hinges by loosening hexagon nut⇒ Item 6 (page 29) .–Adjust adjustment buffer ⇒ page 33 .NoteThe rear lid is correctly adjusted if, when closed, it is not sunkenor raised, the gap is uniform all around and the contours align.2.8.1Adjusting adjustment bufferNoteOnly the adjustment for the right adjustment buffer is described.The adjustment for the left adjustment buffer is similar.–Loosen grub screw -1- until it is visible in rubber buffer.–Now pull detent slide out of adjustment buffer.Golf Variant 2007 ➤ , Jetta 2005 ➤General body repairs, exterior - Edition 10.20092. Rear lid (saloon) 33 Downloaded from www.Manualslib.com manuals search engine
Protected by copyright. Copying for private or commercial purposes, in partor in whole, is not permitted unless authorised by Volkswagen AG. Volkswagen AG does notguarantee or accept any liability with respect to the correctness ofinformation in this document.Copyright by Volkswagen AG.–Adjust detent slide to dimension -a- = 12.5 mm.–Close rear lid to detent position with light pressure at centre oflid.–Open rear lid again.–Screw in adjustment buffer clamping screw -1- to a depth ofdimension -a - = 25 mm.–Check setting.Golf Variant 2007 ➤ , Jetta 2005 ➤General body repairs, exterior - Edition 10.200934 Rep. Gr.55 - Bonnet, rear lid Downloaded from www.Manualslib.com manuals search engine
Protected by copyright. Copying for private or commercial purposes, in partor in whole, is not permitted unless authorised by Volkswagen AG. Volkswagen AG does notguarantee or accept any liability with respect to the correctness ofinformation in this document.Copyright by Volkswagen AG.2.9Assembly overview - lid lock and lock cylinder carrier1 - Bowden cable❑From lid lock to lock cyl‐inder2 - Connector❑For bonnet lock3 - Bowden cable❑From lid lock to emer‐gency release lever ininterior❑Only vehicles withemergency releasefrom interior4 - Rear lid trim5 - Lock cover6 - Hexagon nut❑8 Nm7 - Lid lock❑Removing and installing⇒ page 368 - Cover❑Not supplied with lid lock❑Secured on lid lock withlocking lugs9 - Handle trim❑Removing and installing⇒ page 3610 - Connector❑For registration platelighting and release but‐ton on vehicles with a re‐lease button11 - Lock cylinder❑Removing and installing ⇒ page 3512 - Connector❑For lock cylinder2.10Removing and installing lock cylinder2.10.1Removing–Removing rear lid trim ⇒ General body repairs, interior; Rep.Gr. 70 ; Rear lid trim .Golf Variant 2007 ➤ , Jetta 2005 ➤General body repairs, exterior - Edition 10.20092. Rear lid (saloon) 35 Downloaded from www.Manualslib.com manuals search engine
Protected by copyright. Copying for private or commercial purposes, in partor in whole, is not permitted unless authorised by Volkswagen AG. Volkswagen AG does notguarantee or accept any liability with respect to the correctness ofinformation in this document.Copyright by Volkswagen AG.–Disconnect connections -1- on lock cylinder.–Unhook Bowden cable -2-.–Remove nuts -3- and remove lock cylinder -4-.2.10.2InstallingInstall in reverse order of removal.Specified torque for hexagon nuts: 8 NmBefore closing rear lid, check function of lid release components.2.11Removing and installing handle trim2.11.1Removing–Removing rear lid trim ⇒ General body repairs, interior; Rep.Gr. 70 ; Rear lid trim .–Remove lock cylinder ⇒ page 35 .–Disconnect connector -5-.–Remove nuts -6- and remove handle trim -7-.2.11.2InstallingInstall in reverse order of removal.Specified torque for hexagon nuts: 8 NmBefore closing rear lid, check function of lid release components.2.12Removing and installing lid lock2.12.1Removing–Remove lock cover ⇒ Item 5 (page 35) .–Removing rear lid trim ⇒ General body repairs, interior; Rep.Gr. 70 ; Rear lid trim .Golf Variant 2007 ➤ , Jetta 2005 ➤General body repairs, exterior - Edition 10.200936 Rep. Gr.55 - Bonnet, rear lid Downloaded from www.Manualslib.com manuals search engine
Protected by copyright. Copying for private or commercial purposes, in partor in whole, is not permitted unless authorised by Volkswagen AG. Volkswagen AG does notguarantee or accept any liability with respect to the correctness ofinformation in this document.Copyright by Volkswagen AG.–Remove cover cap -1-.–Disconnect connector -2- from lid lock -5-.–Unhook Bowden cable -3-.–Remove remove hexagon nuts -4- and remove lid lock -5-.–If lid lock -5- is renewed, Bowden cable -6- must be unhooked.2.12.2InstallingInstall in reverse order of removal.Specified torque for hexagon nuts: 8 NmBefore closing rear lid, check function of lid release components.2.13Rear lid sealDuring production, a sealant is applied to the rear lid seals, theseal is then placed on the rear lid flange and rolled on.Note♦When seals are removed, the sealant will spread to the insideof the seal and the flanks will be bent out slightly. If the seal isthen refitted, a leak-free tight seal is not guaranteed.♦Therefore each seal which is removed completely should bereplaced by a so-called “tap-on” seal.♦If a seal has been partially removed, squeeze sides of sealtogether before refitting.Golf Variant 2007 ➤ , Jetta 2005 ➤General body repairs, exterior - Edition 10.20092. Rear lid (saloon) 37 Downloaded from www.Manualslib.com manuals search engine
Protected by copyright. Copying for private or commercial purposes, in partor in whole, is not permitted unless authorised by Volkswagen AG. Volkswagen AG does notguarantee or accept any liability with respect to the correctness ofinformation in this document.Copyright by Volkswagen AG.2.14Removing and installing rear lid seal2.14.1Removing–Pull rear lid seal -1- off body flange.2.14.2Installing–Align rear lid seal -1- so that the vulcanised point -arrow- islocated to the middle of the left tail light cluster.Golf Variant 2007 ➤ , Jetta 2005 ➤General body repairs, exterior - Edition 10.200938 Rep. Gr.55 - Bonnet, rear lid Downloaded from www.Manualslib.com manuals search engine
Protected by copyright. Copying for private or commercial purposes, in partor in whole, is not permitted unless authorised by Volkswagen AG. Volkswagen AG does notguarantee or accept any liability with respect to the correctness ofinformation in this document.Copyright by Volkswagen AG.3Rear lid (Variant)3.1ToolsSpecial tools and workshop equipment required♦Torque wrench 5…50 Nm -V.A.G 1331-3.2Assembly overview - rear lid1 - Rear lid❑Removing and installing⇒ page 40❑Adjusting ⇒ page 442 - Lid lock❑Removing and installing⇒ page 483 - Stop4 - Striker pin❑Adjusting ⇒ page 455 - Hinge❑Removing and installing⇒ page 426 - Gas strut❑Removing and installing⇒ page 41❑Releasing gas⇒ page 427 - Adjustment buffer❑Adjusting ⇒ page 468 - Rear lid trim❑Removing and installing⇒ General body repairs,interior; Rep. Gr. 70 ;Removing and installingrear lid trim9 - Button to release rear lid❑Removing and installing⇒ page 47Golf Variant 2007 ➤ , Jetta 2005 ➤General body repairs, exterior - Edition 10.20093. Rear lid (Variant) 39 Downloaded from www.Manualslib.com manuals search engine
Protected by copyright. Copying for private or commercial purposes, in partor in whole, is not permitted unless authorised by Volkswagen AG. Volkswagen AG does notguarantee or accept any liability with respect to the correctness ofinformation in this document.Copyright by Volkswagen AG.10 - Registration plate light❑Removing and installing⇒ Electrical system; Rep. Gr. 94 ; Lights, bulbs, switches - exterior11 - Rear window wiper❑Removing and installing ⇒ Electrical system; Rep. Gr. 92 ; Window washer/wiper system3.3Removing and installing rear lid3.3.1Removing–Remove rear lid trim ⇒ General body repairs, interior; Rep.Gr. 70 ; Rear lid trim .–Remove rear lid window frame trim ⇒ General body repairs,interior; Rep. Gr. 70 ; Rear lid trim .–Disconnect all connections in rear lid.–Release bellows -1- and guide electrical wiring -5- throughopening in rear lid.–Loosen bolts -3- on hinge -2- (do not remove).Further dismantling requires the assistance of a second mechan‐ic.–Remove gas strut -4- ⇒ page 41 .–Remove bolts -3-.–Remove rear lid from hinge.3.3.2InstallingFurther installation is possible only with the help of a second me‐chanic.–Position rear lid carefully on hinges.Golf Variant 2007 ➤ , Jetta 2005 ➤General body repairs, exterior - Edition 10.200940 Rep. Gr.55 - Bonnet, rear lid Downloaded from www.Manualslib.com manuals search engine
Protected by copyright. Copying for private or commercial purposes, in partor in whole, is not permitted unless authorised by Volkswagen AG. Volkswagen AG does notguarantee or accept any liability with respect to the correctness ofinformation in this document.Copyright by Volkswagen AG.–Install bolts -3-.–Guide electrical wiring -5- through opening in rear lid and se‐cure bellows -1-.–Adjust rear lid ⇒ page 44 and tighten bolts -3-, specified tor‐que: 10 Nm.–Install gas strut -4-.–Install rear lid trim ⇒ General body repairs, interior; Rep. Gr. 70 ; Rear lid trim .–Install rear lid window frame trim ⇒ General body repairs, in‐terior; Rep. Gr. 70 ; Rear lid trim .–Check adjustment of rear lid ⇒ page 44 .3.4Removing and installing gas strut–Open rear lid and support it.–Position a small screwdriver beneath spring clip -2-.–Raise spring clip -2- until it can be moved over ball socket indirection of -arrow-.–Pull gas strut -1- off ball-head pins -3- and -4-.After removing gas strut -1-, slide spring clip -2- back immediately.WARNINGProceed with care if gas strut is reused. Spring clip must notbe levered completely out of ball socket, as it will otherwise bedamaged. Gas strut will spring out of mounting, causing dam‐age or injury to operator.NoteBall sockets -3- and -4- are screwed into rear lid or body, specifiedtorque: 20 Nm.–Releasing gas from gas strut ⇒ page 42Golf Variant 2007 ➤ , Jetta 2005 ➤General body repairs, exterior - Edition 10.20093. Rear lid (Variant) 41 Downloaded from www.Manualslib.com manuals search engine
Protected by copyright. Copying for private or commercial purposes, in partor in whole, is not permitted unless authorised by Volkswagen AG. Volkswagen AG does notguarantee or accept any liability with respect to the correctness ofinformation in this document.Copyright by Volkswagen AG.3.5Releasing gas from gas strut–Clamp gas strut in vice in area marked -x- = 50 mm.WARNINGClamp gas strut only within area -x-; otherwise danger of ac‐cident!–Saw through cylinder of gas strut within first third of cylinder'soverall length using piston rod end of cylinder as referencepoint.Note♦Wear eye protection when sawing.♦Cover area of saw cut with a cloth.♦Dispose of oil and cloth via existing disposal channels.3.6Removing and installing rear lid hinge3.6.1Removing–Remove rear lid ⇒ page 40 .–Remove end strip for moulded headliner ⇒ General body re‐pairs, interior; Rep. Gr. 70 ; Trim, insulation .–Unscrew nuts -2- from studs -1-.–Remove hinge -3- from exterior.Golf Variant 2007 ➤ , Jetta 2005 ➤General body repairs, exterior - Edition 10.200942 Rep. Gr.55 - Bonnet, rear lid Downloaded from www.Manualslib.com manuals search engine
Protected by copyright. Copying for private or commercial purposes, in partor in whole, is not permitted unless authorised by Volkswagen AG. Volkswagen AG does notguarantee or accept any liability with respect to the correctness ofinformation in this document.Copyright by Volkswagen AG.3.6.2Installing–Position hinge -3- in vehicle.–Screw nuts -2- onto studs -1-.–Install rear lid ⇒ page 40 .–Align hinge to rear lid.–Specified torque for nuts -2-: 24 Nm–Check adjustment of rear lid ⇒ page 44 .Further installation is performed in reverse order of removal.Golf Variant 2007 ➤ , Jetta 2005 ➤General body repairs, exterior - Edition 10.20093. Rear lid (Variant) 43 Downloaded from www.Manualslib.com manuals search engine
Protected by copyright. Copying for private or commercial purposes, in partor in whole, is not permitted unless authorised by Volkswagen AG. Volkswagen AG does notguarantee or accept any liability with respect to the correctness ofinformation in this document.Copyright by Volkswagen AG.3.7Adjusting rear lidNote♦Vehicle must be on the ground to carry out rear lid adjustment.♦The rear lid lock -2- is bolted directly to the rear lid -1-. It does not have elongated holes, so it cannot beadjusted.♦The stop buffers -3- on the left and right are not a means of adjustment. Their purpose is to stabilise anddampen the rear lid -1-.♦The rear lid is adjusted correctly if the gaps/shut lines are even all around, the door is not too deep or doesnot stand proud and all contours align when the rear lid is closed.♦The rear lid must engage in the striker pin -4- without excessive force.The rear lid adjustment is described step by step below.Use setting gauge -3371- ⇒ Body Repairs; Rep. Gr. 00 ; Tech‐nical data; Body gap dimensions to check or adjust the gapdimensions.Golf Variant 2007 ➤ , Jetta 2005 ➤General body repairs, exterior - Edition 10.200944 Rep. Gr.55 - Bonnet, rear lid Downloaded from www.Manualslib.com manuals search engine
Protected by copyright. Copying for private or commercial purposes, in partor in whole, is not permitted unless authorised by Volkswagen AG. Volkswagen AG does notguarantee or accept any liability with respect to the correctness ofinformation in this document.Copyright by Volkswagen AG.–Rear lid can be adjusted within oversized holes of hinge -3- byloosening nut -2-.–Rear lid can be adjusted slightly at bolts -3-.–After completing adjustments, perform corrosion protectionmeasures on hinge and bolts.–Adjusting rear lid at striker pin ⇒ page 45 .–Adjusting left and right adjustment buffer ⇒ page 46 .3.7.1Adjusting striker pinNote♦Loosen bolts to slide striker pin in over-sized holes.♦Adjust striker pin so that recess of rear lid lock engages withrotary catch centrally to striker pin.–Remove lock carrier cover ⇒ General body repairs, interior;Rep. Gr. 70 ; Luggage and load compartment trim .Golf Variant 2007 ➤ , Jetta 2005 ➤General body repairs, exterior - Edition 10.20093. Rear lid (Variant) 45 Downloaded from www.Manualslib.com manuals search engine
Protected by copyright. Copying for private or commercial purposes, in partor in whole, is not permitted unless authorised by Volkswagen AG. Volkswagen AG does notguarantee or accept any liability with respect to the correctness ofinformation in this document.Copyright by Volkswagen AG.–Loosen bolts -1-.–Move striker pin -2- to upper position and tighten bolts -1-.–Close rear lid and check adjustment.The rear lid is adjusted correctly if the gaps/shut lines are evenall around, the door is not too deep or does not stand proud andall contours align when the rear lid is closed.–Specified torque for bolts -1-: 23 Nm3.7.2Adjusting adjustment buffer–Tighten stop buffer -2-, specified torque for bolt -3-: 10 Nm.–Pull cover -4- off adjustment buffer.–Loosen bolt -5- on adjustment buffer -6- slightly until adjust‐ment buffer can be moved onto stop in direction of -arrow-.–Close rear lid -1- to first detent position by applying light pres‐sure to centre area.–Open rear lid again.–Tighten bolt -5-, specified torque: 10 Nm.Golf Variant 2007 ➤ , Jetta 2005 ➤General body repairs, exterior - Edition 10.200946 Rep. Gr.55 - Bonnet, rear lid Downloaded from www.Manualslib.com manuals search engine
Protected by copyright. Copying for private or commercial purposes, in partor in whole, is not permitted unless authorised by Volkswagen AG. Volkswagen AG does notguarantee or accept any liability with respect to the correctness ofinformation in this document.Copyright by Volkswagen AG.–Press cover -4- onto adjustment buffer.3.8Removing and installing release button3.8.1Removing–Remove rear lid trim ⇒ General body repairs, interior; Rep.Gr. 70 ; Rear lid trim .Golf Variant 2007 ➤ , Jetta 2005 ➤General body repairs, exterior - Edition 10.20093. Rear lid (Variant) 47 Downloaded from www.Manualslib.com manuals search engine
Protected by copyright. Copying for private or commercial purposes, in partor in whole, is not permitted unless authorised by Volkswagen AG. Volkswagen AG does notguarantee or accept any liability with respect to the correctness ofinformation in this document.Copyright by Volkswagen AG.–Disconnect connector -3- from connection on release button-1-.–Unscrew the two nuts -2- from studs for release button andtake cover -4- off upwards.–Remove release button -1- from rear lid.In case of electrical malfunction, rear lid can be opened using lockemergency release ⇒ page 48 . Emergency release is acces‐sible through an aperture in rear lid trim.3.8.2InstallingInstall in reverse order of removal.Specified torque for nuts: 8 Nm.Before closing rear lid, check function of lid release components.3.9Removing and installing lid lock3.9.1Removing–Remove rear lid trim ⇒ General body repairs, interior; Rep.Gr. 70 ; Trim, insulation .–Disconnect connector -3- on back of lock.–Remove bolts -2- and take off lock -1- from rear lid.Golf Variant 2007 ➤ , Jetta 2005 ➤General body repairs, exterior - Edition 10.200948 Rep. Gr.55 - Bonnet, rear lid Downloaded from www.Manualslib.com manuals search engine
Protected by copyright. Copying for private or commercial purposes, in partor in whole, is not permitted unless authorised by Volkswagen AG. Volkswagen AG does notguarantee or accept any liability with respect to the correctness ofinformation in this document.Copyright by Volkswagen AG.The rear lid can be opened using emergency release -4- for elec‐trical malfunctions. Emergency release is accessible through anaperture in rear lid trim.3.9.2Installing–Reconnect connector -3- on back of lock.–Insert lock -1- into rear lid and tighten bolts -2-, specified tor‐que: 24 Nm.–Install rear lid trim ⇒ General body repairs, interior; Rep. Gr. 70 ; Trim, insulation .Golf Variant 2007 ➤ , Jetta 2005 ➤General body repairs, exterior - Edition 10.20093. Rear lid (Variant) 49 Downloaded from www.Manualslib.com manuals search engine
Protected by copyright. Copying for private or commercial purposes, in partor in whole, is not permitted unless authorised by Volkswagen AG. Volkswagen AG does notguarantee or accept any liability with respect to the correctness ofinformation in this document.Copyright by Volkswagen AG.Before closing rear lid, check function of lid release components.3.10Rear lid sealDuring production a sealant is applied to the rear lid seals, theseal is then placed on the body flange and rolled on.Note♦When seals are removed, the sealant will spread to the insideof the seal and the flanks will be bent out slightly. If the seal isthen refitted, a leak-free tight seal is not guaranteed.♦Therefore each seal which is removed completely should bereplaced by a so-called “tap-on” seal.♦If a seal has been partially removed, squeeze the sides to‐gether before installing.Golf Variant 2007 ➤ , Jetta 2005 ➤General body repairs, exterior - Edition 10.200950 Rep. Gr.55 - Bonnet, rear lid Downloaded from www.Manualslib.com manuals search engine
Protected by copyright. Copying for private or commercial purposes, in partor in whole, is not permitted unless authorised by Volkswagen AG. Volkswagen AG does notguarantee or accept any liability with respect to the correctness ofinformation in this document.Copyright by Volkswagen AG.3.11Removing and installing rear lid seal3.11.1Removing–Pull rear lid seal -1- off body flange -2-.3.11.2Installing–Align rear lid seal -1- so that vulcanised point -arrow- facescentre of left tail light.Golf Variant 2007 ➤ , Jetta 2005 ➤General body repairs, exterior - Edition 10.20093. Rear lid (Variant) 51 Downloaded from www.Manualslib.com manuals search engine
Protected by copyright. Copying for private or commercial purposes, in partor in whole, is not permitted unless authorised by Volkswagen AG. Volkswagen AG does notguarantee or accept any liability with respect to the correctness ofinformation in this document.Copyright by Volkswagen AG.Push seal -1- evenly onto body flange -2-.Golf Variant 2007 ➤ , Jetta 2005 ➤General body repairs, exterior - Edition 10.200952 Rep. Gr.55 - Bonnet, rear lid Downloaded from www.Manualslib.com manuals search engine
Protected by copyright. Copying for private or commercial purposes, in partor in whole, is not permitted unless authorised by Volkswagen AG. Volkswagen AG does notguarantee or accept any liability with respect to the correctness ofinformation in this document.Copyright by Volkswagen AG.3.12Registration plate carrier1 - Pop rivet nut❑Qty. 22 - Registration plate carrier❑Assignment ⇒ Partscatalogue“ETKA”3 - Bolt❑Qty. 2❑4 NmGolf Variant 2007 ➤ , Jetta 2005 ➤General body repairs, exterior - Edition 10.20093. Rear lid (Variant) 53 Downloaded from www.Manualslib.com manuals search engine
Protected by copyright. Copying for private or commercial purposes, in partor in whole, is not permitted unless authorised by Volkswagen AG. Volkswagen AG does notguarantee or accept any liability with respect to the correctness ofinformation in this document.Copyright by Volkswagen AG.4Fuel tank flap unit (saloon)4.1Assembly overview - tank flap unit1 - Fuel filler neck2 - Tank flap unit❑Removing and installing⇒ page 543 - Water drain hose4 - Bolt❑1.5 Nm5 - Assembly part6 - Seal7 - Release rod8 - Connector❑For tank filler flap lock‐ing motor -V155-9 - Tank filler flap locking motor-V155-❑Removing and installing⇒ page 5610 - Securing bolt❑For tank filler flap lock‐ing motor -V155-❑Qty. 2❑1.5 Nm11 - Securing bracket❑On rear right wheelhousing4.2Removing and installing tank flap unit4.2.1RemovingNoteIf fuel tank filler flap does not open, it can be opened by hand using the release rod -7-. Remove rear rightluggage compartment trim ⇒ General body repairs, interior; Rep. Gr. 70 ; Load area and luggage compartmenttrim for this.–Open fuel tank flap.–Remove tank cap.–Remove bolt -4-.Golf Variant 2007 ➤ , Jetta 2005 ➤General body repairs, exterior - Edition 10.200954 Rep. Gr.55 - Bonnet, rear lid Downloaded from www.Manualslib.com manuals search engine
Protected by copyright. Copying for private or commercial purposes, in partor in whole, is not permitted unless authorised by Volkswagen AG. Volkswagen AG does notguarantee or accept any liability with respect to the correctness ofinformation in this document.Copyright by Volkswagen AG.–Pull rubber part of tank flap unit -2- off fuel tank filler neck-1-.–Pull tank flap unit -2- with drain hose -3- to rear and swing fueltank flap unit out of side panel.–Unclip assembly part -5- out of side panel and pull assemblypart off release rod -7-.4.2.2Installing•The mounting part -5- has been pushed in.–Feed drain hose -3- through aperture in tank flap unit -2- andpull drain hose through as far as possible.–Guide drain hose into side panel.–With hinge side leading, guide tank flap unit -2- into side panel.–Then swivel tank flap unit completely onto side panel.Make sure that tank flap unit -2- locking devices engage correctlyin side panel at top and bottom.–Pull rubber part of tank flap unit over filler neck and tighten bolt-4-.Golf Variant 2007 ➤ , Jetta 2005 ➤General body repairs, exterior - Edition 10.20094. Fuel tank flap unit (saloon) 55 Downloaded from www.Manualslib.com manuals search engine
Protected by copyright. Copying for private or commercial purposes, in partor in whole, is not permitted unless authorised by Volkswagen AG. Volkswagen AG does notguarantee or accept any liability with respect to the correctness ofinformation in this document.Copyright by Volkswagen AG.Specified torque for bolt -4-: 1.5 Nm–Perform functional check of release components.4.3Removing and installing tank filler flaplocking motor -V155-4.3.1Removing–Remove luggage compartment side trim on right ⇒ Generalbody repairs, interior; Rep. Gr. 70 ; Load area and luggagecompartment trim .–Disconnect connector -8- on tank filler flap locking motor -V155- -9-.–Loosen bolts -10-.Golf Variant 2007 ➤ , Jetta 2005 ➤General body repairs, exterior - Edition 10.200956 Rep. Gr.55 - Bonnet, rear lid Downloaded from www.Manualslib.com manuals search engine
Protected by copyright. Copying for private or commercial purposes, in partor in whole, is not permitted unless authorised by Volkswagen AG. Volkswagen AG does notguarantee or accept any liability with respect to the correctness ofinformation in this document.Copyright by Volkswagen AG.–Pull tank filler flap locking motor -V155- -9- together with re‐lease rod -7- out of seal -6- and fitting -5-.4.3.2InstallingInstall in reverse order of removal.–Perform functional check of release components.Golf Variant 2007 ➤ , Jetta 2005 ➤General body repairs, exterior - Edition 10.20094. Fuel tank flap unit (saloon) 57 Downloaded from www.Manualslib.com manuals search engine
Protected by copyright. Copying for private or commercial purposes, in partor in whole, is not permitted unless authorised by Volkswagen AG. Volkswagen AG does notguarantee or accept any liability with respect to the correctness ofinformation in this document.Copyright by Volkswagen AG.5Fuel tank flap unit (Variant)5.1Assembly overview - tank flap unit1 - Fuel filler neck2 - Tank flap unit❑Removing and installing⇒ page 583 - Water drain hose4 - Bolt❑1.5 Nm5 - Tank filler flap locking motor-V155-❑Removing and installing⇒ page 606 - Wiring harness❑For tank filler flap lock‐ing motor -V155-5.2Removing and installing tank flap unit5.2.1Removing–Open fuel tank flap.–Remove tank cap.–Remove bolt -4-.–Pull rubber part of tank flap unit -2- off fuel tank filler neck-1-.–Pull tank flap unit -2- with drain hose -3- to rear and swing fueltank flap unit out of side panel.Golf Variant 2007 ➤ , Jetta 2005 ➤General body repairs, exterior - Edition 10.200958 Rep. Gr.55 - Bonnet, rear lid Downloaded from www.Manualslib.com manuals search engine
Protected by copyright. Copying for private or commercial purposes, in partor in whole, is not permitted unless authorised by Volkswagen AG. Volkswagen AG does notguarantee or accept any liability with respect to the correctness ofinformation in this document.Copyright by Volkswagen AG.5.2.2Installing–Feed drain hose -3- through aperture in tank flap unit -2- andpull drain hose through as far as possible.–Guide drain hose into side panel.–With hinge side leading, guide tank flap unit -2- into side panel.–Then swivel tank flap unit completely onto side panel.Make sure that tank flap unit -2- locking devices engage correctlyin side panel at top and bottom.–Pull rubber part of tank flap unit over filler neck and tighten bolt-4-.Specified torque for bolt -4-: 1.5 NmGolf Variant 2007 ➤ , Jetta 2005 ➤General body repairs, exterior - Edition 10.20095. Fuel tank flap unit (Variant) 59 Downloaded from www.Manualslib.com manuals search engine
Protected by copyright. Copying for private or commercial purposes, in partor in whole, is not permitted unless authorised by Volkswagen AG. Volkswagen AG does notguarantee or accept any liability with respect to the correctness ofinformation in this document.Copyright by Volkswagen AG.–Perform functional check of release components.5.3Removing and installing tank filler flaplocking motor -V155-5.3.1Removing–Remove tank flap unit ⇒ page 58 .–Unclip service cover -B- from side panel -A-.Golf Variant 2007 ➤ , Jetta 2005 ➤General body repairs, exterior - Edition 10.200960 Rep. Gr.55 - Bonnet, rear lid Downloaded from www.Manualslib.com manuals search engine
Protected by copyright. Copying for private or commercial purposes, in partor in whole, is not permitted unless authorised by Volkswagen AG. Volkswagen AG does notguarantee or accept any liability with respect to the correctness ofinformation in this document.Copyright by Volkswagen AG.–Pull service cover -B- forwards slightly.–Disconnect connector -2- on tank filler flap locking motor -V155- -1- through opening in side panel.–Push rubber grommet -4- out of side panel and pull out wiringharness -3-.–Pull tank filler flap locking motor -V155- -1- in direction of-arrow- off side panel.Golf Variant 2007 ➤ , Jetta 2005 ➤General body repairs, exterior - Edition 10.20095. Fuel tank flap unit (Variant) 61 Downloaded from www.Manualslib.com manuals search engine
Protected by copyright. Copying for private or commercial purposes, in partor in whole, is not permitted unless authorised by Volkswagen AG. Volkswagen AG does notguarantee or accept any liability with respect to the correctness ofinformation in this document.Copyright by Volkswagen AG.5.3.2Installing–Feed wiring harness -3- through opening in side panel.–Secure rubber grommet -4- on side panel.–Reconnect connector -2-.–Slide tank filler flap locking motor -V155- -1- in opposite direc‐tion of -arrow- onto side panel.–Install tank flap unit ⇒ page 59 .–Install luggage compartment side trim on right ⇒ General bodyrepairs, interior; Rep. Gr. 70 ; Load area and luggage com‐partment trim .Golf Variant 2007 ➤ , Jetta 2005 ➤General body repairs, exterior - Edition 10.200962 Rep. Gr.55 - Bonnet, rear lid Downloaded from www.Manualslib.com manuals search engine
Protected by copyright. Copying for private or commercial purposes, in partor in whole, is not permitted unless authorised by Volkswagen AG. Volkswagen AG does notguarantee or accept any liability with respect to the correctness ofinformation in this document.Copyright by Volkswagen AG.57 –Front doors, door components, central locking1Front door1.1ToolsSpecial tools and workshopequipment required♦Socket -T10072-♦Assembly tool -T10118-♦Door alignment tool -3320-with -3320/1- , -3320/2- and-3320/3-♦Roller for door insulationfoil -3356-♦Torque wrench -V.A.G1331-♦Setting gauge -3371-Golf Variant 2007 ➤ , Jetta 2005 ➤General body repairs, exterior - Edition 10.20091. Front door 63 Downloaded from www.Manualslib.com manuals search engine
Protected by copyright. Copying for private or commercial purposes, in partor in whole, is not permitted unless authorised by Volkswagen AG. Volkswagen AG does notguarantee or accept any liability with respect to the correctness ofinformation in this document.Copyright by Volkswagen AG.♦Cartridge gun -V.A.G 1628-♦Cartridge heater -V.A.G1939 A-♦Removal wedge -3409-♦Assembly tool set -T10237-1.2Materials♦1K or 2K glass adhesive-DH 009 100 01- 1) 2) or -DH 004600 A2- 1)♦Glass primer/paint primer-D 009 200 02- 3)♦Cleaning solution-D 009 401 04- 3)♦Primer applicator-D 009 500 25- 3)1) Observe curing period ⇒ page 822) Heat according to manufacturer's instructions, using cartridge heater -V.A.G1939 A- .3) Materials are stored in box -D 004 700- .1.3Assembly overview - door assemblyA new door concept has been introduced with Jetta 2005 ▸, Bora2005 ▸.The door consists of an inner part -6- and an outer panel -1-.The parts are joined by the front -7- and rear -4- retaining rail.Golf Variant 2007 ➤ , Jetta 2005 ➤General body repairs, exterior - Edition 10.200964 Rep. Gr.57 - Front doors, door components, central locking Downloaded from www.Manualslib.com manuals search engine
Protected by copyright. Copying for private or commercial purposes, in partor in whole, is not permitted unless authorised by Volkswagen AG. Volkswagen AG does notguarantee or accept any liability with respect to the correctness ofinformation in this document.Copyright by Volkswagen AG.The retaining rails are bolted to the inner part of the door andbonded to the outer panel of the door.The inner part -6- of the door functions basically as the previouslyknown assembly carrier. Loudspeaker, window regulator, windowregulator motor, wiring, window channel, exterior mirror and doorlock are mounted on the door inner part.The outer panel -1- of the door is additionally bolted to the loweredge of the inner part. The window slot outer seal, insulation andexterior door handle are mounted on the outer panel of the door.CautionDifferent securing screws are used for the door outer panel. Ifthese are fitted in the wrong positions, the outer panel for thedoor will be damaged.NoteThe edge protection foil -2- must always be bonded between the door outer panel and the door inner part.1 - Door outer panel❑Removing and installing⇒ page 1122 - Edge protection foil❑Self-adhesive❑Is bonded between doorouter panel and door in‐ner part.3 - Bolt❑Feature: bolt with poin‐ted end and thinnerwasher.❑Qty. 6 on lower edge❑Qty. 1 in rear section ofdoor shoulder❑10 Nm4 - Rear retaining rail❑Adhesive -DH 009 10003-5 - Bolt❑Feature: bolt with nopointed end and thickerwasher.❑Qty. 10 for both retain‐ing rails❑14 Nm6 - Door inner part❑Assembly overview⇒ page 847 - Front retaining rail❑Adhesive -DH 009 10003-Golf Variant 2007 ➤ , Jetta 2005 ➤General body repairs, exterior - Edition 10.20091. Front door 65 Downloaded from www.Manualslib.com manuals search engine
Protected by copyright. Copying for private or commercial purposes, in partor in whole, is not permitted unless authorised by Volkswagen AG. Volkswagen AG does notguarantee or accept any liability with respect to the correctness ofinformation in this document.Copyright by Volkswagen AG.8 - Bolt❑Feature: bolt with pointed end and thicker washer❑Qty. 1 in area of front section of door shoulder❑10 Nm9 - Insulation❑Self-adhesive❑To bond, first heat the insulation and then press on firmly10 - Clip❑Qty. 611 - Window slot seal❑Must be fitted before fitting door outer panel.1.4Assembly overview - door hingesCautionNut of eccentric bolt -9- should not be loosened under any cir‐cumstances. It cannot be tightened again using normal work‐shop tools.Golf Variant 2007 ➤ , Jetta 2005 ➤General body repairs, exterior - Edition 10.200966 Rep. Gr.57 - Front doors, door components, central locking Downloaded from www.Manualslib.com manuals search engine
Protected by copyright. Copying for private or commercial purposes, in partor in whole, is not permitted unless authorised by Volkswagen AG. Volkswagen AG does notguarantee or accept any liability with respect to the correctness ofinformation in this document.Copyright by Volkswagen AG.Note♦The right side is shown. The left side is similar.♦The hinge bolts must always be renewed if loosened.♦Hinges are now one piece.1 - Door❑Removing and installing⇒ page 68❑Adjusting ⇒ page 702 - Guide bolt❑10 Nm3 - Door hinge with arrester4 - Multi-point socket head bolt❑20 Nm + 1/4 turn further(90°).❑Always renew afterloosening5 - Multi-point socket head bolt❑Installed from inside ve‐hicle.❑Removing A-pillar lowertrim ⇒ General body re‐pairs, interior; Rep. Gr. 70 ; Pillar and side paneltrim❑20 Nm + 1/4 turn further(90°).❑Always renew afterloosening6 - Multi-point socket head bolt❑20 Nm + 1/4 turn further(90°).❑Always renew afterloosening7 - Multi-point socket head bolt❑20 Nm + 1/4 turn further(90°).❑Always renew after loosening8 - Guide bolt❑10 Nm9 - Nut❑For eccentric pin❑Do not loosen❑Serves as a means of adjustment during production only10 - Door hinge❑Door hinge is now one piece.Golf Variant 2007 ➤ , Jetta 2005 ➤General body repairs, exterior - Edition 10.20091. Front door 67 Downloaded from www.Manualslib.com manuals search engine
Protected by copyright. Copying for private or commercial purposes, in partor in whole, is not permitted unless authorised by Volkswagen AG. Volkswagen AG does notguarantee or accept any liability with respect to the correctness ofinformation in this document.Copyright by Volkswagen AG.11 - Multi-point socket head bolt❑20 Nm + 1/4 turn further (90°).❑Always renew after loosening12 - Multi-point socket head bolt❑20 Nm + 1/4 turn further (90°).❑Always renew after loosening13 - Multi-point socket head bolt❑20 Nm + 1/4 turn further (90°).❑Always renew after loosening1.5Removing and installing doorNoteThe removal and installation sequence is only for the right door.The removal and installation of the left door is similar.1.5.1Removing–Release boot -6- by pressing fastener -arrow a- and pull bootoff A-pillar.–Swing locking lever -7- downwards -arrow b- and separateelectrical connector -8- from coupling station.–Remove bolts -4-, -5- and -11- from hinge using special dooralignment tool -3320- and bit -3320/3- .Golf Variant 2007 ➤ , Jetta 2005 ➤General body repairs, exterior - Edition 10.200968 Rep. Gr.57 - Front doors, door components, central locking Downloaded from www.Manualslib.com manuals search engine
Protected by copyright. Copying for private or commercial purposes, in partor in whole, is not permitted unless authorised by Volkswagen AG. Volkswagen AG does notguarantee or accept any liability with respect to the correctness ofinformation in this document.Copyright by Volkswagen AG.–Pull door in direction of -arrow- off guide bolts -2- and -9-.1.5.2InstallingInstall in reverse order of removal.Specified torque for bolts -4-, -5- and -11-: 20 Nm + 1/4 turn further(90°).Always renew bolts -4-, -5- and -11-.Golf Variant 2007 ➤ , Jetta 2005 ➤General body repairs, exterior - Edition 10.20091. Front door 69 Downloaded from www.Manualslib.com manuals search engine
Protected by copyright. Copying for private or commercial purposes, in partor in whole, is not permitted unless authorised by Volkswagen AG. Volkswagen AG does notguarantee or accept any liability with respect to the correctness ofinformation in this document.Copyright by Volkswagen AG.Observe front door gap/shut lines ⇒ Body Repairs; Rep. Gr. 00 ;Body dimensions .1.6Adjusting doorCautionNut of eccentric bolt -9- should not be loosened under any cir‐cumstances. Nut cannot be retightened using normal work‐shop tools.Note♦The door is adjusted correctly if the gaps/shut lines are even all around, the door is not too deep or doesnot stand proud and all contours align when the is door closed.♦Vehicle must be standing on its wheels when adjustments are performed.♦If door outer panel has been removed, door inner part window frame must be adjusted to roof frame and B-pillar, or rear door.Golf Variant 2007 ➤ , Jetta 2005 ➤General body repairs, exterior - Edition 10.200970 Rep. Gr.57 - Front doors, door components, central locking Downloaded from www.Manualslib.com manuals search engine
Protected by copyright. Copying for private or commercial purposes, in partor in whole, is not permitted unless authorised by Volkswagen AG. Volkswagen AG does notguarantee or accept any liability with respect to the correctness ofinformation in this document.Copyright by Volkswagen AG.Observe front door gap/shut lines ⇒ Body Repairs; Rep. Gr. 00 ;Body dimensions .To be able to adjust gaps correctly, bolts -5-, -7-, -11- and -12- onA-pillar must be loosened. For bolt -5-, A-pillar lower trim must beremoved ⇒ General body repairs, interior; Rep. Gr. 70 ; Pillarand side panel trim .Other measures such as raising the door have no effect. Subse‐quent pressure from above will cause the door to sack again.Bolts -4-, -6- and -13- and also guide bolts -2- and -8- must beloosened to correctly adjust the flush fitting of the door.Use door alignment tool -3320- with bit -3320/3- for this.1.6.1Adjusting striker pinNote♦The front door must lock fully when closing without any addi‐tional force being required and must not have any play.♦The front door must not be pushed up or down as a result ofthe striker pin adjustment.Golf Variant 2007 ➤ , Jetta 2005 ➤General body repairs, exterior - Edition 10.20091. Front door 71 Downloaded from www.Manualslib.com manuals search engine
Protected by copyright. Copying for private or commercial purposes, in partor in whole, is not permitted unless authorised by Volkswagen AG. Volkswagen AG does notguarantee or accept any liability with respect to the correctness ofinformation in this document.Copyright by Volkswagen AG.The following can be adjusted at the striker pin:♦When the front door does not align with the rear door.–Loosen striker pin -1- by unbolting bolts -2- on B-pillar.–Adjust the front door with the striker pin -1- so that the frontdoor is flush with the rear door when shut (wind noise).Maximum twist tolerance -A- of striker pin: ± 3°–Retighten bolts -2-.Specified torque: 20 NmWARNINGOnly use this adjustment to adjust door inwards or outwards,never use for vertical adjustment. Door must not move up‐wards or downwards when opening and closing. This indicatesthat the vertical adjustment is incorrect.Golf Variant 2007 ➤ , Jetta 2005 ➤General body repairs, exterior - Edition 10.200972 Rep. Gr.57 - Front doors, door components, central locking Downloaded from www.Manualslib.com manuals search engine
Protected by copyright. Copying for private or commercial purposes, in partor in whole, is not permitted unless authorised by Volkswagen AG. Volkswagen AG does notguarantee or accept any liability with respect to the correctness ofinformation in this document.Copyright by Volkswagen AG.1.7Removing and installing outer panel ondoor1.7.1Removing–Prise out clips -3-, starting at bottom of door -1-, and removecover -2-.Golf Variant 2007 ➤ , Jetta 2005 ➤General body repairs, exterior - Edition 10.20091. Front door 73 Downloaded from www.Manualslib.com manuals search engine
Protected by copyright. Copying for private or commercial purposes, in partor in whole, is not permitted unless authorised by Volkswagen AG. Volkswagen AG does notguarantee or accept any liability with respect to the correctness ofinformation in this document.Copyright by Volkswagen AG.–Remove lock cylinder ⇒ page 86 .–Remove door handle ⇒ page 86 .–Remove bolt -1- from bearing bracket -2- which is located be‐hind door outer panel.–Remove all bolts -2-, -3- and -4-.NoteIt is possible to find bolt type -4- instead of bolt type -2- in rear upper location on door of some vehicles. If thisis the case, do not replace bolt type -4- with bolt type -2-.–Carefully remove door outer panel.Golf Variant 2007 ➤ , Jetta 2005 ➤General body repairs, exterior - Edition 10.200974 Rep. Gr.57 - Front doors, door components, central locking Downloaded from www.Manualslib.com manuals search engine
Protected by copyright. Copying for private or commercial purposes, in partor in whole, is not permitted unless authorised by Volkswagen AG. Volkswagen AG does notguarantee or accept any liability with respect to the correctness ofinformation in this document.Copyright by Volkswagen AG.1.7.2InstallingCautionBolts of different types are used to secure outer panel of door.If these are fitted in the wrong positions, the outer panel for thedoor will be damaged.–Carefully position outer panel on door.–Insert all bolts -2-, -3- and -4-.Observe correct usage for the different types of bolts.♦Feature for bolt -2-: bolt with pointed end and thinner washer♦Feature for bolt -3-: bolt with no pointed end but with thickerwasher.♦Feature for bolt -4-: bolt with pointed end and thicker washer.–Check whether retaining rail guide pins are located in appro‐priate guide holes in inner part of door. Only then tighten allbolts -2-, -3- and -4-.Observe correct specified torque for the different types of bolts.Golf Variant 2007 ➤ , Jetta 2005 ➤General body repairs, exterior - Edition 10.20091. Front door 75 Downloaded from www.Manualslib.com manuals search engine
Protected by copyright. Copying for private or commercial purposes, in partor in whole, is not permitted unless authorised by Volkswagen AG. Volkswagen AG does notguarantee or accept any liability with respect to the correctness ofinformation in this document.Copyright by Volkswagen AG.Specified torque for bolt -2-: 10 NmSpecified torque for bolt -3-: 14 NmSpecified torque for bolt -4-: 10 NmFurther installation is performed in reverse order of removal1.8Installing new outer panel on doorCautionBolts of different types are used to secure outer panel of door.If these are fitted in the wrong positions, the outer panel for thedoor will be damaged.NoteObserve installation notes in chapter for bonding new outer panel on door ⇒ page 82•The old (damaged) outer panel with retaining rails is removed⇒ page 73 .Golf Variant 2007 ➤ , Jetta 2005 ➤General body repairs, exterior - Edition 10.200976 Rep. Gr.57 - Front doors, door components, central locking Downloaded from www.Manualslib.com manuals search engine
Protected by copyright. Copying for private or commercial purposes, in partor in whole, is not permitted unless authorised by Volkswagen AG. Volkswagen AG does notguarantee or accept any liability with respect to the correctness ofinformation in this document.Copyright by Volkswagen AG.–Install front -2- and rear -6- retaining rails on inner part of door-1-. Use “bolt with no point but with thicker washer” for this.Specified torque for bolts -3- and -5-: 14 Nm–Fit two guide bolts -4- in lower edge of door inner part -1-.The painted outer panel for the door is first offered up withoutbonding agent.Assembly blocks -3- from assembly tool set -T10237- are requiredwhen fitting outer panel on door. A strip of double-sided adhesivetape -6- is applied on the side with a cut-out step. The pin has theminimum dimension for the gap width. The surface with no ad‐hesive tape is brought into position on the adjacent panel.–Stick the assembly block -3- on outer panel -1- of the door.–Guide outer panel -1- over guide bolts on lower edge of doorinner part.–Adjust gap to sill and height of outer panel on door usingwedges -4- from assembly tool set -T10237- .–Lay door outer panel -1- with assembly blocks on adjacentpanels -2- and -5-.Golf Variant 2007 ➤ , Jetta 2005 ➤General body repairs, exterior - Edition 10.20091. Front door 77 Downloaded from www.Manualslib.com manuals search engine
Protected by copyright. Copying for private or commercial purposes, in partor in whole, is not permitted unless authorised by Volkswagen AG. Volkswagen AG does notguarantee or accept any liability with respect to the correctness ofinformation in this document.Copyright by Volkswagen AG.–Check gap/shut lines using setting gauge -3371- ⇒ Body Re‐pairs; Rep. Gr. 00 ; Body dimensions .If gap dimension cannot be adjusted further, door inner part mustbe adjusted ⇒ page 70–Remove door outer panel again.–Apply a bead of adhesive material -2- using cartridge gun -V.A.G 1628- to front -1- and rear -3- retaining rails.NoteAdhesive -DA 004 600 A2- can be used for this procedure and is applied with double cartridge gun -VAS 5237- .There is no requirement to preheat.Golf Variant 2007 ➤ , Jetta 2005 ➤General body repairs, exterior - Edition 10.200978 Rep. Gr.57 - Front doors, door components, central locking Downloaded from www.Manualslib.com manuals search engine
Protected by copyright. Copying for private or commercial purposes, in partor in whole, is not permitted unless authorised by Volkswagen AG. Volkswagen AG does notguarantee or accept any liability with respect to the correctness ofinformation in this document.Copyright by Volkswagen AG.Fixing blocks -2- from assembly tool set -T10237- are requiredwhen fitting outer panel on door. Two strips of double-sided ad‐hesive tape -5- are applied on the contact surface.–Guide outer panel -1- over guide bolts on lower edge of doorinner part.–Bring outer panel with assembly blocks -3- into contact withsurrounding components.–Adjust gap to sill and height of outer panel on door usingwedges -4- from assembly tool set.–Check gap/shut line using setting gauge -3371- ⇒ Body Re‐pairs; Rep. Gr. 00 ; Body dimensions .–Bond short fixing blocks -2- evenly on the replacement doorand the adjacent components.NoteA waiting period of 90 or 180 minutes must be observed before performing further work on the bonded door⇒ page 82 .–Further installation is performed in reverse order of removal⇒ page 75 .Golf Variant 2007 ➤ , Jetta 2005 ➤General body repairs, exterior - Edition 10.20091. Front door 79 Downloaded from www.Manualslib.com manuals search engine
Protected by copyright. Copying for private or commercial purposes, in partor in whole, is not permitted unless authorised by Volkswagen AG. Volkswagen AG does notguarantee or accept any liability with respect to the correctness ofinformation in this document.Copyright by Volkswagen AG.1.9Removing and installing retaining rail ondoor outer panel1.9.1Removing retaining railCautionThe following work steps are to be carried out with great care.As outer panel is to be reused, dents and scratches must beavoided.When cutting through the adhesive bead, always hold the re‐taining rail and outer panel together as shown in the illustration.If this is not done, the outer panel will come away from theretaining rail, thus rendering it useless.NoteThe following procedures should be carried out with the aid of anassistant.Golf Variant 2007 ➤ , Jetta 2005 ➤General body repairs, exterior - Edition 10.200980 Rep. Gr.57 - Front doors, door components, central locking Downloaded from www.Manualslib.com manuals search engine
Protected by copyright. Copying for private or commercial purposes, in partor in whole, is not permitted unless authorised by Volkswagen AG. Volkswagen AG does notguarantee or accept any liability with respect to the correctness ofinformation in this document.Copyright by Volkswagen AG.•Door outer panel with retaining rails is removed ⇒ page 73 .–Place door outer panel -1- on firm surface and protect doorouter panel against scratches.–Secure reel -2- on outer panel of door -1-.–Secure cord -5- on reel -2- and counterhold -4-.–Hold retaining rail and outer panel of door together securelywhen cutting through adhesive bead.–Cut through adhesive bead of retaining rail -3- and outer panel-1- with cord up to just over half way.–Once adhesive bead has been cut through to just over halfway in step one, turn reel -2- around and insert cord -5- in sidestill bonded.–Hold retaining rail -3- and outer panel -1- of door together se‐curely when cutting through adhesive bead further.–Cut through second half of adhesive bead.1.9.2Installing retaining rail–Using extreme care, cut away remainder of adhesive bead tothe utmost minimum on outer panel of door, ensuring that nodamage is caused to the paintwork.–Remainder of procedure is described in chapter entitled “In‐stalling new outer panel for door” ⇒ page 76 .NoteObserve also “instructions for bonding in new outer panel” on doorwhen installing a new retaining rail.–In place of removed retaining rail, install a new retaining railon the door inner part.–Apply adhesive to new retaining rail–Tighten screws to secure door panel on lower edge and onretaining rail still in place.Golf Variant 2007 ➤ , Jetta 2005 ➤General body repairs, exterior - Edition 10.20091. Front door 81 Downloaded from www.Manualslib.com manuals search engine
Protected by copyright. Copying for private or commercial purposes, in partor in whole, is not permitted unless authorised by Volkswagen AG. Volkswagen AG does notguarantee or accept any liability with respect to the correctness ofinformation in this document.Copyright by Volkswagen AG.–Secure outer panel for door on new retaining rail with fixingblocks from assembly tool set -T10237- and double-sided ad‐hesive tape.1.10Installation notes for bonding a new out‐er panel on doorNote♦If front and rear door outer panels must be renewed, they mustbe done at the same time. When bonding-in both outer panels,the long fixing block from assembly tool set -T10237- is stuckon for the transition from front outer panel to rear outer panel.♦If door outer panel CDP coating is damaged on inside in areato be bonded or it has been painted, this area must be primedwith glass/paint primer -D 009 200 02- .♦The 1K glass adhesive -DH 009 100 01- must be heated incartridge heater -V.A.G 1939 A- for 20 minutes.♦Adhesive -DA 004 600 A2- can be used for this procedure andis applied with double cartridge gun -VAS 5237- . There is norequirement to preheat.–Clean contact surfaces on retaining rails thoroughly usingcleaning solution -D 009 401 04- .–Apply adhesive material to appropriate surfaces at right anglesto retaining rail using cartridge gun -V.A.G 1628- .CautionDoor outer panel must be installed within 10 minutes, or ad‐hesive properties of adhesive will be impaired.♦With assistance of both assembly blocks from assembly toolset -T10237- , place door outer panel on retaining rails andalign with wedges and setting gauge -3371- and press contactsurfaces of assembly blocks onto adjacent components.♦Secure door with fixing blocks from assembly tool set -T10237- during curing period.♦After installation door outer panel must align with other com‐ponents and gaps must be even.♦If adhesive bead is too thick and adhesive exudes betweenretaining rail and door outer panel, excess adhesive must beremoved.1.11Minimum curing periodWARNINGSpecial standards must be adhered to when replacing bondedouter panels for door. One of these standards is, for example,that a freshly bonded door outer panel must comply with thesafety requirements following the minimum prescribed curingperiod, even in an accident.For door outer panel: curing period for 1K adhesive -DH 009 10001- is 180 minutes and for 2K adhesive -DA 004 600 A2- 90 mi‐nutes.Golf Variant 2007 ➤ , Jetta 2005 ➤General body repairs, exterior - Edition 10.200982 Rep. Gr.57 - Front doors, door components, central locking Downloaded from www.Manualslib.com manuals search engine
Protected by copyright. Copying for private or commercial purposes, in partor in whole, is not permitted unless authorised by Volkswagen AG. Volkswagen AG does notguarantee or accept any liability with respect to the correctness ofinformation in this document.Copyright by Volkswagen AG.What is meant by minimum curing period is, time from bondingouter panel on door to time vehicle is taken into use or furtherwork is carried out. During this time, the vehicle must stand on alevel surface at room temperature (at least 15 °C).WARNINGVehicle is safe to use only after the curing period is completed.1.12Cleaning off excess adhesive sealingmaterial–Use of adhesive remover -D 002 000 10- as a cleaning solutionis recommended. Observe the appropriate safety precautionswhen performing this work.CautionWhen cleaning vehicle the door outer panel just bonded-inmust not be moved.–First clean painted surface as much as possible using a drycloth. Remove residual excess with adhesive remover -D 002000 10- .–Cleaning plastic trim: allow adhesive sealant to cure (approx.one hour) and then peel off.Golf Variant 2007 ➤ , Jetta 2005 ➤General body repairs, exterior - Edition 10.20091. Front door 83 Downloaded from www.Manualslib.com manuals search engine
Protected by copyright. Copying for private or commercial purposes, in partor in whole, is not permitted unless authorised by Volkswagen AG. Volkswagen AG does notguarantee or accept any liability with respect to the correctness ofinformation in this document.Copyright by Volkswagen AG.1.13Assembly overview - door inner partNoteThe right side is shown. The left side is similar.1 - Door inner part2 - Window slot seal3 - Loudspeaker4 - Window regulator motor❑Removing ⇒ page 2845 - Insulation❑Qty. 4❑20 mm x 40 mm com‐mercially available tex‐tile adhesive tapeGolf Variant 2007 ➤ , Jetta 2005 ➤General body repairs, exterior - Edition 10.200984 Rep. Gr.57 - Front doors, door components, central locking Downloaded from www.Manualslib.com manuals search engine
Protected by copyright. Copying for private or commercial purposes, in partor in whole, is not permitted unless authorised by Volkswagen AG. Volkswagen AG does notguarantee or accept any liability with respect to the correctness ofinformation in this document.Copyright by Volkswagen AG.1.14Assembly overview - door handle and door lockNoteOnly the left side is shown. The right side is similar.1 - Cable❑To lock release from in‐terior door handle.2 - Cable❑To release lock fromdoor exterior handle.3 - Bolt❑Qty. 2❑To secure lock to doorinner part.❑18 Nm4 - Door lock❑Removing and installing⇒ page 905 - Cover❑Not supplied with doorlock.❑Secured on door lockwith locking lugs6 - Bearing bracket❑Removing and installing⇒ page 897 - Torx bolt❑To secure lock cylinderhousing or housing⇒ Item 9 (page 85)8 - Base9 - Lock cylinder housing❑Only on driver side.❑Passenger side is instal‐led in a housing.❑Removing and installing ⇒ page 8610 - Cover❑For lock cylinder housing❑Secured to lock cylinder housing with three locking lugs11 - Key❑Changing battery ⇒ page 100 .❑Adapting new or additional key to remote control and immobilizer ⇒ page 100 .12 - Door handle with base❑Removing and installing ⇒ page 8613 - Base❑Part of door handle.Golf Variant 2007 ➤ , Jetta 2005 ➤General body repairs, exterior - Edition 10.20091. Front door 85 Downloaded from www.Manualslib.com manuals search engine
Protected by copyright. Copying for private or commercial purposes, in partor in whole, is not permitted unless authorised by Volkswagen AG. Volkswagen AG does notguarantee or accept any liability with respect to the correctness ofinformation in this document.Copyright by Volkswagen AG.14 - Torx bolt❑4.5 Nm1.15Removing and installing housingNoteThe removal and installation sequence is only for the right hous‐ing. The removal and installation of the right lock cylinder issimilar.1.15.1Removing–Prise cover ( ⇒ page 73 Fig. N57-10065, item 2) off front door.–Lever out caps in front of bolts -1-.–Pull door handle -2- in direction of -arrow- and unbolt bolt -1-onto stop using socket wrench -T10072- .–Pull out housing -3-.1.15.2Installing–Fit housing -3- in door handle -2- bearing bracket at right an‐gles -arrow-.Door handle -2- must rest only lightly against door panel.–Now tighten bolt -1- in bearing bracket using socket wrench -T10072- .The door handle -2- locates in the housing -3- with a well audibleclick.NoteDuring installation, housing must be pressed against door panel.The door handle just rests lightly against the door panel.Further installation is performed in reverse order of removal.Then always check function while door is still open, as an incor‐rectly fitted and adjusted Bowden cable cannot open the door.1.16Removing and installing door handleNoteThe removal and installation sequence is only for the right doorhandle. The removal and installation of the left door handle issimilar.Golf Variant 2007 ➤ , Jetta 2005 ➤General body repairs, exterior - Edition 10.200986 Rep. Gr.57 - Front doors, door components, central locking Downloaded from www.Manualslib.com manuals search engine
Protected by copyright. Copying for private or commercial purposes, in partor in whole, is not permitted unless authorised by Volkswagen AG. Volkswagen AG does notguarantee or accept any liability with respect to the correctness ofinformation in this document.Copyright by Volkswagen AG.1.16.1Removing–Remove housing ⇒ page 86 .–Lever clip -2- out of door handle -1-.–Swivel door handle -1- out of door -arrow-.1.16.2Installing–Guide assembly tool -T10118- into door through opening indoor outer panel.–Use a hand torch to illuminate inside of door for improved vis‐ibility.–Hook assembly tool -T10118- in spring -arrow A-.–Hook spring onto door lock by pulling assembly tool -T10118--arrow B-.The release lever is now secured.Golf Variant 2007 ➤ , Jetta 2005 ➤General body repairs, exterior - Edition 10.20091. Front door 87 Downloaded from www.Manualslib.com manuals search engine
Protected by copyright. Copying for private or commercial purposes, in partor in whole, is not permitted unless authorised by Volkswagen AG. Volkswagen AG does notguarantee or accept any liability with respect to the correctness ofinformation in this document.Copyright by Volkswagen AG.NoteHooking the spring into the operating lever secures the lock. This prevents incorrect attachment of the Bowdencable to the door handle later.–Swivel door handle -1- into door.–Pull clip -2- in the panel opening and engage clip in door han‐dle -1- -arrow-.Note♦Press door handle -1- against door panel when assembling.♦Clip -2- must engage audibly in door handle -1-.–Install housing ⇒ page 86 .Then always check function while door is still open, as an incor‐rectly fitted and adjusted Bowden cable cannot open the door.Golf Variant 2007 ➤ , Jetta 2005 ➤General body repairs, exterior - Edition 10.200988 Rep. Gr.57 - Front doors, door components, central locking Downloaded from www.Manualslib.com manuals search engine
Protected by copyright. Copying for private or commercial purposes, in partor in whole, is not permitted unless authorised by Volkswagen AG. Volkswagen AG does notguarantee or accept any liability with respect to the correctness ofinformation in this document.Copyright by Volkswagen AG.1.17Removing and installing bearing bracketNoteRemoval and installation are described only for the right bearingbracket. The removal and installation of the left bearing bracketis similar.1.17.1Removing–Remove housing ⇒ page 86 .–Remove door handle ⇒ page 86 .–Remove door outer panel ⇒ page 112 .–Pull retaining rubber -4- upwards off guide pins.–Pull bearing bracket -1- in direction of -arrow- with guide pins-2- out of mountings -3-.Golf Variant 2007 ➤ , Jetta 2005 ➤General body repairs, exterior - Edition 10.20091. Front door 89 Downloaded from www.Manualslib.com manuals search engine
Protected by copyright. Copying for private or commercial purposes, in partor in whole, is not permitted unless authorised by Volkswagen AG. Volkswagen AG does notguarantee or accept any liability with respect to the correctness ofinformation in this document.Copyright by Volkswagen AG.1.17.2Installing–Push bearing bracket -1- with guide pins -2- in mountings-3-.–Secure retaining rubber -4- to guide pins and securing boltson bearing plate mounting.Further installation is performed in reverse order of removal.1.18Removing and installing door lockNoteThe removal and installation sequence is only for the right doorlock. The removal and installation of the left door lock is similar.1.18.1Removing–Remove housing ⇒ page 86 .–Remove door handle ⇒ page 86 .–Remove door outer panel ⇒ page 73 .Golf Variant 2007 ➤ , Jetta 2005 ➤General body repairs, exterior - Edition 10.200990 Rep. Gr.57 - Front doors, door components, central locking Downloaded from www.Manualslib.com manuals search engine
Protected by copyright. Copying for private or commercial purposes, in partor in whole, is not permitted unless authorised by Volkswagen AG. Volkswagen AG does notguarantee or accept any liability with respect to the correctness ofinformation in this document.Copyright by Volkswagen AG.–Remove bearing bracket ⇒ page 89 .–Disconnect connector -5-.–Remove bolts -6-.–Release cable -1- from relay lever -8- and remove door lock-4-.Cover -3- is not supplied with door lock.1.18.2InstallingInstall in reverse order of removal.Specified torque for bolts: 18 Nm.Then always check function while door is still open, as an incor‐rectly fitted and adjusted Bowden cable cannot open the door.Golf Variant 2007 ➤ , Jetta 2005 ➤General body repairs, exterior - Edition 10.20091. Front door 91 Downloaded from www.Manualslib.com manuals search engine
Protected by copyright. Copying for private or commercial purposes, in partor in whole, is not permitted unless authorised by Volkswagen AG. Volkswagen AG does notguarantee or accept any liability with respect to the correctness ofinformation in this document.Copyright by Volkswagen AG.1.19Assembly overview - side impact protection1 - Side impact protection❑To remove and install,remove outer panel fordoor ⇒ page 1122 - Bolt❑Qty. 4❑20 Nm3 - Insulation4 - Nut❑Qty. 2❑20 Nm1.20Door inner sealDuring production, a sealant is applied to the door inner seals,which are then placed on the door flange and rolled on.Note♦When seals are removed, the sealant will spread to the insideof the seal and the flanks will be bent out slightly. If the seal isthen refitted, a tight seal is not guaranteed.♦Therefore each seal which is removed completely should bereplaced by a so-called “tap-on” seal.♦If a seal has been partially removed, squeeze sides of sealtogether before refitting.Golf Variant 2007 ➤ , Jetta 2005 ➤General body repairs, exterior - Edition 10.200992 Rep. Gr.57 - Front doors, door components, central locking Downloaded from www.Manualslib.com manuals search engine
Protected by copyright. Copying for private or commercial purposes, in partor in whole, is not permitted unless authorised by Volkswagen AG. Volkswagen AG does notguarantee or accept any liability with respect to the correctness ofinformation in this document.Copyright by Volkswagen AG.1.21Removing and installing door inner sealNoteThe removal and installation sequence is only for the right doorinner seal. The removal and installation of the left door inner sealis similar.1.21.1Removing–Pull door inner seal off body flange.1.21.2Installing–Align door inner seal so that the vulcanised point -arrow b- islocated at the height of the lower hinge.Golf Variant 2007 ➤ , Jetta 2005 ➤General body repairs, exterior - Edition 10.20091. Front door 93 Downloaded from www.Manualslib.com manuals search engine
Protected by copyright. Copying for private or commercial purposes, in partor in whole, is not permitted unless authorised by Volkswagen AG. Volkswagen AG does notguarantee or accept any liability with respect to the correctness ofinformation in this document.Copyright by Volkswagen AG.–Start installing door inner seal at top radius -arrow a- of dooraperture.1.22Removing and installing door outer sealNote♦Removal and installation are described only for the right doorouter seal. Removal and installation of the left door outer sealare similar.♦Remove protective backing immediately before installation.Working temperature approx. 20 °C.Golf Variant 2007 ➤ , Jetta 2005 ➤General body repairs, exterior - Edition 10.200994 Rep. Gr.57 - Front doors, door components, central locking Downloaded from www.Manualslib.com manuals search engine
Protected by copyright. Copying for private or commercial purposes, in partor in whole, is not permitted unless authorised by Volkswagen AG. Volkswagen AG does notguarantee or accept any liability with respect to the correctness ofinformation in this document.Copyright by Volkswagen AG.1.22.1Removing–Pull door outer seal off door.1.22.2Installing–Remove adhesive residues with erasure disc of adhesive stripremover -VAS 6349- .–Immediately before bonding door outer seal, clean bondingsurface thoroughly with adhesive remover -D 002 000 10- .•Bonding surfaces must be free of dust and grease and thereshould be no adhesive residues.–Align door outer seal with section -arrow b- towards door locksecuring bolts.–Door outer seal vulcanised point -arrow c- should then be inmiddle of sill.Golf Variant 2007 ➤ , Jetta 2005 ➤General body repairs, exterior - Edition 10.20091. Front door 95 Downloaded from www.Manualslib.com manuals search engine
Protected by copyright. Copying for private or commercial purposes, in partor in whole, is not permitted unless authorised by Volkswagen AG. Volkswagen AG does notguarantee or accept any liability with respect to the correctness ofinformation in this document.Copyright by Volkswagen AG.–Pull off protective foil and install seal on door. Do not pull doorouter seal excessively to avoid stretching seal.–Press complete bonding surface of seal -3- onto door -1- allaround using roller -3356- .–To do this, push seal aside -arrow a- so that the roller -3356-runs directly over the contact surface of the seal.The roller can apply the necessary force -arrow b- to the bondingsurface -2- only when procedure described above is followed.–If the seal has stretched, cut seal to required length and presson butt joint well.–If seal -3- comes loose in small areas again, press seal on wellagain using roller -3356- .NoteThe door must not be closed for a period of 2 hours to ensure the door outer seal does not move or loosenagain.Golf Variant 2007 ➤ , Jetta 2005 ➤General body repairs, exterior - Edition 10.200996 Rep. Gr.57 - Front doors, door components, central locking Downloaded from www.Manualslib.com manuals search engine
Protected by copyright. Copying for private or commercial purposes, in partor in whole, is not permitted unless authorised by Volkswagen AG. Volkswagen AG does notguarantee or accept any liability with respect to the correctness ofinformation in this document.Copyright by Volkswagen AG.Golf Variant 2007 ➤ , Jetta 2005 ➤General body repairs, exterior - Edition 10.20091. Front door 97 Downloaded from www.Manualslib.com manuals search engine
Protected by copyright. Copying for private or commercial purposes, in partor in whole, is not permitted unless authorised by Volkswagen AG. Volkswagen AG does notguarantee or accept any liability with respect to the correctness ofinformation in this document.Copyright by Volkswagen AG.2Central locking2.1Fitting location overview - central locking components1 - Anti-theft alarm horn❑Location: under rearsection of wheel hous‐ing liner in front rightwheel housing (remov‐ing rear section of wheelhousing liner⇒ page 321 )2 - Coupling station❑Location: right A-pillar❑To disconnect connec‐tor, release bellows atA-pillar ⇒ page 683 - Convenience system cen‐tral control unit -J393-❑Location: under dashpanel and behind glovecompartment on frontpassenger side (remov‐ing glove compartment⇒ General body repairs,interior; Rep. Gr. 68 ;Compartments, coversand trims )4 - Door control unit -J387-❑Integrated in windowregulator motor (remov‐ing window regulatormotor ⇒ page 285 )5 - Door lock❑Door lock is secured oninner part of door (re‐moving door lock⇒ page 90 )❑Electric central lockingis integrated into doorlock6 - Coupling station❑Location: right B-pillar.❑To disconnect connector, release boot on B-pillar ⇒ page 107 .7 - Rear right door control unit -J389-❑Integrated in window regulator motor❑Removing (saloon) ⇒ page 302❑Removing (Variant) ⇒ page 3178 - Door lock❑Electric central locking is integrated into door lock❑Removing (saloon) ⇒ page 129❑Removing (Variant) ⇒ page 155Golf Variant 2007 ➤ , Jetta 2005 ➤General body repairs, exterior - Edition 10.200998 Rep. Gr.57 - Front doors, door components, central locking Downloaded from www.Manualslib.com manuals search engine
Protected by copyright. Copying for private or commercial purposes, in partor in whole, is not permitted unless authorised by Volkswagen AG. Volkswagen AG does notguarantee or accept any liability with respect to the correctness ofinformation in this document.Copyright by Volkswagen AG.9 - Tank filler flap locking motor -V155-❑Location: behind right trim of luggage compartment❑Removing (saloon) ⇒ page 54❑Removing (Variant) ⇒ page 5810 - Lock for rear lid❑Location: bolted to rear lid❑Removing (saloon) ⇒ page 36❑Removing (Variant) ⇒ page 4811 - Rear lid handle release button -E234-❑Not installed on all vehicles❑Integrated in rear handle of rear lid (removing handle on saloon) ⇒ page 36 )❑Removing (Variant) ⇒ page 4712 - Coupling station, rear lid❑Location, saloon: behind luggage compartment side trim on left (removing luggage compartment sidetrim on left ⇒ General body repairs, interior; Rep. Gr. 70 ; Load area and luggage compartment trim .❑Location, Variant: on rear of moulded headliner (lowering moulded headliner ⇒ General body repairs,interior; Rep. Gr. 70 ; Roof trims )13 - Door lock❑Electric central locking is integrated into door lock❑Removing (saloon) ⇒ page 129❑Removing (Variant) ⇒ page 15514 - Rear left door control unit -J388-❑Integrated in window regulator motor❑Removing (saloon) ⇒ page 302❑Removing (Variant) ⇒ page 31715 - Coupling station❑Fitting location: left B-pillar❑To disconnect connector, release boot on B-pillar ⇒ page 107 .16 - Door lock❑Door lock is secured on inner part of door (removing door lock ⇒ page 90 )❑Electric central locking is integrated into door lock17 - Central switch for window regulators❑Location: installed in door panel❑Removing and installing central switch for window regulators ⇒ Electrical system; Rep. Gr. 96 ; Lights,bulbs, switches - interior18 - Door control unit -J386-❑Integrated in window regulator motor (removing window regulator motor ⇒ page 285 )19 - Coupling station❑Fitting location: left A-pillar❑To disconnect connector, release bellows at A-pillar ⇒ page 6820 - Bonnet contact switch -F266-❑Anti-theft alarm system contact switch❑Cannot be replaced as an individual item❑Location: on bonnet lock (removing bonnet lock ⇒ page 23 )Golf Variant 2007 ➤ , Jetta 2005 ➤General body repairs, exterior - Edition 10.20092. Central locking 99 Downloaded from www.Manualslib.com manuals search engine
Protected by copyright. Copying for private or commercial purposes, in partor in whole, is not permitted unless authorised by Volkswagen AG. Volkswagen AG does notguarantee or accept any liability with respect to the correctness ofinformation in this document.Copyright by Volkswagen AG.2.2Adapting keys with remote controlKeys with remote control are adapted using the vehicle diagnosis,testing and information system -VAS 5051- .–Select “guided fault finding” in vehicle diagnostic, testing andinformation system -VAS 5051- .–Using the GoTo key, select “Function/component selection”and the following menu items in succession:♦Body (Repair group 01; 27; 50 - 97)♦Internal/external installations (Repair group 01; from 55 77)♦01 - Self-diagnosis♦46 - Convenience system central module♦Functions♦Adaption2.3Assembly overview - battery for folding key with remote control1 - Key with variable codetransponder2 - Upper part of transmitterunit3 - LED❑LED must flash when re‐mote control is operated❑If LED does not flashduring remote controloperation, the battery isdead and must be re‐newed.4 - Battery❑Removing battery⇒ page 101❑Installing battery⇒ page 1015 - Lower part of transmitterunitGolf Variant 2007 ➤ , Jetta 2005 ➤General body repairs, exterior - Edition 10.2009100 Rep. Gr.57 - Front doors, door components, central locking Downloaded from www.Manualslib.com manuals search engine
Protected by copyright. Copying for private or commercial purposes, in partor in whole, is not permitted unless authorised by Volkswagen AG. Volkswagen AG does notguarantee or accept any liability with respect to the correctness ofinformation in this document.Copyright by Volkswagen AG.2.4Removing and installing battery for fold‐ing key with remote control2.4.1Removing–Insert a screwdriver in slot between transmitter unit -1- and key-2-.–Twist screwdriver in -direction of arrow- to separate transmitterunit from key.–Press upper part of transmitter unit and lower part of transmit‐ter unit apart in direction of -arrow-.–Unclip battery -1- from retainers -2- with a screwdriver in di‐rection of -arrow-.2.4.2InstallingNote polarity and correct position when installing battery.–Place battery -1- in transmitter unit -2- with positive terminaldownwards (positive terminal is marked on housing).–Engage battery in lower part of transmitter unit by pressingdown lightly.–Fit upper part of transmitter unit and lower part of transmitterunit together (do not damage seal).–Then clip transmitter unit to key.Golf Variant 2007 ➤ , Jetta 2005 ➤General body repairs, exterior - Edition 10.20092. Central locking 101 Downloaded from www.Manualslib.com manuals search engine
Protected by copyright. Copying for private or commercial purposes, in partor in whole, is not permitted unless authorised by Volkswagen AG. Volkswagen AG does notguarantee or accept any liability with respect to the correctness ofinformation in this document.Copyright by Volkswagen AG.58 –Rear doors, door components1Rear door (saloon)1.1ToolsSpecial tools and workshopequipment required♦Socket -T10072-♦Assembly tool -T10118-♦Door alignment tool -3320-with -3320/1- , -3320/2- and-3320/3-♦Roller for door insulationfoil -3356-♦Torque wrench -V.A.G1331-♦Setting gauge -3371-Golf Variant 2007 ➤ , Jetta 2005 ➤General body repairs, exterior - Edition 10.2009102 Rep. Gr.58 - Rear doors, door components Downloaded from www.Manualslib.com manuals search engine
Protected by copyright. Copying for private or commercial purposes, in partor in whole, is not permitted unless authorised by Volkswagen AG. Volkswagen AG does notguarantee or accept any liability with respect to the correctness ofinformation in this document.Copyright by Volkswagen AG.♦Cartridge gun -V.A.G 1628-♦Cartridge heater -V.A.G1939 A-♦Removal wedge -3409-♦Assembly tool set -T10237-1.2Materials♦1K or 2K glass adhesive-DH 009 100 01- 4) 5) or -DA004 600 A2- 4)♦Glass primer/paint primer-D 009 200 02- 6)♦Cleaning solution-D 009 401 04- 6)♦Primer applicator-D 009 500 25- 6)4) Observe curing period ⇒ page 1215) Heat according to manufacturer's instructions, using cartridge heater -V.A.G1939 A- .6) Materials are stored in box -D 004 700- .1.3Assembly overview - door assemblyA new door concept has been introduced with Jetta 2005 ▸, Bora2005 ▸.The door consists of an inner part -6- and an outer panel -1-.The parts are joined by the front -7- and rear -4- retaining rail.Golf Variant 2007 ➤ , Jetta 2005 ➤General body repairs, exterior - Edition 10.20091. Rear door (saloon) 103 Downloaded from www.Manualslib.com manuals search engine
Protected by copyright. Copying for private or commercial purposes, in partor in whole, is not permitted unless authorised by Volkswagen AG. Volkswagen AG does notguarantee or accept any liability with respect to the correctness ofinformation in this document.Copyright by Volkswagen AG.The retaining rails are bolted to the inner part of the door andbonded to the outer panel of the door.The inner part -6- of the door functions basically as the previouslyknown assembly carrier. Loudspeaker, window regulator, windowregulator motor, wiring, window channel, exterior mirror and doorlock are mounted on the inner part of the door.The outer panel -1- of the door is additionally bolted to the loweredge of the inner part. The window slot outer seal, insulation andexterior door handle are mounted on the outer panel of the door.CautionBolts of different types are used to secure outer panel of door.If these are fitted in the wrong positions, the outer panel for thedoor will be damaged.1 - Door outer panel❑Removing and installingdoor outer panel⇒ page 1122 - Edge protection❑Between door outerpanel and door innerpart.3 - Bolt❑Feature: bolt with poin‐ted end and thinnerwasher.❑Qty. 4 on lower edge❑Qty. 1 in rear section ofdoor shoulder❑10 Nm4 - Rear retaining rail❑Adhesive: -DH 009 10003-5 - Bolt❑Feature: bolt with nopointed end and thickerwasher.❑Qty. 11 on both retainingrails❑14 Nm6 - Door inner part❑Assembly overview⇒ page 1237 - Front retaining rail❑Adhesive: -DH 009 10003-8 - Bolt❑Feature: bolt with pointed end and thicker washer❑Qty. 1 in area of front section of door shoulder❑10 NmGolf Variant 2007 ➤ , Jetta 2005 ➤General body repairs, exterior - Edition 10.2009104 Rep. Gr.58 - Rear doors, door components Downloaded from www.Manualslib.com manuals search engine
Protected by copyright. Copying for private or commercial purposes, in partor in whole, is not permitted unless authorised by Volkswagen AG. Volkswagen AG does notguarantee or accept any liability with respect to the correctness ofinformation in this document.Copyright by Volkswagen AG.9 - Insulation❑Self-adhesive❑To bond, first heat the insulation and then press on firmly10 - Clip❑Qty. 511 - Window slot seal❑Must be fitted before fitting door outer panel.1.4Assembly overview - door hingesCautionNut of eccentric bolt -9- should not be loosened under any cir‐cumstances. It cannot be tightened again using normal work‐shop tools.Golf Variant 2007 ➤ , Jetta 2005 ➤General body repairs, exterior - Edition 10.20091. Rear door (saloon) 105 Downloaded from www.Manualslib.com manuals search engine
Protected by copyright. Copying for private or commercial purposes, in partor in whole, is not permitted unless authorised by Volkswagen AG. Volkswagen AG does notguarantee or accept any liability with respect to the correctness ofinformation in this document.Copyright by Volkswagen AG.Note♦The right side is shown. The left side is similar.♦The hinge bolts must always be renewed if loosened.♦Hinges are now one piece.1 - Door❑Removing and installing⇒ page 107❑Adjusting ⇒ page 1092 - Guide bolt❑10 Nm3 - Door hinge with arrester4 - Multi-point socket head bolt❑20 Nm + 1/4 turn further(90°).❑Always renew afterloosening5 - Multi-point socket head bolt❑20 Nm + 1/4 turn further(90°).❑Always renew afterloosening6 - Multi-point socket head bolt❑20 Nm + 1/4 turn further(90°).❑Always renew afterloosening7 - Multi-point socket head bolt❑20 Nm + 1/4 turn further(90°).❑Always renew afterloosening8 - Guide bolt❑10 Nm9 - Nut❑For eccentric pin❑Do not loosen❑Serves as a means of adjustment during production only10 - Door hinge❑Hinge no longer comprises of more than one part.11 - Multi-point socket head bolt❑20 Nm + 1/4 turn further (90°).❑Always renew after loosening12 - Multi-point socket head bolt❑20 Nm + 1/4 turn further (90°).❑Always renew after looseningGolf Variant 2007 ➤ , Jetta 2005 ➤General body repairs, exterior - Edition 10.2009106 Rep. Gr.58 - Rear doors, door components Downloaded from www.Manualslib.com manuals search engine
Protected by copyright. Copying for private or commercial purposes, in partor in whole, is not permitted unless authorised by Volkswagen AG. Volkswagen AG does notguarantee or accept any liability with respect to the correctness ofinformation in this document.Copyright by Volkswagen AG.13 - Multi-point socket head bolt❑20 Nm + 1/4 turn further (90°).❑Always renew after loosening1.5Removing and installing doorNoteThe removal and installation sequence is only for the right door.The removal and installation of the left door is similar.1.5.1Removing–Release boots -6- by pressing fastener -arrow a- and pullboots off B-pillar.–Swing release lever -7- downwards -arrow b- and disconnectelectrical connector -8- from coupling station.–Remove bolts -4-, -5- and -11- from hinge using special dooralignment tool -3320- and bit -3320/3- .Golf Variant 2007 ➤ , Jetta 2005 ➤General body repairs, exterior - Edition 10.20091. Rear door (saloon) 107 Downloaded from www.Manualslib.com manuals search engine
Protected by copyright. Copying for private or commercial purposes, in partor in whole, is not permitted unless authorised by Volkswagen AG. Volkswagen AG does notguarantee or accept any liability with respect to the correctness ofinformation in this document.Copyright by Volkswagen AG.–Pull door -1- in direction of -arrow- off guide bolts -2- and -9-.1.5.2InstallingInstall in reverse order of removal.Specified torque for bolts -4-, -5- and -11-: 20 Nm + 1/4 turn further(90°).Always renew bolts -4-, -5- and -11-.Golf Variant 2007 ➤ , Jetta 2005 ➤General body repairs, exterior - Edition 10.2009108 Rep. Gr.58 - Rear doors, door components Downloaded from www.Manualslib.com manuals search engine
Protected by copyright. Copying for private or commercial purposes, in partor in whole, is not permitted unless authorised by Volkswagen AG. Volkswagen AG does notguarantee or accept any liability with respect to the correctness ofinformation in this document.Copyright by Volkswagen AG.Observe rear door gap/shut lines ⇒ Body Repairs; Rep. Gr. 00 ;Body dimensions .1.6Adjusting doorCautionNut of eccentric bolt -9- should not be loosened under any cir‐cumstances. It cannot be tightened again using normal work‐shop tools.Note♦The door is adjusted correctly if the gaps/shut lines are even all around, the door is not too deep or doesnot stand proud and all contours align when the is door closed.♦Vehicle must be standing on its wheels when adjustments are performed.♦If the door outer panel has been removed, the door inner part window frame must be adjusted to the roofframe, C-pillar and front door.Golf Variant 2007 ➤ , Jetta 2005 ➤General body repairs, exterior - Edition 10.20091. Rear door (saloon) 109 Downloaded from www.Manualslib.com manuals search engine
Protected by copyright. Copying for private or commercial purposes, in partor in whole, is not permitted unless authorised by Volkswagen AG. Volkswagen AG does notguarantee or accept any liability with respect to the correctness ofinformation in this document.Copyright by Volkswagen AG.Observe rear door gap/shut lines ⇒ Body Repairs; Rep. Gr. 00 ;Body dimensions .To be able to adjust gaps correctly, bolts -6-, -7-, -11- and -12-must be loosened.Other measures such as raising the door have no effect. Subse‐quent pressure from above will cause the door to sack again.Bolts -4-, -5- and -13- and also guide bolts -2- and -8- must beloosened to correctly adjust the flush fitting of the door.Use door alignment tool -3320- with bit -3320/3- for this.1.6.1Adjusting striker pinNote♦The rear door must lock fully when closing without any addi‐tional force being required and must not have any play.♦The rear door must not be pushed up or down as a result ofthe striker pin adjustment.The following can be adjusted at the striker pin:Golf Variant 2007 ➤ , Jetta 2005 ➤General body repairs, exterior - Edition 10.2009110 Rep. Gr.58 - Rear doors, door components Downloaded from www.Manualslib.com manuals search engine
Protected by copyright. Copying for private or commercial purposes, in partor in whole, is not permitted unless authorised by Volkswagen AG. Volkswagen AG does notguarantee or accept any liability with respect to the correctness ofinformation in this document.Copyright by Volkswagen AG.♦When rear door does not align with side panel.–Loosen striker pin -1- by loosening bolts -2- on side panel.–Adjust rear door at striker pin -1- so that rear door is flush withrear side panel when shut (wind noise).Maximum twist tolerance -A- of striker pin: ± 3°–Retighten bolts -2-.Specified torque: 20 NmWARNINGOnly use this adjustment to adjust door inwards or outwards,never use for vertical adjustment. Door must not move up‐wards or downwards when opening and closing. This indicatesthat the vertical adjustment is incorrect.Golf Variant 2007 ➤ , Jetta 2005 ➤General body repairs, exterior - Edition 10.20091. Rear door (saloon) 111 Downloaded from www.Manualslib.com manuals search engine
Protected by copyright. Copying for private or commercial purposes, in partor in whole, is not permitted unless authorised by Volkswagen AG. Volkswagen AG does notguarantee or accept any liability with respect to the correctness ofinformation in this document.Copyright by Volkswagen AG.1.7Removing and installing outer panel ondoor1.7.1Removing–Prise out clips -3-, starting at bottom of door -1-, and removerear cover -2-.Golf Variant 2007 ➤ , Jetta 2005 ➤General body repairs, exterior - Edition 10.2009112 Rep. Gr.58 - Rear doors, door components Downloaded from www.Manualslib.com manuals search engine
Protected by copyright. Copying for private or commercial purposes, in partor in whole, is not permitted unless authorised by Volkswagen AG. Volkswagen AG does notguarantee or accept any liability with respect to the correctness ofinformation in this document.Copyright by Volkswagen AG.–Remove housing ⇒ page 124 .–Remove door handle ⇒ page 125 .–Remove bolt -1- from bearing bracket -2- which is located be‐hind door outer panel.–Remove all bolts -2-, -3- and -4-.–Carefully remove door outer panel.Golf Variant 2007 ➤ , Jetta 2005 ➤General body repairs, exterior - Edition 10.20091. Rear door (saloon) 113 Downloaded from www.Manualslib.com manuals search engine
Protected by copyright. Copying for private or commercial purposes, in partor in whole, is not permitted unless authorised by Volkswagen AG. Volkswagen AG does notguarantee or accept any liability with respect to the correctness ofinformation in this document.Copyright by Volkswagen AG.1.7.2InstallingCautionBolts of different types are used to secure outer panel of door.If these are fitted in the wrong positions, the outer panel for thedoor will be damaged.–Carefully position outer panel on door.–Insert all bolts -2-, -3- and -4-.Observe correct usage for the different types of bolts.♦Feature for bolt -2-: bolt with pointed end and thinner washer♦Feature for bolt -3-: bolt with no pointed end but with thickerwasher.♦Feature for bolt -4-: bolt with pointed end and thicker washer.–Check whether retaining rail guide pins are located in appro‐priate guide holes in inner part of door. Only then tighten allbolts -2-, -3- and -4-.Observe correct specified torque for the different types of bolts.Specified torque for bolt -2-: 10 NmSpecified torque for bolt -3-: 14 NmSpecified torque for bolt -4-: 10 NmGolf Variant 2007 ➤ , Jetta 2005 ➤General body repairs, exterior - Edition 10.2009114 Rep. Gr.58 - Rear doors, door components Downloaded from www.Manualslib.com manuals search engine
Protected by copyright. Copying for private or commercial purposes, in partor in whole, is not permitted unless authorised by Volkswagen AG. Volkswagen AG does notguarantee or accept any liability with respect to the correctness ofinformation in this document.Copyright by Volkswagen AG.Further installation is performed in reverse order of removal1.8Installing new outer panel on doorCautionBolts of different types are used to secure outer panel of door.If these are fitted in the wrong positions, the outer panel for thedoor will be damaged.NoteObserve section preparing door outer panel for bonding ⇒ page 121•The old (damaged) outer panel with retaining rails is removed⇒ page 112 .–Install front -2- and rear -6- retaining rails on inner part of door-1-. Use “bolt with no point but with thicker washer” for this.Specified torque for bolts -3- and -5-: 14 NmGolf Variant 2007 ➤ , Jetta 2005 ➤General body repairs, exterior - Edition 10.20091. Rear door (saloon) 115 Downloaded from www.Manualslib.com manuals search engine
Protected by copyright. Copying for private or commercial purposes, in partor in whole, is not permitted unless authorised by Volkswagen AG. Volkswagen AG does notguarantee or accept any liability with respect to the correctness ofinformation in this document.Copyright by Volkswagen AG.–Fit two guide bolts -4- in lower edge of door inner part -1-.The painted outer panel for the door is first offered up withoutbonding agent.Assembly blocks -3- from assembly tool set -T10237- are requiredwhen fitting outer panel on door. A strip of double-sided adhesivetape -6- is applied on the side with a cut-out step. The pin has theminimum dimension for the gap width. The surface with no ad‐hesive tape is brought into position on the adjacent panel.–Stick the assembly block -3- on outer panel -1- of the door.–Guide outer panel -1- over guide bolts on lower edge of doorinner part.–Adjust gap to sill and height of outer panel on door usingwedges -4- from assembly tool set -T10237- .–Lay door outer panel -1- with assembly blocks on adjacentpanels -2- and -5-.–Check gap/shut lines using setting gauge -3371- ⇒ Body Re‐pairs; Rep. Gr. 00 ; Body dimensions .If gap dimension cannot be adjusted further, door inner part mustbe adjusted ⇒ page 123Golf Variant 2007 ➤ , Jetta 2005 ➤General body repairs, exterior - Edition 10.2009116 Rep. Gr.58 - Rear doors, door components Downloaded from www.Manualslib.com manuals search engine
Protected by copyright. Copying for private or commercial purposes, in partor in whole, is not permitted unless authorised by Volkswagen AG. Volkswagen AG does notguarantee or accept any liability with respect to the correctness ofinformation in this document.Copyright by Volkswagen AG.–Remove door outer panel again.–Apply a bead of adhesive material -2- using cartridge gun -V.A.G 1628- to front -1- and rear -3- retaining rails.NoteAdhesive -DA 004 600 A2- can be used for this procedure and is applied with double cartridge gun -VAS 5237- .There is no requirement to preheat.Golf Variant 2007 ➤ , Jetta 2005 ➤General body repairs, exterior - Edition 10.20091. Rear door (saloon) 117 Downloaded from www.Manualslib.com manuals search engine
Protected by copyright. Copying for private or commercial purposes, in partor in whole, is not permitted unless authorised by Volkswagen AG. Volkswagen AG does notguarantee or accept any liability with respect to the correctness ofinformation in this document.Copyright by Volkswagen AG.Fixing blocks -2- from assembly tool set -T10237- are requiredwhen fitting outer panel on door. Two strips of double-sided ad‐hesive tape -5- are applied on the contact surface.–Guide outer panel -1- over guide bolts on lower edge of doorinner part.–Bring outer panel with assembly blocks -3- into contact withsurrounding components.–Adjust gap to sill and height of outer panel on door usingwedges -4- from assembly tool set.–Check gap/shut line using setting gauge -3371- ⇒ Body Re‐pairs; Rep. Gr. 00 ; Body dimensions .–Bond short fixing blocks -2- evenly on the replacement doorand the adjacent components.NoteA waiting period of 90 or 180 minutes must be observed before performing further work on the bonded door⇒ page 121 .–Further installation is performed in reverse order of removal⇒ page 114 .Golf Variant 2007 ➤ , Jetta 2005 ➤General body repairs, exterior - Edition 10.2009118 Rep. Gr.58 - Rear doors, door components Downloaded from www.Manualslib.com manuals search engine
Protected by copyright. Copying for private or commercial purposes, in partor in whole, is not permitted unless authorised by Volkswagen AG. Volkswagen AG does notguarantee or accept any liability with respect to the correctness ofinformation in this document.Copyright by Volkswagen AG.1.9Removing and installing retaining rail ondoor outer panel1.9.1Removing retaining railCautionThe following work steps are to be carried out with great care.As outer panel is to be reused, dents and scratches must beavoided.When cutting through the adhesive bead, always hold the re‐taining rail and outer panel together as shown in the illustration.If this is not done, the outer panel will come away from theretaining rail, thus rendering it useless.NoteThe following procedures should be carried out with the aid of anassistant.Golf Variant 2007 ➤ , Jetta 2005 ➤General body repairs, exterior - Edition 10.20091. Rear door (saloon) 119 Downloaded from www.Manualslib.com manuals search engine
Protected by copyright. Copying for private or commercial purposes, in partor in whole, is not permitted unless authorised by Volkswagen AG. Volkswagen AG does notguarantee or accept any liability with respect to the correctness ofinformation in this document.Copyright by Volkswagen AG.•Door outer panel with retaining rails is removed ⇒ page 112 .–Place door outer panel -1- on firm surface and protect doorouter panel against scratches.–Secure reel -2- on outer panel of door -1-.–Secure cord -5- on reel -2- and counterhold -4-.–Hold retaining rail and outer panel of door together securelywhen cutting through adhesive bead.–Cut through adhesive bead of retaining rail -3- and outer panel-1- with cord up to just over half way.–Once adhesive bead has been cut through to just over halfway in step one, turn reel -2- around and insert cord -5- in sidestill bonded.–Hold retaining rail -3- and outer panel -1- of door together se‐curely when cutting through adhesive bead further.–Cut through second half of adhesive bead.1.9.2Installing retaining rail–Using extreme care, cut away remainder of adhesive bead tothe utmost minimum on outer panel of door, ensuring that nodamage is caused to the paintwork.–Remainder of procedure is described in chapter entitled “In‐stalling new outer panel for door” ⇒ page 115 .NoteObserve also “instructions for bonding in new door outer panel”when installing a new retaining rail.–In place of removed retaining rail, install a new retaining railon the door inner part.–Apply adhesive to new retaining rail–Secure outer panel for door to lower edge and fitted retainingrail.Golf Variant 2007 ➤ , Jetta 2005 ➤General body repairs, exterior - Edition 10.2009120 Rep. Gr.58 - Rear doors, door components Downloaded from www.Manualslib.com manuals search engine
Protected by copyright. Copying for private or commercial purposes, in partor in whole, is not permitted unless authorised by Volkswagen AG. Volkswagen AG does notguarantee or accept any liability with respect to the correctness ofinformation in this document.Copyright by Volkswagen AG.–Secure outer panel for door on new retaining rail with fixingblocks from assembly tool set -T10237- and double-sided ad‐hesive tape.1.10Installation notes for bonding a new out‐er panel on doorNote♦If front and rear door outer panels must be renewed, they mustbe done at the same time. When bonding-in both door outerpanels, the long fixing block from assembly tool set -T10237-is stuck on for the transition from front door outer panel to reardoor outer panel.♦If door outer panel CDP coating is damaged on inside in areato be bonded or it has been painted, this area must be primedwith glass/paint primer -D 009 200 02- .♦The 1K glass adhesive -DH 009 100 01- must be heated incartridge heater -V.A.G 1939 A- for 20 minutes.♦Adhesive -DA 004 600 A2- can be used for this procedure andis applied with double cartridge gun -VAS 5237- . There is norequirement to preheat.–Clean contact surfaces on retaining rails thoroughly usingcleaning solution -D 009 401 04- .–Apply adhesive material to appropriate surfaces at right anglesto retaining rail using cartridge gun -V.A.G 1628- .CautionDoor outer panel must be installed within 10 minutes, or ad‐hesive properties of adhesive will be impaired.♦With assistance of both assembly blocks from assembly toolset -T10237- , place outer panel for door on retaining rails andalign with wedges and setting gauge -3371- and press contactsurfaces of assembly blocks onto adjacent components.♦Secure door with fixing blocks from assembly tool set -T10237- during curing period.♦After installation door outer panel must align with other com‐ponents and gaps must be even.♦If adhesive bead is too thick and adhesive exudes betweenretaining rail and door outer panel, excess adhesive must beremoved.1.11Minimum curing periodWARNINGSpecial standards must be adhered to when replacing bondedouter panels for door. One of these standards is, for example,that a freshly bonded door outer panel must comply with thesafety requirements following the minimum prescribed curingperiod, even in an accident.Golf Variant 2007 ➤ , Jetta 2005 ➤General body repairs, exterior - Edition 10.20091. Rear door (saloon) 121 Downloaded from www.Manualslib.com manuals search engine
Protected by copyright. Copying for private or commercial purposes, in partor in whole, is not permitted unless authorised by Volkswagen AG. Volkswagen AG does notguarantee or accept any liability with respect to the correctness ofinformation in this document.Copyright by Volkswagen AG.For door outer panel: curing period for 1K adhesive -DH 009 10001- is 90 minutes and for 2K adhesive -DA 004 600 A2- 180 mi‐nutes.What is meant by minimum curing period is, time from bondingouter panel on door to time vehicle is taken into use or furtherwork is carried out. During this time, the vehicle must stand on alevel surface at room temperature (at least 15 °C).WARNINGVehicle is safe to use only after the curing period is completed.1.12Cleaning off excess adhesive sealingmaterial–Use of adhesive remover -D 002 000 10- as a cleaning solutionis recommended. Observe the appropriate safety precautionswhen performing this work.CautionWhen cleaning vehicle the door outer panel just bonded-inmust not be moved.–First clean painted surface as much as possible using a drycloth. Remove residual excess with adhesive remover -D 002000 10- .–Cleaning plastic trim: allow adhesive sealant to cure (approx.one hour) and then peel off.Golf Variant 2007 ➤ , Jetta 2005 ➤General body repairs, exterior - Edition 10.2009122 Rep. Gr.58 - Rear doors, door components Downloaded from www.Manualslib.com manuals search engine
Protected by copyright. Copying for private or commercial purposes, in partor in whole, is not permitted unless authorised by Volkswagen AG. Volkswagen AG does notguarantee or accept any liability with respect to the correctness ofinformation in this document.Copyright by Volkswagen AG.1.13Assembly overview - door inner partNoteThe right side is shown. The left side is similar.1 - Window slot seal2 - Insulation❑Qty. 4❑20 mm x 40 mm, com‐mercially available tex‐tile adhesive tape.Golf Variant 2007 ➤ , Jetta 2005 ➤General body repairs, exterior - Edition 10.20091. Rear door (saloon) 123 Downloaded from www.Manualslib.com manuals search engine
Protected by copyright. Copying for private or commercial purposes, in partor in whole, is not permitted unless authorised by Volkswagen AG. Volkswagen AG does notguarantee or accept any liability with respect to the correctness ofinformation in this document.Copyright by Volkswagen AG.1.14Assembly overview - door handle and door lockNoteThe right side is shown. The left side is similar.1 - Door lock❑Removing and installing⇒ page 1292 - Cable❑To lock release from in‐terior door handle.3 - Cover❑Not supplied with doorlock.❑Secured on door lockwith locking lugs4 - Bearing bracket❑Removing ⇒ page 1275 - Torx bolt❑4.5 Nm6 - Base❑Part of door handle.7 - Door handle with base❑Removing and installing⇒ page 1258 - Cover❑For housing❑Secured on housingwith locking lugs9 - Housing❑Removing and installing⇒ page 12410 - Base11 - Torx bolt❑For locking housing ⇒ Item 9 (page 150)12 - Bolt❑18 Nm13 - Cable❑To release lock from door exterior handle.1.15Removing and installing housingNoteRemoval and installation sequence is only for right housing. Re‐moval and installation of left housing is similar.Golf Variant 2007 ➤ , Jetta 2005 ➤General body repairs, exterior - Edition 10.2009124 Rep. Gr.58 - Rear doors, door components Downloaded from www.Manualslib.com manuals search engine
Protected by copyright. Copying for private or commercial purposes, in partor in whole, is not permitted unless authorised by Volkswagen AG. Volkswagen AG does notguarantee or accept any liability with respect to the correctness ofinformation in this document.Copyright by Volkswagen AG.1.15.1Removing–Prise rear cover ( ⇒ page 112 Fig. M58-0054, item 2) off reardoor.–Lever out caps in front of bolts -1-.–Pull door handle -2- in direction of -arrow- and unbolt bolt -1-onto stop using socket wrench -T10072- .–Pull housing -3- out of door handle bearing bracket at rightangles to door.1.15.2Installing–Fit housing -2- in door handle -1- bearing bracket at right an‐gles -arrow-.Door handle -1- must rest only lightly against door panel.–Now tighten bolt -3- in bearing bracket using socket wrench -T10072- .The door handle engages in housing again with an audible click.NoteDuring installation, housing must be pressed against door panel.The door handle just rests lightly against the door panel.Further installation is performed in reverse order of removal.Then always check function while door is still open, as an incor‐rectly fitted and adjusted Bowden cable cannot open the door.1.16Removing and installing door handleNoteThe removal and installation sequence is only for the right doorhandle. The removal and installation of the left door handle issimilar.1.16.1Removing–Remove housing ⇒ page 124 .–Lever clip -2- out of door handle -1-.–Swivel door handle -1- out of door -arrow-.Golf Variant 2007 ➤ , Jetta 2005 ➤General body repairs, exterior - Edition 10.20091. Rear door (saloon) 125 Downloaded from www.Manualslib.com manuals search engine
Protected by copyright. Copying for private or commercial purposes, in partor in whole, is not permitted unless authorised by Volkswagen AG. Volkswagen AG does notguarantee or accept any liability with respect to the correctness ofinformation in this document.Copyright by Volkswagen AG.1.16.2Installing–Guide assembly tool -T10118- into door through opening indoor outer panel.–Use a hand torch to illuminate inside of door for improved vis‐ibility.–Hook assembly tool -T10118- in spring -arrow A-.–Hook spring onto door lock by pulling assembly tool -T10118--arrow B-.The release lever is now secured.NoteHooking the spring into the operating lever secures the lock. This prevents incorrect attachment of the Bowdencable to the door handle later.Golf Variant 2007 ➤ , Jetta 2005 ➤General body repairs, exterior - Edition 10.2009126 Rep. Gr.58 - Rear doors, door components Downloaded from www.Manualslib.com manuals search engine
Protected by copyright. Copying for private or commercial purposes, in partor in whole, is not permitted unless authorised by Volkswagen AG. Volkswagen AG does notguarantee or accept any liability with respect to the correctness ofinformation in this document.Copyright by Volkswagen AG.–Swivel door handle -1- into door.–Pull clip -2- in the panel opening and engage clip in door han‐dle -1- -arrow-.Note♦Press door handle -1- against door panel when assembling.♦Clip -2- must engage in door handle -1- with a clearly audibleclick.–Install housing ⇒ page 125 .Then always check function while door is still open, as an incor‐rectly fitted and adjusted Bowden cable cannot open the door.1.17Removing bearing bracketNoteRemoval and installation are described only for the right bearingbracket. The removal and installation of the left bearing bracketis similar.1.17.1Removing–Remove housing ⇒ page 124 .–Remove door handle ⇒ page 125 .–Remove door outer panel ⇒ page 112 .–Pull retaining rubber -4- off upwards from guide pins and re‐taining pins on mounting.Golf Variant 2007 ➤ , Jetta 2005 ➤General body repairs, exterior - Edition 10.20091. Rear door (saloon) 127 Downloaded from www.Manualslib.com manuals search engine
Protected by copyright. Copying for private or commercial purposes, in partor in whole, is not permitted unless authorised by Volkswagen AG. Volkswagen AG does notguarantee or accept any liability with respect to the correctness ofinformation in this document.Copyright by Volkswagen AG.–Pull bearing bracket -1- with guide pins -2- out of mountings-3-.1.17.2Installing–Push bearing bracket -1- with guide pins -2- in mountings-3-.–Secure retaining rubber -4- to guide pin and retaining pin onmounting.Golf Variant 2007 ➤ , Jetta 2005 ➤General body repairs, exterior - Edition 10.2009128 Rep. Gr.58 - Rear doors, door components Downloaded from www.Manualslib.com manuals search engine
Protected by copyright. Copying for private or commercial purposes, in partor in whole, is not permitted unless authorised by Volkswagen AG. Volkswagen AG does notguarantee or accept any liability with respect to the correctness ofinformation in this document.Copyright by Volkswagen AG.Further installation is performed in reverse order of removal.1.18Removing and installing door lockNoteThe removal and installation sequence is only for the right doorlock. The removal and installation of the left door lock is similar.1.18.1Removing–Remove housing ⇒ page 124 .–Remove door handle ⇒ page 125 .–Remove door outer panel ⇒ page 112 .Golf Variant 2007 ➤ , Jetta 2005 ➤General body repairs, exterior - Edition 10.20091. Rear door (saloon) 129 Downloaded from www.Manualslib.com manuals search engine
Protected by copyright. Copying for private or commercial purposes, in partor in whole, is not permitted unless authorised by Volkswagen AG. Volkswagen AG does notguarantee or accept any liability with respect to the correctness ofinformation in this document.Copyright by Volkswagen AG.–Remove bearing bracket ⇒ page 127 .–Separate connector -4-.–Remove bolts -6-.–Release cable -3- from relay lever -5- and remove door lock-1-.Cover -2- is not supplied with door lock.1.18.2InstallingInstall in reverse order of removal.Specified torque for bolts: 18 Nm.Then always check function while door is still open, as an incor‐rectly fitted and adjusted Bowden cable cannot open the door.Golf Variant 2007 ➤ , Jetta 2005 ➤General body repairs, exterior - Edition 10.2009130 Rep. Gr.58 - Rear doors, door components Downloaded from www.Manualslib.com manuals search engine
Protected by copyright. Copying for private or commercial purposes, in partor in whole, is not permitted unless authorised by Volkswagen AG. Volkswagen AG does notguarantee or accept any liability with respect to the correctness ofinformation in this document.Copyright by Volkswagen AG.1.19Assembly overview - side impact protection1 - Side impact protection❑To remove and install,remove outer panel fordoor ⇒ page 1122 - Bolts❑Qty. 2❑20 Nm3 - Nut❑Qty. 2❑20 Nm4 - Door inner part1.20Door inner sealsDuring production, a sealant is applied to the door inner seals,which are then placed on the door flange and rolled on.Note♦When seals are removed, the sealant will spread to the insideof the seal and the flanks will be bent out slightly. If the seal isthen refitted, a tight seal is not guaranteed.♦Therefore each seal which is removed completely should bereplaced by a so-called “tap-on” seal.♦If a seal has been partially removed, squeeze sides of sealtogether before refitting.Golf Variant 2007 ➤ , Jetta 2005 ➤General body repairs, exterior - Edition 10.20091. Rear door (saloon) 131 Downloaded from www.Manualslib.com manuals search engine
Protected by copyright. Copying for private or commercial purposes, in partor in whole, is not permitted unless authorised by Volkswagen AG. Volkswagen AG does notguarantee or accept any liability with respect to the correctness ofinformation in this document.Copyright by Volkswagen AG.1.21Removing and installing door inner sealNoteThe removal and installation sequence is only for the right doorinner seal. The removal and installation of the left door inner sealis similar.1.21.1Removing–Pull door inner seal off body flange.1.21.2Installing–Align door inner seal so that the vulcanised point -arrow b- islocated at the height of the lower hinge.Golf Variant 2007 ➤ , Jetta 2005 ➤General body repairs, exterior - Edition 10.2009132 Rep. Gr.58 - Rear doors, door components Downloaded from www.Manualslib.com manuals search engine
Protected by copyright. Copying for private or commercial purposes, in partor in whole, is not permitted unless authorised by Volkswagen AG. Volkswagen AG does notguarantee or accept any liability with respect to the correctness ofinformation in this document.Copyright by Volkswagen AG.–Start installing door inner seal at top radius -arrow a- of dooraperture.1.22Removing and installing door outer sealNote♦Removal and installation are described only for the right doorouter seal. Removal and installation of the left door outer sealare similar.♦Remove protective backing immediately before installation.Working temperature approx. 20 °C.Golf Variant 2007 ➤ , Jetta 2005 ➤General body repairs, exterior - Edition 10.20091. Rear door (saloon) 133 Downloaded from www.Manualslib.com manuals search engine
Protected by copyright. Copying for private or commercial purposes, in partor in whole, is not permitted unless authorised by Volkswagen AG. Volkswagen AG does notguarantee or accept any liability with respect to the correctness ofinformation in this document.Copyright by Volkswagen AG.1.22.1Removing–Pull door outer seal -1- off door -2-.1.22.2Installing–Remove adhesive residues with erasure disc of adhesive stripremover -VAS 6349- .–Immediately before bonding outer seal for door, clean bondingsurface thoroughly with adhesive remover -D 002 000 10- .•Bonding surfaces must be free of dust and grease and thereshould be no adhesive residues.–The vulcanised point -arrow b- of door outer seal -1- must belocated in centre of sill.Golf Variant 2007 ➤ , Jetta 2005 ➤General body repairs, exterior - Edition 10.2009134 Rep. Gr.58 - Rear doors, door components Downloaded from www.Manualslib.com manuals search engine
Protected by copyright. Copying for private or commercial purposes, in partor in whole, is not permitted unless authorised by Volkswagen AG. Volkswagen AG does notguarantee or accept any liability with respect to the correctness ofinformation in this document.Copyright by Volkswagen AG.–Pull off protective backing and start fitting seal in upper radius-arrow a- of door. Do not pull door outer seal excessively toavoid stretching seal.–Press complete bonding surface of seal -3- onto door -1- allaround using roller -3356- .–To do this, push seal aside -arrow a- so that the roller -3356-runs directly over the contact surface of the seal.The roller can apply the necessary force -arrow b- to the bondingsurface -2- only when procedure described above is followed.–If the seal has stretched, cut seal to required length and presson butt joint well.–If seal -3- comes loose in small areas again, press seal on wellagain using roller -3356- .NoteThe door must not be closed for a period of 2 hours to ensure the door outer seal does not move or loosenagain.Golf Variant 2007 ➤ , Jetta 2005 ➤General body repairs, exterior - Edition 10.20091. Rear door (saloon) 135 Downloaded from www.Manualslib.com manuals search engine
Protected by copyright. Copying for private or commercial purposes, in partor in whole, is not permitted unless authorised by Volkswagen AG. Volkswagen AG does notguarantee or accept any liability with respect to the correctness ofinformation in this document.Copyright by Volkswagen AG.Golf Variant 2007 ➤ , Jetta 2005 ➤General body repairs, exterior - Edition 10.2009136 Rep. Gr.58 - Rear doors, door components Downloaded from www.Manualslib.com manuals search engine
Protected by copyright. Copying for private or commercial purposes, in partor in whole, is not permitted unless authorised by Volkswagen AG. Volkswagen AG does notguarantee or accept any liability with respect to the correctness ofinformation in this document.Copyright by Volkswagen AG.2Rear door (Variant)NoteThe rear doors of the Variant are of a different concept whencompared with the rear doors of the saloon. The door outer panelis no longer removable. The window lifter and the door lock areaccessible via a removable assembly carrier.2.1ToolsSpecial tools and workshopequipment required♦Socket -T10072-♦Assembly tool -T10118-♦Door alignment tool -3320-with -3320/1- , -3320/2- and-3320/3-♦Roller for door insulationfoil -3356-♦Torque wrench -V.A.G1331-♦Setting gauge -3371-Golf Variant 2007 ➤ , Jetta 2005 ➤General body repairs, exterior - Edition 10.20092. Rear door (Variant) 137 Downloaded from www.Manualslib.com manuals search engine
Protected by copyright. Copying for private or commercial purposes, in partor in whole, is not permitted unless authorised by Volkswagen AG. Volkswagen AG does notguarantee or accept any liability with respect to the correctness ofinformation in this document.Copyright by Volkswagen AG.2.2Assembly overview - rear door1 - Door❑Removing and installing⇒ page 140❑Adjusting door⇒ page 1422 - Door handle with base❑Removing and installing⇒ page 1513 - Lock cylinder housing❑Removing and installing⇒ page 151❑Without cylinder lock.4 - Door lock❑The door lock can be re‐moved only togetherwith the assembly carri‐er⇒ Item 5 (page 138) .❑Removing and installing⇒ page 1555 - Assembly carrier❑Removing and installing⇒ page 1456 - Door hinge❑Removing and installing⇒ page 1387 - Door hinge❑Removing and installing⇒ page 1382.3Assembly overview - door hingesCautionNut of eccentric bolt -9- should not be loosened under any cir‐cumstances. It cannot be tightened again using normal work‐shop tools.Golf Variant 2007 ➤ , Jetta 2005 ➤General body repairs, exterior - Edition 10.2009138 Rep. Gr.58 - Rear doors, door components Downloaded from www.Manualslib.com manuals search engine
Protected by copyright. Copying for private or commercial purposes, in partor in whole, is not permitted unless authorised by Volkswagen AG. Volkswagen AG does notguarantee or accept any liability with respect to the correctness ofinformation in this document.Copyright by Volkswagen AG.Note♦The right side is shown. The left side is similar.♦The hinge bolts must always be renewed if loosened.♦Hinges are now one piece.1 - Door❑Removing and installing⇒ page 140❑Adjusting door⇒ page 1422 - Guide bolt❑10 Nm3 - Door hinge with arrester4 - Multi-point socket head bolt❑20 Nm + 1/4 turn further(90°).❑Always renew afterloosening5 - Multi-point socket head bolt❑20 Nm + 1/4 turn further(90°).❑Always renew afterloosening6 - Multi-point socket head bolt❑20 Nm + 1/4 turn further(90°).❑Always renew afterloosening7 - Multi-point socket head bolt❑20 Nm + 1/4 turn further(90°).❑Always renew afterloosening8 - Guide bolt❑10 Nm9 - Nut❑For eccentric pin❑Do not loosen❑Serves as a means of adjustment during production only10 - Door hinge❑Hinge no longer comprises of more than one part.11 - Multi-point socket head bolt❑20 Nm + 1/4 turn further (90°).❑Always renew after loosening12 - Multi-point socket head bolt❑20 Nm + 1/4 turn further (90°).Golf Variant 2007 ➤ , Jetta 2005 ➤General body repairs, exterior - Edition 10.20092. Rear door (Variant) 139 Downloaded from www.Manualslib.com manuals search engine
Protected by copyright. Copying for private or commercial purposes, in partor in whole, is not permitted unless authorised by Volkswagen AG. Volkswagen AG does notguarantee or accept any liability with respect to the correctness ofinformation in this document.Copyright by Volkswagen AG.❑Always renew after loosening13 - Multi-point socket head bolt❑20 Nm + 1/4 turn further (90°).❑Always renew after loosening2.4Removing and installing door2.4.1RemovingNoteThe removal and installation sequence is only for the right door. The removal and installation of the left door issimilar.–Release boots -6- by pressing fastener -arrow a- and pullboots off B-pillar.–Swing release lever -7- downwards -arrow b- and disconnectelectrical connector -8- from coupling station.–Remove bolts -4-, -5- and -11- from hinge using special dooralignment tool -3320- and bit -3320/3- .Golf Variant 2007 ➤ , Jetta 2005 ➤General body repairs, exterior - Edition 10.2009140 Rep. Gr.58 - Rear doors, door components Downloaded from www.Manualslib.com manuals search engine
Protected by copyright. Copying for private or commercial purposes, in partor in whole, is not permitted unless authorised by Volkswagen AG. Volkswagen AG does notguarantee or accept any liability with respect to the correctness ofinformation in this document.Copyright by Volkswagen AG.–Pull door -1- in direction of -arrow- off guide bolts -2- and -9-.2.4.2InstallingInstall in reverse order of removal.Specified torque for bolts -4-, -5- and -11-: 20 Nm + 1/4 turn further(90°).Always renew bolts -4-, -5- and -11-.Golf Variant 2007 ➤ , Jetta 2005 ➤General body repairs, exterior - Edition 10.20092. Rear door (Variant) 141 Downloaded from www.Manualslib.com manuals search engine
Protected by copyright. Copying for private or commercial purposes, in partor in whole, is not permitted unless authorised by Volkswagen AG. Volkswagen AG does notguarantee or accept any liability with respect to the correctness ofinformation in this document.Copyright by Volkswagen AG.Observe rear door gap/shut lines ⇒ Body Repairs; Rep. Gr. 00 ;Body dimensions .2.5Adjusting doorCautionNut of eccentric bolt -9- should not be loosened under any cir‐cumstances. It cannot be tightened again using normal work‐shop tools.Note♦The door is adjusted correctly if the gaps/shut lines are even all around, the door is not too deep or doesnot stand proud and all contours align when the is door closed.♦Vehicle must be standing on its wheels when adjustments are performed.Observe rear door gap/shut lines ⇒ Body Repairs; Rep. Gr. 00 ;Body dimensions .Golf Variant 2007 ➤ , Jetta 2005 ➤General body repairs, exterior - Edition 10.2009142 Rep. Gr.58 - Rear doors, door components Downloaded from www.Manualslib.com manuals search engine
Protected by copyright. Copying for private or commercial purposes, in partor in whole, is not permitted unless authorised by Volkswagen AG. Volkswagen AG does notguarantee or accept any liability with respect to the correctness ofinformation in this document.Copyright by Volkswagen AG.To be able to adjust gaps correctly, bolts -6-, -7-, -11- and -12-must be loosened.Other measures such as raising the door have no effect. Subse‐quent pressure from above will cause the door to sack again.Bolts -4-, -5- and -13- and also guide bolts -2- and -8- must beloosened to correctly adjust the flush fitting of the door.Use door alignment tool -3320- with bit -3320/3- for this.2.5.1Adjusting striker pinNote♦The rear door must lock fully when closing without any addi‐tional force being required and must not have any play.♦The rear door must not be pushed up or down as a result ofthe striker pin adjustment.The following can be adjusted at the striker pin:♦When rear door does not align with side panel.Golf Variant 2007 ➤ , Jetta 2005 ➤General body repairs, exterior - Edition 10.20092. Rear door (Variant) 143 Downloaded from www.Manualslib.com manuals search engine
Protected by copyright. Copying for private or commercial purposes, in partor in whole, is not permitted unless authorised by Volkswagen AG. Volkswagen AG does notguarantee or accept any liability with respect to the correctness ofinformation in this document.Copyright by Volkswagen AG.–Loosen striker pin -1- by loosening bolts -2- on side panel.–Adjust rear door at striker pin -1- so that rear door is flush withrear side panel when shut (wind noise).Maximum twist tolerance -A- of striker pin: ± 3°–Retighten bolts -2-.Specified torque: 20 NmWARNINGOnly use this adjustment to adjust door inwards or outwards,never use for vertical adjustment. Door must not move up‐wards or downwards when opening and closing. This indicatesthat the vertical adjustment is incorrect.2.6Assembly overview - assembly carrierNoteThe right side is shown. The left side is similar.1 - Bolt❑Qty. 2❑18 Nm2 - Door lock❑Removing and installing⇒ page 1553 - Assembly carrier❑Removing and installing⇒ page 1454 - Bolt❑Qty. 8❑8 Nm5 - Cover6 - Window regulator motor❑Removing and installingGolf Variant 2007 ➤ , Jetta 2005 ➤General body repairs, exterior - Edition 10.2009144 Rep. Gr.58 - Rear doors, door components Downloaded from www.Manualslib.com manuals search engine
Protected by copyright. Copying for private or commercial purposes, in partor in whole, is not permitted unless authorised by Volkswagen AG. Volkswagen AG does notguarantee or accept any liability with respect to the correctness ofinformation in this document.Copyright by Volkswagen AG.⇒ page 3172.7Removing and installing assembly car‐rierNoteThe removal and installation sequence is only for the right as‐sembly carrier. The removal and installation of the left assemblycarrier is similar.Window regulator, door lock and loudspeaker are secured to theassembly carrier.The door lock can be removed only together with the assemblycarrier.If door window cannot be lowered on electric window version, firstdetermine the cause of the fault.To do this, read the fault memory of the convenience system us‐ing vehicle diagnostic, testing and information system -VAS 5051A- or -VAS 5052- ⇒ Vehicle diagnosis, testing and informationsystem VAS 5051.If an electrical fault exists, rectify it first.If an electric fault occurs on window regulator motor, it can beunscrewed from assembly carrier and door window can be slid byhand in the necessary repair position.2.7.1RemovingRemove door handle ⇒ page 152 .–Remove door trim ⇒ General body repairs, interior; Rep. Gr. 70 ; Roof trims .Golf Variant 2007 ➤ , Jetta 2005 ➤General body repairs, exterior - Edition 10.20092. Rear door (Variant) 145 Downloaded from www.Manualslib.com manuals search engine
Protected by copyright. Copying for private or commercial purposes, in partor in whole, is not permitted unless authorised by Volkswagen AG. Volkswagen AG does notguarantee or accept any liability with respect to the correctness ofinformation in this document.Copyright by Volkswagen AG.–Lever out caps -5-.–Lower door window -1- until spreader pin -3- and spreader plug-4- are accessible in cut-out of window regulator.NoteIf the procedure cannot be carried out because there is a fault withthe electric window regulator, remove electric window motor toslide window down.–Screw a 5 mm bolt (approx. 70 mm long) into spreader pin-3-.–Pull bolt and spreader pin out of spreader plug -4-.–Screw an 8 mm bolt (approx. 80 mm long) into spreader plug-4-.NoteDo not exert too great a pressure on the plug because otherwisethe plug will fall into the door.–Pull spreader plug -4- out of clamping jaws -2- and thereforeout of door window.–Push window -1- upwards and secure in position (e.g. withadhesive tape).–Release boots -4- by pressing fastener -arrow a- and pullboots off B-pillar.–Swing release lever -5- downwards -arrow b- and disconnectelectrical connector -6- from coupling station.–Unscrew bolts -2- from door lock -3-.–Unscrew bolts -arrow- from assembly carrier -1-.Golf Variant 2007 ➤ , Jetta 2005 ➤General body repairs, exterior - Edition 10.2009146 Rep. Gr.58 - Rear doors, door components Downloaded from www.Manualslib.com manuals search engine
Protected by copyright. Copying for private or commercial purposes, in partor in whole, is not permitted unless authorised by Volkswagen AG. Volkswagen AG does notguarantee or accept any liability with respect to the correctness ofinformation in this document.Copyright by Volkswagen AG.–Guide wire -3- in door.–Remove assembly carrier -1- with door lock -2- from door indirection of -arrow-.Golf Variant 2007 ➤ , Jetta 2005 ➤General body repairs, exterior - Edition 10.20092. Rear door (Variant) 147 Downloaded from www.Manualslib.com manuals search engine
Protected by copyright. Copying for private or commercial purposes, in partor in whole, is not permitted unless authorised by Volkswagen AG. Volkswagen AG does notguarantee or accept any liability with respect to the correctness ofinformation in this document.Copyright by Volkswagen AG.2.7.2InstallingInstall in reverse order of removal.–Secure door window ⇒ page 310 .–Specified torque for assembly carrier bolt -arrow-: 8 NmGolf Variant 2007 ➤ , Jetta 2005 ➤General body repairs, exterior - Edition 10.2009148 Rep. Gr.58 - Rear doors, door components Downloaded from www.Manualslib.com manuals search engine
Protected by copyright. Copying for private or commercial purposes, in partor in whole, is not permitted unless authorised by Volkswagen AG. Volkswagen AG does notguarantee or accept any liability with respect to the correctness ofinformation in this document.Copyright by Volkswagen AG.–Specified torque for door lock bolt -2-: 18 NmGolf Variant 2007 ➤ , Jetta 2005 ➤General body repairs, exterior - Edition 10.20092. Rear door (Variant) 149 Downloaded from www.Manualslib.com manuals search engine
Protected by copyright. Copying for private or commercial purposes, in partor in whole, is not permitted unless authorised by Volkswagen AG. Volkswagen AG does notguarantee or accept any liability with respect to the correctness ofinformation in this document.Copyright by Volkswagen AG.2.8Assembly overview - door handle and door lockNoteThe right side is shown. The left side is similar.1 - Door lock❑Removing and installing⇒ page 1552 - Cable❑To lock release from in‐terior door handle.3 - Cover❑Not supplied with doorlock.❑Secured on door lockwith locking lugs4 - Bearing bracket❑Removing and installing⇒ page 1545 - Torx bolt❑4.5 Nm6 - Base❑Part of door handle.7 - Door handle with base❑Removing and installing⇒ page 1518 - Cover❑For housing❑Secured on housingwith locking lugs9 - Housing❑Removing and installing⇒ page 15110 - Base11 - Door lock bracket❑Not supplied with door lock.❑Pushed onto door lock and riveted.12 - Bolt❑18 Nm13 - Cable❑To release lock from door exterior handle.Golf Variant 2007 ➤ , Jetta 2005 ➤General body repairs, exterior - Edition 10.2009150 Rep. Gr.58 - Rear doors, door components Downloaded from www.Manualslib.com manuals search engine
Protected by copyright. Copying for private or commercial purposes, in partor in whole, is not permitted unless authorised by Volkswagen AG. Volkswagen AG does notguarantee or accept any liability with respect to the correctness ofinformation in this document.Copyright by Volkswagen AG.2.9Removing and installing housingNoteRemoval and installation sequence is only for right housing. Re‐moval and installation of left housing is similar.2.9.1Removing–Lever out caps in front of bolts -1-.–Pull door handle -2- in direction of -arrow- and unbolt bolt -1-onto stop using socket wrench -T10072- .–Pull housing -3- out of door handle bearing bracket at rightangles to door.2.9.2Installing–Fit housing -2- in door handle -1- bearing bracket at right an‐gles -arrow-.Door handle -1- must rest only lightly against door panel.–Now tighten bolt -3- in bearing bracket using socket wrench -T10072- .The door handle engages in housing again with an audible click.NoteDuring installation, housing must be pressed against door panel.The door handle just rests lightly against the door panel.Further installation is performed in reverse order of removal.Then always check function while door is still open, as an incor‐rectly fitted and adjusted Bowden cable cannot open the door.2.10Removing and installing door handleNoteThe removal and installation sequence is only for the right doorhandle. The removal and installation of the left door handle issimilar.Golf Variant 2007 ➤ , Jetta 2005 ➤General body repairs, exterior - Edition 10.20092. Rear door (Variant) 151 Downloaded from www.Manualslib.com manuals search engine
Protected by copyright. Copying for private or commercial purposes, in partor in whole, is not permitted unless authorised by Volkswagen AG. Volkswagen AG does notguarantee or accept any liability with respect to the correctness ofinformation in this document.Copyright by Volkswagen AG.2.10.1Removing–Remove housing ⇒ page 151 .–Lever clip -2- out of door handle -1-.–Swivel door handle -1- out of door -arrow-.2.10.2Installing–Guide assembly tool -T10118- into door through opening indoor outer panel.–Use a hand torch to illuminate inside of door for improved vis‐ibility.–Hook assembly tool -T10118- in spring -arrow A-.–Hook spring onto door lock by pulling assembly tool -T10118--arrow B-.The release lever is now secured.Golf Variant 2007 ➤ , Jetta 2005 ➤General body repairs, exterior - Edition 10.2009152 Rep. Gr.58 - Rear doors, door components Downloaded from www.Manualslib.com manuals search engine
Protected by copyright. Copying for private or commercial purposes, in partor in whole, is not permitted unless authorised by Volkswagen AG. Volkswagen AG does notguarantee or accept any liability with respect to the correctness ofinformation in this document.Copyright by Volkswagen AG.NoteHooking the spring into the operating lever secures the lock. This prevents incorrect attachment of the Bowdencable to the door handle later.–Swivel door handle -1- into door.–Pull clip -2- in the panel opening and engage clip in door han‐dle -1- -arrow-.Note♦Press door handle -1- against door panel when assembling.♦Clip -2- must engage in door handle -1- with a clearly audibleclick.–Install housing ⇒ page 151 .Then always check function while door is still open, as an incor‐rectly fitted and adjusted Bowden cable cannot open the door.Golf Variant 2007 ➤ , Jetta 2005 ➤General body repairs, exterior - Edition 10.20092. Rear door (Variant) 153 Downloaded from www.Manualslib.com manuals search engine
Protected by copyright. Copying for private or commercial purposes, in partor in whole, is not permitted unless authorised by Volkswagen AG. Volkswagen AG does notguarantee or accept any liability with respect to the correctness ofinformation in this document.Copyright by Volkswagen AG.2.11Removing and installing bearing bracket2.11.1RemovingNoteRemoval and installation are described only for the right bearingbracket. The removal and installation of the left bearing bracketis similar.–Remove housing ⇒ page 151 .–Remove door handle ⇒ page 152 .–Remove door assembly carrier ⇒ page 145 .–Remove bolt -3- from bearing plate -1-.–Remove bearing plate -1- inwards in -direction of arrow- out ofdoor cut-out in door -2-.2.11.2Installing–Insert bearing plate -1- into door -2- in -direction of arrow-.Further installation is performed in reverse order of removal.–Specified torque for bolt -3-: 4.5 Nm.Golf Variant 2007 ➤ , Jetta 2005 ➤General body repairs, exterior - Edition 10.2009154 Rep. Gr.58 - Rear doors, door components Downloaded from www.Manualslib.com manuals search engine
Protected by copyright. Copying for private or commercial purposes, in partor in whole, is not permitted unless authorised by Volkswagen AG. Volkswagen AG does notguarantee or accept any liability with respect to the correctness ofinformation in this document.Copyright by Volkswagen AG.2.12Removing and installing door lockNoteThe removal and installation sequence is only for the right doorlock. The removal and installation of the left door lock is similar.2.12.1Removing–Remove door assembly carrier ⇒ page 145 .–Turn assembly carrier around and pull connections -4- off doorlock -5-.–Drive clip -2- out using a punch.–Lever door lock -5- with retaining bracket -1- out of assemblycarrier using a screwdriver.NoteThe retaining bracket is not supplied with the door lock -5-. Thedoor lock is pushed onto the retaining bracket -1- and securedwith a pop rivet -6-.–Unclip Bowden cable -1- from door lock.–Turn cable nipple through 90° -arrow- and remove cable fromeye.2.12.2InstallingInstall in reverse order of removal.•Then always check function while door is still open, as an in‐correctly fitted and adjusted Bowden cable cannot open thedoor.2.13Door inner sealsDuring production, a sealant is applied to the door inner seals,which are then placed on the door flange and rolled on.Note♦When seals are removed, the sealant will spread to the insideof the seal and the flanks will be bent out slightly. If the seal isthen refitted, a tight seal is not guaranteed.♦Therefore each seal which is removed completely should bereplaced by a so-called “tap-on” seal.♦If a seal has been partially removed, squeeze sides of sealtogether before refitting.Golf Variant 2007 ➤ , Jetta 2005 ➤General body repairs, exterior - Edition 10.20092. Rear door (Variant) 155 Downloaded from www.Manualslib.com manuals search engine
Protected by copyright. Copying for private or commercial purposes, in partor in whole, is not permitted unless authorised by Volkswagen AG. Volkswagen AG does notguarantee or accept any liability with respect to the correctness ofinformation in this document.Copyright by Volkswagen AG.2.14Removing and installing door inner sealNoteThe removal and installation sequence is only for the left doorinner seal. The removal and installation of the right door inner sealis similar.2.14.1Removing–Pull door inner seal -1- off body flange.2.14.2Installing–Align door inner seal -1- so that vulcanised point -arrow b- isat same height as lower hinge.Golf Variant 2007 ➤ , Jetta 2005 ➤General body repairs, exterior - Edition 10.2009156 Rep. Gr.58 - Rear doors, door components Downloaded from www.Manualslib.com manuals search engine
Protected by copyright. Copying for private or commercial purposes, in partor in whole, is not permitted unless authorised by Volkswagen AG. Volkswagen AG does notguarantee or accept any liability with respect to the correctness ofinformation in this document.Copyright by Volkswagen AG.–Start installing door inner seal at top radius -arrow a- of dooraperture.2.15Removing and installing door outer sealNote♦Removal and installation are described only for the right doorouter seal. Removal and installation of the left door outer sealare similar.♦Remove protective backing immediately before installation.Working temperature approx. 20 °C.♦Adhesive remover -D 002 000 10- must be used exclusively.♦The door outer seal must be bonded in place immediately aftercleaning.Golf Variant 2007 ➤ , Jetta 2005 ➤General body repairs, exterior - Edition 10.20092. Rear door (Variant) 157 Downloaded from www.Manualslib.com manuals search engine
Protected by copyright. Copying for private or commercial purposes, in partor in whole, is not permitted unless authorised by Volkswagen AG. Volkswagen AG does notguarantee or accept any liability with respect to the correctness ofinformation in this document.Copyright by Volkswagen AG.2.15.1Removing–Pull door outer seal -1- off door -2-.2.15.2Installing–Remove adhesive residues with erasure disc of adhesive stripremover -VAS 6349- .–Immediately before bonding outer seal for door, clean bondingsurface thoroughly with adhesive remover -D 002 000 10- .•Bonding surfaces must be free of dust and grease and thereshould be no adhesive residues.–The vulcanised point -arrow b- of door outer seal -1- must belocated in centre of sill.Golf Variant 2007 ➤ , Jetta 2005 ➤General body repairs, exterior - Edition 10.2009158 Rep. Gr.58 - Rear doors, door components Downloaded from www.Manualslib.com manuals search engine
Protected by copyright. Copying for private or commercial purposes, in partor in whole, is not permitted unless authorised by Volkswagen AG. Volkswagen AG does notguarantee or accept any liability with respect to the correctness ofinformation in this document.Copyright by Volkswagen AG.–Pull off protective backing and start fitting seal in upper radius-arrow a- of door. Do not pull door outer seal excessively toavoid stretching seal.–Press complete bonding surface of seal -3- onto door -1- allaround using roller -3356- .–To do this, push seal aside -arrow a- so that the roller -3356-runs directly over the contact surface of the seal.The roller can apply the necessary force -arrow b- to the bondingsurface -2- only when procedure described above is followed.–If the seal has stretched, cut seal to required length and presson butt joint well.–If seal -3- comes loose in small areas again, press seal on wellagain using roller -3356- .NoteThe door must not be closed for a period of 2 hours to ensure the door outer seal does not move or loosenagain.Golf Variant 2007 ➤ , Jetta 2005 ➤General body repairs, exterior - Edition 10.20092. Rear door (Variant) 159 Downloaded from www.Manualslib.com manuals search engine
Protected by copyright. Copying for private or commercial purposes, in partor in whole, is not permitted unless authorised by Volkswagen AG. Volkswagen AG does notguarantee or accept any liability with respect to the correctness ofinformation in this document.Copyright by Volkswagen AG.Golf Variant 2007 ➤ , Jetta 2005 ➤General body repairs, exterior - Edition 10.2009160 Rep. Gr.58 - Rear doors, door components Downloaded from www.Manualslib.com manuals search engine
Protected by copyright. Copying for private or commercial purposes, in partor in whole, is not permitted unless authorised by Volkswagen AG. Volkswagen AG does notguarantee or accept any liability with respect to the correctness ofinformation in this document.Copyright by Volkswagen AG.60 –Sunroof1Sliding/tilting sunroof with glass pan‐el (Meritor)1.1ToolsSpecial tools and workshopequipment required♦Roller for door insulationfoil -3356-♦Front end hook -3370-♦Torque wrench -V.A.G1783-♦Removal wedge -3409-1.2FunctionAll actions of the sliding/tilting sunroof with glass panel can beperformed with the ignition switched on.After the ignition is switched off, actions can be performed untileither the driver or front passenger door is opened.The opening of the glass panel in sliding or tilting positions canbe preselected using the rotary switch.On the rotary switch there are marks for preset sliding and tiltingpositions of the glass panel.Golf Variant 2007 ➤ , Jetta 2005 ➤General body repairs, exterior - Edition 10.20091. Sliding/tilting sunroof with glass panel (Meritor) 161 Downloaded from www.Manualslib.com manuals search engine
Protected by copyright. Copying for private or commercial purposes, in partor in whole, is not permitted unless authorised by Volkswagen AG. Volkswagen AG does notguarantee or accept any liability with respect to the correctness ofinformation in this document.Copyright by Volkswagen AG.Opening sliding/tilting sunroof to the so called comfort position,prevents to a large extent wind noise while driving, which can oc‐cur when sunroof is fully open.Pre-selector switchThe sliding/tilting sunroof with glass panel is equipped with a forcelimitation (roll back) feature while closing. If the sunroof encoun‐ters an obstruction while closing from tilting or sliding position, itwill open automatically.In addition, there is an emergency closure function. If problemsoccur during closure, the sliding/tilting roof with glass panel canbe forced to shut by pressing the preselector switch when it is inthe “close sliding/tilting roof” position.The roll-back function is disabled when the emergency closurefunction is active.The drive for the sliding/tilting sunroof with glass panel is protec‐ted against overheating by a time limit. The protective mechanismactivates when the sunroof is operated continuously for approx.2 minutes. It is functional again after a cooling-off phase.In the event of power failure, the sliding/tilting sunroof with glasspanel can be moved using a hexagon key directly on the drive.Hexagon key is located in vehicle tool kit.Golf Variant 2007 ➤ , Jetta 2005 ➤General body repairs, exterior - Edition 10.2009162 Rep. Gr.60 - Sunroof Downloaded from www.Manualslib.com manuals search engine
Protected by copyright. Copying for private or commercial purposes, in partor in whole, is not permitted unless authorised by Volkswagen AG. Volkswagen AG does notguarantee or accept any liability with respect to the correctness ofinformation in this document.Copyright by Volkswagen AG.1.3Assembly overview - sliding/tilting sunroof with glass panel1 - Glass panel for sliding/tiltingsunroof (single pane safetyglass)❑Removing and installing⇒ page 166❑Adjusting ⇒ page 1672 - Panel seal❑Renewing ⇒ page 169❑Adjusting ⇒ page 168❑Joint of seal centred atrear3 - Sliding headliner❑Removing and installing⇒ page 1704 - Bolt❑Bolts are microencap‐sulated and must al‐ways be renewed afterloosening.❑Qty. 4❑1.8 Nm5 - Spring slide❑Screwed to slidingheadliner❑Qty. 4❑Can be renewed individ‐ually.❑Removing ⇒ page 1706 - Bellows❑To cover guide plate.❑Removing and installing⇒ page 1647 - Water channel❑Removing ⇒ page 1788 - Latch guide❑Is removed together with guide plate ⇒ page 1789 - End piece upper part❑Clipped to end piece upper part.❑Removing ⇒ page 17810 - End piece lower part❑Can be renewed individually.❑To seal use butyl adhesive sealing cord -AKL 450 005 05- .11 - Carrier unit❑Removing and installing ⇒ page 174❑If needed, guide channels may be greased only with special grease -G 000 450 02- , otherwise correctoperation cannot be guaranteed.12 - Bolt❑Bolts are microencapsulated and must always be renewed after loosening.Golf Variant 2007 ➤ , Jetta 2005 ➤General body repairs, exterior - Edition 10.20091. Sliding/tilting sunroof with glass panel (Meritor) 163 Downloaded from www.Manualslib.com manuals search engine
Protected by copyright. Copying for private or commercial purposes, in partor in whole, is not permitted unless authorised by Volkswagen AG. Volkswagen AG does notguarantee or accept any liability with respect to the correctness ofinformation in this document.Copyright by Volkswagen AG.❑Qty. 3❑3.5 Nm13 - Crank for emergency operation❑Hexagon key is located in vehicle tool kit14 - Electric drive❑Removing and installing ⇒ page 171❑Adjusting drive (0 position) ⇒ page 172 .15 - Spring❑Qty. 2❑Pushes up wind deflector.❑Clipped onto wind deflector and can be renewed individually❑Removing ⇒ page 16916 - Wind deflector❑Removing and installing ⇒ page 16917 - Wind deflector bearing❑Qty. 2❑Clipped onto wind deflector and can be renewed individually❑Removing ⇒ page 16918 - Front guide❑Can be pushed out of guide rail individually.❑Removing ⇒ page 17819 - Lower rear guide❑Is removed together with guide plate ⇒ page 17820 - Torx bolt❑Qty. 3 on each side❑5 Nm21 - Guide plate❑Removing and installing ⇒ page 17722 - Spacer❑Removing and installing ⇒ page 1771.4Removing and installing bellows1.4.1Removing–Slide sliding headlining to rear.–Run sliding/tilting sunroof glass panel to tilted position.–Carefully unclip bellows -1- from lower part of guide plate -3-using a removal wedge -3409- .–Pull bellows -1- off securing pins -4-.–Detach bellows -1- at top rear -2-.Golf Variant 2007 ➤ , Jetta 2005 ➤General body repairs, exterior - Edition 10.2009164 Rep. Gr.60 - Sunroof Downloaded from www.Manualslib.com manuals search engine
Protected by copyright. Copying for private or commercial purposes, in partor in whole, is not permitted unless authorised by Volkswagen AG. Volkswagen AG does notguarantee or accept any liability with respect to the correctness ofinformation in this document.Copyright by Volkswagen AG.–Remove bellows -1-.1.4.2Installing–Slide sliding headlining to rear.–Run sliding/tilting sunroof glass panel to tilted position.–Fit bellows -1- first at top rear -2-.–Clip bellows -1- in securing pins -4- in guide plate.Golf Variant 2007 ➤ , Jetta 2005 ➤General body repairs, exterior - Edition 10.20091. Sliding/tilting sunroof with glass panel (Meritor) 165 Downloaded from www.Manualslib.com manuals search engine
Protected by copyright. Copying for private or commercial purposes, in partor in whole, is not permitted unless authorised by Volkswagen AG. Volkswagen AG does notguarantee or accept any liability with respect to the correctness ofinformation in this document.Copyright by Volkswagen AG.–Hook in bellows -1- at bottom front and clip in bellows in lowerpart of guide plate -3-.1.5Removing and installing sliding/tiltingsunroof glass panel1.5.1Removing–Remove bellows ⇒ page 164 .Golf Variant 2007 ➤ , Jetta 2005 ➤General body repairs, exterior - Edition 10.2009166 Rep. Gr.60 - Sunroof Downloaded from www.Manualslib.com manuals search engine
Protected by copyright. Copying for private or commercial purposes, in partor in whole, is not permitted unless authorised by Volkswagen AG. Volkswagen AG does notguarantee or accept any liability with respect to the correctness ofinformation in this document.Copyright by Volkswagen AG.–Remove bolts -1- on left and right.–Remove sliding/tilting sunroof glass panel -2- out upwards.CautionThe guide plate must not moved to “Open” position when re‐moved, because the water channel will not be compressed bythe glass panel and can become wedged together in the roof.1.5.2Installing•Panel must be installed in the zero position (panel closed).Zero position:The mark -arrow- on the rear of the guide upper section -1- must,on both sides, lie within the marks dimension -a- on the guideplate -2-.The guide plate -2- must be located in the guide rails (cannot bemoved by hand).If this is not the case, adjust parallel running ⇒ page 173 .–Insert sliding/tilting sunroof glass panel -2- from above and fitbolts -1-.–Lightly tighten bolts -1-.–Adjust sliding/tilting sunroof glass panel (height adjustment)⇒ page 167 .Note♦After adjusting panel height, tighten securing screws (5 Nm).♦Install bellows after adjusting height of panel ⇒ page 164 .1.6Adjusting height of sliding/tilting sunroofglass panelNoteThe glass panel height adjustment is performed after the glasspanel has been closed from tilt position.Sliding/tilting sunroof glass panel 0 (zero) position OK (checking⇒ page 167 ).Golf Variant 2007 ➤ , Jetta 2005 ➤General body repairs, exterior - Edition 10.20091. Sliding/tilting sunroof with glass panel (Meritor) 167 Downloaded from www.Manualslib.com manuals search engine
Protected by copyright. Copying for private or commercial purposes, in partor in whole, is not permitted unless authorised by Volkswagen AG. Volkswagen AG does notguarantee or accept any liability with respect to the correctness ofinformation in this document.Copyright by Volkswagen AG.–Remove bellows ⇒ page 164 .–Loosen sliding/tilting sunroof glass panel -2- securing bolts-1- on left and right (do not remove).–Run sliding/tilting sunroof glass panel to “open” position.–Run sliding/tilting sunroof glass panel to “closed” position.–Carry out height adjustment of sliding/tilting sunroof glass pan‐el at front and rear on both sides as follows:Front panel adjustment:-a- = 0…1 mm lower than roof-Arrow- points forwards–Tighten foremost left and right bolts (5 Nm).Rear panel adjustment:-b- = 0…1 mm higher than roof-Arrow- = Forwards–First tighten middle and then rear bolts on left and right (5 Nm).Note♦To achieve the best possible optical appearance, ensure thatadjustments on left and right are as far as is possible uniform(symmetric).♦The glass panel should not be higher than the roof at any pointat the front or lower than the roof at any point at the rear.–Install bellows ⇒ page 164 .1.7Adjusting panel seal–Check that the pre-loading between panel seal -2- and bodyis uniform all-round using a 0.3 mm thick strip of paper (a vis‐iting card for example).•It must be possible to pull the paper strip through tightly be‐tween the panel seal and body.If this is not the case:–Removing glass panel for sunroof ⇒ page 166 .–If the pressure is too little, roof seal -2- can be pushed apartwith removal wedge -3409- -1-.Golf Variant 2007 ➤ , Jetta 2005 ➤General body repairs, exterior - Edition 10.2009168 Rep. Gr.60 - Sunroof Downloaded from www.Manualslib.com manuals search engine
Protected by copyright. Copying for private or commercial purposes, in partor in whole, is not permitted unless authorised by Volkswagen AG. Volkswagen AG does notguarantee or accept any liability with respect to the correctness ofinformation in this document.Copyright by Volkswagen AG.–If the pressure is too great, roof seal -1- can be pushed to‐gether all round by rolling with roller -3356- .1.8Renewing panel seal–Removing glass panel for sunroof ⇒ page 166 .–Pull seal -1- off sliding/tilting sunroof glass panel -2-.–Fit new seal -1- to rear edge of panel, start in middle and pushonto sliding/tilting sunroof glass panel -2- from bottom to top.Note♦To ease fitting of seal, coat panel edge with a soapy solution.♦If the seal is not correctly installed, the surface will ripple.♦The panel seal must be shortened to suit the panel circumfer‐ence.–Install sliding/tilting roof glass panel ⇒ page 166 .–Adjust panel seal ⇒ page 168 .1.9Removing and installing wind deflector1.9.1Removing–Fully open sliding/tilting sunroof glass panel.–Push wind deflector and height limit stop out of front of roofaperture and set wind deflector vertical.Golf Variant 2007 ➤ , Jetta 2005 ➤General body repairs, exterior - Edition 10.20091. Sliding/tilting sunroof with glass panel (Meritor) 169 Downloaded from www.Manualslib.com manuals search engine
Protected by copyright. Copying for private or commercial purposes, in partor in whole, is not permitted unless authorised by Volkswagen AG. Volkswagen AG does notguarantee or accept any liability with respect to the correctness ofinformation in this document.Copyright by Volkswagen AG.–Insert front-end hook -3370- between edge of roof and winddeflector bearing -arrow-.–Pull wind deflector bearings out of detents on left and right, indirection of -arrow-, using front-end hook -3370- .–Remove wind deflector upwards out of guide rails.1.9.2Installing–Place wind deflector in guide rails and slide wind deflector withheight limit stop under front of roof aperture on both sides.–Using light pressure press wind deflector bearings into guiderails.NoteWind deflector bearings must audibly engage in the guide rails.1.10Removing and installing sliding headlin‐er1.10.1Removing–Removing glass panel for sunroof ⇒ page 166 .–Move sliding headliner backwards slightly.–Remove front bolts -arrow- on left and right.–Push spring slide forwards past the stop -1-.–Move sliding headliner forwards and lift sliding headlinerslightly above roof aperture.–Remove rear bolt -arrow- on left and right.–Push spring slide to rear and remove sliding headliner -1- outupwards.Golf Variant 2007 ➤ , Jetta 2005 ➤General body repairs, exterior - Edition 10.2009170 Rep. Gr.60 - Sunroof Downloaded from www.Manualslib.com manuals search engine
Protected by copyright. Copying for private or commercial purposes, in partor in whole, is not permitted unless authorised by Volkswagen AG. Volkswagen AG does notguarantee or accept any liability with respect to the correctness ofinformation in this document.Copyright by Volkswagen AG.1.10.2InstallingInstall in reverse order of removal.Finally carry out a functional check.1.11Removing and installing sliding/tiltingsunroof glass panel drive1.11.1Removing–Removing lights and front operating unit ⇒ Electrical system;Rep. Gr. 96 ; Lights and switches in roof trim .Motor change - preselction switch recognition:Note♦To interrupt the authorization signal and therefore to activatethe switch recognition, the requirements described below mustbe fulfilled.♦If this is not the case, it can lead to, that the drive does notcorrectly recognise the preselection switch and does not runto the selected positions. This can be seen if the sunroof stopsapprox. 10 cm before the fully closed position when the switchis in the closed position.CautionRemove or install drive for tilting/sliding sunroof glass panelonly when sunroof is closed (0 position ).The requirements for removing and installing drive are: enginenot running and ignition off, key not in ignition and door open.–Switch off engine and ignition, withdraw key and open door.This condition must remain until drive has been installed.–Remove screws -arrows- and pull off sliding/tilting sunroofdrive.–Separate connector for sliding/tilting sunroof drive.1.11.2InstallingThe screws for the sliding/tilting sunroof drive are microencapsu‐lated and must always be renewed (3.5 Nm).Install in reverse order of removal.After installation is complete, key can be inserted into lock cylin‐der of ignition/starter switch again.Golf Variant 2007 ➤ , Jetta 2005 ➤General body repairs, exterior - Edition 10.20091. Sliding/tilting sunroof with glass panel (Meritor) 171 Downloaded from www.Manualslib.com manuals search engine
Protected by copyright. Copying for private or commercial purposes, in partor in whole, is not permitted unless authorised by Volkswagen AG. Volkswagen AG does notguarantee or accept any liability with respect to the correctness ofinformation in this document.Copyright by Volkswagen AG.–Finally carry out a functional check.1.12Adjusting drive for sliding/tilting sunroofglass panel (0 position)There may be a requirement to adjust the zero (0) position if thedrive was removed when not in the zero position or the sliding/tilting sunroof glass panel was opened or closed using the emer‐gency key.•Drive removed but still connected electrically.–Select “open sunroof” using preselection control rotary switch.–Select “close sunroof” using preselection control rotary switch.–Select “tilt sunroof” using preselection control rotary switch.–Select “close sunroof” using preselection control rotary switch.–Install drive in this position (zero position) with sunroof closed.The sliding/tilting sunroof glass panel drive is in zero (0) position,if a white dot can be seen in the drive aperture -arrow-.1.13Removing and installing sliding/tiltingsunroof glass panel automatic preselec‐tion switch–Removing preselector for sliding/tilting sunroof roof glass pan‐el ⇒ Electrical system; Rep. Gr. 96 ; Lights and switches inroof trim .1.14Checking parallel running–Removing glass panel for sunroof ⇒ page 166 .Golf Variant 2007 ➤ , Jetta 2005 ➤General body repairs, exterior - Edition 10.2009172 Rep. Gr.60 - Sunroof Downloaded from www.Manualslib.com manuals search engine
Protected by copyright. Copying for private or commercial purposes, in partor in whole, is not permitted unless authorised by Volkswagen AG. Volkswagen AG does notguarantee or accept any liability with respect to the correctness ofinformation in this document.Copyright by Volkswagen AG.The mark -arrow- on the rear of the guide upper section -1- must,on both sides, lie within the marks dimension -a- on the guideplate -2-.•The guide plate -2- must be located in the guide rails (cannotbe moved by hand).1.15Adjusting parallel runningNoteThe parallel running adjustment can only be made when the driveand glass panel are removed ("0" position).–Remove sliding/tilting sunroof glass panel drive ⇒ page 171 .The mark -arrow- on the rear of the guide upper section -1- must,on both sides, lie within the marks dimension -a- on the guideplate -2-.•The guide plate -2- must be located in the guide rails (cannotbe moved by hand).–Push guide upper part -1- both sides centrally between themarks.–Install drive in this position (zero position) ⇒ page 171 .–Then check zero position ⇒ page 172 .Golf Variant 2007 ➤ , Jetta 2005 ➤General body repairs, exterior - Edition 10.20091. Sliding/tilting sunroof with glass panel (Meritor) 173 Downloaded from www.Manualslib.com manuals search engine
Protected by copyright. Copying for private or commercial purposes, in partor in whole, is not permitted unless authorised by Volkswagen AG. Volkswagen AG does notguarantee or accept any liability with respect to the correctness ofinformation in this document.Copyright by Volkswagen AG.1.16Assembly overview - carrier unit1 - Carrier unit❑Removing and installing⇒ page 1742 - Bolt❑Qty. 12❑8 Nm3 - Connector4 - Sliding/tilting sunroof glasspanel drive❑Removing and installing⇒ page 1711.17Removing and installing carrier unitCautionRemove or install drive for tilting/sliding sunroof glass panelonly when sunroof is closed (0 position ).The requirements for removing and installing drive are: enginenot running and ignition off, key not in ignition and door open.1.17.1RemovingCautionCarry out following sequences using extreme care so as not todamage the moulded headliner.–Lower moulded headliner (moulded headliner is not removedfrom the vehicle, the front seats and front passenger door areGolf Variant 2007 ➤ , Jetta 2005 ➤General body repairs, exterior - Edition 10.2009174 Rep. Gr.60 - Sunroof Downloaded from www.Manualslib.com manuals search engine
Protected by copyright. Copying for private or commercial purposes, in partor in whole, is not permitted unless authorised by Volkswagen AG. Volkswagen AG does notguarantee or accept any liability with respect to the correctness ofinformation in this document.Copyright by Volkswagen AG.not removed) ⇒ General body repairs, interior; Rep. Gr. 70 ;Roof trims .–Pull water drain hoses -arrows- off carrier unit -1-.–Separate connector -3- on sliding/tilting sunroof glass paneldrive -4-.–Remove bolts -2- and remove carrier unit -1- from vehicle withthe help of a second mechanic.1.17.2InstallingCautionCarry out following sequences using extreme care so as not todamage the moulded headliner.–Fit carrier unit -1- into roof aperture with the help of a secondmechanic.–During installation align carrier unit -1- in roof using two cylin‐drical pins (shank end of drill) 12 mm front right and 10 mmrear left.Golf Variant 2007 ➤ , Jetta 2005 ➤General body repairs, exterior - Edition 10.20091. Sliding/tilting sunroof with glass panel (Meritor) 175 Downloaded from www.Manualslib.com manuals search engine
Protected by copyright. Copying for private or commercial purposes, in partor in whole, is not permitted unless authorised by Volkswagen AG. Volkswagen AG does notguarantee or accept any liability with respect to the correctness ofinformation in this document.Copyright by Volkswagen AG.Carrier unit must not contact roof frame.–Install bolts -2-.–Check routing of wiring and connectors of electrical consum‐ers in roof and correct as necessary.–Tighten screws (8 Nm) for carrier unit -1-, starting at sunroofdrive -4- and moving rearward, alternating between left andright sides.–Install water drain hoses -arrows-.–Attach connector -3- on sliding/tilting sunroof glass panel drive-4-.–Install moulded headliner ⇒ General body repairs, interior;Rep. Gr. 70 ; Roof trims .Golf Variant 2007 ➤ , Jetta 2005 ➤General body repairs, exterior - Edition 10.2009176 Rep. Gr.60 - Sunroof Downloaded from www.Manualslib.com manuals search engine
Protected by copyright. Copying for private or commercial purposes, in partor in whole, is not permitted unless authorised by Volkswagen AG. Volkswagen AG does notguarantee or accept any liability with respect to the correctness ofinformation in this document.Copyright by Volkswagen AG.1.18Operating without currentNoteIn the event of power failure, the sliding/tilting sunroof with glasspanel can be moved using a hexagon key directly on the drive.Hexagon key is located in vehicle tool kit.–Removing lights and front operating unit ⇒ Electrical system;Rep. Gr. 96 ; Lights and switches in roof trim .–Guide hexagon key into bolt on drive.–Press key upwards -arrow- to release the drive.The bolt will be pressed a few millimetres inwards -a-. Sliding/tilting sunroof glass panel can only be moved in this position.1.19Removing and installing guide plate1.19.1Removing–Removing glass panel for sunroof ⇒ page 166 .–Using a screwdriver, unclip spacer -2- from guide plate -1- atfront and rear -arrows-.–Pull spacer -2- in -direction of arrow- out of guide plate -1-.–Lift guide plate up -1- in -direction of arrow-.Golf Variant 2007 ➤ , Jetta 2005 ➤General body repairs, exterior - Edition 10.20091. Sliding/tilting sunroof with glass panel (Meritor) 177 Downloaded from www.Manualslib.com manuals search engine
Protected by copyright. Copying for private or commercial purposes, in partor in whole, is not permitted unless authorised by Volkswagen AG. Volkswagen AG does notguarantee or accept any liability with respect to the correctness ofinformation in this document.Copyright by Volkswagen AG.–Slide front guide -2- forwards and pull guide plate -1- in-direction of arrow- out of front guide -2-.1.19.2InstallingInstall in reverse order of removal.1.20Removing and installing guide plate1.20.1RemovingNoteAlways renew guides with cables as a pair.–Removing glass panel for sunroof ⇒ page 166 .–Remove sliding/tilting sunroof glass panel drive ⇒ page 171 .–Remove carrier unit ⇒ page 174 .–Remove guide plate ⇒ page 177 .–Detach water channels -1- carefully using a screwdriver atboth sides on guide locating hook -2- in -direction of arrow-and remove water channels.–Release end piece upper part -1- fastening -arrows- from endpiece lower part -2- and pull off upwards.Golf Variant 2007 ➤ , Jetta 2005 ➤General body repairs, exterior - Edition 10.2009178 Rep. Gr.60 - Sunroof Downloaded from www.Manualslib.com manuals search engine
Protected by copyright. Copying for private or commercial purposes, in partor in whole, is not permitted unless authorised by Volkswagen AG. Volkswagen AG does notguarantee or accept any liability with respect to the correctness ofinformation in this document.Copyright by Volkswagen AG.–Slide rear guide lower part -1- in -direction of arrow- in guiderail -3-, until the locating hook guide locking mechanism -2- isreleased.–Pull out rear guide lower part -1- and locking hook guide -2-together in -direction of arrow- from guide rail -3- and remove.1.20.2InstallingInstall in reverse order of removal.1.21Cleaning water drain hosesNoteFor cleaning, a locally manufactured tool made from a speedom‐eter inner cable, approx. 2300 mm long is recommended.Golf Variant 2007 ➤ , Jetta 2005 ➤General body repairs, exterior - Edition 10.20091. Sliding/tilting sunroof with glass panel (Meritor) 179 Downloaded from www.Manualslib.com manuals search engine
Protected by copyright. Copying for private or commercial purposes, in partor in whole, is not permitted unless authorised by Volkswagen AG. Volkswagen AG does notguarantee or accept any liability with respect to the correctness ofinformation in this document.Copyright by Volkswagen AG.1.21.1Front water drain hosesThe front water drain hoses run through the A-pillars and end atthe bulkhead cross member. Cleaning is done from the sunroofpanel aperture.Golf Variant 2007 ➤ , Jetta 2005 ➤General body repairs, exterior - Edition 10.2009180 Rep. Gr.60 - Sunroof Downloaded from www.Manualslib.com manuals search engine
Protected by copyright. Copying for private or commercial purposes, in partor in whole, is not permitted unless authorised by Volkswagen AG. Volkswagen AG does notguarantee or accept any liability with respect to the correctness ofinformation in this document.Copyright by Volkswagen AG.1.21.2Rear water drain hosesThe rear water drain hoses run through the C-pillars and end inthe rear wheel housings. Cleaning is done from the wheel hous‐ing. The wheel housing liner must be removed ⇒ page 323 .Golf Variant 2007 ➤ , Jetta 2005 ➤General body repairs, exterior - Edition 10.20091. Sliding/tilting sunroof with glass panel (Meritor) 181 Downloaded from www.Manualslib.com manuals search engine
Protected by copyright. Copying for private or commercial purposes, in partor in whole, is not permitted unless authorised by Volkswagen AG. Volkswagen AG does notguarantee or accept any liability with respect to the correctness ofinformation in this document.Copyright by Volkswagen AG.2Panorama sliding sunroof (Arvin-Meritor)2.1ToolsSpecial tools and workshop equipment required♦Roller for door insulation foil -3356-♦Torque wrench -V.A.G 1783-♦Adhesive strip remover -VAS 6349-2.2FunctionAll actions of the panorama sliding roof can be performed withignition switched on.After the ignition is switched off, actions can be performed untileither the driver or front passenger door is opened.Golf Variant 2007 ➤ , Jetta 2005 ➤General body repairs, exterior - Edition 10.2009182 Rep. Gr.60 - Sunroof Downloaded from www.Manualslib.com manuals search engine
Protected by copyright. Copying for private or commercial purposes, in partor in whole, is not permitted unless authorised by Volkswagen AG. Volkswagen AG does notguarantee or accept any liability with respect to the correctness ofinformation in this document.Copyright by Volkswagen AG.Opening of front glass panel can be preselected using rotaryswitch -1-.Opening glass panel to the so called comfort position -4-, pre‐vents to a large extent wind noise while driving, which can occurwhen roof is fully open.Glass panel can be tilted and closed using pull and push functionon rotary switch.Sun blind opening button -2- and sun blind closing button -3- areintegrated into rotary switch.The panorama sliding roof is equipped with a roll-back function.If the glass panel encounters an obstruction while closing fromtilting or sliding position, it will open automatically.In addition, there is an emergency closure function. If problemsoccur during closure, panorama sliding roof can be forced to closeby pulling rear end of rotary switch. Rotary switch must thus be in“Sliding sunroof closed” position.The roll-back function is disabled when the emergency closurefunction is active.The sliding sunroof motor is equipped with an overheating pro‐tection, whose activation depends on various parameters. Thesliding sunroof motor is functional again after a cooling-off phase.In the event of power failure, front glass panel and sun blind canbe moved manually ⇒ page 217 .2.3Establishing reference points of panor‐ama sliding roofNote♦After renewal of glass panel, motor, tilting mechanism or sunblind, establish reference points of panorama sliding roof forrespective drive.♦Roll-back function is switched off when establishing referencepoints.Establishing reference points of sliding sunroof motorIgnition is switched on.Rotary switch must be in “Sliding sunroof closed” position.–Pull rotary switch -1- downwards and hold during whole proc‐ess to establish reference points (approx. 20 s) in this position.–When establishing reference points, glass panel first closesand then moves approx. 200 mm towards the rear.–After glass panel is closed again, establishment of referencepoints is finished and rotary switch must be released.Establishing reference points for sun blind motorIgnition is switched on.Golf Variant 2007 ➤ , Jetta 2005 ➤General body repairs, exterior - Edition 10.20092. Panorama sliding sunroof (Arvin-Meritor) 183 Downloaded from www.Manualslib.com manuals search engine
Protected by copyright. Copying for private or commercial purposes, in partor in whole, is not permitted unless authorised by Volkswagen AG. Volkswagen AG does notguarantee or accept any liability with respect to the correctness ofinformation in this document.Copyright by Volkswagen AG.–Press sun blind closing button -3- and hold during wholestandardization run (approx. 20 s) in this position.–When establishing reference points, sun blind first closes andthen moves approx. 200 mm towards the rear.–After sun blind is closed completely again, establishment ofreference points is finished and button must be released.2.4Assembly overview - panorama sliding roof1 - Exterior seal❑Renewing ⇒ page 1912 - Rear glass panel❑Removing and installing⇒ page 187❑Adjusting ⇒ page 1883 - Front glass panel❑Removing and installing⇒ page 185❑Adjusting ⇒ page 1884 - Assembly frame❑Assembly overview⇒ page 203❑Removing and installing⇒ page 2075 - Sun blind❑Removing and installing⇒ page 1996 - Sun blind motor❑Removing and installing⇒ page 198❑Standardization⇒ page 1837 - Sliding sunroof motor❑Removing and installing⇒ page 196❑Standardization⇒ page 1838 - Tilting mechanism❑Removing and installing⇒ page 2159 - Wind deflector❑Removing and installing ⇒ page 193Golf Variant 2007 ➤ , Jetta 2005 ➤General body repairs, exterior - Edition 10.2009184 Rep. Gr.60 - Sunroof Downloaded from www.Manualslib.com manuals search engine
Protected by copyright. Copying for private or commercial purposes, in partor in whole, is not permitted unless authorised by Volkswagen AG. Volkswagen AG does notguarantee or accept any liability with respect to the correctness ofinformation in this document.Copyright by Volkswagen AG.2.5Removing and installing front glass pan‐el2.5.1Removing–Open glass panel -1- until trim -2- is accessible.–Unclip locking lugs -3- by pressing together in direction of-arrow A- on back.–First pull off trim panel -2- downwards at rear and then inwardsin direction of -arrow B- and remove it from bolt -4-.–Push trim panel in direction of -arrow C- forwards and remove.Golf Variant 2007 ➤ , Jetta 2005 ➤General body repairs, exterior - Edition 10.20092. Panorama sliding sunroof (Arvin-Meritor) 185 Downloaded from www.Manualslib.com manuals search engine
Protected by copyright. Copying for private or commercial purposes, in partor in whole, is not permitted unless authorised by Volkswagen AG. Volkswagen AG does notguarantee or accept any liability with respect to the correctness ofinformation in this document.Copyright by Volkswagen AG.–Remove bolts -2- from glass panel -1- on left and right.NoteTo remove bolts, use a magnetic tool so that bolts do not fall intomechanism of panorama sliding roof.–Remove glass panel upwards.CautionTo avoid damaging wind deflector, do not move tilting mecha‐nism when glass panel is removed.2.5.2InstallingNote♦Always use new bolts when installing or removing glass panel.♦To screw in bolts, use a magnetic tool so that bolts do not fallinto mechanism of panorama sliding roof.–Set glass panel -1- from top and screw bolts -2- without tight‐ening them.–Adjust front glass panel ⇒ page 188 .–Tighten bolts -2- (5 Nm).–Fit front trim panel -2- into glass panel -1- and slide in directionof -arrow A-.–Push trim panel in direction of -arrow B- onto bolt -4- and cliplocking lugs -4- on back.–On completion of work, establish reference points of slidingsunroof motor ⇒ page 183 .Golf Variant 2007 ➤ , Jetta 2005 ➤General body repairs, exterior - Edition 10.2009186 Rep. Gr.60 - Sunroof Downloaded from www.Manualslib.com manuals search engine
Protected by copyright. Copying for private or commercial purposes, in partor in whole, is not permitted unless authorised by Volkswagen AG. Volkswagen AG does notguarantee or accept any liability with respect to the correctness ofinformation in this document.Copyright by Volkswagen AG.2.6Removing and installing rear glass pan‐el2.6.1RemovingNoteTo remove bolts, use a magnetic tool so that bolts do not fall intomechanism of panorama sliding roof.–Open front glass panel completely by pressing rotary switchbeyond comfort position.–Remove bolts -3- of rear glass panel -1-.–Remove spacer -2- under bolting point.–Move front glass panel into “tilted” position.–Pull inner seal -3- inwards slightly at point -arrow- and removebolts -2-.–Remove rear glass panel upwards -1-.2.6.2InstallingInstall in reverse order of removal.Note♦Always use new bolts when installing or removing glass panel.♦To screw in bolts, use a magnetic tool so that bolts do not fallinto mechanism of panorama sliding roof.Golf Variant 2007 ➤ , Jetta 2005 ➤General body repairs, exterior - Edition 10.20092. Panorama sliding sunroof (Arvin-Meritor) 187 Downloaded from www.Manualslib.com manuals search engine
Protected by copyright. Copying for private or commercial purposes, in partor in whole, is not permitted unless authorised by Volkswagen AG. Volkswagen AG does notguarantee or accept any liability with respect to the correctness ofinformation in this document.Copyright by Volkswagen AG.–Fit glass panel -1- from top into roof.–Install spacer -2- and tighten bolt -3- (5 Nm).–Pull inner seal -3- slightly backwards at -arrow- positions andscrew bolts -2- without tightening them.–Adjust rear glass panel ⇒ page 188 .–After adjusting rear glass panel, tighten bolts (5 Nm).–On completion of work, establish reference points of slidingsunroof motor ⇒ page 183 .2.7Adjusting height of front and rear glasspanelNote♦Front glass panel must only be adjusted on front edge and rearglass panel on rear edge.♦To achieve the best possible optical appearance, ensure thatadjustments on left and right are as far as is possible uniform(symmetric).Golf Variant 2007 ➤ , Jetta 2005 ➤General body repairs, exterior - Edition 10.2009188 Rep. Gr.60 - Sunroof Downloaded from www.Manualslib.com manuals search engine
Protected by copyright. Copying for private or commercial purposes, in partor in whole, is not permitted unless authorised by Volkswagen AG. Volkswagen AG does notguarantee or accept any liability with respect to the correctness ofinformation in this document.Copyright by Volkswagen AG.Checking height adjustment–Check adjustment of front glass panel -1- and rear glass panel-2- with a depth gauge.♦Dimension -a- = 1.5 ± 1 mm♦Dimension -b- = 1 ± 1 mm♦Dimension -c- = 1 ± 1 mmIf measured values differ from specifications, respective glasspanel must be adjusted.♦Adjusting front glass panel ⇒ page 189♦Adjusting rear glass panel ⇒ page 189Adjusting front glass panelNoteThe glass panel height adjustment is performed after the glasspanel has been closed from slide open position.–Remove trim panel ⇒ page 185 .–Loosen only both front bolts -2- left and right for glass panel-1-.–Close glass panel.–Adjust glass panel -1- as shown in illustration.♦Dimension -a- = 1.5 ± 1 mm♦Dimension -b- = 1 ± 1 mm♦Dimension -c- = 1 ± 1 mm–Tighten left and right bolts (5 Nm).–Install trim ⇒ page 186 .Adjusting rear glass panelGolf Variant 2007 ➤ , Jetta 2005 ➤General body repairs, exterior - Edition 10.20092. Panorama sliding sunroof (Arvin-Meritor) 189 Downloaded from www.Manualslib.com manuals search engine
Protected by copyright. Copying for private or commercial purposes, in partor in whole, is not permitted unless authorised by Volkswagen AG. Volkswagen AG does notguarantee or accept any liability with respect to the correctness ofinformation in this document.Copyright by Volkswagen AG.–Pull inner seal -3- slightly backwards at -arrow- positions andremove bolts -2- of rear glass panel -1-.–Adjust rear glass panel -2- as shown in illustration.♦Dimension -a- = 1.5 ± 1 mm♦Dimension -b- = 1 ± 1 mm♦Dimension -c- = 1 ± 1 mm–Tighten left and right bolts (5 Nm).2.8Renewing seals for rear glass panel–Remove rear glass panel ⇒ page 187 .Renew front and inner seals–Pull respective seal -1- off rear glass panel.♦2 Front seal♦3 Inner seal–Remove existing adhesive residue using adhesive strip re‐mover -VAS 6349- .–Bonding surface on glass panel must be free of dust andgrease.–Clean bonding surface completely using cleaning solution -D009 401 04- .NoteTo guarantee a good bonding of seal, do not bond at a tempera‐ture below 20°C.–Remove protective backing from adhesive tape of new sealand press on seal at both ends.–Sprain any seal excess length evenly.–Press in seal evenly using roller for door insulation foil -3356- .–Install rear glass panel ⇒ page 187 .Removing side sealGolf Variant 2007 ➤ , Jetta 2005 ➤General body repairs, exterior - Edition 10.2009190 Rep. Gr.60 - Sunroof Downloaded from www.Manualslib.com manuals search engine
Protected by copyright. Copying for private or commercial purposes, in partor in whole, is not permitted unless authorised by Volkswagen AG. Volkswagen AG does notguarantee or accept any liability with respect to the correctness ofinformation in this document.Copyright by Volkswagen AG.–Remove side seal -2- from profile of rear glass panel -1-.–Remove existing adhesive residue using adhesive strip re‐mover -VAS 6349- .–Bonding surface on glass panel must be free of dust andgrease.–Clean bonding surface completely using cleaning solution -D009 401 04- .Note♦New seal is supplied in excess length. Cut new seal to appro‐priate length. It is recommended to leave new seal 1-2 mmlonger and to sprain any excess length.♦To guarantee a good bonding of seal, do not bond at a tem‐perature below 20°C.–Pull off protective backing from adhesive tape of new seal.–Set new seal -2- with fastener -3- on glass panel -1-.–Press seal on both ends.–Press seal -2- onto profile of glass panel -1- and sprain anyexcess length evenly.–Press in seal evenly using roller for door insulation foil -3356- .–Install rear glass panel ⇒ page 187 .2.9Renewing outer seal–Remove front glass panel ⇒ page 185 .–Remove rear glass panel ⇒ page 187 .Golf Variant 2007 ➤ , Jetta 2005 ➤General body repairs, exterior - Edition 10.20092. Panorama sliding sunroof (Arvin-Meritor) 191 Downloaded from www.Manualslib.com manuals search engine
Protected by copyright. Copying for private or commercial purposes, in partor in whole, is not permitted unless authorised by Volkswagen AG. Volkswagen AG does notguarantee or accept any liability with respect to the correctness ofinformation in this document.Copyright by Volkswagen AG.–Pull out outer seal -1- in bonding area -3- from roof -2-.–Cut off all round profile of outer seal -1- in -arrow- area, flushwith edge of roof -4-.–Remaining part -3- stays between roof -4- and assembly frame-2-.–Remove existing adhesive residue using adhesive strip re‐mover -VAS 6349- .–Entire bonding surface on roof cut-out must be free of dust andgrease.–Clean bonding surface completely using cleaning solution -D009 401 04- .Note♦New seal is supplied in excess length. Cut new seal to appro‐priate length. It is recommended to leave new seal 1-2 mmlonger and to sprain any excess length.♦To guarantee a good bonding of seal, do not bond at a tem‐perature below 20°C.♦After bonding outer seal, wait at least 30 min before fittingglass panel to assure seal does not unstick.Golf Variant 2007 ➤ , Jetta 2005 ➤General body repairs, exterior - Edition 10.2009192 Rep. Gr.60 - Sunroof Downloaded from www.Manualslib.com manuals search engine
Protected by copyright. Copying for private or commercial purposes, in partor in whole, is not permitted unless authorised by Volkswagen AG. Volkswagen AG does notguarantee or accept any liability with respect to the correctness ofinformation in this document.Copyright by Volkswagen AG.–Centre new outer seal -1- with butt -arrow- on rear centre ofroof cut-out.–Pull protective backing from adhesive tape -3- of new outerseal -1- and press seal on roof -2-.–The seal must not pull into the radii, otherwise the seal willstretch and compress.–Press in outer seal evenly and all round twice using roller fordoor insulation foil -3356- .–Install rear glass panel ⇒ page 187 .–Install front glass panel ⇒ page 185 .2.10Renewing inner seal–Remove front glass panel ⇒ page 185 .–Remove rear glass panel ⇒ page 187 .–Pull inner seal -2- off assembly frame -1-.–Remove existing adhesive residue using adhesive strip re‐mover -VAS 6349- .–Bonding surface must be free of dust and grease.–Clean bonding surface completely using cleaning solution -D009 401 04- .NoteTo guarantee a good bonding of seal, do not bond at a tempera‐ture below 20°C.–Place inner seal -2- with butt positioned on rear centre of roofcut-out, onto bonding surface of assembly frame -1-.–Pull protective backing from adhesive tape of new inner sealsection by section and press it on.–The seal must not pull into the radii, otherwise the seal willstretch and compress.–Press inner seal in evenly and all round twice using roller-3356- .–Install rear glass panel ⇒ page 187 .–Install front glass panel ⇒ page 185 .2.11Removing and installing wind deflector2.11.1Removing–Open front glass panel completely.Golf Variant 2007 ➤ , Jetta 2005 ➤General body repairs, exterior - Edition 10.20092. Panorama sliding sunroof (Arvin-Meritor) 193 Downloaded from www.Manualslib.com manuals search engine
Protected by copyright. Copying for private or commercial purposes, in partor in whole, is not permitted unless authorised by Volkswagen AG. Volkswagen AG does notguarantee or accept any liability with respect to the correctness ofinformation in this document.Copyright by Volkswagen AG.–Using a screwdriver, unclip securing clip -3- over mountingbracket -2- of wind deflector -1-.–Using a screwdriver, unclip mounting bracket -2- of wind de‐flector -1- from assembly frame -3-.–Remove bolts -2- from wind deflector -1-.–Remove wind deflector -1- upwards.2.11.2InstallingInstall in reverse order of removal.Specified torqueWind deflector bolts 2 NmGolf Variant 2007 ➤ , Jetta 2005 ➤General body repairs, exterior - Edition 10.2009194 Rep. Gr.60 - Sunroof Downloaded from www.Manualslib.com manuals search engine
Protected by copyright. Copying for private or commercial purposes, in partor in whole, is not permitted unless authorised by Volkswagen AG. Volkswagen AG does notguarantee or accept any liability with respect to the correctness ofinformation in this document.Copyright by Volkswagen AG.Note♦Wind deflector mounting bracket must engage audibly.♦Securing clip of mounting bracket must always be renewedafter removal.2.12Removing and installing wind deflectorbracket2.12.1Removing–Remove wind deflector ⇒ page 193 .–Using a drift -1-, drive dowel pin -3- out of upper net strip -2-.–Pull wind deflector bracket -1- out of net strip -5- in directionof -arrow-.–Pull tensioning wire -2- out of lower net strip -4- and net -3-.2.12.2Installing–Carefully push tensioning wire -2- through net -3- into lowernet strip -4-.Further installation is performed in reverse order of removal.Use a new dowel pin to secure wind deflector bracket.–Install wind deflector ⇒ page 193 .Golf Variant 2007 ➤ , Jetta 2005 ➤General body repairs, exterior - Edition 10.20092. Panorama sliding sunroof (Arvin-Meritor) 195 Downloaded from www.Manualslib.com manuals search engine
Protected by copyright. Copying for private or commercial purposes, in partor in whole, is not permitted unless authorised by Volkswagen AG. Volkswagen AG does notguarantee or accept any liability with respect to the correctness ofinformation in this document.Copyright by Volkswagen AG.2.13Removing and installing preselector forglass panel and sun blind–Removing preselector for panorama sliding roof glass panel⇒ Electrical system; Rep. Gr. 96 ; Lights and switches in rooftrim .2.14Removing and installing sliding sunroofmotor2.14.1Removing–Removing lights and front operating unit ⇒ Electrical system;Rep. Gr. 96 ; Lights and switches in roof trim .WARNINGOn some models, a ribbon cable is bonded to the light cut-outweb. Before removing sliding sunroof motor, carefully detachribbon cable from web and push it to side. Ensure that ribboncable is not damaged when doing this.Golf Variant 2007 ➤ , Jetta 2005 ➤General body repairs, exterior - Edition 10.2009196 Rep. Gr.60 - Sunroof Downloaded from www.Manualslib.com manuals search engine
Protected by copyright. Copying for private or commercial purposes, in partor in whole, is not permitted unless authorised by Volkswagen AG. Volkswagen AG does notguarantee or accept any liability with respect to the correctness ofinformation in this document.Copyright by Volkswagen AG.–Carefully detach ribbon cable -3- (if fitted) from web -1- andpull it to side -arrow-.To access right bolt -4- of sliding sunroof motor -2- with tool, drilla 10 mm ∅ hole in web -1-.Dimension -a- = 10 mmDimension -b- = 2 mmCautionEnsure when drilling hole that sliding roof motor underneath isnot damaged. If necessary, use a drill with depth-control stopand set drilling depth to 3 mm.–Remove bolts -4-.–Slightly lower sliding sunroof motor and tilt it out forwards.–Separate connector.Golf Variant 2007 ➤ , Jetta 2005 ➤General body repairs, exterior - Edition 10.20092. Panorama sliding sunroof (Arvin-Meritor) 197 Downloaded from www.Manualslib.com manuals search engine
Protected by copyright. Copying for private or commercial purposes, in partor in whole, is not permitted unless authorised by Volkswagen AG. Volkswagen AG does notguarantee or accept any liability with respect to the correctness ofinformation in this document.Copyright by Volkswagen AG.2.14.2InstallingWith front glass panel removed:–Pull tilting mechanism fully forwards on both sides until it iscompletely lowered.–Push tilting mechanism on -arrow- areas of slider -2- not onguide plate -3-.Further installation is performed in reverse order of removal.Specified torque for sliding sunroof motor bolts: 3.5 Nm–On completion of work, establish reference points of slidingsunroof motor ⇒ page 183 .2.15Removing and installing sun blind motor2.15.1Removing–Remove moulded headliner ⇒ General body repairs, interior;Rep. Gr. 70 ; Roof trims .–Disconnect connector -1- on sun blind motor -2-.–Remove bolts -arrow- from sun blind motor -2-.–Remove sun blind motor -2-.Golf Variant 2007 ➤ , Jetta 2005 ➤General body repairs, exterior - Edition 10.2009198 Rep. Gr.60 - Sunroof Downloaded from www.Manualslib.com manuals search engine
Protected by copyright. Copying for private or commercial purposes, in partor in whole, is not permitted unless authorised by Volkswagen AG. Volkswagen AG does notguarantee or accept any liability with respect to the correctness ofinformation in this document.Copyright by Volkswagen AG.2.15.2Installing–Before installing motor, adjust sun blind by ensuring paralleldistance -a- between sun blind cross strut -1- and sun blindhousing -2-.Further installation is performed in reverse order of removal.Specified torqueBolts 3.5 Nm–On completion of work, establish reference points of sun blindmotor ⇒ page 183 .2.16Removing and installing sun blind2.16.1Removing–Run sun blind to fully open position.NoteIn the event of power failure, sun blind can be moved by turningsun blind motor with a commercially available hexagon key to re‐moval position (fully open). ⇒ page 217–Remove rear glass panel ⇒ page 187 .–Remove bolt -3- from cap -2-.–Using a screwdriver, unclip fastener -arrow- of cover cap -2-from rear part -4- and tilt cover cap -2- upwards.Inner seal -1- must not be removed for this.Golf Variant 2007 ➤ , Jetta 2005 ➤General body repairs, exterior - Edition 10.20092. Panorama sliding sunroof (Arvin-Meritor) 199 Downloaded from www.Manualslib.com manuals search engine
Protected by copyright. Copying for private or commercial purposes, in partor in whole, is not permitted unless authorised by Volkswagen AG. Volkswagen AG does notguarantee or accept any liability with respect to the correctness ofinformation in this document.Copyright by Volkswagen AG.–Carefully lift sun blind cross strut -3- with sun blind slide -1-.NoteEnsure that sun blind fabric -2- is not damaged.–Pull sun blind slide -1- in direction of -arrow- on side of sunblind cross strut -3-.–Remove moulded headliner ⇒ General body repairs, interior;Rep. Gr. 70 ; Roof trims .–Remove bolts -1- of sun blind housing -2-.–Pull sun blind housing -2- in direction of -arrow- slightly down‐wards to get past sun blind motor -3-.–Pull sun blind housing -2- with sun blind steel strap -4- in di‐rection of -arrow- out of sun blind rail -1-.NoteEnsure that sun blind fabric -3- is not damaged.Sun blind cross strut can be renewed when sun blind is removed.Golf Variant 2007 ➤ , Jetta 2005 ➤General body repairs, exterior - Edition 10.2009200 Rep. Gr.60 - Sunroof Downloaded from www.Manualslib.com manuals search engine
Protected by copyright. Copying for private or commercial purposes, in partor in whole, is not permitted unless authorised by Volkswagen AG. Volkswagen AG does notguarantee or accept any liability with respect to the correctness ofinformation in this document.Copyright by Volkswagen AG.–Carefully pull sun blind cross strut -1- in direction of -arrow-out of beading -3- of sun blind fabric -2-.–Carefully slide sun blind cross strut -1- on beading -3-.NoteEnsure that sun blind fabric -2- is not damaged.2.16.2InstallingNote♦Sun blind cross strut must be fitted before installation of sunblind housing.♦Do not grease sun blind slide and sun blind cables.–Push sun blind housing -2- with sun blind steel strap -4- indirection of -arrow- into sun blind rail -1-.NoteEnsure that sun blind fabric -3- is not damaged.Golf Variant 2007 ➤ , Jetta 2005 ➤General body repairs, exterior - Edition 10.20092. Panorama sliding sunroof (Arvin-Meritor) 201 Downloaded from www.Manualslib.com manuals search engine
Protected by copyright. Copying for private or commercial purposes, in partor in whole, is not permitted unless authorised by Volkswagen AG. Volkswagen AG does notguarantee or accept any liability with respect to the correctness ofinformation in this document.Copyright by Volkswagen AG.Lug -3- of sun blind housing -2- must be inserted under sun blindrail -1-.–Push sun blind slide -1- in direction of -arrow- into sun blindcross strut -4-.NoteEnsure that sun blind slide -1- engages into cut-out of sun blind steel strip -5- and into follower of sun blindcable -2-.Further installation is performed in reverse order of removal.Golf Variant 2007 ➤ , Jetta 2005 ➤General body repairs, exterior - Edition 10.2009202 Rep. Gr.60 - Sunroof Downloaded from www.Manualslib.com manuals search engine
Protected by copyright. Copying for private or commercial purposes, in partor in whole, is not permitted unless authorised by Volkswagen AG. Volkswagen AG does notguarantee or accept any liability with respect to the correctness ofinformation in this document.Copyright by Volkswagen AG.Specified torquesSun blind housing bolt 3.5 NmCover cap bolt 2 NmNoteAfter installation, sun blind synchronism and ease of operationshould be checked. To do this, move by hand sun blind drive onmotor using a commercially available hexagon key and avoidwrinkling and deformation of sun blind fabric.–Install moulded headliner ⇒ General body repairs, interior;Rep. Gr. 70 ; Roof trims .–Install rear glass panel ⇒ page 187 .–On completion of work, establish reference points of sun blindmotor ⇒ page 183 .2.17Assembly overview - assembly frame1 - Sun blind rail❑Cannot be renewed in‐dividually2 - Guide rail❑Cannot be renewed in‐dividually❑Attached to front part3 - Bolt❑2 Nm4 - Rear part❑Removing and installing⇒ page 2095 - Rear motor plate❑Removing and installing⇒ page 2046 - Front motor plate❑Removing and installing⇒ page 2157 - Front part❑Cannot be renewed in‐dividually❑Attached to guide rail8 - Inner seal❑Renewing ⇒ page 193Golf Variant 2007 ➤ , Jetta 2005 ➤General body repairs, exterior - Edition 10.20092. Panorama sliding sunroof (Arvin-Meritor) 203 Downloaded from www.Manualslib.com manuals search engine
Protected by copyright. Copying for private or commercial purposes, in partor in whole, is not permitted unless authorised by Volkswagen AG. Volkswagen AG does notguarantee or accept any liability with respect to the correctness ofinformation in this document.Copyright by Volkswagen AG.2.18Installing and removing motor plate andsun blind cable2.18.1Removing–Remove moulded headliner ⇒ General body repairs, interior;Rep. Gr. 70 ; Roof trims .–Remove sun blind motor ⇒ page 198 .–Remove sun blind ⇒ page 199 .–Remove bolts -arrows- of cable covers -1- and -2-.–Remove cable covers -1- and -2-.Motor plate -3- remains on rear part -4-.Golf Variant 2007 ➤ , Jetta 2005 ➤General body repairs, exterior - Edition 10.2009204 Rep. Gr.60 - Sunroof Downloaded from www.Manualslib.com manuals search engine
Protected by copyright. Copying for private or commercial purposes, in partor in whole, is not permitted unless authorised by Volkswagen AG. Volkswagen AG does notguarantee or accept any liability with respect to the correctness ofinformation in this document.Copyright by Volkswagen AG.–Pull sun blind cables -3- out of discharge tubes -1- and motorplate -4-.–Using an appropriate screwdriver -5-, lever motor plate -5- outof rear part -6-.Golf Variant 2007 ➤ , Jetta 2005 ➤General body repairs, exterior - Edition 10.20092. Panorama sliding sunroof (Arvin-Meritor) 205 Downloaded from www.Manualslib.com manuals search engine
Protected by copyright. Copying for private or commercial purposes, in partor in whole, is not permitted unless authorised by Volkswagen AG. Volkswagen AG does notguarantee or accept any liability with respect to the correctness ofinformation in this document.Copyright by Volkswagen AG.–Lever guide tube -1- out of cable support bracket -4- of rearpart -3-.–Remove cable -2- from sun blind rail -5-.2.18.2InstallingInstall in reverse order of removal.Specified torquesBolt for cable cover: 2 NmNoteDo not grease motor plate and sun blind cables.–Install sun blind ⇒ page 201 .–Install sun blind motor ⇒ page 199 .–Install moulded headliner ⇒ General body repairs, interior;Rep. Gr. 70 ; Roof trims .–On completion of work, establish reference points of all drivesfor panorama sliding roof ⇒ page 183 .Golf Variant 2007 ➤ , Jetta 2005 ➤General body repairs, exterior - Edition 10.2009206 Rep. Gr.60 - Sunroof Downloaded from www.Manualslib.com manuals search engine
Protected by copyright. Copying for private or commercial purposes, in partor in whole, is not permitted unless authorised by Volkswagen AG. Volkswagen AG does notguarantee or accept any liability with respect to the correctness ofinformation in this document.Copyright by Volkswagen AG.2.19Removing and installing assemblyframe2.19.1RemovingNoteA second mechanic is required for removing and installing as‐sembly frame.–Remove moulded headliner ⇒ General body repairs, interior;Rep. Gr. 70 ; Roof trims .Vehicles with net partition:–Remove net partition mounting ⇒ General body repairs, inte‐rior; Rep. Gr. 68 ; Net partition .All vehicles:–Remove grab handle mounting (roof) ⇒ General body repairs,interior; Rep. Gr. 68 ; Grab handles .Golf Variant 2007 ➤ , Jetta 2005 ➤General body repairs, exterior - Edition 10.20092. Panorama sliding sunroof (Arvin-Meritor) 207 Downloaded from www.Manualslib.com manuals search engine
Protected by copyright. Copying for private or commercial purposes, in partor in whole, is not permitted unless authorised by Volkswagen AG. Volkswagen AG does notguarantee or accept any liability with respect to the correctness ofinformation in this document.Copyright by Volkswagen AG.–Pull off water drain hoses from connections -arrows- of as‐sembly frame -1-.–Disconnect connector to wiring harness of sliding sunroof mo‐tor -8-.–Unscrew bolts -3- and -4- of on console -5- and remove leftand right consoles.–Unscrew bolts -2- on assembly frame -1- and remove assem‐bly frame from vehicle with the help of at least one mechanic.2.19.2Installing–Lift assembly frame -1- into vehicle with the help of at least asecond mechanic.–When screwing, align assembly frame using 2 cylindrical pins(shank end of drill ∅ 10mm) in elongated holes -6- and -7-.–Screw bolts -2- in, but do not tighten.–Tighten bolts -3-, specified torque: 8 Nm.–Tighten bolts -4-, specified torque: 4.5 Nm.Golf Variant 2007 ➤ , Jetta 2005 ➤General body repairs, exterior - Edition 10.2009208 Rep. Gr.60 - Sunroof Downloaded from www.Manualslib.com manuals search engine
Protected by copyright. Copying for private or commercial purposes, in partor in whole, is not permitted unless authorised by Volkswagen AG. Volkswagen AG does notguarantee or accept any liability with respect to the correctness ofinformation in this document.Copyright by Volkswagen AG.–First tighten letter marked bolts -2- in alphabetic order to 8 Nm.–Tighten then remaining bolts -2- of assembly frame -1- to8 Nm.Further installation is performed in reverse order of removal.Vehicles with net partition:–Install net partition mounting ⇒ General body repairs, interior;Rep. Gr. 68 ; Net partition .All vehicles:–Install grab handle mounting (roof) ⇒ General body repairs,interior; Rep. Gr. 68 ; Grab handles .–Install moulded headliner ⇒ General body repairs, interior;Rep. Gr. 70 ; Roof trims .2.20Removing and installing rear part2.20.1Removing–Remove assembly frame from vehicle ⇒ page 207 .Golf Variant 2007 ➤ , Jetta 2005 ➤General body repairs, exterior - Edition 10.20092. Panorama sliding sunroof (Arvin-Meritor) 209 Downloaded from www.Manualslib.com manuals search engine
Protected by copyright. Copying for private or commercial purposes, in partor in whole, is not permitted unless authorised by Volkswagen AG. Volkswagen AG does notguarantee or accept any liability with respect to the correctness ofinformation in this document.Copyright by Volkswagen AG.–Pull inner seal -2- off assembly frame -1-.–Remove sun blind ⇒ page 199 .–Loosen wiring harness from rear part.–Remove bolts -2- from guide rail -1-.–Mark position -arrow- of rear part -3- for further assembly.–Separate adhesive bonding -2- between guide rail -1- and rearpart -3- using a knife.–Pull entire rear part -1- with discharge tubes -2- in direction of-arrow- out of guide rail -3-.Golf Variant 2007 ➤ , Jetta 2005 ➤General body repairs, exterior - Edition 10.2009210 Rep. Gr.60 - Sunroof Downloaded from www.Manualslib.com manuals search engine
Protected by copyright. Copying for private or commercial purposes, in partor in whole, is not permitted unless authorised by Volkswagen AG. Volkswagen AG does notguarantee or accept any liability with respect to the correctness ofinformation in this document.Copyright by Volkswagen AG.2.20.2Installing–Remove existing adhesive residue using adhesive strip re‐mover -VAS 6349- .–Clean bonding surfaces on rear part and guide rails with clean‐er -D 009 401 04- .–Press a ∅ 3.5 mm butyl sealing cord -AKD 497 010 04 R10--2- as shown in illustration into adhesive canal on rear part-1-.–Push entire rear part -1- with discharge tubes -2- in directionof -arrow- onto guide rail -3-.–Tighten bolts -2- on guide rail -1- to 2 Nm.NoteBefore installation, it is recommended to check leak tightness ofassembly frame.–Seal water drain hoses -1-.–Fill marked area -3- between rear part -2- and guide rail -4-with water.–Wait for at least 5 minutes before checking leak tightness.–Seal any leaks with butyl sealing cord -AKD 497 010 04 R10- .–Install sun blind ⇒ page 199 .–Install sun blind motor ⇒ page 198 .–Install a new inner seal ⇒ page 193 .–Install assembly frame ⇒ page 208 .–On completion of work, establish reference points of all drivesfor panorama sliding roof ⇒ page 183 .Golf Variant 2007 ➤ , Jetta 2005 ➤General body repairs, exterior - Edition 10.20092. Panorama sliding sunroof (Arvin-Meritor) 211 Downloaded from www.Manualslib.com manuals search engine
Protected by copyright. Copying for private or commercial purposes, in partor in whole, is not permitted unless authorised by Volkswagen AG. Volkswagen AG does notguarantee or accept any liability with respect to the correctness ofinformation in this document.Copyright by Volkswagen AG.2.21Removing and installing front motorplate2.21.1Removing–Remove assembly frame from vehicle ⇒ page 207 .–Remove sliding sunroof motor ⇒ page 196 .–Remove bolts -arrows-.–Remove cable covers -1 and 2-.Front motor plate -3- remains on front part -4-.Golf Variant 2007 ➤ , Jetta 2005 ➤General body repairs, exterior - Edition 10.2009212 Rep. Gr.60 - Sunroof Downloaded from www.Manualslib.com manuals search engine
Protected by copyright. Copying for private or commercial purposes, in partor in whole, is not permitted unless authorised by Volkswagen AG. Volkswagen AG does notguarantee or accept any liability with respect to the correctness ofinformation in this document.Copyright by Volkswagen AG.–Pull ends of cable -1- out of motor plate -2-.–Using appropriate screwdriver -4-, lever motor plate -2- out offront part -3-.Golf Variant 2007 ➤ , Jetta 2005 ➤General body repairs, exterior - Edition 10.20092. Panorama sliding sunroof (Arvin-Meritor) 213 Downloaded from www.Manualslib.com manuals search engine
Protected by copyright. Copying for private or commercial purposes, in partor in whole, is not permitted unless authorised by Volkswagen AG. Volkswagen AG does notguarantee or accept any liability with respect to the correctness ofinformation in this document.Copyright by Volkswagen AG.2.21.2InstallingNote♦Insert motor plate -2- into front part -3-.♦Do not grease motor plate and cables -1-.Further installation is performed in reverse order of removal.Specified torquesBolt for cable cover: 2 Nm–Install sliding sunroof motor ⇒ page 196 .–Install assembly frame ⇒ page 208 .–On completion of work, establish reference points of sun blindmotor ⇒ page 183 .Golf Variant 2007 ➤ , Jetta 2005 ➤General body repairs, exterior - Edition 10.2009214 Rep. Gr.60 - Sunroof Downloaded from www.Manualslib.com manuals search engine
Protected by copyright. Copying for private or commercial purposes, in partor in whole, is not permitted unless authorised by Volkswagen AG. Volkswagen AG does notguarantee or accept any liability with respect to the correctness ofinformation in this document.Copyright by Volkswagen AG.2.22Removing and installing tilting mecha‐nism and front glass panel cable2.22.1Removing–Remove front glass panel ⇒ page 185 .–Remove rear glass panel ⇒ page 187 .–Remove assembly frame from vehicle ⇒ page 207 .–Remove sliding sunroof motor ⇒ page 196 .–Remove rear part of assembly frame ⇒ page 209 .After removal of rear part, tilting mechanism can be slid out back‐wards.To do this, proceed as follows:CautionObserve position of cables before removal to avoid any errorwhen installing.Do not pull or push tilting mechanism guide plate.–Push glass panel tilting mechanism only on areas -arrow- ofslider -2-, not on guide plate -3-.Tilting mechanism tilts when moving.–Using appropriate screwdriver, push tilting mechanism back‐wards to end of guide rail -1-.–Unhook cable -2- out of slider -1- -arrow A-.–Pull slider -1- out of guide rail -3- -arrow B-.–Pull cable -2- out of guide rail -3-.Golf Variant 2007 ➤ , Jetta 2005 ➤General body repairs, exterior - Edition 10.20092. Panorama sliding sunroof (Arvin-Meritor) 215 Downloaded from www.Manualslib.com manuals search engine
Protected by copyright. Copying for private or commercial purposes, in partor in whole, is not permitted unless authorised by Volkswagen AG. Volkswagen AG does notguarantee or accept any liability with respect to the correctness ofinformation in this document.Copyright by Volkswagen AG.2.22.2InstallingNote♦Guide rails must only be cleaned if heavily soiled.♦To do this, use cleaner -D 009 401 04- .♦Then grease guide rail in guide areas with lithium grease -G052 147 A2- ⇒ page 217 .♦Do not grease cables.–Slide tilting mechanism -3- into guide rail -1-.–Ensure that slides -2- face towards rear when slid into guiderail -1-.–Push cable -2- into guide rail -3- -arrow B-.–Hook cable -2- into slider -1- -arrow A-.NoteDo not pull or push tilting mechanism guide plate.–Push tilting mechanism on -arrow- areas of slider -2- not onguide plate -3-.–Pull tilting mechanism fully forwards on both sides until it iscompletely lowered.–Install rear part on assembly frame ⇒ page 211 .–Install sliding sunroof motor ⇒ page 198 .–Install assembly frame into vehicle ⇒ page 208 .–Install rear glass panel ⇒ page 187 .–Install front glass panel ⇒ page 185 .–On completion of work, establish reference points of all drivesfor panorama sliding roof ⇒ page 183 .Golf Variant 2007 ➤ , Jetta 2005 ➤General body repairs, exterior - Edition 10.2009216 Rep. Gr.60 - Sunroof Downloaded from www.Manualslib.com manuals search engine
Protected by copyright. Copying for private or commercial purposes, in partor in whole, is not permitted unless authorised by Volkswagen AG. Volkswagen AG does notguarantee or accept any liability with respect to the correctness ofinformation in this document.Copyright by Volkswagen AG.2.23Maintenance and careNo regular maintenance is usually required for the panoramasliding roof.If cleaning is necessary because it is heavily soiled, use cleaner-D 009 401 04- .Guide areas -3- of guide rail -2- must then be greased again withlithium grease -G 052 147 A2- .Inner seal -1- and outer seal -4- have a solid film lubricant coatingand must not be greased.Do not grease cables and motor plate.2.24Operating without current2.24.1Glass panelNote♦In the event of power failure, front glass panel near to slidingsunroof motor can be moved by hand using a commerciallyavailable hexagon key.♦Front glass panel must only be moved until its front edge isflush with front edge of rear glass panel. If glass panel ismoved further backwards, mechanism cables may hook off.–Removing lights and front operating unit ⇒ Electrical system;Rep. Gr. 96 ; Lights and switches in roof trim .WARNINGOn some models, a ribbon cable is bonded to the light cut-outweb. For the emergency key, carefully detach ribbon cablefrom web and push it to side. Ensure that ribbon cable is notdamaged when doing this.Golf Variant 2007 ➤ , Jetta 2005 ➤General body repairs, exterior - Edition 10.20092. Panorama sliding sunroof (Arvin-Meritor) 217 Downloaded from www.Manualslib.com manuals search engine
Protected by copyright. Copying for private or commercial purposes, in partor in whole, is not permitted unless authorised by Volkswagen AG. Volkswagen AG does notguarantee or accept any liability with respect to the correctness ofinformation in this document.Copyright by Volkswagen AG.–Carefully detach ribbon cable -5- (if fitted) from web -1-.–Pull ribbon cable to side -arrow- using a commercially availa‐ble hexagon key -4- until access is made possible through holein web -1-.–Guide hexagon key -4- through hole in web -1- into bolt -3- ofsliding sunroof motor -2-.When turning by hand, greater force is necessary since motor isnot uncoupled from drive.2.24.2Sun blindNoteIn the event of power failure, sun blind can be moved by hand onsun blind motor using a commercially available hexagon key.–Remove moulded headliner ⇒ General body repairs, interior;Rep. Gr. 70 ; Roof trims .Golf Variant 2007 ➤ , Jetta 2005 ➤General body repairs, exterior - Edition 10.2009218 Rep. Gr.60 - Sunroof Downloaded from www.Manualslib.com manuals search engine
Protected by copyright. Copying for private or commercial purposes, in partor in whole, is not permitted unless authorised by Volkswagen AG. Volkswagen AG does notguarantee or accept any liability with respect to the correctness ofinformation in this document.Copyright by Volkswagen AG.–Insert hexagon key -2- into bolt of sun blind motor -1-.When turning by hand, greater force is necessary since motor isnot uncoupled from drive.2.25Cleaning water drain hosesNoteFor cleaning, a locally manufactured tool made from a speedom‐eter inner cable, approx. 2300 mm long is recommended.Golf Variant 2007 ➤ , Jetta 2005 ➤General body repairs, exterior - Edition 10.20092. Panorama sliding sunroof (Arvin-Meritor) 219 Downloaded from www.Manualslib.com manuals search engine
Protected by copyright. Copying for private or commercial purposes, in partor in whole, is not permitted unless authorised by Volkswagen AG. Volkswagen AG does notguarantee or accept any liability with respect to the correctness ofinformation in this document.Copyright by Volkswagen AG.2.25.1Front water drain hosesThe front water drain hoses run through the A-pillars and end atthe bulkhead cross member. Cleaning is done from panoramasliding roof cut-out.Golf Variant 2007 ➤ , Jetta 2005 ➤General body repairs, exterior - Edition 10.2009220 Rep. Gr.60 - Sunroof Downloaded from www.Manualslib.com manuals search engine
Protected by copyright. Copying for private or commercial purposes, in partor in whole, is not permitted unless authorised by Volkswagen AG. Volkswagen AG does notguarantee or accept any liability with respect to the correctness ofinformation in this document.Copyright by Volkswagen AG.2.25.2Rear water drain hosesThe rear water drain hoses run through the D-pillars and end inthe rear wheel housings. Cleaning is done from the wheel hous‐ing. The wheel housing liner must be removed.Golf Variant 2007 ➤ , Jetta 2005 ➤General body repairs, exterior - Edition 10.20092. Panorama sliding sunroof (Arvin-Meritor) 221 Downloaded from www.Manualslib.com manuals search engine
Protected by copyright. Copying for private or commercial purposes, in partor in whole, is not permitted unless authorised by Volkswagen AG. Volkswagen AG does notguarantee or accept any liability with respect to the correctness ofinformation in this document.Copyright by Volkswagen AG.63 –Bumpers1Front bumper1.1ToolsSpecial tools and workshop equipment required♦Torque wrench -V.A.G 1783-♦Torque wrench -V.A.G 1332-1.2Repairing bumper coverNoteIf bumper cover is damaged, determine whether plastic can berepaired before renewing bumper.Description under: ⇒ General Information; Body Repairs, GeneralBody Repairs ; Plastic repair proceduresGolf Variant 2007 ➤ , Jetta 2005 ➤General body repairs, exterior - Edition 10.2009222 Rep. Gr.63 - Bumpers Downloaded from www.Manualslib.com manuals search engine
Protected by copyright. Copying for private or commercial purposes, in partor in whole, is not permitted unless authorised by Volkswagen AG. Volkswagen AG does notguarantee or accept any liability with respect to the correctness ofinformation in this document.Copyright by Volkswagen AG.1.3Assembly overview - bumper cover1 - Bolt❑2 Nm2 - Bolt❑3.5 Nm3 - Cover❑Material PP/EPDM❑Removing and installing⇒ page 2234 - Bolt❑Qty. 3 on each side❑2 Nm5 - Bolt❑Qty. 8❑2 Nm1.4Removing and installing front bumpercoverNoteThe removal and installation procedures may have to be modifiedslightly depending on variations in equipment.1.4.1Removing–Remove radiator grille ⇒ page 337 .–Vehicles with headlight washer system, pull washer jet withcover cap up out of bumper cover onto stop and unclip covercap.–Remove bolts -2-.–Remove bolts -5- from below.Golf Variant 2007 ➤ , Jetta 2005 ➤General body repairs, exterior - Edition 10.20091. Front bumper 223 Downloaded from www.Manualslib.com manuals search engine
Protected by copyright. Copying for private or commercial purposes, in partor in whole, is not permitted unless authorised by Volkswagen AG. Volkswagen AG does notguarantee or accept any liability with respect to the correctness ofinformation in this document.Copyright by Volkswagen AG.–Remove bolts -4- and -1- (point upwards) on left and right inarea of wheel housing liner.Further dismantling requires the assistance of a second mechan‐ic.–Pull bumper cover -3- parallel out of guide profiles with help ofa second mechanic.–Disconnect all electrical connections from electrical compo‐nents and separate hoses.1.4.2InstallingInstall in reverse order of removal.Ensure parallelism and gap dimensions are maintained ⇒ BodyRepairs; Rep. Gr. 00 ; Body dimensions .Golf Variant 2007 ➤ , Jetta 2005 ➤General body repairs, exterior - Edition 10.2009224 Rep. Gr.63 - Bumpers Downloaded from www.Manualslib.com manuals search engine
Protected by copyright. Copying for private or commercial purposes, in partor in whole, is not permitted unless authorised by Volkswagen AG. Volkswagen AG does notguarantee or accept any liability with respect to the correctness ofinformation in this document.Copyright by Volkswagen AG.1.5Front bumper cover add-on parts1 - Bumper cover❑Material PP/EPDM❑Removing and installing⇒ page 2232 - Left bumper strip❑Material PP/EPDM❑Different versions forvehicles with headlightwasher system.❑Engaged in bumpercover❑Can be levered out oflatches carefully fromoutside using a plasticwedge and removed3 - Left air intake grille❑Different versions forvehicles with fog lights.❑Removing and installing⇒ page 2264 - Bolt❑1.5 Nm5 - Spoiler❑Material PC/ABS❑Engages in cover.❑Only remove whenbumper cover is re‐moved6 - Centre air intake grille❑Pull forward out of fas‐tenings in-direction of arrow-.7 - Bolt❑1.5 Nm8 - Right air intake grille❑Different versions for vehicles with fog lights.❑Removing and installing ⇒ page 2269 - Right bumper strip❑Material PP/EPDM❑Different versions for vehicles with headlight washer system.❑Engaged in bumper cover❑Can be levered out of latches carefully from outside using a plastic wedge and removed.Golf Variant 2007 ➤ , Jetta 2005 ➤General body repairs, exterior - Edition 10.20091. Front bumper 225 Downloaded from www.Manualslib.com manuals search engine
Protected by copyright. Copying for private or commercial purposes, in partor in whole, is not permitted unless authorised by Volkswagen AG. Volkswagen AG does notguarantee or accept any liability with respect to the correctness ofinformation in this document.Copyright by Volkswagen AG.1.5.1Removing and installing air intake grilleRemovingNoteThe removal and installation sequence is only for the left side.Removal and installation of the right side is similar.–Remove bolt -1-.–Carefully swing air intake grille in direction of -arrow- so thatthe outer side lug -2- does not break off.NoteGrasp inner side of air intake grille and pull grille out of bumperthen swing air intake grille outwards and out of bumper.InstallingInstall in reverse order of removal.Golf Variant 2007 ➤ , Jetta 2005 ➤General body repairs, exterior - Edition 10.2009226 Rep. Gr.63 - Bumpers Downloaded from www.Manualslib.com manuals search engine
Protected by copyright. Copying for private or commercial purposes, in partor in whole, is not permitted unless authorised by Volkswagen AG. Volkswagen AG does notguarantee or accept any liability with respect to the correctness ofinformation in this document.Copyright by Volkswagen AG.1.6Front bumper cover substructure parts1 - Right guide❑Bolted to bumper carrier❑To remove, unbolt bolts⇒ Item 9 (page 227) .2 - Expanding nut❑Qty. 3 on each side3 - Bolt❑Qty. 3 on each side❑2 Nm4 - Guide bracket❑Left and right❑To remove, unbolt bolts⇒ Item 3 (page 227)5 - Bolt❑Qty. 2❑2 Nm6 - Left guide❑Bolted to bumper carrier❑To remove, unbolt bolts⇒ Item 5 (page 227) .7 - Left air duct❑Fastened to lock carrier.8 - Right air duct❑Fastened to lock carrier.9 - Bolt❑Qty. 2❑2 NmGolf Variant 2007 ➤ , Jetta 2005 ➤General body repairs, exterior - Edition 10.20091. Front bumper 227 Downloaded from www.Manualslib.com manuals search engine
Protected by copyright. Copying for private or commercial purposes, in partor in whole, is not permitted unless authorised by Volkswagen AG. Volkswagen AG does notguarantee or accept any liability with respect to the correctness ofinformation in this document.Copyright by Volkswagen AG.1.7Assembly overview - bumper carrier1 - Bumper carrier2 - Bolt❑Qty. 4 on each side❑60 Nm3 - Bolt❑Qty. 6❑8 Nm4 - Foam element❑Self-adhesive1.8Installing small registration plate carrier–Mark the four points -5- on the grille which require drilling.NoteThe correct position of the registration plate carrier -2- is estab‐lished by inserting the registration plate carrier guide -3- into therecess -4- on the grille.–Drill out the four points -5-.Diameter of hole: 7.7 +0.2 mm–Install registration plate carrier using the four plastic spreaderrivets -1-.Golf Variant 2007 ➤ , Jetta 2005 ➤General body repairs, exterior - Edition 10.2009228 Rep. Gr.63 - Bumpers Downloaded from www.Manualslib.com manuals search engine
Protected by copyright. Copying for private or commercial purposes, in partor in whole, is not permitted unless authorised by Volkswagen AG. Volkswagen AG does notguarantee or accept any liability with respect to the correctness ofinformation in this document.Copyright by Volkswagen AG.2Front bumper, Cup Edition2.1Front bumper cover2.1.1ToolsSpecial tools and workshop equipment required♦Torque wrench -V.A.G 1783-♦Torque wrench -V.A.G 1332-2.1.2Repairing front bumper coverNoteIf bumper cover is damaged, determine whether plastic can berepaired before renewing bumper.Description under: ⇒ General Information; Body Repairs, GeneralBody Repairs ; Plastic repair proceduresGolf Variant 2007 ➤ , Jetta 2005 ➤General body repairs, exterior - Edition 10.20092. Front bumper, Cup Edition 229 Downloaded from www.Manualslib.com manuals search engine
Protected by copyright. Copying for private or commercial purposes, in partor in whole, is not permitted unless authorised by Volkswagen AG. Volkswagen AG does notguarantee or accept any liability with respect to the correctness ofinformation in this document.Copyright by Volkswagen AG.2.1.3Assembly overview - front bumper cover1 - Front bumper cover❑Material PUR/MF 17❑Removing ⇒ page 231❑Installing ⇒ page 2322 - Bolt❑Left and right❑Points upwards❑Specified torque: 2 Nm3 - Bolt❑Qty. 4 on each side❑Specified torque: 2 Nm4 - Bolt❑Left and right❑Specified torque:3.5 Nm5 - Bolt❑Qty. 6.❑Specified torque: 2 Nm6 - Bolt❑Qty. 2.❑Specified torque:3.5 NmGolf Variant 2007 ➤ , Jetta 2005 ➤General body repairs, exterior - Edition 10.2009230 Rep. Gr.63 - Bumpers Downloaded from www.Manualslib.com manuals search engine
Protected by copyright. Copying for private or commercial purposes, in partor in whole, is not permitted unless authorised by Volkswagen AG. Volkswagen AG does notguarantee or accept any liability with respect to the correctness ofinformation in this document.Copyright by Volkswagen AG.2.1.4Removing–Remove left and right side marker lights -5- ⇒ Electrical sys‐tem; Rep. Gr. 92 ; Removing and installing side marker lightsin from bumper .–Remove radiator grille ⇒ page 341 .–Remove bolts -6- from above.–Remove bolts -2- (pointing upwards) on left and right of wheelhousing.–Unscrew bolts -3- from left and right wheel housing.–Unscrew bolts -4- and -5- from underneath.Further dismantling requires the help of a second mechanic.–With help of a second mechanic pull front bumper cover -1-parallel off vehicle.–Disconnect electrical connectors from all electrical compo‐nents (if fitted).Golf Variant 2007 ➤ , Jetta 2005 ➤General body repairs, exterior - Edition 10.20092. Front bumper, Cup Edition 231 Downloaded from www.Manualslib.com manuals search engine
Protected by copyright. Copying for private or commercial purposes, in partor in whole, is not permitted unless authorised by Volkswagen AG. Volkswagen AG does notguarantee or accept any liability with respect to the correctness ofinformation in this document.Copyright by Volkswagen AG.2.1.5Installing–With help of a second mechanic, install front bumper cover-1- on lock carrier ensuring it remains parallel with vehicleNoteWhen positioning front bumper cover -1-, ensure it is parallel to wing.–Ensure joints are parallel and shut lines are equal ⇒ Body Re‐pairs; Rep. Gr. 00; Karosseriespaltmaße; Karosserie vorn–Start bolts -2, 3, 4, 5 and 6- and tighten these to the relevanttorque settings ⇒ page 230Further installation is performed in reverse order of removal.Golf Variant 2007 ➤ , Jetta 2005 ➤General body repairs, exterior - Edition 10.2009232 Rep. Gr.63 - Bumpers Downloaded from www.Manualslib.com manuals search engine
Protected by copyright. Copying for private or commercial purposes, in partor in whole, is not permitted unless authorised by Volkswagen AG. Volkswagen AG does notguarantee or accept any liability with respect to the correctness ofinformation in this document.Copyright by Volkswagen AG.2.1.6Front bumper cover add-on parts1 - Front bumper cover❑Material PUR/MF 17❑Removing ⇒ page 231❑Installing ⇒ page 2322 - End plate❑Left❑Clipped on the insidewith 4 panel clips.❑Only remove whenbumper cover -1- is re‐moved3 - Air intake grille❑Left❑Secured with four boltsfrom the outside.❑Specified torque: 2 Nm4 - Centre air intake grille❑Clipped on the insidewith 19 panel clips.❑Only remove whenbumper cover -1- is re‐moved5 - Spoiler attachment❑Only remove whenbumper cover -1- is re‐moved6 - Air intake grille❑Right❑Secured with four boltsfrom the outside.❑Specified torque: 2 Nm7 - Towing eye cap❑Engaged in front bumper cover -1-8 - End plate❑Right❑Clipped on the inside with 4 panel clips.❑Only remove when bumper cover -1- is removed9 - Adapter❑Secured to the middle of the front bumper -1- with four bolts from above and four blind rivets from below.❑Specified torque for the 4 bolts (2 Nm).Golf Variant 2007 ➤ , Jetta 2005 ➤General body repairs, exterior - Edition 10.20092. Front bumper, Cup Edition 233 Downloaded from www.Manualslib.com manuals search engine
Protected by copyright. Copying for private or commercial purposes, in partor in whole, is not permitted unless authorised by Volkswagen AG. Volkswagen AG does notguarantee or accept any liability with respect to the correctness ofinformation in this document.Copyright by Volkswagen AG.2.1.7Front bumper cover substructure parts1 - Right guide❑Bolted to bumper carrier❑To remove, unbolt bolts⇒ Item 9 (page 234) .2 - Expanding nut❑Qty. 3 on each side3 - Bolt❑Qty. 3 on each side❑Specified torque: 2 Nm4 - Guide bracket❑Left and right❑To remove, unbolt bolts⇒ Item 3 (page 234)5 - Bolt❑Qty. 2.❑Specified torque: 2 Nm6 - Left guide❑Bolted to bumper carrier❑To remove, unbolt bolts⇒ Item 5 (page 234) .7 - Left air duct❑Fastened to lock carrier.8 - Right air duct❑Fastened to lock carrier.9 - Bolt❑Qty. 2.❑Specified torque: 2 NmGolf Variant 2007 ➤ , Jetta 2005 ➤General body repairs, exterior - Edition 10.2009234 Rep. Gr.63 - Bumpers Downloaded from www.Manualslib.com manuals search engine
Protected by copyright. Copying for private or commercial purposes, in partor in whole, is not permitted unless authorised by Volkswagen AG. Volkswagen AG does notguarantee or accept any liability with respect to the correctness ofinformation in this document.Copyright by Volkswagen AG.2.1.8Assembly overview - front bumper carrier1 - Front bumper carrier2 - Bolt❑Qty. 4 on each side❑Specified torque: 60 Nm3 - Bolt❑Qty. 6.❑Specified torque: 8 Nm4 - Foam element❑Self-adhesiveGolf Variant 2007 ➤ , Jetta 2005 ➤General body repairs, exterior - Edition 10.20092. Front bumper, Cup Edition 235 Downloaded from www.Manualslib.com manuals search engine
Protected by copyright. Copying for private or commercial purposes, in partor in whole, is not permitted unless authorised by Volkswagen AG. Volkswagen AG does notguarantee or accept any liability with respect to the correctness ofinformation in this document.Copyright by Volkswagen AG.3Rear bumper (saloon)3.1ToolsSpecial tools and workshop equipment required♦Torque wrench -V.A.G 1783-♦Torque wrench -V.A.G 1331-3.2Repairing bumper coverNoteIf bumper cover is damaged, determine whether plastic can berepaired before renewing bumper.Description under: ⇒ General Information; Body Repairs, GeneralBody Repairs ; Plastic repair proceduresGolf Variant 2007 ➤ , Jetta 2005 ➤General body repairs, exterior - Edition 10.2009236 Rep. Gr.63 - Bumpers Downloaded from www.Manualslib.com manuals search engine
Protected by copyright. Copying for private or commercial purposes, in partor in whole, is not permitted unless authorised by Volkswagen AG. Volkswagen AG does notguarantee or accept any liability with respect to the correctness ofinformation in this document.Copyright by Volkswagen AG.3.3Assembly overview - bumper cover1 - Bolt❑Qty. 1 on each side❑Bolted from luggagecompartment (to re‐move, remove luggagecompartment side cov‐ers ⇒ General body re‐pairs, interior; Rep. Gr. 70 ; Luggage and loadcompartment trim )❑8 Nm2 - Bolt❑5 Nm3 - Spreader rivet❑Qty. 1 on each side4 - Bolt❑Qty. 3❑Only on right side❑2 Nm5 - Bolt❑Qty. 3❑5 Nm6 - Bumper cover❑Material PP/EPDM❑Removing and installing⇒ page 2377 - Bolt❑Qty. 3 on each side❑2 Nm3.4Removing and installing bumper coverNoteThe removal and installation procedures may have to be modifiedslightly depending on variations in equipment.3.4.1Removing–Remove tail lights in left and right side panels ⇒ Electricalsystem; Rep. Gr. 94 ; Tail lights .–Remove bolts -7- on left and right in area of wheel housingliner.–Lever out spreader rivet -3- on left and right using a screw‐driver.–From below, remove bolts -4- and -5-.–Remove bolts -2- from above.Golf Variant 2007 ➤ , Jetta 2005 ➤General body repairs, exterior - Edition 10.20093. Rear bumper (saloon) 237 Downloaded from www.Manualslib.com manuals search engine
Protected by copyright. Copying for private or commercial purposes, in partor in whole, is not permitted unless authorised by Volkswagen AG. Volkswagen AG does notguarantee or accept any liability with respect to the correctness ofinformation in this document.Copyright by Volkswagen AG.–From luggage compartment, remove bolt -1- on left and right(remove luggage compartment side covers ⇒ General bodyrepairs, interior; Rep. Gr. 70 ; Luggage and load compartmenttrim .Further dismantling requires the assistance of a second mechan‐ic.–Pull bumper cover -6- parallel out of guide profiles with help ofa second mechanic.–Disconnect connectors from all electrical components.3.4.2InstallingInstall in reverse order of removal.Ensure parallelism and gap dimensions are maintained ⇒ BodyRepairs; Rep. Gr. 00 ; Body dimensions .Golf Variant 2007 ➤ , Jetta 2005 ➤General body repairs, exterior - Edition 10.2009238 Rep. Gr.63 - Bumpers Downloaded from www.Manualslib.com manuals search engine
Protected by copyright. Copying for private or commercial purposes, in partor in whole, is not permitted unless authorised by Volkswagen AG. Volkswagen AG does notguarantee or accept any liability with respect to the correctness ofinformation in this document.Copyright by Volkswagen AG.3.5Rear bumper cover with add-on parts1 - Bumper cover❑Material PP/EPDM❑Removing and installing⇒ page 2372 - Spoiler❑Material PC/ABS❑Engaged in bumpercover❑Can only be removedwhen bumper cover isremoved3 - Towing eye cap❑Engaged in bumpercover4 - Bumper strip❑Engaged in spoiler❑Can only be removedwhen spoiler is removedGolf Variant 2007 ➤ , Jetta 2005 ➤General body repairs, exterior - Edition 10.20093. Rear bumper (saloon) 239 Downloaded from www.Manualslib.com manuals search engine
Protected by copyright. Copying for private or commercial purposes, in partor in whole, is not permitted unless authorised by Volkswagen AG. Volkswagen AG does notguarantee or accept any liability with respect to the correctness ofinformation in this document.Copyright by Volkswagen AG.3.6Rear bumper cover substructure parts1 - Securing strip2 - Hexagon nut❑Qty. 4❑2 Nm3 - Guide❑Left and right4 - Hexagon nut❑Qty. 2 on each side❑2 Nm5 - Bolt❑Qty. 1 on each side❑2 Nm6 - Bolt❑Qty. 4 on each side❑2 Nm7 - Guide bracket❑Left and rightGolf Variant 2007 ➤ , Jetta 2005 ➤General body repairs, exterior - Edition 10.2009240 Rep. Gr.63 - Bumpers Downloaded from www.Manualslib.com manuals search engine
Protected by copyright. Copying for private or commercial purposes, in partor in whole, is not permitted unless authorised by Volkswagen AG. Volkswagen AG does notguarantee or accept any liability with respect to the correctness ofinformation in this document.Copyright by Volkswagen AG.3.7Assembly overview - bumper carrier1 - Bumper carrier2 - Bolt❑Qty. 3 on each side❑20 Nm3 - Foam element❑Self-adhesiveGolf Variant 2007 ➤ , Jetta 2005 ➤General body repairs, exterior - Edition 10.20093. Rear bumper (saloon) 241 Downloaded from www.Manualslib.com manuals search engine
Protected by copyright. Copying for private or commercial purposes, in partor in whole, is not permitted unless authorised by Volkswagen AG. Volkswagen AG does notguarantee or accept any liability with respect to the correctness ofinformation in this document.Copyright by Volkswagen AG.4Rear bumper, saloon, Cup Edition4.1Rear bumper cover, saloon4.1.1ToolsSpecial tools and workshop equipment required♦Torque wrench -V.A.G 1783-♦Torque wrench -V.A.G 1331-♦Pop rivet pliers -VAS 5072-4.1.2Repairing rear bumper coverNoteIf bumper cover is damaged, determine whether plastic can berepaired before renewing bumper.Description under: ⇒ General Information; Body Repairs, GeneralBody Repairs ; Plastic repair proceduresGolf Variant 2007 ➤ , Jetta 2005 ➤General body repairs, exterior - Edition 10.2009242 Rep. Gr.63 - Bumpers Downloaded from www.Manualslib.com manuals search engine
Protected by copyright. Copying for private or commercial purposes, in partor in whole, is not permitted unless authorised by Volkswagen AG. Volkswagen AG does notguarantee or accept any liability with respect to the correctness ofinformation in this document.Copyright by Volkswagen AG.4.1.3Assembly overview - rear bumper cover1 - Bolt❑Left and right❑Specified torque: 8 Nm2 - Bolt❑Specified torque: 5 Nm3 - Spreader rivet❑Left and right4 - Bolt❑Qty. 3.❑Only on right side❑Specified torque: 2 Nm5 - Bolt❑Qty. 3.❑Specified torque: 5 Nm6 - Rear bumper cover❑Material PP/EPDM❑Removing ⇒ page 244❑Installing ⇒ page 2457 - Bolt❑Qty. 3 on each side❑Specified torque: 2 Nm8 - Diffuser9 - Quick-release screw❑Qty. 3.Golf Variant 2007 ➤ , Jetta 2005 ➤General body repairs, exterior - Edition 10.20094. Rear bumper, saloon, Cup Edition 243 Downloaded from www.Manualslib.com manuals search engine
Protected by copyright. Copying for private or commercial purposes, in partor in whole, is not permitted unless authorised by Volkswagen AG. Volkswagen AG does notguarantee or accept any liability with respect to the correctness ofinformation in this document.Copyright by Volkswagen AG.4.1.4Removing–Remove luggage compartment side trim ⇒ General body re‐pairs, interior; Rep. Gr. 70 ; Trims; Luggage and load com‐partment .–Remove tail lights in left and right side panels ⇒ Electricalsystem; Rep. Gr. 94 ; Tail lights .–Release quick-release screw -9- and remove diffuser -8- fromspoiler.–Remove bolts -7- on left and right in area of wheel housingliner.–Lever out spreader rivet -3- on left and right using a screw‐driver.–From below, remove bolts -4- and -5-.–Remove bolts -2- on left and right from above.–Remove bolt -1- on left and right in luggage compartment.Further dismantling requires the assistance of a second person.–With the help of a second mechanic, pull rear bumper cover-6- parallel out of guide profiles.Golf Variant 2007 ➤ , Jetta 2005 ➤General body repairs, exterior - Edition 10.2009244 Rep. Gr.63 - Bumpers Downloaded from www.Manualslib.com manuals search engine
Protected by copyright. Copying for private or commercial purposes, in partor in whole, is not permitted unless authorised by Volkswagen AG. Volkswagen AG does notguarantee or accept any liability with respect to the correctness ofinformation in this document.Copyright by Volkswagen AG.–Disconnect connectors from all electrical components.4.1.5Installing–With the help of a second mechanic, guide rear bumper coverparallel into left and right guides.NoteEnsure when fitting the rear bumper cover that it runs parallel along the left and right guide profiles.–Install left and right spreader rivets -3-.Ensure that joints are parallel and specified dimensions are main‐tained ⇒ Body Repairs; Rep. Gr. 00 ; Body panel gaps/shut lines;Body - rear–Start bolts -1, 2, 4, 5 and 7- and tighten these to the relevanttorque settings ⇒ page 243–Install diffuser -8- and lock quick-release screws -9-.Further installation is performed in reverse order of removal.Golf Variant 2007 ➤ , Jetta 2005 ➤General body repairs, exterior - Edition 10.20094. Rear bumper, saloon, Cup Edition 245 Downloaded from www.Manualslib.com manuals search engine
Protected by copyright. Copying for private or commercial purposes, in partor in whole, is not permitted unless authorised by Volkswagen AG. Volkswagen AG does notguarantee or accept any liability with respect to the correctness ofinformation in this document.Copyright by Volkswagen AG.4.1.6Rear bumper cover add-on parts1 - Rear bumper cover❑Material PP/EPDM❑Removing ⇒ page 244❑Installing ⇒ page 2452 - Spoiler❑Engaged in rear bumpercover -1-❑Can only be removedwhen rear bumper coveris removed3 - Reflector❑Left and right❑Engaged in spoiler4 - Diffuser5 - Quick-release screw❑Qty. 4.6 - Left diffuser7 - Heat shield8 - Pop rivet❑Qty. 3.❑Insert with pop rivet pli‐ers -VAS 5072-9 - Clip❑Qty. 3.Golf Variant 2007 ➤ , Jetta 2005 ➤General body repairs, exterior - Edition 10.2009246 Rep. Gr.63 - Bumpers Downloaded from www.Manualslib.com manuals search engine
Protected by copyright. Copying for private or commercial purposes, in partor in whole, is not permitted unless authorised by Volkswagen AG. Volkswagen AG does notguarantee or accept any liability with respect to the correctness ofinformation in this document.Copyright by Volkswagen AG.4.1.7Rear bumper cover substructure parts1 - Securing strip2 - Hexagon nut❑Qty. 4.❑Specified torque: 2 Nm3 - Guide❑Left and right4 - Hexagon nut❑Qty. 2 on each side❑Specified torque: 2 Nm5 - Bolt❑Qty. 1 on each side❑Specified torque: 2 Nm6 - Bolt❑Qty. 4 on each side❑Specified torque: 2 Nm7 - Guide bracket❑Left and rightGolf Variant 2007 ➤ , Jetta 2005 ➤General body repairs, exterior - Edition 10.20094. Rear bumper, saloon, Cup Edition 247 Downloaded from www.Manualslib.com manuals search engine
Protected by copyright. Copying for private or commercial purposes, in partor in whole, is not permitted unless authorised by Volkswagen AG. Volkswagen AG does notguarantee or accept any liability with respect to the correctness ofinformation in this document.Copyright by Volkswagen AG.4.1.8Assembly overview - rear bumper carrier1 - Rear bumper carrier2 - Bolt❑Qty. 3 on each side❑Specified torque: 20 Nm3 - Foam element❑Self-adhesiveNoteGolf Variant 2007 ➤ , Jetta 2005 ➤General body repairs, exterior - Edition 10.2009248 Rep. Gr.63 - Bumpers Downloaded from www.Manualslib.com manuals search engine
Protected by copyright. Copying for private or commercial purposes, in partor in whole, is not permitted unless authorised by Volkswagen AG. Volkswagen AG does notguarantee or accept any liability with respect to the correctness ofinformation in this document.Copyright by Volkswagen AG.5Rear bumper (Variant)5.1ToolsSpecial tools and workshop equipment required♦Torque wrench -V.A.G 1783-♦Torque wrench -V.A.G 1331-5.2Repairing bumper coverNoteIf bumper cover is damaged, determine whether plastic can berepaired before renewing bumper.Description under: ⇒ General Information; Body Repairs, GeneralBody Repairs ; Plastic repair proceduresGolf Variant 2007 ➤ , Jetta 2005 ➤General body repairs, exterior - Edition 10.20095. Rear bumper (Variant) 249 Downloaded from www.Manualslib.com manuals search engine
Protected by copyright. Copying for private or commercial purposes, in partor in whole, is not permitted unless authorised by Volkswagen AG. Volkswagen AG does notguarantee or accept any liability with respect to the correctness ofinformation in this document.Copyright by Volkswagen AG.5.3Assembly overview - bumper cover1 - Bolt❑Qty. 7❑5 Nm2 - Spreader rivet❑Qty. 1 on each side3 - Bumper cover❑Material PP/EPDM❑Removing and installing⇒ page 2504 - Bolt❑Qty. 3 on each side❑2 Nm5 - Bolt❑Qty. 2❑2 Nm5.4Removing and installing bumper coverNoteThe removal and installation procedures may have to be modifiedslightly depending on variations in equipment.5.4.1Removing–Remove tail lights in left and right side panels ⇒ Electricalsystem; Rep. Gr. 94 ; Tail lights .–Remove bolts -4- on left and right in area of wheel housingliner.–Lever out spreader rivet -2- on left and right using a screw‐driver.–Remove bolts -1-.–Remove bolts -5-.Golf Variant 2007 ➤ , Jetta 2005 ➤General body repairs, exterior - Edition 10.2009250 Rep. Gr.63 - Bumpers Downloaded from www.Manualslib.com manuals search engine
Protected by copyright. Copying for private or commercial purposes, in partor in whole, is not permitted unless authorised by Volkswagen AG. Volkswagen AG does notguarantee or accept any liability with respect to the correctness ofinformation in this document.Copyright by Volkswagen AG.Further dismantling requires the assistance of a second mechan‐ic.–Pull bumper cover -3- parallel out of guide profiles with help ofa second mechanic.–Disconnect connectors from all electrical components.5.4.2InstallingInstall in reverse order of removal.Ensure parallelism and gap dimensions are maintained ⇒ BodyRepairs; Rep. Gr. 00 ; Body dimensions .Tightening torques:Bolt -1-: 5 NmBolt -4-: 2 NmBolt -5-: 2 NmGolf Variant 2007 ➤ , Jetta 2005 ➤General body repairs, exterior - Edition 10.20095. Rear bumper (Variant) 251 Downloaded from www.Manualslib.com manuals search engine
Protected by copyright. Copying for private or commercial purposes, in partor in whole, is not permitted unless authorised by Volkswagen AG. Volkswagen AG does notguarantee or accept any liability with respect to the correctness ofinformation in this document.Copyright by Volkswagen AG.Golf Variant 2007 ➤ , Jetta 2005 ➤General body repairs, exterior - Edition 10.2009252 Rep. Gr.63 - Bumpers Downloaded from www.Manualslib.com manuals search engine
Protected by copyright. Copying for private or commercial purposes, in partor in whole, is not permitted unless authorised by Volkswagen AG. Volkswagen AG does notguarantee or accept any liability with respect to the correctness ofinformation in this document.Copyright by Volkswagen AG.5.5Rear bumper cover with add-on parts1 - Bumper cover❑Material PP/EPDM❑Removing and installing⇒ page 2502 - Reflector❑Engaged in bumpercover3 - Towing eye cap❑Engaged in bumpercover4 - Spoiler❑Material PC/ABS❑Engaged in bumpercover❑Can only be removedwhen bumper cover isremoved5 - Spring clip❑Qty. 2❑Only with towing bracket6 - Cover❑Only with towing bracket7 - Bolt❑Qty. 2❑Only with towing bracket8 - Retaining disc❑Qty. 2❑Only with towing bracketGolf Variant 2007 ➤ , Jetta 2005 ➤General body repairs, exterior - Edition 10.20095. Rear bumper (Variant) 253 Downloaded from www.Manualslib.com manuals search engine
Protected by copyright. Copying for private or commercial purposes, in partor in whole, is not permitted unless authorised by Volkswagen AG. Volkswagen AG does notguarantee or accept any liability with respect to the correctness ofinformation in this document.Copyright by Volkswagen AG.5.6Rear bumper cover substructure parts1 - Securing strip2 - Nut❑Qty. 4❑2 Nm3 - Nut❑Qty. 1 on each side❑2 Nm4 - Bolt❑Qty. 4 on each side❑2 Nm5 - Guide bracket❑Left and rightGolf Variant 2007 ➤ , Jetta 2005 ➤General body repairs, exterior - Edition 10.2009254 Rep. Gr.63 - Bumpers Downloaded from www.Manualslib.com manuals search engine
Protected by copyright. Copying for private or commercial purposes, in partor in whole, is not permitted unless authorised by Volkswagen AG. Volkswagen AG does notguarantee or accept any liability with respect to the correctness ofinformation in this document.Copyright by Volkswagen AG.5.7Assembly overview - bumper carrier1 - Bumper carrier2 - Bolt❑Qty. 5❑20 Nm3 - Foam element❑USA versions onlyGolf Variant 2007 ➤ , Jetta 2005 ➤General body repairs, exterior - Edition 10.20095. Rear bumper (Variant) 255 Downloaded from www.Manualslib.com manuals search engine
Protected by copyright. Copying for private or commercial purposes, in partor in whole, is not permitted unless authorised by Volkswagen AG. Volkswagen AG does notguarantee or accept any liability with respect to the correctness ofinformation in this document.Copyright by Volkswagen AG.5.8Assembly overview - towing bracket1 - Bolt❑Sealing plugs❑Qty. 3❑Specified torque: 20 NmDANGER!The bolts -1- function asplugs and seal the pas‐senger compartmentagainst exhaust fumes,and must without excep‐tion be installed.2 - Towing bracket❑Illustration shows tow‐ing bracket with remov‐able ball head -2-3 - Ball coupling❑Removable ball hitch ishoused in fold-out lug‐gage compartment floor4 - Bolt❑Qty. 2 on each side❑Specified torque: 50 Nm+ turn 90° + 30° furtherWARNINGBolts -4- must always berenewed after being re‐moved.5.9Removing and installing towing bracket5.9.1RemovingNote♦The specified torques refer only to factory-installed towing brackets.♦Request torque specifications for other towing brackets from the manufacturers.♦Information on electrics can be found in ⇒ Electrical system; Rep. Gr. 94 .–Remove rear bumper cover ⇒ page 250 .–Remove rear silencer ⇒ Exhaust system; Rep. Gr. 26 ; Si‐lencer with mountings .–Remove heat shield.Golf Variant 2007 ➤ , Jetta 2005 ➤General body repairs, exterior - Edition 10.2009256 Rep. Gr.63 - Bumpers Downloaded from www.Manualslib.com manuals search engine
Protected by copyright. Copying for private or commercial purposes, in partor in whole, is not permitted unless authorised by Volkswagen AG. Volkswagen AG does notguarantee or accept any liability with respect to the correctness ofinformation in this document.Copyright by Volkswagen AG.–Remove bolts -4-.5.9.2InstallingInstall in reverse order of removal.DANGER!The bolts -1- function as plugs and seal the passenger com‐partment against exhaust fumes, and must without exceptionbe installed.WARNINGBolts -4- must always be renewed after being removed.Contact surfaces between towing bracket and body must befree of grease and cavity sealant.Specified torquesBolt -1-: 20 NmGolf Variant 2007 ➤ , Jetta 2005 ➤General body repairs, exterior - Edition 10.20095. Rear bumper (Variant) 257 Downloaded from www.Manualslib.com manuals search engine
Protected by copyright. Copying for private or commercial purposes, in partor in whole, is not permitted unless authorised by Volkswagen AG. Volkswagen AG does notguarantee or accept any liability with respect to the correctness ofinformation in this document.Copyright by Volkswagen AG.Bolt -4-: 50 Nm + turn 90° + 30° furtherGolf Variant 2007 ➤ , Jetta 2005 ➤General body repairs, exterior - Edition 10.2009258 Rep. Gr.63 - Bumpers Downloaded from www.Manualslib.com manuals search engine
Protected by copyright. Copying for private or commercial purposes, in partor in whole, is not permitted unless authorised by Volkswagen AG. Volkswagen AG does notguarantee or accept any liability with respect to the correctness ofinformation in this document.Copyright by Volkswagen AG.64 –Glazing1Flush bonded windows1.1ToolsSpecial tools and workshopequipment required♦Removal kit for flush bon‐ded windows -V.A.G 1474 A-♦Suction lifter -V.A.G 1344-♦Cutting tool -V.A.G 1351-♦Windscreen removal kit -V.A.G 1755-♦Cartridge gun -V.A.G 1628-♦Cartridge heater -V.A.G 1939 A-Golf Variant 2007 ➤ , Jetta 2005 ➤General body repairs, exterior - Edition 10.20091. Flush bonded windows 259 Downloaded from www.Manualslib.com manuals search engine
Protected by copyright. Copying for private or commercial purposes, in partor in whole, is not permitted unless authorised by Volkswagen AG. Volkswagen AG does notguarantee or accept any liability with respect to the correctness ofinformation in this document.Copyright by Volkswagen AG.♦Electric cutter -V.A.G 1561 A-♦Cutting blade -V.A.G 1561/2-♦Scraping blade -V.A.G 1561/8-♦Cutter (offset) -V.A.G 1561/10-♦Cutting blade -V.A.G 1561/19-♦Double cartridge gun -VAS 5237-Special tools and workshop equipment required♦Removal wedge -T10039/1-1.2Materials♦2K glass adhesive-DA 004 600 A2- 7) 8)♦1K glass adhesive-DH 009 100 03- 9) 10)♦Activator-D 181 801 A1- 11)♦Glass primer/paint primer-D 009 200 02- 11)Golf Variant 2007 ➤ , Jetta 2005 ➤General body repairs, exterior - Edition 10.2009260 Rep. Gr.64 - Glazing Downloaded from www.Manualslib.com manuals search engine
Protected by copyright. Copying for private or commercial purposes, in partor in whole, is not permitted unless authorised by Volkswagen AG. Volkswagen AG does notguarantee or accept any liability with respect to the correctness ofinformation in this document.Copyright by Volkswagen AG.♦Cleaning solution-D 009 401 04- 11)♦Primer applicator-D 009 500 25- 11)♦Adhesive remover-D 002 000 10- 11)♦Cutting cord-357 853 999-7) Observe curing period ⇒ page 2768) Double cartridge gun -VAS 5237- must be used to apply these materials9) Small cartridge, 110 ml, for sealing and/or when a 400 ml cartridge alone is notsufficient.10) Heat according to manufacturer's instructions, using cartridge heater -V.A.G1939 A- .11) Materials are stored in box -D 004 700- .1.3Assembly overview - windscreen1 - Windscreen❑Removing and installing⇒ page 2642 - Windscreen adjuster❑-443 845 631 A-3 - Plenum chamber cover❑Only pull out of wind‐screen seal by hand❑Removing and installing⇒ page 2624 - Windscreen seal❑Part of windscreen5 - Spacing lip❑Part of windscreen6 - PUR adhesive sealant❑Cross section of bead:width = 6.5 mm, height =10 mm (including resid‐ual material on windowglass and windowflange)❑Minimum curing period⇒ page 276Golf Variant 2007 ➤ , Jetta 2005 ➤General body repairs, exterior - Edition 10.20091. Flush bonded windows 261 Downloaded from www.Manualslib.com manuals search engine
Protected by copyright. Copying for private or commercial purposes, in partor in whole, is not permitted unless authorised by Volkswagen AG. Volkswagen AG does notguarantee or accept any liability with respect to the correctness ofinformation in this document.Copyright by Volkswagen AG.1.4Assembly overview - plenum chamber cover1 - Plenum chamber cover❑Only pull out of wind‐screen seal by hand❑Removing and installing⇒ page 2622 - Plenum chamber bulkhead❑Removing and installing⇒ page 153 - Windscreen❑Removing and installing⇒ page 2644 - Plenum chamber seal5 - Windscreen seal❑Part of windscreen1.5Removing and installing plenum cham‐ber cover1.5.1Removing plenum chamber cover–Unbolt wiper arms ⇒ Electrical system; Rep. Gr. 92 ; Wipersystem .CautionThe plenum chamber cover must not be levered off with a tool(wedge). The windscreen will be damaged and may subse‐quently crack.–Pull plenum chamber seal -4- off over entire length of plenumchamber bulkhead -2-.Golf Variant 2007 ➤ , Jetta 2005 ➤General body repairs, exterior - Edition 10.2009262 Rep. Gr.64 - Glazing Downloaded from www.Manualslib.com manuals search engine
Protected by copyright. Copying for private or commercial purposes, in partor in whole, is not permitted unless authorised by Volkswagen AG. Volkswagen AG does notguarantee or accept any liability with respect to the correctness ofinformation in this document.Copyright by Volkswagen AG.–Beginning on right, carefully pull plenum chamber cover -1-upwards out of windscreen seal -5-.1.5.2Installing plenum chamber coverCautionStriking the plenum chamber cover can cause cracks in thewindscreen.–Spray windscreen seal -5- with a soapy solution so that ple‐num chamber cover -1- is easier to press on.–Position plenum chamber cover -1- on windscreen seal -5- andclip it into windscreen seal -5- using light pressure beginningin the middle.–Install plenum chamber seal -4- and windscreen wiper ⇒ Electrical system; Rep. Gr. 92 ; Wiper system .Golf Variant 2007 ➤ , Jetta 2005 ➤General body repairs, exterior - Edition 10.20091. Flush bonded windows 263 Downloaded from www.Manualslib.com manuals search engine
Protected by copyright. Copying for private or commercial purposes, in partor in whole, is not permitted unless authorised by Volkswagen AG. Volkswagen AG does notguarantee or accept any liability with respect to the correctness ofinformation in this document.Copyright by Volkswagen AG.NoteAn insert is installed in windscreen seal of new windscreens. Remove this insert before installing plenumchamber cover.1.6Removing and installing windscreen1.6.1Removing windscreen–Remove plenum chamber cover ⇒ page 262 .–Remove A-pillar trim ⇒ General body repairs, interior; Rep.Gr. 70 ; Pillar and side panel trim .–Remove sun visor ⇒ General body repairs, interior; Rep. Gr. 68 ; Compartments, covers and trims .–Remove interior mirror ⇒ General body repairs, interior; Rep.Gr. 68 ; Interior mirrorGolf Variant 2007 ➤ , Jetta 2005 ➤General body repairs, exterior - Edition 10.2009264 Rep. Gr.64 - Glazing Downloaded from www.Manualslib.com manuals search engine
Protected by copyright. Copying for private or commercial purposes, in partor in whole, is not permitted unless authorised by Volkswagen AG. Volkswagen AG does notguarantee or accept any liability with respect to the correctness ofinformation in this document.Copyright by Volkswagen AG.–Slide cover -V.A.G 1474/8- between windscreen -1- and dashpanel.–Thrust awl -V.A.G 1474/2- -2- through adhesive bead.–Pull cutting cord -3- through adhesive sealing material into in‐side of vehicle using awl -V.A.G 1474/2- -2-.–Secure inside end of cutting cord against falling out using pullhandle -V.A.G 1351/1- -3-.–Place cutting cord -2- using small tube -1- in upper area ofwindow.–Lay cutting cord -2- around window and guide second end ofcord inwards into interior.Ensure that cutting cord -2- lies under window in corners.–Secure other end of cord to reel device -V.A.G 1654- .–Position reel device -V.A.G 1654- in “position I”.–Reposition reel device -V.A.G 1654- as necessary and cutwindow free.–Use wedge -V.A.G 1474/5- to press cutting cord against win‐dow glass while cutting in order to avoid damaging dash paneland to create clearance at window flange.1.6.2Installing windscreenPreparing used undamaged window for glazing ⇒ page 274Preparing new window for glazing ⇒ page 274Preparing body flange for glazing ⇒ page 275Installation instructions ⇒ page 276 .Minimum curing period ⇒ page 276Golf Variant 2007 ➤ , Jetta 2005 ➤General body repairs, exterior - Edition 10.20091. Flush bonded windows 265 Downloaded from www.Manualslib.com manuals search engine
Protected by copyright. Copying for private or commercial purposes, in partor in whole, is not permitted unless authorised by Volkswagen AG. Volkswagen AG does notguarantee or accept any liability with respect to the correctness ofinformation in this document.Copyright by Volkswagen AG.1.7Assembly overview - rear window (saloon)1 - Rear window❑Removing and installing⇒ page 2662 - Rear lid3 - PUR adhesive sealant❑Cross section of bead:width = 6.5 mm, height =10 mm (including resid‐ual material on windowglass and windowflange).❑Minimum curing period⇒ page 2764 - Windscreen adjuster5 - C-pillar trim❑Removing ⇒ Generalbody repairs, interior;Rep. Gr. 70 ; Pillars andside panel trim .1.8Removing and installing rear window(saloon)1.8.1Removing undamaged rear window–Remove C-pillar trims ⇒ General body repairs, interior; Rep.Gr. 70 ; Pillars and side trims .–Remove roof end strip ⇒ General body repairs, interior; Rep.Gr. 70 ; Roof trims .–Remove rear shelf ⇒ General body repairs, interior; Rep. Gr. 70 ; Luggage/load compartment trim .–Remove high-level brake light ⇒ Electrical system; Rep. Gr. 94 ; Additional brake lights .–Disconnect connections for heated rear window and windowaerial.–Insert cutting cord into window flange using tube.Golf Variant 2007 ➤ , Jetta 2005 ➤General body repairs, exterior - Edition 10.2009266 Rep. Gr.64 - Glazing Downloaded from www.Manualslib.com manuals search engine
Protected by copyright. Copying for private or commercial purposes, in partor in whole, is not permitted unless authorised by Volkswagen AG. Volkswagen AG does notguarantee or accept any liability with respect to the correctness ofinformation in this document.Copyright by Volkswagen AG.–Pull cutting cord through adhesive sealing material into insideof vehicle using awl -V.A.G 1474/2- .–Pull the other end of the cord through into the interior andcounterhold using handle -V.A.G 1351/1- .–Secure inner end of cord on reel device -V.A.G 1654- .–Position reel device -V.A.G 1654- .–Carefully slide cover -V.A.G 1474/8- -1- between rear windowand moulded headliner, remove moulded headliner securingscrews for this.–Position reel device -V.A.G 1654- in “position I”.–Move reel device according to position required and cut win‐dow free.–Press cutting thread against window glass with plastic wedgeduring cutting process, in order to have clearance at windowflange.–Instead of reel device -V.A.G 1654- , reel device -V.A.G 1654A- can be used.–One suction cup can be removed from the reel device asshown in illustration. This ensures that the reel device rollercan be guided closer to the window flange.1.8.2Removing broken rear window–Protect body and interior from glass splinters.–Remove pieces of glass up to adhesive sealing material.–Remove C-pillar trims ⇒ General body repairs, interior; Rep.Gr. 70 ; Pillars and side trims .Golf Variant 2007 ➤ , Jetta 2005 ➤General body repairs, exterior - Edition 10.20091. Flush bonded windows 267 Downloaded from www.Manualslib.com manuals search engine
Protected by copyright. Copying for private or commercial purposes, in partor in whole, is not permitted unless authorised by Volkswagen AG. Volkswagen AG does notguarantee or accept any liability with respect to the correctness ofinformation in this document.Copyright by Volkswagen AG.–Remove roof end strip ⇒ General body repairs, interior; Rep.Gr. 70 ; Roof trims .–Remove rear shelf ⇒ General body repairs, interior; Rep. Gr. 70 ; Luggage/load compartment trim .–Remove high-level brake light ⇒ Electrical system; Rep. Gr. 94 ; Additional brake lights .–Pull off connectors for rear window heating and aerial.–Cover flange -2- all round with textile-reinforced adhesivetape.–Cut through adhesive sealing material (with remains of win‐dow) in window aperture using electric cutter -V.A.G 1561 A-and blade -V.A.G 1561/10- (with stop roller).WARNINGAlways wear safety goggles and leather gloves.1.8.3Installing rear windowPreparing used undamaged window for glazing ⇒ page 274Preparing new window for glazing ⇒ page 274Preparing body flange for glazing ⇒ page 275Installation instructions ⇒ page 276 .Minimum curing period ⇒ page 276Golf Variant 2007 ➤ , Jetta 2005 ➤General body repairs, exterior - Edition 10.2009268 Rep. Gr.64 - Glazing Downloaded from www.Manualslib.com manuals search engine
Protected by copyright. Copying for private or commercial purposes, in partor in whole, is not permitted unless authorised by Volkswagen AG. Volkswagen AG does notguarantee or accept any liability with respect to the correctness ofinformation in this document.Copyright by Volkswagen AG.1.9Assembly overview - rear window (Variant)1 - Rear window❑Removing and installing⇒ page 2692 - Rear lid3 - PUR adhesive sealant❑Cross section of bead:width = 6.5 mm, height =10 mm (including resid‐ual material on windowglass and windowflange).❑Minimum curing period⇒ page 2764 - Rear lid trim❑Removing ⇒ Generalbody repairs, interior;Rep. Gr. 70 ; Rear lidtrim1.10Removing and installing rear window(Variant)1.10.1Removing undamaged rear window–Remove rear lid trim ⇒ General body repairs, interior; Rep.Gr. 70 ; Trim, insulation .–Remove window frame trim ⇒ General body repairs, interior;Rep. Gr. 70 ; Trim, insulation .–Remove rear window wiper ⇒ Electrical system; Rep. Gr. 92 ;Window wash/wipe system .Golf Variant 2007 ➤ , Jetta 2005 ➤General body repairs, exterior - Edition 10.20091. Flush bonded windows 269 Downloaded from www.Manualslib.com manuals search engine
Protected by copyright. Copying for private or commercial purposes, in partor in whole, is not permitted unless authorised by Volkswagen AG. Volkswagen AG does notguarantee or accept any liability with respect to the correctness ofinformation in this document.Copyright by Volkswagen AG.–Pull off connector -1- for heated rear window -arrow- and pressconnecting tabs onto window.–Pull cutting cord -1- through adhesive sealing material at lowerradius of rear window and into inside of vehicle using awl -V.A.G 1474/2- from removal kit for flush bonded windows -V.A.G 1474 A- .–Lay cutting cord -1- around rear window and pull second endof cord inwards into interior.–Secure one end of cord to pull handle -V.A.G 1351/1- -2- tocounterhold.–Secure other end of cord to reel device -1-.–Reposition reel device -1- as necessary and cut window free.–Use plastic wedge to press cutting cord against window glasswhile cutting in order to have clearance at window flange.1.10.2Removing broken rear window–Protect body and interior from glass splinters.–Remove pieces of glass up to adhesive sealing material.–Remove rear lid trim ⇒ General body repairs, interior; Rep.Gr. 70 ; Trim, insulation .–Remove window frame trim ⇒ General body repairs, interior;Rep. Gr. 70 ; Trim, insulation .–Remove rear window wiper ⇒ Electrical system; Rep. Gr. 92 ;Window wash/wipe system .–Disconnect connections for heated rear window.Golf Variant 2007 ➤ , Jetta 2005 ➤General body repairs, exterior - Edition 10.2009270 Rep. Gr.64 - Glazing Downloaded from www.Manualslib.com manuals search engine
Protected by copyright. Copying for private or commercial purposes, in partor in whole, is not permitted unless authorised by Volkswagen AG. Volkswagen AG does notguarantee or accept any liability with respect to the correctness ofinformation in this document.Copyright by Volkswagen AG.–Cover flange -2- all round with textile-reinforced adhesivetape.–Cut through adhesive sealing material (with remains of win‐dow) in window aperture using electric cutter -V.A.G 1561 A-and blade -V.A.G 1561/10- (with stop roller).WARNINGAlways wear safety goggles and leather gloves.1.10.3Installing rear windowPreparing used undamaged window for glazing ⇒ page 274Preparing new window for glazing ⇒ page 274Preparing body flange for glazing ⇒ page 275Installation instructions ⇒ page 276 .Minimum curing period ⇒ page 2761.11Assembly overview - side window (Variant)1 - Side window❑Removing side window⇒ page 272❑Installing side window⇒ page 2732 - Trim strip❑Integral part of side win‐dow.3 - Seal❑Integral part of side win‐dow.4 - Side panel5 - PUR adhesive sealant❑Cross section of bead:width = 6.5 mm, height =10 mm (including pre‐coating, residual materi‐al on window glass andwindow flange)❑Minimum curing period⇒ page 2766 - Retaining clip❑Integral part of side win‐dow.Golf Variant 2007 ➤ , Jetta 2005 ➤General body repairs, exterior - Edition 10.20091. Flush bonded windows 271 Downloaded from www.Manualslib.com manuals search engine
Protected by copyright. Copying for private or commercial purposes, in partor in whole, is not permitted unless authorised by Volkswagen AG. Volkswagen AG does notguarantee or accept any liability with respect to the correctness ofinformation in this document.Copyright by Volkswagen AG.1.12Removing undamaged side window(Variant)NoteThe removal and installation sequence is only for the right sidewindow. The removal and installation of the left side window issimilar.–Remove C and D-pillar trim: ⇒ General body repairs, interior;Rep. Gr. 70 ; Trims, insulation; Pillars and side trims .–Depending on equipment, disconnect connector from impe‐dance converter -1-.Vehicles with side window trim–Carefully insert wedge -T10039/1- in direction of -arrow- undertrim strip -1-.–Remove trim strip -1-.All vehicles–Pull cutting cord -1- through adhesive sealing material at pointmarked on illustration and into inside of vehicle using awl -V.A.G 1474/2- from removal kit for flush bonded windows -V.A.G 1474 A- .Golf Variant 2007 ➤ , Jetta 2005 ➤General body repairs, exterior - Edition 10.2009272 Rep. Gr.64 - Glazing Downloaded from www.Manualslib.com manuals search engine
Protected by copyright. Copying for private or commercial purposes, in partor in whole, is not permitted unless authorised by Volkswagen AG. Volkswagen AG does notguarantee or accept any liability with respect to the correctness ofinformation in this document.Copyright by Volkswagen AG.–Insert cutting cord -3- behind seal in window flange with aid oftube -1-.–Secure one end of cord -2- to pull handle -V.A.G 1351/1- -2-to counterhold.–Pull other end of cord into vehicle interior.–Secure other end of cord to reel device -V.A.G 1654 A- -1-.–Reposition reel device -V.A.G 1654 A- -1- as necessary andcut window free.–Use plastic wedge to press cutting cord against window glasswhile cutting in order to have clearance at window flange.–Instead of reel device -V.A.G 1654- , reel device -V.A.G 1654A- can be used.–One suction cup can be removed from the reel device -V.A.G1654- as shown in figure. This ensures that the reel device -V.A.G 1654 A- roller can be guided closer to the windowflange.1.13Removing broken side window (Variant)Removing a broken side window is performed in the same man‐ner as removing a broken rear window ⇒ page 270 .1.14Installing side window (Variant)Preparing old undamaged window for glazing ⇒ page 274Preparing new window for glazing ⇒ page 274Preparing body flange for glazing ⇒ page 275Installation instructions ⇒ page 276Minimum curing period ⇒ page 276Golf Variant 2007 ➤ , Jetta 2005 ➤General body repairs, exterior - Edition 10.20091. Flush bonded windows 273 Downloaded from www.Manualslib.com manuals search engine
Protected by copyright. Copying for private or commercial purposes, in partor in whole, is not permitted unless authorised by Volkswagen AG. Volkswagen AG does notguarantee or accept any liability with respect to the correctness ofinformation in this document.Copyright by Volkswagen AG.1.15Preparing old undamaged window forglazingNote♦If installing an undamaged window, cut back residual adhesiveseal to 1...2 mm, being careful not to damage primer and ce‐ramic coating.♦Remaining material serves as adhesion base for newly ap‐plied adhesive sealing compound.CautionDo not prime bonding surface and do not treat with a cleaningsolution. Keep bonding surface free of dirt and grease.Exception: If bonding is not performed immediately after cuttingback, the remaining residual material must be activated with ac‐tivator -D 181 801 A1- .1.16Preparing new window for glazingOnly the applied ceramic layer and injection moulded sealing lipwith spacer rib are found on all new windows.Exception: rear window does not have a sealing lip or spacing lip.1 - Sealing lip2 - Spacing lip3 - WindowNoteThe area on which the adhesive bead is applied is not precoatedor primed.–Clean a 20 mm wide strip all around edge of window usingcleaning solution -D 009 401 04- .–Then rub edge of window dry using a lint free cloth.WARNINGCeramic coating on window is not primer! It must be primedbefore application of adhesive sealing compound! Use onlyprimer -D 009 200 02- !Golf Variant 2007 ➤ , Jetta 2005 ➤General body repairs, exterior - Edition 10.2009274 Rep. Gr.64 - Glazing Downloaded from www.Manualslib.com manuals search engine
Protected by copyright. Copying for private or commercial purposes, in partor in whole, is not permitted unless authorised by Volkswagen AG. Volkswagen AG does notguarantee or accept any liability with respect to the correctness ofinformation in this document.Copyright by Volkswagen AG.–Now apply primer -4- evenly in one motion using applicator -D 009 500 25- -3- to the previously cleaned area -1- of window.Ensure that glass adhesive is applied to primed area at a distanceof approx. 2 mm from sealing lip -2-.Drying time approx. 10 minutes1.17Touching up paint damageIf paintwork is damaged, paint structure must be restored accord‐ing to specifications in “Paint” workshop manual.1.18Preparing body flange for glazing–Cut back remaining material on body flange with electric cutter-V.A.G 1561 A- and scraping blade -V.A.G 1561/8- , but do notremove completely.NoteRemaining material serves as adhesion base for newly appliedadhesive sealing compound. Keep bonding surfaces free of dirtand grease.Exception: If bonding is not performed immediately after cuttingback, the remaining residual material must be activated with ac‐tivator -D 181 801 A1- .CautionActivator must not have contact with paint or the paintwork willbe damaged.If the window flange has been repaired or partially renewed, thearea concerned must be cleaned and primed again after painting.Golf Variant 2007 ➤ , Jetta 2005 ➤General body repairs, exterior - Edition 10.20091. Flush bonded windows 275 Downloaded from www.Manualslib.com manuals search engine
Protected by copyright. Copying for private or commercial purposes, in partor in whole, is not permitted unless authorised by Volkswagen AG. Volkswagen AG does notguarantee or accept any liability with respect to the correctness ofinformation in this document.Copyright by Volkswagen AG.1.19Installation instructions–Apply adhesive material to primed area -1- or to trimmed seal‐ant bead, holding double cartridge gun -VAS 5237- at rightangle to window.WARNINGWindow must be installed within 10 minutes, or adhesive prop‐erties of glass adhesive will be impaired.♦Using two suction lifters -V.A.G 1344- , install glass pane inwindow aperture, align to centre and press in onto spacing lip.♦Secure windscreen during curing period with window adjust‐ers.♦It is absolutely necessary to install the plenum chamber coveras described ⇒ page 263 .♦Replace stickers (e.g. for airbag) which may be installed.♦The activator must not come into contact with the windowheater bus bar.♦If the adhesive bead is too thick and the adhesive expandsonto the area of the window heating, excess adhesive mustbe removed.1.20Minimum curing periodWARNINGSpecial standards must be adhered to when replacing bondedwindows. One of these standards is, for example, that a freshlybonded windscreen must comply with the safety requirements,even in an accident, following the minimum prescribed curingperiod.The minimum curing period for 2K adhesive -DA 004 600 A2- isthree hours for all windows.Minimum curing period is the time from bonding the window untilvehicle may be used. During this time, the vehicle must stand ona level surface at room temperature (at least 15 °C).WARNINGVehicle is safe to use only after the curing period is completed.1.21Touching up paint damagePaint structure must be restored according to specifications in the“Paint” workshop manual.The following repair method is suitable for paint finish damagedin areas which are not visible:Painting over twice (wet-on-wet) with glass/paint primer -D009 200 02- - flash-off time = at least 10 minutes.Golf Variant 2007 ➤ , Jetta 2005 ➤General body repairs, exterior - Edition 10.2009276 Rep. Gr.64 - Glazing Downloaded from www.Manualslib.com manuals search engine
Protected by copyright. Copying for private or commercial purposes, in partor in whole, is not permitted unless authorised by Volkswagen AG. Volkswagen AG does notguarantee or accept any liability with respect to the correctness ofinformation in this document.Copyright by Volkswagen AG.1.22Cleaning off excess adhesive sealingmaterial–Use of adhesive remover -D 002 000 10- as a cleaning solutionis recommended. Observe the appropriate safety precautionswhen performing this work.WARNINGWhen cleaning freshly installed glass from the inside in the ve‐hicle, do not press glass outwards.–First clean painted surface as much as possible using a drycloth. Remove residual excess with adhesive remover -D 002000 10- .–Cleaning plastic trim: allow adhesive sealant to cure (approx.one hour) and then peel off.Golf Variant 2007 ➤ , Jetta 2005 ➤General body repairs, exterior - Edition 10.20091. Flush bonded windows 277 Downloaded from www.Manualslib.com manuals search engine
Protected by copyright. Copying for private or commercial purposes, in partor in whole, is not permitted unless authorised by Volkswagen AG. Volkswagen AG does notguarantee or accept any liability with respect to the correctness ofinformation in this document.Copyright by Volkswagen AG.2Front door windows2.1ToolsSpecial tools and workshop equipment required♦Roller -T10314-♦Torque wrench -V.A.G 1783-Golf Variant 2007 ➤ , Jetta 2005 ➤General body repairs, exterior - Edition 10.2009278 Rep. Gr.64 - Glazing Downloaded from www.Manualslib.com manuals search engine
Protected by copyright. Copying for private or commercial purposes, in partor in whole, is not permitted unless authorised by Volkswagen AG. Volkswagen AG does notguarantee or accept any liability with respect to the correctness ofinformation in this document.Copyright by Volkswagen AG.2.2Assembly overview- front door windowNote♦The right side is shown. The left side is similar.♦The bolt -4- is accessible from interior and exterior. From exterior the bolt has a right-hand thread. Thismeans: from exterior the bolt is removed by turning it to left, from interior the bolt is removed by turning it toright.1 - Door window❑Removing and installing⇒ page 2792 - Window channel❑Removing and installing⇒ page 2873 - Mounting4 - Bolt❑Accessible from exterior(right-hand thread), re‐move by turning anti-clockwise (to remove:remove door outer pan‐el ⇒ page 112 )❑Accessible from interior,remove by turningclockwise (to remove:remove front door trim⇒ General body repairs,interior; Rep. Gr. 70 ;Trims, insulation; Doortrims )❑Qty. 2❑8 Nm5 - Window regulator❑Removing and installing⇒ page 2916 - Cover❑Qty. 27 - Window regulator motor❑Removing and installing⇒ page 2842.3Removing and installing door windowNoteRemoval and installation is described only for the right door win‐dow. Removal and installation of the left door window is done inthe same manner.Golf Variant 2007 ➤ , Jetta 2005 ➤General body repairs, exterior - Edition 10.20092. Front door windows 279 Downloaded from www.Manualslib.com manuals search engine
Protected by copyright. Copying for private or commercial purposes, in partor in whole, is not permitted unless authorised by Volkswagen AG. Volkswagen AG does notguarantee or accept any liability with respect to the correctness ofinformation in this document.Copyright by Volkswagen AG.2.3.1RemovingNoteThe bolt -3- is accessible from interior and exterior. From exterior the bolt has a right-hand thread. This means:from exterior the bolt is removed by turning it to left, from interior the bolt is removed by turning it to right.–Removing front door trim ⇒ General body repairs, interior;Rep. Gr. 70 ; Door trim .–Lever out caps -4-.–Lower door window -1- until clamping bolts -3- for mounting-2- are accessible.NoteIf the work step cannot be carried out because there is a fault with the electric window motor, remove motor toslide window down.CautionRemove bolt -3- from interior by turning it clockwise.Golf Variant 2007 ➤ , Jetta 2005 ➤General body repairs, exterior - Edition 10.2009280 Rep. Gr.64 - Glazing Downloaded from www.Manualslib.com manuals search engine
Protected by copyright. Copying for private or commercial purposes, in partor in whole, is not permitted unless authorised by Volkswagen AG. Volkswagen AG does notguarantee or accept any liability with respect to the correctness ofinformation in this document.Copyright by Volkswagen AG.–Loosen bolts -3- (do not remove) from inside by turning to rightand press clamping jaws apart.–Lift rear of door window -1- and swivel out of door forwards, indirection of -arrow-.Golf Variant 2007 ➤ , Jetta 2005 ➤General body repairs, exterior - Edition 10.20092. Front door windows 281 Downloaded from www.Manualslib.com manuals search engine
Protected by copyright. Copying for private or commercial purposes, in partor in whole, is not permitted unless authorised by Volkswagen AG. Volkswagen AG does notguarantee or accept any liability with respect to the correctness ofinformation in this document.Copyright by Volkswagen AG.2.3.2Installing–Insert door window -1- in door in -direction of arrow-.Ensure that door window -1- is properly located in window chan‐nels.–The bolt can now be tightened by turning to left.Specified torque for bolt: 8 Nm.Further installation is performed in reverse order of removal.Then test for proper function.2.4Adjusting door window–Removing front door trim ⇒ General body repairs, interior;Rep. Gr. 70 ; Door trim .–Lever out caps -4-.–Lower door window -1- until clamping bolts -3- for mounting-2- are accessible.CautionRemove bolt -3- from interior by turning it clockwise.Golf Variant 2007 ➤ , Jetta 2005 ➤General body repairs, exterior - Edition 10.2009282 Rep. Gr.64 - Glazing Downloaded from www.Manualslib.com manuals search engine
Protected by copyright. Copying for private or commercial purposes, in partor in whole, is not permitted unless authorised by Volkswagen AG. Volkswagen AG does notguarantee or accept any liability with respect to the correctness ofinformation in this document.Copyright by Volkswagen AG.–Loosen bolts -3- (do not remove) from inside by turning to rightand press clamping jaws apart.–Applying light pressure press door window -1- in clampingjaws in -direction of arrow- and align door window tension freeat rear window channel.When doing so, ensure that door window -1- is positioned parallelto window channel.–Tighten clamping jaws by turning bolts anti-clockwise from in‐terior.Specified torque for bolt: 8 Nm.Then test for proper function.Further installation is performed in reverse order of removal.Golf Variant 2007 ➤ , Jetta 2005 ➤General body repairs, exterior - Edition 10.20092. Front door windows 283 Downloaded from www.Manualslib.com manuals search engine
Protected by copyright. Copying for private or commercial purposes, in partor in whole, is not permitted unless authorised by Volkswagen AG. Volkswagen AG does notguarantee or accept any liability with respect to the correctness ofinformation in this document.Copyright by Volkswagen AG.2.5Assembly overview - window regulator motorNoteThe right side is shown. The left side is similar.1 - Window regulator motor❑Removing and installing⇒ page 2842 - Bolt❑Qty. 3❑3.5 Nm2.6Removing and installing window regula‐tor motorNote♦The removal and installation sequence is only for the rightwindow regulator motor. The removal and installation of theleft window regulator motor is similar.♦The window regulator motor can also be removed with mount‐ing plate when door outer panel is removed.Golf Variant 2007 ➤ , Jetta 2005 ➤General body repairs, exterior - Edition 10.2009284 Rep. Gr.64 - Glazing Downloaded from www.Manualslib.com manuals search engine
Protected by copyright. Copying for private or commercial purposes, in partor in whole, is not permitted unless authorised by Volkswagen AG. Volkswagen AG does notguarantee or accept any liability with respect to the correctness ofinformation in this document.Copyright by Volkswagen AG.2.6.1Removing–Removing front door trim ⇒ General body repairs, interior;Rep. Gr. 70 ; Door trim .–Secure door window against sliding down with adhesive tape.–Release connectors -arrows- using a screwdriver in-direction of arrow-.–Remove the three bolts -2-.–Remove window regulator motor with control unit -1- frommounting plate.2.6.2Installing–Push window regulator motor -1- into place and reconnectconnector -arrows-.–Move door window lightly up and down so that the splines be‐tween motor and cable drum engage easier.–Tighten bolts -2- window regulator motor.Specified torque: 3.5 NmGolf Variant 2007 ➤ , Jetta 2005 ➤General body repairs, exterior - Edition 10.20092. Front door windows 285 Downloaded from www.Manualslib.com manuals search engine
Protected by copyright. Copying for private or commercial purposes, in partor in whole, is not permitted unless authorised by Volkswagen AG. Volkswagen AG does notguarantee or accept any liability with respect to the correctness ofinformation in this document.Copyright by Volkswagen AG.–Run window regulator twice in each direction to upper andlower stops. This initiates and readies the window regulatormotor and activates the roll-back function.Further installation is performed in reverse order of removal.Golf Variant 2007 ➤ , Jetta 2005 ➤General body repairs, exterior - Edition 10.2009286 Rep. Gr.64 - Glazing Downloaded from www.Manualslib.com manuals search engine
Protected by copyright. Copying for private or commercial purposes, in partor in whole, is not permitted unless authorised by Volkswagen AG. Volkswagen AG does notguarantee or accept any liability with respect to the correctness ofinformation in this document.Copyright by Volkswagen AG.2.7Assembly overview - window channelNote♦The right side is shown. The left side is similar.♦For a better representation the illustration is drawn without door outer panel.1 - Window channel2 - Trim3 - Bolt❑Qty. 2❑2 Nm4 - Window frame on door innerpart5 - Trim strip fasteners❑Spreader rivet or screw6 - Window channel trim strip❑Depends on equipment❑Removing and installing⇒ page 2892.8Removing and installing window chan‐nelNote♦Removal and installation is described only for the right windowchannel. The removal and installation of the left window chan‐nel is similar.♦For a better representation the removal and installation isdrawn without door outer panel.Golf Variant 2007 ➤ , Jetta 2005 ➤General body repairs, exterior - Edition 10.20092. Front door windows 287 Downloaded from www.Manualslib.com manuals search engine
Protected by copyright. Copying for private or commercial purposes, in partor in whole, is not permitted unless authorised by Volkswagen AG. Volkswagen AG does notguarantee or accept any liability with respect to the correctness ofinformation in this document.Copyright by Volkswagen AG.2.8.1Removing–Removing front door trim ⇒ General body repairs, interior;Rep. Gr. 70 ; Door trim .–Remove exterior mirror ⇒ page 331 .–Removing door window ⇒ page 279 .Vehicles with window channel trim strip–Remove window channel trim strip -6- ⇒ page 289 .All vehicles–Pull window channel -1- out of mounting.–Remove bolts -3- (Qty. 2) and pull trim plate -2- off in directionof B-pillar -direction of arrow-.–Pull window channel -1- off all around window frame -4- andremove upwards out of window slot.2.8.2InstallingInstall in reverse order of removal.Golf Variant 2007 ➤ , Jetta 2005 ➤General body repairs, exterior - Edition 10.2009288 Rep. Gr.64 - Glazing Downloaded from www.Manualslib.com manuals search engine
Protected by copyright. Copying for private or commercial purposes, in partor in whole, is not permitted unless authorised by Volkswagen AG. Volkswagen AG does notguarantee or accept any liability with respect to the correctness ofinformation in this document.Copyright by Volkswagen AG.NoteTo prevent wind noise, ensure window channel seats evenlywhen installing.2.9Removing and installing window chan‐nel trim strip2.9.1Removing–Push window channel -1- in top rear area slightly to side.–Remove spreader rivet -6- for window channel -1-.–Pull trim strip -5- out of window channel -1- in direction of-arrow-.Trim -2- must not be removed.2.9.2Installing–Spray window channel with soapy water.Golf Variant 2007 ➤ , Jetta 2005 ➤General body repairs, exterior - Edition 10.20092. Front door windows 289 Downloaded from www.Manualslib.com manuals search engine
Protected by copyright. Copying for private or commercial purposes, in partor in whole, is not permitted unless authorised by Volkswagen AG. Volkswagen AG does notguarantee or accept any liability with respect to the correctness ofinformation in this document.Copyright by Volkswagen AG.–Press trim strip -1- evenly in direction of -arrow- into windowchannel -2- by hand.–Then press window channel -2- fully into mounting of trim strip-1- with roller -T 10314- .Further installation is performed in reverse order of removal.Golf Variant 2007 ➤ , Jetta 2005 ➤General body repairs, exterior - Edition 10.2009290 Rep. Gr.64 - Glazing Downloaded from www.Manualslib.com manuals search engine
Protected by copyright. Copying for private or commercial purposes, in partor in whole, is not permitted unless authorised by Volkswagen AG. Volkswagen AG does notguarantee or accept any liability with respect to the correctness ofinformation in this document.Copyright by Volkswagen AG.2.10Assembly overview - window regulatorNoteThe right side is shown. The left side is similar.1 - Window regulator❑Removing and installing⇒ page 2912 - Bolt❑Qty. 4❑8 Nm3 - Bolt❑Qty. 5❑8 Nm4 - Drive5 - Mounting plate2.11Removing and installing window regula‐torNoteThe removal and installation sequence is only for the right windowregulator. The removal and installation of the left window regulatoris similar.2.11.1Removing–Remove door outer panel ⇒ page 112 .–Remove side impact protection ⇒ page 92 .Golf Variant 2007 ➤ , Jetta 2005 ➤General body repairs, exterior - Edition 10.20092. Front door windows 291 Downloaded from www.Manualslib.com manuals search engine
Protected by copyright. Copying for private or commercial purposes, in partor in whole, is not permitted unless authorised by Volkswagen AG. Volkswagen AG does notguarantee or accept any liability with respect to the correctness ofinformation in this document.Copyright by Volkswagen AG.–Removing door window ⇒ page 279 .–Remove bolts -2- from mounting plate -5-.–Remove bolts -3- for window regulator.–Remove window regulator -1- with drive -4- and mountingplate -5- for window regulator motor from inner part of door.–Disconnect connections for window regulator motor⇒ page 285 .2.11.2InstallingInstall in reverse order of removal.Carry out functional check before installing door outer panel.Golf Variant 2007 ➤ , Jetta 2005 ➤General body repairs, exterior - Edition 10.2009292 Rep. Gr.64 - Glazing Downloaded from www.Manualslib.com manuals search engine
Protected by copyright. Copying for private or commercial purposes, in partor in whole, is not permitted unless authorised by Volkswagen AG. Volkswagen AG does notguarantee or accept any liability with respect to the correctness ofinformation in this document.Copyright by Volkswagen AG.3Rear door window (saloon)3.1ToolsSpecial tools and workshopequipment required♦Release tool -T10236-♦Roller -T10314-♦Torque wrench -V.A.G1783-Golf Variant 2007 ➤ , Jetta 2005 ➤General body repairs, exterior - Edition 10.20093. Rear door window (saloon) 293 Downloaded from www.Manualslib.com manuals search engine
Protected by copyright. Copying for private or commercial purposes, in partor in whole, is not permitted unless authorised by Volkswagen AG. Volkswagen AG does notguarantee or accept any liability with respect to the correctness ofinformation in this document.Copyright by Volkswagen AG.3.2Assembly overview - rear door windowNoteThe right side is shown. The left side is similar.1 - Door window❑Removing and installing⇒ page 2942 - Window channel❑Component part of fixeddoor window❑Removing and installing⇒ page 2973 - Fixed door window❑Part of widow channel.❑Removing and installing⇒ page 2974 - Window regulator guide5 - Spreader plug❑Always renew whenworking on door window6 - Spreader pin❑Always renew whenworking on door window7 - Cover8 - Window regulator❑Removing and installing⇒ page 3059 - Window regulator motor❑Removing and installing⇒ page 3023.3Removing and installing door windowNoteThe removal and installation sequence is only for the rear rightdoor window. The removal and installation of the rear left doorwindow is similar.Golf Variant 2007 ➤ , Jetta 2005 ➤General body repairs, exterior - Edition 10.2009294 Rep. Gr.64 - Glazing Downloaded from www.Manualslib.com manuals search engine
Protected by copyright. Copying for private or commercial purposes, in partor in whole, is not permitted unless authorised by Volkswagen AG. Volkswagen AG does notguarantee or accept any liability with respect to the correctness ofinformation in this document.Copyright by Volkswagen AG.3.3.1RemovingNoteWhen door outer panel has been removed the spreader pin andspreader plug to remove door window are accessible from exte‐rior.–Remove rear door trim ⇒ General body repairs, interior; Rep.Gr. 70 ; Door trim .–Lever out caps -5-.–Lower door window until spreader pin -3- and spreader plug-4- in cut-out of window regulator is accessible.NoteIf the work step cannot be carried out because there is a fault withthe electric window motor, remove motor to slide window down.–Screw a 5 mm bolt (approx. 70 mm long) into spreader pin-3-.–Pull bolt and spreader pin out of spreader plug -4-.–Screw an 8 mm bolt (approx. 80 mm long) into spreader plug-4-.NoteDo not exert too great a pressure on the plug because otherwisethe plug will fall into the door.–Pull spreader plug -4- out of clamping jaws -2- and thereforeout of door window.–Remove window regulator motor ⇒ page 302 .–Lower door window fully.–Pull window channel -3- out of mounting.–Remove screws -2- and pull trim -1- towards B-pillar-direction of arrow-.Golf Variant 2007 ➤ , Jetta 2005 ➤General body repairs, exterior - Edition 10.20093. Rear door window (saloon) 295 Downloaded from www.Manualslib.com manuals search engine
Protected by copyright. Copying for private or commercial purposes, in partor in whole, is not permitted unless authorised by Volkswagen AG. Volkswagen AG does notguarantee or accept any liability with respect to the correctness ofinformation in this document.Copyright by Volkswagen AG.–Pull door window upwards -arrow- out of window slot.3.3.2InstallingNote♦When installing door window, always renew spreader plug andspreader pin.♦Before inserting spreader plug and spreader pin check washerfor damage.–With door window -1- removed insert spreader plug -3- in mid‐dle - centralised.–Press spreader pin -2- flush into spreader plug -3-.–Remove window slot seal ( ⇒ Item 1 (page 123) ).–Guide door window -1- into door and insert door window intomounting of window regulator guide -4-.–With light pressure from above -arrow-, engage window -1- inmounting of window regulator guide -4-.–Install window slot seal ( ⇒ Item 1 (page 123) ) again.Further installation is performed in reverse order of removal.Carry out functional test function before installing door trim.Golf Variant 2007 ➤ , Jetta 2005 ➤General body repairs, exterior - Edition 10.2009296 Rep. Gr.64 - Glazing Downloaded from www.Manualslib.com manuals search engine
Protected by copyright. Copying for private or commercial purposes, in partor in whole, is not permitted unless authorised by Volkswagen AG. Volkswagen AG does notguarantee or accept any liability with respect to the correctness ofinformation in this document.Copyright by Volkswagen AG.3.4Assembly overview - door with fixed window with window channelNoteThe right side is shown. The left side is similar.1 - Window channel❑Component part of fixeddoor window❑Removing and installing⇒ page 2972 - Fixed door window❑Part of widow channel.❑Removing and installing⇒ page 2973 - Window frame on door innerpart4 - Window channel trim strip❑Depends on equipment❑Removing and installing⇒ page 3005 - Spreader rivet3.5Removing and installing door with fixedwindow with window channelNote♦The removal and installation sequence is only for the right doorfixed window with window channel. The removal and installa‐tion of the left door fixed window with window channel issimilar.♦When door outer panel has been removed the spreader pinand spreader plug to remove door window are accessible fromexterior.Golf Variant 2007 ➤ , Jetta 2005 ➤General body repairs, exterior - Edition 10.20093. Rear door window (saloon) 297 Downloaded from www.Manualslib.com manuals search engine
Protected by copyright. Copying for private or commercial purposes, in partor in whole, is not permitted unless authorised by Volkswagen AG. Volkswagen AG does notguarantee or accept any liability with respect to the correctness ofinformation in this document.Copyright by Volkswagen AG.3.5.1Removing–Remove door outer panel ⇒ page 112 .–Removing door window ⇒ page 294 .–Pull window channel -4- out of middle frame -1- and guidewindow channel inwards.–Remove bolts -2- and -3- and slide middle frame -1- down‐wards -arrow A-.–Pull middle frame -4- off fixed door window seal -arrow B-.–Release window channel -1- with fixed door window -2- on in‐side and outside from window frame -4-.–Using release tool -T10236- release locking lugs on guide pin-3- in window frame -4-.Vehicles with window channel trim stripRemove window channel trim strip -4- ⇒ page 300 .All vehicles–Pull complete window channel -1- with fixed door window -2-off window frame -3- in -direction of arrow-.Golf Variant 2007 ➤ , Jetta 2005 ➤General body repairs, exterior - Edition 10.2009298 Rep. Gr.64 - Glazing Downloaded from www.Manualslib.com manuals search engine
Protected by copyright. Copying for private or commercial purposes, in partor in whole, is not permitted unless authorised by Volkswagen AG. Volkswagen AG does notguarantee or accept any liability with respect to the correctness ofinformation in this document.Copyright by Volkswagen AG.3.5.2InstallingInstall in reverse order of removal.Specified torque for bolts -2- on middle frame: 5.5 NmSpecified torque for bolts -3- on middle frame: 4.5 NmNoteWhen installing fixed door window with window channel ensure itis seated uniformly (wind noise).Golf Variant 2007 ➤ , Jetta 2005 ➤General body repairs, exterior - Edition 10.20093. Rear door window (saloon) 299 Downloaded from www.Manualslib.com manuals search engine
Protected by copyright. Copying for private or commercial purposes, in partor in whole, is not permitted unless authorised by Volkswagen AG. Volkswagen AG does notguarantee or accept any liability with respect to the correctness ofinformation in this document.Copyright by Volkswagen AG.3.6Removing and installing window chan‐nel trim strip3.6.1Removing–Push window channel -1- in top front area slightly to side.–Remove spreader rivet -5-.–Pull trim strip -4- out of window channel -1- in direction of-arrow-.3.6.2Installing–Spray window channel with soapy water.Golf Variant 2007 ➤ , Jetta 2005 ➤General body repairs, exterior - Edition 10.2009300 Rep. Gr.64 - Glazing Downloaded from www.Manualslib.com manuals search engine
Protected by copyright. Copying for private or commercial purposes, in partor in whole, is not permitted unless authorised by Volkswagen AG. Volkswagen AG does notguarantee or accept any liability with respect to the correctness ofinformation in this document.Copyright by Volkswagen AG.–Press trim strip -1- evenly -arrow- into window channel -2- byhand.–Then press window channel -2- fully into mounting of trim stripwith roller -T 10314- .Further installation is performed in reverse order of removal.Golf Variant 2007 ➤ , Jetta 2005 ➤General body repairs, exterior - Edition 10.20093. Rear door window (saloon) 301 Downloaded from www.Manualslib.com manuals search engine
Protected by copyright. Copying for private or commercial purposes, in partor in whole, is not permitted unless authorised by Volkswagen AG. Volkswagen AG does notguarantee or accept any liability with respect to the correctness ofinformation in this document.Copyright by Volkswagen AG.3.7Assembly overview - window regulator motorNoteThe right side is shown. The left side is similar.1 - Connector2 - Bolt❑Qty. 3❑3.5 Nm3 - Window regulator motor❑Removing and installing⇒ page 3023.8Removing and installing window regula‐tor motorNoteThe removal and installation sequence is only for the right windowregulator motor. The removal and installation of the left windowregulator motor is similar.3.8.1Removing–Removing door trim ⇒ General body repairs, interior; Rep. Gr. 70 ; Door trim .Golf Variant 2007 ➤ , Jetta 2005 ➤General body repairs, exterior - Edition 10.2009302 Rep. Gr.64 - Glazing Downloaded from www.Manualslib.com manuals search engine
Protected by copyright. Copying for private or commercial purposes, in partor in whole, is not permitted unless authorised by Volkswagen AG. Volkswagen AG does notguarantee or accept any liability with respect to the correctness ofinformation in this document.Copyright by Volkswagen AG.–Secure door window against sliding down with adhesive tape.–Remove the three bolts -2-.–Disconnect connector -1-.–Remove window regulator motor with control unit -3- frommounting plate.3.8.2Installing–Push window regulator motor -3- into place and reconnectconnector -1-.–Move door window lightly up and down so that the splines be‐tween motor and cable drum engage easier.–Tighten bolts -2- window regulator motor.Specified torque for bolts -2- 3.5 Nm–Run window regulator twice in each direction to upper andlower stops. This initiates and readies the window regulatormotor and activates the roll-back function.Golf Variant 2007 ➤ , Jetta 2005 ➤General body repairs, exterior - Edition 10.20093. Rear door window (saloon) 303 Downloaded from www.Manualslib.com manuals search engine
Protected by copyright. Copying for private or commercial purposes, in partor in whole, is not permitted unless authorised by Volkswagen AG. Volkswagen AG does notguarantee or accept any liability with respect to the correctness ofinformation in this document.Copyright by Volkswagen AG.Further installation is performed in reverse order of removal.Golf Variant 2007 ➤ , Jetta 2005 ➤General body repairs, exterior - Edition 10.2009304 Rep. Gr.64 - Glazing Downloaded from www.Manualslib.com manuals search engine
Protected by copyright. Copying for private or commercial purposes, in partor in whole, is not permitted unless authorised by Volkswagen AG. Volkswagen AG does notguarantee or accept any liability with respect to the correctness ofinformation in this document.Copyright by Volkswagen AG.3.9Assembly overview - window regulatorNoteThe right side is shown. The left side is similar.1 - Window regulator❑Removing and installing⇒ page 3052 - Bolt❑Qty. 4❑8 Nm3 - Mounting plate4 - Drive5 - Bolt❑Qty. 2❑8 Nm3.10Removing and installing window regula‐torNote♦The removal and installation sequence is only for the rightwindow regulator. The removal and installation of the left win‐dow regulator is similar.♦For clarity the side impact protection is not shown in the illus‐trationGolf Variant 2007 ➤ , Jetta 2005 ➤General body repairs, exterior - Edition 10.20093. Rear door window (saloon) 305 Downloaded from www.Manualslib.com manuals search engine
Protected by copyright. Copying for private or commercial purposes, in partor in whole, is not permitted unless authorised by Volkswagen AG. Volkswagen AG does notguarantee or accept any liability with respect to the correctness ofinformation in this document.Copyright by Volkswagen AG.3.10.1Removing–Remove door outer panel ⇒ page 112 .–Removing door window ⇒ page 294 .–Remove bolts -2- from mounting plate -3-.–Remove bolts -5- for window regulator.–Remove window regulator -1- with drive -4- and mountingplate -3- for window regulator motor from inner part of door.3.10.2InstallingInstall in reverse order of removal.Carry out functional check before installing door outer panel.Golf Variant 2007 ➤ , Jetta 2005 ➤General body repairs, exterior - Edition 10.2009306 Rep. Gr.64 - Glazing Downloaded from www.Manualslib.com manuals search engine
Protected by copyright. Copying for private or commercial purposes, in partor in whole, is not permitted unless authorised by Volkswagen AG. Volkswagen AG does notguarantee or accept any liability with respect to the correctness ofinformation in this document.Copyright by Volkswagen AG.4Rear door window (Variant)4.1ToolsSpecial tools and workshop equipment required♦Roller -T10314-♦Torque wrench -V.A.G 1783-Golf Variant 2007 ➤ , Jetta 2005 ➤General body repairs, exterior - Edition 10.20094. Rear door window (Variant) 307 Downloaded from www.Manualslib.com manuals search engine
Protected by copyright. Copying for private or commercial purposes, in partor in whole, is not permitted unless authorised by Volkswagen AG. Volkswagen AG does notguarantee or accept any liability with respect to the correctness ofinformation in this document.Copyright by Volkswagen AG.4.2Assembly overview - rear door windowNoteThe right side is shown. The left side is similar.1 - Door window❑Removing and installing⇒ page 3082 - Window channel❑Component part of fixeddoor window❑Removing and installing⇒ page 3123 - Fixed door window❑Removing and installing⇒ page 3124 - Window regulator guide5 - Spreader plug❑Always renew whenworking on door window6 - Spreader pin❑Always renew whenworking on door window7 - Cover8 - Window regulator❑Part of assembly carrier9 - Window regulator motor❑Removing and installing⇒ page 31710 - Bolt❑Qty. 8❑8 Nm11 - Assembly carrier❑Removing and installing⇒ page 14512 - Window slot inner seal4.3Removing and installing door windowNote♦The removal and installation sequence is only for the rear rightdoor window. The removal and installation of the rear left doorwindow is similar.♦Outer window slot seal need not be removed.Golf Variant 2007 ➤ , Jetta 2005 ➤General body repairs, exterior - Edition 10.2009308 Rep. Gr.64 - Glazing Downloaded from www.Manualslib.com manuals search engine
Protected by copyright. Copying for private or commercial purposes, in partor in whole, is not permitted unless authorised by Volkswagen AG. Volkswagen AG does notguarantee or accept any liability with respect to the correctness ofinformation in this document.Copyright by Volkswagen AG.4.3.1Removing–Remove rear door trim ⇒ General body repairs, interior; Rep.Gr. 70 ; Door trim .–Lower door window completely.–Pull window channel -3- out of mounting.–Remove screws -2- and pull trim -1- towards B-pillar-direction of arrow-.–Lever out cap -5-.–Lift door window until spreader pin -3- and spreader plug -4-in cut-out of window regulator is accessible.NoteIf the procedure cannot be carried out because there is a fault withthe electric window regulator, remove electric window motor toslide window down.–Screw a 5 mm bolt (approx. 70 mm long) into spreader pin-3-.–Pull bolt and spreader pin out of spreader plug -4-.–Screw an 8 mm bolt (approx. 80 mm long) into spreader plug-4-.NoteDo not exert too great a pressure on the plug because otherwisethe plug will fall into the door.–Pull spreader plug -4- out of clamping jaws -2- and thereforeout of door window.–Pull window slot inner seal -6- off door inner panel.Golf Variant 2007 ➤ , Jetta 2005 ➤General body repairs, exterior - Edition 10.20094. Rear door window (Variant) 309 Downloaded from www.Manualslib.com manuals search engine
Protected by copyright. Copying for private or commercial purposes, in partor in whole, is not permitted unless authorised by Volkswagen AG. Volkswagen AG does notguarantee or accept any liability with respect to the correctness ofinformation in this document.Copyright by Volkswagen AG.–Pull door window upwards -arrow- out of window slot.4.3.2InstallingNote♦When installing door window, always renew spreader plug andspreader pin.♦Before inserting spreader plug and spreader pin check washerfor damage.–With door window -1- removed insert spreader plug -3- in mid‐dle - centralised.–Press spreader pin -2- flush into spreader plug -3-.–Guide door window -1- into door and insert door window intomounting of window regulator guide -4-.–With light pressure from above -arrow-, engage window -1- inmounting of window regulator guide -4-.Further installation is performed in reverse order of removal.Carry out functional test function before installing door trim.4.4Removing and installing window slotouter seal4.4.1Removing–Remove door window ⇒ page 309 .Golf Variant 2007 ➤ , Jetta 2005 ➤General body repairs, exterior - Edition 10.2009310 Rep. Gr.64 - Glazing Downloaded from www.Manualslib.com manuals search engine
Protected by copyright. Copying for private or commercial purposes, in partor in whole, is not permitted unless authorised by Volkswagen AG. Volkswagen AG does notguarantee or accept any liability with respect to the correctness ofinformation in this document.Copyright by Volkswagen AG.–Lever spreader clip -4- out of clip -3- using a small screwdriver.–Pull the four clips -3- out of the window slot seal -2-.–Pull window slot seal -2- upwards off door outer panel -1-.4.4.2InstallingInstall in reverse order of removal.4.5Assembly overview - door with fixed window with window channelNoteThe right side is shown. The left side is similar.1 - Spreader rivet❑Only with window chan‐nel trim strip2 - Window channel trim strip❑Depends on equipment❑Removing and installing⇒ page 3163 - Window channel❑Removing and installing⇒ page 3124 - Clip❑Always renew whenmaking repairs5 - Middle frame6 - Bolt❑4.5 Nm7 - Fixed door window❑Removing and installing⇒ page 3128 - Bolt❑Qty. 2❑5.5 Nm9 - Window frame on door innerpartGolf Variant 2007 ➤ , Jetta 2005 ➤General body repairs, exterior - Edition 10.20094. Rear door window (Variant) 311 Downloaded from www.Manualslib.com manuals search engine
Protected by copyright. Copying for private or commercial purposes, in partor in whole, is not permitted unless authorised by Volkswagen AG. Volkswagen AG does notguarantee or accept any liability with respect to the correctness ofinformation in this document.Copyright by Volkswagen AG.4.6Removing and installing door with fixedwindow with window channelNoteThe removal and installation sequence is only for the right doorfixed window with window channel. The removal and installationof the left door fixed window with window channel is similar.4.6.1Removing–Remove door window ⇒ page 309 .–Remove window slot outer seal ⇒ page 310 .–Lever out both caps -3-.–Remove both bolts -2- from middle frame -1-.–Pull window channel rubber -3- off trim -2- in direction of-arrow A-.–Remove bolts -1- and pull off trim -2- in direction of-arrow B-.Vehicles with window channel trim stripGolf Variant 2007 ➤ , Jetta 2005 ➤General body repairs, exterior - Edition 10.2009312 Rep. Gr.64 - Glazing Downloaded from www.Manualslib.com manuals search engine
Protected by copyright. Copying for private or commercial purposes, in partor in whole, is not permitted unless authorised by Volkswagen AG. Volkswagen AG does notguarantee or accept any liability with respect to the correctness ofinformation in this document.Copyright by Volkswagen AG.–Push window channel -2- in top front area slightly to side.–Remove spreader rivet -5- for window channel trim strip -1-.All vehicles–Release window channel -2- with fixed door window -3- on in‐side and outside from window frame -4-.–Carefully prise clip -5- out of window frame -2-.–Pull complete window channel -1- with fixed door window -4-and middle frame -3- upwards and out of door in direction of-arrow A-.Golf Variant 2007 ➤ , Jetta 2005 ➤General body repairs, exterior - Edition 10.20094. Rear door window (Variant) 313 Downloaded from www.Manualslib.com manuals search engine
Protected by copyright. Copying for private or commercial purposes, in partor in whole, is not permitted unless authorised by Volkswagen AG. Volkswagen AG does notguarantee or accept any liability with respect to the correctness ofinformation in this document.Copyright by Volkswagen AG.–Remove bolt -4-.–Pull middle frame -3- out of clips -2- and window channel -1-.–Take fixed door window -5- out of window channel -1-.Golf Variant 2007 ➤ , Jetta 2005 ➤General body repairs, exterior - Edition 10.2009314 Rep. Gr.64 - Glazing Downloaded from www.Manualslib.com manuals search engine
Protected by copyright. Copying for private or commercial purposes, in partor in whole, is not permitted unless authorised by Volkswagen AG. Volkswagen AG does notguarantee or accept any liability with respect to the correctness ofinformation in this document.Copyright by Volkswagen AG.4.6.2InstallingSpray window channel with soapy water when installing.Further installation is performed in reverse order of removal.Use a new clip when installing middle frame.NoteWhen installing fixed door window with window channel ensure itis seated uniformly (wind noise).Golf Variant 2007 ➤ , Jetta 2005 ➤General body repairs, exterior - Edition 10.20094. Rear door window (Variant) 315 Downloaded from www.Manualslib.com manuals search engine
Protected by copyright. Copying for private or commercial purposes, in partor in whole, is not permitted unless authorised by Volkswagen AG. Volkswagen AG does notguarantee or accept any liability with respect to the correctness ofinformation in this document.Copyright by Volkswagen AG.4.7Removing and installing window chan‐nel trim strip4.7.1Removing–Push window channel -2- in top front area slightly to side.–Remove spreader rivet -5- for window channel trim strip -1-.–Pull trim strip -1- out of window channel -2-.4.7.2Installing–Spray window channel with soapy water.–Press trim strip -1- evenly -arrow- into window channel -2- byhand.–Then press window channel -2- fully into mounting of trim stripwith roller -T 10314- .Further installation is performed in reverse order of removal.Golf Variant 2007 ➤ , Jetta 2005 ➤General body repairs, exterior - Edition 10.2009316 Rep. Gr.64 - Glazing Downloaded from www.Manualslib.com manuals search engine
Protected by copyright. Copying for private or commercial purposes, in partor in whole, is not permitted unless authorised by Volkswagen AG. Volkswagen AG does notguarantee or accept any liability with respect to the correctness ofinformation in this document.Copyright by Volkswagen AG.4.8Assembly overview - window regulator motorNoteThe right side is shown. The left side is similar.1 - Connector2 - Bolt❑Qty. 3❑3.5 Nm3 - Window regulator motor❑Removing and installing⇒ page 3174.9Removing and installing window regula‐tor motor4.9.1RemovingNoteThe removal and installation sequence is only for the right window regulator motor. The removal and installationof the left window regulator motor is similar.–Removing door trim ⇒ General body repairs, interior; Rep. Gr. 70 ; Door trim .Golf Variant 2007 ➤ , Jetta 2005 ➤General body repairs, exterior - Edition 10.20094. Rear door window (Variant) 317 Downloaded from www.Manualslib.com manuals search engine
Protected by copyright. Copying for private or commercial purposes, in partor in whole, is not permitted unless authorised by Volkswagen AG. Volkswagen AG does notguarantee or accept any liability with respect to the correctness ofinformation in this document.Copyright by Volkswagen AG.–Secure door window against sliding down with adhesive tape.–Pull connector -1- in direction of -arrow- off window regulatormotor with control unit -3-.–Remove the three bolts -2-.–Remove window regulator motor with control unit -3- from as‐sembly carrier.4.9.2Installing–Install window regulator motor with control unit -3-.–Move door window lightly up and down so that the splines be‐tween motor and cable drum engage easier.–Tighten bolts -2- for window regulator motor (3.5 Nm).–Reconnect connector -1- to window regulator motor with con‐trol unit -3- (in opposite direction of -arrow-).–Run window regulator twice in each direction to upper andlower stops. This initiates and readies the window regulatormotor and activates the roll-back function.Golf Variant 2007 ➤ , Jetta 2005 ➤General body repairs, exterior - Edition 10.2009318 Rep. Gr.64 - Glazing Downloaded from www.Manualslib.com manuals search engine
Protected by copyright. Copying for private or commercial purposes, in partor in whole, is not permitted unless authorised by Volkswagen AG. Volkswagen AG does notguarantee or accept any liability with respect to the correctness ofinformation in this document.Copyright by Volkswagen AG.Further installation is performed in reverse order of removal.Golf Variant 2007 ➤ , Jetta 2005 ➤General body repairs, exterior - Edition 10.20094. Rear door window (Variant) 319 Downloaded from www.Manualslib.com manuals search engine
Protected by copyright. Copying for private or commercial purposes, in partor in whole, is not permitted unless authorised by Volkswagen AG. Volkswagen AG does notguarantee or accept any liability with respect to the correctness ofinformation in this document.Copyright by Volkswagen AG.66 –Exterior equipment1Wheel housing liner1.1ToolsSpecial tools and workshop equipment required♦Torque wrench -V.A.G 1783-Golf Variant 2007 ➤ , Jetta 2005 ➤General body repairs, exterior - Edition 10.2009320 Rep. Gr.66 - Exterior equipment Downloaded from www.Manualslib.com manuals search engine
Protected by copyright. Copying for private or commercial purposes, in partor in whole, is not permitted unless authorised by Volkswagen AG. Volkswagen AG does notguarantee or accept any liability with respect to the correctness ofinformation in this document.Copyright by Volkswagen AG.1.2Assembly overview - front wheel housing linerNote♦Only the left side is shown. The right side is similar.♦The removal and installation procedures may have to be modified slightly depending on variations in equip‐ment.♦The wheel housing liner consists of a front and a rear part.1 - Wheel housing liner rearpart❑Material: PP/EPDM2 - Bolt❑Qty. 7❑2 Nm3 - Wheel housing liner frontpart❑Material: PP/EPDM4 - Bolt❑Qty. 11❑2 Nm5 - Expanding nut1.3Removing and installing front wheelhousing linerNoteThe removal and installation sequence is only for the left wheelhousing liner. Removal and installation of the right wheel housingliner are similar.Golf Variant 2007 ➤ , Jetta 2005 ➤General body repairs, exterior - Edition 10.20091. Wheel housing liner 321 Downloaded from www.Manualslib.com manuals search engine
Protected by copyright. Copying for private or commercial purposes, in partor in whole, is not permitted unless authorised by Volkswagen AG. Volkswagen AG does notguarantee or accept any liability with respect to the correctness ofinformation in this document.Copyright by Volkswagen AG.1.3.1RemovingWheel housing liner rear part–Remove wheel ⇒ Running gear, axles, steering; Rep. Gr. 44 ;Specified torques for wheel bolts .–Remove bolts -4- (Qty. 3) at transition of front and rear partsof wheel housing liner–Remove bolts -2- (Qty 7).–Pull off rear part of wheel housing liner -1-.Wheel housing liner front part–Remove bolts -4- (Qty 11).–Pull off front part of wheel housing liner -3-.1.3.2InstallingInstall in reverse order of removal.Golf Variant 2007 ➤ , Jetta 2005 ➤General body repairs, exterior - Edition 10.2009322 Rep. Gr.66 - Exterior equipment Downloaded from www.Manualslib.com manuals search engine
Protected by copyright. Copying for private or commercial purposes, in partor in whole, is not permitted unless authorised by Volkswagen AG. Volkswagen AG does notguarantee or accept any liability with respect to the correctness ofinformation in this document.Copyright by Volkswagen AG.1.4Assembly overview - rear wheel housing linerNoteOnly the left side is shown. The right side is similar.1 - Wheel housing liner❑Material: PP/EPDM2 - Bolt❑Qty. 9❑2 Nm3 - Expanding nut1.5Removing and installing rear wheelhousing linerNoteThe removal and installation sequence is only for the left wheelhousing liner. Removal and installation of the right wheel housingliner are similar.1.5.1Removing–Remove wheel ⇒ Running gear, axles, steering; Rep. Gr. 44 ;Specified torques for wheel bolts .Golf Variant 2007 ➤ , Jetta 2005 ➤General body repairs, exterior - Edition 10.20091. Wheel housing liner 323 Downloaded from www.Manualslib.com manuals search engine
Protected by copyright. Copying for private or commercial purposes, in partor in whole, is not permitted unless authorised by Volkswagen AG. Volkswagen AG does notguarantee or accept any liability with respect to the correctness ofinformation in this document.Copyright by Volkswagen AG.–Remove bolts -2- (Qty 9).–Pull off wheel housing liner -1-.1.5.2InstallingInstall in reverse order of removal.1.6Installing protective cover for wheelhousing1.6.1Installing–Clean contact surfaces of bumper cover and wheel housingliner so that they are free of dust and grease. We recommendisopropyl alcohol.–Remove protective backing -1- from protective cover -2-.Golf Variant 2007 ➤ , Jetta 2005 ➤General body repairs, exterior - Edition 10.2009324 Rep. Gr.66 - Exterior equipment Downloaded from www.Manualslib.com manuals search engine
Protected by copyright. Copying for private or commercial purposes, in partor in whole, is not permitted unless authorised by Volkswagen AG. Volkswagen AG does notguarantee or accept any liability with respect to the correctness ofinformation in this document.Copyright by Volkswagen AG.–Stick protective cover -2- on approx. 28.7 mm from -A-, wherethe highest point of the protective cover -2- and the upper edgeof the bumper cover -3- are used as reference points.Golf Variant 2007 ➤ , Jetta 2005 ➤General body repairs, exterior - Edition 10.20091. Wheel housing liner 325 Downloaded from www.Manualslib.com manuals search engine
Protected by copyright. Copying for private or commercial purposes, in partor in whole, is not permitted unless authorised by Volkswagen AG. Volkswagen AG does notguarantee or accept any liability with respect to the correctness ofinformation in this document.Copyright by Volkswagen AG.2Exterior mirror2.1ToolsSpecial tools and workshop equipment required♦Removal lever -80-200-♦Torque wrench -V.A.G 1783-Golf Variant 2007 ➤ , Jetta 2005 ➤General body repairs, exterior - Edition 10.2009326 Rep. Gr.66 - Exterior equipment Downloaded from www.Manualslib.com manuals search engine
Protected by copyright. Copying for private or commercial purposes, in partor in whole, is not permitted unless authorised by Volkswagen AG. Volkswagen AG does notguarantee or accept any liability with respect to the correctness ofinformation in this document.Copyright by Volkswagen AG.2.2Assembly overview - exterior mirrorNoteOnly the left side is shown. The right side is similar.1 - Mirror housing❑Material: ABS.❑Removing and installing⇒ page 3282 - Mirror mounting❑Removing and installing⇒ page 3313 - Bolt❑Qty. 3❑8 Nm4 - Bolt❑Qty. 2❑1 Nm5 - Assembly part❑Removing and installing⇒ page 3306 - Bolt❑Qty. 2❑1 Nm7 - Side turn signal repeater❑Removing and installing⇒ page 3308 - Trim❑Removing and installing⇒ page 3299 - Bolt❑Qty. 1❑1 Nm10 - Ambient light❑Removing and installing ⇒ page 33011 - Adjuster unit with motor for exterior mirror❑Removing and installing ⇒ page 33112 - Mirror glass❑Removing and installing ⇒ page 328Golf Variant 2007 ➤ , Jetta 2005 ➤General body repairs, exterior - Edition 10.20092. Exterior mirror 327 Downloaded from www.Manualslib.com manuals search engine
Protected by copyright. Copying for private or commercial purposes, in partor in whole, is not permitted unless authorised by Volkswagen AG. Volkswagen AG does notguarantee or accept any liability with respect to the correctness ofinformation in this document.Copyright by Volkswagen AG.2.3Removing and installing mirror glassNoteThe removal and installation sequence is only for the left mirrorglass. The removal and installation of the right mirror glass issimilar.2.3.1RemovingWARNINGWhen doing this repair work, always wear safety goggles andleather gloves!–Protect edge of housing -1- against damage to paintwork withe.g. fabric-reinforced adhesive tape.–Press bottom of mirror glass -2- into mirror housing -1-.–Using removal lever -80-200- , lever -arrow 6- mirror glass-2- off adjuster unit with mirror -5-.–Swivel mirror glass -2- to side -arrow 4- and detach connectors-3- for electric dip and mirror heating on rear of mirror glass-2-.2.3.2Installing–Push connectors onto mirror glass.–Press mirror glass centrally onto adjuster unit with motor inhousing.–Mirror glass engages audibly.Finally carry out a functional check.2.4Removing and installing mirror housingNoteThe removal and installation sequence is only for the left mirrorhousing. The removal and installation of the right mirror housingis similar.Golf Variant 2007 ➤ , Jetta 2005 ➤General body repairs, exterior - Edition 10.2009328 Rep. Gr.66 - Exterior equipment Downloaded from www.Manualslib.com manuals search engine
Protected by copyright. Copying for private or commercial purposes, in partor in whole, is not permitted unless authorised by Volkswagen AG. Volkswagen AG does notguarantee or accept any liability with respect to the correctness ofinformation in this document.Copyright by Volkswagen AG.2.4.1Removing–Remove mirror glass ⇒ page 328 .–For ease of assembly, fold exterior mirror forwards.–Using a screwdriver underneath the locking hooks -2- pressmirror housing out of fastening.–Pull mirror housing slightly forward off mirror base carrier atfront.–Then pull mirror housing -1- upwards off mirror base carrier.2.4.2Installing–Place mirror housing -1- on mirror base carrier and press mir‐ror housing down until the locking hooks -2- engage audibly.–Install mirror glass again ⇒ page 328 .Finally carry out a functional check.2.5Removing and installing trimNoteThe removal and installation sequence is only for the left trimplate. The removal and installation of the right trim plate is similar.2.5.1Removing–Remove mirror glass ⇒ page 328 .–Remove mirror housing ⇒ page 328 .–Using a screwdriver lever locking hooks -2- out of mirror basecarrier.–Pull trim plate -1- off in -direction of arrow-.2.5.2InstallingInstall in reverse order of removal.Finally carry out a functional check.Golf Variant 2007 ➤ , Jetta 2005 ➤General body repairs, exterior - Edition 10.20092. Exterior mirror 329 Downloaded from www.Manualslib.com manuals search engine
Protected by copyright. Copying for private or commercial purposes, in partor in whole, is not permitted unless authorised by Volkswagen AG. Volkswagen AG does notguarantee or accept any liability with respect to the correctness ofinformation in this document.Copyright by Volkswagen AG.2.6Removing and installing side turn signalrepeatersNote♦The removal and installation sequence is only for the left sidemounted turn signal. The removal and installation of the rightside turn signal repeater is similar.♦The side turn signal repeaters are fitted with long-life light-emitting diodes (LEDs) instead of conventional bulbs.♦Therefore, changing bulbs is not necessary. In case of dam‐age, the entire turn signal must be renewed.2.6.1Removing–Remove mirror glass ⇒ page 328 .–Remove mirror housing ⇒ page 328 .–Remove trim ⇒ page 329 .–Remove bolts -4- and remove assembly part -1- downwards.–Detach connector -5- from turn signal -3-.–Remove bolts -2- and take turn signal -3- off assembly part-1-.2.6.2InstallingInstall in reverse order of removal.Finally carry out a functional check.2.7Removing and installing entry lightNoteThe removal and installation sequence is only for the left entrylight. The removal and installation of the right entry light is similar.2.7.1Removing–Remove mirror glass ⇒ page 328 .–Remove mirror housing ⇒ page 328 .–Remove trim ⇒ page 329 .Golf Variant 2007 ➤ , Jetta 2005 ➤General body repairs, exterior - Edition 10.2009330 Rep. Gr.66 - Exterior equipment Downloaded from www.Manualslib.com manuals search engine
Protected by copyright. Copying for private or commercial purposes, in partor in whole, is not permitted unless authorised by Volkswagen AG. Volkswagen AG does notguarantee or accept any liability with respect to the correctness ofinformation in this document.Copyright by Volkswagen AG.–Remove assembly part with turn signal repeater ⇒ page 330 .–Remove bolt -1-.–Swing entry light -2- out downwards and pull bulb out of entrylight housing.2.7.2InstallingInstall in reverse order of removal.Specified torque for entry light bolt: 1 NmFinally carry out a functional check.2.8Removing and installing adjustment unitwith motor for exterior mirrorNoteThe removal and installation sequence is only for the left adjust‐ment unit with motor. The removal and installation of the leftadjustment unit with motor is similar.2.8.1Removing–Remove mirror glass ⇒ page 328 .–Remove bolts -1-.–Remove adjustment unit with motor -2- and disconnect con‐nector.2.8.2InstallingInstall in reverse order of removal.Specified torque for adjustment unit with motor: 1 NmFinally carry out a functional check.2.9Removing and installing exterior mirrorNoteThe removal and installation sequence is only for the left exteriormirror. The removal and installation of the rear view mirror is sim‐ilar.Golf Variant 2007 ➤ , Jetta 2005 ➤General body repairs, exterior - Edition 10.20092. Exterior mirror 331 Downloaded from www.Manualslib.com manuals search engine
Protected by copyright. Copying for private or commercial purposes, in partor in whole, is not permitted unless authorised by Volkswagen AG. Volkswagen AG does notguarantee or accept any liability with respect to the correctness ofinformation in this document.Copyright by Volkswagen AG.2.9.1Removing–Removing front door trim on driver's side ⇒ General body re‐pairs, interior; Rep. Gr. 70 ; Door trim .–Release cable retainer -2- and detach connector -1- for exte‐rior mirror.–Lever cap -3- out of door and remove bolts -2-.–Remove exterior mirror -1- and guide wire through aperture indoor.2.9.2InstallingInstall in reverse order of removal.Specified torque for exterior mirror bolts: 8 NmTest function before installing door trim.Golf Variant 2007 ➤ , Jetta 2005 ➤General body repairs, exterior - Edition 10.2009332 Rep. Gr.66 - Exterior equipment Downloaded from www.Manualslib.com manuals search engine
Protected by copyright. Copying for private or commercial purposes, in partor in whole, is not permitted unless authorised by Volkswagen AG. Volkswagen AG does notguarantee or accept any liability with respect to the correctness ofinformation in this document.Copyright by Volkswagen AG.3Roof railing3.1ToolsSpecial tools and workshop equipment required♦Torque wrench 5…50 Nm -V.A.G 1331-♦Plastic wedge -T10039/1-Golf Variant 2007 ➤ , Jetta 2005 ➤General body repairs, exterior - Edition 10.20093. Roof railing 333 Downloaded from www.Manualslib.com manuals search engine
Protected by copyright. Copying for private or commercial purposes, in partor in whole, is not permitted unless authorised by Volkswagen AG. Volkswagen AG does notguarantee or accept any liability with respect to the correctness ofinformation in this document.Copyright by Volkswagen AG.3.2Assembly overview - roof railing1 - Roof railing❑Removing and installing⇒ page 3342 - Bolt❑Qty. 3 on each side❑20 Nm3 - Roof railing rear cover4 - Roof railing middle cover5 - Roof railing front cover3.3Removing and installing roof railing3.3.1Removing–Using wedge -T10039/1- , lever out front and rear roof railingcovers -1- in direction of -arrow-.Golf Variant 2007 ➤ , Jetta 2005 ➤General body repairs, exterior - Edition 10.2009334 Rep. Gr.66 - Exterior equipment Downloaded from www.Manualslib.com manuals search engine
Protected by copyright. Copying for private or commercial purposes, in partor in whole, is not permitted unless authorised by Volkswagen AG. Volkswagen AG does notguarantee or accept any liability with respect to the correctness ofinformation in this document.Copyright by Volkswagen AG.–Lever front and rear covers of roof railing -1- in direction of-arrow A- and press them in direction of -arrow B-.–Pull out cover for roof railing -1-.–Remove bolt -3- from front and rear roof railing mounting -2-(20 Nm).–Pull middle cover -1- off roof railing -3- in direction of -arrow-.–Remove bolt -2- from middle roof railing mounting -3- (20 Nm).3.3.2InstallingInstall in reverse order of removal.Check roof railing covers for damage and replace as necessary.Golf Variant 2007 ➤ , Jetta 2005 ➤General body repairs, exterior - Edition 10.20093. Roof railing 335 Downloaded from www.Manualslib.com manuals search engine
Protected by copyright. Copying for private or commercial purposes, in partor in whole, is not permitted unless authorised by Volkswagen AG. Volkswagen AG does notguarantee or accept any liability with respect to the correctness ofinformation in this document.Copyright by Volkswagen AG.4Radiator grille4.1ToolsSpecial tools and workshop equipment required♦Torque wrench -V.A.G 1783-Golf Variant 2007 ➤ , Jetta 2005 ➤General body repairs, exterior - Edition 10.2009336 Rep. Gr.66 - Exterior equipment Downloaded from www.Manualslib.com manuals search engine
Protected by copyright. Copying for private or commercial purposes, in partor in whole, is not permitted unless authorised by Volkswagen AG. Volkswagen AG does notguarantee or accept any liability with respect to the correctness ofinformation in this document.Copyright by Volkswagen AG.4.2Radiator grille4.2.1Assembly overview - radiator grille1 - Radiator grille❑Removing ⇒ page 337❑Installing ⇒ page 3382 - Bolt❑Qty. 4❑Specified torque: 2 Nm3 - VW emblem❑Clipped into radiatorgrille❑Removing: release lock‐ing hooks on rear ofcompany emblem andremove by turning it inopposite direction to-arrow c-.❑Installing: guide VW em‐blem with locking hooksinto recesses in radiatorgrille -arrow b-, then turnslightly in direction of-arrow c- until VW em‐blem engages in radia‐tor grille4.2.2Removing–Remove bolts -2-.–Release clips -arrows- from lock carrier using a small screw‐driver.Golf Variant 2007 ➤ , Jetta 2005 ➤General body repairs, exterior - Edition 10.20094. Radiator grille 337 Downloaded from www.Manualslib.com manuals search engine
Protected by copyright. Copying for private or commercial purposes, in partor in whole, is not permitted unless authorised by Volkswagen AG. Volkswagen AG does notguarantee or accept any liability with respect to the correctness ofinformation in this document.Copyright by Volkswagen AG.–Tilt radiator grille -1- forwards slightly and pull it upwards outof bumper cover.4.2.3Installing–Insert radiator grille -1- into bumper cover mounting fromabove and tilted forwards slightly.–Tilt radiator grille -1- towards lock carrier and locate clips-arrows- in lock carrier.Golf Variant 2007 ➤ , Jetta 2005 ➤General body repairs, exterior - Edition 10.2009338 Rep. Gr.66 - Exterior equipment Downloaded from www.Manualslib.com manuals search engine
Protected by copyright. Copying for private or commercial purposes, in partor in whole, is not permitted unless authorised by Volkswagen AG. Volkswagen AG does notguarantee or accept any liability with respect to the correctness ofinformation in this document.Copyright by Volkswagen AG.–Install bolts -2- (2 Nm).Golf Variant 2007 ➤ , Jetta 2005 ➤General body repairs, exterior - Edition 10.20094. Radiator grille 339 Downloaded from www.Manualslib.com manuals search engine
Protected by copyright. Copying for private or commercial purposes, in partor in whole, is not permitted unless authorised by Volkswagen AG. Volkswagen AG does notguarantee or accept any liability with respect to the correctness ofinformation in this document.Copyright by Volkswagen AG.4.3Radiator grille, Cup Edition4.3.1Assembly overview - radiator grille1 - Radiator grille❑Removing ⇒ page 341❑Installing ⇒ page 3422 - Bolt❑Qty. 2.❑Specified torque: 2 Nm3 - Locking lug❑Qty. 6.Golf Variant 2007 ➤ , Jetta 2005 ➤General body repairs, exterior - Edition 10.2009340 Rep. Gr.66 - Exterior equipment Downloaded from www.Manualslib.com manuals search engine
Protected by copyright. Copying for private or commercial purposes, in partor in whole, is not permitted unless authorised by Volkswagen AG. Volkswagen AG does notguarantee or accept any liability with respect to the correctness ofinformation in this document.Copyright by Volkswagen AG.4.3.2Removing–Remove bolts -2-.–Release clips -arrows- from lock carrier using a small screw‐driver.–Tilt radiator grille -1- backwards slightly and pull locking hooks-3- upwards out of front bumper cover.Golf Variant 2007 ➤ , Jetta 2005 ➤General body repairs, exterior - Edition 10.20094. Radiator grille 341 Downloaded from www.Manualslib.com manuals search engine
Protected by copyright. Copying for private or commercial purposes, in partor in whole, is not permitted unless authorised by Volkswagen AG. Volkswagen AG does notguarantee or accept any liability with respect to the correctness ofinformation in this document.Copyright by Volkswagen AG.4.3.3Installing–With radiator grille -1- tilted forward slightly place lockinghooks -3- in front bumper cover.–Tilt radiator grille -1- towards lock carrier and locate clips-arrows- in lock carrier.–Install bolts -2-.Golf Variant 2007 ➤ , Jetta 2005 ➤General body repairs, exterior - Edition 10.2009342 Rep. Gr.66 - Exterior equipment Downloaded from www.Manualslib.com manuals search engine
Protected by copyright. Copying for private or commercial purposes, in partor in whole, is not permitted unless authorised by Volkswagen AG. Volkswagen AG does notguarantee or accept any liability with respect to the correctness ofinformation in this document.Copyright by Volkswagen AG.4.3.4Removing and installing emblemRemoving–Release locking hooks -arrows- on rear of emblem -2- withradiator grille removed -1-.–Turn emblem -2- in -direction of arrow- slightly and pull em‐blem forwards out of radiator grille -1-.Installing–Guide emblem -2- with locking hooks in recesses of radiatorgrille -1-.–Turn emblem -2- in -direction of arrow- until emblem -2- en‐gages with radiator grille -1-.Golf Variant 2007 ➤ , Jetta 2005 ➤General body repairs, exterior - Edition 10.20094. Radiator grille 343 Downloaded from www.Manualslib.com manuals search engine
Protected by copyright. Copying for private or commercial purposes, in partor in whole, is not permitted unless authorised by Volkswagen AG. Volkswagen AG does notguarantee or accept any liability with respect to the correctness ofinformation in this document.Copyright by Volkswagen AG.5Mouldings and trims5.1ToolsSpecial tools and workshop equipment required♦Torque wrench -V.A.G 1783-♦Double cartridge gun -VAS 5237-♦Hot air blower -V.A.G 1416-♦Removal wedge -3409-Golf Variant 2007 ➤ , Jetta 2005 ➤General body repairs, exterior - Edition 10.2009344 Rep. Gr.66 - Exterior equipment Downloaded from www.Manualslib.com manuals search engine
Protected by copyright. Copying for private or commercial purposes, in partor in whole, is not permitted unless authorised by Volkswagen AG. Volkswagen AG does notguarantee or accept any liability with respect to the correctness ofinformation in this document.Copyright by Volkswagen AG.5.2Removing and installing side panel trimstrips on GLI vehicles5.2.1Removing–Remove bolts -1- (Torx T25) from body.–Remove side panel trim strip -2- in direction of -arrow-.As necessary–Slide retainer -2- forwards and release it as described-arrow-.–Remove damaged bolts -1-.NoteThe part number for bolts -1- deviates from the production num‐ber. Refer to parts department.5.2.2Installing–Clean side panel and retainer to remove adhesive remains,we recommend isopropyl alcohol.As necessary–Install bolts -1-. Specified torque: 1.2 ±0.1 Nm–Install retainer -2-, by checking that all bolts fit in their respec‐tive holes then slide retainer forwards.Continuation for all casesGolf Variant 2007 ➤ , Jetta 2005 ➤General body repairs, exterior - Edition 10.20095. Mouldings and trims 345 Downloaded from www.Manualslib.com manuals search engine
Protected by copyright. Copying for private or commercial purposes, in partor in whole, is not permitted unless authorised by Volkswagen AG. Volkswagen AG does notguarantee or accept any liability with respect to the correctness ofinformation in this document.Copyright by Volkswagen AG.–Starting at rear of retainer, position side panel trim strip -2-over retainer -4-.–Secure front of side panel trim strip -2- using a bolt -1-. Speci‐fied torque: 2 ±0.5 Nm.–Remove protective backing -3- from double-sided tape of sidepanel trim strip -2- using a wedge.–Secure side panel trim strip -2- by pressing it onto body.–Install remaining bolts -1- (Qty. 3). Specified torque: 2 ±0.5 Nm5.3Side member extension, Jetta Cup Edi‐tionNoteThe removal and installation sequence is for the left side member(sill) extension. The removal and installation of the right sidemember (sill) extension is similar.Golf Variant 2007 ➤ , Jetta 2005 ➤General body repairs, exterior - Edition 10.2009346 Rep. Gr.66 - Exterior equipment Downloaded from www.Manualslib.com manuals search engine
Protected by copyright. Copying for private or commercial purposes, in partor in whole, is not permitted unless authorised by Volkswagen AG. Volkswagen AG does notguarantee or accept any liability with respect to the correctness ofinformation in this document.Copyright by Volkswagen AG.5.3.1Assembly overview1 - Side member extension❑Removing ⇒ page 348❑Installing ⇒ page 3492 - PUR adhesive sealant❑Lower adhesive surface❑Bead cross section:width = 8 mm; height = 8mm❑Minimum curing period3 - Bolt❑Specified torque: 2 ±0.5Nm4 - PUR adhesive sealant❑Upper adhesive surface❑Bead cross section:width = 8 mm; height = 8mm❑Minimum curing period5 - Spacer❑At front and rear.❑Qty. 2 on each side6 - Bolt❑Qty. 2 per spacer❑Specified torque: 2 NmGolf Variant 2007 ➤ , Jetta 2005 ➤General body repairs, exterior - Edition 10.20095. Mouldings and trims 347 Downloaded from www.Manualslib.com manuals search engine
Protected by copyright. Copying for private or commercial purposes, in partor in whole, is not permitted unless authorised by Volkswagen AG. Volkswagen AG does notguarantee or accept any liability with respect to the correctness ofinformation in this document.Copyright by Volkswagen AG.5.3.2RemovingNoteThe side member extension cannot be removed without being damaged.WARNINGClean all surrounding parts before beginning work and maskthem with tape.Do not use cutting wire to remove side member extension-1-.–Remove bolt -3-.–From below, remove bolts -6- from front and rear spacers-5-.–Before removing, heat side member extension -1- in bondingsurface areas -2- and -4- with hot air blower -V.A.G 1416- .Golf Variant 2007 ➤ , Jetta 2005 ➤General body repairs, exterior - Edition 10.2009348 Rep. Gr.66 - Exterior equipment Downloaded from www.Manualslib.com manuals search engine
Protected by copyright. Copying for private or commercial purposes, in partor in whole, is not permitted unless authorised by Volkswagen AG. Volkswagen AG does notguarantee or accept any liability with respect to the correctness ofinformation in this document.Copyright by Volkswagen AG.–Lift a corner of side member extension -1- using wedge-3409- .–Firmly holding corner, forcefully pull side member extension-1- from side panel.NoteCut bonding using suitable equipment, if required.5.3.3Installing–Installation instructions ⇒ page 353 .–Preparing body component for bonding ⇒ page 352–Preparing new add-on part for bonding ⇒ page 353–Apply 2K glass adhesive -DA 004 600 A2- to sealing surfaces-3- and -4- evenly along the complete length of the side mem‐ber extension -1- using double cartridge gun -VAS 5237- .–Apply 2K glass adhesive -DA 004 600 A2- to front and rearspacers -5-.Golf Variant 2007 ➤ , Jetta 2005 ➤General body repairs, exterior - Edition 10.20095. Mouldings and trims 349 Downloaded from www.Manualslib.com manuals search engine
Protected by copyright. Copying for private or commercial purposes, in partor in whole, is not permitted unless authorised by Volkswagen AG. Volkswagen AG does notguarantee or accept any liability with respect to the correctness ofinformation in this document.Copyright by Volkswagen AG.–Install side member extension -1- on side member, start at rearwheel housing and use assistance of a second mechanic.–Then tighten bolt -2-.–Press side member extension -1- on firmly and secure it withtextile adhesive tape.–Loosen bolts -6- on front and rear spacers -5-.–Move front and rear spacers -5- so that they are in full contactwith side member.–Then tighten bolts -6- on spacer -5-.NoteThe side member extension -1- must lie evenly on the side member over the complete length, otherwise aperfect bond cannot be guaranteed.•Minimum curing period ⇒ page 354Golf Variant 2007 ➤ , Jetta 2005 ➤General body repairs, exterior - Edition 10.2009350 Rep. Gr.66 - Exterior equipment Downloaded from www.Manualslib.com manuals search engine
Protected by copyright. Copying for private or commercial purposes, in partor in whole, is not permitted unless authorised by Volkswagen AG. Volkswagen AG does notguarantee or accept any liability with respect to the correctness ofinformation in this document.Copyright by Volkswagen AG.6Special add-on parts6.1Safety requirementsCautionWhen removing special add-on parts, use suitable gloves andprotective eyewear.Special add-on parts must cure at least 3 hours after beingbonded before work on the vehicle is continued.Note♦The following special add-on parts have been developed tofulfil the technical requirements of the respective models.These special add-on parts should always be replaced withthe corresponding genuine parts.♦Without these special add-on parts, the vehicle will not complywith the traffic regulations.6.2Fitting notes for extensionsNote♦The side member extension are applied with adhesive at thefactory.♦The side member extensions are supplied primed by the sup‐plier.♦Ensure the side member extension adhesive surfaces remainfree of paint and paint mist when painting extensions.6.3Materials♦2K glass adhesive-DA 004 600 A2-♦Static mixer with tapered noz‐zle-D 002 001-♦Primer-D 009 200 02-♦Cleaning solution-D 009 401 04-♦Primer applicator-D 009 500 25-♦Adhesive remover-D 002 000 10-♦Activator-D 181 801 A1-NoteObserve instructions for use on the information sheet provided bythe manufacturer.Golf Variant 2007 ➤ , Jetta 2005 ➤General body repairs, exterior - Edition 10.20096. Special add-on parts 351 Downloaded from www.Manualslib.com manuals search engine
Protected by copyright. Copying for private or commercial purposes, in partor in whole, is not permitted unless authorised by Volkswagen AG. Volkswagen AG does notguarantee or accept any liability with respect to the correctness ofinformation in this document.Copyright by Volkswagen AG.Heat 1-K glass adhesive according to manufacturer's instructions,using cartridge heater -V.A.G 1939A- .6.4Special add-on parts, Jetta Cup Edition1 - Radiator grille❑Removing ⇒ page 341❑Installing ⇒ page 3422 - Front bumper cover❑Removing ⇒ page 231❑Installing ⇒ page 2323 - Scuff protection film❑Renewing ⇒ page 3554 - Side member extension❑Removing ⇒ page 348❑Installing ⇒ page 3495 - Rear bumper cover❑Removing ⇒ page 244❑Installing ⇒ page 2456.5Preparing body kit component for bond‐ingNoteRemaining material serves as adhesion base for newly appliedadhesive sealing compound. Keep dirt and grease off of bondingsurfaces.Exception: If bonding is not performed immediately after cuttingback, the remaining residual material must be activated with ac‐tivator -D 181 801 A1- .Golf Variant 2007 ➤ , Jetta 2005 ➤General body repairs, exterior - Edition 10.2009352 Rep. Gr.66 - Exterior equipment Downloaded from www.Manualslib.com manuals search engine
Protected by copyright. Copying for private or commercial purposes, in partor in whole, is not permitted unless authorised by Volkswagen AG. Volkswagen AG does notguarantee or accept any liability with respect to the correctness ofinformation in this document.Copyright by Volkswagen AG.WARNINGActivator must not have contact with paint or the paintwork willbe damaged.NoteIf the body kit part has been repaired or partially renewed, thearea concerned must be cleaned and primed again after painting.6.6Preparing new add-on part for bondingWARNINGMask off primed and bonding surfaces properly before paint‐ing.–Immediately before bonding add-on parts, clean bonding sur‐face thoroughly with adhesive remover -D 002 000 10- .•Bonding surfaces must be free of dust and grease and thereshould be no adhesive residues.–Now apply plastic primer -D 009 600- using applicator -D 009500 25- equally in one stroke.•Drying time approx. 10 minutes•The body component must be prepared for bonding.–A thin coat of 2K glass adhesive -DA 004 600 A2- must beapplied evenly to the primed surfaces of the add-on parts withthe double cartridge gun -VAS 5237- .6.7Installation instructionsThe surfaces to be primed for the body kit parts should be com‐pletely clean.–Remove adhesive residue using adhesive remover -D 002 00010- .–Soak cloth in silicon remover -LSE 020 100 A3- .–Clean area of application for adhesive bead twice thoroughlyusing cloth soaked with solution and allow to dry.–Now apply glass/paint primer using applicator -D 009 500 25-evenly in one stroke.♦Drying time approx. 10 minutes–Adhesive sealant must be applied to the primed areas of theadd-on parts.WARNINGBody kit parts should be installed within 10 minutes, or bondingproperties of adhesive will be impaired.♦Gap dimensions should be kept to an absolute minimum, upto approx. 1 mm.Golf Variant 2007 ➤ , Jetta 2005 ➤General body repairs, exterior - Edition 10.20096. Special add-on parts 353 Downloaded from www.Manualslib.com manuals search engine
Protected by copyright. Copying for private or commercial purposes, in partor in whole, is not permitted unless authorised by Volkswagen AG. Volkswagen AG does notguarantee or accept any liability with respect to the correctness ofinformation in this document.Copyright by Volkswagen AG.♦Use adhesive tape to secure add-on parts in position duringminimum curing time.6.8Minimum curing periodThe minimum curing period for newly bonded attaching parts is 3hours.The minimum curing time is the time from bonding the add-onparts until the vehicle may be used. During this time, the vehiclemust stand on a level surface at room temperature (at least 15 °C).WARNINGVehicle is safe to use only after the curing period is completed.6.9Touching up paint damagePaint structure must be restored according to specifications in the“Paint” workshop manual.6.10Cleaning off excess adhesive sealingmaterial–Use adhesive remover -D 002 000 10- as a cleaning solution.Observe the appropriate safety precautions when performingthis work.–First clean painted surface as well as possible using a drycloth. Remove residue using adhesive remover -D 002 00010- .Golf Variant 2007 ➤ , Jetta 2005 ➤General body repairs, exterior - Edition 10.2009354 Rep. Gr.66 - Exterior equipment Downloaded from www.Manualslib.com manuals search engine
Protected by copyright. Copying for private or commercial purposes, in partor in whole, is not permitted unless authorised by Volkswagen AG. Volkswagen AG does notguarantee or accept any liability with respect to the correctness ofinformation in this document.Copyright by Volkswagen AG.7Protective backing7.1Scuff protection film7.1.1ToolsSpecial tools and workshop equipment required♦Hot air blower -V.A.G 1416-7.1.2Fitting notesNote♦Before removal, heat the scuff protection film with a hot airblower -V.A.G 1416- .♦If the scuff protection film is installed for the first time on a newvehicle and newly painted surfaces, the procedure in ⇒ Work‐shop manual "Paint"; ⇒Paintwork repairs; ⇒Paint finish;⇒Mouldings & Film should be observed.♦If the scuff protection film is removed and reinstalled, only useadhesive remover -D 002 000 10- to remove the adhesive re‐mains.♦Ensure that the adhesive surfaces are free of dust and grease.♦Bond scuff protection film immediately after cleaning.♦Pull protective backing off only directly prior to installation.♦The working temperature is approx. 21 °C.♦The scuff protection film cannot be removed without damage.Golf Variant 2007 ➤ , Jetta 2005 ➤General body repairs, exterior - Edition 10.20097. Protective backing 355 Downloaded from www.Manualslib.com manuals search engine
Protected by copyright. Copying for private or commercial purposes, in partor in whole, is not permitted unless authorised by Volkswagen AG. Volkswagen AG does notguarantee or accept any liability with respect to the correctness ofinformation in this document.Copyright by Volkswagen AG.7.1.3Renewing scuff protection filmNoteRenewing scuff protection films is described only for the left side. The right side is similar.Removing–Remove inner seal for front door in area of side member⇒ page 93 .–Heat front scuff protection film -1- using a hot air blower -V.A.G1416- and pull scuff protection film -1- from sill.Installing–Clean installation area with adhesive remover -D 002 00 10- .–Pull off protective backing -2-.–Position front scuff protection film -1- on the references points-a- = 155 mm and press it smooth using a plastic blade wrap‐ped in a soft paper towel.Golf Variant 2007 ➤ , Jetta 2005 ➤General body repairs, exterior - Edition 10.2009356 Rep. Gr.66 - Exterior equipment Downloaded from www.Manualslib.com manuals search engine
Protected by copyright. Copying for private or commercial purposes, in partor in whole, is not permitted unless authorised by Volkswagen AG. Volkswagen AG does notguarantee or accept any liability with respect to the correctness ofinformation in this document.Copyright by Volkswagen AG.8Lettering8.1ToolsSpecial tools and workshop equipment required♦Hot air blower -V.A.G 1416-8.2Installation instructions for lettering andemblemsNote♦Before removal, heat lettering or emblem with a hot air blower-V.A.G 1416- .♦If the lettering or emblem is installed for the first time on a newvehicle and newly painted surfaces, the procedure in ⇒ Work‐shop manual "Paint"; ⇒Paintwork repairs; ⇒Paint finish;⇒Mouldings & Film should be observed.♦If the lettering or emblem is removed and reinstalled, only useadhesive remover -D 002 000 10- to remove the adhesive re‐mains.♦Ensure that bonding surfaces are free of dust and grease.♦Bond lettering or emblem immediately after cleaning.♦Pull protective backing off only directly prior to installation.♦The working temperature is approx. 21 °C.Golf Variant 2007 ➤ , Jetta 2005 ➤General body repairs, exterior - Edition 10.20098. Lettering 357 Downloaded from www.Manualslib.com manuals search engine
Protected by copyright. Copying for private or commercial purposes, in partor in whole, is not permitted unless authorised by Volkswagen AG. Volkswagen AG does notguarantee or accept any liability with respect to the correctness ofinformation in this document.Copyright by Volkswagen AG.8.3Rear lettering dimensions (saloon)1 - Dimension -a- = 25 mm❑From outer edge of rearlid to lettering2 - Dimension -b- = 15 mm❑From lower edge of taillight aperture in rear lidto upper edge of letter‐ingGolf Variant 2007 ➤ , Jetta 2005 ➤General body repairs, exterior - Edition 10.2009358 Rep. Gr.66 - Exterior equipment Downloaded from www.Manualslib.com manuals search engine
Protected by copyright. Copying for private or commercial purposes, in partor in whole, is not permitted unless authorised by Volkswagen AG. Volkswagen AG does notguarantee or accept any liability with respect to the correctness ofinformation in this document.Copyright by Volkswagen AG.8.4Rear lettering dimensions (Variant)8.4.1Lettering (Golf Variant)1 - Dimension -a- = 5 mm❑Lower edge of letteringto height of lower edgeof rear light -1-❑Transfer -dimension a-from outer edge of rearlid to lettering.Golf Variant 2007 ➤ , Jetta 2005 ➤General body repairs, exterior - Edition 10.20098. Lettering 359 Downloaded from www.Manualslib.com manuals search engine
Protected by copyright. Copying for private or commercial purposes, in partor in whole, is not permitted unless authorised by Volkswagen AG. Volkswagen AG does notguarantee or accept any liability with respect to the correctness ofinformation in this document.Copyright by Volkswagen AG.8.4.2Lettering (Jetta Variant)1 - Dimension -a- = 25 mm❑Transfer -dimension a-from outer edge of rearlid to lettering.❑Lower edge of letteringto height of upper edgeof rear light -1-Golf Variant 2007 ➤ , Jetta 2005 ➤General body repairs, exterior - Edition 10.2009360 Rep. Gr.66 - Exterior equipment Downloaded from www.Manualslib.com manuals search engine
Protected by copyright. Copying for private or commercial purposes, in partor in whole, is not permitted unless authorised by Volkswagen AG. Volkswagen AG does notguarantee or accept any liability with respect to the correctness ofinformation in this document.Copyright by Volkswagen AG.8.5Side lettering dimensions - Individual8.5.1Dimensions for emblem on left wing1 - Dimension -a- = 551 mm❑Transfer -dimension a -from lower edge of wingto wing.2 - Dimension -b- = 14 mm❑Transfer -dimension b-from end point of dimen‐sion a to corner of em‐blem.3 - Dimension -c- = 70 mm❑Use -dimension c- tocheck distance from up‐per edge of emblem toedge of wing.4 - Dimension -d- = 92 mm❑Use -dimension d- tocheck distance fromlower edge of emblem toedge of wing.Golf Variant 2007 ➤ , Jetta 2005 ➤General body repairs, exterior - Edition 10.20098. Lettering 361 Downloaded from www.Manualslib.com manuals search engine
Protected by copyright. Copying for private or commercial purposes, in partor in whole, is not permitted unless authorised by Volkswagen AG. Volkswagen AG does notguarantee or accept any liability with respect to the correctness ofinformation in this document.Copyright by Volkswagen AG.8.5.2Dimensions for emblem on right wing1 - Dimension -a- = 550 mm❑Transfer -dimension a -from lower edge of wingto wing.2 - Dimension -b- = 30 mm❑Transfer -dimension b-from end point of-dimension a- to cornerof emblem.3 - Dimension -c- = 86 mm❑Use -dimension c- tocheck distance from up‐per edge of emblem toedge of wing.4 - Dimension -d- = 92 mm❑Use -dimension d- tocheck distance fromlower edge of emblem toedge of wing.Golf Variant 2007 ➤ , Jetta 2005 ➤General body repairs, exterior - Edition 10.2009362 Rep. Gr.66 - Exterior equipment Downloaded from www.Manualslib.com manuals search engine
Protected by copyright. Copying for private or commercial purposes, in partor in whole, is not permitted unless authorised by Volkswagen AG. Volkswagen AG does notguarantee or accept any liability with respect to the correctness ofinformation in this document.Copyright by Volkswagen AG.Workshop ManualGolf Variant 2007 ➤Jetta 2005 ➤General body repairs, exteriorEdition 10.2009ServiceService Department. Technical Information Downloaded from www.Manualslib.com manuals search engine
Protected by copyright. Copying for private or commercial purposes, in partor in whole, is not permitted unless authorised by Volkswagen AG. Volkswagen AG does notguarantee or accept any liability with respect to the correctness ofinformation in this document.Copyright by Volkswagen AG.List of Workshop Manual Repair GroupsList of Workshop ManualRepair GroupsList of Workshop Manual Repair GroupsRepair Group50 - Body - front55 - Bonnet, rear lid57 - Front doors, door components, central locking58 - Rear doors, door components60 - Sunroof63 - Bumpers64 - Glazing66 - Exterior equipmentTechnical information should always be available to the foremen and mechanics, because theircareful and constant adherence to the instructions is essential to ensure vehicle road-worthiness andsafety. In addition, the normal basic safety precautions for working on motor vehicles must, as amatter of course, be observed.ServiceAll rights reserved.No reproduction without prior agreement from publisher.Copyright © 2010 Volkswagen AG, WolfsburgMEX5R005620 Downloaded from www.Manualslib.com manuals search engine
Protected by copyright. Copying for private or commercial purposes, in partor in whole, is not permitted unless authorised by Volkswagen AG. Volkswagen AG does notguarantee or accept any liability with respect to the correctness ofinformation in this document.Copyright by Volkswagen AG.Contents50 - Body - front . . . . . . . . . . . . . . . . . . . . . . . . . . . . . . . . . . . . . . . . . . . . . . . . . . . . . .11Lock carrier . . . . . . . . . . . . . . . . . . . . . . . . . . . . . . . . . . . . . . . . . . . . . . . . . . . . . . . . . . . . . .11.1Tools . . . . . . . . . . . . . . . . . . . . . . . . . . . . . . . . . . . . . . . . . . . . . . . . . . . . . . . . . . . . . . . . . .11.2Assembly overview - lock carrier, service position . . . . . . . . . . . . . . . . . . . . . . . . . . . . . . . .21.3Service position . . . . . . . . . . . . . . . . . . . . . . . . . . . . . . . . . . . . . . . . . . . . . . . . . . . . . . . . . .21.4Removing and installing lock carrier with add-on parts . . . . . . . . . . . . . . . . . . . . . . . . . . . .42Wing . . . . . . . . . . . . . . . . . . . . . . . . . . . . . . . . . . . . . . . . . . . . . . . . . . . . . . . . . . . . . . . . . .62.1Tools . . . . . . . . . . . . . . . . . . . . . . . . . . . . . . . . . . . . . . . . . . . . . . . . . . . . . . . . . . . . . . . . . .62.2Assembly overview - front wing . . . . . . . . . . . . . . . . . . . . . . . . . . . . . . . . . . . . . . . . . . . . . .72.3Removing and installing wing . . . . . . . . . . . . . . . . . . . . . . . . . . . . . . . . . . . . . . . . . . . . . . . .72.4Removing and installing wing bracket . . . . . . . . . . . . . . . . . . . . . . . . . . . . . . . . . . . . . . . .83Noise insulation . . . . . . . . . . . . . . . . . . . . . . . . . . . . . . . . . . . . . . . . . . . . . . . . . . . . . . . . . .103.1Tools . . . . . . . . . . . . . . . . . . . . . . . . . . . . . . . . . . . . . . . . . . . . . . . . . . . . . . . . . . . . . . . . . .103.2Assembly overview - noise insulation . . . . . . . . . . . . . . . . . . . . . . . . . . . . . . . . . . . . . . . . . .114Underbody cladding . . . . . . . . . . . . . . . . . . . . . . . . . . . . . . . . . . . . . . . . . . . . . . . . . . . . . .124.1Tools . . . . . . . . . . . . . . . . . . . . . . . . . . . . . . . . . . . . . . . . . . . . . . . . . . . . . . . . . . . . . . . . . .124.2Assembly overview - underbody cladding . . . . . . . . . . . . . . . . . . . . . . . . . . . . . . . . . . . . . .134.3Assembly overview - rear underbody cladding . . . . . . . . . . . . . . . . . . . . . . . . . . . . . . . . . .145Plenum chamber bulkhead . . . . . . . . . . . . . . . . . . . . . . . . . . . . . . . . . . . . . . . . . . . . . . . . . .155.1Tools . . . . . . . . . . . . . . . . . . . . . . . . . . . . . . . . . . . . . . . . . . . . . . . . . . . . . . . . . . . . . . . . . .155.2Assembly overview - plenum chamber bulkhead . . . . . . . . . . . . . . . . . . . . . . . . . . . . . . . .1555 - Bonnet, rear lid . . . . . . . . . . . . . . . . . . . . . . . . . . . . . . . . . . . . . . . . . . . . . . . . . . . .161Bonnet . . . . . . . . . . . . . . . . . . . . . . . . . . . . . . . . . . . . . . . . . . . . . . . . . . . . . . . . . . . . . . . .161.1Tools . . . . . . . . . . . . . . . . . . . . . . . . . . . . . . . . . . . . . . . . . . . . . . . . . . . . . . . . . . . . . . . . . .161.2Assembly overview - bonnet . . . . . . . . . . . . . . . . . . . . . . . . . . . . . . . . . . . . . . . . . . . . . . . .171.3Removing and installing bonnet . . . . . . . . . . . . . . . . . . . . . . . . . . . . . . . . . . . . . . . . . . . . . .171.4Removing gas strut . . . . . . . . . . . . . . . . . . . . . . . . . . . . . . . . . . . . . . . . . . . . . . . . . . . . . .191.5Releasing gas from gas strut . . . . . . . . . . . . . . . . . . . . . . . . . . . . . . . . . . . . . . . . . . . . . . . .191.6Removing and installing lid hinge . . . . . . . . . . . . . . . . . . . . . . . . . . . . . . . . . . . . . . . . . . . .191.7Removing and installing insulation . . . . . . . . . . . . . . . . . . . . . . . . . . . . . . . . . . . . . . . . . . . .201.8Assembly overview - bonnet latch and release components . . . . . . . . . . . . . . . . . . . . . . . .231.9Removing and installing bonnet lock . . . . . . . . . . . . . . . . . . . . . . . . . . . . . . . . . . . . . . . . . .231.10Disconnecting Bowden cable . . . . . . . . . . . . . . . . . . . . . . . . . . . . . . . . . . . . . . . . . . . . . . . .241.11Adjusting bonnet . . . . . . . . . . . . . . . . . . . . . . . . . . . . . . . . . . . . . . . . . . . . . . . . . . . . . . . . . .251.12Removing and installing release lever . . . . . . . . . . . . . . . . . . . . . . . . . . . . . . . . . . . . . . . .272Rear lid (saloon) . . . . . . . . . . . . . . . . . . . . . . . . . . . . . . . . . . . . . . . . . . . . . . . . . . . . . . . . . .292.1Tools . . . . . . . . . . . . . . . . . . . . . . . . . . . . . . . . . . . . . . . . . . . . . . . . . . . . . . . . . . . . . . . . . .292.2Assembly overview - rear lid . . . . . . . . . . . . . . . . . . . . . . . . . . . . . . . . . . . . . . . . . . . . . . . .292.3Removing and installing rear lid . . . . . . . . . . . . . . . . . . . . . . . . . . . . . . . . . . . . . . . . . . . . . .302.4Removing gas strut . . . . . . . . . . . . . . . . . . . . . . . . . . . . . . . . . . . . . . . . . . . . . . . . . . . . . .302.5Releasing gas from gas strut . . . . . . . . . . . . . . . . . . . . . . . . . . . . . . . . . . . . . . . . . . . . . . . .312.6Removing and installing lid hinge . . . . . . . . . . . . . . . . . . . . . . . . . . . . . . . . . . . . . . . . . . . .312.7Removing and installing striker pin . . . . . . . . . . . . . . . . . . . . . . . . . . . . . . . . . . . . . . . . . . . .322.8Adjusting rear lid . . . . . . . . . . . . . . . . . . . . . . . . . . . . . . . . . . . . . . . . . . . . . . . . . . . . . . . . . .332.9Assembly overview - lid lock and lock cylinder carrier . . . . . . . . . . . . . . . . . . . . . . . . . . . .352.10Removing and installing lock cylinder . . . . . . . . . . . . . . . . . . . . . . . . . . . . . . . . . . . . . . . .352.11Removing and installing handle trim . . . . . . . . . . . . . . . . . . . . . . . . . . . . . . . . . . . . . . . . . .362.12Removing and installing lid lock . . . . . . . . . . . . . . . . . . . . . . . . . . . . . . . . . . . . . . . . . . . . . .362.13Rear lid seal . . . . . . . . . . . . . . . . . . . . . . . . . . . . . . . . . . . . . . . . . . . . . . . . . . . . . . . . . . . .372.14Removing and installing rear lid seal . . . . . . . . . . . . . . . . . . . . . . . . . . . . . . . . . . . . . . . . . .383Rear lid (Variant) . . . . . . . . . . . . . . . . . . . . . . . . . . . . . . . . . . . . . . . . . . . . . . . . . . . . . . . .39Golf Variant 2007 ➤ , Jetta 2005 ➤General body repairs, exterior - Edition 10.2009Contents i Downloaded from www.Manualslib.com manuals search engine
Protected by copyright. Copying for private or commercial purposes, in partor in whole, is not permitted unless authorised by Volkswagen AG. Volkswagen AG does notguarantee or accept any liability with respect to the correctness ofinformation in this document.Copyright by Volkswagen AG.3.1Tools . . . . . . . . . . . . . . . . . . . . . . . . . . . . . . . . . . . . . . . . . . . . . . . . . . . . . . . . . . . . . . . . . .393.2Assembly overview - rear lid . . . . . . . . . . . . . . . . . . . . . . . . . . . . . . . . . . . . . . . . . . . . . . . .393.3Removing and installing rear lid . . . . . . . . . . . . . . . . . . . . . . . . . . . . . . . . . . . . . . . . . . . . . .403.4Removing and installing gas strut . . . . . . . . . . . . . . . . . . . . . . . . . . . . . . . . . . . . . . . . . . . .413.5Releasing gas from gas strut . . . . . . . . . . . . . . . . . . . . . . . . . . . . . . . . . . . . . . . . . . . . . . . .423.6Removing and installing rear lid hinge . . . . . . . . . . . . . . . . . . . . . . . . . . . . . . . . . . . . . . . .423.7Adjusting rear lid . . . . . . . . . . . . . . . . . . . . . . . . . . . . . . . . . . . . . . . . . . . . . . . . . . . . . . . . . .443.8Removing and installing release button . . . . . . . . . . . . . . . . . . . . . . . . . . . . . . . . . . . . . . . .473.9Removing and installing lid lock . . . . . . . . . . . . . . . . . . . . . . . . . . . . . . . . . . . . . . . . . . . . . .483.10Rear lid seal . . . . . . . . . . . . . . . . . . . . . . . . . . . . . . . . . . . . . . . . . . . . . . . . . . . . . . . . . . . .503.11Removing and installing rear lid seal . . . . . . . . . . . . . . . . . . . . . . . . . . . . . . . . . . . . . . . . . .513.12Registration plate carrier . . . . . . . . . . . . . . . . . . . . . . . . . . . . . . . . . . . . . . . . . . . . . . . . . .534Fuel tank flap unit (saloon) . . . . . . . . . . . . . . . . . . . . . . . . . . . . . . . . . . . . . . . . . . . . . . . . . .544.1Assembly overview - tank flap unit . . . . . . . . . . . . . . . . . . . . . . . . . . . . . . . . . . . . . . . . . . . .544.2Removing and installing tank flap unit . . . . . . . . . . . . . . . . . . . . . . . . . . . . . . . . . . . . . . . .544.3Removing and installing tank filler flap locking motor V155 . . . . . . . . . . . . . . . . . . . . . . . .565Fuel tank flap unit (Variant) . . . . . . . . . . . . . . . . . . . . . . . . . . . . . . . . . . . . . . . . . . . . . . . .585.1Assembly overview - tank flap unit . . . . . . . . . . . . . . . . . . . . . . . . . . . . . . . . . . . . . . . . . . . .585.2Removing and installing tank flap unit . . . . . . . . . . . . . . . . . . . . . . . . . . . . . . . . . . . . . . . .585.3Removing and installing tank filler flap locking motor V155 . . . . . . . . . . . . . . . . . . . . . . . .6057 - Front doors, door components, central locking . . . . . . . . . . . . . . . . . . . . . . . . . .631Front door . . . . . . . . . . . . . . . . . . . . . . . . . . . . . . . . . . . . . . . . . . . . . . . . . . . . . . . . . . . . . .631.1Tools . . . . . . . . . . . . . . . . . . . . . . . . . . . . . . . . . . . . . . . . . . . . . . . . . . . . . . . . . . . . . . . . . .631.2Materials . . . . . . . . . . . . . . . . . . . . . . . . . . . . . . . . . . . . . . . . . . . . . . . . . . . . . . . . . . . . . . . .641.3Assembly overview - door assembly . . . . . . . . . . . . . . . . . . . . . . . . . . . . . . . . . . . . . . . . . .641.4Assembly overview - door hinges . . . . . . . . . . . . . . . . . . . . . . . . . . . . . . . . . . . . . . . . . . . .661.5Removing and installing door . . . . . . . . . . . . . . . . . . . . . . . . . . . . . . . . . . . . . . . . . . . . . . . .681.6Adjusting door . . . . . . . . . . . . . . . . . . . . . . . . . . . . . . . . . . . . . . . . . . . . . . . . . . . . . . . . . .701.7Removing and installing outer panel on door . . . . . . . . . . . . . . . . . . . . . . . . . . . . . . . . . . . .731.8Installing new outer panel on door . . . . . . . . . . . . . . . . . . . . . . . . . . . . . . . . . . . . . . . . . . . .761.9Removing and installing retaining rail on door outer panel . . . . . . . . . . . . . . . . . . . . . . . .801.10Installation notes for bonding a new outer panel on door . . . . . . . . . . . . . . . . . . . . . . . . . .821.11Minimum curing period . . . . . . . . . . . . . . . . . . . . . . . . . . . . . . . . . . . . . . . . . . . . . . . . . . . .821.12Cleaning off excess adhesive sealing material . . . . . . . . . . . . . . . . . . . . . . . . . . . . . . . . . .831.13Assembly overview - door inner part . . . . . . . . . . . . . . . . . . . . . . . . . . . . . . . . . . . . . . . . . .841.14Assembly overview - door handle and door lock . . . . . . . . . . . . . . . . . . . . . . . . . . . . . . . .851.15Removing and installing housing . . . . . . . . . . . . . . . . . . . . . . . . . . . . . . . . . . . . . . . . . . . .861.16Removing and installing door handle . . . . . . . . . . . . . . . . . . . . . . . . . . . . . . . . . . . . . . . . . .861.17Removing and installing bearing bracket . . . . . . . . . . . . . . . . . . . . . . . . . . . . . . . . . . . . . .891.18Removing and installing door lock . . . . . . . . . . . . . . . . . . . . . . . . . . . . . . . . . . . . . . . . . . . .901.19Assembly overview - side impact protection . . . . . . . . . . . . . . . . . . . . . . . . . . . . . . . . . . . .921.20Door inner seal . . . . . . . . . . . . . . . . . . . . . . . . . . . . . . . . . . . . . . . . . . . . . . . . . . . . . . . . . .921.21Removing and installing door inner seal . . . . . . . . . . . . . . . . . . . . . . . . . . . . . . . . . . . . . .931.22Removing and installing door outer seal . . . . . . . . . . . . . . . . . . . . . . . . . . . . . . . . . . . . . .942Central locking . . . . . . . . . . . . . . . . . . . . . . . . . . . . . . . . . . . . . . . . . . . . . . . . . . . . . . . . . .982.1Fitting location overview - central locking components . . . . . . . . . . . . . . . . . . . . . . . . . . . .982.2Adapting keys with remote control . . . . . . . . . . . . . . . . . . . . . . . . . . . . . . . . . . . . . . . . . . . .1002.3Assembly overview - battery for folding key with remote control . . . . . . . . . . . . . . . . . . . .1002.4Removing and installing battery for folding key with remote control . . . . . . . . . . . . . . . . . .10158 - Rear doors, door components . . . . . . . . . . . . . . . . . . . . . . . . . . . . . . . . . . . . . . . .1021Rear door (saloon) . . . . . . . . . . . . . . . . . . . . . . . . . . . . . . . . . . . . . . . . . . . . . . . . . . . . . . . .1021.1Tools . . . . . . . . . . . . . . . . . . . . . . . . . . . . . . . . . . . . . . . . . . . . . . . . . . . . . . . . . . . . . . . . . .1021.2Materials . . . . . . . . . . . . . . . . . . . . . . . . . . . . . . . . . . . . . . . . . . . . . . . . . . . . . . . . . . . . . . . .103Golf Variant 2007 ➤ , Jetta 2005 ➤General body repairs, exterior - Edition 10.2009ii Contents Downloaded from www.Manualslib.com manuals search engine
Protected by copyright. Copying for private or commercial purposes, in partor in whole, is not permitted unless authorised by Volkswagen AG. Volkswagen AG does notguarantee or accept any liability with respect to the correctness ofinformation in this document.Copyright by Volkswagen AG.1.3Assembly overview - door assembly . . . . . . . . . . . . . . . . . . . . . . . . . . . . . . . . . . . . . . . . . .1031.4Assembly overview - door hinges . . . . . . . . . . . . . . . . . . . . . . . . . . . . . . . . . . . . . . . . . . . .1051.5Removing and installing door . . . . . . . . . . . . . . . . . . . . . . . . . . . . . . . . . . . . . . . . . . . . . . . .1071.6Adjusting door . . . . . . . . . . . . . . . . . . . . . . . . . . . . . . . . . . . . . . . . . . . . . . . . . . . . . . . . . .1091.7Removing and installing outer panel on door . . . . . . . . . . . . . . . . . . . . . . . . . . . . . . . . . . . .1121.8Installing new outer panel on door . . . . . . . . . . . . . . . . . . . . . . . . . . . . . . . . . . . . . . . . . . . .1151.9Removing and installing retaining rail on door outer panel . . . . . . . . . . . . . . . . . . . . . . . .1191.10Installation notes for bonding a new outer panel on door . . . . . . . . . . . . . . . . . . . . . . . . . .1211.11Minimum curing period . . . . . . . . . . . . . . . . . . . . . . . . . . . . . . . . . . . . . . . . . . . . . . . . . . . .1211.12Cleaning off excess adhesive sealing material . . . . . . . . . . . . . . . . . . . . . . . . . . . . . . . . . .1221.13Assembly overview - door inner part . . . . . . . . . . . . . . . . . . . . . . . . . . . . . . . . . . . . . . . . . .1231.14Assembly overview - door handle and door lock . . . . . . . . . . . . . . . . . . . . . . . . . . . . . . . .1241.15Removing and installing housing . . . . . . . . . . . . . . . . . . . . . . . . . . . . . . . . . . . . . . . . . . . .1241.16Removing and installing door handle . . . . . . . . . . . . . . . . . . . . . . . . . . . . . . . . . . . . . . . . . .1251.17Removing bearing bracket . . . . . . . . . . . . . . . . . . . . . . . . . . . . . . . . . . . . . . . . . . . . . . . . . .1271.18Removing and installing door lock . . . . . . . . . . . . . . . . . . . . . . . . . . . . . . . . . . . . . . . . . . . .1291.19Assembly overview - side impact protection . . . . . . . . . . . . . . . . . . . . . . . . . . . . . . . . . . . .1311.20Door inner seals . . . . . . . . . . . . . . . . . . . . . . . . . . . . . . . . . . . . . . . . . . . . . . . . . . . . . . . . . .1311.21Removing and installing door inner seal . . . . . . . . . . . . . . . . . . . . . . . . . . . . . . . . . . . . . .1321.22Removing and installing door outer seal . . . . . . . . . . . . . . . . . . . . . . . . . . . . . . . . . . . . . .1332Rear door (Variant) . . . . . . . . . . . . . . . . . . . . . . . . . . . . . . . . . . . . . . . . . . . . . . . . . . . . . . . .1372.1Tools . . . . . . . . . . . . . . . . . . . . . . . . . . . . . . . . . . . . . . . . . . . . . . . . . . . . . . . . . . . . . . . . . .1372.2Assembly overview - rear door . . . . . . . . . . . . . . . . . . . . . . . . . . . . . . . . . . . . . . . . . . . . . .1382.3Assembly overview - door hinges . . . . . . . . . . . . . . . . . . . . . . . . . . . . . . . . . . . . . . . . . . . .1382.4Removing and installing door . . . . . . . . . . . . . . . . . . . . . . . . . . . . . . . . . . . . . . . . . . . . . . . .1402.5Adjusting door . . . . . . . . . . . . . . . . . . . . . . . . . . . . . . . . . . . . . . . . . . . . . . . . . . . . . . . . . .1422.6Assembly overview - assembly carrier . . . . . . . . . . . . . . . . . . . . . . . . . . . . . . . . . . . . . . . .1442.7Removing and installing assembly carrier . . . . . . . . . . . . . . . . . . . . . . . . . . . . . . . . . . . . . .1452.8Assembly overview - door handle and door lock . . . . . . . . . . . . . . . . . . . . . . . . . . . . . . . .1502.9Removing and installing housing . . . . . . . . . . . . . . . . . . . . . . . . . . . . . . . . . . . . . . . . . . . .1512.10Removing and installing door handle . . . . . . . . . . . . . . . . . . . . . . . . . . . . . . . . . . . . . . . . . .1512.11Removing and installing bearing bracket . . . . . . . . . . . . . . . . . . . . . . . . . . . . . . . . . . . . . .1542.12Removing and installing door lock . . . . . . . . . . . . . . . . . . . . . . . . . . . . . . . . . . . . . . . . . . . .1552.13Door inner seals . . . . . . . . . . . . . . . . . . . . . . . . . . . . . . . . . . . . . . . . . . . . . . . . . . . . . . . . . .1552.14Removing and installing door inner seal . . . . . . . . . . . . . . . . . . . . . . . . . . . . . . . . . . . . . .1562.15Removing and installing door outer seal . . . . . . . . . . . . . . . . . . . . . . . . . . . . . . . . . . . . . .15760 - Sunroof . . . . . . . . . . . . . . . . . . . . . . . . . . . . . . . . . . . . . . . . . . . . . . . . . . . . . . . .1611Sliding/tilting sunroof with glass panel (Meritor) . . . . . . . . . . . . . . . . . . . . . . . . . . . . . . . . . .1611.1Tools . . . . . . . . . . . . . . . . . . . . . . . . . . . . . . . . . . . . . . . . . . . . . . . . . . . . . . . . . . . . . . . . . .1611.2Function . . . . . . . . . . . . . . . . . . . . . . . . . . . . . . . . . . . . . . . . . . . . . . . . . . . . . . . . . . . . . . . .1611.3Assembly overview - sliding/tilting sunroof with glass panel . . . . . . . . . . . . . . . . . . . . . . . .1631.4Removing and installing bellows . . . . . . . . . . . . . . . . . . . . . . . . . . . . . . . . . . . . . . . . . . . .1641.5Removing and installing sliding/tilting sunroof glass panel . . . . . . . . . . . . . . . . . . . . . . . .1661.6Adjusting height of sliding/tilting sunroof glass panel . . . . . . . . . . . . . . . . . . . . . . . . . . . . . .1671.7Adjusting panel seal . . . . . . . . . . . . . . . . . . . . . . . . . . . . . . . . . . . . . . . . . . . . . . . . . . . . . .1681.8Renewing panel seal . . . . . . . . . . . . . . . . . . . . . . . . . . . . . . . . . . . . . . . . . . . . . . . . . . . . . .1691.9Removing and installing wind deflector . . . . . . . . . . . . . . . . . . . . . . . . . . . . . . . . . . . . . . . .1691.10Removing and installing sliding headliner . . . . . . . . . . . . . . . . . . . . . . . . . . . . . . . . . . . . . .1701.11Removing and installing sliding/tilting sunroof glass panel drive . . . . . . . . . . . . . . . . . . . .1711.12Adjusting drive for sliding/tilting sunroof glass panel (0 position) . . . . . . . . . . . . . . . . . . . .1721.13Removing and installing sliding/tilting sunroof glass panel automatic preselection switch . . . . . . . . . . . . . . . . . . . . . . . . . . . . . . . . . . . . . . . . . . . . . . . . . . . . . . . . . . . . . . . . . . . . . . . .1721.14Checking parallel running . . . . . . . . . . . . . . . . . . . . . . . . . . . . . . . . . . . . . . . . . . . . . . . . . .1721.15Adjusting parallel running . . . . . . . . . . . . . . . . . . . . . . . . . . . . . . . . . . . . . . . . . . . . . . . . . .1731.16Assembly overview - carrier unit . . . . . . . . . . . . . . . . . . . . . . . . . . . . . . . . . . . . . . . . . . . .174Golf Variant 2007 ➤ , Jetta 2005 ➤General body repairs, exterior - Edition 10.2009Contents iii Downloaded from www.Manualslib.com manuals search engine
Protected by copyright. Copying for private or commercial purposes, in partor in whole, is not permitted unless authorised by Volkswagen AG. Volkswagen AG does notguarantee or accept any liability with respect to the correctness ofinformation in this document.Copyright by Volkswagen AG.1.17Removing and installing carrier unit . . . . . . . . . . . . . . . . . . . . . . . . . . . . . . . . . . . . . . . . . .1741.18Operating without current . . . . . . . . . . . . . . . . . . . . . . . . . . . . . . . . . . . . . . . . . . . . . . . . . .1771.19Removing and installing guide plate . . . . . . . . . . . . . . . . . . . . . . . . . . . . . . . . . . . . . . . . . .1771.20Removing and installing guide plate . . . . . . . . . . . . . . . . . . . . . . . . . . . . . . . . . . . . . . . . . .1781.21Cleaning water drain hoses . . . . . . . . . . . . . . . . . . . . . . . . . . . . . . . . . . . . . . . . . . . . . . . .1792Panorama sliding sunroof (Arvin-Meritor) . . . . . . . . . . . . . . . . . . . . . . . . . . . . . . . . . . . . . .1822.1Tools . . . . . . . . . . . . . . . . . . . . . . . . . . . . . . . . . . . . . . . . . . . . . . . . . . . . . . . . . . . . . . . . . .1822.2Function . . . . . . . . . . . . . . . . . . . . . . . . . . . . . . . . . . . . . . . . . . . . . . . . . . . . . . . . . . . . . . . .1822.3Establishing reference points of panorama sliding roof . . . . . . . . . . . . . . . . . . . . . . . . . . . .1832.4Assembly overview - panorama sliding roof . . . . . . . . . . . . . . . . . . . . . . . . . . . . . . . . . . . .1842.5Removing and installing front glass panel . . . . . . . . . . . . . . . . . . . . . . . . . . . . . . . . . . . . . .1852.6Removing and installing rear glass panel . . . . . . . . . . . . . . . . . . . . . . . . . . . . . . . . . . . . . .1872.7Adjusting height of front and rear glass panel . . . . . . . . . . . . . . . . . . . . . . . . . . . . . . . . . .1882.8Renewing seals for rear glass panel . . . . . . . . . . . . . . . . . . . . . . . . . . . . . . . . . . . . . . . . . .1902.9Renewing outer seal . . . . . . . . . . . . . . . . . . . . . . . . . . . . . . . . . . . . . . . . . . . . . . . . . . . . . .1912.10Renewing inner seal . . . . . . . . . . . . . . . . . . . . . . . . . . . . . . . . . . . . . . . . . . . . . . . . . . . . . .1932.11Removing and installing wind deflector . . . . . . . . . . . . . . . . . . . . . . . . . . . . . . . . . . . . . . . .1932.12Removing and installing wind deflector bracket . . . . . . . . . . . . . . . . . . . . . . . . . . . . . . . . . .1952.13Removing and installing preselector for glass panel and sun blind . . . . . . . . . . . . . . . . . .1962.14Removing and installing sliding sunroof motor . . . . . . . . . . . . . . . . . . . . . . . . . . . . . . . . . .1962.15Removing and installing sun blind motor . . . . . . . . . . . . . . . . . . . . . . . . . . . . . . . . . . . . . .1982.16Removing and installing sun blind . . . . . . . . . . . . . . . . . . . . . . . . . . . . . . . . . . . . . . . . . . . .1992.17Assembly overview - assembly frame . . . . . . . . . . . . . . . . . . . . . . . . . . . . . . . . . . . . . . . .2032.18Installing and removing motor plate and sun blind cable . . . . . . . . . . . . . . . . . . . . . . . . . .2042.19Removing and installing assembly frame . . . . . . . . . . . . . . . . . . . . . . . . . . . . . . . . . . . . . .2072.20Removing and installing rear part . . . . . . . . . . . . . . . . . . . . . . . . . . . . . . . . . . . . . . . . . . . .2092.21Removing and installing front motor plate . . . . . . . . . . . . . . . . . . . . . . . . . . . . . . . . . . . . . .2122.22Removing and installing tilting mechanism and front glass panel cable . . . . . . . . . . . . . .2152.23Maintenance and care . . . . . . . . . . . . . . . . . . . . . . . . . . . . . . . . . . . . . . . . . . . . . . . . . . . .2172.24Operating without current . . . . . . . . . . . . . . . . . . . . . . . . . . . . . . . . . . . . . . . . . . . . . . . . . .2172.25Cleaning water drain hoses . . . . . . . . . . . . . . . . . . . . . . . . . . . . . . . . . . . . . . . . . . . . . . . .21963 - Bumpers . . . . . . . . . . . . . . . . . . . . . . . . . . . . . . . . . . . . . . . . . . . . . . . . . . . . . . . .2221Front bumper . . . . . . . . . . . . . . . . . . . . . . . . . . . . . . . . . . . . . . . . . . . . . . . . . . . . . . . . . . . .2221.1Tools . . . . . . . . . . . . . . . . . . . . . . . . . . . . . . . . . . . . . . . . . . . . . . . . . . . . . . . . . . . . . . . . . .2221.2Repairing bumper cover . . . . . . . . . . . . . . . . . . . . . . . . . . . . . . . . . . . . . . . . . . . . . . . . . . . .2221.3Assembly overview - bumper cover . . . . . . . . . . . . . . . . . . . . . . . . . . . . . . . . . . . . . . . . . .2231.4Removing and installing front bumper cover . . . . . . . . . . . . . . . . . . . . . . . . . . . . . . . . . . . .2231.5Front bumper cover add-on parts . . . . . . . . . . . . . . . . . . . . . . . . . . . . . . . . . . . . . . . . . . . .2251.6Front bumper cover substructure parts . . . . . . . . . . . . . . . . . . . . . . . . . . . . . . . . . . . . . . . .2271.7Assembly overview - bumper carrier . . . . . . . . . . . . . . . . . . . . . . . . . . . . . . . . . . . . . . . . . .2281.8Installing small registration plate carrier . . . . . . . . . . . . . . . . . . . . . . . . . . . . . . . . . . . . . . . .2282Front bumper, Cup Edition . . . . . . . . . . . . . . . . . . . . . . . . . . . . . . . . . . . . . . . . . . . . . . . . . .2292.1Front bumper cover . . . . . . . . . . . . . . . . . . . . . . . . . . . . . . . . . . . . . . . . . . . . . . . . . . . . . .2293Rear bumper (saloon) . . . . . . . . . . . . . . . . . . . . . . . . . . . . . . . . . . . . . . . . . . . . . . . . . . . .2363.1Tools . . . . . . . . . . . . . . . . . . . . . . . . . . . . . . . . . . . . . . . . . . . . . . . . . . . . . . . . . . . . . . . . . .2363.2Repairing bumper cover . . . . . . . . . . . . . . . . . . . . . . . . . . . . . . . . . . . . . . . . . . . . . . . . . . . .2363.3Assembly overview - bumper cover . . . . . . . . . . . . . . . . . . . . . . . . . . . . . . . . . . . . . . . . . .2373.4Removing and installing bumper cover . . . . . . . . . . . . . . . . . . . . . . . . . . . . . . . . . . . . . . . .2373.5Rear bumper cover with add-on parts . . . . . . . . . . . . . . . . . . . . . . . . . . . . . . . . . . . . . . . .2393.6Rear bumper cover substructure parts . . . . . . . . . . . . . . . . . . . . . . . . . . . . . . . . . . . . . . . .2403.7Assembly overview - bumper carrier . . . . . . . . . . . . . . . . . . . . . . . . . . . . . . . . . . . . . . . . . .2414Rear bumper, saloon, Cup Edition . . . . . . . . . . . . . . . . . . . . . . . . . . . . . . . . . . . . . . . . . . . .2424.1Rear bumper cover, saloon . . . . . . . . . . . . . . . . . . . . . . . . . . . . . . . . . . . . . . . . . . . . . . . .2425Rear bumper (Variant) . . . . . . . . . . . . . . . . . . . . . . . . . . . . . . . . . . . . . . . . . . . . . . . . . . . .249Golf Variant 2007 ➤ , Jetta 2005 ➤General body repairs, exterior - Edition 10.2009iv Contents Downloaded from www.Manualslib.com manuals search engine
Protected by copyright. Copying for private or commercial purposes, in partor in whole, is not permitted unless authorised by Volkswagen AG. Volkswagen AG does notguarantee or accept any liability with respect to the correctness ofinformation in this document.Copyright by Volkswagen AG.5.1Tools . . . . . . . . . . . . . . . . . . . . . . . . . . . . . . . . . . . . . . . . . . . . . . . . . . . . . . . . . . . . . . . . . .2495.2Repairing bumper cover . . . . . . . . . . . . . . . . . . . . . . . . . . . . . . . . . . . . . . . . . . . . . . . . . . . .2495.3Assembly overview - bumper cover . . . . . . . . . . . . . . . . . . . . . . . . . . . . . . . . . . . . . . . . . .2505.4Removing and installing bumper cover . . . . . . . . . . . . . . . . . . . . . . . . . . . . . . . . . . . . . . . .2505.5Rear bumper cover with add-on parts . . . . . . . . . . . . . . . . . . . . . . . . . . . . . . . . . . . . . . . .2535.6Rear bumper cover substructure parts . . . . . . . . . . . . . . . . . . . . . . . . . . . . . . . . . . . . . . . .2545.7Assembly overview - bumper carrier . . . . . . . . . . . . . . . . . . . . . . . . . . . . . . . . . . . . . . . . . .2555.8Assembly overview - towing bracket . . . . . . . . . . . . . . . . . . . . . . . . . . . . . . . . . . . . . . . . . .2565.9Removing and installing towing bracket . . . . . . . . . . . . . . . . . . . . . . . . . . . . . . . . . . . . . . . .25664 - Glazing . . . . . . . . . . . . . . . . . . . . . . . . . . . . . . . . . . . . . . . . . . . . . . . . . . . . . . . . . .2591Flush bonded windows . . . . . . . . . . . . . . . . . . . . . . . . . . . . . . . . . . . . . . . . . . . . . . . . . . . .2591.1Tools . . . . . . . . . . . . . . . . . . . . . . . . . . . . . . . . . . . . . . . . . . . . . . . . . . . . . . . . . . . . . . . . . .2591.2Materials . . . . . . . . . . . . . . . . . . . . . . . . . . . . . . . . . . . . . . . . . . . . . . . . . . . . . . . . . . . . . . . .2601.3Assembly overview - windscreen . . . . . . . . . . . . . . . . . . . . . . . . . . . . . . . . . . . . . . . . . . . .2611.4Assembly overview - plenum chamber cover . . . . . . . . . . . . . . . . . . . . . . . . . . . . . . . . . . . .2621.5Removing and installing plenum chamber cover . . . . . . . . . . . . . . . . . . . . . . . . . . . . . . . .2621.6Removing and installing windscreen . . . . . . . . . . . . . . . . . . . . . . . . . . . . . . . . . . . . . . . . . .2641.7Assembly overview - rear window (saloon) . . . . . . . . . . . . . . . . . . . . . . . . . . . . . . . . . . . .2661.8Removing and installing rear window (saloon) . . . . . . . . . . . . . . . . . . . . . . . . . . . . . . . . . .2661.9Assembly overview - rear window (Variant) . . . . . . . . . . . . . . . . . . . . . . . . . . . . . . . . . . . .2691.10Removing and installing rear window (Variant) . . . . . . . . . . . . . . . . . . . . . . . . . . . . . . . . . .2691.11Assembly overview - side window (Variant) . . . . . . . . . . . . . . . . . . . . . . . . . . . . . . . . . . . .2711.12Removing undamaged side window (Variant) . . . . . . . . . . . . . . . . . . . . . . . . . . . . . . . . . .2721.13Removing broken side window (Variant) . . . . . . . . . . . . . . . . . . . . . . . . . . . . . . . . . . . . . .2731.14Installing side window (Variant) . . . . . . . . . . . . . . . . . . . . . . . . . . . . . . . . . . . . . . . . . . . . . .2731.15Preparing old undamaged window for glazing . . . . . . . . . . . . . . . . . . . . . . . . . . . . . . . . . .2741.16Preparing new window for glazing . . . . . . . . . . . . . . . . . . . . . . . . . . . . . . . . . . . . . . . . . . . .2741.17Touching up paint damage . . . . . . . . . . . . . . . . . . . . . . . . . . . . . . . . . . . . . . . . . . . . . . . . . .2751.18Preparing body flange for glazing . . . . . . . . . . . . . . . . . . . . . . . . . . . . . . . . . . . . . . . . . . . .2751.19Installation instructions . . . . . . . . . . . . . . . . . . . . . . . . . . . . . . . . . . . . . . . . . . . . . . . . . . . .2761.20Minimum curing period . . . . . . . . . . . . . . . . . . . . . . . . . . . . . . . . . . . . . . . . . . . . . . . . . . . .2761.21Touching up paint damage . . . . . . . . . . . . . . . . . . . . . . . . . . . . . . . . . . . . . . . . . . . . . . . . . .2761.22Cleaning off excess adhesive sealing material . . . . . . . . . . . . . . . . . . . . . . . . . . . . . . . . . .2772Front door windows . . . . . . . . . . . . . . . . . . . . . . . . . . . . . . . . . . . . . . . . . . . . . . . . . . . . . .2782.1Tools . . . . . . . . . . . . . . . . . . . . . . . . . . . . . . . . . . . . . . . . . . . . . . . . . . . . . . . . . . . . . . . . . .2782.2Assembly overview- front door window . . . . . . . . . . . . . . . . . . . . . . . . . . . . . . . . . . . . . . . .2792.3Removing and installing door window . . . . . . . . . . . . . . . . . . . . . . . . . . . . . . . . . . . . . . . .2792.4Adjusting door window . . . . . . . . . . . . . . . . . . . . . . . . . . . . . . . . . . . . . . . . . . . . . . . . . . . .2822.5Assembly overview - window regulator motor . . . . . . . . . . . . . . . . . . . . . . . . . . . . . . . . . .2842.6Removing and installing window regulator motor . . . . . . . . . . . . . . . . . . . . . . . . . . . . . . . .2842.7Assembly overview - window channel . . . . . . . . . . . . . . . . . . . . . . . . . . . . . . . . . . . . . . . .2872.8Removing and installing window channel . . . . . . . . . . . . . . . . . . . . . . . . . . . . . . . . . . . . . .2872.9Removing and installing window channel trim strip . . . . . . . . . . . . . . . . . . . . . . . . . . . . . .2892.10Assembly overview - window regulator . . . . . . . . . . . . . . . . . . . . . . . . . . . . . . . . . . . . . . . .2912.11Removing and installing window regulator . . . . . . . . . . . . . . . . . . . . . . . . . . . . . . . . . . . . . .2913Rear door window (saloon) . . . . . . . . . . . . . . . . . . . . . . . . . . . . . . . . . . . . . . . . . . . . . . . .2933.1Tools . . . . . . . . . . . . . . . . . . . . . . . . . . . . . . . . . . . . . . . . . . . . . . . . . . . . . . . . . . . . . . . . . .2933.2Assembly overview - rear door window . . . . . . . . . . . . . . . . . . . . . . . . . . . . . . . . . . . . . . . .2943.3Removing and installing door window . . . . . . . . . . . . . . . . . . . . . . . . . . . . . . . . . . . . . . . .2943.4Assembly overview - door with fixed window with window channel . . . . . . . . . . . . . . . . . .2973.5Removing and installing door with fixed window with window channel . . . . . . . . . . . . . . . .2973.6Removing and installing window channel trim strip . . . . . . . . . . . . . . . . . . . . . . . . . . . . . .3003.7Assembly overview - window regulator motor . . . . . . . . . . . . . . . . . . . . . . . . . . . . . . . . . .3023.8Removing and installing window regulator motor . . . . . . . . . . . . . . . . . . . . . . . . . . . . . . . .3023.9Assembly overview - window regulator . . . . . . . . . . . . . . . . . . . . . . . . . . . . . . . . . . . . . . . .305Golf Variant 2007 ➤ , Jetta 2005 ➤General body repairs, exterior - Edition 10.2009Contents v Downloaded from www.Manualslib.com manuals search engine
Protected by copyright. Copying for private or commercial purposes, in partor in whole, is not permitted unless authorised by Volkswagen AG. Volkswagen AG does notguarantee or accept any liability with respect to the correctness ofinformation in this document.Copyright by Volkswagen AG.3.10Removing and installing window regulator . . . . . . . . . . . . . . . . . . . . . . . . . . . . . . . . . . . . . .3054Rear door window (Variant) . . . . . . . . . . . . . . . . . . . . . . . . . . . . . . . . . . . . . . . . . . . . . . . .3074.1Tools . . . . . . . . . . . . . . . . . . . . . . . . . . . . . . . . . . . . . . . . . . . . . . . . . . . . . . . . . . . . . . . . . .3074.2Assembly overview - rear door window . . . . . . . . . . . . . . . . . . . . . . . . . . . . . . . . . . . . . . . .3084.3Removing and installing door window . . . . . . . . . . . . . . . . . . . . . . . . . . . . . . . . . . . . . . . .3084.4Removing and installing window slot outer seal . . . . . . . . . . . . . . . . . . . . . . . . . . . . . . . . . .3104.5Assembly overview - door with fixed window with window channel . . . . . . . . . . . . . . . . . .3114.6Removing and installing door with fixed window with window channel . . . . . . . . . . . . . . . .3124.7Removing and installing window channel trim strip . . . . . . . . . . . . . . . . . . . . . . . . . . . . . .3164.8Assembly overview - window regulator motor . . . . . . . . . . . . . . . . . . . . . . . . . . . . . . . . . .3174.9Removing and installing window regulator motor . . . . . . . . . . . . . . . . . . . . . . . . . . . . . . . .31766 - Exterior equipment . . . . . . . . . . . . . . . . . . . . . . . . . . . . . . . . . . . . . . . . . . . . . . . .3201Wheel housing liner . . . . . . . . . . . . . . . . . . . . . . . . . . . . . . . . . . . . . . . . . . . . . . . . . . . . . .3201.1Tools . . . . . . . . . . . . . . . . . . . . . . . . . . . . . . . . . . . . . . . . . . . . . . . . . . . . . . . . . . . . . . . . . .3201.2Assembly overview - front wheel housing liner . . . . . . . . . . . . . . . . . . . . . . . . . . . . . . . . . .3211.3Removing and installing front wheel housing liner . . . . . . . . . . . . . . . . . . . . . . . . . . . . . . . .3211.4Assembly overview - rear wheel housing liner . . . . . . . . . . . . . . . . . . . . . . . . . . . . . . . . . .3231.5Removing and installing rear wheel housing liner . . . . . . . . . . . . . . . . . . . . . . . . . . . . . . . .3231.6Installing protective cover for wheel housing . . . . . . . . . . . . . . . . . . . . . . . . . . . . . . . . . . . .3242Exterior mirror . . . . . . . . . . . . . . . . . . . . . . . . . . . . . . . . . . . . . . . . . . . . . . . . . . . . . . . . . . . .3262.1Tools . . . . . . . . . . . . . . . . . . . . . . . . . . . . . . . . . . . . . . . . . . . . . . . . . . . . . . . . . . . . . . . . . .3262.2Assembly overview - exterior mirror . . . . . . . . . . . . . . . . . . . . . . . . . . . . . . . . . . . . . . . . . .3272.3Removing and installing mirror glass . . . . . . . . . . . . . . . . . . . . . . . . . . . . . . . . . . . . . . . . . .3282.4Removing and installing mirror housing . . . . . . . . . . . . . . . . . . . . . . . . . . . . . . . . . . . . . . . .3282.5Removing and installing trim . . . . . . . . . . . . . . . . . . . . . . . . . . . . . . . . . . . . . . . . . . . . . . . .3292.6Removing and installing side turn signal repeaters . . . . . . . . . . . . . . . . . . . . . . . . . . . . . .3302.7Removing and installing entry light . . . . . . . . . . . . . . . . . . . . . . . . . . . . . . . . . . . . . . . . . . . .3302.8Removing and installing adjustment unit with motor for exterior mirror . . . . . . . . . . . . . . . .3312.9Removing and installing exterior mirror . . . . . . . . . . . . . . . . . . . . . . . . . . . . . . . . . . . . . . . .3313Roof railing . . . . . . . . . . . . . . . . . . . . . . . . . . . . . . . . . . . . . . . . . . . . . . . . . . . . . . . . . . . . . .3333.1Tools . . . . . . . . . . . . . . . . . . . . . . . . . . . . . . . . . . . . . . . . . . . . . . . . . . . . . . . . . . . . . . . . . .3333.2Assembly overview - roof railing . . . . . . . . . . . . . . . . . . . . . . . . . . . . . . . . . . . . . . . . . . . . . .3343.3Removing and installing roof railing . . . . . . . . . . . . . . . . . . . . . . . . . . . . . . . . . . . . . . . . . .3344Radiator grille . . . . . . . . . . . . . . . . . . . . . . . . . . . . . . . . . . . . . . . . . . . . . . . . . . . . . . . . . . . .3364.1Tools . . . . . . . . . . . . . . . . . . . . . . . . . . . . . . . . . . . . . . . . . . . . . . . . . . . . . . . . . . . . . . . . . .3364.2Radiator grille . . . . . . . . . . . . . . . . . . . . . . . . . . . . . . . . . . . . . . . . . . . . . . . . . . . . . . . . . . . .3374.3Radiator grille, Cup Edition . . . . . . . . . . . . . . . . . . . . . . . . . . . . . . . . . . . . . . . . . . . . . . . . . .3405Mouldings and trims . . . . . . . . . . . . . . . . . . . . . . . . . . . . . . . . . . . . . . . . . . . . . . . . . . . . . .3445.1Tools . . . . . . . . . . . . . . . . . . . . . . . . . . . . . . . . . . . . . . . . . . . . . . . . . . . . . . . . . . . . . . . . . .3445.2Removing and installing side panel trim strips on GLI vehicles . . . . . . . . . . . . . . . . . . . . . .3455.3Side member extension, Jetta Cup Edition . . . . . . . . . . . . . . . . . . . . . . . . . . . . . . . . . . . .3466Special add-on parts . . . . . . . . . . . . . . . . . . . . . . . . . . . . . . . . . . . . . . . . . . . . . . . . . . . . . .3516.1Safety requirements . . . . . . . . . . . . . . . . . . . . . . . . . . . . . . . . . . . . . . . . . . . . . . . . . . . . . .3516.2Fitting notes for extensions . . . . . . . . . . . . . . . . . . . . . . . . . . . . . . . . . . . . . . . . . . . . . . . .3516.3Materials . . . . . . . . . . . . . . . . . . . . . . . . . . . . . . . . . . . . . . . . . . . . . . . . . . . . . . . . . . . . . . . .3516.4Special add-on parts, Jetta Cup Edition . . . . . . . . . . . . . . . . . . . . . . . . . . . . . . . . . . . . . . . .3526.5Preparing body kit component for bonding . . . . . . . . . . . . . . . . . . . . . . . . . . . . . . . . . . . . . .3526.6Preparing new add-on part for bonding . . . . . . . . . . . . . . . . . . . . . . . . . . . . . . . . . . . . . . . .3536.7Installation instructions . . . . . . . . . . . . . . . . . . . . . . . . . . . . . . . . . . . . . . . . . . . . . . . . . . . .3536.8Minimum curing period . . . . . . . . . . . . . . . . . . . . . . . . . . . . . . . . . . . . . . . . . . . . . . . . . . . .3546.9Touching up paint damage . . . . . . . . . . . . . . . . . . . . . . . . . . . . . . . . . . . . . . . . . . . . . . . . . .3546.10Cleaning off excess adhesive sealing material . . . . . . . . . . . . . . . . . . . . . . . . . . . . . . . . . .3547Protective backing . . . . . . . . . . . . . . . . . . . . . . . . . . . . . . . . . . . . . . . . . . . . . . . . . . . . . . . .3557.1Scuff protection film . . . . . . . . . . . . . . . . . . . . . . . . . . . . . . . . . . . . . . . . . . . . . . . . . . . . . .355Golf Variant 2007 ➤ , Jetta 2005 ➤General body repairs, exterior - Edition 10.2009vi Contents Downloaded from www.Manualslib.com manuals search engine
Protected by copyright. Copying for private or commercial purposes, in partor in whole, is not permitted unless authorised by Volkswagen AG. Volkswagen AG does notguarantee or accept any liability with respect to the correctness ofinformation in this document.Copyright by Volkswagen AG.8Lettering . . . . . . . . . . . . . . . . . . . . . . . . . . . . . . . . . . . . . . . . . . . . . . . . . . . . . . . . . . . . . . . .3578.1Tools . . . . . . . . . . . . . . . . . . . . . . . . . . . . . . . . . . . . . . . . . . . . . . . . . . . . . . . . . . . . . . . . . .3578.2Installation instructions for lettering and emblems . . . . . . . . . . . . . . . . . . . . . . . . . . . . . . . .3578.3Rear lettering dimensions (saloon) . . . . . . . . . . . . . . . . . . . . . . . . . . . . . . . . . . . . . . . . . . . .3588.4Rear lettering dimensions (Variant) . . . . . . . . . . . . . . . . . . . . . . . . . . . . . . . . . . . . . . . . . .3598.5Side lettering dimensions - Individual . . . . . . . . . . . . . . . . . . . . . . . . . . . . . . . . . . . . . . . . . .361Golf Variant 2007 ➤ , Jetta 2005 ➤General body repairs, exterior - Edition 10.2009Contents vii Downloaded from www.Manualslib.com manuals search engine
Protected by copyright. Copying for private or commercial purposes, in partor in whole, is not permitted unless authorised by Volkswagen AG. Volkswagen AG does notguarantee or accept any liability with respect to the correctness ofinformation in this document.Copyright by Volkswagen AG.Golf Variant 2007 ➤ , Jetta 2005 ➤General body repairs, exterior - Edition 10.2009viii Contents Downloaded from www.Manualslib.com manuals search engine
Protected by copyright. Copying for private or commercial purposes, in partor in whole, is not permitted unless authorised by Volkswagen AG. Volkswagen AG does notguarantee or accept any liability with respect to the correctness ofinformation in this document.Copyright by Volkswagen AG.50 –Body - front1Lock carrier1.1ToolsSpecial tools and workshopequipment required♦Guide pins -T10093-♦Torque wrench -V.A.G1331-♦Torque wrench -V.A.G1332-Golf Variant 2007 ➤ , Jetta 2005 ➤General body repairs, exterior - Edition 10.20091. Lock carrier 1 Downloaded from www.Manualslib.com manuals search engine
Protected by copyright. Copying for private or commercial purposes, in partor in whole, is not permitted unless authorised by Volkswagen AG. Volkswagen AG does notguarantee or accept any liability with respect to the correctness ofinformation in this document.Copyright by Volkswagen AG.1.2Assembly overview - lock carrier, service position1 - Lock carrier with add-onparts❑Removing and installing⇒ page 4❑Service position⇒ page 22 - Bolt❑Qty. 4❑8 Nm3 - Bolt❑Qty. 8❑60 Nm1.3Service position1.3.1Moving to service position–Remove front bumper cover ⇒ page 223 .–Remove air duct from lock carrier -1- ⇒ Rep. Gr. 24 ; Repair‐ing injection system .–Unhook Bowden cable from coupling for bonnet release⇒ page 24–If vehicle has charge air cooler, disconnect pressure hoses⇒ page 4 .–Unscrew horn -4- with bracket on right side of longitudinalmember ⇒ Electrical system; Rep. Gr. 96 ; Horn .–Pull connector off high-pressure sender -G65- ⇒ Heating, airconditioning system; Rep. Gr. 87 .–Remove bolts -3- from left and right longitudinal members.Golf Variant 2007 ➤ , Jetta 2005 ➤General body repairs, exterior - Edition 10.20092 Rep. Gr.50 - Body - front Downloaded from www.Manualslib.com manuals search engine
Protected by copyright. Copying for private or commercial purposes, in partor in whole, is not permitted unless authorised by Volkswagen AG. Volkswagen AG does notguarantee or accept any liability with respect to the correctness ofinformation in this document.Copyright by Volkswagen AG.–Attach special tool guide pins -T10093- to left and right longi‐tudinal members.–Remove bolts -2- on left and right from upper part of lock car‐rier -1-.–The lock carrier -1- can be pulled forwards on the guide pins-T10093- .NoteIf necessary, disconnect upper coolant hose from radiator, but drain coolant first ⇒ Rep. Gr. 19 ; Removingand installing parts of coolant system .1.3.2Moving from service positionInstall in reverse order of removal.–Align lock carrier on longitudinal members and between wings⇒ Body Repairs; Rep. Gr. 00 ; Body dimensions .Golf Variant 2007 ➤ , Jetta 2005 ➤General body repairs, exterior - Edition 10.20091. Lock carrier 3 Downloaded from www.Manualslib.com manuals search engine
Protected by copyright. Copying for private or commercial purposes, in partor in whole, is not permitted unless authorised by Volkswagen AG. Volkswagen AG does notguarantee or accept any liability with respect to the correctness ofinformation in this document.Copyright by Volkswagen AG.Note♦Ensure that the charge air cooler pressure hoses are properlyengaged again.♦Hoses and lines must not be pinched.♦If necessary, replenish coolant ⇒ Rep. Gr. 19 ; Removing andinstalling parts of coolant system .1.3.3Releasing pressure hoses–Release push-on coupling -1- and pull pressure hose -2- indirection of -arrow- out of coupling.During installation of pressure hoses, ensure that push-on cou‐pling engages audibly.1.4Removing and installing lock carrier withadd-on parts1.4.1RemovingNote♦Because the lock carrier is a safety-relevant component, it must not be repaired.♦If damaged, the lock carrier must be renewed.–Set lock carrier with add-on parts -1- to service position⇒ page 2 .–Disconnect all electrical connectors.–Drain coolant and disconnect coolant hoses ⇒ Rep. Gr. 19 ;Removing and installing parts of coolant system .–Disconnect lines for condenser ⇒ Heating, air conditioningsystem; Rep. Gr. 87 .–Together with a second mechanic, unscrew guide pins -T10093- from left and right longitudinal member and lift lockcarrier out -1-.CautionDo not start the engine if the air conditioning system and/or thecoolant system lines are disconnected.Golf Variant 2007 ➤ , Jetta 2005 ➤General body repairs, exterior - Edition 10.20094 Rep. Gr.50 - Body - front Downloaded from www.Manualslib.com manuals search engine
Protected by copyright. Copying for private or commercial purposes, in partor in whole, is not permitted unless authorised by Volkswagen AG. Volkswagen AG does notguarantee or accept any liability with respect to the correctness ofinformation in this document.Copyright by Volkswagen AG.Note♦Do not hang condenser and hydraulic oil cooler from lines.♦Do not kink lines for condenser and hydraulic systems.1.4.2InstallingInstall in reverse order of removal.During assembly, ensure that all connectors and hose connec‐tions are properly installed.–Align lock carrier on longitudinal members and between wings⇒ Body Repairs; Rep. Gr. 00 ; Body dimensions .Golf Variant 2007 ➤ , Jetta 2005 ➤General body repairs, exterior - Edition 10.20091. Lock carrier 5 Downloaded from www.Manualslib.com manuals search engine
Protected by copyright. Copying for private or commercial purposes, in partor in whole, is not permitted unless authorised by Volkswagen AG. Volkswagen AG does notguarantee or accept any liability with respect to the correctness ofinformation in this document.Copyright by Volkswagen AG.2Wing2.1ToolsSpecial tools and workshop equipment required♦Torque wrench -V.A.G 1783-Golf Variant 2007 ➤ , Jetta 2005 ➤General body repairs, exterior - Edition 10.20096 Rep. Gr.50 - Body - front Downloaded from www.Manualslib.com manuals search engine
Protected by copyright. Copying for private or commercial purposes, in partor in whole, is not permitted unless authorised by Volkswagen AG. Volkswagen AG does notguarantee or accept any liability with respect to the correctness ofinformation in this document.Copyright by Volkswagen AG.2.2Assembly overview - front wingNoteOnly the left side is shown. The right side is similar.1 - Wing❑Removing and installing⇒ page 72 - Bolt❑Qty. 2, A-pillar❑Qty. 2, side member❑Qty. 2, wing bracket❑Qty. 3, wing connectionpiece❑6 Nm3 - Foam element❑Loosely inserted be‐tween wing and top oflongitudinal member4 - Wing bracket❑Removing and installing⇒ page 85 - Moulded foam element❑Inserted on top of longi‐tudinal member❑Bonds to wing6 - Hexagon nut❑Qty. 1, on wing connec‐tion piece❑6 Nm2.3Removing and installing wingNoteThe removal and installation sequence is only described for theleft wing. The removal and installation of the right wing is similar.2.3.1Removing–Remove front bumper cover ⇒ page 223 .–Remove front and rear parts of wheel housing liner⇒ page 321 .–Remove guide ⇒ Item 4 (page 227) .Golf Variant 2007 ➤ , Jetta 2005 ➤General body repairs, exterior - Edition 10.20092. Wing 7 Downloaded from www.Manualslib.com manuals search engine
Protected by copyright. Copying for private or commercial purposes, in partor in whole, is not permitted unless authorised by Volkswagen AG. Volkswagen AG does notguarantee or accept any liability with respect to the correctness ofinformation in this document.Copyright by Volkswagen AG.–Loosen hexagon nut -6- and remove bolts -2-.–Pull out foam element -3- between wing and longitudinal mem‐ber and remove wing -1-.2.3.2InstallingInstall in reverse order of removal.Ensure parallelism and gap dimensions are maintained ⇒ BodyRepairs; Rep. Gr. 00 ; Body dimensions .2.4Removing and installing wing bracketNoteThe removal and installation sequence is described for the leftwing bracket. The removal and installation of the right wing brack‐et is similar.2.4.1Removing•The wing has been removed.Golf Variant 2007 ➤ , Jetta 2005 ➤General body repairs, exterior - Edition 10.20098 Rep. Gr.50 - Body - front Downloaded from www.Manualslib.com manuals search engine
Protected by copyright. Copying for private or commercial purposes, in partor in whole, is not permitted unless authorised by Volkswagen AG. Volkswagen AG does notguarantee or accept any liability with respect to the correctness ofinformation in this document.Copyright by Volkswagen AG.–Remove bolts -2- and remove wing bracket -1-.2.4.2Installing–Install wing bracket -1-.Specified torque for bolts -2-: 6 Nm.Wing and wing bracket must be aligned with bonnet and bumpercover ⇒ Body Repairs; Rep. Gr. 00 ; Body dimensions .Golf Variant 2007 ➤ , Jetta 2005 ➤General body repairs, exterior - Edition 10.20092. Wing 9 Downloaded from www.Manualslib.com manuals search engine
Protected by copyright. Copying for private or commercial purposes, in partor in whole, is not permitted unless authorised by Volkswagen AG. Volkswagen AG does notguarantee or accept any liability with respect to the correctness ofinformation in this document.Copyright by Volkswagen AG.3Noise insulation3.1ToolsSpecial tools and workshop equipment required♦Torque wrench -V.A.G 1783-Golf Variant 2007 ➤ , Jetta 2005 ➤General body repairs, exterior - Edition 10.200910 Rep. Gr.50 - Body - front Downloaded from www.Manualslib.com manuals search engine
Protected by copyright. Copying for private or commercial purposes, in partor in whole, is not permitted unless authorised by Volkswagen AG. Volkswagen AG does notguarantee or accept any liability with respect to the correctness ofinformation in this document.Copyright by Volkswagen AG.3.2Assembly overview - noise insulationNoteThe removal and installation procedures may have to be modified slightly depending on engine fitted.1 - Noise insulation❑-Arrow- points forwards❑To remove, unbolt bolts⇒ Item 2 (page 11)2 - Bolt❑Qty. 8❑2 NmGolf Variant 2007 ➤ , Jetta 2005 ➤General body repairs, exterior - Edition 10.20093. Noise insulation 11 Downloaded from www.Manualslib.com manuals search engine
Protected by copyright. Copying for private or commercial purposes, in partor in whole, is not permitted unless authorised by Volkswagen AG. Volkswagen AG does notguarantee or accept any liability with respect to the correctness ofinformation in this document.Copyright by Volkswagen AG.4Underbody cladding4.1ToolsSpecial tools and workshop equipment required♦Torque wrench -V.A.G 1783-Golf Variant 2007 ➤ , Jetta 2005 ➤General body repairs, exterior - Edition 10.200912 Rep. Gr.50 - Body - front Downloaded from www.Manualslib.com manuals search engine
Protected by copyright. Copying for private or commercial purposes, in partor in whole, is not permitted unless authorised by Volkswagen AG. Volkswagen AG does notguarantee or accept any liability with respect to the correctness ofinformation in this document.Copyright by Volkswagen AG.4.2Assembly overview - underbody claddingNoteOnly the left side is shown. The right side is similar.1 - Underbody cladding❑-Arrow- points forwards❑To remove, unbolt hex‐agon nuts⇒ Item 2 (page 13)2 - Hexagon nut❑Qty. 8❑1.5 Nm3 - Cover❑To remove, unbolt bolts⇒ Item 4 (page 13)4 - Bolt❑Qty. 2❑2 NmGolf Variant 2007 ➤ , Jetta 2005 ➤General body repairs, exterior - Edition 10.20094. Underbody cladding 13 Downloaded from www.Manualslib.com manuals search engine
Protected by copyright. Copying for private or commercial purposes, in partor in whole, is not permitted unless authorised by Volkswagen AG. Volkswagen AG does notguarantee or accept any liability with respect to the correctness ofinformation in this document.Copyright by Volkswagen AG.4.3Assembly overview - rear underbody cladding1 - Bolt❑Qty. 3❑2 Nm2 - Rear underbody cladding❑Installed only on rightside.❑To remove, removebolts⇒ Item 1 (page 14) andhexagon nuts⇒ Item 3 (page 14)3 - Hexagon nut❑Qty. 2❑1.5 NmGolf Variant 2007 ➤ , Jetta 2005 ➤General body repairs, exterior - Edition 10.200914 Rep. Gr.50 - Body - front Downloaded from www.Manualslib.com manuals search engine
Protected by copyright. Copying for private or commercial purposes, in partor in whole, is not permitted unless authorised by Volkswagen AG. Volkswagen AG does notguarantee or accept any liability with respect to the correctness ofinformation in this document.Copyright by Volkswagen AG.5Plenum chamber bulkhead5.1ToolsSpecial tools and workshop equipment required♦Torque wrench -V.A.G 1783-5.2Assembly overview - plenum chamber bulkhead1 - Plenum chamber bulkhead2 - Hexagon nut❑8 Nm3 - Plenum chamber bulkheadseal❑When installing bulk‐head, ensure seal is cor‐rectly seated.4 - Bolt❑8 NmGolf Variant 2007 ➤ , Jetta 2005 ➤General body repairs, exterior - Edition 10.20095. Plenum chamber bulkhead 15 Downloaded from www.Manualslib.com manuals search engine
Protected by copyright. Copying for private or commercial purposes, in partor in whole, is not permitted unless authorised by Volkswagen AG. Volkswagen AG does notguarantee or accept any liability with respect to the correctness ofinformation in this document.Copyright by Volkswagen AG.55 –Bonnet, rear lid1Bonnet1.1ToolsSpecial tools and workshop equipment required♦Torque wrench -V.A.G 1331-♦Removal lever -80-200-Golf Variant 2007 ➤ , Jetta 2005 ➤General body repairs, exterior - Edition 10.200916 Rep. Gr.55 - Bonnet, rear lid Downloaded from www.Manualslib.com manuals search engine
Protected by copyright. Copying for private or commercial purposes, in partor in whole, is not permitted unless authorised by Volkswagen AG. Volkswagen AG does notguarantee or accept any liability with respect to the correctness ofinformation in this document.Copyright by Volkswagen AG.1.2Assembly overview - bonnet1 - Bonnet❑Removing and installing⇒ page 17❑Adjusting ⇒ page 252 - Adjustment buffer❑Qty. 2❑Adjusting ⇒ page 253 - Stop buffer❑Qty. 24 - Insulation❑Removing and installing⇒ page 205 - Guide❑Qty. 26 - Lid hinge❑Removing and installing⇒ page 19❑Adjust bonnet⇒ page 25 .7 - Gas strut❑Removing ⇒ page 19❑Releasing gas⇒ page 198 - Seal❑Secured to inner bonnetwith clips1.3Removing and installing bonnet1.3.1Removing–Remove left and right washer jets -6- ⇒ Electrical system;Rep. Gr. 92 ; Windscreen washer system .–Unclip line -2- from bonnet hinge -3- and bonnet -5-.–Pull line -2- out through aperture in bonnet -5-.–Loosen hexagon nuts -1- on left and right (do not remove).Further dismantling requires the assistance of a second mechan‐ic.–Disconnect gas strut -4- from bonnet -5- ⇒ page 19 .Golf Variant 2007 ➤ , Jetta 2005 ➤General body repairs, exterior - Edition 10.20091. Bonnet 17 Downloaded from www.Manualslib.com manuals search engine
Protected by copyright. Copying for private or commercial purposes, in partor in whole, is not permitted unless authorised by Volkswagen AG. Volkswagen AG does notguarantee or accept any liability with respect to the correctness ofinformation in this document.Copyright by Volkswagen AG.–Now remove hexagon nuts -1- and lift bonnet -5- out of bonnethinges -3-.1.3.2InstallingInstall in reverse order of removal.Specified torque for bonnet hexagon nut: 22 Nm.Adjusting bonnet -1- ⇒ page 25 .–Route line -2- in an arc -arrow-. If line is installed twisted it willkink.Golf Variant 2007 ➤ , Jetta 2005 ➤General body repairs, exterior - Edition 10.200918 Rep. Gr.55 - Bonnet, rear lid Downloaded from www.Manualslib.com manuals search engine
Protected by copyright. Copying for private or commercial purposes, in partor in whole, is not permitted unless authorised by Volkswagen AG. Volkswagen AG does notguarantee or accept any liability with respect to the correctness ofinformation in this document.Copyright by Volkswagen AG.1.4Removing gas strut–Open bonnet and support it.–Position a small screwdriver beneath spring clip -2-.–Raise spring clip -2- until it can be moved over ball socket indirection of -arrow-.–Pull gas strut -1- off ball-head pins -3- and -4-.–Slide spring clip -2- back immediately after removing gas strut-1-.WARNINGProceed with care if gas strut is reused. Spring clip must notbe levered completely out of ball socket, as it will otherwise bedamaged. Gas strut will spring out of mounting, causing dam‐age or injury to operator.Specified torque for ball-head pins -3- and -4-: 22 Nm.Releasing gas from gas strut ⇒ page 191.5Releasing gas from gas strut–Clamp gas strut in vice in area marked -x- = 50 mm (2 in).WARNINGClamp gas strut only within area -x-; otherwise danger of ac‐cident!–Saw through cylinder of gas strut within first third of cylinder'soverall length using piston rod end of cylinder as referencepoint.Note♦Wear eye protection when sawing.♦Cover area of saw cut with a cloth.♦Dispose of oil and cloth via existing disposal channels.1.6Removing and installing lid hingeNoteThe removal and installation sequence is only described for theleft hinge. The removal and installation of the right hinge is similar.Golf Variant 2007 ➤ , Jetta 2005 ➤General body repairs, exterior - Edition 10.20091. Bonnet 19 Downloaded from www.Manualslib.com manuals search engine
Protected by copyright. Copying for private or commercial purposes, in partor in whole, is not permitted unless authorised by Volkswagen AG. Volkswagen AG does notguarantee or accept any liability with respect to the correctness ofinformation in this document.Copyright by Volkswagen AG.1.6.1Removing–Remove front bonnet ⇒ page 17 .–Remove bolts -2- and remove bonnet hinge -1-.1.6.2Installing–Install lid hinge -1-.Specified torque for bolts -2-: 22 Nm.–Install bonnet ⇒ page 18 .1.7Removing and installing insulation1.7.1Removing–Lever retaining clips -1- out of insulation -2- using removallever -80-200- .Golf Variant 2007 ➤ , Jetta 2005 ➤General body repairs, exterior - Edition 10.200920 Rep. Gr.55 - Bonnet, rear lid Downloaded from www.Manualslib.com manuals search engine
Protected by copyright. Copying for private or commercial purposes, in partor in whole, is not permitted unless authorised by Volkswagen AG. Volkswagen AG does notguarantee or accept any liability with respect to the correctness ofinformation in this document.Copyright by Volkswagen AG.–Pull insulation -2- out of elongated holes.1.7.2Installing–Push insulation -2- underneath gas strut and place assemblytongues in elongated holes.–Engage all retaining clips -1- in insulation -2-.Golf Variant 2007 ➤ , Jetta 2005 ➤General body repairs, exterior - Edition 10.20091. Bonnet 21 Downloaded from www.Manualslib.com manuals search engine
Protected by copyright. Copying for private or commercial purposes, in partor in whole, is not permitted unless authorised by Volkswagen AG. Volkswagen AG does notguarantee or accept any liability with respect to the correctness ofinformation in this document.Copyright by Volkswagen AG.When installing insulation -2- ensure that retaining clips -1- arefitted with wider side outwards.Golf Variant 2007 ➤ , Jetta 2005 ➤General body repairs, exterior - Edition 10.200922 Rep. Gr.55 - Bonnet, rear lid Downloaded from www.Manualslib.com manuals search engine
Protected by copyright. Copying for private or commercial purposes, in partor in whole, is not permitted unless authorised by Volkswagen AG. Volkswagen AG does notguarantee or accept any liability with respect to the correctness ofinformation in this document.Copyright by Volkswagen AG.1.8Assembly overview - bonnet latch and release components1 - Arrester❑To remove, unbolt bolts⇒ Item 2 (page 23)❑Adjustment is carriedout by moving arresterto left or right in elonga‐ted holes.2 - Bolt❑Qty. 3❑10 Nm3 - Expanding nut❑Qty. 24 - Mounting bracket5 - Bowden cable❑Clipped into bearingbracket6 - Bolt❑Qty. 2❑1.5 Nm7 - Release lever❑Removing and installing⇒ page 278 - Bowden cable❑Clipped onto wheelhousing and lock carrier9 - Bowden cable coupling❑Separating Bowden ca‐ble ⇒ page 2410 - Lid lock❑Removing and installing⇒ page 23❑Adjusting ⇒ page 261.9Removing and installing bonnet lock1.9.1Removing–Open bonnet.–Remove radiator grille ⇒ page 337 .–Disconnect Bowden cable ⇒ page 24 .Golf Variant 2007 ➤ , Jetta 2005 ➤General body repairs, exterior - Edition 10.20091. Bonnet 23 Downloaded from www.Manualslib.com manuals search engine
Protected by copyright. Copying for private or commercial purposes, in partor in whole, is not permitted unless authorised by Volkswagen AG. Volkswagen AG does notguarantee or accept any liability with respect to the correctness ofinformation in this document.Copyright by Volkswagen AG.–Disconnect connector -5- for bonnet contact switch -F266- .The connector is secured over the right headlight.–Unclip wiring for bonnet contact switch -F266- on lock carrier-3-.–Remove bolts -4- (Qty. 3) on lock carrier -3- and remove bon‐net lock -1- upwards.–To unclip Bowden cable -2-, press tabs on Bowden cable to‐gether -arrows-.–Fastener is released and Bowden cable -2- can be removedfrom bonnet lock -1-.1.9.2Installing–Clip Bowden cable -2- into bonnet lock -1-.–Install bonnet lock -1- into lock carrier -3-.Specified torque for bolts -4-: 12 Nm–Reconnect connector -5- for bonnet contact switch -F266- andclip wiring onto lock carrier -3-.–Install Bowden cable -2- ⇒ page 24 .–Adjust bonnet lock ⇒ page 26 .Before closing bonnet, check function of release lever and Bow‐den cable.1.10Disconnecting Bowden cable–Open bonnet.–Unclip Bowden coupling -1- above right headlight for lock car‐rier -2-.–Open Bowden cable coupling -1- upwards and remove Bow‐den cable -3- in direction of -arrow- out of Bowden cablecoupling.NoteWhen installing, ensure that the Bowden cable sleeve is insertedcorrectly and the coupling engages.Before closing bonnet, check function of release lever and Bow‐den cable.Golf Variant 2007 ➤ , Jetta 2005 ➤General body repairs, exterior - Edition 10.200924 Rep. Gr.55 - Bonnet, rear lid Downloaded from www.Manualslib.com manuals search engine
Protected by copyright. Copying for private or commercial purposes, in partor in whole, is not permitted unless authorised by Volkswagen AG. Volkswagen AG does notguarantee or accept any liability with respect to the correctness ofinformation in this document.Copyright by Volkswagen AG.1.11Adjusting bonnetFor initial adjustment of bonnet, -1-, the vehicle must be standingon the ground and the arrester be removed.–Remove latch hook -9- ⇒ Item 1 (page 23) .–Disconnect gas strut -2- from bonnet -1- ⇒ page 19 .–Bonnet -1- can be centred between wings by loosening hex‐agon nuts -5- and bolt -3- (do not remove) on left and rightbonnet hinges -4-.–Bonnet -1- can be adjusted in height to wings at rear by meansof adjustment screw -6- on left and right.–The stop buffers -7- (Qty. 2) are not used for adjustment. Theyhave the function of stabilising and damping the bonnet -1-.–The front part of the bonnet -1- can be adjusted to wing heightby using the adjustment buffers -8- (Qty. 2).Ensure that gaps are uniform ⇒ Body Repairs; Rep. Gr. 00 ; Bodydimensions .–After refitting or adjustment work, apply corrosion protectionto bonnet hinge, -4-, hexagon nuts -55- and bolts -3-.Golf Variant 2007 ➤ , Jetta 2005 ➤General body repairs, exterior - Edition 10.20091. Bonnet 25 Downloaded from www.Manualslib.com manuals search engine
Protected by copyright. Copying for private or commercial purposes, in partor in whole, is not permitted unless authorised by Volkswagen AG. Volkswagen AG does notguarantee or accept any liability with respect to the correctness ofinformation in this document.Copyright by Volkswagen AG.–After adjusting bonnet -1-, install and adjust arrester⇒ Item 1 (page 23) .1.11.1Adjusting bonnet lockIf gaps change when bonnet is closed, minor corrections can bemade via bonnet lock and arrester.–Remove radiator grille ⇒ page 337 .Golf Variant 2007 ➤ , Jetta 2005 ➤General body repairs, exterior - Edition 10.200926 Rep. Gr.55 - Bonnet, rear lid Downloaded from www.Manualslib.com manuals search engine
Protected by copyright. Copying for private or commercial purposes, in partor in whole, is not permitted unless authorised by Volkswagen AG. Volkswagen AG does notguarantee or accept any liability with respect to the correctness ofinformation in this document.Copyright by Volkswagen AG.–Now loosen bolts -1- to correct or adjust gaps at front of bonnet⇒ Body Repairs; Rep. Gr. 00 ; Body dimensions .Specified torque for bolts -1-: 12 Nm.–Adjust arrester ⇒ Item 1 (page 23) .1.12Removing and installing release lever1.12.1Removing–Pull operating lever -1- and release bonnet.–Insert a small screwdriver in gap between release lever -1- andclip -2-.–Lever clip -2- out of release lever -1- and pull off release lever.Golf Variant 2007 ➤ , Jetta 2005 ➤General body repairs, exterior - Edition 10.20091. Bonnet 27 Downloaded from www.Manualslib.com manuals search engine
Protected by copyright. Copying for private or commercial purposes, in partor in whole, is not permitted unless authorised by Volkswagen AG. Volkswagen AG does notguarantee or accept any liability with respect to the correctness ofinformation in this document.Copyright by Volkswagen AG.1.12.2Installing–Slide clip -2- completely into release lever -1-.–Then press release lever -1- onto mounting in mounting brack‐et and fasten release lever.Before closing bonnet, check function of release lever and Bow‐den cable.Golf Variant 2007 ➤ , Jetta 2005 ➤General body repairs, exterior - Edition 10.200928 Rep. Gr.55 - Bonnet, rear lid Downloaded from www.Manualslib.com manuals search engine
Protected by copyright. Copying for private or commercial purposes, in partor in whole, is not permitted unless authorised by Volkswagen AG. Volkswagen AG does notguarantee or accept any liability with respect to the correctness ofinformation in this document.Copyright by Volkswagen AG.2Rear lid (saloon)2.1ToolsSpecial tools and workshop equipment required♦Torque wrench -V.A.G 1331-2.2Assembly overview - rear lid1 - Hinge cover2 - Wiring harness3 - Rear lid❑Removing and installing⇒ page 30❑Adjusting ⇒ page 334 - Rear lid trim❑Removing and installing⇒ General body repairs,exterior; Rep. Gr. 70 ;Removing and installingrear lid trim5 - Adjustment buffer❑Left and right❑When installing, turn 90°anti-clockwise -arrow-❑Adjusting ⇒ page 336 - Hexagon nut❑Qty. 2❑22 Nm7 - Lid hinge❑Removing and installing⇒ page 318 - Rubber buffer9 - Bolt❑Qty. 3❑22 Nm10 - Gas strut❑Removing ⇒ page 30❑Releasing gas⇒ page 31Golf Variant 2007 ➤ , Jetta 2005 ➤General body repairs, exterior - Edition 10.20092. Rear lid (saloon) 29 Downloaded from www.Manualslib.com manuals search engine
Protected by copyright. Copying for private or commercial purposes, in partor in whole, is not permitted unless authorised by Volkswagen AG. Volkswagen AG does notguarantee or accept any liability with respect to the correctness ofinformation in this document.Copyright by Volkswagen AG.11 - Bolt❑Qty. 2❑23 Nm12 - Locking wedge❑Removing and installing ⇒ page 3213 - Pop rivet nut14 - Base for registration plate❑Different versions are possible.❑Assignment ⇒ Parts catalogue “ETKA”2.3Removing and installing rear lid2.3.1Removing–Open rear lid.–Remove rear lid trim ⇒ General body repairs, interior; Rep.Gr. 70 ; Rear lid trim .–Disconnect connectors -1- and pull wiring -2- with rubbergrommet out of lid.–Loosen hexagon nuts -3- on left and right lid hinges (do notunbolt completely).Further dismantling requires the assistance of a second mechan‐ic.–Detach gas struts -4- on left and right of rear lid ⇒ page 30 .–Now, and only now, unbolt bolts -3- and remove rear lid.2.3.2InstallingInstall in reverse order of removal.Specified torque for rear lid hexagon nut: 22 Nm.Adjust rear lid ⇒ page 33 .Before closing rear lid, check function of lid release components.2.4Removing gas strut–Open rear lid and support it.Golf Variant 2007 ➤ , Jetta 2005 ➤General body repairs, exterior - Edition 10.200930 Rep. Gr.55 - Bonnet, rear lid Downloaded from www.Manualslib.com manuals search engine
Protected by copyright. Copying for private or commercial purposes, in partor in whole, is not permitted unless authorised by Volkswagen AG. Volkswagen AG does notguarantee or accept any liability with respect to the correctness ofinformation in this document.Copyright by Volkswagen AG.–Position a small screwdriver beneath spring clip -2-.–Raise spring clip -2- until it can be moved over ball socket indirection of -arrow-.–Pull gas strut -1- off ball-head pins -3- and -4-.–Slide spring clip -2- back immediately after removing gas strut-1-.WARNINGProceed with care if gas strut is reused. Spring clip must notbe levered completely out of ball socket, as it will otherwise bedamaged. Gas strut will spring out of mounting, causing dam‐age or injury to operator.Releasing gas from gas strut ⇒ page 312.5Releasing gas from gas strut–Clamp gas strut in vice in area marked -x- = 50 mm (2 in).WARNINGClamp gas strut only within area -x-; otherwise danger of ac‐cident!–Saw through cylinder of gas strut within first third of cylinder'soverall length using piston rod end of cylinder as referencepoint.Note♦Wear eye protection when sawing.♦Cover area of saw cut with a cloth.♦Dispose of oil and cloth via existing disposal channels.2.6Removing and installing lid hingeNoteRemoval and installation is described for hinge on right of lid.Follow same instructions for hinge on left of lid as appropriate.2.6.1Removing–Remove rear lid ⇒ page 30Golf Variant 2007 ➤ , Jetta 2005 ➤General body repairs, exterior - Edition 10.20092. Rear lid (saloon) 31 Downloaded from www.Manualslib.com manuals search engine
Protected by copyright. Copying for private or commercial purposes, in partor in whole, is not permitted unless authorised by Volkswagen AG. Volkswagen AG does notguarantee or accept any liability with respect to the correctness ofinformation in this document.Copyright by Volkswagen AG.–Remove bolts -1- and remove lid hinge -2-.2.6.2InstallingInstall in reverse order of removal.Specified torque for lid hinge bolts: 22 NmAdjust rear lid ⇒ page 33 .Before closing rear lid, check function of lid release components.2.7Removing and installing striker pin2.7.1Removing–Remove lock carrier cover ⇒ General body repairs, interior;Rep. Gr. 70 ; Luggage and load compartment trim .–Remove bolts -1- and remove striker pin -2-.2.7.2Installing–Install striker pin -2-.Specified torque for bolts -1-: 23 Nm.Further installation is performed in reverse order of removal.Golf Variant 2007 ➤ , Jetta 2005 ➤General body repairs, exterior - Edition 10.200932 Rep. Gr.55 - Bonnet, rear lid Downloaded from www.Manualslib.com manuals search engine
Protected by copyright. Copying for private or commercial purposes, in partor in whole, is not permitted unless authorised by Volkswagen AG. Volkswagen AG does notguarantee or accept any liability with respect to the correctness ofinformation in this document.Copyright by Volkswagen AG.2.8Adjusting rear lidNote♦Vehicle must be standing on the ground to perform the basicadjustment of the rear lid.♦The rear lid lock is bolted directly to the rear lid. It does nothave elongated holes, so it cannot be adjusted.♦Adjusting buffers cannot be used to adjust rear lid as they arein some other vehicles. They have the function of stabilisingand damping the rear lid.The rear lid adjustment is described step by step below.Use setting gauge -3371- ⇒ Body Repairs; Rep. Gr. 00 ; Bodydimensions to check or set gap dimensions.–Remove gas strut ⇒ page 30 .–Adjust rear lid on rear lid hinges by loosening bolts⇒ Item 9 (page 29) .–Adjust rear lid with rear lid hinges by loosening hexagon nut⇒ Item 6 (page 29) .–Adjust adjustment buffer ⇒ page 33 .NoteThe rear lid is correctly adjusted if, when closed, it is not sunkenor raised, the gap is uniform all around and the contours align.2.8.1Adjusting adjustment bufferNoteOnly the adjustment for the right adjustment buffer is described.The adjustment for the left adjustment buffer is similar.–Loosen grub screw -1- until it is visible in rubber buffer.–Now pull detent slide out of adjustment buffer.Golf Variant 2007 ➤ , Jetta 2005 ➤General body repairs, exterior - Edition 10.20092. Rear lid (saloon) 33 Downloaded from www.Manualslib.com manuals search engine
Protected by copyright. Copying for private or commercial purposes, in partor in whole, is not permitted unless authorised by Volkswagen AG. Volkswagen AG does notguarantee or accept any liability with respect to the correctness ofinformation in this document.Copyright by Volkswagen AG.–Adjust detent slide to dimension -a- = 12.5 mm.–Close rear lid to detent position with light pressure at centre oflid.–Open rear lid again.–Screw in adjustment buffer clamping screw -1- to a depth ofdimension -a - = 25 mm.–Check setting.Golf Variant 2007 ➤ , Jetta 2005 ➤General body repairs, exterior - Edition 10.200934 Rep. Gr.55 - Bonnet, rear lid Downloaded from www.Manualslib.com manuals search engine
Protected by copyright. Copying for private or commercial purposes, in partor in whole, is not permitted unless authorised by Volkswagen AG. Volkswagen AG does notguarantee or accept any liability with respect to the correctness ofinformation in this document.Copyright by Volkswagen AG.2.9Assembly overview - lid lock and lock cylinder carrier1 - Bowden cable❑From lid lock to lock cyl‐inder2 - Connector❑For bonnet lock3 - Bowden cable❑From lid lock to emer‐gency release lever ininterior❑Only vehicles withemergency releasefrom interior4 - Rear lid trim5 - Lock cover6 - Hexagon nut❑8 Nm7 - Lid lock❑Removing and installing⇒ page 368 - Cover❑Not supplied with lid lock❑Secured on lid lock withlocking lugs9 - Handle trim❑Removing and installing⇒ page 3610 - Connector❑For registration platelighting and release but‐ton on vehicles with a re‐lease button11 - Lock cylinder❑Removing and installing ⇒ page 3512 - Connector❑For lock cylinder2.10Removing and installing lock cylinder2.10.1Removing–Removing rear lid trim ⇒ General body repairs, interior; Rep.Gr. 70 ; Rear lid trim .Golf Variant 2007 ➤ , Jetta 2005 ➤General body repairs, exterior - Edition 10.20092. Rear lid (saloon) 35 Downloaded from www.Manualslib.com manuals search engine
Protected by copyright. Copying for private or commercial purposes, in partor in whole, is not permitted unless authorised by Volkswagen AG. Volkswagen AG does notguarantee or accept any liability with respect to the correctness ofinformation in this document.Copyright by Volkswagen AG.–Disconnect connections -1- on lock cylinder.–Unhook Bowden cable -2-.–Remove nuts -3- and remove lock cylinder -4-.2.10.2InstallingInstall in reverse order of removal.Specified torque for hexagon nuts: 8 NmBefore closing rear lid, check function of lid release components.2.11Removing and installing handle trim2.11.1Removing–Removing rear lid trim ⇒ General body repairs, interior; Rep.Gr. 70 ; Rear lid trim .–Remove lock cylinder ⇒ page 35 .–Disconnect connector -5-.–Remove nuts -6- and remove handle trim -7-.2.11.2InstallingInstall in reverse order of removal.Specified torque for hexagon nuts: 8 NmBefore closing rear lid, check function of lid release components.2.12Removing and installing lid lock2.12.1Removing–Remove lock cover ⇒ Item 5 (page 35) .–Removing rear lid trim ⇒ General body repairs, interior; Rep.Gr. 70 ; Rear lid trim .Golf Variant 2007 ➤ , Jetta 2005 ➤General body repairs, exterior - Edition 10.200936 Rep. Gr.55 - Bonnet, rear lid Downloaded from www.Manualslib.com manuals search engine
Protected by copyright. Copying for private or commercial purposes, in partor in whole, is not permitted unless authorised by Volkswagen AG. Volkswagen AG does notguarantee or accept any liability with respect to the correctness ofinformation in this document.Copyright by Volkswagen AG.–Remove cover cap -1-.–Disconnect connector -2- from lid lock -5-.–Unhook Bowden cable -3-.–Remove remove hexagon nuts -4- and remove lid lock -5-.–If lid lock -5- is renewed, Bowden cable -6- must be unhooked.2.12.2InstallingInstall in reverse order of removal.Specified torque for hexagon nuts: 8 NmBefore closing rear lid, check function of lid release components.2.13Rear lid sealDuring production, a sealant is applied to the rear lid seals, theseal is then placed on the rear lid flange and rolled on.Note♦When seals are removed, the sealant will spread to the insideof the seal and the flanks will be bent out slightly. If the seal isthen refitted, a leak-free tight seal is not guaranteed.♦Therefore each seal which is removed completely should bereplaced by a so-called “tap-on” seal.♦If a seal has been partially removed, squeeze sides of sealtogether before refitting.Golf Variant 2007 ➤ , Jetta 2005 ➤General body repairs, exterior - Edition 10.20092. Rear lid (saloon) 37 Downloaded from www.Manualslib.com manuals search engine
Protected by copyright. Copying for private or commercial purposes, in partor in whole, is not permitted unless authorised by Volkswagen AG. Volkswagen AG does notguarantee or accept any liability with respect to the correctness ofinformation in this document.Copyright by Volkswagen AG.2.14Removing and installing rear lid seal2.14.1Removing–Pull rear lid seal -1- off body flange.2.14.2Installing–Align rear lid seal -1- so that the vulcanised point -arrow- islocated to the middle of the left tail light cluster.Golf Variant 2007 ➤ , Jetta 2005 ➤General body repairs, exterior - Edition 10.200938 Rep. Gr.55 - Bonnet, rear lid Downloaded from www.Manualslib.com manuals search engine
Protected by copyright. Copying for private or commercial purposes, in partor in whole, is not permitted unless authorised by Volkswagen AG. Volkswagen AG does notguarantee or accept any liability with respect to the correctness ofinformation in this document.Copyright by Volkswagen AG.3Rear lid (Variant)3.1ToolsSpecial tools and workshop equipment required♦Torque wrench 5…50 Nm -V.A.G 1331-3.2Assembly overview - rear lid1 - Rear lid❑Removing and installing⇒ page 40❑Adjusting ⇒ page 442 - Lid lock❑Removing and installing⇒ page 483 - Stop4 - Striker pin❑Adjusting ⇒ page 455 - Hinge❑Removing and installing⇒ page 426 - Gas strut❑Removing and installing⇒ page 41❑Releasing gas⇒ page 427 - Adjustment buffer❑Adjusting ⇒ page 468 - Rear lid trim❑Removing and installing⇒ General body repairs,interior; Rep. Gr. 70 ;Removing and installingrear lid trim9 - Button to release rear lid❑Removing and installing⇒ page 47Golf Variant 2007 ➤ , Jetta 2005 ➤General body repairs, exterior - Edition 10.20093. Rear lid (Variant) 39 Downloaded from www.Manualslib.com manuals search engine
Protected by copyright. Copying for private or commercial purposes, in partor in whole, is not permitted unless authorised by Volkswagen AG. Volkswagen AG does notguarantee or accept any liability with respect to the correctness ofinformation in this document.Copyright by Volkswagen AG.10 - Registration plate light❑Removing and installing⇒ Electrical system; Rep. Gr. 94 ; Lights, bulbs, switches - exterior11 - Rear window wiper❑Removing and installing ⇒ Electrical system; Rep. Gr. 92 ; Window washer/wiper system3.3Removing and installing rear lid3.3.1Removing–Remove rear lid trim ⇒ General body repairs, interior; Rep.Gr. 70 ; Rear lid trim .–Remove rear lid window frame trim ⇒ General body repairs,interior; Rep. Gr. 70 ; Rear lid trim .–Disconnect all connections in rear lid.–Release bellows -1- and guide electrical wiring -5- throughopening in rear lid.–Loosen bolts -3- on hinge -2- (do not remove).Further dismantling requires the assistance of a second mechan‐ic.–Remove gas strut -4- ⇒ page 41 .–Remove bolts -3-.–Remove rear lid from hinge.3.3.2InstallingFurther installation is possible only with the help of a second me‐chanic.–Position rear lid carefully on hinges.Golf Variant 2007 ➤ , Jetta 2005 ➤General body repairs, exterior - Edition 10.200940 Rep. Gr.55 - Bonnet, rear lid Downloaded from www.Manualslib.com manuals search engine
Protected by copyright. Copying for private or commercial purposes, in partor in whole, is not permitted unless authorised by Volkswagen AG. Volkswagen AG does notguarantee or accept any liability with respect to the correctness ofinformation in this document.Copyright by Volkswagen AG.–Install bolts -3-.–Guide electrical wiring -5- through opening in rear lid and se‐cure bellows -1-.–Adjust rear lid ⇒ page 44 and tighten bolts -3-, specified tor‐que: 10 Nm.–Install gas strut -4-.–Install rear lid trim ⇒ General body repairs, interior; Rep. Gr. 70 ; Rear lid trim .–Install rear lid window frame trim ⇒ General body repairs, in‐terior; Rep. Gr. 70 ; Rear lid trim .–Check adjustment of rear lid ⇒ page 44 .3.4Removing and installing gas strut–Open rear lid and support it.–Position a small screwdriver beneath spring clip -2-.–Raise spring clip -2- until it can be moved over ball socket indirection of -arrow-.–Pull gas strut -1- off ball-head pins -3- and -4-.After removing gas strut -1-, slide spring clip -2- back immediately.WARNINGProceed with care if gas strut is reused. Spring clip must notbe levered completely out of ball socket, as it will otherwise bedamaged. Gas strut will spring out of mounting, causing dam‐age or injury to operator.NoteBall sockets -3- and -4- are screwed into rear lid or body, specifiedtorque: 20 Nm.–Releasing gas from gas strut ⇒ page 42Golf Variant 2007 ➤ , Jetta 2005 ➤General body repairs, exterior - Edition 10.20093. Rear lid (Variant) 41 Downloaded from www.Manualslib.com manuals search engine
Protected by copyright. Copying for private or commercial purposes, in partor in whole, is not permitted unless authorised by Volkswagen AG. Volkswagen AG does notguarantee or accept any liability with respect to the correctness ofinformation in this document.Copyright by Volkswagen AG.3.5Releasing gas from gas strut–Clamp gas strut in vice in area marked -x- = 50 mm.WARNINGClamp gas strut only within area -x-; otherwise danger of ac‐cident!–Saw through cylinder of gas strut within first third of cylinder'soverall length using piston rod end of cylinder as referencepoint.Note♦Wear eye protection when sawing.♦Cover area of saw cut with a cloth.♦Dispose of oil and cloth via existing disposal channels.3.6Removing and installing rear lid hinge3.6.1Removing–Remove rear lid ⇒ page 40 .–Remove end strip for moulded headliner ⇒ General body re‐pairs, interior; Rep. Gr. 70 ; Trim, insulation .–Unscrew nuts -2- from studs -1-.–Remove hinge -3- from exterior.Golf Variant 2007 ➤ , Jetta 2005 ➤General body repairs, exterior - Edition 10.200942 Rep. Gr.55 - Bonnet, rear lid Downloaded from www.Manualslib.com manuals search engine
Protected by copyright. Copying for private or commercial purposes, in partor in whole, is not permitted unless authorised by Volkswagen AG. Volkswagen AG does notguarantee or accept any liability with respect to the correctness ofinformation in this document.Copyright by Volkswagen AG.3.6.2Installing–Position hinge -3- in vehicle.–Screw nuts -2- onto studs -1-.–Install rear lid ⇒ page 40 .–Align hinge to rear lid.–Specified torque for nuts -2-: 24 Nm–Check adjustment of rear lid ⇒ page 44 .Further installation is performed in reverse order of removal.Golf Variant 2007 ➤ , Jetta 2005 ➤General body repairs, exterior - Edition 10.20093. Rear lid (Variant) 43 Downloaded from www.Manualslib.com manuals search engine
Protected by copyright. Copying for private or commercial purposes, in partor in whole, is not permitted unless authorised by Volkswagen AG. Volkswagen AG does notguarantee or accept any liability with respect to the correctness ofinformation in this document.Copyright by Volkswagen AG.3.7Adjusting rear lidNote♦Vehicle must be on the ground to carry out rear lid adjustment.♦The rear lid lock -2- is bolted directly to the rear lid -1-. It does not have elongated holes, so it cannot beadjusted.♦The stop buffers -3- on the left and right are not a means of adjustment. Their purpose is to stabilise anddampen the rear lid -1-.♦The rear lid is adjusted correctly if the gaps/shut lines are even all around, the door is not too deep or doesnot stand proud and all contours align when the rear lid is closed.♦The rear lid must engage in the striker pin -4- without excessive force.The rear lid adjustment is described step by step below.Use setting gauge -3371- ⇒ Body Repairs; Rep. Gr. 00 ; Tech‐nical data; Body gap dimensions to check or adjust the gapdimensions.Golf Variant 2007 ➤ , Jetta 2005 ➤General body repairs, exterior - Edition 10.200944 Rep. Gr.55 - Bonnet, rear lid Downloaded from www.Manualslib.com manuals search engine
Protected by copyright. Copying for private or commercial purposes, in partor in whole, is not permitted unless authorised by Volkswagen AG. Volkswagen AG does notguarantee or accept any liability with respect to the correctness ofinformation in this document.Copyright by Volkswagen AG.–Rear lid can be adjusted within oversized holes of hinge -3- byloosening nut -2-.–Rear lid can be adjusted slightly at bolts -3-.–After completing adjustments, perform corrosion protectionmeasures on hinge and bolts.–Adjusting rear lid at striker pin ⇒ page 45 .–Adjusting left and right adjustment buffer ⇒ page 46 .3.7.1Adjusting striker pinNote♦Loosen bolts to slide striker pin in over-sized holes.♦Adjust striker pin so that recess of rear lid lock engages withrotary catch centrally to striker pin.–Remove lock carrier cover ⇒ General body repairs, interior;Rep. Gr. 70 ; Luggage and load compartment trim .Golf Variant 2007 ➤ , Jetta 2005 ➤General body repairs, exterior - Edition 10.20093. Rear lid (Variant) 45 Downloaded from www.Manualslib.com manuals search engine
Protected by copyright. Copying for private or commercial purposes, in partor in whole, is not permitted unless authorised by Volkswagen AG. Volkswagen AG does notguarantee or accept any liability with respect to the correctness ofinformation in this document.Copyright by Volkswagen AG.–Loosen bolts -1-.–Move striker pin -2- to upper position and tighten bolts -1-.–Close rear lid and check adjustment.The rear lid is adjusted correctly if the gaps/shut lines are evenall around, the door is not too deep or does not stand proud andall contours align when the rear lid is closed.–Specified torque for bolts -1-: 23 Nm3.7.2Adjusting adjustment buffer–Tighten stop buffer -2-, specified torque for bolt -3-: 10 Nm.–Pull cover -4- off adjustment buffer.–Loosen bolt -5- on adjustment buffer -6- slightly until adjust‐ment buffer can be moved onto stop in direction of -arrow-.–Close rear lid -1- to first detent position by applying light pres‐sure to centre area.–Open rear lid again.–Tighten bolt -5-, specified torque: 10 Nm.Golf Variant 2007 ➤ , Jetta 2005 ➤General body repairs, exterior - Edition 10.200946 Rep. Gr.55 - Bonnet, rear lid Downloaded from www.Manualslib.com manuals search engine
Protected by copyright. Copying for private or commercial purposes, in partor in whole, is not permitted unless authorised by Volkswagen AG. Volkswagen AG does notguarantee or accept any liability with respect to the correctness ofinformation in this document.Copyright by Volkswagen AG.–Press cover -4- onto adjustment buffer.3.8Removing and installing release button3.8.1Removing–Remove rear lid trim ⇒ General body repairs, interior; Rep.Gr. 70 ; Rear lid trim .Golf Variant 2007 ➤ , Jetta 2005 ➤General body repairs, exterior - Edition 10.20093. Rear lid (Variant) 47 Downloaded from www.Manualslib.com manuals search engine
Protected by copyright. Copying for private or commercial purposes, in partor in whole, is not permitted unless authorised by Volkswagen AG. Volkswagen AG does notguarantee or accept any liability with respect to the correctness ofinformation in this document.Copyright by Volkswagen AG.–Disconnect connector -3- from connection on release button-1-.–Unscrew the two nuts -2- from studs for release button andtake cover -4- off upwards.–Remove release button -1- from rear lid.In case of electrical malfunction, rear lid can be opened using lockemergency release ⇒ page 48 . Emergency release is acces‐sible through an aperture in rear lid trim.3.8.2InstallingInstall in reverse order of removal.Specified torque for nuts: 8 Nm.Before closing rear lid, check function of lid release components.3.9Removing and installing lid lock3.9.1Removing–Remove rear lid trim ⇒ General body repairs, interior; Rep.Gr. 70 ; Trim, insulation .–Disconnect connector -3- on back of lock.–Remove bolts -2- and take off lock -1- from rear lid.Golf Variant 2007 ➤ , Jetta 2005 ➤General body repairs, exterior - Edition 10.200948 Rep. Gr.55 - Bonnet, rear lid Downloaded from www.Manualslib.com manuals search engine
Protected by copyright. Copying for private or commercial purposes, in partor in whole, is not permitted unless authorised by Volkswagen AG. Volkswagen AG does notguarantee or accept any liability with respect to the correctness ofinformation in this document.Copyright by Volkswagen AG.The rear lid can be opened using emergency release -4- for elec‐trical malfunctions. Emergency release is accessible through anaperture in rear lid trim.3.9.2Installing–Reconnect connector -3- on back of lock.–Insert lock -1- into rear lid and tighten bolts -2-, specified tor‐que: 24 Nm.–Install rear lid trim ⇒ General body repairs, interior; Rep. Gr. 70 ; Trim, insulation .Golf Variant 2007 ➤ , Jetta 2005 ➤General body repairs, exterior - Edition 10.20093. Rear lid (Variant) 49 Downloaded from www.Manualslib.com manuals search engine
Protected by copyright. Copying for private or commercial purposes, in partor in whole, is not permitted unless authorised by Volkswagen AG. Volkswagen AG does notguarantee or accept any liability with respect to the correctness ofinformation in this document.Copyright by Volkswagen AG.Before closing rear lid, check function of lid release components.3.10Rear lid sealDuring production a sealant is applied to the rear lid seals, theseal is then placed on the body flange and rolled on.Note♦When seals are removed, the sealant will spread to the insideof the seal and the flanks will be bent out slightly. If the seal isthen refitted, a leak-free tight seal is not guaranteed.♦Therefore each seal which is removed completely should bereplaced by a so-called “tap-on” seal.♦If a seal has been partially removed, squeeze the sides to‐gether before installing.Golf Variant 2007 ➤ , Jetta 2005 ➤General body repairs, exterior - Edition 10.200950 Rep. Gr.55 - Bonnet, rear lid Downloaded from www.Manualslib.com manuals search engine
Protected by copyright. Copying for private or commercial purposes, in partor in whole, is not permitted unless authorised by Volkswagen AG. Volkswagen AG does notguarantee or accept any liability with respect to the correctness ofinformation in this document.Copyright by Volkswagen AG.3.11Removing and installing rear lid seal3.11.1Removing–Pull rear lid seal -1- off body flange -2-.3.11.2Installing–Align rear lid seal -1- so that vulcanised point -arrow- facescentre of left tail light.Golf Variant 2007 ➤ , Jetta 2005 ➤General body repairs, exterior - Edition 10.20093. Rear lid (Variant) 51 Downloaded from www.Manualslib.com manuals search engine
Protected by copyright. Copying for private or commercial purposes, in partor in whole, is not permitted unless authorised by Volkswagen AG. Volkswagen AG does notguarantee or accept any liability with respect to the correctness ofinformation in this document.Copyright by Volkswagen AG.Push seal -1- evenly onto body flange -2-.Golf Variant 2007 ➤ , Jetta 2005 ➤General body repairs, exterior - Edition 10.200952 Rep. Gr.55 - Bonnet, rear lid Downloaded from www.Manualslib.com manuals search engine
Protected by copyright. Copying for private or commercial purposes, in partor in whole, is not permitted unless authorised by Volkswagen AG. Volkswagen AG does notguarantee or accept any liability with respect to the correctness ofinformation in this document.Copyright by Volkswagen AG.3.12Registration plate carrier1 - Pop rivet nut❑Qty. 22 - Registration plate carrier❑Assignment ⇒ Partscatalogue“ETKA”3 - Bolt❑Qty. 2❑4 NmGolf Variant 2007 ➤ , Jetta 2005 ➤General body repairs, exterior - Edition 10.20093. Rear lid (Variant) 53 Downloaded from www.Manualslib.com manuals search engine
Protected by copyright. Copying for private or commercial purposes, in partor in whole, is not permitted unless authorised by Volkswagen AG. Volkswagen AG does notguarantee or accept any liability with respect to the correctness ofinformation in this document.Copyright by Volkswagen AG.4Fuel tank flap unit (saloon)4.1Assembly overview - tank flap unit1 - Fuel filler neck2 - Tank flap unit❑Removing and installing⇒ page 543 - Water drain hose4 - Bolt❑1.5 Nm5 - Assembly part6 - Seal7 - Release rod8 - Connector❑For tank filler flap lock‐ing motor -V155-9 - Tank filler flap locking motor-V155-❑Removing and installing⇒ page 5610 - Securing bolt❑For tank filler flap lock‐ing motor -V155-❑Qty. 2❑1.5 Nm11 - Securing bracket❑On rear right wheelhousing4.2Removing and installing tank flap unit4.2.1RemovingNoteIf fuel tank filler flap does not open, it can be opened by hand using the release rod -7-. Remove rear rightluggage compartment trim ⇒ General body repairs, interior; Rep. Gr. 70 ; Load area and luggage compartmenttrim for this.–Open fuel tank flap.–Remove tank cap.–Remove bolt -4-.Golf Variant 2007 ➤ , Jetta 2005 ➤General body repairs, exterior - Edition 10.200954 Rep. Gr.55 - Bonnet, rear lid Downloaded from www.Manualslib.com manuals search engine
Protected by copyright. Copying for private or commercial purposes, in partor in whole, is not permitted unless authorised by Volkswagen AG. Volkswagen AG does notguarantee or accept any liability with respect to the correctness ofinformation in this document.Copyright by Volkswagen AG.–Pull rubber part of tank flap unit -2- off fuel tank filler neck-1-.–Pull tank flap unit -2- with drain hose -3- to rear and swing fueltank flap unit out of side panel.–Unclip assembly part -5- out of side panel and pull assemblypart off release rod -7-.4.2.2Installing•The mounting part -5- has been pushed in.–Feed drain hose -3- through aperture in tank flap unit -2- andpull drain hose through as far as possible.–Guide drain hose into side panel.–With hinge side leading, guide tank flap unit -2- into side panel.–Then swivel tank flap unit completely onto side panel.Make sure that tank flap unit -2- locking devices engage correctlyin side panel at top and bottom.–Pull rubber part of tank flap unit over filler neck and tighten bolt-4-.Golf Variant 2007 ➤ , Jetta 2005 ➤General body repairs, exterior - Edition 10.20094. Fuel tank flap unit (saloon) 55 Downloaded from www.Manualslib.com manuals search engine
Protected by copyright. Copying for private or commercial purposes, in partor in whole, is not permitted unless authorised by Volkswagen AG. Volkswagen AG does notguarantee or accept any liability with respect to the correctness ofinformation in this document.Copyright by Volkswagen AG.Specified torque for bolt -4-: 1.5 Nm–Perform functional check of release components.4.3Removing and installing tank filler flaplocking motor -V155-4.3.1Removing–Remove luggage compartment side trim on right ⇒ Generalbody repairs, interior; Rep. Gr. 70 ; Load area and luggagecompartment trim .–Disconnect connector -8- on tank filler flap locking motor -V155- -9-.–Loosen bolts -10-.Golf Variant 2007 ➤ , Jetta 2005 ➤General body repairs, exterior - Edition 10.200956 Rep. Gr.55 - Bonnet, rear lid Downloaded from www.Manualslib.com manuals search engine
Protected by copyright. Copying for private or commercial purposes, in partor in whole, is not permitted unless authorised by Volkswagen AG. Volkswagen AG does notguarantee or accept any liability with respect to the correctness ofinformation in this document.Copyright by Volkswagen AG.–Pull tank filler flap locking motor -V155- -9- together with re‐lease rod -7- out of seal -6- and fitting -5-.4.3.2InstallingInstall in reverse order of removal.–Perform functional check of release components.Golf Variant 2007 ➤ , Jetta 2005 ➤General body repairs, exterior - Edition 10.20094. Fuel tank flap unit (saloon) 57 Downloaded from www.Manualslib.com manuals search engine
Protected by copyright. Copying for private or commercial purposes, in partor in whole, is not permitted unless authorised by Volkswagen AG. Volkswagen AG does notguarantee or accept any liability with respect to the correctness ofinformation in this document.Copyright by Volkswagen AG.5Fuel tank flap unit (Variant)5.1Assembly overview - tank flap unit1 - Fuel filler neck2 - Tank flap unit❑Removing and installing⇒ page 583 - Water drain hose4 - Bolt❑1.5 Nm5 - Tank filler flap locking motor-V155-❑Removing and installing⇒ page 606 - Wiring harness❑For tank filler flap lock‐ing motor -V155-5.2Removing and installing tank flap unit5.2.1Removing–Open fuel tank flap.–Remove tank cap.–Remove bolt -4-.–Pull rubber part of tank flap unit -2- off fuel tank filler neck-1-.–Pull tank flap unit -2- with drain hose -3- to rear and swing fueltank flap unit out of side panel.Golf Variant 2007 ➤ , Jetta 2005 ➤General body repairs, exterior - Edition 10.200958 Rep. Gr.55 - Bonnet, rear lid Downloaded from www.Manualslib.com manuals search engine
Protected by copyright. Copying for private or commercial purposes, in partor in whole, is not permitted unless authorised by Volkswagen AG. Volkswagen AG does notguarantee or accept any liability with respect to the correctness ofinformation in this document.Copyright by Volkswagen AG.5.2.2Installing–Feed drain hose -3- through aperture in tank flap unit -2- andpull drain hose through as far as possible.–Guide drain hose into side panel.–With hinge side leading, guide tank flap unit -2- into side panel.–Then swivel tank flap unit completely onto side panel.Make sure that tank flap unit -2- locking devices engage correctlyin side panel at top and bottom.–Pull rubber part of tank flap unit over filler neck and tighten bolt-4-.Specified torque for bolt -4-: 1.5 NmGolf Variant 2007 ➤ , Jetta 2005 ➤General body repairs, exterior - Edition 10.20095. Fuel tank flap unit (Variant) 59 Downloaded from www.Manualslib.com manuals search engine
Protected by copyright. Copying for private or commercial purposes, in partor in whole, is not permitted unless authorised by Volkswagen AG. Volkswagen AG does notguarantee or accept any liability with respect to the correctness ofinformation in this document.Copyright by Volkswagen AG.–Perform functional check of release components.5.3Removing and installing tank filler flaplocking motor -V155-5.3.1Removing–Remove tank flap unit ⇒ page 58 .–Unclip service cover -B- from side panel -A-.Golf Variant 2007 ➤ , Jetta 2005 ➤General body repairs, exterior - Edition 10.200960 Rep. Gr.55 - Bonnet, rear lid Downloaded from www.Manualslib.com manuals search engine
Protected by copyright. Copying for private or commercial purposes, in partor in whole, is not permitted unless authorised by Volkswagen AG. Volkswagen AG does notguarantee or accept any liability with respect to the correctness ofinformation in this document.Copyright by Volkswagen AG.–Pull service cover -B- forwards slightly.–Disconnect connector -2- on tank filler flap locking motor -V155- -1- through opening in side panel.–Push rubber grommet -4- out of side panel and pull out wiringharness -3-.–Pull tank filler flap locking motor -V155- -1- in direction of-arrow- off side panel.Golf Variant 2007 ➤ , Jetta 2005 ➤General body repairs, exterior - Edition 10.20095. Fuel tank flap unit (Variant) 61 Downloaded from www.Manualslib.com manuals search engine
Protected by copyright. Copying for private or commercial purposes, in partor in whole, is not permitted unless authorised by Volkswagen AG. Volkswagen AG does notguarantee or accept any liability with respect to the correctness ofinformation in this document.Copyright by Volkswagen AG.5.3.2Installing–Feed wiring harness -3- through opening in side panel.–Secure rubber grommet -4- on side panel.–Reconnect connector -2-.–Slide tank filler flap locking motor -V155- -1- in opposite direc‐tion of -arrow- onto side panel.–Install tank flap unit ⇒ page 59 .–Install luggage compartment side trim on right ⇒ General bodyrepairs, interior; Rep. Gr. 70 ; Load area and luggage com‐partment trim .Golf Variant 2007 ➤ , Jetta 2005 ➤General body repairs, exterior - Edition 10.200962 Rep. Gr.55 - Bonnet, rear lid Downloaded from www.Manualslib.com manuals search engine
Protected by copyright. Copying for private or commercial purposes, in partor in whole, is not permitted unless authorised by Volkswagen AG. Volkswagen AG does notguarantee or accept any liability with respect to the correctness ofinformation in this document.Copyright by Volkswagen AG.57 –Front doors, door components, central locking1Front door1.1ToolsSpecial tools and workshopequipment required♦Socket -T10072-♦Assembly tool -T10118-♦Door alignment tool -3320-with -3320/1- , -3320/2- and-3320/3-♦Roller for door insulationfoil -3356-♦Torque wrench -V.A.G1331-♦Setting gauge -3371-Golf Variant 2007 ➤ , Jetta 2005 ➤General body repairs, exterior - Edition 10.20091. Front door 63 Downloaded from www.Manualslib.com manuals search engine
Protected by copyright. Copying for private or commercial purposes, in partor in whole, is not permitted unless authorised by Volkswagen AG. Volkswagen AG does notguarantee or accept any liability with respect to the correctness ofinformation in this document.Copyright by Volkswagen AG.♦Cartridge gun -V.A.G 1628-♦Cartridge heater -V.A.G1939 A-♦Removal wedge -3409-♦Assembly tool set -T10237-1.2Materials♦1K or 2K glass adhesive-DH 009 100 01- 1) 2) or -DH 004600 A2- 1)♦Glass primer/paint primer-D 009 200 02- 3)♦Cleaning solution-D 009 401 04- 3)♦Primer applicator-D 009 500 25- 3)1) Observe curing period ⇒ page 822) Heat according to manufacturer's instructions, using cartridge heater -V.A.G1939 A- .3) Materials are stored in box -D 004 700- .1.3Assembly overview - door assemblyA new door concept has been introduced with Jetta 2005 ▸, Bora2005 ▸.The door consists of an inner part -6- and an outer panel -1-.The parts are joined by the front -7- and rear -4- retaining rail.Golf Variant 2007 ➤ , Jetta 2005 ➤General body repairs, exterior - Edition 10.200964 Rep. Gr.57 - Front doors, door components, central locking Downloaded from www.Manualslib.com manuals search engine
Protected by copyright. Copying for private or commercial purposes, in partor in whole, is not permitted unless authorised by Volkswagen AG. Volkswagen AG does notguarantee or accept any liability with respect to the correctness ofinformation in this document.Copyright by Volkswagen AG.The retaining rails are bolted to the inner part of the door andbonded to the outer panel of the door.The inner part -6- of the door functions basically as the previouslyknown assembly carrier. Loudspeaker, window regulator, windowregulator motor, wiring, window channel, exterior mirror and doorlock are mounted on the door inner part.The outer panel -1- of the door is additionally bolted to the loweredge of the inner part. The window slot outer seal, insulation andexterior door handle are mounted on the outer panel of the door.CautionDifferent securing screws are used for the door outer panel. Ifthese are fitted in the wrong positions, the outer panel for thedoor will be damaged.NoteThe edge protection foil -2- must always be bonded between the door outer panel and the door inner part.1 - Door outer panel❑Removing and installing⇒ page 1122 - Edge protection foil❑Self-adhesive❑Is bonded between doorouter panel and door in‐ner part.3 - Bolt❑Feature: bolt with poin‐ted end and thinnerwasher.❑Qty. 6 on lower edge❑Qty. 1 in rear section ofdoor shoulder❑10 Nm4 - Rear retaining rail❑Adhesive -DH 009 10003-5 - Bolt❑Feature: bolt with nopointed end and thickerwasher.❑Qty. 10 for both retain‐ing rails❑14 Nm6 - Door inner part❑Assembly overview⇒ page 847 - Front retaining rail❑Adhesive -DH 009 10003-Golf Variant 2007 ➤ , Jetta 2005 ➤General body repairs, exterior - Edition 10.20091. Front door 65 Downloaded from www.Manualslib.com manuals search engine
Protected by copyright. Copying for private or commercial purposes, in partor in whole, is not permitted unless authorised by Volkswagen AG. Volkswagen AG does notguarantee or accept any liability with respect to the correctness ofinformation in this document.Copyright by Volkswagen AG.8 - Bolt❑Feature: bolt with pointed end and thicker washer❑Qty. 1 in area of front section of door shoulder❑10 Nm9 - Insulation❑Self-adhesive❑To bond, first heat the insulation and then press on firmly10 - Clip❑Qty. 611 - Window slot seal❑Must be fitted before fitting door outer panel.1.4Assembly overview - door hingesCautionNut of eccentric bolt -9- should not be loosened under any cir‐cumstances. It cannot be tightened again using normal work‐shop tools.Golf Variant 2007 ➤ , Jetta 2005 ➤General body repairs, exterior - Edition 10.200966 Rep. Gr.57 - Front doors, door components, central locking Downloaded from www.Manualslib.com manuals search engine
Protected by copyright. Copying for private or commercial purposes, in partor in whole, is not permitted unless authorised by Volkswagen AG. Volkswagen AG does notguarantee or accept any liability with respect to the correctness ofinformation in this document.Copyright by Volkswagen AG.Note♦The right side is shown. The left side is similar.♦The hinge bolts must always be renewed if loosened.♦Hinges are now one piece.1 - Door❑Removing and installing⇒ page 68❑Adjusting ⇒ page 702 - Guide bolt❑10 Nm3 - Door hinge with arrester4 - Multi-point socket head bolt❑20 Nm + 1/4 turn further(90°).❑Always renew afterloosening5 - Multi-point socket head bolt❑Installed from inside ve‐hicle.❑Removing A-pillar lowertrim ⇒ General body re‐pairs, interior; Rep. Gr. 70 ; Pillar and side paneltrim❑20 Nm + 1/4 turn further(90°).❑Always renew afterloosening6 - Multi-point socket head bolt❑20 Nm + 1/4 turn further(90°).❑Always renew afterloosening7 - Multi-point socket head bolt❑20 Nm + 1/4 turn further(90°).❑Always renew after loosening8 - Guide bolt❑10 Nm9 - Nut❑For eccentric pin❑Do not loosen❑Serves as a means of adjustment during production only10 - Door hinge❑Door hinge is now one piece.Golf Variant 2007 ➤ , Jetta 2005 ➤General body repairs, exterior - Edition 10.20091. Front door 67 Downloaded from www.Manualslib.com manuals search engine
Protected by copyright. Copying for private or commercial purposes, in partor in whole, is not permitted unless authorised by Volkswagen AG. Volkswagen AG does notguarantee or accept any liability with respect to the correctness ofinformation in this document.Copyright by Volkswagen AG.11 - Multi-point socket head bolt❑20 Nm + 1/4 turn further (90°).❑Always renew after loosening12 - Multi-point socket head bolt❑20 Nm + 1/4 turn further (90°).❑Always renew after loosening13 - Multi-point socket head bolt❑20 Nm + 1/4 turn further (90°).❑Always renew after loosening1.5Removing and installing doorNoteThe removal and installation sequence is only for the right door.The removal and installation of the left door is similar.1.5.1Removing–Release boot -6- by pressing fastener -arrow a- and pull bootoff A-pillar.–Swing locking lever -7- downwards -arrow b- and separateelectrical connector -8- from coupling station.–Remove bolts -4-, -5- and -11- from hinge using special dooralignment tool -3320- and bit -3320/3- .Golf Variant 2007 ➤ , Jetta 2005 ➤General body repairs, exterior - Edition 10.200968 Rep. Gr.57 - Front doors, door components, central locking Downloaded from www.Manualslib.com manuals search engine
Protected by copyright. Copying for private or commercial purposes, in partor in whole, is not permitted unless authorised by Volkswagen AG. Volkswagen AG does notguarantee or accept any liability with respect to the correctness ofinformation in this document.Copyright by Volkswagen AG.–Pull door in direction of -arrow- off guide bolts -2- and -9-.1.5.2InstallingInstall in reverse order of removal.Specified torque for bolts -4-, -5- and -11-: 20 Nm + 1/4 turn further(90°).Always renew bolts -4-, -5- and -11-.Golf Variant 2007 ➤ , Jetta 2005 ➤General body repairs, exterior - Edition 10.20091. Front door 69 Downloaded from www.Manualslib.com manuals search engine
Protected by copyright. Copying for private or commercial purposes, in partor in whole, is not permitted unless authorised by Volkswagen AG. Volkswagen AG does notguarantee or accept any liability with respect to the correctness ofinformation in this document.Copyright by Volkswagen AG.Observe front door gap/shut lines ⇒ Body Repairs; Rep. Gr. 00 ;Body dimensions .1.6Adjusting doorCautionNut of eccentric bolt -9- should not be loosened under any cir‐cumstances. Nut cannot be retightened using normal work‐shop tools.Note♦The door is adjusted correctly if the gaps/shut lines are even all around, the door is not too deep or doesnot stand proud and all contours align when the is door closed.♦Vehicle must be standing on its wheels when adjustments are performed.♦If door outer panel has been removed, door inner part window frame must be adjusted to roof frame and B-pillar, or rear door.Golf Variant 2007 ➤ , Jetta 2005 ➤General body repairs, exterior - Edition 10.200970 Rep. Gr.57 - Front doors, door components, central locking Downloaded from www.Manualslib.com manuals search engine
Protected by copyright. Copying for private or commercial purposes, in partor in whole, is not permitted unless authorised by Volkswagen AG. Volkswagen AG does notguarantee or accept any liability with respect to the correctness ofinformation in this document.Copyright by Volkswagen AG.Observe front door gap/shut lines ⇒ Body Repairs; Rep. Gr. 00 ;Body dimensions .To be able to adjust gaps correctly, bolts -5-, -7-, -11- and -12- onA-pillar must be loosened. For bolt -5-, A-pillar lower trim must beremoved ⇒ General body repairs, interior; Rep. Gr. 70 ; Pillarand side panel trim .Other measures such as raising the door have no effect. Subse‐quent pressure from above will cause the door to sack again.Bolts -4-, -6- and -13- and also guide bolts -2- and -8- must beloosened to correctly adjust the flush fitting of the door.Use door alignment tool -3320- with bit -3320/3- for this.1.6.1Adjusting striker pinNote♦The front door must lock fully when closing without any addi‐tional force being required and must not have any play.♦The front door must not be pushed up or down as a result ofthe striker pin adjustment.Golf Variant 2007 ➤ , Jetta 2005 ➤General body repairs, exterior - Edition 10.20091. Front door 71 Downloaded from www.Manualslib.com manuals search engine
Protected by copyright. Copying for private or commercial purposes, in partor in whole, is not permitted unless authorised by Volkswagen AG. Volkswagen AG does notguarantee or accept any liability with respect to the correctness ofinformation in this document.Copyright by Volkswagen AG.The following can be adjusted at the striker pin:♦When the front door does not align with the rear door.–Loosen striker pin -1- by unbolting bolts -2- on B-pillar.–Adjust the front door with the striker pin -1- so that the frontdoor is flush with the rear door when shut (wind noise).Maximum twist tolerance -A- of striker pin: ± 3°–Retighten bolts -2-.Specified torque: 20 NmWARNINGOnly use this adjustment to adjust door inwards or outwards,never use for vertical adjustment. Door must not move up‐wards or downwards when opening and closing. This indicatesthat the vertical adjustment is incorrect.Golf Variant 2007 ➤ , Jetta 2005 ➤General body repairs, exterior - Edition 10.200972 Rep. Gr.57 - Front doors, door components, central locking Downloaded from www.Manualslib.com manuals search engine
Protected by copyright. Copying for private or commercial purposes, in partor in whole, is not permitted unless authorised by Volkswagen AG. Volkswagen AG does notguarantee or accept any liability with respect to the correctness ofinformation in this document.Copyright by Volkswagen AG.1.7Removing and installing outer panel ondoor1.7.1Removing–Prise out clips -3-, starting at bottom of door -1-, and removecover -2-.Golf Variant 2007 ➤ , Jetta 2005 ➤General body repairs, exterior - Edition 10.20091. Front door 73 Downloaded from www.Manualslib.com manuals search engine
Protected by copyright. Copying for private or commercial purposes, in partor in whole, is not permitted unless authorised by Volkswagen AG. Volkswagen AG does notguarantee or accept any liability with respect to the correctness ofinformation in this document.Copyright by Volkswagen AG.–Remove lock cylinder ⇒ page 86 .–Remove door handle ⇒ page 86 .–Remove bolt -1- from bearing bracket -2- which is located be‐hind door outer panel.–Remove all bolts -2-, -3- and -4-.NoteIt is possible to find bolt type -4- instead of bolt type -2- in rear upper location on door of some vehicles. If thisis the case, do not replace bolt type -4- with bolt type -2-.–Carefully remove door outer panel.Golf Variant 2007 ➤ , Jetta 2005 ➤General body repairs, exterior - Edition 10.200974 Rep. Gr.57 - Front doors, door components, central locking Downloaded from www.Manualslib.com manuals search engine
Protected by copyright. Copying for private or commercial purposes, in partor in whole, is not permitted unless authorised by Volkswagen AG. Volkswagen AG does notguarantee or accept any liability with respect to the correctness ofinformation in this document.Copyright by Volkswagen AG.1.7.2InstallingCautionBolts of different types are used to secure outer panel of door.If these are fitted in the wrong positions, the outer panel for thedoor will be damaged.–Carefully position outer panel on door.–Insert all bolts -2-, -3- and -4-.Observe correct usage for the different types of bolts.♦Feature for bolt -2-: bolt with pointed end and thinner washer♦Feature for bolt -3-: bolt with no pointed end but with thickerwasher.♦Feature for bolt -4-: bolt with pointed end and thicker washer.–Check whether retaining rail guide pins are located in appro‐priate guide holes in inner part of door. Only then tighten allbolts -2-, -3- and -4-.Observe correct specified torque for the different types of bolts.Golf Variant 2007 ➤ , Jetta 2005 ➤General body repairs, exterior - Edition 10.20091. Front door 75 Downloaded from www.Manualslib.com manuals search engine
Protected by copyright. Copying for private or commercial purposes, in partor in whole, is not permitted unless authorised by Volkswagen AG. Volkswagen AG does notguarantee or accept any liability with respect to the correctness ofinformation in this document.Copyright by Volkswagen AG.Specified torque for bolt -2-: 10 NmSpecified torque for bolt -3-: 14 NmSpecified torque for bolt -4-: 10 NmFurther installation is performed in reverse order of removal1.8Installing new outer panel on doorCautionBolts of different types are used to secure outer panel of door.If these are fitted in the wrong positions, the outer panel for thedoor will be damaged.NoteObserve installation notes in chapter for bonding new outer panel on door ⇒ page 82•The old (damaged) outer panel with retaining rails is removed⇒ page 73 .Golf Variant 2007 ➤ , Jetta 2005 ➤General body repairs, exterior - Edition 10.200976 Rep. Gr.57 - Front doors, door components, central locking Downloaded from www.Manualslib.com manuals search engine
Protected by copyright. Copying for private or commercial purposes, in partor in whole, is not permitted unless authorised by Volkswagen AG. Volkswagen AG does notguarantee or accept any liability with respect to the correctness ofinformation in this document.Copyright by Volkswagen AG.–Install front -2- and rear -6- retaining rails on inner part of door-1-. Use “bolt with no point but with thicker washer” for this.Specified torque for bolts -3- and -5-: 14 Nm–Fit two guide bolts -4- in lower edge of door inner part -1-.The painted outer panel for the door is first offered up withoutbonding agent.Assembly blocks -3- from assembly tool set -T10237- are requiredwhen fitting outer panel on door. A strip of double-sided adhesivetape -6- is applied on the side with a cut-out step. The pin has theminimum dimension for the gap width. The surface with no ad‐hesive tape is brought into position on the adjacent panel.–Stick the assembly block -3- on outer panel -1- of the door.–Guide outer panel -1- over guide bolts on lower edge of doorinner part.–Adjust gap to sill and height of outer panel on door usingwedges -4- from assembly tool set -T10237- .–Lay door outer panel -1- with assembly blocks on adjacentpanels -2- and -5-.Golf Variant 2007 ➤ , Jetta 2005 ➤General body repairs, exterior - Edition 10.20091. Front door 77 Downloaded from www.Manualslib.com manuals search engine
Protected by copyright. Copying for private or commercial purposes, in partor in whole, is not permitted unless authorised by Volkswagen AG. Volkswagen AG does notguarantee or accept any liability with respect to the correctness ofinformation in this document.Copyright by Volkswagen AG.–Check gap/shut lines using setting gauge -3371- ⇒ Body Re‐pairs; Rep. Gr. 00 ; Body dimensions .If gap dimension cannot be adjusted further, door inner part mustbe adjusted ⇒ page 70–Remove door outer panel again.–Apply a bead of adhesive material -2- using cartridge gun -V.A.G 1628- to front -1- and rear -3- retaining rails.NoteAdhesive -DA 004 600 A2- can be used for this procedure and is applied with double cartridge gun -VAS 5237- .There is no requirement to preheat.Golf Variant 2007 ➤ , Jetta 2005 ➤General body repairs, exterior - Edition 10.200978 Rep. Gr.57 - Front doors, door components, central locking Downloaded from www.Manualslib.com manuals search engine
Protected by copyright. Copying for private or commercial purposes, in partor in whole, is not permitted unless authorised by Volkswagen AG. Volkswagen AG does notguarantee or accept any liability with respect to the correctness ofinformation in this document.Copyright by Volkswagen AG.Fixing blocks -2- from assembly tool set -T10237- are requiredwhen fitting outer panel on door. Two strips of double-sided ad‐hesive tape -5- are applied on the contact surface.–Guide outer panel -1- over guide bolts on lower edge of doorinner part.–Bring outer panel with assembly blocks -3- into contact withsurrounding components.–Adjust gap to sill and height of outer panel on door usingwedges -4- from assembly tool set.–Check gap/shut line using setting gauge -3371- ⇒ Body Re‐pairs; Rep. Gr. 00 ; Body dimensions .–Bond short fixing blocks -2- evenly on the replacement doorand the adjacent components.NoteA waiting period of 90 or 180 minutes must be observed before performing further work on the bonded door⇒ page 82 .–Further installation is performed in reverse order of removal⇒ page 75 .Golf Variant 2007 ➤ , Jetta 2005 ➤General body repairs, exterior - Edition 10.20091. Front door 79 Downloaded from www.Manualslib.com manuals search engine
Protected by copyright. Copying for private or commercial purposes, in partor in whole, is not permitted unless authorised by Volkswagen AG. Volkswagen AG does notguarantee or accept any liability with respect to the correctness ofinformation in this document.Copyright by Volkswagen AG.1.9Removing and installing retaining rail ondoor outer panel1.9.1Removing retaining railCautionThe following work steps are to be carried out with great care.As outer panel is to be reused, dents and scratches must beavoided.When cutting through the adhesive bead, always hold the re‐taining rail and outer panel together as shown in the illustration.If this is not done, the outer panel will come away from theretaining rail, thus rendering it useless.NoteThe following procedures should be carried out with the aid of anassistant.Golf Variant 2007 ➤ , Jetta 2005 ➤General body repairs, exterior - Edition 10.200980 Rep. Gr.57 - Front doors, door components, central locking Downloaded from www.Manualslib.com manuals search engine
Protected by copyright. Copying for private or commercial purposes, in partor in whole, is not permitted unless authorised by Volkswagen AG. Volkswagen AG does notguarantee or accept any liability with respect to the correctness ofinformation in this document.Copyright by Volkswagen AG.•Door outer panel with retaining rails is removed ⇒ page 73 .–Place door outer panel -1- on firm surface and protect doorouter panel against scratches.–Secure reel -2- on outer panel of door -1-.–Secure cord -5- on reel -2- and counterhold -4-.–Hold retaining rail and outer panel of door together securelywhen cutting through adhesive bead.–Cut through adhesive bead of retaining rail -3- and outer panel-1- with cord up to just over half way.–Once adhesive bead has been cut through to just over halfway in step one, turn reel -2- around and insert cord -5- in sidestill bonded.–Hold retaining rail -3- and outer panel -1- of door together se‐curely when cutting through adhesive bead further.–Cut through second half of adhesive bead.1.9.2Installing retaining rail–Using extreme care, cut away remainder of adhesive bead tothe utmost minimum on outer panel of door, ensuring that nodamage is caused to the paintwork.–Remainder of procedure is described in chapter entitled “In‐stalling new outer panel for door” ⇒ page 76 .NoteObserve also “instructions for bonding in new outer panel” on doorwhen installing a new retaining rail.–In place of removed retaining rail, install a new retaining railon the door inner part.–Apply adhesive to new retaining rail–Tighten screws to secure door panel on lower edge and onretaining rail still in place.Golf Variant 2007 ➤ , Jetta 2005 ➤General body repairs, exterior - Edition 10.20091. Front door 81 Downloaded from www.Manualslib.com manuals search engine
Protected by copyright. Copying for private or commercial purposes, in partor in whole, is not permitted unless authorised by Volkswagen AG. Volkswagen AG does notguarantee or accept any liability with respect to the correctness ofinformation in this document.Copyright by Volkswagen AG.–Secure outer panel for door on new retaining rail with fixingblocks from assembly tool set -T10237- and double-sided ad‐hesive tape.1.10Installation notes for bonding a new out‐er panel on doorNote♦If front and rear door outer panels must be renewed, they mustbe done at the same time. When bonding-in both outer panels,the long fixing block from assembly tool set -T10237- is stuckon for the transition from front outer panel to rear outer panel.♦If door outer panel CDP coating is damaged on inside in areato be bonded or it has been painted, this area must be primedwith glass/paint primer -D 009 200 02- .♦The 1K glass adhesive -DH 009 100 01- must be heated incartridge heater -V.A.G 1939 A- for 20 minutes.♦Adhesive -DA 004 600 A2- can be used for this procedure andis applied with double cartridge gun -VAS 5237- . There is norequirement to preheat.–Clean contact surfaces on retaining rails thoroughly usingcleaning solution -D 009 401 04- .–Apply adhesive material to appropriate surfaces at right anglesto retaining rail using cartridge gun -V.A.G 1628- .CautionDoor outer panel must be installed within 10 minutes, or ad‐hesive properties of adhesive will be impaired.♦With assistance of both assembly blocks from assembly toolset -T10237- , place door outer panel on retaining rails andalign with wedges and setting gauge -3371- and press contactsurfaces of assembly blocks onto adjacent components.♦Secure door with fixing blocks from assembly tool set -T10237- during curing period.♦After installation door outer panel must align with other com‐ponents and gaps must be even.♦If adhesive bead is too thick and adhesive exudes betweenretaining rail and door outer panel, excess adhesive must beremoved.1.11Minimum curing periodWARNINGSpecial standards must be adhered to when replacing bondedouter panels for door. One of these standards is, for example,that a freshly bonded door outer panel must comply with thesafety requirements following the minimum prescribed curingperiod, even in an accident.For door outer panel: curing period for 1K adhesive -DH 009 10001- is 180 minutes and for 2K adhesive -DA 004 600 A2- 90 mi‐nutes.Golf Variant 2007 ➤ , Jetta 2005 ➤General body repairs, exterior - Edition 10.200982 Rep. Gr.57 - Front doors, door components, central locking Downloaded from www.Manualslib.com manuals search engine
Protected by copyright. Copying for private or commercial purposes, in partor in whole, is not permitted unless authorised by Volkswagen AG. Volkswagen AG does notguarantee or accept any liability with respect to the correctness ofinformation in this document.Copyright by Volkswagen AG.What is meant by minimum curing period is, time from bondingouter panel on door to time vehicle is taken into use or furtherwork is carried out. During this time, the vehicle must stand on alevel surface at room temperature (at least 15 °C).WARNINGVehicle is safe to use only after the curing period is completed.1.12Cleaning off excess adhesive sealingmaterial–Use of adhesive remover -D 002 000 10- as a cleaning solutionis recommended. Observe the appropriate safety precautionswhen performing this work.CautionWhen cleaning vehicle the door outer panel just bonded-inmust not be moved.–First clean painted surface as much as possible using a drycloth. Remove residual excess with adhesive remover -D 002000 10- .–Cleaning plastic trim: allow adhesive sealant to cure (approx.one hour) and then peel off.Golf Variant 2007 ➤ , Jetta 2005 ➤General body repairs, exterior - Edition 10.20091. Front door 83 Downloaded from www.Manualslib.com manuals search engine
Protected by copyright. Copying for private or commercial purposes, in partor in whole, is not permitted unless authorised by Volkswagen AG. Volkswagen AG does notguarantee or accept any liability with respect to the correctness ofinformation in this document.Copyright by Volkswagen AG.1.13Assembly overview - door inner partNoteThe right side is shown. The left side is similar.1 - Door inner part2 - Window slot seal3 - Loudspeaker4 - Window regulator motor❑Removing ⇒ page 2845 - Insulation❑Qty. 4❑20 mm x 40 mm com‐mercially available tex‐tile adhesive tapeGolf Variant 2007 ➤ , Jetta 2005 ➤General body repairs, exterior - Edition 10.200984 Rep. Gr.57 - Front doors, door components, central locking Downloaded from www.Manualslib.com manuals search engine
Protected by copyright. Copying for private or commercial purposes, in partor in whole, is not permitted unless authorised by Volkswagen AG. Volkswagen AG does notguarantee or accept any liability with respect to the correctness ofinformation in this document.Copyright by Volkswagen AG.1.14Assembly overview - door handle and door lockNoteOnly the left side is shown. The right side is similar.1 - Cable❑To lock release from in‐terior door handle.2 - Cable❑To release lock fromdoor exterior handle.3 - Bolt❑Qty. 2❑To secure lock to doorinner part.❑18 Nm4 - Door lock❑Removing and installing⇒ page 905 - Cover❑Not supplied with doorlock.❑Secured on door lockwith locking lugs6 - Bearing bracket❑Removing and installing⇒ page 897 - Torx bolt❑To secure lock cylinderhousing or housing⇒ Item 9 (page 85)8 - Base9 - Lock cylinder housing❑Only on driver side.❑Passenger side is instal‐led in a housing.❑Removing and installing ⇒ page 8610 - Cover❑For lock cylinder housing❑Secured to lock cylinder housing with three locking lugs11 - Key❑Changing battery ⇒ page 100 .❑Adapting new or additional key to remote control and immobilizer ⇒ page 100 .12 - Door handle with base❑Removing and installing ⇒ page 8613 - Base❑Part of door handle.Golf Variant 2007 ➤ , Jetta 2005 ➤General body repairs, exterior - Edition 10.20091. Front door 85 Downloaded from www.Manualslib.com manuals search engine
Protected by copyright. Copying for private or commercial purposes, in partor in whole, is not permitted unless authorised by Volkswagen AG. Volkswagen AG does notguarantee or accept any liability with respect to the correctness ofinformation in this document.Copyright by Volkswagen AG.14 - Torx bolt❑4.5 Nm1.15Removing and installing housingNoteThe removal and installation sequence is only for the right hous‐ing. The removal and installation of the right lock cylinder issimilar.1.15.1Removing–Prise cover ( ⇒ page 73 Fig. N57-10065, item 2) off front door.–Lever out caps in front of bolts -1-.–Pull door handle -2- in direction of -arrow- and unbolt bolt -1-onto stop using socket wrench -T10072- .–Pull out housing -3-.1.15.2Installing–Fit housing -3- in door handle -2- bearing bracket at right an‐gles -arrow-.Door handle -2- must rest only lightly against door panel.–Now tighten bolt -1- in bearing bracket using socket wrench -T10072- .The door handle -2- locates in the housing -3- with a well audibleclick.NoteDuring installation, housing must be pressed against door panel.The door handle just rests lightly against the door panel.Further installation is performed in reverse order of removal.Then always check function while door is still open, as an incor‐rectly fitted and adjusted Bowden cable cannot open the door.1.16Removing and installing door handleNoteThe removal and installation sequence is only for the right doorhandle. The removal and installation of the left door handle issimilar.Golf Variant 2007 ➤ , Jetta 2005 ➤General body repairs, exterior - Edition 10.200986 Rep. Gr.57 - Front doors, door components, central locking Downloaded from www.Manualslib.com manuals search engine
Protected by copyright. Copying for private or commercial purposes, in partor in whole, is not permitted unless authorised by Volkswagen AG. Volkswagen AG does notguarantee or accept any liability with respect to the correctness ofinformation in this document.Copyright by Volkswagen AG.1.16.1Removing–Remove housing ⇒ page 86 .–Lever clip -2- out of door handle -1-.–Swivel door handle -1- out of door -arrow-.1.16.2Installing–Guide assembly tool -T10118- into door through opening indoor outer panel.–Use a hand torch to illuminate inside of door for improved vis‐ibility.–Hook assembly tool -T10118- in spring -arrow A-.–Hook spring onto door lock by pulling assembly tool -T10118--arrow B-.The release lever is now secured.Golf Variant 2007 ➤ , Jetta 2005 ➤General body repairs, exterior - Edition 10.20091. Front door 87 Downloaded from www.Manualslib.com manuals search engine
Protected by copyright. Copying for private or commercial purposes, in partor in whole, is not permitted unless authorised by Volkswagen AG. Volkswagen AG does notguarantee or accept any liability with respect to the correctness ofinformation in this document.Copyright by Volkswagen AG.NoteHooking the spring into the operating lever secures the lock. This prevents incorrect attachment of the Bowdencable to the door handle later.–Swivel door handle -1- into door.–Pull clip -2- in the panel opening and engage clip in door han‐dle -1- -arrow-.Note♦Press door handle -1- against door panel when assembling.♦Clip -2- must engage audibly in door handle -1-.–Install housing ⇒ page 86 .Then always check function while door is still open, as an incor‐rectly fitted and adjusted Bowden cable cannot open the door.Golf Variant 2007 ➤ , Jetta 2005 ➤General body repairs, exterior - Edition 10.200988 Rep. Gr.57 - Front doors, door components, central locking Downloaded from www.Manualslib.com manuals search engine
Protected by copyright. Copying for private or commercial purposes, in partor in whole, is not permitted unless authorised by Volkswagen AG. Volkswagen AG does notguarantee or accept any liability with respect to the correctness ofinformation in this document.Copyright by Volkswagen AG.1.17Removing and installing bearing bracketNoteRemoval and installation are described only for the right bearingbracket. The removal and installation of the left bearing bracketis similar.1.17.1Removing–Remove housing ⇒ page 86 .–Remove door handle ⇒ page 86 .–Remove door outer panel ⇒ page 112 .–Pull retaining rubber -4- upwards off guide pins.–Pull bearing bracket -1- in direction of -arrow- with guide pins-2- out of mountings -3-.Golf Variant 2007 ➤ , Jetta 2005 ➤General body repairs, exterior - Edition 10.20091. Front door 89 Downloaded from www.Manualslib.com manuals search engine
Protected by copyright. Copying for private or commercial purposes, in partor in whole, is not permitted unless authorised by Volkswagen AG. Volkswagen AG does notguarantee or accept any liability with respect to the correctness ofinformation in this document.Copyright by Volkswagen AG.1.17.2Installing–Push bearing bracket -1- with guide pins -2- in mountings-3-.–Secure retaining rubber -4- to guide pins and securing boltson bearing plate mounting.Further installation is performed in reverse order of removal.1.18Removing and installing door lockNoteThe removal and installation sequence is only for the right doorlock. The removal and installation of the left door lock is similar.1.18.1Removing–Remove housing ⇒ page 86 .–Remove door handle ⇒ page 86 .–Remove door outer panel ⇒ page 73 .Golf Variant 2007 ➤ , Jetta 2005 ➤General body repairs, exterior - Edition 10.200990 Rep. Gr.57 - Front doors, door components, central locking Downloaded from www.Manualslib.com manuals search engine
Protected by copyright. Copying for private or commercial purposes, in partor in whole, is not permitted unless authorised by Volkswagen AG. Volkswagen AG does notguarantee or accept any liability with respect to the correctness ofinformation in this document.Copyright by Volkswagen AG.–Remove bearing bracket ⇒ page 89 .–Disconnect connector -5-.–Remove bolts -6-.–Release cable -1- from relay lever -8- and remove door lock-4-.Cover -3- is not supplied with door lock.1.18.2InstallingInstall in reverse order of removal.Specified torque for bolts: 18 Nm.Then always check function while door is still open, as an incor‐rectly fitted and adjusted Bowden cable cannot open the door.Golf Variant 2007 ➤ , Jetta 2005 ➤General body repairs, exterior - Edition 10.20091. Front door 91 Downloaded from www.Manualslib.com manuals search engine
Protected by copyright. Copying for private or commercial purposes, in partor in whole, is not permitted unless authorised by Volkswagen AG. Volkswagen AG does notguarantee or accept any liability with respect to the correctness ofinformation in this document.Copyright by Volkswagen AG.1.19Assembly overview - side impact protection1 - Side impact protection❑To remove and install,remove outer panel fordoor ⇒ page 1122 - Bolt❑Qty. 4❑20 Nm3 - Insulation4 - Nut❑Qty. 2❑20 Nm1.20Door inner sealDuring production, a sealant is applied to the door inner seals,which are then placed on the door flange and rolled on.Note♦When seals are removed, the sealant will spread to the insideof the seal and the flanks will be bent out slightly. If the seal isthen refitted, a tight seal is not guaranteed.♦Therefore each seal which is removed completely should bereplaced by a so-called “tap-on” seal.♦If a seal has been partially removed, squeeze sides of sealtogether before refitting.Golf Variant 2007 ➤ , Jetta 2005 ➤General body repairs, exterior - Edition 10.200992 Rep. Gr.57 - Front doors, door components, central locking Downloaded from www.Manualslib.com manuals search engine
Protected by copyright. Copying for private or commercial purposes, in partor in whole, is not permitted unless authorised by Volkswagen AG. Volkswagen AG does notguarantee or accept any liability with respect to the correctness ofinformation in this document.Copyright by Volkswagen AG.1.21Removing and installing door inner sealNoteThe removal and installation sequence is only for the right doorinner seal. The removal and installation of the left door inner sealis similar.1.21.1Removing–Pull door inner seal off body flange.1.21.2Installing–Align door inner seal so that the vulcanised point -arrow b- islocated at the height of the lower hinge.Golf Variant 2007 ➤ , Jetta 2005 ➤General body repairs, exterior - Edition 10.20091. Front door 93 Downloaded from www.Manualslib.com manuals search engine
Protected by copyright. Copying for private or commercial purposes, in partor in whole, is not permitted unless authorised by Volkswagen AG. Volkswagen AG does notguarantee or accept any liability with respect to the correctness ofinformation in this document.Copyright by Volkswagen AG.–Start installing door inner seal at top radius -arrow a- of dooraperture.1.22Removing and installing door outer sealNote♦Removal and installation are described only for the right doorouter seal. Removal and installation of the left door outer sealare similar.♦Remove protective backing immediately before installation.Working temperature approx. 20 °C.Golf Variant 2007 ➤ , Jetta 2005 ➤General body repairs, exterior - Edition 10.200994 Rep. Gr.57 - Front doors, door components, central locking Downloaded from www.Manualslib.com manuals search engine
Protected by copyright. Copying for private or commercial purposes, in partor in whole, is not permitted unless authorised by Volkswagen AG. Volkswagen AG does notguarantee or accept any liability with respect to the correctness ofinformation in this document.Copyright by Volkswagen AG.1.22.1Removing–Pull door outer seal off door.1.22.2Installing–Remove adhesive residues with erasure disc of adhesive stripremover -VAS 6349- .–Immediately before bonding door outer seal, clean bondingsurface thoroughly with adhesive remover -D 002 000 10- .•Bonding surfaces must be free of dust and grease and thereshould be no adhesive residues.–Align door outer seal with section -arrow b- towards door locksecuring bolts.–Door outer seal vulcanised point -arrow c- should then be inmiddle of sill.Golf Variant 2007 ➤ , Jetta 2005 ➤General body repairs, exterior - Edition 10.20091. Front door 95 Downloaded from www.Manualslib.com manuals search engine
Protected by copyright. Copying for private or commercial purposes, in partor in whole, is not permitted unless authorised by Volkswagen AG. Volkswagen AG does notguarantee or accept any liability with respect to the correctness ofinformation in this document.Copyright by Volkswagen AG.–Pull off protective foil and install seal on door. Do not pull doorouter seal excessively to avoid stretching seal.–Press complete bonding surface of seal -3- onto door -1- allaround using roller -3356- .–To do this, push seal aside -arrow a- so that the roller -3356-runs directly over the contact surface of the seal.The roller can apply the necessary force -arrow b- to the bondingsurface -2- only when procedure described above is followed.–If the seal has stretched, cut seal to required length and presson butt joint well.–If seal -3- comes loose in small areas again, press seal on wellagain using roller -3356- .NoteThe door must not be closed for a period of 2 hours to ensure the door outer seal does not move or loosenagain.Golf Variant 2007 ➤ , Jetta 2005 ➤General body repairs, exterior - Edition 10.200996 Rep. Gr.57 - Front doors, door components, central locking Downloaded from www.Manualslib.com manuals search engine
Protected by copyright. Copying for private or commercial purposes, in partor in whole, is not permitted unless authorised by Volkswagen AG. Volkswagen AG does notguarantee or accept any liability with respect to the correctness ofinformation in this document.Copyright by Volkswagen AG.Golf Variant 2007 ➤ , Jetta 2005 ➤General body repairs, exterior - Edition 10.20091. Front door 97 Downloaded from www.Manualslib.com manuals search engine
Protected by copyright. Copying for private or commercial purposes, in partor in whole, is not permitted unless authorised by Volkswagen AG. Volkswagen AG does notguarantee or accept any liability with respect to the correctness ofinformation in this document.Copyright by Volkswagen AG.2Central locking2.1Fitting location overview - central locking components1 - Anti-theft alarm horn❑Location: under rearsection of wheel hous‐ing liner in front rightwheel housing (remov‐ing rear section of wheelhousing liner⇒ page 321 )2 - Coupling station❑Location: right A-pillar❑To disconnect connec‐tor, release bellows atA-pillar ⇒ page 683 - Convenience system cen‐tral control unit -J393-❑Location: under dashpanel and behind glovecompartment on frontpassenger side (remov‐ing glove compartment⇒ General body repairs,interior; Rep. Gr. 68 ;Compartments, coversand trims )4 - Door control unit -J387-❑Integrated in windowregulator motor (remov‐ing window regulatormotor ⇒ page 285 )5 - Door lock❑Door lock is secured oninner part of door (re‐moving door lock⇒ page 90 )❑Electric central lockingis integrated into doorlock6 - Coupling station❑Location: right B-pillar.❑To disconnect connector, release boot on B-pillar ⇒ page 107 .7 - Rear right door control unit -J389-❑Integrated in window regulator motor❑Removing (saloon) ⇒ page 302❑Removing (Variant) ⇒ page 3178 - Door lock❑Electric central locking is integrated into door lock❑Removing (saloon) ⇒ page 129❑Removing (Variant) ⇒ page 155Golf Variant 2007 ➤ , Jetta 2005 ➤General body repairs, exterior - Edition 10.200998 Rep. Gr.57 - Front doors, door components, central locking Downloaded from www.Manualslib.com manuals search engine
Protected by copyright. Copying for private or commercial purposes, in partor in whole, is not permitted unless authorised by Volkswagen AG. Volkswagen AG does notguarantee or accept any liability with respect to the correctness ofinformation in this document.Copyright by Volkswagen AG.9 - Tank filler flap locking motor -V155-❑Location: behind right trim of luggage compartment❑Removing (saloon) ⇒ page 54❑Removing (Variant) ⇒ page 5810 - Lock for rear lid❑Location: bolted to rear lid❑Removing (saloon) ⇒ page 36❑Removing (Variant) ⇒ page 4811 - Rear lid handle release button -E234-❑Not installed on all vehicles❑Integrated in rear handle of rear lid (removing handle on saloon) ⇒ page 36 )❑Removing (Variant) ⇒ page 4712 - Coupling station, rear lid❑Location, saloon: behind luggage compartment side trim on left (removing luggage compartment sidetrim on left ⇒ General body repairs, interior; Rep. Gr. 70 ; Load area and luggage compartment trim .❑Location, Variant: on rear of moulded headliner (lowering moulded headliner ⇒ General body repairs,interior; Rep. Gr. 70 ; Roof trims )13 - Door lock❑Electric central locking is integrated into door lock❑Removing (saloon) ⇒ page 129❑Removing (Variant) ⇒ page 15514 - Rear left door control unit -J388-❑Integrated in window regulator motor❑Removing (saloon) ⇒ page 302❑Removing (Variant) ⇒ page 31715 - Coupling station❑Fitting location: left B-pillar❑To disconnect connector, release boot on B-pillar ⇒ page 107 .16 - Door lock❑Door lock is secured on inner part of door (removing door lock ⇒ page 90 )❑Electric central locking is integrated into door lock17 - Central switch for window regulators❑Location: installed in door panel❑Removing and installing central switch for window regulators ⇒ Electrical system; Rep. Gr. 96 ; Lights,bulbs, switches - interior18 - Door control unit -J386-❑Integrated in window regulator motor (removing window regulator motor ⇒ page 285 )19 - Coupling station❑Fitting location: left A-pillar❑To disconnect connector, release bellows at A-pillar ⇒ page 6820 - Bonnet contact switch -F266-❑Anti-theft alarm system contact switch❑Cannot be replaced as an individual item❑Location: on bonnet lock (removing bonnet lock ⇒ page 23 )Golf Variant 2007 ➤ , Jetta 2005 ➤General body repairs, exterior - Edition 10.20092. Central locking 99 Downloaded from www.Manualslib.com manuals search engine
Protected by copyright. Copying for private or commercial purposes, in partor in whole, is not permitted unless authorised by Volkswagen AG. Volkswagen AG does notguarantee or accept any liability with respect to the correctness ofinformation in this document.Copyright by Volkswagen AG.2.2Adapting keys with remote controlKeys with remote control are adapted using the vehicle diagnosis,testing and information system -VAS 5051- .–Select “guided fault finding” in vehicle diagnostic, testing andinformation system -VAS 5051- .–Using the GoTo key, select “Function/component selection”and the following menu items in succession:♦Body (Repair group 01; 27; 50 - 97)♦Internal/external installations (Repair group 01; from 55 77)♦01 - Self-diagnosis♦46 - Convenience system central module♦Functions♦Adaption2.3Assembly overview - battery for folding key with remote control1 - Key with variable codetransponder2 - Upper part of transmitterunit3 - LED❑LED must flash when re‐mote control is operated❑If LED does not flashduring remote controloperation, the battery isdead and must be re‐newed.4 - Battery❑Removing battery⇒ page 101❑Installing battery⇒ page 1015 - Lower part of transmitterunitGolf Variant 2007 ➤ , Jetta 2005 ➤General body repairs, exterior - Edition 10.2009100 Rep. Gr.57 - Front doors, door components, central locking Downloaded from www.Manualslib.com manuals search engine
Protected by copyright. Copying for private or commercial purposes, in partor in whole, is not permitted unless authorised by Volkswagen AG. Volkswagen AG does notguarantee or accept any liability with respect to the correctness ofinformation in this document.Copyright by Volkswagen AG.2.4Removing and installing battery for fold‐ing key with remote control2.4.1Removing–Insert a screwdriver in slot between transmitter unit -1- and key-2-.–Twist screwdriver in -direction of arrow- to separate transmitterunit from key.–Press upper part of transmitter unit and lower part of transmit‐ter unit apart in direction of -arrow-.–Unclip battery -1- from retainers -2- with a screwdriver in di‐rection of -arrow-.2.4.2InstallingNote polarity and correct position when installing battery.–Place battery -1- in transmitter unit -2- with positive terminaldownwards (positive terminal is marked on housing).–Engage battery in lower part of transmitter unit by pressingdown lightly.–Fit upper part of transmitter unit and lower part of transmitterunit together (do not damage seal).–Then clip transmitter unit to key.Golf Variant 2007 ➤ , Jetta 2005 ➤General body repairs, exterior - Edition 10.20092. Central locking 101 Downloaded from www.Manualslib.com manuals search engine
Protected by copyright. Copying for private or commercial purposes, in partor in whole, is not permitted unless authorised by Volkswagen AG. Volkswagen AG does notguarantee or accept any liability with respect to the correctness ofinformation in this document.Copyright by Volkswagen AG.58 –Rear doors, door components1Rear door (saloon)1.1ToolsSpecial tools and workshopequipment required♦Socket -T10072-♦Assembly tool -T10118-♦Door alignment tool -3320-with -3320/1- , -3320/2- and-3320/3-♦Roller for door insulationfoil -3356-♦Torque wrench -V.A.G1331-♦Setting gauge -3371-Golf Variant 2007 ➤ , Jetta 2005 ➤General body repairs, exterior - Edition 10.2009102 Rep. Gr.58 - Rear doors, door components Downloaded from www.Manualslib.com manuals search engine
Protected by copyright. Copying for private or commercial purposes, in partor in whole, is not permitted unless authorised by Volkswagen AG. Volkswagen AG does notguarantee or accept any liability with respect to the correctness ofinformation in this document.Copyright by Volkswagen AG.♦Cartridge gun -V.A.G 1628-♦Cartridge heater -V.A.G1939 A-♦Removal wedge -3409-♦Assembly tool set -T10237-1.2Materials♦1K or 2K glass adhesive-DH 009 100 01- 4) 5) or -DA004 600 A2- 4)♦Glass primer/paint primer-D 009 200 02- 6)♦Cleaning solution-D 009 401 04- 6)♦Primer applicator-D 009 500 25- 6)4) Observe curing period ⇒ page 1215) Heat according to manufacturer's instructions, using cartridge heater -V.A.G1939 A- .6) Materials are stored in box -D 004 700- .1.3Assembly overview - door assemblyA new door concept has been introduced with Jetta 2005 ▸, Bora2005 ▸.The door consists of an inner part -6- and an outer panel -1-.The parts are joined by the front -7- and rear -4- retaining rail.Golf Variant 2007 ➤ , Jetta 2005 ➤General body repairs, exterior - Edition 10.20091. Rear door (saloon) 103 Downloaded from www.Manualslib.com manuals search engine
Protected by copyright. Copying for private or commercial purposes, in partor in whole, is not permitted unless authorised by Volkswagen AG. Volkswagen AG does notguarantee or accept any liability with respect to the correctness ofinformation in this document.Copyright by Volkswagen AG.The retaining rails are bolted to the inner part of the door andbonded to the outer panel of the door.The inner part -6- of the door functions basically as the previouslyknown assembly carrier. Loudspeaker, window regulator, windowregulator motor, wiring, window channel, exterior mirror and doorlock are mounted on the inner part of the door.The outer panel -1- of the door is additionally bolted to the loweredge of the inner part. The window slot outer seal, insulation andexterior door handle are mounted on the outer panel of the door.CautionBolts of different types are used to secure outer panel of door.If these are fitted in the wrong positions, the outer panel for thedoor will be damaged.1 - Door outer panel❑Removing and installingdoor outer panel⇒ page 1122 - Edge protection❑Between door outerpanel and door innerpart.3 - Bolt❑Feature: bolt with poin‐ted end and thinnerwasher.❑Qty. 4 on lower edge❑Qty. 1 in rear section ofdoor shoulder❑10 Nm4 - Rear retaining rail❑Adhesive: -DH 009 10003-5 - Bolt❑Feature: bolt with nopointed end and thickerwasher.❑Qty. 11 on both retainingrails❑14 Nm6 - Door inner part❑Assembly overview⇒ page 1237 - Front retaining rail❑Adhesive: -DH 009 10003-8 - Bolt❑Feature: bolt with pointed end and thicker washer❑Qty. 1 in area of front section of door shoulder❑10 NmGolf Variant 2007 ➤ , Jetta 2005 ➤General body repairs, exterior - Edition 10.2009104 Rep. Gr.58 - Rear doors, door components Downloaded from www.Manualslib.com manuals search engine
Protected by copyright. Copying for private or commercial purposes, in partor in whole, is not permitted unless authorised by Volkswagen AG. Volkswagen AG does notguarantee or accept any liability with respect to the correctness ofinformation in this document.Copyright by Volkswagen AG.9 - Insulation❑Self-adhesive❑To bond, first heat the insulation and then press on firmly10 - Clip❑Qty. 511 - Window slot seal❑Must be fitted before fitting door outer panel.1.4Assembly overview - door hingesCautionNut of eccentric bolt -9- should not be loosened under any cir‐cumstances. It cannot be tightened again using normal work‐shop tools.Golf Variant 2007 ➤ , Jetta 2005 ➤General body repairs, exterior - Edition 10.20091. Rear door (saloon) 105 Downloaded from www.Manualslib.com manuals search engine
Protected by copyright. Copying for private or commercial purposes, in partor in whole, is not permitted unless authorised by Volkswagen AG. Volkswagen AG does notguarantee or accept any liability with respect to the correctness ofinformation in this document.Copyright by Volkswagen AG.Note♦The right side is shown. The left side is similar.♦The hinge bolts must always be renewed if loosened.♦Hinges are now one piece.1 - Door❑Removing and installing⇒ page 107❑Adjusting ⇒ page 1092 - Guide bolt❑10 Nm3 - Door hinge with arrester4 - Multi-point socket head bolt❑20 Nm + 1/4 turn further(90°).❑Always renew afterloosening5 - Multi-point socket head bolt❑20 Nm + 1/4 turn further(90°).❑Always renew afterloosening6 - Multi-point socket head bolt❑20 Nm + 1/4 turn further(90°).❑Always renew afterloosening7 - Multi-point socket head bolt❑20 Nm + 1/4 turn further(90°).❑Always renew afterloosening8 - Guide bolt❑10 Nm9 - Nut❑For eccentric pin❑Do not loosen❑Serves as a means of adjustment during production only10 - Door hinge❑Hinge no longer comprises of more than one part.11 - Multi-point socket head bolt❑20 Nm + 1/4 turn further (90°).❑Always renew after loosening12 - Multi-point socket head bolt❑20 Nm + 1/4 turn further (90°).❑Always renew after looseningGolf Variant 2007 ➤ , Jetta 2005 ➤General body repairs, exterior - Edition 10.2009106 Rep. Gr.58 - Rear doors, door components Downloaded from www.Manualslib.com manuals search engine
Protected by copyright. Copying for private or commercial purposes, in partor in whole, is not permitted unless authorised by Volkswagen AG. Volkswagen AG does notguarantee or accept any liability with respect to the correctness ofinformation in this document.Copyright by Volkswagen AG.13 - Multi-point socket head bolt❑20 Nm + 1/4 turn further (90°).❑Always renew after loosening1.5Removing and installing doorNoteThe removal and installation sequence is only for the right door.The removal and installation of the left door is similar.1.5.1Removing–Release boots -6- by pressing fastener -arrow a- and pullboots off B-pillar.–Swing release lever -7- downwards -arrow b- and disconnectelectrical connector -8- from coupling station.–Remove bolts -4-, -5- and -11- from hinge using special dooralignment tool -3320- and bit -3320/3- .Golf Variant 2007 ➤ , Jetta 2005 ➤General body repairs, exterior - Edition 10.20091. Rear door (saloon) 107 Downloaded from www.Manualslib.com manuals search engine
Protected by copyright. Copying for private or commercial purposes, in partor in whole, is not permitted unless authorised by Volkswagen AG. Volkswagen AG does notguarantee or accept any liability with respect to the correctness ofinformation in this document.Copyright by Volkswagen AG.–Pull door -1- in direction of -arrow- off guide bolts -2- and -9-.1.5.2InstallingInstall in reverse order of removal.Specified torque for bolts -4-, -5- and -11-: 20 Nm + 1/4 turn further(90°).Always renew bolts -4-, -5- and -11-.Golf Variant 2007 ➤ , Jetta 2005 ➤General body repairs, exterior - Edition 10.2009108 Rep. Gr.58 - Rear doors, door components Downloaded from www.Manualslib.com manuals search engine
Protected by copyright. Copying for private or commercial purposes, in partor in whole, is not permitted unless authorised by Volkswagen AG. Volkswagen AG does notguarantee or accept any liability with respect to the correctness ofinformation in this document.Copyright by Volkswagen AG.Observe rear door gap/shut lines ⇒ Body Repairs; Rep. Gr. 00 ;Body dimensions .1.6Adjusting doorCautionNut of eccentric bolt -9- should not be loosened under any cir‐cumstances. It cannot be tightened again using normal work‐shop tools.Note♦The door is adjusted correctly if the gaps/shut lines are even all around, the door is not too deep or doesnot stand proud and all contours align when the is door closed.♦Vehicle must be standing on its wheels when adjustments are performed.♦If the door outer panel has been removed, the door inner part window frame must be adjusted to the roofframe, C-pillar and front door.Golf Variant 2007 ➤ , Jetta 2005 ➤General body repairs, exterior - Edition 10.20091. Rear door (saloon) 109 Downloaded from www.Manualslib.com manuals search engine
Protected by copyright. Copying for private or commercial purposes, in partor in whole, is not permitted unless authorised by Volkswagen AG. Volkswagen AG does notguarantee or accept any liability with respect to the correctness ofinformation in this document.Copyright by Volkswagen AG.Observe rear door gap/shut lines ⇒ Body Repairs; Rep. Gr. 00 ;Body dimensions .To be able to adjust gaps correctly, bolts -6-, -7-, -11- and -12-must be loosened.Other measures such as raising the door have no effect. Subse‐quent pressure from above will cause the door to sack again.Bolts -4-, -5- and -13- and also guide bolts -2- and -8- must beloosened to correctly adjust the flush fitting of the door.Use door alignment tool -3320- with bit -3320/3- for this.1.6.1Adjusting striker pinNote♦The rear door must lock fully when closing without any addi‐tional force being required and must not have any play.♦The rear door must not be pushed up or down as a result ofthe striker pin adjustment.The following can be adjusted at the striker pin:Golf Variant 2007 ➤ , Jetta 2005 ➤General body repairs, exterior - Edition 10.2009110 Rep. Gr.58 - Rear doors, door components Downloaded from www.Manualslib.com manuals search engine
Protected by copyright. Copying for private or commercial purposes, in partor in whole, is not permitted unless authorised by Volkswagen AG. Volkswagen AG does notguarantee or accept any liability with respect to the correctness ofinformation in this document.Copyright by Volkswagen AG.♦When rear door does not align with side panel.–Loosen striker pin -1- by loosening bolts -2- on side panel.–Adjust rear door at striker pin -1- so that rear door is flush withrear side panel when shut (wind noise).Maximum twist tolerance -A- of striker pin: ± 3°–Retighten bolts -2-.Specified torque: 20 NmWARNINGOnly use this adjustment to adjust door inwards or outwards,never use for vertical adjustment. Door must not move up‐wards or downwards when opening and closing. This indicatesthat the vertical adjustment is incorrect.Golf Variant 2007 ➤ , Jetta 2005 ➤General body repairs, exterior - Edition 10.20091. Rear door (saloon) 111 Downloaded from www.Manualslib.com manuals search engine
Protected by copyright. Copying for private or commercial purposes, in partor in whole, is not permitted unless authorised by Volkswagen AG. Volkswagen AG does notguarantee or accept any liability with respect to the correctness ofinformation in this document.Copyright by Volkswagen AG.1.7Removing and installing outer panel ondoor1.7.1Removing–Prise out clips -3-, starting at bottom of door -1-, and removerear cover -2-.Golf Variant 2007 ➤ , Jetta 2005 ➤General body repairs, exterior - Edition 10.2009112 Rep. Gr.58 - Rear doors, door components Downloaded from www.Manualslib.com manuals search engine
Protected by copyright. Copying for private or commercial purposes, in partor in whole, is not permitted unless authorised by Volkswagen AG. Volkswagen AG does notguarantee or accept any liability with respect to the correctness ofinformation in this document.Copyright by Volkswagen AG.–Remove housing ⇒ page 124 .–Remove door handle ⇒ page 125 .–Remove bolt -1- from bearing bracket -2- which is located be‐hind door outer panel.–Remove all bolts -2-, -3- and -4-.–Carefully remove door outer panel.Golf Variant 2007 ➤ , Jetta 2005 ➤General body repairs, exterior - Edition 10.20091. Rear door (saloon) 113 Downloaded from www.Manualslib.com manuals search engine
Protected by copyright. Copying for private or commercial purposes, in partor in whole, is not permitted unless authorised by Volkswagen AG. Volkswagen AG does notguarantee or accept any liability with respect to the correctness ofinformation in this document.Copyright by Volkswagen AG.1.7.2InstallingCautionBolts of different types are used to secure outer panel of door.If these are fitted in the wrong positions, the outer panel for thedoor will be damaged.–Carefully position outer panel on door.–Insert all bolts -2-, -3- and -4-.Observe correct usage for the different types of bolts.♦Feature for bolt -2-: bolt with pointed end and thinner washer♦Feature for bolt -3-: bolt with no pointed end but with thickerwasher.♦Feature for bolt -4-: bolt with pointed end and thicker washer.–Check whether retaining rail guide pins are located in appro‐priate guide holes in inner part of door. Only then tighten allbolts -2-, -3- and -4-.Observe correct specified torque for the different types of bolts.Specified torque for bolt -2-: 10 NmSpecified torque for bolt -3-: 14 NmSpecified torque for bolt -4-: 10 NmGolf Variant 2007 ➤ , Jetta 2005 ➤General body repairs, exterior - Edition 10.2009114 Rep. Gr.58 - Rear doors, door components Downloaded from www.Manualslib.com manuals search engine
Protected by copyright. Copying for private or commercial purposes, in partor in whole, is not permitted unless authorised by Volkswagen AG. Volkswagen AG does notguarantee or accept any liability with respect to the correctness ofinformation in this document.Copyright by Volkswagen AG.Further installation is performed in reverse order of removal1.8Installing new outer panel on doorCautionBolts of different types are used to secure outer panel of door.If these are fitted in the wrong positions, the outer panel for thedoor will be damaged.NoteObserve section preparing door outer panel for bonding ⇒ page 121•The old (damaged) outer panel with retaining rails is removed⇒ page 112 .–Install front -2- and rear -6- retaining rails on inner part of door-1-. Use “bolt with no point but with thicker washer” for this.Specified torque for bolts -3- and -5-: 14 NmGolf Variant 2007 ➤ , Jetta 2005 ➤General body repairs, exterior - Edition 10.20091. Rear door (saloon) 115 Downloaded from www.Manualslib.com manuals search engine
Protected by copyright. Copying for private or commercial purposes, in partor in whole, is not permitted unless authorised by Volkswagen AG. Volkswagen AG does notguarantee or accept any liability with respect to the correctness ofinformation in this document.Copyright by Volkswagen AG.–Fit two guide bolts -4- in lower edge of door inner part -1-.The painted outer panel for the door is first offered up withoutbonding agent.Assembly blocks -3- from assembly tool set -T10237- are requiredwhen fitting outer panel on door. A strip of double-sided adhesivetape -6- is applied on the side with a cut-out step. The pin has theminimum dimension for the gap width. The surface with no ad‐hesive tape is brought into position on the adjacent panel.–Stick the assembly block -3- on outer panel -1- of the door.–Guide outer panel -1- over guide bolts on lower edge of doorinner part.–Adjust gap to sill and height of outer panel on door usingwedges -4- from assembly tool set -T10237- .–Lay door outer panel -1- with assembly blocks on adjacentpanels -2- and -5-.–Check gap/shut lines using setting gauge -3371- ⇒ Body Re‐pairs; Rep. Gr. 00 ; Body dimensions .If gap dimension cannot be adjusted further, door inner part mustbe adjusted ⇒ page 123Golf Variant 2007 ➤ , Jetta 2005 ➤General body repairs, exterior - Edition 10.2009116 Rep. Gr.58 - Rear doors, door components Downloaded from www.Manualslib.com manuals search engine
Protected by copyright. Copying for private or commercial purposes, in partor in whole, is not permitted unless authorised by Volkswagen AG. Volkswagen AG does notguarantee or accept any liability with respect to the correctness ofinformation in this document.Copyright by Volkswagen AG.–Remove door outer panel again.–Apply a bead of adhesive material -2- using cartridge gun -V.A.G 1628- to front -1- and rear -3- retaining rails.NoteAdhesive -DA 004 600 A2- can be used for this procedure and is applied with double cartridge gun -VAS 5237- .There is no requirement to preheat.Golf Variant 2007 ➤ , Jetta 2005 ➤General body repairs, exterior - Edition 10.20091. Rear door (saloon) 117 Downloaded from www.Manualslib.com manuals search engine
Protected by copyright. Copying for private or commercial purposes, in partor in whole, is not permitted unless authorised by Volkswagen AG. Volkswagen AG does notguarantee or accept any liability with respect to the correctness ofinformation in this document.Copyright by Volkswagen AG.Fixing blocks -2- from assembly tool set -T10237- are requiredwhen fitting outer panel on door. Two strips of double-sided ad‐hesive tape -5- are applied on the contact surface.–Guide outer panel -1- over guide bolts on lower edge of doorinner part.–Bring outer panel with assembly blocks -3- into contact withsurrounding components.–Adjust gap to sill and height of outer panel on door usingwedges -4- from assembly tool set.–Check gap/shut line using setting gauge -3371- ⇒ Body Re‐pairs; Rep. Gr. 00 ; Body dimensions .–Bond short fixing blocks -2- evenly on the replacement doorand the adjacent components.NoteA waiting period of 90 or 180 minutes must be observed before performing further work on the bonded door⇒ page 121 .–Further installation is performed in reverse order of removal⇒ page 114 .Golf Variant 2007 ➤ , Jetta 2005 ➤General body repairs, exterior - Edition 10.2009118 Rep. Gr.58 - Rear doors, door components Downloaded from www.Manualslib.com manuals search engine
Protected by copyright. Copying for private or commercial purposes, in partor in whole, is not permitted unless authorised by Volkswagen AG. Volkswagen AG does notguarantee or accept any liability with respect to the correctness ofinformation in this document.Copyright by Volkswagen AG.1.9Removing and installing retaining rail ondoor outer panel1.9.1Removing retaining railCautionThe following work steps are to be carried out with great care.As outer panel is to be reused, dents and scratches must beavoided.When cutting through the adhesive bead, always hold the re‐taining rail and outer panel together as shown in the illustration.If this is not done, the outer panel will come away from theretaining rail, thus rendering it useless.NoteThe following procedures should be carried out with the aid of anassistant.Golf Variant 2007 ➤ , Jetta 2005 ➤General body repairs, exterior - Edition 10.20091. Rear door (saloon) 119 Downloaded from www.Manualslib.com manuals search engine
Protected by copyright. Copying for private or commercial purposes, in partor in whole, is not permitted unless authorised by Volkswagen AG. Volkswagen AG does notguarantee or accept any liability with respect to the correctness ofinformation in this document.Copyright by Volkswagen AG.•Door outer panel with retaining rails is removed ⇒ page 112 .–Place door outer panel -1- on firm surface and protect doorouter panel against scratches.–Secure reel -2- on outer panel of door -1-.–Secure cord -5- on reel -2- and counterhold -4-.–Hold retaining rail and outer panel of door together securelywhen cutting through adhesive bead.–Cut through adhesive bead of retaining rail -3- and outer panel-1- with cord up to just over half way.–Once adhesive bead has been cut through to just over halfway in step one, turn reel -2- around and insert cord -5- in sidestill bonded.–Hold retaining rail -3- and outer panel -1- of door together se‐curely when cutting through adhesive bead further.–Cut through second half of adhesive bead.1.9.2Installing retaining rail–Using extreme care, cut away remainder of adhesive bead tothe utmost minimum on outer panel of door, ensuring that nodamage is caused to the paintwork.–Remainder of procedure is described in chapter entitled “In‐stalling new outer panel for door” ⇒ page 115 .NoteObserve also “instructions for bonding in new door outer panel”when installing a new retaining rail.–In place of removed retaining rail, install a new retaining railon the door inner part.–Apply adhesive to new retaining rail–Secure outer panel for door to lower edge and fitted retainingrail.Golf Variant 2007 ➤ , Jetta 2005 ➤General body repairs, exterior - Edition 10.2009120 Rep. Gr.58 - Rear doors, door components Downloaded from www.Manualslib.com manuals search engine
Protected by copyright. Copying for private or commercial purposes, in partor in whole, is not permitted unless authorised by Volkswagen AG. Volkswagen AG does notguarantee or accept any liability with respect to the correctness ofinformation in this document.Copyright by Volkswagen AG.–Secure outer panel for door on new retaining rail with fixingblocks from assembly tool set -T10237- and double-sided ad‐hesive tape.1.10Installation notes for bonding a new out‐er panel on doorNote♦If front and rear door outer panels must be renewed, they mustbe done at the same time. When bonding-in both door outerpanels, the long fixing block from assembly tool set -T10237-is stuck on for the transition from front door outer panel to reardoor outer panel.♦If door outer panel CDP coating is damaged on inside in areato be bonded or it has been painted, this area must be primedwith glass/paint primer -D 009 200 02- .♦The 1K glass adhesive -DH 009 100 01- must be heated incartridge heater -V.A.G 1939 A- for 20 minutes.♦Adhesive -DA 004 600 A2- can be used for this procedure andis applied with double cartridge gun -VAS 5237- . There is norequirement to preheat.–Clean contact surfaces on retaining rails thoroughly usingcleaning solution -D 009 401 04- .–Apply adhesive material to appropriate surfaces at right anglesto retaining rail using cartridge gun -V.A.G 1628- .CautionDoor outer panel must be installed within 10 minutes, or ad‐hesive properties of adhesive will be impaired.♦With assistance of both assembly blocks from assembly toolset -T10237- , place outer panel for door on retaining rails andalign with wedges and setting gauge -3371- and press contactsurfaces of assembly blocks onto adjacent components.♦Secure door with fixing blocks from assembly tool set -T10237- during curing period.♦After installation door outer panel must align with other com‐ponents and gaps must be even.♦If adhesive bead is too thick and adhesive exudes betweenretaining rail and door outer panel, excess adhesive must beremoved.1.11Minimum curing periodWARNINGSpecial standards must be adhered to when replacing bondedouter panels for door. One of these standards is, for example,that a freshly bonded door outer panel must comply with thesafety requirements following the minimum prescribed curingperiod, even in an accident.Golf Variant 2007 ➤ , Jetta 2005 ➤General body repairs, exterior - Edition 10.20091. Rear door (saloon) 121 Downloaded from www.Manualslib.com manuals search engine
Protected by copyright. Copying for private or commercial purposes, in partor in whole, is not permitted unless authorised by Volkswagen AG. Volkswagen AG does notguarantee or accept any liability with respect to the correctness ofinformation in this document.Copyright by Volkswagen AG.For door outer panel: curing period for 1K adhesive -DH 009 10001- is 90 minutes and for 2K adhesive -DA 004 600 A2- 180 mi‐nutes.What is meant by minimum curing period is, time from bondingouter panel on door to time vehicle is taken into use or furtherwork is carried out. During this time, the vehicle must stand on alevel surface at room temperature (at least 15 °C).WARNINGVehicle is safe to use only after the curing period is completed.1.12Cleaning off excess adhesive sealingmaterial–Use of adhesive remover -D 002 000 10- as a cleaning solutionis recommended. Observe the appropriate safety precautionswhen performing this work.CautionWhen cleaning vehicle the door outer panel just bonded-inmust not be moved.–First clean painted surface as much as possible using a drycloth. Remove residual excess with adhesive remover -D 002000 10- .–Cleaning plastic trim: allow adhesive sealant to cure (approx.one hour) and then peel off.Golf Variant 2007 ➤ , Jetta 2005 ➤General body repairs, exterior - Edition 10.2009122 Rep. Gr.58 - Rear doors, door components Downloaded from www.Manualslib.com manuals search engine
Protected by copyright. Copying for private or commercial purposes, in partor in whole, is not permitted unless authorised by Volkswagen AG. Volkswagen AG does notguarantee or accept any liability with respect to the correctness ofinformation in this document.Copyright by Volkswagen AG.1.13Assembly overview - door inner partNoteThe right side is shown. The left side is similar.1 - Window slot seal2 - Insulation❑Qty. 4❑20 mm x 40 mm, com‐mercially available tex‐tile adhesive tape.Golf Variant 2007 ➤ , Jetta 2005 ➤General body repairs, exterior - Edition 10.20091. Rear door (saloon) 123 Downloaded from www.Manualslib.com manuals search engine
Protected by copyright. Copying for private or commercial purposes, in partor in whole, is not permitted unless authorised by Volkswagen AG. Volkswagen AG does notguarantee or accept any liability with respect to the correctness ofinformation in this document.Copyright by Volkswagen AG.1.14Assembly overview - door handle and door lockNoteThe right side is shown. The left side is similar.1 - Door lock❑Removing and installing⇒ page 1292 - Cable❑To lock release from in‐terior door handle.3 - Cover❑Not supplied with doorlock.❑Secured on door lockwith locking lugs4 - Bearing bracket❑Removing ⇒ page 1275 - Torx bolt❑4.5 Nm6 - Base❑Part of door handle.7 - Door handle with base❑Removing and installing⇒ page 1258 - Cover❑For housing❑Secured on housingwith locking lugs9 - Housing❑Removing and installing⇒ page 12410 - Base11 - Torx bolt❑For locking housing ⇒ Item 9 (page 150)12 - Bolt❑18 Nm13 - Cable❑To release lock from door exterior handle.1.15Removing and installing housingNoteRemoval and installation sequence is only for right housing. Re‐moval and installation of left housing is similar.Golf Variant 2007 ➤ , Jetta 2005 ➤General body repairs, exterior - Edition 10.2009124 Rep. Gr.58 - Rear doors, door components Downloaded from www.Manualslib.com manuals search engine
Protected by copyright. Copying for private or commercial purposes, in partor in whole, is not permitted unless authorised by Volkswagen AG. Volkswagen AG does notguarantee or accept any liability with respect to the correctness ofinformation in this document.Copyright by Volkswagen AG.1.15.1Removing–Prise rear cover ( ⇒ page 112 Fig. M58-0054, item 2) off reardoor.–Lever out caps in front of bolts -1-.–Pull door handle -2- in direction of -arrow- and unbolt bolt -1-onto stop using socket wrench -T10072- .–Pull housing -3- out of door handle bearing bracket at rightangles to door.1.15.2Installing–Fit housing -2- in door handle -1- bearing bracket at right an‐gles -arrow-.Door handle -1- must rest only lightly against door panel.–Now tighten bolt -3- in bearing bracket using socket wrench -T10072- .The door handle engages in housing again with an audible click.NoteDuring installation, housing must be pressed against door panel.The door handle just rests lightly against the door panel.Further installation is performed in reverse order of removal.Then always check function while door is still open, as an incor‐rectly fitted and adjusted Bowden cable cannot open the door.1.16Removing and installing door handleNoteThe removal and installation sequence is only for the right doorhandle. The removal and installation of the left door handle issimilar.1.16.1Removing–Remove housing ⇒ page 124 .–Lever clip -2- out of door handle -1-.–Swivel door handle -1- out of door -arrow-.Golf Variant 2007 ➤ , Jetta 2005 ➤General body repairs, exterior - Edition 10.20091. Rear door (saloon) 125 Downloaded from www.Manualslib.com manuals search engine
Protected by copyright. Copying for private or commercial purposes, in partor in whole, is not permitted unless authorised by Volkswagen AG. Volkswagen AG does notguarantee or accept any liability with respect to the correctness ofinformation in this document.Copyright by Volkswagen AG.1.16.2Installing–Guide assembly tool -T10118- into door through opening indoor outer panel.–Use a hand torch to illuminate inside of door for improved vis‐ibility.–Hook assembly tool -T10118- in spring -arrow A-.–Hook spring onto door lock by pulling assembly tool -T10118--arrow B-.The release lever is now secured.NoteHooking the spring into the operating lever secures the lock. This prevents incorrect attachment of the Bowdencable to the door handle later.Golf Variant 2007 ➤ , Jetta 2005 ➤General body repairs, exterior - Edition 10.2009126 Rep. Gr.58 - Rear doors, door components Downloaded from www.Manualslib.com manuals search engine
Protected by copyright. Copying for private or commercial purposes, in partor in whole, is not permitted unless authorised by Volkswagen AG. Volkswagen AG does notguarantee or accept any liability with respect to the correctness ofinformation in this document.Copyright by Volkswagen AG.–Swivel door handle -1- into door.–Pull clip -2- in the panel opening and engage clip in door han‐dle -1- -arrow-.Note♦Press door handle -1- against door panel when assembling.♦Clip -2- must engage in door handle -1- with a clearly audibleclick.–Install housing ⇒ page 125 .Then always check function while door is still open, as an incor‐rectly fitted and adjusted Bowden cable cannot open the door.1.17Removing bearing bracketNoteRemoval and installation are described only for the right bearingbracket. The removal and installation of the left bearing bracketis similar.1.17.1Removing–Remove housing ⇒ page 124 .–Remove door handle ⇒ page 125 .–Remove door outer panel ⇒ page 112 .–Pull retaining rubber -4- off upwards from guide pins and re‐taining pins on mounting.Golf Variant 2007 ➤ , Jetta 2005 ➤General body repairs, exterior - Edition 10.20091. Rear door (saloon) 127 Downloaded from www.Manualslib.com manuals search engine
Protected by copyright. Copying for private or commercial purposes, in partor in whole, is not permitted unless authorised by Volkswagen AG. Volkswagen AG does notguarantee or accept any liability with respect to the correctness ofinformation in this document.Copyright by Volkswagen AG.–Pull bearing bracket -1- with guide pins -2- out of mountings-3-.1.17.2Installing–Push bearing bracket -1- with guide pins -2- in mountings-3-.–Secure retaining rubber -4- to guide pin and retaining pin onmounting.Golf Variant 2007 ➤ , Jetta 2005 ➤General body repairs, exterior - Edition 10.2009128 Rep. Gr.58 - Rear doors, door components Downloaded from www.Manualslib.com manuals search engine
Protected by copyright. Copying for private or commercial purposes, in partor in whole, is not permitted unless authorised by Volkswagen AG. Volkswagen AG does notguarantee or accept any liability with respect to the correctness ofinformation in this document.Copyright by Volkswagen AG.Further installation is performed in reverse order of removal.1.18Removing and installing door lockNoteThe removal and installation sequence is only for the right doorlock. The removal and installation of the left door lock is similar.1.18.1Removing–Remove housing ⇒ page 124 .–Remove door handle ⇒ page 125 .–Remove door outer panel ⇒ page 112 .Golf Variant 2007 ➤ , Jetta 2005 ➤General body repairs, exterior - Edition 10.20091. Rear door (saloon) 129 Downloaded from www.Manualslib.com manuals search engine
Protected by copyright. Copying for private or commercial purposes, in partor in whole, is not permitted unless authorised by Volkswagen AG. Volkswagen AG does notguarantee or accept any liability with respect to the correctness ofinformation in this document.Copyright by Volkswagen AG.–Remove bearing bracket ⇒ page 127 .–Separate connector -4-.–Remove bolts -6-.–Release cable -3- from relay lever -5- and remove door lock-1-.Cover -2- is not supplied with door lock.1.18.2InstallingInstall in reverse order of removal.Specified torque for bolts: 18 Nm.Then always check function while door is still open, as an incor‐rectly fitted and adjusted Bowden cable cannot open the door.Golf Variant 2007 ➤ , Jetta 2005 ➤General body repairs, exterior - Edition 10.2009130 Rep. Gr.58 - Rear doors, door components Downloaded from www.Manualslib.com manuals search engine
Protected by copyright. Copying for private or commercial purposes, in partor in whole, is not permitted unless authorised by Volkswagen AG. Volkswagen AG does notguarantee or accept any liability with respect to the correctness ofinformation in this document.Copyright by Volkswagen AG.1.19Assembly overview - side impact protection1 - Side impact protection❑To remove and install,remove outer panel fordoor ⇒ page 1122 - Bolts❑Qty. 2❑20 Nm3 - Nut❑Qty. 2❑20 Nm4 - Door inner part1.20Door inner sealsDuring production, a sealant is applied to the door inner seals,which are then placed on the door flange and rolled on.Note♦When seals are removed, the sealant will spread to the insideof the seal and the flanks will be bent out slightly. If the seal isthen refitted, a tight seal is not guaranteed.♦Therefore each seal which is removed completely should bereplaced by a so-called “tap-on” seal.♦If a seal has been partially removed, squeeze sides of sealtogether before refitting.Golf Variant 2007 ➤ , Jetta 2005 ➤General body repairs, exterior - Edition 10.20091. Rear door (saloon) 131 Downloaded from www.Manualslib.com manuals search engine
Protected by copyright. Copying for private or commercial purposes, in partor in whole, is not permitted unless authorised by Volkswagen AG. Volkswagen AG does notguarantee or accept any liability with respect to the correctness ofinformation in this document.Copyright by Volkswagen AG.1.21Removing and installing door inner sealNoteThe removal and installation sequence is only for the right doorinner seal. The removal and installation of the left door inner sealis similar.1.21.1Removing–Pull door inner seal off body flange.1.21.2Installing–Align door inner seal so that the vulcanised point -arrow b- islocated at the height of the lower hinge.Golf Variant 2007 ➤ , Jetta 2005 ➤General body repairs, exterior - Edition 10.2009132 Rep. Gr.58 - Rear doors, door components Downloaded from www.Manualslib.com manuals search engine
Protected by copyright. Copying for private or commercial purposes, in partor in whole, is not permitted unless authorised by Volkswagen AG. Volkswagen AG does notguarantee or accept any liability with respect to the correctness ofinformation in this document.Copyright by Volkswagen AG.–Start installing door inner seal at top radius -arrow a- of dooraperture.1.22Removing and installing door outer sealNote♦Removal and installation are described only for the right doorouter seal. Removal and installation of the left door outer sealare similar.♦Remove protective backing immediately before installation.Working temperature approx. 20 °C.Golf Variant 2007 ➤ , Jetta 2005 ➤General body repairs, exterior - Edition 10.20091. Rear door (saloon) 133 Downloaded from www.Manualslib.com manuals search engine
Protected by copyright. Copying for private or commercial purposes, in partor in whole, is not permitted unless authorised by Volkswagen AG. Volkswagen AG does notguarantee or accept any liability with respect to the correctness ofinformation in this document.Copyright by Volkswagen AG.1.22.1Removing–Pull door outer seal -1- off door -2-.1.22.2Installing–Remove adhesive residues with erasure disc of adhesive stripremover -VAS 6349- .–Immediately before bonding outer seal for door, clean bondingsurface thoroughly with adhesive remover -D 002 000 10- .•Bonding surfaces must be free of dust and grease and thereshould be no adhesive residues.–The vulcanised point -arrow b- of door outer seal -1- must belocated in centre of sill.Golf Variant 2007 ➤ , Jetta 2005 ➤General body repairs, exterior - Edition 10.2009134 Rep. Gr.58 - Rear doors, door components Downloaded from www.Manualslib.com manuals search engine
Protected by copyright. Copying for private or commercial purposes, in partor in whole, is not permitted unless authorised by Volkswagen AG. Volkswagen AG does notguarantee or accept any liability with respect to the correctness ofinformation in this document.Copyright by Volkswagen AG.–Pull off protective backing and start fitting seal in upper radius-arrow a- of door. Do not pull door outer seal excessively toavoid stretching seal.–Press complete bonding surface of seal -3- onto door -1- allaround using roller -3356- .–To do this, push seal aside -arrow a- so that the roller -3356-runs directly over the contact surface of the seal.The roller can apply the necessary force -arrow b- to the bondingsurface -2- only when procedure described above is followed.–If the seal has stretched, cut seal to required length and presson butt joint well.–If seal -3- comes loose in small areas again, press seal on wellagain using roller -3356- .NoteThe door must not be closed for a period of 2 hours to ensure the door outer seal does not move or loosenagain.Golf Variant 2007 ➤ , Jetta 2005 ➤General body repairs, exterior - Edition 10.20091. Rear door (saloon) 135 Downloaded from www.Manualslib.com manuals search engine
Protected by copyright. Copying for private or commercial purposes, in partor in whole, is not permitted unless authorised by Volkswagen AG. Volkswagen AG does notguarantee or accept any liability with respect to the correctness ofinformation in this document.Copyright by Volkswagen AG.Golf Variant 2007 ➤ , Jetta 2005 ➤General body repairs, exterior - Edition 10.2009136 Rep. Gr.58 - Rear doors, door components Downloaded from www.Manualslib.com manuals search engine
Protected by copyright. Copying for private or commercial purposes, in partor in whole, is not permitted unless authorised by Volkswagen AG. Volkswagen AG does notguarantee or accept any liability with respect to the correctness ofinformation in this document.Copyright by Volkswagen AG.2Rear door (Variant)NoteThe rear doors of the Variant are of a different concept whencompared with the rear doors of the saloon. The door outer panelis no longer removable. The window lifter and the door lock areaccessible via a removable assembly carrier.2.1ToolsSpecial tools and workshopequipment required♦Socket -T10072-♦Assembly tool -T10118-♦Door alignment tool -3320-with -3320/1- , -3320/2- and-3320/3-♦Roller for door insulationfoil -3356-♦Torque wrench -V.A.G1331-♦Setting gauge -3371-Golf Variant 2007 ➤ , Jetta 2005 ➤General body repairs, exterior - Edition 10.20092. Rear door (Variant) 137 Downloaded from www.Manualslib.com manuals search engine
Protected by copyright. Copying for private or commercial purposes, in partor in whole, is not permitted unless authorised by Volkswagen AG. Volkswagen AG does notguarantee or accept any liability with respect to the correctness ofinformation in this document.Copyright by Volkswagen AG.2.2Assembly overview - rear door1 - Door❑Removing and installing⇒ page 140❑Adjusting door⇒ page 1422 - Door handle with base❑Removing and installing⇒ page 1513 - Lock cylinder housing❑Removing and installing⇒ page 151❑Without cylinder lock.4 - Door lock❑The door lock can be re‐moved only togetherwith the assembly carri‐er⇒ Item 5 (page 138) .❑Removing and installing⇒ page 1555 - Assembly carrier❑Removing and installing⇒ page 1456 - Door hinge❑Removing and installing⇒ page 1387 - Door hinge❑Removing and installing⇒ page 1382.3Assembly overview - door hingesCautionNut of eccentric bolt -9- should not be loosened under any cir‐cumstances. It cannot be tightened again using normal work‐shop tools.Golf Variant 2007 ➤ , Jetta 2005 ➤General body repairs, exterior - Edition 10.2009138 Rep. Gr.58 - Rear doors, door components Downloaded from www.Manualslib.com manuals search engine
Protected by copyright. Copying for private or commercial purposes, in partor in whole, is not permitted unless authorised by Volkswagen AG. Volkswagen AG does notguarantee or accept any liability with respect to the correctness ofinformation in this document.Copyright by Volkswagen AG.Note♦The right side is shown. The left side is similar.♦The hinge bolts must always be renewed if loosened.♦Hinges are now one piece.1 - Door❑Removing and installing⇒ page 140❑Adjusting door⇒ page 1422 - Guide bolt❑10 Nm3 - Door hinge with arrester4 - Multi-point socket head bolt❑20 Nm + 1/4 turn further(90°).❑Always renew afterloosening5 - Multi-point socket head bolt❑20 Nm + 1/4 turn further(90°).❑Always renew afterloosening6 - Multi-point socket head bolt❑20 Nm + 1/4 turn further(90°).❑Always renew afterloosening7 - Multi-point socket head bolt❑20 Nm + 1/4 turn further(90°).❑Always renew afterloosening8 - Guide bolt❑10 Nm9 - Nut❑For eccentric pin❑Do not loosen❑Serves as a means of adjustment during production only10 - Door hinge❑Hinge no longer comprises of more than one part.11 - Multi-point socket head bolt❑20 Nm + 1/4 turn further (90°).❑Always renew after loosening12 - Multi-point socket head bolt❑20 Nm + 1/4 turn further (90°).Golf Variant 2007 ➤ , Jetta 2005 ➤General body repairs, exterior - Edition 10.20092. Rear door (Variant) 139 Downloaded from www.Manualslib.com manuals search engine
Protected by copyright. Copying for private or commercial purposes, in partor in whole, is not permitted unless authorised by Volkswagen AG. Volkswagen AG does notguarantee or accept any liability with respect to the correctness ofinformation in this document.Copyright by Volkswagen AG.❑Always renew after loosening13 - Multi-point socket head bolt❑20 Nm + 1/4 turn further (90°).❑Always renew after loosening2.4Removing and installing door2.4.1RemovingNoteThe removal and installation sequence is only for the right door. The removal and installation of the left door issimilar.–Release boots -6- by pressing fastener -arrow a- and pullboots off B-pillar.–Swing release lever -7- downwards -arrow b- and disconnectelectrical connector -8- from coupling station.–Remove bolts -4-, -5- and -11- from hinge using special dooralignment tool -3320- and bit -3320/3- .Golf Variant 2007 ➤ , Jetta 2005 ➤General body repairs, exterior - Edition 10.2009140 Rep. Gr.58 - Rear doors, door components Downloaded from www.Manualslib.com manuals search engine
Protected by copyright. Copying for private or commercial purposes, in partor in whole, is not permitted unless authorised by Volkswagen AG. Volkswagen AG does notguarantee or accept any liability with respect to the correctness ofinformation in this document.Copyright by Volkswagen AG.–Pull door -1- in direction of -arrow- off guide bolts -2- and -9-.2.4.2InstallingInstall in reverse order of removal.Specified torque for bolts -4-, -5- and -11-: 20 Nm + 1/4 turn further(90°).Always renew bolts -4-, -5- and -11-.Golf Variant 2007 ➤ , Jetta 2005 ➤General body repairs, exterior - Edition 10.20092. Rear door (Variant) 141 Downloaded from www.Manualslib.com manuals search engine
Protected by copyright. Copying for private or commercial purposes, in partor in whole, is not permitted unless authorised by Volkswagen AG. Volkswagen AG does notguarantee or accept any liability with respect to the correctness ofinformation in this document.Copyright by Volkswagen AG.Observe rear door gap/shut lines ⇒ Body Repairs; Rep. Gr. 00 ;Body dimensions .2.5Adjusting doorCautionNut of eccentric bolt -9- should not be loosened under any cir‐cumstances. It cannot be tightened again using normal work‐shop tools.Note♦The door is adjusted correctly if the gaps/shut lines are even all around, the door is not too deep or doesnot stand proud and all contours align when the is door closed.♦Vehicle must be standing on its wheels when adjustments are performed.Observe rear door gap/shut lines ⇒ Body Repairs; Rep. Gr. 00 ;Body dimensions .Golf Variant 2007 ➤ , Jetta 2005 ➤General body repairs, exterior - Edition 10.2009142 Rep. Gr.58 - Rear doors, door components Downloaded from www.Manualslib.com manuals search engine
Protected by copyright. Copying for private or commercial purposes, in partor in whole, is not permitted unless authorised by Volkswagen AG. Volkswagen AG does notguarantee or accept any liability with respect to the correctness ofinformation in this document.Copyright by Volkswagen AG.To be able to adjust gaps correctly, bolts -6-, -7-, -11- and -12-must be loosened.Other measures such as raising the door have no effect. Subse‐quent pressure from above will cause the door to sack again.Bolts -4-, -5- and -13- and also guide bolts -2- and -8- must beloosened to correctly adjust the flush fitting of the door.Use door alignment tool -3320- with bit -3320/3- for this.2.5.1Adjusting striker pinNote♦The rear door must lock fully when closing without any addi‐tional force being required and must not have any play.♦The rear door must not be pushed up or down as a result ofthe striker pin adjustment.The following can be adjusted at the striker pin:♦When rear door does not align with side panel.Golf Variant 2007 ➤ , Jetta 2005 ➤General body repairs, exterior - Edition 10.20092. Rear door (Variant) 143 Downloaded from www.Manualslib.com manuals search engine
Protected by copyright. Copying for private or commercial purposes, in partor in whole, is not permitted unless authorised by Volkswagen AG. Volkswagen AG does notguarantee or accept any liability with respect to the correctness ofinformation in this document.Copyright by Volkswagen AG.–Loosen striker pin -1- by loosening bolts -2- on side panel.–Adjust rear door at striker pin -1- so that rear door is flush withrear side panel when shut (wind noise).Maximum twist tolerance -A- of striker pin: ± 3°–Retighten bolts -2-.Specified torque: 20 NmWARNINGOnly use this adjustment to adjust door inwards or outwards,never use for vertical adjustment. Door must not move up‐wards or downwards when opening and closing. This indicatesthat the vertical adjustment is incorrect.2.6Assembly overview - assembly carrierNoteThe right side is shown. The left side is similar.1 - Bolt❑Qty. 2❑18 Nm2 - Door lock❑Removing and installing⇒ page 1553 - Assembly carrier❑Removing and installing⇒ page 1454 - Bolt❑Qty. 8❑8 Nm5 - Cover6 - Window regulator motor❑Removing and installingGolf Variant 2007 ➤ , Jetta 2005 ➤General body repairs, exterior - Edition 10.2009144 Rep. Gr.58 - Rear doors, door components Downloaded from www.Manualslib.com manuals search engine
Protected by copyright. Copying for private or commercial purposes, in partor in whole, is not permitted unless authorised by Volkswagen AG. Volkswagen AG does notguarantee or accept any liability with respect to the correctness ofinformation in this document.Copyright by Volkswagen AG.⇒ page 3172.7Removing and installing assembly car‐rierNoteThe removal and installation sequence is only for the right as‐sembly carrier. The removal and installation of the left assemblycarrier is similar.Window regulator, door lock and loudspeaker are secured to theassembly carrier.The door lock can be removed only together with the assemblycarrier.If door window cannot be lowered on electric window version, firstdetermine the cause of the fault.To do this, read the fault memory of the convenience system us‐ing vehicle diagnostic, testing and information system -VAS 5051A- or -VAS 5052- ⇒ Vehicle diagnosis, testing and informationsystem VAS 5051.If an electrical fault exists, rectify it first.If an electric fault occurs on window regulator motor, it can beunscrewed from assembly carrier and door window can be slid byhand in the necessary repair position.2.7.1RemovingRemove door handle ⇒ page 152 .–Remove door trim ⇒ General body repairs, interior; Rep. Gr. 70 ; Roof trims .Golf Variant 2007 ➤ , Jetta 2005 ➤General body repairs, exterior - Edition 10.20092. Rear door (Variant) 145 Downloaded from www.Manualslib.com manuals search engine
Protected by copyright. Copying for private or commercial purposes, in partor in whole, is not permitted unless authorised by Volkswagen AG. Volkswagen AG does notguarantee or accept any liability with respect to the correctness ofinformation in this document.Copyright by Volkswagen AG.–Lever out caps -5-.–Lower door window -1- until spreader pin -3- and spreader plug-4- are accessible in cut-out of window regulator.NoteIf the procedure cannot be carried out because there is a fault withthe electric window regulator, remove electric window motor toslide window down.–Screw a 5 mm bolt (approx. 70 mm long) into spreader pin-3-.–Pull bolt and spreader pin out of spreader plug -4-.–Screw an 8 mm bolt (approx. 80 mm long) into spreader plug-4-.NoteDo not exert too great a pressure on the plug because otherwisethe plug will fall into the door.–Pull spreader plug -4- out of clamping jaws -2- and thereforeout of door window.–Push window -1- upwards and secure in position (e.g. withadhesive tape).–Release boots -4- by pressing fastener -arrow a- and pullboots off B-pillar.–Swing release lever -5- downwards -arrow b- and disconnectelectrical connector -6- from coupling station.–Unscrew bolts -2- from door lock -3-.–Unscrew bolts -arrow- from assembly carrier -1-.Golf Variant 2007 ➤ , Jetta 2005 ➤General body repairs, exterior - Edition 10.2009146 Rep. Gr.58 - Rear doors, door components Downloaded from www.Manualslib.com manuals search engine
Protected by copyright. Copying for private or commercial purposes, in partor in whole, is not permitted unless authorised by Volkswagen AG. Volkswagen AG does notguarantee or accept any liability with respect to the correctness ofinformation in this document.Copyright by Volkswagen AG.–Guide wire -3- in door.–Remove assembly carrier -1- with door lock -2- from door indirection of -arrow-.Golf Variant 2007 ➤ , Jetta 2005 ➤General body repairs, exterior - Edition 10.20092. Rear door (Variant) 147 Downloaded from www.Manualslib.com manuals search engine
Protected by copyright. Copying for private or commercial purposes, in partor in whole, is not permitted unless authorised by Volkswagen AG. Volkswagen AG does notguarantee or accept any liability with respect to the correctness ofinformation in this document.Copyright by Volkswagen AG.2.7.2InstallingInstall in reverse order of removal.–Secure door window ⇒ page 310 .–Specified torque for assembly carrier bolt -arrow-: 8 NmGolf Variant 2007 ➤ , Jetta 2005 ➤General body repairs, exterior - Edition 10.2009148 Rep. Gr.58 - Rear doors, door components Downloaded from www.Manualslib.com manuals search engine
Protected by copyright. Copying for private or commercial purposes, in partor in whole, is not permitted unless authorised by Volkswagen AG. Volkswagen AG does notguarantee or accept any liability with respect to the correctness ofinformation in this document.Copyright by Volkswagen AG.–Specified torque for door lock bolt -2-: 18 NmGolf Variant 2007 ➤ , Jetta 2005 ➤General body repairs, exterior - Edition 10.20092. Rear door (Variant) 149 Downloaded from www.Manualslib.com manuals search engine
Protected by copyright. Copying for private or commercial purposes, in partor in whole, is not permitted unless authorised by Volkswagen AG. Volkswagen AG does notguarantee or accept any liability with respect to the correctness ofinformation in this document.Copyright by Volkswagen AG.2.8Assembly overview - door handle and door lockNoteThe right side is shown. The left side is similar.1 - Door lock❑Removing and installing⇒ page 1552 - Cable❑To lock release from in‐terior door handle.3 - Cover❑Not supplied with doorlock.❑Secured on door lockwith locking lugs4 - Bearing bracket❑Removing and installing⇒ page 1545 - Torx bolt❑4.5 Nm6 - Base❑Part of door handle.7 - Door handle with base❑Removing and installing⇒ page 1518 - Cover❑For housing❑Secured on housingwith locking lugs9 - Housing❑Removing and installing⇒ page 15110 - Base11 - Door lock bracket❑Not supplied with door lock.❑Pushed onto door lock and riveted.12 - Bolt❑18 Nm13 - Cable❑To release lock from door exterior handle.Golf Variant 2007 ➤ , Jetta 2005 ➤General body repairs, exterior - Edition 10.2009150 Rep. Gr.58 - Rear doors, door components Downloaded from www.Manualslib.com manuals search engine
Protected by copyright. Copying for private or commercial purposes, in partor in whole, is not permitted unless authorised by Volkswagen AG. Volkswagen AG does notguarantee or accept any liability with respect to the correctness ofinformation in this document.Copyright by Volkswagen AG.2.9Removing and installing housingNoteRemoval and installation sequence is only for right housing. Re‐moval and installation of left housing is similar.2.9.1Removing–Lever out caps in front of bolts -1-.–Pull door handle -2- in direction of -arrow- and unbolt bolt -1-onto stop using socket wrench -T10072- .–Pull housing -3- out of door handle bearing bracket at rightangles to door.2.9.2Installing–Fit housing -2- in door handle -1- bearing bracket at right an‐gles -arrow-.Door handle -1- must rest only lightly against door panel.–Now tighten bolt -3- in bearing bracket using socket wrench -T10072- .The door handle engages in housing again with an audible click.NoteDuring installation, housing must be pressed against door panel.The door handle just rests lightly against the door panel.Further installation is performed in reverse order of removal.Then always check function while door is still open, as an incor‐rectly fitted and adjusted Bowden cable cannot open the door.2.10Removing and installing door handleNoteThe removal and installation sequence is only for the right doorhandle. The removal and installation of the left door handle issimilar.Golf Variant 2007 ➤ , Jetta 2005 ➤General body repairs, exterior - Edition 10.20092. Rear door (Variant) 151 Downloaded from www.Manualslib.com manuals search engine
Protected by copyright. Copying for private or commercial purposes, in partor in whole, is not permitted unless authorised by Volkswagen AG. Volkswagen AG does notguarantee or accept any liability with respect to the correctness ofinformation in this document.Copyright by Volkswagen AG.2.10.1Removing–Remove housing ⇒ page 151 .–Lever clip -2- out of door handle -1-.–Swivel door handle -1- out of door -arrow-.2.10.2Installing–Guide assembly tool -T10118- into door through opening indoor outer panel.–Use a hand torch to illuminate inside of door for improved vis‐ibility.–Hook assembly tool -T10118- in spring -arrow A-.–Hook spring onto door lock by pulling assembly tool -T10118--arrow B-.The release lever is now secured.Golf Variant 2007 ➤ , Jetta 2005 ➤General body repairs, exterior - Edition 10.2009152 Rep. Gr.58 - Rear doors, door components Downloaded from www.Manualslib.com manuals search engine
Protected by copyright. Copying for private or commercial purposes, in partor in whole, is not permitted unless authorised by Volkswagen AG. Volkswagen AG does notguarantee or accept any liability with respect to the correctness ofinformation in this document.Copyright by Volkswagen AG.NoteHooking the spring into the operating lever secures the lock. This prevents incorrect attachment of the Bowdencable to the door handle later.–Swivel door handle -1- into door.–Pull clip -2- in the panel opening and engage clip in door han‐dle -1- -arrow-.Note♦Press door handle -1- against door panel when assembling.♦Clip -2- must engage in door handle -1- with a clearly audibleclick.–Install housing ⇒ page 151 .Then always check function while door is still open, as an incor‐rectly fitted and adjusted Bowden cable cannot open the door.Golf Variant 2007 ➤ , Jetta 2005 ➤General body repairs, exterior - Edition 10.20092. Rear door (Variant) 153 Downloaded from www.Manualslib.com manuals search engine
Protected by copyright. Copying for private or commercial purposes, in partor in whole, is not permitted unless authorised by Volkswagen AG. Volkswagen AG does notguarantee or accept any liability with respect to the correctness ofinformation in this document.Copyright by Volkswagen AG.2.11Removing and installing bearing bracket2.11.1RemovingNoteRemoval and installation are described only for the right bearingbracket. The removal and installation of the left bearing bracketis similar.–Remove housing ⇒ page 151 .–Remove door handle ⇒ page 152 .–Remove door assembly carrier ⇒ page 145 .–Remove bolt -3- from bearing plate -1-.–Remove bearing plate -1- inwards in -direction of arrow- out ofdoor cut-out in door -2-.2.11.2Installing–Insert bearing plate -1- into door -2- in -direction of arrow-.Further installation is performed in reverse order of removal.–Specified torque for bolt -3-: 4.5 Nm.Golf Variant 2007 ➤ , Jetta 2005 ➤General body repairs, exterior - Edition 10.2009154 Rep. Gr.58 - Rear doors, door components Downloaded from www.Manualslib.com manuals search engine
Protected by copyright. Copying for private or commercial purposes, in partor in whole, is not permitted unless authorised by Volkswagen AG. Volkswagen AG does notguarantee or accept any liability with respect to the correctness ofinformation in this document.Copyright by Volkswagen AG.2.12Removing and installing door lockNoteThe removal and installation sequence is only for the right doorlock. The removal and installation of the left door lock is similar.2.12.1Removing–Remove door assembly carrier ⇒ page 145 .–Turn assembly carrier around and pull connections -4- off doorlock -5-.–Drive clip -2- out using a punch.–Lever door lock -5- with retaining bracket -1- out of assemblycarrier using a screwdriver.NoteThe retaining bracket is not supplied with the door lock -5-. Thedoor lock is pushed onto the retaining bracket -1- and securedwith a pop rivet -6-.–Unclip Bowden cable -1- from door lock.–Turn cable nipple through 90° -arrow- and remove cable fromeye.2.12.2InstallingInstall in reverse order of removal.•Then always check function while door is still open, as an in‐correctly fitted and adjusted Bowden cable cannot open thedoor.2.13Door inner sealsDuring production, a sealant is applied to the door inner seals,which are then placed on the door flange and rolled on.Note♦When seals are removed, the sealant will spread to the insideof the seal and the flanks will be bent out slightly. If the seal isthen refitted, a tight seal is not guaranteed.♦Therefore each seal which is removed completely should bereplaced by a so-called “tap-on” seal.♦If a seal has been partially removed, squeeze sides of sealtogether before refitting.Golf Variant 2007 ➤ , Jetta 2005 ➤General body repairs, exterior - Edition 10.20092. Rear door (Variant) 155 Downloaded from www.Manualslib.com manuals search engine
Protected by copyright. Copying for private or commercial purposes, in partor in whole, is not permitted unless authorised by Volkswagen AG. Volkswagen AG does notguarantee or accept any liability with respect to the correctness ofinformation in this document.Copyright by Volkswagen AG.2.14Removing and installing door inner sealNoteThe removal and installation sequence is only for the left doorinner seal. The removal and installation of the right door inner sealis similar.2.14.1Removing–Pull door inner seal -1- off body flange.2.14.2Installing–Align door inner seal -1- so that vulcanised point -arrow b- isat same height as lower hinge.Golf Variant 2007 ➤ , Jetta 2005 ➤General body repairs, exterior - Edition 10.2009156 Rep. Gr.58 - Rear doors, door components Downloaded from www.Manualslib.com manuals search engine
Protected by copyright. Copying for private or commercial purposes, in partor in whole, is not permitted unless authorised by Volkswagen AG. Volkswagen AG does notguarantee or accept any liability with respect to the correctness ofinformation in this document.Copyright by Volkswagen AG.–Start installing door inner seal at top radius -arrow a- of dooraperture.2.15Removing and installing door outer sealNote♦Removal and installation are described only for the right doorouter seal. Removal and installation of the left door outer sealare similar.♦Remove protective backing immediately before installation.Working temperature approx. 20 °C.♦Adhesive remover -D 002 000 10- must be used exclusively.♦The door outer seal must be bonded in place immediately aftercleaning.Golf Variant 2007 ➤ , Jetta 2005 ➤General body repairs, exterior - Edition 10.20092. Rear door (Variant) 157 Downloaded from www.Manualslib.com manuals search engine
Protected by copyright. Copying for private or commercial purposes, in partor in whole, is not permitted unless authorised by Volkswagen AG. Volkswagen AG does notguarantee or accept any liability with respect to the correctness ofinformation in this document.Copyright by Volkswagen AG.2.15.1Removing–Pull door outer seal -1- off door -2-.2.15.2Installing–Remove adhesive residues with erasure disc of adhesive stripremover -VAS 6349- .–Immediately before bonding outer seal for door, clean bondingsurface thoroughly with adhesive remover -D 002 000 10- .•Bonding surfaces must be free of dust and grease and thereshould be no adhesive residues.–The vulcanised point -arrow b- of door outer seal -1- must belocated in centre of sill.Golf Variant 2007 ➤ , Jetta 2005 ➤General body repairs, exterior - Edition 10.2009158 Rep. Gr.58 - Rear doors, door components Downloaded from www.Manualslib.com manuals search engine
Protected by copyright. Copying for private or commercial purposes, in partor in whole, is not permitted unless authorised by Volkswagen AG. Volkswagen AG does notguarantee or accept any liability with respect to the correctness ofinformation in this document.Copyright by Volkswagen AG.–Pull off protective backing and start fitting seal in upper radius-arrow a- of door. Do not pull door outer seal excessively toavoid stretching seal.–Press complete bonding surface of seal -3- onto door -1- allaround using roller -3356- .–To do this, push seal aside -arrow a- so that the roller -3356-runs directly over the contact surface of the seal.The roller can apply the necessary force -arrow b- to the bondingsurface -2- only when procedure described above is followed.–If the seal has stretched, cut seal to required length and presson butt joint well.–If seal -3- comes loose in small areas again, press seal on wellagain using roller -3356- .NoteThe door must not be closed for a period of 2 hours to ensure the door outer seal does not move or loosenagain.Golf Variant 2007 ➤ , Jetta 2005 ➤General body repairs, exterior - Edition 10.20092. Rear door (Variant) 159 Downloaded from www.Manualslib.com manuals search engine
Protected by copyright. Copying for private or commercial purposes, in partor in whole, is not permitted unless authorised by Volkswagen AG. Volkswagen AG does notguarantee or accept any liability with respect to the correctness ofinformation in this document.Copyright by Volkswagen AG.Golf Variant 2007 ➤ , Jetta 2005 ➤General body repairs, exterior - Edition 10.2009160 Rep. Gr.58 - Rear doors, door components Downloaded from www.Manualslib.com manuals search engine
Protected by copyright. Copying for private or commercial purposes, in partor in whole, is not permitted unless authorised by Volkswagen AG. Volkswagen AG does notguarantee or accept any liability with respect to the correctness ofinformation in this document.Copyright by Volkswagen AG.60 –Sunroof1Sliding/tilting sunroof with glass pan‐el (Meritor)1.1ToolsSpecial tools and workshopequipment required♦Roller for door insulationfoil -3356-♦Front end hook -3370-♦Torque wrench -V.A.G1783-♦Removal wedge -3409-1.2FunctionAll actions of the sliding/tilting sunroof with glass panel can beperformed with the ignition switched on.After the ignition is switched off, actions can be performed untileither the driver or front passenger door is opened.The opening of the glass panel in sliding or tilting positions canbe preselected using the rotary switch.On the rotary switch there are marks for preset sliding and tiltingpositions of the glass panel.Golf Variant 2007 ➤ , Jetta 2005 ➤General body repairs, exterior - Edition 10.20091. Sliding/tilting sunroof with glass panel (Meritor) 161 Downloaded from www.Manualslib.com manuals search engine
Protected by copyright. Copying for private or commercial purposes, in partor in whole, is not permitted unless authorised by Volkswagen AG. Volkswagen AG does notguarantee or accept any liability with respect to the correctness ofinformation in this document.Copyright by Volkswagen AG.Opening sliding/tilting sunroof to the so called comfort position,prevents to a large extent wind noise while driving, which can oc‐cur when sunroof is fully open.Pre-selector switchThe sliding/tilting sunroof with glass panel is equipped with a forcelimitation (roll back) feature while closing. If the sunroof encoun‐ters an obstruction while closing from tilting or sliding position, itwill open automatically.In addition, there is an emergency closure function. If problemsoccur during closure, the sliding/tilting roof with glass panel canbe forced to shut by pressing the preselector switch when it is inthe “close sliding/tilting roof” position.The roll-back function is disabled when the emergency closurefunction is active.The drive for the sliding/tilting sunroof with glass panel is protec‐ted against overheating by a time limit. The protective mechanismactivates when the sunroof is operated continuously for approx.2 minutes. It is functional again after a cooling-off phase.In the event of power failure, the sliding/tilting sunroof with glasspanel can be moved using a hexagon key directly on the drive.Hexagon key is located in vehicle tool kit.Golf Variant 2007 ➤ , Jetta 2005 ➤General body repairs, exterior - Edition 10.2009162 Rep. Gr.60 - Sunroof Downloaded from www.Manualslib.com manuals search engine
Protected by copyright. Copying for private or commercial purposes, in partor in whole, is not permitted unless authorised by Volkswagen AG. Volkswagen AG does notguarantee or accept any liability with respect to the correctness ofinformation in this document.Copyright by Volkswagen AG.1.3Assembly overview - sliding/tilting sunroof with glass panel1 - Glass panel for sliding/tiltingsunroof (single pane safetyglass)❑Removing and installing⇒ page 166❑Adjusting ⇒ page 1672 - Panel seal❑Renewing ⇒ page 169❑Adjusting ⇒ page 168❑Joint of seal centred atrear3 - Sliding headliner❑Removing and installing⇒ page 1704 - Bolt❑Bolts are microencap‐sulated and must al‐ways be renewed afterloosening.❑Qty. 4❑1.8 Nm5 - Spring slide❑Screwed to slidingheadliner❑Qty. 4❑Can be renewed individ‐ually.❑Removing ⇒ page 1706 - Bellows❑To cover guide plate.❑Removing and installing⇒ page 1647 - Water channel❑Removing ⇒ page 1788 - Latch guide❑Is removed together with guide plate ⇒ page 1789 - End piece upper part❑Clipped to end piece upper part.❑Removing ⇒ page 17810 - End piece lower part❑Can be renewed individually.❑To seal use butyl adhesive sealing cord -AKL 450 005 05- .11 - Carrier unit❑Removing and installing ⇒ page 174❑If needed, guide channels may be greased only with special grease -G 000 450 02- , otherwise correctoperation cannot be guaranteed.12 - Bolt❑Bolts are microencapsulated and must always be renewed after loosening.Golf Variant 2007 ➤ , Jetta 2005 ➤General body repairs, exterior - Edition 10.20091. Sliding/tilting sunroof with glass panel (Meritor) 163 Downloaded from www.Manualslib.com manuals search engine
Protected by copyright. Copying for private or commercial purposes, in partor in whole, is not permitted unless authorised by Volkswagen AG. Volkswagen AG does notguarantee or accept any liability with respect to the correctness ofinformation in this document.Copyright by Volkswagen AG.❑Qty. 3❑3.5 Nm13 - Crank for emergency operation❑Hexagon key is located in vehicle tool kit14 - Electric drive❑Removing and installing ⇒ page 171❑Adjusting drive (0 position) ⇒ page 172 .15 - Spring❑Qty. 2❑Pushes up wind deflector.❑Clipped onto wind deflector and can be renewed individually❑Removing ⇒ page 16916 - Wind deflector❑Removing and installing ⇒ page 16917 - Wind deflector bearing❑Qty. 2❑Clipped onto wind deflector and can be renewed individually❑Removing ⇒ page 16918 - Front guide❑Can be pushed out of guide rail individually.❑Removing ⇒ page 17819 - Lower rear guide❑Is removed together with guide plate ⇒ page 17820 - Torx bolt❑Qty. 3 on each side❑5 Nm21 - Guide plate❑Removing and installing ⇒ page 17722 - Spacer❑Removing and installing ⇒ page 1771.4Removing and installing bellows1.4.1Removing–Slide sliding headlining to rear.–Run sliding/tilting sunroof glass panel to tilted position.–Carefully unclip bellows -1- from lower part of guide plate -3-using a removal wedge -3409- .–Pull bellows -1- off securing pins -4-.–Detach bellows -1- at top rear -2-.Golf Variant 2007 ➤ , Jetta 2005 ➤General body repairs, exterior - Edition 10.2009164 Rep. Gr.60 - Sunroof Downloaded from www.Manualslib.com manuals search engine
Protected by copyright. Copying for private or commercial purposes, in partor in whole, is not permitted unless authorised by Volkswagen AG. Volkswagen AG does notguarantee or accept any liability with respect to the correctness ofinformation in this document.Copyright by Volkswagen AG.–Remove bellows -1-.1.4.2Installing–Slide sliding headlining to rear.–Run sliding/tilting sunroof glass panel to tilted position.–Fit bellows -1- first at top rear -2-.–Clip bellows -1- in securing pins -4- in guide plate.Golf Variant 2007 ➤ , Jetta 2005 ➤General body repairs, exterior - Edition 10.20091. Sliding/tilting sunroof with glass panel (Meritor) 165 Downloaded from www.Manualslib.com manuals search engine
Protected by copyright. Copying for private or commercial purposes, in partor in whole, is not permitted unless authorised by Volkswagen AG. Volkswagen AG does notguarantee or accept any liability with respect to the correctness ofinformation in this document.Copyright by Volkswagen AG.–Hook in bellows -1- at bottom front and clip in bellows in lowerpart of guide plate -3-.1.5Removing and installing sliding/tiltingsunroof glass panel1.5.1Removing–Remove bellows ⇒ page 164 .Golf Variant 2007 ➤ , Jetta 2005 ➤General body repairs, exterior - Edition 10.2009166 Rep. Gr.60 - Sunroof Downloaded from www.Manualslib.com manuals search engine
Protected by copyright. Copying for private or commercial purposes, in partor in whole, is not permitted unless authorised by Volkswagen AG. Volkswagen AG does notguarantee or accept any liability with respect to the correctness ofinformation in this document.Copyright by Volkswagen AG.–Remove bolts -1- on left and right.–Remove sliding/tilting sunroof glass panel -2- out upwards.CautionThe guide plate must not moved to “Open” position when re‐moved, because the water channel will not be compressed bythe glass panel and can become wedged together in the roof.1.5.2Installing•Panel must be installed in the zero position (panel closed).Zero position:The mark -arrow- on the rear of the guide upper section -1- must,on both sides, lie within the marks dimension -a- on the guideplate -2-.The guide plate -2- must be located in the guide rails (cannot bemoved by hand).If this is not the case, adjust parallel running ⇒ page 173 .–Insert sliding/tilting sunroof glass panel -2- from above and fitbolts -1-.–Lightly tighten bolts -1-.–Adjust sliding/tilting sunroof glass panel (height adjustment)⇒ page 167 .Note♦After adjusting panel height, tighten securing screws (5 Nm).♦Install bellows after adjusting height of panel ⇒ page 164 .1.6Adjusting height of sliding/tilting sunroofglass panelNoteThe glass panel height adjustment is performed after the glasspanel has been closed from tilt position.Sliding/tilting sunroof glass panel 0 (zero) position OK (checking⇒ page 167 ).Golf Variant 2007 ➤ , Jetta 2005 ➤General body repairs, exterior - Edition 10.20091. Sliding/tilting sunroof with glass panel (Meritor) 167 Downloaded from www.Manualslib.com manuals search engine
Protected by copyright. Copying for private or commercial purposes, in partor in whole, is not permitted unless authorised by Volkswagen AG. Volkswagen AG does notguarantee or accept any liability with respect to the correctness ofinformation in this document.Copyright by Volkswagen AG.–Remove bellows ⇒ page 164 .–Loosen sliding/tilting sunroof glass panel -2- securing bolts-1- on left and right (do not remove).–Run sliding/tilting sunroof glass panel to “open” position.–Run sliding/tilting sunroof glass panel to “closed” position.–Carry out height adjustment of sliding/tilting sunroof glass pan‐el at front and rear on both sides as follows:Front panel adjustment:-a- = 0…1 mm lower than roof-Arrow- points forwards–Tighten foremost left and right bolts (5 Nm).Rear panel adjustment:-b- = 0…1 mm higher than roof-Arrow- = Forwards–First tighten middle and then rear bolts on left and right (5 Nm).Note♦To achieve the best possible optical appearance, ensure thatadjustments on left and right are as far as is possible uniform(symmetric).♦The glass panel should not be higher than the roof at any pointat the front or lower than the roof at any point at the rear.–Install bellows ⇒ page 164 .1.7Adjusting panel seal–Check that the pre-loading between panel seal -2- and bodyis uniform all-round using a 0.3 mm thick strip of paper (a vis‐iting card for example).•It must be possible to pull the paper strip through tightly be‐tween the panel seal and body.If this is not the case:–Removing glass panel for sunroof ⇒ page 166 .–If the pressure is too little, roof seal -2- can be pushed apartwith removal wedge -3409- -1-.Golf Variant 2007 ➤ , Jetta 2005 ➤General body repairs, exterior - Edition 10.2009168 Rep. Gr.60 - Sunroof Downloaded from www.Manualslib.com manuals search engine
Protected by copyright. Copying for private or commercial purposes, in partor in whole, is not permitted unless authorised by Volkswagen AG. Volkswagen AG does notguarantee or accept any liability with respect to the correctness ofinformation in this document.Copyright by Volkswagen AG.–If the pressure is too great, roof seal -1- can be pushed to‐gether all round by rolling with roller -3356- .1.8Renewing panel seal–Removing glass panel for sunroof ⇒ page 166 .–Pull seal -1- off sliding/tilting sunroof glass panel -2-.–Fit new seal -1- to rear edge of panel, start in middle and pushonto sliding/tilting sunroof glass panel -2- from bottom to top.Note♦To ease fitting of seal, coat panel edge with a soapy solution.♦If the seal is not correctly installed, the surface will ripple.♦The panel seal must be shortened to suit the panel circumfer‐ence.–Install sliding/tilting roof glass panel ⇒ page 166 .–Adjust panel seal ⇒ page 168 .1.9Removing and installing wind deflector1.9.1Removing–Fully open sliding/tilting sunroof glass panel.–Push wind deflector and height limit stop out of front of roofaperture and set wind deflector vertical.Golf Variant 2007 ➤ , Jetta 2005 ➤General body repairs, exterior - Edition 10.20091. Sliding/tilting sunroof with glass panel (Meritor) 169 Downloaded from www.Manualslib.com manuals search engine
Protected by copyright. Copying for private or commercial purposes, in partor in whole, is not permitted unless authorised by Volkswagen AG. Volkswagen AG does notguarantee or accept any liability with respect to the correctness ofinformation in this document.Copyright by Volkswagen AG.–Insert front-end hook -3370- between edge of roof and winddeflector bearing -arrow-.–Pull wind deflector bearings out of detents on left and right, indirection of -arrow-, using front-end hook -3370- .–Remove wind deflector upwards out of guide rails.1.9.2Installing–Place wind deflector in guide rails and slide wind deflector withheight limit stop under front of roof aperture on both sides.–Using light pressure press wind deflector bearings into guiderails.NoteWind deflector bearings must audibly engage in the guide rails.1.10Removing and installing sliding headlin‐er1.10.1Removing–Removing glass panel for sunroof ⇒ page 166 .–Move sliding headliner backwards slightly.–Remove front bolts -arrow- on left and right.–Push spring slide forwards past the stop -1-.–Move sliding headliner forwards and lift sliding headlinerslightly above roof aperture.–Remove rear bolt -arrow- on left and right.–Push spring slide to rear and remove sliding headliner -1- outupwards.Golf Variant 2007 ➤ , Jetta 2005 ➤General body repairs, exterior - Edition 10.2009170 Rep. Gr.60 - Sunroof Downloaded from www.Manualslib.com manuals search engine
Protected by copyright. Copying for private or commercial purposes, in partor in whole, is not permitted unless authorised by Volkswagen AG. Volkswagen AG does notguarantee or accept any liability with respect to the correctness ofinformation in this document.Copyright by Volkswagen AG.1.10.2InstallingInstall in reverse order of removal.Finally carry out a functional check.1.11Removing and installing sliding/tiltingsunroof glass panel drive1.11.1Removing–Removing lights and front operating unit ⇒ Electrical system;Rep. Gr. 96 ; Lights and switches in roof trim .Motor change - preselction switch recognition:Note♦To interrupt the authorization signal and therefore to activatethe switch recognition, the requirements described below mustbe fulfilled.♦If this is not the case, it can lead to, that the drive does notcorrectly recognise the preselection switch and does not runto the selected positions. This can be seen if the sunroof stopsapprox. 10 cm before the fully closed position when the switchis in the closed position.CautionRemove or install drive for tilting/sliding sunroof glass panelonly when sunroof is closed (0 position ).The requirements for removing and installing drive are: enginenot running and ignition off, key not in ignition and door open.–Switch off engine and ignition, withdraw key and open door.This condition must remain until drive has been installed.–Remove screws -arrows- and pull off sliding/tilting sunroofdrive.–Separate connector for sliding/tilting sunroof drive.1.11.2InstallingThe screws for the sliding/tilting sunroof drive are microencapsu‐lated and must always be renewed (3.5 Nm).Install in reverse order of removal.After installation is complete, key can be inserted into lock cylin‐der of ignition/starter switch again.Golf Variant 2007 ➤ , Jetta 2005 ➤General body repairs, exterior - Edition 10.20091. Sliding/tilting sunroof with glass panel (Meritor) 171 Downloaded from www.Manualslib.com manuals search engine
Protected by copyright. Copying for private or commercial purposes, in partor in whole, is not permitted unless authorised by Volkswagen AG. Volkswagen AG does notguarantee or accept any liability with respect to the correctness ofinformation in this document.Copyright by Volkswagen AG.–Finally carry out a functional check.1.12Adjusting drive for sliding/tilting sunroofglass panel (0 position)There may be a requirement to adjust the zero (0) position if thedrive was removed when not in the zero position or the sliding/tilting sunroof glass panel was opened or closed using the emer‐gency key.•Drive removed but still connected electrically.–Select “open sunroof” using preselection control rotary switch.–Select “close sunroof” using preselection control rotary switch.–Select “tilt sunroof” using preselection control rotary switch.–Select “close sunroof” using preselection control rotary switch.–Install drive in this position (zero position) with sunroof closed.The sliding/tilting sunroof glass panel drive is in zero (0) position,if a white dot can be seen in the drive aperture -arrow-.1.13Removing and installing sliding/tiltingsunroof glass panel automatic preselec‐tion switch–Removing preselector for sliding/tilting sunroof roof glass pan‐el ⇒ Electrical system; Rep. Gr. 96 ; Lights and switches inroof trim .1.14Checking parallel running–Removing glass panel for sunroof ⇒ page 166 .Golf Variant 2007 ➤ , Jetta 2005 ➤General body repairs, exterior - Edition 10.2009172 Rep. Gr.60 - Sunroof Downloaded from www.Manualslib.com manuals search engine
Protected by copyright. Copying for private or commercial purposes, in partor in whole, is not permitted unless authorised by Volkswagen AG. Volkswagen AG does notguarantee or accept any liability with respect to the correctness ofinformation in this document.Copyright by Volkswagen AG.The mark -arrow- on the rear of the guide upper section -1- must,on both sides, lie within the marks dimension -a- on the guideplate -2-.•The guide plate -2- must be located in the guide rails (cannotbe moved by hand).1.15Adjusting parallel runningNoteThe parallel running adjustment can only be made when the driveand glass panel are removed ("0" position).–Remove sliding/tilting sunroof glass panel drive ⇒ page 171 .The mark -arrow- on the rear of the guide upper section -1- must,on both sides, lie within the marks dimension -a- on the guideplate -2-.•The guide plate -2- must be located in the guide rails (cannotbe moved by hand).–Push guide upper part -1- both sides centrally between themarks.–Install drive in this position (zero position) ⇒ page 171 .–Then check zero position ⇒ page 172 .Golf Variant 2007 ➤ , Jetta 2005 ➤General body repairs, exterior - Edition 10.20091. Sliding/tilting sunroof with glass panel (Meritor) 173 Downloaded from www.Manualslib.com manuals search engine
Protected by copyright. Copying for private or commercial purposes, in partor in whole, is not permitted unless authorised by Volkswagen AG. Volkswagen AG does notguarantee or accept any liability with respect to the correctness ofinformation in this document.Copyright by Volkswagen AG.1.16Assembly overview - carrier unit1 - Carrier unit❑Removing and installing⇒ page 1742 - Bolt❑Qty. 12❑8 Nm3 - Connector4 - Sliding/tilting sunroof glasspanel drive❑Removing and installing⇒ page 1711.17Removing and installing carrier unitCautionRemove or install drive for tilting/sliding sunroof glass panelonly when sunroof is closed (0 position ).The requirements for removing and installing drive are: enginenot running and ignition off, key not in ignition and door open.1.17.1RemovingCautionCarry out following sequences using extreme care so as not todamage the moulded headliner.–Lower moulded headliner (moulded headliner is not removedfrom the vehicle, the front seats and front passenger door areGolf Variant 2007 ➤ , Jetta 2005 ➤General body repairs, exterior - Edition 10.2009174 Rep. Gr.60 - Sunroof Downloaded from www.Manualslib.com manuals search engine
Protected by copyright. Copying for private or commercial purposes, in partor in whole, is not permitted unless authorised by Volkswagen AG. Volkswagen AG does notguarantee or accept any liability with respect to the correctness ofinformation in this document.Copyright by Volkswagen AG.not removed) ⇒ General body repairs, interior; Rep. Gr. 70 ;Roof trims .–Pull water drain hoses -arrows- off carrier unit -1-.–Separate connector -3- on sliding/tilting sunroof glass paneldrive -4-.–Remove bolts -2- and remove carrier unit -1- from vehicle withthe help of a second mechanic.1.17.2InstallingCautionCarry out following sequences using extreme care so as not todamage the moulded headliner.–Fit carrier unit -1- into roof aperture with the help of a secondmechanic.–During installation align carrier unit -1- in roof using two cylin‐drical pins (shank end of drill) 12 mm front right and 10 mmrear left.Golf Variant 2007 ➤ , Jetta 2005 ➤General body repairs, exterior - Edition 10.20091. Sliding/tilting sunroof with glass panel (Meritor) 175 Downloaded from www.Manualslib.com manuals search engine
Protected by copyright. Copying for private or commercial purposes, in partor in whole, is not permitted unless authorised by Volkswagen AG. Volkswagen AG does notguarantee or accept any liability with respect to the correctness ofinformation in this document.Copyright by Volkswagen AG.Carrier unit must not contact roof frame.–Install bolts -2-.–Check routing of wiring and connectors of electrical consum‐ers in roof and correct as necessary.–Tighten screws (8 Nm) for carrier unit -1-, starting at sunroofdrive -4- and moving rearward, alternating between left andright sides.–Install water drain hoses -arrows-.–Attach connector -3- on sliding/tilting sunroof glass panel drive-4-.–Install moulded headliner ⇒ General body repairs, interior;Rep. Gr. 70 ; Roof trims .Golf Variant 2007 ➤ , Jetta 2005 ➤General body repairs, exterior - Edition 10.2009176 Rep. Gr.60 - Sunroof Downloaded from www.Manualslib.com manuals search engine
Protected by copyright. Copying for private or commercial purposes, in partor in whole, is not permitted unless authorised by Volkswagen AG. Volkswagen AG does notguarantee or accept any liability with respect to the correctness ofinformation in this document.Copyright by Volkswagen AG.1.18Operating without currentNoteIn the event of power failure, the sliding/tilting sunroof with glasspanel can be moved using a hexagon key directly on the drive.Hexagon key is located in vehicle tool kit.–Removing lights and front operating unit ⇒ Electrical system;Rep. Gr. 96 ; Lights and switches in roof trim .–Guide hexagon key into bolt on drive.–Press key upwards -arrow- to release the drive.The bolt will be pressed a few millimetres inwards -a-. Sliding/tilting sunroof glass panel can only be moved in this position.1.19Removing and installing guide plate1.19.1Removing–Removing glass panel for sunroof ⇒ page 166 .–Using a screwdriver, unclip spacer -2- from guide plate -1- atfront and rear -arrows-.–Pull spacer -2- in -direction of arrow- out of guide plate -1-.–Lift guide plate up -1- in -direction of arrow-.Golf Variant 2007 ➤ , Jetta 2005 ➤General body repairs, exterior - Edition 10.20091. Sliding/tilting sunroof with glass panel (Meritor) 177 Downloaded from www.Manualslib.com manuals search engine
Protected by copyright. Copying for private or commercial purposes, in partor in whole, is not permitted unless authorised by Volkswagen AG. Volkswagen AG does notguarantee or accept any liability with respect to the correctness ofinformation in this document.Copyright by Volkswagen AG.–Slide front guide -2- forwards and pull guide plate -1- in-direction of arrow- out of front guide -2-.1.19.2InstallingInstall in reverse order of removal.1.20Removing and installing guide plate1.20.1RemovingNoteAlways renew guides with cables as a pair.–Removing glass panel for sunroof ⇒ page 166 .–Remove sliding/tilting sunroof glass panel drive ⇒ page 171 .–Remove carrier unit ⇒ page 174 .–Remove guide plate ⇒ page 177 .–Detach water channels -1- carefully using a screwdriver atboth sides on guide locating hook -2- in -direction of arrow-and remove water channels.–Release end piece upper part -1- fastening -arrows- from endpiece lower part -2- and pull off upwards.Golf Variant 2007 ➤ , Jetta 2005 ➤General body repairs, exterior - Edition 10.2009178 Rep. Gr.60 - Sunroof Downloaded from www.Manualslib.com manuals search engine
Protected by copyright. Copying for private or commercial purposes, in partor in whole, is not permitted unless authorised by Volkswagen AG. Volkswagen AG does notguarantee or accept any liability with respect to the correctness ofinformation in this document.Copyright by Volkswagen AG.–Slide rear guide lower part -1- in -direction of arrow- in guiderail -3-, until the locating hook guide locking mechanism -2- isreleased.–Pull out rear guide lower part -1- and locking hook guide -2-together in -direction of arrow- from guide rail -3- and remove.1.20.2InstallingInstall in reverse order of removal.1.21Cleaning water drain hosesNoteFor cleaning, a locally manufactured tool made from a speedom‐eter inner cable, approx. 2300 mm long is recommended.Golf Variant 2007 ➤ , Jetta 2005 ➤General body repairs, exterior - Edition 10.20091. Sliding/tilting sunroof with glass panel (Meritor) 179 Downloaded from www.Manualslib.com manuals search engine
Protected by copyright. Copying for private or commercial purposes, in partor in whole, is not permitted unless authorised by Volkswagen AG. Volkswagen AG does notguarantee or accept any liability with respect to the correctness ofinformation in this document.Copyright by Volkswagen AG.1.21.1Front water drain hosesThe front water drain hoses run through the A-pillars and end atthe bulkhead cross member. Cleaning is done from the sunroofpanel aperture.Golf Variant 2007 ➤ , Jetta 2005 ➤General body repairs, exterior - Edition 10.2009180 Rep. Gr.60 - Sunroof Downloaded from www.Manualslib.com manuals search engine
Protected by copyright. Copying for private or commercial purposes, in partor in whole, is not permitted unless authorised by Volkswagen AG. Volkswagen AG does notguarantee or accept any liability with respect to the correctness ofinformation in this document.Copyright by Volkswagen AG.1.21.2Rear water drain hosesThe rear water drain hoses run through the C-pillars and end inthe rear wheel housings. Cleaning is done from the wheel hous‐ing. The wheel housing liner must be removed ⇒ page 323 .Golf Variant 2007 ➤ , Jetta 2005 ➤General body repairs, exterior - Edition 10.20091. Sliding/tilting sunroof with glass panel (Meritor) 181 Downloaded from www.Manualslib.com manuals search engine
Protected by copyright. Copying for private or commercial purposes, in partor in whole, is not permitted unless authorised by Volkswagen AG. Volkswagen AG does notguarantee or accept any liability with respect to the correctness ofinformation in this document.Copyright by Volkswagen AG.2Panorama sliding sunroof (Arvin-Meritor)2.1ToolsSpecial tools and workshop equipment required♦Roller for door insulation foil -3356-♦Torque wrench -V.A.G 1783-♦Adhesive strip remover -VAS 6349-2.2FunctionAll actions of the panorama sliding roof can be performed withignition switched on.After the ignition is switched off, actions can be performed untileither the driver or front passenger door is opened.Golf Variant 2007 ➤ , Jetta 2005 ➤General body repairs, exterior - Edition 10.2009182 Rep. Gr.60 - Sunroof Downloaded from www.Manualslib.com manuals search engine
Protected by copyright. Copying for private or commercial purposes, in partor in whole, is not permitted unless authorised by Volkswagen AG. Volkswagen AG does notguarantee or accept any liability with respect to the correctness ofinformation in this document.Copyright by Volkswagen AG.Opening of front glass panel can be preselected using rotaryswitch -1-.Opening glass panel to the so called comfort position -4-, pre‐vents to a large extent wind noise while driving, which can occurwhen roof is fully open.Glass panel can be tilted and closed using pull and push functionon rotary switch.Sun blind opening button -2- and sun blind closing button -3- areintegrated into rotary switch.The panorama sliding roof is equipped with a roll-back function.If the glass panel encounters an obstruction while closing fromtilting or sliding position, it will open automatically.In addition, there is an emergency closure function. If problemsoccur during closure, panorama sliding roof can be forced to closeby pulling rear end of rotary switch. Rotary switch must thus be in“Sliding sunroof closed” position.The roll-back function is disabled when the emergency closurefunction is active.The sliding sunroof motor is equipped with an overheating pro‐tection, whose activation depends on various parameters. Thesliding sunroof motor is functional again after a cooling-off phase.In the event of power failure, front glass panel and sun blind canbe moved manually ⇒ page 217 .2.3Establishing reference points of panor‐ama sliding roofNote♦After renewal of glass panel, motor, tilting mechanism or sunblind, establish reference points of panorama sliding roof forrespective drive.♦Roll-back function is switched off when establishing referencepoints.Establishing reference points of sliding sunroof motorIgnition is switched on.Rotary switch must be in “Sliding sunroof closed” position.–Pull rotary switch -1- downwards and hold during whole proc‐ess to establish reference points (approx. 20 s) in this position.–When establishing reference points, glass panel first closesand then moves approx. 200 mm towards the rear.–After glass panel is closed again, establishment of referencepoints is finished and rotary switch must be released.Establishing reference points for sun blind motorIgnition is switched on.Golf Variant 2007 ➤ , Jetta 2005 ➤General body repairs, exterior - Edition 10.20092. Panorama sliding sunroof (Arvin-Meritor) 183 Downloaded from www.Manualslib.com manuals search engine
Protected by copyright. Copying for private or commercial purposes, in partor in whole, is not permitted unless authorised by Volkswagen AG. Volkswagen AG does notguarantee or accept any liability with respect to the correctness ofinformation in this document.Copyright by Volkswagen AG.–Press sun blind closing button -3- and hold during wholestandardization run (approx. 20 s) in this position.–When establishing reference points, sun blind first closes andthen moves approx. 200 mm towards the rear.–After sun blind is closed completely again, establishment ofreference points is finished and button must be released.2.4Assembly overview - panorama sliding roof1 - Exterior seal❑Renewing ⇒ page 1912 - Rear glass panel❑Removing and installing⇒ page 187❑Adjusting ⇒ page 1883 - Front glass panel❑Removing and installing⇒ page 185❑Adjusting ⇒ page 1884 - Assembly frame❑Assembly overview⇒ page 203❑Removing and installing⇒ page 2075 - Sun blind❑Removing and installing⇒ page 1996 - Sun blind motor❑Removing and installing⇒ page 198❑Standardization⇒ page 1837 - Sliding sunroof motor❑Removing and installing⇒ page 196❑Standardization⇒ page 1838 - Tilting mechanism❑Removing and installing⇒ page 2159 - Wind deflector❑Removing and installing ⇒ page 193Golf Variant 2007 ➤ , Jetta 2005 ➤General body repairs, exterior - Edition 10.2009184 Rep. Gr.60 - Sunroof Downloaded from www.Manualslib.com manuals search engine
Protected by copyright. Copying for private or commercial purposes, in partor in whole, is not permitted unless authorised by Volkswagen AG. Volkswagen AG does notguarantee or accept any liability with respect to the correctness ofinformation in this document.Copyright by Volkswagen AG.2.5Removing and installing front glass pan‐el2.5.1Removing–Open glass panel -1- until trim -2- is accessible.–Unclip locking lugs -3- by pressing together in direction of-arrow A- on back.–First pull off trim panel -2- downwards at rear and then inwardsin direction of -arrow B- and remove it from bolt -4-.–Push trim panel in direction of -arrow C- forwards and remove.Golf Variant 2007 ➤ , Jetta 2005 ➤General body repairs, exterior - Edition 10.20092. Panorama sliding sunroof (Arvin-Meritor) 185 Downloaded from www.Manualslib.com manuals search engine
Protected by copyright. Copying for private or commercial purposes, in partor in whole, is not permitted unless authorised by Volkswagen AG. Volkswagen AG does notguarantee or accept any liability with respect to the correctness ofinformation in this document.Copyright by Volkswagen AG.–Remove bolts -2- from glass panel -1- on left and right.NoteTo remove bolts, use a magnetic tool so that bolts do not fall intomechanism of panorama sliding roof.–Remove glass panel upwards.CautionTo avoid damaging wind deflector, do not move tilting mecha‐nism when glass panel is removed.2.5.2InstallingNote♦Always use new bolts when installing or removing glass panel.♦To screw in bolts, use a magnetic tool so that bolts do not fallinto mechanism of panorama sliding roof.–Set glass panel -1- from top and screw bolts -2- without tight‐ening them.–Adjust front glass panel ⇒ page 188 .–Tighten bolts -2- (5 Nm).–Fit front trim panel -2- into glass panel -1- and slide in directionof -arrow A-.–Push trim panel in direction of -arrow B- onto bolt -4- and cliplocking lugs -4- on back.–On completion of work, establish reference points of slidingsunroof motor ⇒ page 183 .Golf Variant 2007 ➤ , Jetta 2005 ➤General body repairs, exterior - Edition 10.2009186 Rep. Gr.60 - Sunroof Downloaded from www.Manualslib.com manuals search engine
Protected by copyright. Copying for private or commercial purposes, in partor in whole, is not permitted unless authorised by Volkswagen AG. Volkswagen AG does notguarantee or accept any liability with respect to the correctness ofinformation in this document.Copyright by Volkswagen AG.2.6Removing and installing rear glass pan‐el2.6.1RemovingNoteTo remove bolts, use a magnetic tool so that bolts do not fall intomechanism of panorama sliding roof.–Open front glass panel completely by pressing rotary switchbeyond comfort position.–Remove bolts -3- of rear glass panel -1-.–Remove spacer -2- under bolting point.–Move front glass panel into “tilted” position.–Pull inner seal -3- inwards slightly at point -arrow- and removebolts -2-.–Remove rear glass panel upwards -1-.2.6.2InstallingInstall in reverse order of removal.Note♦Always use new bolts when installing or removing glass panel.♦To screw in bolts, use a magnetic tool so that bolts do not fallinto mechanism of panorama sliding roof.Golf Variant 2007 ➤ , Jetta 2005 ➤General body repairs, exterior - Edition 10.20092. Panorama sliding sunroof (Arvin-Meritor) 187 Downloaded from www.Manualslib.com manuals search engine
Protected by copyright. Copying for private or commercial purposes, in partor in whole, is not permitted unless authorised by Volkswagen AG. Volkswagen AG does notguarantee or accept any liability with respect to the correctness ofinformation in this document.Copyright by Volkswagen AG.–Fit glass panel -1- from top into roof.–Install spacer -2- and tighten bolt -3- (5 Nm).–Pull inner seal -3- slightly backwards at -arrow- positions andscrew bolts -2- without tightening them.–Adjust rear glass panel ⇒ page 188 .–After adjusting rear glass panel, tighten bolts (5 Nm).–On completion of work, establish reference points of slidingsunroof motor ⇒ page 183 .2.7Adjusting height of front and rear glasspanelNote♦Front glass panel must only be adjusted on front edge and rearglass panel on rear edge.♦To achieve the best possible optical appearance, ensure thatadjustments on left and right are as far as is possible uniform(symmetric).Golf Variant 2007 ➤ , Jetta 2005 ➤General body repairs, exterior - Edition 10.2009188 Rep. Gr.60 - Sunroof Downloaded from www.Manualslib.com manuals search engine
Protected by copyright. Copying for private or commercial purposes, in partor in whole, is not permitted unless authorised by Volkswagen AG. Volkswagen AG does notguarantee or accept any liability with respect to the correctness ofinformation in this document.Copyright by Volkswagen AG.Checking height adjustment–Check adjustment of front glass panel -1- and rear glass panel-2- with a depth gauge.♦Dimension -a- = 1.5 ± 1 mm♦Dimension -b- = 1 ± 1 mm♦Dimension -c- = 1 ± 1 mmIf measured values differ from specifications, respective glasspanel must be adjusted.♦Adjusting front glass panel ⇒ page 189♦Adjusting rear glass panel ⇒ page 189Adjusting front glass panelNoteThe glass panel height adjustment is performed after the glasspanel has been closed from slide open position.–Remove trim panel ⇒ page 185 .–Loosen only both front bolts -2- left and right for glass panel-1-.–Close glass panel.–Adjust glass panel -1- as shown in illustration.♦Dimension -a- = 1.5 ± 1 mm♦Dimension -b- = 1 ± 1 mm♦Dimension -c- = 1 ± 1 mm–Tighten left and right bolts (5 Nm).–Install trim ⇒ page 186 .Adjusting rear glass panelGolf Variant 2007 ➤ , Jetta 2005 ➤General body repairs, exterior - Edition 10.20092. Panorama sliding sunroof (Arvin-Meritor) 189 Downloaded from www.Manualslib.com manuals search engine
Protected by copyright. Copying for private or commercial purposes, in partor in whole, is not permitted unless authorised by Volkswagen AG. Volkswagen AG does notguarantee or accept any liability with respect to the correctness ofinformation in this document.Copyright by Volkswagen AG.–Pull inner seal -3- slightly backwards at -arrow- positions andremove bolts -2- of rear glass panel -1-.–Adjust rear glass panel -2- as shown in illustration.♦Dimension -a- = 1.5 ± 1 mm♦Dimension -b- = 1 ± 1 mm♦Dimension -c- = 1 ± 1 mm–Tighten left and right bolts (5 Nm).2.8Renewing seals for rear glass panel–Remove rear glass panel ⇒ page 187 .Renew front and inner seals–Pull respective seal -1- off rear glass panel.♦2 Front seal♦3 Inner seal–Remove existing adhesive residue using adhesive strip re‐mover -VAS 6349- .–Bonding surface on glass panel must be free of dust andgrease.–Clean bonding surface completely using cleaning solution -D009 401 04- .NoteTo guarantee a good bonding of seal, do not bond at a tempera‐ture below 20°C.–Remove protective backing from adhesive tape of new sealand press on seal at both ends.–Sprain any seal excess length evenly.–Press in seal evenly using roller for door insulation foil -3356- .–Install rear glass panel ⇒ page 187 .Removing side sealGolf Variant 2007 ➤ , Jetta 2005 ➤General body repairs, exterior - Edition 10.2009190 Rep. Gr.60 - Sunroof Downloaded from www.Manualslib.com manuals search engine
Protected by copyright. Copying for private or commercial purposes, in partor in whole, is not permitted unless authorised by Volkswagen AG. Volkswagen AG does notguarantee or accept any liability with respect to the correctness ofinformation in this document.Copyright by Volkswagen AG.–Remove side seal -2- from profile of rear glass panel -1-.–Remove existing adhesive residue using adhesive strip re‐mover -VAS 6349- .–Bonding surface on glass panel must be free of dust andgrease.–Clean bonding surface completely using cleaning solution -D009 401 04- .Note♦New seal is supplied in excess length. Cut new seal to appro‐priate length. It is recommended to leave new seal 1-2 mmlonger and to sprain any excess length.♦To guarantee a good bonding of seal, do not bond at a tem‐perature below 20°C.–Pull off protective backing from adhesive tape of new seal.–Set new seal -2- with fastener -3- on glass panel -1-.–Press seal on both ends.–Press seal -2- onto profile of glass panel -1- and sprain anyexcess length evenly.–Press in seal evenly using roller for door insulation foil -3356- .–Install rear glass panel ⇒ page 187 .2.9Renewing outer seal–Remove front glass panel ⇒ page 185 .–Remove rear glass panel ⇒ page 187 .Golf Variant 2007 ➤ , Jetta 2005 ➤General body repairs, exterior - Edition 10.20092. Panorama sliding sunroof (Arvin-Meritor) 191 Downloaded from www.Manualslib.com manuals search engine
Protected by copyright. Copying for private or commercial purposes, in partor in whole, is not permitted unless authorised by Volkswagen AG. Volkswagen AG does notguarantee or accept any liability with respect to the correctness ofinformation in this document.Copyright by Volkswagen AG.–Pull out outer seal -1- in bonding area -3- from roof -2-.–Cut off all round profile of outer seal -1- in -arrow- area, flushwith edge of roof -4-.–Remaining part -3- stays between roof -4- and assembly frame-2-.–Remove existing adhesive residue using adhesive strip re‐mover -VAS 6349- .–Entire bonding surface on roof cut-out must be free of dust andgrease.–Clean bonding surface completely using cleaning solution -D009 401 04- .Note♦New seal is supplied in excess length. Cut new seal to appro‐priate length. It is recommended to leave new seal 1-2 mmlonger and to sprain any excess length.♦To guarantee a good bonding of seal, do not bond at a tem‐perature below 20°C.♦After bonding outer seal, wait at least 30 min before fittingglass panel to assure seal does not unstick.Golf Variant 2007 ➤ , Jetta 2005 ➤General body repairs, exterior - Edition 10.2009192 Rep. Gr.60 - Sunroof Downloaded from www.Manualslib.com manuals search engine
Protected by copyright. Copying for private or commercial purposes, in partor in whole, is not permitted unless authorised by Volkswagen AG. Volkswagen AG does notguarantee or accept any liability with respect to the correctness ofinformation in this document.Copyright by Volkswagen AG.–Centre new outer seal -1- with butt -arrow- on rear centre ofroof cut-out.–Pull protective backing from adhesive tape -3- of new outerseal -1- and press seal on roof -2-.–The seal must not pull into the radii, otherwise the seal willstretch and compress.–Press in outer seal evenly and all round twice using roller fordoor insulation foil -3356- .–Install rear glass panel ⇒ page 187 .–Install front glass panel ⇒ page 185 .2.10Renewing inner seal–Remove front glass panel ⇒ page 185 .–Remove rear glass panel ⇒ page 187 .–Pull inner seal -2- off assembly frame -1-.–Remove existing adhesive residue using adhesive strip re‐mover -VAS 6349- .–Bonding surface must be free of dust and grease.–Clean bonding surface completely using cleaning solution -D009 401 04- .NoteTo guarantee a good bonding of seal, do not bond at a tempera‐ture below 20°C.–Place inner seal -2- with butt positioned on rear centre of roofcut-out, onto bonding surface of assembly frame -1-.–Pull protective backing from adhesive tape of new inner sealsection by section and press it on.–The seal must not pull into the radii, otherwise the seal willstretch and compress.–Press inner seal in evenly and all round twice using roller-3356- .–Install rear glass panel ⇒ page 187 .–Install front glass panel ⇒ page 185 .2.11Removing and installing wind deflector2.11.1Removing–Open front glass panel completely.Golf Variant 2007 ➤ , Jetta 2005 ➤General body repairs, exterior - Edition 10.20092. Panorama sliding sunroof (Arvin-Meritor) 193 Downloaded from www.Manualslib.com manuals search engine
Protected by copyright. Copying for private or commercial purposes, in partor in whole, is not permitted unless authorised by Volkswagen AG. Volkswagen AG does notguarantee or accept any liability with respect to the correctness ofinformation in this document.Copyright by Volkswagen AG.–Using a screwdriver, unclip securing clip -3- over mountingbracket -2- of wind deflector -1-.–Using a screwdriver, unclip mounting bracket -2- of wind de‐flector -1- from assembly frame -3-.–Remove bolts -2- from wind deflector -1-.–Remove wind deflector -1- upwards.2.11.2InstallingInstall in reverse order of removal.Specified torqueWind deflector bolts 2 NmGolf Variant 2007 ➤ , Jetta 2005 ➤General body repairs, exterior - Edition 10.2009194 Rep. Gr.60 - Sunroof Downloaded from www.Manualslib.com manuals search engine
Protected by copyright. Copying for private or commercial purposes, in partor in whole, is not permitted unless authorised by Volkswagen AG. Volkswagen AG does notguarantee or accept any liability with respect to the correctness ofinformation in this document.Copyright by Volkswagen AG.Note♦Wind deflector mounting bracket must engage audibly.♦Securing clip of mounting bracket must always be renewedafter removal.2.12Removing and installing wind deflectorbracket2.12.1Removing–Remove wind deflector ⇒ page 193 .–Using a drift -1-, drive dowel pin -3- out of upper net strip -2-.–Pull wind deflector bracket -1- out of net strip -5- in directionof -arrow-.–Pull tensioning wire -2- out of lower net strip -4- and net -3-.2.12.2Installing–Carefully push tensioning wire -2- through net -3- into lowernet strip -4-.Further installation is performed in reverse order of removal.Use a new dowel pin to secure wind deflector bracket.–Install wind deflector ⇒ page 193 .Golf Variant 2007 ➤ , Jetta 2005 ➤General body repairs, exterior - Edition 10.20092. Panorama sliding sunroof (Arvin-Meritor) 195 Downloaded from www.Manualslib.com manuals search engine
Protected by copyright. Copying for private or commercial purposes, in partor in whole, is not permitted unless authorised by Volkswagen AG. Volkswagen AG does notguarantee or accept any liability with respect to the correctness ofinformation in this document.Copyright by Volkswagen AG.2.13Removing and installing preselector forglass panel and sun blind–Removing preselector for panorama sliding roof glass panel⇒ Electrical system; Rep. Gr. 96 ; Lights and switches in rooftrim .2.14Removing and installing sliding sunroofmotor2.14.1Removing–Removing lights and front operating unit ⇒ Electrical system;Rep. Gr. 96 ; Lights and switches in roof trim .WARNINGOn some models, a ribbon cable is bonded to the light cut-outweb. Before removing sliding sunroof motor, carefully detachribbon cable from web and push it to side. Ensure that ribboncable is not damaged when doing this.Golf Variant 2007 ➤ , Jetta 2005 ➤General body repairs, exterior - Edition 10.2009196 Rep. Gr.60 - Sunroof Downloaded from www.Manualslib.com manuals search engine
Protected by copyright. Copying for private or commercial purposes, in partor in whole, is not permitted unless authorised by Volkswagen AG. Volkswagen AG does notguarantee or accept any liability with respect to the correctness ofinformation in this document.Copyright by Volkswagen AG.–Carefully detach ribbon cable -3- (if fitted) from web -1- andpull it to side -arrow-.To access right bolt -4- of sliding sunroof motor -2- with tool, drilla 10 mm ∅ hole in web -1-.Dimension -a- = 10 mmDimension -b- = 2 mmCautionEnsure when drilling hole that sliding roof motor underneath isnot damaged. If necessary, use a drill with depth-control stopand set drilling depth to 3 mm.–Remove bolts -4-.–Slightly lower sliding sunroof motor and tilt it out forwards.–Separate connector.Golf Variant 2007 ➤ , Jetta 2005 ➤General body repairs, exterior - Edition 10.20092. Panorama sliding sunroof (Arvin-Meritor) 197 Downloaded from www.Manualslib.com manuals search engine
Protected by copyright. Copying for private or commercial purposes, in partor in whole, is not permitted unless authorised by Volkswagen AG. Volkswagen AG does notguarantee or accept any liability with respect to the correctness ofinformation in this document.Copyright by Volkswagen AG.2.14.2InstallingWith front glass panel removed:–Pull tilting mechanism fully forwards on both sides until it iscompletely lowered.–Push tilting mechanism on -arrow- areas of slider -2- not onguide plate -3-.Further installation is performed in reverse order of removal.Specified torque for sliding sunroof motor bolts: 3.5 Nm–On completion of work, establish reference points of slidingsunroof motor ⇒ page 183 .2.15Removing and installing sun blind motor2.15.1Removing–Remove moulded headliner ⇒ General body repairs, interior;Rep. Gr. 70 ; Roof trims .–Disconnect connector -1- on sun blind motor -2-.–Remove bolts -arrow- from sun blind motor -2-.–Remove sun blind motor -2-.Golf Variant 2007 ➤ , Jetta 2005 ➤General body repairs, exterior - Edition 10.2009198 Rep. Gr.60 - Sunroof Downloaded from www.Manualslib.com manuals search engine
Protected by copyright. Copying for private or commercial purposes, in partor in whole, is not permitted unless authorised by Volkswagen AG. Volkswagen AG does notguarantee or accept any liability with respect to the correctness ofinformation in this document.Copyright by Volkswagen AG.2.15.2Installing–Before installing motor, adjust sun blind by ensuring paralleldistance -a- between sun blind cross strut -1- and sun blindhousing -2-.Further installation is performed in reverse order of removal.Specified torqueBolts 3.5 Nm–On completion of work, establish reference points of sun blindmotor ⇒ page 183 .2.16Removing and installing sun blind2.16.1Removing–Run sun blind to fully open position.NoteIn the event of power failure, sun blind can be moved by turningsun blind motor with a commercially available hexagon key to re‐moval position (fully open). ⇒ page 217–Remove rear glass panel ⇒ page 187 .–Remove bolt -3- from cap -2-.–Using a screwdriver, unclip fastener -arrow- of cover cap -2-from rear part -4- and tilt cover cap -2- upwards.Inner seal -1- must not be removed for this.Golf Variant 2007 ➤ , Jetta 2005 ➤General body repairs, exterior - Edition 10.20092. Panorama sliding sunroof (Arvin-Meritor) 199 Downloaded from www.Manualslib.com manuals search engine
Protected by copyright. Copying for private or commercial purposes, in partor in whole, is not permitted unless authorised by Volkswagen AG. Volkswagen AG does notguarantee or accept any liability with respect to the correctness ofinformation in this document.Copyright by Volkswagen AG.–Carefully lift sun blind cross strut -3- with sun blind slide -1-.NoteEnsure that sun blind fabric -2- is not damaged.–Pull sun blind slide -1- in direction of -arrow- on side of sunblind cross strut -3-.–Remove moulded headliner ⇒ General body repairs, interior;Rep. Gr. 70 ; Roof trims .–Remove bolts -1- of sun blind housing -2-.–Pull sun blind housing -2- in direction of -arrow- slightly down‐wards to get past sun blind motor -3-.–Pull sun blind housing -2- with sun blind steel strap -4- in di‐rection of -arrow- out of sun blind rail -1-.NoteEnsure that sun blind fabric -3- is not damaged.Sun blind cross strut can be renewed when sun blind is removed.Golf Variant 2007 ➤ , Jetta 2005 ➤General body repairs, exterior - Edition 10.2009200 Rep. Gr.60 - Sunroof Downloaded from www.Manualslib.com manuals search engine
Protected by copyright. Copying for private or commercial purposes, in partor in whole, is not permitted unless authorised by Volkswagen AG. Volkswagen AG does notguarantee or accept any liability with respect to the correctness ofinformation in this document.Copyright by Volkswagen AG.–Carefully pull sun blind cross strut -1- in direction of -arrow-out of beading -3- of sun blind fabric -2-.–Carefully slide sun blind cross strut -1- on beading -3-.NoteEnsure that sun blind fabric -2- is not damaged.2.16.2InstallingNote♦Sun blind cross strut must be fitted before installation of sunblind housing.♦Do not grease sun blind slide and sun blind cables.–Push sun blind housing -2- with sun blind steel strap -4- indirection of -arrow- into sun blind rail -1-.NoteEnsure that sun blind fabric -3- is not damaged.Golf Variant 2007 ➤ , Jetta 2005 ➤General body repairs, exterior - Edition 10.20092. Panorama sliding sunroof (Arvin-Meritor) 201 Downloaded from www.Manualslib.com manuals search engine
Protected by copyright. Copying for private or commercial purposes, in partor in whole, is not permitted unless authorised by Volkswagen AG. Volkswagen AG does notguarantee or accept any liability with respect to the correctness ofinformation in this document.Copyright by Volkswagen AG.Lug -3- of sun blind housing -2- must be inserted under sun blindrail -1-.–Push sun blind slide -1- in direction of -arrow- into sun blindcross strut -4-.NoteEnsure that sun blind slide -1- engages into cut-out of sun blind steel strip -5- and into follower of sun blindcable -2-.Further installation is performed in reverse order of removal.Golf Variant 2007 ➤ , Jetta 2005 ➤General body repairs, exterior - Edition 10.2009202 Rep. Gr.60 - Sunroof Downloaded from www.Manualslib.com manuals search engine
Protected by copyright. Copying for private or commercial purposes, in partor in whole, is not permitted unless authorised by Volkswagen AG. Volkswagen AG does notguarantee or accept any liability with respect to the correctness ofinformation in this document.Copyright by Volkswagen AG.Specified torquesSun blind housing bolt 3.5 NmCover cap bolt 2 NmNoteAfter installation, sun blind synchronism and ease of operationshould be checked. To do this, move by hand sun blind drive onmotor using a commercially available hexagon key and avoidwrinkling and deformation of sun blind fabric.–Install moulded headliner ⇒ General body repairs, interior;Rep. Gr. 70 ; Roof trims .–Install rear glass panel ⇒ page 187 .–On completion of work, establish reference points of sun blindmotor ⇒ page 183 .2.17Assembly overview - assembly frame1 - Sun blind rail❑Cannot be renewed in‐dividually2 - Guide rail❑Cannot be renewed in‐dividually❑Attached to front part3 - Bolt❑2 Nm4 - Rear part❑Removing and installing⇒ page 2095 - Rear motor plate❑Removing and installing⇒ page 2046 - Front motor plate❑Removing and installing⇒ page 2157 - Front part❑Cannot be renewed in‐dividually❑Attached to guide rail8 - Inner seal❑Renewing ⇒ page 193Golf Variant 2007 ➤ , Jetta 2005 ➤General body repairs, exterior - Edition 10.20092. Panorama sliding sunroof (Arvin-Meritor) 203 Downloaded from www.Manualslib.com manuals search engine
Protected by copyright. Copying for private or commercial purposes, in partor in whole, is not permitted unless authorised by Volkswagen AG. Volkswagen AG does notguarantee or accept any liability with respect to the correctness ofinformation in this document.Copyright by Volkswagen AG.2.18Installing and removing motor plate andsun blind cable2.18.1Removing–Remove moulded headliner ⇒ General body repairs, interior;Rep. Gr. 70 ; Roof trims .–Remove sun blind motor ⇒ page 198 .–Remove sun blind ⇒ page 199 .–Remove bolts -arrows- of cable covers -1- and -2-.–Remove cable covers -1- and -2-.Motor plate -3- remains on rear part -4-.Golf Variant 2007 ➤ , Jetta 2005 ➤General body repairs, exterior - Edition 10.2009204 Rep. Gr.60 - Sunroof Downloaded from www.Manualslib.com manuals search engine
Protected by copyright. Copying for private or commercial purposes, in partor in whole, is not permitted unless authorised by Volkswagen AG. Volkswagen AG does notguarantee or accept any liability with respect to the correctness ofinformation in this document.Copyright by Volkswagen AG.–Pull sun blind cables -3- out of discharge tubes -1- and motorplate -4-.–Using an appropriate screwdriver -5-, lever motor plate -5- outof rear part -6-.Golf Variant 2007 ➤ , Jetta 2005 ➤General body repairs, exterior - Edition 10.20092. Panorama sliding sunroof (Arvin-Meritor) 205 Downloaded from www.Manualslib.com manuals search engine
Protected by copyright. Copying for private or commercial purposes, in partor in whole, is not permitted unless authorised by Volkswagen AG. Volkswagen AG does notguarantee or accept any liability with respect to the correctness ofinformation in this document.Copyright by Volkswagen AG.–Lever guide tube -1- out of cable support bracket -4- of rearpart -3-.–Remove cable -2- from sun blind rail -5-.2.18.2InstallingInstall in reverse order of removal.Specified torquesBolt for cable cover: 2 NmNoteDo not grease motor plate and sun blind cables.–Install sun blind ⇒ page 201 .–Install sun blind motor ⇒ page 199 .–Install moulded headliner ⇒ General body repairs, interior;Rep. Gr. 70 ; Roof trims .–On completion of work, establish reference points of all drivesfor panorama sliding roof ⇒ page 183 .Golf Variant 2007 ➤ , Jetta 2005 ➤General body repairs, exterior - Edition 10.2009206 Rep. Gr.60 - Sunroof Downloaded from www.Manualslib.com manuals search engine
Protected by copyright. Copying for private or commercial purposes, in partor in whole, is not permitted unless authorised by Volkswagen AG. Volkswagen AG does notguarantee or accept any liability with respect to the correctness ofinformation in this document.Copyright by Volkswagen AG.2.19Removing and installing assemblyframe2.19.1RemovingNoteA second mechanic is required for removing and installing as‐sembly frame.–Remove moulded headliner ⇒ General body repairs, interior;Rep. Gr. 70 ; Roof trims .Vehicles with net partition:–Remove net partition mounting ⇒ General body repairs, inte‐rior; Rep. Gr. 68 ; Net partition .All vehicles:–Remove grab handle mounting (roof) ⇒ General body repairs,interior; Rep. Gr. 68 ; Grab handles .Golf Variant 2007 ➤ , Jetta 2005 ➤General body repairs, exterior - Edition 10.20092. Panorama sliding sunroof (Arvin-Meritor) 207 Downloaded from www.Manualslib.com manuals search engine
Protected by copyright. Copying for private or commercial purposes, in partor in whole, is not permitted unless authorised by Volkswagen AG. Volkswagen AG does notguarantee or accept any liability with respect to the correctness ofinformation in this document.Copyright by Volkswagen AG.–Pull off water drain hoses from connections -arrows- of as‐sembly frame -1-.–Disconnect connector to wiring harness of sliding sunroof mo‐tor -8-.–Unscrew bolts -3- and -4- of on console -5- and remove leftand right consoles.–Unscrew bolts -2- on assembly frame -1- and remove assem‐bly frame from vehicle with the help of at least one mechanic.2.19.2Installing–Lift assembly frame -1- into vehicle with the help of at least asecond mechanic.–When screwing, align assembly frame using 2 cylindrical pins(shank end of drill ∅ 10mm) in elongated holes -6- and -7-.–Screw bolts -2- in, but do not tighten.–Tighten bolts -3-, specified torque: 8 Nm.–Tighten bolts -4-, specified torque: 4.5 Nm.Golf Variant 2007 ➤ , Jetta 2005 ➤General body repairs, exterior - Edition 10.2009208 Rep. Gr.60 - Sunroof Downloaded from www.Manualslib.com manuals search engine
Protected by copyright. Copying for private or commercial purposes, in partor in whole, is not permitted unless authorised by Volkswagen AG. Volkswagen AG does notguarantee or accept any liability with respect to the correctness ofinformation in this document.Copyright by Volkswagen AG.–First tighten letter marked bolts -2- in alphabetic order to 8 Nm.–Tighten then remaining bolts -2- of assembly frame -1- to8 Nm.Further installation is performed in reverse order of removal.Vehicles with net partition:–Install net partition mounting ⇒ General body repairs, interior;Rep. Gr. 68 ; Net partition .All vehicles:–Install grab handle mounting (roof) ⇒ General body repairs,interior; Rep. Gr. 68 ; Grab handles .–Install moulded headliner ⇒ General body repairs, interior;Rep. Gr. 70 ; Roof trims .2.20Removing and installing rear part2.20.1Removing–Remove assembly frame from vehicle ⇒ page 207 .Golf Variant 2007 ➤ , Jetta 2005 ➤General body repairs, exterior - Edition 10.20092. Panorama sliding sunroof (Arvin-Meritor) 209 Downloaded from www.Manualslib.com manuals search engine
Protected by copyright. Copying for private or commercial purposes, in partor in whole, is not permitted unless authorised by Volkswagen AG. Volkswagen AG does notguarantee or accept any liability with respect to the correctness ofinformation in this document.Copyright by Volkswagen AG.–Pull inner seal -2- off assembly frame -1-.–Remove sun blind ⇒ page 199 .–Loosen wiring harness from rear part.–Remove bolts -2- from guide rail -1-.–Mark position -arrow- of rear part -3- for further assembly.–Separate adhesive bonding -2- between guide rail -1- and rearpart -3- using a knife.–Pull entire rear part -1- with discharge tubes -2- in direction of-arrow- out of guide rail -3-.Golf Variant 2007 ➤ , Jetta 2005 ➤General body repairs, exterior - Edition 10.2009210 Rep. Gr.60 - Sunroof Downloaded from www.Manualslib.com manuals search engine
Protected by copyright. Copying for private or commercial purposes, in partor in whole, is not permitted unless authorised by Volkswagen AG. Volkswagen AG does notguarantee or accept any liability with respect to the correctness ofinformation in this document.Copyright by Volkswagen AG.2.20.2Installing–Remove existing adhesive residue using adhesive strip re‐mover -VAS 6349- .–Clean bonding surfaces on rear part and guide rails with clean‐er -D 009 401 04- .–Press a ∅ 3.5 mm butyl sealing cord -AKD 497 010 04 R10--2- as shown in illustration into adhesive canal on rear part-1-.–Push entire rear part -1- with discharge tubes -2- in directionof -arrow- onto guide rail -3-.–Tighten bolts -2- on guide rail -1- to 2 Nm.NoteBefore installation, it is recommended to check leak tightness ofassembly frame.–Seal water drain hoses -1-.–Fill marked area -3- between rear part -2- and guide rail -4-with water.–Wait for at least 5 minutes before checking leak tightness.–Seal any leaks with butyl sealing cord -AKD 497 010 04 R10- .–Install sun blind ⇒ page 199 .–Install sun blind motor ⇒ page 198 .–Install a new inner seal ⇒ page 193 .–Install assembly frame ⇒ page 208 .–On completion of work, establish reference points of all drivesfor panorama sliding roof ⇒ page 183 .Golf Variant 2007 ➤ , Jetta 2005 ➤General body repairs, exterior - Edition 10.20092. Panorama sliding sunroof (Arvin-Meritor) 211 Downloaded from www.Manualslib.com manuals search engine
Protected by copyright. Copying for private or commercial purposes, in partor in whole, is not permitted unless authorised by Volkswagen AG. Volkswagen AG does notguarantee or accept any liability with respect to the correctness ofinformation in this document.Copyright by Volkswagen AG.2.21Removing and installing front motorplate2.21.1Removing–Remove assembly frame from vehicle ⇒ page 207 .–Remove sliding sunroof motor ⇒ page 196 .–Remove bolts -arrows-.–Remove cable covers -1 and 2-.Front motor plate -3- remains on front part -4-.Golf Variant 2007 ➤ , Jetta 2005 ➤General body repairs, exterior - Edition 10.2009212 Rep. Gr.60 - Sunroof Downloaded from www.Manualslib.com manuals search engine
Protected by copyright. Copying for private or commercial purposes, in partor in whole, is not permitted unless authorised by Volkswagen AG. Volkswagen AG does notguarantee or accept any liability with respect to the correctness ofinformation in this document.Copyright by Volkswagen AG.–Pull ends of cable -1- out of motor plate -2-.–Using appropriate screwdriver -4-, lever motor plate -2- out offront part -3-.Golf Variant 2007 ➤ , Jetta 2005 ➤General body repairs, exterior - Edition 10.20092. Panorama sliding sunroof (Arvin-Meritor) 213 Downloaded from www.Manualslib.com manuals search engine
Protected by copyright. Copying for private or commercial purposes, in partor in whole, is not permitted unless authorised by Volkswagen AG. Volkswagen AG does notguarantee or accept any liability with respect to the correctness ofinformation in this document.Copyright by Volkswagen AG.2.21.2InstallingNote♦Insert motor plate -2- into front part -3-.♦Do not grease motor plate and cables -1-.Further installation is performed in reverse order of removal.Specified torquesBolt for cable cover: 2 Nm–Install sliding sunroof motor ⇒ page 196 .–Install assembly frame ⇒ page 208 .–On completion of work, establish reference points of sun blindmotor ⇒ page 183 .Golf Variant 2007 ➤ , Jetta 2005 ➤General body repairs, exterior - Edition 10.2009214 Rep. Gr.60 - Sunroof Downloaded from www.Manualslib.com manuals search engine
Protected by copyright. Copying for private or commercial purposes, in partor in whole, is not permitted unless authorised by Volkswagen AG. Volkswagen AG does notguarantee or accept any liability with respect to the correctness ofinformation in this document.Copyright by Volkswagen AG.2.22Removing and installing tilting mecha‐nism and front glass panel cable2.22.1Removing–Remove front glass panel ⇒ page 185 .–Remove rear glass panel ⇒ page 187 .–Remove assembly frame from vehicle ⇒ page 207 .–Remove sliding sunroof motor ⇒ page 196 .–Remove rear part of assembly frame ⇒ page 209 .After removal of rear part, tilting mechanism can be slid out back‐wards.To do this, proceed as follows:CautionObserve position of cables before removal to avoid any errorwhen installing.Do not pull or push tilting mechanism guide plate.–Push glass panel tilting mechanism only on areas -arrow- ofslider -2-, not on guide plate -3-.Tilting mechanism tilts when moving.–Using appropriate screwdriver, push tilting mechanism back‐wards to end of guide rail -1-.–Unhook cable -2- out of slider -1- -arrow A-.–Pull slider -1- out of guide rail -3- -arrow B-.–Pull cable -2- out of guide rail -3-.Golf Variant 2007 ➤ , Jetta 2005 ➤General body repairs, exterior - Edition 10.20092. Panorama sliding sunroof (Arvin-Meritor) 215 Downloaded from www.Manualslib.com manuals search engine
Protected by copyright. Copying for private or commercial purposes, in partor in whole, is not permitted unless authorised by Volkswagen AG. Volkswagen AG does notguarantee or accept any liability with respect to the correctness ofinformation in this document.Copyright by Volkswagen AG.2.22.2InstallingNote♦Guide rails must only be cleaned if heavily soiled.♦To do this, use cleaner -D 009 401 04- .♦Then grease guide rail in guide areas with lithium grease -G052 147 A2- ⇒ page 217 .♦Do not grease cables.–Slide tilting mechanism -3- into guide rail -1-.–Ensure that slides -2- face towards rear when slid into guiderail -1-.–Push cable -2- into guide rail -3- -arrow B-.–Hook cable -2- into slider -1- -arrow A-.NoteDo not pull or push tilting mechanism guide plate.–Push tilting mechanism on -arrow- areas of slider -2- not onguide plate -3-.–Pull tilting mechanism fully forwards on both sides until it iscompletely lowered.–Install rear part on assembly frame ⇒ page 211 .–Install sliding sunroof motor ⇒ page 198 .–Install assembly frame into vehicle ⇒ page 208 .–Install rear glass panel ⇒ page 187 .–Install front glass panel ⇒ page 185 .–On completion of work, establish reference points of all drivesfor panorama sliding roof ⇒ page 183 .Golf Variant 2007 ➤ , Jetta 2005 ➤General body repairs, exterior - Edition 10.2009216 Rep. Gr.60 - Sunroof Downloaded from www.Manualslib.com manuals search engine
Protected by copyright. Copying for private or commercial purposes, in partor in whole, is not permitted unless authorised by Volkswagen AG. Volkswagen AG does notguarantee or accept any liability with respect to the correctness ofinformation in this document.Copyright by Volkswagen AG.2.23Maintenance and careNo regular maintenance is usually required for the panoramasliding roof.If cleaning is necessary because it is heavily soiled, use cleaner-D 009 401 04- .Guide areas -3- of guide rail -2- must then be greased again withlithium grease -G 052 147 A2- .Inner seal -1- and outer seal -4- have a solid film lubricant coatingand must not be greased.Do not grease cables and motor plate.2.24Operating without current2.24.1Glass panelNote♦In the event of power failure, front glass panel near to slidingsunroof motor can be moved by hand using a commerciallyavailable hexagon key.♦Front glass panel must only be moved until its front edge isflush with front edge of rear glass panel. If glass panel ismoved further backwards, mechanism cables may hook off.–Removing lights and front operating unit ⇒ Electrical system;Rep. Gr. 96 ; Lights and switches in roof trim .WARNINGOn some models, a ribbon cable is bonded to the light cut-outweb. For the emergency key, carefully detach ribbon cablefrom web and push it to side. Ensure that ribbon cable is notdamaged when doing this.Golf Variant 2007 ➤ , Jetta 2005 ➤General body repairs, exterior - Edition 10.20092. Panorama sliding sunroof (Arvin-Meritor) 217 Downloaded from www.Manualslib.com manuals search engine
Protected by copyright. Copying for private or commercial purposes, in partor in whole, is not permitted unless authorised by Volkswagen AG. Volkswagen AG does notguarantee or accept any liability with respect to the correctness ofinformation in this document.Copyright by Volkswagen AG.–Carefully detach ribbon cable -5- (if fitted) from web -1-.–Pull ribbon cable to side -arrow- using a commercially availa‐ble hexagon key -4- until access is made possible through holein web -1-.–Guide hexagon key -4- through hole in web -1- into bolt -3- ofsliding sunroof motor -2-.When turning by hand, greater force is necessary since motor isnot uncoupled from drive.2.24.2Sun blindNoteIn the event of power failure, sun blind can be moved by hand onsun blind motor using a commercially available hexagon key.–Remove moulded headliner ⇒ General body repairs, interior;Rep. Gr. 70 ; Roof trims .Golf Variant 2007 ➤ , Jetta 2005 ➤General body repairs, exterior - Edition 10.2009218 Rep. Gr.60 - Sunroof Downloaded from www.Manualslib.com manuals search engine
Protected by copyright. Copying for private or commercial purposes, in partor in whole, is not permitted unless authorised by Volkswagen AG. Volkswagen AG does notguarantee or accept any liability with respect to the correctness ofinformation in this document.Copyright by Volkswagen AG.–Insert hexagon key -2- into bolt of sun blind motor -1-.When turning by hand, greater force is necessary since motor isnot uncoupled from drive.2.25Cleaning water drain hosesNoteFor cleaning, a locally manufactured tool made from a speedom‐eter inner cable, approx. 2300 mm long is recommended.Golf Variant 2007 ➤ , Jetta 2005 ➤General body repairs, exterior - Edition 10.20092. Panorama sliding sunroof (Arvin-Meritor) 219 Downloaded from www.Manualslib.com manuals search engine
Protected by copyright. Copying for private or commercial purposes, in partor in whole, is not permitted unless authorised by Volkswagen AG. Volkswagen AG does notguarantee or accept any liability with respect to the correctness ofinformation in this document.Copyright by Volkswagen AG.2.25.1Front water drain hosesThe front water drain hoses run through the A-pillars and end atthe bulkhead cross member. Cleaning is done from panoramasliding roof cut-out.Golf Variant 2007 ➤ , Jetta 2005 ➤General body repairs, exterior - Edition 10.2009220 Rep. Gr.60 - Sunroof Downloaded from www.Manualslib.com manuals search engine
Protected by copyright. Copying for private or commercial purposes, in partor in whole, is not permitted unless authorised by Volkswagen AG. Volkswagen AG does notguarantee or accept any liability with respect to the correctness ofinformation in this document.Copyright by Volkswagen AG.2.25.2Rear water drain hosesThe rear water drain hoses run through the D-pillars and end inthe rear wheel housings. Cleaning is done from the wheel hous‐ing. The wheel housing liner must be removed.Golf Variant 2007 ➤ , Jetta 2005 ➤General body repairs, exterior - Edition 10.20092. Panorama sliding sunroof (Arvin-Meritor) 221 Downloaded from www.Manualslib.com manuals search engine
Protected by copyright. Copying for private or commercial purposes, in partor in whole, is not permitted unless authorised by Volkswagen AG. Volkswagen AG does notguarantee or accept any liability with respect to the correctness ofinformation in this document.Copyright by Volkswagen AG.63 –Bumpers1Front bumper1.1ToolsSpecial tools and workshop equipment required♦Torque wrench -V.A.G 1783-♦Torque wrench -V.A.G 1332-1.2Repairing bumper coverNoteIf bumper cover is damaged, determine whether plastic can berepaired before renewing bumper.Description under: ⇒ General Information; Body Repairs, GeneralBody Repairs ; Plastic repair proceduresGolf Variant 2007 ➤ , Jetta 2005 ➤General body repairs, exterior - Edition 10.2009222 Rep. Gr.63 - Bumpers Downloaded from www.Manualslib.com manuals search engine
Protected by copyright. Copying for private or commercial purposes, in partor in whole, is not permitted unless authorised by Volkswagen AG. Volkswagen AG does notguarantee or accept any liability with respect to the correctness ofinformation in this document.Copyright by Volkswagen AG.1.3Assembly overview - bumper cover1 - Bolt❑2 Nm2 - Bolt❑3.5 Nm3 - Cover❑Material PP/EPDM❑Removing and installing⇒ page 2234 - Bolt❑Qty. 3 on each side❑2 Nm5 - Bolt❑Qty. 8❑2 Nm1.4Removing and installing front bumpercoverNoteThe removal and installation procedures may have to be modifiedslightly depending on variations in equipment.1.4.1Removing–Remove radiator grille ⇒ page 337 .–Vehicles with headlight washer system, pull washer jet withcover cap up out of bumper cover onto stop and unclip covercap.–Remove bolts -2-.–Remove bolts -5- from below.Golf Variant 2007 ➤ , Jetta 2005 ➤General body repairs, exterior - Edition 10.20091. Front bumper 223 Downloaded from www.Manualslib.com manuals search engine
Protected by copyright. Copying for private or commercial purposes, in partor in whole, is not permitted unless authorised by Volkswagen AG. Volkswagen AG does notguarantee or accept any liability with respect to the correctness ofinformation in this document.Copyright by Volkswagen AG.–Remove bolts -4- and -1- (point upwards) on left and right inarea of wheel housing liner.Further dismantling requires the assistance of a second mechan‐ic.–Pull bumper cover -3- parallel out of guide profiles with help ofa second mechanic.–Disconnect all electrical connections from electrical compo‐nents and separate hoses.1.4.2InstallingInstall in reverse order of removal.Ensure parallelism and gap dimensions are maintained ⇒ BodyRepairs; Rep. Gr. 00 ; Body dimensions .Golf Variant 2007 ➤ , Jetta 2005 ➤General body repairs, exterior - Edition 10.2009224 Rep. Gr.63 - Bumpers Downloaded from www.Manualslib.com manuals search engine
Protected by copyright. Copying for private or commercial purposes, in partor in whole, is not permitted unless authorised by Volkswagen AG. Volkswagen AG does notguarantee or accept any liability with respect to the correctness ofinformation in this document.Copyright by Volkswagen AG.1.5Front bumper cover add-on parts1 - Bumper cover❑Material PP/EPDM❑Removing and installing⇒ page 2232 - Left bumper strip❑Material PP/EPDM❑Different versions forvehicles with headlightwasher system.❑Engaged in bumpercover❑Can be levered out oflatches carefully fromoutside using a plasticwedge and removed3 - Left air intake grille❑Different versions forvehicles with fog lights.❑Removing and installing⇒ page 2264 - Bolt❑1.5 Nm5 - Spoiler❑Material PC/ABS❑Engages in cover.❑Only remove whenbumper cover is re‐moved6 - Centre air intake grille❑Pull forward out of fas‐tenings in-direction of arrow-.7 - Bolt❑1.5 Nm8 - Right air intake grille❑Different versions for vehicles with fog lights.❑Removing and installing ⇒ page 2269 - Right bumper strip❑Material PP/EPDM❑Different versions for vehicles with headlight washer system.❑Engaged in bumper cover❑Can be levered out of latches carefully from outside using a plastic wedge and removed.Golf Variant 2007 ➤ , Jetta 2005 ➤General body repairs, exterior - Edition 10.20091. Front bumper 225 Downloaded from www.Manualslib.com manuals search engine
Protected by copyright. Copying for private or commercial purposes, in partor in whole, is not permitted unless authorised by Volkswagen AG. Volkswagen AG does notguarantee or accept any liability with respect to the correctness ofinformation in this document.Copyright by Volkswagen AG.1.5.1Removing and installing air intake grilleRemovingNoteThe removal and installation sequence is only for the left side.Removal and installation of the right side is similar.–Remove bolt -1-.–Carefully swing air intake grille in direction of -arrow- so thatthe outer side lug -2- does not break off.NoteGrasp inner side of air intake grille and pull grille out of bumperthen swing air intake grille outwards and out of bumper.InstallingInstall in reverse order of removal.Golf Variant 2007 ➤ , Jetta 2005 ➤General body repairs, exterior - Edition 10.2009226 Rep. Gr.63 - Bumpers Downloaded from www.Manualslib.com manuals search engine
Protected by copyright. Copying for private or commercial purposes, in partor in whole, is not permitted unless authorised by Volkswagen AG. Volkswagen AG does notguarantee or accept any liability with respect to the correctness ofinformation in this document.Copyright by Volkswagen AG.1.6Front bumper cover substructure parts1 - Right guide❑Bolted to bumper carrier❑To remove, unbolt bolts⇒ Item 9 (page 227) .2 - Expanding nut❑Qty. 3 on each side3 - Bolt❑Qty. 3 on each side❑2 Nm4 - Guide bracket❑Left and right❑To remove, unbolt bolts⇒ Item 3 (page 227)5 - Bolt❑Qty. 2❑2 Nm6 - Left guide❑Bolted to bumper carrier❑To remove, unbolt bolts⇒ Item 5 (page 227) .7 - Left air duct❑Fastened to lock carrier.8 - Right air duct❑Fastened to lock carrier.9 - Bolt❑Qty. 2❑2 NmGolf Variant 2007 ➤ , Jetta 2005 ➤General body repairs, exterior - Edition 10.20091. Front bumper 227 Downloaded from www.Manualslib.com manuals search engine
Protected by copyright. Copying for private or commercial purposes, in partor in whole, is not permitted unless authorised by Volkswagen AG. Volkswagen AG does notguarantee or accept any liability with respect to the correctness ofinformation in this document.Copyright by Volkswagen AG.1.7Assembly overview - bumper carrier1 - Bumper carrier2 - Bolt❑Qty. 4 on each side❑60 Nm3 - Bolt❑Qty. 6❑8 Nm4 - Foam element❑Self-adhesive1.8Installing small registration plate carrier–Mark the four points -5- on the grille which require drilling.NoteThe correct position of the registration plate carrier -2- is estab‐lished by inserting the registration plate carrier guide -3- into therecess -4- on the grille.–Drill out the four points -5-.Diameter of hole: 7.7 +0.2 mm–Install registration plate carrier using the four plastic spreaderrivets -1-.Golf Variant 2007 ➤ , Jetta 2005 ➤General body repairs, exterior - Edition 10.2009228 Rep. Gr.63 - Bumpers Downloaded from www.Manualslib.com manuals search engine
Protected by copyright. Copying for private or commercial purposes, in partor in whole, is not permitted unless authorised by Volkswagen AG. Volkswagen AG does notguarantee or accept any liability with respect to the correctness ofinformation in this document.Copyright by Volkswagen AG.2Front bumper, Cup Edition2.1Front bumper cover2.1.1ToolsSpecial tools and workshop equipment required♦Torque wrench -V.A.G 1783-♦Torque wrench -V.A.G 1332-2.1.2Repairing front bumper coverNoteIf bumper cover is damaged, determine whether plastic can berepaired before renewing bumper.Description under: ⇒ General Information; Body Repairs, GeneralBody Repairs ; Plastic repair proceduresGolf Variant 2007 ➤ , Jetta 2005 ➤General body repairs, exterior - Edition 10.20092. Front bumper, Cup Edition 229 Downloaded from www.Manualslib.com manuals search engine
Protected by copyright. Copying for private or commercial purposes, in partor in whole, is not permitted unless authorised by Volkswagen AG. Volkswagen AG does notguarantee or accept any liability with respect to the correctness ofinformation in this document.Copyright by Volkswagen AG.2.1.3Assembly overview - front bumper cover1 - Front bumper cover❑Material PUR/MF 17❑Removing ⇒ page 231❑Installing ⇒ page 2322 - Bolt❑Left and right❑Points upwards❑Specified torque: 2 Nm3 - Bolt❑Qty. 4 on each side❑Specified torque: 2 Nm4 - Bolt❑Left and right❑Specified torque:3.5 Nm5 - Bolt❑Qty. 6.❑Specified torque: 2 Nm6 - Bolt❑Qty. 2.❑Specified torque:3.5 NmGolf Variant 2007 ➤ , Jetta 2005 ➤General body repairs, exterior - Edition 10.2009230 Rep. Gr.63 - Bumpers Downloaded from www.Manualslib.com manuals search engine
Protected by copyright. Copying for private or commercial purposes, in partor in whole, is not permitted unless authorised by Volkswagen AG. Volkswagen AG does notguarantee or accept any liability with respect to the correctness ofinformation in this document.Copyright by Volkswagen AG.2.1.4Removing–Remove left and right side marker lights -5- ⇒ Electrical sys‐tem; Rep. Gr. 92 ; Removing and installing side marker lightsin from bumper .–Remove radiator grille ⇒ page 341 .–Remove bolts -6- from above.–Remove bolts -2- (pointing upwards) on left and right of wheelhousing.–Unscrew bolts -3- from left and right wheel housing.–Unscrew bolts -4- and -5- from underneath.Further dismantling requires the help of a second mechanic.–With help of a second mechanic pull front bumper cover -1-parallel off vehicle.–Disconnect electrical connectors from all electrical compo‐nents (if fitted).Golf Variant 2007 ➤ , Jetta 2005 ➤General body repairs, exterior - Edition 10.20092. Front bumper, Cup Edition 231 Downloaded from www.Manualslib.com manuals search engine
Protected by copyright. Copying for private or commercial purposes, in partor in whole, is not permitted unless authorised by Volkswagen AG. Volkswagen AG does notguarantee or accept any liability with respect to the correctness ofinformation in this document.Copyright by Volkswagen AG.2.1.5Installing–With help of a second mechanic, install front bumper cover-1- on lock carrier ensuring it remains parallel with vehicleNoteWhen positioning front bumper cover -1-, ensure it is parallel to wing.–Ensure joints are parallel and shut lines are equal ⇒ Body Re‐pairs; Rep. Gr. 00; Karosseriespaltmaße; Karosserie vorn–Start bolts -2, 3, 4, 5 and 6- and tighten these to the relevanttorque settings ⇒ page 230Further installation is performed in reverse order of removal.Golf Variant 2007 ➤ , Jetta 2005 ➤General body repairs, exterior - Edition 10.2009232 Rep. Gr.63 - Bumpers Downloaded from www.Manualslib.com manuals search engine
Protected by copyright. Copying for private or commercial purposes, in partor in whole, is not permitted unless authorised by Volkswagen AG. Volkswagen AG does notguarantee or accept any liability with respect to the correctness ofinformation in this document.Copyright by Volkswagen AG.2.1.6Front bumper cover add-on parts1 - Front bumper cover❑Material PUR/MF 17❑Removing ⇒ page 231❑Installing ⇒ page 2322 - End plate❑Left❑Clipped on the insidewith 4 panel clips.❑Only remove whenbumper cover -1- is re‐moved3 - Air intake grille❑Left❑Secured with four boltsfrom the outside.❑Specified torque: 2 Nm4 - Centre air intake grille❑Clipped on the insidewith 19 panel clips.❑Only remove whenbumper cover -1- is re‐moved5 - Spoiler attachment❑Only remove whenbumper cover -1- is re‐moved6 - Air intake grille❑Right❑Secured with four boltsfrom the outside.❑Specified torque: 2 Nm7 - Towing eye cap❑Engaged in front bumper cover -1-8 - End plate❑Right❑Clipped on the inside with 4 panel clips.❑Only remove when bumper cover -1- is removed9 - Adapter❑Secured to the middle of the front bumper -1- with four bolts from above and four blind rivets from below.❑Specified torque for the 4 bolts (2 Nm).Golf Variant 2007 ➤ , Jetta 2005 ➤General body repairs, exterior - Edition 10.20092. Front bumper, Cup Edition 233 Downloaded from www.Manualslib.com manuals search engine
Protected by copyright. Copying for private or commercial purposes, in partor in whole, is not permitted unless authorised by Volkswagen AG. Volkswagen AG does notguarantee or accept any liability with respect to the correctness ofinformation in this document.Copyright by Volkswagen AG.2.1.7Front bumper cover substructure parts1 - Right guide❑Bolted to bumper carrier❑To remove, unbolt bolts⇒ Item 9 (page 234) .2 - Expanding nut❑Qty. 3 on each side3 - Bolt❑Qty. 3 on each side❑Specified torque: 2 Nm4 - Guide bracket❑Left and right❑To remove, unbolt bolts⇒ Item 3 (page 234)5 - Bolt❑Qty. 2.❑Specified torque: 2 Nm6 - Left guide❑Bolted to bumper carrier❑To remove, unbolt bolts⇒ Item 5 (page 234) .7 - Left air duct❑Fastened to lock carrier.8 - Right air duct❑Fastened to lock carrier.9 - Bolt❑Qty. 2.❑Specified torque: 2 NmGolf Variant 2007 ➤ , Jetta 2005 ➤General body repairs, exterior - Edition 10.2009234 Rep. Gr.63 - Bumpers Downloaded from www.Manualslib.com manuals search engine
Protected by copyright. Copying for private or commercial purposes, in partor in whole, is not permitted unless authorised by Volkswagen AG. Volkswagen AG does notguarantee or accept any liability with respect to the correctness ofinformation in this document.Copyright by Volkswagen AG.2.1.8Assembly overview - front bumper carrier1 - Front bumper carrier2 - Bolt❑Qty. 4 on each side❑Specified torque: 60 Nm3 - Bolt❑Qty. 6.❑Specified torque: 8 Nm4 - Foam element❑Self-adhesiveGolf Variant 2007 ➤ , Jetta 2005 ➤General body repairs, exterior - Edition 10.20092. Front bumper, Cup Edition 235 Downloaded from www.Manualslib.com manuals search engine
Protected by copyright. Copying for private or commercial purposes, in partor in whole, is not permitted unless authorised by Volkswagen AG. Volkswagen AG does notguarantee or accept any liability with respect to the correctness ofinformation in this document.Copyright by Volkswagen AG.3Rear bumper (saloon)3.1ToolsSpecial tools and workshop equipment required♦Torque wrench -V.A.G 1783-♦Torque wrench -V.A.G 1331-3.2Repairing bumper coverNoteIf bumper cover is damaged, determine whether plastic can berepaired before renewing bumper.Description under: ⇒ General Information; Body Repairs, GeneralBody Repairs ; Plastic repair proceduresGolf Variant 2007 ➤ , Jetta 2005 ➤General body repairs, exterior - Edition 10.2009236 Rep. Gr.63 - Bumpers Downloaded from www.Manualslib.com manuals search engine
Protected by copyright. Copying for private or commercial purposes, in partor in whole, is not permitted unless authorised by Volkswagen AG. Volkswagen AG does notguarantee or accept any liability with respect to the correctness ofinformation in this document.Copyright by Volkswagen AG.3.3Assembly overview - bumper cover1 - Bolt❑Qty. 1 on each side❑Bolted from luggagecompartment (to re‐move, remove luggagecompartment side cov‐ers ⇒ General body re‐pairs, interior; Rep. Gr. 70 ; Luggage and loadcompartment trim )❑8 Nm2 - Bolt❑5 Nm3 - Spreader rivet❑Qty. 1 on each side4 - Bolt❑Qty. 3❑Only on right side❑2 Nm5 - Bolt❑Qty. 3❑5 Nm6 - Bumper cover❑Material PP/EPDM❑Removing and installing⇒ page 2377 - Bolt❑Qty. 3 on each side❑2 Nm3.4Removing and installing bumper coverNoteThe removal and installation procedures may have to be modifiedslightly depending on variations in equipment.3.4.1Removing–Remove tail lights in left and right side panels ⇒ Electricalsystem; Rep. Gr. 94 ; Tail lights .–Remove bolts -7- on left and right in area of wheel housingliner.–Lever out spreader rivet -3- on left and right using a screw‐driver.–From below, remove bolts -4- and -5-.–Remove bolts -2- from above.Golf Variant 2007 ➤ , Jetta 2005 ➤General body repairs, exterior - Edition 10.20093. Rear bumper (saloon) 237 Downloaded from www.Manualslib.com manuals search engine
Protected by copyright. Copying for private or commercial purposes, in partor in whole, is not permitted unless authorised by Volkswagen AG. Volkswagen AG does notguarantee or accept any liability with respect to the correctness ofinformation in this document.Copyright by Volkswagen AG.–From luggage compartment, remove bolt -1- on left and right(remove luggage compartment side covers ⇒ General bodyrepairs, interior; Rep. Gr. 70 ; Luggage and load compartmenttrim .Further dismantling requires the assistance of a second mechan‐ic.–Pull bumper cover -6- parallel out of guide profiles with help ofa second mechanic.–Disconnect connectors from all electrical components.3.4.2InstallingInstall in reverse order of removal.Ensure parallelism and gap dimensions are maintained ⇒ BodyRepairs; Rep. Gr. 00 ; Body dimensions .Golf Variant 2007 ➤ , Jetta 2005 ➤General body repairs, exterior - Edition 10.2009238 Rep. Gr.63 - Bumpers Downloaded from www.Manualslib.com manuals search engine
Protected by copyright. Copying for private or commercial purposes, in partor in whole, is not permitted unless authorised by Volkswagen AG. Volkswagen AG does notguarantee or accept any liability with respect to the correctness ofinformation in this document.Copyright by Volkswagen AG.3.5Rear bumper cover with add-on parts1 - Bumper cover❑Material PP/EPDM❑Removing and installing⇒ page 2372 - Spoiler❑Material PC/ABS❑Engaged in bumpercover❑Can only be removedwhen bumper cover isremoved3 - Towing eye cap❑Engaged in bumpercover4 - Bumper strip❑Engaged in spoiler❑Can only be removedwhen spoiler is removedGolf Variant 2007 ➤ , Jetta 2005 ➤General body repairs, exterior - Edition 10.20093. Rear bumper (saloon) 239 Downloaded from www.Manualslib.com manuals search engine
Protected by copyright. Copying for private or commercial purposes, in partor in whole, is not permitted unless authorised by Volkswagen AG. Volkswagen AG does notguarantee or accept any liability with respect to the correctness ofinformation in this document.Copyright by Volkswagen AG.3.6Rear bumper cover substructure parts1 - Securing strip2 - Hexagon nut❑Qty. 4❑2 Nm3 - Guide❑Left and right4 - Hexagon nut❑Qty. 2 on each side❑2 Nm5 - Bolt❑Qty. 1 on each side❑2 Nm6 - Bolt❑Qty. 4 on each side❑2 Nm7 - Guide bracket❑Left and rightGolf Variant 2007 ➤ , Jetta 2005 ➤General body repairs, exterior - Edition 10.2009240 Rep. Gr.63 - Bumpers Downloaded from www.Manualslib.com manuals search engine
Protected by copyright. Copying for private or commercial purposes, in partor in whole, is not permitted unless authorised by Volkswagen AG. Volkswagen AG does notguarantee or accept any liability with respect to the correctness ofinformation in this document.Copyright by Volkswagen AG.3.7Assembly overview - bumper carrier1 - Bumper carrier2 - Bolt❑Qty. 3 on each side❑20 Nm3 - Foam element❑Self-adhesiveGolf Variant 2007 ➤ , Jetta 2005 ➤General body repairs, exterior - Edition 10.20093. Rear bumper (saloon) 241 Downloaded from www.Manualslib.com manuals search engine
Protected by copyright. Copying for private or commercial purposes, in partor in whole, is not permitted unless authorised by Volkswagen AG. Volkswagen AG does notguarantee or accept any liability with respect to the correctness ofinformation in this document.Copyright by Volkswagen AG.4Rear bumper, saloon, Cup Edition4.1Rear bumper cover, saloon4.1.1ToolsSpecial tools and workshop equipment required♦Torque wrench -V.A.G 1783-♦Torque wrench -V.A.G 1331-♦Pop rivet pliers -VAS 5072-4.1.2Repairing rear bumper coverNoteIf bumper cover is damaged, determine whether plastic can berepaired before renewing bumper.Description under: ⇒ General Information; Body Repairs, GeneralBody Repairs ; Plastic repair proceduresGolf Variant 2007 ➤ , Jetta 2005 ➤General body repairs, exterior - Edition 10.2009242 Rep. Gr.63 - Bumpers Downloaded from www.Manualslib.com manuals search engine
Protected by copyright. Copying for private or commercial purposes, in partor in whole, is not permitted unless authorised by Volkswagen AG. Volkswagen AG does notguarantee or accept any liability with respect to the correctness ofinformation in this document.Copyright by Volkswagen AG.4.1.3Assembly overview - rear bumper cover1 - Bolt❑Left and right❑Specified torque: 8 Nm2 - Bolt❑Specified torque: 5 Nm3 - Spreader rivet❑Left and right4 - Bolt❑Qty. 3.❑Only on right side❑Specified torque: 2 Nm5 - Bolt❑Qty. 3.❑Specified torque: 5 Nm6 - Rear bumper cover❑Material PP/EPDM❑Removing ⇒ page 244❑Installing ⇒ page 2457 - Bolt❑Qty. 3 on each side❑Specified torque: 2 Nm8 - Diffuser9 - Quick-release screw❑Qty. 3.Golf Variant 2007 ➤ , Jetta 2005 ➤General body repairs, exterior - Edition 10.20094. Rear bumper, saloon, Cup Edition 243 Downloaded from www.Manualslib.com manuals search engine
Protected by copyright. Copying for private or commercial purposes, in partor in whole, is not permitted unless authorised by Volkswagen AG. Volkswagen AG does notguarantee or accept any liability with respect to the correctness ofinformation in this document.Copyright by Volkswagen AG.4.1.4Removing–Remove luggage compartment side trim ⇒ General body re‐pairs, interior; Rep. Gr. 70 ; Trims; Luggage and load com‐partment .–Remove tail lights in left and right side panels ⇒ Electricalsystem; Rep. Gr. 94 ; Tail lights .–Release quick-release screw -9- and remove diffuser -8- fromspoiler.–Remove bolts -7- on left and right in area of wheel housingliner.–Lever out spreader rivet -3- on left and right using a screw‐driver.–From below, remove bolts -4- and -5-.–Remove bolts -2- on left and right from above.–Remove bolt -1- on left and right in luggage compartment.Further dismantling requires the assistance of a second person.–With the help of a second mechanic, pull rear bumper cover-6- parallel out of guide profiles.Golf Variant 2007 ➤ , Jetta 2005 ➤General body repairs, exterior - Edition 10.2009244 Rep. Gr.63 - Bumpers Downloaded from www.Manualslib.com manuals search engine
Protected by copyright. Copying for private or commercial purposes, in partor in whole, is not permitted unless authorised by Volkswagen AG. Volkswagen AG does notguarantee or accept any liability with respect to the correctness ofinformation in this document.Copyright by Volkswagen AG.–Disconnect connectors from all electrical components.4.1.5Installing–With the help of a second mechanic, guide rear bumper coverparallel into left and right guides.NoteEnsure when fitting the rear bumper cover that it runs parallel along the left and right guide profiles.–Install left and right spreader rivets -3-.Ensure that joints are parallel and specified dimensions are main‐tained ⇒ Body Repairs; Rep. Gr. 00 ; Body panel gaps/shut lines;Body - rear–Start bolts -1, 2, 4, 5 and 7- and tighten these to the relevanttorque settings ⇒ page 243–Install diffuser -8- and lock quick-release screws -9-.Further installation is performed in reverse order of removal.Golf Variant 2007 ➤ , Jetta 2005 ➤General body repairs, exterior - Edition 10.20094. Rear bumper, saloon, Cup Edition 245 Downloaded from www.Manualslib.com manuals search engine
Protected by copyright. Copying for private or commercial purposes, in partor in whole, is not permitted unless authorised by Volkswagen AG. Volkswagen AG does notguarantee or accept any liability with respect to the correctness ofinformation in this document.Copyright by Volkswagen AG.4.1.6Rear bumper cover add-on parts1 - Rear bumper cover❑Material PP/EPDM❑Removing ⇒ page 244❑Installing ⇒ page 2452 - Spoiler❑Engaged in rear bumpercover -1-❑Can only be removedwhen rear bumper coveris removed3 - Reflector❑Left and right❑Engaged in spoiler4 - Diffuser5 - Quick-release screw❑Qty. 4.6 - Left diffuser7 - Heat shield8 - Pop rivet❑Qty. 3.❑Insert with pop rivet pli‐ers -VAS 5072-9 - Clip❑Qty. 3.Golf Variant 2007 ➤ , Jetta 2005 ➤General body repairs, exterior - Edition 10.2009246 Rep. Gr.63 - Bumpers Downloaded from www.Manualslib.com manuals search engine
Protected by copyright. Copying for private or commercial purposes, in partor in whole, is not permitted unless authorised by Volkswagen AG. Volkswagen AG does notguarantee or accept any liability with respect to the correctness ofinformation in this document.Copyright by Volkswagen AG.4.1.7Rear bumper cover substructure parts1 - Securing strip2 - Hexagon nut❑Qty. 4.❑Specified torque: 2 Nm3 - Guide❑Left and right4 - Hexagon nut❑Qty. 2 on each side❑Specified torque: 2 Nm5 - Bolt❑Qty. 1 on each side❑Specified torque: 2 Nm6 - Bolt❑Qty. 4 on each side❑Specified torque: 2 Nm7 - Guide bracket❑Left and rightGolf Variant 2007 ➤ , Jetta 2005 ➤General body repairs, exterior - Edition 10.20094. Rear bumper, saloon, Cup Edition 247 Downloaded from www.Manualslib.com manuals search engine
Protected by copyright. Copying for private or commercial purposes, in partor in whole, is not permitted unless authorised by Volkswagen AG. Volkswagen AG does notguarantee or accept any liability with respect to the correctness ofinformation in this document.Copyright by Volkswagen AG.4.1.8Assembly overview - rear bumper carrier1 - Rear bumper carrier2 - Bolt❑Qty. 3 on each side❑Specified torque: 20 Nm3 - Foam element❑Self-adhesiveNoteGolf Variant 2007 ➤ , Jetta 2005 ➤General body repairs, exterior - Edition 10.2009248 Rep. Gr.63 - Bumpers Downloaded from www.Manualslib.com manuals search engine
Protected by copyright. Copying for private or commercial purposes, in partor in whole, is not permitted unless authorised by Volkswagen AG. Volkswagen AG does notguarantee or accept any liability with respect to the correctness ofinformation in this document.Copyright by Volkswagen AG.5Rear bumper (Variant)5.1ToolsSpecial tools and workshop equipment required♦Torque wrench -V.A.G 1783-♦Torque wrench -V.A.G 1331-5.2Repairing bumper coverNoteIf bumper cover is damaged, determine whether plastic can berepaired before renewing bumper.Description under: ⇒ General Information; Body Repairs, GeneralBody Repairs ; Plastic repair proceduresGolf Variant 2007 ➤ , Jetta 2005 ➤General body repairs, exterior - Edition 10.20095. Rear bumper (Variant) 249 Downloaded from www.Manualslib.com manuals search engine
Protected by copyright. Copying for private or commercial purposes, in partor in whole, is not permitted unless authorised by Volkswagen AG. Volkswagen AG does notguarantee or accept any liability with respect to the correctness ofinformation in this document.Copyright by Volkswagen AG.5.3Assembly overview - bumper cover1 - Bolt❑Qty. 7❑5 Nm2 - Spreader rivet❑Qty. 1 on each side3 - Bumper cover❑Material PP/EPDM❑Removing and installing⇒ page 2504 - Bolt❑Qty. 3 on each side❑2 Nm5 - Bolt❑Qty. 2❑2 Nm5.4Removing and installing bumper coverNoteThe removal and installation procedures may have to be modifiedslightly depending on variations in equipment.5.4.1Removing–Remove tail lights in left and right side panels ⇒ Electricalsystem; Rep. Gr. 94 ; Tail lights .–Remove bolts -4- on left and right in area of wheel housingliner.–Lever out spreader rivet -2- on left and right using a screw‐driver.–Remove bolts -1-.–Remove bolts -5-.Golf Variant 2007 ➤ , Jetta 2005 ➤General body repairs, exterior - Edition 10.2009250 Rep. Gr.63 - Bumpers Downloaded from www.Manualslib.com manuals search engine
Protected by copyright. Copying for private or commercial purposes, in partor in whole, is not permitted unless authorised by Volkswagen AG. Volkswagen AG does notguarantee or accept any liability with respect to the correctness ofinformation in this document.Copyright by Volkswagen AG.Further dismantling requires the assistance of a second mechan‐ic.–Pull bumper cover -3- parallel out of guide profiles with help ofa second mechanic.–Disconnect connectors from all electrical components.5.4.2InstallingInstall in reverse order of removal.Ensure parallelism and gap dimensions are maintained ⇒ BodyRepairs; Rep. Gr. 00 ; Body dimensions .Tightening torques:Bolt -1-: 5 NmBolt -4-: 2 NmBolt -5-: 2 NmGolf Variant 2007 ➤ , Jetta 2005 ➤General body repairs, exterior - Edition 10.20095. Rear bumper (Variant) 251 Downloaded from www.Manualslib.com manuals search engine
Protected by copyright. Copying for private or commercial purposes, in partor in whole, is not permitted unless authorised by Volkswagen AG. Volkswagen AG does notguarantee or accept any liability with respect to the correctness ofinformation in this document.Copyright by Volkswagen AG.Golf Variant 2007 ➤ , Jetta 2005 ➤General body repairs, exterior - Edition 10.2009252 Rep. Gr.63 - Bumpers Downloaded from www.Manualslib.com manuals search engine
Protected by copyright. Copying for private or commercial purposes, in partor in whole, is not permitted unless authorised by Volkswagen AG. Volkswagen AG does notguarantee or accept any liability with respect to the correctness ofinformation in this document.Copyright by Volkswagen AG.5.5Rear bumper cover with add-on parts1 - Bumper cover❑Material PP/EPDM❑Removing and installing⇒ page 2502 - Reflector❑Engaged in bumpercover3 - Towing eye cap❑Engaged in bumpercover4 - Spoiler❑Material PC/ABS❑Engaged in bumpercover❑Can only be removedwhen bumper cover isremoved5 - Spring clip❑Qty. 2❑Only with towing bracket6 - Cover❑Only with towing bracket7 - Bolt❑Qty. 2❑Only with towing bracket8 - Retaining disc❑Qty. 2❑Only with towing bracketGolf Variant 2007 ➤ , Jetta 2005 ➤General body repairs, exterior - Edition 10.20095. Rear bumper (Variant) 253 Downloaded from www.Manualslib.com manuals search engine
Protected by copyright. Copying for private or commercial purposes, in partor in whole, is not permitted unless authorised by Volkswagen AG. Volkswagen AG does notguarantee or accept any liability with respect to the correctness ofinformation in this document.Copyright by Volkswagen AG.5.6Rear bumper cover substructure parts1 - Securing strip2 - Nut❑Qty. 4❑2 Nm3 - Nut❑Qty. 1 on each side❑2 Nm4 - Bolt❑Qty. 4 on each side❑2 Nm5 - Guide bracket❑Left and rightGolf Variant 2007 ➤ , Jetta 2005 ➤General body repairs, exterior - Edition 10.2009254 Rep. Gr.63 - Bumpers Downloaded from www.Manualslib.com manuals search engine
Protected by copyright. Copying for private or commercial purposes, in partor in whole, is not permitted unless authorised by Volkswagen AG. Volkswagen AG does notguarantee or accept any liability with respect to the correctness ofinformation in this document.Copyright by Volkswagen AG.5.7Assembly overview - bumper carrier1 - Bumper carrier2 - Bolt❑Qty. 5❑20 Nm3 - Foam element❑USA versions onlyGolf Variant 2007 ➤ , Jetta 2005 ➤General body repairs, exterior - Edition 10.20095. Rear bumper (Variant) 255 Downloaded from www.Manualslib.com manuals search engine
Protected by copyright. Copying for private or commercial purposes, in partor in whole, is not permitted unless authorised by Volkswagen AG. Volkswagen AG does notguarantee or accept any liability with respect to the correctness ofinformation in this document.Copyright by Volkswagen AG.5.8Assembly overview - towing bracket1 - Bolt❑Sealing plugs❑Qty. 3❑Specified torque: 20 NmDANGER!The bolts -1- function asplugs and seal the pas‐senger compartmentagainst exhaust fumes,and must without excep‐tion be installed.2 - Towing bracket❑Illustration shows tow‐ing bracket with remov‐able ball head -2-3 - Ball coupling❑Removable ball hitch ishoused in fold-out lug‐gage compartment floor4 - Bolt❑Qty. 2 on each side❑Specified torque: 50 Nm+ turn 90° + 30° furtherWARNINGBolts -4- must always berenewed after being re‐moved.5.9Removing and installing towing bracket5.9.1RemovingNote♦The specified torques refer only to factory-installed towing brackets.♦Request torque specifications for other towing brackets from the manufacturers.♦Information on electrics can be found in ⇒ Electrical system; Rep. Gr. 94 .–Remove rear bumper cover ⇒ page 250 .–Remove rear silencer ⇒ Exhaust system; Rep. Gr. 26 ; Si‐lencer with mountings .–Remove heat shield.Golf Variant 2007 ➤ , Jetta 2005 ➤General body repairs, exterior - Edition 10.2009256 Rep. Gr.63 - Bumpers Downloaded from www.Manualslib.com manuals search engine
Protected by copyright. Copying for private or commercial purposes, in partor in whole, is not permitted unless authorised by Volkswagen AG. Volkswagen AG does notguarantee or accept any liability with respect to the correctness ofinformation in this document.Copyright by Volkswagen AG.–Remove bolts -4-.5.9.2InstallingInstall in reverse order of removal.DANGER!The bolts -1- function as plugs and seal the passenger com‐partment against exhaust fumes, and must without exceptionbe installed.WARNINGBolts -4- must always be renewed after being removed.Contact surfaces between towing bracket and body must befree of grease and cavity sealant.Specified torquesBolt -1-: 20 NmGolf Variant 2007 ➤ , Jetta 2005 ➤General body repairs, exterior - Edition 10.20095. Rear bumper (Variant) 257 Downloaded from www.Manualslib.com manuals search engine
Protected by copyright. Copying for private or commercial purposes, in partor in whole, is not permitted unless authorised by Volkswagen AG. Volkswagen AG does notguarantee or accept any liability with respect to the correctness ofinformation in this document.Copyright by Volkswagen AG.Bolt -4-: 50 Nm + turn 90° + 30° furtherGolf Variant 2007 ➤ , Jetta 2005 ➤General body repairs, exterior - Edition 10.2009258 Rep. Gr.63 - Bumpers Downloaded from www.Manualslib.com manuals search engine
Protected by copyright. Copying for private or commercial purposes, in partor in whole, is not permitted unless authorised by Volkswagen AG. Volkswagen AG does notguarantee or accept any liability with respect to the correctness ofinformation in this document.Copyright by Volkswagen AG.64 –Glazing1Flush bonded windows1.1ToolsSpecial tools and workshopequipment required♦Removal kit for flush bon‐ded windows -V.A.G 1474 A-♦Suction lifter -V.A.G 1344-♦Cutting tool -V.A.G 1351-♦Windscreen removal kit -V.A.G 1755-♦Cartridge gun -V.A.G 1628-♦Cartridge heater -V.A.G 1939 A-Golf Variant 2007 ➤ , Jetta 2005 ➤General body repairs, exterior - Edition 10.20091. Flush bonded windows 259 Downloaded from www.Manualslib.com manuals search engine
Protected by copyright. Copying for private or commercial purposes, in partor in whole, is not permitted unless authorised by Volkswagen AG. Volkswagen AG does notguarantee or accept any liability with respect to the correctness ofinformation in this document.Copyright by Volkswagen AG.♦Electric cutter -V.A.G 1561 A-♦Cutting blade -V.A.G 1561/2-♦Scraping blade -V.A.G 1561/8-♦Cutter (offset) -V.A.G 1561/10-♦Cutting blade -V.A.G 1561/19-♦Double cartridge gun -VAS 5237-Special tools and workshop equipment required♦Removal wedge -T10039/1-1.2Materials♦2K glass adhesive-DA 004 600 A2- 7) 8)♦1K glass adhesive-DH 009 100 03- 9) 10)♦Activator-D 181 801 A1- 11)♦Glass primer/paint primer-D 009 200 02- 11)Golf Variant 2007 ➤ , Jetta 2005 ➤General body repairs, exterior - Edition 10.2009260 Rep. Gr.64 - Glazing Downloaded from www.Manualslib.com manuals search engine
Protected by copyright. Copying for private or commercial purposes, in partor in whole, is not permitted unless authorised by Volkswagen AG. Volkswagen AG does notguarantee or accept any liability with respect to the correctness ofinformation in this document.Copyright by Volkswagen AG.♦Cleaning solution-D 009 401 04- 11)♦Primer applicator-D 009 500 25- 11)♦Adhesive remover-D 002 000 10- 11)♦Cutting cord-357 853 999-7) Observe curing period ⇒ page 2768) Double cartridge gun -VAS 5237- must be used to apply these materials9) Small cartridge, 110 ml, for sealing and/or when a 400 ml cartridge alone is notsufficient.10) Heat according to manufacturer's instructions, using cartridge heater -V.A.G1939 A- .11) Materials are stored in box -D 004 700- .1.3Assembly overview - windscreen1 - Windscreen❑Removing and installing⇒ page 2642 - Windscreen adjuster❑-443 845 631 A-3 - Plenum chamber cover❑Only pull out of wind‐screen seal by hand❑Removing and installing⇒ page 2624 - Windscreen seal❑Part of windscreen5 - Spacing lip❑Part of windscreen6 - PUR adhesive sealant❑Cross section of bead:width = 6.5 mm, height =10 mm (including resid‐ual material on windowglass and windowflange)❑Minimum curing period⇒ page 276Golf Variant 2007 ➤ , Jetta 2005 ➤General body repairs, exterior - Edition 10.20091. Flush bonded windows 261 Downloaded from www.Manualslib.com manuals search engine
Protected by copyright. Copying for private or commercial purposes, in partor in whole, is not permitted unless authorised by Volkswagen AG. Volkswagen AG does notguarantee or accept any liability with respect to the correctness ofinformation in this document.Copyright by Volkswagen AG.1.4Assembly overview - plenum chamber cover1 - Plenum chamber cover❑Only pull out of wind‐screen seal by hand❑Removing and installing⇒ page 2622 - Plenum chamber bulkhead❑Removing and installing⇒ page 153 - Windscreen❑Removing and installing⇒ page 2644 - Plenum chamber seal5 - Windscreen seal❑Part of windscreen1.5Removing and installing plenum cham‐ber cover1.5.1Removing plenum chamber cover–Unbolt wiper arms ⇒ Electrical system; Rep. Gr. 92 ; Wipersystem .CautionThe plenum chamber cover must not be levered off with a tool(wedge). The windscreen will be damaged and may subse‐quently crack.–Pull plenum chamber seal -4- off over entire length of plenumchamber bulkhead -2-.Golf Variant 2007 ➤ , Jetta 2005 ➤General body repairs, exterior - Edition 10.2009262 Rep. Gr.64 - Glazing Downloaded from www.Manualslib.com manuals search engine
Protected by copyright. Copying for private or commercial purposes, in partor in whole, is not permitted unless authorised by Volkswagen AG. Volkswagen AG does notguarantee or accept any liability with respect to the correctness ofinformation in this document.Copyright by Volkswagen AG.–Beginning on right, carefully pull plenum chamber cover -1-upwards out of windscreen seal -5-.1.5.2Installing plenum chamber coverCautionStriking the plenum chamber cover can cause cracks in thewindscreen.–Spray windscreen seal -5- with a soapy solution so that ple‐num chamber cover -1- is easier to press on.–Position plenum chamber cover -1- on windscreen seal -5- andclip it into windscreen seal -5- using light pressure beginningin the middle.–Install plenum chamber seal -4- and windscreen wiper ⇒ Electrical system; Rep. Gr. 92 ; Wiper system .Golf Variant 2007 ➤ , Jetta 2005 ➤General body repairs, exterior - Edition 10.20091. Flush bonded windows 263 Downloaded from www.Manualslib.com manuals search engine
Protected by copyright. Copying for private or commercial purposes, in partor in whole, is not permitted unless authorised by Volkswagen AG. Volkswagen AG does notguarantee or accept any liability with respect to the correctness ofinformation in this document.Copyright by Volkswagen AG.NoteAn insert is installed in windscreen seal of new windscreens. Remove this insert before installing plenumchamber cover.1.6Removing and installing windscreen1.6.1Removing windscreen–Remove plenum chamber cover ⇒ page 262 .–Remove A-pillar trim ⇒ General body repairs, interior; Rep.Gr. 70 ; Pillar and side panel trim .–Remove sun visor ⇒ General body repairs, interior; Rep. Gr. 68 ; Compartments, covers and trims .–Remove interior mirror ⇒ General body repairs, interior; Rep.Gr. 68 ; Interior mirrorGolf Variant 2007 ➤ , Jetta 2005 ➤General body repairs, exterior - Edition 10.2009264 Rep. Gr.64 - Glazing Downloaded from www.Manualslib.com manuals search engine
Protected by copyright. Copying for private or commercial purposes, in partor in whole, is not permitted unless authorised by Volkswagen AG. Volkswagen AG does notguarantee or accept any liability with respect to the correctness ofinformation in this document.Copyright by Volkswagen AG.–Slide cover -V.A.G 1474/8- between windscreen -1- and dashpanel.–Thrust awl -V.A.G 1474/2- -2- through adhesive bead.–Pull cutting cord -3- through adhesive sealing material into in‐side of vehicle using awl -V.A.G 1474/2- -2-.–Secure inside end of cutting cord against falling out using pullhandle -V.A.G 1351/1- -3-.–Place cutting cord -2- using small tube -1- in upper area ofwindow.–Lay cutting cord -2- around window and guide second end ofcord inwards into interior.Ensure that cutting cord -2- lies under window in corners.–Secure other end of cord to reel device -V.A.G 1654- .–Position reel device -V.A.G 1654- in “position I”.–Reposition reel device -V.A.G 1654- as necessary and cutwindow free.–Use wedge -V.A.G 1474/5- to press cutting cord against win‐dow glass while cutting in order to avoid damaging dash paneland to create clearance at window flange.1.6.2Installing windscreenPreparing used undamaged window for glazing ⇒ page 274Preparing new window for glazing ⇒ page 274Preparing body flange for glazing ⇒ page 275Installation instructions ⇒ page 276 .Minimum curing period ⇒ page 276Golf Variant 2007 ➤ , Jetta 2005 ➤General body repairs, exterior - Edition 10.20091. Flush bonded windows 265 Downloaded from www.Manualslib.com manuals search engine
Protected by copyright. Copying for private or commercial purposes, in partor in whole, is not permitted unless authorised by Volkswagen AG. Volkswagen AG does notguarantee or accept any liability with respect to the correctness ofinformation in this document.Copyright by Volkswagen AG.1.7Assembly overview - rear window (saloon)1 - Rear window❑Removing and installing⇒ page 2662 - Rear lid3 - PUR adhesive sealant❑Cross section of bead:width = 6.5 mm, height =10 mm (including resid‐ual material on windowglass and windowflange).❑Minimum curing period⇒ page 2764 - Windscreen adjuster5 - C-pillar trim❑Removing ⇒ Generalbody repairs, interior;Rep. Gr. 70 ; Pillars andside panel trim .1.8Removing and installing rear window(saloon)1.8.1Removing undamaged rear window–Remove C-pillar trims ⇒ General body repairs, interior; Rep.Gr. 70 ; Pillars and side trims .–Remove roof end strip ⇒ General body repairs, interior; Rep.Gr. 70 ; Roof trims .–Remove rear shelf ⇒ General body repairs, interior; Rep. Gr. 70 ; Luggage/load compartment trim .–Remove high-level brake light ⇒ Electrical system; Rep. Gr. 94 ; Additional brake lights .–Disconnect connections for heated rear window and windowaerial.–Insert cutting cord into window flange using tube.Golf Variant 2007 ➤ , Jetta 2005 ➤General body repairs, exterior - Edition 10.2009266 Rep. Gr.64 - Glazing Downloaded from www.Manualslib.com manuals search engine
Protected by copyright. Copying for private or commercial purposes, in partor in whole, is not permitted unless authorised by Volkswagen AG. Volkswagen AG does notguarantee or accept any liability with respect to the correctness ofinformation in this document.Copyright by Volkswagen AG.–Pull cutting cord through adhesive sealing material into insideof vehicle using awl -V.A.G 1474/2- .–Pull the other end of the cord through into the interior andcounterhold using handle -V.A.G 1351/1- .–Secure inner end of cord on reel device -V.A.G 1654- .–Position reel device -V.A.G 1654- .–Carefully slide cover -V.A.G 1474/8- -1- between rear windowand moulded headliner, remove moulded headliner securingscrews for this.–Position reel device -V.A.G 1654- in “position I”.–Move reel device according to position required and cut win‐dow free.–Press cutting thread against window glass with plastic wedgeduring cutting process, in order to have clearance at windowflange.–Instead of reel device -V.A.G 1654- , reel device -V.A.G 1654A- can be used.–One suction cup can be removed from the reel device asshown in illustration. This ensures that the reel device rollercan be guided closer to the window flange.1.8.2Removing broken rear window–Protect body and interior from glass splinters.–Remove pieces of glass up to adhesive sealing material.–Remove C-pillar trims ⇒ General body repairs, interior; Rep.Gr. 70 ; Pillars and side trims .Golf Variant 2007 ➤ , Jetta 2005 ➤General body repairs, exterior - Edition 10.20091. Flush bonded windows 267 Downloaded from www.Manualslib.com manuals search engine
Protected by copyright. Copying for private or commercial purposes, in partor in whole, is not permitted unless authorised by Volkswagen AG. Volkswagen AG does notguarantee or accept any liability with respect to the correctness ofinformation in this document.Copyright by Volkswagen AG.–Remove roof end strip ⇒ General body repairs, interior; Rep.Gr. 70 ; Roof trims .–Remove rear shelf ⇒ General body repairs, interior; Rep. Gr. 70 ; Luggage/load compartment trim .–Remove high-level brake light ⇒ Electrical system; Rep. Gr. 94 ; Additional brake lights .–Pull off connectors for rear window heating and aerial.–Cover flange -2- all round with textile-reinforced adhesivetape.–Cut through adhesive sealing material (with remains of win‐dow) in window aperture using electric cutter -V.A.G 1561 A-and blade -V.A.G 1561/10- (with stop roller).WARNINGAlways wear safety goggles and leather gloves.1.8.3Installing rear windowPreparing used undamaged window for glazing ⇒ page 274Preparing new window for glazing ⇒ page 274Preparing body flange for glazing ⇒ page 275Installation instructions ⇒ page 276 .Minimum curing period ⇒ page 276Golf Variant 2007 ➤ , Jetta 2005 ➤General body repairs, exterior - Edition 10.2009268 Rep. Gr.64 - Glazing Downloaded from www.Manualslib.com manuals search engine
Protected by copyright. Copying for private or commercial purposes, in partor in whole, is not permitted unless authorised by Volkswagen AG. Volkswagen AG does notguarantee or accept any liability with respect to the correctness ofinformation in this document.Copyright by Volkswagen AG.1.9Assembly overview - rear window (Variant)1 - Rear window❑Removing and installing⇒ page 2692 - Rear lid3 - PUR adhesive sealant❑Cross section of bead:width = 6.5 mm, height =10 mm (including resid‐ual material on windowglass and windowflange).❑Minimum curing period⇒ page 2764 - Rear lid trim❑Removing ⇒ Generalbody repairs, interior;Rep. Gr. 70 ; Rear lidtrim1.10Removing and installing rear window(Variant)1.10.1Removing undamaged rear window–Remove rear lid trim ⇒ General body repairs, interior; Rep.Gr. 70 ; Trim, insulation .–Remove window frame trim ⇒ General body repairs, interior;Rep. Gr. 70 ; Trim, insulation .–Remove rear window wiper ⇒ Electrical system; Rep. Gr. 92 ;Window wash/wipe system .Golf Variant 2007 ➤ , Jetta 2005 ➤General body repairs, exterior - Edition 10.20091. Flush bonded windows 269 Downloaded from www.Manualslib.com manuals search engine
Protected by copyright. Copying for private or commercial purposes, in partor in whole, is not permitted unless authorised by Volkswagen AG. Volkswagen AG does notguarantee or accept any liability with respect to the correctness ofinformation in this document.Copyright by Volkswagen AG.–Pull off connector -1- for heated rear window -arrow- and pressconnecting tabs onto window.–Pull cutting cord -1- through adhesive sealing material at lowerradius of rear window and into inside of vehicle using awl -V.A.G 1474/2- from removal kit for flush bonded windows -V.A.G 1474 A- .–Lay cutting cord -1- around rear window and pull second endof cord inwards into interior.–Secure one end of cord to pull handle -V.A.G 1351/1- -2- tocounterhold.–Secure other end of cord to reel device -1-.–Reposition reel device -1- as necessary and cut window free.–Use plastic wedge to press cutting cord against window glasswhile cutting in order to have clearance at window flange.1.10.2Removing broken rear window–Protect body and interior from glass splinters.–Remove pieces of glass up to adhesive sealing material.–Remove rear lid trim ⇒ General body repairs, interior; Rep.Gr. 70 ; Trim, insulation .–Remove window frame trim ⇒ General body repairs, interior;Rep. Gr. 70 ; Trim, insulation .–Remove rear window wiper ⇒ Electrical system; Rep. Gr. 92 ;Window wash/wipe system .–Disconnect connections for heated rear window.Golf Variant 2007 ➤ , Jetta 2005 ➤General body repairs, exterior - Edition 10.2009270 Rep. Gr.64 - Glazing Downloaded from www.Manualslib.com manuals search engine
Protected by copyright. Copying for private or commercial purposes, in partor in whole, is not permitted unless authorised by Volkswagen AG. Volkswagen AG does notguarantee or accept any liability with respect to the correctness ofinformation in this document.Copyright by Volkswagen AG.–Cover flange -2- all round with textile-reinforced adhesivetape.–Cut through adhesive sealing material (with remains of win‐dow) in window aperture using electric cutter -V.A.G 1561 A-and blade -V.A.G 1561/10- (with stop roller).WARNINGAlways wear safety goggles and leather gloves.1.10.3Installing rear windowPreparing used undamaged window for glazing ⇒ page 274Preparing new window for glazing ⇒ page 274Preparing body flange for glazing ⇒ page 275Installation instructions ⇒ page 276 .Minimum curing period ⇒ page 2761.11Assembly overview - side window (Variant)1 - Side window❑Removing side window⇒ page 272❑Installing side window⇒ page 2732 - Trim strip❑Integral part of side win‐dow.3 - Seal❑Integral part of side win‐dow.4 - Side panel5 - PUR adhesive sealant❑Cross section of bead:width = 6.5 mm, height =10 mm (including pre‐coating, residual materi‐al on window glass andwindow flange)❑Minimum curing period⇒ page 2766 - Retaining clip❑Integral part of side win‐dow.Golf Variant 2007 ➤ , Jetta 2005 ➤General body repairs, exterior - Edition 10.20091. Flush bonded windows 271 Downloaded from www.Manualslib.com manuals search engine
Protected by copyright. Copying for private or commercial purposes, in partor in whole, is not permitted unless authorised by Volkswagen AG. Volkswagen AG does notguarantee or accept any liability with respect to the correctness ofinformation in this document.Copyright by Volkswagen AG.1.12Removing undamaged side window(Variant)NoteThe removal and installation sequence is only for the right sidewindow. The removal and installation of the left side window issimilar.–Remove C and D-pillar trim: ⇒ General body repairs, interior;Rep. Gr. 70 ; Trims, insulation; Pillars and side trims .–Depending on equipment, disconnect connector from impe‐dance converter -1-.Vehicles with side window trim–Carefully insert wedge -T10039/1- in direction of -arrow- undertrim strip -1-.–Remove trim strip -1-.All vehicles–Pull cutting cord -1- through adhesive sealing material at pointmarked on illustration and into inside of vehicle using awl -V.A.G 1474/2- from removal kit for flush bonded windows -V.A.G 1474 A- .Golf Variant 2007 ➤ , Jetta 2005 ➤General body repairs, exterior - Edition 10.2009272 Rep. Gr.64 - Glazing Downloaded from www.Manualslib.com manuals search engine
Protected by copyright. Copying for private or commercial purposes, in partor in whole, is not permitted unless authorised by Volkswagen AG. Volkswagen AG does notguarantee or accept any liability with respect to the correctness ofinformation in this document.Copyright by Volkswagen AG.–Insert cutting cord -3- behind seal in window flange with aid oftube -1-.–Secure one end of cord -2- to pull handle -V.A.G 1351/1- -2-to counterhold.–Pull other end of cord into vehicle interior.–Secure other end of cord to reel device -V.A.G 1654 A- -1-.–Reposition reel device -V.A.G 1654 A- -1- as necessary andcut window free.–Use plastic wedge to press cutting cord against window glasswhile cutting in order to have clearance at window flange.–Instead of reel device -V.A.G 1654- , reel device -V.A.G 1654A- can be used.–One suction cup can be removed from the reel device -V.A.G1654- as shown in figure. This ensures that the reel device -V.A.G 1654 A- roller can be guided closer to the windowflange.1.13Removing broken side window (Variant)Removing a broken side window is performed in the same man‐ner as removing a broken rear window ⇒ page 270 .1.14Installing side window (Variant)Preparing old undamaged window for glazing ⇒ page 274Preparing new window for glazing ⇒ page 274Preparing body flange for glazing ⇒ page 275Installation instructions ⇒ page 276Minimum curing period ⇒ page 276Golf Variant 2007 ➤ , Jetta 2005 ➤General body repairs, exterior - Edition 10.20091. Flush bonded windows 273 Downloaded from www.Manualslib.com manuals search engine
Protected by copyright. Copying for private or commercial purposes, in partor in whole, is not permitted unless authorised by Volkswagen AG. Volkswagen AG does notguarantee or accept any liability with respect to the correctness ofinformation in this document.Copyright by Volkswagen AG.1.15Preparing old undamaged window forglazingNote♦If installing an undamaged window, cut back residual adhesiveseal to 1...2 mm, being careful not to damage primer and ce‐ramic coating.♦Remaining material serves as adhesion base for newly ap‐plied adhesive sealing compound.CautionDo not prime bonding surface and do not treat with a cleaningsolution. Keep bonding surface free of dirt and grease.Exception: If bonding is not performed immediately after cuttingback, the remaining residual material must be activated with ac‐tivator -D 181 801 A1- .1.16Preparing new window for glazingOnly the applied ceramic layer and injection moulded sealing lipwith spacer rib are found on all new windows.Exception: rear window does not have a sealing lip or spacing lip.1 - Sealing lip2 - Spacing lip3 - WindowNoteThe area on which the adhesive bead is applied is not precoatedor primed.–Clean a 20 mm wide strip all around edge of window usingcleaning solution -D 009 401 04- .–Then rub edge of window dry using a lint free cloth.WARNINGCeramic coating on window is not primer! It must be primedbefore application of adhesive sealing compound! Use onlyprimer -D 009 200 02- !Golf Variant 2007 ➤ , Jetta 2005 ➤General body repairs, exterior - Edition 10.2009274 Rep. Gr.64 - Glazing Downloaded from www.Manualslib.com manuals search engine
Protected by copyright. Copying for private or commercial purposes, in partor in whole, is not permitted unless authorised by Volkswagen AG. Volkswagen AG does notguarantee or accept any liability with respect to the correctness ofinformation in this document.Copyright by Volkswagen AG.–Now apply primer -4- evenly in one motion using applicator -D 009 500 25- -3- to the previously cleaned area -1- of window.Ensure that glass adhesive is applied to primed area at a distanceof approx. 2 mm from sealing lip -2-.Drying time approx. 10 minutes1.17Touching up paint damageIf paintwork is damaged, paint structure must be restored accord‐ing to specifications in “Paint” workshop manual.1.18Preparing body flange for glazing–Cut back remaining material on body flange with electric cutter-V.A.G 1561 A- and scraping blade -V.A.G 1561/8- , but do notremove completely.NoteRemaining material serves as adhesion base for newly appliedadhesive sealing compound. Keep bonding surfaces free of dirtand grease.Exception: If bonding is not performed immediately after cuttingback, the remaining residual material must be activated with ac‐tivator -D 181 801 A1- .CautionActivator must not have contact with paint or the paintwork willbe damaged.If the window flange has been repaired or partially renewed, thearea concerned must be cleaned and primed again after painting.Golf Variant 2007 ➤ , Jetta 2005 ➤General body repairs, exterior - Edition 10.20091. Flush bonded windows 275 Downloaded from www.Manualslib.com manuals search engine
Protected by copyright. Copying for private or commercial purposes, in partor in whole, is not permitted unless authorised by Volkswagen AG. Volkswagen AG does notguarantee or accept any liability with respect to the correctness ofinformation in this document.Copyright by Volkswagen AG.1.19Installation instructions–Apply adhesive material to primed area -1- or to trimmed seal‐ant bead, holding double cartridge gun -VAS 5237- at rightangle to window.WARNINGWindow must be installed within 10 minutes, or adhesive prop‐erties of glass adhesive will be impaired.♦Using two suction lifters -V.A.G 1344- , install glass pane inwindow aperture, align to centre and press in onto spacing lip.♦Secure windscreen during curing period with window adjust‐ers.♦It is absolutely necessary to install the plenum chamber coveras described ⇒ page 263 .♦Replace stickers (e.g. for airbag) which may be installed.♦The activator must not come into contact with the windowheater bus bar.♦If the adhesive bead is too thick and the adhesive expandsonto the area of the window heating, excess adhesive mustbe removed.1.20Minimum curing periodWARNINGSpecial standards must be adhered to when replacing bondedwindows. One of these standards is, for example, that a freshlybonded windscreen must comply with the safety requirements,even in an accident, following the minimum prescribed curingperiod.The minimum curing period for 2K adhesive -DA 004 600 A2- isthree hours for all windows.Minimum curing period is the time from bonding the window untilvehicle may be used. During this time, the vehicle must stand ona level surface at room temperature (at least 15 °C).WARNINGVehicle is safe to use only after the curing period is completed.1.21Touching up paint damagePaint structure must be restored according to specifications in the“Paint” workshop manual.The following repair method is suitable for paint finish damagedin areas which are not visible:Painting over twice (wet-on-wet) with glass/paint primer -D009 200 02- - flash-off time = at least 10 minutes.Golf Variant 2007 ➤ , Jetta 2005 ➤General body repairs, exterior - Edition 10.2009276 Rep. Gr.64 - Glazing Downloaded from www.Manualslib.com manuals search engine
Protected by copyright. Copying for private or commercial purposes, in partor in whole, is not permitted unless authorised by Volkswagen AG. Volkswagen AG does notguarantee or accept any liability with respect to the correctness ofinformation in this document.Copyright by Volkswagen AG.1.22Cleaning off excess adhesive sealingmaterial–Use of adhesive remover -D 002 000 10- as a cleaning solutionis recommended. Observe the appropriate safety precautionswhen performing this work.WARNINGWhen cleaning freshly installed glass from the inside in the ve‐hicle, do not press glass outwards.–First clean painted surface as much as possible using a drycloth. Remove residual excess with adhesive remover -D 002000 10- .–Cleaning plastic trim: allow adhesive sealant to cure (approx.one hour) and then peel off.Golf Variant 2007 ➤ , Jetta 2005 ➤General body repairs, exterior - Edition 10.20091. Flush bonded windows 277 Downloaded from www.Manualslib.com manuals search engine
Protected by copyright. Copying for private or commercial purposes, in partor in whole, is not permitted unless authorised by Volkswagen AG. Volkswagen AG does notguarantee or accept any liability with respect to the correctness ofinformation in this document.Copyright by Volkswagen AG.2Front door windows2.1ToolsSpecial tools and workshop equipment required♦Roller -T10314-♦Torque wrench -V.A.G 1783-Golf Variant 2007 ➤ , Jetta 2005 ➤General body repairs, exterior - Edition 10.2009278 Rep. Gr.64 - Glazing Downloaded from www.Manualslib.com manuals search engine
Protected by copyright. Copying for private or commercial purposes, in partor in whole, is not permitted unless authorised by Volkswagen AG. Volkswagen AG does notguarantee or accept any liability with respect to the correctness ofinformation in this document.Copyright by Volkswagen AG.2.2Assembly overview- front door windowNote♦The right side is shown. The left side is similar.♦The bolt -4- is accessible from interior and exterior. From exterior the bolt has a right-hand thread. Thismeans: from exterior the bolt is removed by turning it to left, from interior the bolt is removed by turning it toright.1 - Door window❑Removing and installing⇒ page 2792 - Window channel❑Removing and installing⇒ page 2873 - Mounting4 - Bolt❑Accessible from exterior(right-hand thread), re‐move by turning anti-clockwise (to remove:remove door outer pan‐el ⇒ page 112 )❑Accessible from interior,remove by turningclockwise (to remove:remove front door trim⇒ General body repairs,interior; Rep. Gr. 70 ;Trims, insulation; Doortrims )❑Qty. 2❑8 Nm5 - Window regulator❑Removing and installing⇒ page 2916 - Cover❑Qty. 27 - Window regulator motor❑Removing and installing⇒ page 2842.3Removing and installing door windowNoteRemoval and installation is described only for the right door win‐dow. Removal and installation of the left door window is done inthe same manner.Golf Variant 2007 ➤ , Jetta 2005 ➤General body repairs, exterior - Edition 10.20092. Front door windows 279 Downloaded from www.Manualslib.com manuals search engine
Protected by copyright. Copying for private or commercial purposes, in partor in whole, is not permitted unless authorised by Volkswagen AG. Volkswagen AG does notguarantee or accept any liability with respect to the correctness ofinformation in this document.Copyright by Volkswagen AG.2.3.1RemovingNoteThe bolt -3- is accessible from interior and exterior. From exterior the bolt has a right-hand thread. This means:from exterior the bolt is removed by turning it to left, from interior the bolt is removed by turning it to right.–Removing front door trim ⇒ General body repairs, interior;Rep. Gr. 70 ; Door trim .–Lever out caps -4-.–Lower door window -1- until clamping bolts -3- for mounting-2- are accessible.NoteIf the work step cannot be carried out because there is a fault with the electric window motor, remove motor toslide window down.CautionRemove bolt -3- from interior by turning it clockwise.Golf Variant 2007 ➤ , Jetta 2005 ➤General body repairs, exterior - Edition 10.2009280 Rep. Gr.64 - Glazing Downloaded from www.Manualslib.com manuals search engine
Protected by copyright. Copying for private or commercial purposes, in partor in whole, is not permitted unless authorised by Volkswagen AG. Volkswagen AG does notguarantee or accept any liability with respect to the correctness ofinformation in this document.Copyright by Volkswagen AG.–Loosen bolts -3- (do not remove) from inside by turning to rightand press clamping jaws apart.–Lift rear of door window -1- and swivel out of door forwards, indirection of -arrow-.Golf Variant 2007 ➤ , Jetta 2005 ➤General body repairs, exterior - Edition 10.20092. Front door windows 281 Downloaded from www.Manualslib.com manuals search engine
Protected by copyright. Copying for private or commercial purposes, in partor in whole, is not permitted unless authorised by Volkswagen AG. Volkswagen AG does notguarantee or accept any liability with respect to the correctness ofinformation in this document.Copyright by Volkswagen AG.2.3.2Installing–Insert door window -1- in door in -direction of arrow-.Ensure that door window -1- is properly located in window chan‐nels.–The bolt can now be tightened by turning to left.Specified torque for bolt: 8 Nm.Further installation is performed in reverse order of removal.Then test for proper function.2.4Adjusting door window–Removing front door trim ⇒ General body repairs, interior;Rep. Gr. 70 ; Door trim .–Lever out caps -4-.–Lower door window -1- until clamping bolts -3- for mounting-2- are accessible.CautionRemove bolt -3- from interior by turning it clockwise.Golf Variant 2007 ➤ , Jetta 2005 ➤General body repairs, exterior - Edition 10.2009282 Rep. Gr.64 - Glazing Downloaded from www.Manualslib.com manuals search engine
Protected by copyright. Copying for private or commercial purposes, in partor in whole, is not permitted unless authorised by Volkswagen AG. Volkswagen AG does notguarantee or accept any liability with respect to the correctness ofinformation in this document.Copyright by Volkswagen AG.–Loosen bolts -3- (do not remove) from inside by turning to rightand press clamping jaws apart.–Applying light pressure press door window -1- in clampingjaws in -direction of arrow- and align door window tension freeat rear window channel.When doing so, ensure that door window -1- is positioned parallelto window channel.–Tighten clamping jaws by turning bolts anti-clockwise from in‐terior.Specified torque for bolt: 8 Nm.Then test for proper function.Further installation is performed in reverse order of removal.Golf Variant 2007 ➤ , Jetta 2005 ➤General body repairs, exterior - Edition 10.20092. Front door windows 283 Downloaded from www.Manualslib.com manuals search engine
Protected by copyright. Copying for private or commercial purposes, in partor in whole, is not permitted unless authorised by Volkswagen AG. Volkswagen AG does notguarantee or accept any liability with respect to the correctness ofinformation in this document.Copyright by Volkswagen AG.2.5Assembly overview - window regulator motorNoteThe right side is shown. The left side is similar.1 - Window regulator motor❑Removing and installing⇒ page 2842 - Bolt❑Qty. 3❑3.5 Nm2.6Removing and installing window regula‐tor motorNote♦The removal and installation sequence is only for the rightwindow regulator motor. The removal and installation of theleft window regulator motor is similar.♦The window regulator motor can also be removed with mount‐ing plate when door outer panel is removed.Golf Variant 2007 ➤ , Jetta 2005 ➤General body repairs, exterior - Edition 10.2009284 Rep. Gr.64 - Glazing Downloaded from www.Manualslib.com manuals search engine
Protected by copyright. Copying for private or commercial purposes, in partor in whole, is not permitted unless authorised by Volkswagen AG. Volkswagen AG does notguarantee or accept any liability with respect to the correctness ofinformation in this document.Copyright by Volkswagen AG.2.6.1Removing–Removing front door trim ⇒ General body repairs, interior;Rep. Gr. 70 ; Door trim .–Secure door window against sliding down with adhesive tape.–Release connectors -arrows- using a screwdriver in-direction of arrow-.–Remove the three bolts -2-.–Remove window regulator motor with control unit -1- frommounting plate.2.6.2Installing–Push window regulator motor -1- into place and reconnectconnector -arrows-.–Move door window lightly up and down so that the splines be‐tween motor and cable drum engage easier.–Tighten bolts -2- window regulator motor.Specified torque: 3.5 NmGolf Variant 2007 ➤ , Jetta 2005 ➤General body repairs, exterior - Edition 10.20092. Front door windows 285 Downloaded from www.Manualslib.com manuals search engine
Protected by copyright. Copying for private or commercial purposes, in partor in whole, is not permitted unless authorised by Volkswagen AG. Volkswagen AG does notguarantee or accept any liability with respect to the correctness ofinformation in this document.Copyright by Volkswagen AG.–Run window regulator twice in each direction to upper andlower stops. This initiates and readies the window regulatormotor and activates the roll-back function.Further installation is performed in reverse order of removal.Golf Variant 2007 ➤ , Jetta 2005 ➤General body repairs, exterior - Edition 10.2009286 Rep. Gr.64 - Glazing Downloaded from www.Manualslib.com manuals search engine
Protected by copyright. Copying for private or commercial purposes, in partor in whole, is not permitted unless authorised by Volkswagen AG. Volkswagen AG does notguarantee or accept any liability with respect to the correctness ofinformation in this document.Copyright by Volkswagen AG.2.7Assembly overview - window channelNote♦The right side is shown. The left side is similar.♦For a better representation the illustration is drawn without door outer panel.1 - Window channel2 - Trim3 - Bolt❑Qty. 2❑2 Nm4 - Window frame on door innerpart5 - Trim strip fasteners❑Spreader rivet or screw6 - Window channel trim strip❑Depends on equipment❑Removing and installing⇒ page 2892.8Removing and installing window chan‐nelNote♦Removal and installation is described only for the right windowchannel. The removal and installation of the left window chan‐nel is similar.♦For a better representation the removal and installation isdrawn without door outer panel.Golf Variant 2007 ➤ , Jetta 2005 ➤General body repairs, exterior - Edition 10.20092. Front door windows 287 Downloaded from www.Manualslib.com manuals search engine
Protected by copyright. Copying for private or commercial purposes, in partor in whole, is not permitted unless authorised by Volkswagen AG. Volkswagen AG does notguarantee or accept any liability with respect to the correctness ofinformation in this document.Copyright by Volkswagen AG.2.8.1Removing–Removing front door trim ⇒ General body repairs, interior;Rep. Gr. 70 ; Door trim .–Remove exterior mirror ⇒ page 331 .–Removing door window ⇒ page 279 .Vehicles with window channel trim strip–Remove window channel trim strip -6- ⇒ page 289 .All vehicles–Pull window channel -1- out of mounting.–Remove bolts -3- (Qty. 2) and pull trim plate -2- off in directionof B-pillar -direction of arrow-.–Pull window channel -1- off all around window frame -4- andremove upwards out of window slot.2.8.2InstallingInstall in reverse order of removal.Golf Variant 2007 ➤ , Jetta 2005 ➤General body repairs, exterior - Edition 10.2009288 Rep. Gr.64 - Glazing Downloaded from www.Manualslib.com manuals search engine
Protected by copyright. Copying for private or commercial purposes, in partor in whole, is not permitted unless authorised by Volkswagen AG. Volkswagen AG does notguarantee or accept any liability with respect to the correctness ofinformation in this document.Copyright by Volkswagen AG.NoteTo prevent wind noise, ensure window channel seats evenlywhen installing.2.9Removing and installing window chan‐nel trim strip2.9.1Removing–Push window channel -1- in top rear area slightly to side.–Remove spreader rivet -6- for window channel -1-.–Pull trim strip -5- out of window channel -1- in direction of-arrow-.Trim -2- must not be removed.2.9.2Installing–Spray window channel with soapy water.Golf Variant 2007 ➤ , Jetta 2005 ➤General body repairs, exterior - Edition 10.20092. Front door windows 289 Downloaded from www.Manualslib.com manuals search engine
Protected by copyright. Copying for private or commercial purposes, in partor in whole, is not permitted unless authorised by Volkswagen AG. Volkswagen AG does notguarantee or accept any liability with respect to the correctness ofinformation in this document.Copyright by Volkswagen AG.–Press trim strip -1- evenly in direction of -arrow- into windowchannel -2- by hand.–Then press window channel -2- fully into mounting of trim strip-1- with roller -T 10314- .Further installation is performed in reverse order of removal.Golf Variant 2007 ➤ , Jetta 2005 ➤General body repairs, exterior - Edition 10.2009290 Rep. Gr.64 - Glazing Downloaded from www.Manualslib.com manuals search engine
Protected by copyright. Copying for private or commercial purposes, in partor in whole, is not permitted unless authorised by Volkswagen AG. Volkswagen AG does notguarantee or accept any liability with respect to the correctness ofinformation in this document.Copyright by Volkswagen AG.2.10Assembly overview - window regulatorNoteThe right side is shown. The left side is similar.1 - Window regulator❑Removing and installing⇒ page 2912 - Bolt❑Qty. 4❑8 Nm3 - Bolt❑Qty. 5❑8 Nm4 - Drive5 - Mounting plate2.11Removing and installing window regula‐torNoteThe removal and installation sequence is only for the right windowregulator. The removal and installation of the left window regulatoris similar.2.11.1Removing–Remove door outer panel ⇒ page 112 .–Remove side impact protection ⇒ page 92 .Golf Variant 2007 ➤ , Jetta 2005 ➤General body repairs, exterior - Edition 10.20092. Front door windows 291 Downloaded from www.Manualslib.com manuals search engine
Protected by copyright. Copying for private or commercial purposes, in partor in whole, is not permitted unless authorised by Volkswagen AG. Volkswagen AG does notguarantee or accept any liability with respect to the correctness ofinformation in this document.Copyright by Volkswagen AG.–Removing door window ⇒ page 279 .–Remove bolts -2- from mounting plate -5-.–Remove bolts -3- for window regulator.–Remove window regulator -1- with drive -4- and mountingplate -5- for window regulator motor from inner part of door.–Disconnect connections for window regulator motor⇒ page 285 .2.11.2InstallingInstall in reverse order of removal.Carry out functional check before installing door outer panel.Golf Variant 2007 ➤ , Jetta 2005 ➤General body repairs, exterior - Edition 10.2009292 Rep. Gr.64 - Glazing Downloaded from www.Manualslib.com manuals search engine
Protected by copyright. Copying for private or commercial purposes, in partor in whole, is not permitted unless authorised by Volkswagen AG. Volkswagen AG does notguarantee or accept any liability with respect to the correctness ofinformation in this document.Copyright by Volkswagen AG.3Rear door window (saloon)3.1ToolsSpecial tools and workshopequipment required♦Release tool -T10236-♦Roller -T10314-♦Torque wrench -V.A.G1783-Golf Variant 2007 ➤ , Jetta 2005 ➤General body repairs, exterior - Edition 10.20093. Rear door window (saloon) 293 Downloaded from www.Manualslib.com manuals search engine
Protected by copyright. Copying for private or commercial purposes, in partor in whole, is not permitted unless authorised by Volkswagen AG. Volkswagen AG does notguarantee or accept any liability with respect to the correctness ofinformation in this document.Copyright by Volkswagen AG.3.2Assembly overview - rear door windowNoteThe right side is shown. The left side is similar.1 - Door window❑Removing and installing⇒ page 2942 - Window channel❑Component part of fixeddoor window❑Removing and installing⇒ page 2973 - Fixed door window❑Part of widow channel.❑Removing and installing⇒ page 2974 - Window regulator guide5 - Spreader plug❑Always renew whenworking on door window6 - Spreader pin❑Always renew whenworking on door window7 - Cover8 - Window regulator❑Removing and installing⇒ page 3059 - Window regulator motor❑Removing and installing⇒ page 3023.3Removing and installing door windowNoteThe removal and installation sequence is only for the rear rightdoor window. The removal and installation of the rear left doorwindow is similar.Golf Variant 2007 ➤ , Jetta 2005 ➤General body repairs, exterior - Edition 10.2009294 Rep. Gr.64 - Glazing Downloaded from www.Manualslib.com manuals search engine
Protected by copyright. Copying for private or commercial purposes, in partor in whole, is not permitted unless authorised by Volkswagen AG. Volkswagen AG does notguarantee or accept any liability with respect to the correctness ofinformation in this document.Copyright by Volkswagen AG.3.3.1RemovingNoteWhen door outer panel has been removed the spreader pin andspreader plug to remove door window are accessible from exte‐rior.–Remove rear door trim ⇒ General body repairs, interior; Rep.Gr. 70 ; Door trim .–Lever out caps -5-.–Lower door window until spreader pin -3- and spreader plug-4- in cut-out of window regulator is accessible.NoteIf the work step cannot be carried out because there is a fault withthe electric window motor, remove motor to slide window down.–Screw a 5 mm bolt (approx. 70 mm long) into spreader pin-3-.–Pull bolt and spreader pin out of spreader plug -4-.–Screw an 8 mm bolt (approx. 80 mm long) into spreader plug-4-.NoteDo not exert too great a pressure on the plug because otherwisethe plug will fall into the door.–Pull spreader plug -4- out of clamping jaws -2- and thereforeout of door window.–Remove window regulator motor ⇒ page 302 .–Lower door window fully.–Pull window channel -3- out of mounting.–Remove screws -2- and pull trim -1- towards B-pillar-direction of arrow-.Golf Variant 2007 ➤ , Jetta 2005 ➤General body repairs, exterior - Edition 10.20093. Rear door window (saloon) 295 Downloaded from www.Manualslib.com manuals search engine
Protected by copyright. Copying for private or commercial purposes, in partor in whole, is not permitted unless authorised by Volkswagen AG. Volkswagen AG does notguarantee or accept any liability with respect to the correctness ofinformation in this document.Copyright by Volkswagen AG.–Pull door window upwards -arrow- out of window slot.3.3.2InstallingNote♦When installing door window, always renew spreader plug andspreader pin.♦Before inserting spreader plug and spreader pin check washerfor damage.–With door window -1- removed insert spreader plug -3- in mid‐dle - centralised.–Press spreader pin -2- flush into spreader plug -3-.–Remove window slot seal ( ⇒ Item 1 (page 123) ).–Guide door window -1- into door and insert door window intomounting of window regulator guide -4-.–With light pressure from above -arrow-, engage window -1- inmounting of window regulator guide -4-.–Install window slot seal ( ⇒ Item 1 (page 123) ) again.Further installation is performed in reverse order of removal.Carry out functional test function before installing door trim.Golf Variant 2007 ➤ , Jetta 2005 ➤General body repairs, exterior - Edition 10.2009296 Rep. Gr.64 - Glazing Downloaded from www.Manualslib.com manuals search engine
Protected by copyright. Copying for private or commercial purposes, in partor in whole, is not permitted unless authorised by Volkswagen AG. Volkswagen AG does notguarantee or accept any liability with respect to the correctness ofinformation in this document.Copyright by Volkswagen AG.3.4Assembly overview - door with fixed window with window channelNoteThe right side is shown. The left side is similar.1 - Window channel❑Component part of fixeddoor window❑Removing and installing⇒ page 2972 - Fixed door window❑Part of widow channel.❑Removing and installing⇒ page 2973 - Window frame on door innerpart4 - Window channel trim strip❑Depends on equipment❑Removing and installing⇒ page 3005 - Spreader rivet3.5Removing and installing door with fixedwindow with window channelNote♦The removal and installation sequence is only for the right doorfixed window with window channel. The removal and installa‐tion of the left door fixed window with window channel issimilar.♦When door outer panel has been removed the spreader pinand spreader plug to remove door window are accessible fromexterior.Golf Variant 2007 ➤ , Jetta 2005 ➤General body repairs, exterior - Edition 10.20093. Rear door window (saloon) 297 Downloaded from www.Manualslib.com manuals search engine
Protected by copyright. Copying for private or commercial purposes, in partor in whole, is not permitted unless authorised by Volkswagen AG. Volkswagen AG does notguarantee or accept any liability with respect to the correctness ofinformation in this document.Copyright by Volkswagen AG.3.5.1Removing–Remove door outer panel ⇒ page 112 .–Removing door window ⇒ page 294 .–Pull window channel -4- out of middle frame -1- and guidewindow channel inwards.–Remove bolts -2- and -3- and slide middle frame -1- down‐wards -arrow A-.–Pull middle frame -4- off fixed door window seal -arrow B-.–Release window channel -1- with fixed door window -2- on in‐side and outside from window frame -4-.–Using release tool -T10236- release locking lugs on guide pin-3- in window frame -4-.Vehicles with window channel trim stripRemove window channel trim strip -4- ⇒ page 300 .All vehicles–Pull complete window channel -1- with fixed door window -2-off window frame -3- in -direction of arrow-.Golf Variant 2007 ➤ , Jetta 2005 ➤General body repairs, exterior - Edition 10.2009298 Rep. Gr.64 - Glazing Downloaded from www.Manualslib.com manuals search engine
Protected by copyright. Copying for private or commercial purposes, in partor in whole, is not permitted unless authorised by Volkswagen AG. Volkswagen AG does notguarantee or accept any liability with respect to the correctness ofinformation in this document.Copyright by Volkswagen AG.3.5.2InstallingInstall in reverse order of removal.Specified torque for bolts -2- on middle frame: 5.5 NmSpecified torque for bolts -3- on middle frame: 4.5 NmNoteWhen installing fixed door window with window channel ensure itis seated uniformly (wind noise).Golf Variant 2007 ➤ , Jetta 2005 ➤General body repairs, exterior - Edition 10.20093. Rear door window (saloon) 299 Downloaded from www.Manualslib.com manuals search engine
Protected by copyright. Copying for private or commercial purposes, in partor in whole, is not permitted unless authorised by Volkswagen AG. Volkswagen AG does notguarantee or accept any liability with respect to the correctness ofinformation in this document.Copyright by Volkswagen AG.3.6Removing and installing window chan‐nel trim strip3.6.1Removing–Push window channel -1- in top front area slightly to side.–Remove spreader rivet -5-.–Pull trim strip -4- out of window channel -1- in direction of-arrow-.3.6.2Installing–Spray window channel with soapy water.Golf Variant 2007 ➤ , Jetta 2005 ➤General body repairs, exterior - Edition 10.2009300 Rep. Gr.64 - Glazing Downloaded from www.Manualslib.com manuals search engine
Protected by copyright. Copying for private or commercial purposes, in partor in whole, is not permitted unless authorised by Volkswagen AG. Volkswagen AG does notguarantee or accept any liability with respect to the correctness ofinformation in this document.Copyright by Volkswagen AG.–Press trim strip -1- evenly -arrow- into window channel -2- byhand.–Then press window channel -2- fully into mounting of trim stripwith roller -T 10314- .Further installation is performed in reverse order of removal.Golf Variant 2007 ➤ , Jetta 2005 ➤General body repairs, exterior - Edition 10.20093. Rear door window (saloon) 301 Downloaded from www.Manualslib.com manuals search engine
Protected by copyright. Copying for private or commercial purposes, in partor in whole, is not permitted unless authorised by Volkswagen AG. Volkswagen AG does notguarantee or accept any liability with respect to the correctness ofinformation in this document.Copyright by Volkswagen AG.3.7Assembly overview - window regulator motorNoteThe right side is shown. The left side is similar.1 - Connector2 - Bolt❑Qty. 3❑3.5 Nm3 - Window regulator motor❑Removing and installing⇒ page 3023.8Removing and installing window regula‐tor motorNoteThe removal and installation sequence is only for the right windowregulator motor. The removal and installation of the left windowregulator motor is similar.3.8.1Removing–Removing door trim ⇒ General body repairs, interior; Rep. Gr. 70 ; Door trim .Golf Variant 2007 ➤ , Jetta 2005 ➤General body repairs, exterior - Edition 10.2009302 Rep. Gr.64 - Glazing Downloaded from www.Manualslib.com manuals search engine
Protected by copyright. Copying for private or commercial purposes, in partor in whole, is not permitted unless authorised by Volkswagen AG. Volkswagen AG does notguarantee or accept any liability with respect to the correctness ofinformation in this document.Copyright by Volkswagen AG.–Secure door window against sliding down with adhesive tape.–Remove the three bolts -2-.–Disconnect connector -1-.–Remove window regulator motor with control unit -3- frommounting plate.3.8.2Installing–Push window regulator motor -3- into place and reconnectconnector -1-.–Move door window lightly up and down so that the splines be‐tween motor and cable drum engage easier.–Tighten bolts -2- window regulator motor.Specified torque for bolts -2- 3.5 Nm–Run window regulator twice in each direction to upper andlower stops. This initiates and readies the window regulatormotor and activates the roll-back function.Golf Variant 2007 ➤ , Jetta 2005 ➤General body repairs, exterior - Edition 10.20093. Rear door window (saloon) 303 Downloaded from www.Manualslib.com manuals search engine
Protected by copyright. Copying for private or commercial purposes, in partor in whole, is not permitted unless authorised by Volkswagen AG. Volkswagen AG does notguarantee or accept any liability with respect to the correctness ofinformation in this document.Copyright by Volkswagen AG.Further installation is performed in reverse order of removal.Golf Variant 2007 ➤ , Jetta 2005 ➤General body repairs, exterior - Edition 10.2009304 Rep. Gr.64 - Glazing Downloaded from www.Manualslib.com manuals search engine
Protected by copyright. Copying for private or commercial purposes, in partor in whole, is not permitted unless authorised by Volkswagen AG. Volkswagen AG does notguarantee or accept any liability with respect to the correctness ofinformation in this document.Copyright by Volkswagen AG.3.9Assembly overview - window regulatorNoteThe right side is shown. The left side is similar.1 - Window regulator❑Removing and installing⇒ page 3052 - Bolt❑Qty. 4❑8 Nm3 - Mounting plate4 - Drive5 - Bolt❑Qty. 2❑8 Nm3.10Removing and installing window regula‐torNote♦The removal and installation sequence is only for the rightwindow regulator. The removal and installation of the left win‐dow regulator is similar.♦For clarity the side impact protection is not shown in the illus‐trationGolf Variant 2007 ➤ , Jetta 2005 ➤General body repairs, exterior - Edition 10.20093. Rear door window (saloon) 305 Downloaded from www.Manualslib.com manuals search engine
Protected by copyright. Copying for private or commercial purposes, in partor in whole, is not permitted unless authorised by Volkswagen AG. Volkswagen AG does notguarantee or accept any liability with respect to the correctness ofinformation in this document.Copyright by Volkswagen AG.3.10.1Removing–Remove door outer panel ⇒ page 112 .–Removing door window ⇒ page 294 .–Remove bolts -2- from mounting plate -3-.–Remove bolts -5- for window regulator.–Remove window regulator -1- with drive -4- and mountingplate -3- for window regulator motor from inner part of door.3.10.2InstallingInstall in reverse order of removal.Carry out functional check before installing door outer panel.Golf Variant 2007 ➤ , Jetta 2005 ➤General body repairs, exterior - Edition 10.2009306 Rep. Gr.64 - Glazing Downloaded from www.Manualslib.com manuals search engine
Protected by copyright. Copying for private or commercial purposes, in partor in whole, is not permitted unless authorised by Volkswagen AG. Volkswagen AG does notguarantee or accept any liability with respect to the correctness ofinformation in this document.Copyright by Volkswagen AG.4Rear door window (Variant)4.1ToolsSpecial tools and workshop equipment required♦Roller -T10314-♦Torque wrench -V.A.G 1783-Golf Variant 2007 ➤ , Jetta 2005 ➤General body repairs, exterior - Edition 10.20094. Rear door window (Variant) 307 Downloaded from www.Manualslib.com manuals search engine
Protected by copyright. Copying for private or commercial purposes, in partor in whole, is not permitted unless authorised by Volkswagen AG. Volkswagen AG does notguarantee or accept any liability with respect to the correctness ofinformation in this document.Copyright by Volkswagen AG.4.2Assembly overview - rear door windowNoteThe right side is shown. The left side is similar.1 - Door window❑Removing and installing⇒ page 3082 - Window channel❑Component part of fixeddoor window❑Removing and installing⇒ page 3123 - Fixed door window❑Removing and installing⇒ page 3124 - Window regulator guide5 - Spreader plug❑Always renew whenworking on door window6 - Spreader pin❑Always renew whenworking on door window7 - Cover8 - Window regulator❑Part of assembly carrier9 - Window regulator motor❑Removing and installing⇒ page 31710 - Bolt❑Qty. 8❑8 Nm11 - Assembly carrier❑Removing and installing⇒ page 14512 - Window slot inner seal4.3Removing and installing door windowNote♦The removal and installation sequence is only for the rear rightdoor window. The removal and installation of the rear left doorwindow is similar.♦Outer window slot seal need not be removed.Golf Variant 2007 ➤ , Jetta 2005 ➤General body repairs, exterior - Edition 10.2009308 Rep. Gr.64 - Glazing Downloaded from www.Manualslib.com manuals search engine
Protected by copyright. Copying for private or commercial purposes, in partor in whole, is not permitted unless authorised by Volkswagen AG. Volkswagen AG does notguarantee or accept any liability with respect to the correctness ofinformation in this document.Copyright by Volkswagen AG.4.3.1Removing–Remove rear door trim ⇒ General body repairs, interior; Rep.Gr. 70 ; Door trim .–Lower door window completely.–Pull window channel -3- out of mounting.–Remove screws -2- and pull trim -1- towards B-pillar-direction of arrow-.–Lever out cap -5-.–Lift door window until spreader pin -3- and spreader plug -4-in cut-out of window regulator is accessible.NoteIf the procedure cannot be carried out because there is a fault withthe electric window regulator, remove electric window motor toslide window down.–Screw a 5 mm bolt (approx. 70 mm long) into spreader pin-3-.–Pull bolt and spreader pin out of spreader plug -4-.–Screw an 8 mm bolt (approx. 80 mm long) into spreader plug-4-.NoteDo not exert too great a pressure on the plug because otherwisethe plug will fall into the door.–Pull spreader plug -4- out of clamping jaws -2- and thereforeout of door window.–Pull window slot inner seal -6- off door inner panel.Golf Variant 2007 ➤ , Jetta 2005 ➤General body repairs, exterior - Edition 10.20094. Rear door window (Variant) 309 Downloaded from www.Manualslib.com manuals search engine
Protected by copyright. Copying for private or commercial purposes, in partor in whole, is not permitted unless authorised by Volkswagen AG. Volkswagen AG does notguarantee or accept any liability with respect to the correctness ofinformation in this document.Copyright by Volkswagen AG.–Pull door window upwards -arrow- out of window slot.4.3.2InstallingNote♦When installing door window, always renew spreader plug andspreader pin.♦Before inserting spreader plug and spreader pin check washerfor damage.–With door window -1- removed insert spreader plug -3- in mid‐dle - centralised.–Press spreader pin -2- flush into spreader plug -3-.–Guide door window -1- into door and insert door window intomounting of window regulator guide -4-.–With light pressure from above -arrow-, engage window -1- inmounting of window regulator guide -4-.Further installation is performed in reverse order of removal.Carry out functional test function before installing door trim.4.4Removing and installing window slotouter seal4.4.1Removing–Remove door window ⇒ page 309 .Golf Variant 2007 ➤ , Jetta 2005 ➤General body repairs, exterior - Edition 10.2009310 Rep. Gr.64 - Glazing Downloaded from www.Manualslib.com manuals search engine
Protected by copyright. Copying for private or commercial purposes, in partor in whole, is not permitted unless authorised by Volkswagen AG. Volkswagen AG does notguarantee or accept any liability with respect to the correctness ofinformation in this document.Copyright by Volkswagen AG.–Lever spreader clip -4- out of clip -3- using a small screwdriver.–Pull the four clips -3- out of the window slot seal -2-.–Pull window slot seal -2- upwards off door outer panel -1-.4.4.2InstallingInstall in reverse order of removal.4.5Assembly overview - door with fixed window with window channelNoteThe right side is shown. The left side is similar.1 - Spreader rivet❑Only with window chan‐nel trim strip2 - Window channel trim strip❑Depends on equipment❑Removing and installing⇒ page 3163 - Window channel❑Removing and installing⇒ page 3124 - Clip❑Always renew whenmaking repairs5 - Middle frame6 - Bolt❑4.5 Nm7 - Fixed door window❑Removing and installing⇒ page 3128 - Bolt❑Qty. 2❑5.5 Nm9 - Window frame on door innerpartGolf Variant 2007 ➤ , Jetta 2005 ➤General body repairs, exterior - Edition 10.20094. Rear door window (Variant) 311 Downloaded from www.Manualslib.com manuals search engine
Protected by copyright. Copying for private or commercial purposes, in partor in whole, is not permitted unless authorised by Volkswagen AG. Volkswagen AG does notguarantee or accept any liability with respect to the correctness ofinformation in this document.Copyright by Volkswagen AG.4.6Removing and installing door with fixedwindow with window channelNoteThe removal and installation sequence is only for the right doorfixed window with window channel. The removal and installationof the left door fixed window with window channel is similar.4.6.1Removing–Remove door window ⇒ page 309 .–Remove window slot outer seal ⇒ page 310 .–Lever out both caps -3-.–Remove both bolts -2- from middle frame -1-.–Pull window channel rubber -3- off trim -2- in direction of-arrow A-.–Remove bolts -1- and pull off trim -2- in direction of-arrow B-.Vehicles with window channel trim stripGolf Variant 2007 ➤ , Jetta 2005 ➤General body repairs, exterior - Edition 10.2009312 Rep. Gr.64 - Glazing Downloaded from www.Manualslib.com manuals search engine
Protected by copyright. Copying for private or commercial purposes, in partor in whole, is not permitted unless authorised by Volkswagen AG. Volkswagen AG does notguarantee or accept any liability with respect to the correctness ofinformation in this document.Copyright by Volkswagen AG.–Push window channel -2- in top front area slightly to side.–Remove spreader rivet -5- for window channel trim strip -1-.All vehicles–Release window channel -2- with fixed door window -3- on in‐side and outside from window frame -4-.–Carefully prise clip -5- out of window frame -2-.–Pull complete window channel -1- with fixed door window -4-and middle frame -3- upwards and out of door in direction of-arrow A-.Golf Variant 2007 ➤ , Jetta 2005 ➤General body repairs, exterior - Edition 10.20094. Rear door window (Variant) 313 Downloaded from www.Manualslib.com manuals search engine
Protected by copyright. Copying for private or commercial purposes, in partor in whole, is not permitted unless authorised by Volkswagen AG. Volkswagen AG does notguarantee or accept any liability with respect to the correctness ofinformation in this document.Copyright by Volkswagen AG.–Remove bolt -4-.–Pull middle frame -3- out of clips -2- and window channel -1-.–Take fixed door window -5- out of window channel -1-.Golf Variant 2007 ➤ , Jetta 2005 ➤General body repairs, exterior - Edition 10.2009314 Rep. Gr.64 - Glazing Downloaded from www.Manualslib.com manuals search engine
Protected by copyright. Copying for private or commercial purposes, in partor in whole, is not permitted unless authorised by Volkswagen AG. Volkswagen AG does notguarantee or accept any liability with respect to the correctness ofinformation in this document.Copyright by Volkswagen AG.4.6.2InstallingSpray window channel with soapy water when installing.Further installation is performed in reverse order of removal.Use a new clip when installing middle frame.NoteWhen installing fixed door window with window channel ensure itis seated uniformly (wind noise).Golf Variant 2007 ➤ , Jetta 2005 ➤General body repairs, exterior - Edition 10.20094. Rear door window (Variant) 315 Downloaded from www.Manualslib.com manuals search engine
Protected by copyright. Copying for private or commercial purposes, in partor in whole, is not permitted unless authorised by Volkswagen AG. Volkswagen AG does notguarantee or accept any liability with respect to the correctness ofinformation in this document.Copyright by Volkswagen AG.4.7Removing and installing window chan‐nel trim strip4.7.1Removing–Push window channel -2- in top front area slightly to side.–Remove spreader rivet -5- for window channel trim strip -1-.–Pull trim strip -1- out of window channel -2-.4.7.2Installing–Spray window channel with soapy water.–Press trim strip -1- evenly -arrow- into window channel -2- byhand.–Then press window channel -2- fully into mounting of trim stripwith roller -T 10314- .Further installation is performed in reverse order of removal.Golf Variant 2007 ➤ , Jetta 2005 ➤General body repairs, exterior - Edition 10.2009316 Rep. Gr.64 - Glazing Downloaded from www.Manualslib.com manuals search engine
Protected by copyright. Copying for private or commercial purposes, in partor in whole, is not permitted unless authorised by Volkswagen AG. Volkswagen AG does notguarantee or accept any liability with respect to the correctness ofinformation in this document.Copyright by Volkswagen AG.4.8Assembly overview - window regulator motorNoteThe right side is shown. The left side is similar.1 - Connector2 - Bolt❑Qty. 3❑3.5 Nm3 - Window regulator motor❑Removing and installing⇒ page 3174.9Removing and installing window regula‐tor motor4.9.1RemovingNoteThe removal and installation sequence is only for the right window regulator motor. The removal and installationof the left window regulator motor is similar.–Removing door trim ⇒ General body repairs, interior; Rep. Gr. 70 ; Door trim .Golf Variant 2007 ➤ , Jetta 2005 ➤General body repairs, exterior - Edition 10.20094. Rear door window (Variant) 317 Downloaded from www.Manualslib.com manuals search engine
Protected by copyright. Copying for private or commercial purposes, in partor in whole, is not permitted unless authorised by Volkswagen AG. Volkswagen AG does notguarantee or accept any liability with respect to the correctness ofinformation in this document.Copyright by Volkswagen AG.–Secure door window against sliding down with adhesive tape.–Pull connector -1- in direction of -arrow- off window regulatormotor with control unit -3-.–Remove the three bolts -2-.–Remove window regulator motor with control unit -3- from as‐sembly carrier.4.9.2Installing–Install window regulator motor with control unit -3-.–Move door window lightly up and down so that the splines be‐tween motor and cable drum engage easier.–Tighten bolts -2- for window regulator motor (3.5 Nm).–Reconnect connector -1- to window regulator motor with con‐trol unit -3- (in opposite direction of -arrow-).–Run window regulator twice in each direction to upper andlower stops. This initiates and readies the window regulatormotor and activates the roll-back function.Golf Variant 2007 ➤ , Jetta 2005 ➤General body repairs, exterior - Edition 10.2009318 Rep. Gr.64 - Glazing Downloaded from www.Manualslib.com manuals search engine
Protected by copyright. Copying for private or commercial purposes, in partor in whole, is not permitted unless authorised by Volkswagen AG. Volkswagen AG does notguarantee or accept any liability with respect to the correctness ofinformation in this document.Copyright by Volkswagen AG.Further installation is performed in reverse order of removal.Golf Variant 2007 ➤ , Jetta 2005 ➤General body repairs, exterior - Edition 10.20094. Rear door window (Variant) 319 Downloaded from www.Manualslib.com manuals search engine
Protected by copyright. Copying for private or commercial purposes, in partor in whole, is not permitted unless authorised by Volkswagen AG. Volkswagen AG does notguarantee or accept any liability with respect to the correctness ofinformation in this document.Copyright by Volkswagen AG.66 –Exterior equipment1Wheel housing liner1.1ToolsSpecial tools and workshop equipment required♦Torque wrench -V.A.G 1783-Golf Variant 2007 ➤ , Jetta 2005 ➤General body repairs, exterior - Edition 10.2009320 Rep. Gr.66 - Exterior equipment Downloaded from www.Manualslib.com manuals search engine
Protected by copyright. Copying for private or commercial purposes, in partor in whole, is not permitted unless authorised by Volkswagen AG. Volkswagen AG does notguarantee or accept any liability with respect to the correctness ofinformation in this document.Copyright by Volkswagen AG.1.2Assembly overview - front wheel housing linerNote♦Only the left side is shown. The right side is similar.♦The removal and installation procedures may have to be modified slightly depending on variations in equip‐ment.♦The wheel housing liner consists of a front and a rear part.1 - Wheel housing liner rearpart❑Material: PP/EPDM2 - Bolt❑Qty. 7❑2 Nm3 - Wheel housing liner frontpart❑Material: PP/EPDM4 - Bolt❑Qty. 11❑2 Nm5 - Expanding nut1.3Removing and installing front wheelhousing linerNoteThe removal and installation sequence is only for the left wheelhousing liner. Removal and installation of the right wheel housingliner are similar.Golf Variant 2007 ➤ , Jetta 2005 ➤General body repairs, exterior - Edition 10.20091. Wheel housing liner 321 Downloaded from www.Manualslib.com manuals search engine
Protected by copyright. Copying for private or commercial purposes, in partor in whole, is not permitted unless authorised by Volkswagen AG. Volkswagen AG does notguarantee or accept any liability with respect to the correctness ofinformation in this document.Copyright by Volkswagen AG.1.3.1RemovingWheel housing liner rear part–Remove wheel ⇒ Running gear, axles, steering; Rep. Gr. 44 ;Specified torques for wheel bolts .–Remove bolts -4- (Qty. 3) at transition of front and rear partsof wheel housing liner–Remove bolts -2- (Qty 7).–Pull off rear part of wheel housing liner -1-.Wheel housing liner front part–Remove bolts -4- (Qty 11).–Pull off front part of wheel housing liner -3-.1.3.2InstallingInstall in reverse order of removal.Golf Variant 2007 ➤ , Jetta 2005 ➤General body repairs, exterior - Edition 10.2009322 Rep. Gr.66 - Exterior equipment Downloaded from www.Manualslib.com manuals search engine
Protected by copyright. Copying for private or commercial purposes, in partor in whole, is not permitted unless authorised by Volkswagen AG. Volkswagen AG does notguarantee or accept any liability with respect to the correctness ofinformation in this document.Copyright by Volkswagen AG.1.4Assembly overview - rear wheel housing linerNoteOnly the left side is shown. The right side is similar.1 - Wheel housing liner❑Material: PP/EPDM2 - Bolt❑Qty. 9❑2 Nm3 - Expanding nut1.5Removing and installing rear wheelhousing linerNoteThe removal and installation sequence is only for the left wheelhousing liner. Removal and installation of the right wheel housingliner are similar.1.5.1Removing–Remove wheel ⇒ Running gear, axles, steering; Rep. Gr. 44 ;Specified torques for wheel bolts .Golf Variant 2007 ➤ , Jetta 2005 ➤General body repairs, exterior - Edition 10.20091. Wheel housing liner 323 Downloaded from www.Manualslib.com manuals search engine
Protected by copyright. Copying for private or commercial purposes, in partor in whole, is not permitted unless authorised by Volkswagen AG. Volkswagen AG does notguarantee or accept any liability with respect to the correctness ofinformation in this document.Copyright by Volkswagen AG.–Remove bolts -2- (Qty 9).–Pull off wheel housing liner -1-.1.5.2InstallingInstall in reverse order of removal.1.6Installing protective cover for wheelhousing1.6.1Installing–Clean contact surfaces of bumper cover and wheel housingliner so that they are free of dust and grease. We recommendisopropyl alcohol.–Remove protective backing -1- from protective cover -2-.Golf Variant 2007 ➤ , Jetta 2005 ➤General body repairs, exterior - Edition 10.2009324 Rep. Gr.66 - Exterior equipment Downloaded from www.Manualslib.com manuals search engine
Protected by copyright. Copying for private or commercial purposes, in partor in whole, is not permitted unless authorised by Volkswagen AG. Volkswagen AG does notguarantee or accept any liability with respect to the correctness ofinformation in this document.Copyright by Volkswagen AG.–Stick protective cover -2- on approx. 28.7 mm from -A-, wherethe highest point of the protective cover -2- and the upper edgeof the bumper cover -3- are used as reference points.Golf Variant 2007 ➤ , Jetta 2005 ➤General body repairs, exterior - Edition 10.20091. Wheel housing liner 325 Downloaded from www.Manualslib.com manuals search engine
Protected by copyright. Copying for private or commercial purposes, in partor in whole, is not permitted unless authorised by Volkswagen AG. Volkswagen AG does notguarantee or accept any liability with respect to the correctness ofinformation in this document.Copyright by Volkswagen AG.2Exterior mirror2.1ToolsSpecial tools and workshop equipment required♦Removal lever -80-200-♦Torque wrench -V.A.G 1783-Golf Variant 2007 ➤ , Jetta 2005 ➤General body repairs, exterior - Edition 10.2009326 Rep. Gr.66 - Exterior equipment Downloaded from www.Manualslib.com manuals search engine
Protected by copyright. Copying for private or commercial purposes, in partor in whole, is not permitted unless authorised by Volkswagen AG. Volkswagen AG does notguarantee or accept any liability with respect to the correctness ofinformation in this document.Copyright by Volkswagen AG.2.2Assembly overview - exterior mirrorNoteOnly the left side is shown. The right side is similar.1 - Mirror housing❑Material: ABS.❑Removing and installing⇒ page 3282 - Mirror mounting❑Removing and installing⇒ page 3313 - Bolt❑Qty. 3❑8 Nm4 - Bolt❑Qty. 2❑1 Nm5 - Assembly part❑Removing and installing⇒ page 3306 - Bolt❑Qty. 2❑1 Nm7 - Side turn signal repeater❑Removing and installing⇒ page 3308 - Trim❑Removing and installing⇒ page 3299 - Bolt❑Qty. 1❑1 Nm10 - Ambient light❑Removing and installing ⇒ page 33011 - Adjuster unit with motor for exterior mirror❑Removing and installing ⇒ page 33112 - Mirror glass❑Removing and installing ⇒ page 328Golf Variant 2007 ➤ , Jetta 2005 ➤General body repairs, exterior - Edition 10.20092. Exterior mirror 327 Downloaded from www.Manualslib.com manuals search engine
Protected by copyright. Copying for private or commercial purposes, in partor in whole, is not permitted unless authorised by Volkswagen AG. Volkswagen AG does notguarantee or accept any liability with respect to the correctness ofinformation in this document.Copyright by Volkswagen AG.2.3Removing and installing mirror glassNoteThe removal and installation sequence is only for the left mirrorglass. The removal and installation of the right mirror glass issimilar.2.3.1RemovingWARNINGWhen doing this repair work, always wear safety goggles andleather gloves!–Protect edge of housing -1- against damage to paintwork withe.g. fabric-reinforced adhesive tape.–Press bottom of mirror glass -2- into mirror housing -1-.–Using removal lever -80-200- , lever -arrow 6- mirror glass-2- off adjuster unit with mirror -5-.–Swivel mirror glass -2- to side -arrow 4- and detach connectors-3- for electric dip and mirror heating on rear of mirror glass-2-.2.3.2Installing–Push connectors onto mirror glass.–Press mirror glass centrally onto adjuster unit with motor inhousing.–Mirror glass engages audibly.Finally carry out a functional check.2.4Removing and installing mirror housingNoteThe removal and installation sequence is only for the left mirrorhousing. The removal and installation of the right mirror housingis similar.Golf Variant 2007 ➤ , Jetta 2005 ➤General body repairs, exterior - Edition 10.2009328 Rep. Gr.66 - Exterior equipment Downloaded from www.Manualslib.com manuals search engine
Protected by copyright. Copying for private or commercial purposes, in partor in whole, is not permitted unless authorised by Volkswagen AG. Volkswagen AG does notguarantee or accept any liability with respect to the correctness ofinformation in this document.Copyright by Volkswagen AG.2.4.1Removing–Remove mirror glass ⇒ page 328 .–For ease of assembly, fold exterior mirror forwards.–Using a screwdriver underneath the locking hooks -2- pressmirror housing out of fastening.–Pull mirror housing slightly forward off mirror base carrier atfront.–Then pull mirror housing -1- upwards off mirror base carrier.2.4.2Installing–Place mirror housing -1- on mirror base carrier and press mir‐ror housing down until the locking hooks -2- engage audibly.–Install mirror glass again ⇒ page 328 .Finally carry out a functional check.2.5Removing and installing trimNoteThe removal and installation sequence is only for the left trimplate. The removal and installation of the right trim plate is similar.2.5.1Removing–Remove mirror glass ⇒ page 328 .–Remove mirror housing ⇒ page 328 .–Using a screwdriver lever locking hooks -2- out of mirror basecarrier.–Pull trim plate -1- off in -direction of arrow-.2.5.2InstallingInstall in reverse order of removal.Finally carry out a functional check.Golf Variant 2007 ➤ , Jetta 2005 ➤General body repairs, exterior - Edition 10.20092. Exterior mirror 329 Downloaded from www.Manualslib.com manuals search engine
Protected by copyright. Copying for private or commercial purposes, in partor in whole, is not permitted unless authorised by Volkswagen AG. Volkswagen AG does notguarantee or accept any liability with respect to the correctness ofinformation in this document.Copyright by Volkswagen AG.2.6Removing and installing side turn signalrepeatersNote♦The removal and installation sequence is only for the left sidemounted turn signal. The removal and installation of the rightside turn signal repeater is similar.♦The side turn signal repeaters are fitted with long-life light-emitting diodes (LEDs) instead of conventional bulbs.♦Therefore, changing bulbs is not necessary. In case of dam‐age, the entire turn signal must be renewed.2.6.1Removing–Remove mirror glass ⇒ page 328 .–Remove mirror housing ⇒ page 328 .–Remove trim ⇒ page 329 .–Remove bolts -4- and remove assembly part -1- downwards.–Detach connector -5- from turn signal -3-.–Remove bolts -2- and take turn signal -3- off assembly part-1-.2.6.2InstallingInstall in reverse order of removal.Finally carry out a functional check.2.7Removing and installing entry lightNoteThe removal and installation sequence is only for the left entrylight. The removal and installation of the right entry light is similar.2.7.1Removing–Remove mirror glass ⇒ page 328 .–Remove mirror housing ⇒ page 328 .–Remove trim ⇒ page 329 .Golf Variant 2007 ➤ , Jetta 2005 ➤General body repairs, exterior - Edition 10.2009330 Rep. Gr.66 - Exterior equipment Downloaded from www.Manualslib.com manuals search engine
Protected by copyright. Copying for private or commercial purposes, in partor in whole, is not permitted unless authorised by Volkswagen AG. Volkswagen AG does notguarantee or accept any liability with respect to the correctness ofinformation in this document.Copyright by Volkswagen AG.–Remove assembly part with turn signal repeater ⇒ page 330 .–Remove bolt -1-.–Swing entry light -2- out downwards and pull bulb out of entrylight housing.2.7.2InstallingInstall in reverse order of removal.Specified torque for entry light bolt: 1 NmFinally carry out a functional check.2.8Removing and installing adjustment unitwith motor for exterior mirrorNoteThe removal and installation sequence is only for the left adjust‐ment unit with motor. The removal and installation of the leftadjustment unit with motor is similar.2.8.1Removing–Remove mirror glass ⇒ page 328 .–Remove bolts -1-.–Remove adjustment unit with motor -2- and disconnect con‐nector.2.8.2InstallingInstall in reverse order of removal.Specified torque for adjustment unit with motor: 1 NmFinally carry out a functional check.2.9Removing and installing exterior mirrorNoteThe removal and installation sequence is only for the left exteriormirror. The removal and installation of the rear view mirror is sim‐ilar.Golf Variant 2007 ➤ , Jetta 2005 ➤General body repairs, exterior - Edition 10.20092. Exterior mirror 331 Downloaded from www.Manualslib.com manuals search engine
Protected by copyright. Copying for private or commercial purposes, in partor in whole, is not permitted unless authorised by Volkswagen AG. Volkswagen AG does notguarantee or accept any liability with respect to the correctness ofinformation in this document.Copyright by Volkswagen AG.2.9.1Removing–Removing front door trim on driver's side ⇒ General body re‐pairs, interior; Rep. Gr. 70 ; Door trim .–Release cable retainer -2- and detach connector -1- for exte‐rior mirror.–Lever cap -3- out of door and remove bolts -2-.–Remove exterior mirror -1- and guide wire through aperture indoor.2.9.2InstallingInstall in reverse order of removal.Specified torque for exterior mirror bolts: 8 NmTest function before installing door trim.Golf Variant 2007 ➤ , Jetta 2005 ➤General body repairs, exterior - Edition 10.2009332 Rep. Gr.66 - Exterior equipment Downloaded from www.Manualslib.com manuals search engine
Protected by copyright. Copying for private or commercial purposes, in partor in whole, is not permitted unless authorised by Volkswagen AG. Volkswagen AG does notguarantee or accept any liability with respect to the correctness ofinformation in this document.Copyright by Volkswagen AG.3Roof railing3.1ToolsSpecial tools and workshop equipment required♦Torque wrench 5…50 Nm -V.A.G 1331-♦Plastic wedge -T10039/1-Golf Variant 2007 ➤ , Jetta 2005 ➤General body repairs, exterior - Edition 10.20093. Roof railing 333 Downloaded from www.Manualslib.com manuals search engine
Protected by copyright. Copying for private or commercial purposes, in partor in whole, is not permitted unless authorised by Volkswagen AG. Volkswagen AG does notguarantee or accept any liability with respect to the correctness ofinformation in this document.Copyright by Volkswagen AG.3.2Assembly overview - roof railing1 - Roof railing❑Removing and installing⇒ page 3342 - Bolt❑Qty. 3 on each side❑20 Nm3 - Roof railing rear cover4 - Roof railing middle cover5 - Roof railing front cover3.3Removing and installing roof railing3.3.1Removing–Using wedge -T10039/1- , lever out front and rear roof railingcovers -1- in direction of -arrow-.Golf Variant 2007 ➤ , Jetta 2005 ➤General body repairs, exterior - Edition 10.2009334 Rep. Gr.66 - Exterior equipment Downloaded from www.Manualslib.com manuals search engine
Protected by copyright. Copying for private or commercial purposes, in partor in whole, is not permitted unless authorised by Volkswagen AG. Volkswagen AG does notguarantee or accept any liability with respect to the correctness ofinformation in this document.Copyright by Volkswagen AG.–Lever front and rear covers of roof railing -1- in direction of-arrow A- and press them in direction of -arrow B-.–Pull out cover for roof railing -1-.–Remove bolt -3- from front and rear roof railing mounting -2-(20 Nm).–Pull middle cover -1- off roof railing -3- in direction of -arrow-.–Remove bolt -2- from middle roof railing mounting -3- (20 Nm).3.3.2InstallingInstall in reverse order of removal.Check roof railing covers for damage and replace as necessary.Golf Variant 2007 ➤ , Jetta 2005 ➤General body repairs, exterior - Edition 10.20093. Roof railing 335 Downloaded from www.Manualslib.com manuals search engine
Protected by copyright. Copying for private or commercial purposes, in partor in whole, is not permitted unless authorised by Volkswagen AG. Volkswagen AG does notguarantee or accept any liability with respect to the correctness ofinformation in this document.Copyright by Volkswagen AG.4Radiator grille4.1ToolsSpecial tools and workshop equipment required♦Torque wrench -V.A.G 1783-Golf Variant 2007 ➤ , Jetta 2005 ➤General body repairs, exterior - Edition 10.2009336 Rep. Gr.66 - Exterior equipment Downloaded from www.Manualslib.com manuals search engine
Protected by copyright. Copying for private or commercial purposes, in partor in whole, is not permitted unless authorised by Volkswagen AG. Volkswagen AG does notguarantee or accept any liability with respect to the correctness ofinformation in this document.Copyright by Volkswagen AG.4.2Radiator grille4.2.1Assembly overview - radiator grille1 - Radiator grille❑Removing ⇒ page 337❑Installing ⇒ page 3382 - Bolt❑Qty. 4❑Specified torque: 2 Nm3 - VW emblem❑Clipped into radiatorgrille❑Removing: release lock‐ing hooks on rear ofcompany emblem andremove by turning it inopposite direction to-arrow c-.❑Installing: guide VW em‐blem with locking hooksinto recesses in radiatorgrille -arrow b-, then turnslightly in direction of-arrow c- until VW em‐blem engages in radia‐tor grille4.2.2Removing–Remove bolts -2-.–Release clips -arrows- from lock carrier using a small screw‐driver.Golf Variant 2007 ➤ , Jetta 2005 ➤General body repairs, exterior - Edition 10.20094. Radiator grille 337 Downloaded from www.Manualslib.com manuals search engine
Protected by copyright. Copying for private or commercial purposes, in partor in whole, is not permitted unless authorised by Volkswagen AG. Volkswagen AG does notguarantee or accept any liability with respect to the correctness ofinformation in this document.Copyright by Volkswagen AG.–Tilt radiator grille -1- forwards slightly and pull it upwards outof bumper cover.4.2.3Installing–Insert radiator grille -1- into bumper cover mounting fromabove and tilted forwards slightly.–Tilt radiator grille -1- towards lock carrier and locate clips-arrows- in lock carrier.Golf Variant 2007 ➤ , Jetta 2005 ➤General body repairs, exterior - Edition 10.2009338 Rep. Gr.66 - Exterior equipment Downloaded from www.Manualslib.com manuals search engine
Protected by copyright. Copying for private or commercial purposes, in partor in whole, is not permitted unless authorised by Volkswagen AG. Volkswagen AG does notguarantee or accept any liability with respect to the correctness ofinformation in this document.Copyright by Volkswagen AG.–Install bolts -2- (2 Nm).Golf Variant 2007 ➤ , Jetta 2005 ➤General body repairs, exterior - Edition 10.20094. Radiator grille 339 Downloaded from www.Manualslib.com manuals search engine
Protected by copyright. Copying for private or commercial purposes, in partor in whole, is not permitted unless authorised by Volkswagen AG. Volkswagen AG does notguarantee or accept any liability with respect to the correctness ofinformation in this document.Copyright by Volkswagen AG.4.3Radiator grille, Cup Edition4.3.1Assembly overview - radiator grille1 - Radiator grille❑Removing ⇒ page 341❑Installing ⇒ page 3422 - Bolt❑Qty. 2.❑Specified torque: 2 Nm3 - Locking lug❑Qty. 6.Golf Variant 2007 ➤ , Jetta 2005 ➤General body repairs, exterior - Edition 10.2009340 Rep. Gr.66 - Exterior equipment Downloaded from www.Manualslib.com manuals search engine
Protected by copyright. Copying for private or commercial purposes, in partor in whole, is not permitted unless authorised by Volkswagen AG. Volkswagen AG does notguarantee or accept any liability with respect to the correctness ofinformation in this document.Copyright by Volkswagen AG.4.3.2Removing–Remove bolts -2-.–Release clips -arrows- from lock carrier using a small screw‐driver.–Tilt radiator grille -1- backwards slightly and pull locking hooks-3- upwards out of front bumper cover.Golf Variant 2007 ➤ , Jetta 2005 ➤General body repairs, exterior - Edition 10.20094. Radiator grille 341 Downloaded from www.Manualslib.com manuals search engine
Protected by copyright. Copying for private or commercial purposes, in partor in whole, is not permitted unless authorised by Volkswagen AG. Volkswagen AG does notguarantee or accept any liability with respect to the correctness ofinformation in this document.Copyright by Volkswagen AG.4.3.3Installing–With radiator grille -1- tilted forward slightly place lockinghooks -3- in front bumper cover.–Tilt radiator grille -1- towards lock carrier and locate clips-arrows- in lock carrier.–Install bolts -2-.Golf Variant 2007 ➤ , Jetta 2005 ➤General body repairs, exterior - Edition 10.2009342 Rep. Gr.66 - Exterior equipment Downloaded from www.Manualslib.com manuals search engine
Protected by copyright. Copying for private or commercial purposes, in partor in whole, is not permitted unless authorised by Volkswagen AG. Volkswagen AG does notguarantee or accept any liability with respect to the correctness ofinformation in this document.Copyright by Volkswagen AG.4.3.4Removing and installing emblemRemoving–Release locking hooks -arrows- on rear of emblem -2- withradiator grille removed -1-.–Turn emblem -2- in -direction of arrow- slightly and pull em‐blem forwards out of radiator grille -1-.Installing–Guide emblem -2- with locking hooks in recesses of radiatorgrille -1-.–Turn emblem -2- in -direction of arrow- until emblem -2- en‐gages with radiator grille -1-.Golf Variant 2007 ➤ , Jetta 2005 ➤General body repairs, exterior - Edition 10.20094. Radiator grille 343 Downloaded from www.Manualslib.com manuals search engine
Protected by copyright. Copying for private or commercial purposes, in partor in whole, is not permitted unless authorised by Volkswagen AG. Volkswagen AG does notguarantee or accept any liability with respect to the correctness ofinformation in this document.Copyright by Volkswagen AG.5Mouldings and trims5.1ToolsSpecial tools and workshop equipment required♦Torque wrench -V.A.G 1783-♦Double cartridge gun -VAS 5237-♦Hot air blower -V.A.G 1416-♦Removal wedge -3409-Golf Variant 2007 ➤ , Jetta 2005 ➤General body repairs, exterior - Edition 10.2009344 Rep. Gr.66 - Exterior equipment Downloaded from www.Manualslib.com manuals search engine
Protected by copyright. Copying for private or commercial purposes, in partor in whole, is not permitted unless authorised by Volkswagen AG. Volkswagen AG does notguarantee or accept any liability with respect to the correctness ofinformation in this document.Copyright by Volkswagen AG.5.2Removing and installing side panel trimstrips on GLI vehicles5.2.1Removing–Remove bolts -1- (Torx T25) from body.–Remove side panel trim strip -2- in direction of -arrow-.As necessary–Slide retainer -2- forwards and release it as described-arrow-.–Remove damaged bolts -1-.NoteThe part number for bolts -1- deviates from the production num‐ber. Refer to parts department.5.2.2Installing–Clean side panel and retainer to remove adhesive remains,we recommend isopropyl alcohol.As necessary–Install bolts -1-. Specified torque: 1.2 ±0.1 Nm–Install retainer -2-, by checking that all bolts fit in their respec‐tive holes then slide retainer forwards.Continuation for all casesGolf Variant 2007 ➤ , Jetta 2005 ➤General body repairs, exterior - Edition 10.20095. Mouldings and trims 345 Downloaded from www.Manualslib.com manuals search engine
Protected by copyright. Copying for private or commercial purposes, in partor in whole, is not permitted unless authorised by Volkswagen AG. Volkswagen AG does notguarantee or accept any liability with respect to the correctness ofinformation in this document.Copyright by Volkswagen AG.–Starting at rear of retainer, position side panel trim strip -2-over retainer -4-.–Secure front of side panel trim strip -2- using a bolt -1-. Speci‐fied torque: 2 ±0.5 Nm.–Remove protective backing -3- from double-sided tape of sidepanel trim strip -2- using a wedge.–Secure side panel trim strip -2- by pressing it onto body.–Install remaining bolts -1- (Qty. 3). Specified torque: 2 ±0.5 Nm5.3Side member extension, Jetta Cup Edi‐tionNoteThe removal and installation sequence is for the left side member(sill) extension. The removal and installation of the right sidemember (sill) extension is similar.Golf Variant 2007 ➤ , Jetta 2005 ➤General body repairs, exterior - Edition 10.2009346 Rep. Gr.66 - Exterior equipment Downloaded from www.Manualslib.com manuals search engine
Protected by copyright. Copying for private or commercial purposes, in partor in whole, is not permitted unless authorised by Volkswagen AG. Volkswagen AG does notguarantee or accept any liability with respect to the correctness ofinformation in this document.Copyright by Volkswagen AG.5.3.1Assembly overview1 - Side member extension❑Removing ⇒ page 348❑Installing ⇒ page 3492 - PUR adhesive sealant❑Lower adhesive surface❑Bead cross section:width = 8 mm; height = 8mm❑Minimum curing period3 - Bolt❑Specified torque: 2 ±0.5Nm4 - PUR adhesive sealant❑Upper adhesive surface❑Bead cross section:width = 8 mm; height = 8mm❑Minimum curing period5 - Spacer❑At front and rear.❑Qty. 2 on each side6 - Bolt❑Qty. 2 per spacer❑Specified torque: 2 NmGolf Variant 2007 ➤ , Jetta 2005 ➤General body repairs, exterior - Edition 10.20095. Mouldings and trims 347 Downloaded from www.Manualslib.com manuals search engine
Protected by copyright. Copying for private or commercial purposes, in partor in whole, is not permitted unless authorised by Volkswagen AG. Volkswagen AG does notguarantee or accept any liability with respect to the correctness ofinformation in this document.Copyright by Volkswagen AG.5.3.2RemovingNoteThe side member extension cannot be removed without being damaged.WARNINGClean all surrounding parts before beginning work and maskthem with tape.Do not use cutting wire to remove side member extension-1-.–Remove bolt -3-.–From below, remove bolts -6- from front and rear spacers-5-.–Before removing, heat side member extension -1- in bondingsurface areas -2- and -4- with hot air blower -V.A.G 1416- .Golf Variant 2007 ➤ , Jetta 2005 ➤General body repairs, exterior - Edition 10.2009348 Rep. Gr.66 - Exterior equipment Downloaded from www.Manualslib.com manuals search engine
Protected by copyright. Copying for private or commercial purposes, in partor in whole, is not permitted unless authorised by Volkswagen AG. Volkswagen AG does notguarantee or accept any liability with respect to the correctness ofinformation in this document.Copyright by Volkswagen AG.–Lift a corner of side member extension -1- using wedge-3409- .–Firmly holding corner, forcefully pull side member extension-1- from side panel.NoteCut bonding using suitable equipment, if required.5.3.3Installing–Installation instructions ⇒ page 353 .–Preparing body component for bonding ⇒ page 352–Preparing new add-on part for bonding ⇒ page 353–Apply 2K glass adhesive -DA 004 600 A2- to sealing surfaces-3- and -4- evenly along the complete length of the side mem‐ber extension -1- using double cartridge gun -VAS 5237- .–Apply 2K glass adhesive -DA 004 600 A2- to front and rearspacers -5-.Golf Variant 2007 ➤ , Jetta 2005 ➤General body repairs, exterior - Edition 10.20095. Mouldings and trims 349 Downloaded from www.Manualslib.com manuals search engine
Protected by copyright. Copying for private or commercial purposes, in partor in whole, is not permitted unless authorised by Volkswagen AG. Volkswagen AG does notguarantee or accept any liability with respect to the correctness ofinformation in this document.Copyright by Volkswagen AG.–Install side member extension -1- on side member, start at rearwheel housing and use assistance of a second mechanic.–Then tighten bolt -2-.–Press side member extension -1- on firmly and secure it withtextile adhesive tape.–Loosen bolts -6- on front and rear spacers -5-.–Move front and rear spacers -5- so that they are in full contactwith side member.–Then tighten bolts -6- on spacer -5-.NoteThe side member extension -1- must lie evenly on the side member over the complete length, otherwise aperfect bond cannot be guaranteed.•Minimum curing period ⇒ page 354Golf Variant 2007 ➤ , Jetta 2005 ➤General body repairs, exterior - Edition 10.2009350 Rep. Gr.66 - Exterior equipment Downloaded from www.Manualslib.com manuals search engine
Protected by copyright. Copying for private or commercial purposes, in partor in whole, is not permitted unless authorised by Volkswagen AG. Volkswagen AG does notguarantee or accept any liability with respect to the correctness ofinformation in this document.Copyright by Volkswagen AG.6Special add-on parts6.1Safety requirementsCautionWhen removing special add-on parts, use suitable gloves andprotective eyewear.Special add-on parts must cure at least 3 hours after beingbonded before work on the vehicle is continued.Note♦The following special add-on parts have been developed tofulfil the technical requirements of the respective models.These special add-on parts should always be replaced withthe corresponding genuine parts.♦Without these special add-on parts, the vehicle will not complywith the traffic regulations.6.2Fitting notes for extensionsNote♦The side member extension are applied with adhesive at thefactory.♦The side member extensions are supplied primed by the sup‐plier.♦Ensure the side member extension adhesive surfaces remainfree of paint and paint mist when painting extensions.6.3Materials♦2K glass adhesive-DA 004 600 A2-♦Static mixer with tapered noz‐zle-D 002 001-♦Primer-D 009 200 02-♦Cleaning solution-D 009 401 04-♦Primer applicator-D 009 500 25-♦Adhesive remover-D 002 000 10-♦Activator-D 181 801 A1-NoteObserve instructions for use on the information sheet provided bythe manufacturer.Golf Variant 2007 ➤ , Jetta 2005 ➤General body repairs, exterior - Edition 10.20096. Special add-on parts 351 Downloaded from www.Manualslib.com manuals search engine
Protected by copyright. Copying for private or commercial purposes, in partor in whole, is not permitted unless authorised by Volkswagen AG. Volkswagen AG does notguarantee or accept any liability with respect to the correctness ofinformation in this document.Copyright by Volkswagen AG.Heat 1-K glass adhesive according to manufacturer's instructions,using cartridge heater -V.A.G 1939A- .6.4Special add-on parts, Jetta Cup Edition1 - Radiator grille❑Removing ⇒ page 341❑Installing ⇒ page 3422 - Front bumper cover❑Removing ⇒ page 231❑Installing ⇒ page 2323 - Scuff protection film❑Renewing ⇒ page 3554 - Side member extension❑Removing ⇒ page 348❑Installing ⇒ page 3495 - Rear bumper cover❑Removing ⇒ page 244❑Installing ⇒ page 2456.5Preparing body kit component for bond‐ingNoteRemaining material serves as adhesion base for newly appliedadhesive sealing compound. Keep dirt and grease off of bondingsurfaces.Exception: If bonding is not performed immediately after cuttingback, the remaining residual material must be activated with ac‐tivator -D 181 801 A1- .Golf Variant 2007 ➤ , Jetta 2005 ➤General body repairs, exterior - Edition 10.2009352 Rep. Gr.66 - Exterior equipment Downloaded from www.Manualslib.com manuals search engine
Protected by copyright. Copying for private or commercial purposes, in partor in whole, is not permitted unless authorised by Volkswagen AG. Volkswagen AG does notguarantee or accept any liability with respect to the correctness ofinformation in this document.Copyright by Volkswagen AG.WARNINGActivator must not have contact with paint or the paintwork willbe damaged.NoteIf the body kit part has been repaired or partially renewed, thearea concerned must be cleaned and primed again after painting.6.6Preparing new add-on part for bondingWARNINGMask off primed and bonding surfaces properly before paint‐ing.–Immediately before bonding add-on parts, clean bonding sur‐face thoroughly with adhesive remover -D 002 000 10- .•Bonding surfaces must be free of dust and grease and thereshould be no adhesive residues.–Now apply plastic primer -D 009 600- using applicator -D 009500 25- equally in one stroke.•Drying time approx. 10 minutes•The body component must be prepared for bonding.–A thin coat of 2K glass adhesive -DA 004 600 A2- must beapplied evenly to the primed surfaces of the add-on parts withthe double cartridge gun -VAS 5237- .6.7Installation instructionsThe surfaces to be primed for the body kit parts should be com‐pletely clean.–Remove adhesive residue using adhesive remover -D 002 00010- .–Soak cloth in silicon remover -LSE 020 100 A3- .–Clean area of application for adhesive bead twice thoroughlyusing cloth soaked with solution and allow to dry.–Now apply glass/paint primer using applicator -D 009 500 25-evenly in one stroke.♦Drying time approx. 10 minutes–Adhesive sealant must be applied to the primed areas of theadd-on parts.WARNINGBody kit parts should be installed within 10 minutes, or bondingproperties of adhesive will be impaired.♦Gap dimensions should be kept to an absolute minimum, upto approx. 1 mm.Golf Variant 2007 ➤ , Jetta 2005 ➤General body repairs, exterior - Edition 10.20096. Special add-on parts 353 Downloaded from www.Manualslib.com manuals search engine
Protected by copyright. Copying for private or commercial purposes, in partor in whole, is not permitted unless authorised by Volkswagen AG. Volkswagen AG does notguarantee or accept any liability with respect to the correctness ofinformation in this document.Copyright by Volkswagen AG.♦Use adhesive tape to secure add-on parts in position duringminimum curing time.6.8Minimum curing periodThe minimum curing period for newly bonded attaching parts is 3hours.The minimum curing time is the time from bonding the add-onparts until the vehicle may be used. During this time, the vehiclemust stand on a level surface at room temperature (at least 15 °C).WARNINGVehicle is safe to use only after the curing period is completed.6.9Touching up paint damagePaint structure must be restored according to specifications in the“Paint” workshop manual.6.10Cleaning off excess adhesive sealingmaterial–Use adhesive remover -D 002 000 10- as a cleaning solution.Observe the appropriate safety precautions when performingthis work.–First clean painted surface as well as possible using a drycloth. Remove residue using adhesive remover -D 002 00010- .Golf Variant 2007 ➤ , Jetta 2005 ➤General body repairs, exterior - Edition 10.2009354 Rep. Gr.66 - Exterior equipment Downloaded from www.Manualslib.com manuals search engine
Protected by copyright. Copying for private or commercial purposes, in partor in whole, is not permitted unless authorised by Volkswagen AG. Volkswagen AG does notguarantee or accept any liability with respect to the correctness ofinformation in this document.Copyright by Volkswagen AG.7Protective backing7.1Scuff protection film7.1.1ToolsSpecial tools and workshop equipment required♦Hot air blower -V.A.G 1416-7.1.2Fitting notesNote♦Before removal, heat the scuff protection film with a hot airblower -V.A.G 1416- .♦If the scuff protection film is installed for the first time on a newvehicle and newly painted surfaces, the procedure in ⇒ Work‐shop manual "Paint"; ⇒Paintwork repairs; ⇒Paint finish;⇒Mouldings & Film should be observed.♦If the scuff protection film is removed and reinstalled, only useadhesive remover -D 002 000 10- to remove the adhesive re‐mains.♦Ensure that the adhesive surfaces are free of dust and grease.♦Bond scuff protection film immediately after cleaning.♦Pull protective backing off only directly prior to installation.♦The working temperature is approx. 21 °C.♦The scuff protection film cannot be removed without damage.Golf Variant 2007 ➤ , Jetta 2005 ➤General body repairs, exterior - Edition 10.20097. Protective backing 355 Downloaded from www.Manualslib.com manuals search engine
Protected by copyright. Copying for private or commercial purposes, in partor in whole, is not permitted unless authorised by Volkswagen AG. Volkswagen AG does notguarantee or accept any liability with respect to the correctness ofinformation in this document.Copyright by Volkswagen AG.7.1.3Renewing scuff protection filmNoteRenewing scuff protection films is described only for the left side. The right side is similar.Removing–Remove inner seal for front door in area of side member⇒ page 93 .–Heat front scuff protection film -1- using a hot air blower -V.A.G1416- and pull scuff protection film -1- from sill.Installing–Clean installation area with adhesive remover -D 002 00 10- .–Pull off protective backing -2-.–Position front scuff protection film -1- on the references points-a- = 155 mm and press it smooth using a plastic blade wrap‐ped in a soft paper towel.Golf Variant 2007 ➤ , Jetta 2005 ➤General body repairs, exterior - Edition 10.2009356 Rep. Gr.66 - Exterior equipment Downloaded from www.Manualslib.com manuals search engine
Protected by copyright. Copying for private or commercial purposes, in partor in whole, is not permitted unless authorised by Volkswagen AG. Volkswagen AG does notguarantee or accept any liability with respect to the correctness ofinformation in this document.Copyright by Volkswagen AG.8Lettering8.1ToolsSpecial tools and workshop equipment required♦Hot air blower -V.A.G 1416-8.2Installation instructions for lettering andemblemsNote♦Before removal, heat lettering or emblem with a hot air blower-V.A.G 1416- .♦If the lettering or emblem is installed for the first time on a newvehicle and newly painted surfaces, the procedure in ⇒ Work‐shop manual "Paint"; ⇒Paintwork repairs; ⇒Paint finish;⇒Mouldings & Film should be observed.♦If the lettering or emblem is removed and reinstalled, only useadhesive remover -D 002 000 10- to remove the adhesive re‐mains.♦Ensure that bonding surfaces are free of dust and grease.♦Bond lettering or emblem immediately after cleaning.♦Pull protective backing off only directly prior to installation.♦The working temperature is approx. 21 °C.Golf Variant 2007 ➤ , Jetta 2005 ➤General body repairs, exterior - Edition 10.20098. Lettering 357 Downloaded from www.Manualslib.com manuals search engine
Protected by copyright. Copying for private or commercial purposes, in partor in whole, is not permitted unless authorised by Volkswagen AG. Volkswagen AG does notguarantee or accept any liability with respect to the correctness ofinformation in this document.Copyright by Volkswagen AG.8.3Rear lettering dimensions (saloon)1 - Dimension -a- = 25 mm❑From outer edge of rearlid to lettering2 - Dimension -b- = 15 mm❑From lower edge of taillight aperture in rear lidto upper edge of letter‐ingGolf Variant 2007 ➤ , Jetta 2005 ➤General body repairs, exterior - Edition 10.2009358 Rep. Gr.66 - Exterior equipment Downloaded from www.Manualslib.com manuals search engine
Protected by copyright. Copying for private or commercial purposes, in partor in whole, is not permitted unless authorised by Volkswagen AG. Volkswagen AG does notguarantee or accept any liability with respect to the correctness ofinformation in this document.Copyright by Volkswagen AG.8.4Rear lettering dimensions (Variant)8.4.1Lettering (Golf Variant)1 - Dimension -a- = 5 mm❑Lower edge of letteringto height of lower edgeof rear light -1-❑Transfer -dimension a-from outer edge of rearlid to lettering.Golf Variant 2007 ➤ , Jetta 2005 ➤General body repairs, exterior - Edition 10.20098. Lettering 359 Downloaded from www.Manualslib.com manuals search engine
Protected by copyright. Copying for private or commercial purposes, in partor in whole, is not permitted unless authorised by Volkswagen AG. Volkswagen AG does notguarantee or accept any liability with respect to the correctness ofinformation in this document.Copyright by Volkswagen AG.8.4.2Lettering (Jetta Variant)1 - Dimension -a- = 25 mm❑Transfer -dimension a-from outer edge of rearlid to lettering.❑Lower edge of letteringto height of upper edgeof rear light -1-Golf Variant 2007 ➤ , Jetta 2005 ➤General body repairs, exterior - Edition 10.2009360 Rep. Gr.66 - Exterior equipment Downloaded from www.Manualslib.com manuals search engine
Protected by copyright. Copying for private or commercial purposes, in partor in whole, is not permitted unless authorised by Volkswagen AG. Volkswagen AG does notguarantee or accept any liability with respect to the correctness ofinformation in this document.Copyright by Volkswagen AG.8.5Side lettering dimensions - Individual8.5.1Dimensions for emblem on left wing1 - Dimension -a- = 551 mm❑Transfer -dimension a -from lower edge of wingto wing.2 - Dimension -b- = 14 mm❑Transfer -dimension b-from end point of dimen‐sion a to corner of em‐blem.3 - Dimension -c- = 70 mm❑Use -dimension c- tocheck distance from up‐per edge of emblem toedge of wing.4 - Dimension -d- = 92 mm❑Use -dimension d- tocheck distance fromlower edge of emblem toedge of wing.Golf Variant 2007 ➤ , Jetta 2005 ➤General body repairs, exterior - Edition 10.20098. Lettering 361 Downloaded from www.Manualslib.com manuals search engine
Protected by copyright. Copying for private or commercial purposes, in partor in whole, is not permitted unless authorised by Volkswagen AG. Volkswagen AG does notguarantee or accept any liability with respect to the correctness ofinformation in this document.Copyright by Volkswagen AG.8.5.2Dimensions for emblem on right wing1 - Dimension -a- = 550 mm❑Transfer -dimension a -from lower edge of wingto wing.2 - Dimension -b- = 30 mm❑Transfer -dimension b-from end point of-dimension a- to cornerof emblem.3 - Dimension -c- = 86 mm❑Use -dimension c- tocheck distance from up‐per edge of emblem toedge of wing.4 - Dimension -d- = 92 mm❑Use -dimension d- tocheck distance fromlower edge of emblem toedge of wing.Golf Variant 2007 ➤ , Jetta 2005 ➤General body repairs, exterior - Edition 10.2009362 Rep. Gr.66 - Exterior equipment