Load a DVD-ROM disc into the system’s main unit through
this slot. Inserting an edge of the disc in the slot causes it
to be drawn in automatically.
You can use this button in the event of a problem. It is also
used when you need to upgrade the program.
NOTE
• The navigation system main unit is located under the driver's seat.
• Before you load a DVD-ROM disc for the first time, press the reset
button for more than one second. Use the tip of a pen or similar
item for this purpose.
button. The system may recover from the problem.
Use the following procedure to start up the navigation system and display the current map screen.
Start the engine.
The CAUTION screen will appear, followed by the opening screen.
Carefully read the instructions on the CAUTION screen (cited below),
then select
CAUTION
Make selections only when vehicle is stopped.
Watching screen while driving can lead to a serious accident.
Some map data may be incorrect.
Use judgment and obey traffic rules.
See Owner’s Manual for complete operating instructions.
The current map screen will appear.
NOTE
• To make a selection, touch the desired key displayed on the screen.
• The CAUTION screen remains on the display unless you select
• When you use the navigation system for the first time, Greenwich Mean Time will be displayed. Adjust the system’s clock to the right
time using the clock setting screen (“SET CLOCK”) as described on Page 82.
Use this function if you want to change the voice guidance volume setting from the default setting.
on the current map screen.
(Volume).
Select the desired key from between
(maximum).
(off): Select this key to mute the sound.
Screens During Route Setting
Touch a point on the map. A crosshair (scroll mark) will appear on the screen. Then touch a desired point on
the map. The map will scroll with the selected point at the center.
Press button
to return to the
current map screen.
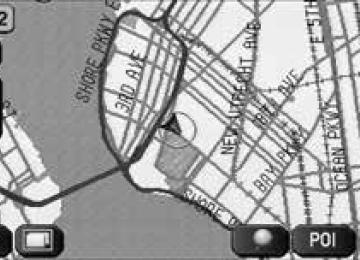
Indicates the current time.
Shows the status of the signal from GPS satellites.
When this marker appears, your navigation system is
receiving GPS signals and using them to calculate the
position of your vehicle.
Used to select either a “north up” display or “heading up”
display of the map. (See Page 18.)
The up-pointing or down-pointing arrow is used to zoom out
or zoom in the map. The number indicates the scale of the
displayed map. The
button also provides the zooming
function.
Select this key to display the menu screen. (See Page 16.)
Allows you to select a preferred display type for route
guidance. (See Page 47.)
Indicates the current position and direction of your vehicle.
8 “Store memory point” key
Stores markers on the map.
This key appears just for a few seconds after a map screen
is selected.
Allows you to display the POI selection screen (see Page
108). On the screen, you can program POIs to appear on a
map as markers. This key appears just for a few seconds
after a map screen is selected.
on a scroll screen.
Indicates the time (either approximate time required or time
of arrival) and the distance to the destination or a waypoint.
A thick green line indicates the route you should follow.
Indicates the direction of your turn at the next
intersection/junction as well as the distance to the
intersection/junction.
4 “Repeat voice” key
If this key is selected, the last voice guidance will be
repeated.
Shows the name of the road you are currently driving on.
If this key is selected, a map containing the entire route will
be displayed. (See Page 65.)
Selecting this key displays the route option menu. Selecting
a new route option causes the system to calculate the
selected route.