- 2006 Subaru Legacy Owners Manuals
- Subaru Legacy Owners Manuals
- 2004 Subaru Legacy Owners Manuals
- Subaru Legacy Owners Manuals
- 2008 Subaru Legacy Owners Manuals
- Subaru Legacy Owners Manuals
- 2005 Subaru Legacy Owners Manuals
- Subaru Legacy Owners Manuals
- 2007 Subaru Legacy Owners Manuals
- Subaru Legacy Owners Manuals
- 2000 Subaru Legacy Owners Manuals
- Subaru Legacy Owners Manuals
- 2003 Subaru Legacy Owners Manuals
- Subaru Legacy Owners Manuals
- 2012 Subaru Legacy Owners Manuals
- Subaru Legacy Owners Manuals
- 2001 Subaru Legacy Owners Manuals
- Subaru Legacy Owners Manuals
- 2010 Subaru Legacy Owners Manuals
- Subaru Legacy Owners Manuals
- 2011 Subaru Legacy Owners Manuals
- Subaru Legacy Owners Manuals
- 2009 Subaru Legacy Owners Manuals
- Subaru Legacy Owners Manuals
- 2002 Subaru Legacy Owners Manuals
- Subaru Legacy Owners Manuals
- Download PDF Manual
-
• Say the name of the device. • The system will let you know it is adding your phone to the system and it will
repeat the name of the device and ask you if it is correct; say “yes.”
• When phone is successfully paired you will hear “Pairing complete.”
Making a Call
• Press the phone button and listen to the prompts.
• Say “dial”; the system will ask for the number.
• Say the number you wish to call (do not pause during the area code, phone
exchange and the number).
• The system will repeat the number and ask you if it is correct; if correct say “yes.”
• The system will then dial.
Receiving a Call
• When a call comes in you will be notified. The audio system will mute and a voice
prompt will inform you.
• Press the phone button to receive the call.
• To end the call press the phone button again.
13
7/23/10 11:22 AM
793593_11a_Bluetooth_QRG_072310.indd 13
Bluetooth with Navigation System (Forester and Impreza) Microphone located in overhead console
MENU button
Pairing Your Cell Phone
Press the MENU button; then touch the “Phone” soft key on the touch screen.
Then touch “Bluetooth Settings.”
14
793593_11a_Bluetooth_QRG_072310.indd 14
7/23/10 11:22 AM
Now touch “Register.”
A pass-key number will appear on the screen. Put your phone into Bluetooth pairing mode and pair your phone to the system using the pass-key provided.
When the phone is successfully paired the screen will show the phone’s name on the list.
15
7/23/10 11:22 AM
793593_11a_Bluetooth_QRG_072310.indd 15
Making a Call
Press the MENU button; then touch the “Phone” soft key on the touch screen.
Then touch “Bluetooth Phone”; a numeric keypad will be displayed.
Touch the numbers for the phone number you wish to call. When complete, touch the green phone soft key.
16
793593_11a_Bluetooth_QRG_072310.indd 16
7/23/10 11:23 AM
A confirmation screen will appear, touch “Yes” to make the call.
During a Call
1 – 5 – Touch 1 through 5 to change the volume of the call.
Receiving a Call
Mute – Touch this to mute the call.
Speaker – Touch this to switch the phone conversation back to your cell phone.
Red phone symbol – Touch this to end a call.
Touch “Hold” to put the call on hold.
Touch “Disconnect” to decline the incoming call.
When a call comes in you will be notified. The audio system will mute and a voice prompt will inform you. Touch the “Call” soft key to answer the call.
793593_11a_Bluetooth_QRG_072310.indd 17
17
7/23/10 11:23 AM
Bluetooth with Navigation System (Legacy and Outback) Microphone located next to the audio system
MENU button
Phone off hook button
Phone on hook button
Talk button
18
793593_11a_Bluetooth_QRG_072310.indd 18
7/23/10 11:23 AM
Pairing Your Cell Phone Press the MENU button; then touch the “Phone” soft key on the touch screen.
Then touch “Bluetooth Settings.”
Now touch “Register.”
A pass-key number will appear on the screen.
793593_11a_Bluetooth_QRG_072310.indd 19
19
7/23/10 11:23 AM
Put your phone into Bluetooth pairing mode and pair your phone to the system using the pass-key provided. When the phone is successfully paired the screen will show the phone’s name on the list.
Making a Call
Press the Talk button on the steering wheel; then say “Dial by number.” A numerical keypad will be displayed.
After the beep, say the numbers of the phone number you wish to call. The system will repeat the numbers you have said at this point. You can continue saying numbers, you can cancel, make a correction or dial. Say “Dial”; the system will then dial the number.
20
793593_11a_Bluetooth_QRG_072310.indd 20
7/23/10 11:24 AM
Mute – Touch this to mute the call.
Speaker – Touch this to switch the phone conversation back to your cell phone.
Red phone symbol – Touch this to end a call.
During a Call
1 – 5 – Touch 1 through 5 to change the volume of the call.
Receiving a Call
Touch “Hold” to put the call on hold.
Touch “Disconnect” to decline the incoming call.
When a call comes in you will be notified. The audio system will mute and a voice prompt will inform you. Touch the “Call” soft key to answer the call.
21
7/23/10 11:24 AM
793593_11a_Bluetooth_QRG_072310.indd 21
Media Hub
Connecting to the Media Hub
iPod® – Using an original Apple iPod cable, connect the USB end into the Media hub. Then connect the iPod connector into the iPod. NOTE: the Media hub kit does not include the iPod cable. Also, while your iPod is connected the buttons on the iPod are deactivated.
USB Storage Device – Using a USB equipped storage device, connect the USB end into the Media hub.
Bluetooth Device – Pairing of a Bluetooth audio device is handled through the device itself. The pairing sequence depends on the device, but generally follows this order:
1. Turn the audio system on.
2. Go to Media 2 by pressing the SAT button
located on the audio system repeatedly.
3. Activate the Bluetooth on the device.
4. Use the search for new device function
on the device until the Media hub (“SUBARU”) is found.
5. Initiate pairing by the phone or device.
6. Enter the pas-key.
22
793593_11a_Bluetooth_QRG_072310.indd 22
7/23/10 11:24 AM
Accessing the Media Hub
To access an item connected to the Media hub press the SAT button located on the audio system repeatedly until the correct Media hub mode is selected.
iPod Operation Text Display
Press the TEXT button located on the audio system repeatedly to cycle through the available text fields:
• TITLE – Song title
• NAME – Artist - Album
• CATEGORY – Displays the information related to the selected mode
• CH NAME – USB iPod
• CH NUMBER (fixed field) – CH001
Changing Tracks
While your iPod is selected and playing through the audio speakers, press the SEEK button or turn the TUNE/TRACK/CH knob located on the audio system to skip forward or backward through the music on the iPod.
Rewind and Fast Forward
Press and hold the SEEK button to rewind or fast forward a track.
793593_11a_Bluetooth_QRG_072310.indd 23
23
7/23/10 11:24 AM
USB Device Operation Text Display
Press the TEXT button located on the audio system repeatedly to cycle through the available text fields:
• TITLE – Song title
• NAME – Artist - Album
• CATEGORY – Displays the information related to the selected mode
• CH NAME – USB DEVICE
• CH NUMBER (fixed field) – CH001
Changing Tracks
While your USB device is selected and playing through the audio speakers, press the SEEK button or turn the TUNE/TRACK/CH knob located on the audio system to skip forward or backward through the music on the USB device.
Rewind and Fast Forward
Press and hold the SEEK button to rewind or fast forward a track.
Bluetooth Device with Streaming Audio Operation Text Display
Press the TEXT button located on the audio system repeatedly to cycle through the available text fields:
• TITLE – PhoneName - LINKED
• NAME – PhoneName - LINKED
• CATEGORY – PhoneName - LINKED
• CH NAME (fixed field) – BT AUDIO
• CH NUMBER (fixed field) – CH001
Changing Tracks
While your Bluetooth equipped device with streaming audio is selected and playing through the audio speakers, press the SEEK button or turn the TUNE/TRACK/CH knob located on the audio system to skip forward or backward through the music on the Bluetooth device.
Rewind and Fast Forward
Press and hold the SEEK button to rewind or fast forward a track. NOTE: some Bluetooth devices do not support the rewind and fast forward function.
24
793593_11a_Bluetooth_QRG_072310.indd 24
7/23/10 11:24 AM
MY.SUBARU.COM Your Subaru vehicle comes with a unique online resource that helps make your ownership experience more convenient and enjoyable. My.Subaru.com is a personalized website that offers useful features and content that makes it easy for you to manage your vehicle care and enjoy all the benefits of Subaru ownership. Log on to My.Subaru.com and access features such as: automated service history, e-mail maintenance reminders, online Owner’s Manual, warranty information, maintenance schedules and much more... Access your site today @ My.Subaru.com
For Roadside Assistance, please call our 24-hour toll-free number at 1-800-261-2155. Subaru of America, Inc. Subaru Plaza P.O. Box 6000
Cherry Hill, NJ 08034-6000All information contained within this Consumer Electronics/Bluetooth & Audio Technology Quick Reference Guide was accurate at the time of publication. We reserve the right to change features, operation and/or functionality of any vehicle specification at any time. Your Subaru dealer is the best source for the most current information. For detailed operating and safety information, please consult your Owner’s Manual.
MSA5B1109A Issued June 2010 Printed in USA 07/10 2011A
793593_11a_Bluetooth_QRG_072310.indd 1
7/23/10 11:19 AM
REAR SEAT ENTERTAINMENT SYSTEM USER GUIDE
The specifications, constructional data and illustrations contained in this publication are not binding. We reserve the right to make alterations without prior
notification.
General information . . . . . . . . . . . . . . . . . . . . . . . . . . . . . . . . . . . . . . . . . . . . . . . . . . . . . . . . . . . . . . . . . . . . . 3
Before using the system . . . . . . . . . . . . . . . . . . . . . . . . . . . . . . . . . . . . . .. . . . . . . . . . . . . . . . . . . . . . . . . . . . . . . . . . 3
System overview . . . . . . . . . . . . . . . . . . . . . . . . . . . . . . . . . . . . . . . . . . . . . . . . . . . . . . . . . . . . . . . . . . . . . . . . 4
Kit contents . . . . . . . . . . . . . . . . . . . . . . . . . . . . . . . . . . . . . . . . . . . . . . . . . . . . . . . . . . . . . . . . . . . . . . . . . . . . . . . . . 4 Main features . . . . . . . . . . . . . . . . . . . . . . . . . . . . . . . . . . . . . . . . . . . . . . . . . . . . . . . . . . . . . . . . . . . . . . . . . . . . . . . . 4 Technical specifications . . . . . . . . . . . . . . . . . . . . . . . . . . . . . . . . . . . . . . . . . . . . . . . . . . . . . . . . . . . . . . . . . . . . . . . . 5
Quick guide . . . . . . . . . . . . . . . . . . . . . . . . . . . . . . . . . . . . . . . . . . . . . . . . . . . . . . . . . . . . . . . . . . . . . . . . . . . . 6
Playing a DVD movie . . . . . . . . . . . . . . . . . . . . . . . . . . . . . . . . . . . . . . . . . . . . . . . . . . . . . . . . . . . . . . . . . . . . . . . . . 6 Using the wireless headphones . . . . . . . . . . . . . . . . . . . . . . . . . . . . . . . . . . . . . . . . . . . . . . . . . . . . . . . . . . . . . . . . . Playing audio/video via game port inputs . . . . . . . . . . . . . . . . . . . . . . . . . . . . . . . . . . . . . . . . . . . . . . . . . . . . . . . . . .
Buttons on the front panel . . . . . . . . . . . . . . . . . . . . . . . . . . . . . . . . . . . . . . . . . . . . . . . . . . . . . . . . . . . . . . 7
Controls and connectors . . . . . . . . . . . . . . . . . . . . . . . . . . . . . . . . . . . . . . . . . . . . . . . . . . . . . . . . . . . . . . . . . . . . . . .
Remote control . . . . . . . . . . . . . . . . . . . . . . . . . . . . . . . . . . . . . . . . . . . . . . . . . . . . . . . . . . . . . . . . . . . . . . . . . 9
Buttons and functions . . . . . . . . . . . . . . . . . . . . . . . . . . . . . . . . . . . . . . . . . . . . . . . . . . . . . . . . . . . . . . . . . . . . . . . . . 9
DISPLAY . . . . . . . . . . . . . . . . . . . . . . . . . . . . . . . . . . . . . . . . . . . . . . . . . . . . . . . . . . . . . . . . . . . . . . . . . . . . . 11
Using the display . . . . . . . . . . . . . . . . . . . . . . . . . . . . . . . . . . . . . . . . . . . . . . . . . . . . . . . . . . . . . . . . . . . . . . . . . . . . 11 Settings for display screen . . . . . . . . . . . . . . . . . . . . . . . . . . . . . . . . . . . . . . . . . . . . . . . . . . . . . . . . . . . . . . . . . . . . 11 12 DISPLAY MENU . . . . . . . . . . . . . . . . . . . . . . . . . . . . . . . . . . . . . . . . . . . . . . . . . . . . . . . . . . . . . . . . . . . . . . . . . . . . Audio control menu . . . . . . . . . . . . . . . . . . . . . . . . . . . . . . . . . . . . . . . . . . . . . . . . . . . . . . . . . . . . . . . . . . . . . . . . 13 Language menu . . . . . . . . . . . . . . . . . . . . . . . . . . . . . . . . . . . . . . . . . . . . . . . . . . . . . . . . . . . . . . . . . . . . . . . . . . . . 13
DVD player
. . . . . . . . . . . . . . . . . . . . . . . . . . . . . . . . . . . . . . . . . . . . . . . . . . . . . . . . . . . . . . . . . . . . . . . . . . 14
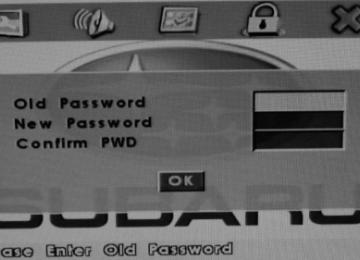
Use the DVD player. . . . . . . . . . . . . . . . . . . . . . . . . . . . . . . . . . . . . . . . . . . . . . . . . . . . . . . . . . . . . . . . . . . . . . . . . . 14 Settings for the DVD player . . . . . . . . . . . . . . . . . . . . . . . . . . . . . . . . . . . . . . . . . . . . . . . . . . . . . . . . . . . . . . . . . . . . 14 General Setup . . . . . . . . . . . . . . . . . . . . . . . . . . . . . . . . . . . . . . . . . . . . . . . . . . . . . . . . . . . . . . . . . . . . . . . . . . . . . 15 Audio Setup . . . . . . . . . . . . . . . . . . . . . . . . . . . . . . . . . . . . . . . . . . . . . . . . . . . . . . . . . . . . . . . . . . . . . . . . . . . . . . . 16 Preference . . . . . . . . . . . . . . . . . . . . . . . . . . . . . . . . . . . . . . . . . . . . . . . . . . . . . . . . . . . . . . . . . . . . . . . . . . . . . . . . 17 Password Setup . . . . . . . . . . . . . . . . . . . . . . . . . . . . . . . . . . . . . . . . . . . . . . . . . . . . . . . . . . . . . . . . . . . . . . . . . . . . . 18
Handling DVDs . . . . . . . . . . . . . . . . . . . . . . . . . . . . . . . . . . . . . . . . . . . . . . . . . . . . . . . . . . . . . . . . . . . . . . . . 19
Tip . . . . . . . . . . . . . . . . . . . . . . . . . . . . . . . . . . . . . . . . . . . . . . . . . . . . . . . . . . . . . . . . . . . . . . . . . . . . . . . . . . . . . . .
19
Icon display . . . . . . . . . . . . . . . . . . . . . . . . . . . . . . . . . . . . . . . . . . . . . . . . . . . . . . . . . . . . . . . . . . . . . . . . . . . 20
Meaning of the icons . . . . . . . . . . . . . . . . . . . . . . . . . . . . . . . . . . . . . . . . . . . . . . . . . . . . . . . . . . . . . . . . . . . . . . . . . . 20
Troubleshooting . . . . . . . . . . . . . . . . . . . . . . . . . . . . . . . . . . . . . . . . . . . . . . . . . . . . . . . . . . . . . . . . . . . . . . . 21
Troubleshooting . . . . . . . . . . . . . . . . . . . . . . . . . . . . . . . . . . . . . . . . . . . . . . . . . . . . . . . . . . . . . . . . . . . . . . . . . . . . . 21
Default Settings . . . . . . . . . . . . . . . . . . . . . . . . . . . . . . . . . . . . . . . . . . . . . . . . . . . . . . . . . . . . . . . . . . . . . . . 24
Default Settings . . . . . . . . . . . . . . . . . . . . . . . . . . . . . . . . . . . . . . . . . . . . . . . . . . . . . . . . . . . . . . . . . . . . . . . . . . . . . 24
Before using the system
Note!
• Read through this user manual
carefully before using the device. • Save the user manual for future
reference.
• Follow the instructions in the manual
carefully when using the device.
• Never use the entertainment system in a way that interferes with driving.
Rear Seat Entertainment system EN
General information
Caution!
• Damage caused by unauthorized • Do not recline/move the front seat so repairs or upgrades may void your that it collides with the roof of the car. warranty.
• Do not use chemical solutions, • Do not recline/move the front seat so
cleaning agents or corrosive agents that it collides with child seats. to remove dirt from the display screen. This can cause permanent damage to the screen surface. We recommend using a soft damp lens cleaning cloth to remove dirt or nger prints.
• Do not touch or push the display
screen when using the device.
• Excess force can cause permanent
damage to the display screen.
• Lock the display screen in the closed
position when not in use.
• Do not use DVD or CD disks with
adhesive labels. These labels can come off inside the unit and cause damage.
EN Rear Seat Entertainment system
System overview
Kit contents • 2 head restraints with screens including
DVD player
• 1 remote control • 2 two-channel wireless IR headsets • 6 x AAA batteries (4 for headsets and
2 for the remote control)
• 2 adapter cables for the audio/video
input
• 2 x 3.5 mm extension cables Optional accessories • Additional dual channel wireless IR
Headphones (Part Number H001SAJ330)
Main features • 7" TFT-LCD-screen with head restraint • Built-in DVD player with support for DVD, VCD, AUDIO CD-R/RW and MP3 CD. • Built-in Wireless Headphone IR Transmitter • 1 Audio/Video Input in each headrest • Full function wireless remote control • OSD (On Screen Display). Graphic menu used to adjust picture quality, image, and clarity. • Integrated with the vehicle's audio system.
Audio can be output through the vehicle's speakers. • Primary function controls integrated to front bezel.
Technical specifications
Display Resolution Dot pitch Viewing angle Brightness Contrast ratio Power
Power consumption Panel dimensions Built-in temperature control system
Rear Seat Entertainment system EN
System overview
7.0" widescreen, TFT LED active matrix 800 (W) x 480 (H) x 3 (R.G.B.) 0.0635 (W) x 0.1905 (H) mm 50°/70°/70°/70° (from above/below/left/right) 450 cd/m² 500:1 12V DC (negative ground) Active (DVD being played): approx. 20W Max (start-up and insertion of disc): approx. 32W 165 x 5.5 x 104 mm (W x D x H) If temperature is greater than +175℉ (+80℃), system will power down.
Note!
Temperature control system monitors the temperature of the circuit board inside the device and not the ambient temperature outside in the passenger compartment.
EN Rear Seat Entertainment system
Quick guide
Playing a DVD movie
– Activate the entertainment system by
pressing the switch (1) on the front panel and inserting a DVD (2).
Using the wireless headphones
– Activate the wireless headsets with the
power switch (1).
– Select CH A if sitting behind the right seat or CH B if sitting behind the left seat (2).
– Adjust the volume (3). Battery Replacement
Playing audio/video via game port inputs
– Connect the device you want to use via
the mini-jack/TRCA wiring (1).
– Insert the mini-jack cable into the port
underneath the front panel (2).
– Activate the entertainment system by pressing the power switch (3) on the front panel.
– Then press the S button for signal source (4) on the front panel until "AUX-AUDIO/VIDEO INPUT" appears at the top left corner of the screen.
Rear Seat Entertainment system EN
Buttons on the front panel
Controls and connectors
1 POWER CONTROL
Switches the screen on/off.
2 Title
Press to return to the DVD root menu.
3 Play/Pause
Play/pause playback of the disc.
4 STOP
Stops disc playback. • Press the Stop button twice and
then Play to play the disc from the beginning.
• Press the Stop button and then
Play to resume playing from the last stopped place.
5 Signal source
Switches between signal sources DVD, LEFT INPUT/RIGHT INPUT and AUX AUDIO/VIDEO INPUT. If LEFT INPUT/RIGHT INPUT is selected as signal source for one screen, the screen menus, display and audio will be controlled by the other screen and remote control.
7 IR transmitter
9 Navigation buttons
Opens the main menu.
6 Menu
Transfers audio to the wireless headsets. 8 IR sensor
Receives infrared signals from the remote control.
Press to navigate Rewind/Fast-forward/
Next/Previous tracks and make
selections in DVD title menus. In DVD
or screen menus they are used to adjust
and select options.
Press to confirm menu options
10 OK button
EN Rear Seat Entertainment system
Buttons on the front panel
11 Headset socket
3.5 mm standard socket for headsets.
12 Eject
When the power is on, eject the disc by pressing the eject button next to the DVD slot.
13 A/V input
3.5 mm audio/video input jack. Use with supplied adapter cable.
14 DVD slot
Buttons and functions
Rear Seat Entertainment system EN
Remote control
1 LEFT/RIGHT
8 Navigation buttons
Press to select and control the screen on the left or right side. 2 POWER CONTROL
Moves the option or cursor to the left/right/up/down.
9 OK
Press to power the selected screen on or Press to confirm selection. off. 10 Back
3 Signal source
Switch between the different signal sources (DVD, LEFT INPUT/RIGHT INPUT and AUX AUDIO/VIDEO INPUT) for the selected screen by pressing the S button several times.
4 AUDIO
Search backwards.
11 Forward
Search forward.
12 ZOOM
Zooms in or out of the image. Use the navigation buttons to pan in the zoomed image.
Hold for 1 sec. to enable/disable RSE audio output to the vehicle’s audio system.
13 REPEAT
5 MUTE
Press once to mute the audio. Press again to restore the audio at the previous volume level. 6 VOLUME +/-
Increases or reduces the audio level.
7 MENU
Opens the main menu. Activates the DVD player’s menu.
Repeat playback of different parts of a DVD, CD or MP3 (track/chapter/option).
14 DISC MENU
Switches between available subtexts during playback of VCD 2.0. Path to DVD title option menu.
15 SUBTITLE
Switches between the subtext languages if applicable.
EN Rear Seat Entertainment system
Remote control
16 A-B
Gives the option to repeat playback of a DVD or CD from point A to point B. Set point A by pressing once, press again to set point B. Press again to clear set points.
17 Number buttons
Direct access to CD track, DVD chapter and used when setting password.
18 DISPLAY
19 TITLE
Shows current media information.
On certain DVDs it is possible to select title. Select desired title with this button.
Return to previous chapter or track.
21 Next track
Goes to next chapter or track.
22 Play/Pause
Starts playback or starts a function. Pauses playback when button is pressed again.
23 STOP
Stops playback.
10
20 Previous track
Battery Replacement
Using the display 1 It is possible to set the display to a
comfortable viewing angle to prevent glare or bright light by tilting the screen.
2 Press the power button on the front panel
or on the remote control to turn the display screen on.
Note!
If the backlight flashes three times and then goes out and the device does not start, the vehicle’s battery voltage is too low.
3 Press the S button to select signal
source. Choose one of the following options: • DVD uses the device’s DVD player • LEFT INPUT/RIGHT INPUT
uses the corresponding device’s DVD player or AUX AUDIO/VIDEO INPUT. If there is no signal from the corresponding DVD player, "NO DISC" appears.
Rear Seat Entertainment system EN
DISPLAY
• AUX AUDIO/VIDEO INPUT uses
the connected AUX input.
Settings for display screen
To change display screen settings, open the main menu by pressing the MENU button on the remote control or the MENU button on the front panel.
Settings for brightness, contrast, color and audio etc are made in the DISPLAY MENU.
11
DIMMER MODE
Select between
Dark mode/Normal mode/ Bright mode
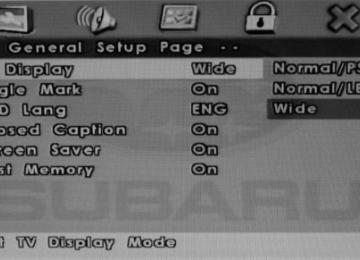
DISPLAY MODE
Select FULL SCREEN or 4 : 3 aspect ratio
WIRE VOLUME
Regulates the volume in the wired headsets.
IR POWER CONTROL
Switches the IR transmitter on and off for the wireless headsets.
EN Rear Seat Entertainment system
DISPLAY
Change settings
DISPLAY MENU
Press the navigation buttons on either the remote control or front panel to select the setting you want to change. Use the left/right button to reduce or increase the value for the selected option. If you do not press a button within 7 seconds, the display screen returns to the normal display mode.
BRIGHTNESS
Adjusts the strength of the background lighting.
CONTRAST
Adjusts the contrast.
COLOR
Adjusts the balance between blue, yellow and red.
TINT
Adjusts the intensity of blue, yellow and red.
12
AUDIO (A.I.I.) CONTROL
Rear Seat Entertainment system EN
DISPLAY
LANGUAGE
This setting allows you to decide which
If MUTE (AUDIO OFF) is activated,
Select preferred language for display
DVD player’s audio will be output to
appears on-screen.
menus. English, French, and German
are available.
RESET TO FACTORY SETTINGS
Resets the display screen to factory settings.
the vehicle’s audio system. When both
display screens are switched on, the
default setting is "ON" on the Right side
and “OFF” on the Left side.
If one of the monitor is changed to "ON",
the audio from this monitor is output to
the vehicle’s audio system and the other
monitor automatically switches to "OFF".
When a device is plugged into the vehicle's
AUX input jack in the center console, the
icon appears on the RSE screen and
the Aii output is disabled. When the device
is unplugged, the icon appears and
audio can be output to the vehicle's audio
system.