- 2012 Mercedes-Benz G Class Owners Manuals
- Mercedes-Benz G Class Owners Manuals
- 2005 Mercedes-Benz G Class Owners Manuals
- Mercedes-Benz G Class Owners Manuals
- 2013 Mercedes-Benz G Class Owners Manuals
- Mercedes-Benz G Class Owners Manuals
- 2009 Mercedes-Benz G Class Owners Manuals
- Mercedes-Benz G Class Owners Manuals
- 2003 Mercedes-Benz G Class Owners Manuals
- Mercedes-Benz G Class Owners Manuals
- 2004 Mercedes-Benz G Class Owners Manuals
- Mercedes-Benz G Class Owners Manuals
- 2011 Mercedes-Benz G Class Owners Manuals
- Mercedes-Benz G Class Owners Manuals
- 2002 Mercedes-Benz G Class Owners Manuals
- Mercedes-Benz G Class Owners Manuals
- 2007 Mercedes-Benz G Class Owners Manuals
- Mercedes-Benz G Class Owners Manuals
- Download PDF Manual
-
i If the driver's door is open, the steering wheel can be adjusted for up to 30 minutes after the ignition has been switched off.
X Press the lever in the direction of
arrow : or ; until the steering wheel is in the desired position.
You can find more information under: REASY-ENTRY/EXIT feature (Y page 83) RStoring settings (Y page 85)
Steering wheel heating Switching on/off The steering-wheel heating heats the leather areas of the steering wheel.
: To switch on the steering-wheel heating ; Indicator lamp = To switch off the steering-wheel heating X To switch on/off: make sure that the
SmartKey is in position 1 or 2 in the ignition lock.
X Turn the lever in the direction of arrow :
or =. Indicator lamp ; lights up or goes out.
i The steering wheel heating does not
switch off automatically.
i The steering wheel heating may switch off
temporarily if: Rthe temperature of the vehicle interior is
above 86 ‡ (30 †).
Rthe temperature of the steering wheel is
above 95 ‡ (35 †).
Indicator lamp ; remains on.
i The steering wheel heating is deactivated
if you remove the SmartKey from the ignition lock.
Steering wheel
83
Problems with the steering wheel heating If steering wheel heating indicator lamp ; is flashing, the steering wheel heating has switched off automatically. The vehicle's electrical system voltage is too low because too many electrical consumers are switched on. X Switch off electrical consumers which you
do not need, such as the rear window defroster or interior lighting. Once the battery is sufficiently charged, the steering wheel heating will switch back on automatically.
Steering wheel EASY-ENTRY/EXIT feature General notes The EASY-ENTRY/EXIT feature makes getting in and out of your vehicle easier. You can activate and deactivate the EASY- ENTRY/EXIT feature in the on-board computer (Y page 161).
Important safety notes G WARNING You must make sure no one can become trapped or injured by the moving steering wheel when the EASY-ENTRY/EXIT feature is activated. To stop steering maneuver do one of the following: Rpress the steering column adjustment
switch.
Rpress one of the memory function position
buttons.
Rpress the memory button. Do not leave children unattended in the vehicle, or with access to an unlocked vehicle. Children could open the driver's door and unintentionally activate the EASY-ENTRY/
EXIT feature. This could result in an accident and/or serious personal injury. G WARNING Let the system complete the adjustment procedure before setting the vehicle in motion. All steering wheel adjustment must be completed before setting the vehicle in motion. Driving off with the steering wheel still adjusting could cause the driver to lose control of the vehicle.
! Do not activate the EASY-ENTRY/EXIT
feature, if the seat backrest is reclined too far backwards. This can damage the front or rear seats. You must first move the backrest to a vertical position.
Position of the steering wheel when the EASY-ENTRY/EXIT feature is active The steering wheel moves upwards and towards the dashboard if: Ryou remove the SmartKey from the ignition
lock or
Ryou open the driver's door with the
SmartKey in position 0 or 1 in the ignition lock.
i The steering wheel only moves upwards
and towards the dashboard if it has not already reached the upper end stop.
Position of the steering wheel for driving The steering wheel is moved to the last selected position when: Rthe driver's door is closed. Ryou insert the SmartKey into the ignition
lock
The last position of the steering wheel is stored when you switch off the ignition or when you store the setting with the memory function (Y page 85).
84 Mirrors
mirror is set to a position that provides you with a good overview of traffic conditions.
You will find further information in the "Storing settings" section (Y page 85).
Exterior mirror out of position If an exterior mirror has been pushed out of position, proceed as follows: X Move the exterior mirror into the correct
position manually. The mirror housing is engaged again and you can adjust the exterior mirrors as usual (Y page 84).
Automatic anti-glare mirrors G WARNING The auto-dimming function does not react if incoming light is not aimed directly at sensors in the interior rear view mirror. The interior rear view mirror and the exterior rear view mirror on the driver's side do not react, for example, when transporting cargo which covers the rear window. Light hitting the mirror(s) at certain angles (incident light) could blind you. As a result, you may not be able to observe traffic conditions and could cause an accident.
The rear-view mirror and the exterior mirror on the driver's side automatically go into anti- glare mode if the ignition is switched on and incident light from headlamps strikes the sensor in the rear-view mirror. The mirrors do not go into anti-glare mode if reverse gear is engaged or the interior lighting is switched on.
Mirrors Rear-view mirror X Adjust the rear-view mirror by hand so you
have a good overview of the traffic conditions.
Exterior mirrors Important safety notes G WARNING Exercise care when using the passenger-side exterior rear view mirror. The mirror surface is convex (outwardly curved surface for a wider field of view). Objects in mirror are closer than they appear. Check your interior rear view mirror and glance over your shoulder before changing lanes.
At low outside temperatures, the exterior mirrors are heated automatically.
Adjusting the exterior mirrors The switches are located on the dashboard on the left-hand side.
X Make sure that the SmartKey is in position
1 or 2 in the ignition lock.
X Press button ; for the right-hand exterior
mirror or button = for the left-hand exterior mirror.
X Press adjustment button : up, down, to
the right or to the left until the exterior
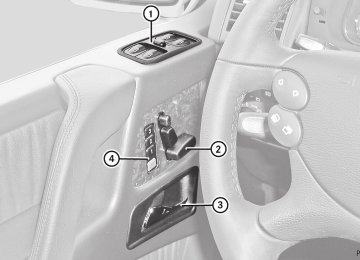
Parking position for the exterior mirror on the front-passenger side General notes To make it easier to park, you can store the front-passenger side exterior mirror position in such a way that you can see the rear wheel on that side as soon as you engage reverse gear R. Using the memory buttons on the driver's side, you can store three parking positions per key.
Setting and storing the parking position
: Adjustment button ; Right-hand exterior mirror = Left-hand exterior mirror ? Memory button X Make sure that the vehicle is stationary and that the SmartKey is in position 1 or 2 in the ignition lock.
X Press button ; for the exterior mirror on
the front-passenger side.
X Engage reverse gear R.
The exterior mirror on the front-passenger side moves to the preset parking position.
X Use adjustment button : to adjust the exterior mirror to a position which allows you to see the rear wheel and the curb.
X Press memory button ? and adjustment
button : within three seconds. The parking position is stored if the exterior mirror does not move.
Memory functions
85
i If the mirror moves out of position, repeat
the steps.
i If you shift the transmission to another position, the exterior mirror on the front- passenger side returns to the driving position.
Calling up a stored parking position setting X With the SmartKey in position 2 in the
ignition lock and the exterior mirror on the front-passenger side activated, engage reverse gear. The exterior mirror on the front-passenger side moves to the stored parking position.
The exterior mirror on the front-passenger side moves back to its original position: Ras soon as you exceed a speed of
10 km/h
Rabout ten seconds after you have
disengaged reverse gear R
Rif you press button = for the exterior
mirror on the driver's side
Memory functions Storing settings With the memory function, you can store up to three different settings, e.g. for three different people. The following settings are stored as a single memory preset: Rposition of the seat, backrest and head
restraint
Rdriver's side: steering wheel position Rdriver's side: position of the exterior
mirrors on the driver's and front-passenger sides G WARNING Do not activate the memory function while driving. Activating the memory function while driving could cause the driver to lose control of the vehicle.
86 Memory functions
The buttons are located on the door control panel.
X Make sure that the SmartKey is in position
2 or that the respective door is open. X Adjust the seat (Y page 76) and head
restraint (Y page 77).
X On the driver's side, adjust the steering
wheel (Y page 82) and the exterior mirrors (Y page 84).
X Press memory button ;. X Press one of memory buttons :1, 2 or 3
within three seconds. The settings are stored in the selected storage position.
Calling up a stored setting X Press and hold the relevant memory button
1, 2 or 3, until the seat, head restraints, steering wheel and mirrors are in the stored position.
i The setting procedure is interrupted as soon as you release the memory button.
! If you want to move the seat from the fully reclined position to a stored seat position, first raise the backrest using the seat switch. The seat could otherwise be damaged.
87
Useful information .............................. 88
Exterior lighting .................................. 88
Interior lighting ................................... 92
Replacing bulbs ................................... 94
Windshield wipers .............................. 9988
Exterior lighting
Useful information
i This Operator's Manual describes all models and all standard and optional equipment of your vehicle available at the time of publication of the Operator's Manual. Country-specific differences are possible. Please note that your vehicle may not be equipped with all features described. This also applies to safety- related systems and functions.
i Please read the information on qualified
specialist workshops (Y page 20).
Exterior lighting Important safety notes For reasons of safety, Mercedes-Benz recommends that you drive with the lights switched on even during the daytime. In some countries, operation of the headlamps varies due to legal requirements and self-imposed obligations. In these countries, the daytime running lamps are automatically switched on when the engine is started.
Information about driving abroad To convert to symmetrical low beam when driving abroad: switch the headlamps to symmetrical low beam in countries in which traffic drives on the opposite side of the road from the country where the vehicle is registered. This prevents glare to oncoming traffic. Symmetrical lights do not illuminate as large an area of the edge of the road. Have the headlamps converted at a qualified specialist workshop as close to the border as possible before driving in these countries. To convert to asymmetrical low beam after returning: have the headlamps converted back to asymmetrical low beam at a qualified specialist workshop as soon as possible after crossing the border and returning to the original country.
Light switch Operation
1W Left-hand standing lamps 2X Right-hand standing lamps 3$ Lights off/daytime running lamps 4Ã Automatic headlamp mode/daytime
running lamps
5T Parking lamps, side marker lamps, license plate and instrument cluster lighting
6L Low-beam/high-beam headlamps 7N Front fog lamps 8R Rear fog lamp The turn signals, high-beam headlamps and the high-beam flasher are operated using the combination switch (Y page 91). ! Switch off the standing lamps, parking
lamps and low-beam headlamps when you leave the vehicle. This prevents the battery from discharging.
The exterior lighting (except the parking lamps) switches off automatically if you: Rremove the SmartKey from the ignition lock Ropen the driver's door with the SmartKey
in position 0
If you hear a warning tone when you leave the vehicle, the lights may still be switched on. The Switch off lights message appears in the multifunction display. X Turn the light switch to $ or Ã. X If you see the Switch off lights or remove key message in the multifunction
display, remove the SmartKey from the ignition lock.
or X Turn the light switch to $ or Ã.
Low-beam headlamps X To switch on: turn the SmartKey to
position 2 in the ignition lock or start the engine.
X Turn the light switch to L.
The L indicator lamp in the instrument cluster lights up.
X To switch off: turn the light switch to
$.
Daytime running lamps Daytime running lamps in Canada The "daytime running lamps" function is required by law in Canada. It cannot therefore be deactivated. X Turn the light switch to $ or Ã.
When the engine is running: depending on the ambient light, the low-beam headlamps or the parking lamps are switched on. When the low-beam headlamps are switched on, the L indicator lamp in the instrument cluster lights up.
If the light switch is set to $ or Ã, you cannot activate the high-beam headlamps. However, the high-beam flasher can always be used. Turn the light switch to L when driving at night. You can switch on the high- beam headlamps in this position. When the engine is running and the vehicle is stationary: if you move the selector lever from a driving position to N or P, the low-beam headlamps go out after three minutes. When the engine is running: if you turn the light switch to T, you turn on the parking lamps and low-beam headlamps. When the engine is running: if you turn the light switch to L, the manual settings take precedence over the daytime running lamps.
Exterior lighting
89
Daytime running lamps in the USA In the USA, the daytime running lamps are deactivated upon delivery from the factory. X To switch on: activate the daytime
running lamps function in the on-board computer (Y page 160).
X Turn the light switch to $ or Ã. When the engine is on: the low-beam headlamps are switched on. The L indicator lamp in the instrument cluster lights up.
If the light switch is set to $ or Ã, you cannot switch on the high-beam headlamps in bright conditions. Turn the light switch to L. You can switch on the high-beam headlamps in this position. If the light switch is set to $, Ã or L, you can switch on the high-beam headlamps in less bright conditions. However, the high-beam flasher can always be used. Turn the light switch to L when driving at night. When the engine is running: if you turn the light switch to T or L, the manual settings take precedence over the daytime running lamps.
Automatic headlamp mode G WARNING If the exterior lamp switch is set to Ã, the headlamps will not automatically come on under foggy conditions. To minimize risk to you and to others, activate headlamps by turning exterior lamp switch to L when traffic and/or ambient lighting conditions require you to do so. In low ambient lighting conditions, only switch from position à to L with the vehicle at a standstill in a safe location. Switching from à to L will briefly switch off the headlamps. Doing so while driving in low ambient lighting conditions may result in an accident.
driving in low ambient lighting conditions may result in an accident.
X To switch on: turn the SmartKey to
position 2 in the ignition lock or start the engine.
X Turn the light switch to L or T. If the
light switch is set to Ã, you cannot switch on the fog lamps.
X Pull the light switch out to the first detent. The green N indicator lamp on the light switch lights up.
X To switch off: press the light switch in as
far as it will go. The green N indicator lamp on the light switch goes out.
Rear fog lamp X To switch on: turn the SmartKey to
position 2 in the ignition lock or start the engine.
X Turn the light switch to L or T. If the
light switch is set to Ã, you cannot switch on the rear fog lamp.
X Pull the light switch out to the second
detent. The yellow R indicator lamp on the light switch lights up.
X To switch off: press the light switch in as
far as it will go. The yellow R indicator lamp on the light switch goes out.
90
Exterior lighting
The automatic headlamp feature is only an aid to the driver. The driver is responsible for the operation of the vehicle’s lights at all times.
The parking lamps, low-beam headlamps and license plate lamp are switched on or off automatically, depending on the brightness of the ambient light. X To switch on: turn the light switch to
Ã. SmartKey in position 1 in the ignition lock: the parking lamps are switched on or off automatically depending on the brightness of the ambient light. When the engine is running: depending on the ambient light, the parking lamps, the low-beam headlamps and the license plate lamp are switched on or off automatically. When the low-beam headlamps are switched on, the L indicator lamp in the instrument cluster lights up.
Canada only: if the light switch is in position $ or Ã, you cannot switch on the high- beam headlamps. However, the high-beam flasher can always be used. Turn the light switch to L when driving at night. You can switch on the high-beam headlamps in this position.
Front fog lamps and rear fog lamp Front fog lamps G WARNING If you suspect that driving conditions will be foggy, turn the light switch to L before you start your journey. Your vehicle may otherwise not be visible and you could endanger yourself and others. G WARNING In low ambient lighting or foggy conditions, only switch from position à to L with the vehicle at a standstill in a safe location. Switching from à to L will briefly switch off the headlamps. Doing so while
Combination switch Turn signals
X To indicate briefly: press the combination switch briefly to the pressure point in the direction of arrow ; or ?. The corresponding turn signal flashes three times.
X To indicate: press the combination switch beyond the pressure point in the direction of arrow ; or ?. The corresponding ! or # indicator lamp in the instrument cluster flashes.
High-beam headlamps X To switch on: turn the SmartKey to
position 2 in the ignition lock or start the engine.
X Turn the light switch to L or Ã. X Press the combination switch beyond the
pressure point in the direction of arrow :. In the à position, the high-beam headlamps are only switched on when it is dark.
X To deactivate: move the combination
switch back to its normal position. The K indicator lamp in the instrument cluster goes out.
Exterior lighting
91
High-beam flasher X To switch on: turn the SmartKey in the
ignition lock to position 1 or 2 or start the engine.
X Pull the combination switch briefly in the
direction of arrow =. The K indicator lamp in the instrument cluster lights up briefly.
Hazard warning lamps
The hazard warning lamps switch on automatically if an air bag or the Emergency Tensioning Devices are triggered and the SmartKey is in position 1 in the ignition lock. X To switch on: press button :.
All turn signals flash. If you now switch on a turn signal using the combination switch, only the turn signal lamp on the corresponding side of the vehicle will flash.
X To switch off: press button :. i The hazard warning lamps still operate if
the ignition is switched off.
Headlamp cleaning system The headlamps are cleaned automatically if the "Wipe with washer fluid" function is operated fifteen times while the lights are on and the engine is running (Y page 100). When you switch off the ignition, the automatic headlamp cleaning system is reset and counting is resumed from 0.
92
Interior lighting
X Drive with the headlamps switched on.
The level of moisture diminishes, depending on the length of the journey and the weather conditions (humidity and temperature).
If the level of moisture does not diminish: X Have the headlamps checked at a qualified
specialist workshop.
Interior lighting Overview of interior lighting
Front overhead control panel : t To switch the cargo compartment
lamp/rear interior lighting on/off
; p Switches the right-hand reading
lamp on/off
= Rocker switch (to control the interior
lighting)
? p Switches the left-hand reading lamp
on/off
X To switch on manually: turn the
SmartKey to position 2 in the ignition lock or start the engine.
X Briefly press button : of the headlamp
cleaning system. The headlamps are cleaned with a high- pressure water jet.
Cornering light function The cornering light function improves the illumination of the road over a wide angle in the direction you are turning, enabling better visibility in tight bends, for example. It can only be activated if the low-beam headlamps are switched on and the fog lamp is switched off. Active: if you are driving at speeds below 25 mph(40 km/h) and switch on the turn signals and turn the steering wheel. Not active: if you are driving at speeds above 25 mph(40 km/h) or switch off the turn signal and turn the steering wheel to the straight- ahead position. The cornering lamp may remain lit for a short time.
Headlamps and indicator lamps fogged up on the inside The headlamps and the indicator lamps in the exterior mirrors may fog up on the inside if there is high atmospheric humidity.
Interior lighting
93
i If a door remains open and the SmartKey
is not in the ignition lock, the interior lighting switches off after a short while.
X To switch off: press the z symbol on
rocker switch =.
The interior lighting remains switched off even when it is dark if you: Runlock the vehicle Ropen a door Rremove the SmartKey from the ignition lock
Manual control Front interior lighting ! If the interior lighting has been switched
on manually, it will not be switched off automatically. This can cause the starter battery to discharge. Make sure that the interior lighting does not remain switched on too long after the engine has been switched off.
X To switch on: press the c symbol on
rocker switch =.
X To switch off: set rocker switch = to the
center position.
Reading lamps X To switch on/off: press the p button. Cargo compartment lamp G WARNING To prevent possible personal injury, always keep hands and fingers away from the cargo compartment opening when closing the tailgate. Be especially careful when small children are around. G WARNING Make sure the tailgate is closed when the engine is running and while driving. Among other dangers, deadly carbon monoxide (CO) gases may enter vehicle interior resulting in unconsciousness and death.
Rear-compartment overhead control panel : p Switches the right-hand reading
lamp on/off
; p Switches the left-hand reading lamp
on/off
Interior lighting control Important notes In order to prevent the vehicle's battery from discharging, the interior lighting functions are automatically deactivated after some time unless the SmartKey is in position 2 in the ignition lock.
Automatic interior lighting control X To switch on: set rocker switch = to the
center position.
The interior lighting switches on automatically when it is dark if you: Runlock the vehicle Ropen a door Rremove the SmartKey from the ignition lock The interior light is activated for a short while when the SmartKey is removed from the ignition lock. You can activate this delayed switch-off using the on-board computer (Y page 161). When a front door is opened, the front interior lighting comes on. When a rear door is opened, the rear interior lighting comes on. In addition, the courtesy lights come on.
94
Replacing bulbs
! Switch off the cargo compartment lamp if you wish to leave the rear door open for a longer period. The battery may otherwise discharge.
X To switch on/off: press the t button. i If you open the rear door, the cargo
compartment lamp comes on. Then, you cannot switch it off using the t button. Switch off the cargo compartment lamp if you wish to leave the rear door open for a longer period. This prevents the battery from discharging.
X Open the rear door. X To switch off with the rear door open: press lock : down in the direction of the arrow until it engages. The cargo compartment lamp is switched off.
! Do not close the rear door while lock : is engaged at the bottom. Otherwise, you could damage lock :.
X To switch on with the rear door open:
press lock cylinder ;. The cargo compartment lamp resumes its normal function.
Rear interior lighting X To switch on/off: press the t button. i The rear interior lighting switches on when you open a rear door. Then, you cannot switch it off using the t button.
Switch off the rear interior lighting if you wish to leave the rear doors open for a longer period. This prevents the battery from discharging.
Replacing bulbs Important safety notes Xenon bulbs G DANGER Xenon bulbs carry a high voltage. You could get an electric shock and be seriously or even fatally injured if you touch the electric contacts on Xenon bulbs. Therefore, never remove the cover from Xenon bulbs. Do not change the Xenon bulbs yourself, but have them replaced at a qualified workshop.
Bulbs and lamps are an important aspect of vehicle safety. You must therefore make sure that these function correctly at all times. Have the headlamp setting checked regularly.
Other bulbs G WARNING Bulbs and lamps can become very hot. For this reason, allow them to cool down before changing them. Otherwise, you could burn yourself when you touch them. Keep bulbs out of the reach of children. Otherwise, they could, for example, damage the bulbs and injure themselves. Never use a bulb which has been dropped. Such a bulb may explode and injure you. Halogen bulbs are pressurized and could explode when you change them, especially if they are very hot. You should therefore wear eye protection and gloves when you are changing them.
There are bulbs other than the Xenon bulbs that you cannot replace. Replace only the bulbs listed (Y page 95). Have the bulbs that
you cannot replace yourself changed at a qualified specialist workshop. If you require assistance changing bulbs, consult a qualified specialist workshop. Do not touch the glass tube of new bulbs with your bare hands. Even minor contamination can burn into the glass surface and reduce the service life of the bulbs. Always use a lint- free cloth or only touch the base of the bulb when installing. Only use bulbs of the correct type. If the new bulb still does not light up, consult a qualified specialist workshop. Bulbs and lamps are an important aspect of vehicle safety. You must therefore make sure that these function correctly at all times. Have the headlamp setting checked regularly.
Before changing bulbs Have the following bulbs changed at a qualified specialist workshop. Radditional turn signals in the exterior
mirrors
Rhigh-mounted brake lamp Rhigh-beam/low-beam headlamps (Xenon
bulbs)
Rparking lamp/standing lamp Rlicense plate lamp i Individual segments of the license plate
lamp LEDs may fail without a display message appearing in the multifunction display. Check the license plate lamp regularly. Consult a qualified specialist workshop if necessary.
You can replace the following bulbs: Rfog lamp/cornering light with fog lamp
function
Rturn signal lamp (front) Rbrake/tail lamp Rturn signal lamp (rear) Rtail lamp/standing lamp
Replacing bulbs
95
Rbackup lamp Rrear fog lamp Rside marker lamp
Overview: changing bulbs/bulb types Front bulbs
: Turn signal lamp: 1156 NA ; Side marker lamp: T 4 W = Cornering light function with fog lamp
function: H11 55 W
Rear bulbs
: Side marker lamp: T 4 W ; Tail lamps:
Turn signal lamp: PY 21 W Brake lamp/tail lamp: P 21/5 W Tail lamp/standing lamp: W 5 W
= Backup lamp: P 21 W ? License plate lamp: LEDs3
A Rear fog lamp: P 21 W3 Have these bulbs changed at a qualified specialist workshop only.
96
Replacing bulbs
Changing the front bulbs Front fog lamps/cornering lamps with fog lamp function
X Hold headlamp =. X Lightly press bulb holder B, turn it
counterclockwise to the stop and pull it out.
X Switch off the lights. X Remove screws :. X Remove cover ;.
X Remove screws ?. i Only remove screws ?. Do not turn
adjustment screw A. If adjustment screw A is turned, the front fog lamp adjustment must be checked at a qualified specialist workshop.
X Remove headlamp =.
X Take bulb C out of bulb holder B. X Insert the new bulb into bulb holder B. X Insert bulb holder B into headlamp = and
turn it clockwise to the stop.
X Insert headlamp =. X Replace and tighten screws ?. X Position cover ;. X Replace and tighten screws :.
Turn signals X Switch off the lights.
Replacing bulbs
97
X Turn bulb = counterclockwise, applying
slight pressure, and remove it from the bulb holder.
X Insert the new bulb into the bulb holder and
turn it clockwise until it engages.
X Install lens ;. X Replace and tighten screws :. ! Do not fasten the screws too tightly. You
could otherwise damage the lens.
X G 55 AMG: fold down protection grille :
and engage it in bracket ;.
Side marker lamps The bulbs of the front and rear side marker lamps are changed in the same way.
G 55 AMG: turn signal with protection grille X G 55 AMG: pull protection grille : out of bracket ; in the direction of the arrow.
X Fold up protection grille :. ! Make sure that the protection grille does
not strike against painted surfaces. You could otherwise damage the paintwork.
X Remove screws :. X Remove lens ;.
Front side marker lamp (example) X Switch off the lights. X Remove screws :. X Remove housing ;.
98
Replacing bulbs
X Remove dust cover =. X Push the catch to the side and pull the bulb
holder with the bulb out of housing ;.
X Unscrew screws ;. X Swing protective grille : to the right. ! Make sure that the protective grille does
not hit any painted surfaces. You could otherwise damage the paintwork.
X After changing the bulbs, swing protective
grille : to the left. X Tighten screws ;.
Tail lamp
X Lightly press bulb ?, turn it counter-
clockwise and pull it out.
X Insert the new bulb and, applying slight
pressure, turn it clockwise until it engages.
X Insert the bulb holder into housing ;. X Attach dust cover =. X Insert housing ;. X Replace and tighten screws :. ! Do not fasten the screws too tightly. You
could otherwise damage the lens.
Changing the rear bulbs Only G 55 AMG: headlamp protection grille You must remove the protective grille before you can change the bulbs in the tail lamps.
G 55 AMG: protective grille
X Switch off the lights. X Remove screws :. X Remove lens ;.
= Turn signals ? Brake/tail lamp A Tail lamp/standing lamp
Windshield wipers
99
X Turn the bulb counterclockwise, applying slight pressure, and remove it from bulb holder.
X Insert the new bulb into the bulb holder and
turn it clockwise until it engages.
! When installing the lens, make sure that
the seal is positioned correctly.
X Install lens ;. X Replace and tighten screws :. ! Do not fasten the screws too tightly. You
could otherwise damage the lens.
X G 55 AMG: secure the protective grille
(Y page 98).
Backup lamp/rear fog lamp
Example: rear fog lamp X Switch off the lights. X Remove screws ;. X Remove lens :.
X Turn bulb = counterclockwise, applying
slight pressure, and remove it from the bulb holder.
X Insert the new bulb into the bulb holder and
turn it clockwise until it engages.
X Install lens :. X Replace and tighten screws ;. ! Do not fasten the screws too tightly. You
could otherwise damage the lens.
Windshield wipers Important safety notes G WARNING The windshield will not longer be wiped properly if the wiper blades are worn. This could prevent you from observing the traffic conditions, thereby causing an accident. Replace the wiper blades twice a year, ideally in spring and fall.
! Do not operate the windshield wipers when the windshield is dry, as this could damage the wiper blades. Moreover, dust that has collected on the windshield/rear window can scratch the glass if wiping takes place when the windshield/rear window is dry. If it is necessary to switch on the windshield wipers in dry weather conditions, always use washer fluid when operating the windshield wipers.
! If the windshield wipers leave smears on
the windshield/rear window after the vehicle has been washed in an automatic car wash, this may be due to wax or other residue. Clean the windshield/rear window with washer fluid after an automatic car wash.
100 Windshield wipers
Switching the windshield wipers on/ off
or
Ryou change the wipe setting on the
combination switch.
Switching the rear window wiper on/ off
Combination switch 1 S Continuous wipe, fast 2 ¯ Continuous wipe, slow 3 ° Intermittent wipe/rain sensor 4 $ Windshield wipers off A í Single wipe/ î To wipe the
windshield using washer fluid
X Turn the SmartKey to position 1 or 2 in the
ignition lock.
X Turn the combination switch to the
corresponding position.
! Intermittent wiping with rain sensor: due
to optical influences and the windshield becoming dirty in dry weather conditions, the windshield wipers may be activated inadvertently. This could then damage the windshield wiper blades or scratch the windshield. For this reason, you should always switch off the windshield wipers in dry weather. In the ° position, the appropriate wiping frequency is set automatically according to the intensity of the rain. Intermittent wiping is interrupted if you stop and open a front door. This protects people getting into and out of the vehicle from being sprayed with water. Intermittent wiping continues when all doors are closed and: Ryou shift the automatic transmission to
drive position D or reverse gear R
The rear window wiper comes on automatically if you shift the selector lever to R while the windshield wipers are on. X Turn the SmartKey to position 1 or 2 in the
ignition lock.
X To switch on intermittent wiping: push
button :. Indicator lamp ; lights up.
X To switch off intermittent wiping: push
button : again. Indicator lamp ; goes out.
X To wipe with washer fluid: push button = and hold it there until the rear window is clean. The rear window is wiped for a further five seconds after the button is released.
Replacing the wiper blades Important safety notes G WARNING For safety reasons, switch off the wipers and remove the SmartKey from the starter switch before replacing a wiper blade. Otherwise, the wiper motor could suddenly turn on and cause injury.
! To avoid damaging the wiper blades,
make sure that you touch only the wiper arm of the wiper.
! Never open the hood if a windshield wiper
arm has been folded away from the windshield. Never fold a windshield wiper arm without a wiper blade back onto the windshield/ rear window. Hold the windshield wiper arm firmly when you change the wiper blade. If you release the windshield wiper arm without a wiper blade and it falls onto the windshield, the windshield may be damaged by the force of the impact. Mercedes-Benz recommends that you have the wiper blades changed at a qualified specialist workshop.
Removing the wiper blade X Remove the SmartKey from the ignition
lock.
X Fold the windshield wiper arm away from
the windshield until it engages.
X Position the wiper blade at right angles.
X Press locking spring :. X Slide wiper blade = with hinge piece ?
from windshield wiper arm ;.
Windshield wipers
101
Installing the wiper blade
: Locking spring ; Windshield wiper arm = Wiper blade ? Hinge piece X Slide new wiper blade = with the recess
onto windshield wiper arm ;.
X Engage locking spring : into the end of
the wiper arm.
X Make sure that wiper blade = is seated
correctly.
X Fold windshield wiper arm ; back onto the
windshield.
Problems with the windshield wipers The windshield wipers are obstructed Leaves or snow, for example, may be obstructing the windshield wiper movement. The wiper motor has been deactivated. X For safety reasons, you should remove the
SmartKey from the ignition lock.
X Remove the cause of the obstruction. X Switch the windshield wipers back on.
The windshield wipers are inoperative The windshield wiper drive is malfunctioning. X Select another wiper speed on the
combination switch.
X Have the windshield wipers checked at a
qualified specialist workshop.
102
Useful information ............................ 104
Overview of climate control sys- tems ................................................... 104
Operating the climate control sys- tem ..................................................... 105
Setting the air vents ......................... 110103
104 Overview of climate control systems
i Ventilate the vehicle for a brief period
during warm weather, e.g. using the convenience opening feature (Y page 69). This will speed up the cooling process and the desired vehicle interior temperature will be reached more quickly.
i The integrated filter can filter out most
particles of dust, and completely filters out pollen. A clogged filter reduces the amount of air supplied to the vehicle interior. For this reason, you should always observe the interval for replacing the filter, which is specified in the Maintenance Booklet. As it depends on environmental conditions, e.g. heavy air pollution, the interval may be shorter than stated in the Maintenance Booklet.
Useful information
i This Operator's Manual describes all models and all standard and optional equipment of your vehicle available at the time of publication of the Operator's Manual. Country-specific differences are possible. Please note that your vehicle may not be equipped with all features described. This also applies to safety- related systems and functions.
i Please read the information on qualified
specialist workshops (Y page 20).
Overview of climate control systems Important safety notes G WARNING Severe conditions (e.g. strong air pollution) may require replacement of the filter before its scheduled replacement interval. A clogged filter will reduce the air volume to the interior and the windows could fog up, impairing visibility and endangering you and others. Have a blocked filter replaced at a Mercedes- Benz Center as soon as possible. G WARNING Follow the recommended settings for heating and cooling given on the following pages. Otherwise, the windows could fog up, impairing visibility and endangering you and others.
Automatic climate control controls the temperature and the humidity in the vehicle interior and filters undesirable substances from the air. The automatic climate control is only operational when the engine is running4. Optimum operation is only achieved if you drive with the side windows and sliding sunroof closed.
4 The residual heat function can only be switched on/off if the ignition is switched off.
Operating the climate control system 105
Control panel for dual-zone automatic climate control
: To increase/reduce the airflow (Y page 108) To switch climate control on/off (Y page 106)
; To set the temperature, left (Y page 107) = To set the temperature, right (Y page 107) ? To set the air distribution (Y page 107) A ª To switch the rear window defroster on/off (USA only) (Y page 109) A £ To switch the rear window defroster on/off (Canada only) (Y page 109) B To activate/deactivate cooling with air dehumidification (Y page 106)
To activate/deactivate the residual heat function (Y page 110)
C To set climate control to automatic (Y page 107) D To activate/deactivate air-recirculation mode (Y page 110) E ¥ To defrost the windshield (USA only) (Y page 108) E z To defrost the windshield (Canada only) (Y page 108)
Operating the climate control system Notes on using dual-zone automatic climate control The following contains notes and recommendations on optimum use of dual- zone automatic climate control.
RActivate climate control using the à and Á buttons. The indicator lamps above the à and Á buttons light up. RSet the temperature to 72 ‡ (22 †). ROnly use the "defrosting" function briefly
until the windshield is clear again.
ROnly use "air-recirculation" mode briefly, e.g. if there are unpleasant outside odors or when in a tunnel. The windows could
106 Operating the climate control system
otherwise fog up as, in air-recirculation mode, no fresh air is drawn into the vehicle. RUse the residual heat function if you want
to heat or ventilate the vehicle interior when the ignition is switched off. The "residual heat" function can only be activated or deactivated with the ignition switched off.
RAt very low temperatures, the rear window
defroster is only switched on once the vehicle interior has warmed up.
Activating/deactivating climate control Important information G WARNING When the climate control system is deactivated, the outside air supply and circulation are also deactivated. Only choose this setting for a short time. Otherwise the windows could fog up, impairing visibility and endangering you and others.
i Switch on climate control primarily using
the à button (Y page 107).
Activating/deactivating X Turn the SmartKey to position 2 in the
ignition lock.
X To switch on: turn control : clockwise to
the desired position (except position 0) (Y page 105).
X The previously selected settings come into
effect again.
X To switch off: turn control : counter-
clockwise to position 0(Y page 105).
Activating/deactivating the cooling with air dehumidification function Important information The cooling with air dehumidification function is only available when the engine is running. The air inside the vehicle is cooled and dehumidified according to the temperature selected. G WARNING If you switch off the cooling function, the vehicle will not be cooled when weather conditions are warm. The windows can fog up more quickly. Window fogging may impair visibility and endanger you and others.
Condensation may drip from the underside of the vehicle when it is in cooling mode. This is normal and not a sign that there is a malfunction. i The cooling with air dehumidification function uses refrigerant R134a. This coolant does not contain chlorofluorocarbons, and therefore does not damage the ozone layer.
Activating/deactivating ! If the cooling with air dehumidification does not switch on, it is possible that the climate control system has lost coolant. Have the cooling with air dehumidification checked at a qualified specialist workshop.
X To activate: press the Á button.
The indicator lamp in the Á button lights up.
X To switch off: press the Á button.
The indicator lamp in the Á button goes out. The cooling with air dehumidification function has a delayed switch-off feature.
Operating the climate control system 107
Problems with the cooling with air dehumidification function If the indicator lamp in the Á button does not go out or flashes when switched on, the cooling with air dehumidification function is switched off due to a malfunction. You can no longer switch on the cooling with air dehumidification function. X Consult a qualified specialist workshop.
Setting climate control to automatic G WARNING If you switch off the cooling function, the vehicle will not be cooled when weather conditions are warm. The windows can fog up more quickly. Window fogging may impair visibility and endanger you and others.
In automatic mode, the set temperature is maintained automatically at a constant level. The system automatically regulates the temperature of the dispensed air, the airflow and the air distribution. Automatic mode will achieve optimal operation if cooling with air dehumidification is also activated. If desired, cooling with air dehumidification can be deactivated. X Turn the SmartKey to position 2 in the
ignition lock.
X Set the desired temperature. X To switch on: press the à button.
The indicator lamp in the à button lights up. Automatic air distribution and airflow are activated.
X To switch off: press the à button.
The indicator lamp in the à button goes out. Automatic air distribution and airflow are deactivated.
Setting the temperature Different temperatures can be set for the driver's and front-passenger sides.
X Turn the SmartKey to position 2 in the
ignition lock.
X To increase/reduce: turn controls ; and
= clockwise or counterclockwise (Y page 105). Only change the temperature setting in small increments. Start at 72 ‡ (22 †).
i If you turn the temperature control on one
side of the vehicle fully clockwise or counterclockwise, you will increase or reduce the temperature on the other side of the vehicle at the same time.
Setting the air distribution You can set the air distribution for the entire vehicle.