- 2012 Mercedes-Benz CL Class Owners Manuals
- Mercedes-Benz CL Class Owners Manuals
- 2008 Mercedes-Benz CL Class Owners Manuals
- Mercedes-Benz CL Class Owners Manuals
- 2011 Mercedes-Benz CL Class Owners Manuals
- Mercedes-Benz CL Class Owners Manuals
- 2007 Mercedes-Benz CL Class Owners Manuals
- Mercedes-Benz CL Class Owners Manuals
- 2002 Mercedes-Benz CL Class Owners Manuals
- Mercedes-Benz CL Class Owners Manuals
- 2013 Mercedes-Benz CL Class Owners Manuals
- Mercedes-Benz CL Class Owners Manuals
- 2004 Mercedes-Benz CL Class Owners Manuals
- Mercedes-Benz CL Class Owners Manuals
- 2000 Mercedes-Benz CL Class Owners Manuals
- Mercedes-Benz CL Class Owners Manuals
- 2010 Mercedes-Benz CL Class Owners Manuals
- Mercedes-Benz CL Class Owners Manuals
- 2006 Mercedes-Benz CL Class Owners Manuals
- Mercedes-Benz CL Class Owners Manuals
- 2003 Mercedes-Benz CL Class Owners Manuals
- Mercedes-Benz CL Class Owners Manuals
- 2005 Mercedes-Benz CL Class Owners Manuals
- Mercedes-Benz CL Class Owners Manuals
- 2009 Mercedes-Benz CL Class Owners Manuals
- Mercedes-Benz CL Class Owners Manuals
- 2001 Mercedes-Benz CL Class Owners Manuals
- Mercedes-Benz CL Class Owners Manuals
- Download PDF Manual
-
time.
X To show the menu: press W the COMAND controller. X In the navigation menu bar, confirm RPT with W.
Switching navigation announcements on/off X To switch off: during the announcement, press the 8 button on the multifunction steering wheel. You will briefly see the message: The driving instructions have been muted. X To switch on: press W the COMAND
controller.
X In the + navigation menu bar, press W
to confirm.
i COMAND automatically switches the
navigation announcements back on when: Ryou have a new route calculated. Ryou start the engine again after having
left the vehicle.
Reducing volume during a navigation announcement The volume of an active audio or video source can be automatically reduced during a navigation announcement. X Select Navi in the main function bar by sliding ZV and turning cVd the COMAND controller and press W to confirm. X Select Audio Fadeout and press W to confirm. The function is switched on O or off ª, depending on the previous status.
Setting the volume manually X Set the volume during a navigation
announcement.
or X In the map display when the menu is
shown, select + and adjust the volume.
Avoiding a section of the route blocked by a traffic jam This function blocks a section of the route ahead of you. You can set the length of the blocked route section. If possible, COMAND calculates a detour around the blocked section of the route. X To activate navigation mode: press the
S function button once or twice.
X To show the menu: press W the COMAND controller. X Select Route in the navigation system menu bar by turning cVd the COMAND controller and press W to confirm. X Select Detour and press W to confirm. X To block a section of the route: select More or Less repeatedly and confirm using W until the desired section has been selected.
i The total length of the section that can be blocked is defined by the digital map. The menu items are available accordingly. X To start route calculation: select Start and press W to confirm. X To delete the blocked section: select Delete while the message is shown and press W to confirm. COMAND calculates the route without the block.
Selecting an alternative route With the "Alternative route" function, routes other than the original one can be calculated. X To activate navigation mode: press the
S function button once or twice.
X To show the menu: press W the COMAND controller. X Select Route in the navigation system menu bar by turning cVd the COMAND controller and press W to confirm.
Navigation 155
X Select Alternative Route and press W to confirm. You see the selected route. The display now shows a split-screen view. On the left-hand side, one or more alternative routes are shown from start to destination. The current route is highlighted dark blue; other alternative routes appear light blue.
: Distance, expected arrival time and
expected journey duration
; Displays incidents which are on the route = Displays the selected route settings X To select the next or previous alternative route: select Next or Previous and press W to confirm. Possible alternative routes are shown in the following order: Current Route, Fast Route, Eco Route, Short Route and Alternative Route. X To select the original route: select Back a corresponding number of times and press W to confirm. X To start route guidance using the selected alternative route: select Start and press W to confirm. COMAND accepts the alternative route.
i The change of route mode in the
alternative route menu only applies to the current route guidance. For example, if the original route was a short route, the next route will also be calculated as a short route. This is also the case if a dynamic route is selected in the alternative route menu.
156 Navigation
Displaying destination information Prerequisite: you have entered a destination (Y page 137) and possibly an intermediate stop (Y page 145). X To activate navigation mode: press the
S function button once or twice.
X To show the menu: press W the COMAND controller. X Select Info in the menu bar by turning cVd the COMAND controller and press W to confirm. Destination information is displayed. If a telephone number is entered for the address displayed, you can also select and call the number using COMAND. X To call the destination: select the
telephone number using the COMAND controller and press W to confirm.
X To close the destination information:
slide XVY the COMAND controller or press the % back button.
Route overview You can use the overview of the route to move along the route section by section and to see details of the route sections. You have entered a destination (Y page 137) or a point of interest (Y page 147) and possibly an intermediate stop (Y page 145). X To activate navigation mode: press the
S function button once or twice.
X To show the menu: press W the COMAND controller. X Select Route in the navigation system menu bar by turning cVd the COMAND controller and press W to confirm. X Select Route Info and press W to confirm.
Example display: route overview : Marked route sections At the top of the display, you will see information about the highlighted route section, for example the distance to be driven on the road and road designation. The highlighted route section is marked in white with a red border on the map. X To view the next or previous route section: select Next or Previous and press W to confirm. i If the first or last route section is highlighted, you cannot select Previous or Next. X To zoom in or out of the map: select N
or M and press W to confirm. X To close the route overview: select Back and press W to confirm.
Where am I? You can view your current position whether or not route guidance has been interrupted. : Current position ; Next intersection or exit = Most recent intersection or exit ? Current street X To activate navigation mode: press the
S function button once or twice.
X To show the menu: press W the COMAND
controller.
X Select Position in the navigation system menu bar by turning cVd the COMAND controller and press W to confirm. X Select Where am I? and press W to confirm.
Off-road Important safety note G WARNING The COMAND navigation system may direct you to off-road routes that your vehicle may not be capable of traversing through without damaging your tires, wheels or vehicle. It is the driver's sole responsibility to determine the suitability of the route. Off-road routes may be of varying conditions and their appropriateness for use may be affected by various factors such as time of day, time of year and immediate weather conditions that cannot be judged or taken into consideration by the COMAND system.
Route guidance to a destination that is not on a digitized road COMAND can guide you to destinations which are within the area covered by the digital map, but which are not themselves recorded on the map. These destinations are known as off-road destinations, which you can enter using the map, for example. In these cases, COMAND guides you for as long as possible with navigation announcements and displays on roads known to the system.
Navigation 157
Example display: route guidance to an off-road destination : Off-road destination ; Off-road route section (dashed blue) = Current vehicle position (the tip of the
triangle indicates the vehicle’s direction of travel)
? Off-road (no street names available) If the vehicle reaches an area which is not part of the digital map, the display appears as a split-screen view. On the right-hand side, an arrow appears which points to off-road destination :. You will hear the announcement: "Please follow the arrow on the display". Route guidance from an off-road location to a destination If the vehicle position is within the area covered by the digital map, but the map does not contain any information about that location, the vehicle is in an off-road location. COMAND is also able to guide you to a destination even from an off-road location. At the start of the route guidance, you will see the Street unknown message, an arrow and the distance to the destination. The direction arrow shows the linear direction to the actual destination. The continuous blue line on the map starts at the street which you left last. As soon as the vehicle is back on a road known to the system, route guidance continues in the usual way.
158 Navigation
Off-road during route guidance Due to roadworks, for example, there may be differences between the data on the digital map and the actual course of the road. In such cases, the system will temporarily be unable to locate the vehicle position on the digital map and thus considers the vehicle to be in an off-road position. In the display, you will see the Street unknown message, an arrow and the distance to the destination. The arrow shows the compass heading to the last road you were driving on. As soon as the system can assign the vehicle position to the map again, route guidance continues in the usual way. Route guidance on roads that are not completely digitalized COMAND attempts to avoid roads that have not been completely digitalized. If the vehicle's position or the destination is located in an area that has not been completely digitalized, then no active route guidance is performed. Instead, the map shows a dashed route along the roads and the target direction is shown with an arrow. You hear the announcement: "You will enter an area, where turn-by-turn guidance can not be provided. Please follow the arrow on the display". Once these roads have been left, regular route guidance is resumed.
Traffic reports Prerequisite i The SatRadio mode described below
requires optional satellite radio equipment and a subscription to SIRIUS XM Satellite Radio Traffic Message Service. Further details on SatRadio are available in the "SatRadio" section (Y page 200).
COMAND can receive traffic reports via SatRadio and incorporate them in the
6 Traffic reports are not available in all countries.
navigation system. Traffic messages and map symbols can then be shown in the COMAND display. COMAND uses high quality traffic data. Nevertheless, there may be differences between the traffic reports received and the actual road and traffic conditions.
Switching traffic reports on/off X To switch on: set the route type to Dynamic Route6(Y page 136). X To switch off: select the Fast Route or Short Route route type (Y page 136). i COMAND calculates a new route if you change the route type setting with route guidance active. If you change the route type setting when route guidance is inactive, COMAND uses the new setting for the next route guidance.
Real-time traffic reports on the map COMAND can show certain traffic incidents on the map. The incidents are shown on the map at a scale from 1/16 mi to 20 mi. X Set the map scale (Y page 166).
12 Icon display for the section of route
affected
3 Icon for incident on the route 4 Current position and direction of travel 5 Map scale
Navigation 159
i COMAND uses corresponding icons to
highlight the entire section of the affected route, regardless of how long the incident actually is. The icons are placed on the side of the road affected by the incident.
160 Navigation
Icon for real-time traffic reports
Icon
Description Warning (red)
Caution (yellow)
Slow-moving traffic
Traffic jam on the route
Blocked route section on the route
Yellow line with arrows
Incidents
Green line with arrows
Unimpeded traffic flow
Slow-moving traffic (stop/start traffic) (yellow vehicle)
Traffic reports in the map display A warning appears, for example, relating to lost cargo. A warning appears, for example, relating to roadwork that does not affect the flow of traffic. This appears at the beginning of a traffic jam (average speed 25 - 45 mph) if route guidance is active and the route leads through an area of congested traffic. Yellow car icons may appear in conjunction with this icon. This appears at the beginning of a traffic jam (average speed 5 - 20 mph) if route guidance is active and the route leads through an area of congested traffic. Red car icons may appear in conjunction with this icon. Appears at the beginning of a blocked route section if route guidance is active and the route leads through the blocked section. The XXXX icons may appear in conjunction with this icon. Possible traffic blocks (e.g. roadwork) Appears on the side of the road affected (direction of travel) No delays Only appears on the side of the road (direction of travel) on which traffic flow is unimpeded High volume of traffic, average speed 40 – 72 km/h (25 – 45 mph). In order to indicate the volume of traffic, more than one symbol may appear. Very high volume of traffic, average speed 8 – 32 km/h (5 – 20 mph).
XXXX
Traffic jam on the route (stop/start traffic) (red vehicle) Blocked route section Unusable section of road. In order to indicate the
length of the blocked section, more than one symbol may appear.
Displaying real-time traffic reports X If necessary, switch to navigation mode and show the menu (Y page 136). X Select Traffic in the navigation system menu bar by turning cVd the COMAND controller and press W to confirm. If you see the No traffic messages. message: This means that: Rno traffic reports have been received yet. Rno traffic reports are available. X To cancel the search: select Cancel. X To close the message window: select OK. If there are any traffic reports, a list is shown. The content of the list varies depending on whether route guidance is active or not. List of traffic reports
X To show the traffic report list: select Display All Messages by turning cVd the COMAND controller and press W to confirm.
The list shows all the roads, areas or regions for which traffic reports are available.
Navigation 161
1 State or province recognition 2 Road affected i A traffic report may refer to an area or a region, e.g. if visibility is impaired due to fog.
X To read a traffic report: select a road, an
area or a region.
X To show a traffic report: select a road, an area or a region and press W to confirm. You will find an example of a traffic report below.
X To exit the list: slide XVY the COMAND
controller once or several times.
Example: traffic report
1 Country code 2 Road, area or region affected by traffic
reports
3 Direction 4 Report 1 of 8 for the road affected 5 Last exit/intersection before the affected
route section starts
162 Navigation
6 Report text C First exit/intersection after the affected
route section ends
X To scroll within a report or to access the next report: turn cVd the COMAND controller.
X To return to the list of messages: press W or slide XVY the COMAND controller.
Showing icon information
without starting route guidance (Y page 141).
Adopting an address book entry as a home address X To activate navigation mode: press the
S function button once or twice.
X To show the menu: press W the COMAND controller. X Select Destination in the navigation system menu bar by turning cVd the COMAND controller and press W to confirm. X Select From Memory and press W to confirm.
X Slide ZV the COMAND controller
repeatedly until the destination memory list appears as a selection list.
Example display : Affected section of freeway ; Icon for an event X To show the next/previous incident: select Next or Previous (if available) and press W to confirm. X To show the detailed view: select Details and press W to confirm. X To scroll the map: select Map and press W to confirm. You can move the map (Y page 144) to enable further traffic reports to be displayed.
Destination memory Home address (My address) Entering the home address via address entry X Enter the home address as a destination,
e.g. as a city, street and house number (Y page 137). Then, save the home address
X Select My Address by turning cVd the COMAND controller and press W to confirm. i If you have not yet entered any characters, the My Address entry is automatically highlighted in the selection list.
If no home address has been stored yet, you can now assign an address book entry. If a home address already exists, it is displayed and you can alter it. i If you select New Entry, you are also offered the option of entering the home address for the first time. You can then
save the home address without starting route guidance. X To enter the home address for the first time: select Assign Address Book Entry and press W to confirm. X Select Home or Work and press W to confirm. X To change the home address: select Change and press W to confirm. X Select Assign Address Book Entry and press W to confirm. i If you select New Entry, you are also offered the option of changing the home address by entering an address. You can then save the home address without starting route guidance. X Select Home or Work and press W to confirm. In both cases, you will see the address book either with the character bar or as a selection list.
X To select an address book entry:
proceed as described in the "Searching for an address book entry" section (Y page 189).
X To confirm the selection: press W the
COMAND controller. If no home address has been stored, COMAND saves the entry. You will see a message and then the address menu with the selected address. Start is highlighted automatically. If a home address has already been stored, you will see a prompt asking you whether the My Address entry should be overwritten. X Select Yes or No and press W to confirm. If you select Yes, COMAND overwrites the destination. You will see a message and then the address menu with the selected address. Start is highlighted automatically. If you select No, the list will reappear.
Navigation 163
Selecting the home address for route guidance X Proceed as described in the "Selecting a destination from the destination memory" section (Y page 143).
Storing a destination in the destination memory Note This function also stores the destination in the address book. After destination entry X The destination has been entered and is
shown in the address entry menu (Y page 140). X Select Save by sliding VÆ and turning cVd the COMAND controller and press W to confirm. You can now select storage options.
During route guidance X To show the menu: press W the COMAND controller. X Select Destination in the navigation system menu bar by turning cVd the COMAND controller and press W to confirm. X Select Save Destination and press W to confirm. You can now select storage options.
From the list of previous destinations X To show the menu: press W the COMAND controller. X Select Destination in the navigation system menu bar by turning cVd the COMAND controller and press W to confirm. X Select From Last Destinations and press W to confirm. The list of last destinations appears.
164 Navigation
X Select a destination by turning cVd the
COMAND controller and press W to confirm. The destination address is shown. X Select Save and press W to confirm. You can now select storage options.
Selecting storing options X To save the destination without a name: select Save without Name and press W to confirm. COMAND stores the destination in the destination memory and uses the address as the destination name. X To save the destination as My address: select Save as "My Address" and press W to confirm. COMAND stores the destination in the destination memory as My Address. If the entry already contains navigable data (symbol L), a prompt appears asking you whether the entry should be overwritten. X Select Yes or No and press W to confirm. If you select Yes, the entry is overwritten. If you select No, the process will be aborted. X To save the destination with a name: select Save with Name and press W to confirm. X Select a category, e.g. Home, and press W to confirm. The input menu appears with data fields and the character bar.
Example display: saving a destination with a name : Selected data field with cursor ; Character bar X Proceed as described under "Entering
characters using the character bar" in the "Entering characters in navigation mode (entering a city)" section (Y page 137).
X Then, select ¬ and press W to confirm. COMAND stores the destination under the name entered.
Assigning a destination to an address book entry An address with complete address data that is suitable for navigation can be assigned to a pre-existing address book entry. You can then later start route guidance to this address straight from the address book (Y page 192). X Select Assign Address Book Entry and press W to confirm. X Select a category, e.g. Home, and press W to confirm. You will see the address book either with the character bar or as a selection list.
X To select an address book entry:
proceed as described in the "Searching for an address book entry" section (Y page 189). COMAND stores the data if the address book entry selected does not yet contain navigable address data. If the selected address book entry already contains navigable address data, a prompt
will appear asking whether you wish to overwrite the existing data. X Select Yes or No and press W to confirm. If you select Yes, COMAND stores the data.
Deleting a destination or the home address from the destination memory X To activate navigation mode: press the
S function button once or twice.
X To show the menu: press W the COMAND controller. X Select Destination in the navigation system menu bar by turning cVd the COMAND controller and press W to confirm. X Select From Memory and press W to confirm. You will see the destination memory list either with the character bar (option 1) or as a selection list (option 2).
X Option 1: destination memory list with character bar: proceed as described in the "Entering characters using the character bar" section (Y page 119).
X Option 2: destination memory list as
selection list: select a destination by turning cVd the COMAND controller and press W to confirm. You see the address data of the selected entry. X Select Delete and press W to confirm. A prompt appears asking whether you wish to delete the destination. X Select Yes or No and press W to confirm. If you select Yes, COMAND deletes the destination. You will see a message to this effect. If you select No, the process is aborted. i If the navigable address data for the
destination being deleted is also assigned to an address book entry, COMAND will also delete this data from there. If the
Navigation 165
corresponding address book entry does not contain any further data, such as telephone numbers, COMAND deletes the entire address book entry.
Previous destinations Introduction COMAND automatically stores the previous destinations for which the route calculation has been started. If the memory is full, COMAND deletes the oldest destination. You can also save a destination from the list of previous destinations in the destination memory. It will be stored there permanently.
Storing a destination permanently in the destination memory X Proceed as described in the "From the list
of previous destinations" section (Y page 163).
Storing the vehicle position in the list of previous destinations X To activate navigation mode: press the
S function button once or twice.
X To show the menu: press W the COMAND controller. X Select Position in the navigation system menu bar by turning cVd the COMAND controller and press W to confirm. X Select Store Vehicle Position and press W to confirm. COMAND stores the current vehicle position as a destination in the list of previous destinations.
166 Navigation
Storing the crosshair position in the list of previous destinations Route guidance not active A crosshair appears on the map if you have moved the map manually. You can store the crosshair position as a destination in the list of previous destinations. X To show the menu: press W the COMAND controller. X Select Position in the navigation system menu bar by turning cVd the COMAND controller and press W to confirm. X Select Save Crosshair Position and press W to confirm.
Route guidance is active X Select Destination in the navigation system menu bar by turning cVd the COMAND controller and press W to confirm. X Select Save Destination and press W to confirm.
Deleting one of the previous destinations X To activate navigation mode: press the
S function button once or twice.
X To show the menu: press W the COMAND controller. X Select Destination in the navigation system menu bar by turning cVd the COMAND controller and press W to confirm. X Select From Last Destinations and press W to confirm. The list of last destinations appears.
X Select the desired destination and press
W to confirm. The destination address appears.
X Select Delete and press W to confirm. A prompt appears asking whether the entry should be deleted. X Select Yes or No and press W to confirm. If you select Yes, the entry is deleted. If you select No, the process is aborted.
Map operation and settings Note Company logos displayed on the map are trademarks of the respective companies and used solely for the purpose of indicating the location of these companies. The use of such logos on the map does not indicate approval of, support of or advertising by these companies for the navigation system itself.
Setting the map scale X To hide the menu: slide ZV the COMAND controller and, when the Full screen menu item is shown, press W.
X To call up the scale bar: as soon as you turn cVd the COMAND controller, scale bar = appears.
X Turn cVd until the desired scale is set.
: Set map scale as a number with unit ; Currently set map scale as indicated by
the needle on the scale bar
= Scale bar Unit of measurement : in the COMAND display depends on the selection made for the instrument cluster.
Moving the map Showing the crosshair X To hide the menu: slide ZV the COMAND controller and, when the Full screen menu item is shown, press W.
X To move the map: slide XVY, ZVÆ or
aVb the COMAND controller. A crosshair appears on the map. If you slide it again, the map moves in the corresponding direction under the crosshair.
Map with crosshair : Current vehicle position ; Crosshair = Details of the crosshair position ? Map scale selected Display = may be the name of a street, for example, provided the digital map contains the necessary data. Or it may show the geo- coordinate position of the crosshair if the Geo-coordinates display is switched on (Y page 170). Hiding the crosshair and centering the map on the vehicle position or destination X Press the % back button.
The crosshair disappears and the map is set to the vehicle position.
or X Set the map to the vehicle position; see the
explanation below.
Navigation 167
Setting the map to the vehicle position, intermediate stop or destination position Centering the map on the vehicle position X To show the menu: press W the COMAND controller. X Select Position in the navigation system menu bar by sliding VÆ and turning cVd the COMAND controller and press W to confirm. X Select Vehicle Position Map and press W to confirm or, if the crosshair is shown, press the % back button. This hides the crosshair.
Centering on an intermediate stop This function requires that a route to an intermediate stop has been calculated. X To show the menu: press W the COMAND controller. X Select Position in the navigation system menu bar by sliding VÆ and turning cVd the COMAND controller and press W to confirm. X Select Stopover Map and press W to confirm. The crosshair is centered on the destination.
Centering on the destination This function requires that a route to a destination has been calculated. X To show the menu: press W the COMAND controller. X Select Position in the navigation system menu bar by sliding VÆ and turning cVd the COMAND controller and press W to confirm. X Select Destination Map and press W to confirm. The crosshair is centered on the destination.
168 Navigation
Map display Setting the map orientation
X Select Navi in the main function bar by sliding ZV and turning cVd the COMAND controller and press W to confirm. X Select Map Orientation and press W to confirm. A # dot indicates the current setting.
Map orientation : Current map orientation The following display modes are possible: R0 North orientation (the map view is displayed so that north is always up).
R¤ Orientation in direction of travel (the map is displayed so that the direction of travel is always up; the orange point of the icon points north).
R¤ Bird's-eye view (the map is displayed so that the direction of travel is always up; the map projection reproduces the curvature of the earth and the orange point of the icon points north).
R¤ 3D map (the map is displayed in the
direction of travel with elevation and terrain modeling. The orange point of the icon points north).
Example display: Bird's-eye view : Current crosshair position ; Current map orientation X To show the menu: press W the COMAND
controller.
X Select North Up, Heading Up, Bird's- eye View or 3-D Map by turning cVd the COMAND controller and press W to confirm.
X To exit the menu: slide XVY the COMAND
controller. The map orientation changes accordingly.
Setting the point of interest icons in the map You can set the points of interest you wish to have displayed as symbols on the map. Points of interest are, for example, gas stations, hotels, cinemas and restaurants. The following settings are possible: RStandard Symbols Symbol display determined by the factory settings. RPersonal Symbols You can determine the symbols yourself. RNo Symbols The map does not show any symbols.
X To show the menu: press W the COMAND
controller.
X Select Navi in the main function bar by sliding ZV and turning cVd the COMAND controller and press W to confirm. X Select POI Symbols on Map and press W to confirm. X Select Standard Symbols, Personal Symbols or No Symbols. If you select Personal Symbols, the list of points of interest appears.
X To switch the icon display on/off: select
a point of interest by turning cVd the COMAND controller and press W to confirm. Depending on the previous state of the symbols, they will either be shown O or hidden ª. You can switch on the symbol displays for more than one point of interest.
i The list shows all symbols that are
contained on the digital map across all countries. However, not all points of interest are available in all countries. As a result, certain point of interest symbols may not be displayed on the map, even if the symbol display is switched on.
X To exit the menu: press the % back
button.
Map information in the display Showing text information During route guidance, you can have map information displayed at the bottom edge of the display. X To show the menu: press W the COMAND controller. X Select Navi in the main function bar by sliding ZV and turning cVd the COMAND controller and press W to confirm. The main area is active. X Select Navi again and press W to confirm. The navigation menu opens.
Navigation 169
X Select Text Information on Map and press W to confirm. A # dot indicates the current setting. X Select Arrival Time/Distance, Current Street, Geo-Coordinates or None and press W to confirm. X To exit the menu: slide XVY the COMAND
controller.
Arrival time/distance to the destination
Arrival time/distance display switched on : Icon for destination ; Distance to the destination = Icon for estimated time of arrival ? Estimated time of arrival You can only see this display during route guidance. While scrolling the map (Y page 167), you will see additional data, e.g. road names, depending on the crosshair position, if the digital map supports this data. Road display
Road display active : Road names or numbers, e.g. for
highways
170 Navigation
Geo-coordinate display
Geo-coordinate display active : Current height above average sea level,
rounded
; Current vehicle position: latitude
coordinates
= Current vehicle position: longitude
coordinates
? Number of GPS satellites currently being
used
There must be sufficient GPS reception for all displays to be shown. If this is not the case, the display will be grayed out. Height display : may vary from the actual value, because the navigation system uses the GPS signals for the calculation. While scrolling the map (Y page 167), you will see the geo-coordinates of the crosshair position. Height display : and number of satellites used ? are not displayed. "None" menu option
Display switched off : Current map orientation i During the "Move map" function you can
see additional information depending on the position of the crosshair, such as a road name, if the digital map supports this data.
Switching the topographical map on/ off The topographical map uses different colors to depict elevation. The color key generally reflects the topography's dominant vegetation or the ground's perceived color when seen from the air, for example: Rgreen for lowland Ryellow or brown for hills Rgray or white for mountains X To show the menu: press W the COMAND controller. X Select Navi in the main function bar by sliding ZV and turning cVd the COMAND controller and press W to confirm. X Select Topographical Map and confirm with W. Depending on the previous state, switch the option on O or off ª.
Switching the city model on/off When the city model is switched on, the map shows buildings as 3D models. i The city model is only shown in the "3D
map" map orientation. It is available for map scales 50 m and 100 m. The data required for displaying buildings is not available for all cities.
X To show the menu: press W the COMAND controller. X Select Navi in the main function bar by sliding ZV and turning cVd the COMAND controller and press W to confirm. X Select City (3D) and press W to confirm. Depending on the previous state, switch the option on O or off ª.
Navigation 171
: Hills ; Buildings = Important buildings
Showing the map data version X To show the menu: press W the COMAND controller. X Select Navi in the main function bar by sliding ZV and turning cVd the COMAND controller and press W to confirm. X Select Map Version and press W to confirm. The map data version number is shown. Information about new versions of the digital map can be obtained from an authorized Mercedes-Benz Center.
Traffic information on the map If you subscribe to the SIRIUS XM Satellite Radio Traffic Message Service, traffic information can be displayed on the map. You can select three categories for the display. X To switch the displays on/off: press W the COMAND controller to show the menu. X Select Navi in the main function bar by sliding ZV and turning cVd the COMAND controller and press W to confirm. X Select Traffic Information On Map and press W to confirm.
X Select a category and press W to confirm.
Depending on the previous state, switch the option on O or off ª.
RTraffic incidents
Road sections are illustrated with a yellow line and arrows. Warning messages or traffic incidents are represented on the map by appropriate symbols and/or yellow/red arrows. Explanation of symbols (Y page 158).
RSpeed & Flow
Road sections are represented by yellow or red car icons. Green arrows: free-flowing traffic Yellow car icons: congested traffic, average speed 25 - 45 mph Red car icons: traffic jam, average speed 5
– 20 mph RFree FlowRoad sections are illustrated with a green line and arrows.
Additional settings Freeway information When driving on highways, you can have the nearest gas stations, rest areas, etc., as well as your current distance from them, shown on the right-hand side of the display. X To activate navigation mode: press the
S function button once or twice.
X To show the menu: press W the COMAND
controller.
172 Navigation
X Select Navi in the main function bar by sliding ZV and turning cVd the COMAND controller and press W to confirm. X Select Highway Information and press W to confirm. Depending on the previous state, switch the option on O or off ª.
SIRIUS XM service Displaying SIRIUS XM service information You can display the SIRIUS XM service information. X To show the menu: press W the COMAND controller. X Select Navi in the main function bar by sliding ZV and turning cVd the COMAND controller and press W to confirm. X Select SIRIUS Service and press W to confirm.
Registering for the SIRIUS XM traffic report service X Call the traffic report provider's phone
number shown on the screen.
i You can also have the satellite service
activated online. To do so, visit the SIRIUS XM Radio website at http://www.sirius.com (USA) or http://www.siriuscanada.com (Canada).
Once the connection has been established: X Follow the instructions of the operator.
The activation process may take up to ten minutes.
If registration is not included when purchasing the system, your credit card details will be required to activate your account.
Compass function You can display the current compass direction heading in which the front of the vehicle is facing.
: Current compass heading ; geo-coordinates In the compass view, you can see the current direction of travel, the current height above sea level and the coordinates of the vehicle position, for example. X To activate navigation mode: press the
S function button once or twice.
X To show the menu: press W the COMAND controller. X Select Position in the navigation system menu bar by sliding VÆ and turning cVd the COMAND controller and press W to confirm. X Select Compass and press W to confirm. X To exit the display: confirm Back by pressing W or press the % button.
Installing new map software The digital maps generated by the map software become outdated in the same way as conventional road maps. Optimum route guidance can only be provided by the navigation system in conjunction with the most up-to-date map software. Information about new map software versions can be obtained from an authorized Mercedes-Benz Center.
You can install new map software yourself which, depending on the scope, may consist of one or more DVDs. The installation process can take between 10 and 120 minutes, depending on the scope of the map software. If the radio is switched on before you start the installation process, you can still adjust the volume. You can also use COMAND to operate automatic climate control and to cancel the process. Other functions are not operational. If possible, carry out the installation when the vehicle is stationary. The DVD read speed is higher when the vehicle is stationary than when it is in motion, so less time is required. If the starter battery is not sufficiently charged, COMAND may end the process automatically in order to protect the battery. Therefore, let the engine idle during the installation process. G WARNING Never leave the engine running in enclosed spaces. The exhaust gases contain toxic carbon monoxide. Breathing in exhaust fumes is a health hazard and can lead to unconsciousness or death.
Displaying information on the map version currently in use X To activate navigation mode: press the
S function button once or twice.
X To show the menu: press W the COMAND controller. X Select Navi in the main function bar by sliding VÆ and turning cVd the COMAND controller and press W to confirm. X Select Map Version and press W to confirm.
Notes on handling DVDs ROnly hold DVDs by the edge. RHandle DVDs carefully to prevent reading
errors.
RAvoid getting scratches, fingerprints and
dust on DVDs.
Navigation 173
RUse a commercially-available cleaning
cloth to clean discs. When cleaning CDs, you should wipe in straight lines from the center outwards rather than in a circular motion.
RPlace DVDs back in their cases after use. RProtect DVDs from heat and direct sunlight. Map software copy protection Map software for COMAND is subject to a charge. The map software has just one activation code which is usable in one vehicle only, and is not transferable. You can obtain the six-digit activation code from your authorized Mercedes-Benz Center. If you have lost the activation code, or if COMAND does not accept the activation code that you have received, contact your authorized Mercedes-Benz Center. Your vehicle is supplied with map software at the factory. Depending on the country, map software for your region is either pre-installed (Europe/USA) or the map software is supplied as a DVD (all other countries). You do not require an activation code for the map software that is provided with your vehicle. If the map software on your vehicle has been installed at the factory and you wish to reinstall it, this also does not necessitate entry of the activation code. Installation process X Load the map software DVD in the DVD
drive (Y page 204). COMAND checks the DVD and shows a corresponding message in the display.
Map software is not compatible with the navigation system You will see a message that the map software cannot be installed. X To confirm the message: press W.
COMAND ejects the DVD.
X Take the DVD out of the slot. X Insert a DVD which is compatible with the
vehicle’s navigation system.
174 Navigation
Map software is not compatible with the current system software You will see a message that the system software and the map software are not compatible. X To confirm the message: press W.
COMAND ejects the DVD.
X Take the DVD out of the slot. X Have the system software updated at an
authorized Mercedes-Benz Center.
The map software cannot be installed until the system software has been updated. Map software compatible with the navigation system and the current system software COMAND checks whether the map data on the DVD is already installed. Map data is already installed You will see a message that the map data is already installed and a prompt will appear asking you whether you wish to continue with the map software installation. X Select Yes or No. If you select Yes, the existing map data is overwritten. If you select No, COMAND automatically ejects the DVD and the installation of the map software is canceled.
X Take the DVD out of the slot. Map data is not installed yet In the display, you will see a comparison of the version statuses of the map software DVD and the map software installed in COMAND. A prompt then appears asking whether the map software installation should be carried out. X Select Yes or No. If you select Yes, the map data is installed. If you select No, COMAND automatically ejects the DVD and the installation of the map software is canceled.
X Take the DVD out of the slot.
If an activation code is required for the map software, a prompt appears in the display requesting the code to be entered.
X Enter the activation code and confirm the
entry with !. The map software is installed.
If you enter an incorrect activation code, the prompt to enter the activation code appears again. If the activation code is entered incorrectly three times, the prompt asking you to enter the activation code appears after a time delay. The time delay increases every time the activation code is entered incorrectly, from five minutes up to a maximum of five hours. Installing map data Just before the copying process starts, COMAND restarts the system. While the installation is running, you will see a message to this effect and a progress bar. X To cancel the installation process: eject
the DVD.
X Take the DVD out of the slot. i If you interrupt the installation process,
the navigation system will not be operational. You can continue an interrupted installation process at a later date.
X Installation process with multi-DVD map data: once the content of the first DVD has been installed, a message appears
prompting you to insert the second DVD. Follow the instructions on the display.
X To allow the installation to run to the end without Canceling: take no further action. When the installation process is successfully completed, you will see a message to this effect.
X To confirm the message: press W.
COMAND ejects the DVD.
X Take the DVD out of the slot. The installation is complete.
When the installation process is not successfully completed, you will see a message to this effect. X To confirm the message: press W.
COMAND ejects the DVD.
X Take the DVD out of the slot.
Navigation 175
176 Navigation
Problems with the navigation system Problem COMAND is unable to continue route guidance after the journey has been interrupted.
COMAND is unable to determine the vehicle's position.
The Navigation function unavailable message appears.
Possible causes/consequences and M Solutions Route guidance is canceled if you interrupt the journey for more than two hours. "Interrupting the journey" refers to stopping the vehicle and switching off COMAND. "Continuing route guidance" refers to switching COMAND back on and driving on. X Continue route guidance (Y page 153).
COMAND determines the vehicle's position. Depending on the driving situation, this may take some time. Route guidance may be restricted during the determination of the vehicle's location. When positioning is complete, route guidance is resumed with navigation announcements and route guidance displays.
COMAND has to redetermine the position of the vehicle if the vehicle has been transported (e.g. by ferry, by motorail or after towing). X Start the vehicle and pull away.
COMAND determines the vehicle's position. Depending on the driving situation, this may take some time. Route guidance may be restricted during the determination of the vehicle's location. When positioning is complete, route guidance is resumed with navigation announcements and route guidance displays.
COMAND has an integrated hard drive on which the digital map is stored. To protect the hard drive from damage, COMAND switches it off at very high temperatures. The navigation system will then be temporarily unavailable. X Let the vehicle and COMAND cool down. X To hide the message: switch COMAND off and then on again. If an area of the hard disk has a malfunction, COMAND can no longer access the map data in this area, for example when calculating a route. X To hide the message: switch COMAND off and then on again. The navigation system will be operational again until it has to access the faulty area of the hard drive once more. The message will then reappear.
X Consult an authorized Mercedes-Benz Center.
Problem You see a message informing you that the DVD containing the digital map is incompatible with the system software.
The installation of the map software has failed.
Telephone 177
Possible causes/consequences and M Solutions The DVD containing the digital map cannot be used for the update. X To confirm the message: press W the COMAND controller. X Eject the DVD. X Have the system software updated at an authorized Mercedes-
Benz Center.
The DVD is dirty or scratched. X Clean the DVD. X Restart installation. There is overheating due to excessive temperatures in the vehicle interior. X Wait until the vehicle interior has cooled down. X Restart installation. COMAND's integral hard drive is faulty. X Consult an authorized Mercedes-Benz Center.
Telephone General notes Introduction COMAND, in conjunction with a Bluetooth®- capable mobile phone, enables you to make calls via the Bluetooth® interface. Using the Bluetooth® interface and a suitable mobile phone, you can use the hands-free system, import contacts from the mobile phone and receive vCards. More detailed information on suitable mobile phones and on connecting Bluetooth®- capable mobile phones to COMAND can be found on the Internet at http://www.mbusa-mobile.com. Or call the Mercedes-Benz Customer Assistance Center on 1-800-FOR-MERCedes(1-800-367-6372) for the USA or on 1-800-387-0100 for Canada.
Safety notes G WARNING A driver's attention to the road must always be his/her primary focus when driving. For your safety and the safety of others, we recommend that you pull over to a safe location and stop before placing or taking a telephone call. If you choose to use the mobile phone while driving, please use the handsfree device and only use the mobile phone when weather, road, and traffic conditions permit. Some jurisdictions prohibit the driver from using a cellular mobile phone while driving a vehicle. Bear in mind that at a speed of just 30 mph (approximately 50 km/h), your vehicle is covering a distance of 44 feet (approximately 14 m) every second.
178 Telephone
Call disconnection while the vehicle is in motion A call may be disconnected if: Rthere is insufficient network coverage in
certain areas.
Ryou move from one transmitter/receiver
area (cell) into another and no channels are free.
Ryou use a SIM card which is not compatible
with the network available.
Ryou are using a mobile phone with
"Twincard" and the mobile phone with the second SIM card is already logged into the network.
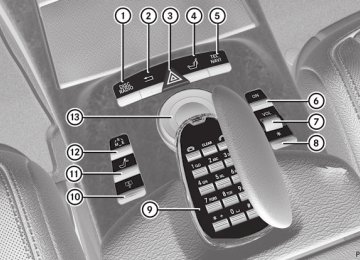
Operating options You can operate the telephone by: Rusing the COMAND controller:
turn cVd. slide XVY or ZVÆ. press W.
Rthe 6 or ~ button on the telephone
keypad on the center console
Rthe 6 or ~ button on the
multifunction steering wheel
Rusing the Voice Control System (see the separate Voice Control System operating instructions)
Unless otherwise indicated, the descriptions and illustrations in this section refer to COMAND and the telephone keypad. This also means that to carry out the functions described here, you must always be in the Telephone menu. The fastest way to access the Telephone menu is to press the S function button.
Function restrictions You will not be able to use the telephone, will no longer be able to use the telephone, or you may have to wait before using it, in the following situations: Rwhen the mobile phone is switched off Rwhen the "Bluetooth®" function is switched
off in COMAND
Rwhen the "Bluetooth®" function is switched
off on the mobile phone
Rif the mobile phone is not logged into a
mobile phone network
i The telephone automatically tries to log on to a network. If no network is available, you will not be able to make a "911" emergency call. If you attempt to make an outgoing call, the NO SERVICE message will appear for a short while.
Rif you remove the SmartKey from the
ignition lock during an active conversation in hands-free mode, the conversation may be continued for up to 30 minutes. After that time, it will be interrupted.
You can prevent this interruption by switching to "private call" ("private mode") on the mobile phone before deactivating COMAND (see mobile phone operating instructions). If you wish to switch off COMAND during an active conversation in hands-free mode, the following message will appear: You cannot shut off COMAND until you have finished your telephone call 911 emergency call G WARNING The 911 emergency call system is a public service. Using it without due cause is a criminal offense.
The following requirements must be fulfilled for a 911 emergency call: Rthe mobile phone must be switched on. Ra network must be available.
Ra valid and operational SIM card must be
inserted in the mobile phone.
Rthe mobile phone is connected to COMAND
via Bluetooth®.
If you cannot make an emergency call, you must arrange rescue measures yourself. X Enter numbers using the number keypad
(Y page 184).
X Press the 6 button.
The telephone makes the connection. X Wait for the emergency call center to
respond and then describe the emergency. i If no SIM card has been inserted in a GSM phone or if there is no service available for a CDMA phone, the NO SERVICE message appears in COMAND. In this case, an emergency call can only be transmitted via the mobile phone itself and not via COMAND.
Telephony via the Bluetooth® interface Conditions On the mobile phone For telephony via COMAND's Bluetooth® interface, a Bluetooth®-capable mobile phone is required. i Not all mobile phones available on the
market are equally suitable. More detailed information on suitable mobile phones and on connecting Bluetooth®-capable mobile phones with COMAND can be found on the Internet at http://www.mbusa-mobile.com. Or call the Mercedes-Benz Customer Assistance Center on 1-800-FOR-MERCedes(1-800-367-6372) (for the USA) or Customer Relations on 1-800-387-0100 (for Canada).
The battery of the mobile phone should always be kept sufficiently charged in order to prevent malfunctions.
Telephone 179
In preparation for telephoning via the Bluetooth® interface, you should check the following items on your mobile phone (see the mobile phone operating instructions): X Hands-Free Profile
The mobile phone must support Hands- Free Profile 1.0 or above.
i Certain displays and functions (e.g. signal strength display, conference connection) are available, depending on the supported version of the Hands-Free Profile.
X Bluetooth® visibility
On certain mobile phones, the device itself must be made "visible" for other devices, as well as activating the Bluetooth® function (see the mobile phone operating instructions).
X Bluetooth® device name
Every Bluetooth® device has its own Bluetooth® device name. This device name is freely definable, but can be identical for all devices from the same manufacturer. It is therefore recommended that you change this name so that you can easily recognize your mobile phone (see the mobile phone operating instructions).
X Switch on the mobile phone and enter the
PIN when prompted to do so (see the mobile phone operating instructions).
X Activate Bluetooth® functions and, where
necessary, Bluetooth® visibility on the mobile phone (see the mobile phone operating instructions).
In COMAND X Activate the Bluetooth® function in
COMAND (Y page 132).
Connecting a mobile phone General information Before using your mobile phone with COMAND for the first time, you will need to connect it.
180 Telephone
When you authorize a new mobile phone, it is connected automatically. Connecting comprises: Rsearching for a Bluetooth®-capable mobile
phone
Rsubsequently authorizing it You can connect up to 15 mobile phones. Searching for a mobile phone X To call up the telephone menu: press the S function button once or twice. X Select Data/Connections in the telephone basic menu by sliding VÆ and turning cVd the COMAND controller and press W to confirm. X Select Bluetooth Telephones and press W to confirm. X Select Update and press W to confirm. COMAND searches for Bluetooth® telephones within range and adds them to the Bluetooth® telephone list. The duration of the search depends on the number of Bluetooth® telephones within range and their characteristics.
The Bluetooth® telephones list shows all mobile phones within range and all previously authorized mobile phones, whether or not they are in range. i If the Bluetooth® telephones list is already full, you will be requested to de-authorize a mobile phone (Y page 182). If COMAND does not find your mobile phone, external authorization (Y page 181) may be necessary.
Authorizing (registering) a mobile phone X In the Bluetooth® telephones list, select the not yet authorized mobile phone by turning cVd the COMAND controller. X Select Options by sliding VY the COMAND controller and press W to confirm. X Select Authorize and press W to confirm. or X Press W to confirm the selected mobile
phone. The input menu for the passcode appears.
Example of display: Bluetooth® telephones list : Currently connected # and authorized
mobile phone Ñ
; Mobile phone not within range but previously authorized (Ñ symbol appears in gray)
= Newly detected mobile phone in range,
not yet authorized Ï
The passcode is any one to sixteen-digit number combination which you can choose yourself. You must enter the same number combination in COMAND and in the Bluetooth®-capable mobile phone (see the operating instructions of the mobile phone). i Some mobile phones require the input of
a four-digit passcode or longer number combinations.
Telephone 181
If you want to reauthorize a mobile phone following de-authorization, you can select a different passcode. X To enter a passcode in COMAND: press
the number keys in sequence. ¬ is available for selection after the first number has been entered.
or X Select the digits one by one by turning cVd the COMAND controller and press W to confirm.
X To confirm an entry in COMAND: select
¬ using the COMAND controller and press W to confirm.
or X Select SEND on the telephone keypad. X Now enter the same passcode in the mobile
phone.
To make entries on the mobile phone: if the Bluetooth® connection is successful, you will be requested to enter the passcode (see mobile phone operating instructions). X Enter the same passcode on the mobile
phone that you entered in COMAND.
i After entering the passcode, you may also need to enter a confirmation in your mobile phone to connect calls. Please check your mobile phone display. If the Error during authorization process message appears on the COMAND display, you may have exceeded the allowed time. Repeat the procedure.
The mobile phone is connected to COMAND (authorized). You can now make phone calls using the COMAND hands-free system.
External authorization If COMAND does not detect your mobile phone, this may be due to particular security settings on your mobile phone. In this case, you can test if your mobile phone can find COMAND. The Bluetooth® device name of COMAND is MB Bluetooth.
Observe the following: some mobile phones require that you reconnect to COMAND after you have entered the passcode (see the mobile phone operating instructions). The mobile phone cannot otherwise be authorized. X Press the S function button on the COMAND controller once or twice. X Select Data/Connections in the telephone basic menu by sliding VÆ and turning cVd the COMAND controller and press W to confirm. X Select Bluetooth Telephones and press W to confirm. X Select Update. X Select Options by sliding VY and press W to confirm. X Select External Authorization and press W to confirm.
X Start the Bluetooth® search on the mobile
phone (see the mobile phone operating instructions). X Select COMAND (MB Bluetooth) on the mobile phone.
i The order in which the passkey is entered
depends on the mobile phone.
X Enter the passkey on the mobile phone when prompted. X Confirm the Do you want to authorize XX? question in COMAND with Yes. X Enter the passkey in COMAND.
Connecting another mobile phone If you have authorized more than one mobile phone, you can switch between the individual phones. i You can only switch to another authorized phone if you are not currently making a call. X Select the mobile phone in the Bluetooth®
telephones list by turning cVd the
X To call up the telephone menu: press the S function button once or twice. X Select Data/Connections in the telephone basic menu by sliding VÆ and turning cVd the COMAND controller and press W to confirm. X Select Bluetooth Telephones and press W to confirm.
X Select the desired mobile phone in the Bluetooth® telephones list. X Select Options by sliding VY and press W to confirm. X Select De-authorize and press W to confirm. A prompt appears asking whether you really wish to de-authorize this device. X Select Yes or No. If you select Yes, the device will be deleted from the Bluetooth® telephones list. If you select No, the process will be aborted. i Before re-authorizing the mobile phone, you should also delete the device name MB Bluetooth from your mobile phone's Bluetooth® list.
Basic telephone menu (Bluetooth® interface) X To call up the telephone menu: press the
S function button once or twice. If the mobile phone is ready for use, the following display appears:
182 Telephone
COMAND controller and press W to confirm. The selected mobile phone is searched for and connected if it is within Bluetooth® range and if Bluetooth® is activated. Only one mobile phone can be connected at any one time. The currently connected mobile phone is indicated by the # dot in the Bluetooth® telephones list (Y page 179).
Displaying details X Select Data/Connections in the telephone basic menu by sliding VÆ and turning cVd the COMAND controller and press W to confirm. X Select Bluetooth Telephones and press W to confirm.
X Select the desired mobile phone in the Bluetooth® telephones list. X Select Options by sliding VY and press W to confirm. X Select Details and press W to confirm. The following information concerning the selected mobile phone is shown: RBluetooth® name RBluetooth® address Requipment class, e.g. telephone,
computer Ravailability Rauthorization status
X To close the detailed view: turn cVd or
slide XVY the COMAND controller.
De-registering (de-authorizing) a mobile phone Mercedes-Benz USA, LLC recommends de- authorizating in both COMAND and the mobile phone. Subsequent authorization may otherwise fail.
Telephone 183
the USA) or Customer Relations on 1-800-387-0100 (for Canada). i Incorrect settings may have a significant
impact on the quality of calls.
X Press the S function button. X Select Data/Connections in the telephone basic menu by sliding VÆ and turning cVd the COMAND controller and press W to confirm. X Select Bluetooth Telephones and press W to confirm.
X Select an authorized mobile phone from the list by turning cVd. X Select Options by sliding VY and press W to confirm. X Select Reception Volume or Transmission Volume and press W to confirm.