- 2009 Jeep Grand Cherokee Owners Manuals
- Jeep Grand Cherokee Owners Manuals
- 2005 Jeep Grand Cherokee Owners Manuals
- Jeep Grand Cherokee Owners Manuals
- 2013 Jeep Grand Cherokee Owners Manuals
- Jeep Grand Cherokee Owners Manuals
- 2008 Jeep Grand Cherokee Owners Manuals
- Jeep Grand Cherokee Owners Manuals
- 2006 Jeep Grand Cherokee Owners Manuals
- Jeep Grand Cherokee Owners Manuals
- 2004 Jeep Grand Cherokee Owners Manuals
- Jeep Grand Cherokee Owners Manuals
- 2007 Jeep Grand Cherokee Owners Manuals
- Jeep Grand Cherokee Owners Manuals
- 2011 Jeep Grand Cherokee Owners Manuals
- Jeep Grand Cherokee Owners Manuals
- 2012 Jeep Grand Cherokee Owners Manuals
- Jeep Grand Cherokee Owners Manuals
- 2010 Jeep Grand Cherokee Owners Manuals
- Jeep Grand Cherokee Owners Manuals
- Download PDF Manual
-
Avoid automatic car washes that use acidic solutions or harsh brushes that may damage the wheels’ protective finish. YES Essentialst Fabric Cleaning Procedure – If Equipped YES Essentialst seats may be cleaned in the following manner: † Remove as much of the stain as possible by blotting † Blot any remaining stain with a clean, damp towel.
with a clean, dry towel.
424 MAINTAINING YOUR VEHICLE
† For tough stains, apply Mopart Total Clean or a mild soap solution to a clean, damp cloth and remove stain. Use a fresh, damp towel to remove soap residue. † For grease stains, apply Mopart Multi-Purpose Cleaner to a clean, damp cloth and remove stain. Use a fresh, damp towel to remove soap residue. † Do not use any solvents or protectants on Yes Essen-
tialst products.
Interior Care Use Mopart Total Clean to clean fabric upholstery and carpeting. Interior Trim should be cleaned starting with a damp cloth, a damp cloth with Mopart Total Clean, then Mopart Spot & Stain Remover if absolutely necessary. Do not use harsh cleaners or Armorall. Use Mopart Total Clean to clean vinyl upholstery.
Leather Seat Care & Cleaning Mopart Total Clean is specifically recommended for leather upholstery. Your leather upholstery can be best preserved by regular cleaning with a damp soft cloth. Small particles of dirt can act as an abrasive and damage the leather upholstery and should be removed promptly with a damp cloth. Stubborn soils can be removed easily with a soft cloth and Mopart Total Clean. Care should be taken to avoid soaking your leather upholstery with any liquid. Please do not use polishes, oils, cleaning fluids, solvents, deter- gents, or ammonia based cleaners to clean your leather upholstery. Application of a leather conditioner is not required to maintain the original condition.
WARNING!
Do not use volatile solvents for cleaning purposes. Many are potentially flammable, and if used in closed areas they may cause respiratory harm.
Cleaning Headlights Your vehicle has plastic headlights that are lighter and less susceptible to stone breakage than glass headlights. Plastic is not as scratch resistant as glass and therefore different lens cleaning procedures must be followed. To minimize the possibility of scratching the lenses and reducing light output, avoid wiping with a dry cloth. To remove road dirt, wash with a mild soap solution fol- lowed by rinsing. Do not use abrasive cleaning components, solvents, steel wool or other aggressive material to clean the lenses.
MAINTAINING YOUR VEHICLE 425
Glass Surfaces All glass surfaces should be cleaned on a regular basis with Mopart Glass Cleaner or any commercial household-type glass cleaner. Never use an abrasive type cleaner. Use caution when cleaning inside rear windows equipped with electric defrosters. Do not use scrapers or other sharp instruments which may scratch the elements. When cleaning the rear view mirror, spray cleaner on the towel or rag that you are using. Do not spray cleaner directly on the mirror. Cleaning Plastic Instrument Cluster Lenses The lenses in front of the instruments in this vehicle are molded in clear plastic. When cleaning the lenses, care must be taken to avoid scratching the plastic. 1. Clean with a wet soft rag. A mild soap solution may be used, but do not use high alcohol content or abrasive cleaners. If soap is used, wipe clean with a clean damp rag.
426 MAINTAINING YOUR VEHICLE
2. Dry with a soft tissue. Seat Belt Maintenance Do not bleach, dye or clean the belts with chemical solvents or abrasive cleaners. This will weaken the fabric. Sun damage will also weaken the fabric. If the belts need cleaning, use Mopart Total Clean, a mild soap solution, or lukewarm water. Do not remove the belts from the vehicle to wash them. Replace the belts if they appear frayed or worn or if the buckles do not work properly. Dry with a soft tissue.
FUSE PANEL
Interior Fuses The fuse panel is on the lower instrument panel just to the left of the steering column.
Fuse Panel
Cav- ity
Cartridge
Fuse
Mini Fuse
Description
Cav- ity
Cartridge
Fuse
Mini Fuse
Description
MAINTAINING YOUR VEHICLE 427
30 Amp Green 15 Amp Blue 10 Amp Red 20 Amp Yellow 10 Amp Red Spare (B+) 20 Amp Yellow 15 Amp Blue
Audio Amp (B+)
Sunroof (B+)
Htd Mirror (EBL)
Rr Pwr Out (B+)
Rr HVAC (R/O) (Commander Only)
Door Locks (B+)
Steer Col Lock (B+) (ELV)
10
11
1220 Amp Yellow 10 Amp Red
Spare (B+) 10 Amp Red
Pwr Outlet (B+)
Final Drive Control Module (FDCM), Heater Ventilation, Air Conditioning (HVAC), Switch Bank, Transfer Case Switch, O/H, Heater Ventilation, Air Conditioning (HVAC) Relay, Rear Park As- sist
Door Mods, Mem. Sw, O/H Lamps, IP Cour- tesy Lamps, Glove Box Lamp (B+)
428 MAINTAINING YOUR VEHICLE
Cav- ity
Cartridge
Fuse
Mini Fuse
Description
Cav- ity
Cartridge
Fuse
Mini Fuse
Description
13
14
15
16
17
19
20
10 Amp Red 20 Amp Yellow 10 Amp Red 10 Amp Red
15 Amp Blue Spare (R/S) 10 Amp Red
Autowipe (R/A)
Cigar Ltr (R/A)
Tire Pressure Trans- ducers (R/O) Steering Control Mod- ule (SCM), Diag. Con- nector, Cluster (B+) Flipper Glass (B+)
Sentry Key Remote Entry Module (SKREEM), Cluster (R/S)
21
22
24
25
Spare (Acc De- lay) 15 Amp Blue 10 Amp Red
10 Amp Red
Rear Wiper (B+)
Power Distribution Center (PDC) Relays, Final Drive Control Module (FDCM), Front Control Module (FCM) (R/S), A580
(R/S) Shifter Assy (BTSI), Trans. Case Switch, ESP/ABS, Brake Supp Rly Coil (R/S)Underhood Fuses (Power Distribution Center)
Power Distribution Center
Cav- ity
Cartridge
Fuse 50 Amp Green
Mini Fuse
Description
PTC Heater 1 (Diesel Only)
Cav- ity
10
Cartridge
Fuse 40 Amp Green 50 Amp Green 30 Amp Pink 50 Amp Red 30 Amp Pink 40 Amp Green 40 Amp Green — —
MAINTAINING YOUR VEHICLE 429
Mini Fuse
Description
HID Headlamps
PTC Heater 2 (Diesel Only) Power Outlets
PTC Heater 3 (Diesel Only) Cig Lighter, Trail Tow Batt Power Liftgate (Com- mander Only) Starter, JB Power
Spare Spare
430 MAINTAINING YOUR VEHICLE
Cav- ity
11
12
13
14
15
1617
18
Cartridge
Fuse 40 Amp Green 30 Amp Pink 40 Amp Green
30 Amp Pink — 50 Amp Red 30 Amp Pink 40 Amp Green
Mini Fuse
Description
HVAC Blower
Rear Wiper, Ign R/O
Rear Window De- froster (EBL)/Heated Mirror Rear HVAC (If Equipped) Spare ASD
ABS Pump
Accessory Delay, Seats
Cartridge
Fuse 40 Amp Green —
Cav- ity
19
20
2122
23
24
25
26
Mini Fuse
Description
JB Power
Spare Fuel Pump
TCM, A/C Clutch
Power Inverter
Rear Heated Seats
Final Drive Control Module (FDCM) Brake Lamps
20 Amp Yellow 20 Amp Yellow 25 Amp Natural 20 Amp Yellow 20 Amp Yellow 15 Amp Blue
Cav- ity
Cartridge
Fuse
Mini Fuse
Description
Cav- ity
Cartridge
Fuse
Mini Fuse
Description
MAINTAINING YOUR VEHICLE 431
27
28
29
30
31
3233
34
3520 Amp Yellow 30 Amp Green 20 Amp Yellow — — 15 Amp Blue 20 Amp Yellow
— 20 Amp Yellow
HD Washer (If Equipped) ABS Valves
PCM Batt (Gasoline Only) Spare Spare Powertrain Control Module (Diesel Only) Final Drive Control Module (FDCM) E-Diff Spare Trail-Tow Mod (BUX Only)
36
3738
39
40
41
42
4344
— 20 Amp Yellow 20 Amp Yellow 20 Amp Yellow 25 Amp Natural
— — 25 Amp Natural —
Spare Ignition Switch
HID Left
HID Right
Next Generation Con- troller (NGC), Injec- tors Spare Spare Coils, Actuators
Spare
432 MAINTAINING YOUR VEHICLE
Underhood Fuses (Integrated Power Module)
Cav- ity
Cartridge
Fuse
Mini Fuse
Description
10
12
13
14
15
16
17
10 Amp Red 10 Amp Red 20 Amp Yellow 20 Amp Yellow 20 Amp Yellow 20 Amp Yellow 20 Amp Yellow 20 Amp Yellow
Trailer-Tow Park Lamps Rt Park Lamps
Front Control Module (FCM) Batt #4
Front Control Module (FCM) Batt #2
Adjustable PedalFt Fog Lamps
Horn
Rear Wiper
Integrated Power Module
Cav- ity
Cartridge
Fuse
Mini Fuse
Description
10 Amp Red
Lt Park Lamps
Cav- ity
Cartridge
Fuse
Mini Fuse
Description
Cav- ity
Cartridge
Fuse
29
30
18
19
20
21
22
23
27
28
20 Amp Yellow 20 Amp Yellow 20 Amp Yellow 20 Amp Yellow
Front Control Module (FCM) Batt #1
Lt Trailer-Tow Stop/ Turn Front Control Module (FCM) Batt #3
Rt Trailer-Tow Stop/ Turn Final Drive Control Module (FDCM) MOD Radiator Fan15 Amp Blue 20 Amp Yellow
Ignition Off Draw (IOD) #1
Ignition Off Draw (IOD) #230 Amp Pink
50 Amp Red
MAINTAINING YOUR VEHICLE 433
Mini Fuse
Description
10 Amp Red 10 Amp Red
Occupant Restraint Controller (ORC) R/S Occupant Restraint Controller (ORC) R/O
labeled Ignition-Off Draw (IOD#1).
VEHICLE STORAGE If you are leaving your vehicle dormant for more than 21
days you may want to take steps to protect your battery. You may: † Remove fuse #27 in the Intelligent Power Module † Or, disconnect the negative cable from the battery. † Anytime you store your vehicle, or keep it out of service (i.e. vacation) for two weeks or more, run the air conditioning system at idle for about five minutes in the fresh air and high blower setting. This will434 MAINTAINING YOUR VEHICLE
insure adequate system lubrication to minimize the possibility of compressor damage when the system is started again.
REPLACEMENT BULBS
Interior Lights Bulb Type Glove Box Light . . . . . . . . . . . . . . . . . . . . . . . . . 194
Grab Handle Light . . . . . . . . . . . . . . . . L002825W5W Overhead Console Reading Lights . . . . . . . . . . VT4976
Rear Cargo Light . . . . . . . . . . . . . . . . . . . . . . . 214–2
Visor Vanity Light . . . . . . . . . . . . . . . . . . . . . V26377
Underpanel Courtesy Lights. . . . . . . . . . . . . . . . . 906
Instrument Cluster (General Illumination) . . . . . . . 103
Telltale/Hazard Light . . . . . . . . . . . . . . . . . . . . . . 74
* Available only from authorized dealers.Exterior Lights Bulb Type Backup Lights . . . . . . . . . . . . . . . . . . . . . . . . . 3157K Front Fog Lights . . . . . . . . . . . . . . . . . . . . . . . . 9145
Front Park/Turn Light . . . . . . . . . . . . . . . . . . . 3157A Front Side Marker . . . . . . . . . . . . . . . . . . . . . . W5W Headlights (Low Beam) . . . . . . . . . . . . . . . . . . . 9006
Headlights (High Beam) . . . . . . . . . . . . . . . . . . . 9005
Rear Turn/Stop/Tail Lights . . . . . . . . . . . . . . . 3157K NOTE: Numbers refer to commercial bulb types that can be purchased from your authorized dealer. If a bulb needs to be replaced, visit your authorized dealer or refer to the applicable Service Manual.BULB REPLACEMENT
High Intensity Discharge Headlights (HID) — If Equipped The headlights are a type of high voltage discharge tube. High voltage can remain in the circuit even with the headlight switch off and the key removed. Because of this, you should not attempt to service a headlight bulb yourself. If a headlight bulb fails, take your vehicle to an authorized dealer for service.
MAINTAINING YOUR VEHICLE 435
WARNING!
A transient high tension occurs at the bulb sockets of High Intensity Discharge (HID) headlights when the headlight switch is turned ON. It may cause serious electrical shock or electrocution if not serviced prop- erly. See your authorized dealer for service.
NOTE: On vehicles equipped with High Intensity Dis- charge Headlights (HID), when the headlights are turned on, there is a blue hue to the lights. This diminishes and becomes more white after approximately 10 seconds, as the system charges.
436 MAINTAINING YOUR VEHICLE
Head Light
1. Open the hood. 2. Turn the low or high beam bulb 1/4 turn counter clockwise to remove from housing.
3. Disconnect the electrical connector and replace the bulb.
CAUTION!
Do not touch the new bulb with your fingers. Oil contamination will severely shorten bulb life. If the bulb comes in contact with any oily surface, clean the bulb with rubbing alcohol.
Front Turn Signal
1. Open the hood. 2. Turn the turn signal bulb 1/4 turn counter clockwise to remove from housing.
MAINTAINING YOUR VEHICLE 437
3. Disconnect the electrical connector and replace the bulb.
CAUTION!
Do not touch the new bulb with your fingers. Oil contamination will severely shorten bulb life. If the bulb comes in contact with any oily surface, clean the bulb with rubbing alcohol.
Front Fog Light
1. Reach behind the front fascia from under the vehicle. 2. Turn the front fog light bulb 1/4 turn counter clock- wise to remove from housing. 3. Disconnect the electrical connector and replace bulb.
438 MAINTAINING YOUR VEHICLE
CAUTION!
Do not touch the new bulb with your fingers. Oil contamination will severely shorten bulb life. If the bulb comes in contact with any oily surface, clean the bulb with rubbing alcohol.
Rear Tail, Stop, Turn Signal, and Back-Up Lights
1. Raise the liftgate. 2. Remove the two Torx fasteners.
3. Squeeze the socket assembly tabs to remove it from the housing.
Center High Mounted Stop Light (CHMSL)
1. Remove the two screws securing the CHMSL.
MAINTAINING YOUR VEHICLE 439
4. Pull the bulb to remove it from the socket. 5. Replace the bulb, reinstall the socket, and reattach the light assembly.
2. Twist the bulb socket to remove from the CHMSL housing. 3. Pull the bulb out of the socket. 4. Replace the bulb, reinstall the socket and reattach the CHMSL.
440 MAINTAINING YOUR VEHICLE
FLUIDS AND CAPACITIES
Fuel (Approximate) 3.7/4.7/5.7L Gasoline Engines 3.0L Diesel Engine Engine Oil with Filter 3.7 Liter Engine (SAE 5W-20, API Certified) 4.7 Liter Engine (SAE 5W-20, API Certified) 5.7 Liter Engine (SAE 5W-20, API Certified) 3.0 Liter Diesel Engine (SAE 5W-30 Synthetic, API Certified Low Ash) Cooling System * 3.7 Liter Engine (Mopart Engine Coolant/Antifreeze 5 Year/100,000 Mile Formula) 4.7 Liter Engine (Mopart Engine Coolant/Antifreeze 5 Year/100,000 Mile Formula) 5.7 Liter Engine (Mopart Engine Coolant/Antifreeze 5 Year/100,000 Mile Formula) 3.0 Liter Diesel Engine (Mopart Antifreeze/Engine Coolant 5 Year/100,000 Mile Formula) * Includes heater and coolant recovery bottle filled to MAX level.
U.S.
Metric
21 Gallons 22 Gallons
79 Liters 83 Liters
5 Qts 6 Qts 7 Qts 10 Qts
9 Qts 14.5 Qts 14.5 Qts 14 Qts
4.7 Liters 5.7 Liters 6.6 Liters 9.5 Liters
10 Liters 13.7 Liters 13.7 Liters 13.2 Liters
MAINTAINING YOUR VEHICLE 441
FLUIDS, LUBRICANTS, AND GENUINE PARTS Engine Component Engine Coolant
Engine Oil (3.7L/4.7L/5.7L Engines)
Engine Oil (3.0L Diesel Engine)
Fluid, Lubricant, or Genuine Part Mopart Antifreeze/Coolant 5 Year/100,000 Mile Formula HOAT (Hy- brid Organic Additive Technology) Use API Certified SAE 5W-20 Engine Oil, meeting the requirements of DaimlerChrysler Material Standard MS-6395. Refer to your engine oil filler cap for correct SAE grade. Use API Certified SAE 5W-30 Synthetic Low Ash Engine Oil, meeting the requirements of DaimlerChrysler Material Standard MS-11106, Mercedes Benz MB 229.31 or 229.51, and ACEA C3 qualified engine oils.
Oil Filter (3.7/4.7/5.7L Gasoline Engines) Mopart Oil Filter (P/N 05281090) Oil Filter (3.0L Diesel Engine) Spark Plugs (3.7L Engine) Spark Plugs (4.7L Engine)
Mopart Oil Filter (P/N 05175571AA) ZFR6F-11G (Gap 0.043”) Upper Bank — FR8TE2 (Gap 0.040”) Lower Bank — FR8T1332 (Gap 0.050”) REC14MCC4 (Gap 0.043”) 87 Octane
Spark Plugs (5.7L Engine) Fuel Selection (3.7L and 4.7L Engines)
442 MAINTAINING YOUR VEHICLE
Component Fuel Selection (5.7L Engines) Fuel Selection (3.0L Diesel Engines)
Fluid, Lubricant, or Genuine Part 87 Octane Acceptable - 89 Octane Recommended Use only the best quality fuel with a calculated Cetane Index of 42–46. In addition, the manufacturer recommends using diesel fuel with a sulfur content of less than or equal to 15 ppm.
Chassis Fluid, Lubricant, or Genuine Part Component Mopart ATF+4 Automatic Transmission Fluid Automatic Transmission Transfer Case (NV140 Single Speed Only) Mopart ATF+4 Automatic Transmission Fluid Mopart NV 247/245 Transfer Case Lubricant Transfer Case (NV245 Two Speed Only) Mopart Synthetic Gear & Axle Lubricant SAE 75W-140 (API-GL5) Axle Differential (Front-Rear) or equivalent with friction modifier additive. Mopart DOT 3 Brake Fluid, SAE J1703 should be used. If DOT 3, SAE J1703 brake fluid is not available, then DOT 4 is acceptable. Use only recommended brake fluids. This system requires the use of Mopart Hydraulic System Power Steering Fluid (P/N 05142893AA) or equivalent, which meets DaimlerChrysler Material Standard MS-10838.
Power Steering Reservoir
Brake Master Cylinder
MAINTENANCE SCHEDULES
CONTENTS
m Emission Control System Maintenance . . . . . . . . 444
m Maintenance Schedule — Gasoline Engines . . . . 444
N Required Maintenance Intervals . . . . . . . . . . . 446m Maintenance Schedules — Diesel Engine . . . . . . 449
N Schedule “B” — Diesel Engine . . . . . . . . . . . . 452
N Schedule “A” — Diesel Engine . . . . . . . . . . . . 457M
444 MAINTENANCE SCHEDULES
EMISSION CONTROL SYSTEM MAINTENANCE The “Scheduled” maintenance services, listed in bold type must be done at the times or mileages specified to assure the continued proper functioning of the emission control system. These, and all other maintenance services included in this manual, should be done to provide best vehicle performance and reliability. More frequent main- tenance may be needed for vehicles in severe operating conditions such as dusty areas and very short trip driving. Inspection and service also should be done any time a malfunction is suspected. NOTE: Maintenance, replacement, or repair of the emis- sion control devices and systems on your vehicle may be performed by any automotive repair establishment or individual using any automotive part which has been certified pursuant to U.S. EPA or, in the State of Califor- nia, California Air Resources Board regulations.
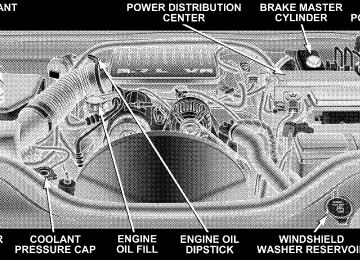
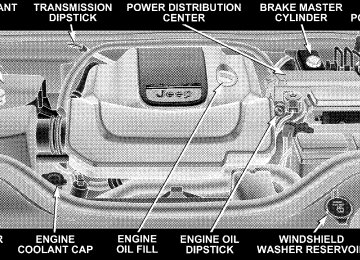
Information Center
MAINTENANCE SCHEDULE — GASOLINE ENGINES The oil change indicator system will remind you that it is time to take your vehicle in for scheduled maintenance. On Electronic Vehicle (EVIC) equipped vehicles, “Oil Change Required” will be dis- played in the EVIC and a single chime will sound, indicating that an oil change is necessary. Based on engine operation condition the oil change indicator message will illuminate, this means that service is required for your vehicle. Have your vehicle serviced as soon as possible, within the next 500 miles (805 km). NOTE: † The oil change indicator message will not monitor the time since the last oil change. Change your vehicles oil if it has been 6 months since your last oil change even if the oil change indicator message is NOT illumi- nated.
vehicle off-road for an extended period of time.
† Change your engine oil more often if you drive your † Under no circumstances should oil change intervals exceed 6,000 miles (10,000 km) or 6 months, whichever comes first.
Your dealer will reset the oil change indicator message after completing the scheduled oil change. If this sched- uled oil change is performed by someone other than your dealer the message can be reset by referring to the steps described under “Oil Change Required” in “Use Factory Settings” of the EVIC section in this manual. At Each Stop for Fuel † Check the engine oil level about 5 minutes after a fully warmed engine is shut off. Checking the oil level while the vehicle is on level ground will improve the accu- racy of the oil level reading. Add oil only when the level is at or below the ADD or MIN mark.
† Check the windshield washer solvent and add if
MAINTENANCE SCHEDULES 445
required.
damage.
Once a Month † Check tire pressure and look for unusual wear or † Inspect the battery and clean and tighten the terminals † Check the fluid levels of coolant reservoir, brake master cylinder, power steering and transmission and add as needed. † Check all lights and other electrical items for correct
as required.
operation.
446 MAINTENANCE SCHEDULES
At Each Oil Change † Change the engine oil filter. † Inspect the brake hoses and lines.
CAUTION!
Failure to perform the required maintenance items may result in damage to the vehicle.
Required Maintenance Intervals
** Vehicles built with the 4.7L engine are NOTE: equipped with sixteen spark plugs, one set is located on the top of the engine under the coils and the second set is located on the side of the engine. The spark plugs located under the coils are a standard plug and must be change every 30,000 miles (50 000 km) The spark plugs located on the side of the engine are a premium plug and must be changed every 102,000 miles (170 000 km).
MAINTENANCE SCHEDULES 447
Perform Maintenance Every (Where time and mile- age are listed, follow the interval that occurs first.)
Maintenance Items Change the engine oil and engine oil filter. Rotate tires. If using your vehicle for any of the following: Dusty or off-road conditions. Inspect the engine air cleaner filter, replace if neces- sary. Inspect the brake linings, replace if necessary. Inspect the front & rear axle fluid, change if using your vehicle for police, taxi, fleet, off-road or frequent trailer towing. Inspect the CV joints. Perform the first inspection at 12,000 miles (20
000 km) or 12 months. Inspect exhaust system. Perform the first inspection at 12,000 miles (20 000 km) or 12 months. Inspect the front suspension, tie rod ends and boot seals, replace if necessary. Replace the engine air cleaner filter.Miles 6,000
6,00012,000
12,000
18,000
24,000
24,000
24,000
30,000
Kilometers
or Months
10 000
10 00020 000
20 000
30 000
40 000
40 000
40 000
50 000
12
12
18
24
24
24
30
M
448 MAINTENANCE SCHEDULES
Perform Maintenance Every (Where time and mile- age are listed, follow the interval that occurs first.)
Maintenance Items Check the PCV valve, replace if necessary. Perform the first in- spection at 60,000 miles (100 000 km) or 60 months. Inspect the transfer case fluid. Replace the top row of spark plugs (4.7L Only). ** Replace the spark plugs (3.7L/5.7L Engines). Change the automatic transmission fluid & filter if using your vehicle for any of the following: police, taxi, fleet or frequent trailer towing. Change the transfer case fluid if using your vehicle for any of the following: police, taxi, fleet, off-road or frequent trailer towing. Flush and replace the engine coolant. Replace the ignition cables (4.7L Only). Replace the side row of spark plugs (4.7L Only). ** Change the automatic transmission fluid & filter. Replace accessory drive belt(s) (3.7L/4.7L/5.7L Engines).
Miles
30,000
30,000
30,000
30,00060,000
60,000
102,000
102,000
102,000
120,000
120,000Kilometers
or Months
50 000
50 000
50 000
50 000100 000
100 000
170 000
170 000
170 000
200 000
200 00030
30
30
3060
60
60
102
102
120
120WARNING!
You can be badly injured working on or around a motor vehicle. Do only that service work for which you have the knowledge and the right equipment. If you have any doubt about your ability to perform a service job, take your vehicle to a competent mechanic.
MAINTENANCE SCHEDULES 449
MAINTENANCE SCHEDULES — DIESEL ENGINE There are two maintenance schedules that show the required service for your vehicle. First is Schedule (B(. It is for vehicles that are operated under the conditions that are listed below and at the beginning of the schedule. † Day or night temperatures are below 32°F (0°C). † Stop and go driving. † Extensive engine idling. † Driving in dusty conditions. † Short trips of less than 10 miles (16.2 km). † More than 50% of your driving is at sustained high † Trailer towing. † Taxi, police, or delivery service (commercial service).
speeds during hot weather, above 90°F (32°C).
M
450 MAINTENANCE SCHEDULES
† Off-road or desert driving. NOTE: Most vehicles are operated under the conditions listed for Schedule “B.” Second is Schedule “A”. It is for vehicles that are not operated under any of the conditions listed under Sched- ule “B.” Use the schedule that best describes your driving condi- tions. Where time and mileage are listed, follow the interval that occurs first.
CAUTION!
Failure to perform the required maintenance items may result in damage to the vehicle.
At Each Stop for Fuel † Check the engine oil level about 5 minutes after a fully warmed engine is shut off. Checking the oil level while the vehicle is on level ground will improve the accu- racy of the oil level reading. Add oil only when the level is at or below the ADD or MIN mark. † Check the windshield washer solvent, add as required. Once a Month † Check the tire pressure and look for unusual wear or † Inspect the battery, clean and tighten the terminals as † Check the fluid levels of engine coolant/anti-freeze deaeration bottle, brake master cylinder, and transmis- sion, and add as needed.
required.
damage.
† Check all lights and all other electrical items for correct
operation.
At Each Oil Change † Change the engine oil filter. † Inspect the exhaust system. † Inspect brake hoses.
MAINTENANCE SCHEDULES 451
clamps.
† Check the engine coolant/anti-freeze level, hoses, and † Inspect engine accessory drive belts. Replace as neces- † Inspect for the presence of water in the fuel filter/
sary.
water separator unit.
452 SCHEDULE “B” — DIESEL ENGINE
Schedule “B” — Diesel Engine Follow schedule “B” if you usually operate your vehicle under one or more of the following conditions. † Day or night temperatures are below 32°F (0°C). † Stop and go driving. † Extensive engine idling. † Driving in dusty conditions.
speeds during hot weather, above 90°F (32°C).
† Short trips of less than 10 miles (16.2 km). † More than 50% of your driving is at sustained high † Trailer towing. † Taxi, police, or delivery service (commercial service). † Off-road or desert driving.
Miles (Kilometers) Change the engine oil and engine oil filter. Rotate the tires. Check spare tire for proper pressure and correct stowage. Inspect the engine air filter element. Replace as necessary. Replace the engine air filter element. Replace the fuel filter/water separator unit. Inspect the brake linings. Drain the transfer case and refill. Drain and refill the front and rear axles.
SCHEDULE “B” — DIESEL ENGINE 453
6,250
(10 000)12,500
(20 000)18,750
(30 000)25,000
(40 000)31,250
(50 000)M
454 SCHEDULE “B” — DIESEL ENGINE
Miles (Kilometers) Change the engine oil and engine oil filter. Rotate the tires. Check spare tire for proper pressure and correct stowage. Inspect the engine air filter element. Replace as necessary. Replace the engine air filter element. Replace the fuel filter/water separator unit. Replace the engine accessory drive belt. Inspect the brake linings. Drain and refill the front and rear axles. Drain and refill the transmission fluid, and change the filter. Drain the transfer case and refill.
37,500
(60 000)43,750
(70 000)50,000
(80 000)56,250
(90 000)62,500
(100 000)Miles (Kilometers) Change the engine oil and engine oil filter. Rotate the tires. Check spare tire for proper pressure and cor- rect stowage. Inspect the engine air filter element. Re- place as necessary. Replace the engine air filter element. Replace the engine accessory drive belt. Replace the fuel filter/water separator unit. Flush and replace the engine coolant/anti- freeze. Inspect the brake linings. Drain the transfer case and refill. Drain and refill the front and rear axles.
SCHEDULE “B” — DIESEL ENGINE 455
68,750
(110 000)75,000
(120 000)81,250
(130 000)87,500
(140 000)93,750
(150 000)100,000
(160 000)456 SCHEDULE “B” — DIESEL ENGINE
L Applies only if vehicle is used for frequent trailer towing, or fleet/commercial service. † The replacement of such component is requested when there is superficial wear, bearing clearance, or evident grease leak.
Inspection and service should be performed anytime a malfunction is observed or suspected. Retain all receipts.
Schedule “A” — Diesel Engine Miles (Kilometers) Change the engine oil and engine oil filter. Rotate the tires. Check spare tire for proper pressure and correct stowage. Inspect the engine air filter element. Replace as neces- sary. Replace the engine air filter element. Replace the fuel filter/water separator unit. Inspect the brake linings. Drain the transfer case and refill.
SCHEDULE “A” — DIESEL ENGINE 457
12,500
(20 000)25,000
(40 000)37,500
(60 000)50,000
(80 000)M
458 SCHEDULE “A” — DIESEL ENGINE
Miles (Kilometers) Change the engine oil and engine oil filter. Rotate the tires. Check spare tire for proper pressure and correct stowage. Inspect the engine air filter element. Replace as neces- sary. Replace the engine air filter element. Replace the fuel filter/water separator unit. Flush and replace the engine coolant/anti-freeze. Replace the engine accessory drive belt. Inspect the brake linings. Drain the transfer case and refill. Inspection and service should be performed anytime a malfunction is observed or suspected. Retain all receipts.
62,500
(100 000)75,000
(120 000)87,500
(140 000)100,000
(160 000)L The replacement of such component is requested when there is superficial wear, bearing clearance, or evident grease leak.
IF YOU NEED CONSUMER ASSISTANCE
CONTENTS
m Suggestions For Obtaining Service For Your
Vehicle . . . . . . . . . . . . . . . . . . . . . . . . . . . . . . 460
N Prepare For The Appointment . . . . . . . . . . . . 460
N Prepare A List . . . . . . . . . . . . . . . . . . . . . . . . 460
N Be Reasonable With Requests . . . . . . . . . . . . . 460
m If You Need Assistance . . . . . . . . . . . . . . . . . . . 460
m Warranty Information (U.S. Vehicles Only) . . . . . 463
m Mopart Parts . . . . . . . . . . . . . . . . . . . . . . . . . 463m Reporting Safety Defects . . . . . . . . . . . . . . . . . . 463
N In Canada . . . . . . . . . . . . . . . . . . . . . . . . . . 464
m Publication Order Forms . . . . . . . . . . . . . . . . . . 464
m Department Of Transportation Uniform TireQuality Grades . . . . . . . . . . . . . . . . . . . . . . . . 466
N Treadwear . . . . . . . . . . . . . . . . . . . . . . . . . . 466
N Traction Grades . . . . . . . . . . . . . . . . . . . . . . 466
N Temperature Grades . . . . . . . . . . . . . . . . . . . 467 9460 IF YOU NEED CONSUMER ASSISTANCE
SUGGESTIONS FOR OBTAINING SERVICE FOR YOUR VEHICLE
Prepare For The Appointment If you’re having warranty work done, be sure to have the right papers with you. Take your warranty folder. All work to be performed may not be covered by the warranty, discuss additional charges with the service manager. Keep a maintenance log of your vehicle’s service history. This can often provide a clue to the current problem. Prepare A List Make a written list of your vehicle’s problems or the specific work you want done. If you’ve had an accident, or work done that is not on your maintenance log, let the service advisor know.
Be Reasonable With Requests If you list a number of items, and you must have your vehicle by the end of the day, discuss the situation with the service advisor and list the items in order of priority. At many dealers, you may obtain a rental vehicle at a minimal daily charge. If you need a rental, it is advisable to make these arrangements when you call for an ap- pointment.
IF YOU NEED ASSISTANCE The manufacturer and its dealers are vitally interested in your satisfaction. We want you to be happy with our products and services. Warranty service must be done by an authorized Chrysler, Dodge, or Jeep dealer. We strongly recommend that you take your vehicle to your selling dealer. They know you and your vehicle best, and are most concerned that you get prompt and high quality service. The manufacturer’s dealers have the facilities, factory-trained
technicians, special tools, and the latest information to assure your vehicle is fixed correctly and in a timely manner. This is why you should always talk to your dealer’s service manager first. Most matters can be resolved with this process. † If for some reason you are still not satisfied, talk to the general manager or owner of the dealership. They want to know if you need assistance. † If your dealership is unable to resolve the concern, you
may contact the Manufacturer’s Customer Center.
Any communication to the Manufacturer’s Customer Center should include the following information: † Owner’s name and address † Owner’s telephone number (home and office) † Dealership name
IF YOU NEED CONSUMER ASSISTANCE 461
† Vehicle identification number † Vehicle delivery date and mileage DaimlerChrysler Motors Corporation Customer Center P.O. Box 21–8004
Auburn Hills, MI 48321–8004
Phone: (800) 992-1997
DaimlerChrysler Canada Inc. Customer Center P.O. Box 1621
Windsor, Ontario N9A 4H6
Phone: (800) 465–2001
In Mexico contact: Av. Prolongacion Paseo de la Reforma, 1240
Sante Fe C.P. 05109
Mexico, D. F. In Mexico (915) 729–1248 or 729–1240
Outside Mexico (525) 729–1248 or 729–1240462 IF YOU NEED CONSUMER ASSISTANCE
Customer Assistance For The Hearing Or Speech Impaired (TDD/TTY) To assist customers who have hearing difficulties, the manufacturer has installed special TDD (Telecommuni- cation Devices for the Deaf) equipment at its Customer Center. Any hearing or speech impaired customer who has access to a TDD or a conventional teletypewriter (TTY) in the United States can communicate with the manufacturer by dialing 1–800–380–CHRY. Service Contract You may have purchased a service contract for your vehicle to help protect you from the high cost of unex- pected repairs after your manufacturer’s new vehicle limited warranty expires. The manufacturer stands be- hind only the manufacturer’s Service Contracts. If you purchased a manufacturer’s Service Contract, you will receive Plan Provisions and an Owner Identification Card in the mail within three weeks of your vehicle delivery date. If you have any questions about your service
contract, call the manufacturer’s Service Contract Na- tional Customer Hotline at 1-800-521-9922. The manufacturer will not stand behind any service contract that is not the manufacturer’s Service Contract. It is not responsible for any service contract other than the manufacturer’s Service Contract. If you purchased a service contract that is not a manufacturer’s Service Contract, and you require service after your manufactur- er’s new vehicle limited warranty expires, please refer to your contract documents, and contact the person listed in those documents. We appreciate that you have made a major investment when you purchased your new vehicle. Your dealer has also made a major investment in facilities, tools, and training to assure that you are absolutely delighted with your ownership experience. You’ll be pleased with their sincere efforts to resolve any warranty issues or related concerns.
WARNING!
contain or emit
Engine exhaust, some of its constituents, and certain vehicle components chemicals known to the State of California to cause cancer and birth defects or other reproductive harm. In addition, certain fluids contained in vehicles and certain prod- ucts of component wear contain or emit chemicals known to the State of California to cause cancer and birth defects or other reproductive harm.
WARRANTY INFORMATION (U.S. Vehicles Only) See the Warranty Information Booklet for the terms and provisions of DaimlerChrysler’s warranties applicable to this vehicle.
IF YOU NEED CONSUMER ASSISTANCE 463
MOPART PARTS Mopart fluids, lubricants, parts, and accessories are available from your dealer. They will help you keep your vehicle operating at its best.
REPORTING SAFETY DEFECTS In the 50 United States and Washington D.C.: If you believe that your vehicle has a defect, which could cause a crash or cause injury or death, you should immediately inform the National Highway Traffic Safety Administra- tion (NHTSA) in addition to notifying the manufacturer. If NHTSA receives similar complaints, it may open an investigation, and if it finds that a safety defect exists in a group of vehicles, it may order a recall and remedy campaign. However, NHTSA cannot become involved in individual problems between you, your dealer, and the manufacturer.
464 IF YOU NEED CONSUMER ASSISTANCE
safety
motor
vehicle
To contact NHTSA, you may either call the Auto Safety Hotline toll free at 1–888–327–4236 (TTY: 1–800–424– 9153), or go to http://www.safercar.gov; or write to: Administrator, NHTSA, 400 Seventh Street, SW., Wash- ington, DC 20590. You can also obtain other information about http:// www.safercar.gov. In Canada: If you believe that your vehicle has a safety defect, you should contact the Customer Service Department imme- diately. Canadian customers who wish to report a safety defect to the Canadian government should write to Transport Canada, Motor Vehicle Defect Investigations and Recalls, 2780 Sheffield Road, Ottawa, Ontario K1B 3V9.
from
PUBLICATION ORDER FORMS To order the following manuals, you may use either the website or the phone numbers listed below. Visa, Mas- tercard, American Express, and Discover orders are ac- cepted. If you prefer mailing your payment, please call for an order form. NOTE: A street address is required when ordering manuals. (No P.O. Boxes). † Service Manuals.
These comprehensive service manuals provide the information that students and professional technicians need in diagnosing/troubleshooting, problem solving, maintaining, servicing, and repairing DaimlerChrysler Corporation vehicles. A complete working knowledge of the vehicle, system, and/or components is written in straightforward language with illustrations, dia- grams, and charts.
† Diagnostic Procedure Manuals.
Filled with diagrams, charts and detailed illustrations, these practical manuals make it easy for students and technicians to find and fix problems on computer- controlled vehicle systems and features. They show exactly how to find and correct problems the first time, using step-by-step troubleshooting and driveability procedures, proven diagnostic tests and a complete list of all tools and equipment.
† Owner’s Manuals.
These manuals have been prepared with the assistance of service and engineering specialists to acquaint you with specific Chrysler group vehicles. Included are starting, operating, emergency and maintenance pro- cedures as well as specifications, capabilities and safety tips.
IF YOU NEED CONSUMER ASSISTANCE 465
Call Toll Free at: † 1–800–890–4038 (U.S.) † 1–800–387–1143 (Canada) Or Visit us on the World Wide Web at: † www.techauthority.daimlerchrysler.com † www.daimlerchrysler.ca/manuals
466 IF YOU NEED CONSUMER ASSISTANCE
DEPARTMENT OF TRANSPORTATION UNIFORM TIRE QUALITY GRADES The following describes the tire grading categories estab- lished by the National highway Traffic Safety Adminis- tration. The specific grade rating assigned by the tire’s manufacturer in each category is shown on the sidewall of the tires on your car. All Passenger Car Tires Must Conform to Federal Safety Requirements in Addition to These Grades.