- Download PDF Manual
-
8-11
OWNER'S MANUAL Operation Maintenance Specifications
All information in this Owner's Manual is current at the time of publica- tion. However, HYUNDAI reserves the right to make changes at any time so that our policy of continual product improvement may be car- ried out.
This manual applies to all models of this vehicle and includes descrip- tions and explanations of optional as well as standard equipment. As a result, you may find material in this manual that does not apply to your specific vehicle.
CAUTION: MODIFICATIONS TO YOUR HYUNDAI
Your HYUNDAI should not be modified in any way. Such modifications may adversely affect the performance, safety or durability of your HYUNDAI and may, in addition, violate condi- tions of the limited warranties covering the vehicle. Certain modifications may also be in vio- lation of regulations established by the Department of Transportation and other government agencies in your country.
TWO-WAY RADIO OR CELLULAR TELEPHONE INSTALLATION
Your vehicle is equipped with electronic fuel injection and other electronic components. It is possible for an improperly installed/adjusted two-way radio or cellular telephone to adversely affect electronic systems. For this reason, we recommend that you carefully follow the radio manufacturer's instructions or consult your HYUNDAI dealer for precautionary measures or special instructions if you choose to install one of these devices.
F2
SAFETY AND VEHICLE DAMAGE WARNING
This manual includes information titled as WARNING, CAUTION and NOTICE. These titles indicate the following:
WARNING
This indicates that a condition may result in harm, serious injury or death to you or other persons if the warning is not heeded. Follow the advice provided with the warning.
CAUTION
This indicates that a condition may result in damage to your vehicle or its equipment if the caution is not heeded. Follow the advice provided with the caution.
✽ NOTICE This indicates that interesting or helpful information is being provided.
F3
FOREWORD
Thank you for choosing HYUNDAI. We are pleased to welcome you to the growing number of discriminating people who drive HYUNDAI. The advanced engineering and high-quality construction of each HYUNDAI we build is something of which we're very proud.
Your Owner's Manual will introduce you to the features and operation of your new HYUNDAI. It is suggested that you read it carefully because the information it contains can contribute greatly to the satisfaction you receive from your new car.
The manufacturer also recommends that service and maintenance on your vehicle be performed by an authorized HYUNDAI dealer.
HYUNDAI MOTOR COMPANY
Note : Because future owners will also need the information included in this manual, if you sell this HYUNDAI, please
leave the manual in the vehicle for their use. Thank you.
CAUTION
Severe engine and transmission damage may result from the use of poor quality fuels and lubricants that do not meet HYUNDAI specifications. You must always use high quality fuels and lubricants that meet the specifications listed on Page 8-6 in the Vehicle Specifications section of the Owner's Manual.
Copyright 2014 HYUNDAI Motor Company. All rights reserved. No part of this publication may be reproduced, stored in any retrieval system or transmitted in any form or by any means without the prior written permission of HYUNDAI Motor Company.
F4
Sections: This manual has eight sec- tions plus an index. Each section begins with a brief list of contents so you can tell at a glance if that section has the information you want.
HOW TO USE THIS MANUAL We want to help you get the greatest possible driving pleasure from your vehicle. Your Owner’s Manual can assist you in many ways. We strong- ly recommend that you read the entire manual. In order to minimize the chance of death or injury, you must read the WARNING and CAU- TION sections in the manual. Illustrations complement the words in this manual to best explain how to enjoy your vehicle. By reading your manual, you will learn about fea- tures, important safety information, and driving tips under various road conditions. The general layout of the manual is provided in the Table of Contents. Use the index when looking for a specific area or subject; it has an alphabetical listing of all information in your manual.
Introduction
You will find various WARNINGS, CAUTIONS, and NOTICES in this manual. These were prepared to enhance your personal safety. You should carefully read and follow ALL procedures and recommendations provided in these WARNINGS, CAU- TIONS and NOTICES.
WARNING
A WARNING indicates a situa- tion in which harm, serious bod- ily injury or death could result if the warning is ignored.
CAUTION
A CAUTION indicates a situa- tion in which damage to your vehicle could result if the cau- tion is ignored.
✽ NOTICE A NOTICE indicates interesting or helpful information is being provided.
F5
Introduction
FUEL REQUIREMENTS Gasoline engine Unleaded For Europe For the optimal vehicle performance, we recommend you use unleaded gasoline which has an octane rating of RON (Research Octane Number) 95 / AKI (Anti Knock Index) 91 or higher. (Do not use methanol blended fuels.) You may use unleaded gasoline with an octane rating of RON 91-94 / AKI 87-90 but it may result in slight per- formance reduction of the vehicle.
Except Europe Your new vehicle is designed to use only unleaded fuel having an Octane Rating of RON (Research Octane Number) 91 / AKI (Anti-Knock Index) 87 or higher. (Do not use methanol blended fuels.)
Your new vehicle is designed to obtain maximum performance with UNLEADED FUEL, as well as mini- mize exhaust emissions and spark plug fouling.
F6
CAUTION
NEVER USE LEADED FUEL. The use of leaded fuel is detrimental to the catalytic converter and will damage the engine control system’s oxygen sensor and affect emission control. Never add any fuel system cleaning agents to the fuel tank other than what has been speci- fied (We recommend that you consult an authorized HYUNDAI dealer for details.)
WARNING
• Do not "top off" after the noz- zle automatically shuts off when refueling.
• Always check that the fuel cap is installed securely to pre- vent fuel spillage in the event of an accident.
Gasoline containing alcohol and methanol Gasohol, a mixture of gasoline and ethanol (also known as grain alco- hol), and gasoline or gasohol con- taining methanol (also known as wood alcohol) are being marketed along with or instead of leaded or unleaded gasoline. Do not use gasohol containing more than 10% ethanol, and do not use gasoline or gasohol containing any methanol. Either of these fuels may cause drivability problems and dam- age to the fuel system, engine control system and emission control system. Discontinue using gasohol of any kind if drivability problems occur. Vehicle damage or driveability prob- lems may not be covered by the man- ufacturer’s warranty if they result from the use of: 1. Gasohol containing more than
10% ethanol.
2. Gasoline or gasohol containing
methanol.
3. Leaded fuel or leaded gasohol.
CAUTION
Never use gasohol which con- tains methanol. Discontinue use of any gasohol product which impairs drivability.
Introduction
Other fuels Using fuels such as; - Silicone (Si) contained fuel, - MMT (Manganese, Mn) contained
fuel,
- Ferrocene (Fe) contained fuel, and - Other metallic additives contained
fuels,
may cause vehicle and engine dam- age or cause plugging, misfiring, poor acceleration, engine stalling, catalyst melting, abnormal corrosion, life cycle reduction, etc. Also, the Malfunction Indicator Lamp (MIL) may illuminate.
✽ NOTICE Damage to the fuel system or per- formance problem caused by the use of these fuels may not be covered by your New Vehicle Limited Warranty.
Use of MTBE HYUNDAI recommends avoiding fuels containing MTBE (Methyl Tertiary Butyl Ether) over 15.0% vol. (Oxygen Content 2.7% weight) in your vehicle. Fuel containing MTBE over 15.0% vol. (Oxygen Content 2.7% weight) may reduce vehicle performance and produce vapor lock or hard starting.
CAUTION
Your New Vehicle Limited Warranty may not cover dam- age to the fuel system and any performance problems that are caused by the use of fuels con- taining methanol or fuels con- taining MTBE (Methyl Tertiary Butyl Ether) over 15.0% vol. (Oxygen Content 2.7% weight.)
F7
Introduction
Do not use methanol Fuels containing methanol (wood alcohol) should not be used in your vehicle. This type of fuel can reduce vehicle performance and damage components of the fuel system, engine control system and emission control system.
Operation in foreign countries If you are going to drive your vehicle in another country, be sure to: • Observe all regulations regarding
registration and insurance.
• Determine that acceptable fuel is
available.
Fuel Additives HYUNDAI recommends that you use unleaded gasoline which has an octane rating of RON (Research Octane Number) 95 / AKI (Anti Knock Index) 91 or higher (for Europe) or Octane Rating of RON (Research Octane Number) 91 / AKI (Anti-Knock Index) 87 or higher (except Europe). For customers who do not use good quality gasolines including fuel addi- tives regularly, and have problems starting or the engine does not run smoothly, one bottle of additives added to the fuel tank at every 15,000km (for Europe)/5,000km (except Europe). Additives are avail- able from your authorized HYUNDAI dealer along with information on how to use them. Do not mix other addi- tives.
F8
VEHICLE BREAK-IN PROCESS No special break-in period is needed. By following a few simple precautions for the first 1,000 km (600 miles) you may add to the performance, econo- my and life of your vehicle. • Do not race the engine. • While driving, keep your engine speed (rpm, or revolutions per minute) between 2,000 rpm and 4,000 rpm.
• Do not maintain a single speed for long periods of time, either fast or slow. Varying engine speed is need- ed to properly break-in the engine. • Avoid hard stops, except in emer- gencies, to allow the brakes to seat properly.
Introduction
F9
TABLE OF CONTENTS
Your vehicle at a glance
Safety system of your vehicle
Convenient features of your vehicle
Multimedia System
Driving your vehicle
What to do in an emergency
Maintenance
Specifications & Consumer information
Index
Your vehicle at a glance
Exterior overview (I) .............................................1-2
Exterior overview (II) ............................................1-3
Interior overview....................................................1-4
Instrument panel overview (I)..............................1-5
Instrument panel overview (II).............................1-6
Engine compartment .............................................1-7Your vehicle at a glance
EXTERIOR OVERVIEW (I) ■ Front view
1. Hood ..................................................3-34
2. Headlamp ..........................................7-78
3. Front fog light.....................................7-78
4. Tires and wheels ...............................7-42
5. Outside rearview mirror .....................3-22
6. Panorama sunroof .............................3-30
7. Front windshield wiper blades ...........7-36
8. Windows ............................................3-26The actual shape may differ from the illustration.
ODH014001CN
1-2
EXTERIOR OVERVIEW (II) ■ Rear view
1. Antenna................................................4-3
2. Defroster ..........................................3-148
3. Fuel filler lid........................................3-47
4. Towing hook .......................................6-29
5. Rear combination lamp ......................7-86
6. High mounted stop lamp ....................7-88
7. Rearview camera .............................3-119The actual shape may differ from the illustration.
ODH014002CN
1-3
Your vehicle at a glance
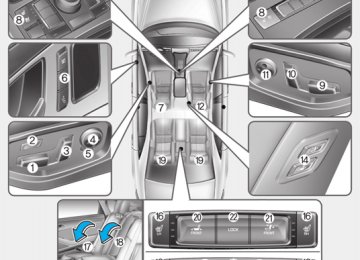
INTERIOR OVERVIEW
The actual shape may differ from the illustration.
1-4
1. Door lock/unlock button ....................3-12
2. Power window switches ....................3-26
3. Power window lock switch ................3-29
4. Central door lock switch ....................3-13
5. Outside rearview mirror controlswitch ................................................3-23
6. Outside rearview mirror folding
button ................................................3-24
7. Fuel filler lid release button ..............3-47
8. Instrument panel illuminationcontrol switch ....................................3-51
9. Trunk release button ..........................3-36
10. Lane departure warning system* ......5-70
Lane keeping assist system button* ..5-74
11. Blind spot detection system button*..5-83
12. Rear curtain button* ......................3-178
13. Electric parking brake switch* ........5-26
14. Steering wheel ................................3-18
15. Steering wheeltilt/telescope control ........................3-18
16. Seat ..................................................2-4
17. Hood release lever ..........................3-34
18. Brake pedal ....................................5-23
19. Accelerator pedal * : if equippedODH013003
INSTRUMENT PANEL OVERVIEW (I)
• Type A
• Type B
1. Light control/Turn signals ..............3-101
2. Steering wheel audio controls* ........4-4
3. Bluetooth phone controls* ................4-6
4. Instrument cluster ..........................3-50
5. Horn ................................................3-20
6. Driver’s front air bag........................2-52
7. Wiper/Washer................................3-116
8. Cruise controls* ....................5-51, 5-55
9. Engine start/stop button....................5-5
10. Automatic transmission ................5-11
11. Drive mode integrated controlsystem ..........................................5-43
12. AUTO HOLD*................................5-31
13. Seat warmers and coolers............2-20
14. Heated steering wheel button ......3-19
15. Smart parking assist system ......3-123
16. Parking assist system ................3-120
17. Around view monitoring (AVM)system ........................................3-146
18. Glove box ....................................3-171
* : if equippedODH013004
1-5
The actual shape may differ from the illustration.
Your vehicle at a glance
INSTRUMENT PANEL OVERVIEW (II)
1. Audio remote control buttons................4-4
2. Bluetooth® wireless technologyhands-free button..................................4-6
3. Cruise control button ....................5-51, 5-55
4. Smart cruise control vehicle-to-vehicledistance button ...................................5-61
5. Light control / Turn signals lever .......3-101
6. Wiper and washer control lever ........3-116
7. LCD display control.............................3-52The actual shape may differ from the illustration.
1-6
ODH013006
ENGINE COMPARTMENT ■ Gasoline Engine (Lambda 3.0 / 3.3 / 3.8)
■ Gasoline Engine (Tau 5.0)
1. Engine coolant reservoir...................7-28
2. Radiator cap .....................................7-30
3. Brake fluid reservoir..........................7-31
4. Air cleaner.........................................7-34
5. Engine oil dipstick .............................7-26
6. Engine oil filler cap ...........................7-27
7. Windshield washer fluid reservoir .....7-33
8. Fuse box ...........................................7-54
9. Jumper terminal ..................................6-6The actual engine room in the vehicle may differ from the illustration.
ODH013005/ODH013006L
1-7
Safety system of your vehicle
Important safety precautions...............................2-2
Always wear your seat belt ..........................................2-2
Restrain all children .........................................................2-2
Air bag hazards ................................................................2-2
Driver distraction .............................................................2-2
Control your speed ..........................................................2-3
Keep your vehicle in safe condition ............................2-3
Seats ........................................................................2-4
Safety precautions ..........................................................2-5
Front seats..........................................................................2-6
Rear seats.........................................................................2-11
Headrest ...........................................................................2-16
Seat warmers and coolers............................................2-20
Seat belts ..............................................................2-24
Seat belt safety precautions ......................................2-24
Seat belt warning light .................................................2-25
Seat belt restraint system ...........................................2-27
Pre-Safe Seat belt (PSB)..............................................2-32
Additional seat belt safety precautions ...................2-33
Care of seat belts ..........................................................2-36
Child restraint system (CRS) ..............................2-37
Children always in the rear .........................................2-37
Selecting a Child Restraint System (CRS) ................2-38
Installing a Child Restraint System (CRS)..................2-40Air bag - supplemental restraint system.....................2-50
Where are the air bags? ..............................................2-52
How does the air bags system operate? .................2-55
What to expect after an air bag inflates ................2-59
Passenger's front air bag ON/OFF switch..............2-60
Do not install a child restraint on the front passenger seat..............................................2-62 Why didn't my air bag go off in a collision? ...........2-63
SRS care ...........................................................................2-68
Additional safety precautions .....................................2-69
Air bag warning labels ...................................................2-70
Active hood lift system.......................................2-71
Active hood lift system activation situation.............2-71
Active hood lift system non-activation situation ...2-72
Active hood lift system malfunction ..........................2-73Restrain all children All children under age 13 should ride in your vehicle properly restrained in a rear seat, not the front seat. Infants and small children should be restrained in an appropriate child restraint. Larger children should use a booster seat with the lap/shoulder belt until they can use the seat belt properly without a booster seat.
Air bag hazards While air bags can save lives, they can also cause serious or fatal injuries to occupants who sit too close to them, or who are not prop- erly restrained. Infants, young chil- dren, and short adults are at the greatest risk of being injured by an inflating air bag. Follow all instruc- tions and warnings in this manual.
Safety system of your vehicle
IMPORTANT SAFETY PRECAUTIONS You will find many safety precautions and recommendations throughout this section, and throughout this man- ual.The safety precautions in this sec- tion are among the most important.
Always wear your seat belt A seat belt is your best protection in all types of accidents. Air bags are designed to supplement seat belts, not replace them. So even though your vehicle is equipped with air bags, ALWAYS make sure you and your passengers wear your seat belts, and wear them properly.
2-2
Driver distraction Driver distraction presents a serious and potentially deadly danger, espe- cially for inexperienced drivers. Safety should be the first concern when behind the wheel and drivers need to be aware of the wide array of potential distractions, such as drowsiness, reaching for objects, eating, personal grooming, other passengers, and using cellular phones. Drivers can become distracted when they take their eyes and attention off the road or their hands off the wheel to focus on activities other than driv- ing. To reduce your risk of distraction and an accident: • ALWAYS set up your mobile devices (i.e., MP3 players, phones, naviga- tion units, etc.) when your vehicle is parked or safely stopped.
• ONLY use your mobile device when allowed by laws and conditions per- mit safe use. NEVER text or email while driving. Most countries have laws prohibiting drivers from texting. Some countries and cities also pro- hibit drivers from using handheld phones.
Keep your vehicle in safe condi- tion Having a tire blowout or a mechanical failure can be extremely hazardous. To reduce the possibility of such prob- lems, check your tire pressures and condition frequently, and perform all regularly scheduled maintenance.
• NEVER let the use of a mobile device distract you from driving. You have a responsibility to your passen- gers and others on the road to always drive safely, with your hands on the wheel as well as your eyes and attention on the road.
Control your speed Excessive speed is a major factor in crash injuries and deaths. Generally, the higher the speed, the greater the risk, but serious injuries can also occur at lower speeds. Never drive faster than is safe for current conditions, regardless of the maximum speed posted.
2-3
Safety system of your vehicle
SEATS
**
2-4
Driver’s seat (1) Seat sliding forward or rearward/
Seat height adjustment
(2) Seat cushion length adjustment (3) Seatback angle adjustment (4) Lumbar support adjustment (5) Seat bolster adjustment (6) Driver position memory system (7) Headrest height adjustment (8) Seat warmer/Seat warmer and cooler (by air)* Front passenger’s seat (9) Seat sliding forward or rearward/
Seat height adjustment
(10) Seatback angle adjustment (11) Lumbar support adjustment* (12) Headrest height adjustment (13) Seat warmer/Seat warmer and cooler (by air)* (14) Additional switches for adjusting the front
passenger seat*(sliding forward or rearward/ Seatback angle adjustment)
Rear seat (15) Seat sliding forward or rearward (16) Seat warmer/Seat warmer and cooler (by air)* (17) Armrest (18) Ski through (19) Headrest height adjustment (20) Front passenger sliding forward or rearward (21) Front passenger angle adjustment (22) LOCK button (23) Rear curtain control * :
if equipped
ODH035001/Q
Safety precautions Adjusting the seats so that you are sit- ting in a safe, comfortable position plays an important role in driver and passenger safety together with the seat belts and air bags in an accident.
WARNING
Do not use a cushion that reduces friction between the seat and the passenger. The passen- ger's hips may slide under the lap portion of the seat belt during an accident or a sudden stop. Serious or fatal internal injuries could result because the seat belt cannot operate properly.
Air bags You can take steps to reduce the risk of being injured by an inflating air bag. Sitting too close to an air bag greatly increases the risk of injury in the event the air bag inflates. It is recom- mended that drivers allow at least 25
cm (10 inches) between the center of the steering wheel and their chest.WARNING
To reduce the risk of serious injury or death from an inflating air bag, take the following pre- cautions: • Adjust the driver’s seat as far to the rear as possible while maintaining the ability to main- tain full control of the vehicle. • Adjust the front passenger seat as far to the rear as possi- ble.
(Continued)
(Continued) • Hold the steering wheel by the rim with hands at the 9 o’clock and 3 o’clock positions to min- imize the risk of injuries to your hands and arms.
• NEVER place anything or any-
one between the air bag.
• Do not allow the front passen- ger to place feet or legs on the dashboard to minimize the risk of leg injuries.
2-5
Safety system of your vehicle
Seat belts Always fasten your seat belt before starting any trip. At all times, passengers should sit upright and be properly restrained. Infants and small children must be restrained in appropriate child restraint systems. Children who have outgrown a booster seat and adults must be restrained using the seat belts.
WARNING
Take the following precautions when adjusting your seat belt: • NEVER use one seat belt for
more than one occupant.
• Always position the seatback upright with the lap portion of the seat belt snug and low across the hips.
• NEVER allow children or small infants to ride in a passenger’s lap.
(Continued)
2-6
(Continued) • Do not route the seat belt across your neck, across sharp edges, or reroute the shoulder strap away from your body.
• Do not allow the seat belt to
become caught or jammed.
Front seats The front seat can be adjusted by using the control switches located on the outside of the seat cushion. Before driving, adjust the seat to the proper position so that you can easily control the steering wheel, foot pedals and controls on the instrument panel.
WARNING
Take the following precautions when adjusting your seat: • NEVER attempt to adjust the seat while the vehicle is mov- ing. The seat could respond with unexpected movement and may cause loss of vehicle control resulting in an acci- dent.
• Do not place anything under the front seats. Loose objects in the driver’s foot area could interfere with the operation of the foot pedals, causing an accident.
(Continued)
(Continued) • Do not allow anything to inter- fere with the normal position and proper locking of the seat- back.
• Do not place a cigarette lighter on the floor or seat. When you operate the seat, gas may exit out of the lighter causing a fire. • Use extreme caution when picking small objects trapped under the seats or between the seat and the center console. Your hands might be cut or injured by the sharp edges of the seat mechanism.
• If there are occupants in the rear seats, be careful while adjusting the front seat posi- tion.
WARNING
CAUTION
To prevent injury: • Do not adjust your seat while wearing your seat belt. Moving the seat cushion for- ward may cause strong pres- sure on your abdomen.
• Do not allow your hands or fingers to get caught in the seat mechanisms while the seat is moving.
WARNING
NEVER allow children in the vehicle unattended. The power seats are operable when the engine is turned off.
To prevent damage to the seats: • Always stop adjusting the seats when the seat has been adjusted as far forward or rearward as possible.
• Do not adjust the seats longer than necessary when the engine is turned off. This may result in unnecessary battery drain.
• Do not operate two or more seats at the same time. This may result in an electrical mal- function.
2-7
To move the front part of cushion rear- ward: 1. Push the rear part of control switch to move the seat cushion to the desired length.
2. Release the switch once the seat cushion reaches the desired length.
CAUTION
Be careful not to damage your body or clothes when using the cushion adjustment.
Safety system of your vehicle
Forward and rearward adjustment
Seat cushion length adjustment (for driver’s seat,if equipped)
ODH033003
To move the seat forward or rearward: 1. Push the control switch forward orrearward.
2. Release the switch once the seat
reaches the desired position.
ODH033004
To move the front part of cushion for- ward: 1. Push the front part of control switch to move the seat cushion to the desired length.2. Release the switch once the seat cushion reaches the desired length.
2-8
Seatback angle
ODH033005
To recline the seatback: 1. Push the control switch forward or
rearward.
2. Release the switch once the seat- back reaches the desired position.
Reclining seatback Sitting in a reclined position when the vehicle is in motion can be dan- gerous. Even when buckled up, the protections of your restraint system (seat belts and air bags) is greatly reduced by reclining your seatback.
WARNING
NEVER ride with a reclined seat- back when the vehicle is moving. Riding with a reclined seatback increases your chance of serious or fatal injuries in the event of a collision or sudden stop. Driver and passengers should ALWAYS sit well back in their seats, properly belted, and with the seatbacks upright.
Seat belts must be snug against your hips and chest to work properly. When the seatback is reclined, the shoulder belt cannot do its job because it will not be snug against your chest. Instead, it will be in front of you. During an accident, you could be thrown into the seat belt, causing neck or other injuries. The more the seatback is reclined, the greater chance the passenger’s hips will slide under the lap belt or the passenger’s neck will strike the shoulder belt.
2-9
Safety system of your vehicle
Seat cushion height
Lumbar support (if equipped)
Seat bolster adjustment (for driver’s seat,if equipped)
ODH033008
To change the height of seat bolster: 1. Pull or push the lever. 2. Release the lever once the bolsterreaches the desired position.
ODH033006
To change the height of the seat cushion: 1. Push the front portion of the con- trol switch up to raise or down to lower the front part of the seat cushion. Push the rear portion of the control switch up to raise or down to lower the height of the seat cushion.2. Release the switch once the seat
reaches the desired position.
2-10
ODH033007
• The lumbar support can be adjust- ed by pressing the lumbar support switch.• Press the front portion of the switch (1) to increase support or the rear portion of the switch (2) to decrease support.
• To move the support position up or
down, press switch (3) or (4).
The lumbar support does not operate up or down when the lumbar support is in the rearmost position. In this case, to use the system, slight- ly increase support by pushing the front portion of the switch (1).
Seatback pocket
■ Type A
WARNING
Do not put heavy or sharp objects in the seatback pockets. In an accident they could come loose from the pocket and injure occupants.
■ Type B
ODH033084L
ODH033083L The seatback pocket is provided on the back of the front seatbacks.
Rear seats
WARNING
• NEVER adjust the rear power seats when a child restraint is installed in that seat.
• NEVER allow children in the car unattended. The power seats are operable when the engine is turned off.
WARNING
To prevent injury: • Do not adjust your seat while wearing your seat belt. Moving the seat cushion for- ward may cause strong pres- sure on your abdomen.
• Do not allow your hands or fingers to get caught in the seat mechanisms while the seat is moving.
2-11
Safety system of your vehicle
CAUTION
To prevent damage to the seats: • Always stop adjusting the seats when the seat has been adjusted as far forward or rearward as possible.
• Do not adjust the seats longer than necessary when the engine is turned off. This may result in unnecessary drain of the battery.
• Do not operate two or more seats at the same time. This may result in an electrical malfunction.
2-12
Front passenger seat control
■ Rear seat (Type B) ■ Rear seat (Type B)
■ Passenger seat (if equipped)
■ Rear seat (Type A)
ODH033019
ODH034052CN
ODH033020
The rear seat passenger may use the switches to control the front pas- senger seat. • Sliding forward or rearward:To move the front passenger seat forward, press the switch (1). To move the front passenger seat rearward, press the switch (2).
• Angle adjustment:
To recline the front passenger seat forward, press the switch (3). To recline the front passenger seat rearward, press the switch (4).
Rear passenger seat control (if equipped)
• Sliding forward or rearward
(Right side seat) : To move the right side passenger seat forward, press the switch (7). To move the right side passenger seat rearward, press the switch (8).
ODH033022
The rear seat passenger may use the switches to control the rear pas- senger seat. While sliding the rear seat, the rear seatback simultane- ously reclines. • Sliding forward or rearward (Leftside seat) : To move the left side passenger seat forward, press the switch (5). To move the left side passenger seat rearward, press the switch (6).
Rear switches operating limita- tion
■ Rear armrest
• Type A
• Type B
• Type C
ODH034027CN You can activate or deactivate the rear seat control by using the LOCK button on the rear armrest or "System Settings" in the AVN (Audio, Video, and Navigation).
2-13
Safety system of your vehicle
■ AVN
• Type A
Armrest
■ AVN
• Type B
ODH033095L
ODH033023
The armrest is located in the center of the rear seat. Pull the armrest down from the seatback to use it.ODH033024
Cup holder To use the cup holder, push the but- ton (1).
ODH033094L Detailed information for the "System Settings" is described in a separate- ly supplied manual. If the rear control button has deacti- vated through AVN, you can reacti- vate the rear control button through AVN or the LOCK button on the rear armrest.
2-14
ODH033025
ODH033051
Storage compartment To use the storage compartment, push the button (2). Close the cover after use.
Carrying long/narrow cargo (if equipped) Additional cargo space is provided to accommodate long/narrow cargo (skis, poles, etc.) not able to fit prop- erly in the trunk when closed. 1. Pull the armrest down. 2. Pull the cover down while pushing
the release lever down.
CAUTION
• Make sure the engine is off, the shift lever is in P and the parking brake is applied whenever loading or unload- ing cargo. The vehicle may move if the shift lever is inad- vertently moved to another position.
• Be careful when
loading cargo through the rear pas- senger seats to prevent dam- age to the vehicle interior.
• When cargo is loaded through the rear passenger seats, ensure the cargo is properly secured to prevent it from moving while driving.
• Unsecured cargo in the pas- senger compartment can cause damage to the vehicle or injury to its occupants.
2-15
Safety system of your vehicle
WARNING
should
Cargo Cargo always be secured to prevent it from being thrown about the vehicle in a collision and causing injury to the vehicle occupants. Do not place objects in the rear seats, since they cannot be properly secured and may hit the front seat occupants in a collision.
WARNING
Cargo loading Make sure the engine is off, the automatic transmission is in P (Park) and the parking brake is securely applied whenever load- ing or unloading cargo. Failure to take these steps may allow the vehicle to move if the shift lever is inadvertently moved to another position.
2-16
Headrest The vehicle’s front and rear seats have adjustable headrests. The head- rests provide comfort for passengers, but more they are designed to help protect passengers from whiplash and other neck and spinal injuries during an accident, especially in a rear impact collision.
importantly
WARNING
To reduce the risk of serious injury or death in an accident, take the following precautions when adjusting your headrests: • Always properly adjust the headrests for all passengers BEFORE starting the vehicle.
• NEVER let anyone ride in a seat
with the headrest removed.
• Adjust the headrests so the middle of the headrests is at the same height as the height of the top of the eyes.
(Continued)
(Continued) • NEVER adjust the headrest position of the driver’s seat when the vehicle is in motion. • Adjust the headrest as close to the passenger’s head as possible. Do not use a seat cushion that holds the body away from the seatback.
• Make sure the headrest locks into position after adjusting it.
CAUTION
To prevent damage, NEVER hit or pull on the headrests.
CAUTION
When there is no occupant in the rear seats, adjust the height of the headrest to the lowest position. The rear seat headrest can reduce the visibility of the rear area.
Front seat headrests
ODH033105L The driver’s and front passenger’s seats are equipped with adjustable headrests for the passengers safety and comfort.
ODH033009
ODH033010
Forward and rearward adjustment The headrest may be adjusted for- ward to 3 different positions by pulling the headrest forward to the desired detent. To adjust the head- rest to it’s furthest rearwards posi- tion, pull it fully forward to the farthest position and release it.
Adjusting the height up and down To raise the headrest: 1. Pull it up to the desired position (1).
To lower the headrest: 1. Push and hold the release button
(2) on the headrest support.
2. Lower the headrest to the desired
position (3).
2-17
Safety system of your vehicle
OLF034015
ODH033011
ODH033012
CAUTION
If you recline the seatback towards the front with the head- rest and seat cushion raised, the headrest may come in con- tact with the sunvisor or other parts of the vehicle.
Removal/Reinstall To remove the headrest: 1. Recline the seatback (2) with using
the seatback angle switch (1).
2. Raise headrest as far as it can go. 3. Press the headrest release button (3) while pulling the headrest up (4).
WARNING
NEVER allow anyone to travel in a seat with the headrest removed.
To reinstall the headrest : 1. Recline the seatback. 2. Put the headrest poles (2) into the holes while pressing the release button (1).
3. Adjust the headrest to the appropri-
ate height.
4. Recline the seatback (4) with using
the seatback angle switch (3).
WARNING
Always make sure the headrest locks into position after rein- stalling and adjusting it properly.
2-18
Rear seat headrests
if equipped
* : ODH033106L The rear seats are equipped with headrests in all the seating positions for the passenger’s safety and com- fort.
ODH033021
Adjusting the height up and down To raise the headrest: 1. Pull it up to the desired position (1).
To lower the headrest: 1. Push and hold the release button
(2) on the headrest support.
2. Lower the headrest to the desired
position (3).
ODH033102L
ODH033103L
Folding the center headrest To fold the center headrest: 1. Fold the center headrest while
pushing the button.
To unfold the center headrest: 1. Lift the center headrest.
2-19
(Continued) • Fatigued individuals. • Intoxicated individuals. • People taking medication that can cause drowsiness or sleepiness.
WARNING
NEVER place anything on the seat that insulates against heat when the seat warmer is in oper- ation, such as a blanket or seat cushion. This may cause the seat warmer to overheat, caus- ing a burn or damage to the seat.
CAUTION
To prevent damage to the seat warmers and seats: • Never use a solvent such as paint thinner, benzene, alco- hol or gasoline to clean the seats.
• Do not place heavy or sharp objects on seats equipped with seat warmers.
• Do not change the seat cover. It may damage the seat warmer or air ventilation sys- tem.
Safety system of your vehicle
Seat warmers and coolers Seat warmers (if equipped) Seat warmers are provided to warm the seats during cold weather.
WARNING
The seat warmers can cause a SERIOUS BURN, even at low temperatures and especially if used for long periods of time. Passengers must be able to feel if the seat is becoming too warm so they can turn it off, if needed. People who cannot detect tem- perature change or pain to the skin should use extreme cau- tion, especially the following types of passengers: • Infants, children, elderly or disabled persons, or hospital outpatients.
• People with sensitive skin or
who burn easily.
(Continued)
2-20
■ Front
■ Rear
• Type A
■ Front
ODH033016
• Type B
ODH033015
ODH034028R While the engine is running, push the switch to warm the seat. During mild weather or under condi- tions where the operation of the seat warmer is not needed, keep the switches in the OFF position.
• Each time you push the switch, the temperature setting of the seat is changed as follows :
OFF→HIGH( →
)→MIDDLE(
)→LOW(
• When pressing the switch for more than 1.5 seconds with the seat warmer operating, the seat warmer will turn OFF.
• The seat warmer defaults to the OFF position whenever the Engine Start/Stop button is in the ON posi- tion.
✽ NOTICE With the seat warmer switch in the ON position, the heating system in the seat automatically controls the seat temperature by designed tem- perature.
2-21
Safety system of your vehicle
Seat warmers and coolers (by air) (if equipped)
■ Rear
■ Front
ODH033050
The seat warmers and coolers are provided to warm or cool the seats by blowing air through small vent holes on the surface of the seat cushions and seatbacks. When the operation of the seat warm- ers or cooler are not needed, keep the switches in the OFF position. While the engine is running, push the switch to warm or cool the seat.• Type A
■ Front
ODH033017
• Type B
ODH033018
2-22
• Each time you push the switch, the
air flow changes as follows:
OFF→HIGH( →
)→MIDDLE(
)→LOW(
• When pressing the switch for more than 1.5 seconds with the seat warmer or cooler operating, the seat warmer will turn OFF.
• The seat warmers or coolers defaults to the OFF position when- ever the Engine Start/Stop button is turned to the ON position.
✽ NOTICE With the seat warmer or cooler switch in the ON position, the sys- tem in the seat automatically con- trols temperature by designed temperature.
the seat
(Continued) • Do not place materials such as plastic bags or newspapers under the seats. They may block the air intake causing the air vents to not work prop- erly.
• Do not change the seat cov- ers. It may damage the seat warmer or cooler.
• If the air vents do not operate, restart the vehicle. If there is no change, we recommend that you have your vehicle inspected by an authorized HYUNDAI dealer.
CAUTION
To prevent damage to the seat warmer, seat cooler and seats: • Use the seat warmer and cool- er ONLY when the climate control system is on. Using the seat warmer and cooler for prolonged periods of time with the climate control sys- tem off could cause the seat warmer and cooler to mal- function.
• Never use a solvent such as paint thinner, benzene, alco- hol or gasoline to clean the seats.
• Avoid spilling liquids on the surface of the seats and seat- backs; this may cause the air vent holes to become blocked and not work properly.
(Continued)
2-23
Safety system of your vehicle
SEAT BELTS This section describes how to use the seat belts properly. It also describes some of the things not to do when using seat belts.
Seat belt safety precautions Always fasten your seat belt and make sure all passengers have fas- tened their seat belts before starting any trip. Air bags (if equipped) are designed to supplement the seat belt as an additional safety device, but they are not a substitute. Most coun- tries require all occupants of a vehicle to wear seat belts.
2-24
WARNING
Seat belts must be used by ALL passengers whenever the vehi- cle is moving. Take the following precautions when adjusting and wearing seat belts: • ALWAYS properly
restrain children under age 13 in the rear seats.
• NEVER allow children to ride in the front passenger seat. If a child age 13 or older must be seated in the front seat, move the seat as far back as possi- ble and properly restrain them in the seat.
• NEVER allow an infant or child to be carried on an occupant’s lap.
• NEVER ride with the seatback reclined when the vehicle is moving.
• Do not allow children to share
a seat or seat belt.
(Continued)
(Continued) • Do not wear the shoulder belt under your arm or behind your back.
• Never wear a seat belt over fragile objects. If there is a sudden stop or impact, the seat belt can damage it.
• Do not use the seat belt if it is twisted. A twisted seat belt will not protect you properly in an accident.
• Do not use a seat belt if the webbing or hardware is dam- aged.
• Do not latch the seat belt into
the buckles of other seats.
• NEVER unfasten the seat belt while driving. This may cause loss of vehicle control result- ing in an accident.
• Make sure there is nothing in the buckle interfering with the seat belt latch mechanism. This may prevent the seat belt from fastening securely.
(Continued)
(Continued) • No modifications or additions should be made by the user which will either prevent the seat belt adjusting devices from operating to remove slack, or prevent the seat belt assembly from being adjusted to remove slack.
WARNING
Damaged seat belts and seat belt assemblies will not operate properly. Always replace: • Frayed, contaminated, or dam-
aged webbing.
• Damaged hardware. • The entire seat belt assembly after it has been worn in an accident, even if damage to webbing or assembly is not apparent.
Seat belt warning light Seat belt warning
ODH033097L
(1) Driver’s seat belt warning light (2) Front passenger’s seat belt warn-
ing light (if equipped)
As a reminder to the driver and front passenger, the driver’s and front pas- senger’s seat belt warning lights will illuminate for approximately 6 seconds each time you turn the Engine Start/Stop button ON regardless of belt fastening.
If the driver’s or front passenger’s seat belt is not fastened when the Engine Start/Stop button is turned ON or if it is disconnected after the Engine Start/Stop button is turned ON, the corresponding seat belt warning light will illuminate until the belt is fastened. If you continue not to fasten the seat belt and you drive over 9 km/h (5
mph), the illuminated warning light will start to blink until you drive under 6 km/h (3 mph). If you continue not to fasten the seat belt and you drive over 20 km/h (12
mph) the seat belt warning chime will sound for approximately 100 sec- onds and the corresponding warning light will blink.