- 2011 Hyundai Accent Owners Manuals
- Hyundai Accent Owners Manuals
- 2005 Hyundai Accent Owners Manuals
- Hyundai Accent Owners Manuals
- 2003 Hyundai Accent Owners Manuals
- Hyundai Accent Owners Manuals
- 2009 Hyundai Accent Owners Manuals
- Hyundai Accent Owners Manuals
- 2008 Hyundai Accent Owners Manuals
- Hyundai Accent Owners Manuals
- 2004 Hyundai Accent Owners Manuals
- Hyundai Accent Owners Manuals
- 2007 Hyundai Accent Owners Manuals
- Hyundai Accent Owners Manuals
- 2012 Hyundai Accent Owners Manuals
- Hyundai Accent Owners Manuals
- Download PDF Manual
-
HEF-241
Tires should be rotated every 7,500
miles (12,000 km). If you notice that tires are wearing unevenly between rotations, have the car checked by a Hyundai dealer so the cause may be corrected. After rotating, adjust the tire pressures and be sure to check the wheel nut torque.I050A01MC-AAT
TIRE CHAINS Tire chains, if necessary, should be installed on the front wheels. Be sure that the chains are installed in accor- dance with the manufacturer's instruc- tions. To minimize tire and chain wear, do not continue to use tire chains when they are no longer needed.
WARNING:
o If your vehicle is equipped with P205/45R16 size tires, do not in- stall tire chains. This may cause damage to the vehicle (wheels, suspension and body) by chains contacting the body.
o When driving on roads covered with snow or ice, drive at less than 20 mph (30 km/h).
o Use the SAE "S" class or wire &
plastic chains.
8 CONSUMER INFORMATION, REPORTING SAFETY DEFECTS & BINDING ARBITRATION OF WARRANTY CLAIMS 12
! WARNING:
o Do not use the temporary spare
tire for tire rotation.
o Do not mix bias ply and radial ply tires under any circumstances. This may cause unusual handling characteristics that could result in death, serious injury, or prop- erty damage.
I070A01A-AAT
TIRE BALANCING A tire that is out of balance may affect handling and tire wear. The tires on your Hyundai were balanced before the car was delivered but may need balancing again during the years you own the car. Whenever a tire is dismounted for repair, it should be rebalanced before being reinstalled on the car.
I080A01A-AAT
TIRE TRACTION Tire traction can be reduced if you drive on worn tires, tires that are im- properly inflated or on slippery road surfaces. Tires should be replaced when tread wear indicators appear. To reduce the possibility of losing control, slow down whenever there is rain, snow or ice on the road.
I090A05A-AAT
WHEN TO REPLACE TIRES
Tread wear indicator
OMC055017
The original tires on your car have tread wear indicators. The location of tread wear indicators is shown by the "TWI" or " " marks, etc., The tread wear indicators appear when the tread depth is 0.06 in. (1.6 mm). The tire should be replaced when these appear as a solid bar across two or more grooves of the tread. Always replace your tires with those of the recom- mended size. If you change wheels, the new wheel's rim width and offset must meet Hyundai specification.CONSUMER INFORMATION, REPORTING SAFETY DEFECTS & BINDING ARBITRATION OF WARRANTY CLAIMS
13
! WARNING:
To reduce the chance or serious or fatal injuries from an accident caused by tire failure or loss of vehicle control: o Replace tires that are worn, show uneven wear, or are damaged. Worn tires can cause loss of brak- ing effectiveness, steering con- trol, and traction.
o Do not drive your vehicle with too little or too much pressure in your tires. This can lead to un- even wear and tire failure.
o When replacing tires, never mix radial and bias-ply tires on the same car. You must replace all tires (including the spare) if mov- ing from radial to bias-ply tires. o Using tires and wheel other than the recommended sizes could cause unusual handling charac- teristics and poor vehicle con- trol, resulting in a serious acci- dent.
WARNING:
o Wheels that do not meet Hyundai's specifications may fit poorly and result in damage to the vehicle or unusual handling and poor ve- hicle control.
o Tires degrade over time, even when they are not being used. Regard- less of the remaining tread, it is recommended that tires tread, It is recommended that tires generally be replaced after 6 years of normal service. Heat caused by hot cli- mates or frequent high loading conditions can accelerate the ag- ing process. Failure to follow this Warning can result in sudden tire failure, which could lead to a loss of control and an accident involv- ing serious injury or death.
o The ABS works by comparing the speed of the wheels. Tire size can affect wheel speed. When replac- ing tires, all 4 tires must use the same size originally supplied with the vehicle. Using tires of a differ- ent size can cause the ABS (Anti- lock Brake System) (If Installed) to work irregularly.
I090B02JM-AAT
TIRE MAINTENANCE In addition to proper inflation, correct wheel alignment helps to decrease tire wear. If you find a tire is worn un- evenly, have your dealer check the wheel alignment.
When you have new tires installed, make sure they are balanced. This will increase vehicle ride comfort and tire life. Additionally, a tire shoud always be rebalanced if it is removed from the wheel.
WARNING:
o Underinflated or overinflated tires can cause poor handling, loss of vehicle control, and sudden tire failure leading to accidents, inju- ries, and even death. Always check tires are properly inflated before driving. Refer to pages 2- 20 and 8-3 for proper tire pres- sures and further information.
8 CONSUMER INFORMATION, REPORTING SAFETY DEFECTS & BINDING ARBITRATION OF WARRANTY CLAIMS 14
I100A01MC-AAT
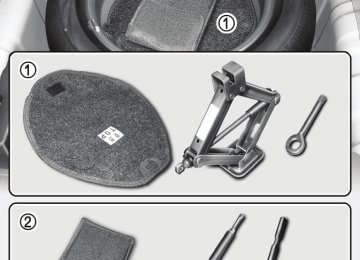
SPARE TIRE AND TOOLS
I110A01A-AAT
SHOP MANUAL A Hyundai Shop Manual is available from your authorized Hyundai dealer. It's writ- ten for professional technicians, but is simple enough for most mechanically- inclined owners to understand.
! WARNING:
o Driving on tires with no or insuf- ficient tread is dangerous. Worn- out tires can result in loss of vehicle control, collisions, and injury and even death. Worn-out tires should be replaced as soon as possible and should never be used for driving. Always check tire tread before driving your car. Refer to this page for further in- formation and tread limits.
Your Hyundai is delivered with the following:
D060B01MC-A
Spare tire and wheel Jack, Towing hook (If Installed) Wrench bar, Wheel nut wrench
WARRANTIES FOR YOUR HYUNDAI VEHICLE
I120A03A-AAT Please consult your Owner's Handbook & Warranty Information booklet for your vehicle's specific warranty coverage.
CONSUMER INFORMATION, REPORTING SAFETY DEFECTS & BINDING ARBITRATION OF WARRANTY CLAIMS CONSUMER INFORMATION
15
I130A01A-AAT This consumer information has been pre- pared in accordance with regulations is- sued by the National Highway Traffic Safety Administration of the U.S. Depart- ment of Transportation. It provides the purchasers and/or prospective purchas- ers of Hyundai automobiles with informa- tion on uniform tire quality grading. Your Hyundai dealer will help answer any questions you may have as you read this information.
I130B05A-AAT
Tire Quality Grading Department of Transportation quality grades - All passenger vehicle tires must conform to Federal motor vehicle Safety Standards in addition to these grades. These quality grades are molded on the sidewall.
Treadwear - The treadwear grade is a comparative rating based on the wear rate of the tire when tested under controlled conditions on a specified government test course. For example, a tire graded 150 would wear one and a half (1 - 1/2) times as well on the government course as a tire graded 100. The relative performance of tires depends upon the actual conditions of their use, however, and may depart significantly from the norm due to variations in driving habits, service practices and differences in road char- acteristics and climate.
8 CONSUMER INFORMATION, REPORTING SAFETY DEFECTS & BINDING ARBITRATION OF WARRANTY CLAIMS 16
Traction AA, A, B, C - The traction grades, from highest to lowest, are AA, A, B, and C. Those grades repre- sent the tire's ability to stop on wet pavement as measured under con- trolled conditions on specified govern- ment test surfaces of asphalt and concrete. A tire marked C may have poor traction performance.
WARNING:
The traction grade assigned to this tire is based on straight-ahead brak- ing traction tests, and does not in- clude acceleration, cornering, hy- droplaning, or peak traction charac- teristics.
Temperature A, B, C - The tempera- ture grades are A (the highest), B, and C, representing the tire's resistance to the generation of heat and its ability to dissipate heat when tested under con- trolled conditions on a specified indoor laboratory test wheel. Sustained high temperature can cause the material of the tire to degenerate and reduce tire life, and excessive temperature can lead to sudden tire failure. The grade C corresponds to a level of performance which all passenger car tires must meet under the Federal Motor Vehicle Safety Standard No. 109. Grades B and A represent higher levels of perfor- mance on the laboratory test wheel than the minimum required by law.
! WARNING:
The temperature grade for this tire is established for a tire that is prop- erly inflated and not overloaded. Excessive speed, underinflation, or excessive loading, either separately or in combination, can cause heat buildup and possible tire failure.
Uniform Tire Quality Grading Quality grades can be found where applicable on the tire sidewall between tread shoulder and maximum section width. For example: TREAD wear 200
TRACTION AA TEMPERATURE ACONSUMER INFORMATION, REPORTING SAFETY DEFECTS & BINDING ARBITRATION OF WARRANTY CLAIMS
17
Western Region: Alaska, Hawaii, Arizona, California, Colorado, ldaho, Montana, Ne- vada, Oregon, Utah, Washington, Wyo- ming.
Western Region 10550 Talbert Avenue P.O.Box 20850
Fountain Valley, California 92728-0850
(800) 633-5151I130D05A-AAT Hyundai motor vehicles are designed and manufactured to meet or exceed all applicable safety standards.
For your safety, however, we strongly urge you to read and follow all directions in this Owner's Manual, particularly the information under the headings "NOTE", "CAUTION" and "WARNING".
If, after reading this manual, you have any questions regarding the operation of your vehicle, please contact your nearest Hyundai Motor America Regional Office as listed below:
Eastern Region : Connecticut, Delaware, Maine, Massachusetts, New Hampshire, New Jersey, New York, Pennsylvania, Rhode Island, Vermont.
Eastern Region 1100 Cranbury South River Road Jamesburg, NJ 08831
(800) 633-5151Southern Region: Florida, Georgia, Mary- land, North Carolina, South Carolina, Vir- ginia, West Virginia.
Southern Region 270 Riverside Parkway, Suite A Austell, GA 30168
(800) 633-5151South Central Region: Alabama, Arkan- sas, Louisiana, Mississippi, New Mexico, Oklahoma, Tennessee, Texas.
South Central Region 1421 South Beltline Road, Suite 400
Coppell, TX 75019
(800) 633-5151Central Region: Illinois, Indiana, lowa, Kentucky, Michigan, Minnesota, Ne- braska, North Dakota, South Dakota, Ohio, Wisconsin, Kansas, Missouri.
Central Region 1705 Sequoia Drive Aurora, Illinois 60506
(800) 633-51518 CONSUMER INFORMATION, REPORTING SAFETY DEFECTS & BINDING ARBITRATION OF WARRANTY CLAIMS BINDING ARBITRATION 18
(U.S.A only)REPORTING SAFETY DE- FECTS
I130C03A-AAT If you believe that your vehicle has a defect which could cause a crash or could cause injury or death, you should imme- diately inform the National Highway Traf- fic Safety Administration (NHTSA) in ad- dition to notifying HYUNDAI MOTOR AMERICA. If NHTSA receives similar complaints, it may open an investigation, and if it finds that a safety defect exists in a group of vehicles, it may order a recall and remedy campaign. However, NHTSA cannot become involved in individual problems between you, your dealer, or HYUNDAI MOTOR AMERICA. To contact NHTSA, you may call the Ve- hicle Safety Hotline toll-free at 1-888- 327-4236 (TTY: 1-800-424-9153); go to http://www.safercar.gov; or write to: Ad- ministrator, NHTSA, 1200 New Jersey Avenue, SE., West Building, Washington, DC 20590. You can also obtain other information about motor vehicle safety from http://www.safercar.gov.
I140A01A-AAT Any claim or dispute you may have related to your vehicle's warranty or the duties contemplated under the war- ranty, including claims related to the refund or partial refund of your vehicle's purchase price (excluding personal in- jury or product liability claims), shall be resolved by binding arbitration. Bind- ing arbitration shall be administered by and through the American Arbitration Association (AAA). You will not be responsible for paying filing and hearing fees above $275.00. All other arbitration costs shall be borne by Hyundai Motor America. You are not responsible to pay any of the costs Hyundai incurs. This Binding Arbitration Agreement shall not deprive you of any remedies available to you under applicable law.
The parties are waiving their right to seek remedies in court, including the right to a jury trial. This Binding Arbitration Agreement shall be governed by and interpreted under the Federal Arbitration Act, 9
U.S.C. sections 1-16. Judgment upon any award may be entered in any court having jurisdiction. You may revoke this Arbitration Agree- ment by (1) written notice or (2) elec- tronic notice. Written notice must be delivered (via certified mail) to Hyundai Motor America, Attn: Consumer Af- fairs, 10550 Talbert Avenue, P.O. Box 20849, Fountain Valley, CA 92728- 0849. Electronic notice must be submitted at the following website address: http:// warranty-arbitration.hyundaiUSA.com. Notice must be received within 90
days after you purchase your vehicle.VEHICLE SPECIFICATIONS
Measurement ................................................................ 9-2
Engine ........................................................................... 9-3
Lubrication Chart ........................................................... 9-49 VEHICLE SPECIFICATIONS
J010A03MC-AAT
MEASUREMENT Item Overall length Overall width Overall height Wheel base Wheel tread Front Rear
4 DOOR
169.3 (4300) 66.7 (1695) 57.8 (1470) 98.4 (2500)
57.8 (1470) / 58.4 (1485)* 57.4 (1460) / 58 (1475)*
* with P175/70R14 Tire
in. (mm)
J060A01A-AAT
FUEL SYSTEM
3 DOOR
159.2 (4045)
Fuel tank capacity
J030A03MC-AAT
TIRE
US. gal
11.9
Imp.gal
9.9
Liter
45
Tire Size
Inflation Pressure
4Door
P175/70 R14, P185/65 R14, P195/55 R15
3Door
P175/70 R14, P185/65 R14, P205/45 R16
32PSI (220 kPa)
J020A01MC-AAT
POWER STEERING Type Wheel free play Rack stroke
175 Tire only Except 175 Tire
Oil pump type
Rack and pinion 0 ~ 1.18 in (0 ~ 30 mm) 5.59 in. (142 mm) 5.43 in. (138 mm) Vane type
T115/70 D15
60PSI (420 kPa)
Spare NOTE: It is permissible to add 3psi (21kPa) to the standard tire pressure specification if colder temperatures are expected soon. Tires typically loose 1psi (7kPa) for every 12°F (-11°C) temperature drop. If extreme temperature variations are ex- pected, re-check your tire pressure as necessary to keep them properly inflated.
J050A02MC-AAT
BRAKE
Type
Front brake type
Rear brake type
Parking brake
Dual hydraulic with brake booster
Ventilated disc
Drum
Cable operated on rear wheel
ENGINE
J070A02MC-AAT
ITEMS
Engine Type Bore x Stroke Displacement (cc) Idle Speed (RPM)
Ignition timing (Base)
Firing order
VEHICLE SPECIFICATIONS
SPECIFICATIONS
1.6 MPI
4-Cylinder in-line DOHC
3.01 x 3.42 in. (76.5 x 87 mm)
1,599
700 ± 100
BTDC 5° ± 5°
1 - 3 - 4 - 2
9 VEHICLE SPECIFICATIONS
LUBRICATION CHART
J080A02MC-AAT
Item
Engine oil
Recommends
API Service SM* or above,
ILSAC GF-4 or above
Oil & Grease Standard
SAE 5W-20, 5W-30
(ALL TEMP. RANGE)
SAE 10W-30 [ABOVE 0°F (-18°C)]
Transaxle
Manual
HYUNDAI GENUINE PARTS MTF 75W/85 (API GL-4)
Automatic
HYUNDAI GENUINE ATF SP III, DIAMOND ATF SP III, SK ATF SP III or other
brands meeting the SP III specification approved by Hyundai Motor Co.
Power steering
Brake fluid Coolant Manual
Transaxle
Automatic
Transaxle
PSF-3
DOT 3, DOT 4 or Equivalent
Ethylene glycol base for aluminum radiator
Q'ty (US.QTS)(Imp.qts, liter)
Drain and refill
Without oil filter : 3.17 (2.6, 3.0)
With oil filter : 3.48 (2.9, 3.3)
2 (1.67, 1.9)
6.44 (5.3, 6.1)
As required
As required
5.49 (4.5, 5.2)
5.60 (4.6, 5.3)
* : If the API service SM engine oil is not available in your country, you are able to use API service SL.
INDEX
10
10
10 INDEX
Advanced Supplemental Restraint (AIRBAG) System (SRS) .................................................................... 1-41
Curtain airbag ................................................................. 1-56
Driver's and passenger's front airbag ............................ 1-42
Occupant classification system ...................................... 1-49
Side impact airbag ......................................................... 1-54
Air Cleaner Filter .................................................................. 6-9
Air ConditioningCare ................................................................................. 6-15
Operation ............................................................ 1-115, 6-15
Switch ............................................................................ 1-115
Antenna ............................................................................ 1-122
Ashtray ................................................................................ 1-83
Audio System ................................................................... 1-122
Audio remote control switch ......................................... 1-102Battery ................................................................................. 6-20
Binding Arbitration ............................................................. 8-18
BrakeAnti-lock brake system (ABS) ......................................... 2-13
Checking the brakes ...................................................... 6-14
Fluid ................................................................................. 6-14
Practices .......................................................................... 2-14
Breaking-In your New Hyundai ........................................... 1-3Care of Discs .................................................................... 1-121
Cargo Area Cover .............................................................. 1-99
Catalytic Converter ............................................................... 7-3
Child Restraint System ...................................................... 1-31Installing a child restraint seat with "Tether Anchorage" system ........................................... 1-33
Securing a child restraint seat with "Child Seat Lower Anchor" system ............................... 1-35
Child-Protector Rear Door Lock .......................................... 1-6
Cigarette Lighter ................................................................ 1-82
Climate Control Air Filter ....................................... 1-118, 6-16
Clock ................................................................................... 1-82
Combination Light .............................................................. 1-76
Headlight flasher ............................................................ 1-77
Headlight switch ............................................................. 1-76
High-beam switch ........................................................... 1-77
Lane change signal ........................................................ 1-76
Parking light auto off ...................................................... 1-77
Turn signal operation ..................................................... 1-76
Consumer Information ....................................................... 8-15
Cooling Fans ...................................................................... 6-21
Corrosion ProtectionCleaning the interior ......................................................... 4-6
Protecting your Hyundai from corrosion .......................... 4-2
Washing and waxing ........................................................ 4-4
Cruise Control .................................................................. 1-103INDEX
10
Defrosting/Defogging ........................................... 1-114, 1-117
DoorCentral door locks ............................................................ 1-6
Door locks ......................................................................... 1-4
Door ajar warning light and chime ................................ 1-66
Locking and unlocking front door with a key .................. 1-5
Drink Holder ....................................................................... 1-84
DrivingEconomical driving ......................................................... 2-15
Smooth cornering ........................................................... 2-16
Winter driving .................................................................. 2-16Emission Control System ..................................................... 7-2
EngineBefore starting the engine ................................................ 2-3
Compartment .................................................................... 6-2
Coolant .............................................................................. 6-8
If the engine overheats ..................................................... 3-4
Number ............................................................................. 8-3
Oil ...................................................................................... 6-5
Starting .............................................................................. 2-5
Engine Exhaust Can Be Dangerous! .................................. 2-2Fog Light
Front ................................................................................ 1-82
Front Seats
Adjusting seat forward and rearward ............................ 1-14
Adjusting seatback angle ............................................... 1-15
Headrest .......................................................................... 1-15
Seat cushion height adjustment ................................... 1-17Fuel
Capacity ............................................................................ 9-2
Gauge .............................................................................. 1-70
Recommendations ............................................................ 1-2Fuel Filler Lid
Remote release .............................................................. 1-94
Fuse Panel Description ..................................................... 6-30
Fuses .................................................................................. 6-17General Checks ................................................................... 6-4
Glove Box ........................................................................... 1-88Hazard Warning System .................................................... 1-81
HeadlightReplacement ................................................................... 6-23
Switch .............................................................................. 1-7610 INDEX
Heating and Cooling Control .......................................... 1-108
Air flow control ............................................................. 1-110
Air intake control switch ............................................... 1-109
Defrosting/Defogging .................................................... 1-114
Fan speed control (Blower control) ............................. 1-109
Temperature control ..................................................... 1-112
High-Mounted Rear Stop Light ......................................... 1-92
Hood Release .................................................................... 1-93
Horn .................................................................................. 1-101Ignition Switch ...................................................................... 2-4
Instrument Cluster and Indicator Lights ............................ 1-60
Instrument Panel Light Control (Rheostat) ....................... 1-80
Interior Light ....................................................................... 1-87Jump Starting ....................................................................... 3-3
Key ........................................................................................ 1-3
If you lose your keys ...................................................... 3-20
Positions ............................................................................ 2-4Light Bulb Wattage ............................................................. 6-29
Light Bulbs Replacement .................................................. 6-23
Lubrication Chart .................................................................. 9-4
Luggage Net ...................................................................... 1-98Maintenance Intervals .......................................................... 5-2
Explanation of scheduled maintenance items ................ 5-7
Maintenance under severe usage conditions ................. 5-6
Scheduled maintenance .................................................. 5-4
Service requirements ........................................................ 5-2
Maintenance Precautions .................................................... 6-5
Map Light ............................................................................ 1-87
MirrorsDay/Night inside rearview mirror ................................... 1-91
Outside rearview ............................................................. 1-89
Multi Box ............................................................................. 1-89Odometer/Trip Odometer ......................................... 1-71, 1-72
Outside Rearview Mirror .................................................... 1-89Parking Brake ..................................................................... 1-91
Power Outlet ....................................................................... 1-83
Power Steering Fluid Level ............................................... 6-22INDEX
10
Rear Seat
Folding rear seatbacks ................................................... 1-19
Warning ........................................................................... 1-22
Rear Window Defroster Switch ......................................... 1-81
Reporting Safety Defects ................................................... 8-18Seats ................................................................................... 1-13
Front ................................................................................ 1-14
Rear ................................................................................. 1-18
Seat Belts ........................................................................... 1-22
3-Point system ................................................................ 1-26
Adjusting your seat belt .................................................. 1-28
Care of seat belts ........................................................... 1-25
Pre-tensioner seat belt ................................................... 1-39
Precautions ..................................................................... 1-22
Speedometer ...................................................................... 1-70
Starting Procedure ............................................................... 2-5
Steering Wheel Tilt Lever ................................................ 1-101
Stereo Sound System ...................................................... 1-119
Sun Visor .......................................................................... 1-100
Sunglass Holder ................................................................ 1-88
Sunroof ............................................................................... 1-84Tachometer ......................................................................... 1-70
Theft-Alarm System .............................................................. 1-8
Tire Pressure Monitoring System (TPMS) ........................... 3-5
TiresAll season tires ............................................................... 8-10
Balancing ........................................................................ 8-12
Chains ............................................................................. 8-10
Changing a flat tire ......................................................... 3-11
Checking the inflation pressure ....................................... 8-5
If you have a flat tire ....................................................... 3-11
Information ........................................................................ 8-3
Maintenance ................................................................... 8-13
Pressure ............................................................................ 8-3
Replacement ................................................................... 8-12
Rotation ........................................................................... 8-11
Sidewall labeling .............................................................. 8-6
Snow tires ....................................................................... 8-10
Spare tire ........................................................................ 3-10
Terminology and definitions ............................................. 8-8
Traction ........................................................................... 8-12Towing
A trailer (or vehicle) ........................................................ 2-20
Emergency ...................................................................... 3-18
If your vehicle must be towed ........................................ 3-1610 INDEX
Transaxle
Automatic .......................................................................... 2-9
Automatic transaxle fluid checking ................................ 6-12
Manual .............................................................................. 2-6
Manual transaxle oil checking ....................................... 6-12
Trip Computer .................................................................... 1-73
Trip Odometer .......................................................... 1-71, 1-72
Trunk Lid/Tail Gate ............................................................. 1-96
Remote trunk lid release ................................................ 1-97Vehicle Identification Number (VIN) .................................... 8-2
Vehicle Load Limit ............................................................. 2-20
Vehicle Specifications .......................................................... 9-1Warning and Indicator Lights ............................................ 1-64
Warranties for Your Hyundai Vehicle ............................... 8-15
Windows ............................................................................. 1-11
Window lock .................................................................... 1-12
Windshield Wiper and Washer Switch .............................. 1-78
Adjustable Intermittent wiper operation ......................... 1-80
Mist wiper operation ....................................................... 1-79
Rear window wiper and washer .................................... 1-80
Washer reservoir ............................................................ 6-11
Windshield washer operation ........................................ 1-79
Windshield Wiper Blades .................................................. 6-10OWNER'S MANUAL OWNER'S MANUAL OWNER'S MANUAL OWNER'S MANUAL OWNER'S MANUAL Operation Maintenance Specifications
All information in the Owner's Manual is current at the time of publication. However, Hyundai reserves the right to make changes at any time as part of our policy of continual product improvement may be carried out.
This manual applies to all Hyundai models and includes descriptions and expla- nations of optional as well as standard equipment. As a result, you may find material in this manual that does not apply to your specific vehicle.
F1
A070A01A-AAT
CAUTION: MODIFICATIONS TO YOUR HYUNDAI
Your Hyundai should not be modified in any way. Such modifications may adversely affect the performance, safety or durability of your Hyundai and may, in addition, violate conditions of the limited warranties covering the vehicle. Certain modifications may also be in violation of regulations established by the U.S. Department of Transportation and other federal or state agencies.
A080A01S-AAT
TWO-WAY RADIO OR CELLULAR TELEPHONE INSTALLATION
Your vehicle is equipped with electronic fuel injection and other electronic components. It is possible for an improperly installed/adjusted two-way radio or cellular telephone to adversely affect electronic systems. For this reason, we recommend that you carefully follow the radio manufacturer's instruc- tions or consult your Hyundai dealer for precautionary measures or special instructions if you choose to install one of these devices.
F2
A090A01A-AAT
SAFETY AND VEHICLE DAMAGE WARNING
This manual includes information titled as WARNING, CAUTION and NOTE. These titles indicate the following:
This indicates that a condition may result in harm, serious injury or death to you or other persons if the warning is not heeded. Follow the advice provided with the warning.
WARNING:
CAUTION:
This indicates that a condition may result in damage to your vehicle or its equipment if the caution is not heeded. Follow the advice provided with the caution.
NOTE: This indicates that interesting or helpful information is being provided.
F3
A110A02A-AAT
VEHICLE DATA COLLECTION AND EVENT DATA RECORDERS
This vehicle is equipped with an event data recorder (EDR). The main purpose of an EDR is to record, in certain crash or near crash-like situations, such as an air bag deployment or hitting a road obstacle, data that will assist in understanding how a vehicle's systems performed. The EDR is designed to record data related to vehicle dynamics and safety systems for a short period of time, typically 30 seconds or less. The EDR in this vehicle is designed to record such data as:
o How various systems in your vehicle were operating; o Whether or not the driver and passenger safety belts were buckled/fastened;
These data can help provide a better understanding of the circumstances in which crashes and injuries occur. NOTE: EDR data are recorded by your vehicle only if a non-trivial crash situation occurs; no data are recorded by the EDR under normal driving conditions and no personal data (e.g., name, gender, age, and crash location) are recorded. However, other parties, such as law enforcement, could combine the EDR data with the type of personally identifying data routinely acquired during a crash investigation. To read data recorded by an EDR, special equipment is required, and access to the vehicle or the EDR is needed. In addition to the vehicle manufacturer, other parties, such as law enforcement, that have the special equipment, can read the information if they have access to the vehicle or the EDR.
F4
A040A01A-AAT
FOREWORD
Thank you for choosing Hyundai. We are pleased to welcome you to the growing number of discriminating people who drive a Hyundai. The advanced engineering and high-quality construction of each Hyundai we build is something of which we're very proud.
Your Owner's Manual will introduce you to the features and operation of your new Hyundai. It is suggested that you read it carefully because the information it contains can contribute greatly to the satisfaction you receive from your new car.
The manufacturer also recommends that all service and maintenance on your car be performed by an authorized Hyundai dealer. Hyundai dealers are prepared to provide high-quality service, maintenance and any other assistance that may be required.
A050A05A-AAT
HYUNDAI MOTOR AMERICA
Note: Because future owners will also need the information included in this manual, if you sell this Hyundai,
please leave the manual in the vehicle for their use. Thank you.
CAUTION:
Severe engine and transaxle damage may result from the use of poor quality fuels and lubricants that do not meet Hyundai specifications. You must always use high quality fuels and lubricants that meet the specifications listed on Page 9-4 in the Vehicle Specifications section of the Owner's Manual and which also appear in the Service Station Information on the back cover of the Owner's Manual.
Copyright 2010 Hyundai Motor America. All rights reserved. No part of this publication may be reproduced, stored in any retrieval system or transmitted in any form or by any means without the prior written permission of Hyundai Motor America.
F5
A100A03A-AAT
Guide to Hyundai Genuine Parts 1. What are Hyundai Genuine Parts?
Hyundai Genuine Parts are the same parts used by Hyundai Motor Company to manufacture vehicles. They are de- signed and tested for the optimum safety, performance, and reliability to our cus- tomers.
2. Why should you use genuine parts? Hyundai Genuine Parts are engineered and built to meet rigid manufacturing requirements. Using imitation, counter- feit or used salvage parts is not covered under the Hyundai New Vehicle Lim- ited Warranty or any other Hyundai warranty. In addition, any damage to or
failure of Genuine Hyundai Parts caused by the installation or failure of an imita- tion, counterfeit or used salvage part is not covered by any Hyundai Warranty.
3. How can you tell if you are purchasing
Hyundai Genuine Parts? Look for the Hyundai Genuine Parts Logo on the package (see below).
Hyundai Genuine Parts exported to the United States are packaged with labels written only in English.
Hyundai Genuine Parts are only sold through Hyundai Dealerships.
authorized
" To find the closest authorized dealer call 1-800-826-CARS "
A100A03L
A100A01L
A100A02L
A100A04L
F6
SECTION
TABLE OF CONTENTS
FEATURES OF YOUR HYUNDAI
DRIVING YOUR HYUNDAI
WHAT TO DO IN AN EMERGENCY
CORROSION PREVENTION & APPEARANCE CARE
VEHICLE MAINTENANCE REQUIREMENTS
DO-IT-YOURSELF MAINTENANCE
EMISSION CONTROL SYSTEMS
CONSUMER INFORMATION, REPORTING SAFETY DEFECTS & BINDING ARBITRATION OF WARRANTY CLAIMS
VEHICLE SPECIFICATIONS
INDEX
10
F7
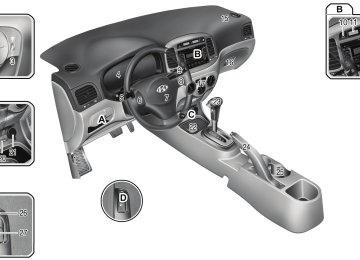
B250A02MC-AAT
INSTRUMENTS AND CONTROLS
F8
OMC010001N-2
1. Hood Release Lever ................................................... 1-93
2. Front Fog Light Switch (If Installed) ............................ 1-82
3. Panel Brightness Control Knob (Rheostat Switch) .... 1-80
4. Instrument Cluster ....................................................... 1-60
5. Multi-Function Light Switch ......................................... 1-76
6. Cruise Control Switches (If Installed) ....................... 1-103
7. Horn and Driver's Front Airbag ........................ 1-101, 1-42
8. Audio Remote Control Switch (If Installed) ............... 1-102
9. Windshield Wiper/Washer Switch(Front and Rear) (If Installed) ...................................... 1-78
10. Hazard Warning Light Switch ..................................... 1-81
11. Digital Clock ................................................................ 1-82
12. "PASSENGER AIR BAG OFF" Indicator ..................... 1-49
13. Rear Window Defroster Switch ................................... 1-8114. Audio System (If Installed) ........................................ 1-123
15. Passenger's Front Airbag ........................................... 1-42
16. Glove Box .................................................................... 1-88
17. Heating/Air Conditioning Control Panel (If Installed) 1-109
18. Multi Box ..................................................................... 1-89
19. Cigarette Lighter ......................................................... 1-82
20. AUX, USB and iPod® Port ......................................... 1-107
21. Power Outlet ............................................................... 1-83
22. Ashtray ........................................................................ 1-83
23. Shift Lever ..................................................................... 2-9
24. Parking Brake Lever ................................................... 1-91
25. Front Drink Holder ...................................................... 1-84
26. Trunk Lid Release Lever (If Installed) ........................ 1-97
27. Fuel Filler Lid Release Lever ..................................... 1-94CAUTION:
When installing a container of liquid air freshener inside the vehicle, do not place it near the instrument cluster nor on the instrument panel surface. If there is any leakage from the air freshener onto these areas (Instrument cluster, instrument panel or air ventilator), it may damage these parts. If the liquid from the air freshener does leak onto these areas, wash them with water immediately.
F9
YOUR VEHICLE AT A GLANCE
B255A03MC-AAT
INDICATOR SYMBOLS ON THE INSTRUMENT PANEL
SRS (Airbag) Warning Light
Trunk Lid / Tail Gate Open Warning Light
ABS Service Reminder Indicator (If Installed)
Low Fuel Level Warning Light
O/D OFF Indicator (Automatic transaxle only)
Turn Signal Indicator Lights
High Beam Indicator Light
Automatic Transaxle Position Indicator Light (If Installed)
Check Fuel Filler Cap Warning Light
Malfunction Indicator Light
Seat Belt Warning Light and Chime
Engine Coolant Temperature Warning Light
Manual Transaxle Shift Indicator (If Installed)
Cruise Indicator Light (If Installed)
Low Oil Pressure Warning Light
Parking Brake/Low Brake Fluid Level Warning Light
Charging System Warning Light
Cruise SET Indicator Light (If Installed)
Low Tire Pressure Telltale (If Installed)
TPMS (Tire Pressure Monitoring System) Malfunction Indicator (If Installed)
Door Ajar Warning Light and Chime
ECO ECO Indicator (If Installed)
* More detailed explanations of these items will be found begining on page 1-64.
F10
!
CALIFORNIA PROPOSITION 65 WARNING:
Items contained in motor vehicles or emitted from them are known to the State of California to cause cancer and birth defects or reproductive harm. These include: o Gasoline and its vapors o Engine exhaust o Used engine oil o Interior passenger compartment
components and materials
o Component parts which are subject
to heat and wear
In addition, battery posts, terminals and related accessories contain lead, lead compounds and other chemicals known to the State of California to cause cancer and reproductive harm.
F11
FEATURES OF YOUR HYUNDAI
Fuel Recommendations ................................................ 1-2
Breaking in Your New Hyundai .................................... 1-3
Keys .............................................................................. 1-3
Door Locks ................................................................... 1-4
Theft-Alarm System ...................................................... 1-8
Window Glass ............................................................ 1-11
Seats ........................................................................... 1-13
Seat Belts ................................................................... 1-22
Child Restraint System ............................................... 1-31
Advanced Supplemental Restraint (AIRBAG) System ...................................................................... 1-41
Instrument Cluster and Indicator Lights ..................... 1-60
Warning and Indicator Lights ...................................... 1-64
Trip Computer ............................................................. 1-73
Multi-Function Light Switch ......................................... 1-76
Windshield Wiper and Washer Switch ....................... 1-78
Sunroof ....................................................................... 1-84
Mirror ........................................................................... 1-89
Hood Release ............................................................. 1-93
Cruise Control System ............................................. 1-103
Heating and Cooling Control .................................... 1-108
Stereo Sound System .............................................. 1-119
Antenna ..................................................................... 1-122
Audio System ........................................................... 1-1221FEATURES OF YOUR HYUNDAI
FUEL RECOMMENDATIONS
B010A02MC-AAT
Use Unleaded Gasoline
UNLEADED FUEL ONLY
B010A01MC-A Unleaded gasoline with a Pump Octane Rating of 87 (Research Octane Number 91) or higher must be used in your Hyundai.
WARNING:
o Do not "top off" after the nozzle au- tomatically shuts off when refueling. o Tighten the cap until it clicks one " light will
time, otherwise the " illuminate.
o Always check that the fuel cap is installed securely to prevent fuel spillage in the event of an accident.
B010B01A-AAT
What About Gasohol? Gasohol (a mixture of 90% unleaded gasoline and 10% ethanol or grain alco- hol) may be used in your Hyundai. How- ever, if your engine develops driveability problems, the use of 100% unleaded gasoline is recommended. Fuels with unspecified quantities of alcohol, or alcohols other than ethanol, should not be used. Use of E85 fuel E85 fuel is an alternative fuel composed of 85 percent ethanol and 15 percent gasoline, and is manufactured for use in Flexible Fuel Vehicles. E85 is not com- patible with your vehicle. Use of E85 may result in poor engine performance and damage to your vehicle's engine and fuel system. Damage resulting from the use of E85 is not covered under Hyundai war- ranties.
B010D01A-AAT
Do Not Use Methanol Fuels containing methanol (wood alco- hol) should not be used in your Hyundai. This type of fuel can reduce vehicle per- formance and damage components of the fuel system.
CAUTION:
Your Hyundai's New Vehicle Limited War- ranty may not cover damage to the fuel system and any performance problems that are caused by the use of fuels con- taining methanol.
B010E01A-AAT
Gasolines for Cleaner Air To help contribute to cleaner air, Hyundai recommends you use gasolines treated with detergent additives, which help pre- vent deposit formation in the engine. These gasolines will help the engine run cleaner and enhance performance of the Emission Control System.
B010F01A-AAT
Operation in Foreign Countries If you are going to drive your Hyundai in another country, be sure to:
o Observe all regulations regarding reg-
istration and insurance.
o Determine that acceptable fuel is avail-
able.
BREAKING IN YOUR NEW HYUNDAI
B020A01S-AAT
During the First 1200 Miles (2000
Km) No formal "break-in" procedure is required with your new Hyundai. However, you can contribute to the economical opera- tion and durability of your Hyundai by observing the following recommenda- tions during the first 1200 miles (2000
km).o Whether going fast or slow, vary your
speed from time to time.
o Don't let the engine idle longer than 3
minutes at one time.
o Don't tow a trailer during the first 1,200
miles (2,000 km) of operation.
o Don't drive faster than 55 MPH (88 km/
h).
o While driving, keep your engine speed (rpm, or revolutions per minute) be- tween 2,000 rpm and 4,000 rpm.
o Use moderate acceleration. Don't start quickly or depress the accelerator pedal fully.
o For the first 200 miles (300 km), try to
avoid hard stops.
o Don't lug the engine (in other words, don't drive so slowly in too high a gear that the engine "bucks"-shift to a lower gear).
FEATURES OF YOUR HYUNDAI FEATURES OF YOUR HYUNDAI
KEYS
B030A01A-AAT
OMC025001
For greater convenience, the same key operates all the locks in your Hyundai. However, because the doors can be locked without a key, carrying a spare key is recommended in case you accidentally lock one key inside the car.1FEATURES OF YOUR HYUNDAI
B030B01NF-GAT
Record Your Key Number
B030B01MC A code number is recorded on the num- ber tag that came with the keys to your Hyundai. This key number tag should not be left with the keys but kept in a safe place, not in the vehicle. The key number should also be recorded in a place where it can be found in an emergency. If you need additional keys, or if you should lose your keys, your authorized Hyundai dealer can make new keys if you can supply the key number.
DOOR LOCKS
B040A01A-AAT
WARNING:
o Unlocked doors can be dangerous. Before you drive away (especially if there are children in the car), be sure that all the doors are securely closed and locked so that the doors cannot be opened from the inside. This helps ensure that the doors will not be opened accidentally. Also, when com- bined with the proper use of seat belts, locking the doors helps keep occupants from being ejected from the car in case of an accident.
o Before opening the door, always look
for and avoid oncoming traffic.
B040B02A-AAT
Locking and Unlocking Front Doors with a Key
UNLOCK
LOCK
OMC025005
o The door can be locked or unlockedwith a key.
o Lock the door by turning the key to- ward the front of the vehicle and un- lock it by turning the key toward the rear.
NOTE: o The driver's door can be unlocked by turning the key once toward the rear. If you wish to unlock all doors, turn the key again toward the rear within 4 seconds (With the central door locking system).
o If your vehicle is equipped with a transmitter, you can change the sys- tem to unlock all doors by turning the key once toward the rear. If you want this feature (central door unlock mode), refer to the "Keyless entry system" in this section.
B040C01MC-AAT
Locking from Outside
B040C04MC The doors can be locked without a key. To lock the doors, first push the inside lock switch to the "LOCK" position so that the red mark on the switch is not visible, then close the door.
NOTE: o When pushing the lock switch of the passenger's door to the "LOCK" po- sition, all doors can be locked.
o If your vehicle is equipped with the central door locking system, the door will not lock if the key is left in the ignition switch when the front doors are closed.
o When locking the door from outside, be careful not to lock the door with the ignition key left in the vehicle.
o To protect against theft, always re- move the ignition key, close all win- dows, and lock all doors and the trunk lid (4 Door) / tail gate (3 Door) when leaving your vehicle unat- tended.
FEATURES OF YOUR HYUNDAI FEATURES OF YOUR HYUNDAI
B040D01MC-AAT
Locking from the Inside
LOCK
UNLOCK
OMC025006
To lock the doors from the inside, simply close the door and push the lock switch to the "LOCK" position.
NOTE: o When pushing the lock switch of the passenger's door to the "LOCK" po- sition, all doors can be locked.
o When the door is locked, the red
mark on the switch is not visible.
o The driver's door can be opened by pulling the inside door handle even if the inside lock switch is pushed to the "LOCK" position.
1FEATURES OF YOUR HYUNDAI
WARNING:
Be careful not to pull the inside door handle while driving. If you pull the inside door handle, the door can be opened and you may be ejected from the vehicle and can be injured or killed.
B040E04A-AAT
CHILD-PROTECTOR REAR DOOR LOCK (4 Door)
B040E01MC Your Hyundai is equipped with left and right side "child-protector" rear door locks.
When the lock mechanism is engaged, the rear door cannot be opened from the inside. Its use is recommended when- ever there are small children in the rear seat. To engage the child-protector feature so that the door cannot be opened from the inside, move the child-protector lever to " position and close the door. Move the " " position when nor- the lever to the " mal door operation is desired. To open the door from the outside, pull the outside door handle.
B040G01MC-AAT
Central Door Locks (If Installed)
UNLOCK
LOCK
OMC029047
The central door locking switch is lo- cated on the driver's armrest. It is oper- ated by depressing the door lock switch. If any door is open when the switch is depressed to the "LOCK" position, the door will remain locked when closed.
NOTE: o When depressing the front portion of the door lock switch, all vehicle doors will lock.
o When depressing the rear portion of the switch, all vehicle doors will un- lock.
o The driver's door can be opened by pulling the inside door handle even if the front portion of the central door locking switch has been depressed to lock the doors.
o If the door is locked/unlocked mul- tiple times in rapid succession with either the vehicle key or door lock switch, the system may stop operat- ing temporarily in order to protect the circuit and prevent damage to system components.
o The central door locking is operated by turning the key in the driver's door lock toward the front or rear of the vehicle.
! WARNING:
Be careful not to pull the inside door handle while driving. If you pull the in- side door handle, the door can be opened and you may be ejected from the ve- hicle and can be injured or killed.
FEATURES OF YOUR HYUNDAI FEATURES OF YOUR HYUNDAI
B070F03O-AAT
KEYLESS ENTRY SYSTEM (If Installed)
3. At the same time all doors lock, the turn signal light will blink once to indi- cate that the system is locked.
This device complies with Part 15 of the FCC rules. Operation is subject to the following two conditions: 1. This device may not cause harmful
interference, and
2. This device must accept any interfer- ence received, including interference that may cause undesired operation.
! WARNING:
Changes or modifications not expressly approved by the party responsible for compliance could void the user’s au- thority to operate the equipment. If the keyless entry system is inoperative due to changes or modifications not expressly approved by the party re- sponsible for compliance, it will not be covered by your manufacturer’s ve- hicle warranty.
Locking doors 1. Close all doors. 2. Push the "LOCK" button on the trans-
mitter.
Unlocking doors 1. Push the "UNLOCK" button on the
transmitter.
2. Two turn unlock mode
At the same time the driver's door un- locks, the turn signal light will blink twice to indicate that the system is unlocked. If you wish to unlock all doors, press the "UNLOCK" button on the transmitter again within 4 seconds.
Central door unlock mode (If Installed) At the same time all doors unlock, the turn signal light will blink twice to indi- cate that the system is unlocked.
NOTE: Unlock mode conversion (two turn un- lock mode ↔ ↔ ↔ ↔ ↔ central door unlock mode) (If Installed)
The unlock mode is changed alternately by pressing the lock button and unlock button at the same time for 4 seconds or more. The turn signal light will blink four times to indicate that the mode conver- sion is completed.
1FEATURES OF YOUR HYUNDAI
NOTE: The transmitter will not work if any of following occur: - The ignition key is in ignition switch. - You exceed the operating distance
limit (10 m).
- The battery in the transmitter is weak. - Other vehicles or objects may be
blocking the signal.
- The weather is extremely cold. - The transmitter is close to a radio transmitter such as a radio station or an airport which can interfere with normal operation of the transmitter. When the transmitter does not work correctly, open and close the door with the ignition key. If you have a problem with the transmitter, contact an autho- rized Hyundai Dealer.
NOTE: Keep the transmitter away from water or any liquid. If the keyless entry system is inoperative due to exposure to water or other liquids, it will not be covered by your manufacturer vehicle warranty.
THEFT-ALARM SYSTEM
B070A01A-AAT
(If Installed) This system is designed to provide pro- tection from unauthorized entry into the car. This system is operated in three stages: the first is the "Armed" stage, the second is the "Alarm" stage, and the third is the "Disarmed" stage. If triggered, the system provides an audible alarm with blinking of the turn signal lights.
B070B02MC-AAT
Armed Stage
LOCK
B070B02MC-A
Park the car and stop the engine. Arm the system as described in the following para- graph.
1) Remove the ignition key from the igni-
tion switch.
2) Make sure that all doors, tail gate (3
Door) and engine hood are closed and latched.3) Lock the doors using the transmitter of
the keyless entry system.
After completion of the steps above, the turn signal lights will blink once to indi- cate that the system is armed.
The system can be armed by locking the doors with the key from the front doors or tail gate (3 Door). However, the hazard warning lights are not operated.
NOTE: If any door, tail gate (3 Door) or engine hood remains open, the system will not be armed. If this happens, rearm the system as described above.
CAUTION:
o Do not arm the system until all pas- sengers have left the car. If the sys- tem is armed while a passenger(s) remains in the car, the alarm may be activated when the remaining passenger(s) leaves the car.
o If the "LOCK" button is pressed once more within 4 seconds after pushing the "LOCK" button on the transmit- ter, the alarming horn will sound once to indicate that the system is armed.
B070D02MC-AAT
Disarmed Stage
UNLOCK
FEATURES OF YOUR HYUNDAI FEATURES OF YOUR HYUNDAI
NOTE: When the system is disarmed with the interior light switched to "DOOR", the interior light will illuminate for 30 sec- onds.
B070E01MC-AAT
Panic Warning
B070C02MC-AAT
Alarm Stage The alarm will be activated if any of the following occurs while the car is parked and the system is armed.
1) Any door, tail gate (3 Door) included, is opened without using the transmitter or the ignition key.
2) The engine hood is opened.
The alarming horn will sound and the turn signal lights will blink continuously for 27
seconds (This happens 3 times). To turn off the system, unlock the door with the transmitter or the ignition key.CAUTION:
Avoid trying to start the engine while the system is armed.
B070D02MC-A The system will be disarmed when the following step is taken:
The doors are unlocked by depressing the "UNLOCK" button on the transmitter or unlocked with the ignition key.
After depressing unlock button, the haz- ard warning lights will blink twice to indi- cate that the system is disarmed.
If any door, tail gate (3 Door) included, is not opened within 30 seconds, the sys- tem will be rearmed.
B070E02MC-A 1. Push the "PANIC" button on the trans-
mitter.
2. At the same time, the alarming horn will sound and the turn signal lights will blink continuously for 30 seconds. 3. To turn off the system, push any button on the transmitter or lock/unlock the doors by turning the key.
1FEATURES OF YOUR HYUNDAI 10
CAUTION:
Do not change, alter or adjust the theft- alarm system because it could cause the theft-alarm system to malfunction. The system should only be serviced by an authorized Hyundai dealer. Malfunctions caused by improper alter- ations, adjustments or modifications to the theft-alarm system are not covered by your vehicle manufacturer warranty.
CAUTION:
An inappropriately disposed battery can be harmful to the environment and hu- man health. Dispose the battery accord- ing to your local law(s) or regulation.
B070E02MC-AAT
Replacing the battery When the transmitter's battery begins to get weak, it may take several pushes on the button to lock or unlock the doors, and the LED will not light. Replace the battery as soon as possible. Battery type : CR2032
Replacement instructions: 1. Carefully separate the case with ablade screwdriver.
Battery
1KMA2003
2. Remove the old battery from the case and note the polarity. Make sure the polarity of the new battery is the same(+side facing up), then insert it in the transmitter.
WINDOW GLASS
B050A01MC-AAT
3FDA2015
To lower or raise the window, turn the window regulator handle clockwise or counterclockwise.WARNING:
When opening or closing the windows, make sure your passenger's arms, hands and body are safely out of the way.
FEATURES OF YOUR HYUNDAI FEATURES OF YOUR HYUNDAI
11
11NOTE: While driving with the rear windows down or with the sunroof (if installed) in an open (or partially open) position, your vehicle may demonstrate a wind buffeting or pulsation noise. This noise is a nor- mal occurrence and can be reduced or eliminated by taking the following ac- tions. If the noise occurs with one or both of the rear windows down, partially lower both front windows ap- proximately one inch. If you experience the noise with the sunroof open, slightly reduce the size of the sunroof opening.
B060A03MC-AAT
POWER WINDOWS (If Installed) 4 Door
3 Door
OMC029048
The power windows operate when the ignition key is in the "ON" position. The main switches are located on the driver's armrest and control the front (4/3 Door) and rear windows (4 Door) on both sides of the vehicle. The windows may be opened by depressing the appropriate window switch and closed by pulling up the switch. To open the window on the driver's side, press the switch (1) halfway down. The window moves as long as the switch is operated. To fully open the driver's window automatically, press the switch fully down. In automatic operation, the window will fully open even if you let go of the switch. To stop at the desired opening, pull up and release the switch.
1FEATURES OF YOUR HYUNDAI 12
CLOSE
OPEN
OMC029049
OMC025015
In order to prevent operation of the pas- senger front (4/3 Door) and rear windows (4 Door), a window lock switch (2) is provided on the armrest of the driver's door. To disable the power windows, press the window lock switch. To revert to normal operation, press the window lock switch a second time.
NOTE: The power windows can be operated for 30 seconds after the ignition key is turned to the "ACC" or "LOCK" posi- tions, or removed from the ignition switch. If the front doors are opened during this 30 second period, the power windows can no longer be operated with- out the ignition key turned to the "ON" position.
CAUTION:
o To prevent possible damage to the power window system, do not open or close two windows or more at the same time. This will also ensure the longevity of the fuse.
o Never try to operate the main switch on the driver's door and the indi- vidual door window switch in oppos- ing directions at the same time. If this is done, the window will stop and cannot be opened or closed.
vehicle.
WARNING - WINDOWS
o NEVER leave the ignition key in the
o NEVER leave any child unattended in the vehicle. Even very young chil- dren may inadvertently cause the vehicle to move, entangle them- selves in the windows, or otherwise injure themselves or others.
o Always double check to make sure all arms, hands, head and other ob- structions are safely out of the way before closing a window.
o Do not allow children to play with the power windows. Keep the driver’s door power window lock switch in the LOCK position (depressed). Serious injury can result from unintentional window operation by the child.
o Do not extend any head or arms outside through the window opening while driving.
SEATS
B080A01MC-AAT
4 Door
FEATURES OF YOUR HYUNDAI FEATURES OF YOUR HYUNDAI
13
13Driver’s seat 1. Seat forward/rearward lock release
lever
2. Seatback recliner control lever 3. Seat cushion height control lever
Front passenger’s seat 4. Seat forward/rearward lock release
lever
5. Seatback recliner control lever
Rear seats 6. Seatback folding lever (If Installed) 7. Armrest (If Installed)
3 Door
OMC029025B
1FEATURES OF YOUR HYUNDAI 14
B080A01FC-AAT
ADJUSTABLE SEATS
! WARNING:
o Never adjust the driver’s seat while the vehicle is moving. Any sudden or unexpected movement of the seat could cause you to lose control of the vehicle resulting in an accident. Only adjust the driver’s seat when the vehicle is stationary.
o Do not sit or lean unnecessarily close to the airbag. Position the seat so that you can sit as far back as pos- sible from the airbag and still com- fortably reach all controls.
B080B03A-AAT
FRONT SEATS Adjusting Seat Forward and Rear- ward
! WARNING:
After adjusting the seat, always check that it is securely locked into place by attempting to move the seat forward or rearward without using the lock release lever. Sudden or unexpected move- ment of the driver's seat could cause you to lose control of the vehicle result- ing in an accident.
OMC029026
To move the seat toward the front or rear, pull the lock release lever upward. This will release the seat on its track so you can move it forward or rearward to the desired position. When you find the position you want, release the lever and slide the seat for- ward or rearward on its track until it locks into the desired position and cannot be moved further.B080C02A-AAT
Adjusting Seatback Angle
OMC029027
To recline the seatback, lean forward to take your weight off it, then pull up on the recliner control lever at the outside edge of the seat. Now lean back until the de- sired seatback angle is achieved. To lock the seatback into position, release the recliner control lever.! WARNING:
Riding with a reclined seatback in- creases your chance of serious or fatal injuries in the event of a collision or sudden stop. The protection of your restraint system (seat belts and airbags) is greatly reduced by reclining your seat. Seat belts must be snug against your hips and chest to work properly. The more the seatback is reclined, the greater the chance that an occupant's hips will slide under the lap belt or the occupant's neck will strike the shoulder belt. Driv- ers and passengers should always sit well back in their seats, properly belted, and with the seatbacks upright.
FEATURES OF YOUR HYUNDAI FEATURES OF YOUR HYUNDAI
15
15C010104AMC
Headrest
OBH038075L The driver's and front passenger's seats are equipped with a headrest for the occupant's safety and comfort. The headrest not only provides comfort for the driver and front passenger, but also helps to protect the head and neck in the event of a collision.
1FEATURES OF YOUR HYUNDAI 16
! WARNING:
o For maximum effectiveness in case of an accident, the headrest should be adjusted so the middle of the headrest is at the same height as the center of gravity of an occupant's head. Generally, the center of grav- ity of most people's head is similar with the height of the top of their eyes. Also, adjust the headrest as close to your head as possible. For this reason, the use of a cushion that holds the body away from the seatback is not recommended.
o Do not operate the vehicle with the headrests removed as severe injury to the occupants may occur in the event of an accident. Headrests may provide protection against neck inju- ries when properly adjusted.
o Do not adjust the headrest position of the driver's seat while the vehicle is in motion.
Adjusting the height up and down
Removal and installation
OMC029029
To raise the headrest, pull it up to the desired position (1). To lower the head- rest, push and hold the release button (2) on the headrest support and lower the headrest to the desired position (3).OMC029030
To remove the headrest, raise it as far as it can go then press the release button (1) while pulling upward (2). To reinstall the headrest, put the headrest poles (3) into the holes while pressing the release button (1). Then adjust it to the appropriate height.! WARNING:
Make sure the headrest locks in position after adjusting it to properly protects the