- 2003 Honda Civic Coupe Owners Manuals
- Honda Civic Coupe Owners Manuals
- 1994 Honda Civic Coupe Owners Manuals
- Honda Civic Coupe Owners Manuals
- 2005 Honda Civic Coupe Owners Manuals
- Honda Civic Coupe Owners Manuals
- 2008 Honda Civic Coupe Owners Manuals
- Honda Civic Coupe Owners Manuals
- 1996 Honda Civic Coupe Owners Manuals
- Honda Civic Coupe Owners Manuals
- 2007 Honda Civic Coupe Owners Manuals
- Honda Civic Coupe Owners Manuals
- 2011 Honda Civic Coupe Owners Manuals
- Honda Civic Coupe Owners Manuals
- 1993 Honda Civic Coupe Owners Manuals
- Honda Civic Coupe Owners Manuals
- 2001 Honda Civic Coupe Owners Manuals
- Honda Civic Coupe Owners Manuals
- 2012 Honda Civic Coupe Owners Manuals
- Honda Civic Coupe Owners Manuals
- 1998 Honda Civic Coupe Owners Manuals
- Honda Civic Coupe Owners Manuals
- 1995 Honda Civic Coupe Owners Manuals
- Honda Civic Coupe Owners Manuals
- 1999 Honda Civic Coupe Owners Manuals
- Honda Civic Coupe Owners Manuals
- 2010 Honda Civic Coupe Owners Manuals
- Honda Civic Coupe Owners Manuals
- 1997 Honda Civic Coupe Owners Manuals
- Honda Civic Coupe Owners Manuals
- 2006 Honda Civic Coupe Owners Manuals
- Honda Civic Coupe Owners Manuals
- 2004 Honda Civic Coupe Owners Manuals
- Honda Civic Coupe Owners Manuals
- 2009 Honda Civic Coupe Owners Manuals
- Honda Civic Coupe Owners Manuals
- 2002 Honda Civic Coupe Owners Manuals
- Honda Civic Coupe Owners Manuals
- 2000 Honda Civic Coupe Owners Manuals
- Honda Civic Coupe Owners Manuals
- Download PDF Manual
-
Keys and Locks
Both doors lock when you push the lock tab on the driver's door. Only the driver's door unlocks when you use the key or lock tab. To unlock the passenger's door, use the master door lock switch or the lock tab on each door.
The doors can also be locked and unlocked from the outside with the key.
Instruments and Controls
Main MenuTable of Contentsst Keys and Locks
Trunk
TRUNK RELEASE HANDLE
You can open the trunk in two ways:
To close the trunk, press down on the trunk lid.
Pull the trunk release handle to the left of the driver's seat. Use the master key to open the trunk lock. The valet key does not work in this lock.
See page 90 for cargo loading and weight-limit information. Keep the trunk lid closed at all times while driving to avoid damaging the lid and getting exhaust gas in the interior. See Carbon Monoxide Hazard on page 25.
MASTER KEY
To protect items in the trunk when you need to give the key to someone else, lock the trunk release handle with the master key and give the other person the valet key.
Instruments and Controls
Main MenuTable of Contentsst Adjust the seat before you start driving.
Front Seat Adjustments
To adjust the seat forward and backward, pull up on the lever under the seat cushion's front edge. Move the seat to the desired position and release the lever. Try to move the seat to make sure it is locked in position.
To change the angle of the seat- back, pull up on the lever on the outside of the seat bottom. Move the seat-back to the desired position and release the lever. Let the seat-back latch in the new position.
Seat Adjustments
Reclining the seat-back can decrease the protection you get from your seat belt in a crash.
You can slide under the seat belt and be seriously injured.
Adjust the seat-back to an upright position and sit well back in the seat.
Instruments and Controls
Main MenuTable of Contentsst Folding Rear Seat
Rear Seat Access
Folding Rear Seat
Passenger side only To get in or out of the rear seat, pull up on the lever at the side of the front passenger's seat. The seat-back will fold down and the front passenger's seat will move forward.
The seat will lock in place when it is pushed back.
The back of the rear seat folds down, giving you direct access to the trunk. The seat-back can be released from inside the car or inside the trunk.
To release the seat-back from inside the trunk, pull the release loop under the rear shelf. Push the seat-back down; then, let go of the loop.
To fold down the seat-back from inside the car, insert the master key in the lock on the rear shelf. Turn the key clockwise, pull down the top of the seat-back; then, release the key.
To lock the seat-back upright, push it firmly against the rear shelf. Make sure it is latched in place by pulling on the top of the seat.
Instruments and Controls
Main MenuTable of Contentsst Folding Rear Seat, Power Windows
Make sure all items in the trunk, or items extending through the opening into the back seat, are tied down. Loose items can fly forward and cause injury if you have to brake hard. See Loading Cargo on page 90.
Never drive with the seat-back folded down and the trunk lid open. See Carbon Monoxide Hazard on page 25.
Power Windows On U.S. EX model Your car's windows are electrically powered. Turn the ignition switch to ON (II) to raise or lower a window.
Each door has a switch that controls its window. To open the window, push the switch down and hold it. Release the switch when you want the window to stop. Close the window by pushing the switch up and holding it.
DRIVER'S WINDOW SWITCH
MAIN SWITCH
The driver's armrest has a master power window control panel. To open the passenger's window, push down on the appropriate switch and hold it down until the window reaches the desired position. To close the window, push up on the window switch. Release the switch when the window gets to the position you want.
The master control panel also contains these extra features:
AUTO - To open the driver's window fully, push the window switch firmly down and release it. The window automatically goes all the way down. To stop the window from going all the way down, push the window switch up briefly.
To open the driver's window only partially, push the window switch down lightly and hold it. The window will stop as soon as you release the switch.
The AUTO function only works to lower the driver's window. To raise the window, you must push the window switch up and hold it until the window reaches the desired position.
Instruments and Controls
Main MenuTable of Contentsst Moonroof
Power Windows, Moonroof
The MAIN switch controls power to the passenger's windows. With this switch off, the passenger's window cannot be raised or lowered. The MAIN switch does not affect the driver's window. Keep the MAIN switch off when you have children in the car so they do not injure themselves by operating the window unintentionally.
Closing a power window on a child's hands or fingers can cause serious injury.
Make sure children are away from the windows before closing them.
Instruments and Controls
Only on EX in the U.S. and Si model in Canada Use the switches on the dash- board under the left vent to operate the moonroof. The ignition must be ON (II).
To lift the rear of the moonroof for ventilation, push the button. To slide the moonroof back, push the switch. Hold it until the moonroof reaches the
desired position, then release the switch.
To close the moonroof, press and hold the
switch.
Closing the moonroof on someone's hands or fingers can cause serious injury.
Make sure passengers are clear of the moonroof before closing it.
NOTICE If you try to open the moonroof in below-freezing temperatures, or when it is covered with snow or ice, you can damage the moonroof panel or motor.
Main MenuTable of Contentsst Sunshade
Mirrors
Manual Door Mirrors
Sunshade, Mirrors
You can slide the sunshade to any position when the moonroof is closed. The sunshade slides open with the moonroof. You must close it manually.
Keep the inside and outside mirrors clean and adjusted for best visibility. Be sure to adjust the mirrors before you start driving.
Only on DX models The outside mirrors can be adjusted by moving the knob on the inside of the door.
TAB
The inside mirror has day and night positions. The night position reduces glare from headlights behind you. Flip the tab on the bottom edge of the mirror to select the day or night position.
Instruments and Controls
Main MenuTable of Contentsst Power Mirrors
Adjusting the Power Mirrors
SELECTOR SWITCH
On the EX in the U.S. and Si in Canada Adjust the outside mirrors with the adjustment switch on the left side of the dashboard:
1. Turn the ignition switch ON (II).
2. Move the selector switch to L
(driver's side) or R (passenger's side).
3. Push the appropriate edge of
the adjustment switch to move the mirror right, left, up, or down.
4. When you finish, move the
selector switch to the center (OFF) position. This turns off the adjustment switch so you can't move a mirror out of position by accidentally bumping it.
Instruments and Controls
The outside mirror on the passenger's side has curved glass. Objects look farther away than they are. Use this mirror to get a "wide view." Don't use it to judge the distance of things behind you.
Main MenuTable of Contentsst Parking Brake
Glove Box
GLOVE BOX
Open the glove box by pulling the handle. Close it with a firm push.
To apply the parking brake, pull the lever up fully. To release it, pull up slightly, push the button, and lower the lever. The parking brake light on the instrument panel should go out when the parking brake is fully released (see page 31).
NOTICE Driving the car with the parking brake applied can damage the rear brakes and axles.
Parking Brake, Glove Box
An open glove box can cause serious injury to your passenger in a crash, even if the passenger is wearing the seat belt.
Always keep the glove box closed while driving.
Instruments and Controls
Main MenuTable of Contentsst Digital Clock
Digital Clock
RESET
EX models in the U.S. and Si models in Canada The digital clock displays the time with the ignition switch ON (II). To see the time with the ignition off, press and hold the wide button under the clock.
To set the clock: 1. Turn the ignition switch
ON (II) to display the time.
2. Swing down the front cover of
the wide button under the clock display. You will see H, M, and RESET buttons.
Instruments and Controls
3. Press and hold the HOUR
button until the hour advances to the desired time.
4. Press and hold the MIN. button until the numbers advance to the desired time.
You can use the RESET button to quickly set the time to the nearest hour. If the displayed time is before the half hour, pressing RESET sets the clock back to the previous hour. If the displayed time is after the half hour, pressing RESET sets the clock forward to the beginning of the next hour.
For example:
1:06 would RESET backward to 1:00. 1:52 would RESET forward to 2:00.
Main MenuTable of Contentsst Beverage Holder
Beverage Holder, Vanity Mirror
Vanity Mirror
To open the beverage holder, push on the top. The beverage holder lid is spring-loaded and will pop open. To close it, push it down until it latches.
Use the beverage holder only when the car is parked. If you place cups in the holder while driving, the liquid may spill when you go over bumps or around corners.
Only on EX in the U.S. and Si model in Canada To use the vanity mirror, pull down the sun visor and swing down the cover.
Be careful when you are using the beverage holder. Spilled liquids can damage the upholstery, carpeting, and electrical components in the interior. If the liquid is very hot, it can scald you or your passengers.
Instruments and Controls
Main MenuTable of Contentsst Cigarette Lighter, Ashtrays
Cigarette Lighter
Ashtrays
The ignition switch must be in ACCESSORY (I) or ON (II) for the cigarette lighter to work. To heat up the lighter, push it in. It will pop out when it is ready for use. Do not hold the lighter in while it is heating up, you could cause it to overheat.
Open the front ashtray by pulling on the bottom edge. Push it in to close it.
To remove the ashtray for empty- ing, push down on the metal plate inside, then pull the ashtray out completely.
The rear ashtray is at the rear end of the center console. Open the ashtray by swinging the upper edge of the lid down. To remove the ashtray for emptying, open it then lift up and out.
NOTICE Use the ashtray only for ciga- rettes, cigars and other smoking materials. To prevent a possible fire and damage to your car, don't put paper or other things that can burn in the ashtrays.
Instruments and Controls
Main MenuTable of Contentsst Interior Light
DOOR ACTIVATED
The interior light has a three- position switch. In the OFF (forward) position, the light does not come on. In the center position, the interior light comes on when you open either front door. In the ON (rearward) position, the interior light stays on continuously.
Interior Light
Instruments and Controls
Main MenuTable of Contentsst Comfort and Convenience Features
The heating/ventilation system in your car, when combined with the optional air conditioner, provides a comfortable driving environment in all weather conditions.
U.S. EX and Canada Si models The standard audio system is very versatile. To get the most benefit from this system, read its description in this manual.
The anti-theft feature on your radio disables the system. To get the system working again you must enter a code number as described in this manual.
For other models Refer to the operating instructions that came with the optional audio system you selected.
Heating and Cooling . . . . . . . . .. 62
What Each Control Does . .. 64
How to Use the System . . . .. 65Controlling Air
Flow Direction . . . . . . .. 65
Ventilation . . . . . . . . . . .. 65
To Cool with A/C . . . . . .. 66
To Heat . . . . . . . . . . . . . .. 67
To Heat and Dehumidify with Air Conditioning . 67
To Defog and Defrost . .. 68
To Turn Everything Off . 68
Audio System . . . . . . . . . . . . . . .. 69
Operating the Radio . . . . . .. 69
Presetting . . . . . . . . . . . . . . .. 70
Adjusting the Sound . . . . . .. 71
Radio Frequencies . . . . . . . .. 72
Operating theCassette Player . . . . . . . . .. 73
Cassette Player Care . . . . . .. 75
Operating theCD Player/Changer . . . . .. 76
Comfort and Convenience Features
Main Menust Heating and Cooling
This system has full heating, ventilation, and air conditioning (optional) capabilities. You can adjust the system controls to mix these in various combinations. The air flows into the interior at three possible levels that you can select.
A Genuine Honda air conditioning system is available from your dealer. It meets Honda's high quality standards and is designed to fit your car. If you purchased your car without air conditioning, it can be installed at a later time. Please contact your dealer for more information.
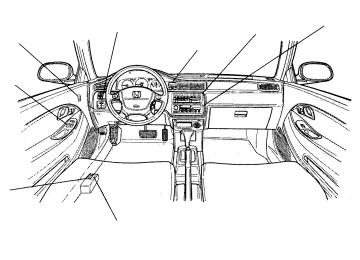
CENTER VENT
SIDE VENT
The direction of air flow from the vents in the center and each side of the dashboard is adjustable. Move the tab in the center of each vent up and down and side to side.
The side and upper vents can be opened and closed with the dials next to them.
The heating and cooling system draws air through the exterior vents at the bottom of the wind- shield. Keep these vents clear of leaves and other debris.
Comfort and Convenience Features
Main MenuTable of Contentsst Heating and Cooling
UPPER VENT
OPEN CLOSE
Comfort and Convenience Features
Main MenuTable of Contentsst Heating and Cooling
What Each Control Does
Fan Control Lever Sliding this lever to the right increases the fan speed, which increases air flow.
Temperature Control Lever Sliding this lever to the right increases the temperature of air flowing through the system.
Mode Buttons These buttons control the direction of air flow. The indicator light shows which button is controlling air flow.
Air Conditioning (A/C) Switch This switch turns the air conditioner ON and OFF. The indicator in the switch lights when the A/C is ON.
MODE BUTTONS
RECIRCULATED AIR AIR CONDITIONING
ON/OFF SWITCH
FRESH AIR
TEMPERATURE CONTROL LEVER
FAN CONTROL LEVER
Fresh Air and Recirculation Buttons These two buttons control the source of air going into the system. In Fresh Air mode, air comes from outside the car. In Recirculation mode, the interior air recycles through the system.
Comfort and Convenience Features
Main MenuTable of Contentsst Heating and Cooling
Ventilation Your car has a flow-through ventilation system. Air enters the car through vents in front of the windshield. It circulates through the interior then exits through vents near the rear window. This system provides fresh air even when the car is standing still. To bring in outside air, press the button. Set the fan at a
comfortable speed.
How to Use the System This section covers the best way to use the system for ventilation, cooling, dehumidifying, defrosting and heating. In most cases, the mode and air source selections are only recommendations. You may prefer different settings.
Use mode to heat or cool the interior more quickly, or to keep out smoke and dust. Leaving the system in recirculation mode with the air conditioning off can cause the windows to fog up. Switch to the interior reaches a comfortable temperature or the outside smoky, dusty condition clears.
mode as soon as
The engine must be running for the heater and air conditioning system to provide hot and cold air. The heater uses engine coolant to warm the air. If the engine is cold, it will be several minutes before you feel warm air circulating.
Air conditioning does not depend on engine temperature. It can produce cold air almost immediately.
Controlling Air Flow Direction Air flows into the interior at three levels: Toward the floor through the dash vents toward the windshield and side windows You select the air flow level or combination of levels with the five mode buttons.
and
Comfort and Convenience Features
continued
Main MenuTable of Contentsst Heating and Cooling
To Cool with A/C To operate the air conditioning system, press the air conditioning switch. Set the fan to the desired speed. You can also use the mode button to direct air out of the dash and heater vents.
To cool the interior down rapidly after the car has been sitting in the sun:
1. Start the engine.
2. Turn on the A/C by pressing
the switch.
3. Set the fan to maximum
speed.
4. Open the windows partially.
Select
and
MODE BUTTONS
AIR CONDITIONING ON/OFF SWITCH
TEMPERATURE CONTROL LEVER
FAN CONTROL LEVER
When the interior reaches a comfortable temperature, close the windows and set the system for cooling as described above.
The air conditioning places an extra load on the engine. Watch the coolant temperature gauge (see page 35) when using the A/C in heavy traffic or driving up long hills. If it moves near the red zone, turn off the air conditioning until the gauge reads normally.
Comfort and Convenience Features
Main MenuTable of Contentsst To Heat
To warm the interior.
1. Start the engine.
2. Select 3. Switch the fan to the desired
and
speed.
4. Adjust the warmth of the air with the temperature control lever.
To Heat and Dehumidify with Air Conditioning Air conditioning removes moisture from the air as it operates. When used in combination with the heater, it makes the interior warm and dry.
1. Switch the fan on. 2. Turn on the air conditioning.
3. Select
and press any
desired mode button.
Heating and Cooling
MODE BUTTONS
AIR CONDITIONING ON/OFF SWITCH
TEMPERATURE CONTROL LEVER
FAN CONTROL LEVER
4. Adjust the temperature control lever so the mixture of heated and cooled air feels comfortable.
This setting is suitable for all driving conditions whenever the outside temperature is above 32°F (0°C).
Comfort and Convenience Features
Main MenuTable of Contentsst To Turn Everything Off To shut off the system temporarily, slide the fan speed and temperature control levers all the way to the left.
You should only shut the system completely off for the first few minutes of driving in cold weather, until the engine coolant warms up enough to operate the heater. Keep the fan on at all other times so stale air does not build up in the interior.
Heating and Cooling
To Defog and Defrost To remove fog from the inside of the windows: 1. Switch the fan on.
2. Turn on the air conditioning.
3. Select
and
4. Adjust the temperature control
lever so the airflow from the defroster vents feels warm.
5. Turn on the rear window
defogger to help clear the rear window.
To remove exterior frost or ice from the windshield and side windows after the car has been sitting out in cold weather: 1. Start the engine.
2. Select
and
3. Switch the fan and temperature
controls to maximum.
To rapidly remove exterior frost or ice from the windshield (on very cold days), first select
Once the windshield is
clear, select fogging the windows.
to avoid
These settings direct all the air flow to the defroster vents at the base of the windshield and each front door window. The air flow will get warmer and clear the windows faster as the engine warms up. You can close the side vents with the dial beside each vent. This will send more warm air to the windshield defroster vents.
For safety, make sure you have clear view through all the windows before driving away.
Comfort and Convenience Features
Main MenuTable of Contentsst AM/FM/Cassette Stereo Audio System U.S. EX and Canada Si Your Honda audio system is easy to use and will give clear AM/FM reception. The preset buttons allow you to select six stations on AM and 12 stations on FM.
The anti-theft feature disables the system if it is disconnected from the car's battery. To get the system working again, you must enter a code number. See page 79.
The cassette system uses Dolby B* noise reduction to give excellent sound reproduction. The system also senses when a metal or a chromium dioxide (CrO adjusts accordingly.
) tape is being played and
Audio System
ON/OFF/VOL KNOB
AM BUTTON
STEREO INDICATOR
TUNE/SEEK BAR
PRESET BUTTONS
FM BUTTON
*Dolby noise reduction manufac- tured under license from Dolby Laboratories Licensing Corpora- tion. "Dolby" and the symbol are trademarks of Dolby Labora- tories Licensing Corporation.
Operating the Radio The ignition switch must be in ACCESSORY (I) or ON (II) to operate the audio system. Turn the system on by turning the ON/OFF/VOL knob clockwise. The radio comes on and displays the frequency of the station it was last tuned to.
Adjust the volume by turning the ON/OFF/VOL knob.
Comfort and Convenience Features
Main MenuTable of Contentsst Audio System
Select the band you want to listen to by pressing the AM or FM1/ FM2 button. You will see the selected band and the frequency in the display.
ST will be displayed next to the frequency if the station is broadcasting in FM stereo. The AM stereo feature is not available.
You can use any of three methods to find radio stations on the selected band: TUNE, SEEK, or the Preset buttons.
The TUNE function lets you find a desired frequency. Push the right side ( ) of the TUNE/SEEK bar to change to a higher frequency, and the left side ( ) of the bar to change to a lower frequency.
To change the frequency up or down a single increment, push and release the TUNE/SEEK bar.
ON/OFF/VOL KNOB
AM BUTTON
STEREO INDICATOR
TUNE/SEEK BAR
PRESET BUTTONS
FM1 / FM2
The SEEK function searches the band for a station with a strong signal. Depending on which way you push the TUNE/SEEK bar, the system searches up or down from the current frequency. Push the bar until you hear a beep, then release it. The system searches until it finds a station with a strong signal, then stops.
Presetting The preset buttons allow you to store radio frequencies for later selection. Each button will store one frequency on the AM band, and two on the FM band. To store a frequency:
1. Select the desired band, AM
or FM. FM1 and FM2 allow you to store two frequencies with each Preset button.
Comfort and Convenience Features
Main MenuTable of Contentsst 2. Use the TUNE or SEEK
function to tune the radio to a desired station.
3. Pick the Preset button you want for that station. Press the button and hold it until you hear a beep. The light in the indicator will come on and the station selected will show in the display.
4. Repeat steps 1 to 3 to store a total of six stations on AM and 12 on FM.
Once that station's frequency is stored, simply press and release the proper Preset button to tune to it. If you want to change any Preset button's selection, store another frequency as described. The frequencies you preset will be lost if your car's battery goes dead or is disconnected.
Audio System
ON/OFF/VOL KNOB
AM BUTTON
STEREO INDICATOR
TUNE/SEEK BAR
PRESET BUTTONS
FM1/ FM2
BASS/ TREBLE
BALANCER/ FADER
Adjust the side-to-side sound balance with the knob. Push the knob back in when you are done.
Adjusting the Sound Use the Balance and Fader controls to adjust the sound "direction." The Balance control moves sound left to right. The Fader control moves it front to back.
To use either control, push on the knob to get it to pop out. Adjust the front-to-back sound to your liking with the outside ring.
Comfort and Convenience Features
Main MenuTable of Contentsst Audio System
The illumination for the radio controls comes on with the instrument panel lights, even if the radio is off. You can use the Balance control to turn off the radio panel illumination even with the radio on. Push the control knob so it pops out, then pull it out slightly further. Check this control if the control panel lights do not come on with the instrument panel lights.
Use the Bass and Treble controls to adjust the tone quality to your liking. Push on the knob to get the controls to pop out. Adjust the bass level with the outer ring and the treble level with the knob. When finished, push the knobs back in so there is less chance of accidentally changing your settings.
ON/OFF/VOL KNOB
AM BUTTON
STEREO INDICATOR
TUNE/SEEK BAR
PRESET BUTTONS
FM1/ FM2
BASS/ TREBLE
BALANCER/ FADER
Radio Frequencies Your Honda's radio can tune in all frequencies in both the AM and FM bands. Those bands cover these frequencies:
AM band 530 to l710 kilohertz FM band 87.7 to 107.9 megahertz
Radio stations on the AM band are assigned frequencies at least 10 kilohertz apart (530, 540, 550). Those on the FM band are assigned frequencies at least 0.2
megahertz apart (87.9, 88.1, 88.3).Comfort and Convenience Features
Main MenuTable of Contentsst Stations must use these exact frequencies. It is fairly common for stations to round-off the frequency in their advertising, so your radio will show a frequency of 100.9 even though the announcer may call the station "FM101."
Operating the Cassette Player Turn the system ON. Insert the cassette into the slot with the tape opening to the right. Push the cassette in most of the way. The drive will pull it in the rest of the way and begin to play.
or will light to show
The you which side of the cassette is playing. The indicates the side you inserted facing upward is now playing. To play the other side of the tape, press the PROG button.
EJECT BUTTON
REWIND BUTTON
CASSETTE SLOT
FAST FORWARD BUTTON
TAPE DIRECTION INDICATOR
Audio System
PROGRAM BUTTON
PLAY BUTTON
TMS BUTTON
DOLBY BUTTON
The system also has an auto- reverse feature. It will automati- cally reverse direction when it reaches the end of the cassette.
If the tape was recorded with Dolby "B" noise reduction, turn it on by pressing the button.
To remove the cassette from the drive, press the EJECT button. The system automatically ejects the cassette whenever you turn off the system or the ignition switch.
Comfort and Convenience Features
Main MenuTable of Contentsst Audio System
Cassette Search Functions Once a cassette is playing, you can use the FF, REW, or TMS function to look for desired songs or passages.
Press the REW button to rewind the cassette. Press the FF button to fast forward. The cassette will stop playing and will rewind or fast forward. To stop rewind or fast forward, press the PLAY button. If the system reaches the end of the cassette while in fast forward or rewind, it auto- matically stops that function, reverses direction, and begins to play.
The TMS function lets you skip to the beginning of a song or other passage.
EJECT BUTTON
REWIND BUTTON
CASSETTE SLOT
FAST FORWARD BUTTON
TAPE DIRECTION INDICATOR
PROGRAM BUTTON
PLAY BUTTON
TMS BUTTON
DOLBY BUTTON
Press the TMS button and then the FF button or REW button. The tape will automatically advance to the beginning of the next song, or return to the beginning of the song just played. When the system senses a silent period on the tape, it goes back to PLAY mode.
The TMS function uses silent periods on the tape to find the end of a selection. This feature may not work satisfactorily on tapes that have almost no gap between songs, a high noise level between songs, or silent periods in the middle of songs.
Comfort and Convenience Features
Main MenuTable of Contentsst Caring for Cassettes Damaged cassettes can jam inside the drive or cause other problems. See page 76 for information on cassette care and protection.
Caring for the Cassette Player The cassette drive picks up dirt and oxides whenever you play a tape. This builds up over time and causes the sound quality to degrade. To prevent this, you should clean the cassette drive after every 30 hours of use. Your Honda dealer has a cleaning kit available for this purpose.
After 30 hours of tape use, you will see CLEAN flashing for 5 seconds in the display when you insert a tape into the tape slot. If you are already regularly cleaning the tape drive at least every 30 hours, reset the indicator by pressing the FM1
button while the system is in the tape operation mode. Hold the button until you hear a beep and the CLEAN indicator goes out.Audio System
If you do not clean the cassette drive regularly, it may eventually become impossible to remove the deposits with a normal cleaning kit.
The cassette player automatically ejects cassettes that do not play normally. If it ejects a cassette before it begins to play, it is probably defective and should not be inserted again. You may have a cassette suddenly stop playing, reverse directions once or twice and then eject. This is normally an indication the tape is wound unevenly. It should play normally after being manually rewound.
Use 100-minute or shorter cassettes. Cassettes longer than 100 minutes use thinner tape that may break or jam the drive.
Comfort and Convenience Features
Main MenuTable of Contentsst Audio System
Look at a cassette before you insert it. If the tape is loose, tighten it by turning one of the hubs with a pencil or your finger.
If the label is peeling off, do not put it in the player. It may cause the cassette to jam in the drive mechanism when you try to eject it.
Do not leave cassettes sitting where they are exposed to high heat or humidity, such as on top of the dashboard or in the player. If a cassette is exposed to extreme heat or cold, let it reach a moderate temperature before putting it in the player.
Operating the CD Player/ Changer (Optional) Your dealer has an in-dash Honda Compact Disc player or a trunk-mounted changer available for your car. The changer holds up to six discs, providing several hours of continuous pro- gramming. You operate the CD player and the changer with the same controls used for the radio.
Loading the CD Changer Load the CDs in the magazine and load the magazine into the changer according to the instructions that came with the changer unit.
To operate the CD player or changer, the ignition key must be in the ACCESSORY (I) or ON (II). If you were listening to a cassette tape, eject it before listening to a CD.
CD Player Insert the disc in the player. Push the CD button on the player, "CD" will show in the display and the disc will start to play.
CD Changer Push the CD button on the radio, the display will show "CD" and the track last listened to will play. When that disc ends, the next disc in the magazine is loaded and played.
After disc 6 has completed the system will return to disc 1. To make your own disc selection, push one of the corresponding preset buttons. Your selection will appear in the display and start playing.
If you try to select an empty slot in the magazine, the system will select and play the first track of the next disc in the magazine.
Comfort and Convenience Features
Main MenuTable of Contentsst You can use the TUNE/SEEK bar while a disc is playing to select passages and change tracks. To move rapidly forward within a track, press and hold the side of the TUNE/SEEK bar. Press and hold the side to move rapidly backward within a track. You will hear a beep a half second after you press either side of the bar. Keep pressing the bar until you think the track has advanced or returned to the desired position. The disc will start playing when you release the bar.
side and
If you press the release it before you hear a beep, the system will skip forward to the beginning of the next track on the CD. It will skip backward to the beginning of the current track if you press the release it.
side and
Audio System
TUNE/SEEK BAR
CD BUTTON
If you change modes to radio or tape while a CD is playing, then change back to CD mode, the same disc and track will play.
If you turn off the system while a CD is playing, either with the ON/OFF/VOL knob or by turning off the ignition, the system will begin playing the same disc and track when you turn it back on.
To return to the radio function, press the AM/FM button.
Comfort and Convenience Features
Main MenuTable of Contentsst Audio System
CD Error Indications If you see an error indication on the display, find the cause in the chart to the right. If you cannot clear the error indication, take the car to your Honda dealer.
Comfort and Convenience Features
Main MenuTable of Contentsst Audio System
You will have to store your favorite stations in the Preset buttons after the system begins working. Your original settings were lost when power was disconnected.
On U.S. EX and Canadian Si models Your car's audio system will disable itself if it is disconnected from electrical power for any reason. To make it work again, the user must enter a specific five-digit code in the Preset buttons. Because there are hundreds of number combinations possible from five digits, making the system work without knowing the exact code is nearly impossible.
You should have received two copies of a card that lists your audio system's code number and serial number. It is best to store one of these cards in a safe place at home, and to keep the other in your wallet or purse. In addition, you should write the audio system's serial number in this Owner's Manual. If you should happen to lose both cards, you must obtain the code number by
having your Honda dealer contact American Honda. To do this, he will need the system's serial number.
If your car's battery is disconnected or goes dead, the audio system will disable itself. If this happens, you will see "Code" in the frequency display the next time you turn on the system. Use the Preset buttons to enter the five-digit code. If it is entered correctly, the radio will start playing.
If you make a mistake entering the code, do not start over or try to correct your mistake. Complete the five-digit sequence, then enter the correct code. You have three tries to enter the correct code. If you are unsuccessful in three attempts, you must then leave the system on for one hour before trying again.
Comfort and Convenience Features
Main MenuTable of Contentsst Before you begin driving your Honda, you should know what gasoline to use, and how to check the levels of important fluids. You also need to know how to properly stow luggage or packages. This section will help you. If you plan to add any accessories to your car, please read the information in this section first.
Before Driving
Break-in Period . . . . . . . . . . . . .. 82
Gasoline . . . . . . . . . . . . . . . . . . .. 82
Oxygenated Fuels . . . . . . .. 82Driving in Foreign
Countries
. . . . . . . . . . . . . . . .. 83
Service Station Procedures . .. 84
Filling the Fuel Tank . . . . .. 84
Opening the Hood . . . . . .. 85
Oil Check . . . . . . . . . . . .. 86
Engine Coolant Check . . 87
Fuel Economy . . . . . . . . . . . . . .. 88
Vehicle Condition . . . . . . .. 88
Driving Habits . . . . . . . . . .. 88
Accessories . . . . . . . . . . . . . . . .. 89
Loading Cargo . . . . . . . . . . . . .. 90Before Driving
Main Menust Break-in Period, Gasoline
Break-in Period Help assure your car's future reliability and performance by paying extra attention to how you drive during the first 600 miles (1,000 km). During this period:
Avoid full-throttle starts and rapid acceleration. If you need to add oil, use the engine oil recommended in this owner's manual. Avoid hard braking. New brakes need to be broken-in by moderate use for the first 200 miles (300 km).
You should follow these same re- commendations with an overhauled or exchanged engine, or when the brakes are relined.
Gasoline Your Honda is designed to operate most effectively on unleaded gasoline. Use an unleaded gasoline with a pump octane number of 86 or higher. Use of a lower octane gasoline can cause a persistent, heavy metallic rapping noise in the engine that can lead to mechanical damage. Gasolines containing detergent additives designed to help prevent fuel system and engine deposits are recommended. Using gasoline containing lead will damage your car's emission controls. This contributes to air pollution and can void certain parts of your warranty.
Oxygenated Fuels Some conventional gasolines are being blended with alcohol or an ether compound. These gasolines are collectively referred to as oxygenated fuels. To meet clean air standards, some areas of the United States and Canada use oxygenated fuels to help reduce emissions.
If you use an oxygenated fuel, be sure it is unleaded and meets the minimum octane rating requirement.
Before using an oxygenated fuel, try to confirm the fuel's contents. Some states/provinces require this information to be posted on the pump.
Before Driving
Main MenuTable of Contentsst If you notice any undesirable operating symptoms, try another service station or switch to another brand of gasoline.
Fuel system damage or performance problems resulting from the use of an oxygenated fuel containing more than the percentages of oxygenates given previously are not covered under warranty.
The following are the EPA-approved percentages of oxygenates:
ETHANOL (ethyl or grain alcohol)— You may use gasoline containing up to 10% ethanol by volume. Gasoline containing ethanol may be marketed under the name "Gasohol."
MTBE (Methyl Tertiary Butyl Ether)— You may use gasoline containing up to 15% MTBE by volume.
METHANOL (methyl or wood alcohol)— You may use gasoline containing up to 5% methanol by volume as long as it also contains cosolvents and corrosion inhibitors to protect the fuel system. Gasoline containing more than 5% methanol by volume may cause starting and/or performance problems. It may also damage metal, rubber, and plastic parts of your fuel system.
Gasoline
Driving in Foreign Countries Using any type of leaded gasoline in your Honda will affect performance and damage its emission controls. Unleaded gasoline may not be available in other countries. If you are planning to take your car outside the U.S. or Canada, write to Honda at the address shown for information about any modifications your car may need. Be sure to include the year and model of your car.
U.S. Owners: American Honda Motor Co., Inc. Consumer Affairs 1919 Torrance Blvd. Torrance, CA 90501-2746
Canadian Owners: Honda Canada Inc. 715 Milner Ave. Scarborough, Ontario M1B 2K8
Before Driving
Main MenuTable of Contentsst Handling gasoline improperly can cause it to ignite or explode, causing you to be seriously or fatally injured. Always put out cigarettes and other smoking materials, and keep all sparks and open flames away when you are around gasoline.
FUEL FILL CAP
3. Remove the fuel fill cap
slowly. You may hear a hissing sound as pressure inside the tank escapes.
4. Stop filling the tank after the
gas pump automatically clicks off. Do not try to "top off" the tank, leave some room for the fuel to expand with temperature changes.
5. Screw the fuel fill cap back on,
tighten it until it clicks.
6. Push the fuel fill door until it
latches.
Service Station Procedures
Filling the Fuel Tank
Pull.
1. The fuel fill is on the driver's side of the car. Park with that side closest to the service station pumps.
2. Open the fuel fill door by
pulling on the handle to the left of the driver's seat.
Before Driving
Main MenuTable of Contentsst Opening the Hood
HOOD RELEASE HANDLE
Service Station Procedures
LATCH
SUPPORT ROD
1. Shift to Park or Neutral and
set the parking brake. Pull the hood release handle located under the left lower corner of the dashboard. The hood will pop up slightly.
2. Standing in front of the car, put your fingers under the front edge of the hood to the right of center. Slide your hand to the left until you feel the hood latch handle. Push this handle to the left until it releases the hood. Lift the hood.
CLIP
3. Pull the support rod out of its
clip and insert the end into the hole on the left side of the hood. To close the hood, lift it up slightly to remove the support rod from the hole. Put the support rod back into its holding clip. Lower the hood to about a foot above the fender, then let it drop.
Before Driving
Main MenuTable of Contentsst Service Station Procedures
Oil Check
DIPSTICK
Check the engine oil level every time you fill the car with fuel. Wait at least two minutes after turning the engine off before you check the oil.
1. Remove the dipstick (orange
handle).
Before Driving
2. Wipe the dipstick with a clean
cloth or paper towel.
3.
Insert it all the way back in its tube.
Main MenuTable of Contentsst Engine Coolant Check
RESERVE TANK
Service Station Procedures
Refer to Periodic Checks on page 113 for information on checking other items in your Honda.
UPPER MARK LOWER MARK
MAX MIN
4. Remove it again and check the level. It should be between the upper and lower marks. If it is near or below the lower mark, see page 115 for information on the proper oil and how to add it.
5.
Look at the coolant level in the radiator reserve tank. Make sure it is between the MAX and MIN lines. If it is below the MIN line, see Adding Coolant on page 120
for information on adding the proper coolant.Before Driving
Main MenuTable of Contentsst Air conditioning puts an extra load on the engine which makes it use more fuel. Turn off the A/C to cut down on air conditioning use. Use the flow-through ventilation when the outside air temperature is moderate.
Fuel Economy
The condition of your car and your driving habits are the two most important things that affect the fuel mileage you get.
Vehicle Condition Always maintain your car according to the maintenance schedule. This will keep it in top operating condition.
An important part of that maintenance is the Periodic Checks (see page 113). For example an underinflated tire causes more "rolling resistance," which uses fuel. It also wears out faster, so check the tire pressure at least monthly. In winter the build-up of snow on your car's underside adds weight and rolling resistance. Frequent cleaning helps your fuel mileage and reduces the chance of corrosion.
Before Driving
Driving Habits You can improve fuel economy by driving moderately. Rapid acceleration, cornering, and hard braking use more fuel. Always drive in the highest gear that allows the engine to run and accelerate smoothly. Maintain a constant speed while cruising, depending on traffic conditions. Every time you slow down and speed up, your car uses extra fuel. Use the cruise control, when appropriate, to increase fuel economy.
A cold engine uses more fuel than a warm engine. It is not necessary to "warm-up" a cold engine by letting it idle for a long time. You can drive away within 30 seconds, no matter how cold it is outside. The engine will warm up faster, and you get better fuel economy. To cut down on the number of "cold starts," try to combine several short trips into one.
Main MenuTable of Contentsst Your Honda dealer has many accessories available to personalize your car. Some of these are audio systems, alloy wheels, air conditioning, and color-coordinated carpet floor mats. All Genuine Honda Accessories have been approved by our engineers for installation and use on your car, and are covered by warranty.
Some non-Honda accessories you can buy in the "aftermarket" are designed for universal applications. Although they may fit your Honda, they may not be within factory specifications. For example, aftermarket wheels may not meet Honda's specifications for width and offset. They could cause suspension problems which would not be covered by your warranty. Improperly designed accessories can adversely affect your car's handling and stability.
Your car has several computer- controlled systems, including the SRS system, the anti-lock brake system, and the engine's fuel injection system. Strong electronic interference can affect their operation.
Accessories
Electronic communications equipment, such as cellular telephones and two-way radios are regulated by the FCC (DOC in Canada) and should not interfere with your car's systems. Improper installation, or using electrical equipment not intended for mobile use may interfere with your car's operation. If you want to install a cellular telephone, other mobile communications equipment, or even add-on stereo amplifiers, please discuss it first with your Honda dealer.
In many cases, improper installation is the real cause of problems with aftermarket accessories. Have these accessories installed by qualified technicians who are familiar with your Honda. If possible, have your Honda dealer inspect the final installation.
Before Driving
Main MenuTable of Contentsst This final number is the total weight of cargo you can load in or on the car. With five occupants (driver and four passengers), the maximum recommended weight for cargo is 100 Ib (45 kg).
If you must carry large objects that prevent you from closing the trunk lid, be aware that exhaust gas can enter the interior. See Carbon Monoxide Hazard on page 25.
Never place items on the shelf behind the back seat. Those items can fly forward and injure you or your passengers if you brake hard or are involved in a collision.
Where you store this cargo, and how well you secure it are just as important as how much it weighs. Make sure you load cargo so it will not shift while driving. Items stored in the trunk should be placed as far forward as possible. You could store additional items on the floor behind the front seats. Make sure they cannot roll under the front seat and interfere with the pedals.
Loading Cargo
The maximum load you can carry in your Honda is 850 Ib (385 kg). It includes the total weight of all passengers and their belongings, and any accessories. This 850 Ib (385 kg) figure is shown as the Vehicle Capacity Weight on the tire information label attached to the inside of the glove box.
To figure out how much cargo you can carry:
Figure the total "occupant weight" you will be transporting. To do this, multiply the number of people (driver and all passengers) by 150 Ib (70 kg). Subtract this number from the Vehicle Capacity Weight (850 lb/385 kg).
Before Driving
Main MenuTable of Contentsst This section gives you tips on starting the engine under various conditions and how to operate the 5-speed manual and automatic transmissions. It also includes important information on your car's braking system.
Driving
Preparing to Drive . . . . . . . . . .. 92
Starting the Engine . . . . . . . . . .. 935-Speed Manual
Transmission . . . . . . . . . .. 93
Automatic Transmission . .. 93
Starting in Cold Weather atHigh Altitude . . . . . . . . . .. 94
5-Speed Manual
Transmission . . . . . . . . . . . . .. 95
Recommended ShiftPoints . . . . . . . . . . . . . . . .. 96
Maximum Speeds . . . . . . . . .. 96
Automatic Transmission . . . . .. 97
Shift Lever Positions . . . . . .. 97
Maximum Speeds . . . . . . . .. 100
Shift Lock Release . . . . . . .. 100
The Braking System . . . . . . . .. 101
Brake Wear Indicators . . .. 101
Brake System Design . . . . .. 102
Anti-Lock Brakes . . . . . . . .. 102
Driving in Bad Weather . . . . .. 104
Towing a Trailer . . . . . . . . . . .. 105Driving
Main Menust Preparing to Drive
You should do the following checks and adjustments every day before you drive your car.
1. Make sure all windows,
mirrors, and outside lights are clean and unobstructed. Remove frost, snow, or ice.
2. Check that the hood and trunk
are fully closed.
3. Visually check the tires. If a
tire looks low, use a gauge to check its pressure.
4. Check that any items you may
be carrying with you inside are stored properly or fastened down securely.
9. Fasten your seat belt. Check
that your passengers have fastened their seat belts (see page 7).
5. Check the adjustment of the
seat (see page 49).
6. Check the adjustment of the
inside and outside mirrors (see pages 53 and 54).
7. Check the adjustment of the steering wheel (see page 41).
8. Make sure the doors are
securely closed and locked.
10. Turn the ignition ON (II).
Check the indicator lights in the instrument panel.
11. Start the engine (see page 93).
12. Check the gauges and indicator lights in the instrument panel (see page 29).
Driving
Main MenuTable of Contentsst 5-Speed Manual Transmission 1. Apply the parking brake.
5.
2.
In cold weather, turn off all electrical accessories to reduce the drain on the battery.
3. Push the clutch pedal down all the way. START (III) does not function unless the clutch pedal is depressed.
6.
4. Without touching the
accelerator pedal, turn the ignition key to the START (III) position. If the engine does not start right away, do not hold the key in START (III) for more than 15 seconds at a time. Pause for at least 10
seconds before trying again.If the engine does not start within 15 seconds, or starts but stalls right away, repeat step 4 with the accelerator pedal pressed half-way down. If the engine starts, release pressure on the accelerator pedal so the engine does not race.
If the engine still does not start, press the accelerator pedal all the way down and hold it there while starting in order to clear flooding. As before, keep the ignition key in the START (III) position for no more than 15 seconds. Return to step 5 if the engine does not start. If it starts, lift your foot off the accelerator pedal so the engine does not race.
Starting the Engine
Automatic Transmission 1. Apply the parking brake.
2. In cold weather, turn off all
electrical accessories to reduce the drain on the battery.
3. Make sure the shift lever is in
Park. Press on the brake pedal.
4. Without touching the
accelerator pedal, turn the ignition key to the START (III) position. If the engine does not start right away, do not hold the key in START (III) for more than 15 seconds at a time. Pause for at least 10
seconds before trying again.continued
Driving
Main MenuTable of Contentsst 3.
If the engine fails to start in step 2, push the accelerator pedal to the floor and hold it there while you try to start the engine for no more than 15 seconds. If the engine does not start, return to step 2.
Starting the Engine
5.
6.
If the engine does not start within 15 seconds, or starts but stalls right away, repeat step 4 with the accelerator pedal pressed half-way down. If the engine starts, release pressure on the accelerator pedal so the engine does not race.
If the engine still does not start, press the accelerator pedal all the way down and hold it there while starting in order to clear flooding. As before, keep the ignition key in the START (III) position for no more than 15 seconds. Return to step 5 if the engine does not start. If it starts, lift your foot off the accelerator pedal so the engine does not race.
Driving
Starting in Cold Weather at High Altitude (Above 8,000 feet/2,400 meters) An engine is harder to start in cold weather. The thinner air found at high altitude above 8,000 feet (2,400 meters) adds to the problem. Use the following procedure:
1. Turn off all electrical
accessories to reduce the drain on the battery.
2. Push the accelerator pedal
half-way to the floor and hold it there while starting the engine. Do not hold the ignition key in START (III) for more than 15 seconds. When the engine starts, release the accelerator pedal gradually as the engine speeds up and smooths out.
Main MenuTable of Contentsst 5-Speed Manual Transmission
Come to a full stop before you shift into reverse. You can damage the transmission by trying to shift into reverse with the car moving. Depress the clutch pedal and pause for a few seconds before putting it in reverse, or shift into one of the forward gears for a moment. This stops the gears so they won't "grind."
You can get extra braking from the engine when slowing down by shifting to a lower gear. This extra braking can help you maintain a safe speed and prevent your brakes from overheating while going down a steep hill. Before downshifting, make sure engine speed will not go into the red zone in the lower gear. Refer to the Maximum Speeds chart.
Rapid slowing or speeding up can cause loss of control on slippery surfaces. If you crash, you can be injured. Use extra care when driving on slippery surfaces.
Driving
The manual transmission is synchronized in all forward gears