- 1996 Ford Contour Owners Manuals
- Ford Contour Owners Manuals
- 1998 Ford Contour Owners Manuals
- Ford Contour Owners Manuals
- 2000 Ford Contour Owners Manuals
- Ford Contour Owners Manuals
- 1999 Ford Contour Owners Manuals
- Ford Contour Owners Manuals
- 1997 Ford Contour Owners Manuals
- Ford Contour Owners Manuals
- Download PDF Manual
-
*[DR16900(ALL)05/95]
*[DR17000(ALL)05/95]
*[DR17100(ALL)03/95]
[DR17350(ALL)05/95] *[DR17450(ALL)11/94]
If your vehicle does not have anti-lock brakes, it may have four-wheel power disc brakes or power front disc brakes and rear drum brakes, which adjust automatically as the brake pads or linings wear down. If your vehicle does not have anti-lock brakes, apply the brake pedal gradually. Use the “squeeze” technique — push on the brake pedal with a steadily increasing force. This allows the wheels to continue to roll while you are slowing down, which lets you steer properly. If your vehicle does not have anti-lock brakes, extreme braking can make the wheels lock and slide, causing you to lose control of the steering. If the wheels lock, release the brake pedal and repeat the “squeeze” technique. Do not drive with your foot resting on the brake pedal; you will wear out the linings and increase your vehicle’s stopping distance. Brake rotor damage may also eventually occur. NOTE: If you are driving down a long or steep hill, shift to a
lower gear and do not apply your brakes continuously. If you apply your brakes continuously, they may overheat and become less effective.
Occasional brake squeal during light to moderate stops does not affect the function of the brake system and is normal. However, if the squeal becomes louder or more frequent, have your brakes inspected by your dealer or a qualified service technician. Anti-lock Brake System (If equipped) Your vehicle may come with the optional anti-lock brake system. Whenever your wheels start to lock (which could result in a skid) the anti-lock brake system prevents the lock-up by automatically releasing and re-applying the brakes. The brake pedal will pulsate as a result of the automatic releasing and re-applying of the brakes. In spite of this improvement in braking performance, you should continue to be cautious in all
150
File:cddro.ex Update:Thu Jan 25 12:23:16 1996
*[DR17500(ALL)05/95]
[DR17600(ALL)05/94]
[DR17650(ALL)05/95]
*[DR17700(ALL)12/93]
Driving Your Contour
hazardous driving situations, especially when driving on hazardous road surfaces. Even with your anti-lock brake system, you may not have total control of your vehicle when braking on roads with loose surfaces such as snow or gravel, holes in the pavement, or alternating patches of slippery and dry surfaces. If the brake pedal is applied while the vehicle is driven over uneven road surfaces, the ABS may cycle and the driver may sense a pulsation in the brake pedal, accompanied by a slight up and down movement of the pedal height and a clicking sound. This may also happen when driving on an inclined surface such as a driveway while making a sharp turn. This is a normal condition. Your vehicle may have an Anti-lock Brake System feature. If it does, check the Anti-lock Brake System light each time you start the engine. If it stays on longer than three (3) seconds, shut off the engine and restart. If it stays on, that means the Anti-lock Brake feature is not working and should be serviced immediately to restore the benefits of the Anti-lock feature. Normal braking is not affected unless the brake warning light is also lit. The Anti-lock Brake System has self-check capabilities. As described above, the system turns on the anti-lock light each time you start your engine. After the engine is started and the anti-lock light turns off, the system performs another test the first time the vehicle reaches 5 mph (8 km/h) (12 mph [20 km/h] for vehicles equipped with the traction control system). The system turns on the ABS pump motor for approximately 1/2 second. At this time, a mechanical noise may be heard and felt. This is a normal part of the self-check feature. If a malfunction is found during this check the anti-lock light will come on. Ford Motor Company has not found any negative effects of mobile radio transmitting equipment installed on vehicles with the ABS system providing that the radio is installed according
151
File:cddro.ex Update:Thu Jan 25 12:23:16 1996
*[DR17800(ALL)03/95] *[DR17900(ALL)01/95] *[DR18100(ALL)11/93]
*[DR18300(ALL)12/89]
*[DR18400(ALL)05/95]
*[DR18500(ALL)11/91]
*[DR18700(ALL)01/93]
to the radio manufacturer’s instructions. However, if you have had a mobile radio transmitter installed and the check ABS light comes on (at any time other than immediately after turning the key to the ON position) have your mobile radio dealer inspect the radio installation. Also, if the ABS system is activated other than during maximum braking, have your mobile radio installation checked. Parking Brake The parking brake should be used whenever you park your vehicle. The parking brake lever is located between the front seats. To set the parking brake, put your foot on the brake pedal while pulling the parking brake handle fully and firmly upward. To release the parking brake, put your foot on the brake pedal, pull the handle upward and push the button. Then lower the handle to the released position while holding the button in.
RWARNING
Always set the parking brake fully and make sure that the gearshift is securely latched in P (Park) (automatic transaxle) or in 1 (First) (manual transaxle).
RWARNING
To prevent personal injury, do not release the parking brake while outside the vehicle.
RWARNING
If the parking brake is fully released, but the Brake System light remains on, have the brakes checked immediately. They may not be working properly.
152
File:cddro.ex Update:Thu Jan 25 12:23:16 1996
*[DR19000(ALL)01/95]
*[DR19050(ALL)03/95]
%*[DR19100(ALL)01/95] *[DR19200(ALL)01/95] *[DR19300(ALL)05/95]
*[DR19400(ALL)03/95]
%*[DR19750(ALL)01/95] %*[DR19800(ALL)01/95] *[DR19900(ALL)03/95]
*[DR20100(ALL)03/95] *[DR20200(ALL)01/95] *[DR20400(ALL)01/95]
Driving Your Contour
The parking brake is not designed to stop a moving vehicle, but you can use the parking brake to stop your vehicle in an emergency if the normal brakes fail. However, since the parking brake applies only the rear brakes, the stopping distance will increase greatly and the handling of your vehicle will be adversely affected. Always check the Brake Warning Light each time you start your engine. Driving with the parking brake on will cause the brakes to wear out quickly and will reduce the fuel economy. Driving Under Special Conditions Tips for Safe Driving As with any new vehicle, yours may drive and handle differently from your previous vehicle. Use care until you become accustomed to its various features and driving characteristics. Operate your vehicle within reasonable limits. Sudden acceleration, deceleration, turning, or combinations of these maneuvers can cause a vehicle to behave differently than anticipated. Driving in Bad Weather Slippery roads On some slippery road surfaces, front-wheel drive may provide better acceleration than rear-wheel drive. However, this does not mean that your vehicle can stop any faster or any better than a vehicle with rear-wheel drive. Exercise the same caution while driving on slippery roads with your front-wheel drive vehicle as you would with a rear-wheel drive vehicle. n Do not quickly move the steering wheel unless necessary. n Drive slower than you normally would. n Give your vehicle more distance to stop.
153
File:cddro.ex Update:Thu Jan 25 12:23:16 1996
*[DR20505(ALL)01/92] *[DR20600(ALL)02/93] *[DR20700(ALL)05/95]
*[DR20750(ALL)03/95]
*[DR20800(ALL)01/95]
*[DR20900(ALL)05/95]
*[DR21000(ALL)03/95]
n Pump the brake pedal steadily and evenly to avoid locking
your wheels.
n Consider using one of the lower gears.
RWARNING
To avoid losing control on slippery roads, do not downshift into 1 (First) with the automatic transaxle when moving faster than 20 mph (32 km/h). Do not downshift into 1 (First) with the manual transaxle when moving faster than 10 mph (16 km/h).
RWARNING
If your vehicle has speed control, do not use it on slippery roads. You could lose control of your vehicle and could injure someone.
If you have an automatic transaxle and your vehicle gets stuck (for example, in mud or snow), you may try to “rock” it out of the spot. Shift, in a steady rhythm, between forward and reverse gears. While in each gear, press lightly on the accelerator and release.
RWARNING
Do not spin the wheels at over 35 mph (55 km/h). The tires may fail and injure a passenger or bystander.
By moving the vehicle backward and forward, you may gain enough momentum to move out of the spot. Do not rock the vehicle for more than a few minutes. This may overheat the engine, damage the transaxle, or damage the tires. If you are still stuck after a minute or two of rocking, call for a tow truck.
154
File:cddro.ex Update:Thu Jan 25 12:23:16 1996
%*[DR21200(ALL)01/95] *[DR21300(ALL)01/95] *[DR21400(ALL)04/94]
*[DR21500(ALL)01/95]
%*[DR21600(ALL)03/95] *[DR21700(ALL)01/95]
%*[DR21800(ALL)01/95]
*[DR21900(ALL)01/95]
*[DR22000(ALL)02/95]
Driving Your Contour
High water Do not drive through flooded areas unless you are sure that the water is below the bottom of the wheel rims. If you must drive through high water, drive slowly. You may have limited traction or wet brakes, so allow extra stopping distance because your vehicle will not stop as quickly as usual. After you drive through the standing water, apply your brakes gently several times as your vehicle moves slowly. This helps to dry the brakes. Driving With a Heavy Load There are limits to the amount of weight your vehicle can carry or tow. The total weight of your vehicle, plus the weight of the passengers and cargo, should never be more than the Gross Vehicle Weight Rating (GVWR). Also, the weight that your vehicle carries over the front axle and rear axle should never be more than the Gross Axle Weight Rating (GAWR) for the respective axle. You can find your vehicle’s GVWR and GAWR on the Safety Compliance Certification Label on the left front door lock facing or on the door latch post pillar. The weight limits of your vehicle’s tires affect the GVWR or GAWR limitations. Usage of replacement tires with higher weight limit than originals does not increase GVWR or GAWR. Usage of lower capacity replacement tires may lower GVWR and GAWR limitations.
RWARNING
If the GVWR or the GAWR specified on the Safety Compliance Certification Label is exceeded, your vehicle may be damaged or you may lose control and injure someone.
155
File:cddro.ex Update:Thu Jan 25 12:23:16 1996
%*[DR22050(ALL)01/95] [DR22150(ALL)01/95]
*[DR22250(ALL)01/95] *[DR22350(ALL)01/95] *[DR22400(ALL)01/95] *[DR22500(ALL)01/95] *[DR22600(ALL)01/95] *[DR22700(ALL)01/95] *[DR22800(ALL)01/95]
*[DR22900(ALL)01/95] *[DR23000(ALL)01/95] *[DR23100(ALL)01/95]
*[DR23200(ALL)01/95]
Limiting Your Vehicle’s Load The load that you add to your vehicle must not exceed the maximum load stated on the Safety Compliance Certification Label attached to the left front door pillar or the left front door lock facing. To figure the weight of your vehicle’s load, add the weights of: n the driver and passengers n luggage and any other items that you put in your vehicle n the tongue load of the loaded trailer n the weight of any equipment that has been added to your
vehicle since it was delivered to your dealer
If you do not know the actual weights of these items, use the following procedure to figure the weight of a load: 1. Weigh your vehicle without the driver, passengers and
luggage. You might take your vehicle to a shipping company or an inspection station for trucks.
2. Then weigh your vehicle with the driver, passengers and
luggage.
3. Subtract the first reading from the second to figure the total
weight of the load.
After determining this load, you must also make sure that the total weight of your vehicle, plus the load it carries, is less than its GVWR. Also, make sure that the weight your vehicle carries over each axle is less than the GAWR for the respective axle. You can find the GVWR and GAWR on the Safety Compliance Certification Label on the left front door lock facing or the door latch post pillar.
156
File:cddro.ex Update:Thu Jan 25 12:23:16 1996
*[DR23300(ALL)01/95]
*[DR23400(ALL)05/95]
*[DR23500(ALL)04/95] [DR23600(ALL)05/95]
*[DR23700(ALL)01/95]
*[DR23800(ALL)01/95]
*[DR25800(ALL)11/92] *[DR25900(ALL)01/95]
*[DR26000(ALL)01/95] *[DR26100(ALL)01/95]
Driving Your Contour
If your vehicle exceeds the GVWR, remove cargo from your vehicle accordingly. If your vehicle exceeds the GAWR for either axle, shift the load or remove cargo accordingly.
RWARNING
Improper distribution of your vehicle’s load or carrying weight in excess of the amount shown on the tire decal can cause rapid tire wear or loss of vehicle control.
Trailer Towing Your vehicle is capable of towing a trailer of up to a maximum of 1,000 lbs. (454 kg) gross trailer weight with a maximum tongue load of 100 lbs (45 kg). It should also have 25 sq. ft. (2.3 sq. meters) or less frontal area. Do not drive faster than 55 mph (90 km/h) while towing a 1,000 lb. (454 kg) trailer. Your vehicle does not come from the factory fully equipped to tow. No towing packages are available through Ford or Lincoln/Mercury dealers. Because towing a trailer puts extra strain on your vehicle, you must follow certain precautions for your safety and the good of your vehicle: n Stay within the load limits when you tow. (See Knowing Your
Vehicle’s Load Limits.)
n Carefully and thoroughly prepare your vehicle for towing,
making sure to use the right equipment and to attach it properly. (See Preparing to Tow in this chapter.)
n Use extra caution when driving your vehicle while you tow.
(See Driving while you tow in this chapter.)
n Service your vehicle more frequently if you tow a trailer.
(See Servicing your vehicle if you tow in this chapter.)
157
File:cddro.ex Update:Thu Jan 25 12:23:16 1996
*[DR26300(ALL)01/95]
*[DR26400(ALL)01/95] *[DR26500(ALL)06/95]
*[DR26600(ALL)05/95]
*[DR27000(ALL)04/95] *[DR28500(ALL)01/95] *[DR28600(ALL)01/95]
*[DR28700(ALL)01/95]
Ten to 15% of the loaded trailer’s weight should be on the tongue. However, the tongue load should never exceed 10% of the maximum weight that your vehicle can safely tow. New vehicles should be driven 2,000 miles (3,200 km) before towing a trailer.
RWARNING
Towing trailers beyond the maximum recommended gross trailer weight exceeds the limits of the vehicle and could result in engine damage, transaxle/axle damage, structural damage, loss of control, and personal injury.
RWARNING
Do not tow a trailer when the temporary spare tire is being used.
You should also limit your trailer’s load when you tow in high altitudes. Preparing to Tow For your safety and for the good of your vehicle, use the right equipment for the type of trailer you tow. Also, make sure that all towing equipment is properly attached to your vehicle. If you are not certain that you are using the right equipment in the proper manner, see your Ford or Lincoln-Mercury dealer. Do not use hitches that clamp onto your vehicle’s bumper. The bumper is not designed to bear the load.
158
File:cddro.ex Update:Thu Jan 25 12:23:16 1996
%*[DR28750(ALL)01/95] *[DR28800(ALL)05/94]
*[DR28900(ALL)01/95]
%*[DR28950(ALL)01/95] *[DR29000(ALL)01/95] *[DR29100(ALL)01/95] *[DR29200(ALL)01/95]
*[DR29300(ALL)01/95] *[DR29400(ALL)01/95]
Driving Your Contour
Using the hitch Your vehicle uses a load carrying hitch. Because this type of hitch places the tongue load of a trailer on the rear wheels of your vehicle, you must distribute the load in your trailer so that 10 to 15% of the total weight of the trailer is on the tongue. Tie down the load so that it does not shift and change the weight on the hitch. This will prevent damage to your vehicle and make your vehicle easier to handle. Connecting the safety chains Always attach the trailer’s safety chains to your vehicle. They help protect your trailer if the hitch breaks. To connect the trailer’s safety chains: 1. Cross the chains under the trailer tongue and attach them to
your vehicle’s frame or hook retainers. Never attach the safety chains to your vehicle’s bumper. The bumper is not designed to bear the weight of a trailer.
2. Make sure that you leave enough slack in the chains to
allow you to turn corners.
If you use a rental trailer, follow the instructions that the rental agency gives you.
159
File:cddro.ex Update:Thu Jan 25 12:23:16 1996
%*[DR29450(ALL)01/95] *[DR29500(ALL)01/95]
*[DR29600(ALL)05/95]
%*[DR29650(ALL)01/95] *[DR29700(ALL)01/95]
*[DR29800(ALL)01/95] %*[DR29900(ALL)01/95] *[DR30000(ALL)05/95]
[DR30050(ALL)01/95]
Connecting the trailer’s brakes Electric brakes and manual, automatic, or surge-type hydraulic brakes are safe if you install them properly and adjust them according to the manufacturer’s instructions. Be sure that your trailer’s brakes meet local and federal regulations.
RWARNING
Do not connect a trailer’s hydraulic brake system directly to your vehicle’s brake system. Your vehicle may not have enough braking power and your chances of having a collision greatly increase.
Connecting the trailer’s lights Do not connect a trailer’s lighting system wiring directly to your vehicle’s lighting system wiring. To get the proper equipment for hooking up your trailer’s lights, see your local trailer dealer and your Ford dealer. Be sure to follow their instructions carefully. If you do not install trailer lights correctly, you may cause damage to the vehicle’s lighting system. Driving While You Tow Be especially careful when driving while you tow a trailer. Never drive faster than 45 mph (70 km/h) when you tow in hilly country on hot days. Also, anticipate stops so that you can brake gradually. If your vehicle has a manual transaxle and you are towing a trailer, you should select gear positions which will avoid jerking or excessive engine speed. If you need to drive excessively in 1
(First) or 2 (Second), it may indicate that the trailer is too big or heavily loaded for your vehicle’s drivetrain. Continuous driving in these two gears while towing a trailer is not recommended.160
File:cddro.ex Update:Thu Jan 25 12:23:16 1996
[DR30100(ALL)11/94]
[DR30175(ALL)04/95]
%*[DR30300(ALL)01/95] [DR30400(ALL)05/95] *[DR30500(ALL)08/93]
Driving Your Contour
When you tow up or down steep hills, move the manual transaxle gearshift to a lower gear. This will increase engine power on upgrades and engine braking on downgrades. When you tow in steep hills, move the automatic transaxle to 1 (First) when descending. This will give more engine braking on downgrades. The automatic transaxle will automatically downshift to the proper gear on upgrades. If you use the speed control while you are towing on very long, steep grades, the speed control may shut off. Servicing Your Vehicle If You Tow If you tow a trailer for a long distance, your vehicle will need to be serviced more frequently than usual. Refer to the Maintenance Schedule and Record booklet for additional information.
161
File:cdreo.ex Update:Thu Jan 25 12:24:30 1996
*[RE00310(ALL)03/95] *[RE00320(ALL)01/95]
*[RE00400(ALL)02/95]
*[RE00500(ALL)02/95]
%*[RE00700(ALL)05/95]
%*[RE00800(ALL)05/95]
*[RE00850(ALL)06/95]
Roadside Emergencies
Jump-Starting Your Vehicle Your vehicle’s battery may die if you leave the lights on or any electrical equipment on after you turn the engine off. If this happens, you may be able to jump-start from a booster battery to start your vehicle.
RWARNING
The gases around the battery can explode if exposed to flames, sparks, or lit cigarettes. An explosion could result in injury or vehicle damage.
RWARNING
To protect yourself when charging a battery, always shield your face and eyes. Make sure that you can breathe fresh air.
RWARNING
Applying too much pressure on the ends when lifting a battery could cause acid to spill. Lift the battery with a carrier or with your hands on the opposite corners.
RWARNING
Batteries contain sulfuric acid which burns skin, eyes, and clothing.
If the acid touches someone’s skin, eyes, or clothing, immediately flush the area with water for at least 15 minutes. If someone swallows the acid, have him or her drink lots of milk or water first, then Milk of Magnesia, a beaten egg, or vegetable oil. Call a doctor immediately.
163
File:cdreo.ex Update:Thu Jan 25 12:24:30 1996
*[RE00900(ALL)03/95]
*[RE01000(ALL)03/95] *[RE01100(ALL)03/95]
*[RE01200(ALL)03/95] *[RE01300(ALL)04/95]
*[RE01400(ALL)03/95] *[RE01600(ALL)03/95] %*[RE01700(ALL)05/95] *[RE02500(ALL)03/95]
*[RE02600(ALL)04/95]
To avoid damaging your vehicle or your battery, and to avoid injury to yourself, follow these directions for preparing your vehicle to jump-start and connecting the jumper cables in the order they are given. If in doubt, call for road service. Preparing Your Vehicle 1. Your vehicle has a 12-volt starting system, so you need to
use a 12-volt jumper system. You will damage your starting motor, ignition system, and other electrical parts if you connect them to a 24-volt power supply (either two 12-volt batteries in series or a 24-volt generator set).
2. Do not disconnect the battery of the disabled vehicle. You
could damage the vehicle’s electrical system.
3. Park the booster vehicle close to the hood of the disabled
vehicle. Make sure the vehicles do not touch each other. Set the parking brake on both vehicles and stay clear of the engine cooling fan and other moving parts.
4. Check all battery terminals and remove any excessive
corrosion before you attach the jumper cables.
5. Turn on the heater fan in both vehicles. Press the DEFROST
button. Turn off all other switches and gauges.
Connecting the jumper cables 1. Connect one end of the first jumper cable to the positive (+)
terminal of the discharged battery. (You can connect either jumper cable to the positive (+) terminal, as long as you use the same cable for both positive terminals.) Most jumper cables have a red cable and a black cable. The red cable is generally used for the positive terminals and the black for the negative ones.
2. Connect the other end of the first cable to the positive (+)
terminal of the booster battery.
164
File:cdreo.ex Update:Thu Jan 25 12:24:30 1996
*[RE02700(ALL)05/95]
*[RE02800(ALL)04/95] *[RE02900(ALL)05/95]
Roadside Emergencies
3. Connect one end of the second cable to the negative (–)
terminal of the booster battery — NOT to the discharged battery.
4. Connect the other end of the second cable to a good metallic
surface on the engine or frame of the disabled vehicle.
RWARNING
Do not connect the end of the second cable to the negative (–) terminal of the battery to be jumped. A spark may cause an explosion of the gases that surround the battery.
165
File:cdreo.ex Update:Thu Jan 25 12:24:30 1996
[RE02975(ALL)01/95]
27-1/2 pica art:0001006-E
Sequence for connecting jumper cables
166
File:cdreo.ex Update:Thu Jan 25 12:24:30 1996
*[RE03400(ALL)03/95] *[RE03600(ALL)03/95]
*[RE03700(ALL)03/95]
*[RE03800(ALL)03/95] *[RE03900(ALL)03/95] *[RE04000(ALL)03/95]
*[RE04100(ALL)05/95] *[RE04200(ALL)03/95] *[RE04300(ALL)05/95] *[RE04400(ALL)04/95]
*[RE04450(ALL)03/95]
Roadside Emergencies
Jump-Starting 1. Make sure that the jumper cables are not in the way of
moving engine parts, then start the booster vehicle. Run the engine at a moderate speed.
2. Let the discharged battery charge for a few minutes and then start the disabled vehicle. It may take a couple of tries before the vehicle starts. If the vehicle does not start after several attempts, there may be a different problem.
3. When both vehicles are running, let them idle for a few
minutes to charge the discharged battery.
Removing jumper cables 1. Always remove the jumper cables in the reverse order.
Remove the negative (–) end of the jumper cable from the metallic surface on the engine or frame of the disabled vehicle.
2. Remove the negative (–) cable from the booster battery. 3. Remove the positive (+) cable from the booster battery. 4. Remove the other end of the positive (+) cable from the
discharged battery.
After the vehicle is started, let it idle for a while to let the engine “relearn” its idle conditions. Drive it around for a while with all electrical accessories turned off to let the battery recharge. You may need to use a battery charger to fully recharge the battery. If you need to replace your battery, see Battery in the Servicing Your Vehicle chapter.
167
File:cdreo.ex Update:Thu Jan 25 12:24:30 1996
*[RE04500(ALL)03/95] *[RE04600(ALL)01/95]
*[RE04700(ALL)03/95] *[RE04800(ALL)03/95]
*[RE04900(ALL)01/93]
*[RE05000(ALL)01/95] *[RE05100(ALL)01/95] *[RE05200(ALL)01/95] *[RE05300(ALL)01/95] *[RE05400(ALL)01/95] *[RE05500(ALL)01/95] *[RE05600(ALL)01/95]
Changing a Tire If you get a flat tire while you are driving, do not apply the brake heavily. Instead, gradually decrease the speed. Hold the steering wheel firmly and slowly move to a safe place on the side of the road. Park on a level spot, turn off the ignition, set the parking brake, and turn on the hazard flashers. The Temporary Spare Tire You may have a high pressure temporary spare tire. This spare tire is smaller than a regular tire and is designed for emergency use only. Use it only when you get a flat tire and replace it as soon as you can. This spare tire is marked with the words “TEMPORARY USE ONLY” so that you can easily identify it.
RWARNING
If you use the temporary spare tire continuously or do not follow these precautions, the tire could fail, causing you to lose control of the vehicle, possibly injuring yourself or others.
When you drive with the temporary spare tire, DO NOT: n exceed 50 mph (80 km/h) under any circumstances. n load your vehicle so that it is heavier than the maximum
vehicle load rating listed on the tire decal.
n tow a trailer. n use tire chains on this tire. n try to repair the temporary spare tire or remove it from its
wheel.
n use the wheel for any other type of vehicle.
168
File:cdreo.ex Update:Thu Jan 25 12:24:30 1996
*[RE05700(ALL)01/95]
*[RE06000(ALL)03/95] *[RE06120(ALL)01/95] [RE06150(ALL)04/94]
[RE06550(ALL)02/94]
17-1/2 pica
Roadside Emergencies
n drive through an automatic car wash with this tire. Because the temporary spare tire is smaller than a conventional tire, it reduces the ground clearance. Your vehicle may get caught in the rails and it could be damaged.
Spare Tire Location The spare tire is stored under the carpet on the floor of the trunk. You will find additional instructions for the spare tire on the wheel decal (located on the temporary spare wheel).
art:0000531-B
The temporary spare tire
169
File:cdreo.ex Update:Thu Jan 25 12:24:30 1996
*[RE07400(ALL)03/95] [RE07650(ALL)05/94]
[RE08500(ALL)05/95]
*[RE08600(ALL)05/95]
*[RE08800(ALL)05/95] *[RE08825(ALL)05/95]
[RE08850(ALL)01/95]
[RE09200(ALL)01/95]
Preparing to Change the Tire 1. Make sure that your vehicle will not move or roll. If you
have an automatic transaxle, put the gearshift in P (Park). If you have a manual transaxle, put the gearshift in 1 (First). Set the parking brake and block the wheel that is diagonally opposite the tire that you are changing.
When one of the front wheels is off the ground, the transaxle alone will not prevent the vehicle from moving or slipping off the jack, even if the vehicle is in P (automatic) or 1 (manual). To prevent the vehicle from moving when you change one of the front tires, put a block behind the wheel that is diagonally opposite to the tire.
RWARNING
If the vehicle slips off the jack, you or someone else could be seriously injured.
2. Get out the spare tire and jack.
RWARNING
To avoid injury, never run the engine with one wheel off the ground, such as when changing a tire.
3. Remove the wheel cover from the wheel with the tapered end of the wheel lug wrench. Insert and twist the handle, then pry against the inner wheel cover flange. For information about removing optional wheel center ornaments see Styled Polycast Wheel Ornaments later in this section.
4. Loosen the wheel lug nuts by pulling up on the handle of the wrench one-half turn counterclockwise. Do not remove the wheel lug nuts until you raise the tire off the ground. For information about removing anti-theft lug nuts, see Anti-Theft Wheel Lug Nuts later in this section.
170
File:cdreo.ex Update:Thu Jan 25 12:24:30 1996
*[RE09250(ALL)05/95] [RE09300(ALL)01/95]
[RE09401(O )05/94]
[RE09500(O )05/94]
10-1/2 pica
art:0001300-A *[RE09800(ALL)05/95]
Roadside Emergencies
Removing and Replacing the Tire 1. Place the scissors-type jack under the side of the vehicle and adjust the jack height with the jack handle. The jack should fit in the notch in the vertical rocker panel flange which is nearest to the wheel to be changed. The front and rear jacking notches on each side of the vehicle are marked by arrows in the rocker panel. On sport models with “skirts,” you must remove a portion of the skirt before placing the jack under the vehicle. Squeeze the removeable portion of the skirt and pull down. A tether connects it to the rocker panel.
Sports models with skirts
RWARNING
To lessen the risk of personal injury, do not put any part of your body under the vehicle while changing a tire. Do not start the engine when your vehicle is on the jack. The jack is only meant for changing the tire.
171
File:cdreo.ex Update:Thu Jan 25 12:24:30 1996
[RE10030(ALL)04/94]
17-1/2 pica art:0000528-E
*[RE10200(ALL)01/95] *[RE12100(ALL)01/95] *[RE12200(ALL)03/95]
The notches for the jack 2. Turn the jack handle clockwise until the wheel clears the
ground. Remove the wheel lug nuts.
3. Replace the flat tire with the spare tire, making sure that the
air valve stem is facing outward.
4. Reinstall the lug nuts, tightening until the wheel is snug against the hub. The beveled edges on the lug nuts face inward. Do not fully tighten the lug nuts until you lower the vehicle. If you do, you could force the vehicle off the jack.
*[RE12300(ALL)02/95]
5. Lower the vehicle by turning the jack handle
counterclockwise.
172
File:cdreo.ex Update:Thu Jan 25 12:24:30 1996
*[RE12400(ALL)01/95]
[RE12550(ALL)04/94]
13-1/2 pica
art:0000498-D *[RE12600(ALL)11/94] *[RE12700(ALL)03/95] *[RE12750(ALL)01/95] [RE12900(ALL)05/95]
[RE13000(ALL)05/95]
[RE13005(ALL)05/95]
Roadside Emergencies
6. Remove the jack and fully tighten the lug nuts in the order
shown in the following illustration. As soon as possible, have your dealer or a qualified service technician check the lug nuts for proper torque specifications.
The lug nuts on the wheel 7. Place any wheel covers and ornaments in the trunk. 8. Put the tire, jack, and wrench away. Make sure the jack is
securely fastened so it does not rattle when you drive.
9. Unblock the wheels. Removing and Replacing Styled Polycast Wheel Ornaments To remove a wheel ornament, insert the tapered end of the jack handle between the ornament and wheel and pry the ornament from the wheel. To install the polycast wheel center ornament, you should insert one side of the ornament into the center of the wheel opening and strike the opposite side with the palm of your hand until the ornament is seated in the opening.
173
File:cdreo.ex Update:Thu Jan 25 12:24:30 1996
%*[RE14100(ALL)03/95] [RE14200(ALL)01/95]
[RE14250(ALL)05/94]
*[RE14300(ALL)03/95] [RE14325(ALL)02/94]
10-1/2 pica
art:0000529-B *[RE14400(ALL)03/95] *[RE14600(ALL)03/95]
*[RE14700(ALL)03/95]
Anti-Theft Wheel Lug Nuts (If equipped) If your vehicle has this option, one of the lug nuts on each wheel locks and must be unlocked with a special key. If you lose the key, send the registration card to the manufacturer (not to the dealer) to get a replacement key. NOTE: If you lose your lug wrench/lug nut key assembly, see your nearest Ford or Lincoln/Mercury dealer who has access to a master set of keys.
DO NOT USE A POWER IMPACT WRENCH ON THE LUG NUT KEY.
The anti-theft lug nut and key
Removing the anti-theft lug nut Insert the key over the locking lug nut. Make sure that you hold the key square to the lug nut. If you hold the key on an angle, you may damage the key and the lug nut. Place the lug nut wrench over the lug nut key and apply pressure on the key with the wrench. Turn the wrench in a counterclockwise direction to remove the lug nut.
174
File:cdreo.ex Update:Thu Jan 25 12:24:30 1996
*[RE14800(ALL)03/95] *[RE14900(ALL)03/95]
*[RE15050(ALL)02/95] *[RE15100(ALL)04/95] *[RE15200(ALL)03/95]
*[RE15250(ALL)01/95] *[RE16400(ALL)05/95] *[RE16500(ALL)04/95]
Roadside Emergencies
Replacing the anti-theft lug nut Insert the key over the locking lug nut. Place the lug nut wrench over the lug nut key and, while applying pressure on the key, install the lug nut. If the Engine Cranks But Does Not Start or Does Not Start After a Collision The Fuel Pump Shut-off Switch If the engine cranks but does not start or if you have had a collision, the fuel pump shut-off switch may have been triggered. The shut-off switch is a device that stops the fuel pump when your vehicle has been involved in a substantial jolt. For information on how to check and reset the fuel pump shut-off switch, see Fuel pump shut-off switch in the Index. Towing Your Vehicle If you need to have your vehicle towed, contact a professional towing service or, if you are a member, your roadside assistance center. Recommended towing options include wheel lift towing or flat bed towing.
175
File:cdreo.ex Update:Thu Jan 25 12:24:30 1996
[RE16600(ALL)05/95]
three fourths page
art:0001100-D *[RE16700(ALL)04/95]
When calling for a tow truck, tell the operator what kind of vehicle you have. A towing manual is available from Ford Motor Company for all authorized tow truck operators. Have your tow truck driver refer to this manual for the proper hook-up and towing procedures for your vehicle.
176
File:cdreo.ex Update:Thu Jan 25 12:24:30 1996
*[RE18000(ALL)03/95] *[RE18100(ALL)03/95] *[RE18200(ALL)03/95] *[RE18300(ALL)03/95] *[RE18400(ALL)03/95] [RE18500(ALL)03/95] *[RE18600(ALL)03/95] [RE18700(ALL)05/95]
[RE18900(ALL)05/95]
*[RE19000(ALL)05/95]
Roadside Emergencies
Towing Your Vehicle Behind Another Vehicle At times, you may want to tow your vehicle behind another vehicle, such as a recreational vehicle, a car, or a truck. Before you have your vehicle towed: n Release the parking brake. n Move the gearshift to N (Neutral). n Turn the ignition to the OFF position. n Unlock the steering wheel. Do not tow your vehicle at a speed faster than 35 mph (55 km/h) or for a distance greater than 50 miles (80 km) unless the drive wheels are placed on dollies. Do not tow your vehicle at a speed faster than 55 mph (90 km/h) if you have a manual transaxle. Your maximum towing distance is unlimited.
RWARNING
Never use a tow bar that attaches to the bumper when you tow your vehicle. This could damage the bumper and cause an accident.
177
File:cdhso.ex Update:Thu Jan 25 12:28:07 1996
*[HS00205(ALL)06/94] *[HS00210(ALL)05/95]
*[HS00215(ALL)06/94] *[HS00220(ALL)06/94] *[HS00225(ALL)06/94] *[HS00230(ALL)06/94] *[HS00235(ALL)06/94] *[HS00240(ALL)06/94]
*[HS00245(ALL)06/94] *[HS00250(ALL)06/94]
*[HS00255(ALL)04/95] *[HS00260(ALL)04/95]
Customer Assistance
Roadside Assistance Ford Motor Company has set up a 24-hour, seven-day-a-week hotline with trained operators that put you in touch with the help you need if you experience a problem with your vehicle. This complimentary service is provided to you throughout your warranty period of 3 years or 36,000 miles (3 years or 60,000 km), whichever comes first. To purchase Roadside Assistance coverages beyond this period, through Ford Auto Club, contact your Ford or Lincoln-Mercury dealer (not available in Canada). Roadside Assistance will cover the following: n Mount your spare if you have a flat tire. n Jump-start your battery if it is dead. n Unlock your vehicle if you are locked out. n Bring you fuel if you run out. n Tow your vehicle if you are stranded. Even non-warranty
related tows, like accidents or getting stuck in mud or snow, are covered (some exclusions apply, such as impound towing and repossession).
How to use Roadside Assistance Your Roadside Assistance identification card can be found in the Owner Guide portfolio in your glove compartment. Complete the card and place it in your wallet for quick reference. To receive roadside assistance in the United States call 1-800-241-FORD (in Canada call 1-800-665-2006). Should you need to arrange for roadside assistance yourself, Ford Motor Company will reimburse the reasonable cost. To obtain information about reimbursement call 1-800-241-FORD (in Canada call 1-800-665-2006).
179
File:cdhso.ex Update:Thu Jan 25 12:28:07 1996
*[HS00300(ALL)01/95] *[HS00400(ALL)01/95]
%*[HS00500(ALL)03/95] *[HS00600(ALL)04/95]
*[HS00700(ALL)04/95]
*[HS01000(ALL)04/95]
[HS01125(ALL)01/95]
6 pica art:0001312-A
*[HS01150(ALL)03/95]
If You Have a Service Problem Ford Motor Company has authorized Ford and Lincoln-Mercury dealerships that can service your vehicle for you. This chapter tells you how to get service or maintenance for your vehicle. Service/Maintenance Concerns (U.S. or Canada) Ford recommends taking your vehicle to your selling dealer who wants to ensure your continued satisfaction. You may, however, take your vehicle to any authorized Ford or Lincoln-Mercury dealer. In most cases, your dealer will be able to resolve your concern. If you are not satisfied with the service you received from your dealership’s service department, talk to the service manager at the dealership, or if you still are not satisfied, talk to the owner or general manager of the dealership. In most cases, you will have your concern resolved at this level. If you are away from home when your vehicle needs to be serviced, or if you need more help than the dealer gave you, contact the Ford Customer Assistance Center to find an authorized dealership that may be able to help you.
If you live in Canada and have any questions or concerns that the dealership cannot answer, contact the Customer Assistance Centre.
180
File:cdhso.ex Update:Thu Jan 25 12:28:07 1996
[HS01175(ALL)01/95]
6 pica art:0001313-A
*[HS01200(ALL)04/95] *[HS01300(ALL)04/95] *[HS01400(ALL)04/95] *[HS01500(ALL)04/95] *[HS01550(ALL)04/95] *[HS01600(ALL)03/95] %*[HS01700(ALL)03/95] [HS01750(ALL)05/95]
6 pica art:0001195-A
*[HS02200(ALL)03/95]
Customer Assistance
Please have the following information available when contacting Ford Customer Assistance: n your telephone number (both business and home) n the name of the dealer and the city where the dealership is
located
n the year and make of your vehicle n the date purchased n the current mileage on your vehicle n your Vehicle Identification Number (VIN) listed on your
owner card and/or your vehicle ownership license
Vehicle Identification Number (VIN/Serial Number) If you still have a service or product complaint, you may wish to contact the Dispute Settlement Board (U.S. only) or the Canadian Motor Vehicle Arbitration Plan (CAMVAP) in Canada.
181
File:cdhso.ex Update:Thu Jan 25 12:28:07 1996
*[HS02300(ALL)02/95] *[HS02400(ALL)03/95]
*[HS02500(ALL)01/95]
*[HS02600(ALL)01/95] *[HS02700(ALL)03/95]
*[HS02750(ALL)03/95] *[HS02800(ALL)01/95] *[HS02900(ALL)01/95] *[HS03100(ALL)01/95] *[HS03200(ALL)01/95]
*[HS03300(ALL)01/95] *[HS03400(ALL)01/95] *[HS03450(ALL)01/95]
*[HS03500(ALL)01/95]
The Dispute Settlement Board (U.S. Only) The Dispute Settlement Board is a voluntary, independent dispute-settlement program available free to owners or lessees of qualifying Ford Motor Company vehicles. The Dispute Settlement Board may not be available in all states. Ford Motor Company reserves the right to change eligibility limitations, modify procedures and/or to discontinue this process at any time without notice and without incurring obligations. What Kind of Cases Does the Board Review? The Board reviews all product performance and service complaints on Ford, Mercury and Lincoln Cars and Ford and Mercury Light Trucks under warranty that have not been resolved by a dealer or Ford Motor Company. The Board does not review issues involving: n A non-Ford product n A non-Ford dealership n A vehicle sales transaction n A request for reimbursement of consequential expenses
unless incidental to a service or product complaint being reviewed
n Items not covered by your warranty n Alleged liability claims n Property damage where such damage is significant when
compared to the economic loss alleged under the warranty dispute
n Cases currently in litigation
182
File:cdhso.ex Update:Thu Jan 25 12:28:07 1996
*[HS03600(ALL)01/95] *[HS03650(ALL)01/95]
*[HS03700(ALL)04/95] *[HS03800(ALL)04/95] *[HS03900(ALL)04/95] *[HS04000(ALL)04/95] *[HS04200(ALL)04/95]
*[HS04300(ALL)04/95]
*[HS04350(ALL)04/95]
*[HS04400(ALL)04/95]
Customer Assistance
n Vehicles not used primarily for personal, family, or
household purposes
NOTE: Complaints involving vehicles on which applicable
express written new vehicle warranties have expired at receipt of your application are not eligible. Eligibility may differ according to state law. For example, see the unique brochure for California purchasers/lessees.
How Does the Board Work? The Board has four members: n three consumer representatives n a Ford or Lincoln-Mercury dealer Consumer candidates for Board membership are recruited and trained by an independent consulting firm. Dealers are chosen because of their business leadership qualities. If the involved vehicle is within 36 months and 36,000 miles of the date of delivery (warranty start date), you have a right to make an oral presentation before the Board by indicating your choice on the application. Also, oral presentations may be requested by the Board. A decision is made by the Board by simple majority vote. Board members review all the materials related to each complaint and, based on the available information, arrive at a fair and impartial decision. Decisions are based on the written statements and any oral presentations made by each of the involved parties. Because the Board usually meets only once a month, some cases will take longer than 30 days to be reviewed. The Board will make every effort to resolve each case within 40 days after it receives the customer application form.
183
File:cdhso.ex Update:Thu Jan 25 12:28:07 1996
*[HS04500(ALL)04/95]
*[HS04600(ALL)04/95]
*[HS04700(ALL)01/95] *[HS04800(ALL)04/95]
[HS04900(ALL)05/94]
6 pica art:0001306-A
*[HS05100(ALL)04/95] *[HS05200(ALL)04/95]
*[HS05300(ALL)04/95] *[HS05400(ALL)04/95]
After your case has been reviewed, the Board will mail you its decision in writing. It will also provide you with a form to indicate your acceptance or rejection of an award decision. The decisions of the Board are binding on the dealer and Ford, but customers may have other options available to them under state or federal law. The decisions of the Board, however, may be introduced into evidence by any party in subsequent legal proceedings that may be initiated. How Do You Contact the Board? Write to the Board at the following address to request a brochure/application. You will be sent a brochure and a one-page customer application form. The form should be completed and mailed to the same address.
What is the Review Process? Your application will be reviewed and if it is determined to be eligible, you will receive an acknowledgment indicating the file number assigned to your application and the local Board address. At the same time, your dealer and Ford Motor Company representative are asked to submit statements. To review your case properly, the Board needs the following information: n legible copies of all documents and maintenance or repair
orders that relate to the case
184
File:cdhso.ex Update:Thu Jan 25 12:28:07 1996
*[HS05500(ALL)04/95] *[HS05600(ALL)04/95] *[HS05700(ALL)04/95] *[HS05800(ALL)04/95] *[HS05900(ALL)04/95] *[HS06000(ALL)04/95] *[HS06100(ALL)05/95] *[HS06200(ALL)05/95] *[HS06300(ALL)04/95] *[HS06310(ALL)04/95] *[HS06320(ALL)04/95] *[HS06340(ALL)01/95]
*[HS06360(ALL)01/95]
Customer Assistance
n the year, make, model, and vehicle identification number n the date you bought your vehicle n the date of repair and the mileage at the time of repair n the current mileage n the name of the dealer who sold you the vehicle or who
serviced your vehicle
n a brief description of your unresolved complaint n a brief summary of actions that were taken with the dealer
and Ford Motor Company
n the names (if known) of all people you contacted at the
dealership
n a description of the action you want done to resolve your
concern.
Should your application NOT qualify for review, an explanation will be mailed to you. Reporting Safety Defects (U.S. Only) If you believe that your vehicle has a defect which could cause a crash or could cause injury or death, you should immediately inform the National Highway Traffic Safety Administration (NHTSA) in addition to notifying Ford Motor Company. If NHTSA receives similar complaints, it may open an investigation, and if it finds that a safety defect exists in a group of vehicles, it may order a recall and remedy campaign. However, NHTSA cannot become involved in individual problems between you, your dealer, or Ford Motor Company.
185
File:cdhso.ex Update:Thu Jan 25 12:28:07 1996
*[HS06380(ALL)01/95]
*[HS07700(ALL)05/95] *[HS07850(ALL)03/95]
[HS07950(ALL)05/94]
6 pica art:0001313-A
*[HS07975(ALL)04/95] *[HS08000(ALL)04/95] *[HS08020(ALL)04/95] *[HS08040(ALL)04/95] *[HS08050(ALL)04/95] *[HS08060(ALL)03/95] %*[HS08080(ALL)03/95]
To contact NHTSA, you may either call the Auto Safety Hotline toll-free at 1-800-424-9393 (or 366-0123 in the Washington, D.C. area) or write to: NHTSA, U.S. Department of Transportation, 400 Seventh Street, Washington D.C. 20590. You can also obtain other information about motor vehicle safety from the Hotline. Ford of Canada Customer Assistance If you live in Canada and have any questions or concerns that the dealership cannot answer, contact the Customer Assistance Centre.
Please have the following information available when contacting the Customer Assistance Centre: n your telephone number (both business and home) n the name of the dealer and the city where the dealership is
located
n the year and make of your vehicle n the date purchased n the current mileage on your vehicle n your Vehicle Identification Number (VIN) listed on your
owner card and/or your vehicle ownership license
186
File:cdhso.ex Update:Thu Jan 25 12:28:07 1996
%*[HS08100(ALL)03/95] *[HS08200(ALL)03/95]
*[HS08300(ALL)05/95]
*[HS08400(ALL)05/95]
*[HS08450(ALL)05/95]
*[HS08500(ALL)06/95] *[HS08600(ALL)06/95] *[HS08700(ALL)06/95]
Customer Assistance
Canadian Motor Vehicle Arbitration Plan (CAMVAP) If a specific item of concern arises, where a solution cannot be reached between a vehicle owner, Ford of Canada, and/or one of its dealers (that all parties can agree upon), the owner may wish to use the services offered by the Canadian Motor Vehicle Arbitration Plan (CAMVAP). CAMVAP uses the services of Provincial Administrators to assist consumers in scheduling and preparing for their arbitration hearings. However, before you can proceed with CAMVAP you must follow your manufacturer’s dispute resolution process as outlined under “Service/Maintenance Concerns (U.S. or Canada)” earlier in this chapter. Consumers wishing to obtain further information about the program can obtain an information booklet from your dealer or contact the Provincial Administrator, Canadian Motor Vehicle Arbitration Plan, at the address or telephone number shown below. O & P Services 595 Bay Street — Suite 300
Toronto, Ontario M5G 2C2
Telephone 1 (800) 207-0685
This plan is not available in the province of Quebec. Getting Help Outside the U.S. and Canada Before you export your vehicle to a foreign country, contact the appropriate foreign embassy or consulate to make sure local regulations do not prevent you from registering your vehicle. Officials at the embassy can also help you decide whether you should import your vehicle to that country.187
File:cdhso.ex Update:Thu Jan 25 12:28:07 1996
*[HS08800(ALL)06/95]
*[HS08900(ALL)06/95]
*[HS09000(ALL)06/95] *[HS09100(ALL)06/95]
[HS09200(ALL)01/95]
7-1/2 pica art:0001307-C
*[HS09300(ALL)06/95]
*[HS09400(ALL)06/95]
Officials at the embassy or consulate can tell you where to get unleaded fuel. If you cannot get unleaded fuel or can get only fuel with an anti-knock index that is lower than your vehicle needs, contact a district or owner relations office before you leave the U.S. or Canada. Use of leaded fuel in your vehicle without a proper conversion may damage the effectiveness of your emissions control system and may cause engine knocking or serious engine damage. Ford Motor Company is not responsible for any damage that is caused by use of improper fuel. You may also have difficulty importing your vehicle back into the U.S. if you use leaded fuel. If your vehicle must be serviced while you are traveling or living in Central or South America, the Caribbean, or the Middle East, contact the nearest Ford dealership. If the dealership cannot help you, write to:
If you are in other foreign countries, contact the nearest Ford dealership. If the dealership cannot help you, they can direct you to the appropriate Ford affiliate office. If you buy your vehicle in North America and then relocate outside of the U.S. or Canada, register your Vehicle Identification Number and new address with Ford Motor Company Export Operations.
188
File:cdaco.ex Update:Thu Jan 25 12:30:23 1996
*[AC00200(ALL)03/95] *[AC00225(ALL)04/95]
*[AC00250(ALL)05/95]
twelve pica
chart:0001433-A *[AC00300(ALL)04/95]
Accessories
Ford Accessories for Your Vehicle Ford has many fine products available from your dealer to clean your vehicle and protect its finishes. For best results, use the following, or products of equivalent quality:
A wide selection of accessories is available through your local authorized dealer. These fine accessories have been engineered specifically to fulfill your automotive needs. They are custom designed to complement the style and aerodynamic appearance of your Ford-built vehicle. In addition, each accessory is made from high quality materials and meets or exceeds Ford’s rigid engineering and safety specifications. That is why Ford brand accessories are warranted for up to 3 years or 36,000 miles (60,000 km), whichever comes first. See your dealer for complete warranty information and accessory availability.
189
File:cdaco.ex Update:Thu Jan 25 12:30:23 1996
*[AC00350(ALL)03/95] [AC00550(ALL)03/95]
Safety, Comfort, and Convenience
fourteen pica
chart:0000608-L
[AC00575(ALL)05/95]
fourteen pica
chart:0001253-D
190
File:cdaco.ex Update:Thu Jan 25 12:30:23 1996
*[AC00600(ALL)01/95]
*[AC00700(ALL)05/95]
*[AC00800(ALL)01/95]
*[AC00900(ALL)05/95]
Accessories
NOTE: When adding accessories, equipment, passengers, and
luggage to your vehicle, do not exceed the total weight capacity of the vehicle or of the front or rear axle (GVWR, GAWR as shown on the Safety Compliance Certification Label). Consult your dealer for specific weight information.
NOTE: The Federal Communications Commission (FCC) or
the Canadian Radio Telecommunications Commission (CRTC) regulates the use of mobile communications systems — such as two-way radios, telephones, and theft alarms — that are equipped with radio transmitters. Any such equipment installed in your vehicle should comply with FCC or CRTC regulations and should be installed only by a qualified technician.
NOTE: Mobile communications systems may harm the
operation of your vehicle, particularly if they are not properly designed for automotive use or are not properly installed. For example, when operated, such systems may cause the engine to stumble or stall. In addition, such systems may themselves be damaged or their operation affected by operating your vehicle. (Citizens band [CB] transceivers, garage door openers, and other transmitters whose power output is 5 watts or less will not ordinarily affect your vehicle’s operation.)
NOTE: Because we have no control over the installation,
design, or manufacture of such systems, Ford cannot assume responsibility for any adverse effects or damage that may result if you use this equipment.
191
File:cdaco.ex Update:Thu Jan 25 12:30:23 1996
[AC01000(O )05/95]
thirty-six pica
chart:0001429-A
192
File:cdaco.ex Update:Thu Jan 25 12:30:23 1996
[AC01100(O )05/95]
thirty-six pica
chart:0001430-A
Accessories
193
File:cdaco.ex Update:Thu Jan 25 12:30:23 1996
[AC01150(O )05/95]
thirty-six pica
chart:0001431-A
194
File:cdsvo.ex Update:Thu Jan 25 12:09:28 1996
%*[SV00300(ALL)03/95] *[SV00400(ALL)01/95] *[SV00500(ALL)01/95] *[SV00600(ALL)01/95] *[SV00700(ALL)01/95] *[SV00800(ALL)01/95] *[SV00900(ALL)05/94]
*[SV01000(ALL)01/95] *[SV01150(ALL)02/95]
*[SV01250(ALL)03/95]
Servicing Your Contour
Service Made Easy Ford has two goals for servicing your vehicle. 1. When we can, we design parts that do not need to be
serviced.
2. We want to make servicing your vehicle as easy as possible.
To help you:
n We highlight do-it-yourself items in yellow in the engine
compartment so that you can find them easily.
n When possible, we design parts — such as the headlamp
bulbs — that can be replaced without tools.
n We give you a Maintenance Schedule that makes tracking
routine service for your vehicle easy. The maintenance schedule is located in the Maintenance Schedule and Record booklet.
This chapter tells you about the basic parts that you need to check and service regularly. If your vehicle needs professional servicing, your dealership can provide the parts and service required. Check your Warranty Information Booklet to find out which parts and services are covered. Also see the Customer Assistance chapter of this Owner Guide. Ford Motor Company recommends that the Owner Maintenance Checks listed in the Maintenance Schedule and Record booklet be performed for the proper operation of your vehicle. In addition to the conditions listed in the Owner Maintenance Checklist, be alert for any unusual noise, vibration, or other indication that your vehicle may need service. If you do notice something unusual, see that your vehicle is serviced promptly.
195
File:cdsvo.ex Update:Thu Jan 25 12:09:28 1996
*[SV01275(ALL)03/95]
%*[SV01280(ALL)04/95]
*[SV01600(ALL)03/95] *[SV01700(ALL)01/95] %*[SV01800(ALL)03/95]
*[SV01850(ALL)05/95]
*[SV01900(ALL)03/95]
*[SV02000(ALL)01/95]
*[SV02100(ALL)01/95]
Use only recommended fuels, lubricants, fluids, and service parts conforming to Ford specifications. Motorcraft parts are designed and built to provide the best performance in your vehicle. Using these parts for replacement is your assurance that Ford-built quality stays in your vehicle. NOTE: Always dispose of used automotive fluids in a responsible manner. Follow your community’s standards for disposing of these types of fluids. Call your local recycling center to find out about recycling automotive fluids.
Precautions When Servicing Your Vehicle Be especially careful when inspecting or servicing your vehicle. Here are some general precautions for your safety: n Do not work on a hot engine. The engine cooling fan may
come on unexpectedly. Always turn the engine off and let it cool.
RWARNING
The cooling fan is automatic and may come on at any time. Always disconnect the negative terminal of the battery before working near the fan.
n If you must work with the engine running, avoid wearing loose clothing or jewelry that could get caught in moving parts. Take appropriate precautions with long hair.
n Do not work on a vehicle in an enclosed space with the
engine running, unless you are sure you have enough ventilation.
n Never get under a vehicle while it is supported by a jack only. If you must work under a vehicle, use safety stands.
196
File:cdsvo.ex Update:Thu Jan 25 12:09:28 1996
*[SV02200(ALL)01/95] *[SV02575(ALL)03/95] [SV02625(ALL)02/95]
*[SV02650(ALL)03/95] *[SV02675(ALL)03/95] *[SV02700(ALL)03/95] *[SV02825(ALL)04/95]
*[SV02850(ALL)03/95] *[SV03000(ALL)02/95]
Servicing Your Contour
n Keep all lit cigarettes and other smoking materials away
from the battery and all fuel-related parts.
Working with the engine off: 1. Set the parking brake fully and make sure that the gearshift
is securely latched in P (Park) (automatic transaxle) or 1 (First) gear (manual transaxle).
2. Remove the key from the ignition after you turn the engine
off.
3. Block the wheels. This will prevent your vehicle from
moving unexpectedly.
Working with the engine on: 1. Set the parking brake fully and make sure the gearshift is
securely latched in P (Park) (automatic transaxle) or Neutral (manual transaxle).
2. Block the wheels. This will prevent your vehicle from
moving unexpectedly.
RWARNING
Do not start your engine with the air cleaner removed and do not remove it while the engine is running.
*[SV03050(ALL)03/95]
If the battery is disconnected, the computer must relearn its idle control. See Battery in the Index.
197
File:cdsvo.ex Update:Thu Jan 25 12:09:28 1996
*[SV03100(ALL)03/95] %*[SV03200(ALL)01/95] [SV03250(ALL)05/95]
10-1/2 pica
art:0000375-K %*[SV03300(ALL)02/95] [SV03400(O )05/95]
10-1/2 pica
art:0001476-A
Opening the Hood 1. Inside the vehicle, pull the hood release handle located
under the bottom left corner of the instrument panel.
The hood release under the instrument panel
2. Go to the front of the vehicle and release the auxiliary latch
that is located under the hood at the center of the vehicle.
The auxiliary latch under the front edge of the hood
198
File:cdsvo.ex Update:Thu Jan 25 12:09:28 1996
[SV04000(ALL)05/94]
[SV04100(ALL)02/89]
*[SV04201(ALL)01/95]
*[SV04301(ALL)01/95]
*[SV04500(ALL)04/95] [SV05200(ALL)05/94]
Servicing Your Contour
3. Lift the hood and secure it in the open position with the
prop rod. Make sure only the hole in the hood marked in yellow is used. When you close the hood, make sure the prop rod is in its retainer and that the hood latches securely.
NOTE: Apply lubricant to the hood latch at six-month intervals to maintain smooth and trouble-free operation.
NOTE: Read and understand Precautions When Servicing Your
Vehicle at the beginning of this chapter before opening the hood.
Engine Compartment Your vehicle has a 4-cylinder 2.0L EFI or 6-cylinder 2.5L EFI engine.
199
a
a
File:cdsvo.ex Update:Thu Jan 25 12:09:28 1996
*[SV05575(ALL)04/95] *[SV05600(ALL)04/95] *[SV05625(ALL)05/95]
*[SV05650(ALL)04/95]
*[SV05675(ALL)06/95] *[SV05700(ALL)04/95] *[SV06100(ALL)03/95] [SV06125(ALL)03/95] [SV06200(ALL)04/94]
[SV06275(ALL)05/94]
7-1/2 pica art:0000601-F
Cleaning the Engine A clean engine is more efficient because a buildup of grease and dirt acts as an insulator, keeping the engine warmer than usual. n Extreme care must be used if a power washer is used to clean the engine. The high pressure fluid could penetrate sealed parts and assemblies causing damage or malfunctions.
n In order to avoid possible cracking of the engine block or fuel injection pump, do not spray a hot engine or injection pump with cold water.
n The alternator, distributor and air intake must be covered.
Covering these components will help prevent water damage.
n Never wash or rinse the engine while it is running. Water
getting into the engine may cause internal damage.
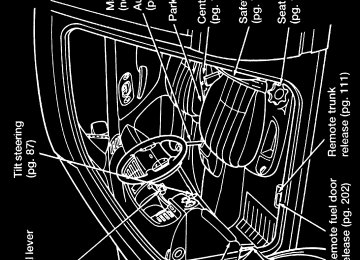
Filling the Fuel Tank Fuel Filler Door Release (If equipped) On some models, the fuel filler door cannot be opened from outside the vehicle. To unlatch the fuel filler door, find the front end of the release handle on the floor to the left of the driver’s seat. Push the handle down firmly until it stops and the door pops open.
[SV06300(ALL)01/95]
The fuel filler door release If the fuel filler door does not open when you push the release handle, open the trunk and find the override release on the
202
File:cdsvo.ex Update:Thu Jan 25 12:09:28 1996
[SV06340(ALL)04/94]
13-1/2 pica
art:0001019-C *[SV06350(ALL)02/95] *[SV06375(ALL)05/95] *[SV06400(ALL)05/95]
*[SV06500(ALL)05/95]
*[SV06550(ALL)05/95]
Servicing Your Contour
right side. The override release is a handle which is marked with a fuel pump symbol. Open the fuel filler door by pulling on the handle.
Fuel filler door release — manual override Filling the fuel tank
The fuel door is outside the car on the passenger side near the back. To fill the fuel tank: 1. After opening the fuel filler door, remove the cap carefully
and slowly by turning it counterclockwise 1/2 to 3/4 turn. If a hissing sound is heard, wait until it stops, then continue turning until the cap is free.
RWARNING
If the fuel cap is venting vapor or if you hear a hissing sound, wait until it stops before completely removing the cap.
2. Put the nozzle all the way inside the fuel filler pipe before
pumping the fuel.
203
File:cdsvo.ex Update:Thu Jan 25 12:09:28 1996
*[SV06625(ALL)05/95]