- 2001 Chevrolet Silverado Owners Manuals
- Chevrolet Silverado Owners Manuals
- 2013 Chevrolet Silverado Owners Manuals
- Chevrolet Silverado Owners Manuals
- 2015 Chevrolet Silverado Owners Manuals
- Chevrolet Silverado Owners Manuals
- 2016 Chevrolet Silverado Owners Manuals
- Chevrolet Silverado Owners Manuals
- 2010 Chevrolet Silverado Owners Manuals
- Chevrolet Silverado Owners Manuals
- 2012 Chevrolet Silverado Owners Manuals
- Chevrolet Silverado Owners Manuals
- 2004 Chevrolet Silverado Owners Manuals
- Chevrolet Silverado Owners Manuals
- 2008 Chevrolet Silverado Owners Manuals
- Chevrolet Silverado Owners Manuals
- 2014 Chevrolet Silverado Owners Manuals
- Chevrolet Silverado Owners Manuals
- 2000 Chevrolet Silverado Owners Manuals
- Chevrolet Silverado Owners Manuals
- 2011 Chevrolet Silverado Owners Manuals
- Chevrolet Silverado Owners Manuals
- 2003 Chevrolet Silverado Owners Manuals
- Chevrolet Silverado Owners Manuals
- 2007 Chevrolet Silverado Owners Manuals
- Chevrolet Silverado Owners Manuals
- 2005 Chevrolet Silverado Owners Manuals
- Chevrolet Silverado Owners Manuals
- Download PDF Manual
-
4. Check both sides of the dipstick and read the lower level. Repeat the check procedure to verify the reading.
5.
If the fluid level is below the COLD check band, add only enough fluid as necessary to bring the level into the COLD band. It does not take much fluid, generally less than 0.5 Liter (1 Pint). Do not overfill.
6. Perform a hot check at the
first opportunity after the transmission reaches a normal operating temperature between 60°C and 75°C (140°F and 167°F). If the fluid level is in the acceptable range, push the dipstick back in all the way.
7.
Hot Check Procedure Use this procedure to check the transmission fluid level when the transmission fluid temperature is between 60°C and 75°C (140°F and 167°F). The hot check is the most accurate method to check the fluid level. The hot check should be performed at the first opportunity in order to verify the cold check. The fluid level rises as fluid temperature increases, so it is important to ensure the transmission temperature is within range.
Vehicle Care
10-7
1. Locate the transmission dipstick
at the rear of the engine compartment, on the passenger side of the vehicle. See Engine Compartment Overview on page 10‑4 for more information.
3.
2. Pull out the dipstick and wipe it with a clean rag or paper towel. Install the dipstick by pushing it back in all the way, wait three seconds, and then pull it back out again.
4. Check both sides of the dipstick and read the lower level. Repeat the check procedure to verify the reading.
Silverado/Sierra Hybrid - 2011
Black plate (8,1)
10-8
Vehicle Care
5. Safe operating level is within the
HOT cross hatch band on the dipstick. If the fluid level is not within the HOT band, and the transmission temperature is between 60°C and 75°C (140°F and 167°F), add or drain fluid as necessary to bring the level into the HOT band. If the fluid level is low, add only enough fluid to bring the level into the HOT band. It does not take much fluid, generally less than 0.5 Liter (1 Pint). Do not overfill. If the fluid level is in the acceptable range, push the dipstick back in all the way.
6.
Consistency of Readings Always check the fluid level at least twice using the procedure described previously. Consistency (repeatable readings) is important to maintaining proper fluid level. If readings are still inconsistent, contact your dealer.
Drive Motor/Generator Control Module (DMCM) Coolant Surge Tank Pressure Cap
See Engine Compartment Overview on page 10‑4 for more information on location. The Drive Motor/Generator Control Module (DMCM) coolant surge tank pressure cap must be fully installed on the hybrid coolant surge tank.
Notice: If the pressure cap is not tightly installed, coolant loss and possible damage to the Drive Motor/Generator Control Module (DMCM) may occur. Be sure the cap is properly and tightly secured.
Drive Motor/Generator Control Module (DMCM) Cooling System In addition to the regular cooling system, the vehicle also has a cooling system for the DMCM system. This system is serviced differently than the vehicle's main cooling system. The DMCM cooling system includes the DMCM coolant surge tank, DMCM surge tank pressure cap, DMCM cooling pumps, hybrid cooling radiator and the Drive Motor/Generator Control Module (DMCM). The DMCM cooling system uses a 50/50
pre-mixed DEX-COOL® coolant and deionized water available at yourSilverado/Sierra Hybrid - 2011
Black plate (9,1)
Vehicle Care
10-9
leak at the DMCM cooler core, DMCM pressure cap, DMCM cooler hoses, DMCM cooling pump or somewhere else in the DMCM cooling system. Notice: Running the engine when there is a leak in the hybrid cooling system can cause the hybrid cooling system to lose all coolant and can damage the system. Get any leak fixed before you drive the vehicle or run the engine.
dealer. See “Engine Coolant” and “Cooling System” in the owner manual for more information.
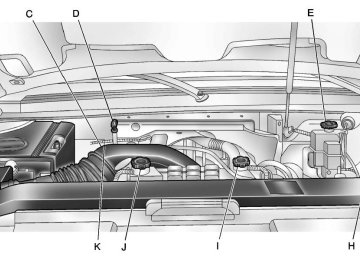
D. DMCM Cooling Hoses
(Out of View)
E. DMCM Coolant Tank
Pressure Cap
If the coolant inside the DMCM coolant surge tank is boiling, do not do anything else until it cools down.
When it is safe to lift the hood: A. Drive Motor/Generator Control
Module (DMCM)
B. Engine Coolant Surge Tank
Pressure Cap
C. DMCM Coolant Surge Tank/ Engine Coolant Surge Tank
The coolant level should be at or above the FULL COLD mark with the vehicle parked on a level surface. If it is not, there might be a
Silverado/Sierra Hybrid - 2011
Black plate (10,1)
10-10
Vehicle Care
How to Add Coolant to the DMCM Coolant Surge Tank
{ WARNING
{ WARNING
You can be burned if you spill coolant on hot engine parts. Coolant contains ethylene glycol and it will burn if the engine parts are hot enough. Do not spill coolant on a hot engine.
If the DMCM coolant is empty , the vehicle must be serviced by your dealer and a special fill procedure must be followed. Notice: Attempting to fill the DMCM cooling surge tank yourself when the fluid level is empty can damage your vehicle. Your vehicle must be serviced.
Steam and scalding liquids from a hot cooling system can blow out and burn you badly. They are under pressure, and if you turn the coolant surge tank pressure cap — even a little — they can come out at high speed. Never turn the cap when the cooling system, including the coolant surge tank pressure cap, is hot. Wait for the cooling system and coolant surge tank pressure cap to cool if you ever have to turn the pressure cap.
Notice: Using coolant other than a pre‐mixed DEX-COOL, available at your dealer, may damage your vehicle. Any repairs would not be covered by your warranty. Always use a pre‐mixed DEX-COOL (silicate-free) coolant in your vehicle.
If no problem has been found yet, check to see if coolant is visible in the DMCM coolant surge tank. If coolant is visible, add pre‐mixed DEX-COOL coolant, available at your dealer, at the DMCM coolant surge tank, but be sure the DMCM cooling system, including the DMCM coolant surge tank pressure cap, is cool before you do it. Use the procedure following.
Silverado/Sierra Hybrid - 2011
Black plate (11,1)
Vehicle Care
10-11
4. Turn the ignition to ON/RUN
without starting the engine. The hybrid cooling pumps will run and any trapped air will purge to the surge tank.
5. Add the pre‐mixed DEX‐COOL, available at your dealer, until the coolant level is maintained at the FULL COLD mark. This should take no longer than two minutes of hybrid cooling pump operation. If the level cannot be kept at the FULL COLD level, the vehicle may need service. See your dealer.
1. Park the vehicle on a level
surface and turn the vehicle off. Remove the DMCM coolant surge tank pressure cap when the DMCM cooling system, including the DMCM coolant surge tank pressure cap and DMCM cooling hoses, are no longer hot. Turn the DMCM coolant surge tank pressure cap slowly counterclockwise (left) about one full turn. Wait 30 seconds.
2. Then keep turning the DMCM
coolant surge tank pressure cap slowly, and remove it.
3. Add the pre‐mixed DEX‐COOL, available at your dealer, to the DMCM coolant surge tank until the level reaches the FULL COLD mark.
Silverado/Sierra Hybrid - 2011
Black plate (12,1)
10-12
Vehicle Care
6. Then replace the DMCM coolant
surge tank pressure cap. Be sure the pressure cap is hand-tight and fully seated.
Notice: Using tap water, cooling system sealers or conditioners in an attempt to stop coolant leaks can damage the DMCM and engine cooling systems. Never use tap water, cooling system sealers or conditioners in your cooling system.
Power Steering Fluid The vehicle has electric power steering and does not use power steering fluid.
Battery This vehicle has a standard 12‐volt battery and a high voltage hybrid battery. Refer to the replacement number on the original battery label when a new standard 12‐volt battery is needed. Only a trained service technician with the proper knowledge and tools should inspect, test, or replace the hybrid battery. See your dealer if the hybrid battery needs service. The dealer has information on how to recycle the hybrid battery . There is also information available at http:// www.recyclemybattery.com.
If an airbag inflates or the vehicle has been in a crash, the vehicle's sensing system might command the automatic hybrid battery disconnect to open. See Replacing Airbag System Parts After a Crash on page 3‑1 for more information.
{ DANGER
Battery posts, terminals, and related accessories contain lead and lead compounds, chemicals known to the State of California to cause cancer and reproductive harm. Wash hands after handling.
Silverado/Sierra Hybrid - 2011
Black plate (13,1)
Vehicle Storage
{ WARNING
Batteries have acid that can burn you and gas that can explode. You can be badly hurt if you are not careful. See Jump Starting on page 10‑15 for tips on working around a battery without getting hurt.
Infrequent Usage: Remove the 12‐volt battery black, negative (−) cable from the battery to keep the battery from running down. Extended Storage: Remove the 12‐volt battery black, negative (−) cable from the battery or use a battery trickle charger. Remember to reconnect the battery when ready to drive the vehicle.
Electrical System
High Voltage Devices and Wiring
{ WARNING
Exposure to high voltage can cause shock, burns, and even death. The high voltage systems in your vehicle can only be serviced by technicians with special training. High voltage devices are identified by labels. Do not remove, open, take apart, or modify these devices. High voltage cable or wiring has orange covering. Do not probe, tamper with, cut, or modify high voltage cable or wiring.
Vehicle Care
10-13
Fuses and Circuit Breakers The wiring circuits in the vehicle are protected from short circuits by a combination of fuses, circuit breakers and fusible thermal links. This greatly reduces the chance of fires caused by electrical problems. Be sure you replace a bad fuse with a new one of the identical size and rating. If you ever have a problem on the road and do not have a spare fuse, you can borrow one that has the same amperage. Just pick some feature of the vehicle that you can get along without, like the radio or cigarette lighter, and use its fuse, if it is the correct amperage. Replace it as soon as you can.
Silverado/Sierra Hybrid - 2011
Black plate (14,1)
10-14
Vehicle Care
The vehicle also has a special fuse in the battery box for the 300-volt batteries. If this fuse has failed and needs to be replaced, the vehicle will be disabled and you will need to have the vehicle repaired by your dealer. Do not attempt to self-service this fuse.
Engine Compartment Fuse Block
Hybrid Auxiliary Engine Compartment Fuse Block The hybrid auxiliary engine compartment fuse block is located in the engine compartment near the front of the vehicle. Lift the cover for access to the fuse/relay block. See Engine Compartment Overview on page 10‑4 for more information on its location. For more information on the main underhood fuse block, see “Engine Compartment Fuse Block” in the owner manual.
Fuses
Usage
ACPO (SUV Only)
BECM FAN
ACCM
Fuses
Usage
CAB HTR PMP
EMPTY
COOL PUMP
Silverado/Sierra Hybrid - 2011
Black plate (15,1)
Fuses
10
J‐Case FAN 1
TRANS PUMP
FAN 2
CABHTR PMP
Usage EPS
Drive Motor/Generator
Control Module 1
Drive Motor/Generator
Control Module 2
BECM
Usage
Cooling Fan 1
Auxiliary
Transmission Fluid Pump
Cooling Fan 2
Cab Heater Pump
Relays
CAB HTR PUMP COOL PUMP
FAN LOW
FAN MID 1
FAN HI
FAN MID 2
FANCNTRL
Vehicle Care
10-15
Usage
Jump Starting
{ WARNING
Personal injury, death, or damage to the vehicle can result if you try jump starting or using a battery charger on the high voltage hybrid battery. Use only the 12-volt battery for jump starting and charging.
For more information about the vehicle's batteries, see Battery on page 10‑12.
Cabin Heater Pump
Coolant Pump
Cooling Fan Low
Speed Relay
Cooling Fan Mid 1
Cooling Fan High
Speed Relay
Cooling Fan Mid 2
Cooling Fan Control
Silverado/Sierra Hybrid - 2011
Black plate (16,1)
10-16
Vehicle Care
If the vehicle's 12‐volt battery has run down, you may want to use another vehicle and some jumper cables to start your vehicle. Use the following steps to do it safely.
{ WARNING
Batteries can hurt you. They can be dangerous because:
. They contain acid that can
burn you.
. They contain gas that can
explode or ignite.
. They contain enough electricity to burn you.
If you do not follow these steps exactly, some or all of these things can hurt you.
Notice: Ignoring these steps could result in costly damage to the vehicle that would not be covered by the warranty.
Trying to start the vehicle by pushing or pulling it will not work, and it could damage the vehicle. 1. Check the other vehicle. It must
have a 12‐volt battery with a negative ground system.
Notice: Only use vehicles with 12-volt systems with negative grounds to jump start your vehicle. If the other vehicle's system is not a 12-volt system with a negative ground, both vehicles can be damaged. 2. Get the vehicles close enough
so the jumper cables can reach, but be sure the vehicles are not touching each other. It could cause a ground connection you do not want. You would not be able to start your vehicle, and the bad grounding could damage the electrical systems.
To avoid the possibility of the vehicles rolling, set the parking brake firmly on both vehicles involved in the jump start procedure. Put the automatic transmission in P (Park) or a manual transmission in N (Neutral) before setting the parking brake. If you have a four-wheel-drive vehicle, be sure the transfer case is in a drive gear, not in N (Neutral).
Notice: If you leave the radio or other accessories on during the jump starting procedure, they could be damaged. The repairs would not be covered by the warranty. Always turn off the radio and other accessories when jump starting the vehicle. 3. Turn off the ignition on both
vehicles. Unplug unnecessary accessories plugged into the cigarette lighter or the accessory power outlets. Turn off the radio and all the lamps that are not needed.
Silverado/Sierra Hybrid - 2011
Black plate (17,1)
This avoids sparks and helps save both batteries. It could save the radio!
4. Open the hood on the other
vehicle and locate the positive (+) and negative (−) terminal locations on that vehicle.
The positive (+) connection is located under a red plastic cover at the positive battery post. To uncover the remote positive (+) terminal, open the red plastic cover.
5. The remote negative (−) is a
solid engine ground.
{ WARNING
An electric fan can start up even when the engine is not running and can injure you. Keep hands, clothing and tools away from any underhood electric fan.
{ WARNING
Using an open flame near a battery can cause battery gas to explode. People have been hurt doing this, and some have been blinded. Use a flashlight if you need more light. Be sure the battery has enough water. You do not need to add water to the battery installed in your new vehicle. But if a battery has filler caps, be sure the right
(Continued)
Vehicle Care
10-17
WARNING (Continued)
amount of fluid is there. If it is low, add water to take care of that first. If you do not, explosive gas could be present. Battery fluid contains acid that can burn you. Do not get it on you. If you accidentally get it in your eyes or on your skin, flush the place with water and get medical help immediately.
{ WARNING
Fans or other moving engine parts can injure you badly. Keep your hands away from moving parts once the engine is running.
6. Check that the jumper cables do not have loose or missing insulation. If they do, you could get a shock. The vehicles could be damaged too.
Silverado/Sierra Hybrid - 2011
Black plate (18,1)
10-18
Vehicle Care
Before you connect the cables, here are some basic things you should know. Positive (+) goes to positive (+) or to a remote positive (+) terminal if the vehicle has one. Negative (−) will go to a heavy, unpainted metal engine part or a solid engine ground. Do not connect positive (+) to negative (−) or you will get a short that would damage the battery and maybe other parts too. Do not connect the negative (−) cable to the negative (−) terminal on the dead battery because this can cause sparks.
7. Connect the red positive (+)
cable to the positive (+) terminal of the vehicle with the dead battery. Use a remote positive (+) if the vehicle has one.
8. Do not let the other end touch
metal. Connect it to the positive (+) terminal of the good battery. Use a remote positive (+) if the vehicle has one.
9. Now connect the black
negative (−) cable to the negative (−) terminal of the good battery. Use a remote negative (−) if the vehicle has one. Do not let the other end touch anything until the next step. The other end of the negative (−) cable does not go to the dead battery. It goes to a heavy, unpainted metal engine part or to the remote negative (−) terminal on the vehicle with the dead battery.
10. Connect the other end of the
negative (−) cable to the remote negative (−) terminal, on the vehicle with the dead battery.
11. Now start the vehicle with the
good battery and run the engine for a while.
12. Try to start the vehicle that had
the dead battery. If it will not start after a few tries, it probably needs service.
Notice: If the jumper cables are connected or removed in the wrong order, electrical shorting may occur and damage the vehicle. The repairs would not be covered by the vehicle warranty. Always connect and remove the jumper cables in the correct order, making sure that the cables do not touch each other or other metal.
Silverado/Sierra Hybrid - 2011
Black plate (19,1)
To disconnect the jumper cables from both vehicles: 1. Disconnect the black
negative (−) cable from the vehicle that had the bad battery.
2. Disconnect the black
negative (−) cable from the vehicle with the good battery.
3. Disconnect the red positive (+) cable from the vehicle with the good battery.
4. Disconnect the red positive (+)
cable from the other vehicle.
5. Return the remote positive (+)
terminal cover to its original position.
Vehicle Care
10-19
Towing
Recreational Vehicle Towing Recreational vehicle towing means towing the vehicle behind another vehicle – such as behind a motorhome. The two most common types of recreational vehicle towing are known as dinghy towing and dolly towing. Dinghy towing is towing the vehicle with all four wheels on the ground. Dolly towing is towing the vehicle with two wheels on the ground and two wheels up on a device known as a dolly.
Jumper Cable Removal
A. Heavy, Unpainted Metal Engine
Part or Remote Negative (−) Terminal
B. Good Battery or Remote Positive (+) and Remote Negative (−) Terminals
C. Dead Battery or Remote
Positive (+) Terminal
Silverado/Sierra Hybrid - 2011
Black plate (20,1)
10-20
Vehicle Care
Here are some important things to consider before recreational vehicle towing: . What is the towing capacity
of the towing vehicle? Be sure to read the tow vehicle manufacturer's recommendations.
Dinghy Towing
Two-Wheel Drive Vehicles
. What is the distance that will be travelled? Some vehicles have restrictions on how far and how long they can tow. Is the proper towing equipment going to be used? See your dealer or trailering professional for additional advice and equipment recommendations. Is the vehicle ready to be towed? Just as preparing the vehicle for a long trip, make sure the vehicle is prepared to be towed.
Notice: If the vehicle is towed with all four wheels on the ground, the drivetrain components could be damaged.
The repairs would not be covered by the vehicle warranty. Do not tow the vehicle with all four wheels on the ground. Two-wheel drive vehicles should not be towed with all four wheels on the ground. Two-wheel drive transmissions have no provisions for internal lubrication while being towed.
Silverado/Sierra Hybrid - 2011
Black plate (21,1)
Vehicle Care
10-21
Dolly Towing – Front Towing (Front Wheels Off the Ground)
Two-Wheel Drive Vehicles
Four-Wheel Drive Vehicles
{ WARNING Shifting a four-wheel-drive vehicle's transfer case into N (Neutral) can cause the vehicle to roll even if the transmission is in P (Park). The driver or others could be injured. Make sure the parking brake is firmly set before the transfer case is shifted to N (Neutral).
Use the following procedure to dinghy tow a four-wheel drive vehicle: 1. Position the vehicle being towed behind the tow vehicle and shift the transmission to P (Park).
2. Turn the engine off and firmly set the parking brake. See “Parking Brake” in the owner manual. 3. Securely attach the vehicle
being towed to the tow vehicle.
4. Shift the transfer case to
N (Neutral). For more information on “Shifting into N (Neutral)”, see “Four Wheel Drive” in the owner manual.
5. Release the parking brake only after the vehicle being towed is firmly attached to the towing vehicle.
6. Turn the ignition to LOCK/OFF
and remove the key — the steering wheel will still turn.
Notice: If a two-wheel-drive vehicle is towed with the rear wheels on the ground, the transmission could be damaged. The repairs would not be covered by the vehicle warranty. Never tow the vehicle with the rear wheels on the ground. Two-wheel drive vehicles should not be towed with the rear wheels on the ground. Two-wheel drive
Silverado/Sierra Hybrid - 2011
Black plate (22,1)
10-22
Vehicle Care
transmissions have no provisions for internal lubrication while being towed. To dolly tow a two‐wheel drive vehicle, the vehicle must be towed with the rear wheels on the dolly. See “Rear Towing (Rear Wheels Off the Ground)” in this section for more information.
Four-Wheel Drive Vehicles
3. Shift the transmission to
P (Park).
4. Firmly set the parking brake.
See “Parking Brake” in the owner manual.
{ WARNING Shifting a four-wheel-drive vehicle's transfer case into N (Neutral) can cause the vehicle to roll even if the transmission is in P (Park). The driver or others could be injured. Make sure the parking brake is firmly set before the transfer case is shifted to N (Neutral).
5. Shift the transfer case to
N (Neutral). For more information on “Shifting into N (Neutral)”, see “Four Wheel Drive” in the owner manual.
Use the following procedure to dolly tow a four-wheel drive vehicle from the front: 1. Attach the dolly to the tow vehicle following the dolly manufacturer's instructions.
2. Drive the front wheels onto the
dolly.
Silverado/Sierra Hybrid - 2011
Black plate (23,1)
Dolly Towing – Rear Towing (Rear Wheels Off the Ground)
6. Secure the vehicle to the dolly
following the manufacturer's instructions.
7. Release the parking brake only after the vehicle being towed is firmly attached to the towing vehicle.
8. Turn the ignition to LOCK/OFF. After towing, see “Shifting Out of N (Neutral)” under “Four Wheel Drive” in the owner manual.
Two‐Wheel Drive Vehicles Use the following procedure to dolly tow a two-wheel-drive vehicle from the rear: 1. Attach the dolly to the tow vehicle following the dolly manufacturer's instructions.
2. Drive the rear wheels onto the
dolly.
Vehicle Care
10-23
3. Firmly set the parking brake.
See “Parking Brake” in the owner manual.
4. Put the transmission in P (Park). 5. Secure the vehicle to the dolly
following the manufacturer's instructions.
6. Use an adequate clamping
device designed for towing to ensure that the front wheels are locked into the straight position. 7. Turn the ignition to LOCK/OFF.
Four‐Wheel Drive Vehicles Use the following procedure to dolly tow a four-wheel drive vehicle from the rear: 1. Attach the dolly to the tow vehicle following the dolly manufacturer's instructions.
2. Drive the rear wheels onto the
dolly.
Silverado/Sierra Hybrid - 2011
Black plate (24,1)
10-24
Vehicle Care
3. Firmly set the parking brake.
See “Parking Brake” in the owner manual.
4. Put the transmission in P (Park). 5. Secure the vehicle to the dolly
following the manufacturer's instructions.
6. Use an adequate clamping
device designed for towing to ensure that the front wheels are locked into the straight position.
Appearance Care
Exterior Care When scraping the windshield glass to remove ice and snow, stay clear of the hybrid decal. To have the hybrid decals removed from the vehicle, please see your dealer.
{ WARNING Shifting a four-wheel-drive vehicle's transfer case into N (Neutral) can cause the vehicle to roll even if the transmission is in P (Park). The driver or others could be injured. Make sure the parking brake is firmly set before the transfer case is shifted to N (Neutral).
7. Shift the transfer case to
N (Neutral). For more information on “Shifting into N (Neutral)”, see “Four Wheel Drive” in the owner manual.
8. Turn the ignition to LOCK/OFF. After towing, see “Shifting Out of N (Neutral)” under “Four Wheel Drive” in the owner manual.
Silverado/Sierra Hybrid - 2011
Black plate (1,1)
Service and Maintenance
11-1
Service and Maintenance
Recommended Fluids, Lubricants, and Parts
Recommended Fluids and
Lubricants . . . . . . . . . . . . . . . . . . 11-2
Silverado/Sierra Hybrid - 2011
Black plate (2,1)
11-2
Service and Maintenance
Recommended Fluids, Lubricants, and Parts Recommended Fluids and Lubricants
Fluids identified below are specific to the hybrid vehicle and can be obtained from your dealer. See the owner manual for the other fluids and lubricants recommended for the vehicle.
Usage
Drive Motor/Generator Control
Module (DMCM) Cooling System
Fluid/Lubricant Always use the pre-mixed 50/50 mixture of de‐ionized water and DEX-COOL® (silicate-free) coolant available at your dealer. See Drive Motor/Generator Control Module (DMCM) Cooling System on page 10‑8.
Silverado/Sierra Hybrid - 2011
Black plate (1,1)
Technical Data
12-1
Technical Data
Vehicle Data
Capacities and
Specifications . . . . . . . . . . . . . . 12-2
Engine Drive Belt Routing . . . 12-3Silverado/Sierra Hybrid - 2011
Black plate (2,1)
12-2
Technical Data
Vehicle Data Capacities and Specifications
Application
Automatic Transmission* (Pan Removal and Filter Replacement) Cooling System
Drive Motor Generator Control Module Cooling System 6.0L V8 Engine Cooling System
Capacities
Metric
10.9 L
2.7 L
16.3 L 98.4 L
English
11.5 qt
2.9 qt
17.2 qt 26.0 gal
Fuel Tank *See Automatic Transmission Fluid on page 10‑5 for information on checking fluid level. All capacities are approximate. Recheck fluid level after filling.
Engine
6.0L V8
VIN Code
Transmission
Automatic
Spark Plug Gap 1.02 mm (0.040 in)
Engine Specifications
Silverado/Sierra Hybrid - 2011
Black plate (3,1)
Engine Drive Belt Routing
Technical Data
12-3
Silverado/Sierra Hybrid - 2011
Black plate (4,1)
12-4
Technical Data
2 NOTES
Silverado/Sierra Hybrid - 2011
Black plate (1,1)
Antilock Brake System (ABS)
Warning Light . . . . . . . . . . . . . . . . . . 5-9
Appearance Care
Exterior . . . . . . . . . . . . . . . . . . . . . 10-24
Automatic Transmission . . . . . . . . 9-5
Fluid . . . . . . . . . . . . . . . . . . . . . . . . . .10-5
Manual Mode . . . . . . . . . . . . . . . . . . 9-7Battery . . . . . . . . . . . . . . . . . . . . . . . 10-12
Jump Starting . . . . . . . . . . . . . . . 10-15
Voltage and ChargingMessages . . . . . . . . . . . . . . . . . . .5-12
Brakes
Regenerative Braking . . . . . . . . . . 9-8
System Messages . . . . . . . . . . . .5-12Canadian Vehicle Owners . . . . . . . . .ii Capacities and
Specifications . . . . . . . . . . . . . . . . 12-2
Charging System Light . . . . . . . . . 5-7
Circuit Breakers . . . . . . . . . . . . . . 10-13
CleaningExterior Care . . . . . . . . . . . . . . . 10-24
Climate Control Systems . . . . . . . 8-1
Air Conditioning . . . . . . . . . . . . . . . 8-1
Heating . . . . . . . . . . . . . . . . . . . . . . . . 8-1
Cluster, IP . . . . . . . . . . . . . . . . . . . . . . 5-2
CoolantEngine Temperature Gauge . . . 5-7
Coolant Surge Tank
Pressure Cap, (DMCM) . . . . . . 10-8
Cooling System, (DMCM) . . . . . . 10-8
CoversTonneau . . . . . . . . . . . . . . . . . . 4-1, 4-6
INDEX
i-1
Door
Ajar Messages . . . . . . . . . . . . . . .5-12
Drive Motor/Generator
Control Module (DMCM) Coolant Surge Tank Pressure Cap . . . . . . . . . . . . . . . . 10-8
Drive Motor/Generator
Control Module (DMCM) Cooling System . . . . . . . . . . . . . . 10-8
Driver Information
Center (DIC) . . . . . . . . . . . . . . . . . 5-11
Silverado/Sierra Hybrid - 2011
Black plate (2,1)
i-2
INDEX
Electrical System
Engine Compartment
Fuse Block . . . . . . . . . . . . . . . . 10-14
Fluid
Automatic Transmission . . . . . .10-5
Power Steering . . . . . . . . . . . . . 10-12Fuses and Circuit
Fuel
Gauge . . . . . . . . . . . . . . . . . . . . . . . . . 5-3
Fuel Economy Gauge . . . . . . . . . . 5-4
FusesGauges
Engine Coolant
Temperature . . . . . . . . . . . . . . . . . 5-7
Engine Oil Pressure . . . . . . . . . . . 5-5
Fuel . . . . . . . . . . . . . . . . . . . . . . . . . . . 5-3
Fuel Economy . . . . . . . . . . . . . . . . . 5-4
Tachometer . . . . . . . . . . . . . . . . . . . . 5-3Breakers . . . . . . . . . . . . . . . . . . 10-13
Engine
Compartment Overview . . . . . . .10-4
Coolant Heater . . . . . . . . . . . . . . . . 9-3
Coolant Temperature Gauge . . . 5-7
Drive Belt Routing . . . . . . . . . . . .12-3
Oil Pressure Gauge . . . . . . . . . . . 5-5
Pressure Light . . . . . . . . . . . . . . . .5-10
Running While Parked . . . . . . . . . 9-4Engine Oil
Messages . . . . . . . . . . . . . . . . . . . .5-12
Equipment, Towing . . . . . . . . . . . . 9-10Engine Compartment
General Information
Fuse Block . . . . . . . . . . . . . . . . 10-14
Towing . . . . . . . . . . . . . . . . . . . . . . . . . 9-9
Fuses and Circuit
Breakers . . . . . . . . . . . . . . . . . . 10-13
Heater
Engine Coolant . . . . . . . . . . . . . . . . 9-3
Heating and Air Conditioning . . . 8-1
High Voltage Devices andWiring . . . . . . . . . . . . . . . . . . . . . . . 10-13
Silverado/Sierra Hybrid - 2011
Black plate (3,1)
INDEX
i-3
Instrument Cluster . . . . . . . . . . . . . . 5-2
Introduction . . . . . . . . . . . . . . . . . . . ii, 7-1Maintenance Schedule
Recommended Fluids and
Power
Steering Fluid . . . . . . . . . . . . . . . 10-12
Jump Starting . . . . . . . . . . . . . . . . . 10-15
Lights
Antilock Brake System
(ABS) Warning . . . . . . . . . . . . . . . 5-9
Charging System . . . . . . . . . . . . . . 5-7
Engine Oil Pressure . . . . . . . . . .5-10
StabiliTrak® Indicator . . . . . . . . . . 5-9Lubricants . . . . . . . . . . . . . . . . . . . 11-2
Manual Mode . . . . . . . . . . . . . . . . . . . 9-7
MessagesBattery Voltage and
Charging . . . . . . . . . . . . . . . . . . . .5-12
Brake System . . . . . . . . . . . . . . . .5-12
Door Ajar . . . . . . . . . . . . . . . . . . . . .5-12
Engine Oil . . . . . . . . . . . . . . . . . . . .5-12
Service Vehicle . . . . . . . . . . . . . . .5-12
Vehicle . . . . . . . . . . . . . . . . . . . . . . . 5-11Oil
Engine Oil Pressure Gauge . . . . 5-5
Messages . . . . . . . . . . . . . . . . . . . .5-12
Pressure Light . . . . . . . . . . . . . . . .5-10Rear Seats . . . . . . . . . . . . . . . . . . . . . 3-1
Recommended Fluids andLubricants . . . . . . . . . . . . . . . . . . . . 11-2
Recreational Vehicle
Towing . . . . . . . . . . . . . . . . . . . . . . 10-19
Regenerative Braking . . . . . . . . . . . 9-8
Replacement PartsAirbags . . . . . . . . . . . . . . . . . . . . . . . . 3-1
Replacing Airbag System . . . . . . . 3-1
Routing, Engine Drive Belt . . . . . 12-3
Running the Vehicle WhileParked . . . . . . . . . . . . . . . . . . . . . . . . 9-4
Silverado/Sierra Hybrid - 2011
Black plate (4,1)
i-4
INDEX
Seats
Rear . . . . . . . . . . . . . . . . . . . . . . . . . . . 3-1
Service
Doing Your Own Work . . . . . . . .10-2
Vehicle Messages . . . . . . . . . . . .5-12Specifications and
Capacities . . . . . . . . . . . . . . . . . . . . 12-2
StabiliTrak® Indicator Light . . . . . 5-9
Starting the Vehicle . . . . . . . . . . . . . 9-2
Steering . . . . . . . . . . . . . . . . . . . . . . . . 9-1
Fluid, Power . . . . . . . . . . . . . . . . 10-12Supplement
Using . . . . . . . . . . . . . . . . . . . . . . . . . . . . ii
Tachometer . . . . . . . . . . . . . . . . . . . . . 5-3
Tonneau Cover . . . . . . . . . . . . . 4-1, 4-6
TowingEquipment . . . . . . . . . . . . . . . . . . . .9-10
General Information . . . . . . . . . . . 9-9
Recreational Vehicle . . . . . . . . 10-19
Trailer . . . . . . . . . . . . . . . . . . . . . . . . . 9-9
Trailer Towing . . . . . . . . . . . . . . . . . . 9-9
TransmissionAutomatic . . . . . . . . . . . . . . . . . . . . . . 9-5
Fluid, Automatic . . . . . . . . . . . . . .10-5Using this Supplement . . . . . . . . . . . . .ii
Vehicle
Canadian Owners . . . . . . . . . . . . . . . ii Messages . . . . . . . . . . . . . . . . . . . . 5-11
Starting . . . . . . . . . . . . . . . . . . . . . . . . 9-2Voltage Devices, and
Wiring . . . . . . . . . . . . . . . . . . . . . . . 10-13
Wiring, High Voltage
Devices . . . . . . . . . . . . . . . . . . . . . 10-13