- 2010 Chevrolet Avalanche Owners Manuals
- Chevrolet Avalanche Owners Manuals
- 2006 Chevrolet Avalanche Owners Manuals
- Chevrolet Avalanche Owners Manuals
- 2002 Chevrolet Avalanche Owners Manuals
- Chevrolet Avalanche Owners Manuals
- 2012 Chevrolet Avalanche Owners Manuals
- Chevrolet Avalanche Owners Manuals
- 2007 Chevrolet Avalanche Owners Manuals
- Chevrolet Avalanche Owners Manuals
- 2005 Chevrolet Avalanche Owners Manuals
- Chevrolet Avalanche Owners Manuals
- 2003 Chevrolet Avalanche Owners Manuals
- Chevrolet Avalanche Owners Manuals
- 2009 Chevrolet Avalanche Owners Manuals
- Chevrolet Avalanche Owners Manuals
- 2004 Chevrolet Avalanche Owners Manuals
- Chevrolet Avalanche Owners Manuals
- 2011 Chevrolet Avalanche Owners Manuals
- Chevrolet Avalanche Owners Manuals
- 2008 Chevrolet Avalanche Owners Manuals
- Chevrolet Avalanche Owners Manuals
- Download PDF Manual
-
Chevrolet Avalanche Owner Manual - 2012 - crc 2nd edition - 11/7/11
Black plate (1,1)
2012 Chevrolet Avalanche Owner Manual M
In Brief . . . . . . . . . . . . . . . . . . . . . . . . 1-1
Instrument Panel . . . . . . . . . . . . . . 1-2
Initial Drive Information . . . . . . . . 1-4
Vehicle Features . . . . . . . . . . . . . 1-19
Performance andMaintenance . . . . . . . . . . . . . . . . 1-26
Keys, Doors, and
Windows . . . . . . . . . . . . . . . . . . . . 2-1
Keys and Locks . . . . . . . . . . . . . . . 2-2
Doors . . . . . . . . . . . . . . . . . . . . . . . . . . 2-9
Vehicle Security. . . . . . . . . . . . . . 2-16
Exterior Mirrors . . . . . . . . . . . . . . . 2-19
Interior Mirrors . . . . . . . . . . . . . . . . 2-22
Windows . . . . . . . . . . . . . . . . . . . . . 2-23
Roof . . . . . . . . . . . . . . . . . . . . . . . . . . 2-25Seats and Restraints . . . . . . . . . 3-1
Head Restraints . . . . . . . . . . . . . . . 3-2
Front Seats . . . . . . . . . . . . . . . . . . . . 3-3
Rear Seats . . . . . . . . . . . . . . . . . . . 3-10Safety Belts . . . . . . . . . . . . . . . . . . 3-11
Airbag System . . . . . . . . . . . . . . . . 3-20
Child Restraints . . . . . . . . . . . . . . 3-34Storage . . . . . . . . . . . . . . . . . . . . . . . 4-1
Storage Compartments . . . . . . . . 4-1
Luggage/Load Locations . . . . . . . 4-2
Additional Storage Features . . . 4-5
Roof Rack System . . . . . . . . . . . . 4-11Instruments and Controls . . . . 5-1
Controls . . . . . . . . . . . . . . . . . . . . . . . 5-2
Warning Lights, Gauges, andIndicators . . . . . . . . . . . . . . . . . . . . 5-9
Information Displays . . . . . . . . . . 5-25
Vehicle Messages . . . . . . . . . . . . 5-33
Vehicle Personalization . . . . . . . 5-42
Universal Remote System . . . . 5-50Lighting . . . . . . . . . . . . . . . . . . . . . . . 6-1
Exterior Lighting . . . . . . . . . . . . . . . 6-1
Interior Lighting . . . . . . . . . . . . . . . . 6-6
Lighting Features . . . . . . . . . . . . . . 6-7Infotainment System . . . . . . . . . 7-1
Introduction . . . . . . . . . . . . . . . . . . . . 7-1
Radio . . . . . . . . . . . . . . . . . . . . . . . . . . 7-8
Audio Players . . . . . . . . . . . . . . . . 7-13
Rear Seat Infotainment . . . . . . . 7-33
Phone . . . . . . . . . . . . . . . . . . . . . . . . 7-45
Trademarks and LicenseAgreements . . . . . . . . . . . . . . . . . 7-52
Climate Controls . . . . . . . . . . . . . 8-1
Climate Control Systems . . . . . . 8-1
Air Vents . . . . . . . . . . . . . . . . . . . . . 8-10Driving and Operating . . . . . . . . 9-1
Driving Information . . . . . . . . . . . . . 9-2
Starting and Operating . . . . . . . 9-21
Engine Exhaust . . . . . . . . . . . . . . 9-29
Automatic Transmission . . . . . . 9-30
Drive Systems . . . . . . . . . . . . . . . . 9-35
Brakes . . . . . . . . . . . . . . . . . . . . . . . 9-41
Ride Control Systems . . . . . . . . 9-44
Cruise Control . . . . . . . . . . . . . . . . 9-48Chevrolet Avalanche Owner Manual - 2012 - crc 2nd edition - 11/7/11
Black plate (2,1)
2012 Chevrolet Avalanche Owner Manual M
Object Detection Systems . . . . 9-50
Fuel . . . . . . . . . . . . . . . . . . . . . . . . . . 9-56
Towing . . . . . . . . . . . . . . . . . . . . . . . 9-62
Conversions and Add-Ons . . . 9-80Vehicle Care . . . . . . . . . . . . . . . . . 10-1
General Information . . . . . . . . . . 10-2
Vehicle Checks . . . . . . . . . . . . . . . 10-4
Headlamp Aiming . . . . . . . . . . . 10-33
Bulb Replacement . . . . . . . . . . 10-35
Electrical System . . . . . . . . . . . . 10-37
Wheels and Tires . . . . . . . . . . . 10-46
Jump Starting . . . . . . . . . . . . . . . 10-80
Towing . . . . . . . . . . . . . . . . . . . . . . 10-84
Appearance Care . . . . . . . . . . . 10-89Service and Maintenance . . . 11-1
General Information . . . . . . . . . . 11-1
Maintenance Schedule . . . . . . . 11-3
Special ApplicationServices . . . . . . . . . . . . . . . . . . . . 11-8
Additional Maintenance
and Care . . . . . . . . . . . . . . . . . . . . 11-8
Recommended Fluids,
Lubricants, and Parts . . . . . . 11-11
Maintenance Records . . . . . . . 11-14Technical Data . . . . . . . . . . . . . . . 12-1
Vehicle Identification . . . . . . . . . 12-1
Vehicle Data . . . . . . . . . . . . . . . . . . 12-2Customer Information . . . . . . . 13-1
Customer Information . . . . . . . . 13-1
Reporting Safety Defects . . . . 13-17
Vehicle Data Recording andPrivacy. . . . . . . . . . . . . . . . . . . . 13-19
OnStar . . . . . . . . . . . . . . . . . . . . . . . 14-1
OnStar Overview . . . . . . . . . . . . . 14-1
OnStar Services . . . . . . . . . . . . . . 14-2
OnStar AdditionalInformation . . . . . . . . . . . . . . . . . . 14-5
Index . . . . . . . . . . . . . . . . . . . . . i-1Chevrolet Avalanche Owner Manual - 2012 - crc 2nd edition - 11/7/11
Black plate (3,1)
This manual describes features that may or may not be on your specific vehicle either because they are options that you did not purchase or due to changes subsequent to the printing of this owner manual. Please refer to the purchase documentation relating to your specific vehicle to confirm each of the features found on your vehicle. For vehicles first sold in Canada, substitute the name “General Motors of Canada Limited” for Chevrolet Motor Division wherever it appears in this manual. Keep this manual in the vehicle for quick reference.
Introduction
iii
Canadian Vehicle Owners
Propriétaires Canadiens A French language copy of this manual can be obtained from your dealer or from: On peut obtenir un exemplaire de ce guide en français auprès du concessionnaire ou à l'adresse suivante: Helm, Incorporated Attention: Customer Service 47911 Halyard Drive Plymouth, MI 48170
The names, logos, emblems, slogans, vehicle model names, and vehicle body designs appearing in this manual including, but not limited to, GM, the GM logo, CHEVROLET, the CHEVROLET Emblem, AVALANCHE, and Z71 are trademarks and/or service marks of General Motors LLC, its subsidiaries, affiliates, or licensors.
Litho in U.S.A. Part No. 20902915 B Second Printing
©2011 General Motors LLC. All Rights Reserved.
Chevrolet Avalanche Owner Manual - 2012 - crc 2nd edition - 11/7/11
Black plate (4,1)
iv
Introduction
Using this Manual To quickly locate information about the vehicle, use the Index in the back of the manual. It is an alphabetical list of what is in the manual and the page number where it can be found.
Danger, Warnings, and Cautions Warning messages found on vehicle labels and in this manual describe hazards and what to do to avoid or reduce them. Danger indicates a hazard with a high level of risk which will result in serious injury or death. Warning or Caution indicates a hazard that could result in injury or death.
{ WARNING
These mean there is something that could hurt you or other people.
Notice: This means there is something that could result in property or vehicle damage. This would not be covered by the vehicle's warranty.
A circle with a slash through it is a safety symbol which means “Do Not,” “Do not do this,” or “Do not let this happen.”
Symbols The vehicle has components and labels that use symbols instead of text. Symbols are shown along with the text describing the operation or information relating to a specific component, control, message, gauge, or indicator. M : This symbol is shown when you need to see your owner manual for additional instructions or information. * : This symbol is shown when you need to see a service manual for additional instructions or information.
Chevrolet Avalanche Owner Manual - 2012 - crc 2nd edition - 11/7/11
Black plate (5,1)
Vehicle Symbol Chart Here are some additional symbols that may be found on the vehicle and what they mean. For more information on the symbol, refer to the Index. 0 : Adjustable Pedals 9 : Airbag Readiness Light # : Air Conditioning ! : Antilock Brake System (ABS) % : Audio Steering Wheel Controls or OnStar® $ : Brake System Warning Light " : Charging System
I : Cruise Control B : Engine Coolant Temperature O : Exterior Lamps # : Fog Lamps . : Fuel Gauge + : Fuses 3 : Headlamp High/Low-Beam Changer ( : Heated Steering Wheel j : LATCH System Child Restraints * : Malfunction Indicator Lamp
Introduction
: : Oil Pressure g : Outside Power Foldaway Mirrors O : Power / : Remote Vehicle Start > : Safety Belt Reminders 7 : Tire Pressure Monitor _ : Tow/Haul Mode d : Traction Control/StabiliTrak® M : Windshield Washer Fluid
Chevrolet Avalanche Owner Manual - 2012 - crc 2nd edition - 11/7/11
Black plate (6,1)
vi
Introduction
2 NOTES
Chevrolet Avalanche Owner Manual - 2012 - crc 2nd edition - 11/7/11
Black plate (1,1)
In Brief
1-1
In Brief
Instrument Panel
Instrument Panel . . . . . . . . . . . . . . 1-2
Initial Drive Information
Initial Drive Information . . . . . . . . 1-4
Remote Keyless Entry (RKE)System . . . . . . . . . . . . . . . . . . . . . . 1-4
Remote Vehicle Start . . . . . . . . . 1-4
Door Locks . . . . . . . . . . . . . . . . . . . 1-5
Midgate® . . . . . . . . . . . . . . . . . . . . . . 1-5
Tailgate . . . . . . . . . . . . . . . . . . . . . . . 1-5
Windows . . . . . . . . . . . . . . . . . . . . . . 1-6
Seat Adjustment . . . . . . . . . . . . . . 1-6
Memory Features . . . . . . . . . . . . . 1-9
Second Row Seats . . . . . . . . . . . 1-9
Heated and VentilatedSeats . . . . . . . . . . . . . . . . . . . . . . . 1-10
Head Restraint
Adjustment . . . . . . . . . . . . . . . . . 1-10
Safety Belts . . . . . . . . . . . . . . . . . . 1-10Passenger Sensing
System . . . . . . . . . . . . . . . . . . . . . 1-11
Mirror Adjustment . . . . . . . . . . . . 1-11
Steering WheelAdjustment . . . . . . . . . . . . . . . . . 1-13
Throttle and Brake Pedal
Adjustment . . . . . . . . . . . . . . . . . 1-14
Interior Lighting . . . . . . . . . . . . . . 1-14
Exterior Lighting . . . . . . . . . . . . . 1-15
Windshield Wiper/Washer . . . . 1-15
Climate Controls . . . . . . . . . . . . . 1-16
Transmission . . . . . . . . . . . . . . . . 1-17
Four-Wheel Drive . . . . . . . . . . . . 1-18Vehicle Features
Radio(s) . . . . . . . . . . . . . . . . . . . . . 1-19
Satellite Radio . . . . . . . . . . . . . . . 1-20
Portable Audio Devices . . . . . . 1-21
Bluetooth® . . . . . . . . . . . . . . . . . . . 1-21
Steering Wheel Controls . . . . . 1-21
Cruise Control . . . . . . . . . . . . . . . 1-22
Navigation System . . . . . . . . . . . 1-22Driver Information
Center (DIC) . . . . . . . . . . . . . . . 1-23
Rear Vision
Camera (RVC) . . . . . . . . . . . . . 1-24
Ultrasonic Parking Assist . . . . 1-24
Power Outlets . . . . . . . . . . . . . . . 1-24
Universal Remote System . . . 1-24
Sunroof . . . . . . . . . . . . . . . . . . . . . . 1-25
Performance and Maintenance StabiliTrak® System . . . . . . . . . 1-26
Tire Pressure Monitor . . . . . . . . 1-26
Engine Oil Life System . . . . . . 1-26
Fuel E85 (85% Ethanol) . . . . . 1-27
Driving for Better FuelEconomy . . . . . . . . . . . . . . . . . . . 1-27
Roadside Assistance
Program . . . . . . . . . . . . . . . . . . . . 1-28
OnStar® . . . . . . . . . . . . . . . . . . . . . 1-28Chevrolet Avalanche Owner Manual - 2012 - crc 2nd edition - 11/7/11
Black plate (2,1)
1-2
In Brief
Instrument Panel
Chevrolet Avalanche Owner Manual - 2012 - crc 2nd edition - 11/7/11
Black plate (3,1)
A. Air Vents on page 8‑10. B. Turn and Lane‐Change Lever.
See Turn and Lane-Change Signals on page 6‑5. Windshield Wiper/Washer on page 5‑4. Instrument Cluster on page 5‑10.
C.
D. Hazard Warning Flashers on
page 6‑4 (Out of View).
E. Shift Lever. See Automatic Transmission on page 9‑30.
F. Tow/Haul Mode on page 9‑34
(If Equipped).
G. Driver Information Center (DIC) Buttons. See Driver Information Center (DIC) on page 5‑25. H. AM-FM Radio on page 7‑8. I. Exterior Lamp Controls on page 6‑1.
J. Dome Lamp Override. See Dome Lamps on page 6‑7. Instrument Panel Illumination Control on page 6‑6. Fog Lamps on page 6‑5
(If Equipped).K. Automatic Transfer Case
Control (If Equipped). See Four-Wheel Drive (Single Speed Automatic Transfer Case) on page 9‑39 or Four-Wheel Drive (Two Speed Automatic Transfer Case) on page 9‑35.
L. Data Link Connector (DLC)
(Out of View). See Malfunction Indicator Lamp on page 5‑18. M. Cruise Control on page 9‑48. N. Steering Wheel Adjustment on
page 5‑2.
O. Horn on page 5‑4.
In Brief
1-3
P. Steering Wheel Controls on
page 5‑2.
Q. Climate Control Systems on
page 8‑1 (If Equipped). Dual Automatic Climate Control System on page 8‑4
(If Equipped).R. Power Outlets on page 5‑8. S. StabiliTrak® System on
page 9‑44. Pedal Adjust Control (If Equipped). See Adjustable Throttle and Brake Pedal on page 9‑21. Ultrasonic Parking Assist on page 9‑50 (If Equipped). Power Assist Steps on page 2‑16 (If Equipped). T. Glove Box on page 4‑1.
Chevrolet Avalanche Owner Manual - 2012 - crc 2nd edition - 11/7/11
Black plate (4,1)
1-4
In Brief
Initial Drive Information This section provides a brief overview about some of the important features that may or may not be on your specific vehicle. For more detailed information, refer to each of the features which can be found later in this owner manual.
Remote Keyless Entry (RKE) System The RKE transmitter is used to remotely lock and unlock the doors from up to 60 m (195 ft) away from the vehicle.
See Keys on page 2‑2 and Remote Keyless Entry (RKE) System Operation on page 2‑3.
Remote Vehicle Start With this feature the engine can be started from outside of the vehicle. Starting the Vehicle 1. Aim the RKE transmitter at the
vehicle.
2. Press and release Q. 3.
Immediately after completing Step 2, press and hold / until the turn signal lamps flash.
When the vehicle starts, the parking lamps will turn on and remain on as long as the engine is running. The doors will be locked and the climate control system may come on. The engine will continue to run for 10 minutes. Repeat the steps for a 10-minute time extension. Remote start can be extended only once.
K : Press to unlock the driver door. Press K again within three seconds to unlock all remaining doors. Q : Press to lock all doors. Lock and unlock feedback can be personalized. See Vehicle Personalization (With DIC Buttons) on page 5‑42. L : Press and release to locate the vehicle. Press L and hold for more than two seconds to sound the panic alarm. Press L again to cancel the panic alarm.
Chevrolet Avalanche Owner Manual - 2012 - crc 2nd edition - 11/7/11
Black plate (5,1)
Canceling a Remote Start To cancel a remote start: . Aim the RKE transmitter at the vehicle and press and hold / until the parking lamps turn off. Turn on the hazard warning flashers. Turn the ignition on and then back off.
Power Door Locks Press Q or K on the RKE transmitter. See Remote Keyless Entry (RKE) System Operation on page 2‑3.
See Remote Vehicle Start on page 2‑5.
Door Locks There are several ways to lock and unlock the vehicle. From outside, use the Remote Keyless Entry (RKE) transmitter or the key in the driver door. From inside, use the power door locks or the manual door locks. To lock or unlock the door with the manual locks, push down or pull up on the manual lock knob.
Power Folding Mirrors Shown,
Other Models Similar Q : Press to lock the doors. K : Press to unlock the doors. See Door Locks on page 2‑7.
In Brief
1-5
Midgate® This vehicle is equipped with a Midgate and a removable rear glass panel. The Midgate allows you to extend the length of the vehicle's cargo area. For more information see Midgate® on page 2‑9.
Tailgate Use the Remote Keyless Entry (RKE) transmitter or power door lock switch to lock and unlock the tailgate. Open the tailgate by lifting up on its handle while pulling the tailgate toward you. To close the tailgate, push it firmly upward until it latches. Push and pull on the tailgate to be sure it is latched securely.
Chevrolet Avalanche Owner Manual - 2012 - crc 2nd edition - 11/7/11
Black plate (6,1)
1-6
In Brief
Tailgate Removal The tailgate is not to be removed. Removing the tailgate may cause damage to the electrical connector resulting in a loss of lock/unlock and rear vision camera function. See Tailgate on page 2‑15.
Windows
The driver door has switches that control all windows, the passengers door switch only control that window. The power windows work when the ignition is in ON/RUN or ACC/ACCESSORY, or in Retained Accessory Power (RAP). See Retained Accessory Power (RAP) on page 9‑26 for more information. Press the switch to lower the window. Pull the switch up to raise it. For more information, see: . Windows on page 2‑23. . Power Windows on page 2‑24.
Power Folding Mirrors Shown,
Other Models Similar
Seat Adjustment
Manual Seats
To adjust the seat: 1. Lift the bar to unlock the seat. 2. Slide the seat to the desired position and release the bar.
3. Try to move the seat back and
forth to be sure the seat is locked in place.
See Seat Adjustment on page 3‑3.
Chevrolet Avalanche Owner Manual - 2012 - crc 2nd edition - 11/7/11
Black plate (7,1)
Power Seats
Lumbar Adjustment
Power Lumbar
Manual Lumbar
In Brief
1-7
To adjust a power seat, if equipped: . Move the seat forward or
rearward by sliding the control forward or rearward. If available, raise or lower the front or rear part of the seat cushion by moving the front or rear of the control up or down. If available, raise or lower the entire seat by moving the entire control up or down.
See Power Seat Adjustment on page 3‑4.
If equipped, increase or decrease manual lumbar support by turning the knob forward or rearward. See Lumbar Adjustment on page 3‑4.
To adjust the power lumbar support, if equipped: . On vehicles with two-way
lumbar, press and hold the top or bottom of the control to increase or decrease lumbar support.
. On vehicles with four-way
lumbar, press and hold the front or rear of the control to increase or decrease lumbar support.
Chevrolet Avalanche Owner Manual - 2012 - crc 2nd edition - 11/7/11
Black plate (8,1)
1-8
In Brief
To raise or lower the height of the support, press and hold the top or bottom of the control.
See Lumbar Adjustment on page 3‑4. Reclining Seatbacks
Manual Reclining Seatbacks
To recline a manual seatback: 1. Lift the lever.
2. Move the seatback to the desired position, and then release the lever to lock the seatback in place.
3. Push and pull on the seatback to
make sure it is locked.
To return the seatback to the upright position: 1. Lift the lever fully without applying pressure to the seatback, and the seatback will return to the upright position.
2. Push and pull on the seatback to
make sure it is locked.
See Reclining Seatbacks on page 3‑5.
Power Reclining Seatbacks
To adjust a power seatback, if equipped:
Tilt the top of the control rearward to recline. Tilt the top of the control forward to raise.
See Reclining Seatbacks on page 3‑5.
Chevrolet Avalanche Owner Manual - 2012 - crc 2nd edition - 11/7/11
Black plate (9,1)
Memory Features
On vehicles with the memory feature, the controls on the driver door are used to program and recall memory settings for the driver seat, outside mirrors, and the adjustable throttle and brake pedals, if equipped.
In Brief
1-9
See Memory Seats on page 3‑7 and Vehicle Personalization (With DIC Buttons) on page 5‑42.
Easy Exit Driver Seat This feature can move the seat rearward to allow extra room to exit the vehicle. B : Press to recall the easy exit seat position. The vehicle must be in P (Park). See Memory Seats on page 3‑7 and Vehicle Personalization (With DIC Buttons) on page 5‑42.
Second Row Seats The rear seatbacks can be folded to provide more cargo space and access to the midgate. For detailed instructions see Rear Seats on page 3‑10.
Storing Memory Positions To save into memory: 1. Adjust the driver seat and
seatback recliner, both outside mirrors, and the throttle and brake pedals, if equipped. See Power Mirrors on page 2‑20
and Adjustable Throttle and Brake Pedal on page 9‑21. Not all mirrors and adjustable throttle and brake pedals will have the ability to save and recall their positions.2. Press and hold “1” until
two beeps sound.
3. Repeat for a second driver
position using “2.”
To recall, press and release “1” or “2.” The vehicle must be in P (Park). A single beep will sound. The seat, outside mirrors, and adjustable throttle and brake pedals, if equipped, will move to the position previously stored for the identified driver.
Chevrolet Avalanche Owner Manual - 2012 - crc 2nd edition - 11/7/11
Black plate (10,1)
1-10
In Brief
Heated and Ventilated Seats
Heated and Cooled Seat Buttons
Shown, Heated Seat Buttons
Similar
If available, the buttons are on the front doors. To operate, the ignition must be in ON/RUN. H : the seat. I : Press to heat the seatback only.
If available, press to cool
J : Press to heat the seat and seatback. Press the button once for the highest setting. With each press of the button, the seat will change to the next lower setting, and then to the off setting. The lights indicate three for the highest setting and one for the lowest. See Heated and Ventilated Front Seats on page 3‑8.
Head Restraint Adjustment Do not drive until the head restraints for all occupants are installed and adjusted properly. To achieve a comfortable seating position, change the seatback recline angle as little as necessary while keeping the seat and the head restraint height in the proper position. See Head Restraints on page 3‑2
and Seat Adjustment on page 3‑3.Safety Belts
Refer to the following sections for important information on how to use safety belts properly. . Safety Belts on page 3‑11. . How to Wear Safety Belts
Properly on page 3‑12. Lap-Shoulder Belt on page 3‑13. Lower Anchors and Tethers for Children (LATCH System) on page 3‑43.
Chevrolet Avalanche Owner Manual - 2012 - crc 2nd edition - 11/7/11
Black plate (11,1)
Passenger Sensing System The passenger sensing system, if equipped, turns off the front outboard passenger frontal airbag under certain conditions. No other airbag is affected by the passenger sensing system. If the vehicle has one of the indicators pictured in the following illustrations, then the vehicle has a passenger sensing system for the right front passenger position. The passenger airbag status indicator, if equipped, will be visible on the overhead console when the vehicle is started.
United States
Canada and Mexico
See Passenger Sensing System on page 3‑28 for important information.
In Brief
1-11
Mirror Adjustment
Exterior Mirrors
With Power Folding Mirrors
To adjust the mirrors: 1. Press (A) or (B) to select the
driver or passenger side mirror.
2. Press one of the four arrows located on the control pad to adjust the mirror.
Chevrolet Avalanche Owner Manual - 2012 - crc 2nd edition - 11/7/11
Black plate (12,1)
1-12
In Brief
3. Adjust the outside mirror so that
the side of the vehicle and the area behind are seen.
4. Press either (A) or (B) again to
deselect the mirror.
See Power Mirrors on page 2‑20 for more information . To power fold the mirrors: 1. Press (C) to fold the mirrors out
to the driving position.
2. Press (D) to fold the mirrors in to
the folded position.
2. Press one of the four arrows located on the control pad to move the mirror in the desired direction.
3. Adjust the outside mirror so that
the side of the vehicle and the area behind are seen.
See Power Mirrors on page 2‑20 for more information. Keep the selector switch in the center position when not adjusting either outside mirror. To manual fold the mirrors: Fold the mirrors inward to prevent damage when going through an automatic car wash. To fold, pull the mirror toward the vehicle. Push the mirror outward, to return to its original position.
With Manual Folding Mirrors
To adjust the mirrors: 1. Move the selector switch located
above the four-way control pad to the left or right to choose either the driver side or passenger side mirror.
Chevrolet Avalanche Owner Manual - 2012 - crc 2nd edition - 11/7/11
Black plate (13,1)
Heated Mirrors Press 1 to heat the mirrors. See “Rear Window Defogger” under Dual Automatic Climate Control System on page 8‑4 or Climate Control Systems on page 8‑1 for more information.
Park Tilt Mirrors If the vehicle has the memory package, the exterior mirrors tilt to a preselected position when the vehicle is in R (Reverse). This feature lets the driver view the curb when parallel parking. The mirrors return to the original position when the vehicle is shifted out of R (Reverse), or the ignition is turned off or to OFF/LOCK. This feature can be programed through the Driver Information Center (DIC). See Vehicle Personalization (With DIC Buttons) on page 5‑42 for more information.
Interior Mirror
Adjustment Hold the rearview mirror in the center and move it to view the area behind the vehicle.
Manual Rearview Mirror For vehicles with a manual rearview mirror, push the tab forward for daytime use and pull it for nighttime use to avoid glare from the headlamps from behind. See Manual Rearview Mirror on page 2‑22 for more information.
Automatic Dimming Rearview Mirror For vehicles with an automatic dimming rearview mirror. The mirror will automatically reduce the glare from the headlamps from behind. The dimming feature comes on and the indicator light illuminates each time the ignition is turned to start. See Automatic Dimming Rearview Mirror on page 2‑22 for more information.
In Brief
1-13
Steering Wheel Adjustment
The tilt lever is located on the lower left side of the steering column. To adjust the steering wheel: 1. Hold the steering wheel and pull
the lever.
2. Move the steering wheel up
or down.
3. Release the lever to lock the
wheel in place.
Do not adjust the steering wheel while driving.
Chevrolet Avalanche Owner Manual - 2012 - crc 2nd edition - 11/7/11
Black plate (14,1)
1-14
In Brief
Throttle and Brake Pedal Adjustment On vehicles with this feature, you can change the position of the throttle and brake pedals.
The control used to adjust the pedals is located on the instrument panel below the climate control system. Press the bottom of the control to move the pedals closer to your body. Press the top of the control to move the pedals away. See Adjustable Throttle and Brake Pedal on page 9‑21.
Interior Lighting
Dome Lamps The dome lamps are located in the overhead console. They come on when any door is opened and turn off after all the doors are closed. Turn the instrument panel brightness knob located below the dome lamp override button, clockwise to the farthest position to manually turn on the dome lamps. The dome lamps remain on until the knob is turned counterclockwise.
Dome Lamp Override The dome lamp override button is located next to the exterior lamps control.
k : Press the button in and the dome lamps remain off when a door is opened. Press the button again to return it to the extended position so that the dome lamps come on when a door is opened.
Reading Lamps For vehicles with reading lamps in the overhead console, press the button located next to the lamp to turn it on or off. The vehicle may also have reading lamps in other locations. The lamps cannot be adjusted.
Chevrolet Avalanche Owner Manual - 2012 - crc 2nd edition - 11/7/11
Black plate (15,1)
For more information about interior lamps, see: . Dome Lamps on page 6‑7. . Reading Lamps on page 6‑7. Instrument Panel Illumination Control on page 6‑6.
Exterior Lighting
The exterior lamps control is located on the instrument panel to the left of the steering wheel. P : Turns off the automatic headlamps and Daytime Running Lamps (DRL). Turn the headlamp
control to the off position again to turn the automatic headlamps or DRL back on. For vehicles first sold in Canada, the off position will only work when the vehicle is shifted into P (Park). AUTO: Automatically turns on the headlamps, parking lamps, instrument panel lights, license plate lamps, and taillamps. ; : Turns on the parking lamps, instrument panel lights, license plate lamps, and taillamps. 2 : Turns on the headlamps, parking lamps, instrument panel lights, license plate lamps, and taillamps. For more information, see: . Exterior Lamp Controls on
page 6‑1.
. Daytime Running Lamps (DRL)
on page 6‑3. Fog Lamps on page 6‑5.
In Brief
1-15
Windshield Wiper/Washer
The front wiper control is located on the turn and lane‐change lever. The windshield wipers are controlled by turning the band with z on it. 8 : For a single wipe, turn to 8, then release. For several wipes, hold the band on 8 longer. 9 : Turns the windshield wipers off.
Chevrolet Avalanche Owner Manual - 2012 - crc 2nd edition - 11/7/11
Black plate (16,1)
1-16
In Brief
6 : Turn the band up for more frequent wipes or down for less frequent wipes. 6 : Slow wipes. ? : Fast wipes. L : Push the paddle at the top of the lever to spray washer fluid on the windshield. See Windshield Wiper/Washer on page 5‑4.
Climate Controls
The heating, cooling, defrost, defog and ventilation of the vehicle can be controlled with these systems.
A. Fan Control B. Outside Air C. Air Recirculation D. Air Delivery Mode Control
E. Air Conditioning F. Driver and Passenger Temperature Controls
G. Rear Window Defogger
Chevrolet Avalanche Owner Manual - 2012 - crc 2nd edition - 11/7/11
Black plate (17,1)
In Brief
1-17
Transmission
Range Selection Mode
If available, the Range Selection Mode switch is located on the shift lever. To use the Range Selection feature: 1. Move the column shift lever to
the M (Manual) position. The current range will appear next to the M. This is the highest attainable range with all lower gears accessible. As an example, when 5 (Fifth) gear is selected, 1 (First) through 5 (Fifth) gears are available.
A. Driver and Passenger Temperature Controls
B. Fan Control C. AUTO D. Defrost E. Air Recirculation F. Outside Air G. Air Delivery Mode Control
Power Button
H. Display I. J. Rear Window Defogger K. Air Conditioning L. PASS See Climate Control Systems on page 8‑1 and Dual Automatic Climate Control System on page 8‑4.
Chevrolet Avalanche Owner Manual - 2012 - crc 2nd edition - 11/7/11
Black plate (18,1)
1-18
In Brief
2. Press the plus/minus buttons, located on the steering column shift lever, to select the desired range of gears for current driving conditions. See Manual Mode on page 9‑33.
While using Range Selection Mode, cruise control and the Tow/Haul mode can be used. Grade Braking is not available when Range Selection Mode is active. See Tow/Haul Mode on page 9‑34.
Four-Wheel Drive If the vehicle has Four-Wheel Drive, you can send the engine's driving power to all four wheels for extra traction.
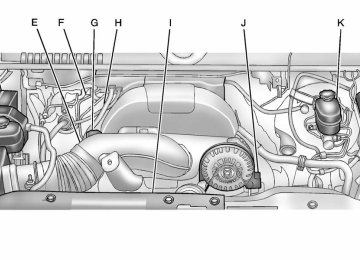
Automatic Transfer Case
Two Speed Transfer Case
Single Speed Transfer Case
The transfer case knob is located to the left of the instrument panel cluster. Use this knob to shift into and out of the different Four-Wheel Drive modes. 2 m : This setting is used for driving in most street and highway situations. AUTO: This setting is ideal for use when road surface traction conditions are variable. 4 m : Use the Four-Wheel-Drive High position when extra traction is needed, such as on snowy or icy roads or in most off-road situations. 4 n : Vehicles with a two speed transfer case have a Four-Wheel-Drive Low position. This setting sends maximum power to all four wheels. You might choose Four-Wheel-Drive Low if you are driving off-road in deep sand, deep mud, deep snow, and while climbing or descending steep hills.
Chevrolet Avalanche Owner Manual - 2012 - crc 2nd edition - 11/7/11
Black plate (19,1)
In Brief
1-19
Vehicle Features Radio(s)
N (Neutral): Vehicles with a two speed transfer case have a N (Neutral) position. Shift the transfer case to N (Neutral) only when towing the vehicle. See Recreational Vehicle Towing on page 10‑85 or Towing the Vehicle on page 10‑84. See Four-Wheel Drive (Single Speed Automatic Transfer Case) on page 9‑39 or Four-Wheel Drive (Two Speed Automatic Transfer Case) on page 9‑35.
Radio with USB, CD, and DVD (MP3)
O : Press to turn the system on and off. Turn to increase or decrease the volume.
BAND: Press to choose between FM, AM, or XM™, if equipped. f : Select radio stations.
Chevrolet Avalanche Owner Manual - 2012 - crc 2nd edition - 11/7/11
Black plate (20,1)
1-20
In Brief
© SEEK or ¨ SEEK: Seek or scan stations. 4 : Press to switch the display between the radio station frequency and the time. While the ignition is off, press this button to display the time. Press to display additional text information related to the current FM-RDS or XM station; or CD, MP3, or WMA song. If information is available during XM, CD, MP3, or WMA playback, the song title information displays on the top line of the display and artist information displays on the bottom line. When information is not available, “NO INFO” displays. For more information about these and other radio features, see Operation on page 7‑3. For vehicles with a Rear Seat Entertainment System (RSE) and Rear Seat Audio System (RSA), see Rear Seat Entertainment (RSE) System on page 7‑33 and Rear Seat Audio (RSA) System on page 7‑43 for more information.
Storing Radio Stations A maximum of 36 stations can be stored as favorites using the six softkeys located below the radio station frequency tabs and by using the radio FAV button. Press FAV to go through up to six pages of favorites, each having six favorite stations available per page. Each page of favorites can contain any combination of AM, FM, or XM stations. For more information, see “Storing Radio Stations” in AM-FM Radio on page 7‑8. Setting the Clock To set the time and date: 1. Turn the ignition key to ACC/
ACCESSORY or ON/RUN, then press O , to turn the radio on. 2. Press H to display HR, MIN,
MM, DD, and YYYY (hour, minute, month, day, and year).
3. Press the softkey located under
any one of the labels to be changed.
4. To increase or decrease the time
or date, turn f clockwise or counter‐clockwise.
For detailed instructions on setting the clock for the vehicle's specific audio system, see Clock on page 5‑7.
Satellite Radio XM is a satellite radio service based in the 48 contiguous United States and 10 Canadian provinces. XM satellite radio has a wide variety of programming and commercial-free music, coast to coast, and in digital-quality sound. A fee is required to receive the XM service.
Chevrolet Avalanche Owner Manual - 2012 - crc 2nd edition - 11/7/11
Black plate (21,1)
For more information, refer to: . www.xmradio.com or call
1-800-929-2100 (U.S.) . www.xmradio.ca or call
1-877-438-9677 (Canada)
See Satellite Radio on page 7‑9.
Portable Audio Devices
This vehicle has an auxiliary input, located on the audio faceplate, and a USB port located in the center console. External devices such as
iPod®, laptop computers, MP3 players, CD changers, USB storage device, etc. can be connected to the auxiliary port using a 3.5 mm (1/8 in) input jack or the USB port depending on the audio system. See Auxiliary Devices on page 7‑29
for further information.Bluetooth® For vehicles with a Bluetooth system, it allows users with a Bluetooth‐enabled cell phone to make and receive hands-free calls using the vehicle’s audio system and controls. The Bluetooth‐enabled cell phone must be paired with the Bluetooth system before it can be used in the vehicle. Not all phones will support all functions. For more information, visit www.gm.com/bluetooth. For more information, see Bluetooth on page 7‑45.
In Brief
1-21
Steering Wheel Controls
If available, some audio controls can be adjusted at the steering wheel. w : Press to go to the next favorite radio station, track on a CD, or folder on an iPod® or USB device. c / x : Press to go to the previous favorite radio station, track on a CD, or folder on an iPod® or USB device. Press to reject an incoming call, or to end a call.
Chevrolet Avalanche Owner Manual - 2012 - crc 2nd edition - 11/7/11
Black plate (22,1)
1-22
In Brief
b / g : Press to silence the vehicle speakers only. Press again to turn the sound on. Press and hold longer than two seconds to interact with OnStar® or Bluetooth systems, if equipped.
+ e : Press to increase volume.
− e : Press to decrease volume.
SRCE: Press to switch between the radio and CD, and for equipped vehicles, the DVD, front auxiliary, and rear auxiliary. ¨ : Press to seek the next radio station, the next track or chapter while sourced to the CD or DVD slot, or to select tracks and folders on an iPod or USB device. For more information, see Steering Wheel Controls on page 5‑2.
Cruise Control
T : Press to turn the system on or off. The indicator light is on when cruise control is on and turns off when cruise control is off. + RES: Press briefly to make the vehicle resume to a previously set speed, or press and hold to accelerate. SET −: Press to set the speed and activate cruise control or make the vehicle decelerate.
[ : Press to disengage cruise control without erasing the set speed from memory. See Cruise Control on page 9‑48.
Navigation System If the vehicle has a navigation system, there is a separate navigation system manual that includes information on the radio, audio players, and navigation system. The navigation system provides detailed maps of most major freeways and roads. After a destination has been set, the system provides turn-by-turn instructions for reaching the destination. In addition, the system can help locate a variety of points of interest (POIs), such as banks, airports, restaurants, and more. See the navigation system manual for more information.
Chevrolet Avalanche Owner Manual - 2012 - crc 2nd edition - 11/7/11
Black plate (23,1)
Driver Information Center (DIC) The DIC display is located at the bottom of the instrument panel cluster. It shows the status of many vehicle systems and enables access to the personalization menu.
The DIC buttons are located on the instrument panel, next to the steering wheel. Some vehicles do not have the buttons shown, however some of the menus can be viewed by using the trip odometer reset stem.
3 : Press to display the odometer, trip odometer, fuel range, average economy, fuel used, timer, instantaneous economy and Active Fuel Management™ indicator, and transmission temperature. The compass and outside air temperature will also be shown in the display. The temperature will be shown in °C or °F depending on the units selected. T : Press to display the oil life, units, tire pressure readings for vehicles with the Tire Pressure Monitor System (TPMS), trailer brake gain and output information for vehicles with the Integrated Trailer Brake Control (ITBC) system, engine hours, compass zone setting, and compass recalibration. U : Press to customize the feature settings on your vehicle. See Vehicle Personalization (With DIC Buttons) on page 5‑42 for more information.
In Brief
1-23
V : Press to set or reset certain functions and to turn off or acknowledge messages on the DIC. For more information, see Driver Information Center (DIC) on page 5‑25. Vehicle Customization Some vehicle features can be programmed by using the DIC buttons next to the steering wheel. These features include:
Language
. Door Lock and Unlock Settings . RKE Lock and Unlock Feedback
Lighting
. Chime Volume . Memory Features See Vehicle Personalization (With DIC Buttons) on page 5‑42.
Chevrolet Avalanche Owner Manual - 2012 - crc 2nd edition - 11/7/11
Black plate (24,1)
1-24
In Brief
Rear Vision Camera (RVC) If available, the RVC displays a view of the area behind the vehicle when the vehicle is shifted into R (Reverse). This is displayed on the inside rearview mirror or the navigation screen, if equipped. To clean the camera lens, located in the bezel of the tailgate handle, rinse it with water and wipe it with a soft cloth. For more information, see Rear Vision Camera (RVC) on page 9‑52.
Ultrasonic Parking Assist If available, the Ultrasonic Rear Parking Assist (URPA) system uses sensors on the rear bumper to assist with parking and avoiding objects while in R (Reverse).
It operates at speeds less than 8 km/h (5 mph). URPA uses audible beeps to provide distance and system information. Keep the sensors on the vehicle's rear bumper clean to ensure proper operation. See Ultrasonic Parking Assist on page 9‑50.
Power Outlets Accessory power outlets can be used to plug in electrical equipment, such as a cell phone or MP3 player. The vehicle may have two accessory power outlets located on the instrument panel and one inside the center floor console. The vehicle may also have an outlet on the rear of the center floor console above the cupholder door. The accessory power outlet is operational at all times. See Power Outlets on page 5‑8.
Universal Remote System
Vehicles with the Universal Remote System will have these buttons located in the headliner. This system provides a way to replace up to three remote control transmitters used to activate devices such as garage door openers, security systems, and home automation devices. Read the instructions completely before attempting to program the transmitter. Because of the steps involved, it may be helpful to have another person assist with programming the transmitter. See Universal Remote System on page 5‑50.
Chevrolet Avalanche Owner Manual - 2012 - crc 2nd edition - 11/7/11
Black plate (25,1)
In Brief
1-25
When the sunroof is opened, an air deflector will automatically raise. The air deflector will retract when the sunroof is closed. The sunroof also has a sunshade which can be pulled forward to block sun rays. The sunshade must be opened and closed manually. If an object is in the path of the sunroof while it is closing, the anti-pinch feature will detect the object and stop the sunroof. See Sunroof on page 2‑25 for more information.
Vent: From the closed position, press the rear of switch (B) to vent the sunroof. Open/Close: To open the sunroof, press and hold switch (A) until the sunroof reaches the desired position. Press and hold the front of switch (A) to close it. Express-Open/Express-Close: To express-open the sunroof, fully press and release the rear of switch (A) until the sunroof reaches the desired position. To express-close the sunroof, fully press and release the front of switch (A). Press the switch again to stop it.
Sunroof
A. Open or Close B. Vent On vehicles with a sunroof, the sunroof only operates when the ignition is in the ACC/ACCESSORY or ON/RUN, or when Retained Accessory Power (RAP) is active. See Retained Accessory Power (RAP) on page 9‑26 for more information.
Chevrolet Avalanche Owner Manual - 2012 - crc 2nd edition - 11/7/11
Black plate (26,1)
1-26
In Brief
Performance and Maintenance
StabiliTrak® System The vehicle has a traction control system that limits wheel spin and the StabiliTrak system that assists with directional control of the vehicle in difficult driving conditions. Both systems turn on automatically every time the vehicle is started.
To turn off traction control, press and release g on the instrument panel. The appropriate DIC message displays. See Ride Control System Messages on page 5‑38. To turn off both traction control and StabiliTrak, press and hold g until g illuminates and the appropriate DIC message displays. See Ride Control System Messages on page 5‑38.
. Press and release g again to
turn on both systems. For more information, see StabiliTrak® System on page 9‑44.
Tire Pressure Monitor This vehicle may have a Tire Pressure Monitor System (TPMS).
The TPMS warning light alerts you to a significant loss in pressure of one of the vehicle's tires. If the warning light comes on, stop as soon as possible and inflate the tires to the recommended pressure shown on the Tire and Loading Information label. See Vehicle Load Limits on page 9‑16. The warning light will remain on until the tire pressure is corrected.
During cooler conditions, the low tire pressure warning light may appear when the vehicle is first started and then turn off. This may be an early indicator that the tire pressures are getting low and the tires need to be inflated to the proper pressure. The TPMS does not replace normal monthly tire maintenance. It is the driver’s responsibility to maintain correct tire pressures. See Tire Pressure Monitor System on page 10‑54.
Engine Oil Life System The engine oil life system calculates engine oil life based on vehicle use and, on most vehicles, displays a DIC message when it is necessary to change the engine oil and filter. The oil life system should be reset to 100% only following an oil change.
Chevrolet Avalanche Owner Manual - 2012 - crc 2nd edition - 11/7/11
Black plate (27,1)
Resetting the Oil Life System To reset the Engine Oil Life System on most vehicles: 1. Display OIL LIFE REMAINING on the DIC. If the vehicle does not have DIC buttons, the vehicle must be in P (Park) to access this display.
2. Press and hold the SET/RESET
button on the DIC, or the trip odometer reset stem if the vehicle does not have DIC buttons, for more than five seconds. The oil life will change to 100%.
On all vehicles, the Engine Oil Life System can be reset as follows: 1. Turn the ignition to ON/RUN with
the engine off.
2. Fully press the accelerator pedal
slowly three times within five seconds.
3. Display OIL LIFE REMAINING
on the DIC. If the display shows 100%, the system is reset. See Engine Oil Life System on page 10‑10.
Fuel E85 (85% Ethanol) Vehicles that have a FlexFuel badge and a yellow fuel cap can use either unleaded gasoline or ethanol fuel containing up to 85% ethanol (E85). See Fuel E85 (85% Ethanol) on page 9‑59. For all other vehicles, use only the unleaded gasoline described under Recommended Fuel on page 9‑57.
Driving for Better Fuel Economy Driving habits can affect fuel mileage. Here are some driving tips to get the best fuel economy possible. . Avoid fast starts and accelerate
smoothly.
In Brief
1-27
. Brake gradually and avoid
abrupt stops.
. Avoid idling the engine for long
periods of time.
. When road and weather
conditions are appropriate, use cruise control.
. Always follow posted speed
limits or drive more slowly when conditions require.
. Keep vehicle tires properly
inflated.
. Combine several trips into a
single trip.
. Replace the vehicle's tires with
the same TPC Spec number molded into the tire's sidewall near the size. Follow recommended scheduled maintenance.
Chevrolet Avalanche Owner Manual - 2012 - crc 2nd edition - 11/7/11
Black plate (28,1)
1-28
In Brief
Roadside Assistance Program U.S.: 1-800-243-8872
TTY Users (U.S.): 1-888-889-2438
Canada: 1-800-268-6800
Mexico: 01-800-466-0800
As the owner of a new Chevrolet, you are automatically enrolled in the Roadside Assistance program. See Roadside Assistance Program (U.S. and Canada) on page 13‑7 or Roadside Assistance Program (Mexico) on page 13‑9.Roadside Assistance and OnStar (U.S. and Canada) If you have an active OnStar subscription, press the Q button and the current GPS location will be sent to an OnStar advisor who will assess your problem, contact Roadside Assistance, and relay your exact location to get the help you need.
Online Owner Center (U.S. and Canada) The Online Owner Center is a complimentary service that includes online service reminders, vehicle maintenance tips, online owner manual, special privileges, and more.
Sign up today at: U.S.: chevrolet.com (click on “Owners,” then “Manage My Chevrolet/Owners Login”) Canada: chevroletowner.ca
OnStar® If equipped, this vehicle has a comprehensive, in-vehicle system that can connect to a live Advisor for Emergency, Security, Navigation, Connection, and Diagnostic Services. See OnStar Overview on page 14‑1.
Chevrolet Avalanche Owner Manual - 2012 - crc 2nd edition - 11/7/11
Black plate (1,1)
Keys, Doors, and Windows
Keys and Locks
Keys . . . . . . . . . . . . . . . . . . . . . . . . . . 2-2
Remote Keyless Entry (RKE)System . . . . . . . . . . . . . . . . . . . . . . 2-2
Remote Keyless Entry (RKE)
System Operation . . . . . . . . . . . 2-3
Remote Vehicle Start . . . . . . . . . 2-5
Door Locks . . . . . . . . . . . . . . . . . . . 2-7
Power Door Locks . . . . . . . . . . . . 2-8
Delayed Locking . . . . . . . . . . . . . . 2-8
Automatic Door Locks . . . . . . . . . 2-8
Lockout Protection . . . . . . . . . . . . 2-8
Safety Locks . . . . . . . . . . . . . . . . . . 2-8Keys, Doors, and Windows
2-1
Doors
Interior Mirrors
Midgate® . . . . . . . . . . . . . . . . . . . . . . 2-9
Tailgate . . . . . . . . . . . . . . . . . . . . . . 2-15
Power Assist Steps . . . . . . . . . . 2-16Manual Rearview Mirror . . . . . . 2-22
Automatic Dimming RearviewMirror . . . . . . . . . . . . . . . . . . . . . . . 2-22
Vehicle Security
Windows
Windows . . . . . . . . . . . . . . . . . . . . . 2-23
Power Windows . . . . . . . . . . . . . 2-24
Sun Visors . . . . . . . . . . . . . . . . . . . 2-25Roof
Sunroof . . . . . . . . . . . . . . . . . . . . . . 2-25
Vehicle Security . . . . . . . . . . . . . . 2-16
Anti-theft Alarm System . . . . . . 2-16
Immobilizer . . . . . . . . . . . . . . . . . . 2-18
Immobilizer Operation . . . . . . . 2-18Exterior Mirrors
Convex Mirrors . . . . . . . . . . . . . . 2-19
Power Mirrors . . . . . . . . . . . . . . . . 2-20
Folding Mirrors . . . . . . . . . . . . . . . 2-21
Heated Mirrors . . . . . . . . . . . . . . . 2-21
Automatic Dimming Mirror . . . 2-21
Park Tilt Mirrors . . . . . . . . . . . . . . 2-22Chevrolet Avalanche Owner Manual - 2012 - crc 2nd edition - 11/7/11
Black plate (2,1)
2-2
Keys, Doors, and Windows
Keys and Locks
Keys
{ WARNING
Leaving children in a vehicle with the ignition key is dangerous for many reasons. Children or others could be badly injured or even killed. They could operate the power windows or other controls or even make the vehicle move. The windows will function with the keys in the ignition and children could be seriously injured or killed if caught in the path of a closing window. Do not leave the keys in a vehicle with children.
If locked out of your vehicle, contact Roadside Assistance. See Roadside Assistance Program (U.S. and Canada) on page 13‑7 or Roadside Assistance Program (Mexico) on page 13‑9 for more information. With an active OnStar subscription, an OnStar Advisor may remotely unlock the vehicle. See OnStar Overview on page 14‑1.
Remote Keyless Entry (RKE) System See Radio Frequency Statement on page 13‑20 for information regarding Part 15 of the Federal Communications Commission (FCC) rules and Industry Canada Standards RSS-GEN/210/220/310.
The key can be used for the ignition, door locks, tailgate, and side storage boxes. See your dealer if a replacement key or additional key is needed. Notice: If the keys get locked in the vehicle, it may have to be damaged to get them out. Always carry a spare key.
Chevrolet Avalanche Owner Manual - 2012 - crc 2nd edition - 11/7/11
Black plate (3,1)
Keys, Doors, and Windows
2-3
If there is a decrease in the RKE operating range: . Check the distance. The
transmitter may be too far from the vehicle.
. Check the location. Other vehicles or objects may be blocking the signal.
. Check the transmitter's battery.
See “Battery Replacement” later in this section. If the transmitter is still not working correctly, see your dealer or a qualified technician for service.
Remote Keyless Entry (RKE) System Operation The Remote Keyless Entry (RKE) transmitter functions work up to 60 m (195 ft) away from the vehicle. There are other conditions which can affect the performance of the transmitter. See Remote Keyless Entry (RKE) System on page 2‑2.
With Remote Start (Without
Remote Start Similar)
/ (Remote Vehicle Start): For vehicles with this feature, press / to start the engine from outside the vehicle using the RKE transmitter. See Remote Vehicle Start on page 2‑5 for additional information. Q (Lock): Press to lock all the doors, including the tailgate. If enabled through the Driver Information Center (DIC), the turn signal lamps flash once to indicate locking has occurred. If enabled through the DIC, the horn chirps
when Q is pressed again within three seconds of the previous press of the lock button. See Vehicle Personalization (With DIC Buttons) on page 5‑42 for additional information. Pressing Q arms the content theft‐deterrent system. See Anti-theft Alarm System on page 2‑16. K (Unlock): Press once to unlock only the driver door. If K is pressed again within three seconds, all remaining doors, including the tailgate, unlock. The interior lamps may come on and stay on for 20 seconds or until the ignition is turned on. If enabled through the DIC, the turn signal lamps flash twice to indicate unlocking has occurred. See Vehicle Personalization (With DIC Buttons) on page 5‑42. If enabled through the DIC, the exterior lights may turn on.
Chevrolet Avalanche Owner Manual - 2012 - crc 2nd edition - 11/7/11
Black plate (4,1)
2-4
Keys, Doors, and Windows
See “APPROACH LIGHTING” under Vehicle Personalization (With DIC Buttons) on page 5‑42. Pressing K on the RKE transmitter disarms the content theft‐deterrent system. See Anti-theft Alarm System on page 2‑16. L (Vehicle Locator/Panic Alarm): Press and release to locate the vehicle. The turn signal lamps flash and the horn sounds three times. Press and hold L for more than two seconds to activate the panic alarm. The turn signal lamps flash and the horn sounds repeatedly for 30 seconds. The alarm turns off when the ignition is moved to ON/ RUN or L is pressed again. The ignition must be in LOCK/OFF for the panic alarm to work.
Programming Transmitters to the Vehicle Only RKE transmitters programmed to this vehicle will work. If a transmitter is lost or stolen, a replacement can be purchased and programmed through your dealer. When the replacement transmitter is programmed to this vehicle, all remaining transmitters must also be reprogrammed. Any lost or stolen transmitters will no longer work once the new transmitter is programmed. Each vehicle can have up to eight transmitters programmed to it. See your dealer to program transmitters to the vehicle.
Battery Replacement Replace the battery if the REPLACE BATTERY IN REMOTE KEY message displays in the DIC. See “REPLACE BATTERY IN REMOTE KEY” under Key and Lock Messages on page 5‑37 for additional information. Notice: When replacing the battery, do not touch any of the circuitry on the transmitter. Static from your body could damage the transmitter.
Chevrolet Avalanche Owner Manual - 2012 - crc 2nd edition - 11/7/11
Black plate (5,1)
Keys, Doors, and Windows
2-5
3.
Insert the new battery, positive side facing down. Replace with a CR2032 or equivalent battery.
4. Snap the transmitter back
together.
Remote Vehicle Start If available, this feature allows you to start the engine from outside of the vehicle. It may also start up the vehicle's heating or air conditioning systems and rear window defogger. Normal operation of the system will return after the key is turned to the ON/RUN position. If the vehicle has an automatic climate control system, the climate control system will default to a heating or cooling mode depending on the outside temperatures. If the vehicle does not have an automatic climate control system, the system will turn on at the setting the vehicle was set to when the vehicle was last turned off.
During a remote start, if the vehicle has an automatic climate control system and heated seats, the heated seats will turn on during colder outside temperatures and will shut off when the key is turned to ON/RUN. If the vehicle does not have an automatic climate control system, during remote start, manually turn the heated seats on and off. See Heated and Ventilated Front Seats on page 3‑8 for additional information. Laws in some communities may restrict the use of remote starters. For example, some laws may require a person using the remote start to have the vehicle in view when doing so. Check local regulations for any requirements on remote starting of vehicles. Do not use the remote start feature if the vehicle is low on fuel. The vehicle may run out of fuel.
To replace the battery: 1. Separate the transmitter with a
flat, thin object, such as a flat head screwdriver.
Carefully insert the tool into the notch located along the parting line of the transmitter. Do not insert the tool too far. Stop as soon as resistance is felt. Twist the tool until the transmitter is separated.
2. Remove the old battery. Do not
use a metal object.
Chevrolet Avalanche Owner Manual - 2012 - crc 2nd edition - 11/7/11
Black plate (6,1)
2-6
Keys, Doors, and Windows