- 2007 Cadillac STS Owners Manuals
- Cadillac STS Owners Manuals
- 2006 Cadillac STS Owners Manuals
- Cadillac STS Owners Manuals
- 2008 Cadillac STS Owners Manuals
- Cadillac STS Owners Manuals
- 2009 Cadillac STS Owners Manuals
- Cadillac STS Owners Manuals
- 2005 Cadillac STS Owners Manuals
- Cadillac STS Owners Manuals
- 2010 Cadillac STS Owners Manuals
- Cadillac STS Owners Manuals
- 2011 Cadillac STS Owners Manuals
- Cadillac STS Owners Manuals
- Download PDF Manual
-
garage door opener’s remote control battery cover. Your garage door opener is a fixed code device if there is a panel of switches. If not, your garage door opener is a rolling code device. Programming Universal Home Remote — Fixed Code Fixed Code garage door openers are used for garage doors produced prior to 1996. Fixed code uses the same coded signal every time, which is manually programmed by setting DIP switches for a unique personal code.
138
Follow these steps to program up to three channels: 1. Remove the battery cover of the hand-held
transmitter.
3. Enter these positions into the Universal Home
Remote System as follows. Press and release all three buttons at the same time to put the device into programming mode.
Example of Switch Settings
2. Write down the eight to 12 coding switch
settings from left to right. When the switch is in the up position, write “on,” and when a switch is in the down position, write “off”. If a switch is set between the up and down position, write “middle”.
4. The indicator light will blink slowly. In order
from left to right, and within two and one-half minutes, enter each switch setting into the Universal Home Remote System. Push one button for each switch as follows: (cid:127) Left button = “on” switch position. (cid:127) Right button = “off” switch position. (cid:127) Middle button = “middle” switch position.
139
Programming Universal Home Remote — Rolling Code Rolling code garage door openers are used for garage doors produced after 1996 and are code protected. Rolling code means the coded signal is changed every time your remote control garage door opener is used. Programming a rolling code garage door opener involves time-sensitive actions, so read the entire procedure before you begin. If you do not follow these actions, the device will time out and you will have to repeat the procedure.
5. After entering the switch settings, press and
release all three buttons at the same time. The indicator lights will turn on.
6. Press and hold the button you would like to
use to control the garage door until the garage door moves. The indicator light above the selected button should slowly blink. You may need to hold the button from five to 55 seconds.
7. Immediately release the button when the
garage door moves. The indicator light will blink rapidly until programming is complete.
8. Press and release the button again. The garage door should move, confirming that programming is successful and complete.
To program another device such as an additional garage door opener, a security device, or home lighting, repeat Steps 1–8, choosing a different function button in Step 6 than what you used for the garage door opener.
140
Follow these steps to program up to three channels: 1. Press the two outside buttons at the same
time for one to two seconds, and immediately release them.
2. Go to the garage. Locate the garage door
motor head and press and release the “learn” button.
After pressing the “learn” button, you have 10 to 30 seconds to complete Step 4
depending on your garage control unit. If you cannot locate the “learn” button, refer to the owners guide for your garage door opener.3. Press and hold the button you would like to use to control the garage door until the garage door moves. The indicator light, above the selected button, should slowly blink. You may need to hold the button from five to 20 seconds.
4. Immediately release the button when the
garage door moves. The indicator light will blink rapidly until programming is complete.
5. Press and release the button again. The garage door should move, confirming that programming is successful and complete.
To program another device such as an additional garage door opener, a security device, or home lighting, repeat Steps 1–5, choosing a different function button in Step 3 than what you used for the garage door opener.
141
Using Universal Home Remote Press and hold the appropriate button for at least half of a second. The indicator light will come on while the signal is being transmitted. Reprogramming Universal Home Remote Buttons You can reprogram any of the three buttons by repeating the instructions. Erasing Universal Home Remote Buttons You should erase the programmed buttons when you sell or terminate your lease. To erase either rolling code or fixed code on the Universal Home Remote device, do the following: 1. Press and hold the two outside buttons at
the same time for approximately 20 seconds, until the indicator lights, located directly above the buttons, begin to blink rapidly.
2. Once the indicator lights begin to blink,
release both buttons. The codes from all buttons will be erased.
142
Universal Home Remote System Operation (With One Triangular LED)
Your vehicle may have the Universal Home Remote System. If there is one triangular Light Emitting Diode (LED) next to the Universal Home Remote buttons, follow the instructions below. If your vehicle has three round LED under the Universal Home Remote buttons, follow the instructions under Universal Home Remote System Operation (With three round LED). Do not use the Universal Home Remote with any garage door opener that does not have the stop and reverse feature. This includes any garage door opener model manufactured before April 1, 1982. If you have a newer garage door opener with rolling codes, please be sure to follow Steps 6 through 8
to complete the programming of your Universal Home Remote Transmitter.Read the instructions completely before attempting to program the Universal Home Remote. Because of the steps involved, it may be helpful to have another person available to assist you in the programming steps. Keep the original hand-held transmitter for use in other vehicles as well as for future Universal Home Remote programming. It is also recommended that upon the sale of the vehicle, the programmed Universal Home Remote buttons should be erased for security purposes. See “Erasing Universal Home Remote Buttons” later in this section or, for assistance, see Customer Assistance Offices on page 529. Be sure that people and objects are clear of the garage door or gate operator you are programming. When programming a garage door, it is advised to park outside of the garage. It is recommended that a new battery be installed in your hand-held transmitter for quicker and more accurate transmission of the radio-frequency signal.
Programming Universal Home Remote Follow these steps to program up to three channels: 1. Press and hold down the two outside
Universal Home Remote buttons, releasing only when the Universal Home Remote indicator light begins to flash, after 20 seconds. Do not hold down the buttons for longer than 30 seconds and do not repeat this step to program a second and/or third hand-held transmitter to the remaining two Universal Home Remote buttons.
2. Position the end of your hand-held transmitter about 1 to 3 inches (3 to 8 cm) away from the Universal Home Remote buttons while keeping the indicator light in view.
3. Simultaneously press and hold both the desired Universal Home Remote button and the hand-held transmitter button. Do not release the buttons until Step 4 has been completed. Some entry gates and garage door openers may require you to substitute Step 3 with the procedure noted in “Gate Operator and Canadian Programming” later in this section.
143
4. The indicator light will flash slowly at first and
then rapidly after Universal Home Remote successfully receives the frequency signal from the hand-held transmitter. Release both buttons.
6. Locate in the garage, the garage door opener receiver (motor-head unit). Locate the “Learn” or “Smart” button. This can usually be found where the hanging antenna wire is attached to the motor-head unit.
5. Press and hold the newly-trained Universal
Home Remote button and observe the indicator light. If the indicator light stays on continuously, programming is complete and your device should activate when the Universal Home Remote button is pressed and released. To program the remaining two Universal Home Remote buttons, begin with Step 2 under “Programming Universal Home Remote.” Do not repeat Step 1 as this will erase all of the programmed channels. If the indicator light blinks rapidly for two seconds and then turns to a constant light, continue with Steps 6 through 8 following to complete the programming of a rolling-code device, most commonly, a garage door opener.
7. Firmly press and release the “Learn” or “Smart” button. The name and color of the button may vary by manufacturer. You will have 30 seconds to start Step 8.
8. Return to the vehicle. Firmly press and hold
the programmed Universal Home Remote button for two seconds, then release it. Immediately press and hold the same button a second time for two seconds, then release it. Immediately, press and hold the same button a third time for two seconds, then release. The Universal Home Remote should now activate the rolling-code device.
To program the remaining two Universal Home Remote buttons, begin with Step 2 of “Programming Universal Home Remote.” You do not want to repeat Step 1, as this will erase all previous programming from the Universal Home Remote buttons.
144
Gate Operator and Canadian Programming Canadian radio-frequency laws require transmitter signals to time out or quit after several seconds of transmission. This may not be long enough for Universal Home Remote to pick up the signal during programming. Similarly, some U.S. gate operators are manufactured to time out in the same manner. If you live in Canada, or you are having difficulty programming a gate operator or garage door opener by using the “Programming Universal Home Remote” procedures, regardless of where you live, replace Step 3 under “Programming Universal Home Remote” with the following: Continue to press and hold the Universal Home Remote button while you press and release every two seconds (cycle) the hand-held transmitter button until the frequency signal has been successfully accepted by the Universal Home Remote. The Universal Home Remote indicator light will flash slowly at first and then rapidly. Proceed with Step 4 under “Programming Universal Home Remote” to complete.
Using Universal Home Remote Press and hold the appropriate Universal Home Remote button for at least half of a second. The indicator light will come on while the signal is being transmitted. Erasing Universal Home Remote Buttons To erase programming from the three Universal Home Remote buttons do the following: 1. Press and hold down the two outside buttons
until the indicator light begins to flash, after 20 seconds. Do not hold the two outside buttons for longer than 30 seconds.
2. Release both buttons. The Universal Home Remote is now in the training (learning) mode and can be programmed at any time beginning with Step 2 under “Programming Universal Home Remote” shown earlier in this section. Individual buttons cannot be erased, but they can be reprogrammed. See “Reprogramming a Single Universal Home Remote Button” following this section.
145
Reprogramming a Single Universal Home Remote Button To program a device to Universal Home Remote using a Universal Home Remote button previously trained, follow these steps: 1. Press and hold the desired Universal Home
Remote button. Do not release the button. 2. The indicator light will begin to flash after
20 seconds. While still holding the Universal Home Remote button, proceed with Step 2 under “Programming Universal Home Remote” shown earlier in this section.
For additional information on Universal Home Remote, see Customer Assistance Offices on page 529. Storage Areas
Glove Box To open the glove box, lift up on the lever. The glove box has a light inside.
146
Cupholder(s) Your vehicle has two cupholders in the center console area.
Center Console Storage Area Your vehicle has a center console storage area located between the front seats. It includes storage areas, and accessory power outlet(s) on the rear of the console.
Convenience Net Your vehicle may have a tie down strap and convenience net. The convenience net attaches to the floor or back wall of the rear of the vehicle using six anchor points. The net can be used like a hammock across the rear of the vehicle or hooked on the floor. Put small loads, like grocery bags, behind the net. It can help keep them from falling over during sharp turns or quick starts and stops. The net is not for larger, heavier loads. Store them in the rear of the vehicle as far forward as you can.
Sunroof
If your vehicle has a power sunroof, the switches are located on the overhead console.
To open or close the sunroof, the ignition must be on or Retained Accessory Power (RAP) must be active. See Retained Accessory Power (RAP) on page 112. Express Open: The express open feature will operate from the closed or partially open position. To express open the power sunroof, fully press the driver’s side switch rearward once. To stop the sunroof glass in a desired position other than to the express-open position, press the switch again,
in either direction, to stop the movement. If the sunshade is in the closed position, it will open with the sunroof, or it can be opened manually. Vent Open: To open the power sunroof to the vent position from the closed position, press and hold the passenger’s side sunroof switch forward. The rear of the sunroof panel will tilt upward to the full vent position. The sunshade must be opened manually. Express Close: The express close feature will operate from the open or partially open position. To express close the power sunroof, fully press the driver’s side switch forward once. To stop the sunroof glass in a desired position other than closed, press the switch again in either direction. The sunshade must be closed manually. Close: To close the power sunroof, operate the controls according to one of the following: (cid:127) From the open position, press and hold the
driver’s side sunroof switch forward. The sunshade must be closed manually.
(cid:127) From the vent position, press and hold the passenger’s side sunroof switch rearward.
147
Anti-Pinch: If an object is in the path of the sunroof while it is closing, the anti-pinch feature will detect the object and stop the sunroof from closing at the point of the obstruction. The sunroof will then return to the full-open or vent position. To close the sunroof once it has re-opened, refer to the two options previously described under the “Close” feature instructions. Vehicle Personalization Your vehicle has personalization that allows you to program certain features to a preferred setting for up to two drivers. The back of the keyless access transmitters are labelled 1 or 2. Additional keyless access transmitters programmed to the vehicle, as 3 and/or 4, do not have a number on the back and are not capable of being personalized. The number of programmable features varies depending upon which vehicle options are purchased. On all vehicles, features such as climate control settings, radio and XM™ preset settings, exterior lighting at unlock and remote lock unlock confirmation, and language have already been programmed for your convenience. Your vehicle also has an automatic door locking feature
148
that is always on. You cannot turn the automatic door locking feature off. See Programmable Automatic Door Locks on page 99. Some vehicles have additional features that can be programmed including the seat, steering column, and outside rearview mirror position. If your vehicle has the base audio system, the following information explains the vehicle personalization on your vehicle. If your vehicle has the Navigation system, see “Personalization” in the Index of the Navigation System manual for information on vehicle personalization. If your vehicle has the ability to program additional personalization features, the driver’s preferences are recalled by pressing any button on the keyless access transmitter, 1 or 2, by selecting Driver 1 or 2 on the radio display, or when a valid keyless access transmitter is detected upon opening the driver’s door. If more than one valid keyless access transmitter is detected upon opening the driver’s door, the driver preferences for the lowest driver number will be recalled.
Certain features can be programmed not to recall until the ignition is turned off. To change feature preferences, use the following procedure. Entering the Personal Settings Menu To enter the feature programming mode, use the following procedure: 1. Be sure the ignition is either on, in Acc., or in RAP and place the transmission in PARK (P) or make sure that the vehicle speed is less than 6 mph (9 km/h). To avoid excessive drain on the battery, it is recommended that the headlamps are turned off.
2. Press any button on the appropriate keyless
access transmitter to identify yourself as Driver 1 or Driver 2.
3. Turn on the radio by pressing the
power/volume knob.
4. Press the CNFG radio button or the
tune/select knob located on the right side of the radio to enter the radio’s main menu.
5. Turn the tune/select knob and scroll to
SETUP.
6. Press the tune/select knob to enter the
SETUP menu.
7. Turn the tune/select knob and scroll to
PERSONAL SETTINGS MENU, then press the tune/select knob to turn the feature on. A check mark appears after this selection when it is turned on and the entire list of personalization features will appear. 8. Turn the tune/select knob and scroll to the feature you want to change, then press the tune/select knob to turn the feature on or off. If the feature is turned on, a check mark will appear next to the feature name. Some features have submenus that show additional features that can be turned on or off. After entering a submenu, turn the tune/select knob and scroll to the feature you want to change, then press the tune/select knob to turn the feature on or off.
149
Personal Settings Menu Items The PERSONAL SETTINGS MENU must be selected with a check mark to program the personalization features. If it is not selected, press the tune/select knob until the check mark appears. If it is selected, the entire list of features will be available to program. DRIVER GREETING This feature allows you to type in a customized name or greeting that will appear on the display whenever the corresponding keyless access transmitter, 1 or 2, is used or Driver 1 or Driver 2
is selected on the radio display. If a customized name or greeting is not programmed, the system will show Driver 1 or Driver 2 to correspond with the numbers on the back of the keyless access transmitters. In this case, the customized driver greeting feature is factory shipped as off.To turn the driver greeting feature on and to program a customized name or greeting, use the following procedure: 1. Enter the PERSONAL SETTINGS MENU by
following the instructions listed previously under “Entering the Personal Settings Menu.”
2. Turn the tune/select knob until DRIVER
GREETING is highlighted.
3. Press the tune/select knob to turn on the
DRIVER GREETING feature. You will see a cursor on the screen.
4. Turn the tune/select knob until you reach the
first letter you want; the letter will be highlighted. There is a complete alphabet with both upper and lower case letters and the numbers zero through nine. Also included are spaces and other non-letter characters such as the ampersand (&).
150
5. Press the tune/select knob once to select the
letter. The letter will then appear on the display and the cursor will advance to the next letter. If you make a mistake, press the F5 button, located on the radio, repeatedly to cycle back through all of the characters until you reach the character you wish to change. Then turn the tune/select knob until the letter you want is highlighted and press the tune/select knob to select the new letter.
6. Repeat Steps 4 and 5 until the name or greeting you want is complete. You can program up to 16 characters.
The name or greeting you programmed is now set. You can either exit the programming mode by following the instructions later in this section or program the next feature available on your vehicle by pressing the F6 (BACK) button, located on the radio, to return to the PERSONAL SETTINGS MENU. You will now see a check mark next to the driver greeting menu item, which means that the driver greeting feature is on and a customized driver greeting is being used.
To turn off the customized driver greeting, and go back to displaying either Driver 1 or Driver 2, use the following procedure: 1. Enter the PERSONAL SETTINGS MENU by
following the instructions listed previously under “Entering the Personal Settings Menu.”
2. Turn the tune/select knob until DRIVER
GREETING is highlighted.
3. Press the tune/select knob to turn on the DRIVER GREETING feature. The check mark will be cleared and the customized driver greeting is off.
The only way to correct a customized driver greeting once you have exited the screen to spell the name, is to turn the driver greeting feature off, and then turn it back on.
151
KEY FOB REMINDER This feature chirps the horn three times when the driver’s door is closed and there is a keyless access transmitter left inside of the vehicle. This will only occur when the vehicle is off. Programmable Modes
Mode 1: ON
Mode 2: OFF Before your vehicle was shipped from the factory, it was programmed to Mode 1. The mode to which the vehicle was programmed may have been changed since it left the factory. To program the vehicle to a different mode, use the following procedure: 1. Enter the PERSONAL SETTINGS MENU by
following the instructions listed previously under “Entering the Personal Settings Menu.”
2. Turn the tune/select knob until KEY FOB
REMINDER is highlighted.
3. Press the tune/select knob to switch back and
forth between on and off. When the mode is turned on, a check mark will appear next to the feature name.
The mode you selected is now set. You can either exit the programming mode by following the instructions later in this section or program the next feature available on your vehicle. REMOTE START If your vehicle has this feature, it allows you to choose the features you would like to have activated when you engage the remote start on your vehicle. These features include the climate control system, the rear defogger, and the seat temperature, if your vehicle has this feature. Activating these features helps provide a more comfortable vehicle upon entry. See “Remote Vehicle Start” under Keyless Access System Operation on page 88 for more information.
152
Programmable Modes
Mode 1: ON
Mode 2: OFF Before your vehicle was shipped from the factory, it was programmed to Mode 1. The mode to which the vehicle was programmed may have been changed since it left the factory. To program the vehicle to a different mode, use the following procedure: 1. Enter the PERSONAL SETTINGS MENU by
following the instructions listed previously under “Entering the Personal Settings Menu.”
2. Turn the tune/select knob until REMOTE
START is highlighted.
3. Press the tune/select knob to switch back and
forth between on and off.
When REMOTE START is on, a check mark will appear next to the feature name. You can then choose to activate any or all of the following features by turning the tune/select knob to highlight the feature, then pressing the knob to turn it on.
CLIMATE CONTROL: The climate control system will engage when the vehicle is started using the remote start feature. It will be at the same climate control setting that was last used by the driver using that keyless entry transmitter.
REAR WINDOW DEFOG: If this feature is active, the rear defogger will engage when the vehicle is started using the remote start feature.
SEAT TEMP (Temperature) CONTROL: If your vehicle has this feature and this feature is active, the seats will be heated or cooled when the vehicle is started using the remote start feature. The mode you selected is now set. You can either exit the programming mode by following the instructions later in this section or program the next feature available on your vehicle by pressing the F6 (BACK) button, located on the radio, to return to the PERSONAL SETTINGS MENU.
153
3. Press the tune/select knob to switch back and
forth between on and off. When the mode is turned on, a check mark will appear next to the feature name.
If this feature is selected, START BUTTON RECALL cannot be selected. The mode you selected is now set. You can either exit the programming mode by following the instructions later in this section or program the next feature available on your vehicle. START BUTTON RECALL If your vehicle has the optional memory package, you will have this feature. When this feature is turned on, you can recall any previously programmed seat, mirror, and steering column position when the start button on the ignition is pressed.
REMOTE RECALL MEMORY If your vehicle has the optional memory package, you will have this feature. When this feature is turned on, you can recall any previously programmed seat position and mirror position when the unlock button on the keyless access transmitter is pressed. Programmable Modes
Mode 1: ON
Mode 2: OFF Before your vehicle was shipped from the factory, it was programmed to Mode 2 with the exception of recall seat to driver position which is on. The mode to which the vehicle was programmed may have been changed since it left the factory. To program the vehicle to a different mode, use the following procedure: 1. Enter the PERSONAL SETTINGS MENU by
following the instructions listed previously under “Entering the Personal Settings Menu.”
2. Turn the tune/select knob until REMOTE
RECALL MEMORY is highlighted.
154
Programmable Modes
Mode 1: ON
Mode 2: OFF Before your vehicle was shipped from the factory, it was programmed to Mode 2. The mode to which the vehicle was programmed may have been changed since it left the factory. To program the vehicle to a different mode, use the following procedure: 1. Enter the PERSONAL SETTINGS MENU by
following the instructions listed previously under “Entering the Personal Settings Menu.”
2. Turn the tune/select knob until START
BUTTON RECALL is highlighted.
3. Press the tune/select knob to switch back and
forth between on and off. When the mode is turned on, a check mark will appear next to the feature name.
If this feature is selected, REMOTE RECALL MEMORY cannot be selected.
The mode you selected is now set. You can either exit the programming mode by following the instructions later in this section or program the next feature available on your vehicle. AUTO EXIT SEAT If your vehicle has the optional memory package, you will have this feature. When this feature is turned on, you can recall any previously programmed exit position for the driver’s seat when the vehicle is off, the shift lever is in PARK (P), and the driver’s door is opened. Programmable Modes
Mode 1: ON
Mode 2: OFF Before your vehicle was shipped from the factory, it was programmed to Mode 2. The mode to which the vehicle was programmed may have been changed since it left the factory.
155
To program the vehicle to a different mode, use the following procedure: 1. Enter the PERSONAL SETTINGS MENU by
following the instructions listed previously under “Entering the Personal Settings Menu.”
2. Turn the tune/select knob until AUTO EXIT
SEAT is highlighted.
3. Press the tune/select knob to switch back and
forth between on and off. When the mode is turned on, a check mark will appear in the box next to the feature name.
The mode you selected is now set. You can either exit the programming mode by following the instructions later in this section or program the next feature available on your vehicle. AUTO EXIT COLUMN If your vehicle has the optional memory package, you will have this feature. When this feature is turned on, you can recall any previously programmed exit position for the steering column when the vehicle is off, the shift lever is in PARK (P), and the driver’s door is opened.
Programmable Modes
Mode 1: ON
Mode 2: OFF Before your vehicle was shipped from the factory, it was programmed to Mode 2. The mode to which the vehicle was programmed may have been changed since it left the factory. To program the vehicle to a different mode, use the following procedure: 1. Enter the PERSONAL SETTINGS MENU by
following the instructions listed previously under “Entering the Personal Settings Menu.”
2. Turn the tune/select knob until AUTO EXIT
COLUMN is highlighted.
3. Press the tune/select knob to switch back and
forth between on and off. When the mode is turned on, a check mark will appear in the box next to the feature name.
The mode you selected is now set. You can either exit the programming mode by following the instructions later in this section or program the next feature available on your vehicle.
156
LIGHTS FLASH AT UNLOCK This feature allows the exterior lamps to flash when the keyless access transmitter is used to unlock the vehicle. All doors must be closed for this feature to work, and the lamps will not flash if the parking lamps or headlamps are on. If LIGHTS FLASH AT UNLOCK is turned on and either KEYLESS FT DOOR UNLOCK or KEYLESS DOORS UNLOCK is turned on, the exterior lamps will flash when the doors are passively unlocked. See “KEYLESS FT (Front) DOOR UNLOCK” and “KEYLESS DOORS UNLOCK” later in this section for more information. Programmable Modes
Mode 1: ON
Mode 2: OFF Before your vehicle was shipped from the factory, it was programmed to Mode 1. The mode to which the vehicle was programmed may have been changed since it left the factory.
To program the vehicle to a different mode, use the following procedure: 1. Enter the PERSONAL SETTINGS MENU by
following the instructions listed previously under “Entering the Personal Settings Menu.”
2. Turn the tune/select knob until LIGHTS
FLASH AT UNLOCK is highlighted.
3. Press the tune/select knob to switch back and
forth between on and off. When the mode is turned on, a check mark will appear next to the feature name.
The mode you selected is now set. You can either exit the programming mode by following the instructions later in this section or program the next feature available on your vehicle.
157
LIGHTS FLASH AT LOCK This feature allows the exterior lamps to flash once when the keyless access transmitter is used to lock the vehicle. All doors must be closed for this feature to work, and the lamps will not flash if the parking lamps or headlamps are on. If LIGHTS FLASH AT LOCK is turned on and either KEYLESS FT DOOR UNLOCK or KEYLESS DOORS UNLOCK is turned on, the exterior lamps will flash when the doors are passively unlocked. See “KEYLESS FT (Front) DOOR UNLOCK” and “KEYLESS DOORS UNLOCK” later in this section for more information. Programmable Modes
Mode 1: ON
Mode 2: OFF Before your vehicle was shipped from the factory, it was programmed to Mode 1. The mode to which the vehicle was programmed may have been changed since it left the factory.
To program the vehicle to a different mode, use the following procedure: 1. Enter the PERSONAL SETTINGS MENU by
following the instructions listed previously under “Entering the Personal Settings Menu.”
2. Turn the tune/select knob until LIGHTS
FLASH AT LOCK is highlighted.
3. Press the tune/select knob to switch back and
forth between on and off. When the mode is turned on, a check mark will appear next to the feature name.
You can select this feature by itself, or you can combine it with Horn Chirps At Lock so that both the exterior lamps flash and the horn chirps when you lock your vehicle. The mode you selected is now set. You can either exit the programming mode by following the instructions later in this section or program the next feature available on your vehicle.
158
EXT. (Exterior) LIGHTS AT UNLOCK This feature turns on the exterior lamps when the keyless access transmitter is used to unlock the vehicle. The lamps will remain on for about 20 seconds unless a door is opened, the ignition is in Acc., on, or START, or the keyless access transmitter is used to lock the vehicle. Programmable Modes
Mode 1: ON
Mode 2: OFF Before your vehicle was shipped from the factory, it was programmed to Mode 1. The mode to which the vehicle was programmed may have been changed since it left the factory. To program the vehicle to a different mode, use the following procedure: 1. Enter the PERSONAL SETTINGS MENU by
following the instructions listed previously under “Entering the Personal Settings Menu.” 2. Turn the tune/select knob until EXT. LIGHTS
AT UNLOCK is highlighted.
3. Press the tune/select knob to switch back and
forth between on and off. When the mode is turned on, a check mark will appear next to the feature name.
The mode you selected is now set. You can either exit the programming mode by following the instructions later in this section or program the next feature available on your vehicle. HORN CHIRPS AT LOCK This feature sounds the horn once when the keyless access transmitter is used to lock the vehicle. All doors must be closed for this feature to work. Programmable Modes
Mode 1: ON
Mode 2: OFF Before your vehicle was shipped from the factory, it was programmed to Mode 2. The mode to which the vehicle was programmed may have been changed since it left the factory.
159
To program the vehicle to a different mode, use the following procedure: 1. Enter the PERSONAL SETTINGS MENU by
following the instructions listed previously under “Entering the Personal Settings Menu.” 2. Turn the tune/select knob until HORN CHIRPS
AT LOCK is highlighted.
TWILIGHT DELAY This feature allows you to set the amount of time you want the exterior lamps to remain on after you exit the vehicle. Programmable Modes
Mode 1: 0:00 seconds (off)
3. Press the tune/select knob to switch back and
forth between on and off. When the mode is turned on, a check mark will appear next to the feature name.
The mode you selected is now set. You can either exit the programming mode by following the instructions later in this section or program the next feature available on your vehicle.
Mode 2: 0:05 seconds
Mode 3: 0:15 seconds
Mode 4: 0:30 seconds
Mode 5: 1:30 minutes
Mode 6: 2:00 minutes
Mode 7: 3:00 minutes
Mode 8: 4:00 minutes Before your vehicle was shipped from the factory, it was programmed to Mode 2. The mode to which the vehicle was programmed may have been changed since the vehicle left the factory.
160
To determine the mode to which the vehicle is programmed or to program the vehicle to a different mode, use the following procedure: 1. Enter the PERSONAL SETTINGS MENU by
following the instructions listed previously under “Entering the Personal Settings Menu.”
2. Turn the tune/select knob until TWILIGHT
DELAY is highlighted.
3. Press the tune/select knob to scroll through
the available delay settings and set your selection. If you choose Mode 1, the exterior lamps will not illuminate when you exit the vehicle. Only one mode can be selected at a time.
The mode you selected is now set. You can either exit the programming mode by following the instructions later in this section or program the next feature available on your vehicle. DRIVER UNLOCK AT OFF This feature allows the driver’s door to automatically unlock when the ignition is turned off.
Programmable Modes
Mode 1: ON
Mode 2: OFF Before your vehicle was shipped from the factory, it was programmed to Mode 2. The mode to which the vehicle was programmed may have been changed since it left the factory. To program the vehicle to a different mode, use the following procedure: 1. Enter the PERSONAL SETTINGS MENU by
following the instructions listed previously under “Entering the Personal Settings Menu.”
2. Turn the tune/select knob until DRIVER
UNLOCK AT OFF is highlighted.
3. Press the tune/select knob to switch between
on and off. When the mode is turned on, a check mark will appear next to the feature name.
The mode you selected is now set. You can either exit the programming mode by following the instructions later in this section or program the next feature available on your vehicle.
161
DOORS UNLOCK AT OFF This feature allows all of the doors to automatically unlock when the ignition is turned off. Programmable Modes
Mode 1: ON
Mode 2: OFF Before your vehicle was shipped from the factory, it was programmed to Mode 2. The mode to which the vehicle was programmed may have been changed since it left the factory. To program the vehicle to a different mode, use the following procedure: 1. Enter the PERSONAL SETTINGS MENU by
following the instructions listed previously under “Entering the Personal Settings Menu.”
2. Turn the tune/select knob until DOORS
UNLOCK AT OFF is highlighted.
3. Press the tune/select knob to switch between
on and off. When the mode is turned on, a check mark will appear next to the feature name.
The mode you selected is now set. You can either exit the programming mode by following the instructions later in this section or program the next feature available on your vehicle. DRIVER UNLOCK IN PARK The feature allows the driver’s door to automatically unlock when the transmission is shifted into PARK (P). Programmable Modes
Mode 1: ON
Mode 2: OFF Before your vehicle was shipped from the factory, it was programmed to Mode 2. The mode to which the vehicle was programmed may have been changed since it left the factory. To program the vehicle to a different mode, use the following procedure: 1. Enter the PERSONAL SETTINGS MENU by
following the instructions listed previously under “Entering the Personal Settings Menu.”
2. Turn the tune/select knob until DRIVER
UNLOCK IN PARK is highlighted.
162
3. Press the tune/select knob to switch back and
forth between on and off. When the mode is turned on, a check mark will appear next to the feature name.
The mode you selected is now set. You can either exit the programming mode by following the instructions later in this section or program the next feature available on your vehicle. DOORS UNLOCK IN PARK The feature allows all of the doors to automatically unlock when the transmission is shifted into PARK (P). Programmable Modes
Mode 1: ON
Mode 2: OFF Before your vehicle was shipped from the factory, it was programmed to Mode 1. The mode to which the vehicle was programmed may have been changed since it left the factory.
To program the vehicle to a different mode, use the following procedure: 1. Enter the PERSONAL SETTINGS MENU by
following the instructions listed previously under “Entering the Personal Settings Menu.”
2. Turn the tune/select knob until DOORS
UNLOCK IN PARK is highlighted.
3. Press the tune/select knob to switch back and
forth between on and off. When the mode is turned on, a check mark will appear next to the feature name.
The mode you selected is now set. You can either exit the programming mode by following the instructions later in this section or program the next feature available on your vehicle.
163
KEYLESS FT (Front) DOOR UNLOCK This feature automatically unlocks the appropriate front door when you approach the vehicle with your keyless access transmitter and pull the respective door handle. See Door Locks on page 98 for more information. Programmable Modes
Mode 1: ON
Mode 2: OFF Before your vehicle was shipped from the factory, it was programmed to Mode 2. The mode to which the vehicle was programmed may have been changed since it left the factory. To program the vehicle to a different mode, use the following procedure: 1. Enter the PERSONAL SETTINGS MENU by
following the instructions listed previously under “Entering the Personal Settings Menu.” 2. Turn the tune/select knob until KEYLESS FT
DOOR UNLOCK is highlighted.
3. Press the tune/select knob to switch back and
forth between on and off. When the mode is turned on, a check mark will appear next to the feature name.
The mode you selected is now set. You can either exit the programming mode by following the instructions later in this section or program the next feature available on your vehicle. KEYLESS DOORS UNLOCK This feature automatically unlocks all of the doors when you approach the vehicle with your keyless access transmitter and pull either front door handle. See Door Locks on page 98 for more information. Programmable Modes
Mode 1: ON
Mode 2: OFF Before your vehicle was shipped from the factory, it was programmed to Mode 1. The mode to which the vehicle was programmed may have been changed since it left the factory.
164
To program the vehicle to a different mode, use the following procedure: 1. Enter the PERSONAL SETTINGS MENU by
following the instructions listed previously under “Entering the Personal Settings Menu.”
2. Turn the tune/select knob until KEYLESS
DOORS UNLOCK is highlighted.
3. Press the tune/select knob to switch back and
forth between on and off. When the mode is turned on, a check mark will appear next to the feature name.
The mode you selected is now set. You can either exit the programming mode by following the instructions later in this section or program the next feature available on your vehicle. LOCK DELAY This feature delays the locking of the vehicle’s doors for eight seconds after a power door lock switch or the lock button on the keyless access transmitter is pressed. The eight second delay occurs after the last door is closed. If the keyless access transmitter is left inside of the vehicle, the doors will not lock.
Programmable Modes
Mode 1: ON
Mode 2: OFF Before your vehicle was shipped from the factory, it was programmed to Mode 1. The mode to which the vehicle was programmed may have been changed since it left the factory. To program the vehicle to a different mode, use the following procedure: 1. Enter the PERSONAL SETTINGS MENU by
following the instructions listed previously under “Entering the Personal Settings Menu.” 2. Turn the tune/select knob until LOCK DELAY
is highlighted.
3. Press the tune/select knob to switch back and
forth between on and off. When the mode is turned on, a check mark will appear next to the feature name.
The mode you selected is now set. You can either exit the programming mode by following the instructions later in this section or program the next feature available on your vehicle.
165
KEYLESS LOCK DELAY This feature allows you to select whether the doors automatically lock during normal vehicle exit. When the ignition is turned off and all doors become closed, the vehicle will determine how many keyless access transmitters remain in the vehicle interior. If at least one keyless access transmitter has been removed from the interior of the vehicle, the doors will lock after 10 seconds. For example, if there are two keyless access transmitters in the vehicle and one is removed, the other will be locked in. The keyless access transmitter locked in the vehicle can still be used to start the vehicle or unlock the doors, if needed. A person approaching the outside of the locked vehicle without an authorized keyless access transmitter, however, will not be able to open the door, even with a transmitter in the vehicle. You may temporarily disable the passive door locking feature by pressing the door unlock switch for three seconds on an open door. Passive door locking will then remain disabled until a door lock switch is pressed or until the power mode transitions from the off power mode.
Programmable Modes
Mode 1: ON
Mode 2: OFF Before your vehicle was shipped from the factory, it was programmed to Mode 2. The mode to which the vehicle was programmed may have been changed since it left the factory. To program the vehicle to a different mode, use the following procedure: 1. Enter the PERSONAL SETTINGS MENU by
following the instructions listed previously under “Entering the Personal Settings Menu.”
2. Turn the tune/select knob until KEYLESS
LOCK DELAY is highlighted.
3. Press the tune/select knob to switch back and
forth between on and off. When the mode is turned on, a check mark will appear next to the feature name.
The mode you selected is now set. You can either exit the programming mode by following the instructions later in this section or program the next feature available on your vehicle.
166
FRONT PASS (Passenger) WINDOW LOCK This feature allows you to choose whether or not to have the front passenger window deactivated as part of the window lockout button. If you would like the front passenger window to be deactivated when the window lockout button is pushed, turn this feature on. If this feature is left off, the window lockout button located on the door will deactivate only the rear windows. See Power Windows on page 105 for more information. Programmable Modes
Mode 1: ON
Mode 2: OFF Before your vehicle was shipped from the factory, it was programmed to Mode 2. The mode to which the vehicle was programmed may have been changed since it left the factory. To program the vehicle to a different mode, use the following procedure: 1. Enter the PERSONAL SETTINGS MENU by
following the instructions listed previously under “Entering the Personal Settings Menu.”
2. Turn the tune/select knob until FRONT PASS
WINDOW LOCK is highlighted.
3. Press the tune/select knob to switch back and
forth between on and off. When the mode is turned on, a check mark will appear next to the feature name.
The mode you selected is now set. You can either exit the programming mode by following the instructions later in this section or program the next feature available on your vehicle. CHIME VOLUME HIGH This feature allows you to adjust the volume level of the vehicle’s warning chimes. The chime volume cannot be turned off, only adjusted. Programmable Modes
Mode 1: NORMAL
Mode 2: HIGH Before your vehicle was shipped from the factory, it was programmed to Mode 1. The mode to which the vehicle was programmed may have been changed since it left the factory.
167
To program the vehicle to a different mode, use the following procedure: 1. Enter the PERSONAL SETTINGS MENU by
following the instructions listed previously under “Entering the Personal Settings Menu.”
2. Turn the tune/select knob until CHIME
VOLUME HIGH is highlighted.
3. Press the tune/select knob to switch back and
forth between the normal and high settings. A check mark indicates that the chime volume is set to HIGH.
The mode you selected is now set. You can either exit the programming mode by following the instructions later in this section or program the next feature available on your vehicle. SUSPENSION MODE If your vehicle has this feature, you can select between performance or touring modes. Performance mode is used where road conditions or personal preference demand more control. This setting provides more “feel” or response to road conditions. Touring mode is used for normal city and highway driving. This setting provides a smooth, soft ride.
168
Programmable Modes
Mode 1: PERFORMANCE
Mode 2: TOURING Before your vehicle was shipped from the factory, it was programmed to Mode 2. The mode to which the vehicle was programmed may have been changed since it left the factory. To program the vehicle to a different mode, use the following procedure: 1. Enter the PERSONAL SETTINGS MENU by
following the instructions listed previously under “Entering the Personal Settings Menu.” 2. Turn the tune/select knob until SUSPENSION
MODE is highlighted.
3. Press the tune/select knob to enter the
SUSPENSION MODE submenu.
4. Turn the tune/select knob to highlight
TOURING or PERFORMANCE.
5. Press the tune/select knob to select the
setting.
The mode you selected is now set. You can either exit the programming mode by following the instructions later in this section or program the next feature available on your vehicle by pressing the F6 (BACK) button, located on the radio, to return to the PERSONAL SETTINGS MENU. Exiting the Personal Settings Menu Once you have finished making your selections on the base audio system, you will automatically return to the main audio screen after 15 seconds. You can also press the F6 (BACK) button, located on the radio, to return to the main audio screen.
Memory Seat, Mirrors and Steering Wheel If your vehicle has the memory feature, you can program and recall memory settings for the following features for up to two drivers: (cid:127) The driver’s seat position (cid:127) The outside rearview mirrors position (cid:127) The power tilt wheel and telescopic steering
column position
The following settings and presets are set automatically: (cid:127) The language, radio and XM™ presets, tone, volume, playback mode (AM/FM or CD), last displayed stations, and compact disc position
(cid:127) The last climate control setting (cid:127) The Head-Up Display (HUD) position, if your
vehicle has this feature
(cid:127) Other personalization settings, for example,
remote start settings See Vehicle Personalization on page 148.
For vehicles with the base audio system, memory features are programmed and recalled through the radio from the DRIVER SELECTION and the DRIVER EXIT SETTINGS submenus. See “Entering the Driver Selection Submenu” and “Entering the Driver Exit Settings Submenu” later in this section for more information on recalling and programming the memory settings using the base audio system.
169
3. Turn on the radio by pressing the
power/volume knob.
4. Press the CNFG radio button to enter the
main menu of the radio.
5. Turn the tune/select knob and scroll to
SETUP.
6. Press the tune/select knob to enter the
SETUP menu.
7. Turn the tune/select knob and scroll to
DRIVER SELECTION.
8. Press the tune/select knob to enter the
DRIVER SELECTION submenu. The following items will appear: (cid:127) DRIVER 1
(cid:127) DRIVER 2
(cid:127) RECALL DRIVER SETTINGS (cid:127) STORE DRIVER SETTINGSFor vehicles with the Navigation system, memory features are programmed and recalled through the navigation display. See “Personalization” in the Index of the Navigation System manual for more information on programming and recalling the memory settings using the Navigation system. For vehicles with the Navigation system, you can also recall the memory features by using voice recognition, if your vehicle has this feature. See “Voice Recognition” in the Index of the Navigation System manual for more information. Entering the Driver Selection Submenu To enter the memory programming mode for your driver settings, use the following procedure: 1. Be sure the ignition is either on, in Acc., or in RAP and place the transmission in PARK (P) or make sure that the vehicle speed is less than 6 mph (9 km/h).
2. Press any button on the appropriate keyless
access transmitter to identify yourself as Driver 1 or Driver 2.
170
Driver Selection Submenu Items DRIVER 1/DRIVER 2
The numbers on the back of each keyless access transmitter correspond to DRIVER 1 and DRIVER 2. If you would like to recall or store driver settings for the driver that does not correspond to the number on the back of the keyless access transmitter that you are using, use the following procedure: 1. Enter the memory programming mode foryour driver settings by following the instructions listed previously under “Entering the Driver Selection Submenu.”
2. From the DRIVER SELECTION submenu,
turn the tune/select knob to highlight the driver number that you want, either DRIVER 1
or DRIVER 2.3. Set your choice by pressing in the
tune/select knob.
If you would like to recall or store driver settings for the selected driver, see “RECALL DRIVER SETTINGS” or “STORE DRIVER SETTINGS” later in this section. If you would like to recall or store exit settings for the selected driver, see “RECALL EXIT SETTINGS” or “STORE EXIT SETTINGS” later in this section.
RECALL DRIVER SETTINGS To recall driver settings, use the following procedure: 1. Enter the memory programming mode for
your driver settings by following the instructions listed previously under “Entering the Driver Selection Submenu.”
2. From the DRIVER SELECTION submenu, turn
the tune/select knob to scroll to RECALL DRIVER SETTINGS and press in the knob. If the vehicle is in PARK (P), one beep will sound and your previously saved driving position will then be recalled. If the vehicle is not in PARK (P), three beeps will sound and your previously saved driving position will not be recalled.
A memory recall can be stopped by pressing any memory seat or mirror position button. If you would like the stored driving positions to be recalled when unlocking your vehicle with the keyless access transmitter or when starting your vehicle, see “REMOTE RECALL MEMORY” or “START BUTTON RECALL” under Vehicle Personalization on page 148.
171
STORE DRIVER SETTINGS To store driver settings, use the following procedure: 1. Adjust your settings for the driver’s seat, the
outside rearview mirrors, and the steering column to a comfortable driving position. 2. Enter the memory programming mode for
your driver settings by following the instructions listed previously under “Entering the Driver Selection Submenu.”
3. From the DRIVER SELECTION submenu,
turn the tune/select knob to scroll to STORE DRIVER SETTINGS and press in the knob. Two beeps will sound to confirm that your driver settings are saved.
4. Set the HUD position, if your vehicle has this feature, the climate control temperature, fan speed and mode settings, the radio presets, tone, volume, playback mode (AM/FM, XM™, or CD), and compact disc position. Your memory settings are now programmed. Any changes that are made to the HUD, audio system, and climate controls while driving will be automatically stored when the ignition is turned off.
5. Repeat the procedure for a second driver by
programming the other driver number.
172
Entering the Driver Exit Settings Submenu To enter the memory programming mode for your exit settings, use the following procedure: 1. Be sure the ignition is either on, in Acc., or in RAP and place the transmission in PARK (P) or make sure that the vehicle speed is less than 6 mph (9 km/h).
2. Press any button on the appropriate keyless
access transmitter to identify yourself as Driver 1 or Driver 2.
3. Turn on the radio by pressing the
power/volume knob.
4. Press the CNFG radio button to enter the
main menu of the radio.
5. Turn the tune/select knob and scroll to SETUP. 6. Press the tune/select knob to enter the
SETUP menu.
7. Turn the tune/select knob and scroll to
DRIVER EXIT SETTINGS.
8. Press the tune/select knob to enter the
DRIVER EXIT SETTINGS submenu. The following items will appear: (cid:127) RECALL EXIT SETTINGS (cid:127) STORE EXIT SETTINGS
STORE EXIT SETTINGS To store exit settings, use the following procedure: 1. Adjust your settings for the driver’s seat,
the outside rearview mirrors, and the steering column to a comfortable exit position. 2. Enter the memory programming mode for your exit settings by following the instructions listed previously under “Entering the Driver Exit Settings Submenu.”
3. From the DRIVER EXIT SETTINGS submenu,
turn the tune/select knob to scroll to STORE EXIT SETTINGS and press in the knob. Two beeps will sound to confirm that your new exit settings are saved.
4. Repeat the procedure for a second driver by
programming the other driver number.
Driver Exit Settings Submenu Items RECALL EXIT SETTINGS To recall exit settings, use the following procedure: 1. Enter the memory programming mode for
your exit settings by following the instructions listed previously under “Entering the Driver Exit Settings Submenu.”
2. From the DRIVER EXIT SETTINGS submenu, turn the tune/select knob to scroll to RECALL EXIT SETTINGS and press in the knob. If the vehicle is in PARK (P), one beep will sound and your previously saved exit position will then be recalled. If the vehicle is not in PARK (P), three beeps will sound and your previously saved exit position will not be recalled. A memory recall can be stopped by pressing any memory seat or mirror position button. If you would like the stored exit positions to be recalled when your vehicle is in PARK (P), the vehicle is off, and the driver’s door is opened, see “AUTO EXIT SEAT” and “AUTO EXIT COLUMN” under Vehicle Personalization on page 148.
173
✍ NOTES
174
Section 3
Instrument Panel
Instrument Panel Overview ........................ 178
Hazard Warning Flashers .......................... 180
Other Warning Devices ............................. 180
Horn .......................................................... 180
Power Tilt Wheel and TelescopicSteering Column .................................... 181
Heated Steering Wheel ............................. 181
Turn Signal/Multifunction Lever .................. 182
Turn and Lane-Change Signals ................. 182
Headlamp High/Low-Beam Changer .......... 183
Forward Collision Alert (FCA) System .......... 184
Flash-to-Pass ............................................ 188
Windshield Wipers ..................................... 189
Rainsense™ II Wipers ............................... 190
Windshield Washer .................................... 191
Headlamp Washer ..................................... 192
Cruise Control ........................................... 193
Adaptive Cruise Control ............................. 197
Headlamps ................................................ 211
Wiper Activated Headlamps ....................... 215
Headlamps on Reminder ........................... 216
Daytime Running Lamps (DRL) ................. 216
Fog Lamps ................................................ 217
Twilight Sentinel® ...................................... 218
Exterior Lighting Battery Saver .................. 219Instrument Panel Brightness ...................... 220
Entry Lighting ............................................ 220
Parade Dimming ........................................ 220
Reading Lamps ......................................... 221
Battery Load Management ......................... 221
Electric Power Management ...................... 221
Inadvertent Power Battery Saver ............... 222
Head-Up Display (HUD) ............................ 223
Ultrasonic Rear ParkingAssist (URPA) ........................................ 226
Accessory Power Outlet(s) ........................ 228
Ashtray(s) and Cigarette Lighter ................ 229
Climate Controls ......................................... 230
Dual Climate Control System ..................... 230
Outlet Adjustment ...................................... 237
Rear Climate Control System .................... 237
Passenger Compartment Air Filter ............. 239
Warning Lights, Gages, and Indicators ..... 241
Instrument Panel Cluster ........................... 242
Speedometer and Odometer ...................... 243
Tachometer ............................................... 243
Safety Belt Reminder Light ........................ 243
Passenger Safety Belt Reminder Light ....... 244
Airbag Readiness Light ............................. 244175
Section 3
Instrument Panel
Passenger Airbag Status Indicator ............. 245
Charging System Light .............................. 247
Brake System Warning Light ..................... 248
Anti-Lock Brake System Warning Light ...... 249
Low Tire Pressure Warning Light .............. 249
Traction Control System (TCS)Warning Light
........................................ 250
Engine Coolant Temperature
Warning Light
........................................ 251
Engine Coolant Temperature Gage ............ 251
Malfunction Indicator Lamp ........................ 252
Oil Pressure Light ..................................... 255
Security Light ............................................ 256
Fog Lamp Light ......................................... 256
Lights On Reminder .................................. 256
Cruise Control Light .................................. 256
Highbeam On Light ................................... 257
Fuel Gage ................................................. 257Driver Information Center (DIC) .................. 258
DIC Controls and Displays ........................ 258
DIC Warnings and Messages .................... 264
Other Messages ........................................ 279
Audio System(s) ......................................... 280
Setting the Time ........................................ 281
Radio with CD ........................................... 282
Using an MP3 ........................................... 297
XM Radio Messages ................................. 303
Navigation/Radio System ........................... 305
Radio Personalization ................................ 305
Theft-Deterrent Feature ............................. 309
Audio Steering Wheel Controls .................. 310
Radio Reception ........................................ 312
Care of Your CDs ..................................... 313
Care of the CD Player .............................. 313
Diversity Antenna System .......................... 314
XM™ Satellite Radio Antenna System ....... 314176
✍ NOTES
177
Instrument Panel Overview
178
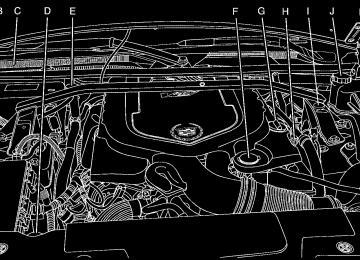
The main components of your instrument panel are the following:
A. Air Outlets. See Outlet Adjustment on
page 237.
B. Instrument Panel Brightness Control. See Instrument Panel Brightness on page 220. Driver Information Center (DIC) Buttons. See DIC Controls and Displays on page 258. HUD Controls (If Equipped). See Head-Up Display (HUD) on page 223.
C. Turn Signal/Multifunction Lever. See Turn
Signal/Multifunction Lever on page 182. Headlamp Controls. See Headlamps on page 211. Cruise Control. See Cruise Control on page 193. Adaptive Cruise Control (If Equipped). See Adaptive Cruise Control on page 197. Forward Collision Alert (FCA) (If Equipped). See Forward Collision Alert (FCA) System on page 184.
D. Instrument Panel Cluster. See Instrument
Panel Cluster on page 242.
E. Windshield Wiper/Washer Lever. See
Windshield Wipers on page 189.
G. Audio Steering Wheel Controls (If Equipped).
See Audio Steering Wheel Controls on page 310. Adaptive Cruise Control Gap Button (If Equipped). See Adaptive Cruise Control on page 197. Heated Steering Wheel Button (If Equipped). See Heated Steering Wheel on page 181.
H. Power Tilt Wheel and Telescopic Steering Column. Power Tilt Wheel and Telescopic Steering Column on page 181. I. Horn. See Horn on page 180. J. Ignition Switch. See Ignition Positions on
page 111.
K. Climate Control System. See Dual Climate
Control System on page 230.
L. Hazard Warning Flasher Button. See Hazard
Warning Flashers on page 180.
M. Cupholders. See Cupholder(s) on page 146. N. Traction Control System Button. See Traction
Control System (TCS) on page 323.
F. Navigation/Radio System. See Audio System(s)
on page 280 and Navigation/Radio System on page 305.
O. Shift Lever. See Automatic Transmission
Operation on page 116.
P. Glove Box. See Glove Box on page 146.
179
Hazard Warning Flashers Your hazard warning flashers let you warn others. They also let police know you have a problem. Your front and rear turn signal lamps will flash on and off.
Press the button to make the front and rear turn signal lamps flash on and off. Press the button again to turn the flashers off. When the hazard warning flashers are on, your turn signals will not work.
The hazard warning flasher button is located on the console, near the shift lever. See Instrument Panel Overview on page 178.
Your hazard warning flashers work no matter what position your key is in, and even if the key is not in.
Other Warning Devices If you carry reflective triangles, you can set them up at the side of the road about 300 feet (100 m) behind your vehicle.
Horn Press near or on the horn symbols on your steering wheel pad to sound the horn.
180
Power Tilt Wheel and Telescopic Steering Column
Heated Steering Wheel Your vehicle may have a heated steering wheel.
The power tilt and telescope wheel control is located on the outboard side of the steering column.
The button for this feature is located on the steering wheel.
To operate the power tilt feature, move the control up or down to tilt the steering wheel up or down. To set the memory position, see Vehicle Personalization on page 148 and Memory Seat, Mirrors and Steering Wheel on page 169. To operate the power telescope feature, move the control forward or rearward and the steering wheel moves toward the front or rear of the vehicle.
Press the bottom of the button to turn the heated steering wheel on or off. A light on the button will display while the feature is on. The steering wheel will take about three minutes to reach its maximum temperature.
181
(cid:127) I Cruise Control. See Cruise Control on
page 193.
(cid:127) Adaptive Cruise Control (If Equipped). See
Adaptive Cruise Control on page 197.
(cid:127) Forward Collision Alert (FCA) (If Equipped). See Forward Collision Alert (FCA) System on page 184.
Turn and Lane-Change Signals To signal a turn, move the lever all the way up or down. The lever returns automatically when the turn is complete.
An arrow on the instrument panel cluster flashes in the direction of the turn or lane change.
Turn Signal/Multifunction Lever
The lever on the left side of the steering column includes the following: (cid:127) G Turn and Lane-Change Signals. See
Turn and Lane-Change Signals on page 182. (cid:127) O Headlamps. See Headlamps on page 211. (cid:127) 3 Headlamp High/Low-Beam Changer. See Headlamp High/Low-Beam Changer on page 183.
(cid:127) Flash-To-Pass Feature. See Flash-to-Pass on
page 188.
(cid:127) - Fog Lamps. See Fog Lamps on page 217.
182
Raise or lower the lever until the arrow starts to flash to signal a lane change. Hold it there until the lane change is complete. The lever returns to its original position when it is released. Rapid flashing of arrows when signaling for a turn or lane change may be caused by a burned-out signal bulb. Other driver’s will not see the signal. Replace burned-out bulbs to help avoid possible accidents. Check the fuse and for burned-out bulbs if the arrow fails to work when signaling a turn. See Fuses and Circuit Breakers on page 487 for more information. Turn Signal On Chime If the turn signal is left on for about 1 mile (1.6 km), a warning chime will sound and the TURN SIGNAL ON message will appear on the Driver Information Center (DIC) display. See “Turn Signal On” under DIC Warnings and Messages on page 264 for more information.
Headlamp High/Low-Beam Changer Push forward on the turn signal/multifunction lever to change the headlamps from low to high beam. Pull the lever back and then release it to change from high to low beam. If you turn the vehicle off with the high beams on, the next time you start your vehicle the low beams will be on. To re-activate high beams, pull lever toward you and then push it forward again.
This light on the instrument panel cluster will be on, indicating high-beam usage.
183
Forward Collision Alert (FCA) System If your vehicle has this feature, be sure to read this entire section before using it. The system operates on a radio frequency subject to Federal Communications Commission (FCC) Rules and with Industry Canada. This device complies with Part 15 of the FCC Rules. Operation is subject to the following two conditions: 1. This device may not cause interference, and 2. This device must accept any interference received, including interference that may cause undesired operation of the device.
This device complies with RSS-210 of Industry Canada. Operation is subject to the following two conditions: 1. This device may not cause interference, and 2. This device must accept any interference received, including interference that may cause undesired operation of the device.
Changes or modifications to this system by other than an authorized service facility could void authorization to use this equipment. The Forward Collision Alert (FCA) system provides an audible and visual warning if you approach a vehicle too rapidly. FCA also provides a visual warning with no audible warning if you are following another vehicle much too closely. FCA uses the Adaptive Cruise Control radar to detect a vehicle directly ahead, in your path, within a distance of 328 ft (100 m) and operates at speeds above 20 mph (32 km/h).
184
{CAUTION:
FCA is only a warning system and does not apply the brakes. When you are approaching a vehicle or object too rapidly or when you are following a vehicle too closely that is ahead of you, FCA may not provide you with enough time to avoid a collision. FCA is not designed to warn the driver of pedestrians or animals. Your complete attention is always required while driving and you should be ready to take action and apply the brakes. For more information, see Defensive Driving on page 316.
The Forward Collision Alert (FCA) controls are located on the end of the multifunction lever.
9(Off): This position turns the system off. R(On): This position turns the system on. To enable FCA, move the Adaptive Cruise Control switch to on. To disable FCA, move the switch to off.
185
{CAUTION:
When FCA is enabled, the Adaptive Cruise Control switch is on. If you press another Adaptive Cruise Control button, you might go into cruise when you do not want to. You could be startled and even lose control. Be careful not to press adaptive cruise buttons unless you want to use cruise control.
Make sure the Head-Up Display is on and properly adjusted. If the HUD is not on, FCA will not be enabled and you will not be provided with FCA audible and visual warnings. See Head-Up Display (HUD) on page 223 for more information.
{CAUTION:
(cid:127) On winding roads, FCA may not detect a vehicle ahead. You could crash into a vehicle ahead of you. Do not rely on FCA on winding roads.
(cid:127) When weather limits visibility, such as in fog, rain, or snow, FCA performance is limited. There may not be enough warning distance to the vehicle in front of you. Do not rely on FCA in low visibility conditions.
186
Warning the Driver
The alert symbol will flash on the HUD and a warning beep will sound when driver action may be required.
The driver warning is active when: (cid:127) You are approaching a vehicle too quickly. (cid:127) You are following a vehicle ahead much
too closely.
See Defensive Driving on page 316 for more information. Detecting the Vehicle Ahead The vehicle ahead symbol will only appear on the HUD when a vehicle ahead of you is detected in your path. If this symbol does not appear, or disappears briefly, FCA will not respond to vehicles you may see ahead. The symbol may disappear on curves, highway exit ramps, or hills. Also, when another vehicle enters the same lane as you, the FCA system will not detect the vehicle until it is completely in your driving lane.
{CAUTION:
When the Adaptive Cruise Control radar is blocked by snow, ice, or dirt, it may not detect a vehicle ahead. FCA may not help you avoid a collision under these conditions. Do not use FCA when the radar is blocked by snow, ice, or dirt. Keep your radar clean. See “Cleaning the System” under Adaptive Cruise Control on page 197.
{CAUTION:
FCA may not detect and warn soon enough to stationary or slow-moving vehicles or other objects ahead of you. You could crash into an object ahead of you. Do not rely on FCA when approaching stationary or slow-moving vehicles or other objects.
187
Flash-to-Pass This feature allows you to use the high-beam headlamps to signal the driver in front of you that you want to pass. Pull and hold the turn signal/multifunction lever toward you to use this feature. When you do this, the following will occur: (cid:127)
If the headlamps are off, in low-beam or in Daytime Running Lamps (DRL) mode, the high-beam headlamps will turn on. They will stay on as long as you hold the lever there. Release the lever to turn them off. If the headlamps are in high-beam mode, they will switch to low beam. To return to high-beam, push the lever away from you.
(cid:127)
Unnecessary Warnings FCA may occasionally provide an unnecessary warning to guard rails, signs, and other stationary objects. This is normal operation, your vehicle does not need service. Other Messages There are three messages that may appear on the Driver Information Center (DIC). They are CLEAN RADAR, RADAR CRUISE NOT READY and SERVICE RADAR CRUISE. See DIC Warnings and Messages on page 264. Cleaning the System The radar can become blocked by snow, ice, or dirt. If so, you may need to turn off the engine and clean the lens. See “Cleaning the System” under Adaptive Cruise Control on page 197.
188
Windshield Wipers
The lever on the right side of the steering column operates the windshield wipers. 7(Mist): Pull the lever down and release it for a single wiping cycle. The lever will return to its original position. For more cycles, hold the lever down before releasing it. 9(Off): Put the lever in this position to turn off the wipers. &(Delay): Put the lever in this position to set a delay between wipes. Turn the delay adjustment band to set the length of the delay.
x(Delay Adjustment): Use this band to set the length of the delay between wipes when using the delay feature. The closer you move the band toward mist, the longer the delay. The windshield wiper lever must be in delay for this feature to work. 6 (Low Speed): Put the lever in this position for slow, steady wiping cycles. 1 (High Speed): Put the lever in this position for rapid wiping cycles. If the windshield wipers are in use for about six seconds while you are driving, the exterior lamps will come on automatically if the exterior lamp control is in AUTO. See Wiper Activated Headlamps on page 215 for more information. Be sure to clear ice and snow from the wiper blades before using them. If they’re frozen to the windshield, gently loosen or thaw them. If the blades do become damaged, install new blades. For more information, see Windshield Wiper Blade Replacement on page 419.
189
Heavy snow or ice can overload the wiper motor. A circuit breaker will stop the motor until it cools down. Clear away snow or ice to prevent an overload. Your vehicle (STS-V only) is equipped with a feature that disables the wiper system when the hood is open and your vehicle is stopped. Opening the hood will automatically park the wipers if they are not parked. This prevents the wipers from interfering with hood operation. Be sure the hood is not opened when you require the vehicle’s wipers out of the park position, such as when changing the wiper blades.
Rainsense™ II Wipers If your vehicle has this feature, the moisture sensor is mounted on the interior side of the windshield behind the rearview mirror. It is used to automatically operate the wipers by monitoring the amount of moisture build-up on the windshield. Wipes occur as needed to clear the windshield depending on driving conditions and the sensitivity setting. In light rain or snow, fewer wipes will occur. In heavy rain or snow, wipes will occur more frequently. The Rainsense™ wipers operate in a
delay mode as well as a continuous low or high speed as needed. If the system is left on for long periods of time, occasional wipes may occur without any moisture on the windshield. This is normal and indicates that the Rainsense™ system is activated. To activate the Rainsense™ system, turn the wiper band to delay mode and select one of the four sensitivity levels indicated on the wiper stalk. The position closest to off is the lowest sensitivity setting, level one. This allows more rain or snow to collect on the windshield between wipes. Turning the wiper band away from you to higher sensitivity levels increases the sensitivity of the system and frequency of wipes. The highest sensitivity setting,