- 2008 Cadillac DTS Owners Manuals
- Cadillac DTS Owners Manuals
- 2009 Cadillac DTS Owners Manuals
- Cadillac DTS Owners Manuals
- 2007 Cadillac DTS Owners Manuals
- Cadillac DTS Owners Manuals
- 2006 Cadillac DTS Owners Manuals
- Cadillac DTS Owners Manuals
- 2010 Cadillac DTS Owners Manuals
- Cadillac DTS Owners Manuals
- 2011 Cadillac DTS Owners Manuals
- Cadillac DTS Owners Manuals
- Download PDF Manual
-
information.
Following break‐in, engine speed and load can be gradually increased.
3-21
Cadillac DTS Owner Manual - 2011
Black plate (22,1)
Ignition Positions The ignition switch has four different positions:
In order to shift out of P (Park), ignition must be in the ON/RUN or ACC/ACCESSORY and the brake pedal must be applied. Notice: Using a tool to force the key to turn in the ignition could cause damage to the switch or break the key. Use the correct key, make sure it is all the way in, and turn it only with your hand. If the key cannot be turned by hand, see your dealer.
3-22
A (STOPPING THE ENGINE/LOCK/OFF): When the vehicle is stopped, turn the ignition switch to LOCK/OFF to turn the engine off. Retained Accessory Power (RAP) will remain active. See Retained Accessory Power (RAP) on page 3‑23. This is the only position in which the ignition key can be inserted or removed. This position locks the ignition and transmission and steering column. Do not turn the engine off when the vehicle is moving. This will cause a loss of power assist in the brake and steering systems and disable the airbags. In an emergency:
1. Brake using a firm and steady pressure. Do not pump the brakes repeatedly. This may deplete power assist, requiring increased brake pedal force.
2. Shift the vehicle to neutral. This can be done while
the vehicle is moving. After shifting to neutral, firmly apply the brakes and steer the vehicle to a safe location.
3. Come to a complete stop, shift to P (Park), and
turn the ignition to LOCK/OFF. On vehicles with an automatic transmission, the shift lever must be in P (Park) to turn the ignition switch to the LOCK/ OFF position.
4. Set the parking brake. See Parking Brake on
page 3‑28 .
Cadillac DTS Owner Manual - 2011
Black plate (23,1)
The steering can bind with the wheels turned off center. If this happens, move the steering wheel from right to left while turning the key to ACC/ACCESSORY. If this doesn't work, the vehicle needs service. B (ACC/ACCESSORY): This position lets the radio and windshield wipers operate while the engine is off. To use ACC/ACCESSORY, turn the key clockwise. C (ON/RUN): This position is where the key returns to after the vehicle is started. This position displays some of the warning and indicator lights. The battery could be drained if you leave the key in the ACC/ACCESSORY or ON/RUN position with the engine off. You may not be able to start the vehicle if the battery is allowed to drain for an extended period of time. D (START): This position starts the engine. A warning chime will sound and the Driver Information Center (DIC) will display DRIVER DOOR OPEN when the driver door is opened if the ignition is in LOCK/OFF, ACC/ACCESSORY and the key is in the ignition. See DIC Warnings and Messages on page 4‑62 for more information.
Retained Accessory Power (RAP) These vehicle accessories can be used for up to 10 minutes after the ignition key is turned off:
. Audio System . Audio Steering Wheel Controls . Power Windows . Sunroof (if equipped)
Power to these accessories will work up to 10 minutes or until the driver's door is opened. For an additional 10 minutes of power, close all the doors and turn the key to ON/RUN and then back to LOCK/OFF. Starting the Engine Move the shift lever to P (Park) or N (Neutral). The engine will not start in any other position. To restart the engine when the vehicle is already moving, use N (Neutral) only. Notice: Do not try to shift to P (Park) if the vehicle is moving. If you do, you could damage the transmission. Shift to P (Park) only when the vehicle is stopped.
3-23
Cadillac DTS Owner Manual - 2011
Black plate (24,1)
If the engine does not start after 5‐10 seconds, especially in very cold weather (below 0°F or −18°C), it could be flooded with too much gasoline. Try pushing the accelerator pedal all the way to the floor and holding it there as you hold the key in START for up to a maximum of 15 seconds. Wait at least 15 seconds between each try, to allow the cranking motor to cool down. When the engine starts, let go of the key and accelerator. If the vehicle starts briefly but then stops again, repeat these steps. This clears the extra gasoline from the engine. Do not race the engine immediately after starting it. Operate the engine and transmission gently until the oil warms up and lubricates all moving parts.
Notice: The engine is designed to work with the electronics in the vehicle. If you add electrical parts or accessories, you could change the way the engine operates. Before adding electrical equipment, check with your dealer. If you do not, the engine might not perform properly. Any resulting damage would not be covered by the vehicle warranty.
Starting Procedure
2.
1. With your foot off the accelerator pedal, turn the
ignition to START. When the engine starts, let go of the key. The idle speed will slow down as the engine warms. Do not race the engine immediately after starting it. Operate the engine and transmission gently to allow the oil to warm up and lubricate all moving parts. The vehicle has a Computer-Controlled Cranking System. This feature assists in starting the engine and protects components. If the ignition key is turned to the START position, and then released when the engine begins cranking, the engine will continue cranking for a few seconds or until the vehicle starts. If the engine does not start and the key is held in START, cranking will be stopped after 15 seconds to prevent cranking motor damage. To prevent gear damage, this system also prevents cranking if the engine is already running. Engine cranking can be stopped by turning the ignition switch to the ACC/ACCESSORY or LOCK/ OFF position.
Notice: Cranking the engine for long periods of time, by returning the key to the START position immediately after cranking has ended, can overheat and damage the cranking motor, and drain the battery. Wait at least 15 seconds between each try, to let the cranking motor cool down.
3-24
Cadillac DTS Owner Manual - 2011
Black plate (25,1)
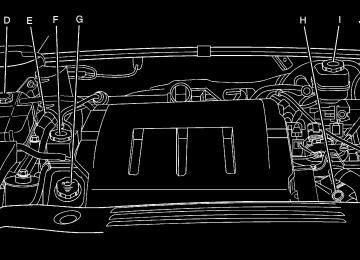
Engine Coolant Heater The engine coolant heater can provide easier starting and better fuel economy during engine warm‐up in cold weather conditions at or below 0°F (−18°C). Vehicles with an engine coolant heater should be plugged in at least four hours before starting. To Use the Engine Coolant Heater 1. Turn off the engine. 2. Open the hood and unwrap the electrical cord.
The electrical cord is located on the driver side of the engine, behind the transmission dipstick/fluid fill location and next to the engine.
3. Plug it into a normal, grounded 110-volt AC outlet.
{ WARNING:
Plugging the cord into an ungrounded outlet could cause an electrical shock. Also, the wrong kind of extension cord could overheat and cause a fire. You could be seriously injured. Plug the cord into a properly grounded three-prong 110-volt AC outlet. If the cord will not reach, use a heavy-duty three-prong extension cord rated for at least 15 amps.
4. Before starting the engine, be sure to unplug and
store the cord as it was before to keep it away from moving engine parts and prevent damage.
The length of time the heater should remain plugged in depends on several factors. Ask a dealer in the area where you will be parking the vehicle for the best advice on this.
3-25
Cadillac DTS Owner Manual - 2011
Black plate (26,1)
Automatic Transmission Operation The automatic transmission may have a shift lever located either on the steering column or on the console between the seats.
There are several different positions for the shift lever. P (Park): This position locks the front wheels. It is the best position to use when you start the engine because the vehicle cannot move easily.
3-26
{ WARNING:
It is dangerous to get out of the vehicle if the shift lever is not fully in P (Park) with the parking brake firmly set. The vehicle can roll. Do not leave the vehicle when the engine is running unless you have to. If you have left the engine running, the vehicle can move suddenly. You or others could be injured. To be sure the vehicle will not move, even when you are on fairly level ground, always set the parking brake and move the shift lever to P (Park). See Shifting Into Park on page 3‑29 . If you are pulling a trailer, see Towing a Trailer on page 5‑26.
Make sure the shift lever is fully in P (Park) before starting the engine. The vehicle has an automatic transmission shift lock control system. You have to fully apply the regular brakes before you can shift from P (Park) while the ignition key is in ON/RUN. If you cannot shift out of P (Park), ease pressure on the shift lever. Push the shift lever all the way into P (Park) as you maintain brake application. Then move the shift lever into another gear. See Shifting Out of Park on page 3‑31 .
Cadillac DTS Owner Manual - 2011
Black plate (27,1)
R (Reverse): Use this gear to back up. Notice: Shifting to R (Reverse) while the vehicle is moving forward could damage the transmission. The repairs would not be covered by the vehicle warranty. Shift to R (Reverse) only after the vehicle is stopped. Also use this gear to rock the vehicle back and forth to get out of snow, ice or sand without damaging the transmission. See If Your Vehicle is Stuck in Sand, Mud, Ice, or Snow on page 5‑17 for additional information. N (Neutral): In this position, the engine does not connect with the wheels. To restart when you are already moving, use N (Neutral) only. Also, use N (Neutral) when the vehicle is being towed.
{ WARNING:
Shifting into a drive gear while the engine is running at high speed is dangerous. Unless your foot is firmly on the brake pedal, the vehicle could move very rapidly. You could lose control and hit people or objects. Do not shift into a drive gear while the engine is running at high speed.
Notice: Shifting out of P (Park) or N (Neutral) with the engine running at high speed may damage the transmission. The repairs would not be covered by the vehicle warranty. Be sure the engine is not running at high speed when shifting the vehicle. D (Drive): This position is for normal driving. It provides the best fuel economy for the vehicle. If you need more power for passing, and you are:
. Going less than 35 mph (55 km/h), push the
accelerator pedal about halfway down.
. Going about 35 mph (55 km/h) or more, push the
accelerator all the way down. The transmission will shift down to the next gear and have more power.
Downshifting the transmission in slippery road conditions could result in skidding, see Skidding under Loss of Control on page 5‑10. Notice: Driving the vehicle if you notice that it is moving slowly or not shifting gears as you increase speed may damage the transmission. Have the vehicle serviced right away. You can drive in 2 (Second) when you are driving less than 35 mph (55 km/h) and D (Drive) for higher speeds until then. D (Drive) can be used for towing. You may want to shift the transmission to 3 (Third) or, if necessary, to a lower gear if the transmission shifts too often under heavy loads and/or hilly conditions.
3-27
Cadillac DTS Owner Manual - 2011
Black plate (28,1)
See Towing a Trailer on page 5‑26 for more information. 3 (Third): This position is also used for normal driving. However, it reduces vehicle speed more than D (Drive) without using the brakes. You might choose 3 (Third) instead of D (Drive) when driving on hilly, winding roads, when towing a trailer, so there is less shifting between gears and when going down a steep hill. 2 (Second): This position reduces vehicle speed more than 3 (Third) without using the brakes. You can use 2 (Second) on hills. It can help control vehicle speed as you go down steep mountain roads, but then you would also want to use the brakes off and on. Notice: Do not shift into 2 (Second) unless you are going slower than 65 mph (105 km/h), or you can damage the engine and/or transmission. 1 (First): This position reduces vehicle speed even more than 2 (Second) without using the brakes. You can use it on very steep hills, or in deep snow or mud. If the shift lever is put in 1 (First) while the vehicle is moving forward, the transmission will not shift into first gear until the vehicle is going slowly enough. Notice: Spinning the tires or holding the vehicle in one place on a hill using only the accelerator pedal may damage the transmission. The repair will not be covered by the vehicle warranty. If you are stuck, do not spin the tires. When stopping on a hill, use the brakes to hold the vehicle in place.
3-28
Performance Shifting If the vehicle has this feature, it can detect a change in driving patterns. If you make an aggressive driving maneuver, the vehicle's transmission automatically shifts to the lowest possible gear to maximize vehicle performance. The vehicle will automatically return to normal operation when you return to normal driving patterns. Parking Brake
The parking brake pedal is located to the left of the regular brake pedal, near the driver door.
To set the parking brake, hold the regular brake pedal down, then push the parking brake pedal down. If the ignition is on, the brake system warning light on the instrument panel cluster should come on. If it does not, you need to have the vehicle serviced.
Cadillac DTS Owner Manual - 2011
Black plate (29,1)
A warning chime will sound if the parking brake is set, the ignition is on, and the vehicle speed is greater than 5 mph (8 km/h). The brake light will come on and stay on until the parking brake is released. See Brake System Warning Light on page 4‑48 for more information. To release the parking brake, hold the regular brake pedal down, then push the parking brake pedal down. When you lift your foot off the parking brake pedal, the pedal will follow your foot to the released position. Notice: Driving with the parking brake on can overheat the brake system and cause premature wear or damage to brake system parts. Make sure that the parking brake is fully released and the brake warning light is off before driving. If you are towing a trailer and are parking on any hill, see Towing a Trailer on page 5‑26. Shifting Into Park
{ WARNING:
It can be dangerous to get out of the vehicle if the shift lever is not fully in P (Park) with the parking brake firmly set. The vehicle can roll. If you have
(Continued)
WARNING: (Continued)
left the engine running, the vehicle can move suddenly. You or others could be injured. To be sure the vehicle will not move, even when you are on fairly level ground, use the steps that follow. If you are pulling a trailer, see Towing a Trailer on page 5‑26 .
Steering Column Shift Lever If the vehicle has a steering column shift lever, use this procedure to shift the vehicle into P (Park):
1. Hold the brake pedal down. 2. Move the shift lever into P (Park) by pulling the
shift lever toward you and moving it up as far as it will go.
3. With your foot still holding the brake pedal down,
set the parking brake. See Parking Brake on page 3‑28 for more information.
4. Turn the ignition key to LOCK/OFF. 5. Remove the key and take it with you. If you can
leave the vehicle with the ignition key in your hand, the vehicle is in P (Park).
3-29
Cadillac DTS Owner Manual - 2011
Black plate (30,1)
Console Shift Lever If the vehicle is equipped with a console shift lever, use this procedure to shift the vehicle into P (Park):
1. Hold the brake pedal down. 2. Move the shift lever into P (Park) by pushing the
lever all the way toward the front of the vehicle and then to the left.
3. While keeping the brake pedal applied, set the
parking brake. See Parking Brake on page 3‑28
for more information.4. Turn the ignition key to LOCK/OFF. 5. Remove the key and take it with you. If you can
leave the vehicle with the ignition key in your hand, the vehicle is in P (Park).
Leaving the Vehicle With the Engine Running
{ WARNING:
It can be dangerous to leave the vehicle with the engine running. The vehicle could move suddenly if the shift lever is not fully in P (Park) with the parking brake firmly set. And, if you leave the
(Continued)
3-30
WARNING: (Continued)
vehicle with the engine running, it could overheat and even catch fire. You or others could be injured. Do not leave the vehicle with the engine running.
If you have to leave the vehicle with the engine running, be sure your vehicle is in P (Park) and the parking brake is firmly set before you leave it. See Parking Brake on page 3‑28 for more information. Torque Lock Torque lock is when the weight of the vehicle puts too much force on the parking pawl in the transmission. This happens when parking on a hill and shifting the transmission into P (Park) is not done properly and then it is difficult to shift out of P (Park). To prevent torque lock, set the parking brake and then shift into P (Park). To find out how, see “Shifting Into Park” in this section. If torque lock does occur, your vehicle may need to be pushed uphill by another vehicle to relieve the parking pawl pressure, so you can shift out of P (Park).
Cadillac DTS Owner Manual - 2011
Black plate (31,1)
Shifting Out of Park Automatic Transmission Shift Lock This vehicle has an electronic shift lock release system. The shift lock release is designed to:
. Prevent ignition key removal unless the shift lever
is in P (Park)
. Prevent movement of the shift lever out of P (Park),
unless the ignition is in ON/RUN or ACC/ ACCESSORY and the regular brake pedal is applied.
The shift lock is always functional except in the case of a an uncharged or low voltage (less than 9 volt) battery. If the vehicle has an uncharged battery or a battery with low voltage, try charging or jump starting the battery. See Jump Starting on page 6‑38. Console Shift If the console shift cannot be moved out of P (Park)
1. Apply the regular brakes. 2. Turn the ignition to ON/RUN or ACC/ACCESSORY
position. See Ignition Positions on page 3‑22 for more information.
3. Push the shift lever all the way into P (Park). 4. Then, shift into the desired gear.
If you still cannot move the shift lever from P (Park), consult your dealer or a professional towing service. Column Shift If the column shift cannot be moved out of P (Park)
1. Apply the regular brakes. 2. Turn the ignition key to the ON/RUN or ACC/
ACCESSORY position. See Ignition Positions on page 3‑22 for more information.
3. Shift out of the P (Park) position to the N (Neutral)
position.
4. Move the column shift to the desired gear.
If you still cannot move the shift lever from P (Park), consult your dealer or a professional towing service. Parking Over Things That Burn
{ WARNING:
Things that can burn could touch hot exhaust parts under the vehicle and ignite. Do not park over papers, leaves, dry grass, or other things that can burn.
3-31
Cadillac DTS Owner Manual - 2011
Black plate (32,1)
Engine Exhaust
{ WARNING:
Engine exhaust contains carbon monoxide (CO) which cannot be seen or smelled. Exposure to CO can cause unconsciousness and even death. Exhaust may enter the vehicle if:
The vehicle idles in areas with poor ventilation (parking garages, tunnels, deep snow that may block underbody airflow or tail pipes). The exhaust smells or sounds strange or different. The exhaust system leaks due to corrosion or damage. The vehicle exhaust system has been modified, damaged or improperly repaired. There are holes or openings in the vehicle body from damage or after market modifications that are not completely sealed.
(Continued)
3-32
WARNING: (Continued)
If unusual fumes are detected or if it is suspected that exhaust is coming into the vehicle: . Drive it only with the windows
completely down.
. Have the vehicle repaired immediately. Never park the vehicle with the engine running in an enclosed area such as a garage or a building that has no fresh air ventilation.
Running the Vehicle While Parked It is better not to park with the engine running. But if you ever have to, here are some things to know.
{ WARNING:
Idling a vehicle in an enclosed area with poor ventilation is dangerous. Engine exhaust may enter the vehicle. Engine exhaust contains Carbon Monoxide (CO) which cannot be seen or smelled. It can cause unconsciousness and even (Continued)
Cadillac DTS Owner Manual - 2011
Black plate (33,1)
WARNING: (Continued)
death. Never run the engine in an enclosed area that has no fresh air ventilation. For more information, see Engine Exhaust on page 3‑32.
{ WARNING:
It can be dangerous to get out of the vehicle if the automatic transmission shift lever is not fully in P (Park) with the parking brake firmly set. The vehicle can roll. Do not leave the vehicle when the engine is running unless you have to. If you have left the engine running, the vehicle can move suddenly. You or others could be injured. To be sure the vehicle will not move, even when you are on fairly level ground, always set the parking brake after you move the shift lever to P (Park).
Follow the proper steps to be sure the vehicle will not move. See Shifting Into Park on page 3‑29. If parking on a hill and pulling a trailer, see Towing a Trailer on page 5‑26.
Mirrors
Automatic Dimming Rearview Mirror The vehicle has an automatic dimming inside rearview mirror with a compass display. Automatic dimming reduces the glare of lights from behind the vehicle. The dimming feature comes on and the indicator light illuminates each time the vehicle is started. O (On/Off): Press and hold O for about three seconds to turn the dimming feature and compass display on or off. AUTO 3 (Vehicles with Intellibeam™): Press and hold for approximately three seconds to turn the compass display on or off. See Exterior Lamps on page 4‑23 for more information. Cleaning the Mirror Do not spray glass cleaner directly on the mirror. Use a soft towel dampened with water.
3-33
Cadillac DTS Owner Manual - 2011
Black plate (34,1)
Compass Compass Operation Press O or AUTO 3, depending on the vehicle, to turn the compass on or off. When the ignition and the compass feature are on, after a few seconds, the mirror will display the compass heading. The compass automatically calibrates as the vehicle is driven. Compass Calibration If after a few seconds, the display does not show the correct direction, (for example, N for North), there may be a strong magnetic field interfering with the compass. Interference can be caused by a magnetic antenna mount, magnetic note pad holder or a similar magnetic item. The compass can be placed in calibration mode manually by pressing and holding O or AUTO 3, depending on the vehicle, until a C is shown in the compass display. The compass can be calibrated by driving the vehicle in circles at 5 mph (8 km/h) or less until the display reads a direction.
3-34
Compass Variance The compass is set to zone eight. If you do not live in zone eight or drive out of the area, the compass variance needs to be changed to the appropriate zone. To adjust for compass variance:
1. Find the current location and variance zone
number on the following zone map.
2. Press and hold O or AUTO 3 until a zone
number displays.
Cadillac DTS Owner Manual - 2011
Black plate (35,1)
3. Once the zone number displays, press O or AUTO 3 repeatedly until the correct zone number displays. Stop pressing the button and the mirror will return to normal operation. If C appears in the compass window, the compass may need calibration. See “Compass Calibration” listed previously.
Outside Power Foldaway Mirrors
Controls for the outside power mirrors are located on the driver door armrest.
Press the selector switch (A) or (B) to choose either the left or right outside mirror. Then press the control pad to move the mirror to the desired direction.
Mirror Adjustment 1. Press (C) to unfold the mirrors out to the driving
position.
2. Press (D) to fold the mirrors toward the vehicle. Resetting the Power Foldaway Mirrors Reset the power foldaway mirrors if:
The mirrors are accidentally obstructed while folding. They are accidentally manually folded/unfolded. The mirrors do not stay in the unfolded position. The mirrors vibrate at normal driving speeds.
Fold and unfold the mirrors one time using the mirror controls to reset them to their normal position. A noise may be heard during the resetting of the power foldaway mirrors. This sound is normal after a manual folding operation. Turn Signal Indicator (If Equipped) The vehicle may have a turn signal indicator lamp that is built into the mirror. The turn signal lamp flashes with the use of the vehicle's turn signal and hazard flashers.
3-35
Cadillac DTS Owner Manual - 2011
Black plate (36,1)
Outside Convex Mirror
{ WARNING:
A convex mirror can make things, like other vehicles, look farther away than they really are. If you cut too sharply into the right lane, you could hit a vehicle on the right. Check the inside mirror or glance over your shoulder before changing lanes.
The passenger side mirror is convex shaped. A convex mirror's surface is curved so more can be seen from the driver seat. Outside Heated Mirrors = (Rear Window Defogger): Press to heat the mirrors. See “Rear Window Defogger” under Dual Climate Control System on page 4‑33 for more information.
Outside Automatic Dimming Mirror If the vehicle has this feature, the driver side mirror adjusts for the glare of headlamps behind you. This feature is controlled by the on and off settings on the automatic dimming rearview mirror. Side Blind Zone Alert (SBZA) If the vehicle has the Side Blind Zone Alert (SBZA) system, see Side Blind Zone Alert (SBZA) on page 3‑40 for more information. Park Tilt Mirrors If your vehicle is equipped with memory mirrors, it is capable of performing the park tilt mirror feature. This feature allows the driver and passenger side mirror to tilt to a factory programmed position when the vehicle is in R (Reverse). This feature may be useful in allowing you to view the curb when you are parallel parking. When the vehicle is shifted out of R (Reverse) and either a five-second delay has occurred, or the ignition is turned to LOCK/OFF, the driver and passenger side mirror will return to its original position. This feature can be enabled/disabled through the Driver Information Center (DIC). See DIC Vehicle Customization on page 4‑74 for more information.
3-36
Cadillac DTS Owner Manual - 2011
Black plate (37,1)
WARNING: (Continued)
If you do not use proper care before moving forward and while backing; vehicle damage, injury, or death could occur. Even with UFRPA, always check in front of the vehicle before moving forward and behind the vehicle before backing up. While moving forward and backing, be sure to look for objects and check the vehicle mirrors.
Object Detection Systems
Ultrasonic Front and Rear Parking Assist (UFRPA) For vehicles with the Ultrasonic Front and Rear Parking Assist (UFRPA) system, it operates at speeds less than 8 km/h (5mph), and assists the driver with parking and avoiding objects. It can determine how close objects are to the front bumper, up to 1.2 m (4 ft.) in front of the vehicle and the rear bumper, up to 2.5 m (8 ft.) behind the vehicle. The distance sensors are located on the front and rear bumper.
{ WARNING:
The Ultrasonic Front and Rear Parking Assist (UFRPA) system does not replace driver vision. It cannot detect: . Objects that are below the bumper,
underneath the vehicle, or if they are too close or far from the vehicle.
. Children, pedestrians, bicyclists, or pets.
(Continued)
Front Parking Assist
Display
Rear Parking Assist
Display
3-37
Cadillac DTS Owner Manual - 2011
Black plate (38,1)
The front display is located on top of the instrument panel to the right of the driver. The front display will have either three or six lights to provide distance and system information. With Adaptive Cruise control (ACC), it will have three lights along with the ACC lights. Without ACC, it will have six lights. High-toned beeps from the front speakers are for objects detected near the front bumper. The rear display is located near the rear window and can be seen by looking over your right shoulder. The rear display uses three color-coded lights to provide distance and system information. Low-toned beeps from the rear speakers are for the rear bumper. How the System Works UFRPA comes on automatically when the shift lever is moved out of P (Park). The system does not work at a forward or reverse speed greater than 5 mph (8 km/h). To be detected, objects must be at least 25.4 cm (10 in.) off the ground and below hood or trunk level. Objects must also be within 1.2 m (4 ft.) in front of the vehicle and 2.5 m (8 ft.) from the rear bumper. This distance may be less during warmer or humid weather. When backing up, if objects are detected at the same time near both the front and rear bumpers, both color-coded light displays will notify you of objects close to each bumper. If there are objects detected near both bumpers, the beeps will only be sounded to notify that
3-38
objects are close to the rear bumper. However, if while the vehicle is backing up and an object comes within 0.3 m (1 ft.) of the front bumper, and at the same time there is another object further than 0.3 m (1 ft.) from the rear bumper, then the beeps will only be sounded to notify you of the closer object that is near the front bumper. The system can be disabled using the Driver Information Center (DIC). See “Parking Assist” under DIC Operation and Displays on page 4‑58 for more information. Moving Forward When the vehicle is started, the front display will briefly illuminate to let you know the system is working. The following describes what will occur with the front display as you get closer to a object detected in the front of the vehicle:
Description
Metric
English
amber/amber lights
ACC — one amber light
four amber lights
ACC — two amber lights four amber/ two red lights ACC — two amber lights/
one red light
1.2 m
1.0 m
0.6 m
4 ft
40 in
23 in
Cadillac DTS Owner Manual - 2011
Black plate (39,1)
Description
Metric
English
four amber/ two red lights
flashing and beep for
five seconds
ACC — two amber lights/ one red light flashing and
beep for five seconds
0.3 m
1 ft
Backing Ultrasonic Rear Parking Assist (URPA) comes on automatically when the shift lever is moved into R (Reverse). The rear display will then briefly illuminate to let you know the system is working. The following describes what will occur with the rear display as you get closer to an object detected in the rear of your vehicle:
Description amber light
amber/amber lights
amber/amber/red lights and
continuous beeping for
five seconds
amber/amber/red lights flashing and continuous beeping for five seconds
Metric 2.5 m 1.0 m
0.6 m
English
8 ft. 40 in.
23 in.
0.3 m
1 ft.
The system can be disabled through the Driver Information Center (DIC). See “Parking Assist” under DIC Operation and Displays on page 4‑58 for more information. When the System Does Not Seem to Work Properly If the URPA system will not activate due to a temporary condition, the message PARK ASSIST OFF will be displayed on the DIC and a red light will be shown on the rear URPA display when the shift lever is moved into R (Reverse). This occurs under the following conditions:
The driver disables the system. The ultrasonic sensors are not clean. Keep the vehicle's rear bumper free of mud, dirt, snow, ice and slush. For cleaning instructions, see Washing Your Vehicle on page 6‑98.
. A trailer was attached to the vehicle, or a bicycle or
an object was hanging out of the trunk during the last drive cycle, the red light may illuminate in the rear display. Once the attached object is removed, URPA will return to normal operation.
. A tow bar is attached to the vehicle.
3-39
Cadillac DTS Owner Manual - 2011
Black plate (40,1)
When the system detects a vehicle in the side blind zone, amber SBZA displays will light up in the side mirrors. This indicates that it may be unsafe to change lanes. Before making a lane change, always check the SBZA display, check the outside and rearview mirrors, look over your shoulder for vehicles and hazards, and use the turn signal.
The vehicle's bumper is damaged. Take the vehicle to your dealer to repair the system.
. Other conditions may affect system performance,
such as vibrations from a jackhammer or the compression of air brakes on a very large truck.
If the system is still disabled after driving forward at least 25 km/h (15 mph), take the vehicle to your dealer. Side Blind Zone Alert (SBZA) The vehicle may have a Side Blind Zone Alert (SBZA) system. Read this entire section before using the system.
{ WARNING:
SBZA is only a lane changing aid and does not replace driver vision. SBZA does not detect: . Vehicles outside the side blind zones which
may be rapidly approaching.
. Pedestrians, bicyclists, or animals. Failure to use proper care when changing lanes may result in damage to the vehicle, injury, or death. Always check the outside and rearview mirrors, glance over your shoulder, and use the turn signal before changing lanes.
3-40
Cadillac DTS Owner Manual - 2011
Black plate (41,1)
SBZA Detection Zones The SBZA sensor covers a zone of approximately one lane over from both sides of the vehicle, 3.5 m (11 ft). This zone starts at each side mirror and goes back approximately 5 m (16 ft). The height of the zone is approximately between 0.5 m (1.5 ft) and 2.0 m (6 ft) off the ground. The SBZA detection zones do not change if the vehicle is towing a trailer. So be extra careful when changing lanes while towing a trailer. How the System Works
Left Side Mirror Display Right Side Mirror Display
When the vehicle is started, both outside mirror displays will briefly come on to indicate that the system is operating. While driving forward, the left or right side mirror SBZA display will light up if a vehicle is detected in that blind zone. If you activate a turn signal and a
vehicle has been detected on the same side, the SBZA display will flash to give you extra warning not to change lanes. SBZA displays do not come on while the vehicle is approaching or passing other vehicles. At speeds greater then 20 mph (32 km/h), SBZA displays may come on when a vehicle you have passed remains in or drops back into the detection zone. SBZA can be disabled through the Driver Information Center (DIC). See Driver Information Center (DIC) on page 4‑57 for more information. If the SBZA is disabled by the driver, the SBZA mirror displays will not light up during normal driving. When the System Does Not Seem To Work Properly Occasional missed alerts can occur under normal circumstances and will increase in wet conditions. The system does not need to be serviced due to an occasional missed alert. The number of missed alerts will increase with increased rainfall or road spray. If the SBZA displays do not light up when the system is on and vehicles are in the blind zone, the system may need service. Take the vehicle to your dealer.
3-41
Cadillac DTS Owner Manual - 2011
Black plate (42,1)
SBZA is designed to ignore stationary objects; however, the system may occasionally light up due to guard rails, signs, trees, shrubs, and other stationary objects. This is normal system operation, the vehicle does not need service. SBZA does not operate when the left or right corners of the rear bumper are covered with mud, dirt, snow, ice, slush, or in heavy rainstorms. For cleaning instructions, see Washing Your Vehicle on page 6‑98 . If the DIC still displays the SIDE BLIND ZONE SYSTEM UNAVAILABLE message after cleaning the bumper, see your dealer. The SBZA displays may remain on if a trailer is attached to the vehicle, or a bicycle or object is extending out to either side of the vehicle. When SBZA is disabled for any reason other than the driver turning it off, the driver will not be able to turn SBZA back on using the DIC. The SIDE BLIND ZONE ALERT ON option will not be selectable if the conditions for normal system operation are not met. Until normal operating conditions for SBZA are met, you should not rely upon SBZA while driving. SBZA Error Messages The following messages may appear in the DIC: SIDE BLIND ZONE ALERT SYSTEM OFF: This message indicates that the driver has turned the system off.
3-42
SIDE BLIND ZONE SYSTEM UNAVAILABLE: This message indicates that the SBZA system is disabled because the sensor is blocked and cannot detect vehicles in the blind zone. The sensor may be blocked by mud, dirt, snow, ice, slush, or even heavy rainstorms. This message may also activate during heavy rain or due to road spray. The vehicle does not need service. For cleaning, see Washing Your Vehicle on page 6‑98 . SERVICE SIDE BLIND ZONE ALERT SYSTEM: If this message appears, both SBZA displays will remain on indicating there is a problem with the SBZA system. If these displays remain on after continued driving, the system needs service. Take the vehicle to your dealer. FCC Information See Radio Frequency Statement on page 8‑17 for information regarding Part 15 of the Federal Communications Commission (FCC) rules and Industry Canada Standards RSS-210/220/310. Frequency of operation: 24.05GHz – 24.25GHz Field Strength: Not greater than 2.5V/m peak (0.25V/m average) at a distance of 3 m. The manufacturer is not responsible for any radio or TV interference caused by unauthorized modifications to this equipment. Such modifications could void the user's authority to operate the equipment.
Cadillac DTS Owner Manual - 2011
Black plate (43,1)
Lane Departure Warning (LDW) The vehicle may have a Lane Departure Warning (LDW) system. Read this entire section before using the system.
{ WARNING:
The Lane Departure Warning (LDW) system does not steer the vehicle and is only an aid to help you stay in your driving lane. The LDW system may not: . Provide you with enough time to avoid a lane
change collision.
. Be loud enough for you to hear the warning
beeps.
. Work properly under bad weather conditions
or if the windshield is not kept clean.
. Detect lane markings and will not detect road
edges.
. Warn you that your vehicle is crossing a lane
marking if the system does not detect the lane marking.
(Continued)
WARNING: (Continued)
LDW will indicate the system is working whenever it detects either the left or right lane marking. So if you depart on the side of the lane that LDW is not detecting, LDW will not warn you. If you do not carefully maintain your vehicle position within the lane, vehicle damage, injury, or death could occur. Even with LDW, always keep your attention on the road and maintain proper vehicle position within the lane. Always keep the windshield clean and do not use LDW in bad weather conditions.
When the vehicle crosses a detected lane marking, the LDW symbol will flash and you will hear three beeps. LDW will not warn you if the turn signal is on or if you make a sharp maneuver. Before making a lane change, check the vehicle's mirrors, glance over your shoulder for vehicles and hazards, and start the turn signal before changing lanes.
3-43
Cadillac DTS Owner Manual - 2011
Black plate (44,1)
How the System Works LDW uses a camera located between the inside rearview mirror and the windshield to detect the lane markings. @ (Lane Departure Warning): To turn LDW on and off, press the LDW control, located by the exterior headlamp control. An indicator on the control will light to indicate that LDW is on.
When the vehicle is started, the LDW symbol, located in the instrument panel cluster, will briefly come on to indicate that the light is operational.
3-44
LDW only operates at speeds of 35 mph (56 km) or greater. If LDW is turned on when traveling at these speeds, the LDW symbol will appear green if the system detects a left or right lane marking. This symbol will change to amber and flash and three beeps will sound if you cross a detected lane marking without using the turn signal. If the LDW symbol does not appear, LDW is not currently operating and will not warn you. To change the volume of the warning chime, see Chime Volume under DIC Vehicle Customization on page 4‑74
for more information. When the System Does Not Seem To Work Properly The LDW symbol will not appear when the system is having difficulty seeing the lines on the road or if the view of the camera on the windshield is blocked with mud, dirt, snow, ice, or slush, if the windshield is damaged, or when weather limits visibility, such as while driving in fog, rain, or snow conditions. This is normal operation, the vehicle does not need service. For cleaning instructions, see Washing Your Vehicle on page 6‑98 . LDW warnings may occasionally occur due to tar marks, shadows, cracks in the road, or other road imperfections. This is normal system operation, the vehicle does not need service.Cadillac DTS Owner Manual - 2011
Black plate (45,1)
LDW Error Message SERVICE LANE DEPARTURE SYSTEM: This message may appear in the DIC to indicate that LDW is not working properly. If this message remains on after continued driving, the system needs service. Take your vehicle to your dealer. LANE DEPARTURE SYSTEM UNAVAILABLE : This message may appear in the DIC if LDW does not activate due to a temporary condition. Universal Home Remote System See Radio Frequency Statement on page 8‑17 for information regarding Part 15 of the Federal Communications Commission (FCC) rules and Industry Canada Standards RSS-210/220/310.
Universal Home Remote System Operation (With Three Round LED)
This vehicle may have the Universal Home Remote System. If there are three round Light Emitting Diode (LED) indicator lights above the Universal Home Remote buttons, follow the instructions below. This system provides a way to replace up to three remote control transmitters used to activate devices such as garage door openers, security systems, and home automation devices. Do not use this system with any garage door opener that does not have the stop and reverse feature. This includes any garage door opener model manufactured before April 1, 1982. Read the instructions completely before attempting to program the transmitter. Because of the steps involved, it may be helpful to have another person assist with programming the transmitter.
3-45
Cadillac DTS Owner Manual - 2011
Black plate (46,1)
Be sure to keep the original remote control transmitter for use in other vehicles, as well as, for future programming. Only the original remote control transmitter is needed for Fixed Code programming. The programmed buttons should be erased when the vehicle is sold or the lease ends. See “Erasing Universal Home Remote Buttons” later in this section. Park the vehicle outside of the garage when programming a garage door. Be sure that people and objects are clear of the garage door or gate that is being programmed. Programming Universal Home Remote — Rolling Code For questions or help programming the Universal Home Remote System, call 1-866-572-2728 or go to learcar2u.com. Most garage door openers sold after 1996 are Rolling Code units.
Programming a garage door opener involves time-sensitive actions, so read the entire procedure before starting. Otherwise, the device will time out and the procedure will have to be repeated. To program up to three devices:
1. From inside the vehicle, press the two outside
buttons at the same time for one to two seconds, and immediately release them.
3-46
Cadillac DTS Owner Manual - 2011
Black plate (47,1)
3.
Immediately return to the vehicle. Press and hold the Universal Home Remote button that will be used to control the garage door until the garage door moves. The indicator light, above the selected button, should slowly blink. This button may need to be held for up to 20 seconds. Immediately, within one second, release the button when the garage door moves. The indicator light will blink rapidly until programming is complete. 5. Press and release the same button again. The
4.
2. Locate in the garage, the garage door opener receiver (motor-head unit). Locate the “Learn” or “Smart” button. It can usually be found where the hanging antenna wire is attached to the motor-head unit and may be a colored button. Press this button. After pressing this button, complete the following steps in less than 30 seconds.
garage door should move, confirming that programming is successful and complete.
To program another Rolling Code device such as an additional garage door opener, a security device, or home automation device, repeat Steps 1 through 5, choosing a different function button in Step 3 than what was used for the garage door opener. If these instructions do not work, the garage door opener is probably a Fixed Code unit. Follow the Programming instructions that follow for a Fixed Code garage door opener.
3-47
Cadillac DTS Owner Manual - 2011
Black plate (48,1)
Programming Universal Home Remote — Fixed Code For questions or help programming the Universal Home Remote System, call 1-866-572-2728 or go to learcar2u.com. Most garage door openers sold before 1996 are Fixed Code units. Programming a garage door opener involves time-sensitive actions, so read the entire procedure before starting. Otherwise, the device will time out and the procedure will have to be repeated. To program up to three devices:
1. To verify that the garage door opener is a Fixed Code unit, remove the battery cover on the hand held transmitter supplied by the manufacturer of the garage door opener motor. If there are a row of dip switches similar to the graphic above, the garage door opener is a Fixed Code unit. If you do not see a row of dip switches, return to the previous section for Programming Universal Home Remote – Rolling Code. Your hand held transmitter can have between eight to 12 dip switches depending on the brand of transmitter. The garage door opener receiver (motor head unit) could also have a row of dip switches that can be used when programming the Universal Home Remote. If the total number of switches on the motor head and hand held transmitter are different, or if the dip switch settings are different, use the dip switch settings on the motor head unit to program the Universal Home Remote. The motor head dip switch settings can also be used when the original hand held transmitter is not available.
3-48
Cadillac DTS Owner Manual - 2011
Black plate (49,1)
Example of Eight Dip Switches with Two Positions
Example of Eight Dip Switches with Three Positions The panel of switches might not appear exactly as they do in the examples above, but they should be similar. The switch positions on the hand-held transmitter could be labeled, as follows: . A switch in the up position could be labeled as
“Up,” “+,” or “On.”
. A switch in the down position could be labeled
as “Down,” “−,” or “Off.”
. A switch in the middle position could be labeled
as “Middle,” “0,” or “Neutral.”
3-49
Cadillac DTS Owner Manual - 2011
Black plate (50,1)
2. Write down the eight to 12 switch settings from left
to right as follows: . When a switch is in the up position, write “Left.” . When a switch is in the down position, write
“Right.” If a switch is set between the up and down position, write “Middle.” The switch settings written down in Step 2 now become the button strokes to be entered into the Universal Home Remote in Step 4. Be sure to enter the switch settings written down in Step 2, in order from left to right, into the Universal Home Remote, when completing Step 4.
3. From inside your vehicle, first firmly press all three buttons at the same time for about three seconds. Release the buttons to put the Universal Home Remote into programming mode.
3-50
4. The indicator lights will blink slowly. Enter each
switch setting from Step 2 into your vehicle's Universal Home Remote. You will have two and one-half minutes to complete Step 4. Now press one button on the Universal Home Remote for each switch setting as follows:
If you wrote “Left,” press the left button in the vehicle. If you wrote “Right,” press the right button in the vehicle. If you wrote “Middle,” press the middle button in the vehicle.
Cadillac DTS Owner Manual - 2011
Black plate (51,1)
5. After entering all of the switch positions, again, firmly press and release all three buttons at the same time. The indicator lights will turn on.
6. Press and hold the button that will be used to control the garage door until the garage door moves. The indicator light above the selected button should slowly blink. This button may need to be held for up to 55 seconds. Immediately release the button when the garage door moves. The indicator light will blink rapidly until programming is complete.
7.
8. Press and release the same button again. The
garage door should move, confirming that programming is successful and complete.
To program another Fixed Code device such as an additional garage door opener, a security device, or home automation device, repeat Steps 1-8, choosing a different button in Step 6 than what was used for the garage door opener. Using Universal Home Remote Press and hold the appropriate button for at least half of a second. The indicator light will come on while the signal is being transmitted.
Reprogramming Universal Home Remote Buttons Any of the three buttons can be reprogrammed by repeating the instructions. Erasing Universal Home Remote Buttons The programmed buttons should be erased when the vehicle is sold or the lease ends. To erase either Rolling Code or Fixed Code on the Universal Home Remote device:
1. Press and hold the two outside buttons at the
same time for approximately 20 seconds, until the indicator lights, located directly above the buttons, begin to blink rapidly.
2. Once the indicator lights begin to blink, release both buttons. The codes from all buttons will be erased.
For help or information on the Universal Home Remote System, call the customer assistance phone number under Customer Assistance Offices on page 8‑5.
3-51
Cadillac DTS Owner Manual - 2011
Black plate (52,1)
Storage Areas
Glove Box Lift up the glove box handle to open it. Use the key to lock and unlock the glove box. Cupholders There are cupholders located in the full floor console, or in the front of the center seat console. Cupholders are also located in the rear armrest. Slide the cover back to access the full floor console cupholder. Fold open the front of the console to access the center seat console cupholder. Front Storage Area To access the front storage area, push down and then release. Push up and forward to remove.
Center Console Storage If the vehicle has a full floor console it has two storage areas. Lift the left lever located in the front of the armrest lid to access the upper storage tray. Lift the right lever to access the lower storage area. If the vehicle has a center seat console it will have two storage areas. Press the button located on the front of the armrest and lift the armrest cover to access the upper storage area. Pull the strap located behind the cup holder to access the lower storage area. Center Flex Storage Unit This vehicle may have a center flex storage unit that includes a front center seat with a lap belt and an underseat storage compartment. The center seatback can also be used as an armrest. Cupholders are also located at the front edge of the storage unit and can be accessed by folding the compartment forward. Pull the handle rearward to open a storage compartment and access the accessory power outlet. Pull out to remove. When not being used, the center seat lap belt can be stored in the underseat storage compartment.
3-52
Cadillac DTS Owner Manual - 2011
Black plate (53,1)
. Do not place anything on top of the driver side
floor mat.
. Use only a single floor mat on the driver side. . Do not place one floor mat on top of another.
The driver side floor mat is held in place by two hooks.
Floor Mats
{ WARNING:
If a floor mat is the wrong size or is not properly installed, it can interfere with the accelerator pedal and/or brake pedal. Interference with the pedals can cause unintended acceleration and/or increased stopping distance which can cause a crash and injury. Make sure the floor mat does not interfere with the accelerator or brake pedal.
Use the following guidelines for proper floor mat usage.
The original equipment floor mats were designed for your vehicle. If the floor mats need replacing, it is recommended that GM certified floor mats be purchased. Non-GM floor mats may not fit properly and may interfere with the accelerator or brake pedal. Always check that the floor mats do not interfere with the pedals.
. Use the floor mat with the correct side up. Do not
turn it over.
3-53
Cadillac DTS Owner Manual - 2011
Black plate (54,1)
Sunroof The vehicle may have a power sunroof.
The switches that operate the sunroof are located on the overhead console.
To open or close the sunroof, the ignition must be turned to ON/RUN or Retained Accessory Power (RAP) must be active. See Retained Accessory Power (RAP) on page 3‑23 .
Removing and Replacing the Floor Mats
1. Pull up on the rear of the mat to remove it from the
hooks.
2. Reinstall the floor mat by lining up the openings in the floor mat over the hooks and push it down into position.
3. Make sure the floor mat is properly secured and
verify that it does not interfere with the accelerator or brake pedals.
Rear Seat Armrest This vehicle has a rear seat armrest with cupholders. Pull the tab on the armrest forward, to access it. Convenience Net Use the convenience net, located in the rear, to store small loads as far forward as possible. The net should not be used to store heavy loads.
3-54
Cadillac DTS Owner Manual - 2011
Black plate (55,1)
Express Open: The express open feature will operate from the closed or partially open position. To express open the power sunroof, fully press the driver side switch rearward once. To stop the sunroof glass in a desired position other than to the express-open position, press the switch again, in either direction, to stop the movement. If the sunshade is in the closed position, it will open with the sunroof, or it can be opened manually. Vent Open: From the closed position, press and hold the passenger side switch forward to vent the sunroof. The rear of the sunroof panel will tilt upward to the full vent position. The sunshade must be opened manually. Close: To close the sunroof, operate the controls according to one of the following:
From the open position, press and hold the driver side sunroof switch forward. The sunshade must be closed manually. From the vent position, press and hold the passenger side sunroof switch rearward.
Dirt and debris may collect on the sunroof seal or in the tracks that could cause an issue with sunroof operation, noise or plug the water drainage system. Periodically open the sunroof and remove any obstacles or loose debris. Wipe the sunroof seal and roof sealing area using a clean cloth, mild soap, and water. Do not remove grease from sunroof.
3-55
Cadillac DTS Owner Manual - 2011
Black plate (56,1)
2 NOTES
3-56
Cadillac DTS Owner Manual - 2011
Black plate (1,1)
Section 4
Instrument Panel
Instrument Panel Overview . . . . . . . . . . . . . . . . . . . . . . . . 4-3
Hazard Warning Flashers . . . . . . . . . . . . . . . . . . . . . . . 4-3
Horn . . . . . . . . . . . . . . . . . . . . . . . . . . . . . . . . . . . . . . . . . . . . 4-3
Tilt Wheel . . . . . . . . . . . . . . . . . . . . . . . . . . . . . . . . . . . . . . . 4-3
Power Tilt Wheel and Telescopic SteeringColumn . . . . . . . . . . . . . . . . . . . . . . . . . . . . . . . . . . . . . . . 4-4
Heated Steering Wheel . . . . . . . . . . . . . . . . . . . . . . . . . 4-4
Turn Signal/Multifunction Lever . . . . . . . . . . . . . . . . . . 4-5
Turn and Lane-Change Signals . . . . . . . . . . . . . . . . . 4-5
Headlamp High/Low-Beam Changer . . . . . . . . . . . . 4-6
Forward Collision Alert (FCA) System . . . . . . . . . . . 4-6
Flash-to-Pass . . . . . . . . . . . . . . . . . . . . . . . . . . . . . . . . . . 4-10
Windshield Wipers . . . . . . . . . . . . . . . . . . . . . . . . . . . . . 4-10
Windshield Washer . . . . . . . . . . . . . . . . . . . . . . . . . . . . 4-11
Cruise Control . . . . . . . . . . . . . . . . . . . . . . . . . . . . . . . . . 4-11
Adaptive Cruise Control . . . . . . . . . . . . . . . . . . . . . . . 4-14
Exterior Lamps . . . . . . . . . . . . . . . . . . . . . . . . . . . . . . . . 4-23
Wiper Activated Headlamps . . . . . . . . . . . . . . . . . . . 4-26
Headlamps on Reminder . . . . . . . . . . . . . . . . . . . . . . 4-27
Daytime Running Lamps (DRL) . . . . . . . . . . . . . . . . 4-27
Fog Lamps . . . . . . . . . . . . . . . . . . . . . . . . . . . . . . . . . . . . 4-28
Cornering Lamps . . . . . . . . . . . . . . . . . . . . . . . . . . . . . . 4-28
Exterior Lighting Battery Saver . . . . . . . . . . . . . . . . . 4-28
Instrument Panel Brightness . . . . . . . . . . . . . . . . . . . 4-29
Courtesy Lamps . . . . . . . . . . . . . . . . . . . . . . . . . . . . . . . 4-29
Entry Lighting . . . . . . . . . . . . . . . . . . . . . . . . . . . . . . . . . . 4-29Parade Dimming . . . . . . . . . . . . . . . . . . . . . . . . . . . . . . . 4-29
Reading Lamps . . . . . . . . . . . . . . . . . . . . . . . . . . . . . . . . 4-29
Footwell Lamps . . . . . . . . . . . . . . . . . . . . . . . . . . . . . . . . 4-30
Battery Load Management . . . . . . . . . . . . . . . . . . . . . 4-30
Electric Power Management . . . . . . . . . . . . . . . . . . . 4-30
Inadvertent Power Battery Saver . . . . . . . . . . . . . . . 4-31
Battery Run-Down Protection . . . . . . . . . . . . . . . . . . 4-31
Accessory Power Outlet(s) . . . . . . . . . . . . . . . . . . . . . 4-31
Analog Clock . . . . . . . . . . . . . . . . . . . . . . . . . . . . . . . . . . 4-32
Climate Controls . . . . . . . . . . . . . . . . . . . . . . . . . . . . . . . . . . 4-33
Dual Climate Control System . . . . . . . . . . . . . . . . . . 4-33
Outlet Adjustment . . . . . . . . . . . . . . . . . . . . . . . . . . . . . . 4-38
Rear Climate Control System . . . . . . . . . . . . . . . . . . 4-39
Passenger Compartment Air Filter . . . . . . . . . . . . . 4-40
Warning Lights, Gauges, and Indicators . . . . . . . . 4-42
Instrument Panel Cluster . . . . . . . . . . . . . . . . . . . . . . . 4-43
Speedometer and Odometer . . . . . . . . . . . . . . . . . . . 4-44
Tachometer . . . . . . . . . . . . . . . . . . . . . . . . . . . . . . . . . . . . 4-44
Safety Belt Reminders . . . . . . . . . . . . . . . . . . . . . . . . . 4-45
Airbag Readiness Light . . . . . . . . . . . . . . . . . . . . . . . . 4-46
Passenger Airbag Status Indicator . . . . . . . . . . . . . 4-46
Charging System Light . . . . . . . . . . . . . . . . . . . . . . . . 4-47
Brake System Warning Light . . . . . . . . . . . . . . . . . . . 4-48
Antilock Brake System (ABS) Warning Light . . . 4-49
Traction Control System (TCS) WarningLight . . . . . . . . . . . . . . . . . . . . . . . . . . . . . . . . . . . . . . . . . 4-49
4-1
Cadillac DTS Owner Manual - 2011
Black plate (2,1)
Section 4
Instrument Panel
StabiliTrak® Indicator Light . . . . . . . . . . . . . . . . . . . . . 4-50
Lane Departure Warning (LDW) Light . . . . . . . . . . 4-50
Engine Coolant Temperature Warning Light . . . . 4-51
Engine Coolant Temperature Gauge . . . . . . . . . . . 4-51
Tire Pressure Light . . . . . . . . . . . . . . . . . . . . . . . . . . . . 4-52
Malfunction Indicator Lamp . . . . . . . . . . . . . . . . . . . . 4-52
Oil Pressure Light . . . . . . . . . . . . . . . . . . . . . . . . . . . . . 4-55
Security Light . . . . . . . . . . . . . . . . . . . . . . . . . . . . . . . . . . 4-55
Front Fog Lamp Light . . . . . . . . . . . . . . . . . . . . . . . . . . 4-55
Lights On Reminder . . . . . . . . . . . . . . . . . . . . . . . . . . . 4-56
Cruise Control Light . . . . . . . . . . . . . . . . . . . . . . . . . . . 4-56
Highbeam On Light . . . . . . . . . . . . . . . . . . . . . . . . . . . . 4-56
Fuel Gauge . . . . . . . . . . . . . . . . . . . . . . . . . . . . . . . . . . . . 4-56Driver Information Center (DIC) . . . . . . . . . . . . . . . . . . 4-57
DIC Operation and Displays . . . . . . . . . . . . . . . . . . . 4-58
DIC Warnings and Messages . . . . . . . . . . . . . . . . . . 4-62
DIC Vehicle Customization . . . . . . . . . . . . . . . . . . . . 4-74
Audio System(s) . . . . . . . . . . . . . . . . . . . . . . . . . . . . . . . . . . 4-83
Setting the Clock . . . . . . . . . . . . . . . . . . . . . . . . . . . . . . 4-83
Radio(s) . . . . . . . . . . . . . . . . . . . . . . . . . . . . . . . . . . . . . . . 4-87
Using an MP3 . . . . . . . . . . . . . . . . . . . . . . . . . . . . . . . . . 4-97
XM Radio Messages . . . . . . . . . . . . . . . . . . . . . . . . . 4-101
Navigation/Radio System . . . . . . . . . . . . . . . . . . . . . 4-102
Bluetooth® . . . . . . . . . . . . . . . . . . . . . . . . . . . . . . . . . . . . 4-103
Theft-Deterrent Feature . . . . . . . . . . . . . . . . . . . . . . . 4-110
Audio Steering Wheel Controls . . . . . . . . . . . . . . . 4-110
Radio Reception . . . . . . . . . . . . . . . . . . . . . . . . . . . . . . 4-111
Backglass Antenna . . . . . . . . . . . . . . . . . . . . . . . . . . . 4-112
XM™ Satellite Radio Antenna System . . . . . . . . 4-1124-2
Cadillac DTS Owner Manual - 2011
Black plate (3,1)
Instrument Panel Overview
Hazard Warning Flashers | (Hazard Warning Flasher): Press this button located on the instrument panel, to make the front and rear turn signal lamps flash on and off. This warns others that you are having trouble. Press | again to turn the flashers off.
Horn Press near or on the horn symbols on the steering wheel pad to sound the horn.
Tilt Wheel This feature allows the position of the steering wheel to be adjusted.
The adjustment lever is located on the left side of the steering column.
1. Pull the lever to move the steering wheel up
or down.
2. Release the lever to lock the wheel in place.
Do not adjust the steering wheel while driving.
4-3
Cadillac DTS Owner Manual - 2011
Black plate (4,1)
Power Tilt Wheel and Telescopic Steering Column
Heated Steering Wheel The vehicle may have a heated steering wheel.
If the vehicle has this feature, the power tilt and telescope wheel control is located on the outboard side of the steering column.
The button for this feature is located on the steering wheel.
Press to turn the heated steering wheel on or off. A light on the button displays while the feature is turned on. Heating will begin in about three minutes.
Press the control up or down to tilt the steering wheel up or down. Press the control forward or rearward and the steering wheel moves toward the front or rear of the vehicle. To set the memory position, see DIC Vehicle Customization on page 4‑74 and Memory Seat, Mirrors and Steering Wheel on page 2‑6.
4-4
Cadillac DTS Owner Manual - 2011
Black plate (5,1)
Turn Signal/Multifunction Lever
Turn and Lane-Change Signals
The lever on the left side of the steering column includes the following: G : Turn and Lane-Change Signals 2 3 : Headlamp High/Low-Beam Changer N : Windshield Wipers L : Windshield Washer Flash-To-Pass Feature. Information for these features is on the pages following.
An arrow on the instrument panel cluster flashes in the direction of the turn or lane change.
For vehicles with the side blind zone alert system, an arrow in the outside mirror flashes when the turn signal is used. See Side Blind Zone Alert (SBZA) on page 3‑40 for more information. Move the lever all the way up or down to signal a turn. Raise or lower the lever until the arrow starts to flash to signal a lane change. Hold it there until the lane change is complete. If the lever is briefly pressed and released, the turn signal will flash three times. The lever returns to its starting position when it is released. If after signaling a turn or lane change the arrow flashes rapidly or does not come on, a signal bulb may be burned out. Have the bulbs replaced. If the bulb is not burned out, check the fuse. See Fuses and Circuit Breakers on page 6‑103.
4-5
Cadillac DTS Owner Manual - 2011
Black plate (6,1)
Turn Signal On Chime If the turn signal is left on, a warning chime sounds and the Driver Information Center (DIC) will display TURN SIGNAL ON after driving about a mile as a reminder to turn it off. See DIC Warnings and Messages on page 4‑62 . Headlamp High/Low-Beam Changer Push forward to change the headlamps from low beam to high. Pull the lever back and then release it to change from high beam to low.
This light on the instrument panel cluster will be on, indicating high-beam usage.
Forward Collision Alert (FCA) System For vehicles with this feature, read the following section before using it. This vehicle has systems that operate on a radio frequency that comply with Part 15 of the Federal Communications Commission (FCC) rules and with Industry Canada Standards RSS‐210/220/310. Operation is subject to the following two conditions:
1. The device may not cause interference. 2. The device must accept any interference received,
including interference that may cause undesired operation of the device.
Changes or modifications to this system by other than an authorized service facility could void authorization to use this equipment.
4-6
Cadillac DTS Owner Manual - 2011
Black plate (7,1)
The FCA control is located on the steering wheel.
To enable or disable FCA, press the Adaptive Cruise Control button. See Adaptive Cruise Control on page 4‑14 .
The Forward Collision Alert (FCA) system provides an audible and visual alert if you approach a vehicle too quickly that is directly ahead. FCA also provides a visual alert with no audible alert if you are following another vehicle much too closely. The FCA alert symbol is located on top of the instrument panel to the right of the driver. FCA uses the Adaptive Cruise Control radar to detect a vehicle directly ahead, in your path, within a distance of 328 ft (100 m) and operates at speeds above 20 mph (32 km/h).
{ WARNING:
FCA is only a warning system and does not apply the brakes. When you are approaching a vehicle or object too rapidly or when you are following a vehicle too closely that is ahead of you, FCA may not provide you with enough time to avoid a collision. FCA is not designed to warn the driver of pedestrians or animals. Your complete attention is always required while driving and you should be ready to take action and apply the brakes. For more information, see Defensive Driving on page 5‑2 .
4-7
Cadillac DTS Owner Manual - 2011
Black plate (8,1)
FCA is enabled when the green light on the button is lit. FCA is disabled when the indicator light is amber.
Alerting the Driver
{ WARNING:
. On winding roads, FCA may not detect a
vehicle ahead. You could crash into a vehicle ahead of you. Do not rely on FCA on winding roads.
. When weather limits visibility, such as in fog,
rain, or snow, FCA performance is limited. There may not be enough warning distance to the vehicle in front of you. Do not rely on FCA in low visibility conditions.
{ WARNING:
When FCA is enabled, the Adaptive Cruise Control switch is on. If you press another Adaptive Cruise Control button, you might go into cruise when you do not want to. You could be startled and even lose control. Be careful not to press adaptive cruise buttons unless you want to use cruise control.
4-8
The FCA alert symbol will flash and a warning beep will sound when driver action may be required.
The alert symbol will flash when:
. Your vehicle is approaching another vehicle too
quickly.
. Your vehicle is following a vehicle ahead of you
much too closely.
See Defensive Driving on page 5‑2 for more information. Detecting the Vehicle Ahead The vehicle ahead symbol, located next to the FCA symbol, only appears when a vehicle ahead of you is detected in your path. If this symbol does not appear, or disappears briefly, FCA will not respond to vehicles you may see ahead. The symbol may disappear on curves, highway exit ramps, or hills. Also, when another vehicle enters the same lane as you, the FCA system will not detect the vehicle until it is completely in your driving lane.
Cadillac DTS Owner Manual - 2011
Black plate (9,1)
{ WARNING:
When the Adaptive Cruise Control radar is blocked by snow, ice, or dirt, it may not detect a vehicle ahead. FCA may not help you avoid a collision under these conditions. Do not use FCA when the radar is blocked by snow, ice, or dirt. Keep your radar clean. See “Cleaning the System” under Adaptive Cruise Control on page 4‑14 .
{ WARNING:
FCA may not detect and warn soon enough to stationary or slow-moving vehicles or other objects ahead of you. You could crash into an object ahead of you. Do not rely on FCA when approaching stationary or slow-moving vehicles or other objects.
Unnecessary Alerts FCA may occasionally provide alerts that you consider unnecessary. It could respond to a turning vehicle ahead of you, guard rails, signs, and other stationary objects. This is normal operation, your vehicle does not need service. Other Messages There are three messages that may appear on the Driver Information Center (DIC). They are CLEAN RADAR, RADAR CRUISE NOT READY and SERVICE RADAR CRUISE. See DIC Warnings and Messages on page 4‑62 . Cleaning the System The radar can become blocked by snow, ice, or dirt. If so, you may need to turn off the engine and clean the lens. See “Cleaning the System” under Adaptive Cruise Control on page 4‑14.
4-9
Cadillac DTS Owner Manual - 2011
Black plate (10,1)
Flash-to-Pass This feature lets you use the high-beam headlamps to signal the driver in front of you that you want to pass. The flash-to-pass feature will only work with the headlamps on. It does not work with Daytime Running Lamps (DRL). Pull and hold the turn signal lever toward you to use. If the headlamps are on low beam, pulling the turn signal towards you will flash the high beams. Windshield Wipers
The windshield wiper lever is located on the left side of the steering column.
4-10
Turn the band with the wiper symbol on it to control the windshield wipers. 8 (Mist): For a single wiping cycle, hold it on mist until the wipers start, then release. The wipers stop after one wipe. Several wipes, hold the band longer. 6 (Delay): Use to set the delay time between wipe cycles. The wiper speed can be set for a long or short delay between wipes. The closer the band is set to the top of the lever, the shorter the delay. 6 (Low Speed): Slow wipes. 1 (High Speed): Fast wipes. 9 (Off): Turns the wipers off. Clear ice and snow from the wiper blades before using them. If frozen to the windshield, carefully loosen or thaw them. Damaged blades should be replaced. Heavy snow or ice can overload the wiper motor. A circuit breaker will stop the motor until it cools. The vehicle has wiper-activated headlamps. After the windshield wipers have completed eight wipe cycles within four minutes, the headlamps automatically turn on. See Wiper Activated Headlamps on page 4‑26 for more information.
Cadillac DTS Owner Manual - 2011
Black plate (11,1)
Windshield Washer
{ WARNING:
In freezing weather, do not use the washer until the windshield is warmed. Otherwise the washer fluid can form ice on the windshield, blocking your vision.
J (Washer Fluid): Press and release this paddle, located at the top of the turn signal/multifunction lever, to spray washer fluid on the windshield. The wipers will clear the windshield and either stop or return to the preset speed. For more washer cycles, press and hold the paddle. Cruise Control With cruise control, a speed of approximately 40 km/h (25 mph) or more can be maintained without keeping your foot on the accelerator. Cruise control does not work at speeds below about 40 km/h (25 mph). A cruise control light appears in the instrument panel cluster when the cruise control is on.
When the brakes are applied, the cruise control shuts off.
{ WARNING:
Cruise control can be dangerous where you cannot drive safely at a steady speed. So, do not use the cruise control on winding roads or in heavy traffic. Cruise control can be dangerous on slippery roads. On such roads, fast changes in tire traction can cause excessive wheel slip, and you could lose control. Do not use cruise control on slippery roads.
If your vehicle is in cruise control when the Traction Control System (TCS) begins to limit wheel spin, the cruise control automatically turns off. See Traction Control System (TCS) on page 5‑6 . When road conditions let you safely use it again, the cruise control can be turned back on.
4-11
Cadillac DTS Owner Manual - 2011
Black plate (12,1)
The cruise control buttons are located on left side of the steering wheel.
I (On/Off): Press to turn the cruise control system on or off. + RES (Resume/Accelerate): Press briefly to make the vehicle resume to a previously set speed or press and hold to accelerate. SET– (Set): Press to set the speed and activate cruise control or make the vehicle decelerate. [ (Cancel): Press to disengage cruise control without erasing the set speed from memory.
4-12
Setting Cruise Control If the cruise button is on when not in use, it could get bumped and go into cruise when not desired. Keep the cruise control switch off when cruise is not being used. The cruise light on the instrument panel cluster comes on after the cruise control has been set to the desired speed. 1. Press I. 2. Get up to the speed desired. 3. Press the SET– button located on the steering
wheel and release it.
4. Take your foot off the accelerator.
Resuming a Set Speed If the cruise control is set at a desired speed and then the brakes are applied, the cruise control is disengaged without erasing the set speed from memory. Once the vehicle speed is 40 km/h (25 mph) or greater, press the +RES button on the steering wheel. The vehicle returns to the previously set speed and stays there. If you press and hold the +RES button, the vehicle speed increases until the button is released or the brake is applied. Do not hold in the +RES button, if you do not want the vehicle speed to increase.
Cadillac DTS Owner Manual - 2011
Black plate (13,1)
Increasing Speed While Using Cruise Control If the cruise control is already activated,
. Press the +RES button. Hold it there until the
desired speed is reached, and then release the button. To increase the vehicle speed in small amounts, briefly press the +RES button and then release it. Each time this is done, the vehicle goes about 1.6 km/h (1 mph) faster.
The accelerate feature only works after the cruise control speed is set by pressing the SET– button. Reducing Speed While Using Cruise Control If the cruise control is already activated,
. Press the SET– button until the lower speed
desired is reached, then release it. To slow down in small amounts, press the SET– button briefly. Each time this is done, the vehicle goes about 1.6 km/h (1 mph) slower.
Passing Another Vehicle While Using Cruise Control Use the accelerator pedal to increase the vehicle speed. When you take your foot off the pedal, the vehicle slows down to the previous cruise control speed. Using Cruise Control on Hills How well your cruise control works on hills depends upon the vehicle speed, load, and the steepness of the hills. When going up steep hills, you might have to step on the accelerator pedal to maintain the vehicle speed. When going downhill, you might have to brake or shift to a lower gear to keep the vehicle speed down. When the brakes are applied or you shift into a lower gear the cruise control is disengaged. Ending Cruise Control There are three ways to end cruise control:
To disengage cruise control, step lightly on the brake pedal.
. Press the [ button. . Press the I button.
4-13
Cadillac DTS Owner Manual - 2011
Black plate (14,1)
Erasing Speed Memory The cruise control set speed is erased from memory by pressing the I button or if the ignition is turned off.
Adaptive Cruise Control For vehicles with this feature, be sure to read this entire section before using it. This vehicle has systems that operate on a radio frequency that comply with Part 15 of the Federal Communications Commission (FCC) rules and with Industry Canada Standards RSS-210/220/310. Operation is subject to the following two conditions:
1. This device may not cause interference. 2. This device must accept any interference received,
including interference that may cause undesired operation of the device.
Changes or modifications to this system by other than an authorized service facility could void authorization to use this equipment. Adaptive Cruise Control (ACC) is an enhancement to traditional cruise control. It allows you to keep cruise control engaged in moderate traffic conditions without having to constantly reset your cruise control. ACC uses radar to detect a vehicle directly ahead in your
4-14
path, within a distance of 100 m (330 ft), and operates at speeds above 40 km/h (25 mph). When it is engaged by the driver, the system can apply limited braking or acceleration of the vehicle automatically to maintain a selected follow distance to the vehicle ahead. Braking is limited to 2.45 m/sec2 (0.25 g's) of deceleration, which is comparable to moderate application of the vehicle's brakes. To disengage ACC, apply the brake. If no vehicle is in your path, the vehicle will react like traditional cruise control.
{ WARNING:
Adaptive Cruise Control will not apply hard braking or bring the vehicle to a complete stop. It will not respond to stopped vehicles, pedestrians or animals. When you are approaching a vehicle or object, Adaptive Cruise Control may not have time to slow your vehicle enough to avoid a collision. Your complete attention is always required while driving and you should be ready to take action and apply the brakes. For more information, see Defensive Driving on page 5‑2.
Cadillac DTS Owner Manual - 2011
Black plate (15,1)
{ WARNING:
WARNING: (Continued)
. On winding roads, Adaptive Cruise Control may not detect a vehicle ahead. You could crash into a vehicle ahead of you. Do not use Adaptive Cruise Control on winding roads.