- Download PDF Manual
-
If the image is distorted, check the basic set‐ tings. Switching on/off
Rain, dirt, snow, or ice can impair camera oper‐ ation. The camera is automatically heated when the external temperatures are low.
124
Online Edition for Part no. 01 40 2 606 469 - 03 11 490
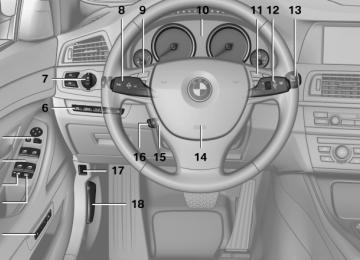
When the low beams are switched on, the brightness of the Head-up Display can be addi‐ tionally influenced using the instrument lighting, refer to page 83. The setting is stored for the remote control cur‐ rently in use. Adjusting the height 1. "Settings" 2. "Head-up display" 3. "Height" 4. Turn the controller.
The height is adjusted.
The setting is stored for the remote control cur‐ rently in use. Special windshield The windshield is part of the system. The shape of the windshield makes it possible to display a precise image. A film in the windshield prevents double images from being displayed. Therefore, have the special windshield replaced by a service center only.
Press the button.
Display
1 Lane departure warning* 2 Active Cruise Control* 3 Desired speed 4 Navigation system* 5 Speed The collision warning*, Night Vision* pedestrian warning, or Check Control messages are dis‐ played briefly if needed. Selecting displays in the Head-up Display 1. "Settings" 2. "Head-up display" 3. "Displayed information" 4. Select the desired displays in the Head-up
Display.
The settings are stored for the remote control currently in use. Setting the brightness The brightness is automatically adjusted to the ambient light. The basic setting can be adjusted manually. 1. "Settings" 2. "Head-up display" 3. "Brightness" 4. Turn the controller.
The brightness is adjusted.
Online Edition for Part no. 01 40 2 606 469 - 03 11 490
125
Climate control Automatic climate control*
1 Air distribution, left 2 Temperature, left 3 AUTO program, left 4 Air volume, AUTO intensity, residual heat,
left
5 Remove ice and condensation 6 Maximum cooling 7 Display 8 Air volume, AUTO intensity, right 9 AUTO program, right 10 Temperature, right
11 Air distribution, right 12 Seat heating*, right 47
13 Active seat ventilation*, right 47
14 Automatic recirculated-air control/recircu‐lated-air mode
15 Cooling function 16 Rear window defroster 17 ALL program 18 Active seat ventilation*, left 47
19 Seat heating*, left 47Climate control functions in detail Manual air distribution
Press the button repeatedly to select a program:
▷ Upper body region. ▷ Upper body region and footwell.
▷ Footwell. ▷ Windows and footwell: driver's side only. ▷ Windows, upper body region and footwell:
driver's side only.
If the windows are fogged over, press the AUTO button on the driver's side to utilize the conden‐ sation sensor.
126
Online Edition for Part no. 01 40 2 606 469 - 03 11 490
Temperature
Turn the wheel to set the desired temperature.
The automatic climate control achieves this temperature as quickly as possible, if necessary with the maximum cooling or heating capacity, and then keeps it constant. Avoid rapidly switching between different tem‐ perature settings. The automatic climate control will not have sufficient time to adjust the set temperature. AUTO program
Press the button. Air volume, air distribution, and tem‐
perature are controlled automatically. Depending on the selected temperature, AUTO intensity, and outside influences, the air is di‐ rected to the windshield, side windows, upper body, and into the footwell. The cooling function, refer to page 128, is switched on automatically with the AUTO pro‐ gram. At the same time, a condensation sensor con‐ trols the program so as to prevent window con‐ densation as much as possible.
Intensity of the AUTO program With the AUTO program switched on, automatic control of the air volume and air distribution can be adjusted.
Press the left or right side of the button: decrease or increase the intensity.
The selected intensity is shown on the display of the automatic climate control. Air volume, manual To be able to manually adjust the air volume, switch off the AUTO program first.
Press the left or right side of the button: decrease or increase air volume.
The selected air volume is shown on the display of the automatic climate control. The air volume of the automatic climate control may be reduced automatically to save battery power. Defrosting windows and removing condensation
Press the button. Ice and condensation are quickly re‐ moved from the windshield and the front side windows. The air volume can be adjusted when the pro‐ gram is active. If the windows are fogged over, additionally switch on the cooling function or press the AUTO button to utilize the condensation sensor. Maximum cooling
Press the button. The system is set to the lowest tem‐
perature, maximum air volume and recirculated- air mode. Air flows out of the vents for the upper body re‐ gion. Open them for this purpose. Air is cooled as quickly as possible: ▷ At an external temperature of approx. 32 ℉/
0 ℃.
▷ When the engine is running. The air volume can be adjusted when the pro‐ gram is active. Automatic recirculated-air control/ recirculated-air mode You can respond to unpleasant odors or pollu‐ tants in the immediate environment by tempo‐ rarily suspending the supply of outside air. The system then recirculates the air currently within the vehicle.
Press the button repeatedly to select an operating mode:
▷ LEDs off: outside air flows in continuously.
Online Edition for Part no. 01 40 2 606 469 - 03 11 490
127
l
▷ Left LED on, automatic recirculated-air con‐ trol: a sensor detects pollutants in the out‐ side air and controls the shut-off automati‐ cally.
▷ Right LED on, recirculated-air mode: the
supply of outside air into the vehicle is per‐ manently blocked.
If the windows are fogged over, switch off the recirculated-air mode and press the AUTO but‐ ton on the driver's side to utilize the condensa‐ tion sensor. Make sure that air can flow onto the windshield.
Continuous recirculated-air mode The recirculated-air mode should not be used for an extended period of time, as the air quality inside the vehicle deteriorates steadily.◀
Cooling function The passenger compartment can only be cooled with the engine running.
Press the button. The air is cooled and dehumidified and
– depending on the temperature setting – warmed again. Depending on the weather, the windshield may fog up briefly when the engine is started. The cooling function is switched on automati‐ cally with the AUTO program. When using the automatic climate control, con‐ densation water, refer to page 148, develops that exits underneath the vehicle. Rear window defroster Press the button. The rear window defroster switches off
automatically after a certain period of time.
ALL program
Press the button. The current settings on the driver's side for temperature, air volume, air distribution, and AUTO program are transferred to the front pas‐ senger side and to the left and right rear*.
The program is switched off if the settings on the front passenger side or in the rear* are changed.
Residual heat The heat stored in the engine is used to heat the interior.
Functional requirement ▷ Up to 20 minutes after the engine has been
switched off. ▷ Warm engine. ▷ The battery is sufficiently charged. ▷ External temperature below 77 ℉/25 ℃.
Switching on 1. Switch off the ignition.
2.
Press the right side of the button on
the driver's side.
is shown on the display of the automatic cli‐
mate control. The interior temperature, air volume and air dis‐ tribution can be adjusted with the ignition switched on.
Switching off At the lowest fan speed, press the left side of the button on the driver's side.
on the display of the automatic climate control
goes out. Switching the system on/off Switching off ▷ Complete system:
At the lowest fan speed, press the left side of the button on the driver's
side.
▷ On the front passenger side:
At the lowest fan speed, press the left side of the button on the front
passenger side.
128
Online Edition for Part no. 01 40 2 606 469 - 03 11 490
Switching on Press any button. Microfilter/activated-charcoal filter The microfilter removes dust and pollen from the incoming air. The activated-charcoal filter removes gaseous pollutants from the outside air that enters the vehicle. This combined filter should be replaced during scheduled maintenance of your vehicle., refer to page 260
Thumbwheel, arrow 3, in level bundled and can be directed to a specific point.
: the air is
Adjusting the ventilation ▷ Ventilation for cooling:
Adjust the vent to direct the air in your di‐ rection, e.g., if the vehicle interior is hot from the sun.
▷ Draft-free ventilation:
Adjust the vent to let the air flow past you.
Ventilation in rear, center
Ventilation Front ventilation
▷ Thumbwheels* for adjusting the tempera‐
ture, arrows 1. Toward blue: colder. Toward red: warmer.
▷ Lever for changing the air flow direction, ar‐
row 2.
▷ Thumbwheels for opening and closing the
vents continuously, arrows 3.
Ventilation levels* ▷ Draft-free ventilation:
Thumbwheel, arrow 3, in level current is fanned out. ▷ Maximum air volume:
: the air
Thumbwheel, arrow 3, in level partially fanned out and partially bundled. This maximizes the air supply.
: the air is
▷ Direct ventilation:
▷ Thumbwheels* for adjusting the tempera‐
ture, arrows 1. Toward blue: colder. Toward red: warmer.
▷ Lever for changing the air flow direction, ar‐
row 2.
▷ Thumbwheels for opening and closing the
vents continuously, arrow 3.
Lateral ventilation*
▷ Thumbwheel for opening and closing the
vents continuously, arrow 1.
Online Edition for Part no. 01 40 2 606 469 - 03 11 490
129
▷ Lever for changing the air flow direction, ar‐
row 2.
Rear automatic climate control* At a glance
1 Temperature 2 AUTO program 3 Vent settings 4 Air volume, AUTO intensity 5 Display 6 Maximum cooling 7 Seat heating* 47
Note The air volume of the automatic climate control may be reduced automatically to save battery power. Switching the rear automatic climate control on/off 1. "Settings" 2. "Climate" 3. "Rear climate control" The rear automatic climate control is not opera‐ tional if the automatic climate control is switched off or if the function for defrosting or defogging the windows is active. AUTO programPress the button.
Air volume, air distribution, and temperature are controlled automatically: Depending on the selected temperature, AUTO intensity, and outside influences, the air is di‐ rected to the upper body and into the footwell. The cooling function is switched on automati‐ cally with the AUTO program. Intensity of the AUTO program With the AUTO program switched on, automatic control of the air volume and air distribution can be adjusted.
Press the left or right side of the button: decrease or increase the intensity.
The selected intensity is shown on the display of the automatic climate control. Temperature
Turn the wheel to set the desired temperature.
The automatic climate control achieves this temperature as quickly as possible, if necessary with the maximum cooling or heating capacity, and then keeps it constant. Avoid rapidly switching between different tem‐ perature settings. The automatic climate control will not have sufficient time to adjust the set temperature. Manual air distribution The air distribution can be adjusted to individual needs.
Press the button repeatedly to select a program:
▷ Upper body region. ▷ Upper body region and footwell. ▷ Footwell. Air volume, manual To be able to manually adjust the air volume, switch off the AUTO program first.
130
Online Edition for Part no. 01 40 2 606 469 - 03 11 490
Switching on/off directly 1. "Settings" 2. "Climate" 3. "Activate parked-car vent."
The symbol on the automatic climate control
flashes if the system is switched on. The system continues to run for some time after being switched off. Preselecting the switch-on time 1. "Settings" 2. "Climate" 3. "Timer 1:" or "Timer 2:" 4. Set the desired time. Activating the switch-on time 1. "Settings" 2. "Climate" 3. "Activate Timer 1" or "Activate Timer 2"
The symbol on the automatic climate control lights up when the switch-on time is activated. The symbol on the automatic climate control flashes when the system has been switched on. The system will only be switched on within the next 24 hours. After that, it needs to reactivated.
Press the left or right side of the button: decrease or increase air volume.
The selected air volume is shown on the display of the automatic climate control. Switching the system on/off Switching off
At the lowest fan speed, press the left side of the button on the driver's side.
Switching on Press any button. Maximum cooling
Press the button. The system is set to the lowest tem‐
perature, maximum air volume and recirculated- air mode. Air flows out of the vents for the upper body re‐ gion. Open them for this purpose. Air is cooled as quickly as possible: ▷ At an external temperature of approx. 32 ℉/
0 ℃.
▷ When the engine is running.
Parked-car ventilation The concept The parked-car ventilation ventilates the vehicle interior and lowers its temperature, if necessary. The system can be switched on and off directly or by using two preset switch-on times. It re‐ mains switched on for 30 minutes. They can be operated via iDrive. Parked-car ventilation Using the preset switch-on time or when oper‐ ated directly: any external temperature. Open the vents to allow air to flow out.
Online Edition for Part no. 01 40 2 606 469 - 03 11 490
131
i
Interior equipment Integrated universal remote control* The concept This system can replace up to three different hand-held transmitters for various types of re‐ mote-controlled equipment, such as garage doors or lighting systems. The hand-held transmitter signal can be pro‐ grammed on one of the three memory buttons. The corresponding device can then be operated using the programmed memory button. The LED indicates that a signal is being trans‐ mitted. When selling the vehicle, delete the stored pro‐ grams for security reasons. During programming During programming and before activat‐ ing a device using the universal remote control, ensure that there are no people, animals, or ob‐ jects in the range of movement of the remote- controlled device; otherwise, there is a risk of injury or damage. Also follow the safety instructions of the hand- held transmitter.◀
Compatibility
If this symbol is printed on the packaging or in the instructions of the hand-held transmitter, the remote-controlled de‐ vice is generally compatible with the universal remote control. If you have any questions, please contact: ▷ Your service center. ▷ www.homelink.com on the Internet.
Programming
▷ LED, arrow 1. ▷ Memory buttons, arrow 2. Fixed-code hand-held transmitters 1. Switch on the ignition. 2.
Initial setup: Press both outer buttons 1 and 3 for approx. 20 seconds until the LED flashes. All programs of the three memory buttons, arrow 2, are cleared.
3. Hold the hand-held transmitter a distance of approx. 2 to 8 in/5 to 20 cm from the memory buttons.
4. Simultaneously press the transmit button of the hand-held transmitter and the memory button of the universal remote control. The LED flashes slowly.
5. Release both buttons when the LED flashes
rapidly. If the LED does not flash rapidly after approx. 15 seconds, change the distance and repeat the step.
The device can be operated using the memory button with the engine running or the ignition switched on. Malfunction If the device cannot be used after repeated at‐ tempts at programming, please check whether the hand-held transmitter is equipped with an alternating code system.
132
Online Edition for Part no. 01 40 2 606 469 - 03 11 490
5. Press the button on the receiver of the de‐ vice to be set. You have approx. 30 seconds for the next step.
6. Press the programmed memory button of the universal remote control three times.
The device can be operated when the engine is running or the ignition is switched on. Reassigning individual programs 1. Switch on the ignition. 2. Hold the hand-held transmitter a distance of approx. 2 to 8 in/5 to 20 cm from the memory buttons.
3. Press the memory button of the universal
4.
remote control. If the LED flashes slowly after approx. 20 seconds, press the transmit button on the hand-held transmitter.
5. Release both buttons when the LED flashes
rapidly. If the LED does not flash rapidly after approx. 15 seconds, change the distance and repeat the step.
Deleting all stored programs Press the left and right memory buttons for ap‐ prox. 20 seconds until the LED flashes rapidly. All stored programs are deleted. The programs cannot be deleted individually.
To do so: ▷ Read the instructions of the hand-held
transmitter.
▷ Press the memory button of the universal
remote control for an extended period.
If the LED flashes rapidly for a brief period and then lights up continuously for approx. 2 sec‐ onds, the hand-held transmitter is equipped with an alternating code system. In this case, program the memory buttons as described under Alternating-code hand-held transmitters. Alternating-code hand-held transmitters Please obtain information on synchronizing the device in the operating manual of the device be‐ ing set up. Programming will be easier with the aid of a sec‐ ond person. 1. Park the vehicle within range of the remote-
controlled device.
2. Program the universal remote control as de‐ scribed above under Fixed-code hand-held transmitters.
3. Press and hold the programmed button on the interior rearview mirror for approx. 5 sec‐ onds until the device to be adjusted is acti‐ vated. If the device does not become activated, press and hold the button and watch the LED: ▷ If the LED lights up continuously, the
programming is completed. The device should become activated when the but‐ ton is pressed briefly.
▷ If the LED flashes for approx. 2 seconds
and then lights up continuously, con‐ tinue the programming procedure be‐ ginning with step 4.
4. Locate the button on the receiver of the de‐
vice to be set, e.g., on the drive.
Online Edition for Part no. 01 40 2 606 469 - 03 11 490
133
i
Ashtray/cigarette lighter* Front: manual transmission Opening
Front: automatic transmission* Opening
Press on the cover.
Emptying Take out the insert. Lighter
Push in the lighter. The lighter can be removed as soon as it pops back out.
Danger of burns Only hold the hot lighter by its knob; oth‐ erwise, there is the danger of getting burned. Switch off the ignition and take the remote con‐ trol with you when leaving the vehicle so that children cannot use the lighter and burn them‐ selves.◀
Press on the cover.
Emptying Take out the insert. Lighter
Press on the cover.
Push in the lighter. The lighter can be removed as soon as it pops back out.
Danger of burns Only hold the hot lighter by its knob; oth‐ erwise, there is the danger of getting burned. Switch off the ignition and take the remote con‐ trol with you when leaving the vehicle so that children cannot use the lighter and burn them‐ selves.◀
134
Online Edition for Part no. 01 40 2 606 469 - 03 11 490
Rear Opening
Press on the cover.
Emptying Take out the insert. Lighter
Push in the lighter. The lighter can be removed as soon as it pops back out.
Danger of burns Only hold the hot lighter by its knob; oth‐ erwise, there is the danger of getting burned. Take the remote control with you when leaving the vehicle so that children cannot use the lighter and burn themselves.◀
Connecting electrical devices Sockets* The lighter socket can be used as a socket for electrical equipment while the engine is running or when the ignition is switched on. The total
load of all sockets must not exceed 140 Watt at 12 V. Do not damage the socket by using unsuitable connectors. Front center console: manual transmission
Press on the cover. Remove the cover or cigarette lighter*.
Front center console: automatic transmission*
Press on the cover. Remove the cover or cigarette lighter*.
Center armrest*
Remove the cover.
135
Online Edition for Part no. 01 40 2 606 469 - 03 11 490
i
Rear center console
Remove the cover or cigarette lighter*.
In the cargo area* The socket is located in the cover of the loading lip. To access the socket: fold open the cover.
Through-loading system* General information The cargo area can be enlarged by folding down the rear seat backrest. The rear seat backrest is divided into two parts at a ratio of 60 to 40. The sides can be folded down separately or together. Opening
Move the front seats to an upright position Before folding down the rear backrests, ensure that the front seats are moved forward slightly and are in an upright position. Other‐ wise, the head restraint and screen could be damaged.◀
1. Unlock the belt lock of the center safety belt
in the rear using the latch plate of another safety belt. Insert the latch plate at the end of the belt into the specially designated fixture on the rear window shelf.
2.
3. Push the corresponding head restraint
down as far as it will go.
4. Pull the corresponding lever in the cargo
area to release the rear seat backrest.
5. The unlocked rear seat backrest moves for‐ ward slightly. Fold the backrest forward by the head restraint.
Closing 1. Return the rear seat backrest to the upright
seating position and engage it.
136
Online Edition for Part no. 01 40 2 606 469 - 03 11 490
Ensure that the lock is securely en‐ gaged
When folding back the backrest, be sure that it locks in place securely. If it is not properly engaged, transported cargo could enter the passenger compartment during braking or evasive maneuvers and endanger the vehi‐ cle occupants.◀
2. Release the latch plate from the fixture on the rear window shelf and insert it into the belt lock of the center safety belt. Make sure you hear the latch plate engage.
To secure cargo, refer to page 149, with nets or draw straps, the cargo area is fitted with lashing eyes.
Ski bag* Capacity The ski bag can be used to transport up to four pairs of skis with a length of up to 6 ft/2.10 m or, depending on the binding, up to two snow‐ boards with a length of up to 5 ft/1.60 m. Preparing and loading the ski bag 1. Fold open the center armrest on the inside. 2. Open the inside cover and cargo area by
pressing the button.
5.
Insert the tongue plate into the belt buckle.
6. Tighten the retaining strap.
Securing the ski bag Secure the ski bag by tightening the re‐
taining strap; otherwise, the contents could present a source of danger to the passengers, for example during braking or evasive maneu‐ vers.◀
Removing the ski bag The ski bag can be removed entirely, e.g., to dry quickly or to use other inserts.
3. Lay out the ski bag. 4. Load the ski bag. If necessary, wrap the
sharp edges of the skis. If necessary, open the ski bag zipper to ease loading or to dry the ski bag.
1. Pull the handle forward and lift the ski bag
out.
2. Close the cover in the cargo area. More information on the various inserts available can be obtained from your service center.
Online Edition for Part no. 01 40 2 606 469 - 03 11 490
137
s
Storage compartments Storage compartments The following storage compartments are avail‐ able in the vehicle interior: ▷ Glove compartment on the driver's and front
passenger side, refer to page 138.
Closing Fold up the cover. USB interface for data transfer
▷ Storage compartment on the center con‐
sole: manual transmission.
▷ Storage compartment*, refer to page 141, in the center console for remote control: au‐ tomatic transmission*.
▷ Storage compartment in the center armrest,
refer to page 139, in the front and rear.
▷ Compartments in the doors. ▷ Pockets* on the backrests of the front seats. ▷ Net* in the front passenger footwell.
Glove compartment Front passenger side Opening
Connection for importing and exporting data on USB devices, e.g.: ▷ Personal Profile settings, refer to page 29. ▷ Music collection, refer to page 188. Observe the following when connecting: ▷ Do not use force when plugging the con‐
nector into the USB interface.
▷ Do not connect devices such as fans or
lamps to the USB interface.
▷ Do not connect USB hard drives. ▷ Do not use the USB interface to recharge
external devices.
Driver's side Opening
Pull the handle. The light in the glove compartment switches on.
Close the glove compartment again im‐ mediately
Close the glove compartment immediately after use while driving; otherwise, injury may occur during accidents.◀
Pull the handle.
138
Online Edition for Part no. 01 40 2 606 469 - 03 11 490
Close the glove compartment again im‐ mediately
Close the glove compartment immediately after use while driving; otherwise, injury may occur during accidents.◀
This prevents access to the storage compart‐ ment and to the cargo area. Connection for an external audio device
Closing Fold up the cover.
Center armrest Front A storage compartment is located in the center armrest between the front seats. Opening
Press the button.
Locking the storage compartment
This can be used to connect an external audio device, such as a CD or MP3 player. ▷ AUX-IN port, refer to page 192. ▷ USB audio interface*, refer to page 193. Rear The center armrest contains a storage compart‐ ment. Folding down
Pull on the opener and fold the armrest forward.
The storage compartment in the armrest can be locked with an integrated key to separately se‐ cure the trunk lid, refer to page 37, for example. After the storage compartment is locked, the re‐ mote control can be handed out without the integrated key, refer to page 28, for instance at a hotel.
Online Edition for Part no. 01 40 2 606 469 - 03 11 490
139
s
Opening
In the center armrest*
Pull on the handle and fold open the cover.
Fold the cupholder down.
Cupholders Notes
Shatter-proof containers and no hot drinks
Use light and shatter-proof containers and do not transport hot drinks. Otherwise, there is the increased danger of injury in an accident.◀
Unsuitable containers Do not forcefully push unsuitable contain‐ ers into the cupholders. This may result in dam‐ age.◀
Front: manual transmission On the center console
Before closing the center armrest, fold the cu‐ pholder back up. Push the lever in the direction of the arrow to do this.
Front: automatic transmission*
To open: press on the cover.
Rear In the front center armrest.
To open: press the button. The insert folds out. To use as a storage compartment, fold the insert back in.
140
Online Edition for Part no. 01 40 2 606 469 - 03 11 490
The cupholder can be adjusted for three differ‐ ent container sizes. To open: press the button. To reduce in size: fold closed to the desired po‐ sition. To close: fold all the way closed. The cupholder must be closed before it can be opened fully.
Remote control storage compartment* Opening
Press on the cover.
Remote control storage compartment
Storage is possible in a vertical position in the center armrest.
Clothes hooks The clothes hooks are located next to the grab handles in the rear and on the door pillar in the rear.
Do not obstruct view When suspending clothing from the
hooks, ensure that it will not obstruct the driver's vision.◀
No heavy objects Do not hang heavy objects from the hooks;
otherwise, they may present a danger to pas‐ sengers during braking and evasive maneu‐ vers.◀
Storage compartments in the cargo area Net* Smaller objects can be stored in the net on the side of the cargo area. To transport larger objects, it can be pushed down. Multi-function hook* A multi-function hook is available on the left cargo area wall.
Online Edition for Part no. 01 40 2 606 469 - 03 11 490
141
s
Light and suitable objects only Only hang light bags or suitable objects
from the holders. Otherwise, there is a danger of objects flying about during braking and evasive maneuvers. Only transport heavy luggage in the trunk if it has been appropriately secured.◀
Storage compartment* under the cargo floor panel
Raise the cargo floor panel.
Storage compartment on the side* A storage compartment is located at the side of the cargo area. Lashing eyes To secure the cargo, refer to page 149, there are lashing eyes in the cargo area.
142
Online Edition for Part no. 01 40 2 606 469 - 03 11 490
Online Edition for Part no. 01 40 2 606 469 - 03 11 490
143
Online Edition for Part no. 01 40 2 606 469 - 03 11 490
Driving tips
This chapter provides you with information useful in dealing with specific driving and operating modes.
Online Edition for Part no. 01 40 2 606 469 - 03 11 490
g
Things to remember when driving Breaking-in period General information Moving parts need to be broken in to adjust to each other. The following instructions will help achieve a long vehicle life and good economy. Engine and differential Always obey the official speed limit. Up to 1,200 miles/2,000 km Do not exceed the maximum engine and road speed: ▷ For gasoline engine, 4500 rpm and
300 miles/500 km. During this break-in period, engage the clutch gently. Following part replacement The same breaking in procedures should be ob‐ served if any of the components mentioned above have to be renewed in the course of the vehicle's operating life.
General driving notes Closing the trunk lid
Drive with the trunk lid closed Only drive with the tailgate closed; other‐ wise, in the event of an accident or braking or evasive maneuvers, passengers or other road users may be injured or the vehicle may be dam‐ aged. In addition, exhaust fumes may enter the passenger compartment.◀ If driving with the tailgate open cannot be avoided: ▷ Close all windows and the glass sunroof*. ▷ Greatly increase the blower speed. ▷ Drive moderately. Hot exhaust system Hot exhaust system High temperatures are generated in the
exhaust system. Do not remove the heat shields installed and never apply undercoating to them. When driv‐ ing, standing at idle and while parking, take care to avoid possible contact between the hot ex‐ haust system and any highly flammable materi‐ als such as hay, leaves, grass, etc. Such contact could lead to a fire, and with it the risk of serious personal injury as well as property damage.