Post Topic
|
Post #1
 8th April 2005 - 02:13 PM 8th April 2005 - 02:13 PM
|
|---|---|
|
Hey guys.. Thought I might give back to the community that helped me (jaws, anthony, commodorenut and STREETCOMMODORES/BOOSTCRUISING) in so many different ways... here goes.. THE BIG DEFINATIVE GUIDE ON INSTALLING A V6 INTO YOU VB - VL Section 1 - The CANVAS The canvas. Well really any vb to vl as long as its not a write off or stolen (LOL). If you are putting it into a VK it will be an advantage if you find a vk which is efi as it has a return line to the fuel tank. Again easier to do the conversion if you buy a rolling shell (no engine or gearbox)... Section 2 - The Donor Car This is the car where you will get most of your gear from.. Engine, radiator, gearbox, suspension etc etc. Most people buy a car with some damage (side or rear so as the engine is still good) or even buy a cheap whole car. This is important to make sure that there is little to no frontdamage as a bent crossmember can be a pain to figure out down the track when your having alignment issues... Best cars for this is probably anything in the vn-vs range.. Section 3 - The Engine So by now we get to the stage where we put the engine in the car. When we (jaws, Microant, arab 4x4 offroad and others) did it a couple of times we dind't have an engine hoist. So we basically 'lifted the car over the engine. This process can be used for taking the engine out of the dondor car (ill use VN from now on) and putting the engine into the Canvas (i'll use vk from now on). The advantage of doing it this was is that you retain the crossmember and suspension with it.Plus you get the gearbox out at the same time. Less time putting it all back in, plus you get later model suspension and brakes (required for eng cert). Basically you undo the 3 nuts on each strut tower, the 4 nuts holding the crossmember in place (2 on each side on the chassis rail, accessable from underneath the car), the swaybar mounts on the chassis rails, 2 bolts holding the cat converter on and the gearbox crossmember. Then you remove all the items connecting to the engine like radiator and heater hoses, intake pipe etc. What we did is cu the loom at the firewall and put it on top of the engine (all the wireing was still connected to the engine but cut the loom at the car). Here is a picture of this all done all bolts are undone and engine, crossmember, gearbox, suspension etc is all ready to be removed...  After this is done take a break, cos the next bit involves lifting. Get 5-6 of your mates around and pretty much you want to lift the car body over the engine. Take the car body back so that the engine is left in front of the (now engineless) vn. Pic below shows the finished product. 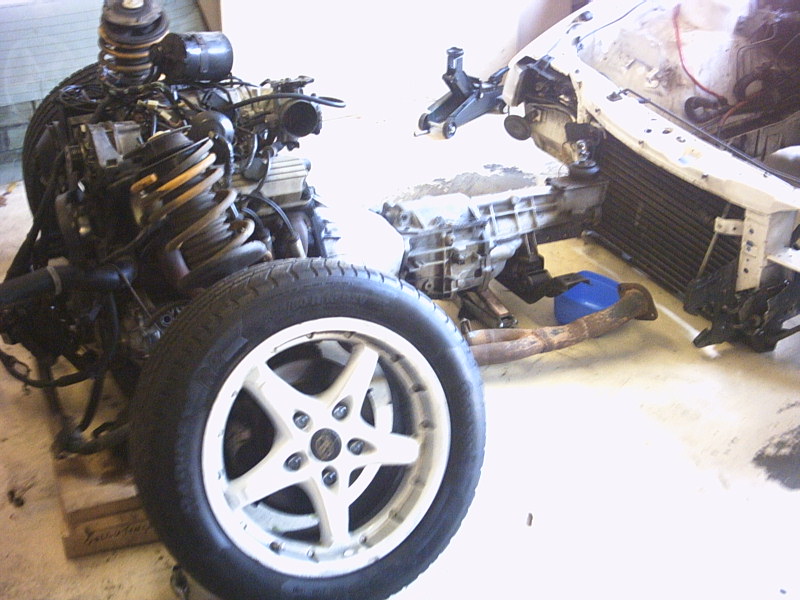 Now that you have the engine/gearbox combo out of the donor car you can rest for a sec. Section 3 - Engine into the Canvas (aka VK) Putting the engine in is pretty much a reverse process with taking the engine out of the donor car. Again call 6 of your mates to come around and lift the vk shall (minus crossmember and front suspension) over the vn front end (crossmember, engine, gearbox, suspension etc). Once its over, line up the crossmember mounts and strut tower bolts and bolt it all together. Picture below shows lifting the vk shell over the engine...  Engine is in...  Section 4 - Gearbox (t5 5spd manual) The following section is for using the t5 5 spd gearbox. Other people have done this using the t700 auto - but i'm not too sure/can't remember how it was done. Since the t5 gbox crossmember don't line up with the factory holes in the chassis rail a new crossmember must be fabricated. This was fabricated by useing the factory m21 crossmember and some bits of steel that jaws found lol. Basically you cut up the bits of steel and weld it onto the factory crossmember so you can mount it to the chassis rails. Pictures tell 1000 words in this case... This picture dhows the factory m21 crossmember and the 2 bits of steel on each side which needed fabrication.  All in...  The original vn t5 mount can't be used as it doesn't fit the m21 crossmember and the vk mount is too short to fit on the gearbox. by using a HQ turbo 400 auto mount lets you mate the gearbox to the crossmember. Pic below shows the hq mount being slightly longer than the vk mount. 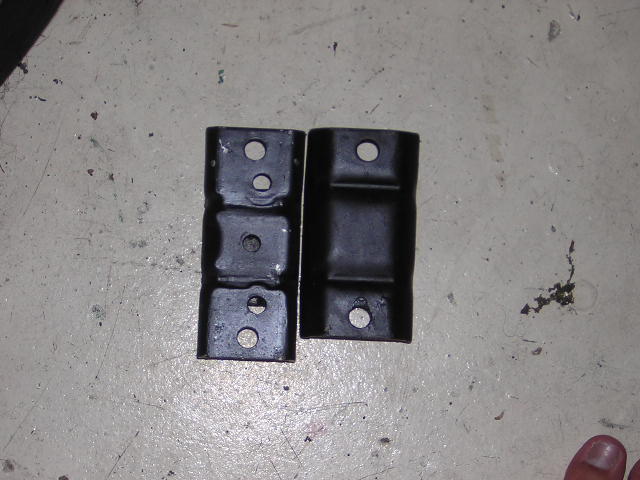 Section 5 - Tailshaft Using the vn tailshaft is fine if you have a borgwarner diff. Just need to get the rear peice shortened by 2 inches. While this is getting done its recommended to get it balanced and have a new centre bearing fitted as the vn ones will more than likely be showing their age... Section 6 -Fuel Tank The vn fuel tank will bolt in no problems using the vn straps. Use the original vn fuel pump and plumb it up to your fuel lines. The original wireing loom will plug straight into the pump (if you have an efi car - not sure about carby :S) The filler neck will need to be shortened by 3" which can be done by using the ol angle grinder... Section 7 - Cooling You can use the original v6 radiator although as its out of the car might be a wise desicion to get it cleaned etc. The radiator will fit but there is some cutting involved. You have to cut the bottom left side to make room for the bottom hose.  Section 8 - Digital Dash The digital dash does work with the v6  For the speedo you will need the vk calais cable to electronic converter and the original vn sender. I had pictures but I lost them in a format For the speedo you will need the vk calais cable to electronic converter and the original vn sender. I had pictures but I lost them in a format  . You need to use the vk speedo converter houseing and use the vn speedo unit needle. This then screws into the t5 5 speed, then just connect earth, power and speedo signal to the digi dash. Now for the correct speed into the ecu you need to take apart a vn dash unit and get the 2 circuit boards. There is a wiring diagram on the back of the dash so you will need that. Basicall there are 2 circuit boards which control the speedo, which are joined by a peice of ribbon cable. . You need to use the vk speedo converter houseing and use the vn speedo unit needle. This then screws into the t5 5 speed, then just connect earth, power and speedo signal to the digi dash. Now for the correct speed into the ecu you need to take apart a vn dash unit and get the 2 circuit boards. There is a wiring diagram on the back of the dash so you will need that. Basicall there are 2 circuit boards which control the speedo, which are joined by a peice of ribbon cable. There is a 5 pin connection on one of the boards which connects to the green circuit on the back of the dash. One of the pins, is for power, the other for ground. Then there is signal in and 10 pulse out. You will have to splice the signal from the gbax to the dash and the signal in on the original vn dash circuit boards. then run the 10 pulse out to the ecu speed in and your set. Once this is don't you can hide the vn speedo circuit baords somewhere in the back of your dash. I know this sounds confusing but when I get my new digi cam i'll take some pics End That about wraps it up I think... If you have any mroe questions please pm or post in here With the Wiring for the engine, there is about 6-7 wires which need wiring up. I got an auto elecy to wire up the engine so it runs no problems and it set me back $350... With the interior and exterior its all up to you what you want to do
-------------------- now known as 'DioXidE'
|
|


|
|
|---|


|
|
thevkguy
Post #5
putting in an rb20/35/30 into a vb-vs is the same.. use a vl crossmember/engine mounts and your set. |
|---|
-
Member Login
If you have a BoostCruising account enter your user name and password into the yellow box.
Alternatively, you can quickly login with Facebook.
If you don't have an account create one below.
Create Account -

Login using your Facebook account!
1 User(s) are reading this topic (1 Guests and 0 Anonymous Users)
0 Members:
Loading...
x