How To Fit A Minispool And Change Your Diff Ratio - Using a Borg Warner in an R31 Skyline as an example
Post Topic
|
Post #1
 12th June 2009 - 12:13 AM 12th June 2009 - 12:13 AM
|
|---|---|
|
Ok This is my first actual tutorial and there are a few steps so we'll see how this goes. If i leave anything out, just ask. This is really three tutorials in one, showing you mainly how to fit a minispool, but will also cover everything you need to know to just replace a diff centre with another standard one, as well as give you nearly everything you need to know to change your diff ratio by fitting a different crown gear and pinion gear. Step one. What I did first was obviously jack the car up and remove the rear wheels. Get it as high as you can. Then support it with chassis stands. I use two pairs, just in case. Make sure you have the front wheels chocked. This is the shed. At our disposal have an engine stand, an engine crane, 2x race jacks, 4 chassis stands, 3hp air compressor with rattle gun, air ratchet etc, roll cab with top box that has full assortment of standard spanners, long spanners short spanners, ratchet spanners, sockets, deep sockets, rattle gun sockets, etc etc. 90% snap on, rest is blue point and kincrome. Essentially, "If you cant find the right tool in THIS garage, Mr Arizona, you shouldnt be anywhere NEAR a car..." 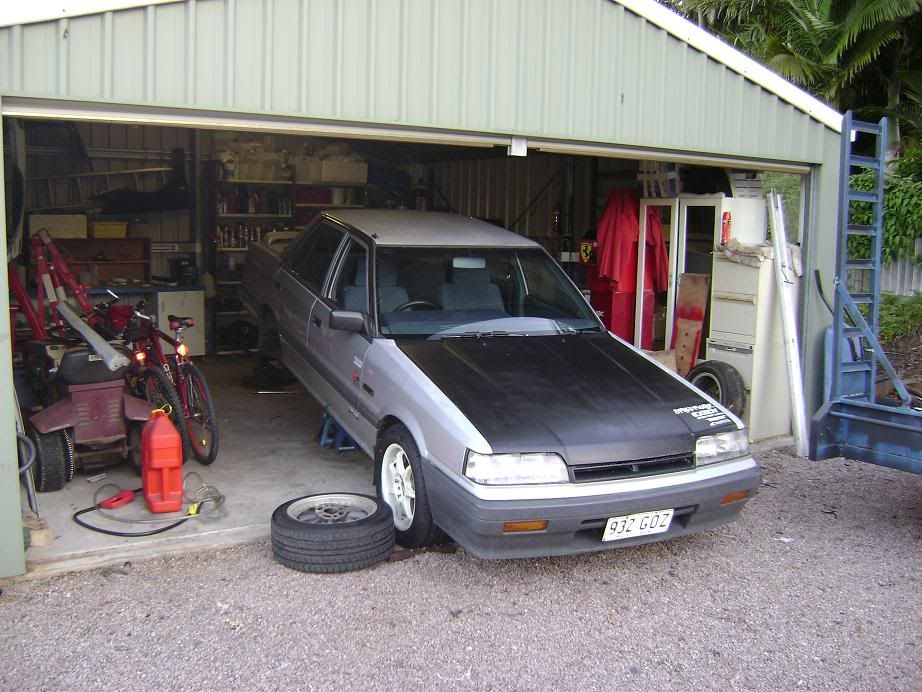 Step two - Next I removed the rear cover off the diff. I undid and removed all bolts so that it was just being held there with the gasket, put a dish underneath, and used a flat blade screwdriver to seperate it a little but, to allow the fluid to drain out. Once the fluid stops, remove the plate completely. 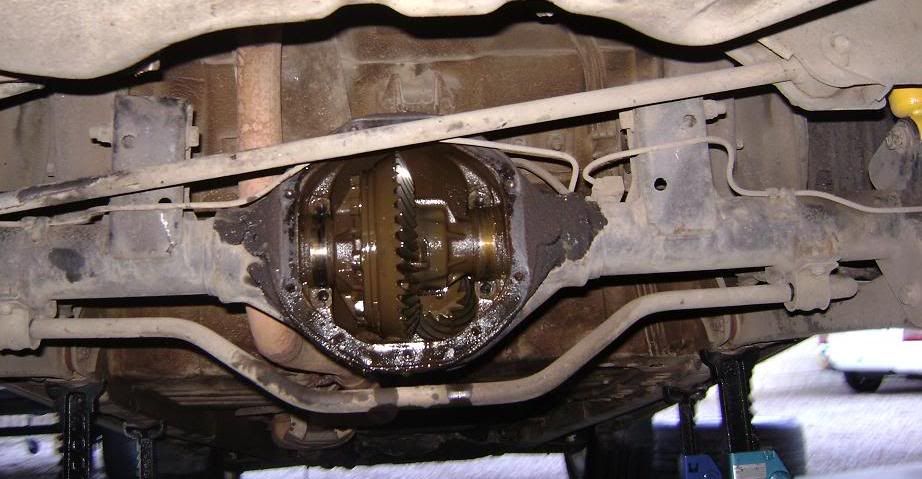 Step three - you can do this later, but its MUCH easier to do it now. You will see the bolts with the red circles. You want to crack these with a breaker bar while you can use the handbrake to stop the gear from turning. No way will you be able to do this once the diff centre is out! The bolts take a 5/8th socket, and are LEFT hand thread, so to loosen them, turn them as tho you are tightening them. You can do about 3 of them, then release handbrake, rotate your back wheel a lil, then put ur handbrake back on again and do a couple more until you have loosened them all half a turn. 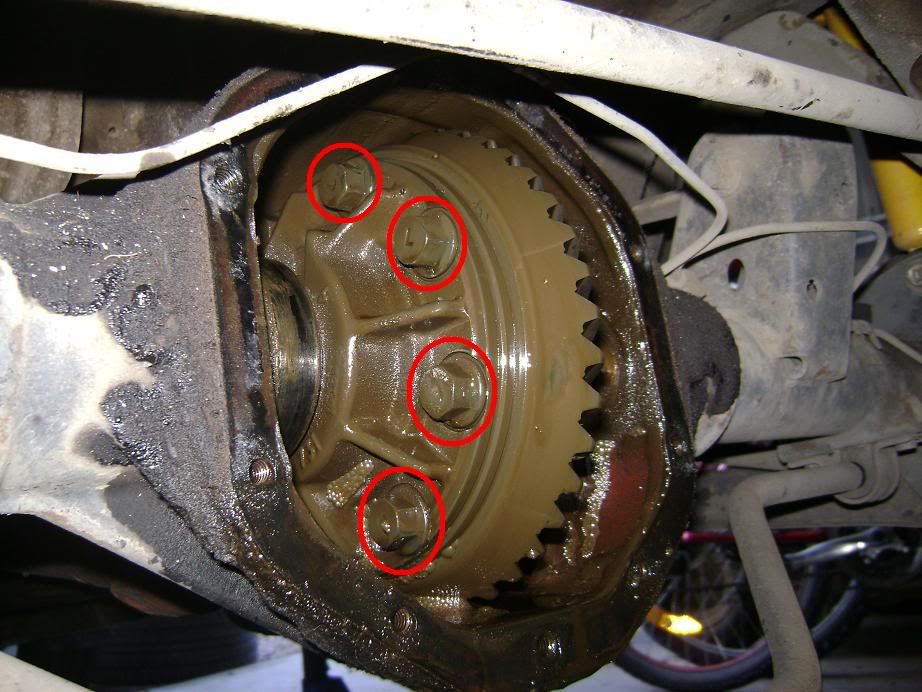 Step four- You need to slide your axles outwards to remove the diff centre. On my car, and R31 skyline, you will start by partially removing the rear brakes. Mine has a disc brake rear. Some of this will also carry over to other vehicles, but some will have slight differences. The two bolts I have circled use a 17mm socket. I needed to put a fair amount of torque on it, so I used a socket and breaker bar, then a ratchet ring spanner. Once you have removed these two, you should be able to remove the rotor and caliper as one item - with the caliper still holding onto the rotor. 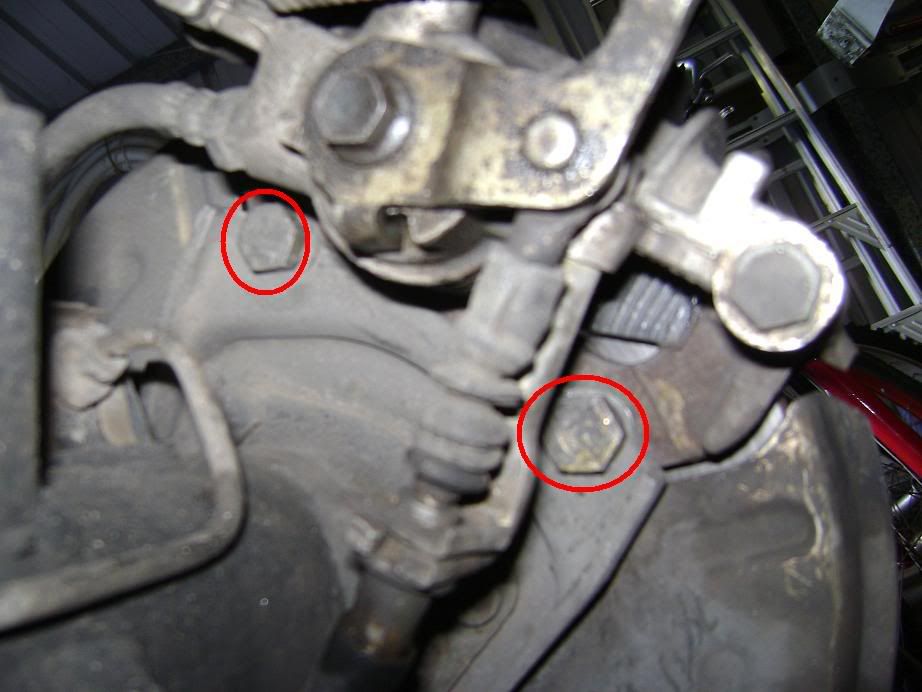 So you end up with this - 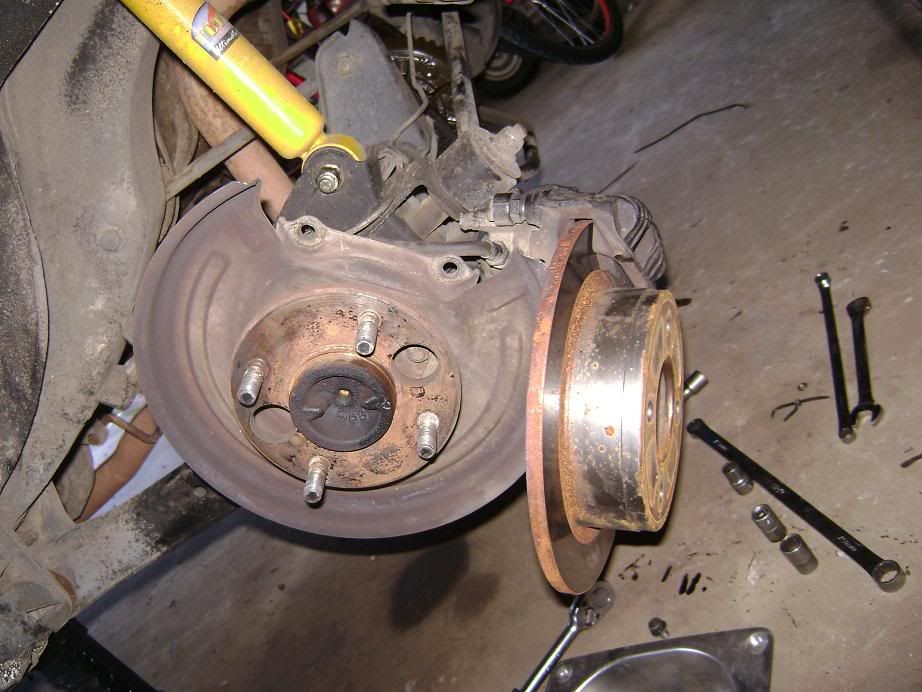 Step five- Not sure what you call this part, i will edit it with the proper name when i know it haha... Im calling it the axle plate cos it makes sense to call it that. Each plate is held in place by four bolts, which are accessible through access holes in the hub. Couple of pictures to explain it - 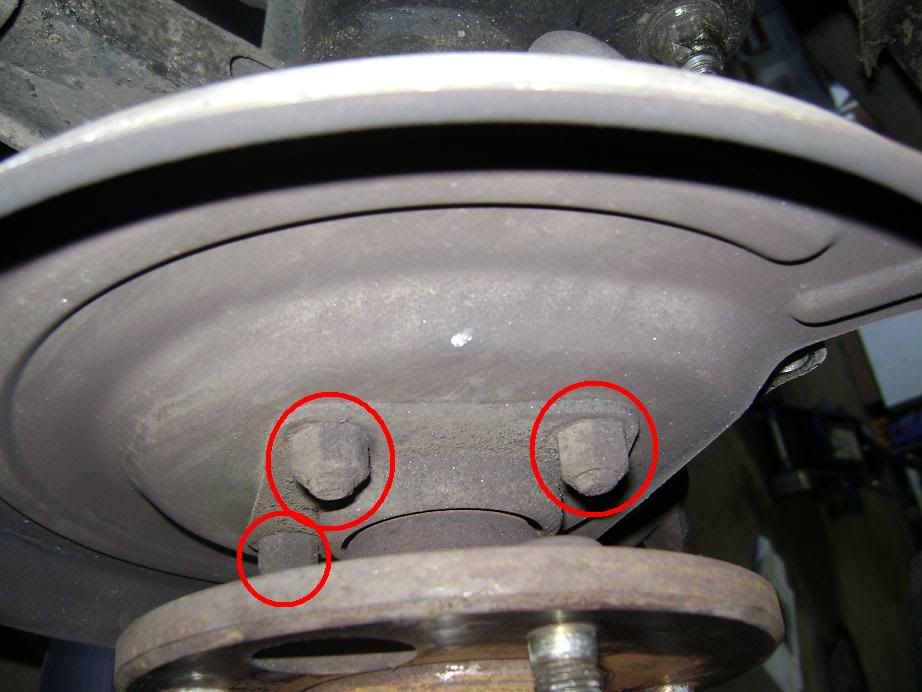 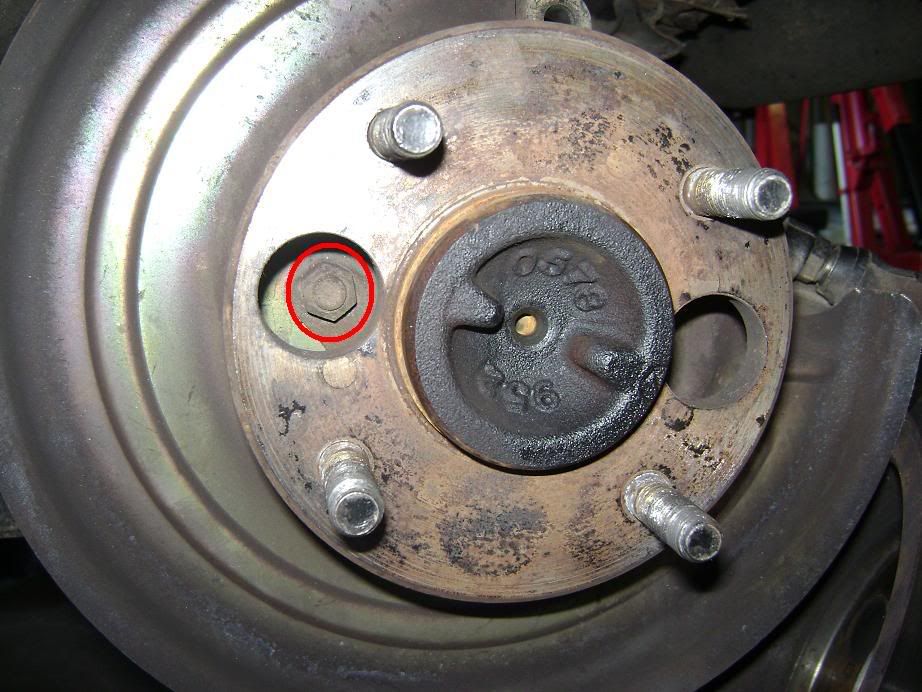 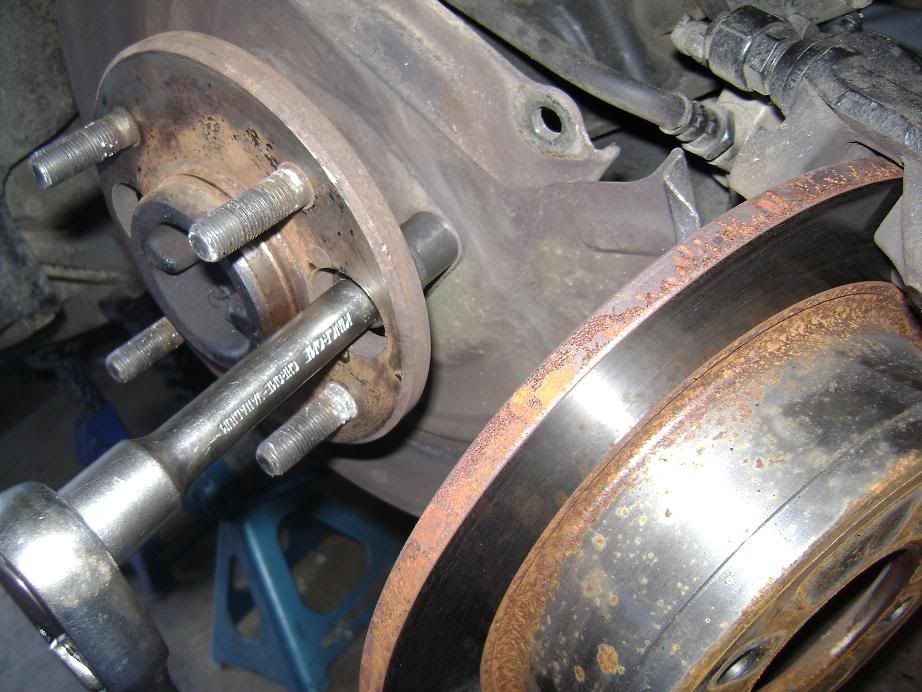 Step six - The axles will then slide out with a little convincing. I simply used a pry bar. Not too hard. You can see how the rotor is out of the road, being held by the caliper. 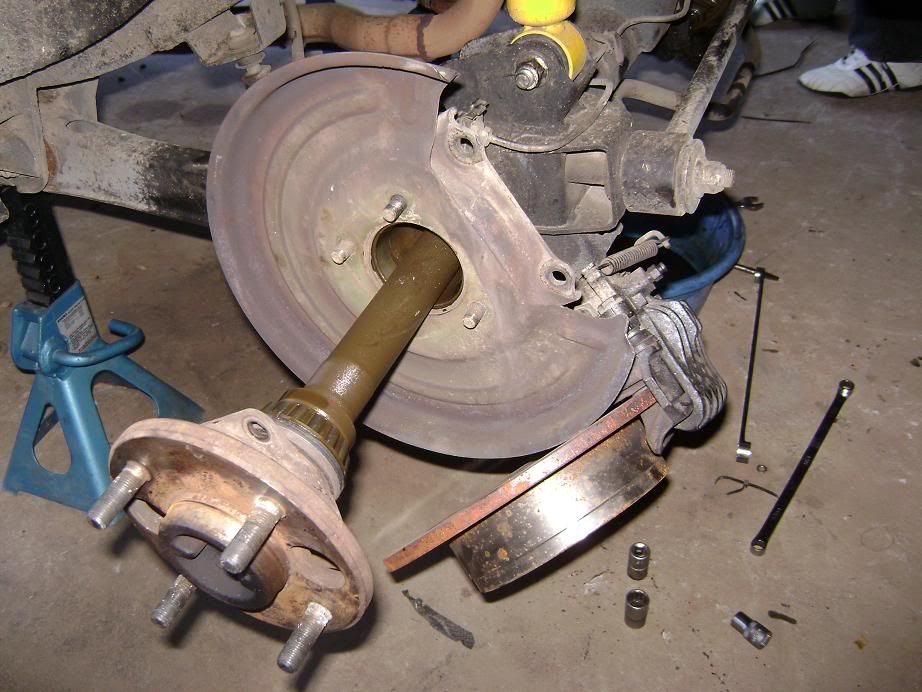 Step seven - Remove the four bolts which hold the retaining clasps that hold the centre in place. In this picture i have already removed them, but have circled the holes that the bolts came from. I have a pic of them back in place further along in the writeup that you can double check but they are simple to see and remove. You should then be able to lever the diff centre up and out. Dont lose the shims and bearing seats that will fall out from either side! (these are what the clasps that you will have just removed were holding down) 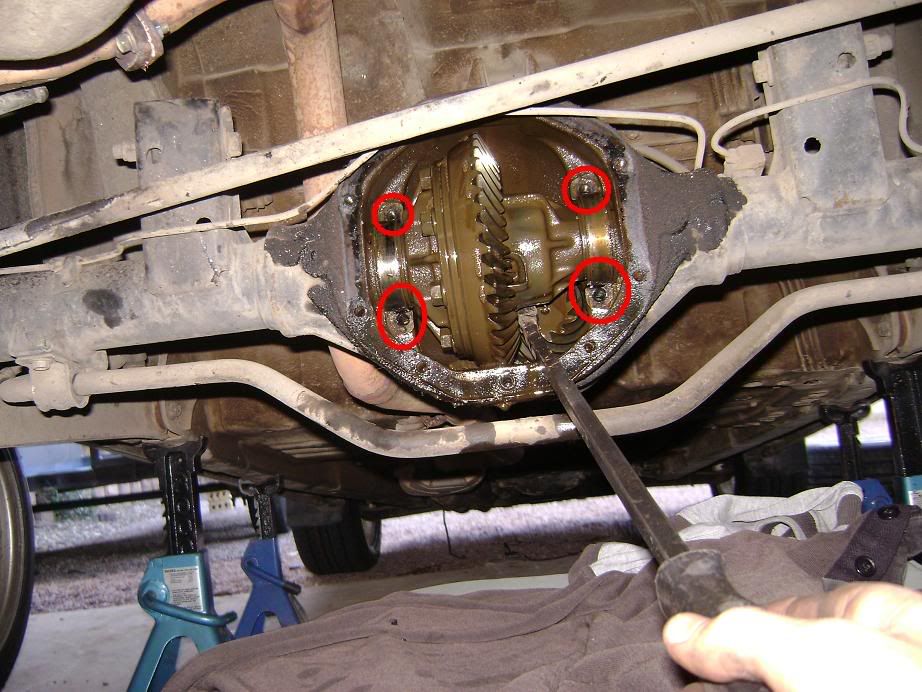 Step eight - All you will have left now is the pinion gear. You can remove this without too much hassle, if you are changine your diff ratio.  Step nine- Remove the bolts that you loosened off while the centre was still in the car. You can then use a hammer to gently tap the crown gear off. From here, you can simply fit a different ratio crown gear to change your diff ratio to a 4.11 etc etc, then put it all back together. 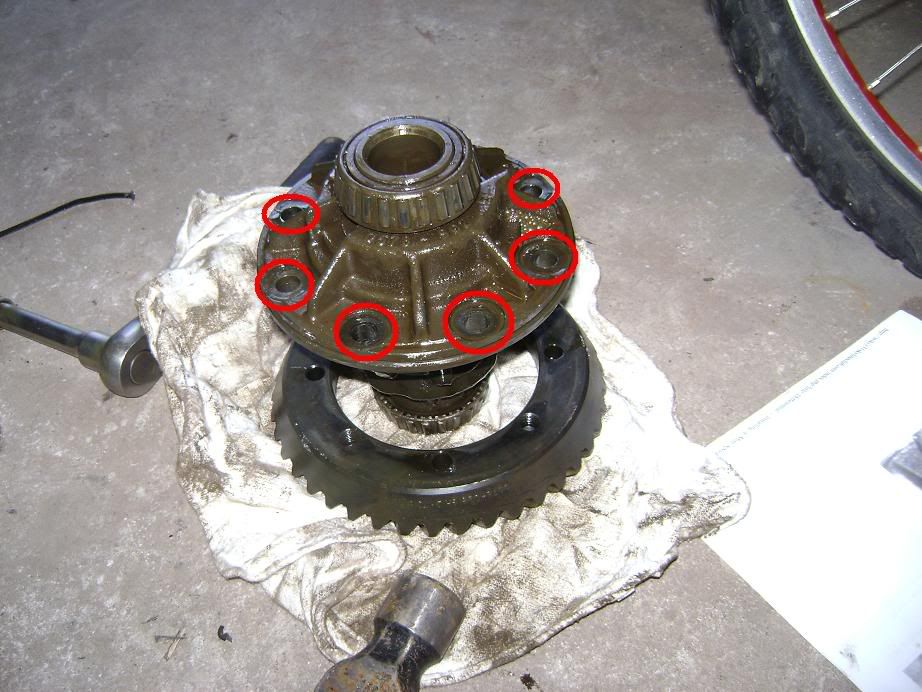 Step ten - Remove the three pins in the next picture (one is smaller cos i think i broke it meh) and you will then be able to use a flat blade screwdriver to ease the two halves of the centre apart. These small pins hold the larger rods in place, that are mentioned in the next couple of steps. You now have two halves - One will look like just a cover, the other will house the spider gears. You need to hammer out the large rods (that the small pins held in) that hold the spider gears in place, and remove any shims from inside. 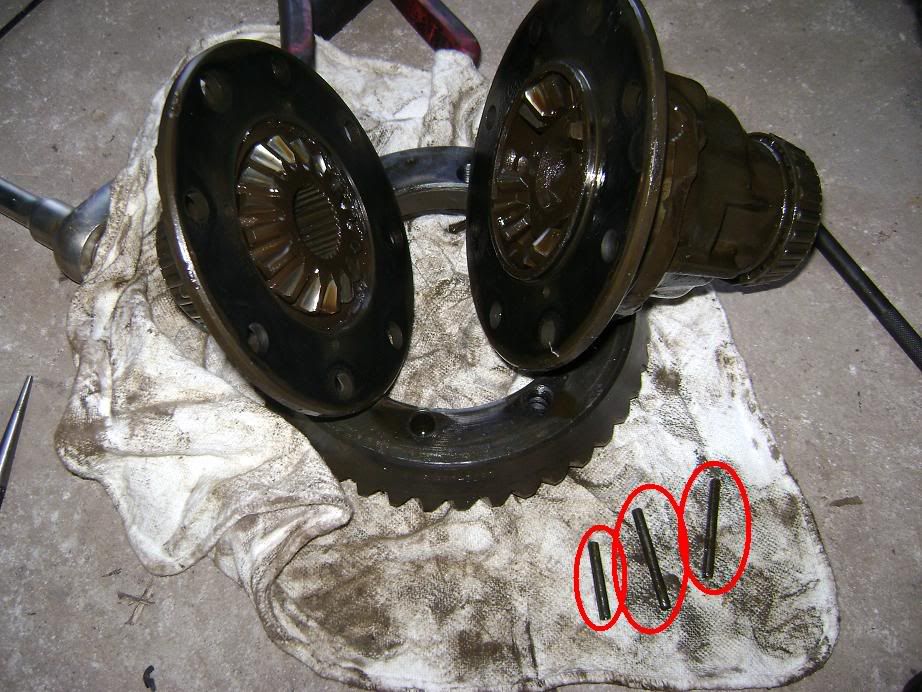 Thats the large rods removed too now. You should have all this crap sitting in front of you. 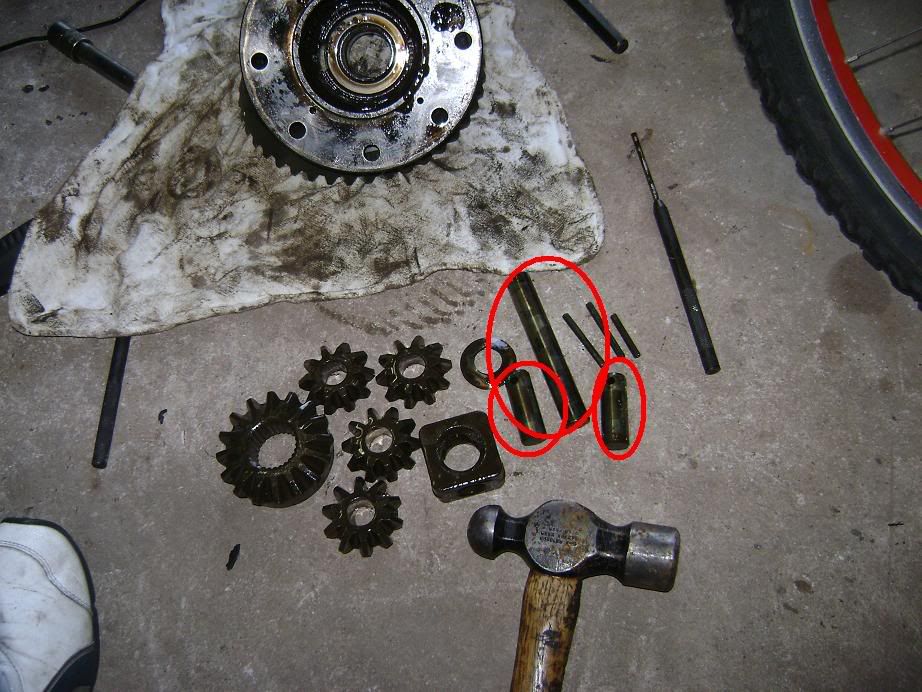 Step eleven - You are replacing all the stuff on the floor, with the minispool centre which im holding there. 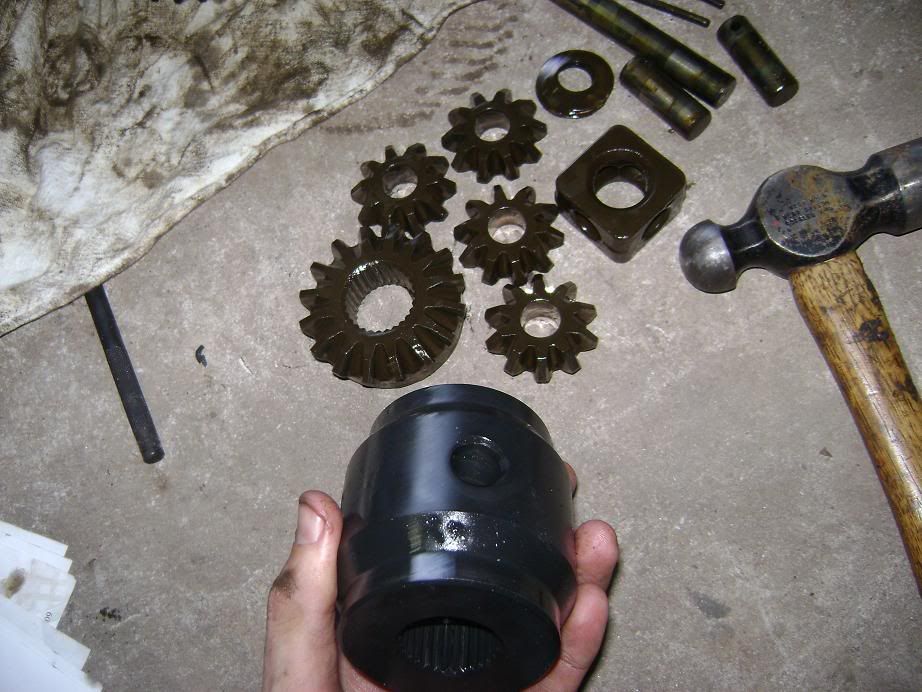 Drop it in, like so, making sure you line up the holes on it, with the holes for the large rods that originally went through the spider gears. 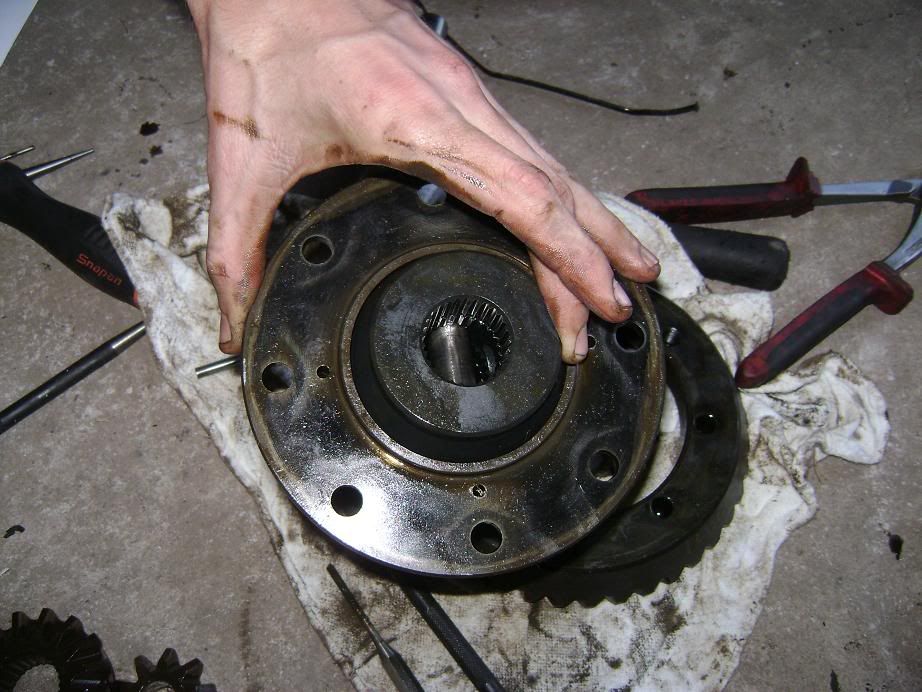 Step twelve - Put the large rods back in through their respective holes. MAKE SURE you line up the holes for the smaller pins at this point. 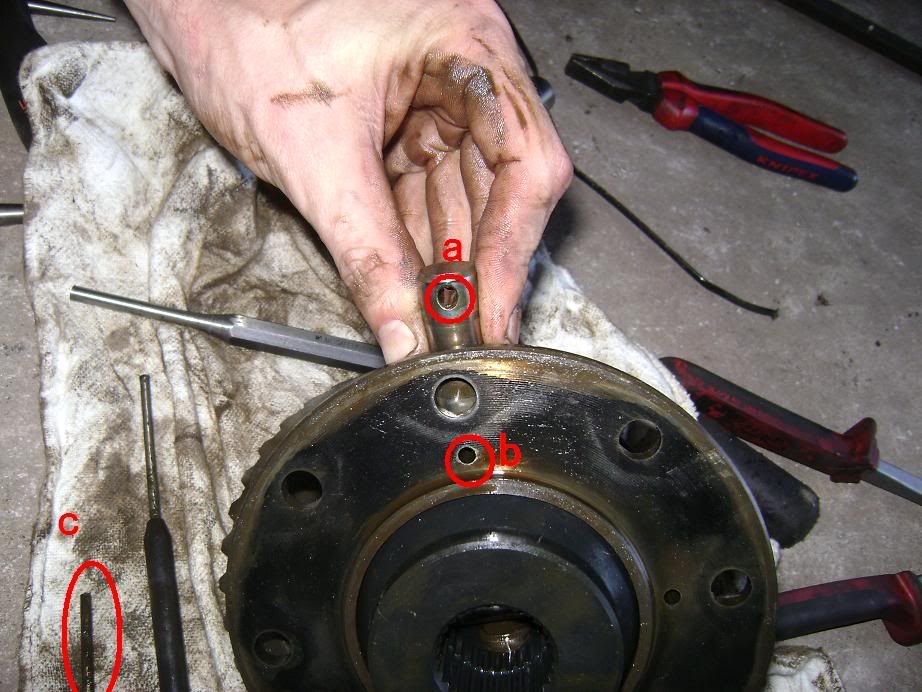 Step thirteen - Refit the smaller pins. You then need to fit the two halves back together, and refit the crown gear. Make sure it lines up PERFECTLY with the large bolts that hold the whole thing together. Once that is done, visually the centre shouldnt look any different to when you first removed it. Fit it back in. I found this to be a two man job cos its bloody heavy and you have to hold the bearing guides and shims in place etc. 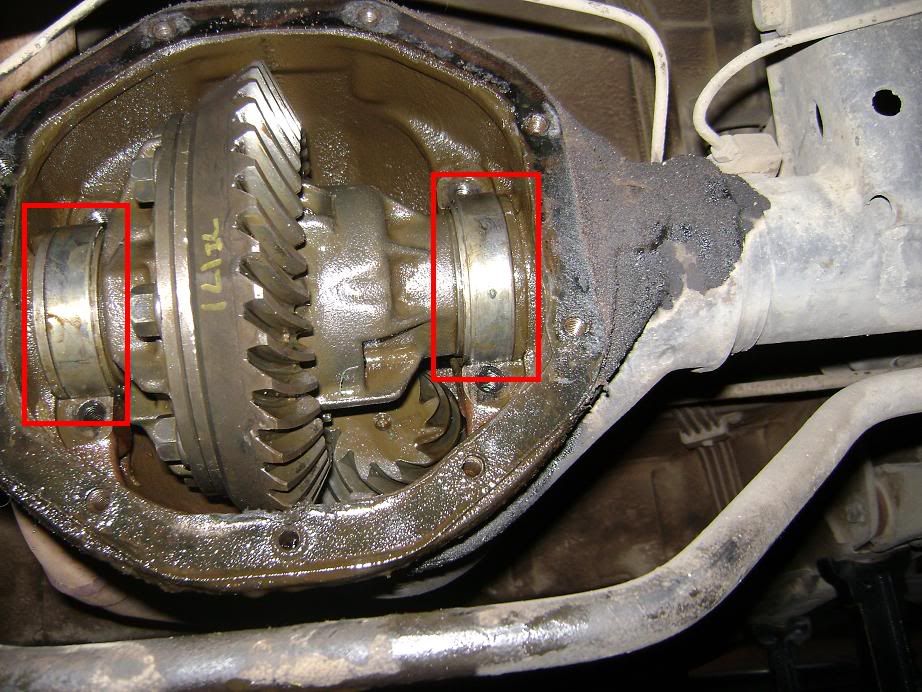 Make sure that the areas in the red boxes are sitting properly, and that there is no play in how its sitting. Should be in just as tight as when you took it out. If its loose, you will need to look at shimming the diff so that it sits properly. Make sure you use the correct shims on the correct sides, as they determine how closely your crown gear and pinion gear mesh together. Too tight and you will get a whine, too loose and it will be noisey too, and clunky. Step fourteen - Put the clasps back on. 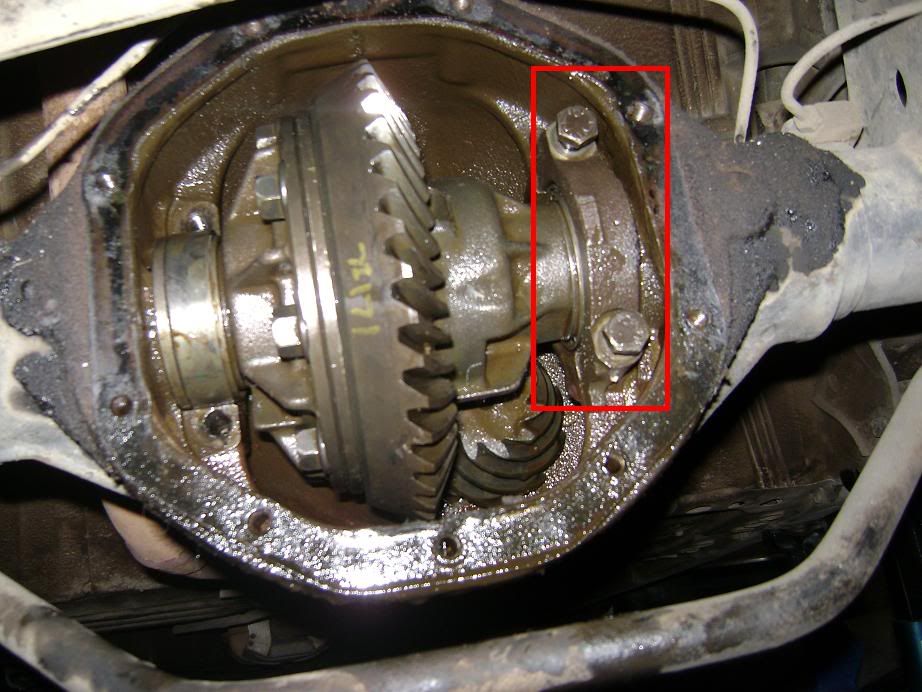 Ok now it is time to reassemble! Make sure you get a razor blade and give the back of the diff as well as the diff cover a thorough clean, then i applied a light film of high pressure gasket goo to both parts, before fitting a new gasket, and putting the back cover back on. I removed the grommet that holds your diff oil in BEFORE putting the cover plate back on, cos it seemed much easier that way. Replace the bolts so its all sealed, and then fill it up with diff oil. Should take 1.7L, i used a synthetis penrite diff oil, not sure of the rating! just go by the recommendation in the book they have wherever you buy your oil. Put the grommet back in, and your laughing. Then, slide the axles back in. You can regrease/replace bearings at this stage i guess, but i didnt. Refit the axle plates, brakes, then the wheels, and youre good to go! Tools i used! I cant remember what all the bolt sizes are haha cos it was a couple of weeks ago! But you'll get there! 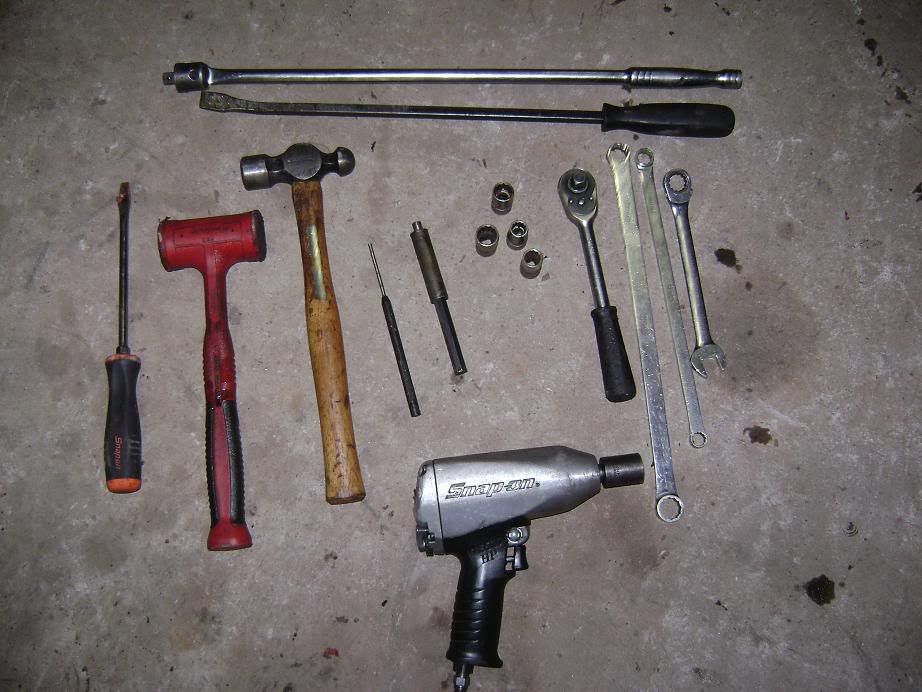 -------------------- Helping smart-arses look like dumb-arses since August '85
Me on TripleJ and smashin it! 72 Ford Galaxie (557 stroker in build) 73 XB Falcon (351/toploader/9") 80 CM Chrysler (265/4spd) 94 XG Falcon Ute (4.0/5spd) 93 EB Fairmont (302/BTR) WANTED: poor condition 2nd hand alloy wheels and tyres. Want some alloys repaired and refinished? PM me |
|


 . Just watch out on the first couple of U-turns you do, its surprisingly easy to loop it hahaha.
 |
|
lil_bobby_260
Post #4
Good to hear! |
|---|
|
|
mongrel_cae71
Post #5
QUOTE (pipster11 @ Jun 15 2009, 05:16 PM)  good job mate will prob end up using this very shortly lol not unless you plan on getting another diff first. you've got a LSD. |
|---|
|
|
pipster11
Post #7
QUOTE (mongrel_cae71 @ Jun 20 2009, 04:35 PM) not unless you plan on getting another diff first. you've got a LSD. well using it for the removal purposes and get the ba rebuild kit and rebuild that mofo its getting pretty winey and clunky and the diff oil was metalic so i think the cones are pretty much history |
|---|
|
|
lil_bobby_260
Post #10
To change the ratio, you simply reassemble it using a different crown and pinion gear. |
|---|

-
Member Login
If you have a BoostCruising account enter your user name and password into the yellow box.
Alternatively, you can quickly login with Facebook.
If you don't have an account create one below.
Create Account -

Login using your Facebook account!
2 User(s) are reading this topic (2 Guests and 0 Anonymous Users)
0 Members:
Loading...
x