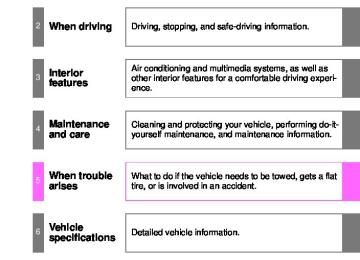
- Download PDF Manual
-
3-2. Using the multimedia system Listening to Bluetooth® audio
The Bluetooth® audio system enables the user to enjoy music played on a portable player from the vehicle speakers via wireless communication. Select “ When a Bluetooth® device cannot be connected, check the con- nection status on the “Bluetooth Audio” screen. If the device is not connected, either register or reconnect the device. (P. 363)
Audio” on the “Select Audio Source” screen.
Audio control screen
Some titles and controls may not be displayed depending on the type of portable audio player used.
to display
Connection status Battery charge “Select Audio Source” screen appears Selecting a Bluetooth® device Select the play mode selection screen Random playback Repeat play Pause Select Setting the sound (P. 335)
to resume play
Indicators
Connection status
Battery charge
Good
Full
Conditions
Not connected
Empty
379
3-2. Using the multimedia system Using a Bluetooth® phone
The hands-free system is a function that allows you to use your cel- lular phone without touching it. This system supports Bluetooth®. Bluetooth® is a wireless data sys- tem that allows the cellular phone to wirelessly connect to the hands-free system and make/receive calls. Before making a phone call, check the connection status, battery charge, call area and signal strength. (P. 381) If a Bluetooth® device cannot be connected, check the connection status on the phone screen. If the device is not connected, either register or reconnect it. (P. 363)
Phone screen
To display the screen shown below, press the Several functions are available to operate on each screen that is dis- played by selecting the 4 tabs.
button.
Device name Bluetooth® connection status
380
■ Microphone
3-2. Using the multimedia system
The vehicle’s built in microphone is used when talking on the phone. The person you are speaking to can be heard from the front speakers.
To use the hands-free system, you must register your Bluetooth® phone in the system. (P. 361)
Status display
You can check indicators such as signal strength and battery charge on any screen.
Connection status Signal strength Battery charge
Indicators
Connection status
Battery charge
Call area
Signal strength
Conditions
Good (Blue)
Not connected
Full
“Rm”: Roaming area Excellent
Empty
Poor
381
3-2. Using the multimedia system
Making a call
Once a Bluetooth® phone is registered, you can make a call using the following procedure: ■ Dialing
Display the phone screen. (P. 380) Select the “Dial Pad” tab and enter a phone number. To delete the input phone number, select For the first digit, you can enter “+” by selecting “” for a while. Select
■ Dialing from the contacts list
You can dial a number from the contact data imported from your cellular phone. The system has one contact for each registered phone. Up to 2500 contacts may be stored in each contact. (P. 383)
Display the phone screen. (P. 380) Select “Contacts” tab. Choose the desired contact to call from the list. Choose the number and then select
382
3-2. Using the multimedia system
■ When the contact is empty
You can transfer the phone numbers in a Bluetooth® phone to the system. Operation methods differ between PBAP (Phone Book Access Profile) compatible and PBAP incompatible Bluetooth® phones. If the cellular phone does not support either PBAP or OPP (Object Push Profile) service, you cannot transfer contacts.
● For PBAP compatible Bluetooth® phones
When “Automatic Contact/History Transfer” is set to on (P. 396)
Select the “Contacts” tab. Check that a confirmation screen is displayed when the oper- ation is complete. Transfer the contact data to the system using a Bluetooth® phone.
When “Automatic Contact/History Transfer” is set to off
Select the “Contacts” tab. Select the desired item.
“Always” and
Select to transfer new con- tacts from a cellular phone, select then enable “Automatic Transfer”. Select to transfer all the con- tacts from a connected cellular phone only once. Select to cancel transferring.
Check that a confirmation screen is displayed when the oper- ation is complete.
383
3-2. Using the multimedia system
● For PBAP incompatible but OPP compatible Bluetooth® phones
Select the “Contacts” tab. Follow the steps in “Update contacts from phone” from “STEP2”. (P. 397)
■ Calling using favorites list
You can make a call using numbers registered in the contact.
Display the phone screen. (P. 380) Select “Favorites” tab. Select the desired number to make a call.
384
3-2. Using the multimedia system
■ Dialing from call history
You can make a call using the call history, which has the 3 func- tions below.
: calls which you missed : calls which you received : calls which you made
Display the phone screen. (P. 380) Select “Call History” tab. Select
or the desired entry from the list.
When
is selected
Check that the “Call” screen is displayed.
When the desired contact is selected
Select the desired number. Check that the “Call” screen is displayed.
■Call history list
●If you make a call to or receive a call from a number registered in the
contact, the name is displayed in the call history.
●If you make multiple calls to the same number, only the last call made is
displayed in the call history.
■International calls
You may not be able to make international calls, depending on the mobile phone in use.
385
3-2. Using the multimedia system
Receiving a call
When a call is received, the following screen is displayed together with a sound. ■ To answer the phone
Select
■ To refuse a call
Select
■ To adjust the incoming call volume
Turn the “PWR·VOL” knob.
■International calls
Received international calls may not be displayed correctly depending on the cellular phone in use.
386
3-2. Using the multimedia system
Speaking on the phone
The following screen is displayed when speaking on the phone.
■ To adjust the call volume
Select “-” or “+”. You can also adjust the volume using the volume knob.
■ To prevent the other party from hearing your voice
Select “Mute”.
■ Inputting tones
When using phone services such as an answering service or a bank, you can store phone numbers and code numbers in the con- tact.
Select “0-9”. Input the number.
● Release Tones
“Release Tones” appear when a continuous tone signal(s) contain- ing a “w” is registered in the contact list.
Select “Release Tones”.
387
3-2. Using the multimedia system
■Release Tones
●A continuous tone signal is a character string that consists of numbers
and the characters “p” or “w”. (e.g.056133w0123p#1)
●When the “p” pause tone is used, the tone data up until the next pause tone will be automatically sent after 2 seconds have elapsed. When the “w” pause tone is used, the tone data up until the next pause tone will be automatically sent after a user operation is performed.
●Release tones can be used when automated operation of a phone based service such as an answering machine or bank phone service is desired. A phone number with continuous tone signals can be registered in the contact list.
●Tone data after a “w” pause tone can be operated on voice command
during a call.
■ To transfer a call
Select “Handset Mode” to change from a hands-free call to a cellu- lar phone call. Select “Handset Mode” to off from a cellular phone call to a hands- free call.
■ Transmit volume setting
Select “Transmit Volume”. Select the desired level for the transmit volume. Select “OK”.
■ To hang up
Select
388
3-2. Using the multimedia system
■ Call waiting When a call is interrupted by a third party while talking, an incoming call message will be displayed.
To talk with the other party, select
To refuse the call, select
Every time you select to the other party.
during call waiting, you will be switched
■Transferring calls
●If you transfer from the cellular phone to hands-free, the hands-free screen will be displayed, and you can operate the system using the screen.
●Transfer method and operation may vary according to the cellular phone
used.
●For operation of the cellular phone in use, see the phone’s manual.
■Call waiting operation
Call waiting operation may differ depending on your phone company and cellular phone.
389
3-2. Using the multimedia system
Bluetooth® phone message function
from
forwarded
Received messages can be the connected Bluetooth® phone, enabling checking and replying using the multime- dia system. Depending on the type of Bluetooth® phone connected, received messages may not be transferred to the message inbox. If the phone does not support the message function, this function cannot be used. ■ Displaying “Message Inbox” screen
Press the Select
button.
on the phone screen.
Check that the “Message Inbox” screen is displayed.
■ Receiving a message
When an e-mail/SMS/MMS is received, the incoming message screen pops up with sound and is ready to be operated on the screen.
E-mail: Select to check the message. Select to refuse the message. Select to call the message sender.
390
3-2. Using the multimedia system
■Receiving a message
●Depending on the cellular phone used for receiving messages, or its reg- istration status with the navigation system, some information may not be displayed.
●The pop up screen is separately available for incoming e-mail and SMS/
MMS messages under the following conditions: E-mail: • “Incoming E-mail Display” is set to “Full Screen”. (P. 403) • “E-mail Notification Popup” is set to on. (P. 403) SMS/MMS: • “Incoming SMS/MMS Display” is set to “Full screen”. (P. 403) • “SMS/MMS Notification Popup” is set to on. (P. 403)
■ Checking the messages
Display the “Message Inbox” screen. (P. 390) Select the desired message from the list. Check that the message is displayed.
E-mails: Select “Mark Unread” or “Mark Read” to mark mail unread or read on the “Mes- sage Inbox” screen. This function is available when “Update Message Read Status on Phone” is set to on (P. 403) Select to make a call to the sender. Select to have messages read out. To cancel this function, select “Stop”. Select to display the previous or next message. Select to reply the message.
391
3-2. Using the multimedia system
■Check the messages
●Depending on the type of Bluetooth® phone being connected, it may be
necessary to perform additional steps on the phone.
●Messages are displayed in the appropriate connected Bluetooth®
phone’s registered mail address folder. Select the tab of the desired folder to be displayed.
●Only received messages on the connected Bluetooth® phone can be dis-
played.
●The text of the message is not displayed while driving. ●When “Automatic Message Readout” is set to on, messages will be auto-
matically read out. (P. 403)
●Turn the “PWRVOL” knob to adjust the message read out volume. ●The message read out function is available even while driving.
■ Replying to a message
Display the “Message Inbox” screen. (P. 390) Select the desired message from the list. Select “Quick Message”. Select the desired message. Select “Send”.
● Editing quick reply message
This operation cannot be performed while driving.
Select “Quick Message”. Select Select “OK” when editing is completed.
corresponding to the desired message to edit.
392
3-2. Using the multimedia system
■ Calling the message sender
Calls can be made to an e-mail/SMS/MMS message sender’s phone number.
Display the “Message Inbox” screen. (P. 390) Select the desired message. Select Check that the “Call” screen is displayed.
● Calling from a number within a message
Calls can be made to a number identified in a message’s text area.
Display the “Message Inbox” screen. (P. 390) Select the desired message. Select the text area. Select Check that the “Call” screen is displayed.
corresponding to the desired number.
● Calling from the incoming message screen
P. 389
393
3-2. Using the multimedia system
Bluetooth® phone settings
You can adjust the hands-free system to your desired settings. ■ “Phone/Message Settings” screen
To display the screen shown below, press the “SETUP” button, and select “Phone” on the “Setup” screen.
the phone connection
Set (P. 361) Sound Settings (P. 394) Contact/Call History Settings (P. 396) Messaging Settings (P. 403) Phone Display Settings (P. 405)
■ Sound setting
Display the “Phone/Message Settings” screen. (P. 394) Select “Sound Settings” on the “Phone/Message Settings” screen.
incoming
the desired
Set the desired ringtone. Adjust the ringtone volume. Adjust the message readout volume. Set SMS/MMS tone. Adjust MMS tone volume. Set the incoming e-mail tone. Adjust incoming e-mail the tone volume. Adjust the default volume of the other party’s voice.
incoming SMS/
the
394
3-2. Using the multimedia system
■To return to the default settings
Select “Default”, and then “Yes”.
395
3-2. Using the multimedia system
Contact/Call history settings
The contact can be transferred from a Bluetooth® phone to the sys- tem. The contact also can be added, edited and deleted. The call history can be deleted and contact and favorites can be changed.
Display the “Phone/Message Settings” screen. (P. 394) Select “Contact/Call History Settings”. Select the desired item to be set.
PBAP
For compatible Bluetooth® phones, select to set automatic contact/history transfer on/off. When set to on, the phone’s contact data and history are automatically transferred. Select to update contacts from the connected phone. (P. 397) Select to sort contacts by the first name or last name field. Select to add contacts to the favorites list. (P. 401) Select to delete contacts from the favorites list. (P. 402) Select images. Select to clear contacts from the call history. Select to add new contacts to the contact list.* (P. 399) Select to edit contacts in the contact list.* (P. 399)
to display contact
396
3-2. Using the multimedia system
Select to delete contacts from the contact list.* (P. 400) Select items.*
reset all setup
to
*: For PBAP compatible Bluetooth® phones only, this function is avail- able when “Automatic Contact/ History Transfer” is set to off. (P. 396)
■ Update contacts from phone
Operation methods differ between PBAP compatible and PBAP incompatible but OPP compatible Bluetooth® phones. If your cellular phone is neither PBAP nor OPP compatible, the contacts cannot be transferred.
● For PBAP Compatible Bluetooth® Phones Select “Update Contacts from Phone”. Check that a confirmation screen is displayed when the oper- ation is complete. This operation may be unnecessary depending on the type of cellu- lar phone. Depending on the type of cellular phone, OBEX authentication may be required when transferring contact data. Enter “1234” into the Bluetooth® phone. If another Bluetooth® device is connected when transferring contact data, depending on the phone, the connected Bluetooth® device may need to be disconnected. Depending on the type of Bluetooth® phone being connected, it may be necessary to perform additional steps on the phone.
397
3-2. Using the multimedia system
● For PBAP Incompatible Bluetooth® Phones Select “Update Contacts from Phone”. Transfer the contact data to the system using a Bluetooth® phone. This operation may be unnecessary depending on the type of cellu- lar phone. Depending on the type of cellular phone, OBEX authentication may be required when transferring contact data. Enter “1234” into the Bluetooth® phone. To cancel this function, select “Cancel”. Select “Done” when it appears on the screen. Check that a confirmation screen is displayed when the oper- ation is complete.
● Updating the contacts in a different way (From the “Call History”
screen) For PBAP compatible Bluetooth® phones, this function is available when “Automatic Contact/History Transfer” is set to off. (P. 396)
Display the phone screen. (P. 380) Select the “Call History” tab and select a contact not yet regis- tered in the contact list. Select “Update Contact”. Select the desired contact. Select a phone type for the phone number.
398
3-2. Using the multimedia system
■ Registering a new contact to the contact list
New contact data can be registered. Up to 4 numbers per person can be registered. For PBAP compatible Bluetooth® phones, this function is available when “Automatic Contact/History Transfer” is set to off. (P. 396)
Select “New Contact”. Enter the name and select “OK”. Enter the phone number and select “OK”. Select the phone type for the phone number. To add another number to this contact, select “Yes”.
● Registering a new contact in a different way (From the “Call His-
tory” screen)
Display the phone screen. (P. 380) Select the “Call History” tab and select a contact not yet regis- tered in the contact list. Select “Add to Contacts”. Follow the steps in “Registering a new contact to the contact list” from “STEP 3”. (P. 399)
■ Editing the contact data
For PBAP compatible Bluetooth® phones, this function is available when “Automatic Contact/History Transfer” is set to off. (P. 396)
Select “Edit Contact”. Select the desired contact. Select
corresponding to the desired name or number.
For editing the name
Follow the steps in “Registering a new contact to the contact list” from “STEP 3”. (P. 399)
For editing the number
Follow the steps in “Registering a new contact to the contact list” from “STEP 4”. (P. 399)
399
3-2. Using the multimedia system
● Editing the contacts in a different way (From the “Contact Details”
screen)
Display the phone screen. (P. 380) Select the “Contacts”, “Call history” tab or the “Favorites” tab and select the desired contact. Select “Edit Contact”. “E-mail Addresses”: Select to display all registered e-mail addresses for the contact. Follow the steps in “Editing the contact data” from “STEP 4”. (P. 399)
■ Deleting the contact data
For PBAP compatible Bluetooth® phones, this function is available when “Automatic Contact/History Transfer” is set to off. (P. 396)
Select “Delete Contacts”. Select the desired contact and select “Delete”. Select “Yes” when the confirmation screen appears.
● Deleting the contact in a different way (From the “Contact Details”
screen)
Display the phone screen. (P. 380) Select the “Contacts”, “Call history” tab or the “Favorites” tab and select the desired contact. Select “Edit Contact”. Select “Yes” when the confirmation screen appears.
400
3-2. Using the multimedia system
■ Favorites list setting
Up to 15 contacts (maximum of 4 numbers per contact) can be reg- istered in the favorites list.
● Registering the contacts in the favorites list
Select “Add Favorite”. Select the desired contact to add to the favorites list. Dimmed contacts are already stored as a favorite. Check that a confirmation screen is displayed when the oper- ation is complete.
When 15 contacts have already been registered to the favorites list When 15 contacts have already been registered to the favor- ites list, a registered contact needs to be replaced. Select “Yes” when the confirmation screen appears to replace a contact. Select the contact to be replaced. Check that a confirmation screen is displayed when the oper- ation is complete.
Registering contacts in the favorites list in a different way (from the “Contacts” screen)
Display the phone screen. (P. 380) Select the “Contacts” tab. Select be registered in the favorites list. When selected, is changed to in the favorites list.
at the beginning of the desired contact list name to
, and the contact is registered
401
3-2. Using the multimedia system
Registering contacts in the favorites list in a different way (from the “Contact Details” screen)
Display the phone screen. (P. 380) Select the “Contacts” tab or the “Call History” tab and select the desired contact. Select “Add Favorite”. Check that a confirmation screen is displayed when the oper- ation is complete.
● Deleting the contacts in the favorites list
Select “Remove Favorite”. Select the desired contacts and select “Remove”. Select “Yes” when the confirmation screen appears. Check that a confirmation screen is displayed when the oper- ation is complete.
Deleting contacts in the favorites list in a different way (from the “Contacts” screen)
Display the phone screen. (P. 380) Select the “Contacts” tab. Select deleted from the favorites. list. When selected, is changed to the list.
at the beginning of the contact list name to be
, and the data is deleted from
Deleting contacts in the favorites list in a different way (from the “Contact Details” screen)
Display the phone screen. (P. 380) Select the “Contacts”, “Call history” tab or the “Favorites” tab and select the desired contact to delete. Select “Remove Favorite”. Select “Yes” when the confirmation screen appears. Check that a confirmation screen is displayed when the oper- ation is complete.
402
3-2. Using the multimedia system
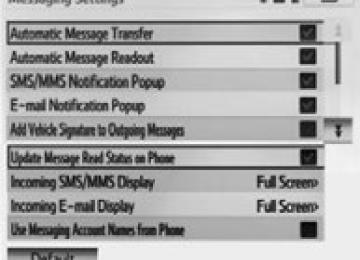
■ Message Settings
Display the “Phone/Message Settings” screen. (P. 394) Select “Messaging Settings”. Select the desired item to be set.
the e-mail notification
Set automatic message trans- fer on/off. Set automatic message read- out on/off. Set the SMS/MMS notification popup on/off. Set popup on/off. Set adding the vehicle signa- ture to outgoing messages on/ off. Set updating message read status on phone on/off. Change the incoming SMS/ MMS display. “Full Screen”: When an SMS/ MMS message is received, the incoming SMS/MMS display screen is displayed and can be operated on the screen. “Drop-Down”: When an SMS/ MMS message is received, a message the upper side of the screen.
is displayed on
403
3-2. Using the multimedia system
Change the incoming e-mail display. “Full Screen”: When an e-mail is received, the incoming e-mail dis- play screen is the displayed and can be operated on the screen. “Drop-Down”: When an e-mail is received, a message is displayed on the upper side of the screen. Set display of messaging account names on the inbox tab on/off. When set to on, messaging account names used on the cellu- lar phone will be displayed. ● Displaying the “Messaging Settings” screen in a different way
Display the phone screen. (P. 380) Select Select “Settings”.
■To return to the default settings
Select “Default”, and then “Yes”.
404
3-2. Using the multimedia system
■ Phone Display Settings
Display the “Phone/Message Settings” screen. (P. 394) Select “Phone Display Settings”. Select the desired item to be set.
Change the incoming call dis- play. “Full Screen”: When a call is received, the hands-free screen is displayed and can be operated on the screen. “Drop-Down”: A message is dis- played on the upper side of the screen. Set display of the contact/his- tory transfer completion mes- sage on/off.
405
3-3. Using the interior lights Interior lights list
Your Toyota is equipped with an illuminated entry system to assist in entering the vehicle. Due to the function of the system, the lights shown in the following illustration automatically turn on/off accord- ing to whether the doors are locked/unlocked, whether the doors are opened/closed, and the engine switch position.
Outer foot lights (if equipped) Interior light (P. 409) Personal/interior lights (P. 408) Engine switch light Foot well lighting Door courtesy lights Ashtray lighting
406
3-3. Using the interior lights
Personal/interior light main switch
■To prevent the battery from being discharged
If the lights remain on when the door is not fully closed and the personal/inte- rior light main switch is in door position, the lights will go off automatically after 20 minutes. ■Customization
●That can be configured at Toyota dealer (vehicles without multi-informa-
tion display) Settings (e.g. The time elapsed before lights turn off) can be changed. (Customizable features P. 631) ●It is possible to change the settings (vehicles with multi-information dis-
play) (Feature customization P. 181)
Personal/interior light main switch
ON The personal/interior lights can- not be individually turned off. DOOR position The personal/interior lights come on when a door is opened. They turn off when the doors are closed. OFF The personal/interior lights and interior light can be individually turned on or off.
407
3-3. Using the interior lights
Personal/interior lights
■ Front Type A
Personal/interior lights
On/off
On/off
On/off
Type B
■ Center Type A
408
Type B
■ Rear
Interior light
3-3. Using the interior lights
Personal/interior lights and interior light
On/off
On/off
DOOR position The interior light comes on when a back door is opened. It turns off when the door is closed. OFF ON
409
3-4. Using the storage features List of storage features
Overhead console Glove boxes Auxiliary boxes Bottle holders Cup holders Rear console box (if equipped) Cup holder (if equipped) Front console box • Card holder • Map holder • Pen holder • Tissue pocket Map holder Coin holder (if equipped)
410
3-4. Using the storage features
Glove boxes
CAUTION
■Items that should not be left in the storage spaces
Do not leave glasses, lighters or spray cans in the storage spaces, as this may result in the following when cabin temperature becomes high: ●Glasses may be deformed by heat or cracked if they come into contact
with other stored items.
●Lighters or spray cans may explode. If they come into contact with other stored items, the lighter may catch fire or the spray can may release gas, causing a fire hazard.
Glove boxes
Upper glove box
Push the button.
Lower glove box
Unlock with the master key Lock with the master key
411
3-4. Using the storage features
Glove boxes and coin holder
Pull the lever up.
■Glove box light
The glove box light turns on when the tail lights are on.
CAUTION
■Caution while driving
Keep the glove box closed. In the event of sudden braking or sudden swerv- ing, an accident may occur due to an occupant being struck by the open glove box or the items stored inside.
Coin holder (if equipped)
Open the lid.
412
3-4. Using the storage features
Coin holder and front console box
CAUTION
■Caution while driving
Keep the coin holder closed. Injuries may result in the event of an accident or sudden braking.
Front console box
Pull the knob up and lift the lid.
413
3-4. Using the storage features
Front console box
■When using the front console box lid as an armrest
Pull the knob up and slide the lid forward. If necessary, the console box lid can slide forward. Pull the lid forward by grasping the front of the lid. When the lid is forward, it cannot be lifted.
■Tray in the front console box
The tray slides forward or backward. The tray can be removed.
414
3-4. Using the storage features
Front console box
The box can be removed. Hanging file folders can be hung on the rails when the box is removed.
CAUTION
■Caution while driving
Keep the console box closed. Injuries may result in the event of an accident or sudden braking.
415
3-4. Using the storage features
Card holder
Card holder
Pull the knob up and lift the lid.
CAUTION
■Caution while driving
Keep the console box closed. Injuries may result in the event of an accident or sudden braking.
416
Map holder
Center console
3-4. Using the storage features
Map holder
Push the tab down to release the lock. Remove the lid. Stow the lid.
CAUTION
■Caution while driving
Keep the console box closed. Injuries may result in the event of an accident or sudden braking.
417
3-4. Using the storage features
Front console box
Map holder
Pull the knob up and lift the lid.
CAUTION
■Caution while driving
Keep the console box closed. Injuries may result in the event of an accident or sudden braking.
418
Pen holder
3-4. Using the storage features
Pen holder
Pull the knob up and lift the lid.
CAUTION
■Caution while driving
Keep the console box closed. Injuries may result in the event of an accident or sudden braking.
419
3-4. Using the storage features
Tissue pocket
Tissue pocket
Pull the knob up and lift the lid.
CAUTION
■Caution while driving
Keep the console box closed. Injuries may result in the event of an accident or sudden braking.
420
3-4. Using the storage features
Rear console box
Rear console box (if equipped)
Upper box
Push the knob and lift the lid.
Lower box
Pull the knob up and lift the upper box.
421
3-4. Using the storage features
Rear console box
■The separator can be used at either of two positions shown in the illus-
tration
Change the separator position.
■The separator can be stowed
Stow the separator to the lid.
■Back side tray
Open the upper box to use the back side tray.
422
3-4. Using the storage features
Rear console box
■The inside tray can be removed
Pull the tray up.
■When closing the rear console box lid
Close the rear console box by lifting the grip on the inside of the upper box.
423
3-4. Using the storage features
CAUTION
■Caution while driving
Rear console box and overhead console
Keep the console box closed. Injuries may result in the event of an accident or sudden braking.
■When opening/closing the lower box
Be careful not to get your hands or feet caught between the lower box and the upper box. Failure to do so may result in serious injury.
■When opening the lower box
Make sure that the upper box is locked. Items stored inside may fall out and cause injury.
Overhead console
The overhead console is useful for temporarily storing sunglasses and similar small items.
Type A
Push the knob forward to open the console.
424
Type B
3-4. Using the storage features
Overhead console
Push the knob forward to open the console.
CAUTION
■Caution while driving
Do not leave the overhead console open while driving. Items stored in it may fall out and cause injury.
425
3-4. Using the storage features
Cup holders
Front
Cup holders
Front console box
Pull the lid down.
Rear
426
Rear console box (if equipped)
3-4. Using the storage features
Cup holders
Attach the separator when using either console box as a cup holder.
Both cup holders cannot be used at the same time.
■Removing the cup holder (front)
Push the tab down to release the lock. Remove the lid. Stow the lid.
427
3-4. Using the storage features
Cup holders
Pull the cup holder up.
■Removing the separator (rear console box)
Inside
Pull the separator up.
Outside
Pull the separator up.
428
3-4. Using the storage features
Cup holders
■The position of the separator can be changed (rear console box)
Inside
Outside
Change the separator position.
Change the separator position.
■The separator can be adjusted (rear console box)
Adjust the separator.
429
3-4. Using the storage features
Cup holders and bottle holders
CAUTION
■Items unsuitable for the cup holder
Do not place anything other than cups or aluminum cans in the cup holders. Other items may be thrown out of the holders in the event of an accident or sudden braking and cause injury. If possible, cover hot drinks to prevent burns.
■When not in use
Front console box and rear console box (inside) cup holder: Keep the cup holders closed. Injuries may result in the event of an accident or sudden braking.
NOTICE
■Before sliding the second center seat to the most forward position
(vehicles with bench type second seat) Ensure that the cup holder on the front console box is closed.
Bottle holders
Front
430
3-4. Using the storage features
Bottle holders and auxiliary boxes
Rear
NOTICE
■Items that should not be stowed in the bottle holders
Put the cap on before stowing a bottle. Do not place open bottles in the bot- tle holders, or glasses and paper cups containing liquid. The contents may spill and glasses may break.
Auxiliary boxes
Front
Press the knob then pull the lid down.
431
3-4. Using the storage features
Auxiliary boxes
Rear
Pull the lid up.
Rear console box (if equipped)
Pull the lever up to release the lock. Pull the handle.
CAUTION
■Caution while driving
Keep the auxiliary boxes closed. Injuries may result in the event of an accident or sudden braking.
432
3-5. Other interior features Sun visors
■ Main visor
Forward position: Flip down. Side position: Flip down, unhook, and swing to the side. Side extender: Place in side position then slide backwards.
■ Sub visor (if equipped)
Flip down.
433
3-5. Other interior features Vanity mirrors
Vehicles without vanity light
Open the cover.
Vehicles with vanity light
Open the cover. The light turns on when the cover is opened. Adjust the brightness of the light.
434
3-5. Other interior features Clock
Adjusts the hours. Adjusts the minutes.
■For quicker adjustment of the clock
Hold down the M or H button continuously. This allows faster advancement of the minutes and hours.
■The clock is displayed when
The engine switch is in the ACC or ON position.
■When disconnecting and reconnecting battery terminals
The time display will automatically be set to 1:00.
435
3-5. Other interior features Outside temperature display
(Fahrenheit).
the outside air
Displays temperature. The temperature range that can be displayed is from -40°F (-40°C) to 122°F (50°C). the outside air Switches temperature display between °C (Celsius) and °F (if equipped) Vehicles without multi-informa- tion display: Push the SETUP button until the desired unit of measure- ment is displayed. Vehicles with multi-information display: With the customized unit- change operation for the multi- information display, the unit of measurement can be changed. (P. 184)
436
3-5. Other interior features
■When – –°C or – –°F is displayed
The system may be malfunctioning. Take your vehicle to your Toyota dealer.
■The outside air temperature is displayed when
The engine switch is in the ON position.
■When disconnecting and reconnecting battery terminals
The display will automatically be set to the initial mode.
■Display
In the following situations, the correct outside temperature may not be dis- played, or the display may take longer than normal to change. ●When stopped, or driving at low speeds (less than 16 mph [25 km/h]) ●When the outside temperature has changed suddenly (at the entrance/
exit of a garage, tunnel, etc.)
437
3-5. Other interior features Portable ashtray
The ashtray can be installed in a cup holder.
■The ashtray can be removed
Pull the ashtray up.
CAUTION
■When not in use
Keep the ashtray closed. Injuries may result in the event of sudden braking, sudden swerving or an accident.
■To prevent fire
●Fully extinguish matches and cigarettes before putting them in the ashtray,
and then make sure the ashtray is fully closed.
●Do not place paper or any other type of flammable object in the ashtray.
438
3-5. Other interior features Cigarette lighter
Push the cigarette lighter.
The cigarette lighter will pop up when it is ready for use.
■The cigarette lighter can be used when
The engine switch is in the ACC or ON position.