- 1998 Nissan Maxima Owners Manuals
- Nissan Maxima Owners Manuals
- 2002 Nissan Maxima Owners Manuals
- Nissan Maxima Owners Manuals
- 2009 Nissan Maxima Owners Manuals
- Nissan Maxima Owners Manuals
- 2003 Nissan Maxima Owners Manuals
- Nissan Maxima Owners Manuals
- 2001 Nissan Maxima Owners Manuals
- Nissan Maxima Owners Manuals
- 1997 Nissan Maxima Owners Manuals
- Nissan Maxima Owners Manuals
- 1996 Nissan Maxima Owners Manuals
- Nissan Maxima Owners Manuals
- 2005 Nissan Maxima Owners Manuals
- Nissan Maxima Owners Manuals
- 2007 Nissan Maxima Owners Manuals
- Nissan Maxima Owners Manuals
- 2006 Nissan Maxima Owners Manuals
- Nissan Maxima Owners Manuals
- 2010 Nissan Maxima Owners Manuals
- Nissan Maxima Owners Manuals
- 2008 Nissan Maxima Owners Manuals
- Nissan Maxima Owners Manuals
- 2012 Nissan Maxima Owners Manuals
- Nissan Maxima Owners Manuals
- 1999 Nissan Maxima Owners Manuals
- Nissan Maxima Owners Manuals
- 2004 Nissan Maxima Owners Manuals
- Nissan Maxima Owners Manuals
- 2000 Nissan Maxima Owners Manuals
- Nissan Maxima Owners Manuals
- 2011 Nissan Maxima Owners Manuals
- Nissan Maxima Owners Manuals
- Download PDF Manual
-
● Waste oil must be disposed of prop-
erly.
● Check your local regulations.
WARNING
● Prolonged and repeated contact with used engine oil may cause skin cancer. ● Try to avoid direct skin contact with used oil. If skin contact is made, wash thoroughly with soap or hand cleaner as soon as possible.
● Keep used engine oil out of reach of
children.
CAUTION
Be careful not to burn yourself. The engine oil may be hot.
7. Clean and reinstall the drain plug and a new washer. Securely tighten the drain plug with a wrench. Do not use excessive force. Drain plug tightening torque: 22 - 29 ft-lb (29 - 39 N·m)
and
“Capacities
8. Refill engine with recommended oil through the oil filler opening, then install the oil filler cap securely. See recommended fuel/lubricants” in the “Technical and con- sumer information” section of this manual for drain and refill capacity. The drain and refill capacity depends on the oil temperature and drain time. Use these specifications for reference only. Always use the dipstick to determine when the proper amount of oil is in the engine.
9. Start the engine. Check for leakage around the drain plug and oil filter. Correct as re- quired.
10. Turn the engine off and wait more than 10
minutes. Check the oil level with the dip- stick. Add engine oil if necessary.LDI0642
CHANGING ENGINE OIL FILTER 1. Park the vehicle on a level surface and apply
the parking brake.
2. Turn the engine off. 3. Place a large drain pan under the oil filter 䊊A . filter 4. Loosen the oil wrench by turning it counterclockwise. Then remove the oil filter by turning it by hand.
filter 䊊A with an oil
CAUTION
Be careful not to burn yourself. The engine oil may be hot.
Maintenance and do-it-yourself 8-11
CONTINUOUSLY VARIABLE TRANSMISSION (CVT) FLUID
POWER STEERING FLUID
5. Wipe the engine oil filter sealing surface with
a clean rag.
CAUTION
Be sure to remove any old gasket material remaining on the sealing surface of the engine. Failure to do so could lead to engine damage.
6. Coat the gasket on the new filter with clean
engine oil.
7. Screw on the oil filter until a slight resistance
is felt, then tighten an additional 2/3 turn.
CAUTION
● Use only Genuine NISSAN CVT Fluid
NS-2. Do not mix with other fluids.
● Using transmission fluid other than Genuine NISSAN CVT Fluid NS-2 will damage the CVT, which is not covered by the warranty.
When checking or replacement of CVT fluid is required, we recommend your NISSAN dealer for servicing.
8. Start
the engine and check for leakage
around the oil filter. Correct as required.
9. Turn the engine off and wait more than 10
minutes. Check the oil level. Add engine oil if necessary.8-12 Maintenance and do-it-yourself
LDI0557
The fluid level should be checked using the HOT MAX range on the power steering fluid reservoir at fluid temperatures of 122° - 176°F (50° - 80°C) or using the COLD MAX range on the power steering fluid reservoir at fluid tempera- tures of 32° - 86°F (0° - 30°C). If the fluid is at or below the MIN line, add Genu- ine NISSAN PSF to HOT MAX or COLD MAX depending on system fluid temperature. Remove the cap and fill through the opening.CAUTION
● DO NOT OVERFILL. ● Recommended
is NISSAN PSF or equivalent.
fluid
Genuine
BRAKE FLUID
to
For further brake fluid specification information, refer recommended fuel/lubricants” in the “Technical and consumer information” section of this manual.
“Capacities
and
WARNING
● Use only new fluid from a sealed con- tainer. Old, inferior or contaminated fluid may damage the brake system. The use of improper fluids can damage the brake system and affect the vehi- cle’s stopping ability.
● Clean the filler cap before removing. ● Brake fluid is poisonous and should be stored carefully in marked containers out of reach of children.
CAUTION
Do not spill the fluid on any painted sur- faces. This will damage the paint. If fluid is spilled, immediately wash the surface with water.
LDI0558
BRAKE FLUID Check the brake fluid level in the reservoir. If the fluid level is below the MIN line or the brake warning light comes on, add Genuine NISSAN Super Heavy Duty Brake Fluid or equivalent DOT 3 fluid up to the MAX line. If fluid must be added frequently, the system should be checked by a NISSAN dealer.
Maintenance and do-it-yourself 8-13
WINDSHIELD-WASHER FLUID
BATTERY
Refill the reservoir more frequently when driving conditions require an increased amount of windshield-washer fluid. Recommended fluid is Genuine NISSAN Wind- shield Washer Concentrate Cleaner & Anti- freeze or equivalent.
CAUTION
for windshield-washer
● Do not substitute engine anti-freeze coolant fluid. This may result in damage to the paint. ● Do not fill the windshield-washer fluid reservoir with washer fluid concen- trates at full strength. Some methyl al- cohol based washer fluid concentrates may permanently stain the grille if spilled while filling the windshield- washer reservoir.
● Pre-mix washer fluid concentrates with water to the manufacturer’s recom- mended levels before pouring the fluid into the windshield-washer fluid reser- voir. Do not use the windshield-washer fluid reservoir to mix the washer fluid concentrate and water.
● Keep the battery surface clean and dry. Clean the battery with a solution of baking soda and water.
● Make certain the terminal connections are
clean and securely tightened.
● If the vehicle is not to be used for 30 days or longer, disconnect the negative (-) battery terminal cable to prevent discharge.
WARNING
● Do not expose the battery to flames, an electrical spark or a cigarette. Hydro- gen gas generated by the battery is ex- plosive. Explosive gases can cause blindness or injury. Do not allow battery fluid to contact your skin, eyes, fabrics or painted surfaces. Sulfuric acid can cause blindness or injury. After touch- ing a battery or battery cap, do not touch or rub your eyes. Thoroughly wash your hands. If the acid contacts your eyes, skin or clothing, immediately flush with water for at least 15 minutes and seek medical attention.
WDI0664
WINDSHIELD-WASHER FLUID RESERVOIR Fill the windshield-washer fluid reservoir periodi- cally. Add windshield-washer fluid when the low windshield-washer fluid warning light comes on.
To fill the windshield-washer fluid reservoir, lift the cap off the reservoir and pour the windshield- washer fluid into the reservoir opening.
Add a washer solvent to the washer for better cleaning. In the winter season, add a windshield- washer antifreeze. Follow the manufacturer’s in- structions for the mixture ratio.
8-14 Maintenance and do-it-yourself
● Do not operate the vehicle if the fluid in the battery is low. Low battery fluid can cause a higher load on the battery which can generate heat, reduce bat- tery life, and in some cases lead to an explosion.
● When working on or near a battery, al- ways wear suitable eye protection and remove all jewelry.
● Battery posts, terminals and related ac- cessories contain lead and lead com- pounds. Wash hands after handling.
● Keep battery out of
children.
the reach of
● Do not tip the battery. Keep the vent
caps tight and the battery level.
WDI0224
1. Remove the vent caps with a screwdriver as shown. Use a cloth to protect the battery case.2. Check the fluid level
in each cell.
WDI0529
If it is necessary to add fluid, add only distilled water to bring the level up to the bottom of the filler opening. Do not overfill. Reinstall the vent caps.Maintenance and do-it-yourself 8-15
VARIABLE VOLTAGE CONTROL SYSTEM
Vehicles operated in high temperatures or under severe conditions require frequent checks of the battery fluid level. JUMP STARTING If jump starting is necessary, see “Jump starting” in the “In case of emergency” section of this manual. If the engine does not start by jump starting, the battery may have to be replaced. Contact a NISSAN dealer.
CAUTION
● Do not ground accessories directly to the battery terminal. Doing so will by- pass the variable voltage control sys- tem and the vehicle battery may not charge completely.
● Use electrical accessories with the en- gine running to avoid discharging the vehicle battery.
Your vehicle is equipped with a variable voltage control system. This system measures the amount of electrical discharge from the battery and controls voltage generated by the generator. The current sensor 䊊A is located near the battery along the negative battery cable. If you add elec- trical accessories to your vehicle, be sure to ground them to a suitable body ground such as the frame or engine block area.
LDI0694
8-16 Maintenance and do-it-yourself
DRIVE BELT
SPARK PLUGS
2. Have the belt checked regularly for condi- tion and tension in accordance with the maintenance the “NISSAN Service and Maintenance Guide”.
schedule
found
in
LDI0564
Power steering fluid pump
1. 2. Generator 3. 4. Crankshaft pulley
Air conditioner compressor
WARNING
Be sure the ignition switch is in the OFF or LOCK position before servicing drive belt. The engine could rotate unexpectedly.
1. Visually inspect the belt for signs of unusual wear, cuts, fraying or looseness. If the belt is in poor condition or is loose, have it replaced or adjusted by a NISSAN dealer.
SDI1895
REPLACING SPARK PLUGS Iridium-tipped spark plugs It is not necessary to replace iridium-tipped 䊊A spark plugs as frequently as conventional type spark plugs because they last much longer. Fol- low the maintenance log shown in the “NISSAN Service and Maintenance Guide”. Do not service iridium-tipped spark plugs by cleaning or regap- ping. ● Always replace spark plugs with rec-
ommended or equivalent ones.
Maintenance and do-it-yourself 8-17
AIR CLEANER
WARNING
Be sure the engine and ignition switch are off and that the parking brake is engaged securely.
CAUTION
Be sure to use the correct socket to re- move the spark plugs. An incorrect socket can damage the spark plugs.
If replacement is required, see your NISSAN dealer for assistance.
WDI0665
The air cleaner filter should not be cleaned and reused. Replace it according to the maintenance log shown in the “NISSAN Service and Mainte- nance Guide.” When replacing the filter, wipe the inside of the air cleaner filter housing and the cover with a damp cloth.To remove the air cleaner filter, push the tabs in the direction indicated and pull the unit upwards.
WARNING
● Operating the engine with the air cleaner removed can cause you or oth- ers to be burned. The air cleaner not only cleans the air, it stops the flame if the engine backfires. If it isn’t there, and the engine backfires, you could be burned. Do not drive with the air cleaner removed, and be careful when working on the engine with the air cleaner removed.
● Never pour fuel into the throttle body or attempt to start the engine with the air cleaner removed. Doing so could result in serious injury.
IN-CABIN MICROFILTER The in-cabin microfilter restricts the entry of air- borne dust and pollen particles and reduces some objectionable outside odors. The filter is located behind the glove box. Refer to the “NISSAN Service and Maintenance Guide” for change intervals. If replacement is required, see your NISSAN dealer.
8-18 Maintenance and do-it-yourself
WINDSHIELD WIPER BLADES
CLEANING If your windshield is not clear after using the windshield-washer or if a wiper blade chatters when running, wax or other material may be on the blade or windshield. Clean the outside of the windshield with a washer solution or a mild detergent. Your windshield is clean if beads do not form when rinsing with clear water. Clean each blade by wiping it with a cloth soaked in a washer solution or a mild detergent. Then rinse the blades with clear water. If your wind- shield is still not clear after cleaning the blades and using the wiper, replace the blades.
CAUTION
Worn windshield wiper blades can dam- age the windshield and impair driver vision.
REPLACING Replace the wiper blades if they are worn. 䊊1
Lift the wiper arm away from the windshield. 䊊2 Push the release tab, then move the wiperblade down the wiper arm to remove.
䊊3 Remove the wiper blade.
4.
WDI0194
Insert the new wiper blade onto the wiper arm until it clicks into place.CAUTION
● After wiper blade replacement, return the wiper arm to its original position; otherwise it may be damaged when the hood is opened.
● Make sure the wiper blades contact the glass; otherwise the arms may be dam- aged from wind pressure.
Maintenance and do-it-yourself 8-19
Proper brake inspection intervals should be followed. For more information regarding brake inspections, see the appropriate mainte- nance schedule information in the “NISSAN Ser- vice and Maintenance Guide”.
BRAKES
If the brakes do not operate properly, have the brakes checked by a NISSAN dealer. Self-adjusting brakes Your vehicle is equipped with self-adjusting brakes.
The front and rear disc-type brakes self-adjust every time the brake pedal is applied.
WARNING
See a NISSAN dealer for a brake system check if the brake pedal height does not return to normal.
Brake pad wear indicators The disc brake pads on your vehicle have audible wear indicators. When a brake pad requires re- placement, a high pitched scraping or screech- ing sound will be heard when the vehicle is in motion. The noise will be heard whether or not the brake pedal is depressed. Have the brakes checked as soon as possible if the wear indicator sound is heard.
Under some driving or climate conditions, occa- sional brake squeak, squeal or other noise may be heard. Occasional brake noise during light to moderate stops is normal and does not affect the function or performance of the brake system.
WDI0337
Be careful not to let anything get into the washer nozzle 䊊A . This may cause clogging or improper windshield washer operation. If something gets into the nozzle, remove it with a needle or small pin 䊊B .8-20 Maintenance and do-it-yourself
FUSES
LDI0455
Two types of fuses are used. Type 䊊A is used in the fuse boxes in the engine compartment. Type 䊊B is used in the passenger compartment fuse box. Type A fuses are provided as spare fuses. They are stored in the passenger compartment fuse box. Type A fuses can be installed in the engine com- partment and passenger compartment fuse boxes.LDI0457
If a type A fuse is used to replace a type B fuse, the type A fuse will not be level with the fuse pocket as shown in the illustration. This will not affect the performance of the fuse. Make sure the fuse is installed in the fuse box securely. Type B fuses cannot be installed in the under- hood fuse boxes. Only use type A fuses in the underhood fuse boxes.LDI0560
ENGINE COMPARTMENT
CAUTION
Never use a fuse of a higher or lower amperage rating than specified on the fuse box cover. This could damage the electrical system or cause a fire.
If any electrical equipment does not come on, check for an open fuse.
1. Be sure the ignition switch and the headlight
switch are OFF.
2. Open the engine hood.
Maintenance and do-it-yourself 8-21
3. Remove the fuse box cover by pushing the
tab and lifting the cover up.
4. Remove the fuse with the fuse puller. The fuse puller is located in the center of the fuse block in the passenger compartment.
5.
6.
WDI0452
If the fuse is open 䊊A , replace it with a new fuse 䊊B . If a new fuse also opens, have the electrical system checked and repaired by a NISSAN dealer.Fusible links If the electrical equipment does not operate and fuses are in good condition, check the fusible links. If any of these fusible links are melted, replace with only Genuine NISSAN parts.
8-22 Maintenance and do-it-yourself
LDI0328
PASSENGER COMPARTMENT
CAUTION
Never use a fuse of a higher or lower amperage rating than specified on the fuse box cover. This could damage the electrical system or cause a fire.
If any electrical equipment does not operate, check for an open fuse. 1. Be sure the ignition switch and the headlight
switch are OFF.
2. Pull the fuse box cover to remove. 3. Remove the fuse with the fuse puller.
Maintenance and do-it-yourself 8-23
BATTERY REPLACEMENT
CAUTION
Be careful not to allow children to swallow the battery or removed parts. NISSAN INTELLIGENT KEY™
WDI0452
LDI0456
4.
Type A
If the fuse is open 䊊A , replace it with an equivalent good fuse 䊊B .
5. Push the fuse box cover to install. 6.
If a new fuse also opens, have the electrical system checked and repaired by a NISSAN dealer.
Type B
8-24 Maintenance and do-it-yourself
Replace the battery in the Intelligent Key as fol- lows: 1. Remove the mechanical key from the Intelli-
2.
gent Key. Insert a small screwdriver 䊊A into the slit 䊊B of the corner and twist it to separate the upper part from the lower part. Use a cloth to protect the casing.
3. Replace the battery with a new one.
Recommended battery: CR2032 or equiva- lent. ● Do not touch the internal circuit and elec- tric terminals as doing so could cause a malfunction.
● Hold the battery by the edges. Holding the battery across the contact points will seriously deplete the storage capacity.
● Make sure that the + side faces the bot-
tom of the case.
LDI2001
WDI0568
4. Close the lid securely as illustrated 䊊C 䊊D . 5. Operate the buttons to check the operation.See a NISSAN dealer if you need assistance for replacement. FCC Notice: Changes or modifications not expressly ap- proved by the party responsible for compli- ance could void the user’s authority to op- erate the equipment.
This device complies with Part 15 of the FCC Rules and RSS-210 of Industry Canada.
Maintenance and do-it-yourself 8-25
LIGHTS
HEADLIGHTS Replacing the xenon headlight bulb (if so equipped)
WARNING
ᏘHIGH VOLTAGE
When xenon headlights are on, they pro- duce a high voltage. To prevent an electric shock, never attempt to modify or disas- semble. Always have your xenon head- lights replaced at a NISSAN dealer. For additional information, see “Headlight and turn signal switch” in the “Instru- ments and controls” section. Replacing the halogen headlight bulb (if so equipped) The headlight is a semi-sealed beam type which uses a replaceable headlight (halogen) bulb. Be- cause the headlight assembly must be removed from the vehicle for bulb replacement, see your NISSAN dealer.
CAUTION
● Aiming is not necessary after replacing the bulb. When aiming adjustment is necessary, contact a NISSAN dealer.
● Do not leave the headlight assembly open without a bulb installed for a long period of time. Dust, moisture, smoke, etc. entering the headlight body may affect bulb performance. Remove the bulb from the headlight assembly just before a replacement bulb is installed. ● Only touch the base when handling the bulb. Never touch the glass envelope. Touching the glass could significantly affect bulb life and/or headlight performance.
● High pressure halogen gas is sealed inside the halogen bulb. The bulb may break if the glass envelope is scratched or the bulb is dropped.
Fog may temporarily form inside the lens of the exterior lights in the rain or in a car wash. A temperature difference between the inside and the outside of the lens causes the fog. This is not a malfunction. If large drops of water collect inside the lens, contact a NISSAN dealer.
Operation is subject to the following two conditions: (1) This device may not cause harmful interference, and (2) this device must accept any interference received, in- cluding interference that may cause undes- ired operation of the device.
8-26 Maintenance and do-it-yourself
EXTERIOR AND INTERIOR LIGHTS
Item
Wattage (W)
Bulb No.*
Headlight assembly
High (Halogen) Low (Halogen) (if so equipped) Low (Xenon)** (if so equipped) Park/Turn Side marker
Front fog light (if so equipped) Front personal/map lights Glove box light Vanity mirror light Step light Rear personal lights Door switch illumination High-mounted stop light (Type A) High-mounted stop light (Type B) Trunk light Rear combination light
Tail/Stop Turn signal Backup (reversing) Sidemarker License plate light Foot well light
65
55
35
28/855
3.4
1.4
3.8
— — — 3.4— 21
18
3.49005 (HB3)
H11
D2S3457NAK WY5W
H11
— 158
— 194
— LED LED LED 158LED
WY21W
921
W5W 168
158* Always check with the Parts Department at a NISSAN dealer for the latest parts information. ** See a NISSAN dealer for replacement.
Maintenance and do-it-yourself 8-27
Rear personal lights Fog light (if so equipped) Step light
1. Headlight assembly 2. Map light 3. 4. 5. 6. High-mounted stop light (Type A) 7. 8. High-mounted stop light (Type B) 9. 10. Rear combination light
License plate light
Trunk light
8-28 Maintenance and do-it-yourself
WDI0666
Use a cloth 䊊1 to protect the housing.
Map lights
Vanity mirror light
Use a cloth 䊊1 to protect the housing.
WDI0667
WDI0340
WDI0263
Replacement procedures All other lights are either type A, B, C or D. When replacing a bulb, lamp and/or cover.
first remove the lens,
Indicates bulb removal Indicates bulb installation
Maintenance and do-it-yourself 8-29
Use a cloth 䊊1 to protect the housing.
Step light
Personal light
Use a cloth 䊊1 to protect the housing.
Trunk light
LDI0341
WDI0670
WDI0343
8-30 Maintenance and do-it-yourself
WHEELS AND TIRES
If you have a flat tire, see “Flat tire” in the “In case of emergency” section of this manual. TIRE PRESSURE Tire Pressure Monitoring System (TPMS) This vehicle is equipped with the Tire Pressure Monitoring System (TPMS). It monitors tire pressure of all tires except the spare. When the low tire pressure warning light is lit and the CHECK TIRE PRESSURE warning appears in the ve- hicle information display, one or more of your tires is significantly under-inflated. If equipped, the system also displays pres- sure of all tires (except the spare tire) on the display screen by sending a signal from a sensor that is installed in each wheel. The TPMS will activate only when the vehicle is driven at speeds above 16 MPH (25 km/h). Also, this system may not de- tect a sudden drop in tire pressure (for example a flat tire while driving).
For more details, refer to “Low tire pres- sure warning light” in the “Instruments and controls” section, “Tire pressure informa- tion” in the “Monitor, climate, audio, phone and voice recognition” section, “Tire Pressure Monitoring System (TPMS)” in the “Starting and driving” section, and “Flat tire” in the “In case of emergency” section. Tire inflation pressure Check the tire pressures (including the spare) often and always prior to long dis- tance trips. The recommended tire pres- sure specifications are shown on the F.M.V.S.S./C.M.V.S.S. certification label or the Tire and Loading Information label under the ⬙Cold Tire Pressure⬙ heading. The Tire and Loading Information label is affixed to the driver side center pillar. Tire pressures should be checked regularly because:
● Most tires naturally lose air over time. ● Tires can lose air suddenly when driven over potholes or other objects or if the vehicle strikes a curb while parking.
The tire pressures should be checked when the tires are cold. The tires are considered COLD after the vehicle has been parked for 3 or more hours, or driven less than 1 mile (1.6 km) at moderate speeds. Set the tire pressure to the normal cold tire inflation pressure when the vehicle speed or load is reduced. Incorrect tire pressure, including un- der inflation, may adversely affect tire life and vehicle handling.
Maintenance and do-it-yourself 8-31
● Increase the cold tire inflation pressure as indicated in ⴖCheck- ing tire pressureⴖ later in this sec- tion when using the tires speci- fied by NISSAN above 100 MPH (162 km/h) where it is legal to do so (on a race track for example). Failure to increase the cold tire inflation pressure may result in tire failure, loss of control and possible injury. After such use, readjust tire pressure.
● For additional
information re- garding tires, refer to “Important Tire Safety Information” (US) or “Tire Information” (Canada) in the Warranty Infor- mation Booklet.
Safety
WARNING
is
located on
● Improperly inflated tires can fail suddenly and cause an accident. ● The Gross Vehicle Weight Rating the (GVWR) certifica- F.M.V.S.S./C.M.V.S.S. tion label. The vehicle weight ca- pacity is indicated on the Tire and Loading Information label (if so equipped). Do not load your ve- hicle beyond this capacity. Over- loading your vehicle may result in reduced tire life, unsafe operat- ing conditions due to premature tire failure, or unfavorable han- dling characteristics and could also lead to a serious accident. Loading beyond the specified ca- pacity may also result in failure of other vehicle components.
● Before taking a long trip, or whenever you heavily load your vehicle, use a tire pressure gauge to ensure that the tire pressures are at the specified level.
8-32 Maintenance and do-it-yourself
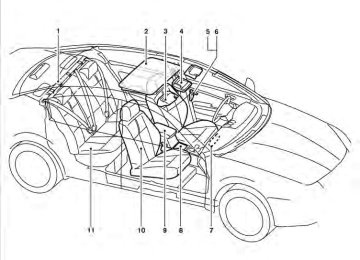
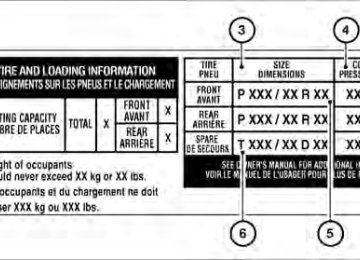
䊊5 Tire size – refer to “Tire labeling” in
this section.
䊊6 Spare tire size (if so equipped).
Tire and loading information label 䊊1 Seating capacity: The maximum num- ber of occupants that can be seated in the vehicle.
䊊2 Vehicle load limit: See loading infor- mation in the “Technical and con- sumer information” section.
䊊3 Original tire size: The size of the tires originally installed on the vehicle at the factory.
LDI2000
䊊4 Cold tire pressure: Inflate the tires to this pressure when the tires are cold. Tires are considered COLD after the vehicle has been parked for 3 or more hours, or driven less than 1 mile (1.6
km) at moderate speeds. The recom- mended cold tire inflation is set by the manufacturer to provide the best bal- ance of tire wear, vehicle handling, driveability, tire noise, etc., up to the vehicle’s GVWR.Maintenance and do-it-yourself 8-33
4. Read the tire pressure on the gauge stem and compare to the specifica- tion shown on the Tire and Loading Information label.
5. Add air to the tire as needed. If too much air is added, press the core of the valve stem briefly with the tip of the gauge stem to release pressure. Recheck the pressure and add or release air as needed. Install the valve stem cap.
6. 7. Check the pressure of all other tires,
including the spare.
LDI0393
Checking tire pressure 1. Remove the valve stem cap from the
tire.
2. Press the pressure gauge squarely onto the valve stem. Do not press too hard or force the valve stem side- ways, or air will escape. If the hissing sound of air escaping from the tire is heard while checking the pressure, reposition the gauge to eliminate this leakage.
3. Remove the gauge. 8-34 Maintenance and do-it-yourself
Front Original Tire
Rear Original Tire
Spare Tire (Temporary)
Size P245/45VR18
P245/40VR19
P245/40WR19
P245/45VR18
P245/40VR19
P245/40WR19
T145/80D17
T145/80R17Cold Tire Inflation Pressure 230 kPa, 33 PSI 230 kPa, 33 PSI 230 kPa, 33 PSI 230 kPa, 33 PSI 230 kPa, 33 PSI 230 kPa, 33 PSI 420 kPa, 60 PSI 420 kPa, 60 PSI
Example
WDI0394
TIRE LABELING Federal law requires tire manufacturers to place standardized information on the sidewall of all tires. This information iden- tifies and describes the fundamental characteristics of the tire and also pro- vides the tire identification number (TIN) for safety standard certification. The TIN can be used to identify the tire in case of a recall.
Maintenance and do-it-yourself 8-35
7. H: Tire speed rating. You should not drive the vehicle faster than the tire speed rating.
WDI0395
䊊1 Tire size (example: P215/65R15 95H) 1. P: The “P” indicates the tire is de- signed for passenger vehicles (not all tires have this information).
2. Three-digit number (215): This num- ber gives the width in millimeters of the tire from sidewall edge to side- wall edge.
3. Two-digit number (65): This number, known as the aspect ratio, gives the tire’s ratio of height to width.
8-36 Maintenance and do-it-yourself
Example
4. R: The “R” stands for radial. 5. Two-digit number (15): This number is the wheel or rim diameter in inches. 6. Two- or three-digit number (95): This number is the tire’s load index. It is a measurement of how much weight each tire can support. You may not find this information on all tires be- cause it is not required by law.
䊊2 TIN (Tire Identification Number) for a new tire (example: DOT XX XX XXX XXXX) 1. DOT: Abbreviation for the “Depart- ment Of Transportation”. The symbol can be placed above, below or to the left or right of the Tire Identification Number. 2. Two-digit
code: Manufacturer’s
identification mark.
3. Two-digit code: Tire size.
Example
WDI0396
4. Three-digit code: Tire type code
(Optional).
5. Three-digit code: Date of Manufac-
ture.
6. Four numbers represent the week and year the tire was built. For ex- ample, the numbers 3103 means the 31st week of 2003. If these numbers are missing, then look on the other sidewall of the tire.
䊊3 Tire ply composition and material The number of layers or plies of rubber- coated fabric in the tire. Tire manufactur- ers also must indicate the materials in the tire, which include steel, nylon, polyester, and others. 䊊4 Maximum permissible inflation pres- sure This number is the greatest amount of air pressure that should be put in the tire. Do not exceed the maximum permissible in- flation pressure. 䊊5 Maximum load rating This number indicates the maximum load in kilograms and pounds that can be car- ried by the tire. When replacing the tires on the vehicle, always use a tire that has the same load rating as the factory in- stalled tire. 䊊6 Term of “tubeless” or “tube type” Indicates whether the tire requires an in- ner tube (“tube type”) or not (“tubeless”).
Maintenance and do-it-yourself 8-37
䊊7 The word “radial” The word “radial” is shown if the tire has radial structure. 䊊8 Manufacturer or brand name Manufacturer or brand name is shown. Other Tire-related Terminology In addition to the many terms that are defined throughout this section, Intended Outboard Sidewall is (1) the sidewall that contains a whitewall, bears white lettering or bears manufacturer, brand, and/or model name molding that is higher or deeper than the same molding on the other sidewall of the tire, or (2) the out- ward facing sidewall of an asymmetrical tire that has a particular side that must always face outward when mounted on a vehicle.
8-38 Maintenance and do-it-yourself
TYPES OF TIRES
WARNING
● When changing or replacing tires, be sure all four tires are of the same type (i.e., Summer, All Season or Snow) and construction. A NISSAN dealer may be able to help you with information about tire type, size, speed rating and availability.
● Replacement tires may have a lower speed rating than the factory equipped tires, and may not match the potential maximum vehicle speed. Never exceed the maximum speed rating of the tire.
● For additional
information regarding tires, refer to “Important Tire Safety In- formation” (US) or “Tire Safety Informa- tion” (Canada) in the Warranty Informa- tion Booklet.
All season tires NISSAN specifies All Season tires on some mod- els to provide good performance all year, includ- ing snowy and icy road conditions. All Season tires are identified by ALL SEASON and/or M&S on the tire sidewall. Snow tires have better snow traction than All Season tires and may be more appropriate in some areas.
Summer tires NISSAN specifies summer tires on some models to provide superior performance on dry roads. Summer tire performance is substantially re- duced in snow and ice. Summer tires do not have the tire traction rating “M&S” on the tire sidewall.
If you do not,
If you plan to operate your vehicle in snowy or icy conditions, NISSAN recommends the use of SNOW tires or ALL SEASON tires on all four wheels. Snow tires If snow tires are needed, it is necessary to select tires equivalent in size and load rating to the original equipment tires. it can adversely affect the safety and handling of your vehicle. Generally, snow tires have lower speed ratings than factory equipped tires and may not match the potential maximum vehicle speed. Never ex- ceed the maximum speed rating of the tire. If you install snow tires, they must be the same size, brand, construction and tread pattern on all four wheels. For additional traction on icy roads, studded tires may be used. However, some U.S. states and Canadian provinces prohibit their use. Check local, state and provincial laws before installing
recommended by the tire chain manufacturer to ensure a tight fit. Loose end links of the tire chain must be secured or removed to prevent the pos- sibility of whipping action damage to the fenders or underbody. If possible, avoid fully loading your vehicle when using tire chains. In addition, drive at a reduced speed. Otherwise, your vehicle may be damaged and/or vehicle handling and perfor- mance may be adversely affected. Tire chains must be installed only on the front wheels and not on the rear wheels. Never install tire chains on a TEMPORARY USE ONLY spare tire. Do not use tire chains on dry roads. Driving with chains in such conditions can cause damage to the various mechanisms of the vehicle due to some overstress.
studded tires. Skid and traction capabilities of studded snow tires on wet or dry surfaces may be poorer than that of non-studded snow tires. TIRE CHAINS
CAUTION
Tire chains/cables should not be installed on P245/40VR19 size tires. Installation of the tire chains/cables on P245/40VR19
size tires will cause damage to the ve- hicle. If you plan to use tire chains/cables, you should install P245/45VR18 size tires on your vehicle.Use of tire chains may be prohibited according to location. Check the local laws before installing tire chains. When installing tire chains, make sure they are the proper size for the tires on your vehicle and are installed according to the chain manufacturer’s suggestions. Use only SAE class “S” chains. Class “S” chains are used on vehicles with restricted tire to vehicle clearance. Vehicles that can use Class “S” chains are de- signed to meet the minimum clearances between the tire and the closest vehicle suspension or body component required to accommodate the use of a winter traction device (tire chains or cables). The minimum clearances are determined using the factory equipped tires. Other types may damage your vehicle. Use chain tensioners when
WDI0258
CHANGING WHEELS AND TIRES Tire rotation NISSAN recommends rotating the tires every 7,500 miles (12,000 km). See “Flat tire” in the “In case of emer- gency” section of this manual for tire re- placing procedures. As soon as possible, tighten the wheel nuts to the specified torque with a torque wrench.
Maintenance and do-it-yourself 8-39
Wheel nut tightening torque:
83 ft-lb (112 N·m)
The wheel nuts must be kept tight- ened to specifications at all times. It is recommended that wheel nuts be tightened to specification at each tire rotation interval.
WARNING
● After rotating the tires, check and
adjust the tire pressure.
● Retighten the wheel nuts when the vehicle has been driven for 600 miles (1,000 km) (also in cases of a flat tire, etc.).
● Do not include the spare tire in
the tire rotation. ● For additional
information re- garding tires, refer to “Important Tire Safety Information” (US) or “Tire Information” (Canada) in the Warranty Infor- mation Booklet.
Safety
● The original tires have built-in tread wear indicators. When the wear indicators are visible, the tire(s) should be replaced.
● Tires degrade with age and use. Have tires, including the spare, over 6 years old checked by a qualified because some tire damage may not be ob- vious. Replace the tires as neces- sary to prevent tire failure and possible personal injury.
technician
● Improper service of the spare tire may result in serious personal in- jury. If it is necessary to repair the spare tire, contact a NISSAN dealer.
● For additional
information re- garding tires, refer to “Important Tire Safety Information” (US) or “Tire Information” (Canada) in the Warranty Infor- mation Booklet.
Safety
WDI0259
1. Wear indicator 2. Location mark Tire wear and damage
WARNING
● Tires should be periodically in- spected for wear, cracking, bulg- ing or objects caught in the tread. If excessive wear, cracks, bulging or deep cuts are found, the tire(s) should be replaced.
8-40 Maintenance and do-it-yourself
Replacing wheels and tires When replacing a tire, use the same size, tread design, speed rating and load carrying capacity as originally equipped. Recommended types and sizes are shown in “Wheels and tires” in the “Technical and consumer information” section of this manual.
WARNING
● The use of tires other than those recom- mended or the mixed use of tires of different brands, construction (bias, bias-belted or radial), or tread patterns can adversely affect the ride, braking, handling, VDC system, ground clear- ance, body-to-tire clearance, tire chain clearance, speedometer calibration, headlight aim and bumper height. Some of these effects may lead to acci- dents and could result in serious per- sonal injury.
● If your vehicle was originally equipped with 4 tires that were the same size and you are only replacing 2 of the 4 tires, install the new tires on the rear axle. Placing new tires on the front axle may cause loss of vehicle control in some driving conditions and cause an acci- dent and personal injury.
● If the wheels are changed for any rea- son, always replace with wheels which have the same off-set dimension. Wheels of a different off-set could cause premature tire wear, degrade ve- hicle handling characteristics, affect the VDC system and/or interference with the brake discs. Such interference can lead to decreased braking effi- ciency and/or early brake pad/shoe wear. Refer to “Wheels and tires” in the “Technical and consumer information” section of this manual for wheel off-set dimensions.
● When a spare tire is mounted or a wheel is replaced, tire pressure will not be indicated, the TPMS will not function and the low tire pressure warning light will flash for approximately 1 minute. The light will remain on after 1 minute. Contact your NISSAN dealer as soon as possible for tire replacement and/or system resetting.
● Replacing tires with those not originally specified by NISSAN could affect the proper operation of the TPMS.
● Do not install a damaged or deformed wheel or tire even if it has been re- paired. Such wheels or tires could have structural damage and could fail with- out warning. ● The use of
retread tires
is not
recommended. ● For additional
information regarding tires, refer to “Important Tire Safety In- formation” (US) or “Tire Safety Informa- tion” (Canada) in the Warranty Informa- tion Booklet. Wheel balance Unbalanced wheels may affect vehicle handling and tire life. Even with regular use, wheels can get out of balance. Therefore, they should be bal- anced as required. Wheel balance service should be per- formed with the wheels off the vehicle. Spin balancing the wheels on the vehicle could lead to mechanical damage.
● For additional information regarding tires, refer to “Important Tire Safety Information” (US) or “Tire Safety Infor- mation” (Canada) in the Warranty In- formation Booklet.
Maintenance and do-it-yourself 8-41
Care of wheels ● Wash the wheels when washing the vehicle
to maintain their appearance.
● Clean the inner side of the wheels when the is changed or the underside of the
wheel vehicle is washed.
● Do not use abrasive cleaners when washing
the wheels.
● Inspect wheel rims regularly for dents or corrosion. Such damage may cause loss of pressure or poor seal at the tire bead.
● NISSAN recommends waxing the road wheels to protect against road salt in areas where it is used during winter.
Spare tire (TEMPORARY USE ONLY spare tire) Observe the following precautions if the TEM- PORARY USE ONLY spare tire must be used. Otherwise, your vehicle could be damaged or involved in an accident:
WARNING
● The spare tire should be used for emer- gency use only. It should be replaced with the standard tire at the first oppor- tunity to avoid possible tire or differen- tial damage.
● Drive carefully while the TEMPORARY USE ONLY spare tire is installed. Avoid sharp turns and abrupt braking while driving.
● Periodically check spare tire inflation pressure. Always keep the pressure of the TEMPORARY USE ONLY spare tire at 60 psi (420 kPa, 4.2 bar).
● With the TEMPORARY USE ONLY spare tire installed do not drive the vehicle at speeds faster than 50 MPH (80 km/h). ● When driving on roads covered with snow or ice, the TEMPORARY USE ONLY spare tire should be used on the rear wheels and the original tire used on the front wheels (drive wheels). Use tire chains only on the front (original) tires.
● Tire tread of the TEMPORARY USE ONLY spare tire will wear at a faster rate than the standard tire. Replace the spare tire as soon as the tread wear indicators appear.
● Do not use the spare tire on other
vehicles.
● Do not use more than one spare tire at
the same time.
● Do not tow a trailer when the TEMPO- RARY USE ONLY spare tire is installed.
CAUTION
● Do not use tire chains on a TEMPO- RARY USE ONLY spare tire. Tire chains will not fit properly and may cause dam- age to the vehicle.
● Because the TEMPORARY USE ONLY spare tire is smaller than the original tire, ground clearance is reduced. To avoid damage to the vehicle, do not drive over obstacles. Also, do not drive the vehicle through an automatic car wash since it may get caught.
8-42 Maintenance and do-it-yourself
9 Technical and consumer information
Capacities and recommended fuel/lubricants . . . . . . . . . 9-2
Fuel recommendation . . . . . . . . . . . . . . . . . . . . . . . . . . . 9-3
Engine oil and oil filter recommendations . . . . . . . . . . 9-5
Air conditioner system refrigerant and oil recommendations . . . . . . . . . . . . . . . . . . . . . . . . . . . . . . 9-6
Specifications. . . . . . . . . . . . . . . . . . . . . . . . . . . . . . . . . . . . . 9-7
Engine . . . . . . . . . . . . . . . . . . . . . . . . . . . . . . . . . . . . . . . . 9-7
Wheels and tires . . . . . . . . . . . . . . . . . . . . . . . . . . . . . . . 9-8
Dimensions and weights . . . . . . . . . . . . . . . . . . . . . . . . 9-8When traveling or registering your vehicle in another country . . . . . . . . . . . . . . . . . . . . . . . . . . . . . . . . . . . 9-9
Vehicle identification . . . . . . . . . . . . . . . . . . . . . . . . . . . . . . . 9-9
Vehicle identification number (VIN) plate . . . . . . . . . . 9-9
Vehicle identification number (chassis number) . . . . . . . . . . . . . . . . . . . . . . . . . . . . . . . 9-9
Engine serial number. . . . . . . . . . . . . . . . . . . . . . . . . . . 9-10
F.M.V.S.S./C.M.V.S.S. certification label . . . . . . . . . . 9-10
Emission control information label . . . . . . . . . . . . . . . 9-10
Tire and loading information label. . . . . . . . . . . . . . . . 9-11Air conditioner specification label. . . . . . . . . . . . . . . . 9-11
Installing front license plate . . . . . . . . . . . . . . . . . . . . . . . . 9-11
Vehicle loading information . . . . . . . . . . . . . . . . . . . . . . . . 9-12
Terms . . . . . . . . . . . . . . . . . . . . . . . . . . . . . . . . . . . . . . . . 9-12
Vehicle load capacity . . . . . . . . . . . . . . . . . . . . . . . . . . 9-13
Loading tips . . . . . . . . . . . . . . . . . . . . . . . . . . . . . . . . . . 9-15
Measurement of weights . . . . . . . . . . . . . . . . . . . . . . . 9-15
Towing a trailer . . . . . . . . . . . . . . . . . . . . . . . . . . . . . . . . . . . 9-16
Maximum load limits . . . . . . . . . . . . . . . . . . . . . . . . . . . 9-16
Towing load/specification. . . . . . . . . . . . . . . . . . . . . . . 9-19
Towing safety . . . . . . . . . . . . . . . . . . . . . . . . . . . . . . . . . 9-19
Flat towing. . . . . . . . . . . . . . . . . . . . . . . . . . . . . . . . . . . . 9-23
Uniform tire quality grading . . . . . . . . . . . . . . . . . . . . . . . . 9-24
Emission control system warranty . . . . . . . . . . . . . . . . . . 9-24
Reporting safety defects . . . . . . . . . . . . . . . . . . . . . . . . . . 9-25
Readiness for inspection/maintenance (I/M) test . . . . . 9-26
Event Data Recorders (EDR). . . . . . . . . . . . . . . . . . . . . . . 9-26
Owner’s Manual/Service Manual order information . . . 9-27
In the event of a collision . . . . . . . . . . . . . . . . . . . . . . . 9-27CAPACITIES AND RECOMMENDED FUEL/LUBRICANTS
The following are approximate capacities. The actual refill capacities may be slightly different. When refilling, follow the procedure described in the “Maintenance and do-it-yourself” section to determine the proper refill capacity.
Fuel Engine oil *7
Drain and Refill
Capacity (Approximate) US measure 20 gal
Imp measure 16-5/8 gal
With oil filter change Without oil filter change
4-7/8 qt 4-1/2 qt
4 qt 3-3/4 qt
Liter 75.6
4.6
4.3Cooling system
With reservoir
CVT fluid Power steering fluid (PSF) Brake fluid Multi-purpose grease Air conditioning system refrigerant Air conditioning system oil Windshield-washer fluid
1-3/4 gal
2-1/8 gal See a NISSAN dealer for service. Refill to the proper level according to the instructions in the “Maintenance and do-it-yourself” section.
8.2
— — — —
— — — —
— — — —
Recommended Fluids and Lubricants
Unleaded gasoline with an octane rating of at least 91 AKI (RON 96) *1
(cid:129) Engine oil with API Certification Mark *2, *3
(cid:129) Viscosity SAE 5W-30 *2, *3Pre-diluted Genuine NISSAN Long Life Antifreeze/Coolant (blue) or equivalent Genuine NISSAN CVT Fluid NS-2 *4
Genuine NISSAN PSF or equivalent.*8
Genuine NISSAN Super Heavy Duty Brake Fluid *5 or equivalent DOT 3
NLGI No. 2 (Lithium Soap base) HFC-134a (R-134a) *6
Genuine NISSAN A/C System Oil Type S or equivalent *6
Genuine NISSAN Windshield Washer Concentrate Cleaner & Antifreeze or equivalent*1: For further details, see “Fuel recommendation” in this section. *2: For further details, see “Engine oil and oil filter recommendation” in this section. *3: NISSAN recommends Genuine NISSAN Ester Engine Oil available at a NISSAN dealer. *4: Use only Genuine NISSAN CVT Fluid NS-2. Using transmission fluid other than Genuine NISSAN CVT Fluid NS-2 will damage the CVT, which is not covered by
the NISSAN new vehicle limited warranty.
*5: Available in mainland USA through a NISSAN dealer. *6: For further details, see “Air conditioner system refrigerant and oil recommendations” in this section. *7: For further details, see “Engine Oil” in the “Maintenance and do-it-yourself” section of this manual. *8: DEXRON™ VI type ATF may also be used. 9-2 Technical and consumer information
FUEL RECOMMENDATION NISSAN recommends the use of premium un- leaded gasoline with an octane rating of at least 91 AKI (Anti-Knock Index) number (Research octane number 96). If unleaded premium gaso- line is not available, you may use unleaded regular gasoline with an octane rating of at least 87 AKI number (Research octane number 91), but you may notice a decrease in performance.
CAUTION
● Using a fuel other than that specified could adversely affect the emission control system, and may also affect the warranty coverage.
● Under no circumstances should a leaded gasoline be used, because this will damage the three-way catalyst.
● Do not use E-85 fuel in your vehicle. Your vehicle is not designed to run on E-85 fuel. Using E-85 fuel can damage the fuel system components and is not covered by the NISSAN new vehicle lim- ited warranty.
Gasoline specifications NISSAN recommends using gasoline that meets the World-Wide Fuel Charter (WWFC) specifi- cations where it is available. Many of the automo- bile manufacturers developed this specification to improve emission control system and vehicle performance. Ask your service station manager if the gasoline meets the WWFC specifications. Reformulated gasoline Some fuel suppliers are now producing reformu- lated gasolines. These gasolines are specially designed to reduce vehicle emissions. NISSAN supports efforts towards cleaner air and sug- gests that you use reformulated gasoline when available. Gasoline containing oxygenates Some fuel suppliers sell gasoline containing oxy- genates such as ethanol, MTBE and methanol with or without advertising their presence. NISSAN does not recommend the use of fuels of which the oxygenate content and the fuel com- patibility for your NISSAN cannot be readily de- termined. If in doubt, ask your service station manager.
If you use oxygenate-blend gasoline, please take the following precautions as the usage of such fuels may cause vehicle performance problems and/or fuel system damage. ● The fuel should be unleaded and have an octane rating no lower than that recommended for unleaded gasoline. than methanol blend is used, it should con- tain no more than 10% oxygenate. (MTBE may, however, be added up to 15%.)
● If an oxygenate-blend other
● If a methanol blend is used, it should contain no more than 5% methanol (methyl alcohol, wood alcohol). It should also contain a suitable amount of appropriate cosolvents and corro- sion inhibitors. If not properly formu- lated with appropriate cosolvents and corrosion inhibitors, such methanol blends may cause fuel system damage and/or vehicle performance problems. At this time, sufficient data is not avail- able to ensure that all methanol blends are suitable for use in NISSAN ve- hicles.
Technical and consumer information 9-3
CAUTION
● Your vehicle is not designed to run on E-85 fuel. Using E-85 fuel in a vehicle not specifically designed for E-85 fuel can damage fuel system components and is not covered by the NISSAN new vehicle limited warranty.
● E-85 is a mixture of approximately 85% 15% unleaded
ethanol
and
fuel gasoline.
● U.S. government
regulations require ethanol dispensing pumps to be identi- fied by a small, square, orange and black label with the common abbrevia- tion or the appropriate percentage for that region.
fuels,
oxygenate-blend
If any driveability problems such as engine stall- ing and difficult hot-starting are experienced after using immediately change to a non-oxygenate fuel or a fuel with a low blend of MTBE. Take care not to spill gasoline during refu- eling. Gasoline containing oxygenates can cause paint damage. E–85 fuel E-85 fuel is a mixture of approximately 85% fuel ethanol and 15% unleaded gasoline. E-85 can only be used in a Flexible Fuel Vehicle (FFV). Do not use E-85 in your vehicle. U.S. government regulations require fuel ethanol dispensing pumps to be identified by a small, square, orange and black label with the common abbreviation or the appropriate percentage for that region. Aftermarket fuel additives NISSAN does not recommend the use of any aftermarket fuel additives (for example, fuel injec- tor cleaner, octane booster, intake valve deposit removers, etc.) which are sold commercially. Many of these additives intended for gum, varnish or deposit removal may contain active solvents or similar ingredients that can be harmful to the fuel system and engine.
9-4 Technical and consumer information
Octane rating tips Using unleaded gasoline with an octane rating lower than recommended can cause persistent, heavy “spark knock.” (“Spark knock” is a metallic rapping noise.) If se- vere, this can lead to engine damage. If you detect a persistent heavy spark knock even when using gasoline of the stated octane rating, or if you hear steady spark knock while holding a steady speed on level roads, have a NISSAN dealer correct the condition. Failure to correct the condition is misuse of the vehicle, for which NISSAN is not responsible.
ignition timing may result
Incorrect in spark knock, after-run and/or overheating, which may cause excessive fuel consumption or engine damage. If any of the above symptoms are en- countered, have your vehicle checked at a NISSAN dealer. However, now and then you may notice light spark knock for a short time while accelerating or driving up hills. This is not a cause for concern, because you get the greatest fuel benefit when there is light spark knock for a short time under heavy engine load.
ENGINE OIL AND OIL FILTER RECOMMENDATIONS Selecting the correct oil It is essential to choose the correct grade, quality and viscosity engine oil to ensure satisfactory engine life and performance. See “Capacities and recommended fuel/lubricants” earlier in this section. NISSAN recommends the use of an energy conserving oil in order to improve fuel economy.
Select only engine oils that meet the American Petroleum Institute (API) certification or Interna- tional Lubricant Standardization and Approval
WTI0183
Committee (ILSAC) certification and SAE vis- cosity standard. These oils have the API certifica- tion mark on the front of the container. Oils which do not have the specified quality label should not be used as they could cause engine damage. Oil additives NISSAN does not recommend the use of oil additives. The use of an oil additive is not neces- sary when the proper oil type is used and main- tenance intervals are followed.Oil which may contain foreign matter or has been previously used should not be used.
Oil viscosity The engine oil viscosity or thickness changes with temperature. Because of this, it is important to select the engine oil viscosity based on the temperatures at which the vehicle will be oper- ated before the next oil change. Choosing an oil viscosity other than that recommended could cause serious engine damage. Selecting the correct oil filter Your new NISSAN vehicle is equipped with a high-quality genuine NISSAN oil filter. When re- placing, use a genuine NISSAN oil filter or its equivalent for the reason described in “Change intervals.” Change intervals The oil and oil filter change intervals for your engine are based on the use of the specified quality oils and filters. Using engine oil and filters that are not of the specified quality, or exceeding recommended oil and filter change intervals could reduce engine life. Damage to the engine caused by improper maintenance or use of incor- rect oil and filter quality and/or viscosity is not covered by the NISSAN new vehicle limited war- ranty.
Technical and consumer information 9-5
CAUTION
The use of any other refrigerant or oil will cause severe damage to the air condition- ing system and will require the replace- ment of all air conditioner system components.
The refrigerant HFC-134a (R-134a) in your NISSAN vehicle does not harm the earth’s ozone layer. Although this refrigerant does not affect the earth’s atmosphere, certain government regula- tions require the recovery and recycling of any refrigerant during automotive air conditioner sys- tem service. A NISSAN dealer has the trained technicians and equipment needed to recover and recycle your air conditioner system refriger- ant. Contact a NISSAN dealer when servicing your air conditioner system.
Your engine was filled with a high-quality engine oil when it was built. You do not have to change the oil before the first recommended change interval. Oil and filter change intervals depend upon how you use your vehicle.
Operation under the following conditions may require more frequent oil and filter changes: ● repeated short distance driving at cold out-
side temperatures
● driving in dusty conditions ● extensive idling ● towing a trailer ● stop and go commuting Refer to the “NISSAN Service and Maintenance Guide” for the maintenance schedule. AIR CONDITIONER SYSTEM REFRIGERANT AND OIL RECOMMENDATIONS The air conditioner system in your NISSAN vehicle must be charged with the refriger- ant HFC-134a (R-134a) and NISSAN A/C system oil Type S or the exact equivalents.
9-6 Technical and consumer information
SPECIFICATIONS
ENGINE
Model
Type Cylinder arrangement Bore x Stroke Displacement Firing order
Idle speed
CVT (in “N” position) Ignition timing (degree B.T.D.C. at idle speed) CO % at idle
Spark plug
Spark plug gap (Nominal)
Camshaft operation This spark ignition system complies with the Canadian standard ICES-002.
VQ35DE
Gasoline, 4-cycle, DOHC 6-cylinder, V-block, Slanted at 60°
in (mm) 3.760 x 3.205 (95.5 x 81.4)
cu in (cm3) 213.45 (3,498) 1–2–3–4–5–6
No adjustment is necessary.
FXE22HR11
in (mm) 0.043 (1.1)
Timing chain
Technical and consumer information 9-7
WHEELS AND TIRES
DIMENSIONS AND WEIGHTS
Wheels
Tires
Spare tire
Speed rating
18 x 8.0J 19 x 8.0J
P245/45VR18
P245/40VR19
P245/40WR19
T145/80D17
T145/80R1718” 19” 19”
Overall length Overall width Overall height Front Track
18 inch tire 19 inch tire
Rear Track
18 inch tire 19 inch tire
Wheelbase Gross vehicle weight rating Gross axle weight rating
Front Rear
9-8 Technical and consumer information
in (mm) in (mm) in (mm)
in (mm) in (mm)
190.6 (4,843) 73.2 (1,860) 57.9 (1,472)
62.4 (1,585) 62.4 (1,585)
62.4 (1,584) 62.4 (1,585) 109.3 (2,775)
in (mm) in (mm) in (mm) lb (kg) See the “F.M.V.S.S./C.M.V. S.S. certification label” on the center pillar between the driver’s side front and rear doors.
lb (kg) lb (kg)
WHEN TRAVELING OR REGISTERING YOUR VEHICLE IN ANOTHER COUNTRY When planning to drive your NISSAN ve- hicle in another country, you should first find out if the fuel available is suitable for your vehi- cle’s engine. Using fuel with an octane rating that is too low may cause engine damage. All gasoline vehicles must be operated with unleaded gasoline. There- fore, avoid taking your vehicle to areas where appropriate fuel is not available. When transferring the registration of your vehicle to another country, state, province or district, it may be necessary to modify the vehicle to meet local laws and regulations. The laws and regulations for motor vehicle emis- sion control and safety standards vary according to the country, state, province or district; there- fore, vehicle specifications may differ. When any vehicle is to be taken into an- other country, state, province or district and registered, its modifications, transpor- tation, and registration are the responsibil- ity of the user. NISSAN is not responsible for any inconvenience that may result.
VEHICLE IDENTIFICATION
WTI0171
VEHICLE IDENTIFICATION NUMBER (VIN) PLATE The vehicle identification number (VIN) plate is attached as shown. This number is the identifica- tion for your vehicle and is used in the vehicle registration.LTI0070
VEHICLE IDENTIFICATION NUMBER (chassis number) The vehicle identification number is located as shown.Technical and consumer information 9-9
WTI0049
WTI0172
WTI0173
ENGINE SERIAL NUMBER The number is stamped on the engine as shown.
F.M.V.S.S./C.M.V.S.S. CERTIFICATION LABEL The Federal/Canadian Motor Vehicle Safety Standard (F.M.V.S.S./C.M.V.S.S.) certification la- bel is affixed as shown. This label contains valu- able vehicle information, such as: Gross Vehicle Weight Ratings (GVWR), Gross Axle Weight Rating (GAWR), month and year of manufacture, Vehicle Identification Number (VIN), etc. Review it carefully.
9-10 Technical and consumer information
EMISSION CONTROL INFORMATION LABEL The emission control tached to the underside of the hood as shown.
information label
is at-
INSTALLING FRONT LICENSE PLATE
WTI0174
TIRE AND LOADING INFORMATION LABEL The cold tire pressure is shown on the Tire and Loading Information label. The label is located as shown.WTI0167
AIR CONDITIONER SPECIFICATION LABEL The air conditioner specification label is affixed to the underside of the hood as shown.Technical and consumer information 9-11
WTI0203
VEHICLE LOADING INFORMATION
WARNING
● It is extremely dangerous to ride in a cargo area inside a vehicle. In a collision, people riding in these areas are more likely to be seri- ously injured or killed.
● Do not allow people to ride in any area of your vehicle that is not equipped with seats and seat belts.
● Be sure everyone in your vehicle is in a seat and using a seat belt properly.
TERMS It is important to familiarize yourself with the following terms before loading your vehicle: ● Curb Weight (actual weight of your vehicle) - vehicle weight including: standard and optional equipment, flu- ids, emergency tools, and spare tire assembly. This weight does not in- clude passengers and cargo.
● GVW (Gross Vehicle Weight) - curb weight plus the combined weight of passengers and cargo.
● GVWR (Gross Vehicle Weight Rat- ing) - maximum total combined weight of the unloaded vehicle, pas- sengers, trailer tongue load and any other optional equipment. This information is lo- cated on the F.M.V.S.S./C.M.V.S.S. certification label.
luggage,
hitch,
● GAWR (Gross Axle Weight Rating) - maximum weight (load) limit specified for the front or rear axle. This informa- tion the located F.M.V.S.S./C.M.V.S.S. certification label.
on
is
● GCWR (Gross Combined Weight rating) - The maximum total weight rating of the vehicle, passengers, cargo, and trailer.
Use the following steps to mount the front license plate: 䊊1 Make holes on the plastic finisher at the location mark (small dimple) using a 0.31 in (8 mm) drill. Apply light pressure to the drill. Install the license plate holder using the two screws provided with the holder.
䊊2 Mount the license plate using two M6-
14mm bolts.