- 2012 Nissan Frontier Owners Manuals
- Nissan Frontier Owners Manuals
- 2003 Nissan Frontier Owners Manuals
- Nissan Frontier Owners Manuals
- 2004 Nissan Frontier Owners Manuals
- Nissan Frontier Owners Manuals
- 2009 Nissan Frontier Owners Manuals
- Nissan Frontier Owners Manuals
- 2001 Nissan Frontier Owners Manuals
- Nissan Frontier Owners Manuals
- 2010 Nissan Frontier Owners Manuals
- Nissan Frontier Owners Manuals
- 1996 Nissan Frontier Owners Manuals
- Nissan Frontier Owners Manuals
- 2005 Nissan Frontier Owners Manuals
- Nissan Frontier Owners Manuals
- 2007 Nissan Frontier Owners Manuals
- Nissan Frontier Owners Manuals
- 2008 Nissan Frontier Owners Manuals
- Nissan Frontier Owners Manuals
- 1999 Nissan Frontier Owners Manuals
- Nissan Frontier Owners Manuals
- 2002 Nissan Frontier Owners Manuals
- Nissan Frontier Owners Manuals
- 2000 Nissan Frontier Owners Manuals
- Nissan Frontier Owners Manuals
- 2011 Nissan Frontier Owners Manuals
- Nissan Frontier Owners Manuals
- 1998 Nissan Frontier Owners Manuals
- Nissan Frontier Owners Manuals
- 1997 Nissan Frontier Owners Manuals
- Nissan Frontier Owners Manuals
- 2006 Nissan Frontier Owners Manuals
- Nissan Frontier Owners Manuals
- Download PDF Manual
-
WRS0175
WRS0176
WRS0131
Forward and backward Pull the lever up and hold it while you slide the seat forward or backward to the desired position. Release the lever to lock the seat in position.
Seat lifter (if so equipped for driver(cid:146)s seat) Turn either dial to adjust the angle and height of the seat cushion to the desired position.
Reclining To recline the seatback, pull the lever up and lean back. To bring the seatback forward, pull the lever up and lean your body forward. Release the lever to lock the seatback in position. The reclining feature allows adjustment of the seatback for occupants of different sizes for added comfort and to help obtain proper seat belt fit. See (cid:147)Precautions on seat belt usage(cid:148) later in this section. Also, the seatback can be reclined to allow occupants to rest when the vehicle is stopped and the transmission is in P (Park) or N (Neutral) position with the parking brake fully applied.
Safety(cid:151)Seats, seat belts and supplemental restraint system 1-3
Z REVIEW COPY—2009 08+ Truck/Frontier (fro) Owners Manual—USA_English (nna) 05/24/08—debbie X
The reclining feature allows adjustment of the seatback for occupants of different sizes for added comfort and to help obtain proper seat belt fit (see (cid:147)Precautions on seat belt usage(cid:148) later in this section). Also, the seatback can be re- clined to allow occupants to rest when the ve- hicle is stopped and the transmission is in P (Park) or N (Neutral) position with the parking brake fully applied.
FRONT POWER SEAT ADJUSTMENT (if so equipped) Operating tips c The power seat motor has an auto-reset the motor overload protection circuit. stops during operation, wait 30 seconds, then reactivate the switch.
If
c Do not operate the power seat switch for a long period of time when the engine is off. This will discharge the battery.
WRS0163
Forward and backward Moving the switch forward or backward will slide the seat forward or backward to the desired position. Reclining Move the recline switch backward until the de- sired angle is obtained. To bring the seatback forward again, move the switch forward and move your body forward. The seatback will move forward.
1-4 Safety(cid:151)Seats, seat belts and supplemental restraint system
Z REVIEW COPY—2009 08+ Truck/Frontier (fro) Owners Manual—USA_English (nna) 05/27/08—debbie X
WRS0164
WRS0389
LRS0556
Seat lifter (driver(cid:146)s seat) Push the front or rear end of the switch up or down to adjust the angle and height of the seat cushion.
Lumbar support (if so equipped for driver(cid:146)s seat) The lumbar support feature provides lower back support to the driver. Move the lever forward or backward to adjust the seat lumbar area.
JUMP SEAT (King cab)
WARNING
c Do not use a child restraint in the driv- er(cid:146)s side jump seat. This seating posi- tion is not suitable for child restraint installation. A child restraint can be in- stalled in the passenger(cid:146)s side jump seat when the seat extension is un- folded from the seat base.
c When folding the jump seat, be careful not to squeeze your finger between the seat cushion and the body side.
Safety(cid:151)Seats, seat belts and supplemental restraint system 1-5
Z REVIEW COPY—2009 08+ Truck/Frontier (fro) Owners Manual—USA_English (nna) 05/24/08—debbie X
WRS0213
HEAD RESTRAINT ADJUSTMENT To raise the head restraint, pull it up s2 . To lower, push and hold the lock knob s1 and push the head restraint down s2 . The head restraints on the rear seats are remov- able.
WARNING
Head restraints should be adjusted prop- erly as they may provide significant pro- tection against injury in an accident. Do not remove them. Check the adjustment after someone else uses the seat.
WRS0134
Adjust the head restraint so the center is level with the center of your ears.SPA1025
FRONT-SEAT ACTIVE HEAD RESTRAINTS
WARNING
c Always adjust the head restraints prop- erly as specified in this section. Failure to do so can reduce the effectiveness of the Active Head Restraint.
c Active Head Restraints are designed to supplement other safety systems. Al- ways wear seat belts. No system can prevent all injuries in any accident.
1-6 Safety(cid:151)Seats, seat belts and supplemental restraint system
Z REVIEW COPY—2009 08+ Truck/Frontier (fro) Owners Manual—USA_English (nna) 05/24/08—debbie X
c Do not attach anything to the head re- straint stalks. Doing so could impair Active Head Restraint function.
The Active Head Restraint moves forward utiliz- ing the force that the seatback receives from the occupant in a rear-end collision. The movement of the head restraint helps support the occu- pant(cid:146)s head by reducing its backward movement and helping absorb some of the forces that may lead to whiplash-type injuries. Active Head Restraints are effective for collisions at low to medium speeds in which it is said that whiplash injuries occur most. Active Head Restraints operate only in certain rear-end collisions. After the collision, the head restraints return to their original positions. Properly adjust the Active Head Restraints as described earlier in this section.
c Do not allow people to ride in any area of your vehicle that is not equipped with seats and seat belts. Be sure everyone in your vehicle is in a seat and using a seat belt properly.
c Do not fold down the rear seats when occupants are in the rear seat area or any luggage is on the rear seats.
c Head restraints should be adjusted properly as they may provide significant protection against injury in an accident. Always replace and adjust them prop- erly if they have been removed for any reason.
c If the head restraints are removed for any reason, they should be securely stored to prevent them from causing injury to passengers or damage to the vehicle in case of sudden braking or an accident.
c When returning the seatbacks to the upright position, be certain they are completely secured in the latched posi- tion. If they are not completely secured, passengers may be injured in an acci- dent or sudden stop.
LRS0557
ARMREST To use the center armrest on the 2nd row bench seat, pull on the tab in the center of the seat and fold it down to the resting position. FLEXIBLE SEATING
WARNING
c Never allow anyone to ride in the cargo area or on the rear seats when they are in the fold-down position. In a collision, people riding in these areas without proper restraints are more likely to be seriously injured or killed.
Safety(cid:151)Seats, seat belts and supplemental restraint system 1-7
Z REVIEW COPY—2009 08+ Truck/Frontier (fro) Owners Manual—USA_English (nna) 05/24/08—debbie X
c Properly secure all cargo to help pre- vent it from sliding or shifting. Do not place cargo higher than the seatbacks. In a sudden stop or collision, unsecured cargo could cause personal injury.
LRS0608
Folding the front passenger(cid:146)s seatback (if so equipped) To fold the front passenger(cid:146)s seatback flat for extra storage length when transporting long items: s1 Slide the seat to the rearmost position. Lift up on the recline lever, located on the out- side edge of the seat, and fold the seatback forward as far as it will go. Then lift up on the latch located on the upper corner of the seatback to release the back of the seat.LRS0609
s2 Once the seatback is released, it will enable you to fold the front passenger seatback flat over the seat cushion.3. To return the front passenger(cid:146)s seat to a seating position, lift up on the seatback and push it up to an upright position. Then pull up on the recline lever and lean the seatback to a proper seating position. Release the lever to lock the seatback in position.
1-8 Safety(cid:151)Seats, seat belts and supplemental restraint system
Z REVIEW COPY—2009 08+ Truck/Frontier (fro) Owners Manual—USA_English (nna) 05/24/08—debbie X
WARNING
c If you fold the front passenger(cid:146)s seat- back flat forward to carry longer ob- jects, be sure this cargo is properly se- cured and not near an air bag. In a crash, an inflating air bag might force that object toward a person. This could cause severe injury or even death. Se- cure objects away from the area in which an air bag would inflate. See (cid:147)Precautions on supplemental restraint system(cid:148) later in this section.
c Never allow anyone to ride in the cargo area or on the front passenger(cid:146)s seat when it is in the fold-down position. Use of these areas by passengers could re- sult in serious injury in an accident or sudden stop.
LRS0398
Folding the rear bench seat To fold the rear bench seat up: s1
Lift up on the lever, located on the side of the seat, while lifting the front of the seat cushion up.
LRS0566
s2 Fold the bottom of the seat cushion toward the back of the vehicle until it locks in place.Safety(cid:151)Seats, seat belts and supplemental restraint system 1-9
Z REVIEW COPY—2009 08+ Truck/Frontier (fro) Owners Manual—USA_English (nna) 05/24/08—debbie X
WARNING
c When the vehicle is being used to carry cargo, properly secure all cargo to help prevent it from sliding or shifting. Do not place cargo higher than the seat- backs. In a sudden stop or collision, unsecured cargo could cause personal injury.
c Do not allow people to ride in any area of your vehicle that is not equipped with seats and seat belts. Be sure everyone in your vehicle is in a seat and using a seat belt properly. Never ride in the rear seat unless the seat bottom cushions are in place and latched.
c When returning the seatbacks to the upright position, be certain they are completely secured in the latched posi- tion. If they are not completely secured, passengers may be injured in an acci- dent or sudden stop.
LRS0567
s3 Repeat this process to raise and secure the seat cushion on the other side of the vehicle for maximum storage capacity.To return the rear bench seat to a seating posi- tion, reverse the process. Make sure to prop- erly push the seat cushion down into place.
1-10 Safety(cid:151)Seats, seat belts and supplemental restraint system
WRS0840
Folding the rear bench seat down The rear bench seatback can be tilted forward to access the child restraint anchor point locations or the jacking equipment. To tilt the seatback forward, pull the strap up s1
and tilt the seatback. The child restraint anchor points s2 can be accessed behind the rear bench seatback. The jacking equipment can be accessed from behind the passenger(cid:146)s side seatback.Z REVIEW COPY—2009 08+ Truck/Frontier (fro) Owners Manual—USA_English (nna) 05/24/08—debbie X
SEAT BELTS
WARNING
Never allow anyone to ride in the cargo area or on the rear seat when it is in the fold-down position. Use of these areas by passengers without proper restraints could result in serious injury in an acci- dent or sudden stop.
SSS0136
PRECAUTIONS ON SEAT BELT USAGE If you are wearing your seat belt properly ad- justed and you are sitting upright and well back in your seat with both feet on the floor, your chances of being injured or killed in an accident and/or the severity of injury may be greatly reduced. NISSAN strongly encourages you and all of your passengers to buckle up every time you drive, even if your seating position includes a supple- mental air bag. Most U.S. states and Canadian provinces or territories specify that seat belts be worn at all times when a vehicle is being driven.
Safety(cid:151)Seats, seat belts and supplemental restraint system 1-11
Z REVIEW COPY—2009 08+ Truck/Frontier (fro) Owners Manual—USA_English (nna) 05/24/08—debbie X
WARNING
c Every person who drives or rides in this vehicle should use a seat belt at all times. Children should be properly re- strained in the rear seat and, if appro- priate, in a child restraint.
SSS0134
SSS0016
WARNING
c The seat belt should be properly ad- justed to a snug fit. Failure to do so may reduce the effectiveness of the entire restraint system and increase the chance or severity of injury in an acci- dent. Serious injury or death can occur if the seat belt is not worn properly.
1-12 Safety(cid:151)Seats, seat belts and supplemental restraint system
Z REVIEW COPY—2009 08+ Truck/Frontier (fro) Owners Manual—USA_English (nna) 05/24/08—debbie X
c Be sure the seat belt tongue is securely
fastened to the proper buckle.
c Do not wear the seat belt inside out or twisted. Doing so may reduce its effectiveness.
c Do not allow more than one person to
use the same seat belt.
c Never carry more people in the vehicle
than there are seat belts.
c If the seat belt warning light glows con- tinuously while the ignition is turned ON with all doors closed and all seat belts fastened, it may indicate a mal- function in the system. Have the system checked by a NISSAN dealer.
c No changes should be made to the seat belt system. For example, do not modify the seat belt, add material, or install devices that may change the seat belt routing or tension. Doing so may affect the operation of the seat belt system. Modifying or tampering with the seat belt system may result in serious per- sonal injury.
SSS0014
WARNING
c Always route the shoulder belt over your shoulder and across your chest. Never put the belt behind your back, under your arm or across your neck. The belt should be away from your face and neck, but not falling off your shoulder. c Position the lap belt as low and snug as possible AROUND THE HIPS, NOT THE WAIST. A lap belt worn too high could increase the risk of internal injuries in an accident.
c Once a seat belt pretensioner has acti- vated, it cannot be reused and must be replaced together with the retractor. See your NISSAN dealer.
c Removal and installation of preten- sioner system components should be done by a NISSAN dealer.
and
attaching
c All seat belt assemblies, including re- tractors hardware, should be inspected after any collision by a NISSAN dealer. NISSAN recom- mends that all seat belt assemblies in use during a collision be replaced un- less the collision was minor and the belts show no damage and continue to operate properly. Seat belt assemblies not in use during a collision should also be inspected and replaced if either damage or improper operation is noted. c All child restraints and attaching hard- ware should be inspected after any col- lision. Always follow the restraint manufacturer(cid:146)s inspection instructions and replacement recommendations. The child restraints should be replaced if they are damaged.
Safety(cid:151)Seats, seat belts and supplemental restraint system 1-13
Z REVIEW COPY—2009 08+ Truck/Frontier (fro) Owners Manual—USA_English (nna) 05/24/08—debbie X
CHILD SAFETY Children need adults to help protect them. They need to be properly restrained.
In addition to the general information in this manual, child safety information is available from many other sources, including doctors, teachers, government traffic safety offices, and community organizations. Every child is different, so be sure to learn the best way to transport your child.
There are three basic types of child restraint systems: c Rear-facing child restraint c Front-facing child restraint c Booster seat The proper restraint depends on the child(cid:146)s size. Generally, infants up to about 1 year and less than 20 lbs (9 kg) should be placed in rear-facing child restraints. Front-facing child restraints are available for children who outgrow rear-facing child restraints and are at least one year old. Booster seats are used to help position a vehicle lap/shoulder belt on a child who can no longer use a front-facing child restraint.
WARNING
c Never install a rear-facing child re- straint in the front passenger(cid:146)s seat. An inflating supplemental air bag could se- riously injure or kill your child. A rear- facing child restraint must only be used in the rear seat.
c Infants and children need special pro- tection. The vehicle(cid:146)s seat belts may not fit them properly. The shoulder belt may come too close to the face or neck. The lap belt may not fit over their small hip bones. In an accident, an improperly fitting seat belt could cause serious or fatal injury. Always use appropriate child restraints.
All U.S. states and Canadian provinces or terri- tories require the use of approved child restraints for infants and small children. See (cid:147)Child re- straints(cid:148) later in this section.
Also, there are other types of child restraints available for larger children for additional protec- tion. NISSAN recommends that all pre-teens and children be restrained in the rear seat if available (Crew Cab models). According to
1-14 Safety(cid:151)Seats, seat belts and supplemental restraint system
accident statistics, children are safer when properly restrained in the rear seat than in the front seat.
This is especially important because your vehicle has a supplemental restraint sys- tem (Air bag system) for the front passen- ger. See (cid:147)Supplemental restraint system(cid:148) later in this section. Infants Infants up to at least 1 year old should be placed in a rear-facing child restraint. NISSAN recom- mends that infants be placed in child restraints that comply with Federal Motor Vehicle Safety Standards or Canadian Motor Vehicle Safety Standards. You should choose a child restraint that fits your vehicle and always follow the manu- facturer(cid:146)s instructions for installation and use. Small children Children that are over one year old and weigh at least 20 lbs (9 kg) can be placed in a forward- facing child restraint. Refer to the manufacturer(cid:146)s instructions for minimum and maximum weight and height recommendations. NISSAN recom- mends that small children be placed in child restraints that comply with Federal Motor Vehicle Safety Standards or Canadian Motor Vehicle Safety Standards. You should choose a child
Z REVIEW COPY—2009 08+ Truck/Frontier (fro) Owners Manual—USA_English (nna) 05/24/08—debbie X
WARNING
Never let a child stand or kneel on any seat and do not allow a child in the cargo areas while the vehicle is moving. The child could be seriously injured or killed in an accident or sudden stop.
PREGNANT WOMEN NISSAN recommends that pregnant women use seat belts. The seat belt should be worn snug and always position the lap belt as low as possible around the hips, not the waist. Place the shoulder belt over your shoulder and across your chest. Never run the lap/shoulder belt over your ab- dominal area. Contact your doctor for specific recommendations. INJURED PERSONS NISSAN recommends that injured persons use seat belts. Check with your doctor for specific recommendations.
THREE-POINT TYPE SEAT BELT WITH RETRACTOR
WARNING
c Every person who drives or rides in this vehicle should use a seat belt at all times.
c Do not ride in a moving vehicle when the seatback is reclined. This can be dangerous. The shoulder belt will not be against your body. In an accident, you could be thrown into it and receive neck or other serious injuries. You could also slide under the lap belt and receive serious internal injuries.
c For the most effective protection when the vehicle is in motion, the seat should be upright. Always sit well back in the seat with both feet on the floor and adjust the seat belt properly.
restraint that fits your vehicle and always follow the manufacturer(cid:146)s instructions for installation and use. Larger children Children who are too large for child restraints should be seated and restrained by the seat belts which are provided. The seat belt may not fit properly if the child is less than 4 ft 9 in (142.5
cm) tall and weighs between 40 lbs (18 kg) and 80 lbs (36 kg). A booster seat should be used to obtain proper seat belt fit.NISSAN recommends that a child be placed in a commercially available booster seat if the shoul- der belt in the child(cid:146)s seating position fits close to the face or neck or if the lap portion of the seat belt goes across the abdomen. The booster seat should raise the child so that the shoulder belt is properly positioned across the top, middle por- tion of the shoulder and the lap belt is low on the hips. A booster seat can only be used in seating positions that have a three-point type seat belt. The booster seat should fit the vehicle seat and have a label certifying that it complies with Fed- eral Motor Vehicle Safety Standards or Canadian Motor Vehicle Safety Standards. Once the child has grown so the shoulder belt is no longer on or near the face and neck, use the shoulder belt without the booster seat.
Safety(cid:151)Seats, seat belts and supplemental restraint system 1-15
Z REVIEW COPY—2009 08+ Truck/Frontier (fro) Owners Manual—USA_English (nna) 05/24/08—debbie X
WRS0174
Manual front seat shown
Fastening the seat belts (Front seats all models and rear seats Crew cab models) s1 Adjust the seat. See (cid:147)Seats(cid:148) earlier in this
section.
LRS0594
s2 Slowly pull the seat belt out of the retractor and insert the tongue into the buckle until you hear and feel the latch engage.c The retractor is designed to lock during a sudden stop or on impact. A slow pulling motion permits the seat belt to move, and allows you some freedom of movement in the seat.
c If the seat belt cannot be pulled from its fully retracted position, firmly pull the belt and release it. Then smoothly pull the belt out of the retractor.
LRS0595
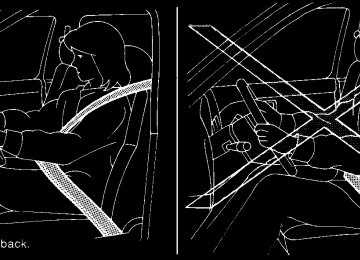
s3 Position the lap belt portion low and snugon the hips as shown.
s4 Pull the shoulder belt portion toward the retractor to take up extra slack. Be sure the shoulder belt is routed over your shoulder and across your chest.
The front passenger seat and the rear seating positions three-point seat belts have two modes of operation: c Emergency Locking Retractor (ELR) c Automatic Locking Retractor (ALR)
1-16 Safety(cid:151)Seats, seat belts and supplemental restraint system
Z REVIEW COPY—2009 08+ Truck/Frontier (fro) Owners Manual—USA_English (nna) 05/24/08—debbie X
WARNING
When fastening the seat belts, be certain that the seatbacks are completely se- cured in the latched position. If they are not completely secured, passengers may be injured in an accident or sudden stop. Fastening the seat belts (Jump seats King cab models)
The Emergency Locking Retractor (ELR) mode allows the seat belt to extend and retract to allow the driver and passengers some freedom of movement in the seat. The ELR locks the seat belt when the vehicle slows down rapidly or during certain impacts.
The Automatic Locking Retractor (ALR) mode (child restraint mode) locks the seat belt for child restraint installation.
When the ALR mode is activated, the seat belt cannot be extended again until the seat belt tongue is detached from the buckle and fully retracted. The seat belt returns to the ELR mode after the seat belt fully retracts. See (cid:147)Child re- straints(cid:148) later in this section for more information. The ALR mode should be used only for child restraint installation. During normal seat belt use by an occupant, the ALR mode should not be activated. If it is activated it may cause uncomfortable seat belt ten- sion. It can also change the operation of the front passenger air bag. See (cid:147)Front passenger air bag and status light(cid:148) later in this section.
LRS0556
1. Open the jump seat. See (cid:147)Seats(cid:148) earlier inthis section.
Safety(cid:151)Seats, seat belts and supplemental restraint system 1-17
Z REVIEW COPY—2009 08+ Truck/Frontier (fro) Owners Manual—USA_English (nna) 05/24/08—debbie X
movement in the seat. The ELR locks the seat belt when the vehicle slows down rapidly or during certain impacts. The Automatic Locking Retractor (ALR) mode (child restraint mode) locks the seat belt for child restraint installation. When the ALR mode is activated, the seat belt cannot be extended again until the seat belt tongue is detached from the buckle and fully retracted. The seat belt returns to the ELR mode after the seat belt fully retracts. See (cid:147)Child re- straints(cid:148) later in this section for more information. The ALR mode should be used only for child restraint installation. During normal seat belt use by an occupant, the ALR mode should not be activated. If it is activated it may cause uncomfortable seat belt ten- sion. It can also change the operation of the front passenger air bag. See (cid:147)Front passenger air bag and status light(cid:148) later in this section.
WARNING
When fastening the seat belts, be certain that the seatbacks are completely se- cured in the latched position. If they are not completely secured, passengers may be injured in an accident or sudden stop.
LRS0569
s2 Slowly pull the seat belt out of the retractor and insert the tongue into the buckle until you hear and feel the latch engage.c The retractor is designed to lock during a sudden stop or on impact. A slow pulling motion permits the seat belt to move, and allows you some freedom of movement in the seat.
c If the seat belt cannot be pulled from its fully retracted position, firmly pull the belt and release it. Then smoothly pull the belt out of the retractor.
LRS0570
s3 Position the lap belt portion low and snugon the hips as shown.
s4 Pull the shoulder belt portion toward the retractor to take up extra slack. Be sure the shoulder belt is routed over your shoulder and across your chest.
The jump seat position(cid:146)s three-point seat belts have two modes of operation: c Emergency Locking Retractor (ELR) c Automatic Locking Retractor (ALR) The Emergency Locking Retractor (ELR) mode allows the seat belt to extend and retract to allow the driver and passengers some freedom of
1-18 Safety(cid:151)Seats, seat belts and supplemental restraint system
Z REVIEW COPY—2009 08+ Truck/Frontier (fro) Owners Manual—USA_English (nna) 05/24/08—debbie X
To increase your confidence in the seat belts, check the operation as follows: c Grasp the shoulder belt and pull forward quickly. The retractor should lock and re- strict further belt movement.
If the retractor does not lock during this check or if you have any questions about seat belt opera- tion, see a NISSAN dealer.
WRS0139
Unfastening the seat belts s1 To unfasten the seat belt, press the button on the buckle. The seat belt automatically re- tracts.
Checking seat belt operation Seat belt retractors are designed to lock seat belt movement by two separate methods: c When the seat belt is pulled quickly from the
retractor.
c When the vehicle slows down rapidly.
LRS0242
Shoulder belt height adjustment (front seats) The shoulder belt anchor height should be ad- justed to the position best for you. (See (cid:147)Precau- tions on seat belt usage(cid:148) earlier in this section.) To adjust, pull out the adjustment button s1 and move the shoulder belt anchor to the desired position s2 , so the belt passes over the center of the shoulder. The belt should be away from your face and neck, but not falling off your shoulder. Release the adjustment button to lock the shoul- der belt anchor into position.Safety(cid:151)Seats, seat belts and supplemental restraint system 1-19
Z REVIEW COPY—2009 08+ Truck/Frontier (fro) Owners Manual—USA_English (nna) 05/24/08—debbie X
c Periodically check to see that the seat belt and the metal components, such as buckles, tongues, retractors, flexible wires and anchors, work properly. If loose parts, deterioration, cuts or other damage on the webbing is found, the entire seat belt as- sembly should be replaced.
WARNING
c After adjustment, release the adjust- ment button and try to move the shoul- der belt anchor up and down to make sure it is securely fixed in position.
c The shoulder belt anchor height should be adjusted to the position best for you. Failure to do so may reduce the effec- tiveness of the entire restraint system and increase the chance or severity of injury in an accident.
SEAT BELT EXTENDERS If, because of body size or driving position, it is not possible to properly fit the lap/shoulder belt and fasten it, an extender is available which is compatible with the installed seat belts. The ex- tender adds approximately 8 in (200 mm) of length and may be used for either the driver or front passenger seating position. See a NISSAN dealer for assistance if an extender is required.
WARNING
c Only NISSAN seat belt extenders, made by the same company which made the original equipment seat belts, should be used with NISSAN seat belts.
c Adults and children who can use the standard seat belt should not use an extender. Such unnecessary use could result in serious personal injury in the event of an accident.
c Never use seat belt extenders to install child restraints. If the child restraint is not secured properly, the child could be seriously injured in a collision or a sud- den stop.
SEAT BELT MAINTENANCE c To clean the seat belt webbing, apply a mild soap solution or any solution recom- mended for cleaning upholstery or carpet. Then wipe with a cloth and allow the seat belts to dry in the shade. Do not allow the seat belts to retract until they are completely dry.
c If dirt builds up in the shoulder belt guide of the seat belt anchors, the seat belts may retract slowly. Wipe the shoulder belt guide with a clean, dry cloth.
1-20 Safety(cid:151)Seats, seat belts and supplemental restraint system
Z REVIEW COPY—2009 08+ Truck/Frontier (fro) Owners Manual—USA_English (nna) 05/24/08—debbie X
CHILD RESTRAINTS
c Even with the NISSAN Advanced Air Bag System, never install a rear-facing child restraint in the front seat. An in- flating front air bag could seriously in- jure or kill your child. A rear-facing child restraint must only be used in the rear seat.
c NISSAN recommends that the child re- straint be installed in the rear seat. Ac- cording to accident statistics, children are safer when properly restrained in the rear seat than in the front seat. If you must install a front facing child re- straint in the front seat, see (cid:147)Child re- straint installation using the seat belts(cid:148) later in this section.
c Improper use or improper installation of a child restraint can increase the risk or severity of injury for both the child and other occupants of the vehicle and can lead to serious injury or death in an accident.
c Follow all of the child restraint manu- facturer(cid:146)s instructions for installation and use. When purchasing a child re- straint, be sure to select one which will fit your child and vehicle. It may not be possible to properly install some types of child restraints in your vehicle.
PRECAUTIONS ON CHILD RESTRAINTS
ARS1098
WRS0256
WARNING
c Infants and small children should al- ways be placed in an appropriate child restraint while riding in the vehicle. Failure to use a child restraint can re- sult in serious injury or death.
c Infants and small children should never be carried on your lap. It is not possible for even the strongest adult to resist the forces of a severe accident. The child could be crushed between the adult and parts of the vehicle. Also, do not put the same seat belt around both your child and yourself.
Safety(cid:151)Seats, seat belts and supplemental restraint system 1-21
Z REVIEW COPY—2009 08+ Truck/Frontier (fro) Owners Manual—USA_English (nna) 05/24/08—debbie X
c If the child restraint is not anchored properly, the risk of a child being in- jured in a collision or a sudden stop greatly increases.
c Child restraint anchor points are de- signed to withstand only those loads imposed by correctly fitted child re- straints. Under no circumstances are they to be used for adult seat belts or harnesses.
c Adjustable seatbacks should be posi- tioned to fit the child restraint, but as upright as possible.
c After attaching the child restraint, test it before you place the child in it. Push it from side to side while holding the seat near the LATCH attachment or by the seat belt path. The child restraint should not move more than 1 inch (25
mm), from side to side. Try to tug it forward and check to see if the belt holds the restraint in place. If the re- straint is not secure, tighten the belt as necessary, or put the restraint in an- other seat and test it again. You may need to try a different child restraint. Not all child restraints fit in all types of vehicles.c When your child restraint is not in use, keep it secured with the LATCH system or a seat belt to prevent it from being thrown around in case of a sudden stop or accident.
CAUTION
Remember that a child restraint left in a closed vehicle can become very hot. Check the seating surface and buckles before placing your child in the child restraint.
This vehicle is equipped with a universal child restraint lower anchor system, referred to as the LATCH (Lower Anchors and Tethers for CHil- dren) SYSTEM. Some child restraints include two rigid or webbing-mounted attachments that can be connected to these lower anchors. For details, see (cid:147)LATCH (Lower Anchors and Tethers for CHildren) SYSTEM(cid:148) later in this section.
If you do not have a LATCH compatible child restraint, the vehicle seat belts can be used. See (cid:147)Child restraint installation using the seat belts(cid:148) later in this section. In general, child restraints are also designed to be installed with a lap/shoulder seat belt.
Several manufacturers offer child restraints for infants and small children of various sizes. When selecting any child restraint, keep the following points in mind: c Choose only a restraint with a label certifying that it complies with Federal Motor Vehicle Safety Standard 213 or Canadian Motor Vehicle Safety Standard 213.
c Check the child restraint in your vehicle to be sure it is compatible with the vehicle(cid:146)s seat and seat belt system.
c If the child restraint is compatible with your vehicle, place your child in the child restraint and check the various adjustments to be sure the child restraint is compatible with your child. Choose a child restraint that is designed for your child(cid:146)s height and weight. Always follow all recommended procedures. All U.S. states and Canadian provinces or territories require that infants and small children be restrained in an approved child restraint at all times while the vehicle is being operated. Canadian law requires the top tether strap on front-facing child re- straints be secured to the designated an- chor point on the vehicle.
1-22 Safety(cid:151)Seats, seat belts and supplemental restraint system
Z REVIEW COPY—2009 08+ Truck/Frontier (fro) Owners Manual—USA_English (nna) 05/24/08—debbie X
LRS0429
LATCH system anchor locations
LATCH (Lower Anchors and Tethers for CHildren) SYSTEM Your vehicle is equipped with special anchor points that are used with LATCH (Lower Anchors and Tethers for CHildren) system compatible child restraints. The LATCH anchor points are provided to install child restraints in the rear outboard seating posi- tions only (Crew cab models only). Do not at- tempt to install a child restraint in the center position using the LATCH anchors.
LRS0571
LATCH label locations (Crew cab modelsonly)
LATCH lower anchor point locations The LATCH system anchors are located at the rear of the seat cushion near the seatback. A label is attached to the seatback to help you locate the LATCH system anchors.
WARNING
c Attach LATCH system compatible child restraints only at the locations shown. If a child restraint is not secured properly, your child could be seriously injured or killed in an accident.
WRS0700
LATCH lower anchor location
c The LATCH system anchors are de- signed to withstand only those loads imposed by correctly fitted child re- straints. Under no circumstances are they to be used for adult seat belts or harnesses.
Safety(cid:151)Seats, seat belts and supplemental restraint system 1-23
Z REVIEW COPY—2009 08+ Truck/Frontier (fro) Owners Manual—USA_English (nna) 05/24/08—debbie X
TOP TETHER STRAP CHILD RESTRAINT If the manufacturer of your child restraint requires the use of a top tether strap, it must be secured to the anchor point.
WARNING
c Child restraint anchor points are de- signed to withstand only those loads imposed by correctly fitted child re- straints. Under no circumstances are they to be used for adult seat belts or harnesses.
c Do not allow cargo to contact the top tether strap when it is attached to the top tether anchor. Properly secure the cargo so it does not contact the top tether strap. Cargo that is not properly secured or cargo that contacts the top tether strap may damage it during a collision. Your child could be seriously injured or killed in a collision if the top tether strap is damaged.
LATCH webbing-mounted attachment
LATCH rigid-mounted attachment
LRS0661
LRS0662
Installing child restraint LATCH anchor attachments LATCH compatible child restraints include two rigid or webbing-mounted attachments that can be connected to two anchors located at certain seating positions in your vehicle. With this sys- tem, you do not have to use a vehicle seat belt to secure the child restraint. Check your child re- straint for a label stating that it is compatible with LATCH. This information may also be in the in- structions provided by the child restraint manu- facturer.
LATCH child restraints generally require the use of a top tether strap. See (cid:147)Top tether strap child restraint(cid:148) later in this section for installation in- structions. When installing a child restraint, carefully read and follow the instructions in this manual and those supplied with the child restraint. See (cid:147)Child restraint installation using LATCH(cid:148) later in this section.
1-24 Safety(cid:151)Seats, seat belts and supplemental restraint system
Z REVIEW COPY—2009 08+ Truck/Frontier (fro) Owners Manual—USA_English (nna) 05/24/08—debbie X
Top tether anchor point locations Anchor points are located in the following loca- tions: c On the back of the front passenger seat
(King cab only).
c On the floor between the jump seat belt buckles in the center of the vehicle (King cab only).
c Under the rear window behind the rear
bench seat (Crew cab only).
If you have any questions when installing a top tether strap child restraint on the front passenger(cid:146)s seat, rear passenger(cid:146)s side jump seat or rear bench seat, consult your NISSAN dealer for details. Installing top tether strap First, secure the child restraint with the LATCH system (rear bench outboard seating positions on Crew cab only) or the seat belt, as applicable.
4. Tighten the tether strap according to the manufacturer(cid:146)s instructions to remove any slack.
For best child restraint fit, see the child restraint installation instructions in this section and the child restraint manufacturer(cid:146)s instructions.
LRS0572
Front passenger seat (King cab models only)1. Top tether strap
2. Top tether strap anchor point
For the front passenger seat in the King cab only, install the top tether strap as follows:
1. Adjust the head restraint to its highest posi-
tion.
2. Route the top tether strap between the head
restraint and the top of the seatback.
3. Secure the tether strap to the tether anchor
point on the seatback.
Safety(cid:151)Seats, seat belts and supplemental restraint system 1-25
Z REVIEW COPY—2009 08+ Truck/Frontier (fro) Owners Manual—USA_English (nna) 05/24/08—debbie X
1. Pull the cover plate off to access the top tether strap routing bracket for the passen- ger(cid:146)s side jump seat.
2. Route the top tether strap through the rout-
ing bracket.
3. Then pull the top tether strap tight and se- cure it to the top tether anchor bracket lo- cated between the seat belt buckle receiv- ers in the center of the vehicle.
LRS0551
LRS0561
Passenger(cid:146)s side jump seat
(King cab models)
1. Cover plate 2. Top tether strap routing bracket 3. Top tether strap anchor point The anchor point is located on the floor between the jump seat belt buckles in the center of the vehicle. The routing bracket is located behind the cover plate under the rear window above the right passenger(cid:146)s side jump seat.
Installing top tether strap
1. Top tether strap
2. Routing bracket
3. Top tether strap anchor point.
WARNING
Do not secure the top tether strap to the routing bracket. If the child restraint is not anchored properly, the risk of a child be- ing injured in a collision or a sudden stop greatly increases.
1-26 Safety(cid:151)Seats, seat belts and supplemental restraint system
Z REVIEW COPY—2009 08+ Truck/Frontier (fro) Owners Manual—USA_English (nna) 05/24/08—debbie X
LRS0393
LRS0392
LRS0576
Rear bench seat (Crew cab models only) The anchor points are located under the rear window behind the rear bench seat. If you have any questions when installing a top strap child restraint on the rear seat, consult your NISSAN dealer for details.
Anchor point access
1. Pull strap 2. Anchor point location To access the anchor points behind the rear bench seat, tilt the rear seatback forward by lifting up on the pull strap behind the seatback.
Installing top tether strap
1. Top tether strap
2. Hook
3. Anchor point
Install the top tether strap as follows:
1. Raise the head restraint.
2. Position the top tether strap over the top of the seatback and under the head restraint.
3. Secure the tether strap to the tether anchor point on the seat directly behind the child restraint.
Safety(cid:151)Seats, seat belts and supplemental restraint system 1-27
Z REVIEW COPY—2009 08+ Truck/Frontier (fro) Owners Manual—USA_English (nna) 05/24/08—debbie X
c Inspect the lower anchors by inserting your fingers into the lower anchor area and feeling to make sure there are no obstructions over the LATCH anchors, such as seat belt webbing or seat cush- ion material. The child restraint will not be secured properly if the LATCH an- chors are obstructed.
Front-facing Follow these steps to install a front-facing child restraint using LATCH: 1. Position the child restraint on the seat. Al- ways follow the child restraint manufactur- er(cid:146)s instructions.
4. Tighten the tether strap according to the manufacturer(cid:146)s instructions to remove any slack.
For best child restraint fit, see the child restraint installation instructions in this section and the child restraint manufacturer(cid:146)s instructions. CHILD RESTRAINT INSTALLATION USING LATCH
WARNING
c Attach LATCH system compatible child restraints only at the locations shown. For the LATCH lower anchor locations see (cid:147)LATCH (Latch Anchors and Tethers for CHildren) system(cid:148). If a child restraint is not secured properly, your child could be seriously injured or killed in an accident.
c The LATCH anchors are designed to withstand only those loads imposed by correctly fitted child restraints. Under no circumstances are they to be used for adult seat belts or harnesses.
1-28 Safety(cid:151)Seats, seat belts and supplemental restraint system
LRS0663
Front-facing web-mounted (cid:150) step 2
2. Secure the child restraint anchor attach- ments to the LATCH lower anchors. Check to make sure the LATCH attachment is prop- erly attached to the lower anchors.
3. The back of the child restraint should be
secured against the vehicle seatback.
If necessary, adjust or remove the head restraint to obtain the correct child restraint fit. See (cid:147)Head restraint adjustment(cid:148) earlier in this section.
If the head restraint is removed, store it in a secure place. Be sure to reinstall the head re- straint when the child restraint is removed.
Z REVIEW COPY—2009 08+ Truck/Frontier (fro) Owners Manual—USA_English (nna) 05/24/08—debbie X
LRS0664
LRS0671
WRS0697
Front-facing rigid-mounted (cid:150) step 2
If the seating position does not have an adjust- able head restraint and it is interfering with the proper child restraint fit, try another seating posi- tion or a different child restraint.
Front-facing (cid:150) step 4
Front-facing (cid:150) step 6
4. For child restraints that are equipped with webbing-mounted attachments, remove any additional slack from the anchor attach- ments. Press downward and rearward firmly in the center of the child restraint with your knee to compress the vehicle seat cushion and seatback while tightening the webbing of the anchor attachments. If the child restraint is equipped with a top tether strap, route the top tether strap and secure the tether strap to the tether anchor point. See (cid:147)Top tether strap child restraint(cid:148) earlier in this section.
5.
6. After attaching the child restraint, test it be- fore you place the child in it. Push it from side to side while holding the seat near the LATCH attachment path. The child restraint should not move more than 1 inch (25 mm), from side to side. Try to tug it forward and check to see if the belt holds the restraint in place. If the restraint is not secure, tighten the belt as necessary, or put the restraint in another seat and test it again. You may need to try a different child restraint. Not all child restraints fit in all types of vehicles.
Safety(cid:151)Seats, seat belts and supplemental restraint system 1-29
Z REVIEW COPY—2009 08+ Truck/Frontier (fro) Owners Manual—USA_English (nna) 05/24/08—debbie X
is loose,
7. Check to make sure the child restraint is properly secured prior to each use. If the child restraint repeat steps 2
through 6. Rear-facing Follow these steps to install a rear-facing child restraint using the LATCH system: 1. Position the child restraint on the seat. Al- ways follow the child restraint manufactur- er(cid:146)s instructions.Rear-facing web-mounted (cid:150) step 2
Rear-facing rigid-mounted (cid:150) step 2
LRS0665
LRS0666
2. Secure the child restraint anchor attach- ments to the LATCH lower anchors. Check to make sure the LATCH attachment is prop- erly attached to the lower anchors.
1-30 Safety(cid:151)Seats, seat belts and supplemental restraint system
Z REVIEW COPY—2009 08+ Truck/Frontier (fro) Owners Manual—USA_English (nna) 05/24/08—debbie X
5. Check to make sure the child restraint is properly secured prior to each use. If the child restraint repeat steps 2
through 4.is loose,
Rear-facing (cid:150) step 3
Rear-facing (cid:150) step 4
LRS0673
LRS0674
3. For child restraints that are equipped with webbing-mounted attachments, remove any additional slack from the anchor attach- ments. Press downward and rearward firmly in the center of the child restraint with your hand to compress the vehicle seat cushion and seatback while tightening the webbing of the anchor attachments.
4. After attaching the child restraint, test it be- fore you place the child in it. Push it from side to side while holding the seat near the LATCH attachment path. The child restraint should not move more than 1 inch (25 mm), from side to side. Try to tug it forward and check to see if the belt holds the restraint in place. If the restraint is not secure, tighten the belt as necessary, or put the restraint in another seat and test it again. You may need to try a different child restraint. Not all child restraints fit in all types of vehicles.
Safety(cid:151)Seats, seat belts and supplemental restraint system 1-31
Z REVIEW COPY—2009 08+ Truck/Frontier (fro) Owners Manual—USA_English (nna) 05/24/08—debbie X
The instructions in this section apply to child restraint installation using the vehicle seat belts in the rear seats or the front passenger seat.
c NISSAN recommends that child re- straints be installed in the rear seat. However, if you must install a front- facing child restraint in the front pas- senger seat, move the passenger seat to the rearmost position. Also, be sure the front passenger air bag status light is illuminated to indicate the passenger air bag is OFF. See (cid:147)Front passenger air bag and status light(cid:148) later in this sec- tion for details.
c The three-point seat belt in your vehicle is equipped with an Automatic Locking Retractor (ALR) which must be used when installing a child restraint.
c Failure to use the ALR mode will result in the child restraint not being properly secured. The restraint could tip over or otherwise be unsecured and cause in- jury to the child in a sudden stop or collision. Also, it can change the opera- tion of the front passenger air bag. See (cid:147)Front passenger air bag and status light(cid:148) later in this section.
c A child restraint with a top tether strap should not be used in the front passen- ger seat except for the King cab models.
WRS0256
CHILD RESTRAINT INSTALLATION USING THE SEAT BELTS (cid:150) FRONT PASSENGER AND REAR BENCH SEAT (Crew cab models only)
WARNING
c Even with the NISSAN Advanced Air Bag System, never install a rear-facing child restraint in the front passenger seat. Front air bags inflate with great force. A rear-facing child restraint could be struck by the front air bag in a crash and could seriously injure or kill your child.
1-32 Safety(cid:151)Seats, seat belts and supplemental restraint system
Z REVIEW COPY—2009 08+ Truck/Frontier (fro) Owners Manual—USA_English (nna) 05/24/08—debbie X
WRS0699
Front-facing (front passenger seat) (cid:150) step 1
Front-facing Follow these steps to install a front-facing child restraint using the vehicle seat belt in the rear bench seat (Crew cab models only) or in the front passenger seat: 1. If you must install a child restraint in the front seat, it should be placed in a front-facing direction only. Move the seat to the rearmost position. Child restraints for infants must be used in the rear-facing direction and therefore must not be used in the front seat.2. Position the child restraint on the seat. Al- ways follow the child restraint manufactur- er(cid:146)s instructions.
The back of the child restraint should be secured against the vehicle seatback. If necessary, adjust or remove the head restraint to obtain the correct child restraint fit. See (cid:147)Head restraint adjustment(cid:148) earlier in this section. If the head restraint is removed, store it in a secure place. Be sure to reinstall the head re- straint when the child restraint is removed. If the seating position does not have an adjust- able head restraint and it is interfering with the proper child restraint fit, try another seating posi- tion or a different child restraint.
WRS0680
Front-facing (cid:150) step 3
3. Route the seat belt tongue through the child restraint and insert it into the buckle until you hear and feel the latch engage. Be sure to follow the child restraint manufacturer(cid:146)s in- structions for belt routing.
Safety(cid:151)Seats, seat belts and supplemental restraint system 1-33
Z REVIEW COPY—2009 08+ Truck/Frontier (fro) Owners Manual—USA_English (nna) 05/24/08—debbie X
Front-facing (cid:150) step 4
Front-facing (cid:150) step 5
Front-facing (cid:150) step 6
LRS0667
LRS0668
WRS0681
4. Pull the shoulder belt until the belt is fully extended. At this time, the seat belt retractor is in the Automatic Locking Retractor (ALR) mode (child restraint mode). It reverts to the Emergency Locking Retractor (ELR) mode when the seat belt is fully retracted.
5. Allow the seat belt to retract. Pull up on the shoulder belt to remove any slack in the belt.
6. Remove any additional slack from the seat belt; press downward and rearward firmly in the center of the child restraint with your knee to compress the vehicle seat cushion and seatback while pulling up on the seat belt.
1-34 Safety(cid:151)Seats, seat belts and supplemental restraint system
Z REVIEW COPY—2009 08+ Truck/Frontier (fro) Owners Manual—USA_English (nna) 05/24/08—debbie X
WRS0698
Front-facing (cid:150) step 7
7.
If the child restraint is equipped with a top tether strap, route the top tether strap and secure the tether strap to the tether anchor point. See (cid:147)Top tether strap child restraint(cid:148) earlier in this section. Do not install child restraints that require the use of a top tether strap to seating positions that do not have a top tether anchor.
8. After attaching the child restraint, test it be- fore you place the child in it. Push it from side to side while holding the seat near the seat belt path. The child restraint should not move more than 1 inch (25 mm), from side to side. Try to tug it forward and check to see if
the belt holds the restraint in place. If the restraint is not secure, tighten the belt as necessary, or put the restraint in another seat and test it again. You may need to try a different child restraint. Not all child re- straints fit in all types of vehicles.
9. Check that the retractor is in the ALR mode by trying to pull more seat belt out of the retractor. If you cannot pull any more belt webbing out of the retractor, the retractor is in the ALR mode.
10. Check to make sure the child restraint is properly secured prior to each use. If the seat belt locked, repeat steps 3
through 8.is not
11.
WRS0475
Front-facing (cid:150) step 11
If the child restraint is installed in the front passenger seat, turn the ignition switch to the ON position. The front passenger air bag status light should illuminate. If this light is not illuminated see 9Front passenger air bag and status light9 later in this section. Move the child restraint to another seating position. Have system checked by a NISSAN dealer.
the
After the child restraint is removed and the seat belt is fully retracted, the ALR mode (child re- straint mode) is canceled.
Safety(cid:151)Seats, seat belts and supplemental restraint system 1-35
Z REVIEW COPY—2009 08+ Truck/Frontier (fro) Owners Manual—USA_English (nna) 05/24/08—debbie X
WRS0256
WRS0761
LRS0669
Rear-facing (cid:150) step 1
Rear-facing Follow these steps to install a rear-facing child restraint using the vehicle seat belt in the rear bench seat (Crew cab models only): 1. Child restraints for infants must be used in the rear-facing direction and therefore must not be used in the front seat. Position the child restraint on the seat. Always follow the restraint manufacturer(cid:146)s instructions.
Rear-facing (cid:150) step 2
Rear-facing (cid:150) step 3
2. Route the seat belt tongue through the child restraint and insert it into the buckle until you hear and feel the latch engage. Be sure to follow the child restraint manufacturer(cid:146)s in- structions for belt routing.
3. Pull the shoulder belt until the belt is fully extended. At this time, the seat belt retractor is in the Automatic Locking Retractor (ALR) mode (child restraint mode). It reverts to the Emergency Locking Retractor (ELR) mode when the seat belt is fully retracted.
1-36 Safety(cid:151)Seats, seat belts and supplemental restraint system
Z REVIEW COPY—2009 08+ Truck/Frontier (fro) Owners Manual—USA_English (nna) 05/24/08—debbie X
Rear-facing (cid:150) step 4
Rear-facing (cid:150) step 5
Rear-facing (cid:150) step 6
LRS0670
WRS0762
WRS0763
4. Allow the seat belt to retract. Pull up on the shoulder belt to remove any slack in the belt.
5. Remove any additional slack from the child restraint; press downward and rearward firmly in the center of the child restraint to compress the vehicle seat cushion and seat- back while pulling up on the seat belt.
6. After attaching the child restraint, test it be- fore you place the child in it. Push it from side to side while holding the seat near the seat belt path. The child restraint should not move more than 1 inch (25 mm), from side to side. Try to tug it forward and check to see if the belt holds the restraint in place. If the restraint is not secure, tighten the belt as necessary, or put the restraint in another seat and test it again. You may need to try a different child restraint. Not all child re- straints fit in all types of vehicles.
Safety(cid:151)Seats, seat belts and supplemental restraint system 1-37
Z REVIEW COPY—2009 08+ Truck/Frontier (fro) Owners Manual—USA_English (nna) 05/24/08—debbie X
c Failure to use the ALR mode will result in the child restraint not being properly secured. The restraint could tip over or otherwise be unsecured and cause in- jury to the child in a sudden stop or collision.
7. Check that the retractor is in the ALR mode by trying to pull more seat belt out of the retractor. If you cannot pull any more seat belt webbing out of the retractor, the retrac- tor is in the ALR mode.
8. Check to make sure that the child restraint is properly secured prior to each use. If the seat belt locked, repeat steps 3
through 7.is not
After the child restraint is removed and the seat belt fully retracted, the ALR mode (child restraint mode) is canceled. CHILD RESTRAINT INSTALLATION USING THE SEAT BELTS (cid:150) PASSENGER(cid:146)S SIDE JUMP SEAT (King cab models only)
WARNING
c The three-point seat belt in your vehicle is equipped with an Automatic Locking Retractor (ALR) which must be used when installing a child restraint.
1-38 Safety(cid:151)Seats, seat belts and supplemental restraint system
LRS0598
WARNING
c When installing a child restraint system in the passenger(cid:146)s side jump seat posi- tion be sure to unfold the seat exten- sion on the jump seat. If the jump seat extension is not properly used, the child restraint will not be installed correctly and the child could be injured in a col- lision or sudden stop.
c Never install a child restraint on the driver(cid:146)s side jump seat. A child restraint can not be properly installed in the driv- er(cid:146)s side jump seat and the child could be injured in a collision or sudden stop.
Z REVIEW COPY—2009 08+ Truck/Frontier (fro) Owners Manual—USA_English (nna) 05/24/08—debbie X
LRS0559
LRS0537
Front-facing When you install a child restraint on the passen- ger(cid:146)s side jump seat, follow these steps: 1. To access the jump seat extension s1 on the passenger(cid:146)s side jump seat pull up s2 on the extension to unfold it to the open posi- tion. Then unfold the two support legs s3
and lower the jump seat to the full open s4
seating position.LRS0540
Front-facing (passenger(cid:146)s side seating po-sition only) (cid:151) step 2
s2 Position the child restraint on the seat. Al- ways follow the child restraint manufactur- er(cid:146)s instructions.
The back of the child restraint should be secured against the vehicle seat back.
If necessary, adjust or remove the head restraint to obtain the correct child restraint fit. See (cid:147)Head restraint adjustment(cid:148) in this section. If the head restraint is removed, store it in a secure place. Be sure to reinstall the head re- straint when the child restraint is removed. If the seating position does not have an adjustable Safety(cid:151)Seats, seat belts and supplemental restraint system 1-39
Z REVIEW COPY—2009 08+ Truck/Frontier (fro) Owners Manual—USA_English (nna) 05/24/08—debbie X
head restraint and it is interfering with the proper child restraint fit, try another seating position or a different child restraint.
LRS0541
LRS0542
Front-facing (cid:151) step 3
s3 Route the seat belt tongue through the child restraint and insert it into the buckle until you hear and feel the latch engage. Be sure to follow the child restraint manu- facturer(cid:146)s instructions for belt routing.
Front-facing (cid:151) step 4
s4 Pull the shoulder belt until the belt is fully extended. At this time, the seat belt retractor is in the Automatic Locking Retractor (ALR) mode (child restraint mode). It reverts to the Emergency Locking Retractor (ELR) mode when the seat belt is fully retracted.
1-40 Safety(cid:151)Seats, seat belts and supplemental restraint system
Z REVIEW COPY—2009 08+ Truck/Frontier (fro) Owners Manual—USA_English (nna) 05/24/08—debbie X
LRS0574
WRS0681
WRS0698
Front-facing (cid:151) step 5
s5 Allow the seat belt to retract. Pull up on the shoulder belt to remove any slack in the belt.
Front-facing (cid:150) step 6
6. Remove any additional slack from the seat belt; press downward and rearward firmly in the center of the child restraint with your knee to compress the vehicle seat cushion and seatback while pulling up on the seat belt.
Front-facing (cid:151) step 7
7.
If the child restraint is equipped with a top tether strap, route the top tether strap and secure the tether strap to the tether anchor point. See (cid:147)Top tether strap child restraint(cid:148) in this section. Do not install child restraints that require the use of a top tether strap to seating positions that do not have a top tether anchor.
8. After attaching the child restraint, test it be- fore you place the child in it. Push it from side to side while holding the seat near the seat belt path. The child restraint should not move more than 1 inch (25 mm), from side to side. Try to tug it forward and check to see if Safety(cid:151)Seats, seat belts and supplemental restraint system 1-41
Z REVIEW COPY—2009 08+ Truck/Frontier (fro) Owners Manual—USA_English (nna) 05/24/08—debbie X
the belt holds the restraint in place. If the restraint is not secure, tighten the belt as necessary, or put the restraint in another seat and test it again. You may need to try a different child restraint. Not all child re- straints fit in all types of vehicles.
9. Check that the retractor is in the ALR mode by trying to pull more seat belt out of the retractor. If you cannot pull any more belt webbing out of the retractor, the retractor is in the ALR mode.
10. Check to make sure that the child restraint is properly secured prior to each use. If the belt is not locked, repeat steps 3 through 9.
After the child restraint is removed and the seat belt is fully retracted, the ALR mode (child re- straint mode) is canceled.
LRS0597
LRS0549
Rear-facing
WARNING
c Do not install a child restraint system on the passenger(cid:146)s side jump seat with- out unfolding the seat extender. A child restraint system will not be installed properly and the child could be seri- ously injured or killed in a sudden stop or collision.
WARNING
c To install a rear-facing child restraint on the passenger(cid:146)s side jump seat, it will be necessary to move the front passen- ger(cid:146)s seat fully forward and place the front seatback upright or tilt it forward. The front seat cannot be used. Attempt- ing to do so could lead to serious injury in a sudden stop or crash.
1-42 Safety(cid:151)Seats, seat belts and supplemental restraint system
Z REVIEW COPY—2009 08+ Truck/Frontier (fro) Owners Manual—USA_English (nna) 05/24/08—debbie X
LRS0559
When you install a child restraint on the passen- ger(cid:146)s side jump seat, follow these steps: 1. To access the jump seat extension s1 on the passenger(cid:146)s side jump seat only pull up s2
on the extension to unfold it to the open position. Then unfold the two support legs s3 and lower the jump seat to the full open s4 seating position.LRS0537
LRS0544
Rear-facing (passenger(cid:146)s side jump seatonly) (cid:151) step 2
s2 Move the front passenger(cid:146)s seat into the FULL FORWARD position. Then move the front seatback to the upright or tilted forward position. Position the child restraint on the jump seat. The direction of the child restraint depends on the type of the child restraint and the size of the child. Always follow the restraint manufacturer(cid:146)s instructions.
Safety(cid:151)Seats, seat belts and supplemental restraint system 1-43
Z REVIEW COPY—2009 08+ Truck/Frontier (fro) Owners Manual—USA_English (nna) 05/24/08—debbie X
LRS0545
LRS0546
LRS0547
Rear-facing (cid:151) step 3
s3 Route the seat belt tongue through the child restraint and insert it into the buckle until you hear and feel the latch engage. Be sure to follow the child restraint manu- facturer(cid:146)s instructions for belt routing.
Rear-facing (cid:151) step 4
s4 Pull the shoulder belt until the belt is fully extended. At this time, the seat belt retractor is in the Automatic Locking Retractor (ALR) mode (child restraint mode). It reverts to the Emergency Locking Retractor (ELR) mode when the seat belt is fully retracted.
Rear-facing (cid:151) step 5
s5 Allow the seat belt to retract. Pull up on the shoulder belt to remove any slack in the belt.
1-44 Safety(cid:151)Seats, seat belts and supplemental restraint system
Z REVIEW COPY—2009 08+ Truck/Frontier (fro) Owners Manual—USA_English (nna) 05/24/08—debbie X
seat and test it again. You may need to try a different child restraint. Not all child re- straints fit in all types of vehicles.
8. Check that the retractor is in the ALR mode by trying to pull more seat belt out of the retractor. If you cannot pull any more seat belt webbing out of the retractor, the retrac- tor is in the ALR mode.
9. Check to make sure that the child restraint is properly secured prior to each use. If the belt is not locked, repeat steps 3 through 8.
After the child restraint is removed and the seat belt fully retracted, the ALR mode (child restraint mode) is canceled.
Rear-facing (cid:150) step 5
WRS0683
LRS0548
Rear-facing (cid:151) step 6
s6 Remove any additional slack from the child restraint; press downward and rearward firmly in the center of the child restraint to compress the vehicle seat cushion and seat- back while pulling up on the seat belt.
7. After attaching the child restraint, test it be- fore you place the child in it. Push it from side to side while holding the seat near the seat belt path. The child restraint should not move more than 1 inch (25 mm), from side to side. Try to tug it forward and check to see if the belt holds the restraint in place. If the restraint is not secure, tighten the belt as necessary, or put the restraint in another
Safety(cid:151)Seats, seat belts and supplemental restraint system 1-45
Z REVIEW COPY—2009 08+ Truck/Frontier (fro) Owners Manual—USA_English (nna) 05/24/08—debbie X
BOOSTER SEATS
ARS1098
PRECAUTIONS ON BOOSTER SEATS
WARNING
c Infants and small children should al- ways be placed in an appropriate child restraint while riding in the vehicle. Failure to use a child restraint or booster seat can result in serious injury or death.
c Infants and small children should never be carried on your lap. It is not possible for even the strongest adult to resist the forces of a severe accident. The child could be crushed between the adult and parts of the vehicle. Also, do not put the same seat belt around both your child and yourself.
c NISSAN recommends that the booster seat be installed in the rear seat. Ac- cording to accident statistics, children are safer when properly restrained in the rear seat than in the front seat. If you must install a booster seat in the front seat, see (cid:147)Booster seat installa- tion on front passenger seat and rear seat (Crew cab models only)(cid:148) or (cid:147)Booster seat installation on passen- ger(cid:146)s side jump seat only (King cab models only)(cid:148) in this section.
c A booster seat must only be installed in a seating position that has a lap/ shoulder belt. Failure to use a three- point type seat belt with a booster seat can result in a serious injury in sudden stop or collision.
c Improper use or improper installation of a booster seat can increase the risk or severity of injury for both the child and other occupants of the vehicle and can lead to serious injury or death in an accident.
c Do not use towels, books, pillows or other items in place of a booster seat. Items such as these may move during normal driving or a collision and result in serious injury or death. Booster seats are designed to be used with a lap/ shoulder belt. Booster seats are de- signed to properly route the lap and shoulder portions of the seat belt over the strongest portions of a child(cid:146)s body to provide the maximum protection dur- ing a collision.
c Follow all of the booster seat manufac- turer(cid:146)s instructions for installation and use. When purchasing a booster seat, be sure to select one which will fit your child and vehicle. It may not be possible to properly install some types of booster seats in your vehicle.
c If the booster seat and seat belt is not used properly, the risk of a child being injured in a collision or a sudden stop greatly increases.
1-46 Safety(cid:151)Seats, seat belts and supplemental restraint system
Z REVIEW COPY—2009 08+ Truck/Frontier (fro) Owners Manual—USA_English (nna) 05/24/08—debbie X
c Adjustable seatbacks should be posi- tioned to fit the booster seat, but as upright as possible.
c After placing the child in the booster seat and fastening the seat belt, make sure the shoulder portion of the belt is away from the child(cid:146)s face and neck and the lap portion of the belt does not cross the abdomen.
c Do not put the shoulder belt behind the child or under the child(cid:146)s arm. If you must install a booster seat in the front seat, see (cid:147)Booster seat installation on front passenger seat and rear seat (Crew cab models only)(cid:148) or (cid:147)Booster seat installation on passenger(cid:146)s side jump seat only (King cab models only)(cid:148) later in this section
c When your booster seat is not in use, keep it secured with a seat belt to pre- vent it from being thrown around in case of a sudden stop or accident.
CAUTION
Remember that a booster seat left in a closed vehicle can become very hot. Check the seating surface and buckles before placing your child in the booster seat.
LRS0455
Booster seats of various sizes are offered by several manufacturers. When selecting any booster seat, keep the following points in mind: c Choose only a booster seat with a label certifying that it complies with Federal Motor Vehicle Safety Standard 213 or Canadian Motor Vehicle Safety Standard 213.c Check the booster seat in your vehicle to be sure it is compatible with the vehicle(cid:146)s seat and seat belt system.
Safety(cid:151)Seats, seat belts and supplemental restraint system 1-47
Z REVIEW COPY—2009 08+ Truck/Frontier (fro) Owners Manual—USA_English (nna) 05/24/08—debbie X
BOOSTER SEAT INSTALLATION ON FRONT PASSENGER SEAT AND REAR SEAT (Crew cab models only)
WARNING
NISSAN recommends that booster seats be installed in the rear seat. However, if you must install a booster seat in the front passenger seat, move the passenger(cid:146)s seat to the rearmost position.
CAUTION
Do not use the lap/shoulder belt Auto- matic Locking Retractor mode when using a booster seat with the seat belts.
Follow these steps to install a booster seat in the rear seat or in the front passenger seat:
LRS0464
All U.S. states and Canadian provinces or territories require that infants and small children be restrained in an approved child restraint at all times while the vehicle is being operated. The instructions in this section apply to booster seat installation in the rear seats or the front passenger seat.LRS0453
c Make sure the child(cid:146)s head will be properly supported by the booster seat or vehicle seat. The seatback must be at or above the center of the child(cid:146)s ears. For example, if a low back booster seat s1 is chosen, the vehicle seatback must be at or above the center of the child(cid:146)s ears. If the seatback is lower than the center of the child(cid:146)s ears, a high back booster seat s2 should be used. c If the booster seat is compatible with your vehicle, place your child in the booster seat and check the various adjustments to be sure the booster seat is compatible with your child. Always follow all recommended pro- cedures.1-48 Safety(cid:151)Seats, seat belts and supplemental restraint system
Z REVIEW COPY—2009 08+ Truck/Frontier (fro) Owners Manual—USA_English (nna) 05/24/08—debbie X
WRS0699
1. If you must install a booster seat in the front seat, move the seat to the rear- most position.2. Position the booster seat on the seat. Only place it in a front-facing direction. Always follow the booster seat manufacturer(cid:146)s in- structions.
Rear center position
Rear outboard position
LRS0596
LRS0563
3. The booster seat should be positioned on the vehicle seat so that it is stable. If neces- sary, adjust or remove the head restraint to obtain the correct booster seat fit. See (cid:147)Head restraint adjustment(cid:148) earlier in this section. If the head restraint is removed, store it in a secure place. Be sure to reinstall the head restraint when the booster seat is removed. If the seating position does not have an adjustable head restraint and it is interfering with the proper booster seat fit, try another seating position or a different booster seat.
Safety(cid:151)Seats, seat belts and supplemental restraint system 1-49
Z REVIEW COPY—2009 08+ Truck/Frontier (fro) Owners Manual—USA_English (nna) 05/24/08—debbie X
4. Position the lap portion of the seat belt low and snug on the child(cid:146)s hips. Be sure to follow the booster seat manufacturer(cid:146)s in- structions for adjusting the belt routing.