- 2012 Nissan Frontier Owners Manuals
- Nissan Frontier Owners Manuals
- 2003 Nissan Frontier Owners Manuals
- Nissan Frontier Owners Manuals
- 2004 Nissan Frontier Owners Manuals
- Nissan Frontier Owners Manuals
- 2009 Nissan Frontier Owners Manuals
- Nissan Frontier Owners Manuals
- 2001 Nissan Frontier Owners Manuals
- Nissan Frontier Owners Manuals
- 2010 Nissan Frontier Owners Manuals
- Nissan Frontier Owners Manuals
- 1996 Nissan Frontier Owners Manuals
- Nissan Frontier Owners Manuals
- 2005 Nissan Frontier Owners Manuals
- Nissan Frontier Owners Manuals
- 2007 Nissan Frontier Owners Manuals
- Nissan Frontier Owners Manuals
- 2008 Nissan Frontier Owners Manuals
- Nissan Frontier Owners Manuals
- 1999 Nissan Frontier Owners Manuals
- Nissan Frontier Owners Manuals
- 2002 Nissan Frontier Owners Manuals
- Nissan Frontier Owners Manuals
- 2000 Nissan Frontier Owners Manuals
- Nissan Frontier Owners Manuals
- 2011 Nissan Frontier Owners Manuals
- Nissan Frontier Owners Manuals
- 1998 Nissan Frontier Owners Manuals
- Nissan Frontier Owners Manuals
- 1997 Nissan Frontier Owners Manuals
- Nissan Frontier Owners Manuals
- 2006 Nissan Frontier Owners Manuals
- Nissan Frontier Owners Manuals
- Download PDF Manual
-
Rear facing (cid:150) step 4
5. Check to make sure the child restraint is properly secured prior to each use. If the child restraint repeat steps 2
through 4.is loose,
4. Before placing the child in the child restraint, hold the child restraint near the LATCH at- tachment and use force to push the child restraint from side to side, and tug it forward to make sure that it is securely held in place. It should not move more than 1 inch (25
mm). If it does move more than 1 inch (25
mm), pull again on the anchor attachments to further tighten the child restraint. If you are unable to properly secure the restraint, move the restraint to another seating position and try again, or try a different child restraint. Not all child restraints fit in all types of vehicles.CHILD RESTRAINT INSTALLATION USING THE SEAT BELTS (cid:150) FRONT PASSENGER AND REAR BENCH SEAT (crew cab models only)
WARNING
c Even with the NISSAN Advanced Air Bag System, never install a rear-facing child restraint in the front passenger seat. Supplemental front air bags inflate with great force. A rear-facing child restraint could be struck by the supplemental front air bag in a crash and could seri- ously injure or kill your child.
Safety(cid:151)Seats, seat belts and supplemental restraint system 1-31
Z REVIEW COPY—2007 Truck/Frontier (d22) Owners Manual—USA_English (nna) 01/09/07—debbie X
The instructions in this section apply to child restraint installation using the vehicle seat belts in the rear seats or the front passenger seat.
c NISSAN recommends that child re- straints be installed in the rear seat. However, if you must install a forward facing child restraint in the front pas- senger seat, move the passenger seat to the rearmost position. Also, be sure the front passenger air bag status light is illuminated to indicate the passenger air bag is OFF. See (cid:147)Front passenger air bag and status light(cid:148) later in this sec- tion for details.
c The three-point seat belt in your vehicle is equipped with an automatic locking mode retractor which must be used when installing a child restraint.
c Failure to use the retractor(cid:146)s locking mode will result in the child restraint not being properly secured. The re- straint could tip over or otherwise be unsecured and cause injury to the child in a sudden stop or collision. Also, it can change the operation of the front pas- senger air bag. See (cid:147)Front passenger air bag and status light(cid:148) later in this section.
c A child restraint with a top tether strap should not be used in the front passen- ger seat except for the King cab models.
1-32 Safety(cid:151)Seats, seat belts and supplemental restraint system
WRS0699
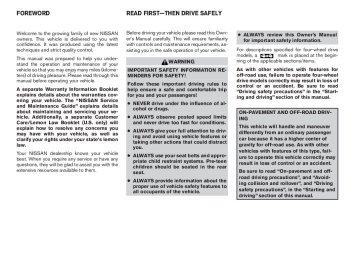
Front-facing (front passenger seat) (cid:150) step 1
Front-facing Follow these steps to install a front-facing child restraint using the vehicle seat belt in the rear bench seat (Crew cab models only) or in the front passenger seat: 1. If you must install a child restraint in the front seat, it should be placed in a front-facing direction only. Move the seat to the rearmost position. Child restraints for infants must be used in the rear-facing direction and therefore must not be used in the front seat.Z REVIEW COPY—2007 Truck/Frontier (d22) Owners Manual—USA_English (nna) 01/09/07—debbie X
2. Position the child restraint on the seat. Al- ways follow the child restraint manufactur- er(cid:146)s instructions
The back of the child restraint should be secured against the vehicle seat back. If necessary, adjust or remove the head restraint to obtain the correct child restraint fit. See (cid:147)Head restraint adjust- ment(cid:148) in this section. If the head restraint is removed, store it in a secure place. Be sure to install the head restraint when the child restraint is removed. If the seating position does not have an adjustable head re- straint and it is interfering with the proper child restraint fit, try another seating position or a dif- ferent child restraint.
Front facing (cid:150) step 3
Front facing (cid:150) step 4
WRS0680
LRS0667
3. Route the seat belt tongue through the child restraint and insert it into the buckle until you hear and feel the latch engage. Be sure to follow the child restraint manufacturer(cid:146)s in- structions for belt routing.
4. Pull on the shoulder belt until the belt is fully extended. At this time, the seat belt retractor is in the automatic locking mode (child re- straint mode). It reverts to emergency lock- ing mode when the seat belt is fully re- tracted.
Safety(cid:151)Seats, seat belts and supplemental restraint system 1-33
Z REVIEW COPY—2007 Truck/Frontier (d22) Owners Manual—USA_English (nna) 12/13/06—cathy X
LRS0668
WRS0681
WRS0698
Front facing (cid:150) step 5
Front facing (cid:150) step 6
5. Allow the seat belt to retract. Pull up on the shoulder belt to remove any slack in the belt.
6. Remove any additional slack from the seat belt; press downward and rearward firmly in the center of the child restraint with your knee to compress the vehicle seat cushion and seatback while pulling up on the seat belt.
Front facing (cid:150) step 7
7.
If the child restraint is equipped with a top tether strap, route the top tether strap and secure the tether strap to the tether anchor point. See (cid:147)Top tether strap child restraint(cid:148) in this section. Do not install child restraints that require the use of a top tether strap to seating positions that do not have a top tether anchor.
1-34 Safety(cid:151)Seats, seat belts and supplemental restraint system
Z REVIEW COPY—2007 Truck/Frontier (d22) Owners Manual—USA_English (nna) 12/13/06—cathy X
8. Before placing the child in the child restraint, hold the child restraint near the seat belt path and use force to push the child restraint from side to side, and tug it forward to make sure that it is securely held in place. It should not move more than 1 inch (25 mm). If it does move more than 1 inch (25 mm), pull again on the shoulder belt to further tighten the child restraint. If you are unable to prop- erly secure the restraint, move the restraint to another seating position and try again, or try a different child restraint. Not all child restraints fit in all types of vehicles.
9. Check that the retractor is in the automatic locking mode by trying to pull more seat belt out of the retractor. If you cannot pull any more belt webbing out of the retractor, the retractor is in the automatic locking mode.
10. Check to make sure the child restraint is properly secured prior to each use. If the seat belt locked, repeat steps 3
through 8.is not
WRS0475
WRS0256
Rear-facing (cid:150) step 1
Rear-facing Follow these steps to install a rear-facing child restraint using the vehicle seat belt in the rear bench seat (Crew cab models only):
11.
Front facing (cid:150) step 11
If the child restraint is installed in the front passenger seat, turn the ignition switch to the ON position. The passenger air bag sta- tus light should illuminate. If this light is not illuminated see 9Front passenger air bag and status light9 in this section. Move the child restraint to another seating position. Have the system checked by a NISSAN dealer.
After the child restraint is removed and the seat belt is fully retracted, the automatic locking mode child restraint mode) is canceled.
Safety(cid:151)Seats, seat belts and supplemental restraint system 1-35
Z REVIEW COPY—2007 Truck/Frontier (d22) Owners Manual—USA_English (nna) 12/13/06—cathy X
CHILD RESTRAINT INSTALLATION USING THE SEAT BELTS (cid:150) PASSENGER(cid:146)S SIDE JUMP SEAT (King cab models only)
WARNING
c The three-point seat belt in your vehicle is equipped with an automatic locking mode retractor which must be used when installing a child restraint.
c Failure to use the retractor(cid:146)s locking mode will result in the child restraint not being properly secured. The re- straint could tip over or otherwise be unsecured and cause injury to the child in a sudden stop or collision.
LRS0598
LRS0559
Front facing When you install a child restraint on the passen- ger(cid:146)s side jump seat, follow these steps:
WARNING
c When installing a child restraint system in the passenger(cid:146)s side jump seat posi- tion be sure to unfold the seat exten- sion on the jump seat. If the jump seat extension is not properly used, the child restraint will not be installed correctly and the child could be injured in a col- lision or sudden stop.
c Never install a child restraint on the driver(cid:146)s side jump seat. A child restraint can not be properly installed in the driv- er(cid:146)s side jump seat and the child could be injured in a collision or sudden stop.
1-36 Safety(cid:151)Seats, seat belts and supplemental restraint system
Z REVIEW COPY—2007 Truck/Frontier (d22) Owners Manual—USA_English (nna) 12/13/06—cathy X
If the head restraint is removed, store it in a secure place. Be sure to install the head restraint when the child restraint is removed. If the seating position does not have an adjustable head re- straint and it is interfering with the proper child restraint fit, try another seating position or a dif- ferent child restraint.
LRS0537
1. To access the jump seat extensions1 on the passenger(cid:146)s side jump seat pull up s2 on the extension to unfold it to the open posi- tion. Then unfold the two support legs s3 and lower the jump seat to the full open s4 seating position.LRS0540
Front facing (passenger(cid:146)s side seating po-sition only) (cid:151) step 2
2. Position the child restraint on the seat. Al- ways follow the child restraint manufactur- er(cid:146)s instructions
The back of the child restraint should be secured against the vehicle seat back. If necessary, adjust or remove the head restraint to obtain the correct child restraint fit. See (cid:147)Head restraint adjust- ment(cid:148) in this section.
Safety(cid:151)Seats, seat belts and supplemental restraint system 1-37
Z REVIEW COPY—2007 Truck/Frontier (d22) Owners Manual—USA_English (nna) 12/13/06—cathy X
Front Facing (cid:151) step 3
Front Facing (cid:151) step 4
Front Facing (cid:151) step 5
LRS0541
LRS0542
LRS0574
3. Route the seat belt tongue through the child restraint and insert it into the buckle until you hear and feel the latch engage. Be sure to follow the child restraint manu- facturer(cid:146)s instructions for belt routing.
4. Pull on the shoulder belt until all of the belt is fully extended. At this time, the seat belt retractor is in the automatic locking mode (child restraint mode). It reverts back to emergency locking mode when the seat belt is fully retracted.
5. Allow the seat belt to retract. Pull up on the shoulder belt to remove any slack in the belt.
1-38 Safety(cid:151)Seats, seat belts and supplemental restraint system
Z REVIEW COPY—2007 Truck/Frontier (d22) Owners Manual—USA_English (nna) 12/13/06—cathy X
8. Before placing the child in the child restraint, hold the child restraint near the seat belt path and use force to push the child restraint from side to side, and tug it forward to make sure that it is securely held in place. It should not move more than 1 inch (25 mm). If it does move more than 1 inch (25 mm), pull again on the shoulder belt to further tighten the child restraint. If you are unable to prop- erly secure the restraint, move the restraint to another seating position and try again, or try a different child restraint. Not all child restraints fit in all types of vehicles.
9. Check that the retractor is in the automatic locking mode by trying to pull more seat belt out of the retractor. If you cannot pull any more belt webbing out of the retractor, the retractor is in the automatic locking mode.
10. Check to make sure that the child restraint is properly secured prior to each use. If the belt is not locked, repeat steps 3 through 9.
After the child restraint is removed and the seat belt is fully retracted, the automatic locking mode (child restraint mode) is canceled.
WRS0681
WRS0698
Front facing (cid:150) step 6
6. Remove any additional slack from the seat belt; press downward and rearward firmly in the center of the child restraint with your knee to compress the vehicle seat cushion and seatback while pulling up on the seat belt.
Front Facing (cid:151) step 7
7.
If the child restraint is equipped with a top tether strap, route the top tether strap and secure the tether strap to the tether anchor point. See (cid:147)Top tether strap child restraint(cid:148) in this section. Do not install child restraints that require the use of a top tether strap to seating positions that do not have a top tether anchor.
Safety(cid:151)Seats, seat belts and supplemental restraint system 1-39
Z REVIEW COPY—2007 Truck/Frontier (d22) Owners Manual—USA_English (nna) 12/13/06—cathy X
LRS0597
LRS0549
Rear facing
WARNING
c Do not install a child restraint system on the passenger(cid:146)s side jump seat with- out unfolding the seat extender. A child restraint system will not be installed properly and the child could be seri- ously injured or killed in a sudden stop or collision.
WARNING
c To install a rear facing child restraint on the passenger(cid:146)s side jump seat, it will be necessary to move the front passen- ger(cid:146)s seat fully forward and place the front seatback upright or tilt it forward. The front seat cannot be used. Attempt- ing to do so could lead to serious injury in a sudden stop or crash.
LRS0559
When you install a child restraint on the passen- ger(cid:146)s side jump seat, follow these steps: 1. To access the jump seat extensions1 on the passenger(cid:146)s side jump seat only pull up s2
on the extension to unfold it to the open position. Then unfold the two support legs s3 and lower the jump seat to the full open s4 seating position.1-40 Safety(cid:151)Seats, seat belts and supplemental restraint system
Z REVIEW COPY—2007 Truck/Frontier (d22) Owners Manual—USA_English (nna) 12/13/06—cathy X
LRS0537
LRS0544
Rear Facing (passenger(cid:146)s side jump seatonly) (cid:151) step 2
2. Move the front passenger(cid:146)s seat into the FULL FORWARD position. Then move the front seatback to the upright or tilted forward position. Position the child restraint on the jump seat. The direction of the child restraint depends on the type of the child restraint and the size of the child. Always follow the restraint manufacturer(cid:146)s instructions.
LRS0545
Rear Facing (cid:151) step 3
3. Route the seat belt tongue through the child restraint and insert it into the buckle until you hear and feel the latch engage. Be sure to follow the child restraint manu- facturer(cid:146)s instructions for belt routing.
Safety(cid:151)Seats, seat belts and supplemental restraint system 1-41
Z REVIEW COPY—2007 Truck/Frontier (d22) Owners Manual—USA_English (nna) 12/13/06—cathy X
LRS0546
LRS0547
WRS0683
Rear Facing (cid:151) step 4
4. Pull on the shoulder belt until all of the belt is fully extended. At this time, the seat belt retractor is in the automatic locking mode (child restraint mode). It reverts to emer- gency locking mode when the seat belt is fully retracted.
Rear Facing (cid:151) step 5
Rear facing (cid:150) step 5
5. Allow the seat belt to retract. Pull up on the shoulder belt to remove any slack in the belt.
6. Remove any additional slack from the child restraint; press downward and rearward firmly in the center of the child restraint to compress the vehicle seat cushion and seat- back while pulling up on the seat belt.
1-42 Safety(cid:151)Seats, seat belts and supplemental restraint system
Z REVIEW COPY—2007 Truck/Frontier (d22) Owners Manual—USA_English (nna) 12/13/06—cathy X
LRS0548
Rear Facing (cid:151) step 6
7. Before placing the child in the child restraint, hold the child restraint near the seat belt path and use force to push the child restraint from side to side, and tug it forward to make sure that it is securely held in place. It should not move more than 1 inch (25 mm). If it does move more than 1 inch (25 mm), pull again on the shoulder belt to further tighten the child restraint. If you are unable to prop- erly secure the restraint, move the restraint to another rear seating position and try again, or try a different child restraint. Not all child restraints fit in all types of vehicles.
BOOSTER SEATS
8. Check that the retractor is in the automatic locking mode by trying to pull more seat belt out of the retractor. If you cannot pull any more seat belt webbing out of the retractor, the retractor is in the automatic locking mode.
9. Check to make sure that the child restraint is properly secured prior to each use. If the belt is not locked, repeat steps 3 through 8.
After the child restraint is removed and the seat belt fully retracted, the automatic locking mode (child restraint mode) is canceled.
ARS1098
PRECAUTIONS ON BOOSTER SEATS
WARNING
c Infants and small children should al- ways be placed in an appropriate child restraint while riding in the vehicle. Failure to use a child restraint or booster seat can result in serious injury or death.
Safety(cid:151)Seats, seat belts and supplemental restraint system 1-43
Z REVIEW COPY—2007 Truck/Frontier (d22) Owners Manual—USA_English (nna) 12/13/06—cathy X
c Infants and small children should never be carried on your lap. It is not possible for even the strongest adult to resist the forces of a severe accident. The child could be crushed between the adult and parts of the vehicle. Also, do not put the same seat belt around both your child and yourself.
c NISSAN recommends that the booster seat be installed in the rear seat. Ac- cording to accident statistics, children are safer when properly restrained in the rear seat than in the front seat. If you must install a booster seat in the front seat, see (cid:147)Booster seat installa- tion(cid:148) in this section.
seating
position
c A booster seat must only be installed in lap/shoulder belt. Failure to use a three-point type seat belt with a booster seat can result in a serious in- jury in sudden stop or collision.
that
has
c Improper use or improper installation of a booster seat can increase the risk or severity of injury for both the child and other occupants of the vehicle and can lead to serious injury or death in an accident.
c Do not use towels, books, pillows or other items in place of a booster seat. Items such as these may move during normal driving or a collision and result in serious injury or death. Booster seats are designed to be used with a lap/shoulder belt. Booster seats are de- signed to properly route the lap and shoulder portions of the seat belt over the strongest portions of a child(cid:146)s body to provide the maximum protection dur- ing a collision.
c Follow all of the booster seat manufac- turer(cid:146)s instructions for installation and use. When purchasing a booster seat, be sure to select one which will fit your child and vehicle. It may not be possible to properly install some types of booster seats in your vehicle.
c If the booster seat and seat belt is not used properly, the risk of a child being injured in a collision or a sudden stop greatly increases.
c Adjustable seatbacks should be posi- tioned to fit the booster seat, but as upright as possible.
c After placing the child in the booster seat and fastening the seat belt, make sure the shoulder portion of the belt is away from the child(cid:146)s face and neck and the lap portion of the belt does not cross the abdomen.
c Do not put the shoulder belt behind the child or under the child(cid:146)s arm. If you must install a booster seat in the front seat, see (cid:147)Booster seat installation(cid:148) later in this section.
c When your booster seat is not in use, keep it secured with a seat belt to pre- vent it from being thrown around in case of a sudden stop or accident.
CAUTION
Remember that a booster seat left in a closed vehicle can become very hot. Check the seating surface and buckles before placing your child in the booster seat.
1-44 Safety(cid:151)Seats, seat belts and supplemental restraint system
Z REVIEW COPY—2007 Truck/Frontier (d22) Owners Manual—USA_English (nna) 12/13/06—cathy X
LRS0455
Booster seats of various sizes are offered by several manufacturers. When selecting any booster seat, keep the following points in mind: c Choose only a booster seat with a label certifying that it complies with Federal Motor Vehicle Safety Standard 213 or Canadian Motor Vehicle Safety Standard 213.c Check the booster seat in your vehicle to be sure it is compatible with the vehicle(cid:146)s seat and seat belt system.
c Make sure the child(cid:146)s head will be properly supported by the booster seat or vehicle seat. The seat back must be at or above the center of the child(cid:146)s ears. For example, if a
LRS0453
low back booster seat s1 is chosen, the vehicle seat back must be at or above the center of the child(cid:146)s ears. If the seat back is lower than the center of the child(cid:146)s ears, a high back booster seat s2 should be used. c If the booster seat is compatible with your vehicle, place your child in the booster seat and check the various adjustments to be sure the booster seat is compatible with your child. Always follow all recommended pro- cedures.LRS0464
All U.S. states and Canadian provinces or territories require that infants and small children be restrained in an approved child restraint at all times while the vehicle is being operated. The instructions in this section apply to booster seat installation in the rear seats or the front passenger seat.Safety(cid:151)Seats, seat belts and supplemental restraint system 1-45
Z REVIEW COPY—2007 Truck/Frontier (d22) Owners Manual—USA_English (nna) 12/13/06—cathy X
BOOSTER SEAT INSTALLATION ON FRONT PASSENGER SEAT AND REAR SEAT (Crew cab models only)
WARNING
NISSAN recommends that child restraints be installed in the rear seat. However, if you must install a booster seat in the front passenger seat, move the passenger(cid:146)s seat to the rearmost position.
CAUTION
Do not use the lap/shoulder belt auto- matic locking mode when using a booster seat with the seat belts. Follow these steps to install a booster seat in the rear seat or in the front passenger seat:
WRS0699
1. If you must install a booster seat in the front seat, move the seat to the rear- most position.2. Position the booster seat on the seat. Only place it in a front facing direction. Always follow the booster seat manufacturer(cid:146)s in- structions.
Rear center position
LRS0596
1-46 Safety(cid:151)Seats, seat belts and supplemental restraint system
Z REVIEW COPY—2007 Truck/Frontier (d22) Owners Manual—USA_English (nna) 12/13/06—cathy X
LRS0563
Rear outboard position
3. The booster seat should be positioned on the vehicle seat so that it is stable. If neces- sary, adjust or remove the head restraint to obtain the correct booster seat fit. See (cid:147)Head restraint adjustment(cid:148) earlier in this section. If the head restraint is removed, store it in a secure place. Be sure to install the head restraint when the booster seat is removed. If the seating position does not have an adjustable head restraint and it is interfering with the proper booster seat fit, try another seating position or a different booster seat.
4. Position the lap portion of the seat belt low and snug on the child(cid:146)s hips. Be sure to follow the booster seat manufacturer(cid:146)s in- structions for adjusting the belt routing.
5. Pull the shoulder belt portion of the seat belt toward the retractor to take up extra slack. Be sure the shoulder belt is positioned across the top, middle portion of the child(cid:146)s shoulder. Be sure to follow the booster seat manufacturer(cid:146)s instructions for adjusting the belt routing.
6. Follow the warnings, cautions and instruc- tions for properly fastening a seat belt shown in the (cid:147)Three-point seat belt with retractor(cid:148) earlier in this section.
LRS0454
7.
Front passenger position
If the booster is installed in the front passen- ger seat: When the ignition switch is turned to the ON position, the passenger air bag status light may or may not be illumi- nated, depending on the size of the child and the type of booster seat being used. See (cid:147)Front passenger air bag and status light(cid:148) later in this section.
Safety(cid:151)Seats, seat belts and supplemental restraint system 1-47
Z REVIEW COPY—2007 Truck/Frontier (d22) Owners Manual—USA_English (nna) 12/13/06—cathy X
BOOSTER SEAT INSTALLATION ON PASSENGER(cid:146)S SIDE JUMP SEAT ONLY (King cab models only)
WARNING
c When installing a booster seat in the passenger(cid:146)s side jump seat position be sure to unfold the seat extension on the jump seat. If the jump seat extension is not properly used, the booster seat will not be installed correctly and a child could be injured in a collision or sudden stop.
c Never install a booster seat on the driv- er(cid:146)s side jump seat. A child restraint can not be properly installed in the driver(cid:146)s side jump seat and a child could be injured in a collision or sudden stop.
CAUTION
Do not use the lap/shoulder belt auto- matic locking mode when using a booster seat with the seat belts. When you install a booster seat on the jump seat follow these steps:
LRS0559
LRS0537
1. To access the jump seat extensions1 on the passenger(cid:146)s side jump seat only pull up s2
on the extension to unfold it to the open position. Then unfold the two support legs s3 and lower the jump seat to the full open s4 seating position.1-48 Safety(cid:151)Seats, seat belts and supplemental restraint system
Z REVIEW COPY—2007 Truck/Frontier (d22) Owners Manual—USA_English (nna) 12/13/06—cathy X
LRS0539
2. Position the booster seat on the seat. Only place it in a front facing direction. Always follow the booster seat manufacturer(cid:146)s in- structions.SUPPLEMENTAL RESTRAINT SYSTEM
4. Position the lap portion of the seat belt low and snug on the child(cid:146)s hips. Be sure to follow the booster seat manufacturer(cid:146)s in- structions for adjusting the belt routing.
3. The booster seat should be positioned on the vehicle seat so that it is stable. If neces- sary, adjust or remove the head restraint to obtain the correct booster seat fit. See (cid:147)Head restraint adjustment(cid:148) earlier in this section. If the head restraint is removed, store it in a secure place. Be sure to install the head restraint when the booster seat is removed. If the seating position does not have an adjustable head restraint and it is interfering with the proper booster seat fit, try another seating position or a different booster seat.
PRECAUTIONS ON SUPPLEMENTAL RESTRAINT SYSTEM This Supplemental Restraint System (SRS) sec- tion contains important information concerning the driver and passenger supplemental front air bags (NISSAN Advanced Air Bag System), supplemental side air bags, curtain side-impact and rollover air bags and pre-tensioner seat belts. Supplemental front impact air bag system: The NISSAN Advanced Air Bag System can help cushion the impact force to the head and chest of the driver and front passenger in certain frontal collisions. Supplemental side-impact air bag system (if so equipped): This system can help cushion the impact force to the chest area of the driver and front passenger in certain side impact colli- sions. The front seat side-impact supplemental side air bags are designed to inflate on the side where the vehicle is impacted. Supplemental curtain side-impact and roll- over air bag system (if so equipped): This system can help cushion the impact force to the head of occupants in front and rear outboard seating positions in certain side impact or rollover collisions. In a side impact, the curtain air bags are designed to inflate on the side where the Safety(cid:151)Seats, seat belts and supplemental restraint system 1-49
5. Pull the shoulder belt portion of the seat belt toward the retractor to take up extra slack. Be sure the shoulder belt is positioned across the top, middle portion of the child(cid:146)s shoulder. Be sure to follow the booster seat manufacturer(cid:146)s instructions for adjusting the belt routing.
6. Follow the warnings, cautions and instruc- tions for properly fastening a seat belt shown in the (cid:147)Three-point seat belt with retractor(cid:148) earlier in this section.
Z REVIEW COPY—2007 Truck/Frontier (d22) Owners Manual—USA_English (nna) 12/13/06—cathy X
vehicle is impacted. In a rollover both curtain air bags are designed to inflate and remain inflated for a short time. These supplemental restraint systems are de- signed to supplement the crash protection pro- vided by the seat belts and are not a substitute for them. Seat belts should always be correctly worn and the occupant seated a suitable dis- tance away from the steering wheel, instrument panel and door finishers. See (cid:147)Seat belts(cid:148) earlier in this section for instructions and precautions on seat belt usage. The supplemental air bags operate only when the ignition switch is in the ON or START position. After turning the ignition key to the ON position, the supplemental air bag warning light illuminates. The supplemental air bag warning light will turn off after about 7
seconds if the system is operational.WARNING
c The supplemental front air bags ordi- narily will not inflate in the event of a side impact, rear impact, rollover, or lower severity frontal collision. Always wear your seat belts to help reduce the risk or severity of injury in various kinds of accidents.
c The front passenger air bag will not inflate if the passenger air bag status light is lit or if the front passenger seat is unoccupied. See (cid:147)Front passenger air bag and status light(cid:148) later in this section.
WRS0031
c The seat belts and the supplemental front air bags are most effective when you are sitting well back and upright in the seat. The front air bags inflate with great force. Even with the NISSAN Ad- vanced Air Bag System, if you are unre- strained, leaning forward, sitting side- ways or out of position in any way, you are at greater risk of injury or death in a crash. You may also receive serious or fatal injuries from the supplemental front air bag if you are up against it
1-50 Safety(cid:151)Seats, seat belts and supplemental restraint system
Z REVIEW COPY—2007 Truck/Frontier (d22) Owners Manual—USA_English (nna) 12/13/06—cathy X
when it inflates. Always sit back against the seatback and as far away as practi- cal from the steering wheel or instru- ment panel. Always use the seat belts. c The driver and front passenger seat belt buckles are equipped with sensors that detect if the seat belts are fastened. The advanced air bag system monitors the severity of a collision and seat belt us- age then inflates the air bags. Failure to properly wear seat belts can increase the risk or severity of injury in an accident.
c The front passenger seat is equipped with an occupant classification sensor (pressure sensor) that turns the front passenger air bag OFF under some conditions. This sensor is only used in this seat. Failure to be properly seated and wearing the seat belt can increase the risk or severity of injury in an acci- dent. See (cid:147)Front Passenger air bag and status light(cid:148) later in this section.
c Keep hands on the outside of the steer- ing wheel. Placing them inside the steering wheel rim could increase the risk that they are injured when the supplemental front air bag inflates.
ARS1133
WARNING
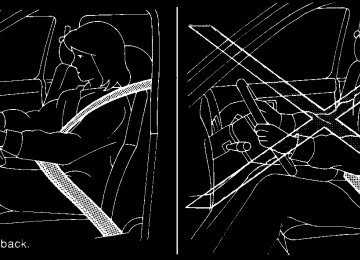
c Never let children ride unrestrained or extend their hands or face out of the window. Do not attempt to hold them in your lap or arms. Some examples of dangerous riding positions are shown in the illustrations.
Safety(cid:151)Seats, seat belts and supplemental restraint system 1-51
Z REVIEW COPY—2007 Truck/Frontier (d22) Owners Manual—USA_English (nna) 12/13/06—cathy X
ARS1041
ARS1042
ARS1043
WARNING
c Children may be severely injured or killed when the supplemental front air bags, side air bags or curtain side- impact and rollover air bags inflate if they are not properly restrained. Pre- teens and children should be properly restrained in the rear seat, if possible.
1-52 Safety(cid:151)Seats, seat belts and supplemental restraint system
Z REVIEW COPY—2007 Truck/Frontier (d22) Owners Manual—USA_English (nna) 12/13/06—cathy X
ARS1044
ARS1045
WRS0256
WARNING
WARNING
c Even with the NISSAN Advanced Air Bag System, never install a rear-facing child restraint in the front seat. An in- flating supplemental front air bag could seriously injure or kill your child. See (cid:147)Child restraints(cid:148) earlier in this section for details.
Supplemental side air bag (if so equipped) and curtain side-impact and rollover air bag (if so equipped): c The supplemental side air bag and cur- tain side-impact and rollover air bag ordinarily will not inflate in the event of a frontal impact, rear impact, or lower severity side collision. Always wear your seat belts to help reduce the risk or severity of injury in various kinds of accidents.
Safety(cid:151)Seats, seat belts and supplemental restraint system 1-53
Z REVIEW COPY—2007 Truck/Frontier (d22) Owners Manual—USA_English (nna) 12/13/06—cathy X
Do not lean against the door.
WRS0431
LRS0396
Do not lean against doors or windows.SSS0162
Do not lean against doors or windows.1-54 Safety(cid:151)Seats, seat belts and supplemental restraint system
Z REVIEW COPY—2007 Truck/Frontier (d22) Owners Manual—USA_English (nna) 12/13/06—cathy X
WARNING
c The seat belts, the supplemental side air bags and curtain side-impact and rollover air bags are most effective when you are sitting well back and up- right in the seat. The side air bag and curtain air bag inflate with great force. Do not allow anyone to place their hand, leg or face near the side air bag on the side of the seatback of the front seat or near the side roof rails. Do not allow anyone sitting in the front seats or rear outboard seats to extend their hand out of the window or lean against the door. Some examples of dangerous riding positions are shown in the previ- ous illustrations.
LRS0421
SSS0159
WARNING
c When sitting in the rear seat, do not hold onto the seatback of the front seat. If the side air bag inflates, you may be seriously injured. Be especially careful with children, who should always be properly restrained. Some examples of dangerous riding positions are shown in the illustrations.
c Do not use seat covers on the front seatbacks. They may interfere with supplemental side air bag inflation.
Safety(cid:151)Seats, seat belts and supplemental restraint system 1-55
Z REVIEW COPY—2007 Truck/Frontier (d22) Owners Manual—USA_English (nna) 12/13/06—cathy X
1.
2.
SRS curtain side-impact and rollover air bag modules (if so equipped) SRS curtain side-impact and rollover air bag (if so equipped) Diagnosis sensor unit Supplemental front air bag modules
3. 4. 5. Crash zone sensor 6. Occupant classification system control
unit
7. Occupant classification sensor
(pressure sensor) Satellite sensors Seat belt buckle switches
8. 9. 10. Pre-tensioner retractor 11. Supplemental side air bag modules
(if so equipped)
NISSAN Advanced Air Bag System (front seats) This vehicle is equipped with the NISSAN ad- vanced air bag system for the driver and front passenger seats. This system is designed to meet certification requirements under U.S. regu- lations. It is also permitted in Canada. However, all of the information, cautions and warn- ings in this manual still apply and must be followed.
1-56 Safety(cid:151)Seats, seat belts and supplemental restraint system
LRS0565
Z REVIEW COPY—2007 Truck/Frontier (d22) Owners Manual—USA_English (nna) 12/13/06—cathy X
The driver supplemental front air bag is located in the center of the steering wheel. The passenger supplemental front air bag is mounted in the dashboard above the glove box. The supplemen- tal front air bags are designed to inflate in higher severity frontal collisions, although they may in- flate if the forces in another type of collision are similar to those of a higher severity frontal impact. They may not inflate in certain frontal collisions. Vehicle damage (or lack of it) is not always an indication of proper supplemental front air bag system operation.
The NISSAN advanced air bag system has dual stage inflators. It also monitors information from the crash zone sensor, the diagnosis sensor unit, seat belt buckle sensors, occupant classification sensor (pressure sensor) and passenger seat belt tension sensor. Inflator operation is based on the severity of a collision and seat belt usage for the driver. For the front passenger, it additionally monitors the weight of an occupant or object on the seat and seat belt tension. Based on informa- tion from the sensors, only one front air bag may inflate in a crash, depending on the crash severity and whether the front occupants are belted or unbelted. Additionally, the front passenger air bag may be automatically turned OFF under some conditions, depending on the weight de- tected on the passenger seat and how the seat belt is used. If the front passenger air bag is OFF,
the passenger air bag status light will be illumi- nated (if the seat is unoccupied, the light will not be illuminated, but the air bag will be off). See (cid:147)Front passenger air bag and status light(cid:148) later in this section for further details. One front air bag inflating does not indicate improper performance of the system. If you have any questions about your air bag system, please contact NISSAN or your NISSAN dealer. If you are considering modification of your vehicle due to a disability, you may also contact NISSAN. Contact information is contained in the front of this Owner(cid:146)s Manual. When a supplemental front air bag inflates, a fairly loud noise may be heard, followed by the release of smoke. This smoke is not harmful and does not indicate a fire. Care should be taken to not inhale it, as it may cause irritation and chok- ing. Those with a history of a breathing condition should get fresh air promptly. Supplemental front air bags, along with the use of seat belts, help to cushion the impact force on the face and chest of the front occupants. They can help save lives and reduce serious injuries. However, an inflating front air bag may cause facial abrasions or other injuries. Front air bags do not provide restraint to the lower body. Even with NISSAN advanced air bags, seat belts should be correctly worn and the driver and pas-
senger seated upright as far as practical away from the steering wheel or instrument panel. The supplemental front air bags inflate quickly in order to help protect the front occupants. Because of this, the force of the front air bag inflating can increase the risk of injury if the occupant is too close to, or is against, the front air bag module during inflation. The front air bags deflate quickly after a collision. The supplemental front air bags operate only when the ignition switch is in the ON or START position. After turning the ignition key to the ON position, the supplemental air bag warning light illuminates. The supplemental air bag warning light will turn off after about 7
seconds if the system is operational.Safety(cid:151)Seats, seat belts and supplemental restraint system 1-57
Z REVIEW COPY—2007 Truck/Frontier (d22) Owners Manual—USA_English (nna) 12/13/06—cathy X
Status light
is The front passenger air bag status light located near the climate controls. The light oper- ates as follows: c Unoccupied passenger(cid:146)s seat: The
is OFF and the front passenger air bag is OFF and will not inflate in a crash.
c Passenger(cid:146)s seat occupied by a small adult, child or child restraint as outlined in this illuminates to indicate section: The that the front passenger air bag is OFF and will not inflate in a crash.
c Occupied passenger seat and the passen- ger meet the conditions outlined in this sec- tion: The light is OFF to indicate that the front passenger air bag is operational.
Front passenger air bag The front passenger air bag is designed to auto- matically turn OFF when the vehicle is operated under some conditions as described below in accordance with U.S. regulations. If the front passenger air bag is OFF, it will not inflate in a crash. The driver air bag and other air bags in your vehicle are not part of this system. The purpose of the regulation is to help reduce the risk of injury or death from an inflating air bag to certain front passenger seat occupants, such
as children, by requiring the air bag to be auto- matically turned OFF. Certain sensors are used to meet the requirements.
One sensor used is the occupant classification sensor (pressure sensor). It is in the bottom of the front passenger seat cushion and is designed to detect an occupant and objects on the seat by weight. It works together with seat belt sensors described later. For example, if a child is in the front passenger seat, the advanced air bag sys- tem is designed to turn the passenger air bag OFF in accordance with the regulations. Also, if a child restraint of the type specified in the regula- tions is on the seat, its weight and the child(cid:146)s weight can be detected and cause the air bag to turn OFF. Occupant classification sensor opera- tion can vary depending on the front passenger seat belt sensors.
The front passenger seat belt sensors are de- signed to detect if the seat belt is buckled and the amount of tension on the seat belt, such as when it is in the automatic locking mode (child restraint mode). Based on the weight on the seat detected by the occupant classification sensor and the belt tension detected on the seat belt, the advanced air bag system determines whether the front pas- senger air bag should be automatically turned OFF as required by the regulations.
Front passenger air bag and status light
WRS0475
WARNING
The front passenger air bag is designed to automatically turn OFF under some con- ditions. Read this section carefully to learn how it operates. Proper use of the seat, seat belt and child restraints is nec- essary for most effective protection. Fail- ure to follow all instructions in this manual concerning the use of seats, seat belts and child restraints can increase the risk or severity of injury in an accident.
1-58 Safety(cid:151)Seats, seat belts and supplemental restraint system
Z REVIEW COPY—2007 Truck/Frontier (d22) Owners Manual—USA_English (nna) 12/13/06—cathy X
Front passenger seat adult occupants who are properly seated and using the seat belt as out- lined in this manual should not cause the passen- ger air bag to be automatically turned OFF. For small adults it may be turned OFF, however if the occupant takes his/her weight off the seat cush- ion (for example, by not sitting upright, by sitting on an edge of the seat, or by otherwise being out of position), this could cause the sensor to turn the air bag OFF. if the occupant improperly uses the seat belt in the automatic locking mode (child restraint mode), this could cause the air bag to be turned OFF. Always be sure to be seated and wearing the seat belt properly for the most effective protection by the seat belt and supplemental air bag.
In addition,
NISSAN recommends that pre-teens and chil- dren be properly restrained in a rear seat. NISSAN also recommends that appropriate child restraints and booster seats be properly installed in a rear seat. If this is not possible, the occupant classification sensor and seat belt sensors are designed to operate as described above to turn the front passenger air bag OFF for specified child restraints as required by the regulations. Failing to properly secure child restraints and to use the automatic locking mode (child restraint mode) may allow the restraint to tip or move in an accident or sudden stop. This can also result in the passenger air bag inflating in a crash instead
of being OFF. See (cid:147)Child restraints(cid:148) earlier in this section for proper use and installation.
If the front passenger seat is not occupied the passenger air bag is designed not to inflate in a crash. However, heavy objects placed on the seat could result in air bag inflation, because of the object(cid:146)s weight detected by the occupant classification sensor. Other conditions could also result in air bag inflation, such as if a child is standing on the seat, or if two children are on the seat, contrary to the instructions in this manual. Always be sure that you and all vehicle occupants are seated and restrained properly. Using the passenger air bag status light, you can monitor when the front passenger air bag is au- tomatically turned OFF with the seat occupied. The light will not illuminate when the front pas- senger seat is unoccupied. If an adult occupant is in the seat but the passen- ger air bag status light is illuminated (indicating that the air bag is OFF), it could be that the person is a small adult, or is not sitting on the seat properly or not using the seat belt properly. If a child restraint must be used in the front seat, the passenger air bag status light may or may not be illuminated, depending on the size of the child and the type of child restraint being used. If the air bag status light is not illuminated (indicating that the air bag might inflate in a crash), it could be
that the child restraint or seat belt is not being used properly. Make sure that the child restraint is installed properly, the seat belt is used properly and the occupant is positioned properly. If the air bag status light is not illuminated, reposition the occupant or child restraint in a rear seat.
If the passenger air bag status light will not illu- minate even though you believe that the child restraint, the seat belts and the occupant are properly positioned, the system may be sensing an unoccupied seat (in which case the air bag is OFF). Your NISSAN dealer can check that the system is OFF by using a special tool. However, until you have confirmed with your dealer that your air bag is working properly, reposition the occupant or child restraint in a rear seat.
The air bag system and passenger air bag status light will take a few seconds to register a change in the passenger seat status. For example, if a large adult who is sitting in the front passenger seat exits the vehicle, the passenger air bag status light will go from OFF to ON for a few seconds and then to OFF. This is normal system operation and does not indicate a malfunction. If a malfunction occurs in the front passenger air bag system, the supplemental air bag warning light , located in the meter and gauges area in the center of the instrument panel, will blink. Have the system checked by a NISSAN dealer. Safety(cid:151)Seats, seat belts and supplemental restraint system 1-59
Z REVIEW COPY—2007 Truck/Frontier (d22) Owners Manual—USA_English (nna) 12/13/06—cathy X
Other supplemental front air bag precau- tions
WARNING
c Do not place any objects on the steer- ing wheel pad or on the instrument panel. Also, do not place any objects between any occupant and the steering wheel or instrument panel. Such ob- jects may become dangerous projec- tiles and cause injury if the supplemen- tal front air bag inflates.
c Immediately after
inflation, several front air bag system components will be hot. Do not touch them; you may se- verely burn yourself.
c No unauthorized changes should be made to any components or wiring of the supplemental air bag system. This is to prevent accidental inflation of the supplemental air bag or damage to the supplemental air bag system.
c Do not make unauthorized changes to your vehicle(cid:146)s electrical system, sus- pension system or front end structure. This could affect proper operation of the supplemental front air bag system.
c Tampering with the supplemental front air bag system may result in serious personal injury. Tampering includes changes to the steering wheel and the instrument panel assembly by placing material over the steering wheel pad and above the instrument panel or by installing trim material around the air bag system.
additional
c Modifying or tampering with the front passenger seat may result in serious personal injury. For example, do not change the front seats by placing mate- rial on the seat cushion or by installing additional trim material, such as seat covers, on the seat that are not specifi- cally designed to assure proper air bag operation. Additionally, do not stow any objects under the front passenger seat or the seat cushion and seatback. Such objects may interfere with the proper operation of the occupant classifica- tion sensor (pressure sensor).
c No unauthorized changes should be made to any components or wiring of the seat belt system. This may affect the supplemental front air bag system. Tampering with the seat belt system may result in serious personal injury.
1-60 Safety(cid:151)Seats, seat belts and supplemental restraint system
c Work on and around the supplemental front air bag system should be done by a NISSAN dealer. Installation of electri- cal equipment should also be done by a NISSAN dealer. The Supplemental Re- straint System (SRS) wiring should not be modified or disconnected. Unautho- rized electrical test equipment and probing devices should not be used on the air bag system.
c A cracked windshield should be re- placed immediately by a qualified re- pair facility. A cracked windshield could affect the function of the supplemental air bag system.
c The SRS wiring harness connectors are easy
orange
for
yellow and identification.
When selling your vehicle, we request that you inform the buyer about the supplemental front air bag system and guide the buyer to the appropri- ate sections in this Owner(cid:146)s Manual.
Z REVIEW COPY—2007 Truck/Frontier (d22) Owners Manual—USA_English (nna) 12/13/06—cathy X
WRS0422
Supplemental side-impact air bag and curtain side-impact and rollover air bags system (if so equipped) The supplemental side-impact air bags are lo- cated in the outside of the seatback of the front seats. The supplemental curtain side-impact and rollover air bags are located in the side roof rails. These systems are designed to meet voluntary guidelines to help reduce the risk of injury to out-of-position occupants. However, all of the information, cautions and warnings in this manual still apply and must be followed. The supplemental side air bags and curtain side- impact and rollover air bags are designed toinflate in higher severity side collisions, although they may inflate if the forces in another type of collision are similar to those of a higher severity side impact. They are designed to inflate on the side where the vehicle is impacted. They may not inflate in certain side collisions.
Curtain side-impact and rollover air bags are also designed to inflate in certain types of rollover collisions or near rollovers. As a result, certain vehicle movements (for example, during severe off roading) may cause the airbags to inflate. Vehicle damage (or lack of it) is not always an indication of proper supplemental side air bag and curtain side-impact and rollover air bag operation. When the supplemental side air bag and curtain air bags inflate, a fairly loud noise may be heard, followed by release of smoke. This smoke is not harmful and does not indicate a fire. Care should be taken not to inhale it, as it may cause irritation and choking. Those with a history of a breathing condition should get fresh air promptly. Supplemental side air bags, along with the use of seat belts, help to cushion the impact force on the chest of the front occupants. Curtain side- impact and rollover air bags help to cushion the impact force to the head of occupants in the front and rear outboard seating positions. They can help save lives and reduce serious injuries. How- ever, an inflating side air bag, or curtain air bag
may cause abrasions or other injuries. Supple- mental side air bags and curtain side-impact and rollover air bags do not provide restraint to the lower body.
The seat belts should be correctly worn and the driver and passenger seated upright as far as practical away from the supplemental side air bag. Rear seat passengers should be seated as far away as practical from the door finishers and side roof rails. The side air bags and curtain side-impact and rollover air bag inflate quickly in order to help protect the occupants. Because of this, the force of the side air bag and curtain air bag inflating can increase the risk of injury if the occupant is too close to, or is against, these air bag modules during inflation. The side air bag will deflate quickly after the collision is over.
The curtain side-impact and rollover air bag will remain inflated for a short time. The supplemental side air bags and curtain side-impact and rollover air bags operate only when the ignition switch is in the ON or START positions.
After turning the ignition key to the ON position, the supplemental air bag warning light illuminates. The supplemental air bag warning light will turn off after about 7
seconds if the system is operational.Safety(cid:151)Seats, seat belts and supplemental restraint system 1-61
Z REVIEW COPY—2007 Truck/Frontier (d22) Owners Manual—USA_English (nna) 12/21/06—cathy X
WARNING
c Do not place any objects near the seat- back of the front seats. Also, do not place any objects (an umbrella, bag, etc.) between the front door finisher and the front seat. Such objects may become dangerous projectiles and cause injury if the supplemental side air bag inflates.
c Right after inflation, several side air bag and curtain side-impact and rollover air bag system components will be hot. Do not touch them; you may severely burn yourself.
c No unauthorized changes should be made to any components or wiring of the side air bag and curtain air bag system. This is to prevent accidental inflation of the side air bag and curtain air bag or damage to the side air bag and curtain air bag system.
c Do not make unauthorized changes to your vehicle(cid:146)s electrical system, sus- pension system or side panel. This could affect proper operation of the supplemental curtain air bag system.
c Tampering with the supplemental side air bag system may result in serious personal injury. For example, do not change the front seats by placing mate- rial near the seatbacks or by installing additional trim material, such as seat covers, around the side air bag.
c Work around and on the curtain air bag system should be done by a NISSAN dealer. Installation of electrical equip- ment should also be done by a NISSAN dealer. The SRS wiring harnesses* should not be modified or discon- nected. Unauthorized electrical test equipment and probing devices should not be used on the side air bag or cur- tain air bag system.
* The SRS wiring harness or connectors are yellow or orange for easy identification.
When selling your vehicle, we request that you inform the buyer about the supplemental side air bag and curtain air bag system and guide the buyer to the appropriate sections in this Owner(cid:146)s Manual.
Pre-tensioner seat belt system (Front seats)
WARNING
c The pre-tensioner seat belt cannot be reused after activation. It must be re- placed together with the retractor and buckle as a unit.
c If the vehicle becomes involved in a frontal collision but the pre-tensioner is not activated, be sure to have the pre- tensioner system checked and, if nec- essary, your NISSAN dealer.
replaced by
c No unauthorized changes should be made to any components or wiring of the pre-tensioner seat belt system. This is to prevent accidental activation of the pre-tensioner seat belt or damage to the pre-tensioner seat belt operation. Tampering with the pre-tensioner seat belt system may result in serious per- sonal injury.
1-62 Safety(cid:151)Seats, seat belts and supplemental restraint system
Z REVIEW COPY—2007 Truck/Frontier (d22) Owners Manual—USA_English (nna) 12/13/06—cathy X
fire. Care should be taken not to inhale it, as it may cause irritation and choking. Those with a history of a breathing condition should get fresh air promptly. After the pre-tensioner seat belts have activated, load limiters allow the seat belt to release web- bing (if necessary) to reduce forces against the chest. If any abnormality occurs in the pre-tensioner system, the supplemental air bag warning will not come on, will flash intermit- light tently or will turn on for 7 seconds and remain on after the ignition key has been turned to the ON or START position. In this case, the pre-tensioner seat belt may not function properly. They must be checked and repaired. Take your vehicle to the nearest NISSAN dealer. When selling your vehicle, we request that you inform the buyer about the pre-tensioner seat belt system and guide the buyer to the appropriate sections in this Owner(cid:146)s Manual.
c Work around and on the pre-tensioner system should be done by a NISSAN dealer. Installation of electrical equip- ment should also be done by a NISSAN dealer. Unauthorized electrical test equipment and probing devices should not be used on the pre-tensioner seat belt system.
c If you need to dispose of the pre- tensioner or scrap the vehicle, contact a NISSAN dealer. Correct pre-tensioner disposal procedures are set forth in the appropriate NISSAN Service Manual. Incorrect disposal procedures could cause personal injury.
The front seat pre-tensioner seat belt system activates in conjunction with the front supple- mental air bag systems. Working with the seat belt retractor, it helps tighten the seat belt when the vehicle becomes involved in certain types of collisions, helping to restrain front seat occu- pants.
The pre-tensioner is encased with the seat belt(cid:146)s retractor. These seat belts are used the same as conventional seat belts.
When the pre-tensioner seat belt activates, smoke is released and a loud noise may be heard. This smoke is not harmful and does not indicate a
LRS0397
1. SRS Air bag warning labels
The warning labels are located on the sur- face of the sun visor.
2. SRS Side air bag warning label
(if so
equipped) The warning label is located on the side of the passenger(cid:146)s side center pillar.
Safety(cid:151)Seats, seat belts and supplemental restraint system 1-63
Z REVIEW COPY—2007 Truck/Frontier (d22) Owners Manual—USA_English (nna) 12/13/06—cathy X
SUPPLEMENTAL AIR BAG WARNING LABELS Warning labels about the supplemental front air bags and supplemental side-impact and rollover air bag systems are placed in the vehicle as shown in the illustration.
LRS0100
SUPPLEMENTAL AIR BAG WARNING LIGHT air bag warning light, The supplemental displaying in the instrument panel, moni- tors the circuits of the supplemental front air bag, supplemental side-impact air bag and curtain side-impact and rollover air bag and pre- tensioner seat belt systems. The circuits moni- tored by the supplemental air bag warning light are the diagnosis sensor unit, crash zone sensor, satellite sensors, rollover sensor, front air bag modules, side air bag modules, curtain air bag modules, pre-tensioner seat belts and all related wiring.
1-64 Safety(cid:151)Seats, seat belts and supplemental restraint system
When the ignition key is in the ON or START position, the supplemental air bag warning light illuminates for about 7 seconds and then turns off. This means the system is operational.
the following conditions occur,
If any of the supplemental front air bag, supplemental side air bag, curtain air bag and pre-tensioner seat belt systems need servicing: c The supplemental air bag warning light re-
mains on after approximately 7 seconds.
c The supplemental air bag warning light
flashes intermittently.
c The supplemental air bag warning light does
not come on at all.
Under these conditions, the supplemental front air bag, supplemental side air bags and curtain air bag or pre-tensioner seat belt systems may not operate properly. It must be checked and re- paired. Take your vehicle to the nearest NISSAN dealer.
Z REVIEW COPY—2007 Truck/Frontier (d22) Owners Manual—USA_English (nna) 12/13/06—cathy X
WARNING
WARNING
If the supplemental air bag warning light is on, it could mean that the supplemental front air bag, supplemental side air bag, curtain air bag systems and/or pre- tensioner seat belt systems will not oper- ate in an accident. To help avoid injury to yourself or others, have your vehicle checked by a NISSAN dealer as soon as possible.
Repair and replacement procedure The supplemental front air bags, supplemental side air bags, curtain air bags and pre-tensioner seat belts are designed to inflate on a one-time- only basis. As a reminder, unless it is damaged, the supplemental air bag warning light remains illuminated after inflation has occurred. Repair and replacement of these supplemental air bag systems should be done only by a NISSAN dealer. When maintenance work is required on the ve- hicle, the supplemental front air bags, supple- mental side air bags, curtain air bags, pre- tensioner seat belts and related parts should be pointed out to the person performing the mainte- nance. The ignition key should always be in the LOCK position when working under the hood or inside the vehicle.
c Once a supplemental front air bag, supplemental side air bag or curtain air bag has inflated, the air bag module will not function again and must be re- placed. Additionally, the supplemental front air bags inflate, the activated pre-tensioner seat belts must also be replaced. The air bag module and pre-tensioner seat belt system should be replaced by a NISSAN dealer. The air bag module and pre-tensioner seat belt system cannot be repaired.
if any of
c The supplemental front air bag, side air bag and curtain air bag systems, and the pre-tensioner seat belt system should be inspected by a NISSAN dealer if there is any damage to the front end or side portion of the vehicle. c If you need to dispose of the supple- mental air bag, pre-tensioner seat belt system or scrap the vehicle, contact a NISSAN dealer. Correct supplemental air bag and pre-tensioner seat belt sys- tem disposal procedures are set forth in the appropriate NISSAN Service Manual. Incorrect disposal procedures could cause personal injury.
Safety(cid:151)Seats, seat belts and supplemental restraint system 1-65
Z REVIEW COPY—2007 Truck/Frontier (d22) Owners Manual—USA_English (nna) 12/13/06—cathy X
MEMO
1-66 Safety(cid:151)Seats, seat belts and supplemental restraint system
2 Instruments and controls
Instrument panel. . . . . . . . . . . . . . . . . . . . . . . . . . . . . . . . . . . 2-3
Meters and gauges . . . . . . . . . . . . . . . . . . . . . . . . . . . . . . . . 2-5
Speedometer and odometer . . . . . . . . . . . . . . . . . . . . . 2-5
Trip computer (if so equipped) . . . . . . . . . . . . . . . . . . . 2-7
Tachometer . . . . . . . . . . . . . . . . . . . . . . . . . . . . . . . . . . . . 2-8
Engine coolant temperature gauge . . . . . . . . . . . . . . . 2-8
Fuel gauge . . . . . . . . . . . . . . . . . . . . . . . . . . . . . . . . . . . . 2-9
Engine oil pressure gauge (if so equipped) . . . . . . . . 2-9
Voltmeter (if so equipped) . . . . . . . . . . . . . . . . . . . . . . 2-10Compass and outside temperature display (if so equipped) . . . . . . . . . . . . . . . . . . . . . . . . . . . . . . . . . . 2-10
Outside temperature display . . . . . . . . . . . . . . . . . . . . 2-11
Compass display . . . . . . . . . . . . . . . . . . . . . . . . . . . . . . 2-11
Warning/indicator lights and audible reminders . . . . . . 2-14
Checking bulbs . . . . . . . . . . . . . . . . . . . . . . . . . . . . . . . 2-15
Warning lights . . . . . . . . . . . . . . . . . . . . . . . . . . . . . . . . 2-15
Indicator lights . . . . . . . . . . . . . . . . . . . . . . . . . . . . . . . . 2-19
Audible reminders . . . . . . . . . . . . . . . . . . . . . . . . . . . . . 2-23
Security systems (if so equipped) . . . . . . . . . . . . . . . . . . 2-23
Vehicle security system (if so equipped). . . . . . . . . . 2-23
NISSAN vehicle immobilizer system (if so equipped) . . . . . . . . . . . . . . . . . . . . . . . . . . . . . . . 2-25
Windshield wiper and washer switch . . . . . . . . . . . . . . . 2-26Switch operation . . . . . . . . . . . . . . . . . . . . . . . . . . . . . . 2-26
Rear window and outside mirror defroster switch (if so equipped) . . . . . . . . . . . . . . . . . . . . . . . . . . . . . . . . . . 2-27
Headlight and turn signal switch. . . . . . . . . . . . . . . . . . . . 2-27
Headlight control switch. . . . . . . . . . . . . . . . . . . . . . . . 2-27
Daytime running light system (Canada only) . . . . . . 2-29
Instrument brightness control . . . . . . . . . . . . . . . . . . . 2-30
Turn signal switch . . . . . . . . . . . . . . . . . . . . . . . . . . . . . 2-30
Fog light switch (if so equipped) . . . . . . . . . . . . . . . . 2-31
Hazard warning flasher switch . . . . . . . . . . . . . . . . . . . . . 2-31
Horn . . . . . . . . . . . . . . . . . . . . . . . . . . . . . . . . . . . . . . . . . . . .2-32
Cargo lamp switch . . . . . . . . . . . . . . . . . . . . . . . . . . . . . . . 2-32
Heated seat (if so equipped). . . . . . . . . . . . . . . . . . . . . . . 2-33
Vehicle dynamic control (VDC) off switch (if so equipped) . . . . . . . . . . . . . . . . . . . . . . . . . . . . . . . . . . 2-33
Hill descent control switch (if so equipped). . . . . . . . . . 2-34
Electronic locking rear differential (E-Lock) system switch (if so equipped) . . . . . . . . . . . . . . . . . . . . . . . . . . . . 2-35
Clutch interlock (clutch start) switch (if so equipped) . . . . . . . . . . . . . . . . . . . . . . . . . . . . . . . . . . 2-36
Power outlet . . . . . . . . . . . . . . . . . . . . . . . . . . . . . . . . . . . . . 2-36
Storage . . . . . . . . . . . . . . . . . . . . . . . . . . . . . . . . . . . . . . . . .2-37
Storage trays . . . . . . . . . . . . . . . . . . . . . . . . . . . . . . . . . 2-37Z REVIEW COPY—2007 Truck/Frontier (d22) Owners Manual—USA_English (nna) 12/21/06—cathy X
Under-seat storage bins. . . . . . . . . . . . . . . . . . . . . . . . 2-39
Console box . . . . . . . . . . . . . . . . . . . . . . . . . . . . . . . . . . 2-40
Glove box . . . . . . . . . . . . . . . . . . . . . . . . . . . . . . . . . . . . 2-41
Sunglasses holder (if so equipped) . . . . . . . . . . . . . . 2-41
Map pockets . . . . . . . . . . . . . . . . . . . . . . . . . . . . . . . . . . 2-42
Seat pockets (if so equipped). . . . . . . . . . . . . . . . . . . 2-43
Cup holders . . . . . . . . . . . . . . . . . . . . . . . . . . . . . . . . . . 2-43
Roof rack (if so equipped) . . . . . . . . . . . . . . . . . . . . . . 2-45
Windows . . . . . . . . . . . . . . . . . . . . . . . . . . . . . . . . . . . . . . . .2-46
Power windows (if so equipped) . . . . . . . . . . . . . . . . 2-46
Manual windows . . . . . . . . . . . . . . . . . . . . . . . . . . . . . . 2-49
Rear sliding window (if so equipped) . . . . . . . . . . . . 2-49
Sunroof (if so equipped). . . . . . . . . . . . . . . . . . . . . . . . . . . 2-49
Automatic sunroof . . . . . . . . . . . . . . . . . . . . . . . . . . . . . 2-49Interior lights . . . . . . . . . . . . . . . . . . . . . . . . . . . . . . . . . . . . . 2-51
Personal lights (if so equipped) . . . . . . . . . . . . . . . . . . . . 2-52
Map lights (if so equipped) . . . . . . . . . . . . . . . . . . . . . . . . 2-52
HomeLinkT universal transceiver (if so equipped). . . . . 2-52
Programming HomeLinkT. . . . . . . . . . . . . . . . . . . . . . . 2-53
Programming HomeLinkT for Canadian customers . . . . . . . . . . . . . . . . . . . . . . . . . . . . . . . . . . . . 2-54
Operating the HomeLinkT universal transceiver. . . . . . . . . . . . . . . . . . . . . . . . . . . . . . . . . . . . 2-54
Programming trouble-diagnosis . . . . . . . . . . . . . . . . . 2-55
Clearing the programmed information . . . . . . . . . . . . 2-55
Reprogramming a single HomeLinkT button . . . . . . 2-55
If your vehicle is stolen . . . . . . . . . . . . . . . . . . . . . . . . . 2-55Z REVIEW COPY—2007 Truck/Frontier (d22) Owners Manual—USA_English (nna) 12/21/06—cathy X
INSTRUMENT PANEL
1. 2.
3.
4.
Ventilators (P. 4-2) Headlight/fog light (if so equipped)/ turn signal switch (P. 2-27) Steering wheel switch for audio control (if so equipped) (P. 4-26) Driver supplemental air bag/horn (P. 1-49, P. 2-32)
5. Meters, gauges and warning/indicator
6.
lights (P. 2-5, 2-14) Cruise control main/set switches (if so equipped) (P. 5-19)
7. Windshield wiper/washer switch
8. 9.
(P. 2-26) Storage (P. 2-37) Audio system controls (if so equipped) (P. 4-10)
10. Front passenger supplemental air bag
(P. 1-49)
11. Upper and lower glove box (P. 2-41) 12. Power outlet (P. 2-36) 13. Electronic locking rear differential
(E-Lock) system switch (if so equipped) (P. 2-35) Heated seat switches (if so equipped) (P. 2-33) Hill descent control switch (if so equipped) (P. 2-34)
Instruments and controls 2-3
WIC0916
Z REVIEW COPY—2007 Truck/Frontier (d22) Owners Manual—USA_English (nna) 01/09/07—debbie X
Vehicle dynamic control (VDC) OFF switch (if so equipped) (P. 2-33)
14. Shift selector lever (P. 5-12) 15. 4WD shift switch (if so equipped)
(P. 5-21)
16. Climate controls (P. 4-2) 17. Passenger air bag status light (P. 1-58) 18. Hazard warning flasher switch (P. 2-31) 19. 20. Tilt steering wheel control (if so equipped) (P. 3-11)
Ignition switch (P. 5-8)
21. Cargo lamp switch (P. 2-32) 22. Clutch interlock (clutch start) switch
(if so equipped) (P. 2-36)
23. Outside mirror controls (if so equipped)
(P. 3-14)
2-4 Instruments and controls
Z REVIEW COPY—2007 Truck/Frontier (d22) Owners Manual—USA_English (nna) 12/13/06—cathy X
METERS AND GAUGES
1. Warning/indicator lights 2. 3. 4. 5.
Tachometer Speedometer Fuel gauge Voltmeter (if so equipped)
WIC1040
6. Odometer/Twin trip odometer/ Trip computer (if so equipped) Engine oil pressure gauge (if so equipped) Engine coolant temperature gauge
7.
8.
WIC0912
Speedometer
1. 2. Odometer/twin trip display 3. Change button SPEEDOMETER AND ODOMETER Speedometer The speedometer indicates vehicle speed in miles per hour (MPH) and kilometers per hour (km/h). Odometer/Twin trip odometer The odometer/twin trip odometer is displayed when the ignition key is in the ON position.
Instruments and controls 2-5
Z REVIEW COPY—2007 Truck/Frontier (d22) Owners Manual—USA_English (nna) 12/13/06—cathy X
The odometer records the total distance the ve- hicle has been driven. The twin trip odometer records the distance of individual trips.
With twin trip odometer
With trip computer
LIC0780
LIC0781
Changing the display: For vehicles equipped with twin trip odometer, pushing the change button changes the display as follows: Trip
! Trip
! Trip
For vehicles equipped with trip computer, push- ing the change button changes the display as follows: ! Trip ! Distance to Empty ! Trip Average speed ! Average fuel consumption ! Journey time ! Trip For additional puter(cid:148) later in this section. Resetting the trip odometer: Pushing the change button for more than 1 sec- ond resets the trip odometer to zero.
information, refer to (cid:147)Trip com-
2-6 Instruments and controls
Z REVIEW COPY—2007 Truck/Frontier (d22) Owners Manual—USA_English (nna) 12/13/06—cathy X
Journey time The journey time mode shows the time since the last reset. The displayed time can be reset by pressing the change button for more than ap- proximately 1 second. Trip computer reset Pushing the change button for more than 3 sec- onds will reset all modes except Trip A and dis- tance to empty (dte).
TRIP COMPUTER (if so equipped) The display of the trip computer is situated in the speedometer display. When the ignition is turned to ON, the display scrolls all the modes of the trip computer and then shows the mode chosen be- fore the ignition switch was turned OFF.
When the ignition switch is turned to ON, modes of the trip computer can be selected by pushing the trip computer change button. The following modes can be selected: Distance to empty (dte(cid:151)mile or km) The distance to empty (dte) mode provides you with an estimation of the distance that can be driven before refueling. The dte is constantly be- ing calculated, based on the amount of fuel in the fuel tank and the actual fuel consumption. The display is updated every 30 seconds. The dte mode includes a low range warning feature: when the fuel level is low, the dte mode is automatically selected and the digits blink in or- der to draw the driver(cid:146)s attention. Press the change button if you wish to return to the mode that was selected before the warning occurred. The dte mark (dte) will remain blinking until the vehicle is refueled. When the fuel display will change to (----).
level drops even lower, the dte
NOTE: c If the amount of fuel added while the ignition switch is OFF is small, the dis- play just before the ignition switch is turned OFF may continue to be dis- played.
c When driving uphill or rounding curves, the fuel in the tank shifts, which may momentarily change the display.
Average speed (MPH or km/h) The average speed mode shows the average vehicle speed since last reset. Resetting is done by pressing the change button for more than approximately 1 second. The display is updated every 30 seconds. The first 30 seconds after a reset, the display shows (----). Average fuel consumption (Mpg or l/100km) The average fuel consumption mode shows the average fuel consumption since the last reset. Resetting is done by pressing the change button for more than approximately 1 second. The dis- play is updated every 30 seconds. At about the first 1/3 miles (500 m) after a reset, the display shows (----).
Instruments and controls 2-7
Z REVIEW COPY—2007 Truck/Frontier (d22) Owners Manual—USA_English (nna) 12/13/06—cathy X
CAUTION
If the gauge indicates coolant tempera- ture near the hot (H) end of the normal range, reduce vehicle speed to decrease temperature. If the gauge is over the nor- mal range, stop the vehicle as soon as safely possible. If the engine is over- heated, continued operation of the ve- hicle may seriously damage the engine. See (cid:147)If your vehicle overheats(cid:148) in the (cid:147)In case of emergency(cid:148) section for immediate action required.
LIC0738
TACHOMETER The tachometer indicates engine speed in revo- lutions per minute (rpm). Do not rev the engine into the red zone s1 .
CAUTION
When engine speed approaches the red zone, shift to a higher gear. Operating the engine in the red zone may cause serious engine damage.
LIC0739
ENGINE COOLANT TEMPERATURE GAUGE The gauge indicates the engine coolant tempera- ture. The engine coolant temperature is within the normal range s1 when the gauge needle points within the zone shown in the illustration.The engine coolant temperature varies with the outside air temperature and driving conditions.
2-8 Instruments and controls
Z REVIEW COPY—2007 Truck/Frontier (d22) Owners Manual—USA_English (nna) 12/13/06—cathy X
The located on the driver(cid:146)s side of the vehicle.
indicates that the fuel-filler door is
CAUTION
c If
the vehicle runs out of
fuel, malfunction indicator light the (MIL) may come on. Refuel as soon as possible. After a few driving trips, the light should turn off. If the light remains on after a few driving trips, have the vehicle inspected by a NISSAN dealer.
c For additional information, see (cid:147)Mal- function indicator light (MIL)(cid:148) later in this section.
LIC0740
FUEL GAUGE The gauge indicates the approximate fuel level in the tank.
The gauge may move slightly during braking, turning, acceleration, or going up or down hills.
The gauge needle returns to E (Empty) after the ignition key is turned to OFF.
The low fuel warning light comes on when the amount of fuel in the tank is getting low. Refill the fuel tank before the gauge regis- ters E (Empty).
LIC0741
ENGINE OIL PRESSURE GAUGE (if so equipped) The gauge indicates the engine lubrication sys- tem oil pressure while the engine is running. When the engine speed is high, the engine oil pressure is also high. When the engine speed is low, the gauge may indicate low oil pressure.CAUTION
c This gauge is not designed to indicate low engine oil level. Use the dipstick to check the oil level. (See (cid:147)Engine oil(cid:148) in the (cid:147)Maintenance and do-it-yourself(cid:148) section.)